:max_bytes(150000):strip_icc():format(webp)/GettyImages-850120538-4d2af54c23a641c8a5f2e00ef7a9aa37.jpg)
Best Frame Rate for 4K Video

Best Frame Rate for 4K Video
People in the videography ad filmmaking world use complicated terminology like Ultra High Def to describe 4K videos. Even though you are not a complete stranger to the term 4K, you might still be unaware of what it means.
In a nutshell, 4K is the highest resolution you can watch your movies and videos. The details are incredibly crisp, meaning you can see pimples or the pores on an actor’s face through the screen. However, the frame rate will significantly affect how you enjoy a 4K video. Therefore, it would be wise to learn how to choose the ideal frame rate to suit your needs.
Keep reading this article to learn more about frame rates and which is suitable for a 4K video.

How Do Frame Rates Affect Video Viewing?
The motion will appear smoother if your video contains more frames per second. Even though your viewers are not tech-savvy, they will definitely notice the difference.
Consider a video of a duck drinking water from a pond. If you film and playback the same video in 24, 30, and 60fps, you will see a noticeable difference, assuming your shutter speed is set according to the 180-degree shutter rule.
If you are filming quicker motions of wildlife and birds, you are better off sticking to higher resolutions to give the viewer a pleasant experience and ensure the motion is fluid.
On the other hand, lower frame rates like 24fps are ideal for human movements, which are not as smooth as wildlife. Suppose you used 60fps for a cinematic film or a TV show. The video would look a bit odd because that is not how we see things in the natural world. In addition, your viewers aren’t used to such smoothness.
Viewing Requirements of 4K Videos
You may have heard about 4K videos and wondered what people mean by that term. In simple terms, a 4K video is a high-resolution video that is four times the usual 1080p HD video. When it comes to 4K videos, there are two standard resolutions. One of them is the standard for Digital Cinema which is 4096*2160 pixels. The other is for television and is 3840*2160 pixels.
To stream 4K content, you need a bandwidth between 10 and 20 Mbps. On the other hand, streaming platforms like Netflix require higher bandwidths of not less than 15 Mbps. In addition to the bandwidth we mentioned earlier, you need a 4KTV or 4K monitor.
This specification was brought up at the UHD Alliance, a union of more than 50 tech companies working together to support 4K content. Tech companies ought to ensure the devices they produce are compatible with 4K videos, which are becoming increasingly popular.
Below is a list of requirements any electronic device should fulfill before being termed a 4KTV or 4K monitor.
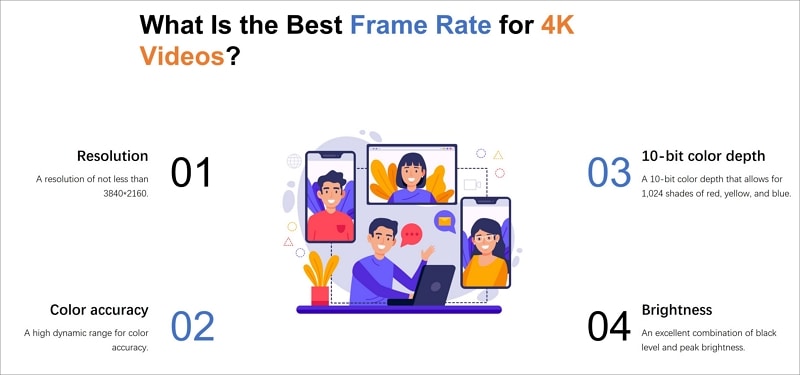
- A resolution of not less than 3840*2160.
- A 10-bit color depth that allows for 1,024 shades of red, yellow, and blue.
- A high dynamic range for color accuracy.
- An excellent combination of black level and peak brightness. The peak brightness should not exceed 1,000 nits, and the black level shouldn’t go below 0.5 nits. Alternatively, the peak brightness shouldn’t exceed 540 nits; neither should the black level plummet below 0.0005 nits.
Best Frame Rate for 4K Video
We all know that the frame rate you choose for your video will significantly impact the viewer’s experience and the overall style of your video. The frame rate will also affect how the video looks. For instance, a frame rate lower than 24fps will make your video look unprofessional and of poor quality. The content will also flicker because there aren’t many still images per second.
On the other hand, a lower FPS causes the file size to be smaller, causing it to consume a lower bandwidth. The vice versa is also true. Now that you understand these facts, you might wonder which frame rate would be best for your 4K videos.
Research reveals that the most acceptable frame rate is 30fps and 60fps. This is because the motion will appear natural to the human eye without being too fast or unrealistic.
If you are wondering what is the best frame rate for 4k videos, we urge you to select 60fps because it contains more detail. The higher frame rate also makes the motion look very smooth and crisp. Perhaps you want to shoot a slow-motion video. In that case, an even higher frame rate of 120fps would be ideal.
How To Choose The Base Frame Rates for Your Next Video
Choosing a frame rate for your videos is not complicated. However, it is not a straightforward process either. There are numerous moving parts that ought to work harmoniously for your video to turn out perfect and guarantee your audience will have a pleasant viewing experience. Before we dive into choosing the best frame rate for your 4K videos, let’s help you understand the filmmaking process.
Most filmmakers and videographers see it fit to shoot videos in 120p or 4K. This step makes their work easier during the editing process. If the raw footage is in 4K, they can de-emphasize or retain specific plot points that would look great in the final video. However, not everyone is shooting a video for Hollywood. Therefore, shooting in 4K on your laptop for your YouTube channel might be difficult.
Below are some factors you should consider when choosing the best frame rate for a 4k video.
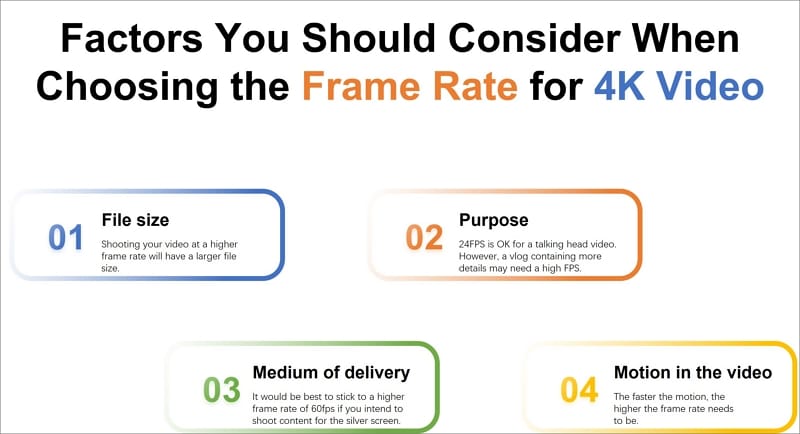
File size
Shooting your video at a higher frame rate means more still images are packed into a single second of the video. Therefore, you will end up with a larger file size. If you want to shoot a video for your YouTube channel, it would be wise to stick to a smaller frame rate.
Purpose
It wouldn’t make sense to shoot a talking head video at more than 24fps. However, a higher frame rate would be ideal for a travel vlog, where the details need to be crisp.
Medium of delivery
The standard frame rate for television is 24fps. On the other hand, it would be best to stick to a higher frame rate of 60fps if you intend to shoot content for the silver screen.
Motion in the video
Lastly, the movement within the video will play a massive role in the frame rate you choose. The faster the motion, the higher the frame rate needs to be. For instance, action movies don’t do well in frame rates of less than 60 fps.
How To Set the Frame Rate of Your Editing Tools
Even though you didn’t use the ideal frame rate for 4k video during filming, you could use an editing tool to tweak the frame rate to where you need it to be. In our opinion, Wondershare Filmora is an excellent editing tool to set the ideal frame rate and take your videos to the next level.
Wondershare Filmora is a feature-rich platform that takes the tedium out of editing your videos and makes the outcome look spectacular. People won’t believe you when you say you edited the video yourself!
The platform is user-friendly, eliminating the need for a learning curve. You also don’t need to be an experienced editor or graphic designer to use this platform. Here is a list of nifty features you might find helpful on this platform.
- GIF support
- Audio equalizer
- Advanced text editing
- Noise removal
- Scene detection
- Audio mixer
- Color tuning
Out of all the wonderful features mentioned above, we will zero in on 4K editing support for now. You can use this feature to edit and export videos up to 4K without breaking a sweat.
Free Download For Win 7 or later(64-bit)
Free Download For macOS 10.14 or later
Wondershare Filmora allows you to customize your 4K videos by zooming in on a particular scene, tilting the video, or incorporating panning to give it a serene effect. We guarantee you will have fun using this platform and will get better at creating exquisite 4K content for your channel.
Below is a simple guide on using Wondershare Filmora to set the 4k video frame rate.
Step1 Launch the platform on your device and select the “File” tab. After a drop-down menu appears, select “Project Settings.”

Step2 In the dialogue box, select “Frame Rate” and choose the frame rate you think is ideal for your video.

Step3 Click “OK” and edit the videos as you like.
Conclusion
4K is the trend of the era, and it would be a shame if you got left behind. The viewer’s expectations are rising steadily, and they would rather skip your video to watch another if the quality is not up to par. In addition to giving you a competitive edge, 4K videos are very crisp and allow you to enjoy deep, vibrant colors.
You can also capture still photos from the video without compromising on quality. We can go on and on about the benefits of adopting 4K resolution in your videos. Therefore, it would be wise to increase your knowledge base and learn everything there is to know about 4K videos and how to set the best frame rates.
Free Download For macOS 10.14 or later
Wondershare Filmora allows you to customize your 4K videos by zooming in on a particular scene, tilting the video, or incorporating panning to give it a serene effect. We guarantee you will have fun using this platform and will get better at creating exquisite 4K content for your channel.
Below is a simple guide on using Wondershare Filmora to set the 4k video frame rate.
Step1 Launch the platform on your device and select the “File” tab. After a drop-down menu appears, select “Project Settings.”

Step2 In the dialogue box, select “Frame Rate” and choose the frame rate you think is ideal for your video.

Step3 Click “OK” and edit the videos as you like.
Conclusion
4K is the trend of the era, and it would be a shame if you got left behind. The viewer’s expectations are rising steadily, and they would rather skip your video to watch another if the quality is not up to par. In addition to giving you a competitive edge, 4K videos are very crisp and allow you to enjoy deep, vibrant colors.
You can also capture still photos from the video without compromising on quality. We can go on and on about the benefits of adopting 4K resolution in your videos. Therefore, it would be wise to increase your knowledge base and learn everything there is to know about 4K videos and how to set the best frame rates.
How to Loop Videos with iMovie
If you are a video creator, there are times when you have to loop a video. This is to extend the duration of the original video. For instance, you have a stock video of a short duration. You want it to be the background in your video throughout. You have to extend the duration of the stock video by playing it in a loop.
If you are a macOS user, you can use iMovie to loop your video. iMovie comes pre-install on macOS devices. iMovie happens to be one of the most preferred video editors among beginners. In fact, iMovie comes pre-installed on iPhones and iPads. You can easily loop your video on your mobile devices as well. We will illustrate how to loop a video on iMovie on iPhone as well as on Mac.
Part 1. How to loop a video on iMovie iPhone
iMovie by Apple comes pre-installed on iPhone and iPad. Naturally, it is one of the most widely used video editors by iPhone users. iMovie app has options for basic and even advanced levels of video editing. Looping a video on iMovie involves a few simple steps that everyone can perform easily. Here are the steps on how to loop a video in the iMovie app on your iPhone.
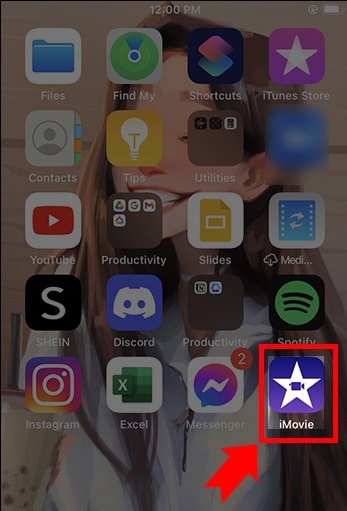
Step1 Launch the iMovie app on your iPhone. If you have uninstalled or disabled the app, you can always go to App Store to install it again.
Step2 If you are opening the app for the first time, you will get a welcome screen. Follow the on-screen instructions to land on the home screen of the app.
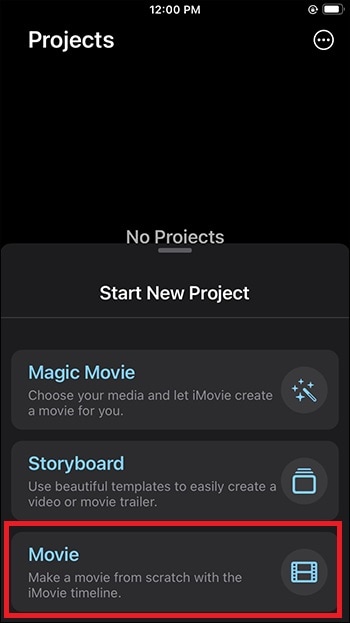
Step3 Tap on New Project “+” icon and select the Movie option to get started. This will take you to the phone media gallery to select a media file to get started.
Step4 You should tap on the Video option and select the video that you want to put into a loop. After selecting a video, tap on Create Movie option.
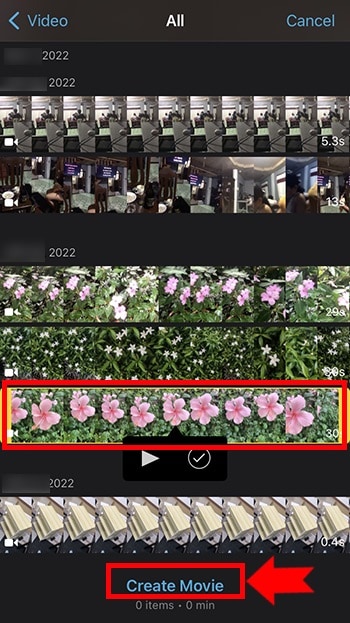
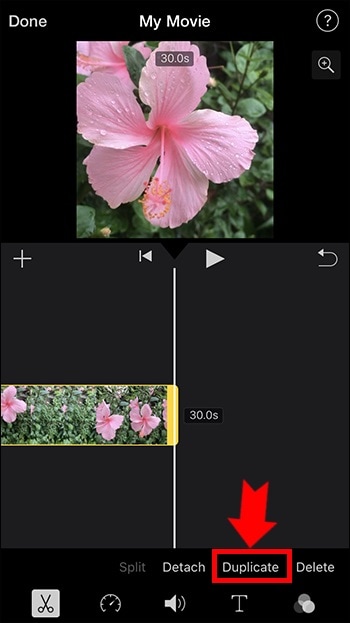
Step5 Tap on the video on the timeline to select the video and tap on the Duplicate option. You will see that the duration of the video has doubled. You can tap on Duplicate as many times as you want to increase the video duration.
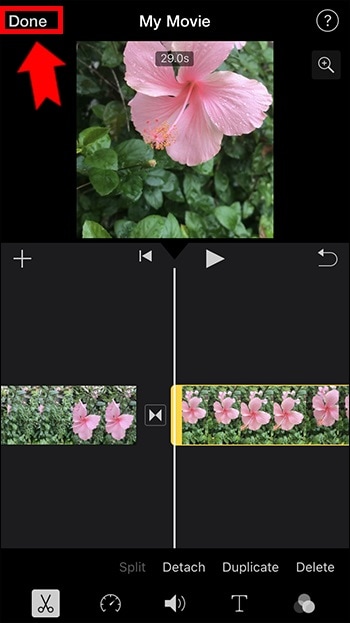
Step6 Once you are done with the iMovie loop, tap on the Done option located in the top-left corner. Thereafter, tap on the Share icon at the bottom.
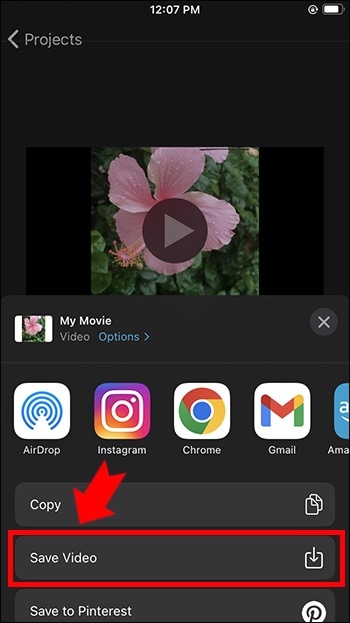
Step7 You will get a pop-up where you have to tap on the Save Video option. The edited video will be saved on your iPhone. You can open the new video from the Photos app.
Part 2. Loop Videos on Mac with iMovie
Editing a video on a Mac is always more comfortable than on an iPhone because of the larger screen. iMovie from Apple comes pre-installed on Mac as well, and hence, you can get started right away. It is completely free to use, and hence, you do not need to install any third-party video editor. Here are the steps on how to loop an iMovie video in simple steps.
Step1 Open the iMovie app from the Applications folder.
Step2 Click on Create New option and then click on the Movie option.

Step3 Bring in the required video under Movie Library by dragging the file from Finder on your Mac. You can also go to File> Import Media option and select the required video. You can also select the required media file from Events or Photos under the Libraries section.

Step4 Drag and drop the video on your timeline. When you want to loop the video, drag and drop the video clip again on the timeline. Make sure there is no gap between the first clip and the second clip on the timeline. You can drag and drop the video clip multiple times on the timeline to increase its duration.

Step5 Once you are done, go to File> Share> File option. Choose the destination to save the edited video.

Part 3. iMovie Alternative to Loop Videos on Mac
If you are looking for an iMovie alternative to perform iMovie loop video action easily, we recommend Wondershare Filmora . Filmora is available for both Mac and Windows. Filmora is a better video editor than iMovie. It is a premium video editor and it has more features and functionalities.
You can loop any video as many times as you want instantly. Besides, you can edit your video clip as per your requirements before looping the edited video. The user interface is highly intuitive for everyone. Hence, it has huge popularity among Mac users. You can also save the looped video in different file formats. Here are the steps to loop a video on Filmora.
Free Download For Win 7 or later(64-bit)
Free Download For macOS 10.14 or later
Step1 Download and install Wondershare Filmora. Launch Filmora and click on New Project on the welcome screen.

Step2 Drag and drop the video file from Finder on Mac to the Project Media folder on Filmora. Thereafter, drop the video file into the timeline.

Step3 Drag and drop the video clip into the timeline again. Make sure that there is no gap between the clips. Besides, make sure that they are on the same channel for looping. You can drag and drop the video into the timeline multiple times.
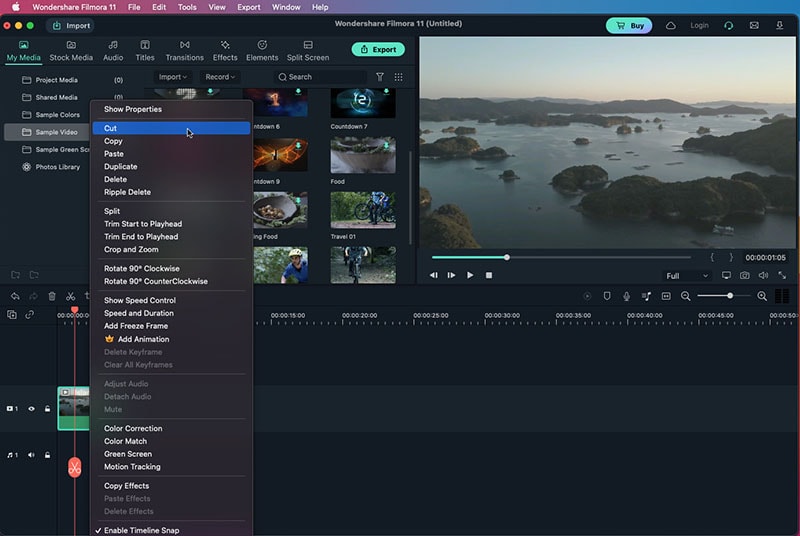
Step4 You can zoom out the timeline for better viewing. Play the video to check its output on Viewer. Finally, click on the Export button and save the video in the desired file format on your Mac.
The Bottom Line
If you want to loop a video on your Mac, iMovie is the most preferred option. The same is applicable to iPhone users as well. iMovie comes pre-installed, and it is completely free to use. That is why you can loop any video instantly. Wondershare Filmora is the best alternative to iMovie to edit and loop your video.
Free Download For macOS 10.14 or later
Step1 Download and install Wondershare Filmora. Launch Filmora and click on New Project on the welcome screen.

Step2 Drag and drop the video file from Finder on Mac to the Project Media folder on Filmora. Thereafter, drop the video file into the timeline.

Step3 Drag and drop the video clip into the timeline again. Make sure that there is no gap between the clips. Besides, make sure that they are on the same channel for looping. You can drag and drop the video into the timeline multiple times.

Step4 You can zoom out the timeline for better viewing. Play the video to check its output on Viewer. Finally, click on the Export button and save the video in the desired file format on your Mac.
The Bottom Line
If you want to loop a video on your Mac, iMovie is the most preferred option. The same is applicable to iPhone users as well. iMovie comes pre-installed, and it is completely free to use. That is why you can loop any video instantly. Wondershare Filmora is the best alternative to iMovie to edit and loop your video.
Splitting a Video Into Frames with the FFmpeg [Step by Step]
FFmpeg is the particular framework that is leading in the multimedia industry. It is a complete solution that runs on multiple platforms for converting, recording and streaming videos and audios. FFmpeg allows you to encode, decode, filter, mux, demux, and transcode much better than humans. FFmpeg runs, complies, and tests using the FATE infrastructure on different operating systems.
It includes Mac OS X, Linux, Windows, Solaris and BSDs. This framework works in a number of built-in environment configurations and architectures of the types of machinery from a technical point of view. It is the appropriate solution for the developers for their applications, and the end-users are similar. You can share the codes at the maximum level in the parts of the FFmpeg. Online support is available for your assistance.
In this article, you will learn about splitting the Video into the frames in FFmpeg and mentioning the easy option for doing the same task in a few seconds by Wondershare Filmora.
How can you split the video clips into frames by using FFmpeg?
There is 7 number of ways, or you can say 7 functions are available splitting the video clips in FFmpeg that are as follows:
- Splitting Video into frames
- Splitting Video by their sizes
- Dividing the videos into the parts with the same duration
- Split the videos by width and in the horizontal direction
To split the Video in FFmpeg, you need to use the correct command to fulfil all your tasks. It helps in extracting the particular frames from your Video. These are the files of the images that are making the whole Video. The working of this command is the following:
Step 1:
The first step is opening the terminal in Mac operating system. Enter the command below for navigating the folder of pictures and videos. Must change the directory whenever you are in the terminal. First, change the location wherever the video file is in your system. Remember that you run these commands in the same folder where the source of the videos is.
Cd ~/Videos and press enter.

Step 2:
This specific command is for splitting the videos into frames. It saves every image separately as the thumbnail file. FFmpeg -I video.mp4 thumb%04d.jpg -hide_banner
splitting is done into the frames. Go to your same folder and choose your image according to your requirement.
An easier way to split the video into the frames
As you see above, it is just 2 significant steps for splitting the Video into frames by FFmpeg. But what if you don’t remember the command or are not familiar with the technical background. Then you need to look for better options and even most straightforward than FFmpeg. There is just one answer to all these questions that is Filmora Video Editor . It is not only a powerful tool but also all the tools are right in front of the screen—no need to enter any command or change of the directory.
For Win 7 or later (64-bit)
For macOS 10.14 or later
Features
- Trimming, rotating, resizing of the clips
- Easy to remove the noise in the background
- Simple to export and share the videos
- Splitting of the screens
- Correcting and matching of the colours
- Availability of controls for audio and Video
The best part is that the Video’s quality remains the same in this software. It is just a few clicks, and the extraction will be done. All the images are high resolution, so no worries about losing any frame quality and images saved in your media library. Follow the easy steps below to begin the extraction of the frames from the Video in Wondershare Filmora.
Step 1. First, import the video file or drag and drop it in the window. Videos are visible in the library so that you can select them accordingly. Click on the Video’s thumbnail if you want the same resolution of the frame as the Video.
Click the Play button for the preview. After the preview, click on the Camera icon to extract frames. Automatically, all the frames are saved in the library of media files.
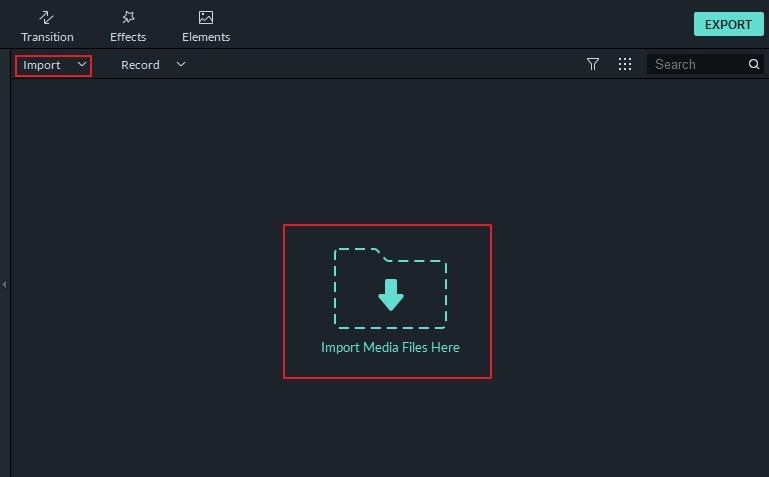
Step 2. Sometimes, you require to see the preview of the Video in the form of frames for extraction purposes. Simply drag and drop the file in the timeline. To begin the preview, press the space bar on the keyboard and take the screenshot whenever the Video starts.
Press the icon of snapshot or press the keys CRTL+ALT+S. Use the left or right keys for playing back the video frame to frame and save it in the form of an image. Select the “Reveal in Explorer” option when you click the screenshot in the library of media files.
The frame extractor of Wondershare Filmora is absolutely free so that you won’t find any watermark on the images. You won’t face any difficulty while extracting your frames as a user. Even you can edit these frames and save them in the format of your own choice.

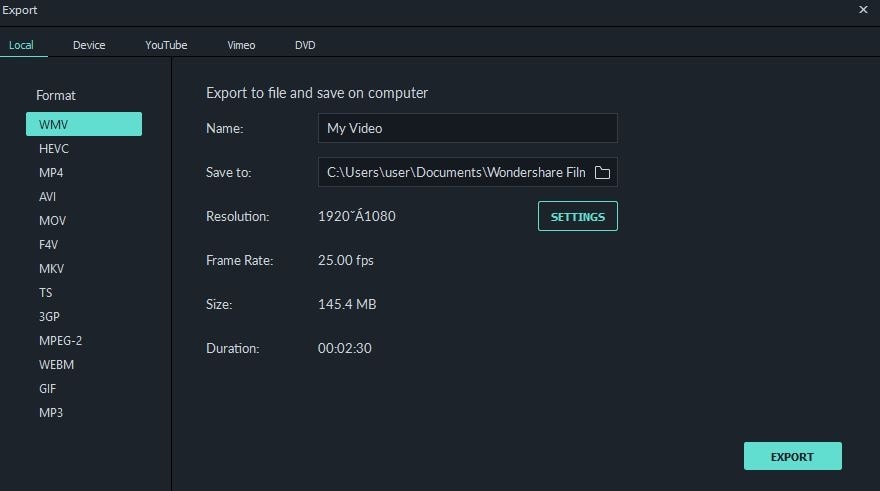
Although there is a huge range of editing software, including FFmpeg, they always have some disadvantages when you keep finding the replacement. Even FFmpeg is an open-source program, and beginners can’t handle it properly.
They need to be familiar with the technicalities. There are many benefits to using Wondershare Filmora for extracting the frames from the videos.
It is supportive to 4K resolution means saving the images in the same resolution. No loss of video quality enables you to explore all the details very clearly. The whole editor appears right before you to edit all the frames.
You can also export these images wherever you want or save them for backup purposes. Even you can upload them on your social networking sites. So, what are you waiting for? No more thinking now; let’s start exploring and using Wondershare Filmora
Step 2:
This specific command is for splitting the videos into frames. It saves every image separately as the thumbnail file. FFmpeg -I video.mp4 thumb%04d.jpg -hide_banner
splitting is done into the frames. Go to your same folder and choose your image according to your requirement.
An easier way to split the video into the frames
As you see above, it is just 2 significant steps for splitting the Video into frames by FFmpeg. But what if you don’t remember the command or are not familiar with the technical background. Then you need to look for better options and even most straightforward than FFmpeg. There is just one answer to all these questions that is Filmora Video Editor . It is not only a powerful tool but also all the tools are right in front of the screen—no need to enter any command or change of the directory.
For Win 7 or later (64-bit)
For macOS 10.14 or later
Features
- Trimming, rotating, resizing of the clips
- Easy to remove the noise in the background
- Simple to export and share the videos
- Splitting of the screens
- Correcting and matching of the colours
- Availability of controls for audio and Video
The best part is that the Video’s quality remains the same in this software. It is just a few clicks, and the extraction will be done. All the images are high resolution, so no worries about losing any frame quality and images saved in your media library. Follow the easy steps below to begin the extraction of the frames from the Video in Wondershare Filmora.
Step 1. First, import the video file or drag and drop it in the window. Videos are visible in the library so that you can select them accordingly. Click on the Video’s thumbnail if you want the same resolution of the frame as the Video.
Click the Play button for the preview. After the preview, click on the Camera icon to extract frames. Automatically, all the frames are saved in the library of media files.

Step 2. Sometimes, you require to see the preview of the Video in the form of frames for extraction purposes. Simply drag and drop the file in the timeline. To begin the preview, press the space bar on the keyboard and take the screenshot whenever the Video starts.
Press the icon of snapshot or press the keys CRTL+ALT+S. Use the left or right keys for playing back the video frame to frame and save it in the form of an image. Select the “Reveal in Explorer” option when you click the screenshot in the library of media files.
The frame extractor of Wondershare Filmora is absolutely free so that you won’t find any watermark on the images. You won’t face any difficulty while extracting your frames as a user. Even you can edit these frames and save them in the format of your own choice.


Although there is a huge range of editing software, including FFmpeg, they always have some disadvantages when you keep finding the replacement. Even FFmpeg is an open-source program, and beginners can’t handle it properly.
They need to be familiar with the technicalities. There are many benefits to using Wondershare Filmora for extracting the frames from the videos.
It is supportive to 4K resolution means saving the images in the same resolution. No loss of video quality enables you to explore all the details very clearly. The whole editor appears right before you to edit all the frames.
You can also export these images wherever you want or save them for backup purposes. Even you can upload them on your social networking sites. So, what are you waiting for? No more thinking now; let’s start exploring and using Wondershare Filmora
Step 2:
This specific command is for splitting the videos into frames. It saves every image separately as the thumbnail file. FFmpeg -I video.mp4 thumb%04d.jpg -hide_banner
splitting is done into the frames. Go to your same folder and choose your image according to your requirement.
An easier way to split the video into the frames
As you see above, it is just 2 significant steps for splitting the Video into frames by FFmpeg. But what if you don’t remember the command or are not familiar with the technical background. Then you need to look for better options and even most straightforward than FFmpeg. There is just one answer to all these questions that is Filmora Video Editor . It is not only a powerful tool but also all the tools are right in front of the screen—no need to enter any command or change of the directory.
For Win 7 or later (64-bit)
For macOS 10.14 or later
Features
- Trimming, rotating, resizing of the clips
- Easy to remove the noise in the background
- Simple to export and share the videos
- Splitting of the screens
- Correcting and matching of the colours
- Availability of controls for audio and Video
The best part is that the Video’s quality remains the same in this software. It is just a few clicks, and the extraction will be done. All the images are high resolution, so no worries about losing any frame quality and images saved in your media library. Follow the easy steps below to begin the extraction of the frames from the Video in Wondershare Filmora.
Step 1. First, import the video file or drag and drop it in the window. Videos are visible in the library so that you can select them accordingly. Click on the Video’s thumbnail if you want the same resolution of the frame as the Video.
Click the Play button for the preview. After the preview, click on the Camera icon to extract frames. Automatically, all the frames are saved in the library of media files.

Step 2. Sometimes, you require to see the preview of the Video in the form of frames for extraction purposes. Simply drag and drop the file in the timeline. To begin the preview, press the space bar on the keyboard and take the screenshot whenever the Video starts.
Press the icon of snapshot or press the keys CRTL+ALT+S. Use the left or right keys for playing back the video frame to frame and save it in the form of an image. Select the “Reveal in Explorer” option when you click the screenshot in the library of media files.
The frame extractor of Wondershare Filmora is absolutely free so that you won’t find any watermark on the images. You won’t face any difficulty while extracting your frames as a user. Even you can edit these frames and save them in the format of your own choice.


Although there is a huge range of editing software, including FFmpeg, they always have some disadvantages when you keep finding the replacement. Even FFmpeg is an open-source program, and beginners can’t handle it properly.
They need to be familiar with the technicalities. There are many benefits to using Wondershare Filmora for extracting the frames from the videos.
It is supportive to 4K resolution means saving the images in the same resolution. No loss of video quality enables you to explore all the details very clearly. The whole editor appears right before you to edit all the frames.
You can also export these images wherever you want or save them for backup purposes. Even you can upload them on your social networking sites. So, what are you waiting for? No more thinking now; let’s start exploring and using Wondershare Filmora
Step 2:
This specific command is for splitting the videos into frames. It saves every image separately as the thumbnail file. FFmpeg -I video.mp4 thumb%04d.jpg -hide_banner
splitting is done into the frames. Go to your same folder and choose your image according to your requirement.
An easier way to split the video into the frames
As you see above, it is just 2 significant steps for splitting the Video into frames by FFmpeg. But what if you don’t remember the command or are not familiar with the technical background. Then you need to look for better options and even most straightforward than FFmpeg. There is just one answer to all these questions that is Filmora Video Editor . It is not only a powerful tool but also all the tools are right in front of the screen—no need to enter any command or change of the directory.
For Win 7 or later (64-bit)
For macOS 10.14 or later
Features
- Trimming, rotating, resizing of the clips
- Easy to remove the noise in the background
- Simple to export and share the videos
- Splitting of the screens
- Correcting and matching of the colours
- Availability of controls for audio and Video
The best part is that the Video’s quality remains the same in this software. It is just a few clicks, and the extraction will be done. All the images are high resolution, so no worries about losing any frame quality and images saved in your media library. Follow the easy steps below to begin the extraction of the frames from the Video in Wondershare Filmora.
Step 1. First, import the video file or drag and drop it in the window. Videos are visible in the library so that you can select them accordingly. Click on the Video’s thumbnail if you want the same resolution of the frame as the Video.
Click the Play button for the preview. After the preview, click on the Camera icon to extract frames. Automatically, all the frames are saved in the library of media files.

Step 2. Sometimes, you require to see the preview of the Video in the form of frames for extraction purposes. Simply drag and drop the file in the timeline. To begin the preview, press the space bar on the keyboard and take the screenshot whenever the Video starts.
Press the icon of snapshot or press the keys CRTL+ALT+S. Use the left or right keys for playing back the video frame to frame and save it in the form of an image. Select the “Reveal in Explorer” option when you click the screenshot in the library of media files.
The frame extractor of Wondershare Filmora is absolutely free so that you won’t find any watermark on the images. You won’t face any difficulty while extracting your frames as a user. Even you can edit these frames and save them in the format of your own choice.


Although there is a huge range of editing software, including FFmpeg, they always have some disadvantages when you keep finding the replacement. Even FFmpeg is an open-source program, and beginners can’t handle it properly.
They need to be familiar with the technicalities. There are many benefits to using Wondershare Filmora for extracting the frames from the videos.
It is supportive to 4K resolution means saving the images in the same resolution. No loss of video quality enables you to explore all the details very clearly. The whole editor appears right before you to edit all the frames.
You can also export these images wherever you want or save them for backup purposes. Even you can upload them on your social networking sites. So, what are you waiting for? No more thinking now; let’s start exploring and using Wondershare Filmora
The Right Ways to Slow Down a Video on iPhone
Slow-motion videos are widely used for various purposes in videography or filmmaking. They not only underline the significance of a shot but also elevate creativity. The frame rate is remarkably higher in slow-motion videos than in normal videos. There are two methods included in the process of how to slow down a video on an iPhone.
The first method involves increasing the frame rate; meanwhile, the other is playback speed adjustment. This article will enfold apps to teach how to slow a video down on iPhone. All these applications will be available in the iPhone’s official App Store. However, check the compatibility of these apps with the iOS version you’re using. Ultimately, we’ll share a desktop alternative on how to slow down a video iPhone.
Slow Motion Video Maker Slow your video’s speed with better control of your keyframes to create unique cinematic effects!
Make A Slow Motion Video Make A Slow Motion Video More Features

Part 1: Pre-Recorded A Video? Adjust Slow Motion Parameters Right Away
One of the major reasons Gen Z and Gen Alpha opt for iPhones is their high-quality camera. It is ideal for capturing and editing videos in high resolution is ideal. In 2013, iPhones were integrated with the Slow-mo feature for creative purposes. Where first users needed third-party applications, they could use the built-in feature. Here is how do you slow down a video on iPhone officially:
Step 1
Locate the “Photos” application on your iPhone and launch it by simply clicking. Upon accessing the app, go to the bottom and click on “Albums.” Afterward, click the “Slo-mo” option from the expanding menu. Formerly, select a video from your device media library import.

Step 2
Once the video has been selected, navigate to the top right corner and select “Edit.”

Step 3
When the editing panel appears, navigate towards the bottom of the timeline bar. Drag the slider’s position to adjust the speed to create a slow motion. As the slow-motion effect has been created, click the “Done” button. Commencing this action will finalize your slow-motion video.

Part 2: Some Top-Notch Solutions to Slow Down Any Video on iPhone
The iPhone does offer a built-in feature to help you curate a perfect slow-mo. Nonetheless, a third-party application can offer additional and upgraded features. They offer specialized effects and filters, multiplatform support, and more. This section discusses 4 applications and how to make video slow motion iPhone using them. Find the brief introduction, capabilities, and guides of these apps below:
- SpeedPro Slow Speed Video Edit
- Slow Fast Slow – Control the Speed of Your Videos
- Slo Mo – Speed Up Video Editor
- Video Speed Editor Slow & Fast
1. SpeedPro Slow Speed Video Edit
This is an exclusive application to answer your question about how to put a video in slow motion on an iPhone. This application offers a -2x to -6x playback speed option for a slow-mo. Its intuitive feature enables speed alteration from a specific video section. This option is ideal for creatively editing your Instagram reels. Along with slowing down the speed, you can also enhance it for fast motion generation.

Key Features
- The application offers a timeline editing interface that enhances precision and accuracy.
- It possesses the ability to incorporate music in your videos using its Music feature.
- The application collaborates with social platforms like Instagram and Facebook for
Steps to Add Slow Motion in Video Using SpeedPro Slow Speed Video Edit
When you embark on a new experience, using something for the first time can be tricky. The unfamiliarity makes it harder, and one doubts its abilities. Hence, consider us your partner in guiding you on how to edit slow motion on your iPhone. We have curated a step-by-step guide to help you in creating a slow-mo:
Step 1: After downloading and accessing the application’s main menu, click the “Speed Pro” option. Then, select a video clip from your device that you desire to apply this effect to.

Step 2: Once the video clip has been selected, click the “Done” button to import.

Step 3: Afterward, you’ll be redirected to its editing interface for speed change. Navigate toward the speed slider at the bottom of the video display. Drag the slider towards the left to select a suitable playback speed option. You can also apply the slow-mo to a specific area by dragging the timeline slider.
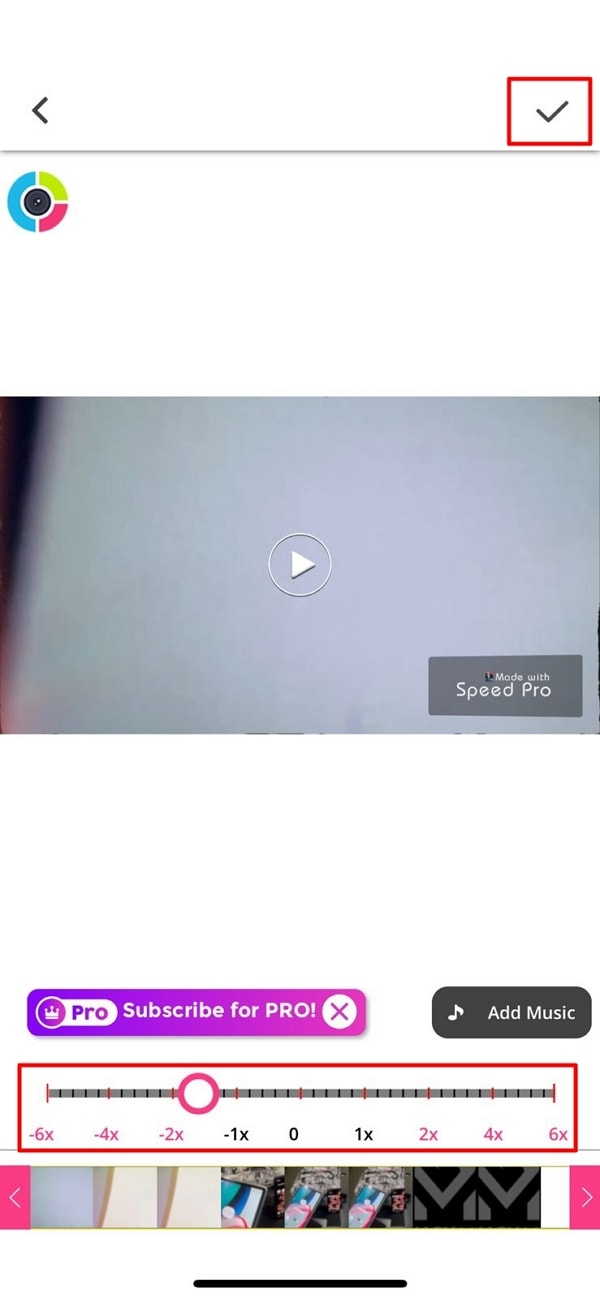
2. Slow Fast Slow - Control the Speed of Your Videos
Use this application to record a slow-motion video or add the effect in post-production editing. This application offers a high frame rate of 240 fps for a high-grade slow-mo effect. This means you can now slow a video up to 1/16th of its original speed. It wins at creating slow motion with the iPhone’s built-in speed manipulation feature.

Key Features
- Provides audio pitch maintenance feature during speed alteration.
- Gives the option to adjust the screen ratio before editing, like square or more.
- The application is compatible with all your iOS 10.0 devices and higher versions.
Steps to Add Slow Motion in Video Using Slow Fast Slow
The encounter with an advanced tool or application is often stressful as you are unfamiliar with it. You do not want to mess up the video, so you must master an app. Following is how to slow down a video on an iPhone using the Slow Fast Slow app:
Step 1: After launching the application, give it access to your files for editing. Then, click on the “Other Videos” option to select a video from a device for slow-mo.

Step 2: Once the video has been imported, you will reach the editing interface. You’ll notice a slider with different points. These points indicate the time frames of your video. The slider is positioned downward to add a slow-mo effect at specific durations.
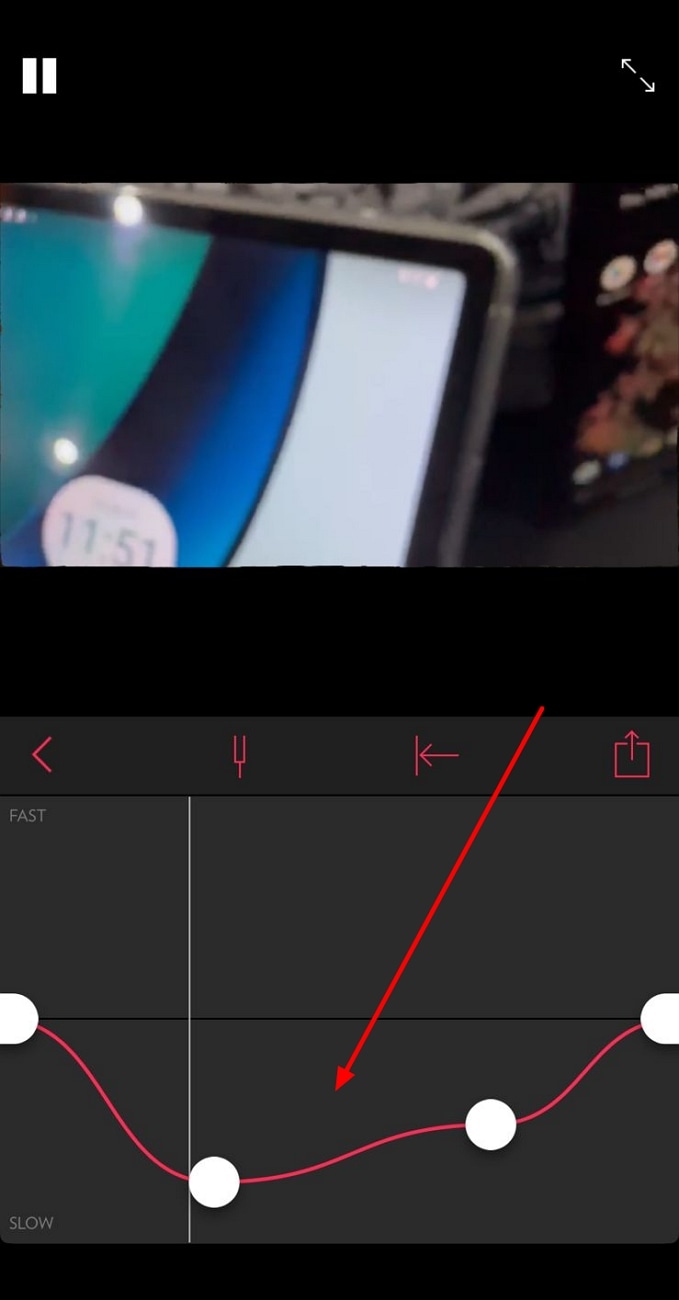
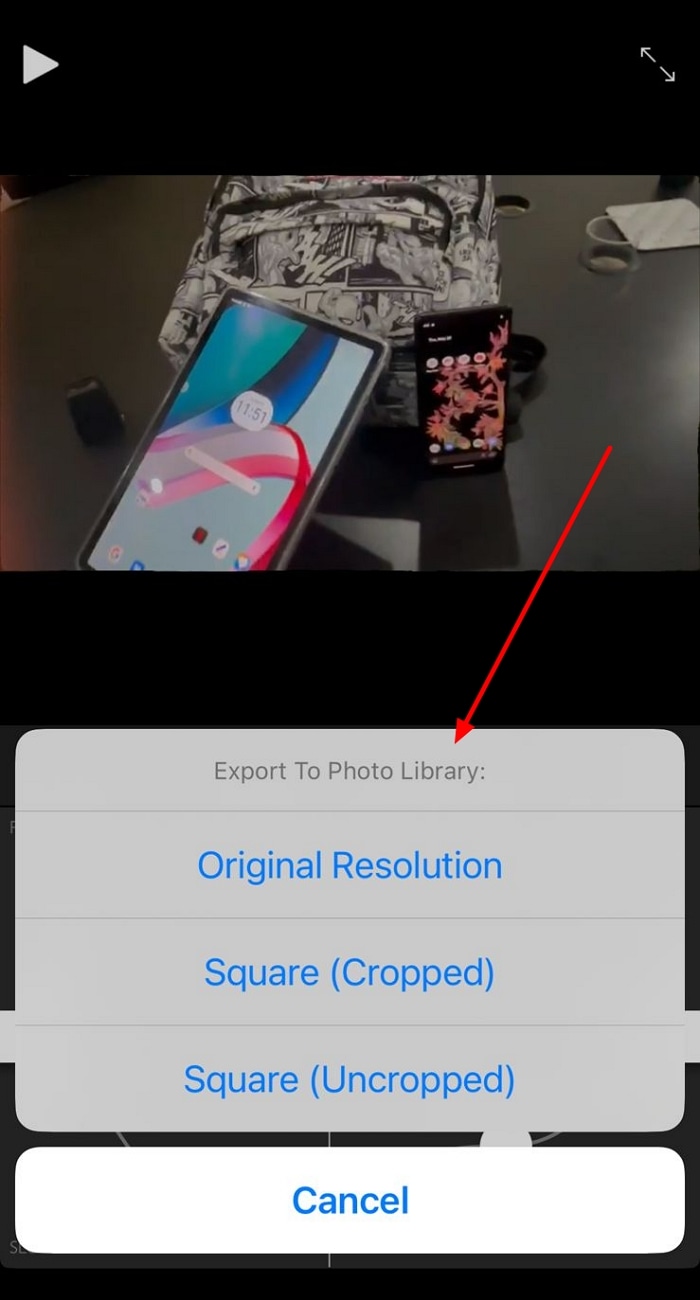
Step 3: Once you are done with the editing, click the play button to preview. Next, navigate towards the right-side bottom of the preview screen and hit “Export.” Select any particular resolution to save the slowed-down video on your device.
3. Slo Mo – Speed Up Video Editor
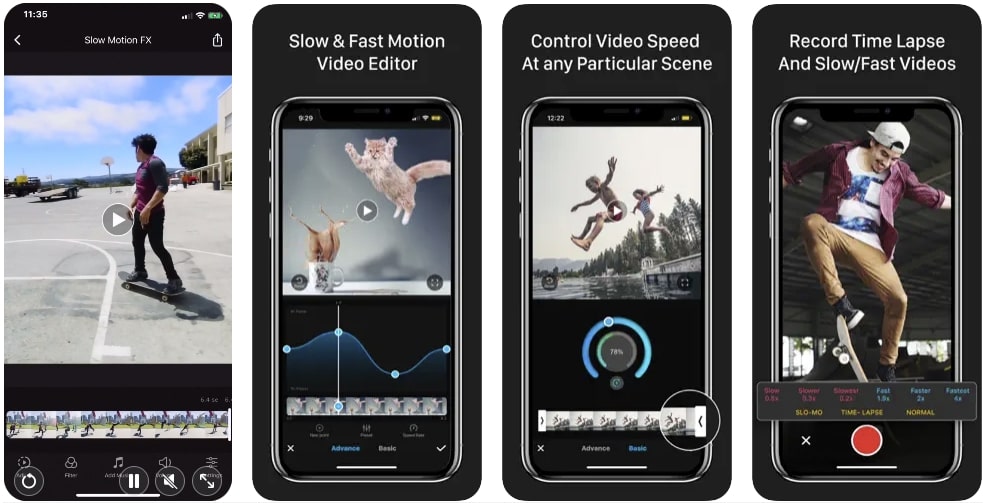
Are you looking for a versatile application about how to make a normal video slow-motion iPhone 13? Fashioned to modify a video’s speed, this app can help you. It allows users to adjust the video speed up to 12x for slow and fast motion. In addition, you can alter the video frame rate up to 240 fps at precise frames.
Key Feature
- With an additional freeze frame feature, infuse an innovative touch to videos.
- Experience a more productive workflow with its quick processing feature.
- Keeping up an accessible to all approach, the user interface is straightforward and minimal.
Steps to Add Slow Motion in Video Using Slo Mo – Speed Up Video Editor
Those initial stages of operating a new app and getting your hands on its UI are difficult. However, this article prioritizes your ease more than anything. Find our guide on how to make a video in slow motion on iPhone here:
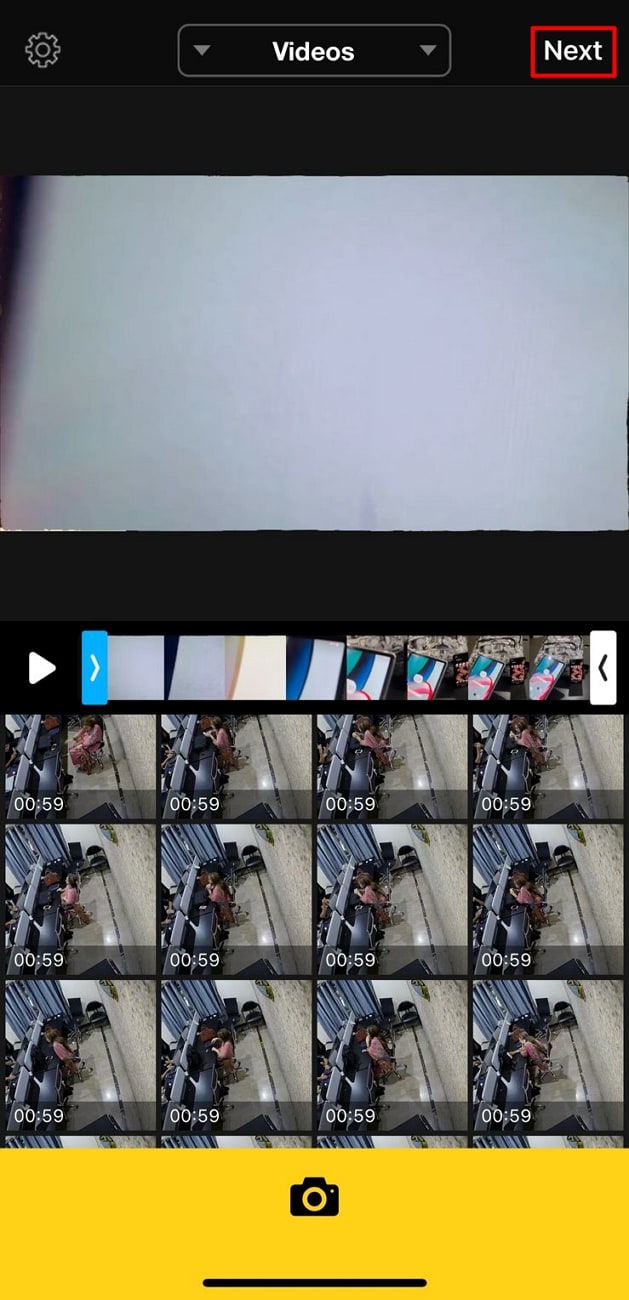
Step 1: Upon launching the application, it will ask you for storage access. After that, you’ll have to import a video to add slow motion. Just select any normal video on your device and click on the “Next” option.
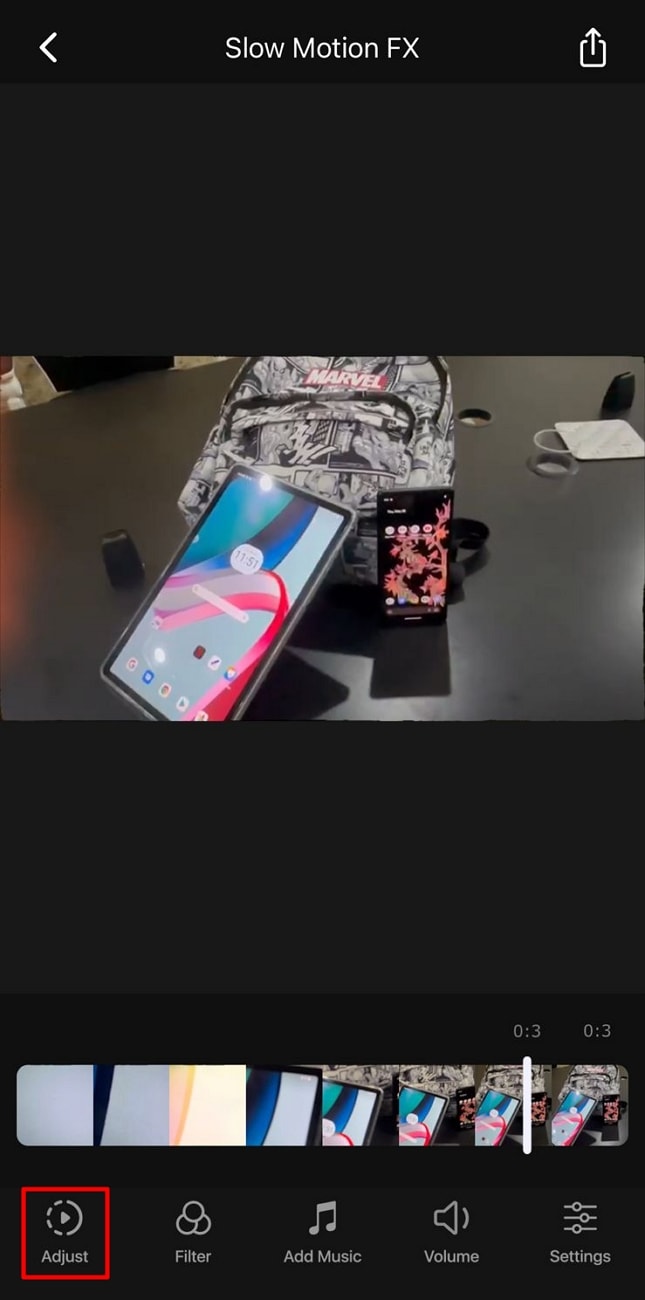
Step 2: Navigate toward the bar at the bottom of the timeline panel and select “Adjust.”
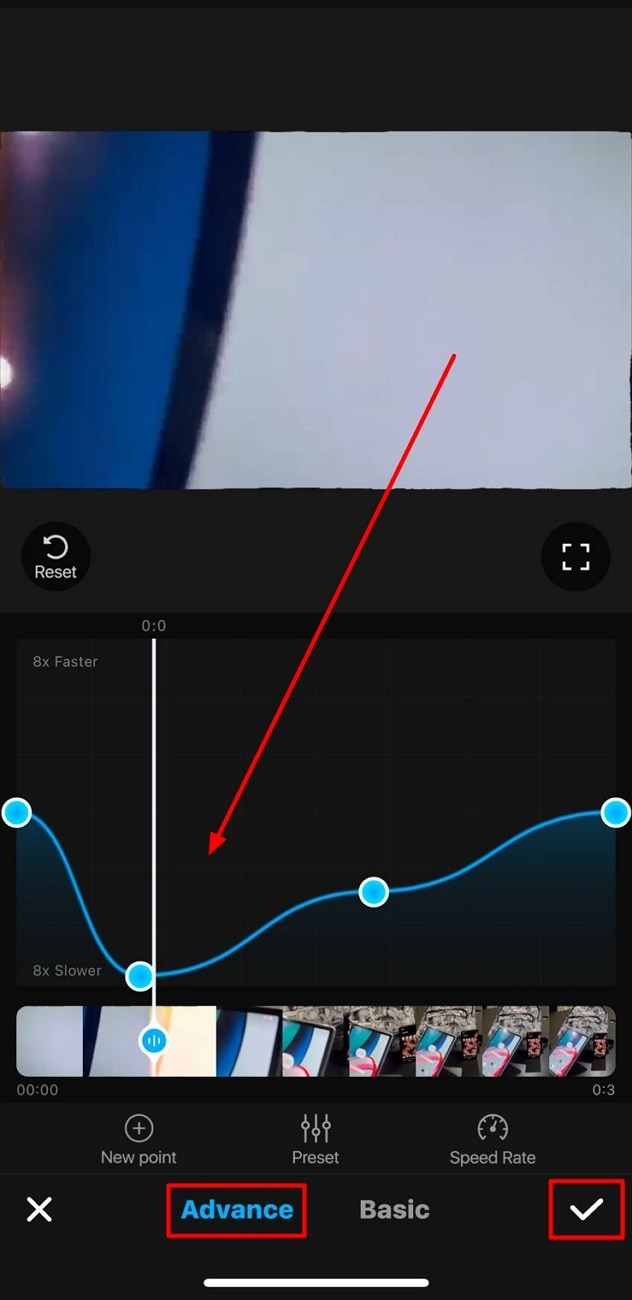
Step 3: This will feature the speed control options on your screen; go to “Advance.” Further, change the speed change slider towards the left to manipulate it. Afterward, preview the video and click on the “tick” icon.
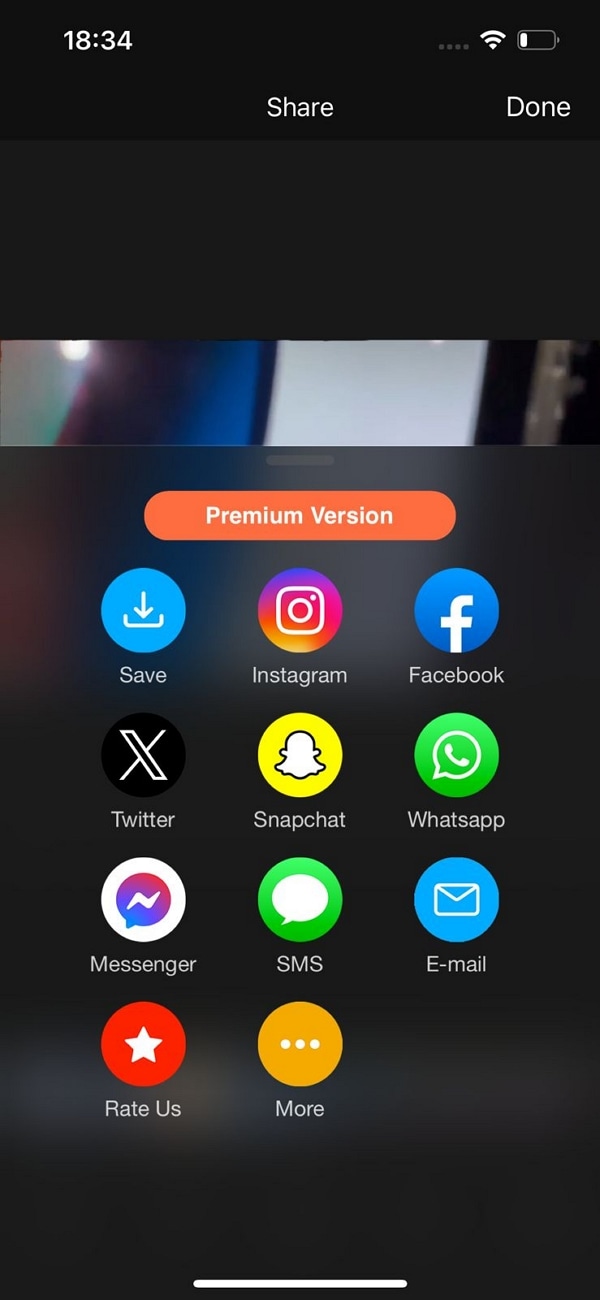
Step 4: Further, select the “Export” icon appearing in the expanded menu.
4. Video Speed Editor Slow & Fast
How do you slow down a video on an iPhone after recording in a minimalistic way? This iPhone application is designed for such contexts to create slow-motion videos. Users can slow down a clip’s playback speed up to 8x at specific durations. Simply trim the video parts to apply the speed setting at specific sections and merge them later.

Key Features
- After slow motion, you have the option to keep the original sound or insert music offered by it.
- The timeline editing method helps you to trim the video at the right time.
- The application is compatible with iOS 12.0, iPadOS 12.0, macOS 11.0, and newer versions.
Steps to Add Slow Motion in Video Using Video Speed Editor Slow & Fast
This application has an innovative user interface with a simple operational menu. To add a slow-motion effect to a video, buy its Pro subscription first. To assist you further, here is how to slow down an iPhone video in it:
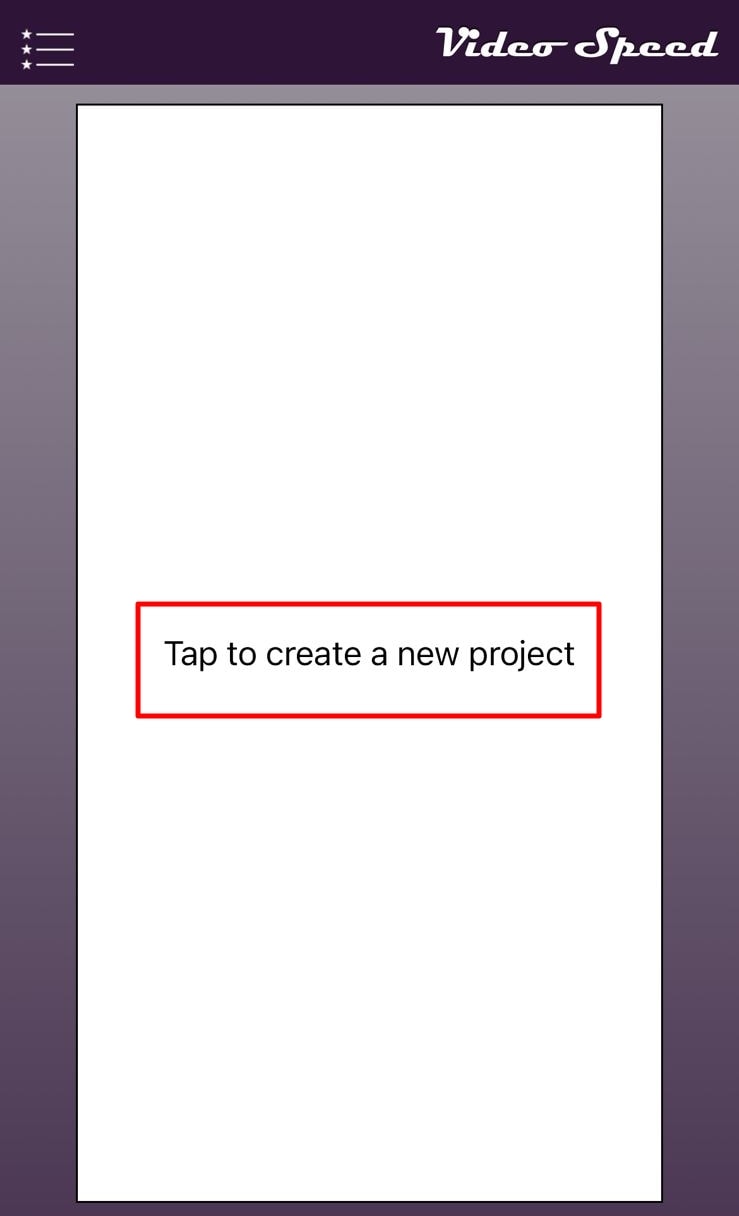
Step 1: Create a new project after launching the application and giving access to storage. Do this by clicking on the screen saying, “Tap to create a new project.”
Step 2: From the Videos section of your media, select a video and hit “Choose.”

Step 3: In the editing interface, simply select a speed option from -2x to -8x for slowing. Once the video is slowed down according to your preferences, export it.
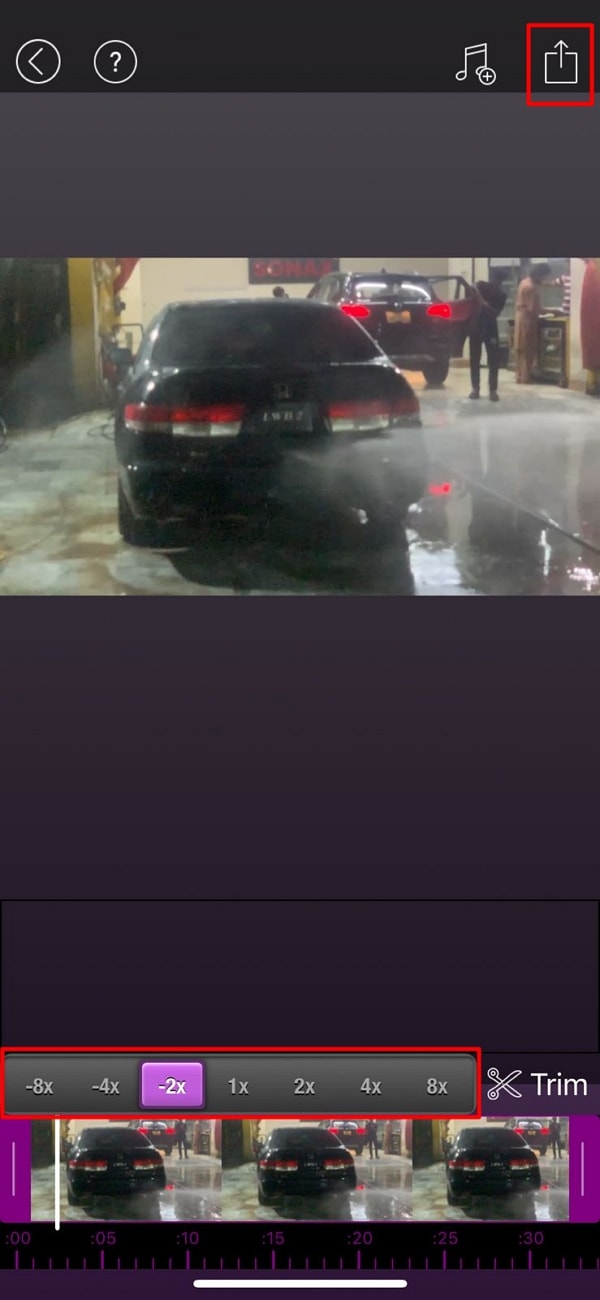
Part 3: Failed to Slow Down Video Properly? Try Wondershare Filmora as a Remedy
Have you tried all the given solutions on how to slow-mo a video on an iPhone and are still clueless? Not getting the desired results can be frustrating, but we have brought the best answer. Wondershare Filmora helps you achieve slow motion on a computer or laptop. The software is compatible with all Windows and macOS devices. You can just connect your iPhone with the source using a cable and import media.
Being a versatile software, Filmora introduces you to two advanced methods. Uniform speed emerges as a simple method of creating a slow-motion effect. On the other hand, Speed Ramping allows you to edit speed for professional purposes. Amongst speed alteration, users can also use the frame interpolation technique. It increases video frames to ensure a smooth playback during slow-mo.
Step-by-Step Guide to Creating Slow-Motion in Filmora
If you are using Filmora for the first time, the user interface might initially seem confusing. However, in comparison to other post-production software, it possesses a minimal interface. In this section, learn about how to slo-mo a video iPhone using Filmora:
Free Download For Win 7 or later(64-bit)
Free Download For macOS 10.14 or later
Step 1Connect iPhone and Import Clip
Once you have created a new project on Filmora, import media. First, to import media from your iPhone, connect it to your computer or related device. Then, go to “Import” > “Import from a Camera or Phone” option. Further, select the device name and import data.

Step 2Access Speed Ramping Option
Use your cursor to bring the edited media to the timeline and select it. From the appearing settings panel, access the “Speed” > “Speed Ramping” tabs. Here, either choose any of the predesigned templates or customize one.

Step 3Enable Optical Flow for Additional Touch
If the slow motion seems rough or abrupt, Filmora has a solution to that as well. Go to the “AI Frame Interpolation” section and expand it. From the expanding menu, click the “Optical Flow” option for a high-quality slow-mo.

Step 4Rendering for Final Preview
To observe the overall results, navigate towards the top toolbar. Select the “File” tab and “Render Preview” from the dropdown menu. After reviewing the final video, use your cursor to click the “Export” button.
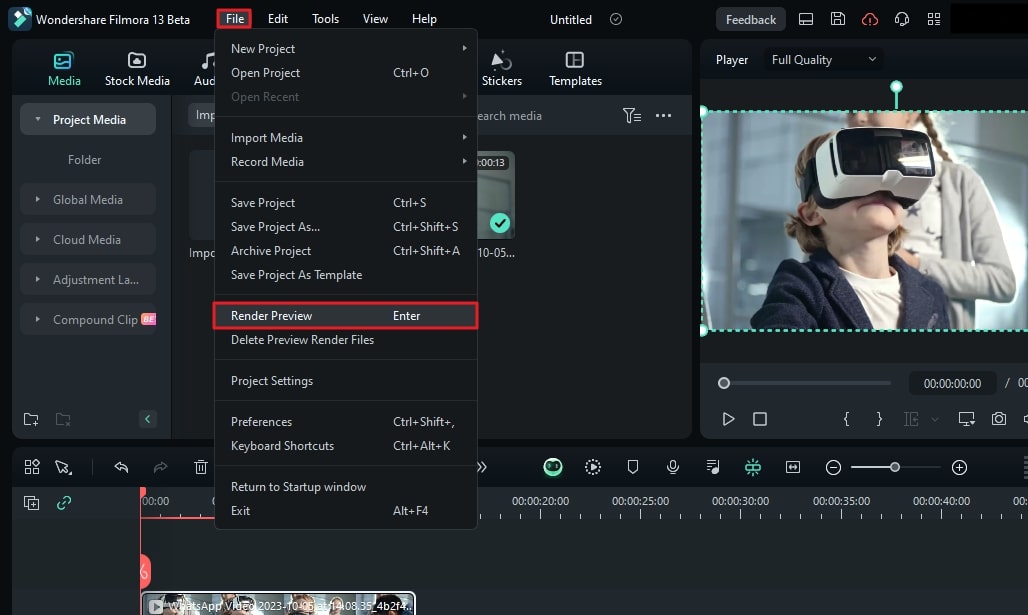
Key Features of Wondershare Filmora
Wondershare Filmora provides a wide range of features for a full-fledged editing experience. Some of these features are for video, some are for audio, and others are for visuals. Here is a list of some of Filmora’s key features that you must give a try to:
1. Instant Mode
Once you have recorded a video, the post-production process cannot be neglected. However, when you start editing a video, the process might be confusing at first. With Filmora’s Instant Mode, use AI’s assistance to edit any video without effort. There are 115 built-in templates to integrate according to context and highlights it.
2. Green Screen
Integrate attractive backgrounds in your videos, like mountains, beaches, or more. With Filmora’s Green Screen feature, remove the video backgrounds with accuracy. After removing the background, you can insert multiple backgrounds, like solid colors. If there are backgrounds that you have previously saved, import them to the timeline. They will automatically show in the video, and you can customize them further.
3. Color Correction
Filmora offers an extensive range of color correction elements to enhance visibility. There are 40+ free presets in Filmora that you can download and apply within the app. In addition, you can do custom color settings and save them as custom presets. You can also use the 3D LUT feature to set preferences for specific factors.
4. Text-to-Speech
Another important feature that helps with interactive video creation is text-to-speech. It allows users to transform text into speech with voice selection options. The software has been trained on NLP and integrates realistic voices in videos. Being closer to the human voice helps with better audience interaction and understanding.
Conclusion
The main theme of this article was how to slow down a video on iPhone and the tools to do it. We mentioned 4 applications that are compatible with higher versions of the iPhone. In addition, the article provided detailed guides on all these applications.
Among them, Wondershare Filmora has been integrated with an advanced slow-mo feature. It allows a seamless and professional user interface to import, edit, and customize. The AI Optical Flow in it adds a remarkable fine touch to your slow-mo video.
Make A Slow Motion Video Make A Slow Motion Video More Features

Part 1: Pre-Recorded A Video? Adjust Slow Motion Parameters Right Away
One of the major reasons Gen Z and Gen Alpha opt for iPhones is their high-quality camera. It is ideal for capturing and editing videos in high resolution is ideal. In 2013, iPhones were integrated with the Slow-mo feature for creative purposes. Where first users needed third-party applications, they could use the built-in feature. Here is how do you slow down a video on iPhone officially:
Step 1
Locate the “Photos” application on your iPhone and launch it by simply clicking. Upon accessing the app, go to the bottom and click on “Albums.” Afterward, click the “Slo-mo” option from the expanding menu. Formerly, select a video from your device media library import.

Step 2
Once the video has been selected, navigate to the top right corner and select “Edit.”

Step 3
When the editing panel appears, navigate towards the bottom of the timeline bar. Drag the slider’s position to adjust the speed to create a slow motion. As the slow-motion effect has been created, click the “Done” button. Commencing this action will finalize your slow-motion video.

Part 2: Some Top-Notch Solutions to Slow Down Any Video on iPhone
The iPhone does offer a built-in feature to help you curate a perfect slow-mo. Nonetheless, a third-party application can offer additional and upgraded features. They offer specialized effects and filters, multiplatform support, and more. This section discusses 4 applications and how to make video slow motion iPhone using them. Find the brief introduction, capabilities, and guides of these apps below:
- SpeedPro Slow Speed Video Edit
- Slow Fast Slow – Control the Speed of Your Videos
- Slo Mo – Speed Up Video Editor
- Video Speed Editor Slow & Fast
1. SpeedPro Slow Speed Video Edit
This is an exclusive application to answer your question about how to put a video in slow motion on an iPhone. This application offers a -2x to -6x playback speed option for a slow-mo. Its intuitive feature enables speed alteration from a specific video section. This option is ideal for creatively editing your Instagram reels. Along with slowing down the speed, you can also enhance it for fast motion generation.

Key Features
- The application offers a timeline editing interface that enhances precision and accuracy.
- It possesses the ability to incorporate music in your videos using its Music feature.
- The application collaborates with social platforms like Instagram and Facebook for
Steps to Add Slow Motion in Video Using SpeedPro Slow Speed Video Edit
When you embark on a new experience, using something for the first time can be tricky. The unfamiliarity makes it harder, and one doubts its abilities. Hence, consider us your partner in guiding you on how to edit slow motion on your iPhone. We have curated a step-by-step guide to help you in creating a slow-mo:
Step 1: After downloading and accessing the application’s main menu, click the “Speed Pro” option. Then, select a video clip from your device that you desire to apply this effect to.

Step 2: Once the video clip has been selected, click the “Done” button to import.

Step 3: Afterward, you’ll be redirected to its editing interface for speed change. Navigate toward the speed slider at the bottom of the video display. Drag the slider towards the left to select a suitable playback speed option. You can also apply the slow-mo to a specific area by dragging the timeline slider.

2. Slow Fast Slow - Control the Speed of Your Videos
Use this application to record a slow-motion video or add the effect in post-production editing. This application offers a high frame rate of 240 fps for a high-grade slow-mo effect. This means you can now slow a video up to 1/16th of its original speed. It wins at creating slow motion with the iPhone’s built-in speed manipulation feature.

Key Features
- Provides audio pitch maintenance feature during speed alteration.
- Gives the option to adjust the screen ratio before editing, like square or more.
- The application is compatible with all your iOS 10.0 devices and higher versions.
Steps to Add Slow Motion in Video Using Slow Fast Slow
The encounter with an advanced tool or application is often stressful as you are unfamiliar with it. You do not want to mess up the video, so you must master an app. Following is how to slow down a video on an iPhone using the Slow Fast Slow app:
Step 1: After launching the application, give it access to your files for editing. Then, click on the “Other Videos” option to select a video from a device for slow-mo.

Step 2: Once the video has been imported, you will reach the editing interface. You’ll notice a slider with different points. These points indicate the time frames of your video. The slider is positioned downward to add a slow-mo effect at specific durations.

Step 3: Once you are done with the editing, click the play button to preview. Next, navigate towards the right-side bottom of the preview screen and hit “Export.” Select any particular resolution to save the slowed-down video on your device.

3. Slo Mo – Speed Up Video Editor
Are you looking for a versatile application about how to make a normal video slow-motion iPhone 13? Fashioned to modify a video’s speed, this app can help you. It allows users to adjust the video speed up to 12x for slow and fast motion. In addition, you can alter the video frame rate up to 240 fps at precise frames.

Key Feature
- With an additional freeze frame feature, infuse an innovative touch to videos.
- Experience a more productive workflow with its quick processing feature.
- Keeping up an accessible to all approach, the user interface is straightforward and minimal.
Steps to Add Slow Motion in Video Using Slo Mo – Speed Up Video Editor
Those initial stages of operating a new app and getting your hands on its UI are difficult. However, this article prioritizes your ease more than anything. Find our guide on how to make a video in slow motion on iPhone here:
Step 1: Upon launching the application, it will ask you for storage access. After that, you’ll have to import a video to add slow motion. Just select any normal video on your device and click on the “Next” option.

Step 2: Navigate toward the bar at the bottom of the timeline panel and select “Adjust.”

Step 3: This will feature the speed control options on your screen; go to “Advance.” Further, change the speed change slider towards the left to manipulate it. Afterward, preview the video and click on the “tick” icon.

Step 4: Further, select the “Export” icon appearing in the expanded menu.

4. Video Speed Editor Slow & Fast
How do you slow down a video on an iPhone after recording in a minimalistic way? This iPhone application is designed for such contexts to create slow-motion videos. Users can slow down a clip’s playback speed up to 8x at specific durations. Simply trim the video parts to apply the speed setting at specific sections and merge them later.

Key Features
- After slow motion, you have the option to keep the original sound or insert music offered by it.
- The timeline editing method helps you to trim the video at the right time.
- The application is compatible with iOS 12.0, iPadOS 12.0, macOS 11.0, and newer versions.
Steps to Add Slow Motion in Video Using Video Speed Editor Slow & Fast
This application has an innovative user interface with a simple operational menu. To add a slow-motion effect to a video, buy its Pro subscription first. To assist you further, here is how to slow down an iPhone video in it:
Step 1: Create a new project after launching the application and giving access to storage. Do this by clicking on the screen saying, “Tap to create a new project.”

Step 2: From the Videos section of your media, select a video and hit “Choose.”

Step 3: In the editing interface, simply select a speed option from -2x to -8x for slowing. Once the video is slowed down according to your preferences, export it.

Part 3: Failed to Slow Down Video Properly? Try Wondershare Filmora as a Remedy
Have you tried all the given solutions on how to slow-mo a video on an iPhone and are still clueless? Not getting the desired results can be frustrating, but we have brought the best answer. Wondershare Filmora helps you achieve slow motion on a computer or laptop. The software is compatible with all Windows and macOS devices. You can just connect your iPhone with the source using a cable and import media.
Being a versatile software, Filmora introduces you to two advanced methods. Uniform speed emerges as a simple method of creating a slow-motion effect. On the other hand, Speed Ramping allows you to edit speed for professional purposes. Amongst speed alteration, users can also use the frame interpolation technique. It increases video frames to ensure a smooth playback during slow-mo.
Step-by-Step Guide to Creating Slow-Motion in Filmora
If you are using Filmora for the first time, the user interface might initially seem confusing. However, in comparison to other post-production software, it possesses a minimal interface. In this section, learn about how to slo-mo a video iPhone using Filmora:
Free Download For Win 7 or later(64-bit)
Free Download For macOS 10.14 or later
Step 1Connect iPhone and Import Clip
Once you have created a new project on Filmora, import media. First, to import media from your iPhone, connect it to your computer or related device. Then, go to “Import” > “Import from a Camera or Phone” option. Further, select the device name and import data.

Step 2Access Speed Ramping Option
Use your cursor to bring the edited media to the timeline and select it. From the appearing settings panel, access the “Speed” > “Speed Ramping” tabs. Here, either choose any of the predesigned templates or customize one.

Step 3Enable Optical Flow for Additional Touch
If the slow motion seems rough or abrupt, Filmora has a solution to that as well. Go to the “AI Frame Interpolation” section and expand it. From the expanding menu, click the “Optical Flow” option for a high-quality slow-mo.

Step 4Rendering for Final Preview
To observe the overall results, navigate towards the top toolbar. Select the “File” tab and “Render Preview” from the dropdown menu. After reviewing the final video, use your cursor to click the “Export” button.

Key Features of Wondershare Filmora
Wondershare Filmora provides a wide range of features for a full-fledged editing experience. Some of these features are for video, some are for audio, and others are for visuals. Here is a list of some of Filmora’s key features that you must give a try to:
1. Instant Mode
Once you have recorded a video, the post-production process cannot be neglected. However, when you start editing a video, the process might be confusing at first. With Filmora’s Instant Mode, use AI’s assistance to edit any video without effort. There are 115 built-in templates to integrate according to context and highlights it.
2. Green Screen
Integrate attractive backgrounds in your videos, like mountains, beaches, or more. With Filmora’s Green Screen feature, remove the video backgrounds with accuracy. After removing the background, you can insert multiple backgrounds, like solid colors. If there are backgrounds that you have previously saved, import them to the timeline. They will automatically show in the video, and you can customize them further.
3. Color Correction
Filmora offers an extensive range of color correction elements to enhance visibility. There are 40+ free presets in Filmora that you can download and apply within the app. In addition, you can do custom color settings and save them as custom presets. You can also use the 3D LUT feature to set preferences for specific factors.
4. Text-to-Speech
Another important feature that helps with interactive video creation is text-to-speech. It allows users to transform text into speech with voice selection options. The software has been trained on NLP and integrates realistic voices in videos. Being closer to the human voice helps with better audience interaction and understanding.
Conclusion
The main theme of this article was how to slow down a video on iPhone and the tools to do it. We mentioned 4 applications that are compatible with higher versions of the iPhone. In addition, the article provided detailed guides on all these applications.
Among them, Wondershare Filmora has been integrated with an advanced slow-mo feature. It allows a seamless and professional user interface to import, edit, and customize. The AI Optical Flow in it adds a remarkable fine touch to your slow-mo video.
Also read:
- New How to Make a Transparent Background in Paint. How 3D Paint Transparent Background Can Be Made. How to Save an Image with Transparent Background?
- Updated 2024 Approved Top 12 Sony Vegas Slideshow Templates for Free Download
- In 2024, Discover How to Download Mobile Phone Green Screen Videos and Pictures for Free. Elevate Your Content with HD Quality Green Screen Frames
- 2024 Approved Adjust the TikTok Videos Length to Make Them Captivating
- In 2024, Stop Worrying if Your Adobe Premiere Playback Slows Down. This Guide Will Show You the Best Solutions to Resolve This Issue and a Perfect Alternative
- In 2024, Having Issues Trying to View SRT Files when You Add Subtitle Files for VLC? Learn the Right Ways to Do so and the Best Alternative Solution
- Do You Want to Remove the Unnecessary Scene From Your TikTok Video? This Article Will Help You to Adjust the Length of TikTok Clip by Providing Easy Methods
- In 2024, Lets Introduce the Top 5 Applications to Add a Song to a Video for Free with some Amazing Sound and Visual Effects
- New In 2024, How to Add Custom Subtitles to Netflix
- 2024 Approved How To Create A YouTube Intro
- How to Make Simple Slideshow Word for 2024
- Steps to Denoise in Final Cut Pro – Reduce Video and Audio Noise
- New In 2024, What You Should Know About Speech-to-Text Technology
- Updated 2024 Approved Best 10 Tools To Make Quiz Videos
- New How to Create Vintage Film Effect 1950S
- Updated Detailed Steps to Rotate Videos in Davinci Resolve
- 2024 Approved A Complete Guideline About QuickTime Player
- New Lets Create a New Premiere Pro Project, Import some Video, and Control Video Playback Speed. Also, Find Alternative Software (WonderShare Filmora) to Control Playback Speed in Minutes
- 2024 Approved Things You Need to Know About Color Grading in Photography
- New 22 Free Video Editing Software to Save Your Money and Time
- Updated How to Crop a Video in Windows Media Player for 2024
- Updated 2024 Approved Difference Between Time Lapse and Hyperlapse
- New In 2024, Detailed Guide to Crop Video in Sony Vegas Pro
- In 2024, How to Put a Filter on a Video in iMovie
- New 2024 Approved Level Up Videos By Applying Keyframe Like A Pro
- New Top 10 Mp3 Visualizers Windows, Mac, Android, iPhone & Online
- Kdenlive Is a Free, Open-Source Video Editing Software Application. Kdenlive Is a Powerful Video Editor that Can Be Used to Create Professional-Quality Videos
- In 2024, Do You Want to Know About the Best Filmic Pro LUTs for Video Editing? This Article Provides Details on the Best Recommendations
- Updated 2 Solutions to Crop a Video Using After Effects
- Updated 2024 Approved Easy Ways to Make Procreate GIFs
- Updated 2024 Approved Ultimate Guide on Magic Effects Video Making
- How to Download and Use Vegas Pro for 2024
- In 2024, Finding the Best Voice Changers for WhatsApp Free and Paid
- Updated How To Use Face Tracking In After Effects To Make Your Videos Pop
- Updated How to Make a Slow Motion Video Complete Guide
- New 2024 Approved How to Record Super Slow Motion Videos on Your Phone?
- In 2024, Do You Know How to Zoom on Facebook Livestream Videos? Through This Article, You Will Find Multiple Ways and Detailed Steps to Zoom in on the Facebook Livestream Videos
- Updated Best 10 3D Slideshow Software Review for 2024
- New Learn How to Easily Concatenate Videos Using FFmpeg in This Step-by-Step Guide. From Installation to Execution, We Cover It All to Streamline Your Video Editing Process
- This Article Talks About Pixel Art Wallpapers. It Gives Examples of Different Pixel Art to Show You How to Customize Your Own Pixel Art Wallpapers, and How to Make a Pixel Art Gif on Filmora
- 2024 Approved 6 Best Text to Speech Generators for YouTube Videos Windows, Mac, Android, iPhone & Online
- How to Set Up Twitch Green Screen
- Create Amazing Slow-Motion Videos 8 Affordable Slow-Motion Cameras
- New Doable Ways to Create Transparent Background in Procreate for 2024
- Updated How to Create Discord Logo GIF
- Updated In 2024, 5 Simple Tools to Merge Video and Audio Online
- Does Life360 Notify When You Log Out On Apple iPhone XS Max? | Dr.fone
- How to Find iSpoofer Pro Activation Key On Honor 90 Pro? | Dr.fone
- How to Transfer Music from Vivo V27e to iPod | Dr.fone
- In 2024, 5 Techniques to Transfer Data from Vivo G2 to iPhone 15/14/13/12 | Dr.fone
- Complete Tutorial for Lava Blaze 2 5G Hard Reset | Dr.fone
- How to Mirror PC Screen to Honor Play 8T Phones? | Dr.fone
- In 2024, Simple and Effective Ways to Change Your Country on YouTube App Of your Samsung Galaxy A14 4G | Dr.fone
- In 2024, 5 Techniques to Transfer Data from Honor 70 Lite 5G to iPhone 15/14/13/12 | Dr.fone
- How To Unlock Oppo Find X7 Phone Without Password?
- Updated In 2024, Narakeet Review Text to Speech Convenient Voice Maker
- In 2024, How Can We Bypass Vivo Y77t FRP?
- Dose Life360 Notify Me When Someone Checks My Location On Xiaomi Redmi Note 12T Pro? | Dr.fone
- Fix Cant Take Screenshot Due to Security Policy on Motorola Edge 40 Pro | Dr.fone
- How to Downgrade iPhone 7 Plus without Losing Any Data? | Dr.fone
- Why is iPogo not working On HTC U23? Fixed | Dr.fone
- Full Guide How To Fix Connection Is Not Private on Tecno Pop 7 Pro | Dr.fone
- Delete Gmail Account With/Without Password On Motorola Moto G34 5G
- How to restore wiped messages on ZTE Nubia Z60 Ultra
- In 2024, How to Unlock Vivo V30 Pro Phone Pattern Lock without Factory Reset
- Authentication Error Occurred on Oppo K11 5G? Here Are 10 Proven Fixes | Dr.fone
- Unlock iPhone SE With Forgotten Passcode Different Methods You Can Try
- How to Reset Xiaomi Redmi 12 without Losing Data | Dr.fone
- In 2024, How to Screen Share on Apple iPhone X? | Dr.fone
- Does Airplane Mode Turn off GPS Location On Oppo Reno 11 5G? | Dr.fone
- In 2024, How to Track WhatsApp Messages on Xiaomi Redmi K70 Without Them Knowing? | Dr.fone
- In 2024, Hassle-Free Ways to Remove FRP Lock on Samsung Galaxy A05s Phones with/without a PC
- Your Complete Guide To Reset Samsung Galaxy M14 4G | Dr.fone
- Best 3 Nubia Red Magic 8S Pro Emulator for Mac to Run Your Wanted Android Apps | Dr.fone
- In 2024, Ways To Find Unlocking Codes For Vivo Y200e 5G Phones
- Catch or Beat Sleeping Snorlax on Pokemon Go For OnePlus Nord CE 3 Lite 5G | Dr.fone
- In 2024, iCloud Separation How To Disconnect Apple iPhone 15 Pro and iPad
- Where Is the Best Place to Catch Dratini On Vivo Y56 5G | Dr.fone
- A Working Guide For Pachirisu Pokemon Go Map On Realme C53 | Dr.fone
- In 2024, How to Transfer Everything from Apple iPhone 15 to iPhone | Dr.fone
- How To Unlock Stolen Apple iPhone 12 Pro Max In Different Conditionsin
- A Working Guide For Pachirisu Pokemon Go Map On Oppo Reno 11 5G | Dr.fone
- iPhone Transfer Transfer Contact from Apple iPhone XS to iPhone without iCloud | Dr.fone
- In 2024, 3 Effective Methods to Fake GPS location on Android For your Nokia G310 | Dr.fone
- Pokemon Go No GPS Signal? Heres Every Possible Solution On Oppo A78 5G | Dr.fone
- Dose Life360 Notify Me When Someone Checks My Location On Xiaomi Redmi Note 13 5G? | Dr.fone
- In 2024, How to Use Life360 on Windows PC For Xiaomi Civi 3? | Dr.fone
- In 2024, Apple ID Locked or Disabled On Apple iPhone 12 Pro? 7 Mehtods You Cant-Miss
- 4 Solutions to Fix Unfortunately Your App Has Stopped Error on Meizu 21 | Dr.fone
- Title: Best Frame Rate for 4K Video
- Author: Chloe
- Created at : 2024-05-20 03:37:20
- Updated at : 2024-05-21 03:37:20
- Link: https://ai-editing-video.techidaily.com/best-frame-rate-for-4k-video/
- License: This work is licensed under CC BY-NC-SA 4.0.

