:max_bytes(150000):strip_icc():format(webp)/ps6-concept-trailer-64aac5b7323041ad93d7535eccf7df40.png)
Best Practical Tips to Improve Your Lighting in the Sun for 2024

Best Practical Tips to Improve Your Lighting in the Sun
Shooting outdoors is a challenge in most situations. We have to deal with the sun being overexposed or the background is too dark.
In this article, we’ll show you how to light with the sun the easiest way. These simple and effective tips can help you block the harsh sun and make it to your advantage!
1) Preparation
You may need those things to film under the harsh sun:
- An ND filter for your lens
- A flag to block the sun. It can be anything like a black poster.
- A white poster to bounce the sunlight.
- Artificial light equipment.
Now let’s see when and how to use them against the strong sunlight!
2) Direct to the Sun
If we want a specific background for our shot but our talent has to face the sun, here are some tips you can do to undermine the unflattering light or the blindness.
1. Pick up an ND filter on your lens

We use it outside so we can open our aperture to get nice blurry backgrounds without overexposing our footage.
2. Use a “flag” to block or shape the sunlight

Using a black piece of poster board works perfectly fine, hold it up to the sun. Also, remember to angle your “flag” to create harsh lines or fully shade your talent.
3. Adjust your camera to fit the environment
For example, you can change the exposure of your camera to match the talent’s face giving a more silhouette look.
3) Back to the Sun
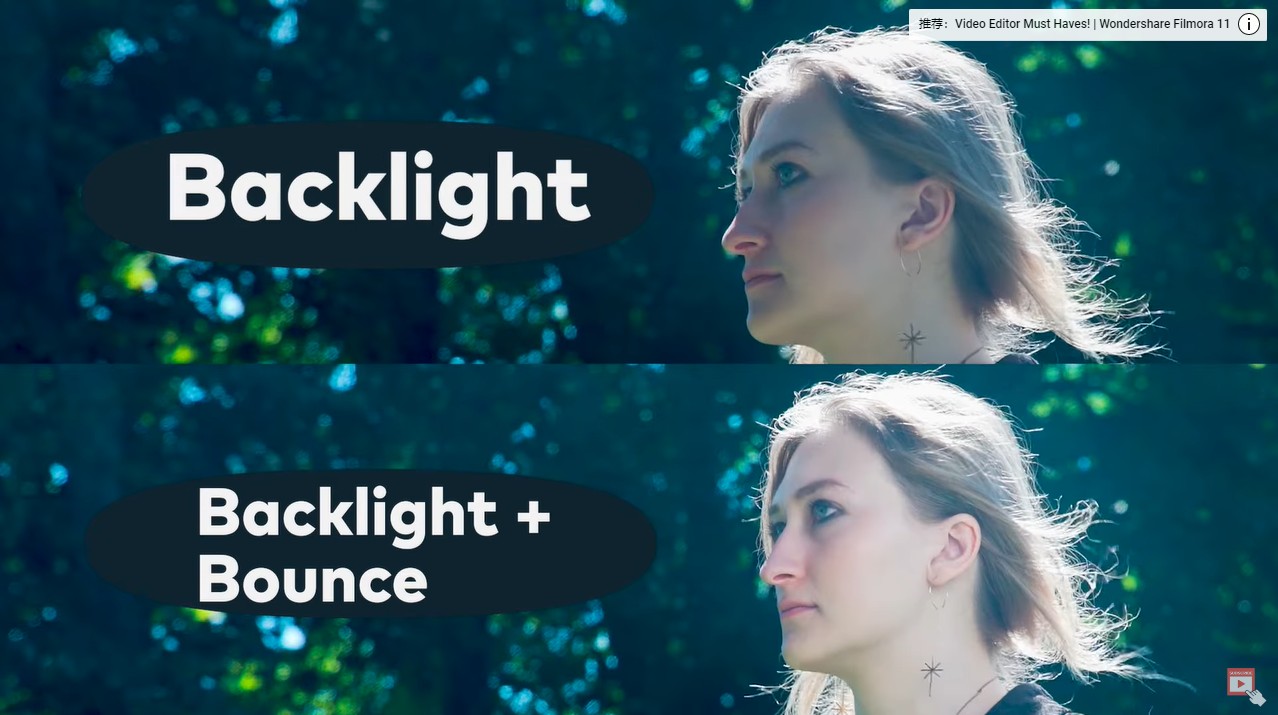
Have you ever been filming outside only to see your talent dark in the frame with the background blown out with light? To fix the problem, the simplest way is to use a “bounce”.
By using a “bounce”, we can reflect the light from the sun to our talent. Make sure to lift the bounce and move it around to get the right amount of light on your talent.
This should give us a nice look with the sun backlighting our subject and the bounce filling in the shadows and giving us soft light on our talent’s face!
4) Artificial lighting
If we want to control our lighting better, we will want to use artificial lights in combination with the sun.
For example, weather changes. As you shot, the sun will move and make lighting challenging to keep consistent.
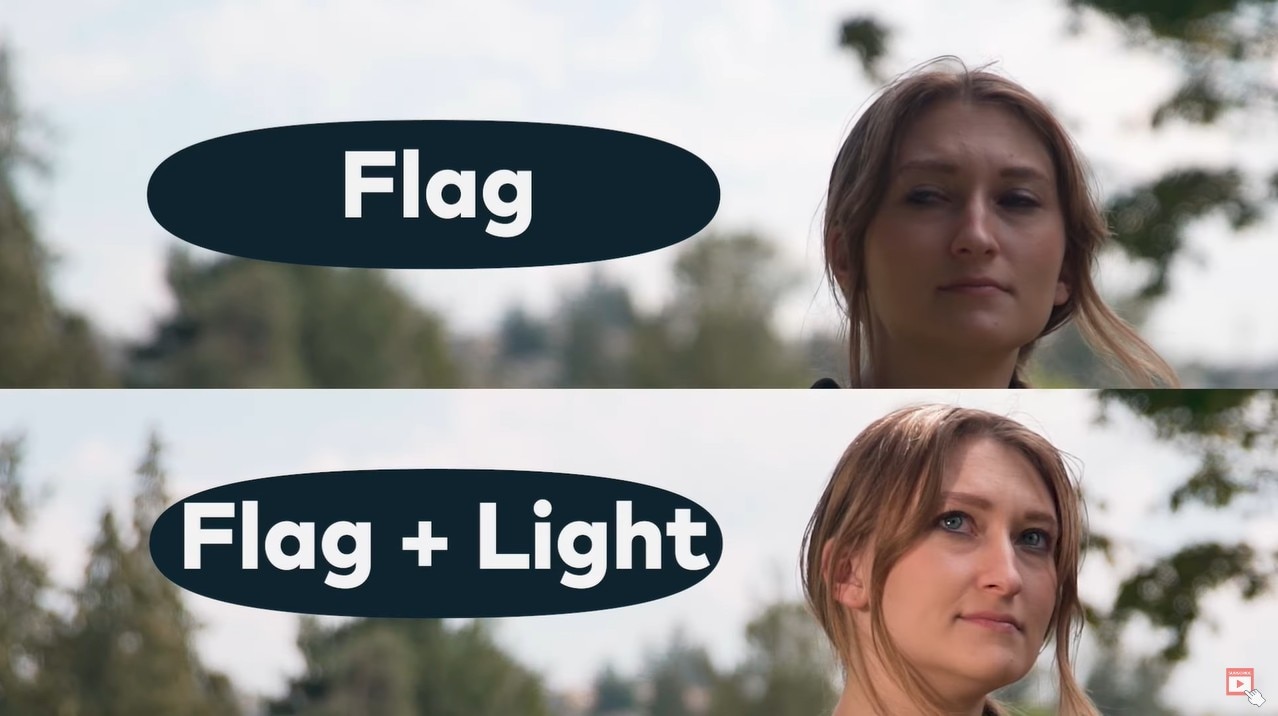
In that case, we can use the flag technique that we used before to block the harsh sunlight and then use our lights on our talent’s face, this keeps our lighting more consistent than if we relied on just the natural light.
Now, take a look at the comparison with all the lighting conditions we create:
- Flag VS Flag & Light
- Backlight VS Backlight & Bounce
Summary
If you shoot or film outdoors, you must learn how to cope with the unsteady natural light. Hope this article helps you with that and kindly leave your thoughts below.
Free Download For Win 7 or later(64-bit)
Free Download For macOS 10.14 or later
Free Download For macOS 10.14 or later
Detailed Tutorial to Crop a Video in KineMaster
“Create. Edit. Share. Transform your videos with KineMaster! Powerful tools, easy to use.” – a few words we read when we come up with the official web-site of KineMaster, a mobile video editing application.

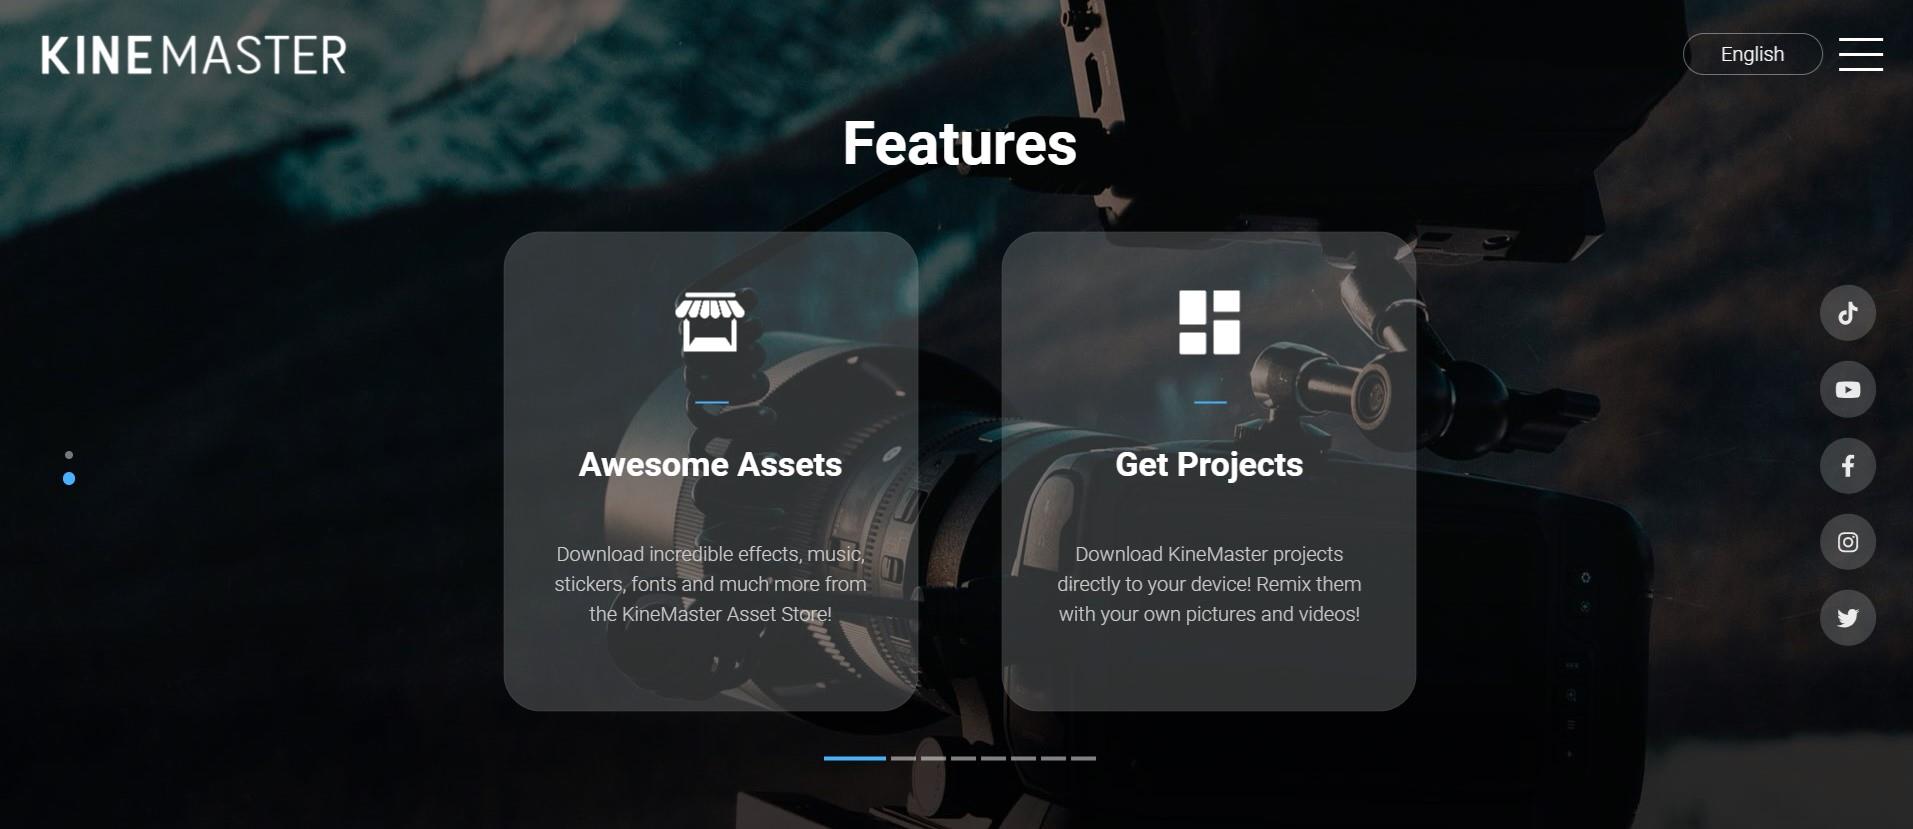
Scrolling down, we see a rich list of all the features KineMaster offers to its users, such as: Assets, Projects, Backup and Share, Blending Modes, Reverse, Chroma Key, High Resolution, Video Layers. Simply put, on KineMaster, you can download projects, add more than 2 500 effects, use powerful tools, add cinematic color, etc…
This many features make you think – how come it is possible to do all that on a mobile phone? How come Kinemaster is not only a software you can download, pay for, and use on your computer, which, on its behalf, should also be a powerful one? It would be a logical question, but remember, we are in 2022 already, so, no limits are put to the technology of today! On Google Play Store, in the description of the abovementioned app, it reads: “KineMaster makes video editing fun on your phone, tablet, or Chromebook!” – So, why not use this opportunity, to explore new ways of making our content better and as appealing as ever for our viewers?
Even though Kinemaster deserves a bigger article with more explanation of each tool, for now, we will only be focusing on cropping a video in this app. First off, why crop a video at all? – well, sometimes we have a wonderful footage but the aspect ratio just doesn’t work for us. It might be because we want to upload our clip on a platform needing a specific aspect ratio, or, we just need to crop and pan (which means to move around within a clip or an image) because we don’t like some things shown in the original video – we might as well need to zoom in and out, in order to get the best out of our footage. For whatever reason, when you need or just wish to crop a video, it should not be a big deal, and let’s see how KineMaster makes it a good and easy experience.
So, the first thing we do in almost every situation is to access the platform or an application itself! – you guessed it right, download KineMaster from Google Play Store! Once you have it on your phone, open it and enjoy the introduction of the app itself.

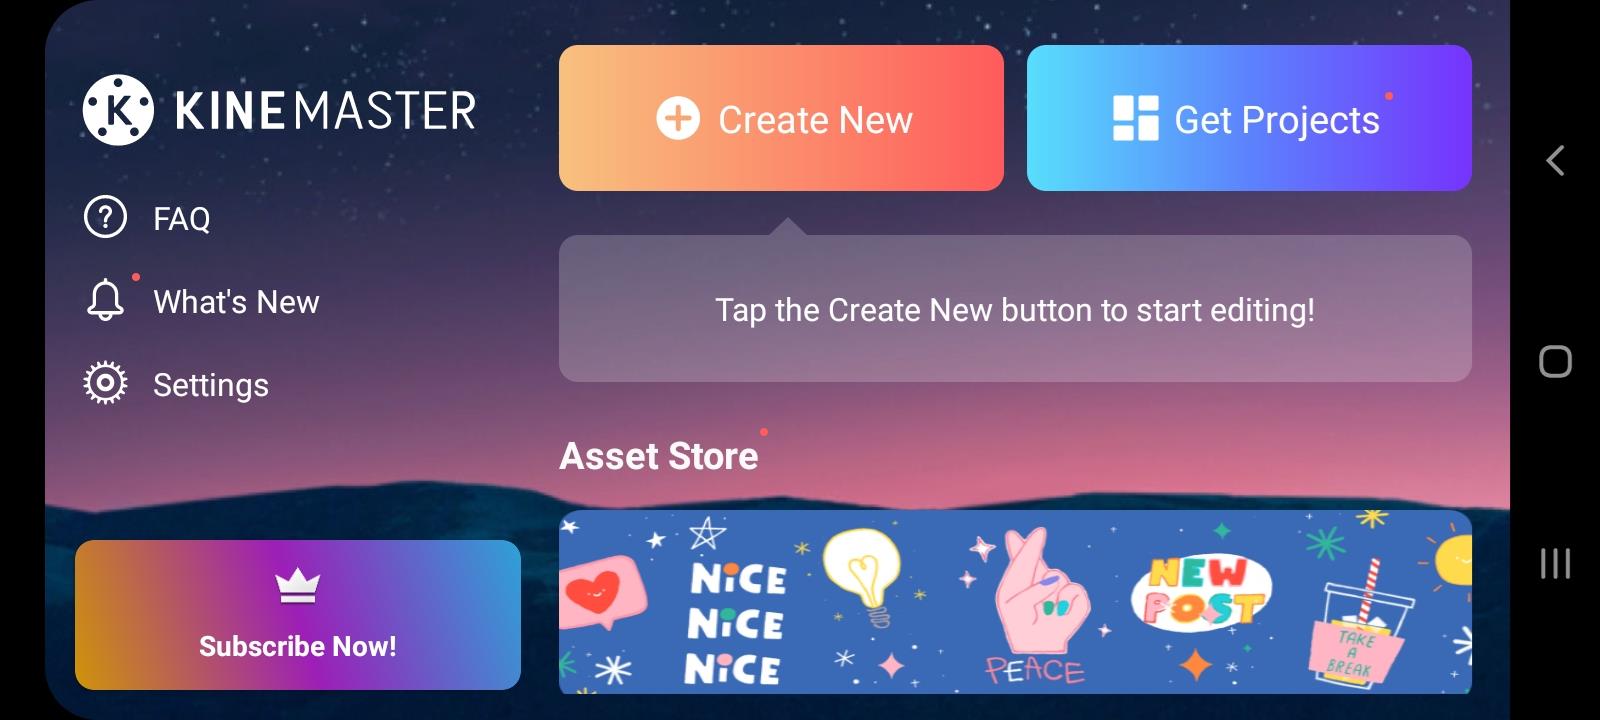
The interesting fact you will notice is that the layout of the app is horizontal, not vertical, unlike in most cases. So, it makes you feel like you are at least close to what video editors who work on their computers represent. The interface of the app is quite enjoyable for your eyes, as it is kind of fun, as well.
It is needless to say that, if you are going to do a specific “operation” to the video, such as cropping, you will already have figured out which one of your footage you want to crop and pan. So, it’s wise to jump on the button which says: Create New.
This will take you to the editor. Even though in the media section you will find the video you want to work on, but you might be struggling to notice a Crop button. It is because unfortunately, it’s not possible to crop your video right away in KineMaster – first, you will need to add a background, for example, a black one.
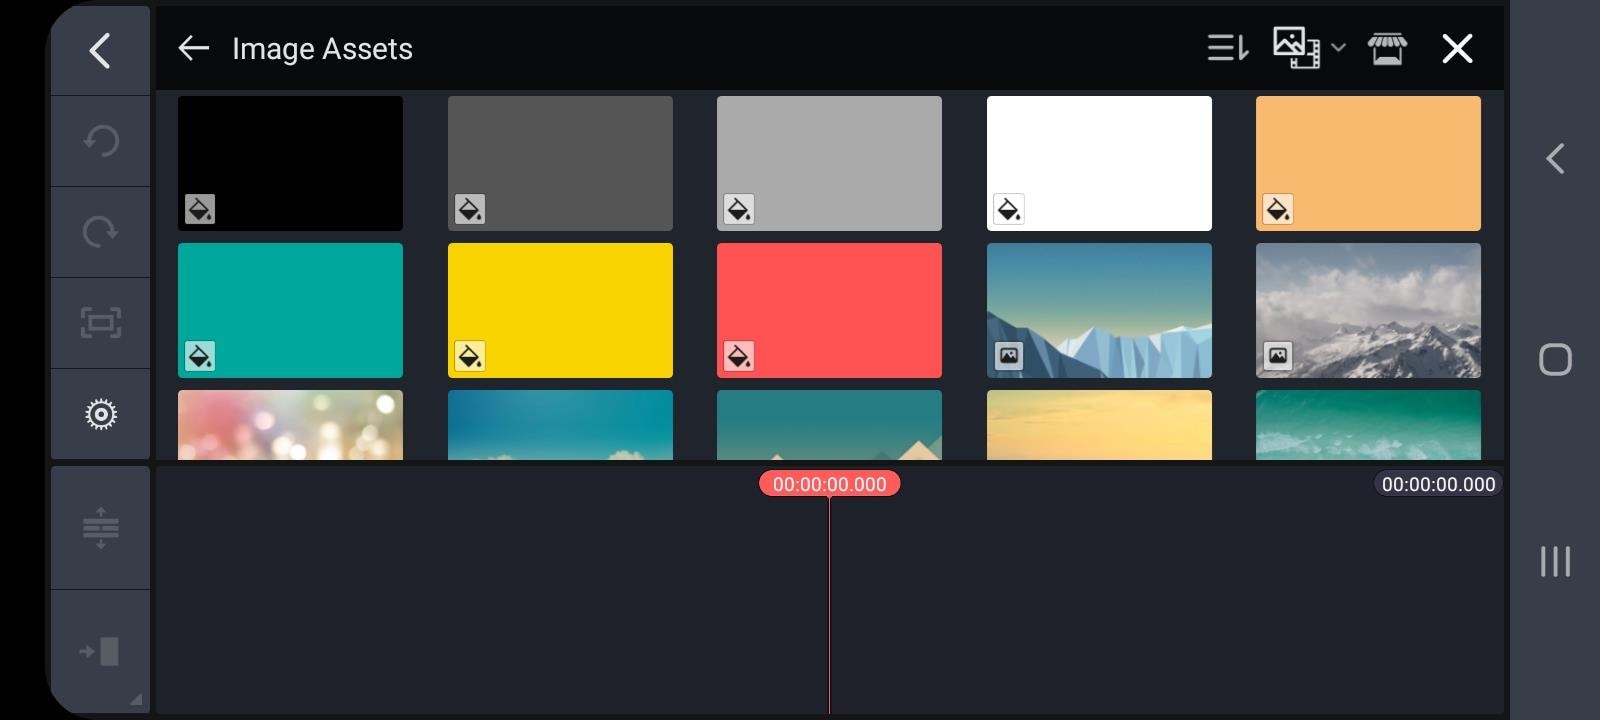
Then, you will go back to the menu and find Media section again to add the video clip you want to crop.
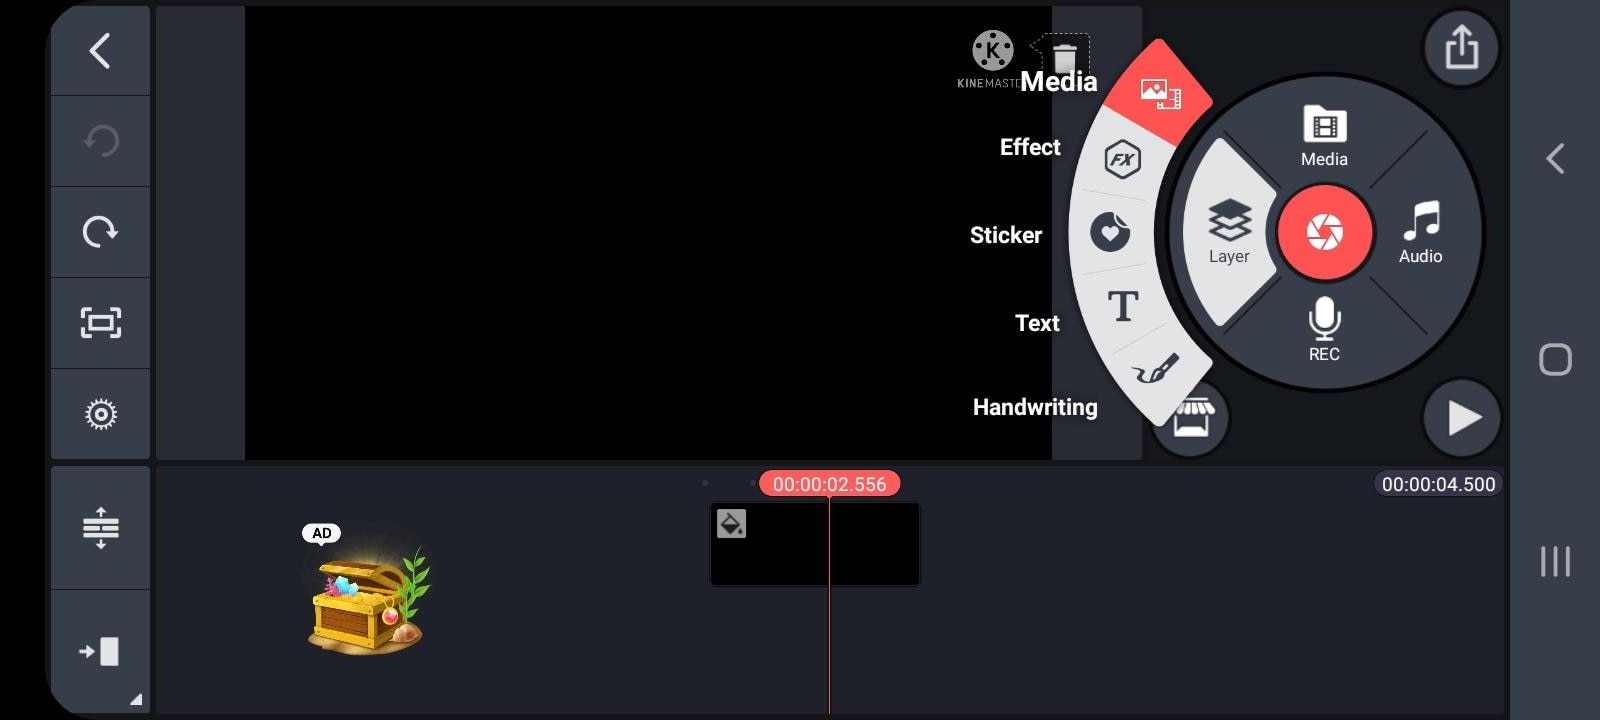
After adding it to the editor, you need to tap on the video file which has appeared in the sequence – this will show you different features you can use on the right. You have to scroll down a little and Voila! – here you find Cropping. After having clicked on that, a little cropping window will appear on the screen.
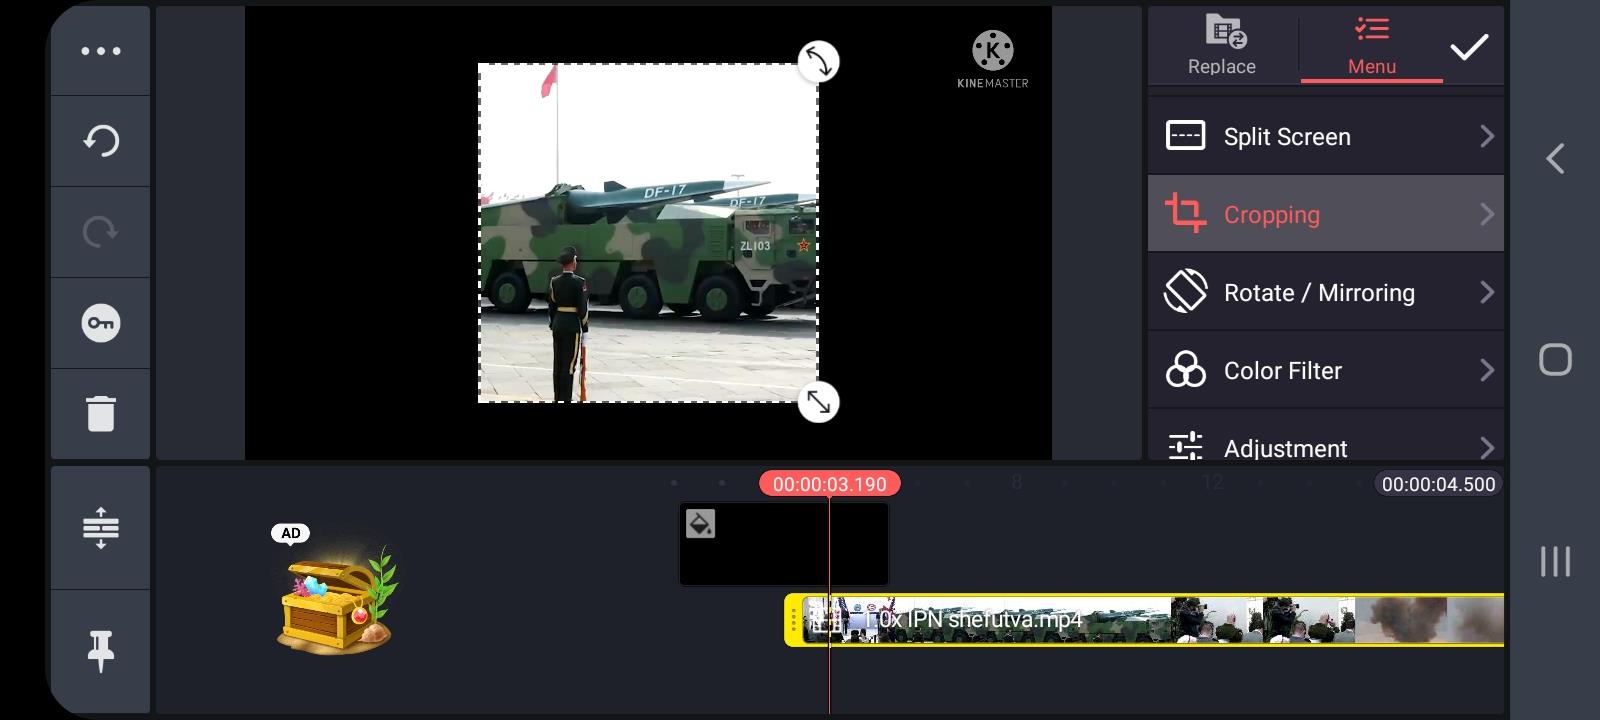
You can resize the clip, and in order to crop the video, turning on the mask option is needed.
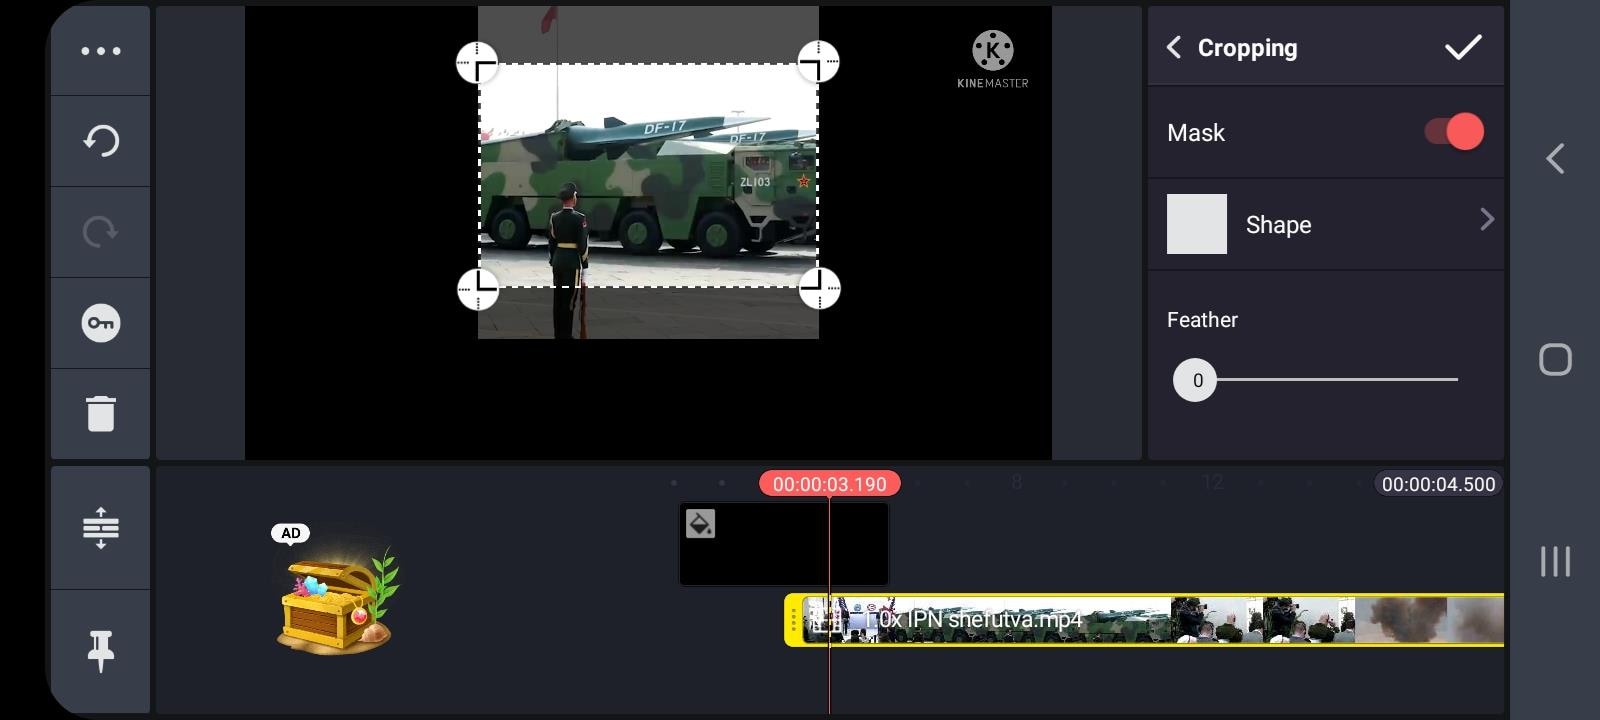

After you have finished cropping and resizing it to your liking, you need to click on the icon on the top right, and it will take you to the Save and Share page.
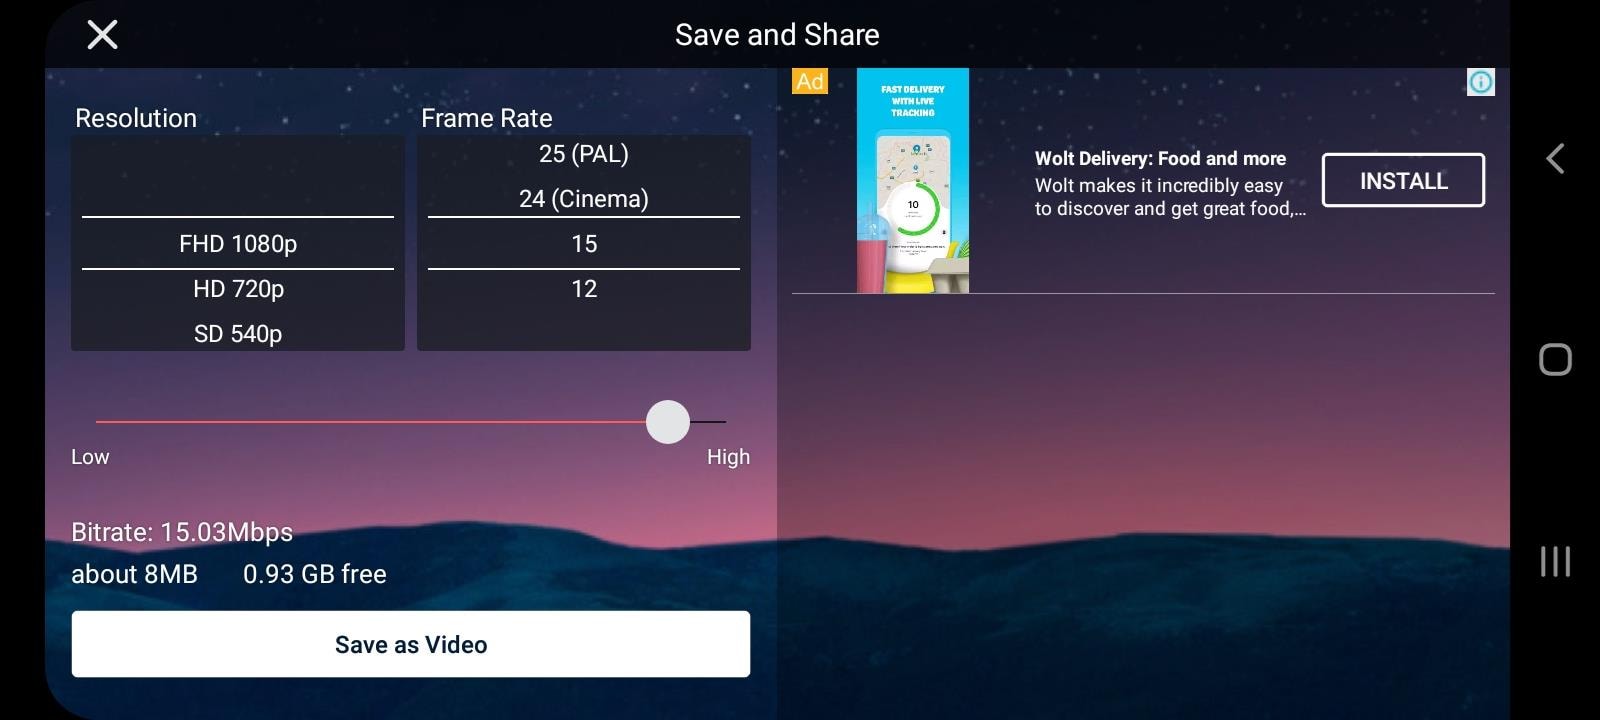
There, you will choose the Resolution and Frame rate, and Save as Video.
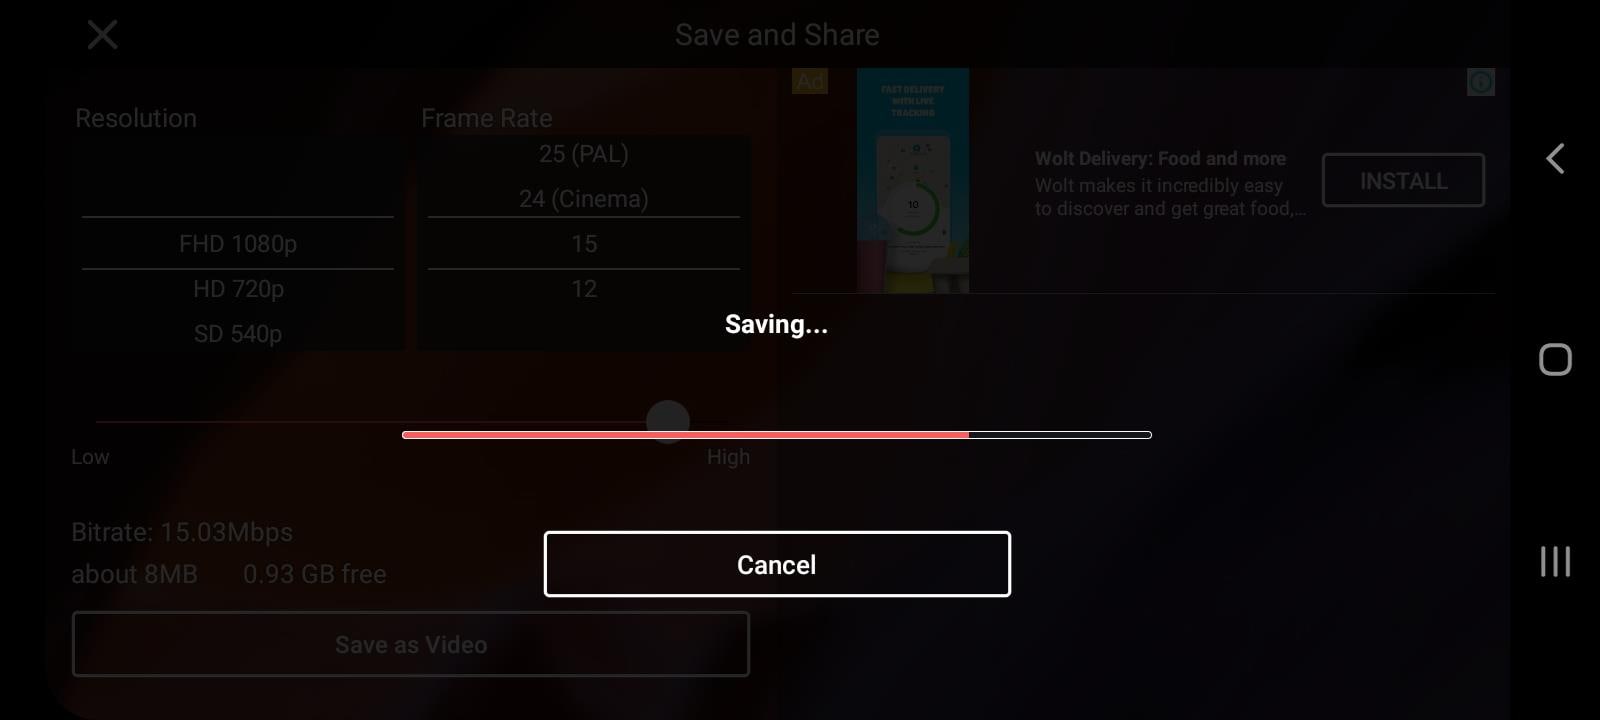
You can check your new cropped video on your gallery.
An easier way to crop video in Wondershare Filmora
An alternate way of cropping your video would be Filmora Video Editor , which is a software you can download and install on your computer and use its features only then. You can also try your hand at this very handy computer program which has an easy and user-friendly interface.
For Win 7 or later (64-bit)
For macOS 10.14 or later
Frist, as mentioned, you need to download and install Wondershare Filmora X. To add your files, you will need to click on Import Media Files Here.

You will choose your clip(s) you would like to crop and then drag and drop it in the sequence.

Above your video in the sequence you will see little icons and find a Crop one.

After clicking on it, a new window will open – it’s for Crop and Zoom, where you can choose a needed ratio or do it manually (for it, you have to select Custom first).

After clicking OK, your video will be cropped as you like. Then, you can proceed with Exporting it – click on Export, choose your preferred settings, and save the video at last.

So, in this article, you have learned how to crop a video using a mobile app KineMaster, as well as using a software – Wondershare Filmora X. of course, there are many other ways in which you can crop your video and make the best out of it. The technology and innovation gives us the opportunity to have great results with as little work as just a few minutes. You might need to crop your video for your channel on Youtube, or for your page on social media, or an official web-page of your company; last but not least is cropping and editing your video for your own pleasure, which is also a great way to interact with the virtual world around us.
Scrolling down, we see a rich list of all the features KineMaster offers to its users, such as: Assets, Projects, Backup and Share, Blending Modes, Reverse, Chroma Key, High Resolution, Video Layers. Simply put, on KineMaster, you can download projects, add more than 2 500 effects, use powerful tools, add cinematic color, etc…

This many features make you think – how come it is possible to do all that on a mobile phone? How come Kinemaster is not only a software you can download, pay for, and use on your computer, which, on its behalf, should also be a powerful one? It would be a logical question, but remember, we are in 2022 already, so, no limits are put to the technology of today! On Google Play Store, in the description of the abovementioned app, it reads: “KineMaster makes video editing fun on your phone, tablet, or Chromebook!” – So, why not use this opportunity, to explore new ways of making our content better and as appealing as ever for our viewers?
Even though Kinemaster deserves a bigger article with more explanation of each tool, for now, we will only be focusing on cropping a video in this app. First off, why crop a video at all? – well, sometimes we have a wonderful footage but the aspect ratio just doesn’t work for us. It might be because we want to upload our clip on a platform needing a specific aspect ratio, or, we just need to crop and pan (which means to move around within a clip or an image) because we don’t like some things shown in the original video – we might as well need to zoom in and out, in order to get the best out of our footage. For whatever reason, when you need or just wish to crop a video, it should not be a big deal, and let’s see how KineMaster makes it a good and easy experience.
So, the first thing we do in almost every situation is to access the platform or an application itself! – you guessed it right, download KineMaster from Google Play Store! Once you have it on your phone, open it and enjoy the introduction of the app itself.

The interesting fact you will notice is that the layout of the app is horizontal, not vertical, unlike in most cases. So, it makes you feel like you are at least close to what video editors who work on their computers represent. The interface of the app is quite enjoyable for your eyes, as it is kind of fun, as well.
It is needless to say that, if you are going to do a specific “operation” to the video, such as cropping, you will already have figured out which one of your footage you want to crop and pan. So, it’s wise to jump on the button which says: Create New.

This will take you to the editor. Even though in the media section you will find the video you want to work on, but you might be struggling to notice a Crop button. It is because unfortunately, it’s not possible to crop your video right away in KineMaster – first, you will need to add a background, for example, a black one.

Then, you will go back to the menu and find Media section again to add the video clip you want to crop.

After adding it to the editor, you need to tap on the video file which has appeared in the sequence – this will show you different features you can use on the right. You have to scroll down a little and Voila! – here you find Cropping. After having clicked on that, a little cropping window will appear on the screen.

You can resize the clip, and in order to crop the video, turning on the mask option is needed.


After you have finished cropping and resizing it to your liking, you need to click on the icon on the top right, and it will take you to the Save and Share page.

There, you will choose the Resolution and Frame rate, and Save as Video.

You can check your new cropped video on your gallery.
An easier way to crop video in Wondershare Filmora
An alternate way of cropping your video would be Filmora Video Editor , which is a software you can download and install on your computer and use its features only then. You can also try your hand at this very handy computer program which has an easy and user-friendly interface.
For Win 7 or later (64-bit)
For macOS 10.14 or later
Frist, as mentioned, you need to download and install Wondershare Filmora X. To add your files, you will need to click on Import Media Files Here.

You will choose your clip(s) you would like to crop and then drag and drop it in the sequence.

Above your video in the sequence you will see little icons and find a Crop one.

After clicking on it, a new window will open – it’s for Crop and Zoom, where you can choose a needed ratio or do it manually (for it, you have to select Custom first).

After clicking OK, your video will be cropped as you like. Then, you can proceed with Exporting it – click on Export, choose your preferred settings, and save the video at last.

So, in this article, you have learned how to crop a video using a mobile app KineMaster, as well as using a software – Wondershare Filmora X. of course, there are many other ways in which you can crop your video and make the best out of it. The technology and innovation gives us the opportunity to have great results with as little work as just a few minutes. You might need to crop your video for your channel on Youtube, or for your page on social media, or an official web-page of your company; last but not least is cropping and editing your video for your own pleasure, which is also a great way to interact with the virtual world around us.
Scrolling down, we see a rich list of all the features KineMaster offers to its users, such as: Assets, Projects, Backup and Share, Blending Modes, Reverse, Chroma Key, High Resolution, Video Layers. Simply put, on KineMaster, you can download projects, add more than 2 500 effects, use powerful tools, add cinematic color, etc…

This many features make you think – how come it is possible to do all that on a mobile phone? How come Kinemaster is not only a software you can download, pay for, and use on your computer, which, on its behalf, should also be a powerful one? It would be a logical question, but remember, we are in 2022 already, so, no limits are put to the technology of today! On Google Play Store, in the description of the abovementioned app, it reads: “KineMaster makes video editing fun on your phone, tablet, or Chromebook!” – So, why not use this opportunity, to explore new ways of making our content better and as appealing as ever for our viewers?
Even though Kinemaster deserves a bigger article with more explanation of each tool, for now, we will only be focusing on cropping a video in this app. First off, why crop a video at all? – well, sometimes we have a wonderful footage but the aspect ratio just doesn’t work for us. It might be because we want to upload our clip on a platform needing a specific aspect ratio, or, we just need to crop and pan (which means to move around within a clip or an image) because we don’t like some things shown in the original video – we might as well need to zoom in and out, in order to get the best out of our footage. For whatever reason, when you need or just wish to crop a video, it should not be a big deal, and let’s see how KineMaster makes it a good and easy experience.
So, the first thing we do in almost every situation is to access the platform or an application itself! – you guessed it right, download KineMaster from Google Play Store! Once you have it on your phone, open it and enjoy the introduction of the app itself.

The interesting fact you will notice is that the layout of the app is horizontal, not vertical, unlike in most cases. So, it makes you feel like you are at least close to what video editors who work on their computers represent. The interface of the app is quite enjoyable for your eyes, as it is kind of fun, as well.
It is needless to say that, if you are going to do a specific “operation” to the video, such as cropping, you will already have figured out which one of your footage you want to crop and pan. So, it’s wise to jump on the button which says: Create New.

This will take you to the editor. Even though in the media section you will find the video you want to work on, but you might be struggling to notice a Crop button. It is because unfortunately, it’s not possible to crop your video right away in KineMaster – first, you will need to add a background, for example, a black one.

Then, you will go back to the menu and find Media section again to add the video clip you want to crop.

After adding it to the editor, you need to tap on the video file which has appeared in the sequence – this will show you different features you can use on the right. You have to scroll down a little and Voila! – here you find Cropping. After having clicked on that, a little cropping window will appear on the screen.

You can resize the clip, and in order to crop the video, turning on the mask option is needed.


After you have finished cropping and resizing it to your liking, you need to click on the icon on the top right, and it will take you to the Save and Share page.

There, you will choose the Resolution and Frame rate, and Save as Video.

You can check your new cropped video on your gallery.
An easier way to crop video in Wondershare Filmora
An alternate way of cropping your video would be Filmora Video Editor , which is a software you can download and install on your computer and use its features only then. You can also try your hand at this very handy computer program which has an easy and user-friendly interface.
For Win 7 or later (64-bit)
For macOS 10.14 or later
Frist, as mentioned, you need to download and install Wondershare Filmora X. To add your files, you will need to click on Import Media Files Here.

You will choose your clip(s) you would like to crop and then drag and drop it in the sequence.

Above your video in the sequence you will see little icons and find a Crop one.

After clicking on it, a new window will open – it’s for Crop and Zoom, where you can choose a needed ratio or do it manually (for it, you have to select Custom first).

After clicking OK, your video will be cropped as you like. Then, you can proceed with Exporting it – click on Export, choose your preferred settings, and save the video at last.

So, in this article, you have learned how to crop a video using a mobile app KineMaster, as well as using a software – Wondershare Filmora X. of course, there are many other ways in which you can crop your video and make the best out of it. The technology and innovation gives us the opportunity to have great results with as little work as just a few minutes. You might need to crop your video for your channel on Youtube, or for your page on social media, or an official web-page of your company; last but not least is cropping and editing your video for your own pleasure, which is also a great way to interact with the virtual world around us.
Scrolling down, we see a rich list of all the features KineMaster offers to its users, such as: Assets, Projects, Backup and Share, Blending Modes, Reverse, Chroma Key, High Resolution, Video Layers. Simply put, on KineMaster, you can download projects, add more than 2 500 effects, use powerful tools, add cinematic color, etc…

This many features make you think – how come it is possible to do all that on a mobile phone? How come Kinemaster is not only a software you can download, pay for, and use on your computer, which, on its behalf, should also be a powerful one? It would be a logical question, but remember, we are in 2022 already, so, no limits are put to the technology of today! On Google Play Store, in the description of the abovementioned app, it reads: “KineMaster makes video editing fun on your phone, tablet, or Chromebook!” – So, why not use this opportunity, to explore new ways of making our content better and as appealing as ever for our viewers?
Even though Kinemaster deserves a bigger article with more explanation of each tool, for now, we will only be focusing on cropping a video in this app. First off, why crop a video at all? – well, sometimes we have a wonderful footage but the aspect ratio just doesn’t work for us. It might be because we want to upload our clip on a platform needing a specific aspect ratio, or, we just need to crop and pan (which means to move around within a clip or an image) because we don’t like some things shown in the original video – we might as well need to zoom in and out, in order to get the best out of our footage. For whatever reason, when you need or just wish to crop a video, it should not be a big deal, and let’s see how KineMaster makes it a good and easy experience.
So, the first thing we do in almost every situation is to access the platform or an application itself! – you guessed it right, download KineMaster from Google Play Store! Once you have it on your phone, open it and enjoy the introduction of the app itself.

The interesting fact you will notice is that the layout of the app is horizontal, not vertical, unlike in most cases. So, it makes you feel like you are at least close to what video editors who work on their computers represent. The interface of the app is quite enjoyable for your eyes, as it is kind of fun, as well.
It is needless to say that, if you are going to do a specific “operation” to the video, such as cropping, you will already have figured out which one of your footage you want to crop and pan. So, it’s wise to jump on the button which says: Create New.

This will take you to the editor. Even though in the media section you will find the video you want to work on, but you might be struggling to notice a Crop button. It is because unfortunately, it’s not possible to crop your video right away in KineMaster – first, you will need to add a background, for example, a black one.

Then, you will go back to the menu and find Media section again to add the video clip you want to crop.

After adding it to the editor, you need to tap on the video file which has appeared in the sequence – this will show you different features you can use on the right. You have to scroll down a little and Voila! – here you find Cropping. After having clicked on that, a little cropping window will appear on the screen.

You can resize the clip, and in order to crop the video, turning on the mask option is needed.


After you have finished cropping and resizing it to your liking, you need to click on the icon on the top right, and it will take you to the Save and Share page.

There, you will choose the Resolution and Frame rate, and Save as Video.

You can check your new cropped video on your gallery.
An easier way to crop video in Wondershare Filmora
An alternate way of cropping your video would be Filmora Video Editor , which is a software you can download and install on your computer and use its features only then. You can also try your hand at this very handy computer program which has an easy and user-friendly interface.
For Win 7 or later (64-bit)
For macOS 10.14 or later
Frist, as mentioned, you need to download and install Wondershare Filmora X. To add your files, you will need to click on Import Media Files Here.

You will choose your clip(s) you would like to crop and then drag and drop it in the sequence.

Above your video in the sequence you will see little icons and find a Crop one.

After clicking on it, a new window will open – it’s for Crop and Zoom, where you can choose a needed ratio or do it manually (for it, you have to select Custom first).

After clicking OK, your video will be cropped as you like. Then, you can proceed with Exporting it – click on Export, choose your preferred settings, and save the video at last.

So, in this article, you have learned how to crop a video using a mobile app KineMaster, as well as using a software – Wondershare Filmora X. of course, there are many other ways in which you can crop your video and make the best out of it. The technology and innovation gives us the opportunity to have great results with as little work as just a few minutes. You might need to crop your video for your channel on Youtube, or for your page on social media, or an official web-page of your company; last but not least is cropping and editing your video for your own pleasure, which is also a great way to interact with the virtual world around us.
Step by Step to Crop Videos with CyberLink PowerDirector
Video Editing is an art form dependent on various elements and factors that are part of your video; this means people, items, or objects in the background can often make or break the viewing experience.
Can you imagine having shot a scene with impeccable attention to detail, but a small uncontrollable action leaves a portion of an unwanted cable or equipment in the frame? Bummer, right? But luckily, due to the power of video editing software, it is not hard to deal with such problems.
A way to work with such clips is to use the crop function while editing, as it can help emphasize or detract attention from a particular part of any video project.
Author’s Note: While filming, try to capture footage in the highest resolution allowed by the available camera hardware; this will give you more room to play with while using the crop function.
To preface, CyberLink PowerDirector is a free video editing tool capable of accomplishing this and providing a professional touch to your video projects. And like other competing software, the program not only allows you to crop into clips but also uses keyframes to modify aspects like panning and zoom. So to help you perform this action, in this article, we list the steps you will need for cropping into video clips with PowerDirector. As an added bonus, we have also included the method to perform the same actions in WonderShare Filmora.
Note: We documented the steps in this guide with PowerDirector 365 and WonderShare Filmora X.
How to Crop Videos with CyberLink PowerDirector?
The idea of cropping into clips has always been an easy action to perform; once you have PowerDirector 365 open, follow the steps listed below.
If you do not already have CyberLink PowerDirector 365, download the software by visiting Cyberlink’s official website.
Step 1: Create a new video project in Cyberlink PowerDirector 365 by choosing Full Mode.

Note: Full Mode in Cyberlink PowerDirector 365 provides access to a full-featured video editing tool, similar to Wondershare Filmora. The other available options cater to distinct video types.
Step 2: Import media onto the Timeline from the Media Library; in this guide, we have gone ahead and used the pre-existing stock footage.

Step 3: Now, click on the video file on the Timeline; this will activate the video toolbar giving you access to the various controls built into PowerDirector 365. Hover over the tools open, following which you need to click on the Crop, Zoom, and Pan option.

Step 4: Pick either corner of the frame visible around the video and set the area you want the clip to focus upon; following this, click Save.
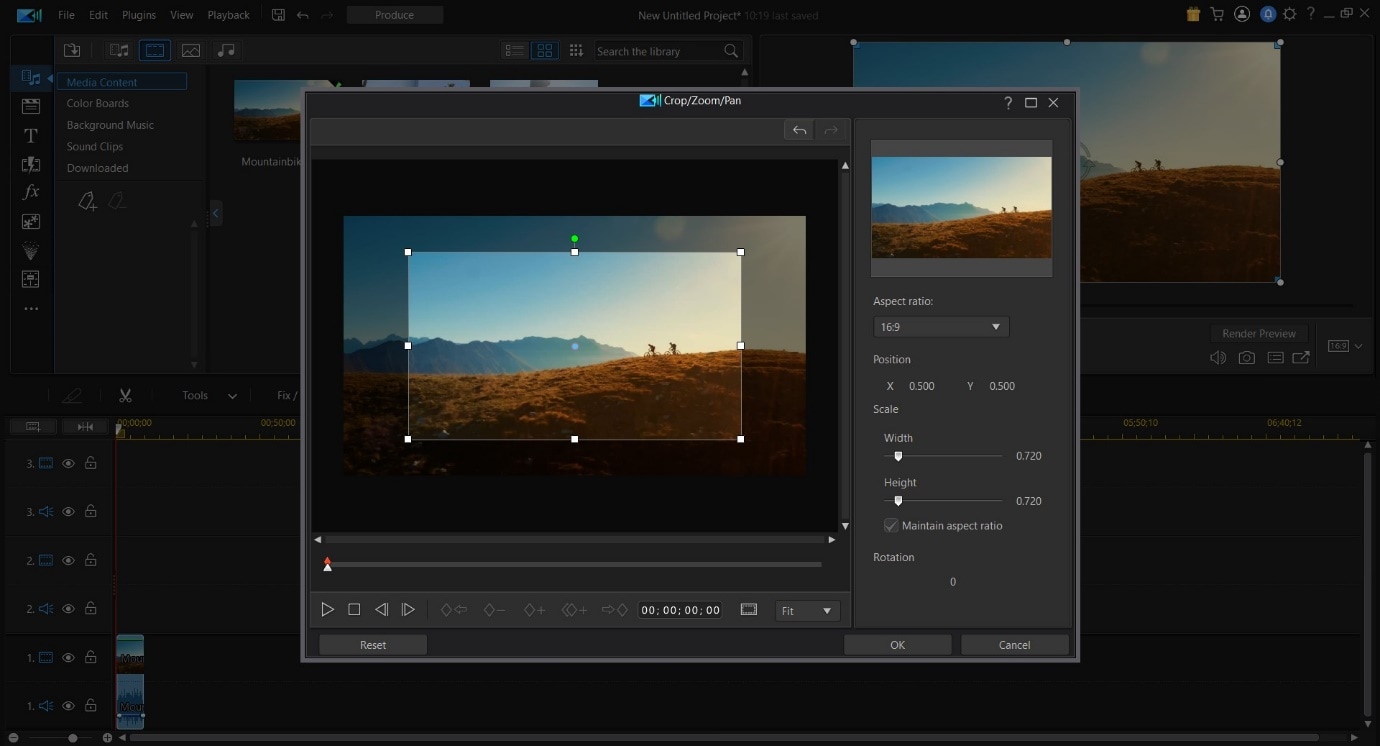
This action will crop the video clip according to your desired size.
Tip:
The activation of Keyframes while cropping will allow you to create an effect that slowly zooms into the footage. To do this, set Keyframe Point 1 at a specific time (say the fifth second) and at one zoom level (say zero) and create Keyframe Point 2 at another time (fifteenth second) and a different zoom level (say fifty). So, between the fifth second and fifteenth second, the zoom will steadily increase and raise emphasis on an object. You can also add an element of position to this action if you want the focus to be on something not in the center of the screen.
Definition: Keyframes while Video Editing is a software-based feature that allows you to set In and Out Points, giving clips between the two positions different properties that change as the playhead continues to move. These properties can be increased zoom, rotation, different colors, or even a gradual pan.
We recommend experimenting with this feature if you want to bring a more dynamic feeling to your video project.
An Easier Way to Crop Video with Wondershare Filmora
While Cyberlink PowerDirector 365 is a powerful video editing tool, in our experience, its menus are not as simple to navigate as some of the other competing video editing tools available, Wondershare Filmora Video Editor included.
An emphasis on quick accessibility is present with Filmora, and we believe this is a huge plus for beginning creators. The use of iconography resemblant to mobile software is another aspect that helps increase familiarity.
If you do not already have Wondershare Filmora, you can download the software by visiting the official website.
Now, to help you learn how to use the Crop Tool and to show you an example of what we mean, here is how you can use the feature Wondershare Filmora to get the desired output.
For Win 7 or later (64-bit)
For macOS 10.14 or later
Once you have the software open, follow the steps listed below.
Step 1: Import the Media File into your Video Project.

Step 2: Drag the clip onto the Timeline and then select it to activate further interactions.

Step 3: Choose the Crop Options (marked in Red) to open the Crop window.
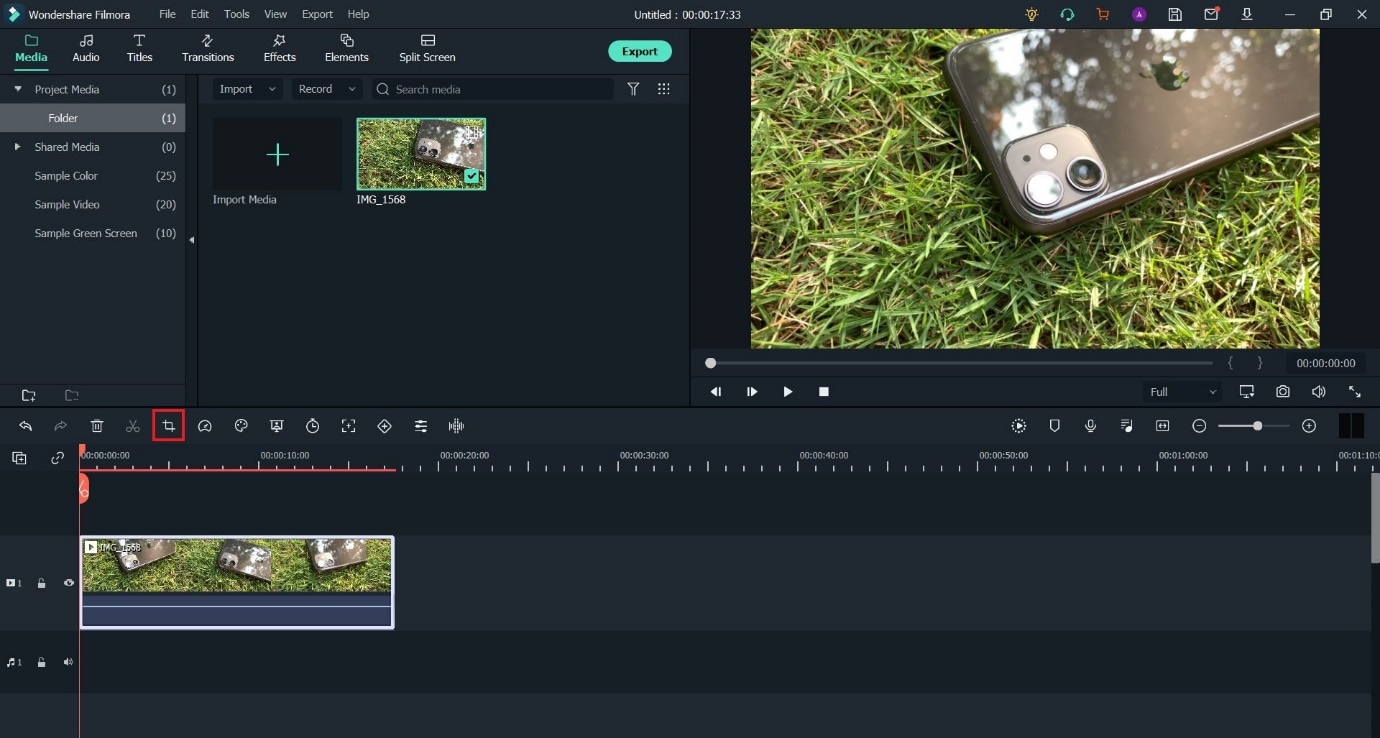
Step 4: Pick any edge within the visible box and resize them to select the portion you want to keep in the clip.
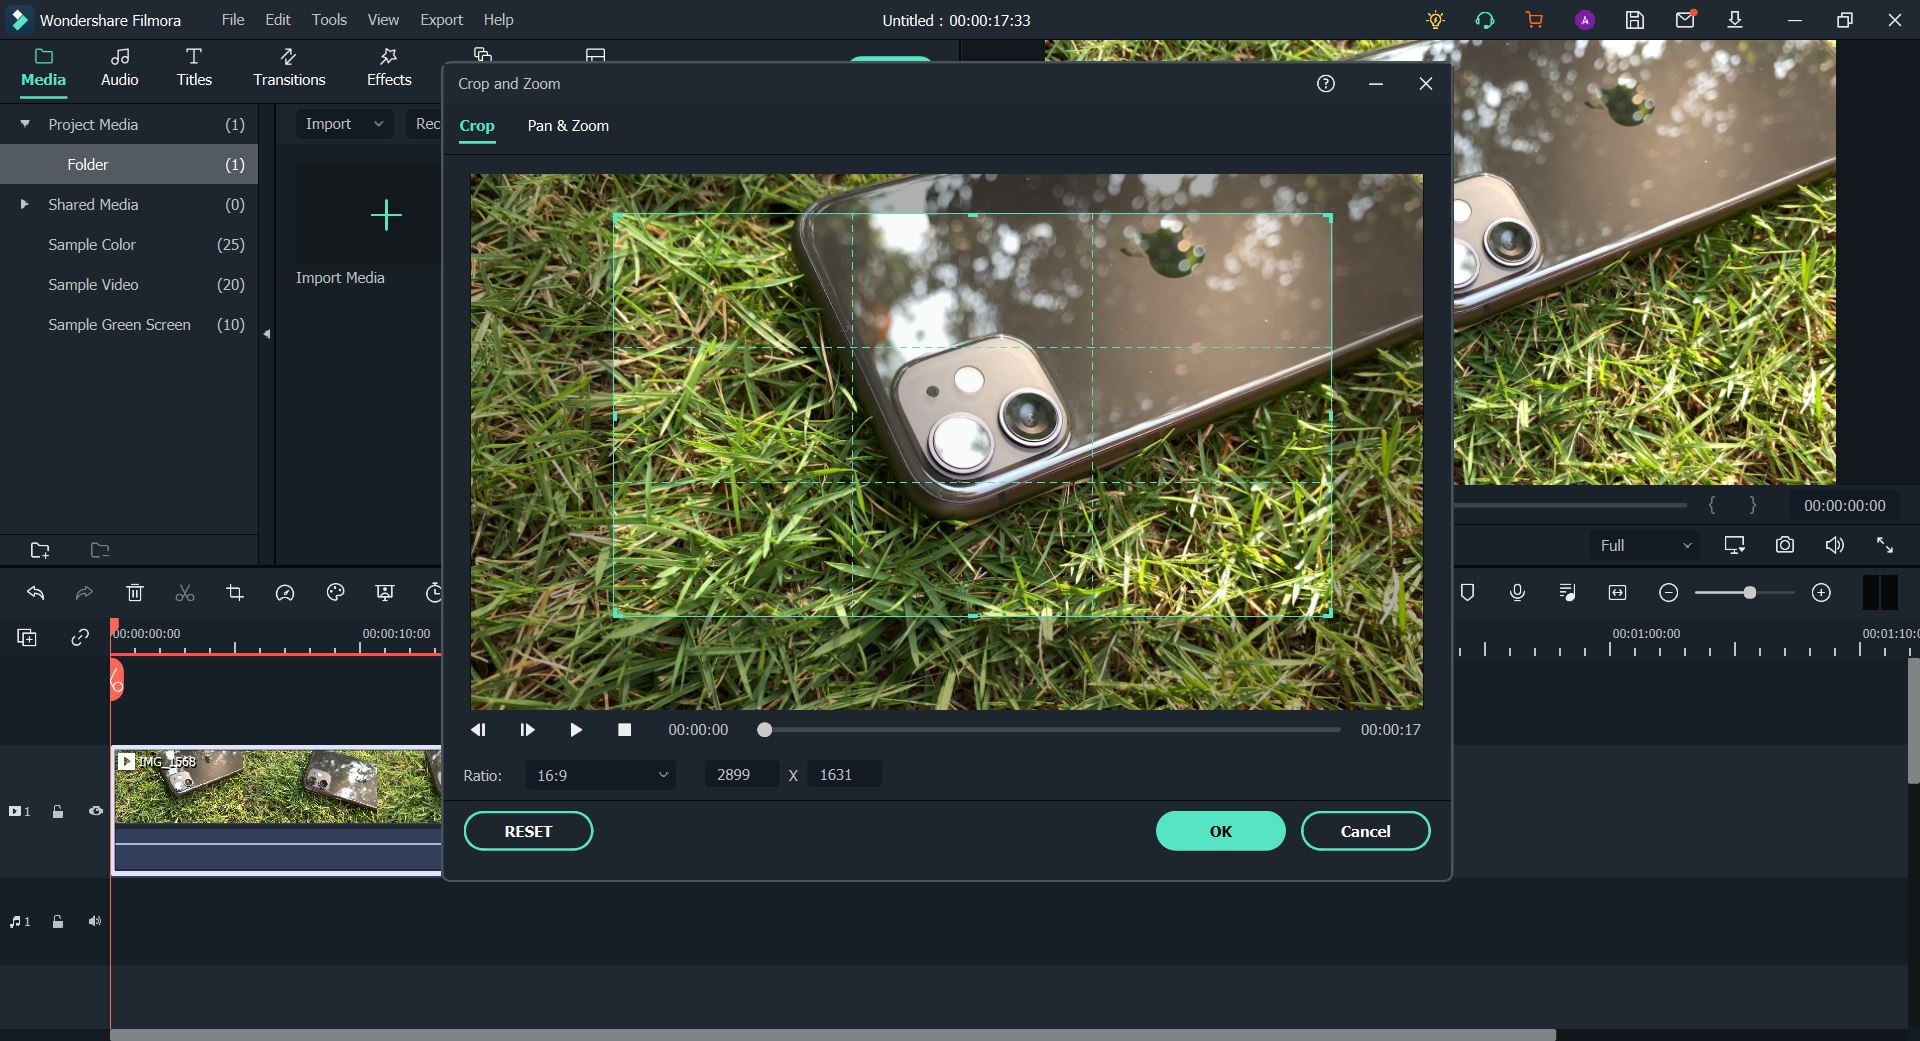
Having read this bit of the guide, we believe you may have noticed how Filmora is more convenient due to the easier access it provides to the crop function.
The Bottom Line
So, at the end of the day, both software listed in this article are fully functional and highly-capable video editing tools, but saving time spent in front of the computer is a huge factor for any video editor.
And Wondershare Filmora does just that with its modern iconography and increased accessibility. With its thoughtful, less-frills approach, Filmora is the one to pick if you do not want to be bogged down by needless menus and have to hunt for actions that will help you create a video that you would want to watch yourself.
Note: Full Mode in Cyberlink PowerDirector 365 provides access to a full-featured video editing tool, similar to Wondershare Filmora. The other available options cater to distinct video types.
Step 2: Import media onto the Timeline from the Media Library; in this guide, we have gone ahead and used the pre-existing stock footage.

Step 3: Now, click on the video file on the Timeline; this will activate the video toolbar giving you access to the various controls built into PowerDirector 365. Hover over the tools open, following which you need to click on the Crop, Zoom, and Pan option.

Step 4: Pick either corner of the frame visible around the video and set the area you want the clip to focus upon; following this, click Save.

This action will crop the video clip according to your desired size.
Tip:
The activation of Keyframes while cropping will allow you to create an effect that slowly zooms into the footage. To do this, set Keyframe Point 1 at a specific time (say the fifth second) and at one zoom level (say zero) and create Keyframe Point 2 at another time (fifteenth second) and a different zoom level (say fifty). So, between the fifth second and fifteenth second, the zoom will steadily increase and raise emphasis on an object. You can also add an element of position to this action if you want the focus to be on something not in the center of the screen.
Definition: Keyframes while Video Editing is a software-based feature that allows you to set In and Out Points, giving clips between the two positions different properties that change as the playhead continues to move. These properties can be increased zoom, rotation, different colors, or even a gradual pan.
We recommend experimenting with this feature if you want to bring a more dynamic feeling to your video project.
An Easier Way to Crop Video with Wondershare Filmora
While Cyberlink PowerDirector 365 is a powerful video editing tool, in our experience, its menus are not as simple to navigate as some of the other competing video editing tools available, Wondershare Filmora Video Editor included.
An emphasis on quick accessibility is present with Filmora, and we believe this is a huge plus for beginning creators. The use of iconography resemblant to mobile software is another aspect that helps increase familiarity.
If you do not already have Wondershare Filmora, you can download the software by visiting the official website.
Now, to help you learn how to use the Crop Tool and to show you an example of what we mean, here is how you can use the feature Wondershare Filmora to get the desired output.
For Win 7 or later (64-bit)
For macOS 10.14 or later
Once you have the software open, follow the steps listed below.
Step 1: Import the Media File into your Video Project.

Step 2: Drag the clip onto the Timeline and then select it to activate further interactions.

Step 3: Choose the Crop Options (marked in Red) to open the Crop window.

Step 4: Pick any edge within the visible box and resize them to select the portion you want to keep in the clip.

Having read this bit of the guide, we believe you may have noticed how Filmora is more convenient due to the easier access it provides to the crop function.
The Bottom Line
So, at the end of the day, both software listed in this article are fully functional and highly-capable video editing tools, but saving time spent in front of the computer is a huge factor for any video editor.
And Wondershare Filmora does just that with its modern iconography and increased accessibility. With its thoughtful, less-frills approach, Filmora is the one to pick if you do not want to be bogged down by needless menus and have to hunt for actions that will help you create a video that you would want to watch yourself.
Note: Full Mode in Cyberlink PowerDirector 365 provides access to a full-featured video editing tool, similar to Wondershare Filmora. The other available options cater to distinct video types.
Step 2: Import media onto the Timeline from the Media Library; in this guide, we have gone ahead and used the pre-existing stock footage.

Step 3: Now, click on the video file on the Timeline; this will activate the video toolbar giving you access to the various controls built into PowerDirector 365. Hover over the tools open, following which you need to click on the Crop, Zoom, and Pan option.

Step 4: Pick either corner of the frame visible around the video and set the area you want the clip to focus upon; following this, click Save.

This action will crop the video clip according to your desired size.
Tip:
The activation of Keyframes while cropping will allow you to create an effect that slowly zooms into the footage. To do this, set Keyframe Point 1 at a specific time (say the fifth second) and at one zoom level (say zero) and create Keyframe Point 2 at another time (fifteenth second) and a different zoom level (say fifty). So, between the fifth second and fifteenth second, the zoom will steadily increase and raise emphasis on an object. You can also add an element of position to this action if you want the focus to be on something not in the center of the screen.
Definition: Keyframes while Video Editing is a software-based feature that allows you to set In and Out Points, giving clips between the two positions different properties that change as the playhead continues to move. These properties can be increased zoom, rotation, different colors, or even a gradual pan.
We recommend experimenting with this feature if you want to bring a more dynamic feeling to your video project.
An Easier Way to Crop Video with Wondershare Filmora
While Cyberlink PowerDirector 365 is a powerful video editing tool, in our experience, its menus are not as simple to navigate as some of the other competing video editing tools available, Wondershare Filmora Video Editor included.
An emphasis on quick accessibility is present with Filmora, and we believe this is a huge plus for beginning creators. The use of iconography resemblant to mobile software is another aspect that helps increase familiarity.
If you do not already have Wondershare Filmora, you can download the software by visiting the official website.
Now, to help you learn how to use the Crop Tool and to show you an example of what we mean, here is how you can use the feature Wondershare Filmora to get the desired output.
For Win 7 or later (64-bit)
For macOS 10.14 or later
Once you have the software open, follow the steps listed below.
Step 1: Import the Media File into your Video Project.

Step 2: Drag the clip onto the Timeline and then select it to activate further interactions.

Step 3: Choose the Crop Options (marked in Red) to open the Crop window.

Step 4: Pick any edge within the visible box and resize them to select the portion you want to keep in the clip.

Having read this bit of the guide, we believe you may have noticed how Filmora is more convenient due to the easier access it provides to the crop function.
The Bottom Line
So, at the end of the day, both software listed in this article are fully functional and highly-capable video editing tools, but saving time spent in front of the computer is a huge factor for any video editor.
And Wondershare Filmora does just that with its modern iconography and increased accessibility. With its thoughtful, less-frills approach, Filmora is the one to pick if you do not want to be bogged down by needless menus and have to hunt for actions that will help you create a video that you would want to watch yourself.
Note: Full Mode in Cyberlink PowerDirector 365 provides access to a full-featured video editing tool, similar to Wondershare Filmora. The other available options cater to distinct video types.
Step 2: Import media onto the Timeline from the Media Library; in this guide, we have gone ahead and used the pre-existing stock footage.

Step 3: Now, click on the video file on the Timeline; this will activate the video toolbar giving you access to the various controls built into PowerDirector 365. Hover over the tools open, following which you need to click on the Crop, Zoom, and Pan option.

Step 4: Pick either corner of the frame visible around the video and set the area you want the clip to focus upon; following this, click Save.

This action will crop the video clip according to your desired size.
Tip:
The activation of Keyframes while cropping will allow you to create an effect that slowly zooms into the footage. To do this, set Keyframe Point 1 at a specific time (say the fifth second) and at one zoom level (say zero) and create Keyframe Point 2 at another time (fifteenth second) and a different zoom level (say fifty). So, between the fifth second and fifteenth second, the zoom will steadily increase and raise emphasis on an object. You can also add an element of position to this action if you want the focus to be on something not in the center of the screen.
Definition: Keyframes while Video Editing is a software-based feature that allows you to set In and Out Points, giving clips between the two positions different properties that change as the playhead continues to move. These properties can be increased zoom, rotation, different colors, or even a gradual pan.
We recommend experimenting with this feature if you want to bring a more dynamic feeling to your video project.
An Easier Way to Crop Video with Wondershare Filmora
While Cyberlink PowerDirector 365 is a powerful video editing tool, in our experience, its menus are not as simple to navigate as some of the other competing video editing tools available, Wondershare Filmora Video Editor included.
An emphasis on quick accessibility is present with Filmora, and we believe this is a huge plus for beginning creators. The use of iconography resemblant to mobile software is another aspect that helps increase familiarity.
If you do not already have Wondershare Filmora, you can download the software by visiting the official website.
Now, to help you learn how to use the Crop Tool and to show you an example of what we mean, here is how you can use the feature Wondershare Filmora to get the desired output.
For Win 7 or later (64-bit)
For macOS 10.14 or later
Once you have the software open, follow the steps listed below.
Step 1: Import the Media File into your Video Project.

Step 2: Drag the clip onto the Timeline and then select it to activate further interactions.

Step 3: Choose the Crop Options (marked in Red) to open the Crop window.

Step 4: Pick any edge within the visible box and resize them to select the portion you want to keep in the clip.

Having read this bit of the guide, we believe you may have noticed how Filmora is more convenient due to the easier access it provides to the crop function.
The Bottom Line
So, at the end of the day, both software listed in this article are fully functional and highly-capable video editing tools, but saving time spent in front of the computer is a huge factor for any video editor.
And Wondershare Filmora does just that with its modern iconography and increased accessibility. With its thoughtful, less-frills approach, Filmora is the one to pick if you do not want to be bogged down by needless menus and have to hunt for actions that will help you create a video that you would want to watch yourself.
How to Add Filters on iMovie
There are times when you record a video and find out that the light and color in the video have been up to the mark. The light could be too bright or too dark while there could be some color overlays in certain portion as well as the entire frame of the video. Thanks to the video editing apps, you can correct any lighting and coloration issues with different filters available to apply to your video.
If you are using iPhone or Mac, you can use Apple’s iMovie app easily. Therefore, you should know how to add filters on iMovie to get the desired output. iMovie app is available for both iPhone and iPad users as well as Mac users. You do not need prior experience in video editing to add filter to your videos to enhance and improve them. We will illustrate the steps on how to add filters in iMovie as well as suggest a better iMovie alternative.
Part 1. How to add filters on iMovie iPhone
If you have an iPhone, you are more likely to record a video with your iPhone. This is because the camera quality of iPhones is extremely good and there are various modes available for capturing different types of videos like slow-motion and time-lapse. Once you capture a video with your iPhone, you can edit the video and add filters to enhance the video quality using iMovie app available for iPhone.
You have to install iMovie app from App Store as it does not come pre-install. If you already have it installed, make sure you update it to the latest version to get all the filters. Here are the steps how to put a filter on a video in iMovie app.
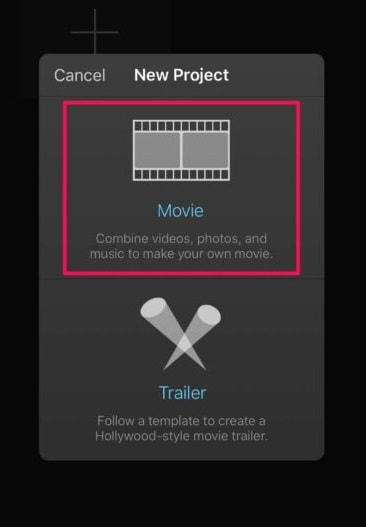
Step1 Open iMovie app on your iPhone. Tap on Create Project option and tap on Movie on the next screen.
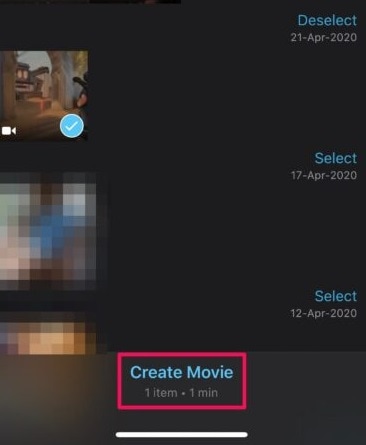
Step2 Select the video from your iPhone that you want to edit and add filters. After your selection, tap on Create Movie option located at the bottom.
Step3 Your selected video will now be available on the Timeline where you can edit your video. Tap on Filters icon located at the bottom-right corner.
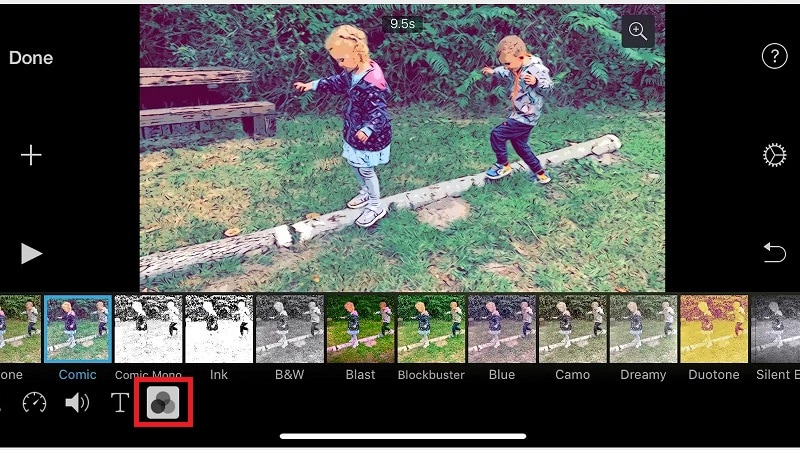
Step4 You will see all the different filters available on iMovie app. You can also find a slider above each selected filter. You can adjust the filter to increase or decrease the filter intensity.
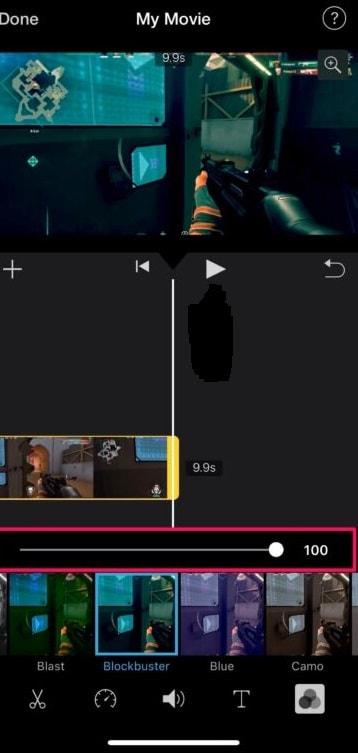
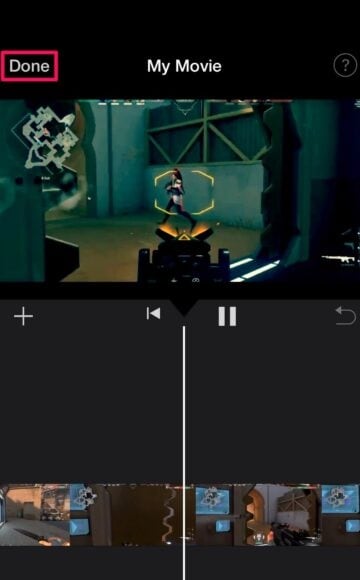
Step5 Tap on Play icon to check how the filter is looking on your video. Once you are satisfied, tap on Done option located at the top-left corner.
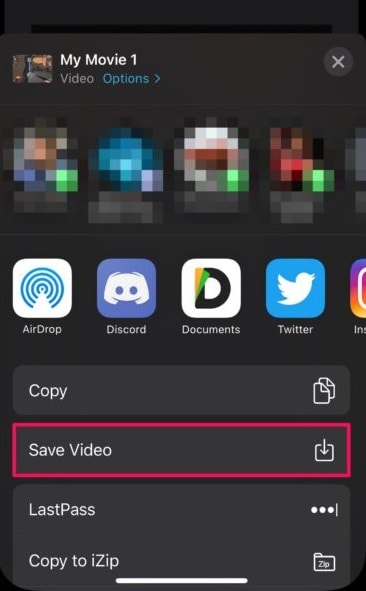
Step6 Tap on Share icon at the bottom and then tap on Save Video option to save the modified video on your iPhone.
Part 2. How to add filters on Mac iMovie
If you are someone who regularly makes videos for social media account or video streaming channel, you are more likely to record your video using a video camera and transfer the recorded video to you Mac for editing purposes. iMovie comes pre-installed on Mac, and therefore, once you have transferred the video, you can get started with editing and adding filters immediately. Here are the steps on how to add filters to iMovie on your Mac.
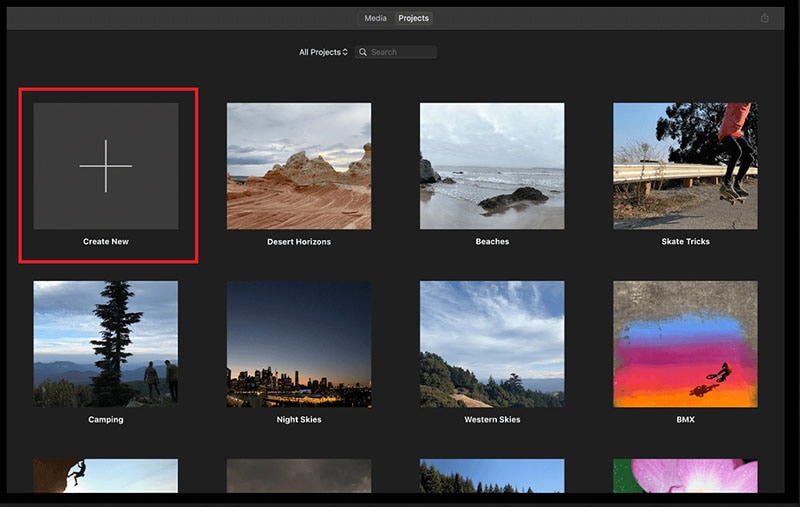
Step1 Launch iMovie from Applications folder. Click on Create New option to start a new Project.
Step2 Drag and drop the target video from Photos app to Desktop. Thereafter, drag and drop the video file from Desktop to the Timeline of iMovie project.
Step3 Click on the video clip on the Timeline and click on Crop Filter and Audio Effects icon above the Viewer.
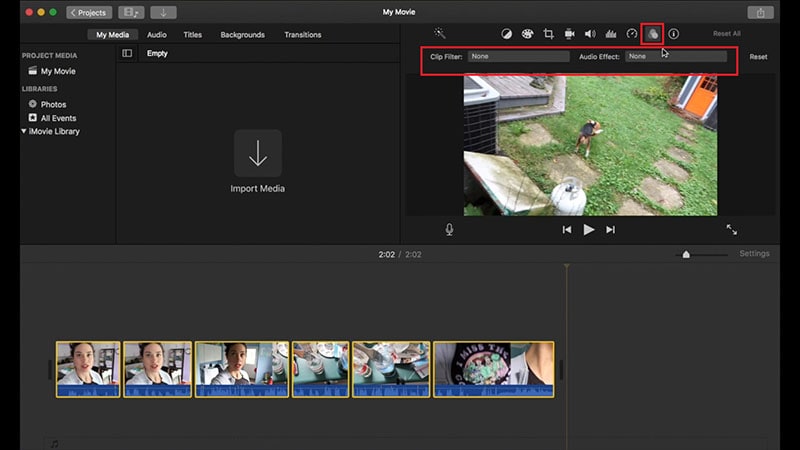
Step4 Click on Clip Filter option and you will see different filters in a window to the left. Place the mouse pointer over the filters, and you will see the filter in the Viewer.
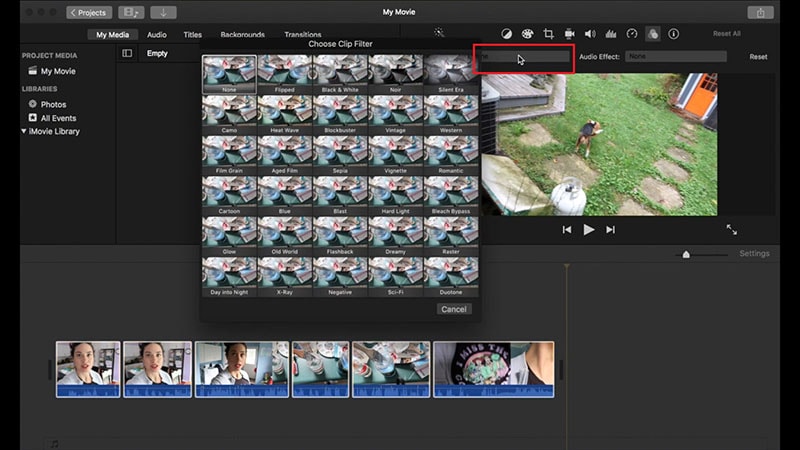
Step5 Once you are satisfied with a filter, click on that filter to apply it to the video clip.
Part 3. iMovie Alternative to add filters on Computer
There are several reasons iMovie filters may not always serve your purpose. For example, there is no way on how to add face filters on iMovie. The collection of filters is rather limited. If you are not satisfied with the filters available on iMovie, there are several iMovie alternatives available. We recommend Wondershare Filmora due to its vast collection of filters of all categories to enhance your video to the next level. Here are steps on how to add filters to your video using Filmora on your computer.
Free Download For Win 7 or later(64-bit)
Free Download For macOS 10.14 or later
Step1 Download and install Wondershare Filmora and it is available for Mac as well as Windows users. Open Filmora and click New Project.
Step2 Drag and drop video clips under Project Media folder. Thereafter, drag and drop video clips to Timeline.

Step3 Go to Effects from the top panel and click on Filters from the left panel. You will see all the different categories of filters.

Step4 Select any filter and drag and drop it on Timeline. You can stretch the duration of the filter as per your requirements.
You can also check Overlay> Utility option from the left panel to add face filters to your video in the same manner. If you want to save the modified video, click on Export button.
Conclusion
If you are an iPhone user or a Mac user, you can add filters to your video using iMovie app. You have to install iMovie app on your iPhone, but iMovie comes pre-installed on Mac. But there are limited filters available on iMovie and there is a lack of face filters which are trending in today’s viral videos. That is why we recommend Wondershare Filmora where there is a wide range of filters available to apply to your video conveniently as per your requirements.
Free Download For macOS 10.14 or later
Step1 Download and install Wondershare Filmora and it is available for Mac as well as Windows users. Open Filmora and click New Project.
Step2 Drag and drop video clips under Project Media folder. Thereafter, drag and drop video clips to Timeline.

Step3 Go to Effects from the top panel and click on Filters from the left panel. You will see all the different categories of filters.

Step4 Select any filter and drag and drop it on Timeline. You can stretch the duration of the filter as per your requirements.
You can also check Overlay> Utility option from the left panel to add face filters to your video in the same manner. If you want to save the modified video, click on Export button.
Conclusion
If you are an iPhone user or a Mac user, you can add filters to your video using iMovie app. You have to install iMovie app on your iPhone, but iMovie comes pre-installed on Mac. But there are limited filters available on iMovie and there is a lack of face filters which are trending in today’s viral videos. That is why we recommend Wondershare Filmora where there is a wide range of filters available to apply to your video conveniently as per your requirements.
Also read:
- New Easy Way to Create an Alternate Reality Effect for 2024
- Updated FLV Editor for Windows 11/10/8.1/8/7 Easily Edit FLV Videos on PC for 2024
- In 2024, Have You Recently Experienced Motion Blur in Games? Do You Wish to Learn More About It? This Article Provides an Overview and the Need for Motion Blur Gaming
- In 2024, Scaling and Setting Videos in Filmora | Tutorial
- New Top-Rated Android Apps For Slowing Down Motion
- For Artists Who Are Making Videos for Show Their Knowledge or Projects, Add some Effects for the Video Can Always Provoke Interests and Attention. This Article Will Show You How to Do that Easily
- Updated Good Ways to Make Sure Your Video Editing Course Is Worthing to Watch for 2024
- Updated How to Create Realistic Fire Effects
- Updated Adobe Premiere Pro Download and Use Guide
- New 2024 Approved Adding Shake Effects to Your Video With Alight Motion
- Updated How to Do Datamoshing Effect in After Effects for 2024
- Some Top Methods to Create AI Slow Motion Videos for 2024
- 2024 Approved Live Stream on YouTube Using Zoom
- Updated In 2024, Guide to Making Cinematography for Music Video
- 8 Excellent Video and Photo Mergers on Desktop/Mobile/Online for 2024
- Easy Way to Add Transitions to Videos
- New Best Love Video Maker with Music
- In 2024, What Is the Top Filmora Slideshow Templates? Experts Choice
- In 2024, Dubbing Videos With Voiceovers | Wondershare Filmora Tutorial
- Updated Free LUTs for OBS How to Use Them?
- Have You Ever Watched a Movie Where You Felt the Filmmakers Left You Hanging? Yea, Thats What Freeze Frame Does. Here We Will Enlighten You on What It Is, Freeze Frame Examples Where It Has Been Helpful to Drive Our Point Home
- Updated Having GoPro Accessories Is Easy, but Editing on GoPro Quik Is Challenging. Read This Guide and, Stepwise, Learn to Use GoPro Slow-Motion for Perfect Shots
- Updated Convert Your Videos to 60 FPS Using These Excellent Tools
- Updated Creating Testimonial Videos For Health And Wellness Business Industry for 2024
- How to Create a Vacation Slideshow in 5 Minutes for 2024
- Updated How To Zoom In On TikTok Videos?
- In 2024, Explore Our Comprehensive Guide to the 10 Best Cameras . Unlock the World of Advanced Technology Perfect for Capturing Slow-Motion Footage in Various Scenarios
- Updated 2024 Approved Best AR Video App - Top 10 Picks
- New EasyHDR Review Is This a Good Choice to Create HDR for 2024
- Updated How to Apply Video Filters Mobile and Desktop
- In 2024, Fake the Location to Get Around the MLB Blackouts on Oppo A18 | Dr.fone
- In 2024, Why is iPogo not working On Apple iPhone 6? Fixed | Dr.fone
- 10 Easy-to-Use FRP Bypass Tools for Unlocking Google Accounts On Lava Storm 5G
- 10 Fake GPS Location Apps on Android Of your Itel P55T | Dr.fone
- How to make a digital signature for .dotx file
- Delete Gmail Account With/Without Password On Honor X9b
- How to Transfer Data from Realme V30 to Any iOS Devices | Dr.fone
- In 2024, Top Apps and Online Tools To Track Oppo A2 Phone With/Without IMEI Number
- Complete Tutorial to Use VPNa to Fake GPS Location On Apple iPhone X | Dr.fone
- 6 Solutions to Fix Error 505 in Google Play Store on Tecno Pova 5 Pro | Dr.fone
- In 2024, Fixing Foneazy MockGo Not Working On Xiaomi Redmi 13C 5G | Dr.fone
- For People Wanting to Mock GPS on Huawei P60 Devices | Dr.fone
- In 2024, How To Remove Screen Lock PIN On Xiaomi Redmi K70E Like A Pro 5 Easy Ways
- In 2024, Full Guide to Unlock iPhone XS Max with iTunes | Dr.fone
- How To Transfer Data From Apple iPhone 15 To Other iPhone 13 devices? | Dr.fone
- How to Change Spotify Location After Moving to Another Country On Honor 90 GT | Dr.fone
- CatchEmAll Celebrate National Pokémon Day with Virtual Location On Infinix Smart 8 Plus | Dr.fone
- What To Do When Vivo S17 Has Black Screen of Death? | Dr.fone
- In 2024, Fake Android Location without Rooting For Your Infinix Hot 40 | Dr.fone
- In 2024, How to Screen Mirror your Apple iPhone SE (2020) Display? | Dr.fone
- How To Unlock iPhone 6 Plus Official Method to Unlock Your iPhone 6 Plus
- In 2024, Top Apps and Online Tools To Track Vivo X90S Phone With/Without IMEI Number
- Title: Best Practical Tips to Improve Your Lighting in the Sun for 2024
- Author: Chloe
- Created at : 2024-05-20 03:38:26
- Updated at : 2024-05-21 03:38:26
- Link: https://ai-editing-video.techidaily.com/best-practical-tips-to-improve-your-lighting-in-the-sun-for-2024/
- License: This work is licensed under CC BY-NC-SA 4.0.

