:max_bytes(150000):strip_icc():format(webp)/GettyImages-1353420724-65161751b9924195880d3273e327cb54.jpg)
Clone Yourself in Videos with Filmora

Clone Yourself in Videos with Filmora
With the help of video editing programs like Filmora , you can create clones of yourself. Whether you’re looking to create a funny skit or a serious video, cloning yourself can add much production value to your project.
In this article, we’ll walk you through the process of how to clone yourself in videos using Filmora.
Part 1: How to Film Clips for Cloning Effects?
To make cloning effects, you will need to take two different shots and use a tripod to place the camera, so the frame doesn’t change.
Shooting the first clip
For the first shot, stay on one side of the frame and do the first action. For example, you can pretend to yank and take off your jacket. Then, drop the jacket to the other side of the frame.

To make it more realistic, make an interaction by reacting to the “clone” while facing the other direction.

Shooting the second clip
Then, shoot for the second clip without changing the frame. You will have to go to the place where you dropped the jacket from the first shot.

Act as if you have just appeared there and give a reaction to the other side as well.
Part 2: How to Do the Clone Effect with Filmora?
After you have shot the necessary film clips, bring the clips into Filmora 11. If you haven’t installed Filmora yet, you can go to their website and download it here:
Free Download For Win 7 or later(64-bit)
Free Download For macOS 10.14 or later
Once you have opened Filmora 11, follow the steps below:
Step1 Bring the first clip to the timeline and cut the clip where you pretend to yank and take off the jacket. Select and delete the unnecessary clip.
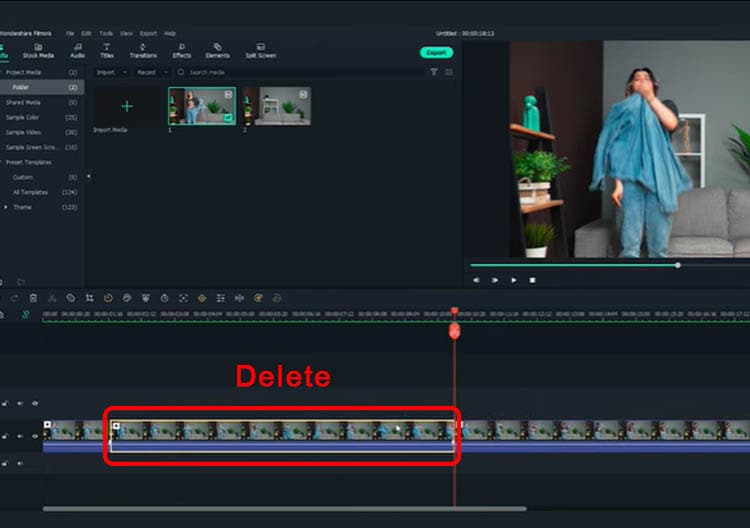
Step2 After you have the first part of the effect ready, let’s start working on the clone part using masking.
First, place the second clip on a different window track, and the starting point is where you react to the “clone.”
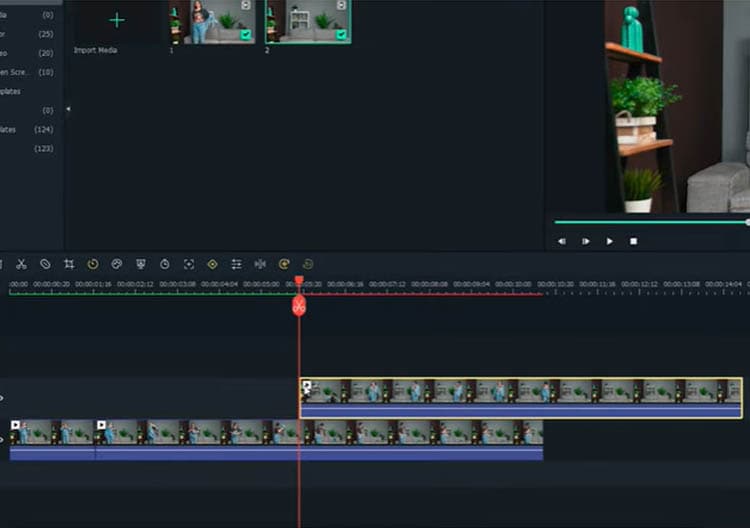
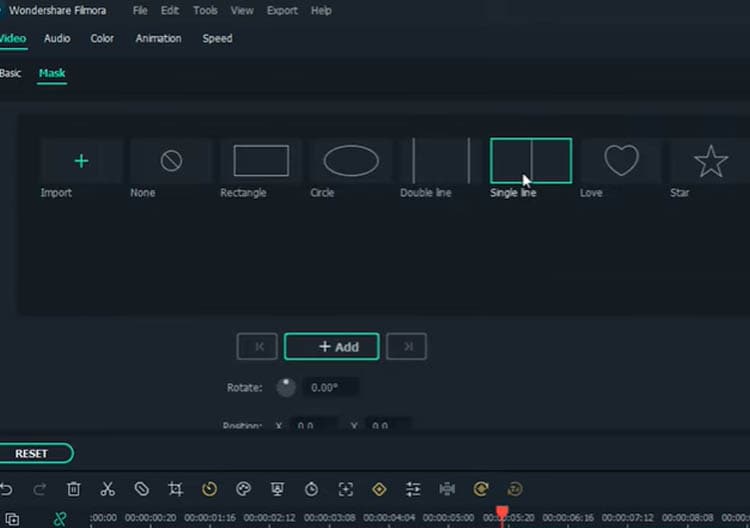
Then, double-click the second clip and go to the Filmora setting window. Tap on the Mask section > Single line.
On the preview screen, adjust the position of the mask to only show “the clone.”
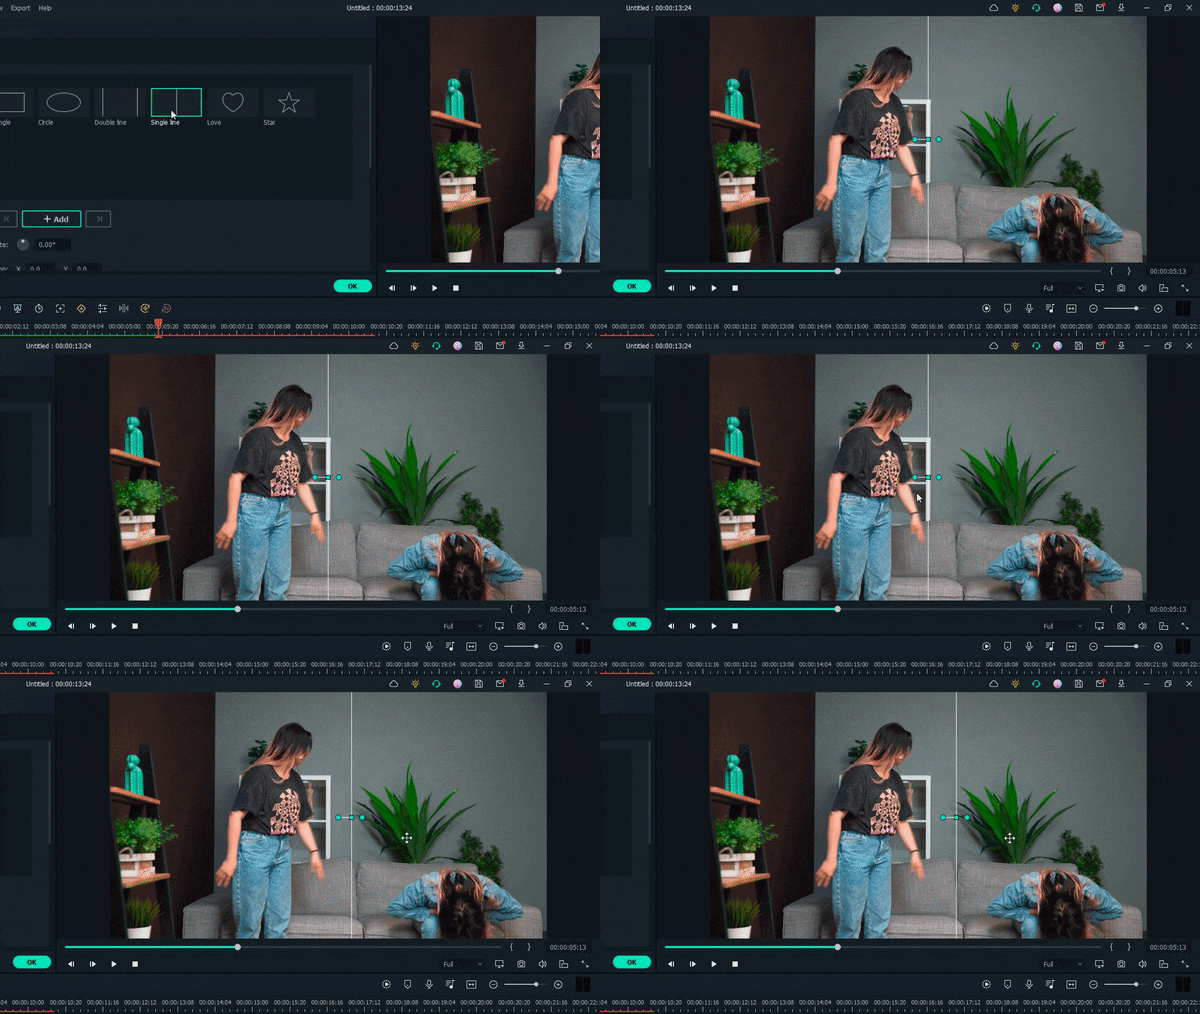
Set the blur strength on the setting to make a smoother edge transition.
Step3 If the timing of the two clips doesn’t match, you can fix it using the speed ramping feature on Filmora 11. To use it, double-click the second clip and select Speed > Speed Ramping > Customize.
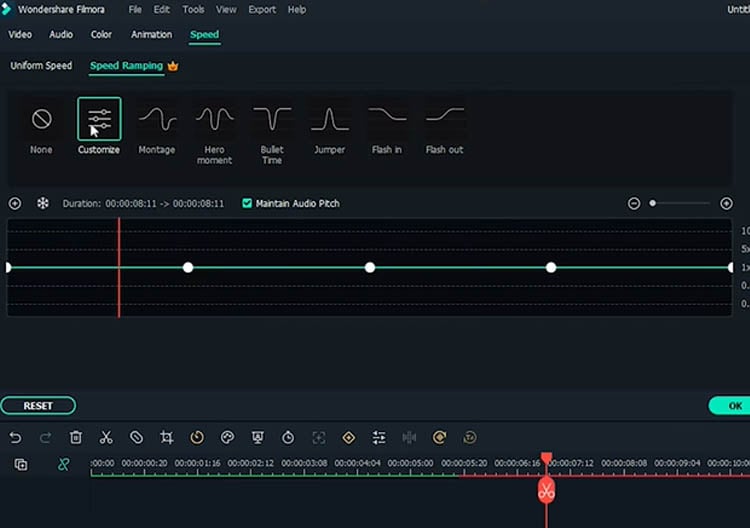
Move the keyframe up to increase the speed. You can adjust it according to your needs.
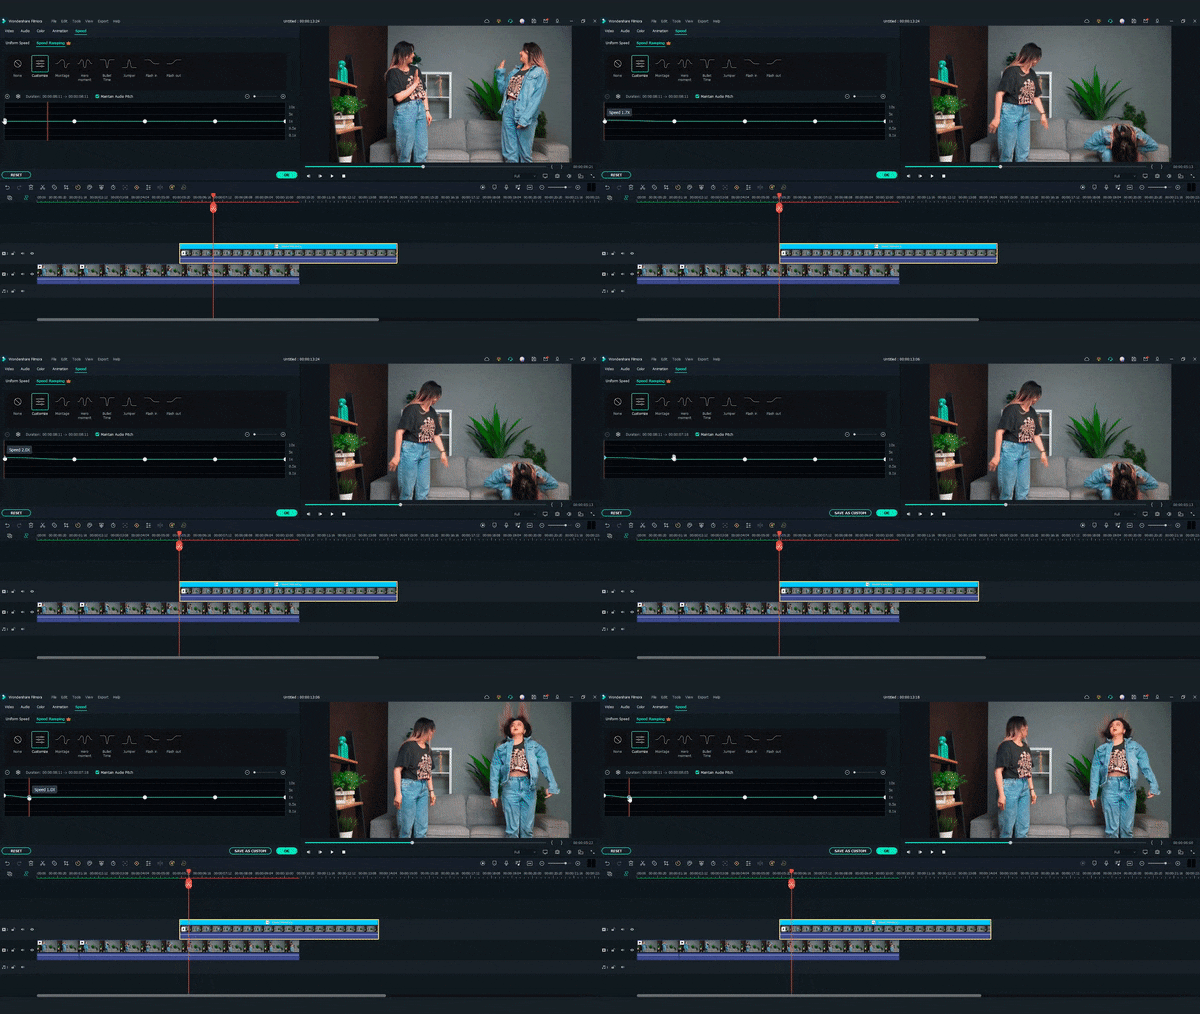
Step4 Once you are satisfied, adjust the clip length on the timeline and make sure that both clips finish at the same time.
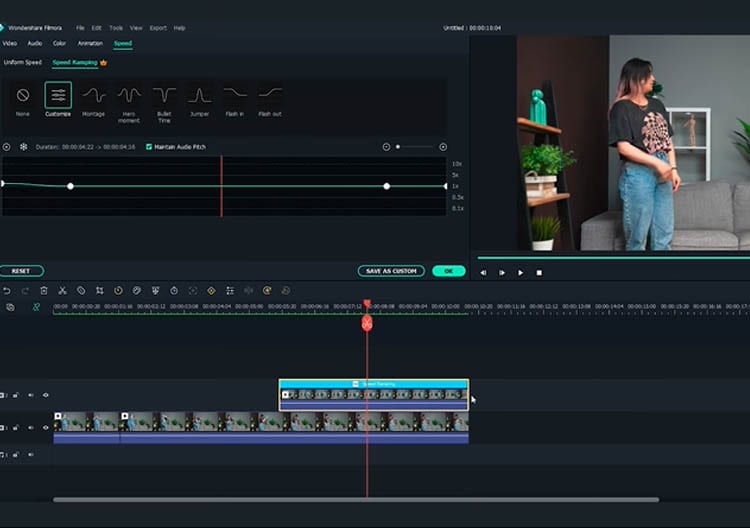
Extra tip: Add one more effect to make it more magical.
Step1 Open the Effects window and search for “up down 1.”
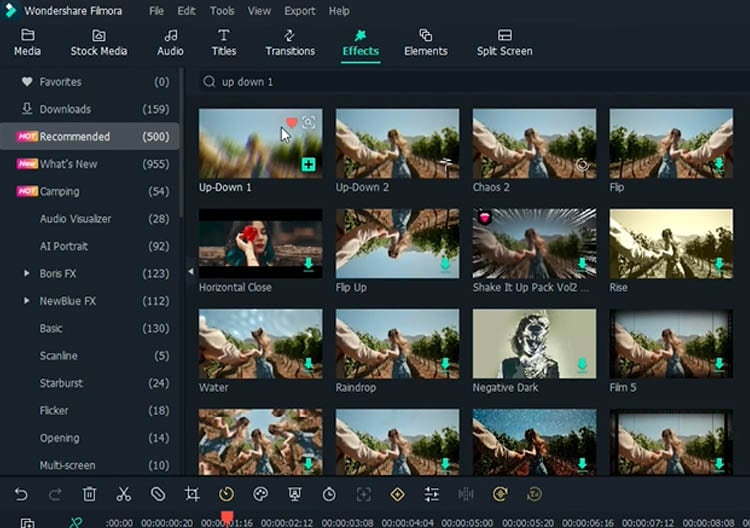
Step2 Drag and drop the effect onto the timeline where the first cut is set. Adjust the effect length to match the action.
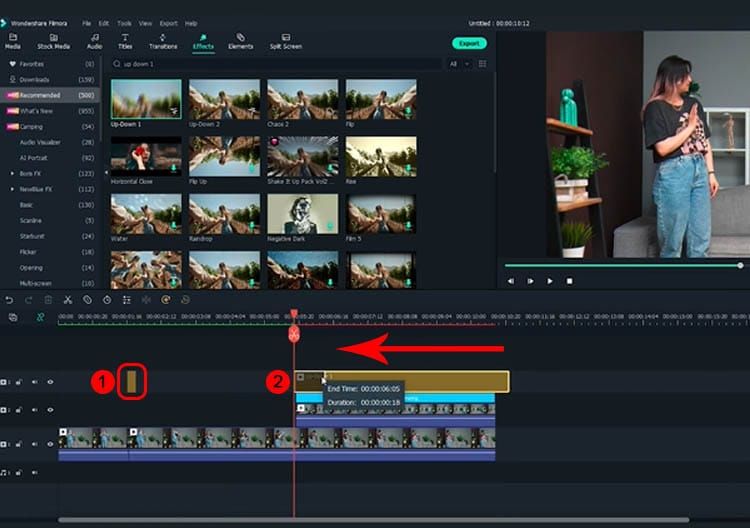
Then, drag and drop the effect again in the transition between the first and the second clip. Adjust it to the appropriate length, then it will give a more dramatic effect.
Step3 You can playback and see how it looks on the preview screen.
Summary
Making a clone effect on video is easy using Filmora. You can use the same trick to create a fashion lookbook video or other creative content to make them more engaging. Let us know if you want to see more tutorials.
Free Download For Win 7 or later(64-bit)
Free Download For macOS 10.14 or later
Free Download For macOS 10.14 or later
Once you have opened Filmora 11, follow the steps below:
Step1 Bring the first clip to the timeline and cut the clip where you pretend to yank and take off the jacket. Select and delete the unnecessary clip.

Step2 After you have the first part of the effect ready, let’s start working on the clone part using masking.
First, place the second clip on a different window track, and the starting point is where you react to the “clone.”

Then, double-click the second clip and go to the Filmora setting window. Tap on the Mask section > Single line.

On the preview screen, adjust the position of the mask to only show “the clone.”

Set the blur strength on the setting to make a smoother edge transition.
Step3 If the timing of the two clips doesn’t match, you can fix it using the speed ramping feature on Filmora 11. To use it, double-click the second clip and select Speed > Speed Ramping > Customize.

Move the keyframe up to increase the speed. You can adjust it according to your needs.

Step4 Once you are satisfied, adjust the clip length on the timeline and make sure that both clips finish at the same time.

Extra tip: Add one more effect to make it more magical.
Step1 Open the Effects window and search for “up down 1.”

Step2 Drag and drop the effect onto the timeline where the first cut is set. Adjust the effect length to match the action.

Then, drag and drop the effect again in the transition between the first and the second clip. Adjust it to the appropriate length, then it will give a more dramatic effect.
Step3 You can playback and see how it looks on the preview screen.
Summary
Making a clone effect on video is easy using Filmora. You can use the same trick to create a fashion lookbook video or other creative content to make them more engaging. Let us know if you want to see more tutorials.
Free Download For Win 7 or later(64-bit)
Free Download For macOS 10.14 or later
Easily Sync Audio With Video With Filmora
Syncing audio with video is an integral part of video editing for any video creator. But believe me; it’s not such a difficult task if you know what to do. The point is IF YOU KNOW WHAT TO DO.
That’s why in this brief guide, we’ll show you the simplest way to sync audio with video using a fantastic video editor easily. But wait a minute, some of you might be confused about why we even need to sync separate audio & video when a single camera can record both. So let’s first answer this simple question.
Part 1: Why Do We Need to Sync Separate Audio & Video?
Creating great video needs extraordinary video graphics, content, and top-notch audio. And you can’t expect a single camera to achieve all these goals. That’s why all professional video creators use a specialized camera for recording with a separate audio recording device.
You might think it’s an exaggeration, but this small change can have massive effects on the quality of your video. Especially the background noise removal effect of separate external microphones.
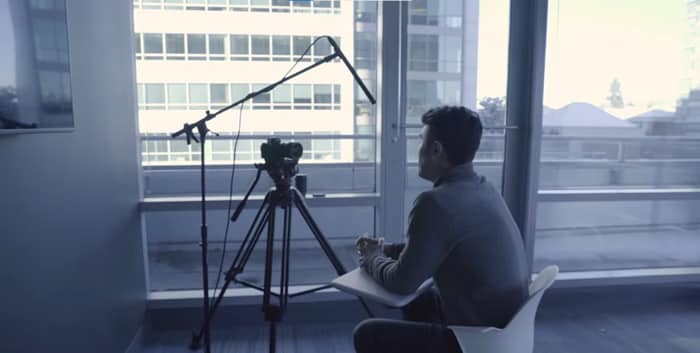
But the downside of using this method is that after the recording is complete, you must sync these audio and video files. And if you don’t do it right, all the effort goes to the drain within a split second. Well, nobody wants to watch a video with an audio lag. Isn’t it?
Correctly synching an audio file with a video is easier than you think. You just need to prepare beforehand and use a suitable video editing tool. So considering these factors, let’s first see what preparations we need. After that, we’ll recommend a top-class video editing tool to achieve this goal in detailed steps. Why are we still waiting? Let’s begin our journey.
Part 2: Preparation for Syncing Audio With Video During Recording
You must make some preparations to sync an audio file with a video properly. It’s to have a sound spike to match the footage properly with the separate audio file. And it might look disturbing, but even a simple Clap might do the job.
And if you want a professional way, just imagine the clapper board. You must have seen it in the film industry. This clapper board is used not only to mark the shot but also to create a sound spike when it claps. We use this audio spike as a reference to sync the audio files with the video.

Every time you cut your shot, remember to clap on camera again the next time you roll. It’s best to clap before you say “Action” or speak so that it’s easy to find and sync when editing. But if you forget, you can also clap at the end of the shot before you cut. That is called a Tail Slate!!!
After you’ve recorded your video like this, the next step is pretty simple. The video editor we recommend is no other than the world’s leading tool in the market, Wondershare Filmora. Let’s move forward and see how to sync audio with video using Filmora .
Part 3: How To Sync Audio With Video Using Filmora
Before we dive into the step-by-step guide, here’s a brief overview of Filmora.
Wondershare Filmora
Filmora is one of the most used video editors that can help all video creators to deliver the best they can. This incredible software from Wondershare contains multiple features that can polish any video.
Free Download For Win 7 or later(64-bit)
Free Download For macOS 10.14 or later
Moreover, the vast arsenal of video effects, images, short clips, AI avatars, and many other things are also available. You just have to pick out the one you like and add it to your video with just a single click.
On top of that, you can also adjust the audio files like audio ducking, silent detection, audio mixing, and synching audio with the video files.

As far as the audio synching is concerned, you can do it either manually or with auto synchronization. And we will explain both of these processes in a stepwise manner to give you complete mastery over your audio synching. Let’s start with the manual process first.
Steps To Manually Sync Audio With Video Using Filmora
Step1Download & install
If you haven’t downloaded the latest version of Filmora yet, click the button below to download it without any cost. And after the download is completed, you can install it on your device right away.
Free Download For Win 7 or later(64-bit)
Free Download For macOS 10.14 or later
Step2Import your files
The next step is to import all the files. Launch the Filmora and click on the “New Project” button from the opening interface.

When a new project is created, you’ll see an “Import Media” section on it. Click on this section to browse your audio and video files from the computer. Or you can also drag and drop these files here to import them.

Step3Prepare your files
Now, it’s time to prepare our files for synchronization. First, drag the video file down to the timeline from the “Import Media” section. After that, drag the audio file in the same way below the video on the panel.
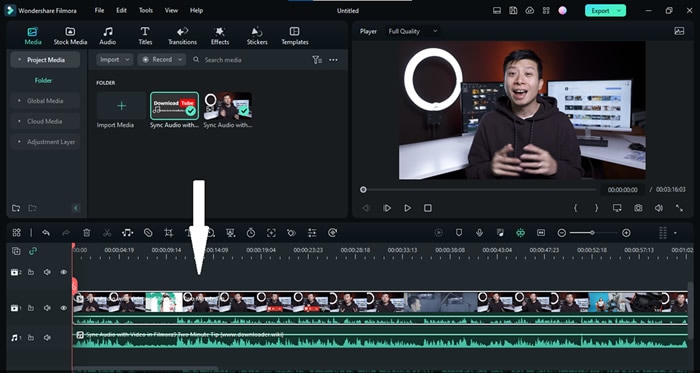
Step4Sync the audio & video files using the audio spike
Now that the video and audio files are on the timeline, you’ll have to find the moment you clap your hands. Look at the waveform from the in-camera audio and the independent audio track. At the moment you clap, we’ll see a spike.
Bonus Tip: If you can’t find the audio spike, zoom the panel to make it easier.
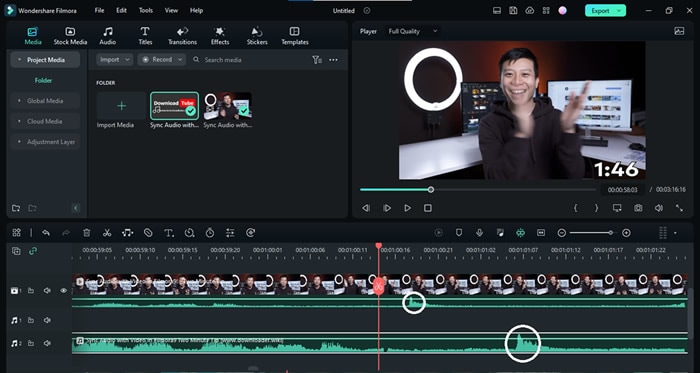
Now take the independent audio clip and align it so that both the spikes match.
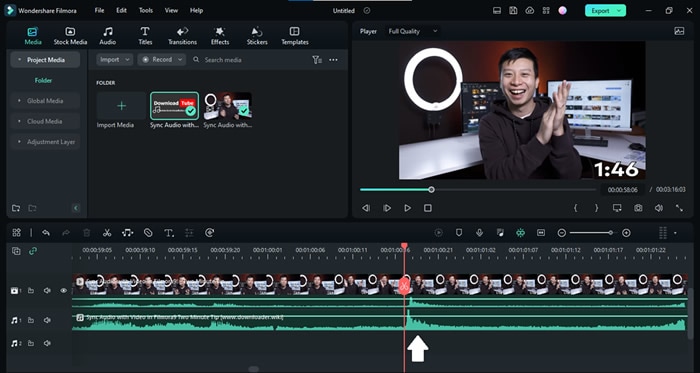
That’s it! We just need to remove the in-camera audio now. Let’s see how to do it now.
Step5Remove the audio from the video footage
To detach the audio in the video footage, right-click on this file and select the “Detach Audio” option. Or you can also use the “Ctrl+Alt+D” as the hotkey.
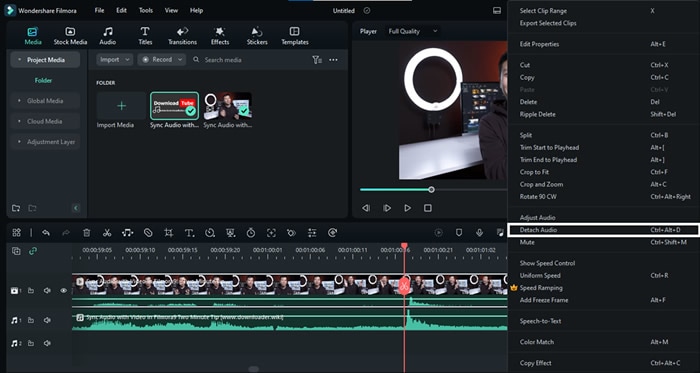
Once the audio file has been separated, you can move forward and delete it. To delete this audio, right-click on it and select “Delete.”
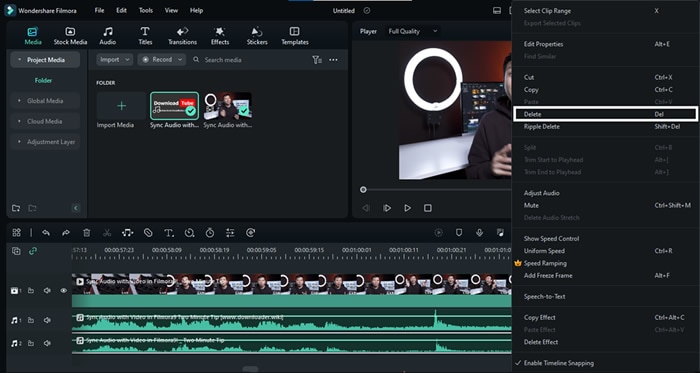
Step6Enjoy your video with the new audio track
So here we go. Our video file has been synced with the high-quality audio file. You can now hit the Export button to get this edited file. But wait a minute. Didn’t we say we’ll show you a method to automatically sync audio with video? Let’s start this method now.
Steps To Automatically Sync Audio With Video Using Filmora
Did you find the above method troubling? Well, be assured because Wondershare Filmora can also automatically sync your audio file with video in a single click. Here are the steps to achieve this feat.
Free Download For Win 7 or later(64-bit)
Free Download For macOS 10.14 or later
Step1Prepare your files
This method’s starting process is the same as the previous one. You’ll need to download the Filmora and prepare your file on the timeline by importing them on a New Project.
Step2Select both audio & video files
Once you’ve got everything ready, select both your audio and files from the timeline.
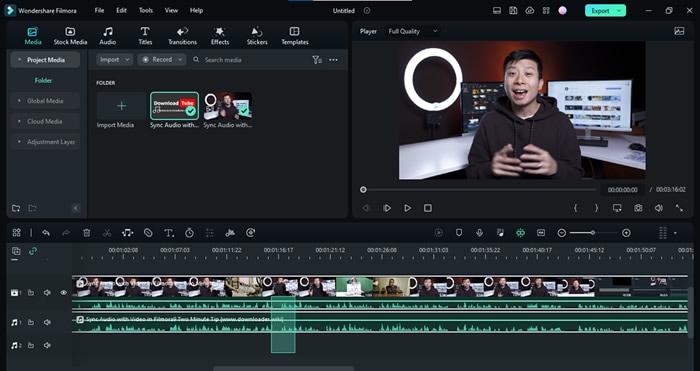
Step3Click on the auto synchronization icon
When you select these files, you’ll see that the “Auto Synchronization” icon has appeared on the toolbar below the Import Media section. Click on this icon and wait for the magic.
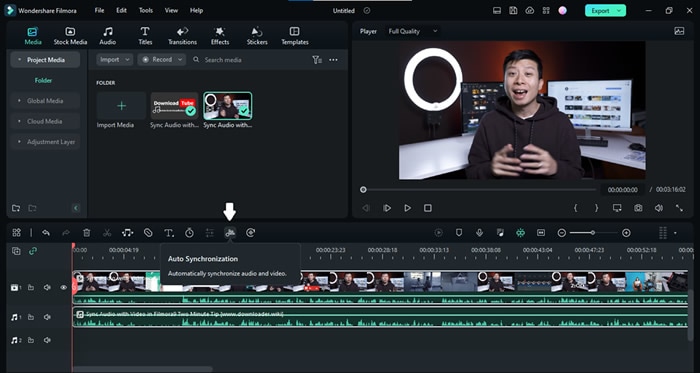
Remember that you need a Premium ID of Wondershare Filmora to use the Auto Synchronization option.
Step4Wait until the syncing is completed
Filmora will start synchronizing your files, and you’ll see the “Synchronization in process” prompt on the screen. Wait until the process is completed.
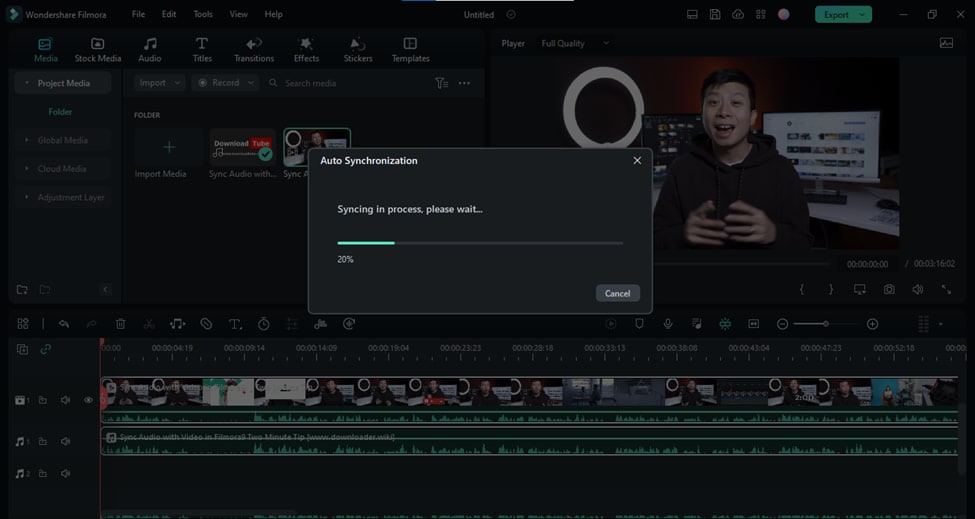
Step5Finish your editing
You can finish your editing when the separate audio file perfectly aligns with the video file. Delete the audio from the in-camera video file and hit the “Export” button.
Congratulations! We have successfully synced separate audio and video files. Now let’s take a look at some hot FAQs before we end our guide.
Part 4: FAQs About Synching Audio With Video
Is auto synchronization better than manual syncing?
Well, auto synchronization is no doubt easier than manual syncing. But that doesn’t mean you don’t need the manual process anymore. Many situations may arise where you may be left with no choice but to use the manual syncing of separate audio and video files. So make sure to properly learn both these methods, and each one of them will definitely come in handy someday.
How can we sync audio & video for free?
Syncing audio and video files for free is not a difficult task. Download the Filmora right now, and after installation, you can freely sync any Audio file with its corresponding video file by using the manual method described above.
Conclusion
For any video creator, knowing how to sync audio with video is a must. That’s because most creators record audio and video separately for higher quality.
This brief guide has covered all the details about how to sync audio and video files using an outstanding video editor, Wondershare Filmora . We hope it comes in handy.
Free Download For Win 7 or later(64-bit)
Free Download For macOS 10.14 or later
Free Download For macOS 10.14 or later
Moreover, the vast arsenal of video effects, images, short clips, AI avatars, and many other things are also available. You just have to pick out the one you like and add it to your video with just a single click.
On top of that, you can also adjust the audio files like audio ducking, silent detection, audio mixing, and synching audio with the video files.

As far as the audio synching is concerned, you can do it either manually or with auto synchronization. And we will explain both of these processes in a stepwise manner to give you complete mastery over your audio synching. Let’s start with the manual process first.
Steps To Manually Sync Audio With Video Using Filmora
Step1Download & install
If you haven’t downloaded the latest version of Filmora yet, click the button below to download it without any cost. And after the download is completed, you can install it on your device right away.
Free Download For Win 7 or later(64-bit)
Free Download For macOS 10.14 or later
Step2Import your files
The next step is to import all the files. Launch the Filmora and click on the “New Project” button from the opening interface.

When a new project is created, you’ll see an “Import Media” section on it. Click on this section to browse your audio and video files from the computer. Or you can also drag and drop these files here to import them.

Step3Prepare your files
Now, it’s time to prepare our files for synchronization. First, drag the video file down to the timeline from the “Import Media” section. After that, drag the audio file in the same way below the video on the panel.

Step4Sync the audio & video files using the audio spike
Now that the video and audio files are on the timeline, you’ll have to find the moment you clap your hands. Look at the waveform from the in-camera audio and the independent audio track. At the moment you clap, we’ll see a spike.
Bonus Tip: If you can’t find the audio spike, zoom the panel to make it easier.

Now take the independent audio clip and align it so that both the spikes match.

That’s it! We just need to remove the in-camera audio now. Let’s see how to do it now.
Step5Remove the audio from the video footage
To detach the audio in the video footage, right-click on this file and select the “Detach Audio” option. Or you can also use the “Ctrl+Alt+D” as the hotkey.

Once the audio file has been separated, you can move forward and delete it. To delete this audio, right-click on it and select “Delete.”

Step6Enjoy your video with the new audio track
So here we go. Our video file has been synced with the high-quality audio file. You can now hit the Export button to get this edited file. But wait a minute. Didn’t we say we’ll show you a method to automatically sync audio with video? Let’s start this method now.
Steps To Automatically Sync Audio With Video Using Filmora
Did you find the above method troubling? Well, be assured because Wondershare Filmora can also automatically sync your audio file with video in a single click. Here are the steps to achieve this feat.
Free Download For Win 7 or later(64-bit)
Free Download For macOS 10.14 or later
Step1Prepare your files
This method’s starting process is the same as the previous one. You’ll need to download the Filmora and prepare your file on the timeline by importing them on a New Project.
Step2Select both audio & video files
Once you’ve got everything ready, select both your audio and files from the timeline.

Step3Click on the auto synchronization icon
When you select these files, you’ll see that the “Auto Synchronization” icon has appeared on the toolbar below the Import Media section. Click on this icon and wait for the magic.

Remember that you need a Premium ID of Wondershare Filmora to use the Auto Synchronization option.
Step4Wait until the syncing is completed
Filmora will start synchronizing your files, and you’ll see the “Synchronization in process” prompt on the screen. Wait until the process is completed.

Step5Finish your editing
You can finish your editing when the separate audio file perfectly aligns with the video file. Delete the audio from the in-camera video file and hit the “Export” button.
Congratulations! We have successfully synced separate audio and video files. Now let’s take a look at some hot FAQs before we end our guide.
Part 4: FAQs About Synching Audio With Video
Is auto synchronization better than manual syncing?
Well, auto synchronization is no doubt easier than manual syncing. But that doesn’t mean you don’t need the manual process anymore. Many situations may arise where you may be left with no choice but to use the manual syncing of separate audio and video files. So make sure to properly learn both these methods, and each one of them will definitely come in handy someday.
How can we sync audio & video for free?
Syncing audio and video files for free is not a difficult task. Download the Filmora right now, and after installation, you can freely sync any Audio file with its corresponding video file by using the manual method described above.
Conclusion
For any video creator, knowing how to sync audio with video is a must. That’s because most creators record audio and video separately for higher quality.
This brief guide has covered all the details about how to sync audio and video files using an outstanding video editor, Wondershare Filmora . We hope it comes in handy.
Free Download For Win 7 or later(64-bit)
Free Download For macOS 10.14 or later
Unlocking the Power of DaVinci Resolve Scopes: Enhance Your Color Grad
How do you set up DaVinci scopes? The internal color scopes in Resolve are flexible and customizable but can be confusing. The built-in DaVinci Resolve scope used to be limited only a few possibilities. However, the new 9-scope view offers a wider range of choice, making them a powerful tool for video editing. In this article, we will explore how to set up DaVinci scopes to achieve better color results.
Color Correction Editor An easy-to-use video editor helps you make color correction and color grading experience for videos!
Free Download Use Vectorscope in Filmora Try Color Correction

Part 1. Unlocking Color Precision: Exploring the Improved Scopes in DaVinci Resolve
The Blackmagic Design continues to improve the Resolve to make it better with every iteration. The new features improve colorist workflow in less powerful ways. The major improvements include a major facelift to the scope, allowing professions to do more with DaVinci resolve. Let’s have a look at some of these changes:
1. CIE 1931 Color Space
The inclusion of the CIE chromaticity diagram is perhaps the biggest change to DaVinci scopes. It displays the gamut of the project as set in the Color Management preferences. This makes it a useful alternate way of looking at the trace of an image to judge when the values are out of legal range. It also functions as an educational tool for learning about the range of color spaces.
2. Low Pass Filter
The wavefront and parade scopes now have a low pass filter, which reduces noise in the trace. This visually sharpens the display of the scopes, allowing easier detection of elements in the frame.
The image above shows the major improvements. The second set of waveforms has more defined lines. These have the low-pass filter activated, which makes the scopes easier to read.
3. High, Mid, and Low Views in Vectorscope
The vectorscope has been added to the ability to toggle the mid-tones, shadows, and highlights of the image independently. You can set the ranges with greater visualization control.
As seen in the picture above, the vectorscope controls allow you to select the low, mid, or high range of the image. You can also set the low and high ranges as desired.
4. Histograms Over Curves
Another great DaVinci scope is the histogram, which now appears outside of the scope panel. The new improvements have embedded the histogram inside the Curves tab on the bottom Palette. Click on the three dots in the Custom Curves tab. The pulldown menu that appears includes the Input or Output of the histogram. With these settings, you can find the element in the frame that helps you make adjustments quickly.
5. Scope Quality
The GPU-accelerated scopes engine allows the scopes to respond quickly. Users have the option to set the quality to high, medium, or low and the scopes will respond to a range of hardware systems. Depending on whether you are working on a stationary short or looking to see how the scopes react in real-time, you will be able to toggle the modes quickly and easily.

6. YRGB View in Histogram and Parade
The histogram and parade now come with the ability to view luminance together with the red, green, and blue channels. Users also have the option for YCbCr mode in the Parade.

7. Extents
These are weak elements in the signore, which are of lesser importance compared to the stronger elements. However, Danvici now allows them to be revealed for a full illustration of the information that lies in the image. Consequently, extents can be used to determine whether the data is being clipped beyond legal limits.

Part 2. Mastering Scopes in DaVinci Resolve: A Brief Guide
DaVinci scopes help you to analyze images as a basis for color correction. When used properly, scopes help in fixing white balance issues and checking saturation. They also allow you to get the correct exposure and check details like skin tone. To use scopes in DaVinci Resolve, go to the color page in the bottom right corner. You can also click on the small graph icon to view the scope. Here is how to use them:
1. Waveform
The Waveform represents the brightness or luminance of your image. In this video scope, the brightest parts are at the top while the darkest are at the bottom. The pixels are represented from left to right.
The Waveform scope on DaVinci Resolve is helpful when you are checking for clipping. This simply means finding out whether the image is too bright or too dark. The waveform also ensures that the image is properly exposed. The colorize feature of the waveform shows the colors of the image while the extent shows the darkest or lightest parts of the image.
2. Parade (RGB)
The RGB Parade comprises 3 waveforms that represent the luminance of red, green, and blue channels. The approach for reading the parade video scope is similar to that of the waveform. However, you now look at the balance between the colors correct the white balance, and check for a color cast.
The Parade works almost in a similar manner as the waveform. It displays the red, green, and blue channels of the image as separate waveforms. This way, you can easily identify and correct color casts while ensuring the colors in the image are balanced. The video scope provides useful information to decide which parts of the image need to be corrected or tweaked further.
3. Vectorscope
Vectorscope in DaVinci Resolve shows hue and saturation on a circular graph. Hues (the colors) are indicated outside of the color wheel for easier color correction. Saturation is indicated by how far the graph extends from the center.
By displaying the hue and saturation of the image as a vector, this video scope helps check skin tones. The scope specifically checks whether skin tones are shifted toward colors such as yellow, magenta, or green. It allows you to make sure that the colors in your subject skin tones are not too saturated or desaturated.
4. Histogram
Histogram is a video scope in DaVinci Resolve that displays the brightness or luminance of an image from left to right for the RGB channel. The video scope is based on the number of pixels that the colors red, blue, and green have in an image.
Using the histogram video scope on DaVinci Resolve allows you to check for overexposure or underexposure in your image. You can also ensure that the image has a good overall brightness range. The scope provides a graphical representation of tonal distribution in each channel. This way, you can evaluate the tone in detail for more accurate brightness and contrast adjustments.
Part 3: Edit Like a Pro: Mastering Video Scopes in Filmora
When working on video projects, Wondershare Filmora is a great editing software. It comes with unique features to color-correct your videos on the go as you edit it. From AI-powered features to royalty-free music, there is so much more you can do with Filmora.
Free Download For Win 7 or later(64-bit)
Free Download For macOS 10.14 or later
How to Use Video Scopes on Filmora
Using video scopes on Filmora is easy. The software offers four video scope options, allowing you to color-correct and grade your visual images properly. They include parade RGB, waveform, vectorscope, and histogram. When editing videos on Filmora, the video scopes can be accessed by clicking on the video scopes icon. The icon is found on the top right corner of the media player.
Filmora has made it easy for users to manage video scopes, and color-correct videos quickly. Users can change the layout options of the video scopes to match the editing needs of their project. You can also expand the button to show the name of the scope. As you manage the scopes, you can start with the Parade to make the necessary adjustments. Then move on to waveform, vectorscope, and histogram.
The uses of the video scope on Filmora are as follows:
- Parade – Cahnge the color channel from RBG to YRGB or YCbCr
- Vectorscope – Identify skin tone
- Waveform – Adjust color channels in a different way
- Histogram – Display the multiple color adjustments in a graphical way
Conclusion
Scopes are indeed valuable to video editors and colorists. While viewing images on a monitor can be subjective, scopes allow you to analyze and define them objectively. This gives you the power to color grade and correct to ensure that viewers look at the image with a clear representation. When working on or editing your videos, we recommend Wondershare Filmora. The video editing software comes with a wide range of features and video scopes that allow you to do everything on the same platform.
Free Download Use Vectorscope in Filmora Try Color Correction

Part 1. Unlocking Color Precision: Exploring the Improved Scopes in DaVinci Resolve
The Blackmagic Design continues to improve the Resolve to make it better with every iteration. The new features improve colorist workflow in less powerful ways. The major improvements include a major facelift to the scope, allowing professions to do more with DaVinci resolve. Let’s have a look at some of these changes:
1. CIE 1931 Color Space
The inclusion of the CIE chromaticity diagram is perhaps the biggest change to DaVinci scopes. It displays the gamut of the project as set in the Color Management preferences. This makes it a useful alternate way of looking at the trace of an image to judge when the values are out of legal range. It also functions as an educational tool for learning about the range of color spaces.
2. Low Pass Filter
The wavefront and parade scopes now have a low pass filter, which reduces noise in the trace. This visually sharpens the display of the scopes, allowing easier detection of elements in the frame.
The image above shows the major improvements. The second set of waveforms has more defined lines. These have the low-pass filter activated, which makes the scopes easier to read.
3. High, Mid, and Low Views in Vectorscope
The vectorscope has been added to the ability to toggle the mid-tones, shadows, and highlights of the image independently. You can set the ranges with greater visualization control.
As seen in the picture above, the vectorscope controls allow you to select the low, mid, or high range of the image. You can also set the low and high ranges as desired.
4. Histograms Over Curves
Another great DaVinci scope is the histogram, which now appears outside of the scope panel. The new improvements have embedded the histogram inside the Curves tab on the bottom Palette. Click on the three dots in the Custom Curves tab. The pulldown menu that appears includes the Input or Output of the histogram. With these settings, you can find the element in the frame that helps you make adjustments quickly.
5. Scope Quality
The GPU-accelerated scopes engine allows the scopes to respond quickly. Users have the option to set the quality to high, medium, or low and the scopes will respond to a range of hardware systems. Depending on whether you are working on a stationary short or looking to see how the scopes react in real-time, you will be able to toggle the modes quickly and easily.

6. YRGB View in Histogram and Parade
The histogram and parade now come with the ability to view luminance together with the red, green, and blue channels. Users also have the option for YCbCr mode in the Parade.

7. Extents
These are weak elements in the signore, which are of lesser importance compared to the stronger elements. However, Danvici now allows them to be revealed for a full illustration of the information that lies in the image. Consequently, extents can be used to determine whether the data is being clipped beyond legal limits.

Part 2. Mastering Scopes in DaVinci Resolve: A Brief Guide
DaVinci scopes help you to analyze images as a basis for color correction. When used properly, scopes help in fixing white balance issues and checking saturation. They also allow you to get the correct exposure and check details like skin tone. To use scopes in DaVinci Resolve, go to the color page in the bottom right corner. You can also click on the small graph icon to view the scope. Here is how to use them:
1. Waveform
The Waveform represents the brightness or luminance of your image. In this video scope, the brightest parts are at the top while the darkest are at the bottom. The pixels are represented from left to right.
The Waveform scope on DaVinci Resolve is helpful when you are checking for clipping. This simply means finding out whether the image is too bright or too dark. The waveform also ensures that the image is properly exposed. The colorize feature of the waveform shows the colors of the image while the extent shows the darkest or lightest parts of the image.
2. Parade (RGB)
The RGB Parade comprises 3 waveforms that represent the luminance of red, green, and blue channels. The approach for reading the parade video scope is similar to that of the waveform. However, you now look at the balance between the colors correct the white balance, and check for a color cast.
The Parade works almost in a similar manner as the waveform. It displays the red, green, and blue channels of the image as separate waveforms. This way, you can easily identify and correct color casts while ensuring the colors in the image are balanced. The video scope provides useful information to decide which parts of the image need to be corrected or tweaked further.
3. Vectorscope
Vectorscope in DaVinci Resolve shows hue and saturation on a circular graph. Hues (the colors) are indicated outside of the color wheel for easier color correction. Saturation is indicated by how far the graph extends from the center.
By displaying the hue and saturation of the image as a vector, this video scope helps check skin tones. The scope specifically checks whether skin tones are shifted toward colors such as yellow, magenta, or green. It allows you to make sure that the colors in your subject skin tones are not too saturated or desaturated.
4. Histogram
Histogram is a video scope in DaVinci Resolve that displays the brightness or luminance of an image from left to right for the RGB channel. The video scope is based on the number of pixels that the colors red, blue, and green have in an image.
Using the histogram video scope on DaVinci Resolve allows you to check for overexposure or underexposure in your image. You can also ensure that the image has a good overall brightness range. The scope provides a graphical representation of tonal distribution in each channel. This way, you can evaluate the tone in detail for more accurate brightness and contrast adjustments.
Part 3: Edit Like a Pro: Mastering Video Scopes in Filmora
When working on video projects, Wondershare Filmora is a great editing software. It comes with unique features to color-correct your videos on the go as you edit it. From AI-powered features to royalty-free music, there is so much more you can do with Filmora.
Free Download For Win 7 or later(64-bit)
Free Download For macOS 10.14 or later
How to Use Video Scopes on Filmora
Using video scopes on Filmora is easy. The software offers four video scope options, allowing you to color-correct and grade your visual images properly. They include parade RGB, waveform, vectorscope, and histogram. When editing videos on Filmora, the video scopes can be accessed by clicking on the video scopes icon. The icon is found on the top right corner of the media player.
Filmora has made it easy for users to manage video scopes, and color-correct videos quickly. Users can change the layout options of the video scopes to match the editing needs of their project. You can also expand the button to show the name of the scope. As you manage the scopes, you can start with the Parade to make the necessary adjustments. Then move on to waveform, vectorscope, and histogram.
The uses of the video scope on Filmora are as follows:
- Parade – Cahnge the color channel from RBG to YRGB or YCbCr
- Vectorscope – Identify skin tone
- Waveform – Adjust color channels in a different way
- Histogram – Display the multiple color adjustments in a graphical way
Conclusion
Scopes are indeed valuable to video editors and colorists. While viewing images on a monitor can be subjective, scopes allow you to analyze and define them objectively. This gives you the power to color grade and correct to ensure that viewers look at the image with a clear representation. When working on or editing your videos, we recommend Wondershare Filmora. The video editing software comes with a wide range of features and video scopes that allow you to do everything on the same platform.
A Full Guide to Funcall Voice Changer and Its Alternatives
Do you want to prank your friends? Everyone can agree that receiving a prank call is one of the world’s most annoying experiences. Still, you must admit that coming up with a great prank is a flex. If you want to make the next big prank film for TikTok or are just looking for something to do during a sleepover with your friends, you’ll need to have a plan before you pick up the phone. In this article, we will tell you how you can make prank calls easily with Funcall apps:
Try AI Voice Changer For Win 7 or later(64-bit)
Try AI Voice Changer For macOS 10.14 or later
Part 1: What’s Funcall App, and how to use it?
Making successful prank calls is very challenging. The Funcall - Voice Changer makes it incredibly easy to change your voice on a call and prank your family members and friends. You can call them and get their funny reactions.
You must input the target’s phone number and select whether you want the voice to be feminine, helium balloon, frightening, male, or regular sound. Funcall app also allows you to make international calls in over 150 countries on cell phones and landlines.

After installing the app, you will only have 30 seconds to play the prank. You can install other applications, view advertisements, or buy time directly through the app to get additional time. You are free to phone whatever number you like and speak in an artificial voice as long as you have the time. Additionally, you can include humorous sound effects like barking, farts, or gunfire. This voice-changing app is compatible with both Android and iPhone devices.
Follow these easy steps to use the Funcall app:
Step1Download
Go to the official website of Funcall apps and download it on your mobile device. To start the Funcall app, tap on the icon.
Step2Dial the Number
Dial the number of your friend or relative you want to prank and select the country.
Step3Select a Voice
At this point, pick the voice-altering sound you want to use. You can also add a background effect.
Step4Change Voice in Real Time
The call’s recipient will hear your customized voice rather than the original. To make the call more thrilling, you can add sound effects in addition to your altered voice.
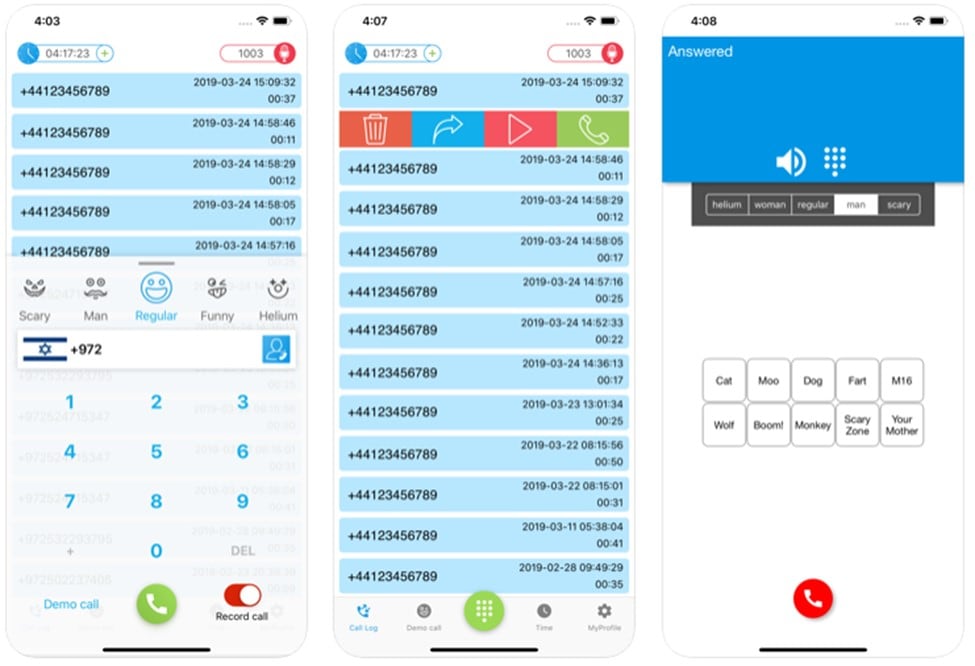
Part 2: How to use the app for free?
Funcall is a premium software, and to use it, you must purchase one of its membership plans, which are reasonably priced. The first call on this app is free. You can earn more free minutes for prank calls by completing activities like watching advertising and downloading software.
Another option is to use Funcall MOD APK. It can be your best option if you’re seeking its free version, which allows you to enjoy an infinite number of minutes and an ad-free experience. You can use its hacked version to have free access to all of its paid features.
Part 3: Best alternatives to Funcall Voice Changer
Prank Dial
If you are looking for the best alternative to the Funcall app, you can use Prank Dial. With the help of the Prank Dial app, users can have fun while spending their free time making up to three random prank calls to friends and coworkers each day. You can press a call scenario to hear it and tap the heart to put it in your favourites so you can use it later.

The array of situations is sorted by category in the Prank Dial app, including “celebrities,” “angry,” “love,” “family prank calls,” etc. The history area displays all recent calls, including call date, caller id, scenario name, etc.
Fake Caller ID
If you want to make prank calls, make false caller ID, and have a good time, download this Fake Caller ID software. It has a very straightforward user interface that is free of any complications. You can easily prank or make fun of your friends by changing your voice pitch and caller ID.

This app gives two free calls each day and allows you to adjust your caller ID before you make the call, alter your voice while on the call, and record calls to listen to them later for fun.
MagicCall
For both Android and iOS, MagicCall is a fantastic tool to use as a voice-changing app when on the phone. It is an excellent app for making prank calls to pals and applying various effects. With multiple voice modifications and appended background effects, Magic Call is straightforward to use.

You can choose between Male, Robot, Female, Elderly Male, and Kid voices in the Voices area.
Prank Caller
With the help of the features in the Prank Caller app, you can access a massive library of prank call scripts directly from your smartphone’s screen and entertain your loved ones by using a different voice.

To try a new prank daily, you can browse the top prank call scripts and a list of all the available prank situations ranked by popularity.
FAQs
Can I use the Funcall app to make international calls?
You can use the Funcall app to make international calls in over 150 countries, including Asian, European, African, Middle Eastern regions, etc.
Can I use the Funcalls app while playing games?
No, you can’t use the Funcalls app while playing games. You can only use this app to change your voice during calls.
Can I change my voice during a call?
Yes, you can change your voice during calls. You can use Funcall apps or any alternatives to change your voice. However, we recommend you use the Funcall app because it is compatible with Android and iPhone.
What are the available voices on the Funcall app?
You can use a feminine, male, scary, helium, or a regular voice. This app also allows you to use various background sounds and effects.
Free Download For Win 7 or later(64-bit)
Free Download For macOS 10.14 or later
Try AI Voice Changer For Win 7 or later(64-bit)
Try AI Voice Changer For macOS 10.14 or later
Part 1: What’s Funcall App, and how to use it?
Making successful prank calls is very challenging. The Funcall - Voice Changer makes it incredibly easy to change your voice on a call and prank your family members and friends. You can call them and get their funny reactions.
You must input the target’s phone number and select whether you want the voice to be feminine, helium balloon, frightening, male, or regular sound. Funcall app also allows you to make international calls in over 150 countries on cell phones and landlines.

After installing the app, you will only have 30 seconds to play the prank. You can install other applications, view advertisements, or buy time directly through the app to get additional time. You are free to phone whatever number you like and speak in an artificial voice as long as you have the time. Additionally, you can include humorous sound effects like barking, farts, or gunfire. This voice-changing app is compatible with both Android and iPhone devices.
Follow these easy steps to use the Funcall app:
Step1Download
Go to the official website of Funcall apps and download it on your mobile device. To start the Funcall app, tap on the icon.
Step2Dial the Number
Dial the number of your friend or relative you want to prank and select the country.
Step3Select a Voice
At this point, pick the voice-altering sound you want to use. You can also add a background effect.
Step4Change Voice in Real Time
The call’s recipient will hear your customized voice rather than the original. To make the call more thrilling, you can add sound effects in addition to your altered voice.

Part 2: How to use the app for free?
Funcall is a premium software, and to use it, you must purchase one of its membership plans, which are reasonably priced. The first call on this app is free. You can earn more free minutes for prank calls by completing activities like watching advertising and downloading software.
Another option is to use Funcall MOD APK. It can be your best option if you’re seeking its free version, which allows you to enjoy an infinite number of minutes and an ad-free experience. You can use its hacked version to have free access to all of its paid features.
Part 3: Best alternatives to Funcall Voice Changer
Prank Dial
If you are looking for the best alternative to the Funcall app, you can use Prank Dial. With the help of the Prank Dial app, users can have fun while spending their free time making up to three random prank calls to friends and coworkers each day. You can press a call scenario to hear it and tap the heart to put it in your favourites so you can use it later.

The array of situations is sorted by category in the Prank Dial app, including “celebrities,” “angry,” “love,” “family prank calls,” etc. The history area displays all recent calls, including call date, caller id, scenario name, etc.
Fake Caller ID
If you want to make prank calls, make false caller ID, and have a good time, download this Fake Caller ID software. It has a very straightforward user interface that is free of any complications. You can easily prank or make fun of your friends by changing your voice pitch and caller ID.

This app gives two free calls each day and allows you to adjust your caller ID before you make the call, alter your voice while on the call, and record calls to listen to them later for fun.
MagicCall
For both Android and iOS, MagicCall is a fantastic tool to use as a voice-changing app when on the phone. It is an excellent app for making prank calls to pals and applying various effects. With multiple voice modifications and appended background effects, Magic Call is straightforward to use.

You can choose between Male, Robot, Female, Elderly Male, and Kid voices in the Voices area.
Prank Caller
With the help of the features in the Prank Caller app, you can access a massive library of prank call scripts directly from your smartphone’s screen and entertain your loved ones by using a different voice.

To try a new prank daily, you can browse the top prank call scripts and a list of all the available prank situations ranked by popularity.
FAQs
Can I use the Funcall app to make international calls?
You can use the Funcall app to make international calls in over 150 countries, including Asian, European, African, Middle Eastern regions, etc.
Can I use the Funcalls app while playing games?
No, you can’t use the Funcalls app while playing games. You can only use this app to change your voice during calls.
Can I change my voice during a call?
Yes, you can change your voice during calls. You can use Funcall apps or any alternatives to change your voice. However, we recommend you use the Funcall app because it is compatible with Android and iPhone.
What are the available voices on the Funcall app?
You can use a feminine, male, scary, helium, or a regular voice. This app also allows you to use various background sounds and effects.
Free Download For Win 7 or later(64-bit)
Free Download For macOS 10.14 or later
Also read:
- Updated In 2024, Splitting Audio From Video in Sony Vegas Step by Step
- New Step by Step to Rotate Videos in Windows Media Player
- Learn About some of the Best Photo Collage with Music Tools
- Updated Step by Step to Crop Videos Using Lightworks
- New How to Add Custom Subtitles to Netflix
- In 2024, How to Make a Slow Motion Video in Wondershare Filmora
- 20 Must-Have Graduation Songs for Slideshow
- In 2024, In This Article Let Me Share with You How to Start a Vlog? Ideas and Any Tips for You to Start Your Own Vlogging Channel
- 2024 Approved Add Neon Effects to Your Dance Videos with the Help of Wondershare Filmora After Reading This Article. It Will Give a More Thrilling and Exciting Appearance
- Updated 2024 Approved How to Speed Up Pictures on TikTok Slideshow
- Being a Content Creator Means Creating a Slow-Mo at some Point. Study This Piece to Learn How to Play a Video in Slow Motion on iPhone for 2024
- In 2024, 10 Best Slow-Motion Cameras to Try
- 2024 Approved How D AI Video Games Act More Human Than Human?
- In 2024, How to Record Super Slow Motion Videos on Your Huawei/Samsung/iPhone?
- Updated In 2024, 3 Effective Methods to Correct Color Distortion in Videos
- New Splitting Video Into Frames with the FFmpeg Step by Step for 2024
- Top 10 TEXT TO SPEECH VIDEO MAKERS for 2024
- Updated In 2024, Finding The Finest Way To Add Subtitles to Videos | Filmora
- New 2024 Approved LumaFusion Color Grading Achieving It Through LUTs
- New Quick Answer Why Did Filmora AI Portrait Attract People for 2024
- New Which 10 Best Video Editing Online Makers Is Worth Your Attention?
- New How to Spruce Up Your Telegram Profile
- This Article Will Show You the Steps to Make Coin Magic in Videos with Filmora
- Updated How to Color Grade Your Picture in LightRoom for 2024
- Easy Steps to Make Glitch Effect with Filmora
- New A Guide to Speed up a Video on Splice for 2024
- Want to Speed up Your Video to Create Short-Duration Instagram Reels? Here Is How You Can Change the Speed of Pre-Recorded and Live Videos on Instagram Reels for 2024
- Updated Best Dark Moody LUTs During Editing for 2024
- How to Merge FLV Files Windows, Mac,Android, iPhone & Online
- 2024 Approved How to Animate Text in A Video
- Updated Top 11 Best Video Editing Apps for iPhone
- New 2024 Approved Unlock Your Video Editing Potential With Wondershare Filmora
- New Add Camera Shake to Video in Adobe After Effects for 2024
- Updated What Are the Best 15 Slideshow Presentation Examples Your Audience Will Love
- How to Detect and Remove Spyware on Apple iPhone 14 Plus? | Dr.fone
- In 2024, How Can HTC U23 ProMirror Share to PC? | Dr.fone
- Why is iPogo not working On Poco M6 Pro 4G? Fixed | Dr.fone
- How to Unlock Apple iPhone SE with/without SIM Card
- In 2024, Full Guide to Bypass Vivo V27e FRP
- In 2024, How to get the dragon scale and evolution-enabled pokemon On Honor X50i+? | Dr.fone
- In 2024, How to Screen Mirroring Oppo Reno 8T 5G to PC? | Dr.fone
- In 2024, Hassle-Free Ways to Remove FRP Lock on Samsung Galaxy S23 Phones with/without a PC
- Updated Top 10 Hindi Video Translators with Step-by-Step Guidance
- Apply These Techniques to Improve How to Detect Fake GPS Location On OnePlus 12R | Dr.fone
- How to Simulate GPS Movement in AR games On Tecno Spark 10 Pro? | Dr.fone
- In 2024, How to Unlock Nubia Red Magic 8S Pro Phone Password Without Factory Reset?
- Restore Missing App Icon on HTC U23 Step-by-Step Solutions | Dr.fone
- How to Restore iPhone from Backup when iTunes Backup is Corrupt or not compatible | Stellar
- In 2024, 7 Ways to Unlock a Locked Realme V30 Phone
- How to Unlock Xiaomi 13T Pro Phone without Any Data Loss
- Complete Guide to Hard Reset Your Vivo Y78t | Dr.fone
- How to Transfer Data from Infinix Hot 30 5G to BlackBerry | Dr.fone
- Tecno Pop 7 Pro Bootloop Problem, How to Fix it Without Data Loss | Dr.fone
- How To Transfer Data From iPhone 15 Pro Max To Other iPhone 11 Pro Max devices? | Dr.fone
- Title: Clone Yourself in Videos with Filmora
- Author: Chloe
- Created at : 2024-05-20 03:37:26
- Updated at : 2024-05-21 03:37:26
- Link: https://ai-editing-video.techidaily.com/clone-yourself-in-videos-with-filmora/
- License: This work is licensed under CC BY-NC-SA 4.0.


