:max_bytes(150000):strip_icc():format(webp)/twittermute-5bc42bbd46e0fb002679ac08.jpg)
Complete Guide to Make a Super Easy Rotating Video Effect for 2024

Complete Guide to Make a Super Easy Rotating Video Effect
Controlling camera direction to the subject’s hands and filming is trending nowadays. Create this effect by using easy film hacks, as shown in this article.
Many users make rotating illusion videos for TikTok or any branding video. The foremost items to record are explained in this article with detailed instructions. The best editing tool is also clarified below for instant results. So keep reading to get a hand with filming and editing a professional rotating transition video!
Part 1. What is a Rotating Video Illusion/Effect
Rotating transition video is a trending feature used by models and influencers. The brands also use this style to record the model’s videos in advertisements. It could be any makeup transition or clothing transition video.

It helps to indulge the audience with your content and show the after and before transitions. You can try this with any object or any character. But first, let’s figure out the requirements for rotating effects.
Part 2. Prerequisites to Make a Rotating Video Effect
You will need a few items to create a rotating transition video. First, look at the fundamental priorities for creating this feature.
The Subject Matters
To record a successful rotating video, you need a person or a subject to perform in front of the camera. It can be a model hired by a brand, a social influencer, or maybe it’s you. Keep in mind the following things before recording:
- The person should get two different costumes.
- All the actions need to be rehearsed before shooting
- Show affinity and control of the camera.

Shotting Equipment
To record a professional video, you need a good camera. You can use a smartphone to record this footage. There is no need to have a tripod stand or any gear to hold the camera because the camera will be in a rotating position, the same as the subject’s hand.
For this, you need a filmmaker or any person living with you. Just give instructions as shown below to him to record a perfect video for yourself:
- Record the whole video in just one direction.
- Don’t shake the camera because it gives blurry footage.
- Ensure to focus on the subject during recording.
- Don’t zoom in or out while recording the video.
- Keep the subject in the middle of the frame during the recording process.
- The hand rotation timing is the same as the camera’s rotation.
![]()
Note: Ensure to record one footage multiple times so that you can choose the perfect one later for editing.

Filming of the First Footage
To make the footage for the rotating video illusion, we have to record it at least twice to get crystal clear and high-resolution results. Therefore, ensure that we have camera movement in the same direction during all recording times.
![]()
Note: You can film the video either in the vertical format of the camera or in horizontal format. It all depends upon your script!
Follow the below-mentioned steps to record the first footage for the video:
- Hold the camera in a perfect format, whatever you choose.
- Let the subject stand or sit in the middle of the frame.
- The filmmaker can rotate the camera when the subject’s hand rotates.
- Try your best to rotate the camera 180 degrees.
- Ensure that the camera lens faces the ground at the end of the rotation.

After filming the first footage for the video, it’s time to record the second footage to transition between the two.
Filming of the Second Footage
To create a second shot, you have to remember that the costume and location of the filming are different from the first footage. Follow the below steps to record it:
- The first step is to hold the camera in the same direction as the first footage.
- When editing, make sure the subject’s position matches the first footage.
- Make sure the subject’s hand movement is in the opposite direction from the first shot.

Now you have both scenes and footage ready. Next, you have to edit them by inserting them into editing software. Follow the step guides below to perform this action!
Part 3. Step-by-Step Guide to Edit on Filmora
To create a professional rotating video illusion, Wondershare Filmora is an ideal tool. Even beginners can quickly get the hang of it due to its highly engaging system user interface (UI). You will discover how to create a rotating video effect in a few clicks.
Free Download For Win 7 or later(64-bit)
Free Download For macOS 10.14 or later

Step1 Download Wondershare Filmora
To edit your video like a pro, download the most recent version of Wondershare Filmora.
- Download and open Wondershare Filmora on your PC or Mac.
Step2 Import the Footage
Import recorded footage to start the editing process. It is better to have all your footage in one folder before importing all the clips. The main import window locates in the upper left corner when it is first launched.
- Click on the Import icon in the import window’s center.
- Wondershare Filmora will then immediately point you toward your PC
- Navigate to the location where your preferred Videos and Photos are kept.
- Choose every footage you wish to import.
- Once you click Open, the files will import.

It’s time to prepare the footage for editing after inserting it into the Filmora. Follow the next steps to do this!
Step3 Add Footage to the Timeline
The videos you’ve imported will be added to the timeline after that. You can import both footages at once and put them all at once into the timeline.
Alternatively, you can add them one at a time as needed. Follow the procedures as shown to add an item to your timeline.
- To choose a photo or movie, use the right-click
- Holding the Right-click, and move it to the timeline from the bottom.

Your images and videos have been imported into the timeline; now it’s time to trim them according to requirements.
Step4 Trim the Clips
To insert transition effects, you must trim the clip at a specific point and speed up the clip at the required duration. For this, follow the next actions as shown below:
- Playback clips and stop the playhead where you want by pressing the Space button from the Keyboard.
- Then, click on the Split icon present on the playhead.
- It will trim the clip from that point and separate it from its former one.

After splitting or trimming the clips, you now have to adjust the speed of the clips, as shown below!
Step5 Adjust Speed and Duration
There is a need to increase the speed of some scenes where the transition starts or ends. For this, follow the below actions:
- Find the section which needs to speed up, such as in the last half of each rotation.
- Right-click on the section of the clip in the timeline.
- Then, select the Speed option as shown in the icon of the timer present on the upper tab of the timeline.
- Select the Fast option, and if you want to lower the speed, select the Slow option**.**
- Choose the speed range according to your requirement.
- Select that required option and play it back to check if it is correct.

The video is all set; give it the final touches by following the last step, as shown below!
Step6 Playback the Video
After adding and adjusting all the features, double-check the video by playback. If you find any duration issue, review it and adjust it according to your requirement.
You can playback the video by clicking on the Play button. Perform this a few more times to ensure the speed looks okay and adjust if it is too slow or too fast.

You can also view it in full screen by selecting the last option on the tab. If there is no problem, you can export it locally or directly share it on TikTok or anywhere you want to gain views and attract an audience. You can also use it as a magic trick to inspire other people or as a transition for videos!
Conclusion
Keep creating and experimenting with other features on Wondershare Filmora. For example, you can use different effects, try on stock media, and then create or film your own. In this way, you’ll get professional results.
If you are showing new strategies daily to your viewers, they will hook up with you, and it’ll assist in the algorithm working by your side. That’s why keep doing it and enjoying the rest!

Filming of the First Footage
To make the footage for the rotating video illusion, we have to record it at least twice to get crystal clear and high-resolution results. Therefore, ensure that we have camera movement in the same direction during all recording times.
![]()
Note: You can film the video either in the vertical format of the camera or in horizontal format. It all depends upon your script!
Follow the below-mentioned steps to record the first footage for the video:
- Hold the camera in a perfect format, whatever you choose.
- Let the subject stand or sit in the middle of the frame.
- The filmmaker can rotate the camera when the subject’s hand rotates.
- Try your best to rotate the camera 180 degrees.
- Ensure that the camera lens faces the ground at the end of the rotation.

After filming the first footage for the video, it’s time to record the second footage to transition between the two.
Filming of the Second Footage
To create a second shot, you have to remember that the costume and location of the filming are different from the first footage. Follow the below steps to record it:
- The first step is to hold the camera in the same direction as the first footage.
- When editing, make sure the subject’s position matches the first footage.
- Make sure the subject’s hand movement is in the opposite direction from the first shot.

Now you have both scenes and footage ready. Next, you have to edit them by inserting them into editing software. Follow the step guides below to perform this action!
Part 3. Step-by-Step Guide to Edit on Filmora
To create a professional rotating video illusion, Wondershare Filmora is an ideal tool. Even beginners can quickly get the hang of it due to its highly engaging system user interface (UI). You will discover how to create a rotating video effect in a few clicks.
Free Download For Win 7 or later(64-bit)
Free Download For macOS 10.14 or later

Step1 Download Wondershare Filmora
To edit your video like a pro, download the most recent version of Wondershare Filmora.
- Download and open Wondershare Filmora on your PC or Mac.
Step2 Import the Footage
Import recorded footage to start the editing process. It is better to have all your footage in one folder before importing all the clips. The main import window locates in the upper left corner when it is first launched.
- Click on the Import icon in the import window’s center.
- Wondershare Filmora will then immediately point you toward your PC
- Navigate to the location where your preferred Videos and Photos are kept.
- Choose every footage you wish to import.
- Once you click Open, the files will import.

It’s time to prepare the footage for editing after inserting it into the Filmora. Follow the next steps to do this!
Step3 Add Footage to the Timeline
The videos you’ve imported will be added to the timeline after that. You can import both footages at once and put them all at once into the timeline.
Alternatively, you can add them one at a time as needed. Follow the procedures as shown to add an item to your timeline.
- To choose a photo or movie, use the right-click
- Holding the Right-click, and move it to the timeline from the bottom.

Your images and videos have been imported into the timeline; now it’s time to trim them according to requirements.
Step4 Trim the Clips
To insert transition effects, you must trim the clip at a specific point and speed up the clip at the required duration. For this, follow the next actions as shown below:
- Playback clips and stop the playhead where you want by pressing the Space button from the Keyboard.
- Then, click on the Split icon present on the playhead.
- It will trim the clip from that point and separate it from its former one.

After splitting or trimming the clips, you now have to adjust the speed of the clips, as shown below!
Step5 Adjust Speed and Duration
There is a need to increase the speed of some scenes where the transition starts or ends. For this, follow the below actions:
- Find the section which needs to speed up, such as in the last half of each rotation.
- Right-click on the section of the clip in the timeline.
- Then, select the Speed option as shown in the icon of the timer present on the upper tab of the timeline.
- Select the Fast option, and if you want to lower the speed, select the Slow option**.**
- Choose the speed range according to your requirement.
- Select that required option and play it back to check if it is correct.

The video is all set; give it the final touches by following the last step, as shown below!
Step6 Playback the Video
After adding and adjusting all the features, double-check the video by playback. If you find any duration issue, review it and adjust it according to your requirement.
You can playback the video by clicking on the Play button. Perform this a few more times to ensure the speed looks okay and adjust if it is too slow or too fast.

You can also view it in full screen by selecting the last option on the tab. If there is no problem, you can export it locally or directly share it on TikTok or anywhere you want to gain views and attract an audience. You can also use it as a magic trick to inspire other people or as a transition for videos!
Conclusion
Keep creating and experimenting with other features on Wondershare Filmora. For example, you can use different effects, try on stock media, and then create or film your own. In this way, you’ll get professional results.
If you are showing new strategies daily to your viewers, they will hook up with you, and it’ll assist in the algorithm working by your side. That’s why keep doing it and enjoying the rest!
Achieving GoPro Slow Motion with Quality: An In-Depth Overview
Slow-motion videos are a new phenomenon in engaging audiences. In this decade, such effects add a dramatic feel to empathize movie clips. Slow motion is an effective way to keep viewers hooked to the content. Now, the question arises of which could be the best way to make a perfect GoPro slow-mo. To find an answer, read this guide and achieve high-quality slow-mo videos with GoPro.
Let us tell you first that GoPro is primarily a company for camera accessories. Besides, there is GoPro Quik, which is responsible for dedicated video editing. Many professionals rely on GoPro slow-motion to change video speed with a single tap. Thus, without wasting time, delve into the details given and learn to make GoPro 11 slow motion with the best available accessories.
Slow Motion Video Maker Slow your video’s speed with better control of your keyframes to create unique cinematic effects!
Make A Slow Motion Video Make A Slow Motion Video More Features

Part 1: Slowing Down Videos on Your GoPro: A Guide
GoPro offers Sony Vegas Pro Slow Motion to record videos in slow motion. Does using such technical equipment seem challenging for you as a new user? Follow this step-by-step guide and set the camera before recording to make a perfect slow-mo shot.
Step 1
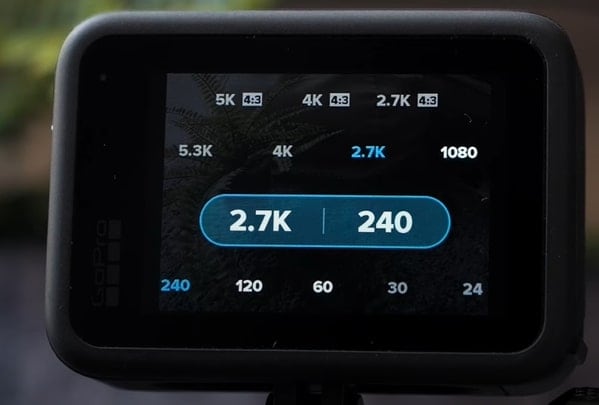
Set the resolution to 2.7k for a slow-motion video and a frame rate of 240fps. Afterward, keep the “Color” natural if you don’t want to color grade it. Moreover, adjust the “Sharping” low by using its respective options.
Step 2
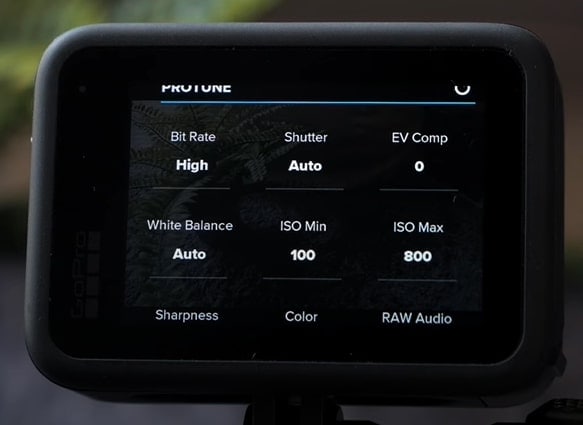
Reset the “Hyper Smooth” to high and later turn ISO to a minimum of 100 and a maximum of 800. Then, head to set the “Shutter Speed” and “White Balance” to auto.
Step 3
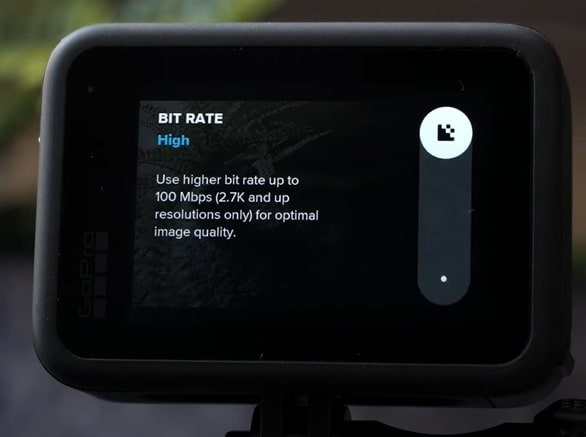
Moving ahead, choose Lens to “Linear” and keep the “Bitrate” high. Finally, select the “Exposure Value Compensation” to -0.5 using its slider. Your camera is ready to capture your desired and captivating slow-motion shots.
Part 2: Slow Down Videos on GoPro Quik After Recording
After recording the required clip, post-editing is important to polish the digital content. GoPro also offers GoPro Quik to edit slow-motion videos to your desired extent. Unfortunately, not everyone can quickly discover Go Pro slow motion in their first use. That’s why it’s necessary to follow the given steps so you can easily discover and edit slow motion.
Step 1
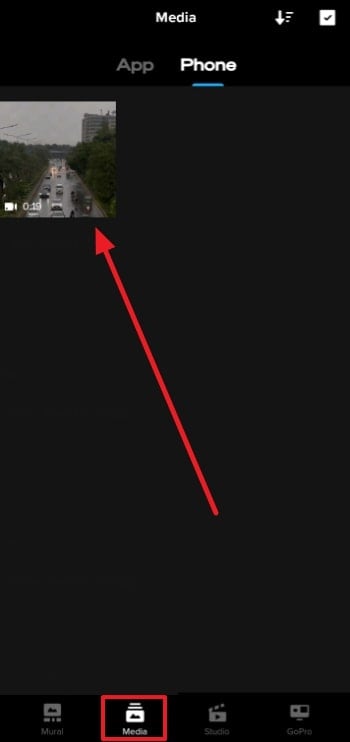
Access the GoPro Quick on your device and launch it. Choose the “Media” icon in the bottom bar and select the video you want to edit. After importing the required media files, start working on a project.
Step 2
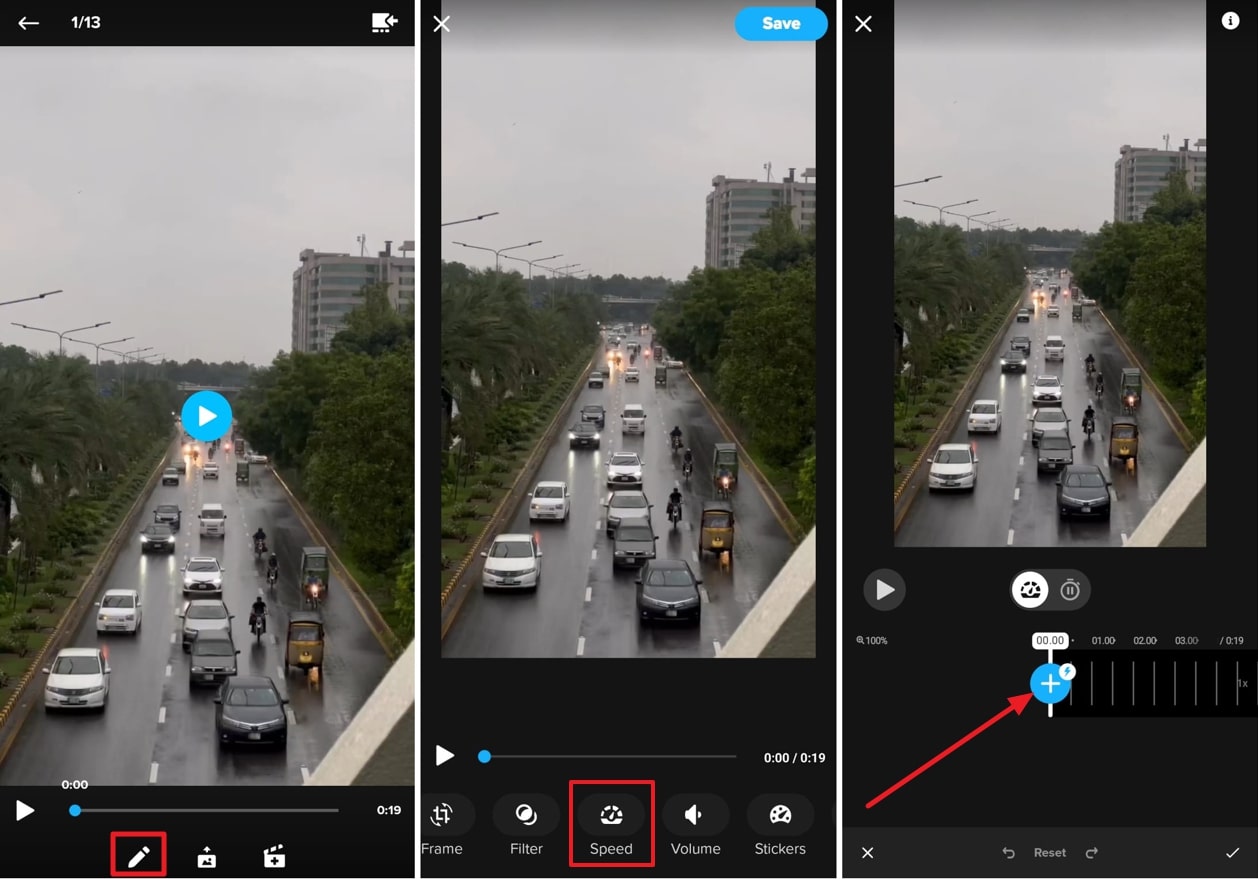
Select the “Pen” icon in the bottom bar and scroll the menu to the left side. Here, choose the “Speed” option and tap the “+” icon to drag the slider to the point where you want to apply the slow motion. Hit the end mark and get a preview of smooth speed ramping in slow motion.
Part 3: Make Better Slow-Motion Videos with Wondershare Filmora
Making a slow motion means spending cognitive effort and time on a project. Thus, video editors seek a reliable platform like GoPro Hero 11, which is slow motion. Unfortunately, this editing app is outdated, and other better platforms are being developed. In search of the latest and easy-to-use video editor, use Wondershare Filmora .
It is a video editing software with various powerful editing features compared with GoPro Quik. This platform can perform more tasks than trimming, merging, and splitting clips. Filmora is equipped with AI technology to provide maximum ease to users. You can use this tool to ensure a smooth workflow and boost your productivity.
Why Filmora is Better Than GoPro Quik?
Filmora provides many features that GoPro Quik does not offer. Everyone needs solid arguments and valid reasons to reconsider their choices. Thus, here we have highlighted some proven and logical reasons to use Filmora instead of GoPro:
- The first and foremost thing you can see is Filmora’s intuitive interface. Anyone without any video editing background can use this tool effectively for their projects.
- Video editors need assistance while editing perfect shots. Filmora offers an AI Copilot Editing system as your editing assistant, which GoPro does not provide. It directs users to create high-quality videos.
Free Download For Win 7 or later(64-bit)
Free Download For macOS 10.14 or later
- GoPro Quik allows you to edit up to 1-minute videos. In contrast, Filmora doesn’t restrict you from editing videos of a certain length.
- With Filmora AI, you can generate a customized script and turn it into a video. AI integration for unique content makes this tool better than GoPro Quik.
- Unlike GoPro Quik, getting personalized music tracks is possible with Filmora. It can create soundtracks that align with your project’s needs.
- Slow-motion GoPro can assist in speed-ramping videos for a smooth transition. Conversely, Filmora also offers an optical flow option to automate the speed ramping .
- Even GoPro Quik cannot remove vocals from the audio files. Using Filmora, this option is just a click away. It can automatically separate vocals from music tracks so you can dub high-quality videos.
- Using GoPro, users can share their videos on social media or export them anywhere. In comparison, Filmora allows you to adjust resolution, quality, project name, and destination.
- AI in Filmora can generate images with your prompts that will not claim legal rights. This service is unavailable in GoPro; it is just limited to video editing.
- Last but not least, Filmora can transform your text into engaging videos. By doing so, you can save the budget for actors, video editors, and other crew.
Step-by-Step Guide to Slow Down Video With Filmora
After learning the exceptional functionalities of Filmora, you might be considering using it. To put you at ease, we have explained stepwise usage of achieving slow motion with Filmora. It’s quite easier and more automatic than GoPro slow motion:
Free Download For Win 7 or later(64-bit)
Free Download For macOS 10.14 or later
Step 1: Install Filmora V13 and Import Your Media
Go to the official site of Wondershare Filmora and download its latest version, V13. Launch it in your system and access its intuitive main interface. Choose “New Project” from its home screen and enter in the editing screen. Press your keyboard’s “Ctrl + I” keys and import your desired file in Filmora.

Step 2: Use the Optical Flow Option and Slow Down the Video Speed
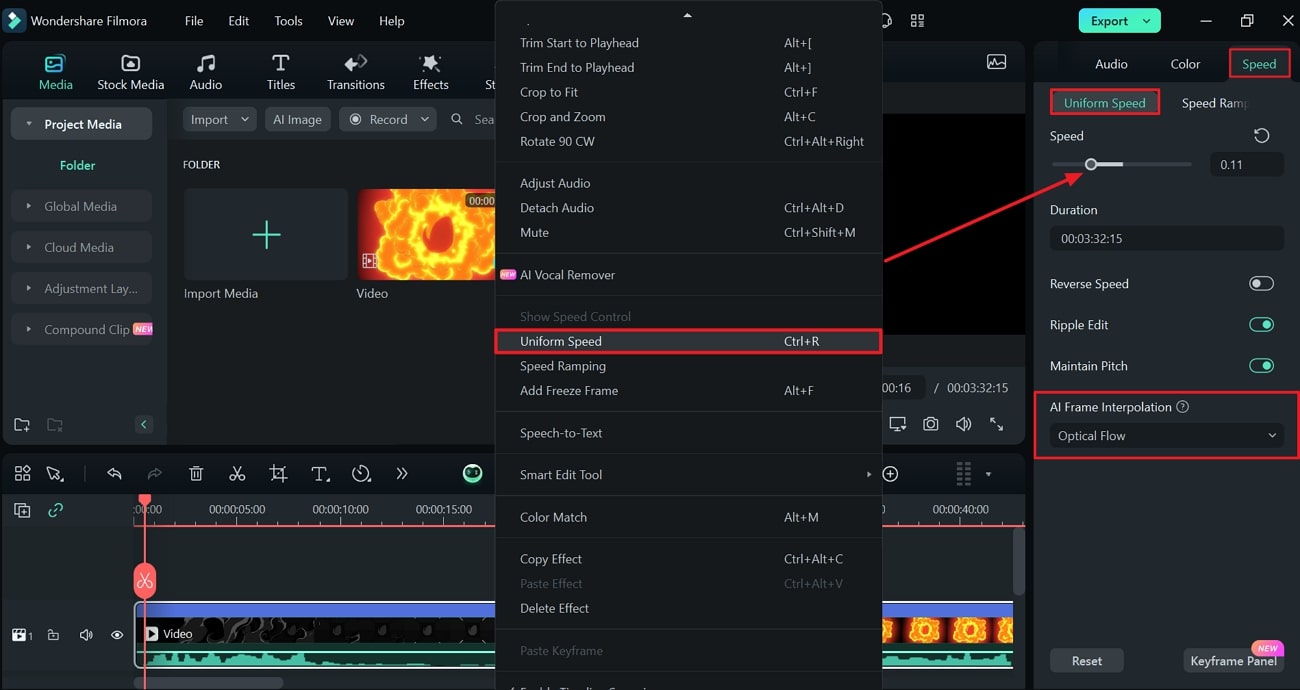
Drag and drop the imported video in the timeline section. Place your cursor on that video and right-click on it. Hit the “Uniform Speed” option from the displayed list and direct toward the right-side editing panel. There, use the “Speed” slider and slow down the video as required. Move downward and extend the “AI Frame Interpolation” menu to pick the “Optical Flow.”
Step 3: Preview the Results to Export or Continue to Edit
Finally, get a preview of a slower but high-quality video by pressing the “Space” key. Afterward, if you are satisfied with the results, move to the “Export” option at the top right. Now, set the output settings based on how you want to save the video. Finally, press the “Export” button to save the results on your system.

Conclusion
To summarize, the GoPro camera is available in the market to capture slow-motion shots. On the other hand, GoPro Quik is an editing tool that has been popular for a decade. Many users are unaware of the latest video editing software, Wondershare Filmora. It is an AI-powered platform that has proven to be better than GoPro slow-motion, as discussed above.
Make A Slow Motion Video Make A Slow Motion Video More Features

Part 1: Slowing Down Videos on Your GoPro: A Guide
GoPro offers Sony Vegas Pro Slow Motion to record videos in slow motion. Does using such technical equipment seem challenging for you as a new user? Follow this step-by-step guide and set the camera before recording to make a perfect slow-mo shot.
Step 1
Set the resolution to 2.7k for a slow-motion video and a frame rate of 240fps. Afterward, keep the “Color” natural if you don’t want to color grade it. Moreover, adjust the “Sharping” low by using its respective options.

Step 2
Reset the “Hyper Smooth” to high and later turn ISO to a minimum of 100 and a maximum of 800. Then, head to set the “Shutter Speed” and “White Balance” to auto.

Step 3
Moving ahead, choose Lens to “Linear” and keep the “Bitrate” high. Finally, select the “Exposure Value Compensation” to -0.5 using its slider. Your camera is ready to capture your desired and captivating slow-motion shots.

Part 2: Slow Down Videos on GoPro Quik After Recording
After recording the required clip, post-editing is important to polish the digital content. GoPro also offers GoPro Quik to edit slow-motion videos to your desired extent. Unfortunately, not everyone can quickly discover Go Pro slow motion in their first use. That’s why it’s necessary to follow the given steps so you can easily discover and edit slow motion.
Step 1
Access the GoPro Quick on your device and launch it. Choose the “Media” icon in the bottom bar and select the video you want to edit. After importing the required media files, start working on a project.

Step 2
Select the “Pen” icon in the bottom bar and scroll the menu to the left side. Here, choose the “Speed” option and tap the “+” icon to drag the slider to the point where you want to apply the slow motion. Hit the end mark and get a preview of smooth speed ramping in slow motion.

Part 3: Make Better Slow-Motion Videos with Wondershare Filmora
Making a slow motion means spending cognitive effort and time on a project. Thus, video editors seek a reliable platform like GoPro Hero 11, which is slow motion. Unfortunately, this editing app is outdated, and other better platforms are being developed. In search of the latest and easy-to-use video editor, use Wondershare Filmora .
It is a video editing software with various powerful editing features compared with GoPro Quik. This platform can perform more tasks than trimming, merging, and splitting clips. Filmora is equipped with AI technology to provide maximum ease to users. You can use this tool to ensure a smooth workflow and boost your productivity.
Why Filmora is Better Than GoPro Quik?
Filmora provides many features that GoPro Quik does not offer. Everyone needs solid arguments and valid reasons to reconsider their choices. Thus, here we have highlighted some proven and logical reasons to use Filmora instead of GoPro:
- The first and foremost thing you can see is Filmora’s intuitive interface. Anyone without any video editing background can use this tool effectively for their projects.
- Video editors need assistance while editing perfect shots. Filmora offers an AI Copilot Editing system as your editing assistant, which GoPro does not provide. It directs users to create high-quality videos.
Free Download For Win 7 or later(64-bit)
Free Download For macOS 10.14 or later
- GoPro Quik allows you to edit up to 1-minute videos. In contrast, Filmora doesn’t restrict you from editing videos of a certain length.
- With Filmora AI, you can generate a customized script and turn it into a video. AI integration for unique content makes this tool better than GoPro Quik.
- Unlike GoPro Quik, getting personalized music tracks is possible with Filmora. It can create soundtracks that align with your project’s needs.
- Slow-motion GoPro can assist in speed-ramping videos for a smooth transition. Conversely, Filmora also offers an optical flow option to automate the speed ramping .
- Even GoPro Quik cannot remove vocals from the audio files. Using Filmora, this option is just a click away. It can automatically separate vocals from music tracks so you can dub high-quality videos.
- Using GoPro, users can share their videos on social media or export them anywhere. In comparison, Filmora allows you to adjust resolution, quality, project name, and destination.
- AI in Filmora can generate images with your prompts that will not claim legal rights. This service is unavailable in GoPro; it is just limited to video editing.
- Last but not least, Filmora can transform your text into engaging videos. By doing so, you can save the budget for actors, video editors, and other crew.
Step-by-Step Guide to Slow Down Video With Filmora
After learning the exceptional functionalities of Filmora, you might be considering using it. To put you at ease, we have explained stepwise usage of achieving slow motion with Filmora. It’s quite easier and more automatic than GoPro slow motion:
Free Download For Win 7 or later(64-bit)
Free Download For macOS 10.14 or later
Step 1: Install Filmora V13 and Import Your Media
Go to the official site of Wondershare Filmora and download its latest version, V13. Launch it in your system and access its intuitive main interface. Choose “New Project” from its home screen and enter in the editing screen. Press your keyboard’s “Ctrl + I” keys and import your desired file in Filmora.

Step 2: Use the Optical Flow Option and Slow Down the Video Speed
Drag and drop the imported video in the timeline section. Place your cursor on that video and right-click on it. Hit the “Uniform Speed” option from the displayed list and direct toward the right-side editing panel. There, use the “Speed” slider and slow down the video as required. Move downward and extend the “AI Frame Interpolation” menu to pick the “Optical Flow.”

Step 3: Preview the Results to Export or Continue to Edit
Finally, get a preview of a slower but high-quality video by pressing the “Space” key. Afterward, if you are satisfied with the results, move to the “Export” option at the top right. Now, set the output settings based on how you want to save the video. Finally, press the “Export” button to save the results on your system.

Conclusion
To summarize, the GoPro camera is available in the market to capture slow-motion shots. On the other hand, GoPro Quik is an editing tool that has been popular for a decade. Many users are unaware of the latest video editing software, Wondershare Filmora. It is an AI-powered platform that has proven to be better than GoPro slow-motion, as discussed above.
How to Blur a Still or Moving Part of Video
Create High-Quality Video - Wondershare Filmora
An easy and powerful YouTube video editor
Numerous video and audio effects to choose from
Detailed tutorials provided by the official channel
Adding a blur effect to your video is vital, especially if you have added unwanted things that could ruin its quality. It often looks awkward when there’s something wrong in the background of your video. Various video editing programs allow you to blur a moving or still part of your video if you don’t want viewers to see it. With that in mind, we’ll look at how to blur part of a video using Filmora.
In this article
01 How to Blur a Part of a Video Using Filmora
02 How to Blur a Moving Part of a Video Using Filmora
03 How to Blur Part of a Video Using OpenShot
There are several ways you can blur part of a video. Filmora allows you to blur a still and moving part of a video. The software is user-friendly and comes with an aesthetically pleasing interface. You don’t have to be tech-savvy to learn how to blur out part of a video with Filmora. You can also use OpenShot to blur part of a video.
How to Blur a Part of a Video Using Filmora
Both Mac and PC owners can use this video editing software to blur part of a video. Here is how to blur a part of video using Filmora.
- Download and install Wondershare Filmora on your device. If you had already installed Filmora on your computer, double-click the program to launch it.
- Next, you need to drag and drop the video file you wish to blur into the Media Library. Alternatively, you could also navigate to the File tab and click it, then choose Import Media and select the Import Media Files option. Find the video you want to edit and select it. You can now hit the Open button to import the video file to Media Library
- After your video file is on Filmora’s Media Library, drag and drop it into the Timeline; this is where the program allows you to assemble effects and media files for your video project.

- Click on the Effects tab; this will allow you to browse through Filmora’s collection of visual effects. Select Utility on the drop-down menu located on the left side of your screen.

- The program will display a range of effects; select the Mosaic option. You can also type in Mosaic in the search bar to find the effect swiftly.
- Drag the Mosaic effect to above the video clip on your Timeline. Dragging the border of your Mosaic clip allows you to adjust its length.
- A small blurred area will appear in the preview window.

- Lock the main tracks.
- Now, click the Mosaic layer to modify the Mosaic size and area. Move it to the part of the video that you would like to blur.
- Double-clicking on the Mosaic clip will allow you to change the mosaic type and adjust the opacity and blur amount. You can choose from six different Mosaic types. Adjusting the opacity allows you to set the degree to which you can see through the blurred area. The blur amount lets you control the intensity of the blur.

- You can now save your blurred video. Click on the File tab and select ‘Save Project.’ Doing this will save your project to the default file. Choose ‘Save Project As’ to save your video to another destination of your choice.
How to Blur a Moving Part of a Video Using Filmora
You can also blur a moving part of your video with Filmora; this program allows you to add the motion-tracking mosaic to any moving object in your video that you do not want your viewers to see. You can use stickers, mosaic, or anything you download on the internet to hide any unwanted moving object.
With that in mind, here is how to blur a moving part of a video using Filmora:
- Run Filmora on your device.
- Import your video into Filmora’s Media Library.
- Drag your video to the Timeline.

- Now, double-click the video in the Timeline. Doing this will open the editing menu.
- Check the box that’s right next to Motion Tracking; this tool allows you to track movement in a video and then have objects like text, images, videos, or elements follow this movement.

- A tracker box will appear on your preview window; move it over the moving object you would like to track. You can increase or reduce the size of the tracker box. Hit the Start Tracking button to render the effect.

- Wait until the tracking process is complete. The duration of this process will depend on the length of your video. You’ll have to do some trimming if other objects block the moving part you’re tracking from time to time.

- WNow, select the Add Mosaic option.
- Choose the Mosaic type you prefer and adjust the opacity and blur amount to ensure the object is unrecognizable.
- Now, select the moving part of the video you want to blur and click OK.
- The object is now blurred, and the mosaic layer will follow its movement everywhere it goes.
- Playback your video to check the result. Filmora allows you to fine-tune the position and size of the object that’s following the track in your Preview Window without restarting tracking. Additionally, you can switch the follower anytime you want.
- When you have finished blurring the moving part on your video, click File > Save Project or Save Project As to save your video.
For Win 7 or later (64-bit)
For macOS 10.12 or later
How to Blur Part of a Video Using OpenShot
Designed for Windows, Mac, and Linux, OpenShot is a free, open-source, and cross-platform video editor. While there’s no predefined function or filter in this tool to help you blur part of a video, OpenShot has another way of blurring static parts of your video: it uses an image.
OpenShot blur part of video is free, and you’ll use its open-source programs as a base program for the edition of the video and GIMP Image Manipulation software to edit photos. Follow the guide below to learn how to blur out something in a video using OpenShot.
Step 1: Download OpenShot and install it on your device.

Step 2: Take a screenshot from your video, where the part you want to blur is easily visible. You can do this by going to a relevant frame and utilizing Save Current Frame with a camera icon, located on the right side of the video preview window in a standard program configuration.

Step 3: Be sure to save your video screenshot on your computer.
Step 4: Since you have exported a relevant frame from your video as a screenshot, you need to open it in a photo editor that can handle PNG pics and transparency, like the GIMP Image Manipulation program. Use any selection tool to select the area of the picture you want to blur on the video. Depending on your preferences, you can choose the free select tool, the ellipse select tool, or the rectangle select tool.

Step 5: In the blur filters submenu, open the Pixelize tool and adjust the options that suit your preferences. You can use CTRL-Z to cancel the operation, and repeat it until you find the best combination of blurring settings.
Step 6: When you are satisfied with blurring, right-click on the blurred area and select Invert in the Select submenu; this will allow you to select the entire part of the frame that has not been blurred, which is the part you would like to get rid of because you will only have to use the blurred part of your video overlay where necessary.
Step 7: Now, cut the section of the picture you do not want to keep. You can do this by using CTRL-X. The blurred filter for your video is now ready.

Step 8: If after cutting you notice a plain color rather than a checkerboard canvas representing transparency, use CTRL-Z to cancel the cut. Then, use CTRL-I to invert the selection again to get control of the blurred selection again, and copy or cut it using CTRL-X or CTRL-C.
Step 9: Create another image using CTRL-N, and ensure you have navigated to the advanced options and selected transparency as the fill-in color, and paste your selection there.
Step 10: You now have a perfect photo with full transparency, which is represented by a checkerboard canvas, except for the section of the video frames you would like to blur that should be pixelized.
Step 11: Use the Export option under the File menu to export the photo to your PC as a . PNG file. To save a picture with a transparency channel, you need to use the . PNG extension.
Step 12: Now return to OpenShot video editor and import the generated picture with a pixelized portion in the OpenShot video project. Next, add the picture as an overlay track. Make sure it’s above the video track.
Step 13: If the program asks you to import the photo as an image sequence, select the NO option because you need to import a still photo, and not a video sequence.
Step 14: The picture will be displayed before the video, blurring only the portion of the video where you modified the frame. The other parts of the video won’t be touched. You can make adjustments to ensure the picture track is only displayed at required moments. And that’s how to blur part of a video using OpenShot.
Conclusion
● Now that you know how to blur out part of a video, you can have fun and censor anything you want in your clips. Use Filmora to blur moving and still parts on your video.
Adding a blur effect to your video is vital, especially if you have added unwanted things that could ruin its quality. It often looks awkward when there’s something wrong in the background of your video. Various video editing programs allow you to blur a moving or still part of your video if you don’t want viewers to see it. With that in mind, we’ll look at how to blur part of a video using Filmora.
In this article
01 How to Blur a Part of a Video Using Filmora
02 How to Blur a Moving Part of a Video Using Filmora
03 How to Blur Part of a Video Using OpenShot
There are several ways you can blur part of a video. Filmora allows you to blur a still and moving part of a video. The software is user-friendly and comes with an aesthetically pleasing interface. You don’t have to be tech-savvy to learn how to blur out part of a video with Filmora. You can also use OpenShot to blur part of a video.
How to Blur a Part of a Video Using Filmora
Both Mac and PC owners can use this video editing software to blur part of a video. Here is how to blur a part of video using Filmora.
- Download and install Wondershare Filmora on your device. If you had already installed Filmora on your computer, double-click the program to launch it.
- Next, you need to drag and drop the video file you wish to blur into the Media Library. Alternatively, you could also navigate to the File tab and click it, then choose Import Media and select the Import Media Files option. Find the video you want to edit and select it. You can now hit the Open button to import the video file to Media Library
- After your video file is on Filmora’s Media Library, drag and drop it into the Timeline; this is where the program allows you to assemble effects and media files for your video project.

- Click on the Effects tab; this will allow you to browse through Filmora’s collection of visual effects. Select Utility on the drop-down menu located on the left side of your screen.

- The program will display a range of effects; select the Mosaic option. You can also type in Mosaic in the search bar to find the effect swiftly.
- Drag the Mosaic effect to above the video clip on your Timeline. Dragging the border of your Mosaic clip allows you to adjust its length.
- A small blurred area will appear in the preview window.

- Lock the main tracks.
- Now, click the Mosaic layer to modify the Mosaic size and area. Move it to the part of the video that you would like to blur.
- Double-clicking on the Mosaic clip will allow you to change the mosaic type and adjust the opacity and blur amount. You can choose from six different Mosaic types. Adjusting the opacity allows you to set the degree to which you can see through the blurred area. The blur amount lets you control the intensity of the blur.

- You can now save your blurred video. Click on the File tab and select ‘Save Project.’ Doing this will save your project to the default file. Choose ‘Save Project As’ to save your video to another destination of your choice.
How to Blur a Moving Part of a Video Using Filmora
You can also blur a moving part of your video with Filmora; this program allows you to add the motion-tracking mosaic to any moving object in your video that you do not want your viewers to see. You can use stickers, mosaic, or anything you download on the internet to hide any unwanted moving object.
With that in mind, here is how to blur a moving part of a video using Filmora:
- Run Filmora on your device.
- Import your video into Filmora’s Media Library.
- Drag your video to the Timeline.

- Now, double-click the video in the Timeline. Doing this will open the editing menu.
- Check the box that’s right next to Motion Tracking; this tool allows you to track movement in a video and then have objects like text, images, videos, or elements follow this movement.

- A tracker box will appear on your preview window; move it over the moving object you would like to track. You can increase or reduce the size of the tracker box. Hit the Start Tracking button to render the effect.

- Wait until the tracking process is complete. The duration of this process will depend on the length of your video. You’ll have to do some trimming if other objects block the moving part you’re tracking from time to time.

- WNow, select the Add Mosaic option.
- Choose the Mosaic type you prefer and adjust the opacity and blur amount to ensure the object is unrecognizable.
- Now, select the moving part of the video you want to blur and click OK.
- The object is now blurred, and the mosaic layer will follow its movement everywhere it goes.
- Playback your video to check the result. Filmora allows you to fine-tune the position and size of the object that’s following the track in your Preview Window without restarting tracking. Additionally, you can switch the follower anytime you want.
- When you have finished blurring the moving part on your video, click File > Save Project or Save Project As to save your video.
For Win 7 or later (64-bit)
For macOS 10.12 or later
How to Blur Part of a Video Using OpenShot
Designed for Windows, Mac, and Linux, OpenShot is a free, open-source, and cross-platform video editor. While there’s no predefined function or filter in this tool to help you blur part of a video, OpenShot has another way of blurring static parts of your video: it uses an image.
OpenShot blur part of video is free, and you’ll use its open-source programs as a base program for the edition of the video and GIMP Image Manipulation software to edit photos. Follow the guide below to learn how to blur out something in a video using OpenShot.
Step 1: Download OpenShot and install it on your device.

Step 2: Take a screenshot from your video, where the part you want to blur is easily visible. You can do this by going to a relevant frame and utilizing Save Current Frame with a camera icon, located on the right side of the video preview window in a standard program configuration.

Step 3: Be sure to save your video screenshot on your computer.
Step 4: Since you have exported a relevant frame from your video as a screenshot, you need to open it in a photo editor that can handle PNG pics and transparency, like the GIMP Image Manipulation program. Use any selection tool to select the area of the picture you want to blur on the video. Depending on your preferences, you can choose the free select tool, the ellipse select tool, or the rectangle select tool.

Step 5: In the blur filters submenu, open the Pixelize tool and adjust the options that suit your preferences. You can use CTRL-Z to cancel the operation, and repeat it until you find the best combination of blurring settings.
Step 6: When you are satisfied with blurring, right-click on the blurred area and select Invert in the Select submenu; this will allow you to select the entire part of the frame that has not been blurred, which is the part you would like to get rid of because you will only have to use the blurred part of your video overlay where necessary.
Step 7: Now, cut the section of the picture you do not want to keep. You can do this by using CTRL-X. The blurred filter for your video is now ready.

Step 8: If after cutting you notice a plain color rather than a checkerboard canvas representing transparency, use CTRL-Z to cancel the cut. Then, use CTRL-I to invert the selection again to get control of the blurred selection again, and copy or cut it using CTRL-X or CTRL-C.
Step 9: Create another image using CTRL-N, and ensure you have navigated to the advanced options and selected transparency as the fill-in color, and paste your selection there.
Step 10: You now have a perfect photo with full transparency, which is represented by a checkerboard canvas, except for the section of the video frames you would like to blur that should be pixelized.
Step 11: Use the Export option under the File menu to export the photo to your PC as a . PNG file. To save a picture with a transparency channel, you need to use the . PNG extension.
Step 12: Now return to OpenShot video editor and import the generated picture with a pixelized portion in the OpenShot video project. Next, add the picture as an overlay track. Make sure it’s above the video track.
Step 13: If the program asks you to import the photo as an image sequence, select the NO option because you need to import a still photo, and not a video sequence.
Step 14: The picture will be displayed before the video, blurring only the portion of the video where you modified the frame. The other parts of the video won’t be touched. You can make adjustments to ensure the picture track is only displayed at required moments. And that’s how to blur part of a video using OpenShot.
Conclusion
● Now that you know how to blur out part of a video, you can have fun and censor anything you want in your clips. Use Filmora to blur moving and still parts on your video.
Adding a blur effect to your video is vital, especially if you have added unwanted things that could ruin its quality. It often looks awkward when there’s something wrong in the background of your video. Various video editing programs allow you to blur a moving or still part of your video if you don’t want viewers to see it. With that in mind, we’ll look at how to blur part of a video using Filmora.
In this article
01 How to Blur a Part of a Video Using Filmora
02 How to Blur a Moving Part of a Video Using Filmora
03 How to Blur Part of a Video Using OpenShot
There are several ways you can blur part of a video. Filmora allows you to blur a still and moving part of a video. The software is user-friendly and comes with an aesthetically pleasing interface. You don’t have to be tech-savvy to learn how to blur out part of a video with Filmora. You can also use OpenShot to blur part of a video.
How to Blur a Part of a Video Using Filmora
Both Mac and PC owners can use this video editing software to blur part of a video. Here is how to blur a part of video using Filmora.
- Download and install Wondershare Filmora on your device. If you had already installed Filmora on your computer, double-click the program to launch it.
- Next, you need to drag and drop the video file you wish to blur into the Media Library. Alternatively, you could also navigate to the File tab and click it, then choose Import Media and select the Import Media Files option. Find the video you want to edit and select it. You can now hit the Open button to import the video file to Media Library
- After your video file is on Filmora’s Media Library, drag and drop it into the Timeline; this is where the program allows you to assemble effects and media files for your video project.

- Click on the Effects tab; this will allow you to browse through Filmora’s collection of visual effects. Select Utility on the drop-down menu located on the left side of your screen.

- The program will display a range of effects; select the Mosaic option. You can also type in Mosaic in the search bar to find the effect swiftly.
- Drag the Mosaic effect to above the video clip on your Timeline. Dragging the border of your Mosaic clip allows you to adjust its length.
- A small blurred area will appear in the preview window.

- Lock the main tracks.
- Now, click the Mosaic layer to modify the Mosaic size and area. Move it to the part of the video that you would like to blur.
- Double-clicking on the Mosaic clip will allow you to change the mosaic type and adjust the opacity and blur amount. You can choose from six different Mosaic types. Adjusting the opacity allows you to set the degree to which you can see through the blurred area. The blur amount lets you control the intensity of the blur.

- You can now save your blurred video. Click on the File tab and select ‘Save Project.’ Doing this will save your project to the default file. Choose ‘Save Project As’ to save your video to another destination of your choice.
How to Blur a Moving Part of a Video Using Filmora
You can also blur a moving part of your video with Filmora; this program allows you to add the motion-tracking mosaic to any moving object in your video that you do not want your viewers to see. You can use stickers, mosaic, or anything you download on the internet to hide any unwanted moving object.
With that in mind, here is how to blur a moving part of a video using Filmora:
- Run Filmora on your device.
- Import your video into Filmora’s Media Library.
- Drag your video to the Timeline.

- Now, double-click the video in the Timeline. Doing this will open the editing menu.
- Check the box that’s right next to Motion Tracking; this tool allows you to track movement in a video and then have objects like text, images, videos, or elements follow this movement.

- A tracker box will appear on your preview window; move it over the moving object you would like to track. You can increase or reduce the size of the tracker box. Hit the Start Tracking button to render the effect.

- Wait until the tracking process is complete. The duration of this process will depend on the length of your video. You’ll have to do some trimming if other objects block the moving part you’re tracking from time to time.

- WNow, select the Add Mosaic option.
- Choose the Mosaic type you prefer and adjust the opacity and blur amount to ensure the object is unrecognizable.
- Now, select the moving part of the video you want to blur and click OK.
- The object is now blurred, and the mosaic layer will follow its movement everywhere it goes.
- Playback your video to check the result. Filmora allows you to fine-tune the position and size of the object that’s following the track in your Preview Window without restarting tracking. Additionally, you can switch the follower anytime you want.
- When you have finished blurring the moving part on your video, click File > Save Project or Save Project As to save your video.
For Win 7 or later (64-bit)
For macOS 10.12 or later
How to Blur Part of a Video Using OpenShot
Designed for Windows, Mac, and Linux, OpenShot is a free, open-source, and cross-platform video editor. While there’s no predefined function or filter in this tool to help you blur part of a video, OpenShot has another way of blurring static parts of your video: it uses an image.
OpenShot blur part of video is free, and you’ll use its open-source programs as a base program for the edition of the video and GIMP Image Manipulation software to edit photos. Follow the guide below to learn how to blur out something in a video using OpenShot.
Step 1: Download OpenShot and install it on your device.

Step 2: Take a screenshot from your video, where the part you want to blur is easily visible. You can do this by going to a relevant frame and utilizing Save Current Frame with a camera icon, located on the right side of the video preview window in a standard program configuration.

Step 3: Be sure to save your video screenshot on your computer.
Step 4: Since you have exported a relevant frame from your video as a screenshot, you need to open it in a photo editor that can handle PNG pics and transparency, like the GIMP Image Manipulation program. Use any selection tool to select the area of the picture you want to blur on the video. Depending on your preferences, you can choose the free select tool, the ellipse select tool, or the rectangle select tool.

Step 5: In the blur filters submenu, open the Pixelize tool and adjust the options that suit your preferences. You can use CTRL-Z to cancel the operation, and repeat it until you find the best combination of blurring settings.
Step 6: When you are satisfied with blurring, right-click on the blurred area and select Invert in the Select submenu; this will allow you to select the entire part of the frame that has not been blurred, which is the part you would like to get rid of because you will only have to use the blurred part of your video overlay where necessary.
Step 7: Now, cut the section of the picture you do not want to keep. You can do this by using CTRL-X. The blurred filter for your video is now ready.

Step 8: If after cutting you notice a plain color rather than a checkerboard canvas representing transparency, use CTRL-Z to cancel the cut. Then, use CTRL-I to invert the selection again to get control of the blurred selection again, and copy or cut it using CTRL-X or CTRL-C.
Step 9: Create another image using CTRL-N, and ensure you have navigated to the advanced options and selected transparency as the fill-in color, and paste your selection there.
Step 10: You now have a perfect photo with full transparency, which is represented by a checkerboard canvas, except for the section of the video frames you would like to blur that should be pixelized.
Step 11: Use the Export option under the File menu to export the photo to your PC as a . PNG file. To save a picture with a transparency channel, you need to use the . PNG extension.
Step 12: Now return to OpenShot video editor and import the generated picture with a pixelized portion in the OpenShot video project. Next, add the picture as an overlay track. Make sure it’s above the video track.
Step 13: If the program asks you to import the photo as an image sequence, select the NO option because you need to import a still photo, and not a video sequence.
Step 14: The picture will be displayed before the video, blurring only the portion of the video where you modified the frame. The other parts of the video won’t be touched. You can make adjustments to ensure the picture track is only displayed at required moments. And that’s how to blur part of a video using OpenShot.
Conclusion
● Now that you know how to blur out part of a video, you can have fun and censor anything you want in your clips. Use Filmora to blur moving and still parts on your video.
Adding a blur effect to your video is vital, especially if you have added unwanted things that could ruin its quality. It often looks awkward when there’s something wrong in the background of your video. Various video editing programs allow you to blur a moving or still part of your video if you don’t want viewers to see it. With that in mind, we’ll look at how to blur part of a video using Filmora.
In this article
01 How to Blur a Part of a Video Using Filmora
02 How to Blur a Moving Part of a Video Using Filmora
03 How to Blur Part of a Video Using OpenShot
There are several ways you can blur part of a video. Filmora allows you to blur a still and moving part of a video. The software is user-friendly and comes with an aesthetically pleasing interface. You don’t have to be tech-savvy to learn how to blur out part of a video with Filmora. You can also use OpenShot to blur part of a video.
How to Blur a Part of a Video Using Filmora
Both Mac and PC owners can use this video editing software to blur part of a video. Here is how to blur a part of video using Filmora.
- Download and install Wondershare Filmora on your device. If you had already installed Filmora on your computer, double-click the program to launch it.
- Next, you need to drag and drop the video file you wish to blur into the Media Library. Alternatively, you could also navigate to the File tab and click it, then choose Import Media and select the Import Media Files option. Find the video you want to edit and select it. You can now hit the Open button to import the video file to Media Library
- After your video file is on Filmora’s Media Library, drag and drop it into the Timeline; this is where the program allows you to assemble effects and media files for your video project.

- Click on the Effects tab; this will allow you to browse through Filmora’s collection of visual effects. Select Utility on the drop-down menu located on the left side of your screen.

- The program will display a range of effects; select the Mosaic option. You can also type in Mosaic in the search bar to find the effect swiftly.
- Drag the Mosaic effect to above the video clip on your Timeline. Dragging the border of your Mosaic clip allows you to adjust its length.
- A small blurred area will appear in the preview window.

- Lock the main tracks.
- Now, click the Mosaic layer to modify the Mosaic size and area. Move it to the part of the video that you would like to blur.
- Double-clicking on the Mosaic clip will allow you to change the mosaic type and adjust the opacity and blur amount. You can choose from six different Mosaic types. Adjusting the opacity allows you to set the degree to which you can see through the blurred area. The blur amount lets you control the intensity of the blur.

- You can now save your blurred video. Click on the File tab and select ‘Save Project.’ Doing this will save your project to the default file. Choose ‘Save Project As’ to save your video to another destination of your choice.
How to Blur a Moving Part of a Video Using Filmora
You can also blur a moving part of your video with Filmora; this program allows you to add the motion-tracking mosaic to any moving object in your video that you do not want your viewers to see. You can use stickers, mosaic, or anything you download on the internet to hide any unwanted moving object.
With that in mind, here is how to blur a moving part of a video using Filmora:
- Run Filmora on your device.
- Import your video into Filmora’s Media Library.
- Drag your video to the Timeline.

- Now, double-click the video in the Timeline. Doing this will open the editing menu.
- Check the box that’s right next to Motion Tracking; this tool allows you to track movement in a video and then have objects like text, images, videos, or elements follow this movement.

- A tracker box will appear on your preview window; move it over the moving object you would like to track. You can increase or reduce the size of the tracker box. Hit the Start Tracking button to render the effect.

- Wait until the tracking process is complete. The duration of this process will depend on the length of your video. You’ll have to do some trimming if other objects block the moving part you’re tracking from time to time.

- WNow, select the Add Mosaic option.
- Choose the Mosaic type you prefer and adjust the opacity and blur amount to ensure the object is unrecognizable.
- Now, select the moving part of the video you want to blur and click OK.
- The object is now blurred, and the mosaic layer will follow its movement everywhere it goes.
- Playback your video to check the result. Filmora allows you to fine-tune the position and size of the object that’s following the track in your Preview Window without restarting tracking. Additionally, you can switch the follower anytime you want.
- When you have finished blurring the moving part on your video, click File > Save Project or Save Project As to save your video.
For Win 7 or later (64-bit)
For macOS 10.12 or later
How to Blur Part of a Video Using OpenShot
Designed for Windows, Mac, and Linux, OpenShot is a free, open-source, and cross-platform video editor. While there’s no predefined function or filter in this tool to help you blur part of a video, OpenShot has another way of blurring static parts of your video: it uses an image.
OpenShot blur part of video is free, and you’ll use its open-source programs as a base program for the edition of the video and GIMP Image Manipulation software to edit photos. Follow the guide below to learn how to blur out something in a video using OpenShot.
Step 1: Download OpenShot and install it on your device.

Step 2: Take a screenshot from your video, where the part you want to blur is easily visible. You can do this by going to a relevant frame and utilizing Save Current Frame with a camera icon, located on the right side of the video preview window in a standard program configuration.

Step 3: Be sure to save your video screenshot on your computer.
Step 4: Since you have exported a relevant frame from your video as a screenshot, you need to open it in a photo editor that can handle PNG pics and transparency, like the GIMP Image Manipulation program. Use any selection tool to select the area of the picture you want to blur on the video. Depending on your preferences, you can choose the free select tool, the ellipse select tool, or the rectangle select tool.

Step 5: In the blur filters submenu, open the Pixelize tool and adjust the options that suit your preferences. You can use CTRL-Z to cancel the operation, and repeat it until you find the best combination of blurring settings.
Step 6: When you are satisfied with blurring, right-click on the blurred area and select Invert in the Select submenu; this will allow you to select the entire part of the frame that has not been blurred, which is the part you would like to get rid of because you will only have to use the blurred part of your video overlay where necessary.
Step 7: Now, cut the section of the picture you do not want to keep. You can do this by using CTRL-X. The blurred filter for your video is now ready.

Step 8: If after cutting you notice a plain color rather than a checkerboard canvas representing transparency, use CTRL-Z to cancel the cut. Then, use CTRL-I to invert the selection again to get control of the blurred selection again, and copy or cut it using CTRL-X or CTRL-C.
Step 9: Create another image using CTRL-N, and ensure you have navigated to the advanced options and selected transparency as the fill-in color, and paste your selection there.
Step 10: You now have a perfect photo with full transparency, which is represented by a checkerboard canvas, except for the section of the video frames you would like to blur that should be pixelized.
Step 11: Use the Export option under the File menu to export the photo to your PC as a . PNG file. To save a picture with a transparency channel, you need to use the . PNG extension.
Step 12: Now return to OpenShot video editor and import the generated picture with a pixelized portion in the OpenShot video project. Next, add the picture as an overlay track. Make sure it’s above the video track.
Step 13: If the program asks you to import the photo as an image sequence, select the NO option because you need to import a still photo, and not a video sequence.
Step 14: The picture will be displayed before the video, blurring only the portion of the video where you modified the frame. The other parts of the video won’t be touched. You can make adjustments to ensure the picture track is only displayed at required moments. And that’s how to blur part of a video using OpenShot.
Conclusion
● Now that you know how to blur out part of a video, you can have fun and censor anything you want in your clips. Use Filmora to blur moving and still parts on your video.
Best 10 Mind-Blowing Video Collage Maker for PC
10 Mind-Blowing Video Collage Maker for PC
An easy yet powerful editor
Numerous effects to choose from
Detailed tutorials provided by the official channel
Video collages are a great way to play multiple short videos at the same time. These collages can be used for different purposes and platforms like social media platforms, online video sharing sites, brand promotion, announcing an event or a service, and similar others.

Whatever may be the situation, you would need a good and feature-packed tool for creating such a collage so that videos look perfect in a frame, background audio can be added, and other customizations can be done. Keep reading below to learn about the best video collage maker for PC.
In this article
01 [Top 10 Video Collage Makers for Pc](#Part 1)
02 [Alternatives to Video Collage Maker for Pc](#Part 2)
Part 1 Top 10 video collage makers for PC
Among the long list of tools available, below we have shortlisted the top 10 PC tools that can be used for creating a video collage.
01**Wondershare Filmora Video Editor **
This Windows and Mac-based software is the best choice when it comes to creating a simple video collage in an effortless manner.
Key features
● Create a video collage using the split-screen feature of the software.
● Excellent video editing tool supporting advanced features for creating professional-looking videos.
● Support customizable animation options along with precise editing functions.
● Support to multiple audio-related features like automatic audio sync, audio compression, audio transitions, and more.
● Offers of stock collection of images, and other media files.
● Windows and Mac support.
For Win 7 or later (64-bit)
For macOS 10.12 or later
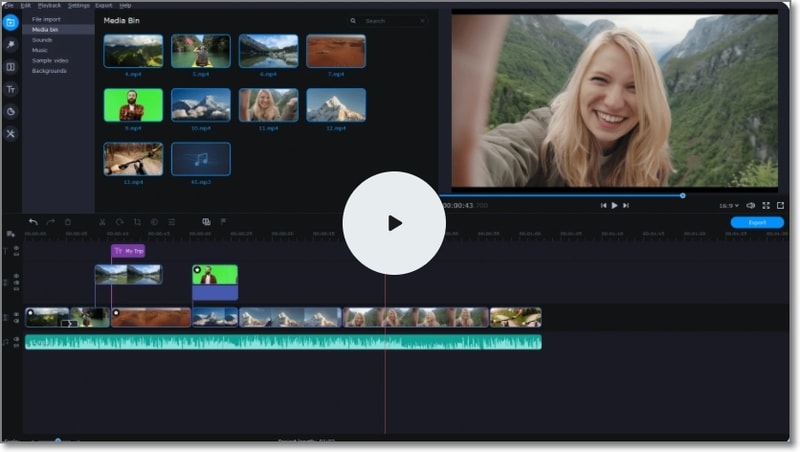
04Movavi Video Editor Plus
Unleash your creativity and make stunning videos including video collages using this excellent software.
Key features:
● Create stunning video collages with multiple video customization options.
● Allows adding titles, transitions, stickers, and filters.
● Option to apply chroma-key for changing the background.
● Option for creating automatic video collages.
● User-friendly interface.
● Windows and Mac support.
05Aiseesoft Video Converter Ultimate
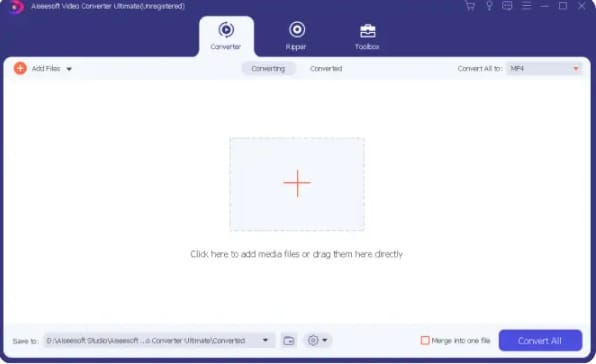
Though the name suggests the software to be a video conversion tool, it is a multi-tasking software that can perform a variety of functions including video collage making and thus can be considered as a decent video collage app for PC.
Key features
● A feature-rich program that can also be used for creating a video collage.
● Allows performing a variety of features like video conversion, editing, compression, and more.
● Option for editing the video effects and also editing ID3 info.
● Create interesting GIF animations.
● Simple and easy-to-understand layout.
● Windows and Mac support.
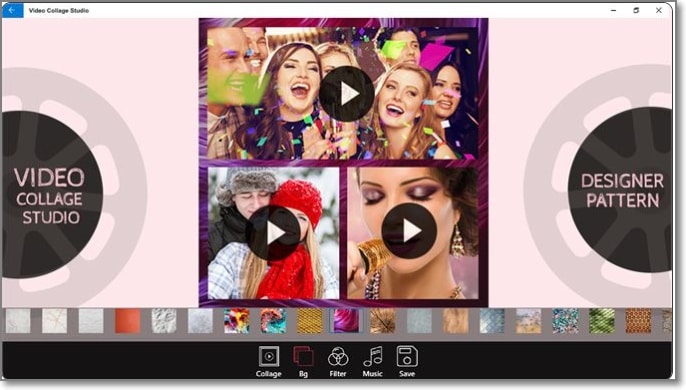
06Cidade Video Collage Studio
Using this intuitive tool, you can quickly create a video collage by combining all your favorite videos in one place.
Key features
● Create a video collage by combining multiple videos or creating a video grid.
● Intuitive and user-friendly interface.
● Multiple-grid options to choose from.
● Allows applying effects like Sepia, Lomo, and others.
● Background audio or music files can be added.
● Option to change the background color and also preview the video.
07Blu-ray Master Video Converter Ultimate
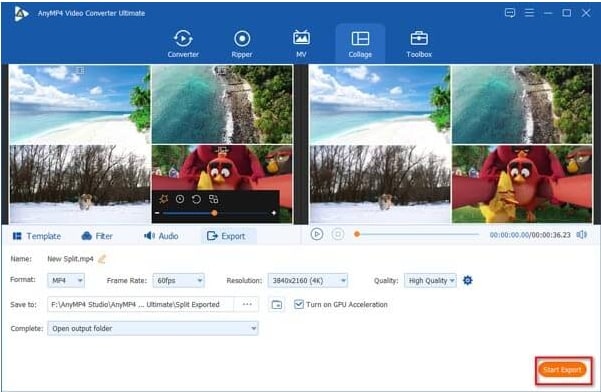
This is a video toolbox supporting multiple functions that also include creating a video collage.
Key feature
● Create a video collage using high-quality videos.
● Support customizing and editing videos using several built-in tools.
● Video conversion to over 500 formats supported.
● Multiple layouts and templates for video collage are available.
● Almost all video, image, and audio formats are supported.
08Adobe Premiere Elements
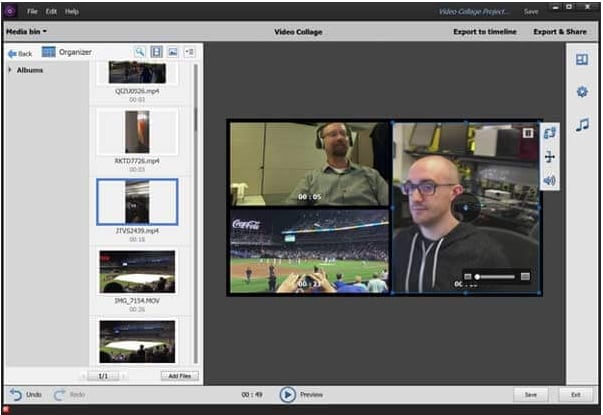
If you are looking for an advanced and professional tool for creating a video collage and for other video editing needs, this is the right choice.
Key features:
● Create professional-looking collages using high-quality video files.
● The interface is clean with support for advanced functions.
● Option for adding multiple video effects.
● Comes with help documents and guides to help you with the software functions.
● Windows and Mac support.
09Collage Maker
For creating a simple video collage on your Windows system this is a good tool to consider.
Key features
● Simple and basic collage-making tool.
● Comes with customizable and adjustable layout options.
● Option to add stickers ad text to the collage.
● Allows mixing videos, and images along with the music file.

1010. iMovie
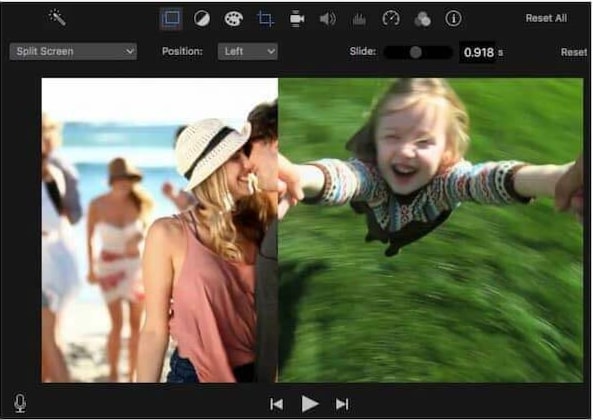
For Mac users, iMovie is the default video editing tool that is pre-installed on the system. Besides editing functions, the tool can also perform other tasks like creating a video collage.
Key features:
● Allows to quickly create a video collage.
● Intuitive interface.
● Comes pre-installed with Mac systems.
● Transitions and other effects can be added.
Part 2 Alternatives to video collage maker for PC
If you do not want to download any additional software on your PC for creating a video collage, there are alternatives available in form of online tools and phone-based apps. The online tools are free and simple to use supporting all basic and needed functions. Some of the popular names in the category include FastReels, Typito, Kapwing, and more.
Apps are a great option when you want to create a collage on your mobile phone. Multiple apps for the task are available on the Google play store and Apple Store. Some of the widely used ones are PicStich, PicPlayPost Movie Video Editor, Mojo, and others.
● Ending Thoughts →
● Video collages are an interesting way to combine and play short multiple videos or play them in a grid.
● There are several PC-based video collage maker tools available like Wondershare Filmora, and others.
● As alternatives, you can use online tools or phone-based apps for creating a video collage.
Video collages are a great way to play multiple short videos at the same time. These collages can be used for different purposes and platforms like social media platforms, online video sharing sites, brand promotion, announcing an event or a service, and similar others.

Whatever may be the situation, you would need a good and feature-packed tool for creating such a collage so that videos look perfect in a frame, background audio can be added, and other customizations can be done. Keep reading below to learn about the best video collage maker for PC.
In this article
01 [Top 10 Video Collage Makers for Pc](#Part 1)
02 [Alternatives to Video Collage Maker for Pc](#Part 2)
Part 1 Top 10 video collage makers for PC
Among the long list of tools available, below we have shortlisted the top 10 PC tools that can be used for creating a video collage.
01**Wondershare Filmora Video Editor **
This Windows and Mac-based software is the best choice when it comes to creating a simple video collage in an effortless manner.
Key features
● Create a video collage using the split-screen feature of the software.
● Excellent video editing tool supporting advanced features for creating professional-looking videos.
● Support customizable animation options along with precise editing functions.
● Support to multiple audio-related features like automatic audio sync, audio compression, audio transitions, and more.
● Offers of stock collection of images, and other media files.
● Windows and Mac support.
For Win 7 or later (64-bit)
For macOS 10.12 or later
04Movavi Video Editor Plus
Unleash your creativity and make stunning videos including video collages using this excellent software.
Key features:
● Create stunning video collages with multiple video customization options.
● Allows adding titles, transitions, stickers, and filters.
● Option to apply chroma-key for changing the background.
● Option for creating automatic video collages.
● User-friendly interface.
● Windows and Mac support.

05Aiseesoft Video Converter Ultimate
Though the name suggests the software to be a video conversion tool, it is a multi-tasking software that can perform a variety of functions including video collage making and thus can be considered as a decent video collage app for PC.
Key features
● A feature-rich program that can also be used for creating a video collage.
● Allows performing a variety of features like video conversion, editing, compression, and more.
● Option for editing the video effects and also editing ID3 info.
● Create interesting GIF animations.
● Simple and easy-to-understand layout.
● Windows and Mac support.

06Cidade Video Collage Studio
Using this intuitive tool, you can quickly create a video collage by combining all your favorite videos in one place.
Key features
● Create a video collage by combining multiple videos or creating a video grid.
● Intuitive and user-friendly interface.
● Multiple-grid options to choose from.
● Allows applying effects like Sepia, Lomo, and others.
● Background audio or music files can be added.
● Option to change the background color and also preview the video.

07Blu-ray Master Video Converter Ultimate
This is a video toolbox supporting multiple functions that also include creating a video collage.
Key feature
● Create a video collage using high-quality videos.
● Support customizing and editing videos using several built-in tools.
● Video conversion to over 500 formats supported.
● Multiple layouts and templates for video collage are available.
● Almost all video, image, and audio formats are supported.

08Adobe Premiere Elements
If you are looking for an advanced and professional tool for creating a video collage and for other video editing needs, this is the right choice.
Key features:
● Create professional-looking collages using high-quality video files.
● The interface is clean with support for advanced functions.
● Option for adding multiple video effects.
● Comes with help documents and guides to help you with the software functions.
● Windows and Mac support.

09Collage Maker
For creating a simple video collage on your Windows system this is a good tool to consider.
Key features
● Simple and basic collage-making tool.
● Comes with customizable and adjustable layout options.
● Option to add stickers ad text to the collage.
● Allows mixing videos, and images along with the music file.

1010. iMovie
For Mac users, iMovie is the default video editing tool that is pre-installed on the system. Besides editing functions, the tool can also perform other tasks like creating a video collage.
Key features:
● Allows to quickly create a video collage.
● Intuitive interface.
● Comes pre-installed with Mac systems.
● Transitions and other effects can be added.

Part 2 Alternatives to video collage maker for PC
If you do not want to download any additional software on your PC for creating a video collage, there are alternatives available in form of online tools and phone-based apps. The online tools are free and simple to use supporting all basic and needed functions. Some of the popular names in the category include FastReels, Typito, Kapwing, and more.
Apps are a great option when you want to create a collage on your mobile phone. Multiple apps for the task are available on the Google play store and Apple Store. Some of the widely used ones are PicStich, PicPlayPost Movie Video Editor, Mojo, and others.
● Ending Thoughts →
● Video collages are an interesting way to combine and play short multiple videos or play them in a grid.
● There are several PC-based video collage maker tools available like Wondershare Filmora, and others.
● As alternatives, you can use online tools or phone-based apps for creating a video collage.
Video collages are a great way to play multiple short videos at the same time. These collages can be used for different purposes and platforms like social media platforms, online video sharing sites, brand promotion, announcing an event or a service, and similar others.

Whatever may be the situation, you would need a good and feature-packed tool for creating such a collage so that videos look perfect in a frame, background audio can be added, and other customizations can be done. Keep reading below to learn about the best video collage maker for PC.
In this article
01 [Top 10 Video Collage Makers for Pc](#Part 1)
02 [Alternatives to Video Collage Maker for Pc](#Part 2)
Part 1 Top 10 video collage makers for PC
Among the long list of tools available, below we have shortlisted the top 10 PC tools that can be used for creating a video collage.
01**Wondershare Filmora Video Editor **
This Windows and Mac-based software is the best choice when it comes to creating a simple video collage in an effortless manner.
Key features
● Create a video collage using the split-screen feature of the software.
● Excellent video editing tool supporting advanced features for creating professional-looking videos.
● Support customizable animation options along with precise editing functions.
● Support to multiple audio-related features like automatic audio sync, audio compression, audio transitions, and more.
● Offers of stock collection of images, and other media files.
● Windows and Mac support.
For Win 7 or later (64-bit)
For macOS 10.12 or later
04Movavi Video Editor Plus
Unleash your creativity and make stunning videos including video collages using this excellent software.
Key features:
● Create stunning video collages with multiple video customization options.
● Allows adding titles, transitions, stickers, and filters.
● Option to apply chroma-key for changing the background.
● Option for creating automatic video collages.
● User-friendly interface.
● Windows and Mac support.

05Aiseesoft Video Converter Ultimate
Though the name suggests the software to be a video conversion tool, it is a multi-tasking software that can perform a variety of functions including video collage making and thus can be considered as a decent video collage app for PC.
Key features
● A feature-rich program that can also be used for creating a video collage.
● Allows performing a variety of features like video conversion, editing, compression, and more.
● Option for editing the video effects and also editing ID3 info.
● Create interesting GIF animations.
● Simple and easy-to-understand layout.
● Windows and Mac support.

06Cidade Video Collage Studio
Using this intuitive tool, you can quickly create a video collage by combining all your favorite videos in one place.
Key features
● Create a video collage by combining multiple videos or creating a video grid.
● Intuitive and user-friendly interface.
● Multiple-grid options to choose from.
● Allows applying effects like Sepia, Lomo, and others.
● Background audio or music files can be added.
● Option to change the background color and also preview the video.

07Blu-ray Master Video Converter Ultimate
This is a video toolbox supporting multiple functions that also include creating a video collage.
Key feature
● Create a video collage using high-quality videos.
● Support customizing and editing videos using several built-in tools.
● Video conversion to over 500 formats supported.
● Multiple layouts and templates for video collage are available.
● Almost all video, image, and audio formats are supported.

08Adobe Premiere Elements
If you are looking for an advanced and professional tool for creating a video collage and for other video editing needs, this is the right choice.
Key features:
● Create professional-looking collages using high-quality video files.
● The interface is clean with support for advanced functions.
● Option for adding multiple video effects.
● Comes with help documents and guides to help you with the software functions.
● Windows and Mac support.

09Collage Maker
For creating a simple video collage on your Windows system this is a good tool to consider.
Key features
● Simple and basic collage-making tool.
● Comes with customizable and adjustable layout options.
● Option to add stickers ad text to the collage.
● Allows mixing videos, and images along with the music file.

1010. iMovie
For Mac users, iMovie is the default video editing tool that is pre-installed on the system. Besides editing functions, the tool can also perform other tasks like creating a video collage.
Key features:
● Allows to quickly create a video collage.
● Intuitive interface.
● Comes pre-installed with Mac systems.
● Transitions and other effects can be added.

Part 2 Alternatives to video collage maker for PC
If you do not want to download any additional software on your PC for creating a video collage, there are alternatives available in form of online tools and phone-based apps. The online tools are free and simple to use supporting all basic and needed functions. Some of the popular names in the category include FastReels, Typito, Kapwing, and more.
Apps are a great option when you want to create a collage on your mobile phone. Multiple apps for the task are available on the Google play store and Apple Store. Some of the widely used ones are PicStich, PicPlayPost Movie Video Editor, Mojo, and others.
● Ending Thoughts →
● Video collages are an interesting way to combine and play short multiple videos or play them in a grid.
● There are several PC-based video collage maker tools available like Wondershare Filmora, and others.
● As alternatives, you can use online tools or phone-based apps for creating a video collage.
Video collages are a great way to play multiple short videos at the same time. These collages can be used for different purposes and platforms like social media platforms, online video sharing sites, brand promotion, announcing an event or a service, and similar others.

Whatever may be the situation, you would need a good and feature-packed tool for creating such a collage so that videos look perfect in a frame, background audio can be added, and other customizations can be done. Keep reading below to learn about the best video collage maker for PC.
In this article
01 [Top 10 Video Collage Makers for Pc](#Part 1)
02 [Alternatives to Video Collage Maker for Pc](#Part 2)
Part 1 Top 10 video collage makers for PC
Among the long list of tools available, below we have shortlisted the top 10 PC tools that can be used for creating a video collage.
01**Wondershare Filmora Video Editor **
This Windows and Mac-based software is the best choice when it comes to creating a simple video collage in an effortless manner.
Key features
● Create a video collage using the split-screen feature of the software.
● Excellent video editing tool supporting advanced features for creating professional-looking videos.
● Support customizable animation options along with precise editing functions.
● Support to multiple audio-related features like automatic audio sync, audio compression, audio transitions, and more.
● Offers of stock collection of images, and other media files.
● Windows and Mac support.
For Win 7 or later (64-bit)
For macOS 10.12 or later
04Movavi Video Editor Plus
Unleash your creativity and make stunning videos including video collages using this excellent software.
Key features:
● Create stunning video collages with multiple video customization options.
● Allows adding titles, transitions, stickers, and filters.
● Option to apply chroma-key for changing the background.
● Option for creating automatic video collages.
● User-friendly interface.
● Windows and Mac support.

05Aiseesoft Video Converter Ultimate
Though the name suggests the software to be a video conversion tool, it is a multi-tasking software that can perform a variety of functions including video collage making and thus can be considered as a decent video collage app for PC.
Key features
● A feature-rich program that can also be used for creating a video collage.
● Allows performing a variety of features like video conversion, editing, compression, and more.
● Option for editing the video effects and also editing ID3 info.
● Create interesting GIF animations.
● Simple and easy-to-understand layout.
● Windows and Mac support.

06Cidade Video Collage Studio
Using this intuitive tool, you can quickly create a video collage by combining all your favorite videos in one place.
Key features
● Create a video collage by combining multiple videos or creating a video grid.
● Intuitive and user-friendly interface.
● Multiple-grid options to choose from.
● Allows applying effects like Sepia, Lomo, and others.
● Background audio or music files can be added.
● Option to change the background color and also preview the video.

07Blu-ray Master Video Converter Ultimate
This is a video toolbox supporting multiple functions that also include creating a video collage.
Key feature
● Create a video collage using high-quality videos.
● Support customizing and editing videos using several built-in tools.
● Video conversion to over 500 formats supported.
● Multiple layouts and templates for video collage are available.
● Almost all video, image, and audio formats are supported.

08Adobe Premiere Elements
If you are looking for an advanced and professional tool for creating a video collage and for other video editing needs, this is the right choice.
Key features:
● Create professional-looking collages using high-quality video files.
● The interface is clean with support for advanced functions.
● Option for adding multiple video effects.
● Comes with help documents and guides to help you with the software functions.
● Windows and Mac support.

09Collage Maker
For creating a simple video collage on your Windows system this is a good tool to consider.
Key features
● Simple and basic collage-making tool.
● Comes with customizable and adjustable layout options.
● Option to add stickers ad text to the collage.
● Allows mixing videos, and images along with the music file.

1010. iMovie
For Mac users, iMovie is the default video editing tool that is pre-installed on the system. Besides editing functions, the tool can also perform other tasks like creating a video collage.
Key features:
● Allows to quickly create a video collage.
● Intuitive interface.
● Comes pre-installed with Mac systems.
● Transitions and other effects can be added.

Part 2 Alternatives to video collage maker for PC
If you do not want to download any additional software on your PC for creating a video collage, there are alternatives available in form of online tools and phone-based apps. The online tools are free and simple to use supporting all basic and needed functions. Some of the popular names in the category include FastReels, Typito, Kapwing, and more.
Apps are a great option when you want to create a collage on your mobile phone. Multiple apps for the task are available on the Google play store and Apple Store. Some of the widely used ones are PicStich, PicPlayPost Movie Video Editor, Mojo, and others.
● Ending Thoughts →
● Video collages are an interesting way to combine and play short multiple videos or play them in a grid.
● There are several PC-based video collage maker tools available like Wondershare Filmora, and others.
● As alternatives, you can use online tools or phone-based apps for creating a video collage.
Also read:
- New 2024 Approved Easy Ways to Create Procreate GIFs
- In 2024, Are You Trying to Make Slow-Mo Videos on Instagram? In This Article, We Will Discuss Top-Rated Ways to Produce Perfect Slow-Motion Videos for Instagram
- Top Photo Video Maker Apps with Song
- Updated In 2024, How to Create Intro with Renderforest
- How To Change Text In Premiere Pro for 2024
- 2 Effective Ways to Easily Convert VTT to SRT for 2024
- 2024 Approved Discover the Top 10 Video Editing Apps with Templates for Professional-Grade Results. Edit Like a Pro with These Tools
- New 2024 Approved Creating Video Testimonials
- Updated Add Green Screen Video on TikTok
- The Way to Quick and Efficient Editing | Keyboard Shortcuts in Filmora for 2024
- What Is Animated GIF | GIF Example & Advantages of GIF
- New Create Risograph Effect In Photoshop A Beginners Guide
- In 2024, Complete Tutorial to Make an Impressive Countdown Timer Video
- Fun & Easy Masking Tricks in Filmora for 2024
- Updated In 2024, Best 10 3D Slideshow Software Review
- New Top List of Best VHS Video Effect Makers
- New In 2024, Best Practical Tips to Improve Your Lighting in the Sun
- How to Use Canva Color Match for 2024
- In 2024, Are You Looking for Dark LUTs Premiere Pro Free? This Article Discusses the Dark Moody LUTs with Top Recommendations for Beginning Visual Editing
- Bricked Your Tecno Camon 30 Pro 5G? Heres A Full Solution | Dr.fone
- Life360 Circle Everything You Need to Know On Tecno Spark 20 Pro+ | Dr.fone
- How to Restore Deleted Honor 90 GT Contacts An Easy Method Explained.
- How To Bypass the Required Apple Store Verification For iPhone XS | Dr.fone
- How to recover deleted photos from Tecno Spark 20C.
- How To Unlock a Vivo Y200 Easily?
- How to Change/Add Location Filters on Snapchat For your Apple iPhone SE (2020) | Dr.fone
- Repair Video Tool - Repair all your damaged video files of Oppo A2
- What Does Enter PUK Code Mean And Why Did The Sim Get PUK Blocked On Vivo Y02T Device
- 7 Ways to Unlock a Locked Xiaomi Mix Fold 3 Phone
- Top 5 Tracking Apps to Track Oppo Find X7 without Them Knowing | Dr.fone
- How To Unlink Apple ID From Apple iPhone 14
- 3 Ways to Change Location on Facebook Marketplace for Apple iPhone SE (2020) | Dr.fone
- Title: Complete Guide to Make a Super Easy Rotating Video Effect for 2024
- Author: Chloe
- Created at : 2024-05-20 03:37:59
- Updated at : 2024-05-21 03:37:59
- Link: https://ai-editing-video.techidaily.com/complete-guide-to-make-a-super-easy-rotating-video-effect-for-2024/
- License: This work is licensed under CC BY-NC-SA 4.0.

