
Create Slide Masking Effect Intro

Create Slide Masking Effect Intro
Preparation
What you need to prepare:
- A computer (Windows or macOS)
- Your video materials.
- Filmora video editor
Step 1
The first thing you want to do is download the Filmora video editor . Hit Install and allow the application to start automatically.
Step 2
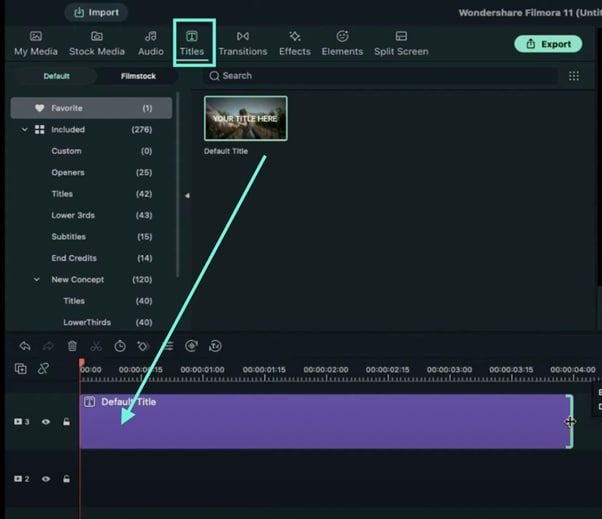
Once the program loads, head straight over to the Titles tab and drag the Basic Title to Track 3 on the Timeline.
Also, drag the clip from the right side towards the left to make it 4 seconds long.
Step 3
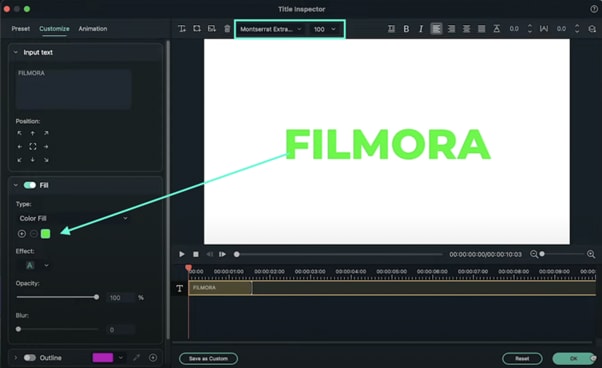
Double-click on the Title clip in the Timeline and edit your Title’s font and size. A panel like this one should pop up when you double-click. When you’re done, click OK.
Step 4
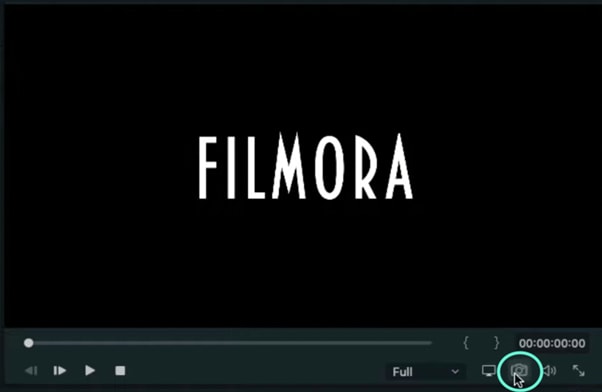
Now, take a snapshot of the new Title that you just created.
Step 5
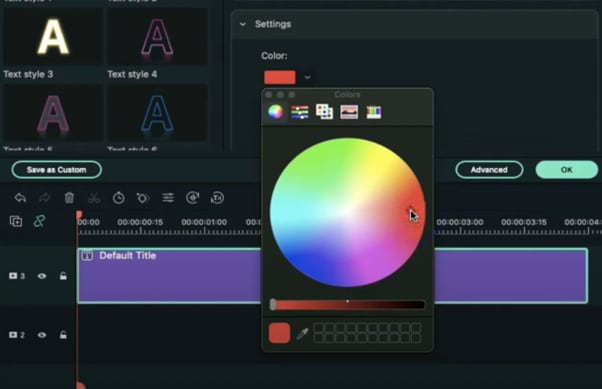
Next, we’re going to need a few more snapshots. But this time, double-click on the Title again and change its color to whichever one you like. Once you’ve changed its color, go ahead and click the same button as in Step 4 to take another snapshot.
Step 6
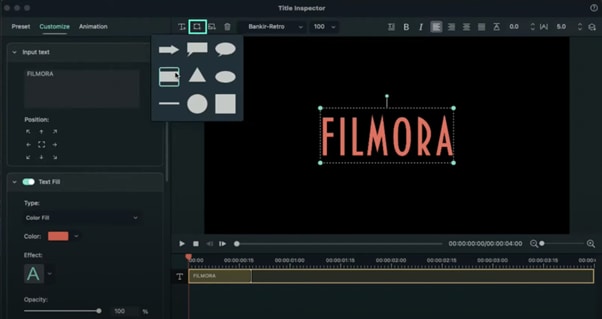
Next, double-click on the Title once again and go to “ADVANCED”. From there, go to Add Shape and select the Rectangle shape.
Step 7
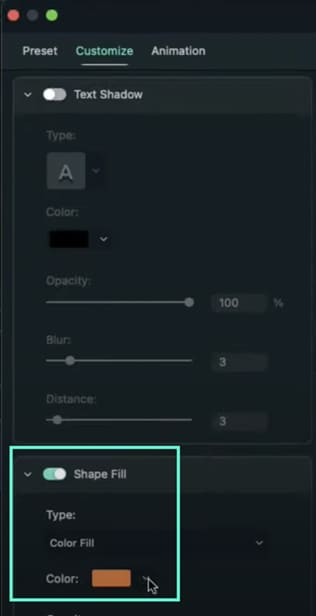
Look to the left side panel and switch OFF the Text Fill button. Then, scroll down to the bottom and change the Shape Fill color to White.
Step 8
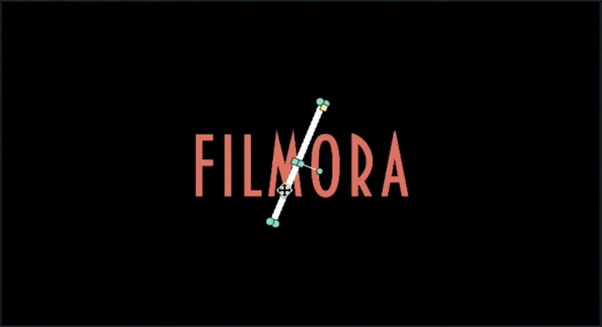
Now, adjust the rectangle’s shape to a thin line, rotate it, and move it into position like in the image.
Step 9
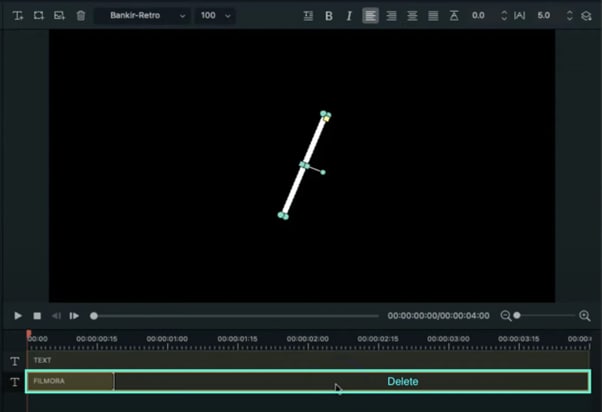
Delete the text layer from the Advanced panel.
Step 10
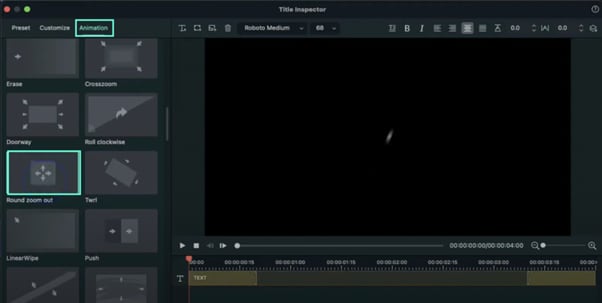
The final step in the Advanced panel is to go to the Animation tab from the left side panel and select the Round Zoom Out animation preset. Then, click OK.
Step 11
Now, it’s time to align the clips in the Timeline. First, move your Default Title clip 5 frames further. Then, drag the first snapshot to Track one and move it 8 frames forward.

Step 12
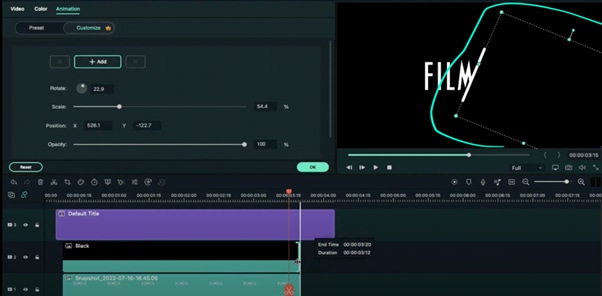
Go to Sample Color and drag the Black color to Track 3 in the Timeline. Align it directly on top of where the clip in Track 1 starts. Then, double-click on the black color clip and align it like in the image here.
Step 13
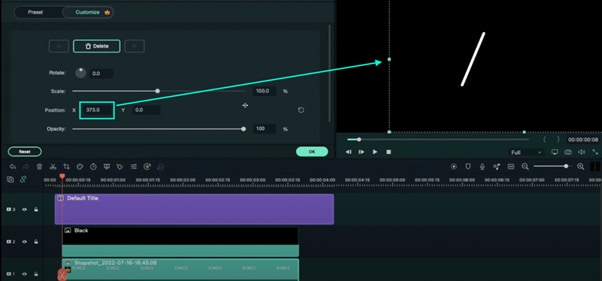
Now, place the Playhead at the beginning of the clip in Track 1. Then, double-click the snapshot clip in Track 1. Now, start increasing the value of the X-axis until it makes the text disappear, just as in this image here.
Step 14
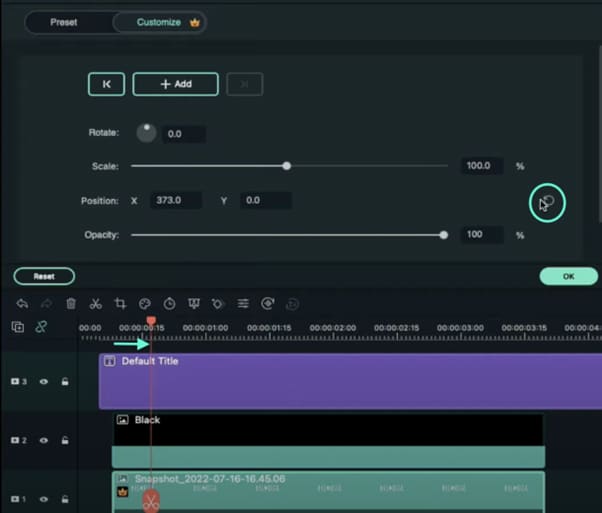
Next, move the Playhead 10 frames further. Then, reset the position values by clicking on this button.
Step 15
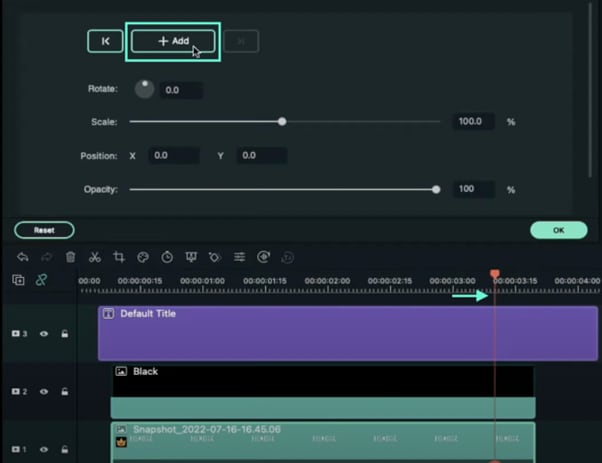
Now, move the Playhead once more and set it at 3 seconds and 10 frames. Then, click on the “+Add” button to add another keyframe.
Step 16
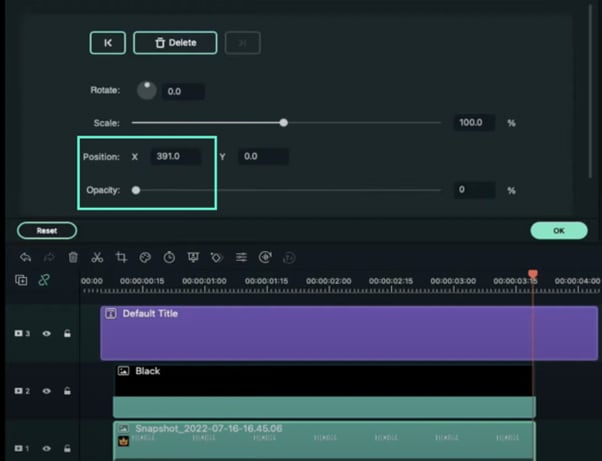
Move the Playhead to the end of the snapshot clip and set the value of the X axis to 391. Then, reduce the opacity to 0%. Move the Playhead at the start of the snapshot clip and reduce the opacity to 0% there as well.
Step 17
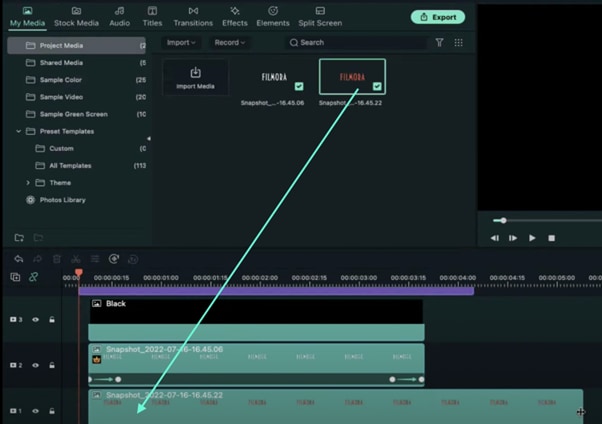
Next, Export the clip to your PC. Just hit the Export button near the top-center of the screen. Then, select all of your clips in the Timeline and move them one track above. Then, drag the second snapshot you took earlier to Track 1.
Step 18
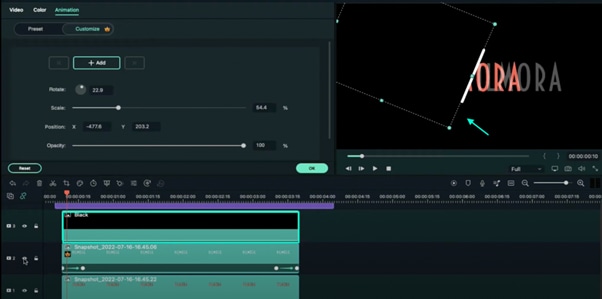
Select the Black Color clip once again and move the position of the Black box like this.
Step 19
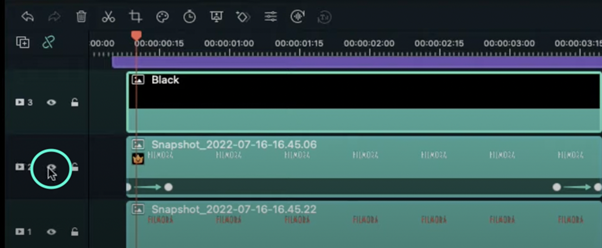
Now, hide the clip on Track 2 by pressing this button next to it.
Step 20
Click on the second snapshot clip located in Track 1. Then, repeat the process of adding keyframes just like we did with the first snapshot. Review the previous steps to get this right. This time, remember to slide the X axis to the LEFT instead of RIGHT. Just drag the values to the left.
Step 21
Export this. Then, delete all the clips in the Timeline. Now, import both clips you exported earlier during these steps. Also, import a background video that you’d like to appear behind your slide masking text effect.
Step 22
Next, drag the clips to Timeline and adjust each of them to be the same length. Four seconds is a good option.
Step 23
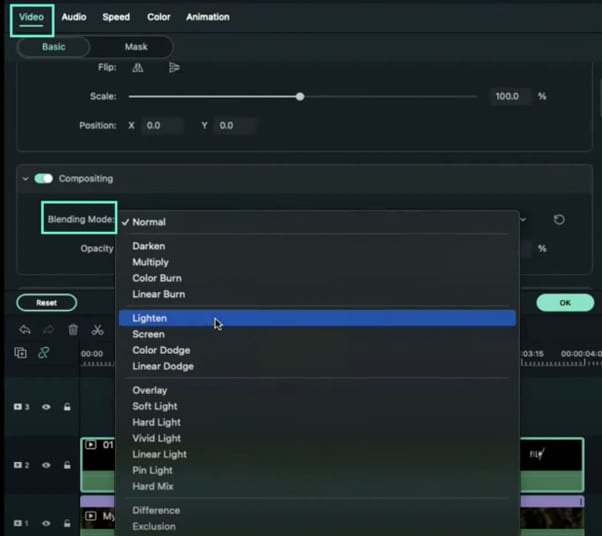
Double-click on the first clip (not the background clip). Go to Video and under Blending Mode select Lighten.
Step 24
Drop your second clip to Track three and repeat the same edits for it.
Step 25
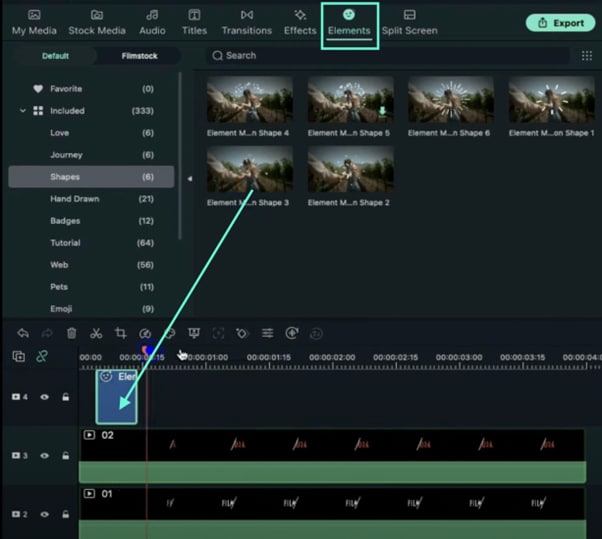
Set the Playhead on frame three and drop the Motion Shape element from the Elements tab on Track 4.
Step 26
Finally, copy and paste the element near the end of the video and Render the project. Then, review your masterpiece. That’s it!

Summary
What you’ve learned:
- Create a slide masking effect intro in Filmora
- Customize masks in the Filmora video editor
- How to take snapshots and edit them thoroughly
- Add keyframes
What you need to prepare:
- A computer (Windows or macOS)
- Your video materials.
- Filmora video editor
Step 1
The first thing you want to do is download the Filmora video editor . Hit Install and allow the application to start automatically.
Step 2
Once the program loads, head straight over to the Titles tab and drag the Basic Title to Track 3 on the Timeline.
Also, drag the clip from the right side towards the left to make it 4 seconds long.

Step 3
Double-click on the Title clip in the Timeline and edit your Title’s font and size. A panel like this one should pop up when you double-click. When you’re done, click OK.

Step 4
Now, take a snapshot of the new Title that you just created.

Step 5
Next, we’re going to need a few more snapshots. But this time, double-click on the Title again and change its color to whichever one you like. Once you’ve changed its color, go ahead and click the same button as in Step 4 to take another snapshot.

Step 6
Next, double-click on the Title once again and go to “ADVANCED”. From there, go to Add Shape and select the Rectangle shape.

Step 7
Look to the left side panel and switch OFF the Text Fill button. Then, scroll down to the bottom and change the Shape Fill color to White.

Step 8
Now, adjust the rectangle’s shape to a thin line, rotate it, and move it into position like in the image.

Step 9
Delete the text layer from the Advanced panel.

Step 10
The final step in the Advanced panel is to go to the Animation tab from the left side panel and select the Round Zoom Out animation preset. Then, click OK.

Step 11
Now, it’s time to align the clips in the Timeline. First, move your Default Title clip 5 frames further. Then, drag the first snapshot to Track one and move it 8 frames forward.

Step 12
Go to Sample Color and drag the Black color to Track 3 in the Timeline. Align it directly on top of where the clip in Track 1 starts. Then, double-click on the black color clip and align it like in the image here.

Step 13
Now, place the Playhead at the beginning of the clip in Track 1. Then, double-click the snapshot clip in Track 1. Now, start increasing the value of the X-axis until it makes the text disappear, just as in this image here.

Step 14
Next, move the Playhead 10 frames further. Then, reset the position values by clicking on this button.

Step 15
Now, move the Playhead once more and set it at 3 seconds and 10 frames. Then, click on the “+Add” button to add another keyframe.

Step 16
Move the Playhead to the end of the snapshot clip and set the value of the X axis to 391. Then, reduce the opacity to 0%. Move the Playhead at the start of the snapshot clip and reduce the opacity to 0% there as well.

Step 17
Next, Export the clip to your PC. Just hit the Export button near the top-center of the screen. Then, select all of your clips in the Timeline and move them one track above. Then, drag the second snapshot you took earlier to Track 1.

Step 18
Select the Black Color clip once again and move the position of the Black box like this.

Step 19
Now, hide the clip on Track 2 by pressing this button next to it.

Step 20
Click on the second snapshot clip located in Track 1. Then, repeat the process of adding keyframes just like we did with the first snapshot. Review the previous steps to get this right. This time, remember to slide the X axis to the LEFT instead of RIGHT. Just drag the values to the left.
Step 21
Export this. Then, delete all the clips in the Timeline. Now, import both clips you exported earlier during these steps. Also, import a background video that you’d like to appear behind your slide masking text effect.
Step 22
Next, drag the clips to Timeline and adjust each of them to be the same length. Four seconds is a good option.
Step 23
Double-click on the first clip (not the background clip). Go to Video and under Blending Mode select Lighten.

Step 24
Drop your second clip to Track three and repeat the same edits for it.
Step 25
Set the Playhead on frame three and drop the Motion Shape element from the Elements tab on Track 4.

Step 26
Finally, copy and paste the element near the end of the video and Render the project. Then, review your masterpiece. That’s it!

Summary
What you’ve learned:
- Create a slide masking effect intro in Filmora
- Customize masks in the Filmora video editor
- How to take snapshots and edit them thoroughly
- Add keyframes
What you need to prepare:
- A computer (Windows or macOS)
- Your video materials.
- Filmora video editor
Step 1
The first thing you want to do is download the Filmora video editor . Hit Install and allow the application to start automatically.
Step 2
Once the program loads, head straight over to the Titles tab and drag the Basic Title to Track 3 on the Timeline.
Also, drag the clip from the right side towards the left to make it 4 seconds long.

Step 3
Double-click on the Title clip in the Timeline and edit your Title’s font and size. A panel like this one should pop up when you double-click. When you’re done, click OK.

Step 4
Now, take a snapshot of the new Title that you just created.

Step 5
Next, we’re going to need a few more snapshots. But this time, double-click on the Title again and change its color to whichever one you like. Once you’ve changed its color, go ahead and click the same button as in Step 4 to take another snapshot.

Step 6
Next, double-click on the Title once again and go to “ADVANCED”. From there, go to Add Shape and select the Rectangle shape.

Step 7
Look to the left side panel and switch OFF the Text Fill button. Then, scroll down to the bottom and change the Shape Fill color to White.

Step 8
Now, adjust the rectangle’s shape to a thin line, rotate it, and move it into position like in the image.

Step 9
Delete the text layer from the Advanced panel.

Step 10
The final step in the Advanced panel is to go to the Animation tab from the left side panel and select the Round Zoom Out animation preset. Then, click OK.

Step 11
Now, it’s time to align the clips in the Timeline. First, move your Default Title clip 5 frames further. Then, drag the first snapshot to Track one and move it 8 frames forward.

Step 12
Go to Sample Color and drag the Black color to Track 3 in the Timeline. Align it directly on top of where the clip in Track 1 starts. Then, double-click on the black color clip and align it like in the image here.

Step 13
Now, place the Playhead at the beginning of the clip in Track 1. Then, double-click the snapshot clip in Track 1. Now, start increasing the value of the X-axis until it makes the text disappear, just as in this image here.

Step 14
Next, move the Playhead 10 frames further. Then, reset the position values by clicking on this button.

Step 15
Now, move the Playhead once more and set it at 3 seconds and 10 frames. Then, click on the “+Add” button to add another keyframe.

Step 16
Move the Playhead to the end of the snapshot clip and set the value of the X axis to 391. Then, reduce the opacity to 0%. Move the Playhead at the start of the snapshot clip and reduce the opacity to 0% there as well.

Step 17
Next, Export the clip to your PC. Just hit the Export button near the top-center of the screen. Then, select all of your clips in the Timeline and move them one track above. Then, drag the second snapshot you took earlier to Track 1.

Step 18
Select the Black Color clip once again and move the position of the Black box like this.

Step 19
Now, hide the clip on Track 2 by pressing this button next to it.

Step 20
Click on the second snapshot clip located in Track 1. Then, repeat the process of adding keyframes just like we did with the first snapshot. Review the previous steps to get this right. This time, remember to slide the X axis to the LEFT instead of RIGHT. Just drag the values to the left.
Step 21
Export this. Then, delete all the clips in the Timeline. Now, import both clips you exported earlier during these steps. Also, import a background video that you’d like to appear behind your slide masking text effect.
Step 22
Next, drag the clips to Timeline and adjust each of them to be the same length. Four seconds is a good option.
Step 23
Double-click on the first clip (not the background clip). Go to Video and under Blending Mode select Lighten.

Step 24
Drop your second clip to Track three and repeat the same edits for it.
Step 25
Set the Playhead on frame three and drop the Motion Shape element from the Elements tab on Track 4.

Step 26
Finally, copy and paste the element near the end of the video and Render the project. Then, review your masterpiece. That’s it!

Summary
What you’ve learned:
- Create a slide masking effect intro in Filmora
- Customize masks in the Filmora video editor
- How to take snapshots and edit them thoroughly
- Add keyframes
What you need to prepare:
- A computer (Windows or macOS)
- Your video materials.
- Filmora video editor
Step 1
The first thing you want to do is download the Filmora video editor . Hit Install and allow the application to start automatically.
Step 2
Once the program loads, head straight over to the Titles tab and drag the Basic Title to Track 3 on the Timeline.
Also, drag the clip from the right side towards the left to make it 4 seconds long.

Step 3
Double-click on the Title clip in the Timeline and edit your Title’s font and size. A panel like this one should pop up when you double-click. When you’re done, click OK.

Step 4
Now, take a snapshot of the new Title that you just created.

Step 5
Next, we’re going to need a few more snapshots. But this time, double-click on the Title again and change its color to whichever one you like. Once you’ve changed its color, go ahead and click the same button as in Step 4 to take another snapshot.

Step 6
Next, double-click on the Title once again and go to “ADVANCED”. From there, go to Add Shape and select the Rectangle shape.

Step 7
Look to the left side panel and switch OFF the Text Fill button. Then, scroll down to the bottom and change the Shape Fill color to White.

Step 8
Now, adjust the rectangle’s shape to a thin line, rotate it, and move it into position like in the image.

Step 9
Delete the text layer from the Advanced panel.

Step 10
The final step in the Advanced panel is to go to the Animation tab from the left side panel and select the Round Zoom Out animation preset. Then, click OK.

Step 11
Now, it’s time to align the clips in the Timeline. First, move your Default Title clip 5 frames further. Then, drag the first snapshot to Track one and move it 8 frames forward.

Step 12
Go to Sample Color and drag the Black color to Track 3 in the Timeline. Align it directly on top of where the clip in Track 1 starts. Then, double-click on the black color clip and align it like in the image here.

Step 13
Now, place the Playhead at the beginning of the clip in Track 1. Then, double-click the snapshot clip in Track 1. Now, start increasing the value of the X-axis until it makes the text disappear, just as in this image here.

Step 14
Next, move the Playhead 10 frames further. Then, reset the position values by clicking on this button.

Step 15
Now, move the Playhead once more and set it at 3 seconds and 10 frames. Then, click on the “+Add” button to add another keyframe.

Step 16
Move the Playhead to the end of the snapshot clip and set the value of the X axis to 391. Then, reduce the opacity to 0%. Move the Playhead at the start of the snapshot clip and reduce the opacity to 0% there as well.

Step 17
Next, Export the clip to your PC. Just hit the Export button near the top-center of the screen. Then, select all of your clips in the Timeline and move them one track above. Then, drag the second snapshot you took earlier to Track 1.

Step 18
Select the Black Color clip once again and move the position of the Black box like this.

Step 19
Now, hide the clip on Track 2 by pressing this button next to it.

Step 20
Click on the second snapshot clip located in Track 1. Then, repeat the process of adding keyframes just like we did with the first snapshot. Review the previous steps to get this right. This time, remember to slide the X axis to the LEFT instead of RIGHT. Just drag the values to the left.
Step 21
Export this. Then, delete all the clips in the Timeline. Now, import both clips you exported earlier during these steps. Also, import a background video that you’d like to appear behind your slide masking text effect.
Step 22
Next, drag the clips to Timeline and adjust each of them to be the same length. Four seconds is a good option.
Step 23
Double-click on the first clip (not the background clip). Go to Video and under Blending Mode select Lighten.

Step 24
Drop your second clip to Track three and repeat the same edits for it.
Step 25
Set the Playhead on frame three and drop the Motion Shape element from the Elements tab on Track 4.

Step 26
Finally, copy and paste the element near the end of the video and Render the project. Then, review your masterpiece. That’s it!

Summary
What you’ve learned:
- Create a slide masking effect intro in Filmora
- Customize masks in the Filmora video editor
- How to take snapshots and edit them thoroughly
- Add keyframes
With Looping Videos, People Stay on Your Site Longer, Boosting Engagement. With Video Being Watched on Mobile over 3X More than Any Other Content, It’s an Essential Part of Mobile Advertising
Looping video is a great way to keep your audience engaged, and it can help you stand out from the crowd. The best part about looping video is that it doesn’t require any special equipment or software, so you don’t have to spend money or time learning how to do it! You can use looped clips as part of a larger advertisement campaign by repeating the same content.
Looping a video on Android is a great way to watch your favorite shows or movies without having to go through the hassle of downloading each episode or movie. You can also use it to share videos with others, which can be perfect for when you want to show off your new movie collection but don’t want to bother downloading it on your phone.
Looping a video on Android can be helpful for several reasons. First, it’s just plain fun to watch a video over and over again! Your phone doesn’t have to work as hard to keep the video playing. This means that your battery life will last longer and you’ll be able to use your phone more often without worrying about it running out of battery life quickly.
Part 1: Steps to Loop a Video on Android
Looping videos can also come in handy when trying to find something specific in a series of videos. For example, if you want to see how long it takes before someone gets hit by a car while crossing the street, then looping through the first few seconds of each clip might help find exactly what you’re looking for!
Loop a video on android is quite simple and easy. You not only can loop a video but also customize it according to your choice. Let’s take an example if you install a reverse or loop app on your mobile phone. Firstly, we install an app whose name is Boomerate reverse or loop app.
Step1 Open the app and record or select the video from the gallery
You can install it from the play-store after installation opens the app. You can record a live video by clicking on the white circle or selecting any media from your gallery. These apps allow you to create short video loops that play over and over again. They’re perfect for setting up as a screensaver or for use as a fun way to show off your favorite photos.

Step2 Crop or select the duration of the video
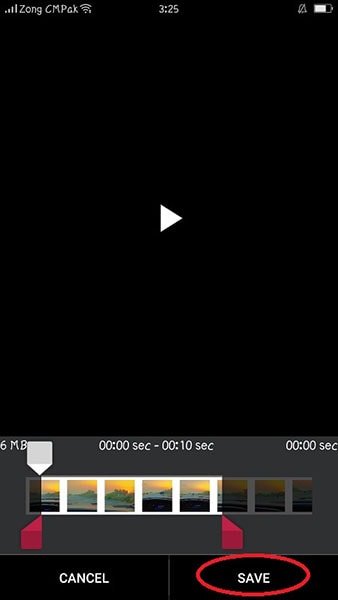
After selecting the video, you can trim your video or select the duration of your video. Suppose you have a video of 30 seconds so you can also make that video of 1 minute.
Step3 Select the loop option
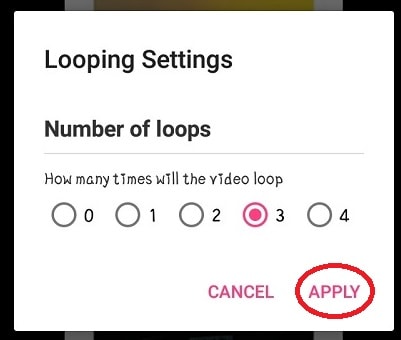
Several options appear below where you can edit effects to your video or loop your video without any interruption. You can loop your video 3 to 4 times or so on.
Step4 Save the video to the gallery
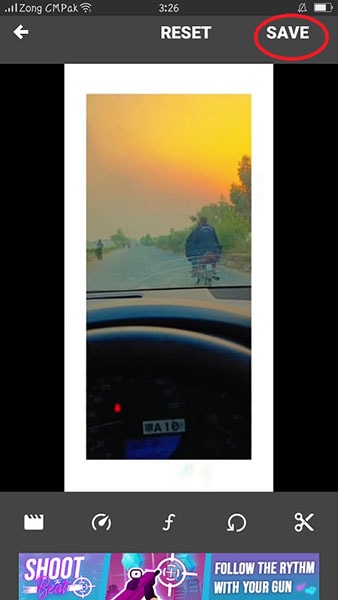
After editing the video click on the save button in the top left corner. To save the video to your phone, you can use the Save button on the video player or the Save button on the phone’s media player. You can easily access and watch your videos anytime you want.
One of the great things about Android is that you can use it to record looping videos. This can be helpful if you want to create a video that you can share with others or use as a background on your device. If you have a lot of videos that you want to keep on your phone, then you can use loop video to help you save space.
Part 2: How to Edit Time-Lapse Video on a Computer
There are a few things to keep in mind when creating a time-lapse video on a computer. First, make sure the video resolution is high enough to create a good image. Second, make sure the video is smooth and free from any choppy or jittery movements. Finally, make sure the video is timed correctly so that the scenes move in smooth, chronological order.
Here’s how you can make a time-lapse video on your computer:
Step1 Install a program like Final Cut Pro or Filmora. These programs allow you to set up scenes and transitions in advance so that when you start filming, everything is ready to go.
Step2 Get started by choosing a period and location this will help you decide what kind of scenery will make sense for your scene. The longer the period, the more important it is to pick one that has a lot of natural light. If there are no natural light sources available, consider shooting on an overcast day or at night instead.
Step3 Next, choose what type of camera angle works best for showing off your subject matter; this could be static shots or moving ones that mimic motion through time or space. Also, consider how far away from your subject matter you want viewers to see them from before deciding on which angle works best for showing both sides equally well without making either side too large.
Benefits of editing time-lapse on computer
Time-lapse videos are a great way to capture incredible footage of your life with minimal effort. You can set the speed of your camera, and then sit back and watch as it moves through time in real-time.
You can play with the speed of the camera to get just the right look. You might find that you want it to go faster or slower, or even stop altogether so that you can get a good shot of something specific in your life (like the chirping of birds or water droplets).
Editing time-lapses on your computer allows you to zoom in and out at will you don’t have to worry about adjusting the zoom on your camera when you’re filming something out of frame, which means less work for you!
Time-lapses are great for making movies that go from beginning to end you can make one movie that shows how you spend each day from sunrise until sunset or one where every hour is its scene. This way, people who watch your videos will see exactly what they need without having to listen over and over again about all things related to everyday life (which would be boring!).
Filmora editing software:
Filmora is the best editing software for video. We can help you edit your videos in a way that will make them look professional and polished. We provide an easy-to-use interface that makes it simple for any level of user to edit their videos. The interface is clean and intuitive, making it easy for even beginner users to learn how to use the software.
Filmora is designed around simplicity, so you don’t have to worry about being overwhelmed by all the features available on other editing software. You can quickly find what you’re looking for by searching through our library of over 50 000 videos or by browsing through our library of categories such as music videos, TV commercials, wedding videos, movie trailers, and much more!
Steps for editing video on Filmora:
You can use Filmora on your desktop or laptop, which makes it easy for people who want to edit their videos in the comfort of their home but don’t want to spend an arm and a leg on an expensive computer system. If you’re looking for a great way to start editing videos, look no further than Filmora!
Free Download For Win 7 or later(64-bit)
Free Download For macOS 10.14 or later
Step1 Download the Filmora software
Install Filmora from its official website and open it. Click on create a new project and then start doing your editing.

Step2 Select a video from its location
Click on the plus symbol and select the specific video you want to edit. Or you just simply drag and drop the video into the software.

Step3 Put the video on the timeline
After selecting the video place it on a timeline or drop it on the timeline. If you have multiple clips then place them in a sequence.

Step4 Customize the video
You can add different effects to your video. You can select a title page according to your choice or select any transition.

Step5 Set duration and export it
Set the duration of your video, you can also trim your video or set the time of each clip. Lastly, export the video to your desktop.
Conclusion
The use of looping video on android is a trend that works for pretty much every type of app, from gaming to streaming video to social apps and beyond. It offers another level of engagement for users, as well as something more cinematic and exciting. Furthermore, it offers an easy way to improve your app’s functionality.
After making a loop video, you must require some editing tools. But not need to worry about it, Filmora is the best editing software for your needs. First, it’s easy to use. It has a lot of features that make it so simple to get started and make you look like an expert. You can simply install it and use it, with no need for any registration.
Free Download For macOS 10.14 or later
Step1 Download the Filmora software
Install Filmora from its official website and open it. Click on create a new project and then start doing your editing.

Step2 Select a video from its location
Click on the plus symbol and select the specific video you want to edit. Or you just simply drag and drop the video into the software.

Step3 Put the video on the timeline
After selecting the video place it on a timeline or drop it on the timeline. If you have multiple clips then place them in a sequence.

Step4 Customize the video
You can add different effects to your video. You can select a title page according to your choice or select any transition.

Step5 Set duration and export it
Set the duration of your video, you can also trim your video or set the time of each clip. Lastly, export the video to your desktop.
Conclusion
The use of looping video on android is a trend that works for pretty much every type of app, from gaming to streaming video to social apps and beyond. It offers another level of engagement for users, as well as something more cinematic and exciting. Furthermore, it offers an easy way to improve your app’s functionality.
After making a loop video, you must require some editing tools. But not need to worry about it, Filmora is the best editing software for your needs. First, it’s easy to use. It has a lot of features that make it so simple to get started and make you look like an expert. You can simply install it and use it, with no need for any registration.
Easy Way to Add Transitions to Videos
Editing a video is equally important as recording a video. A raw video footage is never appealing to the eyes because of sudden cuts, unnecessary parts, and lack of eye-catching effects. That is why video editing is crucial for turning an unappealing raw video into an attention-grabbing video. As a matter of fact, the way you edit your video makes your video stand out when you are posting on social media platforms.
One of the most important aspects of video editing is adding transitions to video clips. When you jump from one scene to another and make sudden cuts, you need to apply some video transitions so that the move from one scene to another becomes soothing to the eyes. Different video editors have different transition effects and Wondershare Filmora has the best collection of transitions. We will illustrate how to add transition in Filmora and how to improve your video with video transitions.
Part 1. What is a Video transition effect?
A video transition effect is the most commonly used graphical effect in video editing. A video transition effect is essential whereby you connect one shot to another, especially when you are making sudden cuts in the video. Therefore, a video transition effect sits in between two shots and connects them together smoothly so that it does not look odd to the eyes. Video editing with transitions is a common practice for short videos on social media, presentation videos, and even movies.
A video transition effect is effective when you are jumping from two moods and emotions in the video. It is equally useful while jumping between storylines, points of view, and timelines. Besides, you can spice up your narrative and make your video eye-catching as well as eye-soothing. There are different types of video transition effects such as fade in and out, zoom in and out, dissolve, wipe and pan.
Part 2. How to add transitions in video?
To add transitions to your video, you will need a video editor. You should choose a video editor that has a wide collection of transition effects so that you can apply them to your video as per your preference. If you are someone who regularly makes videos and edits them, a variety of transitions will make the videos look different. There are Movie Maker transitions for Windows users and iMovie transitions for Mac users. But we recommend Wondershare Filmora as the best video editor for adding transitions.
<pFilmora is a professional video editor with so many different categories of transitions including the trending ones. Their team continuously adds new transitions to their collection, and you can download them and use on your videos. Starting from basic, slideshow, and social media to 3D, light and smoke, there is no dearth of transitions to fulfill your requirements. Here are the steps how to add transition in Filmora. Free Download For Win 7 or later(64-bit)
Free Download For macOS 10.14 or later
Step1 Download and install Filmora on your computer. Filmora is available for Windows and Mac users. Launch Filmora and click on New Project.

Step2 Drag and drop your video clips under Project Media folder. Thereafter, drag and drop them on Timeline.
If you have one raw video file, you can split it up into multiple video clips to add transitions in between them.
Step3 Go to Transitions tab located at the top bar. You will see all the categories of transitions on the left panel.

Step4 Once you select your desired transition effect, drag and drop it in between the video clips. You can add multiple transition effects for different video clips.

Play the video after you are done editing and adding transitions. Thereafter, click on Export button to save the video on your hard drive. You should follow the same steps on how to add transition effects in reels, status videos, and YouTube videos.
Part 3. Video transitions tips and tricks
If you want to make your video stand out by simply using video transition effects, you have to follow the following tips and tricks.
Consistency – Amateur video editors tend to use several extravagant transitions in one video that distract and even annoy the audience. You are using video transition effects not to distract but to smoothen the video content. Therefore, you need to be consistent with the video transition effect you use. You should use one or maximum of two transition effects throughout the video so that the audience does not get distracted.
Experiment – While it is true that you should not be using too many video transitions in one video, but you should definitely apply different video transition effects in different videos initially. This will help you to understand which transition is getting better traction, and thereafter, you can stick to it for the rest of your videos. This is particularly useful when you are making similar type of content for social media and video streaming sites.
Out of the Box – The reason you recommended Wondershare Filmora is that there is a huge collection of different types of transition effects. If you use the regular transitions such as fade, zoom, wipe, and dissolve, you cannot create an impression among your viewers. You have to use out of the box transitions so that your video can look and feel different even when you content is not. There are 3D effects, social media effects, and different genres of effects that can go well with your video content.
Judicious – There is a difference between transition effects and video effects. Transition effects should last only for a fraction of a second so that there is no aftereffect in mind. On the contrary, a video effect can last as long as required in the video. Therefore, do not stretch the duration of a transition effect and keep it as short as possible. Similarly, you should not use transition effects here and there unnecessarily. It should be used only when there is a proper scope such as scene cuts, mood changes, and subject changes.
Meaningful – Even transition effect has a meaning behind it and you should understand it and use wherever appropriate. For example, fade out effect signifies the fading of a scene or changing of mood. Similarly, a dissolve effect is appropriate when the subject is dissolved in certain thoughts or a scene is getting dissolved. That way the effect will look natural and more meaningful as well as impactful.
The Bottom Line
Video transition effects are essential in almost all types of videos. They enhance the video content and make the transition between scenes smoother. You should choose your video editor wisely so that you can avail different types of video transition effects. We recommend Wondershare Filmora for its better collection of video transition effects for all types of videos.
Step1 Download and install Filmora on your computer. Filmora is available for Windows and Mac users. Launch Filmora and click on New Project.
Step2 Drag and drop your video clips under Project Media folder. Thereafter, drag and drop them on Timeline.
If you have one raw video file, you can split it up into multiple video clips to add transitions in between them.
Step3 Go to Transitions tab located at the top bar. You will see all the categories of transitions on the left panel.

Step4 Once you select your desired transition effect, drag and drop it in between the video clips. You can add multiple transition effects for different video clips.

Play the video after you are done editing and adding transitions. Thereafter, click on Export button to save the video on your hard drive. You should follow the same steps on how to add transition effects in reels, status videos, and YouTube videos.
Part 3. Video transitions tips and tricks
If you want to make your video stand out by simply using video transition effects, you have to follow the following tips and tricks.
Consistency – Amateur video editors tend to use several extravagant transitions in one video that distract and even annoy the audience. You are using video transition effects not to distract but to smoothen the video content. Therefore, you need to be consistent with the video transition effect you use. You should use one or maximum of two transition effects throughout the video so that the audience does not get distracted.
Experiment – While it is true that you should not be using too many video transitions in one video, but you should definitely apply different video transition effects in different videos initially. This will help you to understand which transition is getting better traction, and thereafter, you can stick to it for the rest of your videos. This is particularly useful when you are making similar type of content for social media and video streaming sites.
Out of the Box – The reason you recommended Wondershare Filmora is that there is a huge collection of different types of transition effects. If you use the regular transitions such as fade, zoom, wipe, and dissolve, you cannot create an impression among your viewers. You have to use out of the box transitions so that your video can look and feel different even when you content is not. There are 3D effects, social media effects, and different genres of effects that can go well with your video content.
Judicious – There is a difference between transition effects and video effects. Transition effects should last only for a fraction of a second so that there is no aftereffect in mind. On the contrary, a video effect can last as long as required in the video. Therefore, do not stretch the duration of a transition effect and keep it as short as possible. Similarly, you should not use transition effects here and there unnecessarily. It should be used only when there is a proper scope such as scene cuts, mood changes, and subject changes.
Meaningful – Even transition effect has a meaning behind it and you should understand it and use wherever appropriate. For example, fade out effect signifies the fading of a scene or changing of mood. Similarly, a dissolve effect is appropriate when the subject is dissolved in certain thoughts or a scene is getting dissolved. That way the effect will look natural and more meaningful as well as impactful.
The Bottom Line
Video transition effects are essential in almost all types of videos. They enhance the video content and make the transition between scenes smoother. You should choose your video editor wisely so that you can avail different types of video transition effects. We recommend Wondershare Filmora for its better collection of video transition effects for all types of videos.
Also read:
- [New] In 2024, Lightning-Fast Video Delivery on Facebook Select Extensions & Apps
- [Updated] In 2024, Enhancing Media Workflow The Rise of Magix VPX
- [Updated] Uniting Disparate iPhone Media Into One Feed for 2024
- 2024 Approved Accurate Media Scaling Toolkit
- 2024 Approved Best Guide for Setting TikTok Countdown Timer
- Avoid Paying for Space - The Most Attractive 20+ Free Cloud Services for 2024
- Enhance Online Communication with ManyCam: Top Choice for Live Video Applications and Fake Webcams
- How to Make Canva Collages
- How to Make Eye Zoom Transition Effect with Filmora
- In 2024, 10 Free Location Spoofers to Fake GPS Location on your Nubia Z50 Ultra | Dr.fone
- In 2024, Best Ideas on Using Filmora Green Screen
- New 2024 Approved How to Create the Night-to-Day Effect Video
- New In 2024, Mastering Clean Audio Tactics to Eradicate Background Noise
- New Steps To Fade Audio In Premier Pro
- Updated Difference Between Time Lapse and Hyperlapse for 2024
- Updated Drivers Available Now: M-Audio Fast Track for Windows Operating Systems (Win11/7/8/8.1)
- Updated In 2024, Tips to Make Cinematic Color Grading
- Updated Mastering DaVinci Resolve Scopes A Comprehensive Guide for 2024
- Voice Command Mastery: The B550-XT Experience Unveiled
- Title: Create Slide Masking Effect Intro
- Author: Chloe
- Created at : 2024-09-30 09:48:48
- Updated at : 2024-10-02 23:14:03
- Link: https://ai-editing-video.techidaily.com/create-slide-masking-effect-intro/
- License: This work is licensed under CC BY-NC-SA 4.0.