:max_bytes(150000):strip_icc():format(webp)/photo-editor-working-on-computer-at-desk-in-office-946928370-5b85791746e0fb0025b40d84.jpg)
Create Slide Masking Effect Intro【Filmora】 for 2024

Create Slide Masking Effect Intro【Filmora】
Preparation
What you need to prepare:
- A computer (Windows or macOS)
- Your video materials.
- Filmora video editor
Step 1
The first thing you want to do is download the Filmora video editor . Hit Install and allow the application to start automatically.
Step 2
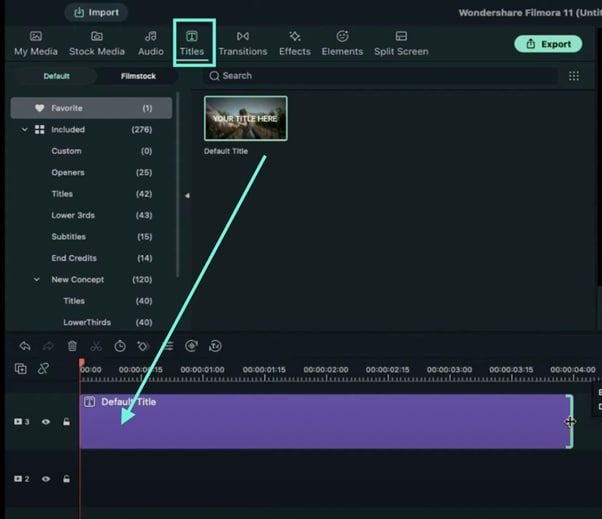
Once the program loads, head straight over to the Titles tab and drag the Basic Title to Track 3 on the Timeline.
Also, drag the clip from the right side towards the left to make it 4 seconds long.
Step 3
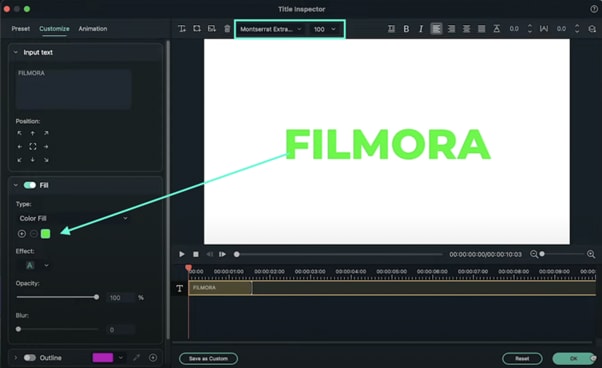
Double-click on the Title clip in the Timeline and edit your Title’s font and size. A panel like this one should pop up when you double-click. When you’re done, click OK.
Step 4
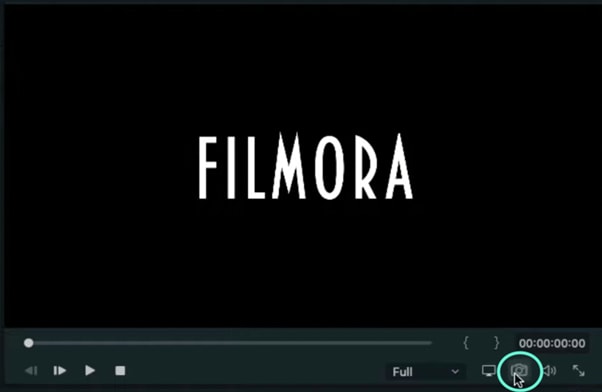
Now, take a snapshot of the new Title that you just created.
Step 5
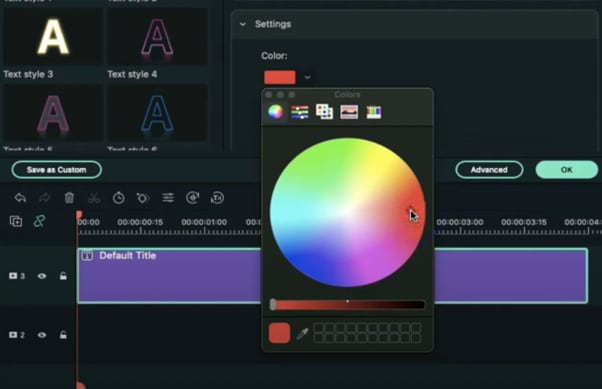
Next, we’re going to need a few more snapshots. But this time, double-click on the Title again and change its color to whichever one you like. Once you’ve changed its color, go ahead and click the same button as in Step 4 to take another snapshot.
Step 6
Next, double-click on the Title once again and go to “ADVANCED”. From there, go to Add Shape and select the Rectangle shape.
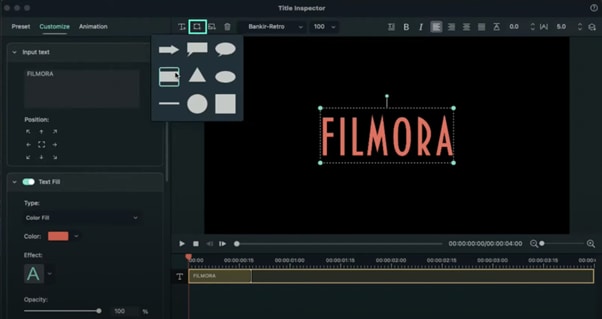
Step 7
Look to the left side panel and switch OFF the Text Fill button. Then, scroll down to the bottom and change the Shape Fill color to White.
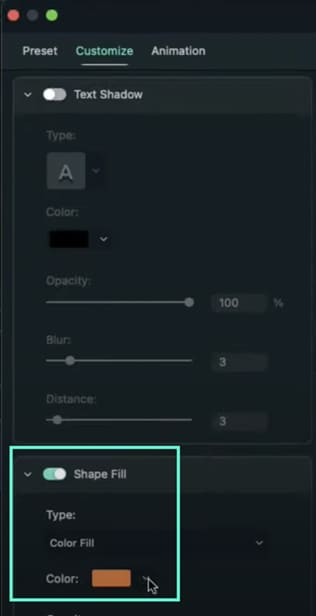
Step 8
Now, adjust the rectangle’s shape to a thin line, rotate it, and move it into position like in the image.
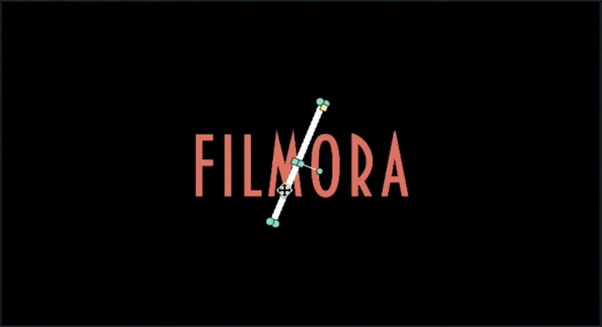
Step 9
Delete the text layer from the Advanced panel.
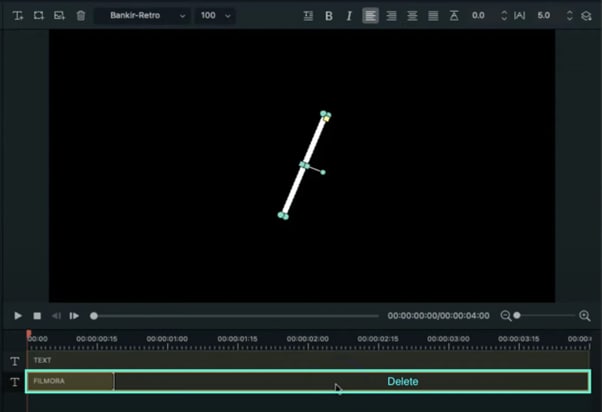
Step 10
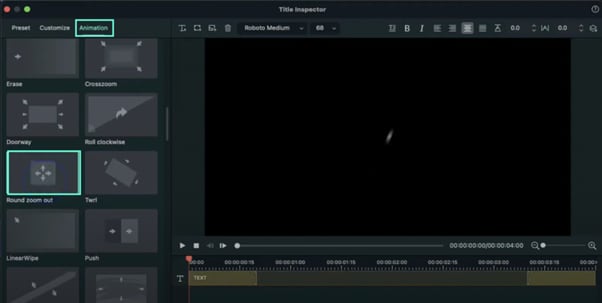
The final step in the Advanced panel is to go to the Animation tab from the left side panel and select the Round Zoom Out animation preset. Then, click OK.
Step 11
Now, it’s time to align the clips in the Timeline. First, move your Default Title clip 5 frames further. Then, drag the first snapshot to Track one and move it 8 frames forward.

Step 12
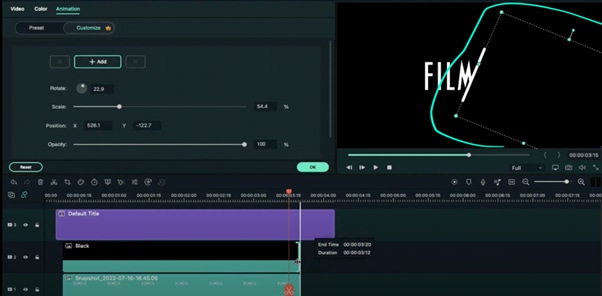
Go to Sample Color and drag the Black color to Track 3 in the Timeline. Align it directly on top of where the clip in Track 1 starts. Then, double-click on the black color clip and align it like in the image here.
Step 13
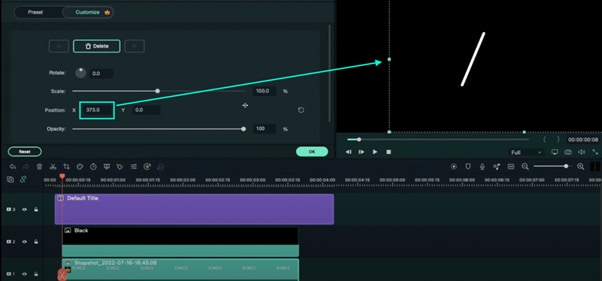
Now, place the Playhead at the beginning of the clip in Track 1. Then, double-click the snapshot clip in Track 1. Now, start increasing the value of the X-axis until it makes the text disappear, just as in this image here.
Step 14
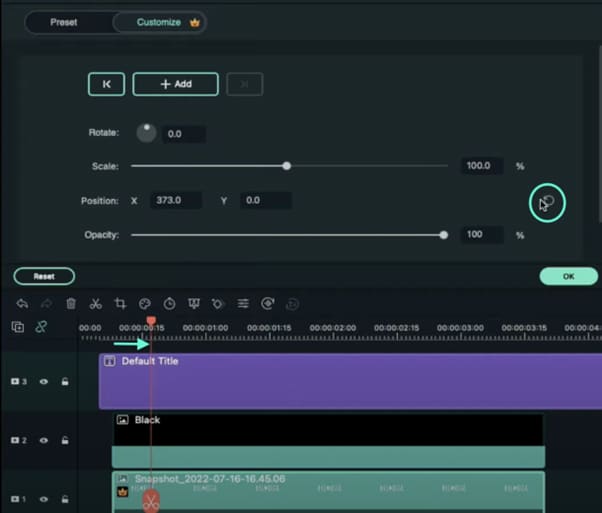
Next, move the Playhead 10 frames further. Then, reset the position values by clicking on this button.
Step 15
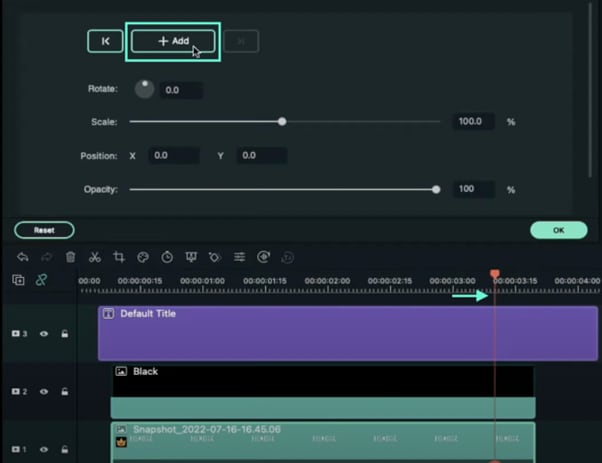
Now, move the Playhead once more and set it at 3 seconds and 10 frames. Then, click on the “+Add” button to add another keyframe.
Step 16
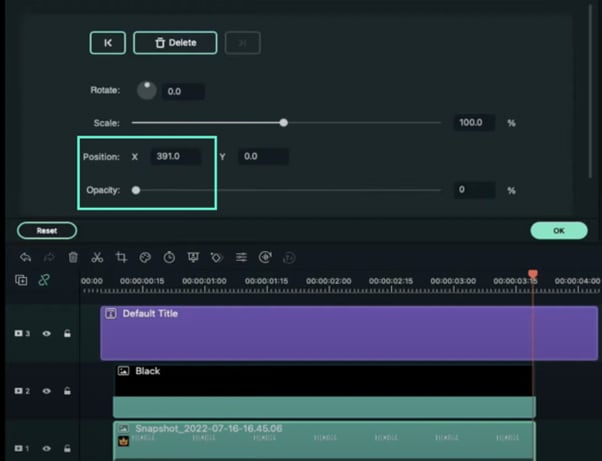
Move the Playhead to the end of the snapshot clip and set the value of the X axis to 391. Then, reduce the opacity to 0%. Move the Playhead at the start of the snapshot clip and reduce the opacity to 0% there as well.
Step 17
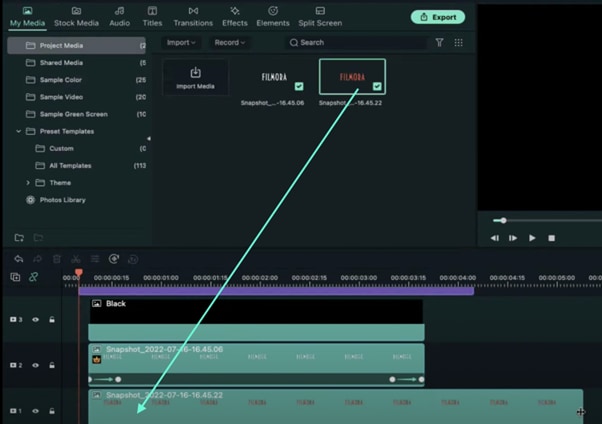
Next, Export the clip to your PC. Just hit the Export button near the top-center of the screen. Then, select all of your clips in the Timeline and move them one track above. Then, drag the second snapshot you took earlier to Track 1.
Step 18
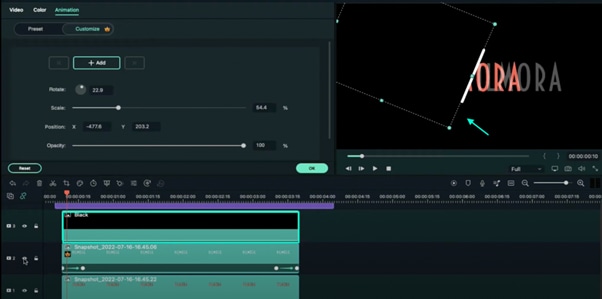
Select the Black Color clip once again and move the position of the Black box like this.
Step 19
Now, hide the clip on Track 2 by pressing this button next to it.
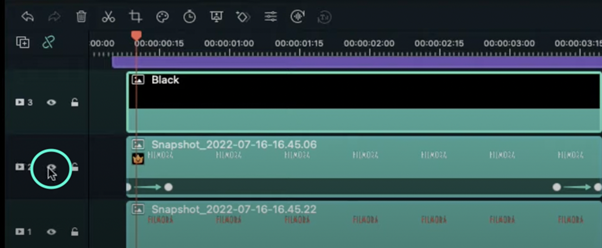
Step 20
Click on the second snapshot clip located in Track 1. Then, repeat the process of adding keyframes just like we did with the first snapshot. Review the previous steps to get this right. This time, remember to slide the X axis to the LEFT instead of RIGHT. Just drag the values to the left.
Step 21
Export this. Then, delete all the clips in the Timeline. Now, import both clips you exported earlier during these steps. Also, import a background video that you’d like to appear behind your slide masking text effect.
Step 22
Next, drag the clips to Timeline and adjust each of them to be the same length. Four seconds is a good option.
Step 23
Double-click on the first clip (not the background clip). Go to Video and under Blending Mode select Lighten.
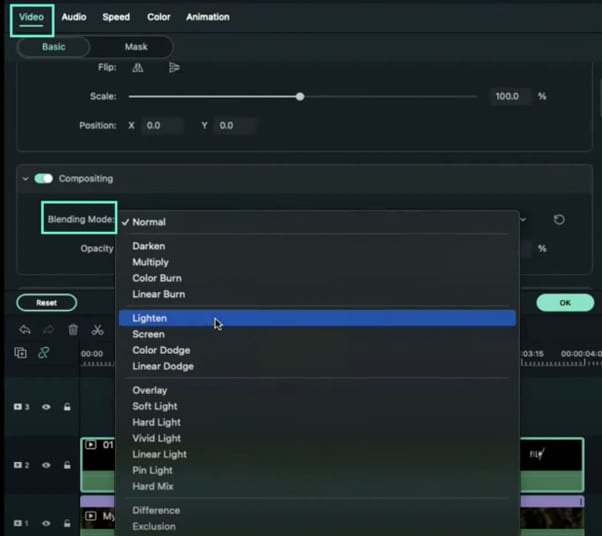
Step 24
Drop your second clip to Track three and repeat the same edits for it.
Step 25
Set the Playhead on frame three and drop the Motion Shape element from the Elements tab on Track 4.
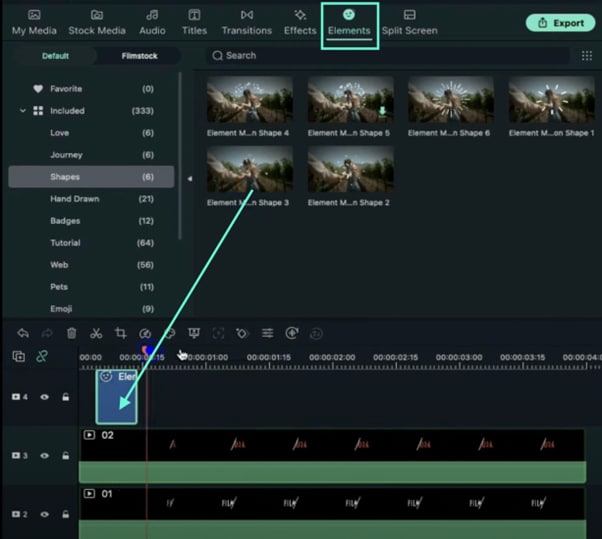
Step 26
Finally, copy and paste the element near the end of the video and Render the project. Then, review your masterpiece. That’s it!

Summary
What you’ve learned:
- Create a slide masking effect intro in Filmora
- Customize masks in the Filmora video editor
- How to take snapshots and edit them thoroughly
- Add keyframes
What you need to prepare:
- A computer (Windows or macOS)
- Your video materials.
- Filmora video editor
Step 1
The first thing you want to do is download the Filmora video editor . Hit Install and allow the application to start automatically.
Step 2
Once the program loads, head straight over to the Titles tab and drag the Basic Title to Track 3 on the Timeline.
Also, drag the clip from the right side towards the left to make it 4 seconds long.

Step 3
Double-click on the Title clip in the Timeline and edit your Title’s font and size. A panel like this one should pop up when you double-click. When you’re done, click OK.

Step 4
Now, take a snapshot of the new Title that you just created.

Step 5
Next, we’re going to need a few more snapshots. But this time, double-click on the Title again and change its color to whichever one you like. Once you’ve changed its color, go ahead and click the same button as in Step 4 to take another snapshot.

Step 6
Next, double-click on the Title once again and go to “ADVANCED”. From there, go to Add Shape and select the Rectangle shape.

Step 7
Look to the left side panel and switch OFF the Text Fill button. Then, scroll down to the bottom and change the Shape Fill color to White.

Step 8
Now, adjust the rectangle’s shape to a thin line, rotate it, and move it into position like in the image.

Step 9
Delete the text layer from the Advanced panel.

Step 10
The final step in the Advanced panel is to go to the Animation tab from the left side panel and select the Round Zoom Out animation preset. Then, click OK.

Step 11
Now, it’s time to align the clips in the Timeline. First, move your Default Title clip 5 frames further. Then, drag the first snapshot to Track one and move it 8 frames forward.

Step 12
Go to Sample Color and drag the Black color to Track 3 in the Timeline. Align it directly on top of where the clip in Track 1 starts. Then, double-click on the black color clip and align it like in the image here.

Step 13
Now, place the Playhead at the beginning of the clip in Track 1. Then, double-click the snapshot clip in Track 1. Now, start increasing the value of the X-axis until it makes the text disappear, just as in this image here.

Step 14
Next, move the Playhead 10 frames further. Then, reset the position values by clicking on this button.

Step 15
Now, move the Playhead once more and set it at 3 seconds and 10 frames. Then, click on the “+Add” button to add another keyframe.

Step 16
Move the Playhead to the end of the snapshot clip and set the value of the X axis to 391. Then, reduce the opacity to 0%. Move the Playhead at the start of the snapshot clip and reduce the opacity to 0% there as well.

Step 17
Next, Export the clip to your PC. Just hit the Export button near the top-center of the screen. Then, select all of your clips in the Timeline and move them one track above. Then, drag the second snapshot you took earlier to Track 1.

Step 18
Select the Black Color clip once again and move the position of the Black box like this.

Step 19
Now, hide the clip on Track 2 by pressing this button next to it.

Step 20
Click on the second snapshot clip located in Track 1. Then, repeat the process of adding keyframes just like we did with the first snapshot. Review the previous steps to get this right. This time, remember to slide the X axis to the LEFT instead of RIGHT. Just drag the values to the left.
Step 21
Export this. Then, delete all the clips in the Timeline. Now, import both clips you exported earlier during these steps. Also, import a background video that you’d like to appear behind your slide masking text effect.
Step 22
Next, drag the clips to Timeline and adjust each of them to be the same length. Four seconds is a good option.
Step 23
Double-click on the first clip (not the background clip). Go to Video and under Blending Mode select Lighten.

Step 24
Drop your second clip to Track three and repeat the same edits for it.
Step 25
Set the Playhead on frame three and drop the Motion Shape element from the Elements tab on Track 4.

Step 26
Finally, copy and paste the element near the end of the video and Render the project. Then, review your masterpiece. That’s it!

Summary
What you’ve learned:
- Create a slide masking effect intro in Filmora
- Customize masks in the Filmora video editor
- How to take snapshots and edit them thoroughly
- Add keyframes
What you need to prepare:
- A computer (Windows or macOS)
- Your video materials.
- Filmora video editor
Step 1
The first thing you want to do is download the Filmora video editor . Hit Install and allow the application to start automatically.
Step 2
Once the program loads, head straight over to the Titles tab and drag the Basic Title to Track 3 on the Timeline.
Also, drag the clip from the right side towards the left to make it 4 seconds long.

Step 3
Double-click on the Title clip in the Timeline and edit your Title’s font and size. A panel like this one should pop up when you double-click. When you’re done, click OK.

Step 4
Now, take a snapshot of the new Title that you just created.

Step 5
Next, we’re going to need a few more snapshots. But this time, double-click on the Title again and change its color to whichever one you like. Once you’ve changed its color, go ahead and click the same button as in Step 4 to take another snapshot.

Step 6
Next, double-click on the Title once again and go to “ADVANCED”. From there, go to Add Shape and select the Rectangle shape.

Step 7
Look to the left side panel and switch OFF the Text Fill button. Then, scroll down to the bottom and change the Shape Fill color to White.

Step 8
Now, adjust the rectangle’s shape to a thin line, rotate it, and move it into position like in the image.

Step 9
Delete the text layer from the Advanced panel.

Step 10
The final step in the Advanced panel is to go to the Animation tab from the left side panel and select the Round Zoom Out animation preset. Then, click OK.

Step 11
Now, it’s time to align the clips in the Timeline. First, move your Default Title clip 5 frames further. Then, drag the first snapshot to Track one and move it 8 frames forward.

Step 12
Go to Sample Color and drag the Black color to Track 3 in the Timeline. Align it directly on top of where the clip in Track 1 starts. Then, double-click on the black color clip and align it like in the image here.

Step 13
Now, place the Playhead at the beginning of the clip in Track 1. Then, double-click the snapshot clip in Track 1. Now, start increasing the value of the X-axis until it makes the text disappear, just as in this image here.

Step 14
Next, move the Playhead 10 frames further. Then, reset the position values by clicking on this button.

Step 15
Now, move the Playhead once more and set it at 3 seconds and 10 frames. Then, click on the “+Add” button to add another keyframe.

Step 16
Move the Playhead to the end of the snapshot clip and set the value of the X axis to 391. Then, reduce the opacity to 0%. Move the Playhead at the start of the snapshot clip and reduce the opacity to 0% there as well.

Step 17
Next, Export the clip to your PC. Just hit the Export button near the top-center of the screen. Then, select all of your clips in the Timeline and move them one track above. Then, drag the second snapshot you took earlier to Track 1.

Step 18
Select the Black Color clip once again and move the position of the Black box like this.

Step 19
Now, hide the clip on Track 2 by pressing this button next to it.

Step 20
Click on the second snapshot clip located in Track 1. Then, repeat the process of adding keyframes just like we did with the first snapshot. Review the previous steps to get this right. This time, remember to slide the X axis to the LEFT instead of RIGHT. Just drag the values to the left.
Step 21
Export this. Then, delete all the clips in the Timeline. Now, import both clips you exported earlier during these steps. Also, import a background video that you’d like to appear behind your slide masking text effect.
Step 22
Next, drag the clips to Timeline and adjust each of them to be the same length. Four seconds is a good option.
Step 23
Double-click on the first clip (not the background clip). Go to Video and under Blending Mode select Lighten.

Step 24
Drop your second clip to Track three and repeat the same edits for it.
Step 25
Set the Playhead on frame three and drop the Motion Shape element from the Elements tab on Track 4.

Step 26
Finally, copy and paste the element near the end of the video and Render the project. Then, review your masterpiece. That’s it!

Summary
What you’ve learned:
- Create a slide masking effect intro in Filmora
- Customize masks in the Filmora video editor
- How to take snapshots and edit them thoroughly
- Add keyframes
What you need to prepare:
- A computer (Windows or macOS)
- Your video materials.
- Filmora video editor
Step 1
The first thing you want to do is download the Filmora video editor . Hit Install and allow the application to start automatically.
Step 2
Once the program loads, head straight over to the Titles tab and drag the Basic Title to Track 3 on the Timeline.
Also, drag the clip from the right side towards the left to make it 4 seconds long.

Step 3
Double-click on the Title clip in the Timeline and edit your Title’s font and size. A panel like this one should pop up when you double-click. When you’re done, click OK.

Step 4
Now, take a snapshot of the new Title that you just created.

Step 5
Next, we’re going to need a few more snapshots. But this time, double-click on the Title again and change its color to whichever one you like. Once you’ve changed its color, go ahead and click the same button as in Step 4 to take another snapshot.

Step 6
Next, double-click on the Title once again and go to “ADVANCED”. From there, go to Add Shape and select the Rectangle shape.

Step 7
Look to the left side panel and switch OFF the Text Fill button. Then, scroll down to the bottom and change the Shape Fill color to White.

Step 8
Now, adjust the rectangle’s shape to a thin line, rotate it, and move it into position like in the image.

Step 9
Delete the text layer from the Advanced panel.

Step 10
The final step in the Advanced panel is to go to the Animation tab from the left side panel and select the Round Zoom Out animation preset. Then, click OK.

Step 11
Now, it’s time to align the clips in the Timeline. First, move your Default Title clip 5 frames further. Then, drag the first snapshot to Track one and move it 8 frames forward.

Step 12
Go to Sample Color and drag the Black color to Track 3 in the Timeline. Align it directly on top of where the clip in Track 1 starts. Then, double-click on the black color clip and align it like in the image here.

Step 13
Now, place the Playhead at the beginning of the clip in Track 1. Then, double-click the snapshot clip in Track 1. Now, start increasing the value of the X-axis until it makes the text disappear, just as in this image here.

Step 14
Next, move the Playhead 10 frames further. Then, reset the position values by clicking on this button.

Step 15
Now, move the Playhead once more and set it at 3 seconds and 10 frames. Then, click on the “+Add” button to add another keyframe.

Step 16
Move the Playhead to the end of the snapshot clip and set the value of the X axis to 391. Then, reduce the opacity to 0%. Move the Playhead at the start of the snapshot clip and reduce the opacity to 0% there as well.

Step 17
Next, Export the clip to your PC. Just hit the Export button near the top-center of the screen. Then, select all of your clips in the Timeline and move them one track above. Then, drag the second snapshot you took earlier to Track 1.

Step 18
Select the Black Color clip once again and move the position of the Black box like this.

Step 19
Now, hide the clip on Track 2 by pressing this button next to it.

Step 20
Click on the second snapshot clip located in Track 1. Then, repeat the process of adding keyframes just like we did with the first snapshot. Review the previous steps to get this right. This time, remember to slide the X axis to the LEFT instead of RIGHT. Just drag the values to the left.
Step 21
Export this. Then, delete all the clips in the Timeline. Now, import both clips you exported earlier during these steps. Also, import a background video that you’d like to appear behind your slide masking text effect.
Step 22
Next, drag the clips to Timeline and adjust each of them to be the same length. Four seconds is a good option.
Step 23
Double-click on the first clip (not the background clip). Go to Video and under Blending Mode select Lighten.

Step 24
Drop your second clip to Track three and repeat the same edits for it.
Step 25
Set the Playhead on frame three and drop the Motion Shape element from the Elements tab on Track 4.

Step 26
Finally, copy and paste the element near the end of the video and Render the project. Then, review your masterpiece. That’s it!

Summary
What you’ve learned:
- Create a slide masking effect intro in Filmora
- Customize masks in the Filmora video editor
- How to take snapshots and edit them thoroughly
- Add keyframes
M31 LUT (Teal and Orange LUT) Free Download
Today’s article will be fascinating for all those who want to shoot their films at home and become a filmmaker. As upon M31, LUT (teal and orange) is one of the most used LUTs in various films. It was first introduced in Hollywood, and there are many movies that use this style for color correction, such as the well-known Transformers, Star Trek, Mad Max, and Wonder Woman. The spectator can rapidly comprehend the information in the image and quickly tell the topic from the backdrop thanks to the two contrasting hues of teal and orange, which are more common in nature. These colors can also merge more smoothly with the rest of the image. In this article, we will discuss how to use it and other amazing LUTs in your videos. So let’s begin!
Part 1. What is M31 LUT (Teal & Orange LUT)?
M31 LUT (Teal & Orange Lut) is one of the most used LUTs in Hollywood and other cinematic industries. This LUT help to get your video the cinematic colors of teal and orange. The contrast between the two colors teal and orange is clear, but there are also other colors present in nature. For example, human skin is mostly composed of the colors yellow, red, and brown. Because blue is the complement of these colors, teal is their contrast color.
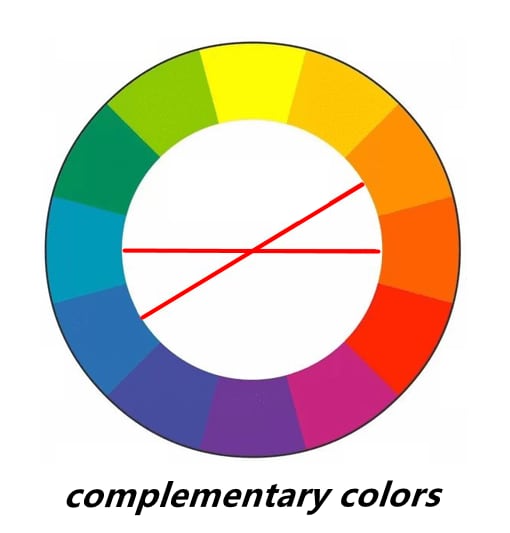
Other quality features are Color Remapping, Skin Toning, Saturation, etc. In other words, it helps your videos look like popular Hollywood films as they also use this same LUT in their movies. Its popularity in Hollywood films may be due to a number of factors, but one of the most crucial ones is that it gives the scene a cohesive mood by allowing disparate aspects to mirror one another and emphasize the overall qualities of the scene.
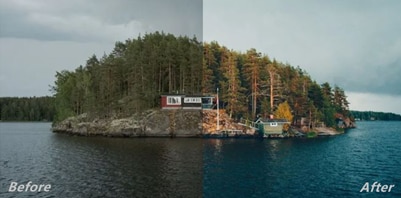
Why is it necessary to discuss the Teal & Orange LUT separately since they are now so popular? The fact that you may utilize this approach for a very long time to enhance the color quality of your own work and your own use of color is what matters most.
The following sections discuss downloading and using these LUTs in your videos.
Part 2. M31 LUT (Teal & Orange LUT) free download
1. Orange and Teal Lightroom Presets by SparkleStock (Lite)
SparkleStock is well-known for its variety of LUTs with its featured appearance on many brands. This Sparkle stock pack contains the M31 Teal and Orange LUT with seven other LUTs.
The download link of the LUT is here .
2. Orange-and-Teal-LUTs-Pack-by-Navpreet-Singh-ShareAE.com
Navpreet Singh is a growing designer. However, he offers some good packs of LUTs. One of which is the Orange and Teal LUTs pack. There are eight variations of M31 LUT available in the pack.
The download link of the LUT is here .
3. Orange and Teal - Kevin Aryal Tutorial
This pack also has nearly six various M31 Orange and Teal LUT. Kevin Aryal Tutorial, a source of many effects and LUTs, offers this pack.
The download link of the LUT is here .
4. DaVinci Resolve 18
DaVinci Resolve 18 also has a good name in providing LUTs and effects. They also offer the M31 Orange and Teal LUT with a variety of many more effects.
The download link of the LUT is here .
5. FG-Free-Cine-LUTs-Pack-v2
Filtergrade is another trusted source to get different LUT packs. This pack by Filtergrade has various cinematic effects, including the M31 Teal and Orange LUT.
The download link of the LUT is here .
Part 3. How to use LUTs in Filmora Video Editor?
In addition to M31 LUTs, Filmora offers more than 100 LUT packages to pick from when color grading your videos. Select the LUT that best suits your video, then use Filmora to add it. To add a sophisticated effect to your clips, follow these steps:
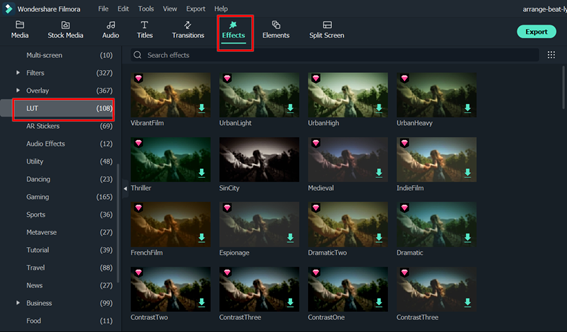
- Once your video clips have been imported, select LUT from the Effects tab. Here, you may view more than 100 different LUT styles to match various themes and moods.
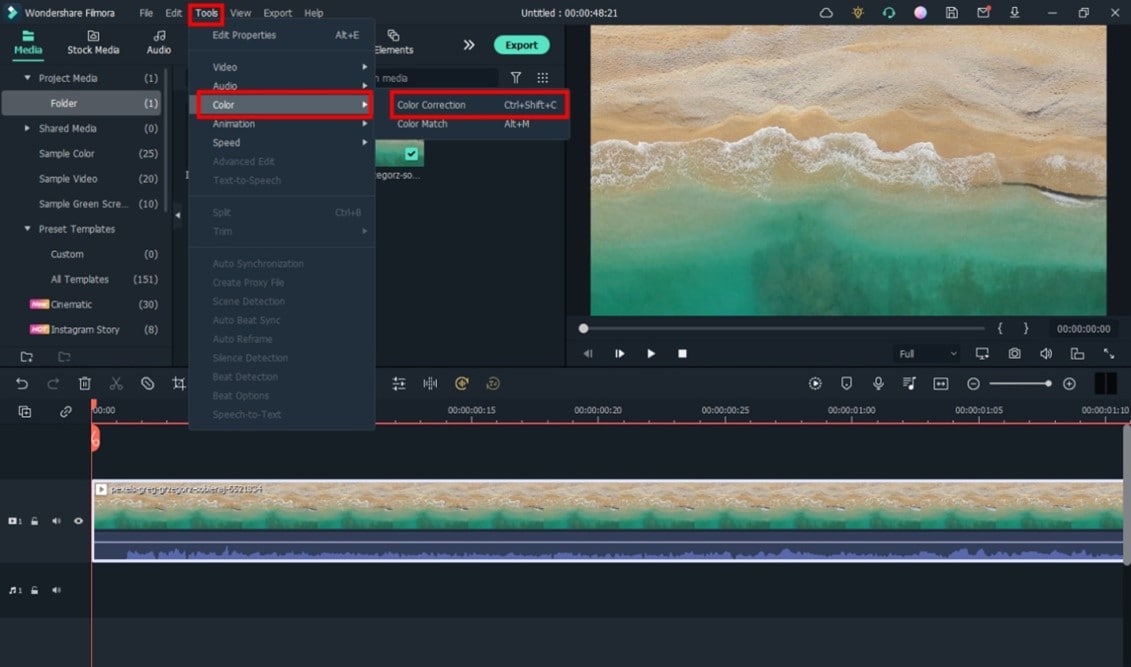
- Or you can just click on the “Tools > Color > Color correction”. You may improve the picture quality by adjusting the color details, contrast, light, and shadows here.
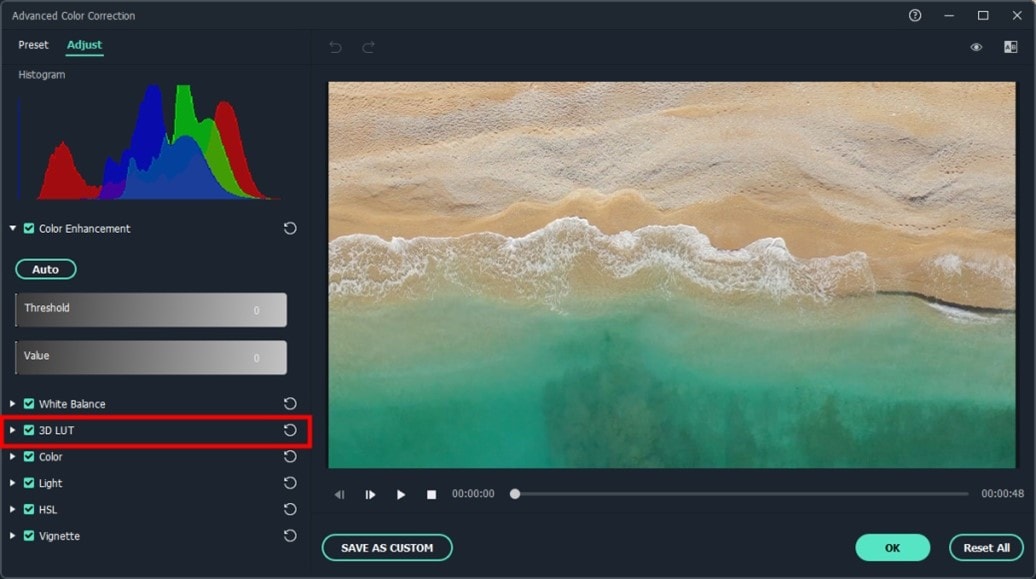
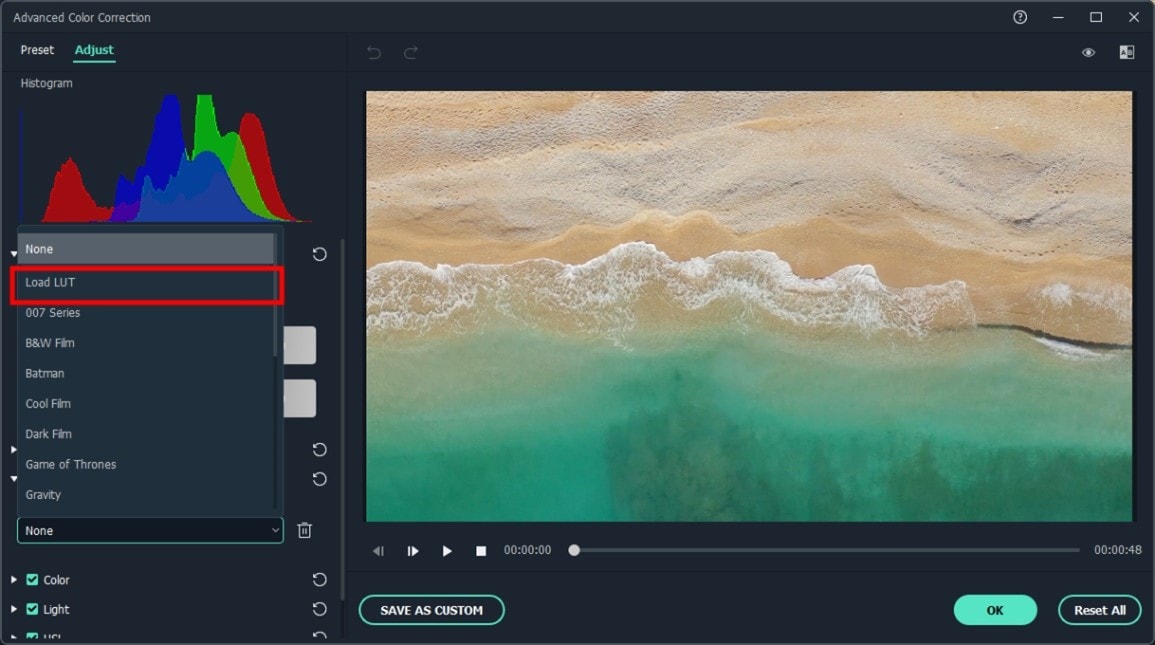
- If you want to use other preset LUTs, click on the drop-down menu and select the Load LUT option. Then, choose the downloaded LUT and click OK button.
Conclusion
Therefore, to help those who want to add amazing LUTs like M31 (teal and orange) in their videos to give them a cinematic look, we hope this article will be helpful. You can use the traditional LUTs that we suggest, and if you’re still having some difficulty with color grading, you’re welcome to try Filmora’s color grading tool to help you out.
Free Download For Win 7 or later(64-bit)
Free Download For macOS 10.14 or later
Free Download For macOS 10.14 or later
Are You Finding It Challenging to Convert GIFs Into JPG or PNG Images? Do Not Worry! The Best Free Online Tool and Software to Change Your GIF Into PNG or JPG Images Are Below
Great Video Converter - Wondershare Filmora
Provide abundant video effects - A creative video editor
Powerful color correction and grading
Detailed tutorials provided by the official channel
There are times you may need to convert GIFs into PNG or PNG and avoid losing image quality. Yet still, it can be tricky to carry this out without losing quality. This is the reason you need a powerful third-party image converter. So today, I will give you a list of the best GIF to image converters online. Let’s dive right in!
In addition, before jumping right into the conversion processes, it is paramount to know that many of these tools are free-to-all and offer exciting customization options. However, some might have specific requirements or conversion size limits. That aside, let’s now discuss how we can convert GIF into PNG online:
In this article
Part 1: Best Online GIF to PNG/JPG Converters
Part 2: How to Convert GIF to PNG?
Part 3: How to Convert GIF to JPG?
Part 1: Best Online GIF to PNG/JPG Converters
FileZigZag
This method can transfer GIF to JPG or PNG online, i.e., it does not require users to download any third-party software. In addition, it supports a wide range of formats, including PNG, WMA, SWF, image, documents, ZIP, MOV, etc.
This is a straightforward process: upload your image and choose the required format. Then input your email address, and the converter will send you a mail within minutes with the conversion.
Features
- Images, documents, audio and video files, ebooks, archival files, and webpages can all be converted with FileZigZag.
- Users will upload or drag a file to the platform.
- It supports a wide range of conversion formats.
- Convert files in minutes
Pros
It is convenient and free to use
The process is effortless, and the conversion speed is moderate
it provides users with sharing option
convert images in a real-time
Cons
You need to wait for a confirmation email, making it a little slow compared to other converters.
CoolUtils Online Image Converter
This is an online converter that gets rid of the need to download any software. In addition, you can get the conversion without wasting any time, and there is no need to wait for an email link.
Features
- To convert your files from GIF to JPG, PNG to JPG, and JPG to PNG, JPEG, or TIFF.
- Drag and drop your source file.
- Convert file online in a matter of seconds.
Pros
It allows users to rotate and resize the image before conversion.
It is compatible with nearly all operating system
It supports many file formats like JPEG, GIF, BMP, etc.
Cons
As of now, nothing in particular
ZAMZAR
This is a comprehensive GIF to PNG and JPG online converter that helps users convert GIF files to any photo format, including PNG and JPG format, for free.
Features
- Allows the addition of GIF files from your computer directly without downloading any programs to your PC.
- It requires only a few steps in converting GIF to JPG format
- It supports several video and photo formats in converting different formats easily
Pros
It is 100% simple to use
Support various input and output formats
No software installation is required
The software is free for conversions up to 100MB
Cons
Most users say the conversion process is a little too slow
The restriction of free conversion up to 100 MB makes it difficult in converting huge files
Ezgif
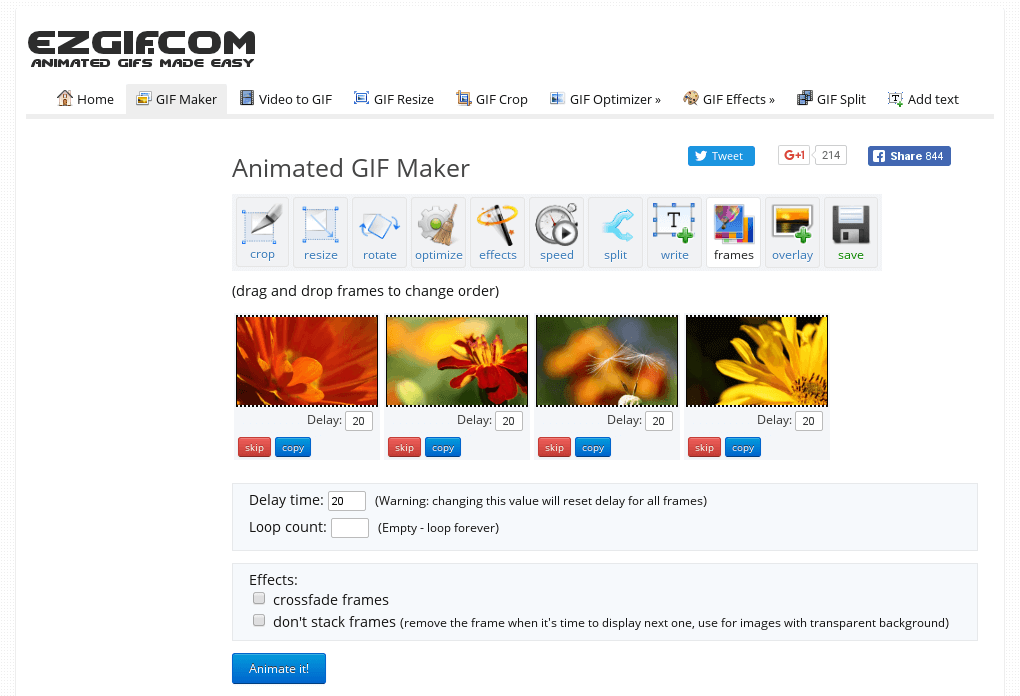
This is a free GIF to JPG converter that allows you to turn your GIF into an image with a single click leaving no watermark on the picture. In addition, the process is relatively easy to use as you need to upload a GIF file up to 35MB, then click the “Convert “ button, and your image will be ready.
Features:
- It performs most picture editing tasks, such as scaling, optimization, and cropping.
- Making, optimizing, trimming, and resizing animated GIFs with gifsicle and lossygif.
- For video conversions and editing, use FFmpeg.
Pros
Fast and free
No watermark
No Ads
No software downloads
Cons
It is sometimes slow
This online editing tool is a complete package that enables you to choose more than 80 different operations, which include the following:
Features:
- It allows Metadata Editing, i.e., editing the data before saving and converting it.
- Transform your pictures as well as resize, rotate, etc.
- Colors can adjust according to users’ preference
- Includes the addition of different filters, including emboss, sharpen, blur, etc.
- Users can do special effects like; vignetting, watermarking, etc.
Pros
Supports 500+ formats
Available on Mac, Windows, and Linux OS
Available in 20+ different languages
Advanced options available.
Cons
Some specific programs require constant updates.
Picresize
This is a free web-based GIF to JPG Converter that lets users add pictures for editing by uploading, linking, URL, etc. It is a customizable, lightweight tool for free editing images and photos online.
Features:
- Shrink and enlarge your photos
- It can crop your images for print or social media.
- Flip and rotate your pictures.
- Reduce the file size of your photos to the desired quality or disk size.
- Get web-ready image files by converting your photos or graphics into BMP, GIF. JPG or PNG format
Pros
It is an easy-to-use software
Support many formats
Compatible with a lot of Operating System
Allows changing the quality of the output file
Cons
There are limited settings compared to other editing software
This is a free Image Convert and Resize editor that is compact yet powerful for batch mode image processing. In addition, the program can easily convert separate images and file folders containing images into different renames, graphic formats, and reorders and changes their size following the set parameters. The supported image file formats for this software include; JPG, PNG, BMP, GIF, TGA, and PDF (export only).
Features:
- It is a compact program required for batch mode image processing.
- It allows the conversion of separate images and file folders to resize them accordingly
- The software is safe to run and use
- There is an option to install additional features according to your requirement
Pros
A secure option for beginners.
This small program is quite light on your system.
It is customizable.
Cons
Not all image format is supported compared to other converters
This software allows the conversion of all your digital pictures for sending email, on your website, posting on auction sites, etc. It provides a straight way to batch convert your digital images according to your need and add your watermark.
Features:
- Allows users to carry out batch conversion
- Enables users to import multiple photos from a folder
- Allows users to add their watermark
- Users can rotate, resize, and alter the images before and after conversion.
- Enables the creation of thumbnail pictures
- Users can upload their pictures to a dedicated server using the built-in FTP client.
Pros
The online help desk is highly responsive
Exceptional quality
Reasonable price
There are no prerequisites related to knowledge or experience.
Massive demands
Cons
Based on users’ preferences, nothing major.
Based on the above list, we have picked two excellent GIF to PNG and GIF to JPG converters that will serve you the best across the industry. Let us look at them one by one.
Part 2: How to Convert GIF to PNG?
Undeniably, Convertio is the clearest GIF to PNG online converter on this list. The numbered steps make it super-easy to use as users can convert GIF to PNG, TIFF, TGA, JPG, BMP, and many others.
Step 1: Access the Website and Add Files
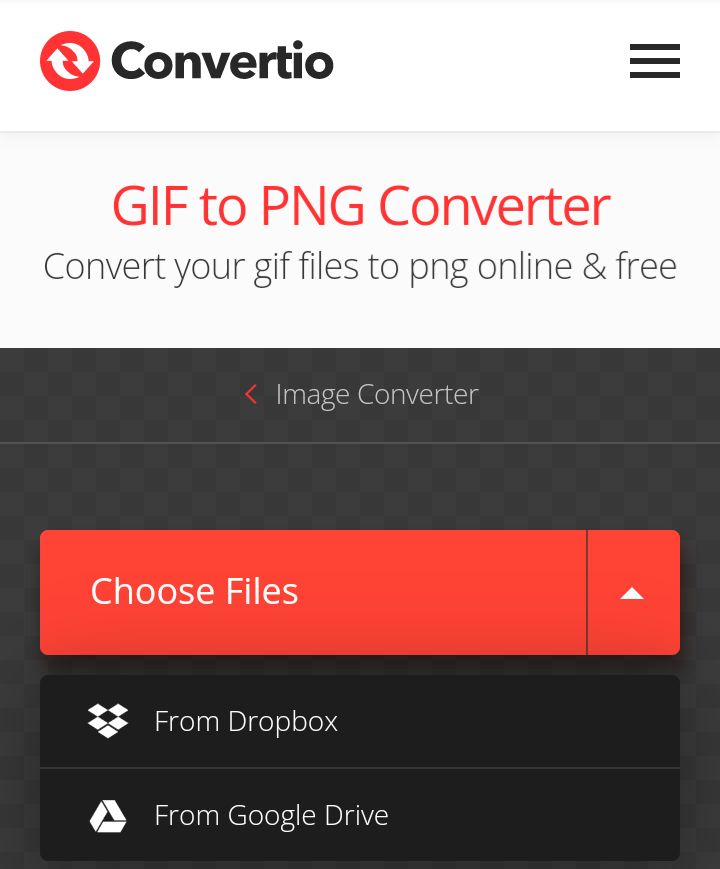
Log in to Convertio and click the Add Files button to add your GIF file. You can besides directly drag and drop your GIF file to the timeline.
Step 2: Search and Choose the Format
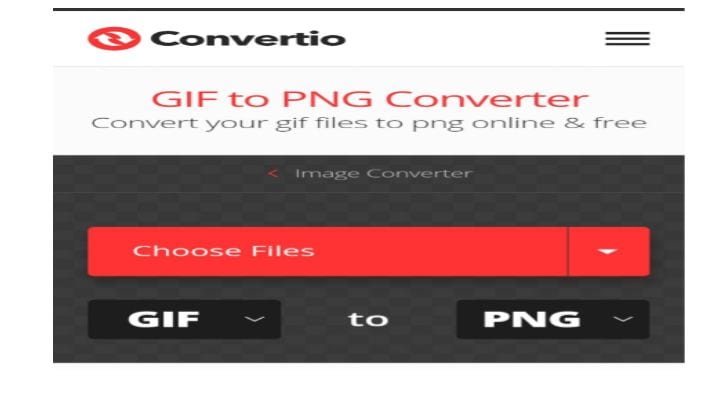
Open the File drop-down list and select PNG open under the Image Formats.
Step 3: Convert and Download
Finally, click the Convert Now button to convert GIF to PNG.
Part 3: How to Convert GIF to JPG?
Ezgif is also a robust GIF converter that supports converting any image format to JPG without losing quality. It also supports the conversion of GIFs to other formats like PNG, WebP, or PDF formats.
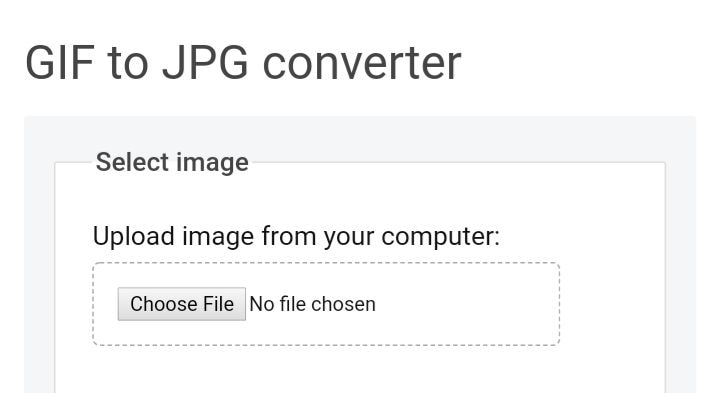
Step 1: Import GIF
After logging in to the website and clicking the Choose file button to import your local GIF file, you can import multiple files having a total file size of less than 35MB.
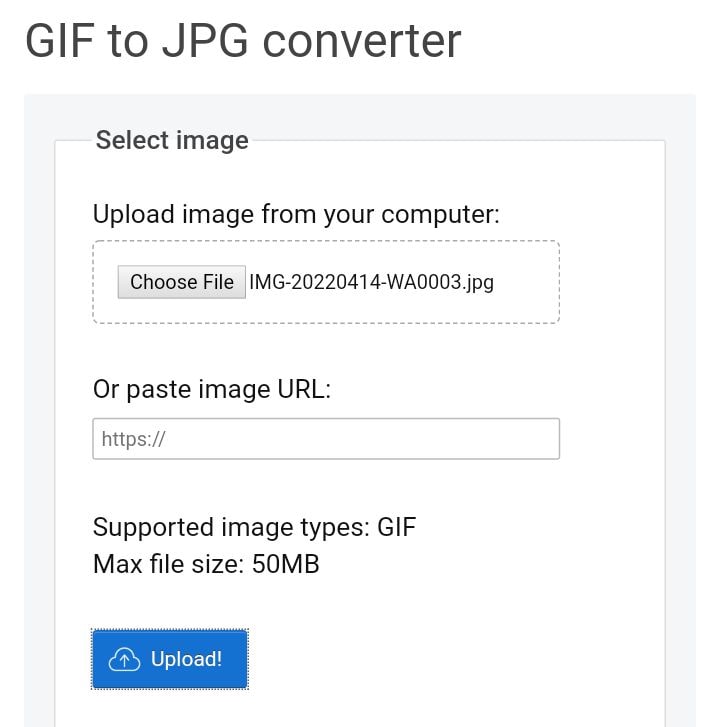
Step 2: Start Editing GIF
Next is to click the Upload button to start editing your GIF file (cut, add text, resize, rotate) before converting it.
Step 3: Convert to APNG and Save
Finally, click the Convert to APNG! button to start converting, and your image is ready.
Conclusion
This article gave a detailed breakdown of GIF to PNG converter and explained how to convert GIF into JPG or PNG effectively.
Also, in the last two parts, you got details on how to use Convertio and Ezgif to convert GIF to PNG in a few simple steps.
There are times you may need to convert GIFs into PNG or PNG and avoid losing image quality. Yet still, it can be tricky to carry this out without losing quality. This is the reason you need a powerful third-party image converter. So today, I will give you a list of the best GIF to image converters online. Let’s dive right in!
In addition, before jumping right into the conversion processes, it is paramount to know that many of these tools are free-to-all and offer exciting customization options. However, some might have specific requirements or conversion size limits. That aside, let’s now discuss how we can convert GIF into PNG online:
In this article
Part 1: Best Online GIF to PNG/JPG Converters
Part 2: How to Convert GIF to PNG?
Part 3: How to Convert GIF to JPG?
Part 1: Best Online GIF to PNG/JPG Converters
FileZigZag
This method can transfer GIF to JPG or PNG online, i.e., it does not require users to download any third-party software. In addition, it supports a wide range of formats, including PNG, WMA, SWF, image, documents, ZIP, MOV, etc.
This is a straightforward process: upload your image and choose the required format. Then input your email address, and the converter will send you a mail within minutes with the conversion.
Features
- Images, documents, audio and video files, ebooks, archival files, and webpages can all be converted with FileZigZag.
- Users will upload or drag a file to the platform.
- It supports a wide range of conversion formats.
- Convert files in minutes
Pros
It is convenient and free to use
The process is effortless, and the conversion speed is moderate
it provides users with sharing option
convert images in a real-time
Cons
You need to wait for a confirmation email, making it a little slow compared to other converters.
CoolUtils Online Image Converter
This is an online converter that gets rid of the need to download any software. In addition, you can get the conversion without wasting any time, and there is no need to wait for an email link.
Features
- To convert your files from GIF to JPG, PNG to JPG, and JPG to PNG, JPEG, or TIFF.
- Drag and drop your source file.
- Convert file online in a matter of seconds.
Pros
It allows users to rotate and resize the image before conversion.
It is compatible with nearly all operating system
It supports many file formats like JPEG, GIF, BMP, etc.
Cons
As of now, nothing in particular
ZAMZAR
This is a comprehensive GIF to PNG and JPG online converter that helps users convert GIF files to any photo format, including PNG and JPG format, for free.
Features
- Allows the addition of GIF files from your computer directly without downloading any programs to your PC.
- It requires only a few steps in converting GIF to JPG format
- It supports several video and photo formats in converting different formats easily
Pros
It is 100% simple to use
Support various input and output formats
No software installation is required
The software is free for conversions up to 100MB
Cons
Most users say the conversion process is a little too slow
The restriction of free conversion up to 100 MB makes it difficult in converting huge files
Ezgif
This is a free GIF to JPG converter that allows you to turn your GIF into an image with a single click leaving no watermark on the picture. In addition, the process is relatively easy to use as you need to upload a GIF file up to 35MB, then click the “Convert “ button, and your image will be ready.

Features:
- It performs most picture editing tasks, such as scaling, optimization, and cropping.
- Making, optimizing, trimming, and resizing animated GIFs with gifsicle and lossygif.
- For video conversions and editing, use FFmpeg.
Pros
Fast and free
No watermark
No Ads
No software downloads
Cons
It is sometimes slow
This online editing tool is a complete package that enables you to choose more than 80 different operations, which include the following:
Features:
- It allows Metadata Editing, i.e., editing the data before saving and converting it.
- Transform your pictures as well as resize, rotate, etc.
- Colors can adjust according to users’ preference
- Includes the addition of different filters, including emboss, sharpen, blur, etc.
- Users can do special effects like; vignetting, watermarking, etc.
Pros
Supports 500+ formats
Available on Mac, Windows, and Linux OS
Available in 20+ different languages
Advanced options available.
Cons
Some specific programs require constant updates.
Picresize
This is a free web-based GIF to JPG Converter that lets users add pictures for editing by uploading, linking, URL, etc. It is a customizable, lightweight tool for free editing images and photos online.
Features:
- Shrink and enlarge your photos
- It can crop your images for print or social media.
- Flip and rotate your pictures.
- Reduce the file size of your photos to the desired quality or disk size.
- Get web-ready image files by converting your photos or graphics into BMP, GIF. JPG or PNG format
Pros
It is an easy-to-use software
Support many formats
Compatible with a lot of Operating System
Allows changing the quality of the output file
Cons
There are limited settings compared to other editing software
This is a free Image Convert and Resize editor that is compact yet powerful for batch mode image processing. In addition, the program can easily convert separate images and file folders containing images into different renames, graphic formats, and reorders and changes their size following the set parameters. The supported image file formats for this software include; JPG, PNG, BMP, GIF, TGA, and PDF (export only).
Features:
- It is a compact program required for batch mode image processing.
- It allows the conversion of separate images and file folders to resize them accordingly
- The software is safe to run and use
- There is an option to install additional features according to your requirement
Pros
A secure option for beginners.
This small program is quite light on your system.
It is customizable.
Cons
Not all image format is supported compared to other converters
This software allows the conversion of all your digital pictures for sending email, on your website, posting on auction sites, etc. It provides a straight way to batch convert your digital images according to your need and add your watermark.
Features:
- Allows users to carry out batch conversion
- Enables users to import multiple photos from a folder
- Allows users to add their watermark
- Users can rotate, resize, and alter the images before and after conversion.
- Enables the creation of thumbnail pictures
- Users can upload their pictures to a dedicated server using the built-in FTP client.
Pros
The online help desk is highly responsive
Exceptional quality
Reasonable price
There are no prerequisites related to knowledge or experience.
Massive demands
Cons
Based on users’ preferences, nothing major.
Based on the above list, we have picked two excellent GIF to PNG and GIF to JPG converters that will serve you the best across the industry. Let us look at them one by one.
Part 2: How to Convert GIF to PNG?
Undeniably, Convertio is the clearest GIF to PNG online converter on this list. The numbered steps make it super-easy to use as users can convert GIF to PNG, TIFF, TGA, JPG, BMP, and many others.
Step 1: Access the Website and Add Files
Log in to Convertio and click the Add Files button to add your GIF file. You can besides directly drag and drop your GIF file to the timeline.

Step 2: Search and Choose the Format
Open the File drop-down list and select PNG open under the Image Formats.

Step 3: Convert and Download
Finally, click the Convert Now button to convert GIF to PNG.
Part 3: How to Convert GIF to JPG?
Ezgif is also a robust GIF converter that supports converting any image format to JPG without losing quality. It also supports the conversion of GIFs to other formats like PNG, WebP, or PDF formats.
Step 1: Import GIF
After logging in to the website and clicking the Choose file button to import your local GIF file, you can import multiple files having a total file size of less than 35MB.

Step 2: Start Editing GIF
Next is to click the Upload button to start editing your GIF file (cut, add text, resize, rotate) before converting it.

Step 3: Convert to APNG and Save
Finally, click the Convert to APNG! button to start converting, and your image is ready.
Conclusion
This article gave a detailed breakdown of GIF to PNG converter and explained how to convert GIF into JPG or PNG effectively.
Also, in the last two parts, you got details on how to use Convertio and Ezgif to convert GIF to PNG in a few simple steps.
There are times you may need to convert GIFs into PNG or PNG and avoid losing image quality. Yet still, it can be tricky to carry this out without losing quality. This is the reason you need a powerful third-party image converter. So today, I will give you a list of the best GIF to image converters online. Let’s dive right in!
In addition, before jumping right into the conversion processes, it is paramount to know that many of these tools are free-to-all and offer exciting customization options. However, some might have specific requirements or conversion size limits. That aside, let’s now discuss how we can convert GIF into PNG online:
In this article
Part 1: Best Online GIF to PNG/JPG Converters
Part 2: How to Convert GIF to PNG?
Part 3: How to Convert GIF to JPG?
Part 1: Best Online GIF to PNG/JPG Converters
FileZigZag
This method can transfer GIF to JPG or PNG online, i.e., it does not require users to download any third-party software. In addition, it supports a wide range of formats, including PNG, WMA, SWF, image, documents, ZIP, MOV, etc.
This is a straightforward process: upload your image and choose the required format. Then input your email address, and the converter will send you a mail within minutes with the conversion.
Features
- Images, documents, audio and video files, ebooks, archival files, and webpages can all be converted with FileZigZag.
- Users will upload or drag a file to the platform.
- It supports a wide range of conversion formats.
- Convert files in minutes
Pros
It is convenient and free to use
The process is effortless, and the conversion speed is moderate
it provides users with sharing option
convert images in a real-time
Cons
You need to wait for a confirmation email, making it a little slow compared to other converters.
CoolUtils Online Image Converter
This is an online converter that gets rid of the need to download any software. In addition, you can get the conversion without wasting any time, and there is no need to wait for an email link.
Features
- To convert your files from GIF to JPG, PNG to JPG, and JPG to PNG, JPEG, or TIFF.
- Drag and drop your source file.
- Convert file online in a matter of seconds.
Pros
It allows users to rotate and resize the image before conversion.
It is compatible with nearly all operating system
It supports many file formats like JPEG, GIF, BMP, etc.
Cons
As of now, nothing in particular
ZAMZAR
This is a comprehensive GIF to PNG and JPG online converter that helps users convert GIF files to any photo format, including PNG and JPG format, for free.
Features
- Allows the addition of GIF files from your computer directly without downloading any programs to your PC.
- It requires only a few steps in converting GIF to JPG format
- It supports several video and photo formats in converting different formats easily
Pros
It is 100% simple to use
Support various input and output formats
No software installation is required
The software is free for conversions up to 100MB
Cons
Most users say the conversion process is a little too slow
The restriction of free conversion up to 100 MB makes it difficult in converting huge files
Ezgif
This is a free GIF to JPG converter that allows you to turn your GIF into an image with a single click leaving no watermark on the picture. In addition, the process is relatively easy to use as you need to upload a GIF file up to 35MB, then click the “Convert “ button, and your image will be ready.

Features:
- It performs most picture editing tasks, such as scaling, optimization, and cropping.
- Making, optimizing, trimming, and resizing animated GIFs with gifsicle and lossygif.
- For video conversions and editing, use FFmpeg.
Pros
Fast and free
No watermark
No Ads
No software downloads
Cons
It is sometimes slow
This online editing tool is a complete package that enables you to choose more than 80 different operations, which include the following:
Features:
- It allows Metadata Editing, i.e., editing the data before saving and converting it.
- Transform your pictures as well as resize, rotate, etc.
- Colors can adjust according to users’ preference
- Includes the addition of different filters, including emboss, sharpen, blur, etc.
- Users can do special effects like; vignetting, watermarking, etc.
Pros
Supports 500+ formats
Available on Mac, Windows, and Linux OS
Available in 20+ different languages
Advanced options available.
Cons
Some specific programs require constant updates.
Picresize
This is a free web-based GIF to JPG Converter that lets users add pictures for editing by uploading, linking, URL, etc. It is a customizable, lightweight tool for free editing images and photos online.
Features:
- Shrink and enlarge your photos
- It can crop your images for print or social media.
- Flip and rotate your pictures.
- Reduce the file size of your photos to the desired quality or disk size.
- Get web-ready image files by converting your photos or graphics into BMP, GIF. JPG or PNG format
Pros
It is an easy-to-use software
Support many formats
Compatible with a lot of Operating System
Allows changing the quality of the output file
Cons
There are limited settings compared to other editing software
This is a free Image Convert and Resize editor that is compact yet powerful for batch mode image processing. In addition, the program can easily convert separate images and file folders containing images into different renames, graphic formats, and reorders and changes their size following the set parameters. The supported image file formats for this software include; JPG, PNG, BMP, GIF, TGA, and PDF (export only).
Features:
- It is a compact program required for batch mode image processing.
- It allows the conversion of separate images and file folders to resize them accordingly
- The software is safe to run and use
- There is an option to install additional features according to your requirement
Pros
A secure option for beginners.
This small program is quite light on your system.
It is customizable.
Cons
Not all image format is supported compared to other converters
This software allows the conversion of all your digital pictures for sending email, on your website, posting on auction sites, etc. It provides a straight way to batch convert your digital images according to your need and add your watermark.
Features:
- Allows users to carry out batch conversion
- Enables users to import multiple photos from a folder
- Allows users to add their watermark
- Users can rotate, resize, and alter the images before and after conversion.
- Enables the creation of thumbnail pictures
- Users can upload their pictures to a dedicated server using the built-in FTP client.
Pros
The online help desk is highly responsive
Exceptional quality
Reasonable price
There are no prerequisites related to knowledge or experience.
Massive demands
Cons
Based on users’ preferences, nothing major.
Based on the above list, we have picked two excellent GIF to PNG and GIF to JPG converters that will serve you the best across the industry. Let us look at them one by one.
Part 2: How to Convert GIF to PNG?
Undeniably, Convertio is the clearest GIF to PNG online converter on this list. The numbered steps make it super-easy to use as users can convert GIF to PNG, TIFF, TGA, JPG, BMP, and many others.
Step 1: Access the Website and Add Files
Log in to Convertio and click the Add Files button to add your GIF file. You can besides directly drag and drop your GIF file to the timeline.

Step 2: Search and Choose the Format
Open the File drop-down list and select PNG open under the Image Formats.

Step 3: Convert and Download
Finally, click the Convert Now button to convert GIF to PNG.
Part 3: How to Convert GIF to JPG?
Ezgif is also a robust GIF converter that supports converting any image format to JPG without losing quality. It also supports the conversion of GIFs to other formats like PNG, WebP, or PDF formats.
Step 1: Import GIF
After logging in to the website and clicking the Choose file button to import your local GIF file, you can import multiple files having a total file size of less than 35MB.

Step 2: Start Editing GIF
Next is to click the Upload button to start editing your GIF file (cut, add text, resize, rotate) before converting it.

Step 3: Convert to APNG and Save
Finally, click the Convert to APNG! button to start converting, and your image is ready.
Conclusion
This article gave a detailed breakdown of GIF to PNG converter and explained how to convert GIF into JPG or PNG effectively.
Also, in the last two parts, you got details on how to use Convertio and Ezgif to convert GIF to PNG in a few simple steps.
There are times you may need to convert GIFs into PNG or PNG and avoid losing image quality. Yet still, it can be tricky to carry this out without losing quality. This is the reason you need a powerful third-party image converter. So today, I will give you a list of the best GIF to image converters online. Let’s dive right in!
In addition, before jumping right into the conversion processes, it is paramount to know that many of these tools are free-to-all and offer exciting customization options. However, some might have specific requirements or conversion size limits. That aside, let’s now discuss how we can convert GIF into PNG online:
In this article
Part 1: Best Online GIF to PNG/JPG Converters
Part 2: How to Convert GIF to PNG?
Part 3: How to Convert GIF to JPG?
Part 1: Best Online GIF to PNG/JPG Converters
FileZigZag
This method can transfer GIF to JPG or PNG online, i.e., it does not require users to download any third-party software. In addition, it supports a wide range of formats, including PNG, WMA, SWF, image, documents, ZIP, MOV, etc.
This is a straightforward process: upload your image and choose the required format. Then input your email address, and the converter will send you a mail within minutes with the conversion.
Features
- Images, documents, audio and video files, ebooks, archival files, and webpages can all be converted with FileZigZag.
- Users will upload or drag a file to the platform.
- It supports a wide range of conversion formats.
- Convert files in minutes
Pros
It is convenient and free to use
The process is effortless, and the conversion speed is moderate
it provides users with sharing option
convert images in a real-time
Cons
You need to wait for a confirmation email, making it a little slow compared to other converters.
CoolUtils Online Image Converter
This is an online converter that gets rid of the need to download any software. In addition, you can get the conversion without wasting any time, and there is no need to wait for an email link.
Features
- To convert your files from GIF to JPG, PNG to JPG, and JPG to PNG, JPEG, or TIFF.
- Drag and drop your source file.
- Convert file online in a matter of seconds.
Pros
It allows users to rotate and resize the image before conversion.
It is compatible with nearly all operating system
It supports many file formats like JPEG, GIF, BMP, etc.
Cons
As of now, nothing in particular
ZAMZAR
This is a comprehensive GIF to PNG and JPG online converter that helps users convert GIF files to any photo format, including PNG and JPG format, for free.
Features
- Allows the addition of GIF files from your computer directly without downloading any programs to your PC.
- It requires only a few steps in converting GIF to JPG format
- It supports several video and photo formats in converting different formats easily
Pros
It is 100% simple to use
Support various input and output formats
No software installation is required
The software is free for conversions up to 100MB
Cons
Most users say the conversion process is a little too slow
The restriction of free conversion up to 100 MB makes it difficult in converting huge files
Ezgif
This is a free GIF to JPG converter that allows you to turn your GIF into an image with a single click leaving no watermark on the picture. In addition, the process is relatively easy to use as you need to upload a GIF file up to 35MB, then click the “Convert “ button, and your image will be ready.

Features:
- It performs most picture editing tasks, such as scaling, optimization, and cropping.
- Making, optimizing, trimming, and resizing animated GIFs with gifsicle and lossygif.
- For video conversions and editing, use FFmpeg.
Pros
Fast and free
No watermark
No Ads
No software downloads
Cons
It is sometimes slow
This online editing tool is a complete package that enables you to choose more than 80 different operations, which include the following:
Features:
- It allows Metadata Editing, i.e., editing the data before saving and converting it.
- Transform your pictures as well as resize, rotate, etc.
- Colors can adjust according to users’ preference
- Includes the addition of different filters, including emboss, sharpen, blur, etc.
- Users can do special effects like; vignetting, watermarking, etc.
Pros
Supports 500+ formats
Available on Mac, Windows, and Linux OS
Available in 20+ different languages
Advanced options available.
Cons
Some specific programs require constant updates.
Picresize
This is a free web-based GIF to JPG Converter that lets users add pictures for editing by uploading, linking, URL, etc. It is a customizable, lightweight tool for free editing images and photos online.
Features:
- Shrink and enlarge your photos
- It can crop your images for print or social media.
- Flip and rotate your pictures.
- Reduce the file size of your photos to the desired quality or disk size.
- Get web-ready image files by converting your photos or graphics into BMP, GIF. JPG or PNG format
Pros
It is an easy-to-use software
Support many formats
Compatible with a lot of Operating System
Allows changing the quality of the output file
Cons
There are limited settings compared to other editing software
This is a free Image Convert and Resize editor that is compact yet powerful for batch mode image processing. In addition, the program can easily convert separate images and file folders containing images into different renames, graphic formats, and reorders and changes their size following the set parameters. The supported image file formats for this software include; JPG, PNG, BMP, GIF, TGA, and PDF (export only).
Features:
- It is a compact program required for batch mode image processing.
- It allows the conversion of separate images and file folders to resize them accordingly
- The software is safe to run and use
- There is an option to install additional features according to your requirement
Pros
A secure option for beginners.
This small program is quite light on your system.
It is customizable.
Cons
Not all image format is supported compared to other converters
This software allows the conversion of all your digital pictures for sending email, on your website, posting on auction sites, etc. It provides a straight way to batch convert your digital images according to your need and add your watermark.
Features:
- Allows users to carry out batch conversion
- Enables users to import multiple photos from a folder
- Allows users to add their watermark
- Users can rotate, resize, and alter the images before and after conversion.
- Enables the creation of thumbnail pictures
- Users can upload their pictures to a dedicated server using the built-in FTP client.
Pros
The online help desk is highly responsive
Exceptional quality
Reasonable price
There are no prerequisites related to knowledge or experience.
Massive demands
Cons
Based on users’ preferences, nothing major.
Based on the above list, we have picked two excellent GIF to PNG and GIF to JPG converters that will serve you the best across the industry. Let us look at them one by one.
Part 2: How to Convert GIF to PNG?
Undeniably, Convertio is the clearest GIF to PNG online converter on this list. The numbered steps make it super-easy to use as users can convert GIF to PNG, TIFF, TGA, JPG, BMP, and many others.
Step 1: Access the Website and Add Files
Log in to Convertio and click the Add Files button to add your GIF file. You can besides directly drag and drop your GIF file to the timeline.

Step 2: Search and Choose the Format
Open the File drop-down list and select PNG open under the Image Formats.

Step 3: Convert and Download
Finally, click the Convert Now button to convert GIF to PNG.
Part 3: How to Convert GIF to JPG?
Ezgif is also a robust GIF converter that supports converting any image format to JPG without losing quality. It also supports the conversion of GIFs to other formats like PNG, WebP, or PDF formats.
Step 1: Import GIF
After logging in to the website and clicking the Choose file button to import your local GIF file, you can import multiple files having a total file size of less than 35MB.

Step 2: Start Editing GIF
Next is to click the Upload button to start editing your GIF file (cut, add text, resize, rotate) before converting it.

Step 3: Convert to APNG and Save
Finally, click the Convert to APNG! button to start converting, and your image is ready.
Conclusion
This article gave a detailed breakdown of GIF to PNG converter and explained how to convert GIF into JPG or PNG effectively.
Also, in the last two parts, you got details on how to use Convertio and Ezgif to convert GIF to PNG in a few simple steps.
Kdenlive Video Editor Review
When you look for an open source video editor online, you will come across several popular video editors. One of them has to be Kdenlive video editor that is available free and compatible across all desktop operating systems. The video editor claims to be suitable for beginners as well as for professional video editors.
Starting from multi-track video editing and support for different file formats to loads to effects and flexible interface, Kdenlive video editor seems to be truly powerful. But is it comparable to premium video editors and is it suitable for standard and advanced video editing? Read our Kdenlive tutorial and review for everything you need to know.
Part 1. Key Features of Kdenlive
If you need to edit videos occasionally, a free video editor is what you will be looking for. Unfortunately, most free videos have very basic video editing tools and they are suitable for editing personal videos only. On the contrary, Kdenlive comes with all the standard as well as some advanced video editing features. Here are all the key features of Kdenlive video editor that you should be aware of.
Multi-track editing – Kdenlive comes with a versatile timeline where you can have multiple tracks consisting of video clips, audio files and different effects and objects. You can lock the tracks as well as mute them so that you can experiment as you edit your video.
Effects and Transitions – Even though limited, there are eye-catching effects and transitions available. You can also go for color correction as well as minor adjustments in your audio. Besides, the titler lets you create amazing 2D texts and titles.
Proxy Editing – Kdenlive uses proxy editing technique to lower the resolution of high-resolution videos while you edit them. This takes away the pressure on the CPU resources, but when it renders, the original resolution gets restored back. That is why Kdenlive has been effective in low-end computers as well.
Flexible User Interface – Kdenlive comes with a customizable user interface. This means you can arrange the layouts of your workflow as per your requirements. Besides, there are configurable keyboard shortcuts. There are also different themes available for the user interface.
Keyframing – One of the advanced features of Kdenlive is that you can keyframe any effect. This means you can change the parameters of the effects with time using curves. Besides, the software supports green screen effect.
Miscellaneous – The software supports almost all types of audio and video file formats. There is an option for automatic backup which is highly useful in any video editing software. The software also supports online resources and add-ons.
Part 2. Basic Editing with Kdenlive
Kdenlive is available for free and you should definitely try it out. Thereafter, you decide whether it is perfect for you or not. After Kdenlive download, here are all the steps for basic video editing with Kdenlive.
Import a clip:
Step 1: Launch Kdenlive on your computer and make sure you have the video clip ready on your hard drive.
Step 2: Go to Project menu option. Click on “Add Clip or Folder” option. You can include all the video clips on any folder.
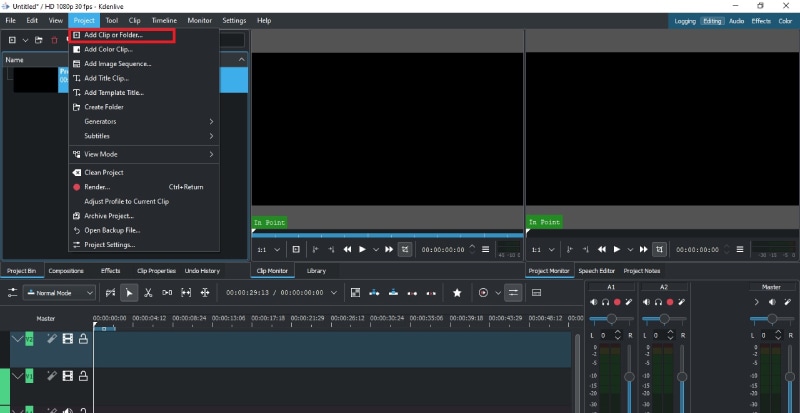
Step 3: The imported clips will then have to be dragged and dropped on the timeline from Project Bin.
Trim and Export:
Step 1: Import the video clip on Kdenlive and drag and drop the clip on the timeline.
Step 2: Put the timeline cursor over the point on the video clip from where you want to trim it.
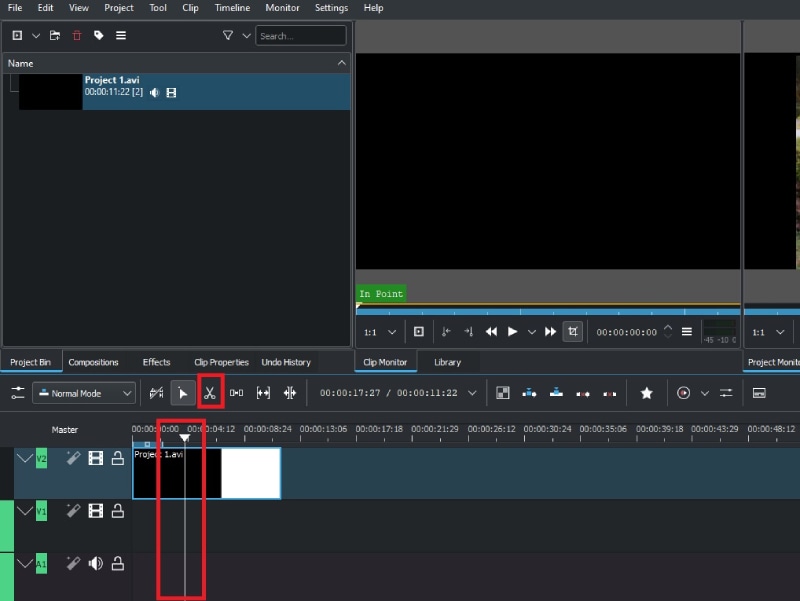
Step 3: Click on Scissor icon to start trimming. Thereafter, move the red timeline cursor to the point where you want the trimming to end.
![]()
Add multiple tracks:
There is enough number of tracks already available on Kdenlive timeline. However, when you are editing a large video project, you may need more tracks that already present.
Step 1: Go to Timeline menu option.
Step 2: Go to Tracks> Inset Track option.
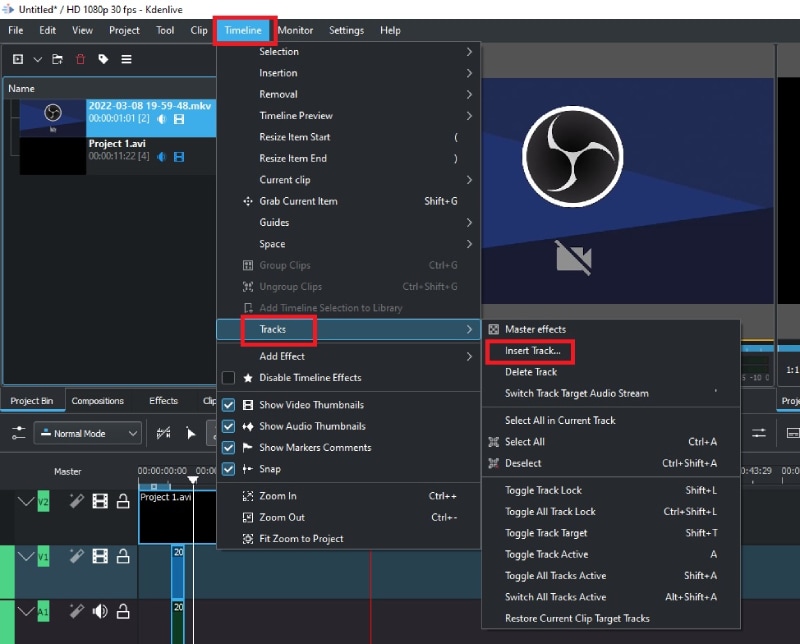
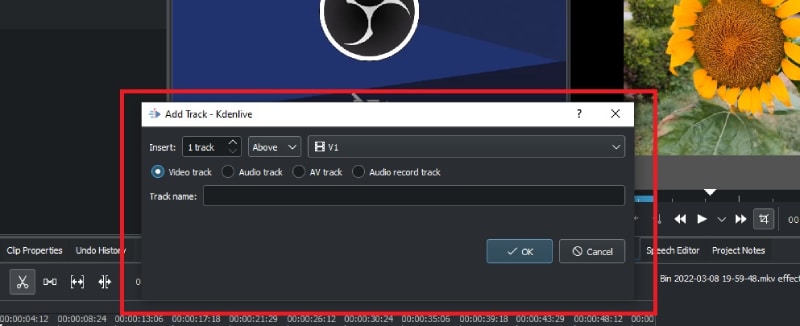
Step 3: Enter a name for the track and select the type of track and click on Ok button.
Adjust brightness and contrast:
Step 1: Go to Effects> Color and Image Correction.
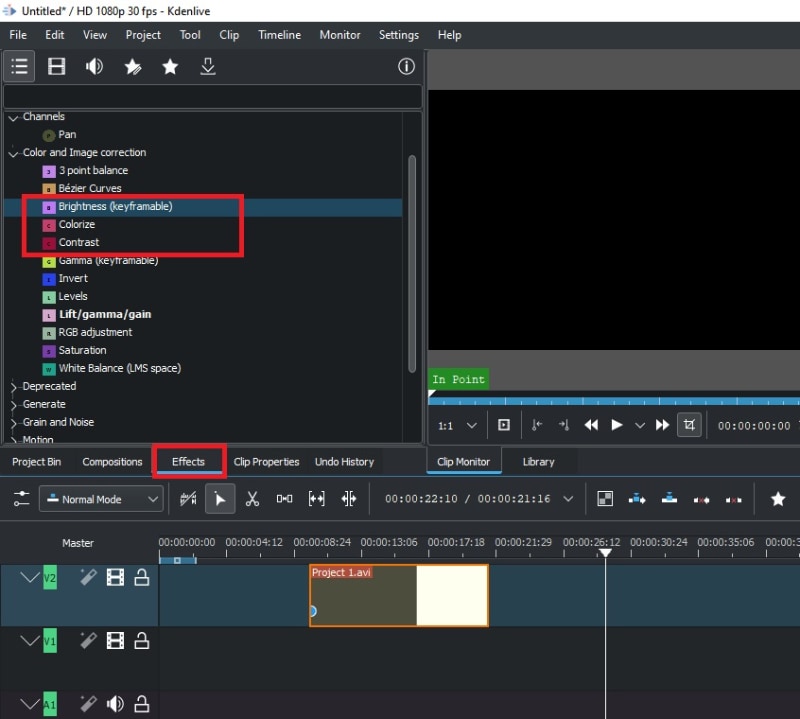
Step 2: Drag and drop Brightness or Contrast directly on the video clip.
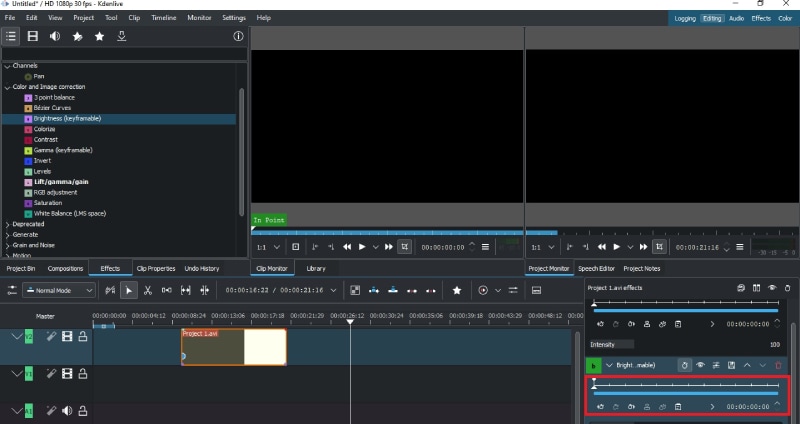
Step 3: Click on Brightness that you just placed on the video clip and adjust the parameter from its slider.
Speed up or slow down:
Step 1: Right-click on the video clip that is on the timeline and click on Change Speed option.
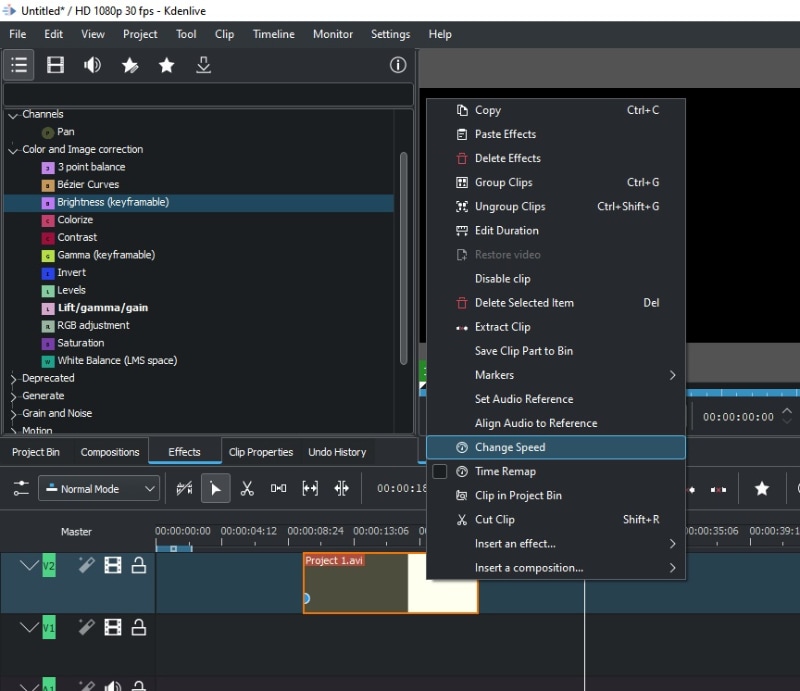
Step 2: Adjust the slider to increase or decrease video clip speed and click on Ok button.

Part 3. Advanced Editing with Kdenlive
Now that we have discussed the basic editing Kdenlive tutorial, let us focus on a couple of useful advanced editing features of Kdenlive.
Use green screen effects:
You must have the video clip with green screen background on the timeline. Below the green screen clip should be the background image with which you want to replace the green screen background.
Step 1: Go to Effect> Alpha, Mask and Keying option.
Step 2: Drag and drop “Chroma Key : Advanced” on the video clip where there is a green screen.
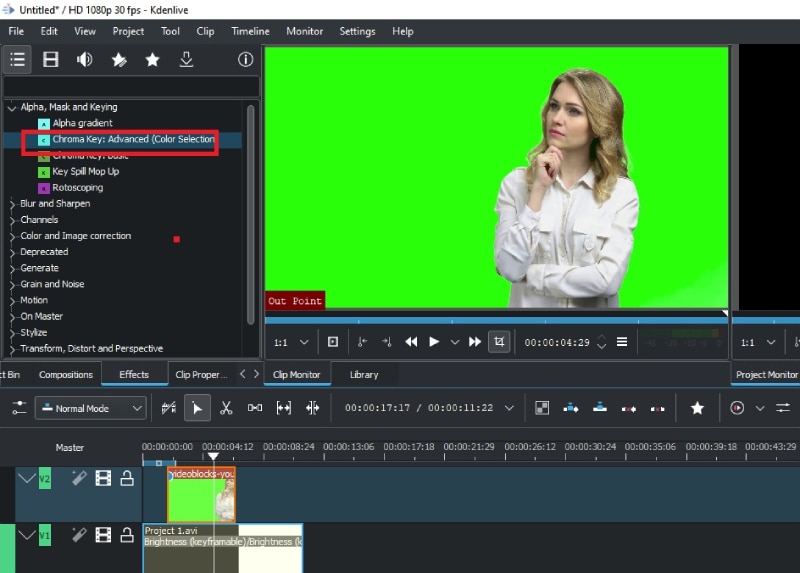
Step 3: Click on video clip and adjust the parameters to soften the edges and make it as natural as possible.
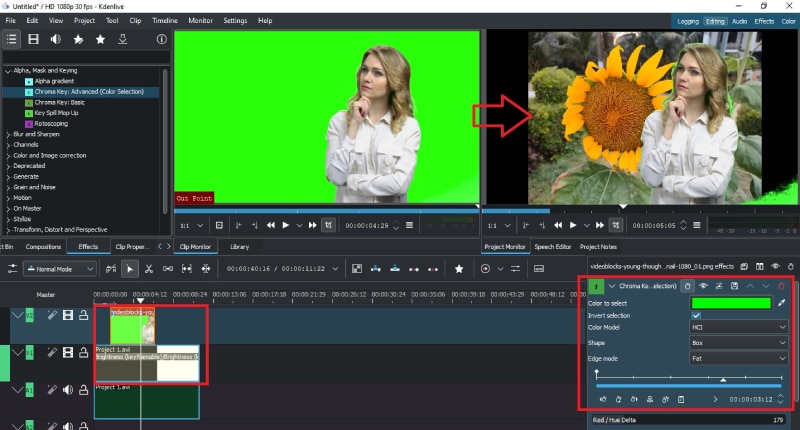
**Add audio:
Adding audio files and music files to the video is as easy as adding video clips. You should have your audio file ready on your hard drive.
Step 1: Go to Project menu option. Click on “Add Clip or Folder” option. Select the audio file or folder from your hard drive.

Step 2: The imported audio files will have to be dragged and dropped on the timeline from Project Bin.
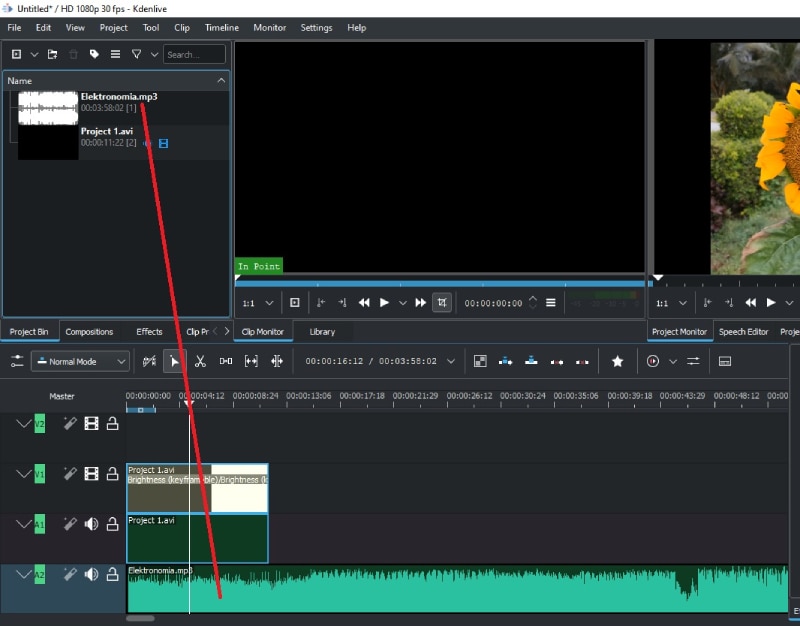
Part 4. Best Kdenlive Alternative to Edit Videos
Kdenlive has several drawbacks that prevent it from becoming the best video editor. Even though the features are sufficient for beginners, it is not suitable for professional editing. There is a lack of advanced options such as motion tracking or faster video production. Besides, the effects are very limited in number and so are the text and audio effects. That is why we recommend Wondershare Filmora as the best alternative to Kdenlive Mac and Windows.
Filmora is a premium video editor with video capturing feature. You can record your screen and webcam video. There is no dearth of effects, filters, elements and royalty-free media files. The user interface is cleaner and hence, it is suitable for both beginners and professionals. Here are the key features of Filmora.

For Win 7 or later (64-bit)
For macOS 10.12 or later
- 4K video editing and exporting without lag.
- Noise removal, color tuning, and video stabilization.
- Standard editing like trim, crop, split, join, rotate etc.
- Advanced text styles, audio mixing options, and audio equalizers.
- Wide range of stock media files. Supports different file formats.
- Capture screen and webcam video with internal and external audio.
Frequently Asked Questions
**Is Kdenlive a good editor?
Kdenlive is a good editor if you are getting started in video editing or you are editing your video for personal usage. However, for professional and even social media videos, a premium video editor will be better. We recommend Filmora over Kdenlive because Kdenlive lacks advanced video editing options.
**Does Kdenlive cost money?
Kdenlive Windows, Mac, and Linux are available free of cost as it belongs to the open-source software category. There is also no premium version available, and hence, all the features are unlocked in the free version.
**What can you do with Kdenlive?
You can trim your video, add music, add effects, adjust speed, correct colors, and add green screen effect. Besides, you can add multiple video clips and audio files to the timeline. There are options for keyframable effects as well.
Also read:
- Here Are a Number of Tools Used in the Market to Resize the Videos. We Are Going to Teach How to Resize the Video in Davinci Resolve and Fimora Wondershare. Once You Have Mastered How to Resize a Video, It Would Be as Simple as the Click
- New SRT Not Displaying How to Open and Use SRT File in VLC?
- New 2024 Approved How to Use Blender Green Screen
- In 2024, How to Make a DIY Vlog or Video
- In 2024, OBS Studio Is a Free and Open-Source App for Screen-Casting and Live Streaming
- Updated How to Create Motion Text Effects for Your Video?
- 2024 Approved What Is Motion Tracking and How to Use It
- In 2024, How to Choose A Nice GoPro for Vlogging?
- Exploring the Best Slow-Motion App
- New How to Add Adjustment Layer (Clip) in DaVinci Resolve for 2024
- In 2024, The Best Laptops For Video Editing
- FLV Editors for Windows 11/10/8.1/8/7 Easily Edit FLV Videos on PC
- In 2024, Zoom In and Out on Snapchat
- In 2024, How to Zoom in Discord
- New 10 Best Vlogging Cameras for Beginners for 2024
- Updated 2 Methods to Crop a Video Using After Effects
- Are You the One Who Is Confused About What to Opt Between Camtasia vs Captivate? No More Confusion! Here We Are Going to Reveal the Answer to Camtasia vs Captivate Which Is Better? Learn More
- Updated How to Make Video Slow Motion for 2024
- New In 2024, Top List 20 Best LUTs for Music Videos
- Using This Article as a Reference, the Users Would Create a Café Meal Intro and YouTube End Screen While Knowing Multiple Ways to Download Cooking Background Music for 2024
- Read Through This Post to Know What Frame Rate Is, the Different Variations, and Why 60FPS Is Superior. Also, Know the Tools Available to Make the Conversion
- Updated In 2024, 6 Free Tools To Radial Blur Photos Online
- Updated In 2024, An Introduction to LUTs | Their Overview and Benefits
- New Are You Looking to Make a Thumbnail for Your Fortnite Video? This Article Features a Guide Explaining Creating a Fortnite Motion Blur Thumbnail
- Updated In 2024, End This Problem! Make Transparent Background Video Today
- The Background in Your Footage Might Be Bland or Unpleasant. This Article Will Discuss Video Background Templates You Can Use to Spice Things up and Make Your Videos Go Viral
- New How to Create Cinematic Style Videos? Easy Guide for Beginners
- How to Animate Designs With Canva GIF for 2024
- New How to Add Customized Transitions to OBS
- In 2024, How Can I Catch the Regional Pokémon without Traveling On Lava Yuva 3 | Dr.fone
- Still Using Pattern Locks with Itel P40? Tips, Tricks and Helpful Advice
- In 2024, Network Locked SIM Card Inserted On Your Vivo V27 Phone? Unlock It Now
- Best Poco F5 5G Pattern Lock Removal Tools Remove Android Pattern Lock Without Losing Data
- Is GSM Flasher ADB Legit? Full Review To Bypass Your Vivo Y100 Phone FRP Lock
- Top 9 Realme C55 Monitoring Apps for Parental Controls | Dr.fone
- 12 Animated Slideshow PowerPoint Templates for 2024
- How do I reset my Oppo Reno 10 Pro 5G Phone without technical knowledge? | Dr.fone
- What Pokémon Evolve with A Dawn Stone For Samsung Galaxy M34? | Dr.fone
- How to recover deleted photos from Android Gallery without backup on Honor Magic 5
- How to Change Google Play Location On Realme Note 50 | Dr.fone
- Full Guide on Mirroring Your Motorola Moto G73 5G to Your PC/Mac | Dr.fone
- Wondering the Best Alternative to Hola On Motorola Edge 40? Here Is the Answer | Dr.fone
- How to Repair a Damaged video file of Samsung Galaxy M14 5G?
- Full Tutorial to Bypass Your Poco X6 Pro Face Lock?
- In 2024, Top 10 Telegram Spy Tools On Motorola Moto G Stylus (2023) for Parents | Dr.fone
- Top 10 Best Spy Watches For your Realme C53 | Dr.fone
- In 2024, A Comprehensive Guide to Mastering iPogo for Pokémon GO On Apple iPhone 14 | Dr.fone
- Which Pokémon can Evolve with a Moon Stone For Samsung Galaxy M54 5G? | Dr.fone
- Best Ways to Bypass iCloud Activation Lock from iPhone 13 mini/iPad/iPod
- Title: Create Slide Masking Effect Intro【Filmora】 for 2024
- Author: Chloe
- Created at : 2024-04-24 07:08:17
- Updated at : 2024-04-25 07:08:17
- Link: https://ai-editing-video.techidaily.com/create-slide-masking-effect-introfilmora-for-2024/
- License: This work is licensed under CC BY-NC-SA 4.0.

