
Create the Stranger Things Upside Down Effect Video for 2024

Create the Stranger Things Upside Down Effect Video
With stranger things season 4 ending, it seems like great timing to make a stranger things style transition to the Upside Down. In the Netflix series Stranger Things, there is an opposite version of our world called the Upside Down. The Upside Down is dark, creepy, and possibly filled with aliens, monsters, creatures, and other things.
Now, you can also apply the Stranger Things Upside Down Effect to your video! This effect combines camera tricks and video editing within Filmora to transition from the normal world into the Upside Down.
How-to Guide
1) Preparation
To make this effect, you will need two footage shots: one with the camera moving down and one with the camera coming back up.
When shooting for the footage, follow the steps below:
First shot
- Find any item close enough to the ground that we can block our frame with.

- Once you have your talent lined up, rotate your camera while lowering it below the foreground item at a constant speed and leaving the camera there. The key is making sure when you go behind the object, the frame is nothing but black.

For the next scene, have your actor change positions, or you can change the set around to look like the Upside Down. For instance, adding fake plants and flickering lights.
Second shot
Start bringing your camera back up at the same speed and rotate it again in the direction it was moving.

2) Steps
After you have all the footage, you can start editing it on Filmora. If you haven’t installed it yet, you can download Filmora at their official website at https://filmora.wondershare.com .
Free Download For Win 7 or later(64-bit)
Free Download For macOS 10.14 or later
Now, launch Filmora on your PC and follow the steps below:
Step1 Take your first clip in the “normal” world and drag it down to a video track on the timeline. Trim the edge of the clip, so it ends on pure black and in a downward motion.

Step2 Drag the second clip (in the Upside Down) onto the video track on the timeline after the first clip. Trim this video, so it begins in pure black and an upward motion.

Cut the clips to get the timing right since it should be a very fast transition. You can cut in the black frames so they won’t be too apparent.
If you don’t have a perfectly smooth transition, you can add a dissolve by going to Transitions > Basic > Dissolve.

Color Grading and Effects
After the transition, you can make the clip look a lot more like the Upside Down from the show with a color grade and Filmora effects. Follow the steps below:
Step1 Double-click on your second clip, then go to Color > Advanced. For a quick edit, you can try one of the presets available, such as “cool film.” It will give you the colder blue tones that Stranger Things used for the Upside Down.

Step2 You can further edit the color grading in the white balance menu. Drag the slider to the left to get a blue, cold vibe for the Upside Down.
The “cool” or “warm” color grading technically talks about color temperature. A “warmer” look will be more orange, and a “colder” look will be bluer. You can also use the tint slider to fine-tune the look.

Step3 Next, move down to the color, lower the brightness and increase contrast. It makes the scene darker and more sinister than the normal world.

Step4 Finally, go down to the vignette and drag the amount slider a tiny bit to give a Vinnette around your clip.

3) Pro Tips
You can still make your clip look even more like Upside Down with some Filmora elements.
Go to Elements > Smoke > Smokescreen 2. Drag this element on top of your Upside Down clip and trim it, so it starts at the same time the clip leaves the black frame.

You can adjust the opacity by double-clicking the smoke effect to open the setting.
Finally, go to the Transition > Basic > Dissolve to the start of the smoke and adjust it when the smoke gradually appears.

Resources from Filmostock
You can also use filmstock effects to bring our video to the next level. Go to Elements > Fire > Large Scale 12 and drag it down on top of your clip and the smoke.

Double-click the clip and change the scale of the effect to your needs. Then, go to compositing to change the blending mode to the screen to help the effect blend in more.

Now, go to color and open the white balance menu. Drag the two sliders to change the color of the particles to match your clip.

Summary
That is all you need to make a Stranger Things Upside Down effects to your video. Let us know if there are any other effects from tv shows you want to learn how to make.
Free Download For macOS 10.14 or later
Now, launch Filmora on your PC and follow the steps below:
Step1 Take your first clip in the “normal” world and drag it down to a video track on the timeline. Trim the edge of the clip, so it ends on pure black and in a downward motion.

Step2 Drag the second clip (in the Upside Down) onto the video track on the timeline after the first clip. Trim this video, so it begins in pure black and an upward motion.

Cut the clips to get the timing right since it should be a very fast transition. You can cut in the black frames so they won’t be too apparent.
If you don’t have a perfectly smooth transition, you can add a dissolve by going to Transitions > Basic > Dissolve.

Color Grading and Effects
After the transition, you can make the clip look a lot more like the Upside Down from the show with a color grade and Filmora effects. Follow the steps below:
Step1 Double-click on your second clip, then go to Color > Advanced. For a quick edit, you can try one of the presets available, such as “cool film.” It will give you the colder blue tones that Stranger Things used for the Upside Down.

Step2 You can further edit the color grading in the white balance menu. Drag the slider to the left to get a blue, cold vibe for the Upside Down.
The “cool” or “warm” color grading technically talks about color temperature. A “warmer” look will be more orange, and a “colder” look will be bluer. You can also use the tint slider to fine-tune the look.

Step3 Next, move down to the color, lower the brightness and increase contrast. It makes the scene darker and more sinister than the normal world.

Step4 Finally, go down to the vignette and drag the amount slider a tiny bit to give a Vinnette around your clip.

3) Pro Tips
You can still make your clip look even more like Upside Down with some Filmora elements.
Go to Elements > Smoke > Smokescreen 2. Drag this element on top of your Upside Down clip and trim it, so it starts at the same time the clip leaves the black frame.

You can adjust the opacity by double-clicking the smoke effect to open the setting.
Finally, go to the Transition > Basic > Dissolve to the start of the smoke and adjust it when the smoke gradually appears.

Resources from Filmostock
You can also use filmstock effects to bring our video to the next level. Go to Elements > Fire > Large Scale 12 and drag it down on top of your clip and the smoke.

Double-click the clip and change the scale of the effect to your needs. Then, go to compositing to change the blending mode to the screen to help the effect blend in more.

Now, go to color and open the white balance menu. Drag the two sliders to change the color of the particles to match your clip.

Summary
That is all you need to make a Stranger Things Upside Down effects to your video. Let us know if there are any other effects from tv shows you want to learn how to make.
How To Split Videos in Premier Pro
You might regularly split and cut clips while doing video editing to find the perfect tempo for your video or removes portions of recordings you might not want. When you first begin using Adobe Premiere for video editing, it is highly possible that you will feel overwhelmed by the number of options at your disposal and question how to divide your footage quickly.
Premiere Pro is the most popular video editing program for movies, television, and online. You may edit the footage into polished films and videos with the aid of creative tools and interaction with other apps and services.
Part 1. How to split a clip in premiere pro?
1. The Razor tool
The Razor tool in Premiere is the simplest way to split or cut clips. This enables you to separate clips from the project timeline during your chosen clip. This technique is useful for making the first rough cut of your clips, with the sole drawback being that it can be less exact.
You can use the following steps to split a clip using the Razor tool:
Step1By pressing Cmd+I or Ctrl+I or by choosing File > Import, you can import it into Premiere Pro.
Step2Drag the clip onto the timeline if there is an existing sequence. If not, use the right-click menu to choose New Sequence From Clip. The video will now appear as a single block.

Step3Choose the Razor tool from the panel next to the timeline to split the clip.
Step4To split a video clip, click on the section you want to split.
Step5Now that you have two segments from the same video file, you can edit them separately.
2. Current-Time Indicator
A blue triangular indication called the Current Time Indicator (CTI) lets you know where you are in the timeline. CTIs are employed in a variety of panels.
You can follow these steps to split the clip using Current-Time Indicator:
Step1Select the section of the clip you want to split by moving the Current-Time Indicator there.
Step2Ensure that the video layer you want to split is highlighted on the timeline’s left side.
Step3Use the keyboard shortcuts Cmd+K or Ctrl+K to split the clip.
3. Source Panel
Individual clips are played back on the Source Monitor. You prepare clips for a sequence in the Source Monitor. You designate the clip’s source tracks, In points, and Out points. In a Timeline panel, you may add clips to a sequence and place clip markers.
How to split video clips with source panel in premiere pro :
For the clip, you want to split to appear in the Source panel, choose it from the Project panel. Then take these actions.
Step1First, locate the arrow-shaped marker at the start of the clip’s time bar in the Source Panel to navigate and indicate the In and Out points.
Step2Wherever you want the In and Out indicators to appear, press the I or O key. I stand for inside, and O for outside.
Step3Select Insert from the Source panel’s tools once your marks are in place.
Part 2. How to split audio from video in premiere pro?
1. The Razor tool
You can use the following steps to split an audio clip using the Razor tool:
Step1You can import it into Premiere Pro by selecting File > Import, or pressing Ctrl+I or Cmd+I.
Step2If there is an existing sequence, drag the clip onto it. If not, select New Sequence From Clip from the right-click menu. Now the video will play in a block format.
Step3Choose the moment at which you want to separate. To trim the movie, choose the “Razor” tool from the Tools area. Utilizing this tool, navigate to the timeline for the video or audio, left click on the video, and it will divide the file into two pieces.
Step4You can edit each part separately now that you have two from the same audio file.
2. Current-Time Indicator
You can follow these steps to split the audio clip using Current-Time Indicator:
Step1By dragging the Current-Time Indicator there, you can choose the part of the audio clip you want to separate.
Step2On the timeline’s left side, make sure the audio layer you want to split is highlighted.
Step3Use the keyboard commands Cmd+K or Ctrl+K to divide the audio clip.
![]()
Note: The methods to split a video/audio are the same. Splitting a video clip using this method will automatically be split if the audio has been highlighted.
Part 3. How to split video and audio in alternative to premiere pro?
As a professional video editing software, Premiere Pro offers a wide range of professional editing features. But, for a beginner, it might seem time-consuming to master the software. Because it requires a high-speed PC due to the video resolution and requirements. So, we suggest Wondershare Filmora because it is considerably easier to use. Products on Filmora are available for various users, from novice to expert. A timeline, preview window, and effects library are common features. These may be accessed and managed using a drag-and-drop interface.
You can follow these steps to split audio and video without any hassle:
Step1To add video files to the Timeline for trimming, first click “Import“ on the main windows and choose the video files you want from your computer. You can also just drag and drop movies into the Media Library.

Step2To eliminate an undesirable segment, move the playhead over it and select the scissor icon.
Step3”Detach Audio” from the context menu when you are ready to extract the audio track from a video file. You’ll see that an audio file immediately appears on the audio track.

Step4Click “Export“ after you’re done trimming, then choose where you want to save the edited video.

Conclusion
Since we run out of time because of our busy schedules, you might find it inconvenient to use two different software programs when it can be done using Filmora. Due to the highly advanced and user-friendly tools introduced in Filmora , it is one of the best and most highly recommended video editing software.
Free Download For Win 7 or later(64-bit)
Free Download For macOS 10.14 or later
Part 3. How to split video and audio in alternative to premiere pro?
As a professional video editing software, Premiere Pro offers a wide range of professional editing features. But, for a beginner, it might seem time-consuming to master the software. Because it requires a high-speed PC due to the video resolution and requirements. So, we suggest Wondershare Filmora because it is considerably easier to use. Products on Filmora are available for various users, from novice to expert. A timeline, preview window, and effects library are common features. These may be accessed and managed using a drag-and-drop interface.
You can follow these steps to split audio and video without any hassle:
Step1To add video files to the Timeline for trimming, first click “Import“ on the main windows and choose the video files you want from your computer. You can also just drag and drop movies into the Media Library.

Step2To eliminate an undesirable segment, move the playhead over it and select the scissor icon.
Step3”Detach Audio” from the context menu when you are ready to extract the audio track from a video file. You’ll see that an audio file immediately appears on the audio track.

Step4Click “Export“ after you’re done trimming, then choose where you want to save the edited video.

Conclusion
Since we run out of time because of our busy schedules, you might find it inconvenient to use two different software programs when it can be done using Filmora. Due to the highly advanced and user-friendly tools introduced in Filmora , it is one of the best and most highly recommended video editing software.
Free Download For Win 7 or later(64-bit)
Free Download For macOS 10.14 or later
How to Edit Facebook Video Ads for E-Commerce Business
If you’re running an e-commerce business, then it’s important to create video ads that promote your products. However, making professional-quality videos can be expensive and time-consuming.
Luckily, there’s an easy way to create Facebook video ads that look great without spending a lot of money. All you need is a copy of Wondershare Filmora, which is a powerful yet easy-to-use video editor.
In this article, we’ll show you how to use Filmora to create eCommerce video ads that will help boost your sales.

Why Video Ads Are Effective for E-commerce Business
Video ads are a very effective way to promote your e-commerce business. They can help you reach a wider audience, and they can also be more engaging than traditional advertising methods.
There are a few things to keep in mind when creating video ads for your e-commerce business:
- First, make sure that your videos are high quality and professional-looking.
- Secondly, focus on creating videos that are short and to the point.
- Finally, make sure to include a call to action in your video so that viewers know what they should do after watching it.
Why Use Wondershare Filmora for Editing E-commerce Video Ads
Wondershare Filmora is a powerful video editing software that you can use to create videos for your e-commerce business. It’s also very user-friendly, which means it’s easy to use even if you have no prior experience with video editing software. You can create professional looking videos using this software, and it comes with built-in templates that make it easier for you to get started quickly.

With Wondershare Filmora , creating an e-commerce video ad will be as simple as possible. There are many different options that you can choose from when making these ads such as adding text, photos or graphics using the built-in editor within this program. You can also add audio clips into your video in order to hear sound effects such as music or voice-overs that narrate what viewers see on screen. They have all my favorite amazing features.
Free Download For Win 7 or later(64-bit)
Free Download For macOS 10.14 or later
Steps to Edit Facebook Video Ads for E-commerce Business
Step1Prepare your script for Video Editing
To make your Facebook video ad, you need to have a clear idea of what you want to say in the video. This can be done by creating a script for your video. Once you have a script, you can start planning out your video and editing it in Filmora.
Step2Save your video materials
To gather all photos and video materials, you can either use your own personal footage or find stock images and videos online. Once you have all the desired media, save them to a designated folder on your computer so you can easily access them while editing in Filmora.
Step3Open Filmora and click on “Create a New Project.”
Now that you have your content ready, open Filmora and click on “Create a New Project.” This will create a new project file for you to start editing in.

Step4Select the right Project Aspect Ratio
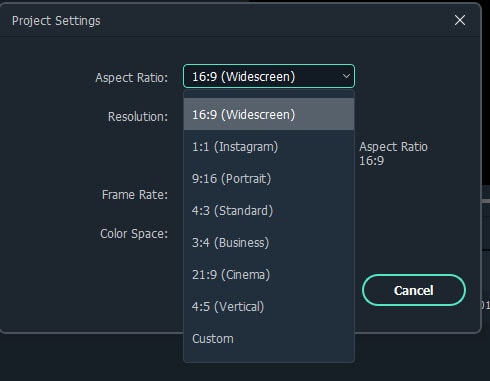
It is important to use the correct project aspect ratio when creating a Facebook video ad because if you don’t, your video may not be in the correct format when it is uploaded to Facebook. When selecting the project aspect ratio, make sure to choose Widescreen (16:9) or Instagram (1:10) to ensure that your video is in the correct format.
Step5Import your media files into Filmora
Once you have decided on the project aspect ratio, you can start importing your video and photo files. To do this, go to the “Media Library” and click on “Import Media Files.” Find the folder where you saved your content and select all of the files that you want to use. Then, click “Open” to import the files into Filmora.

Step6Set the background color for your Facebook Video Ads
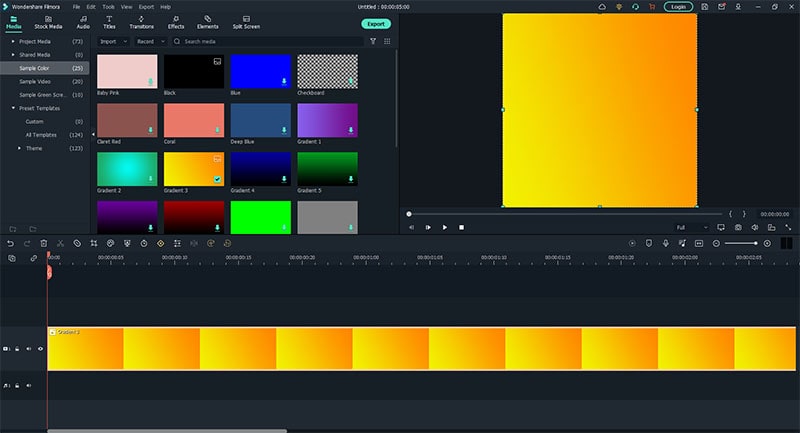
Now that you have all of your content imported into Filmora, you can start editing it. One thing you may want to do is set the background color for your video. To do this, go to the “Media” tab and click on the “Sample Color” section. Then, select the desired color for your background. Make sure to use your branding color palette.
Step7Add Catchy headline and text
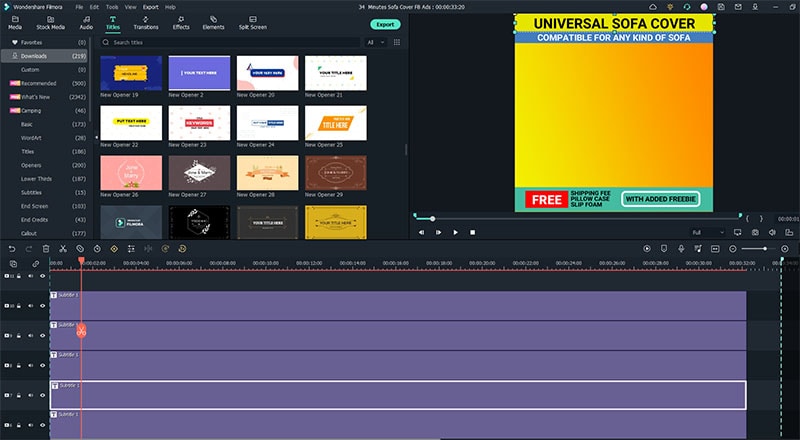
This will help to grab the viewer’s attention and explain what your video is about. To do this, go to the “Titler” tab and select the “Titles” option. Then, click on the “Text” tab and type in your headline. You can also add some text to the video by going to the “Text” tab and clicking on the “Add Text” option.
Catchy headlines will help you stand out from the competition and get your video noticed.
Step8Convert your script into a voice-over narrator
By using text to voice feature, you can generate voice-over that will help you create a more professional video. To do this, go to the “Text” tab and click on the “Add Text” option. Then, type in your script. Once you have finished typing, click on the “Text-ti-Voice Over” button and select the desired language.

Step9Arrange your video clips
Now that you have all of your content imported into Filmora , you can start arranging them into a cohesive video. To do this, go to the “Timeline” tab and drag and drop the desired photos or video clips into the correct order.
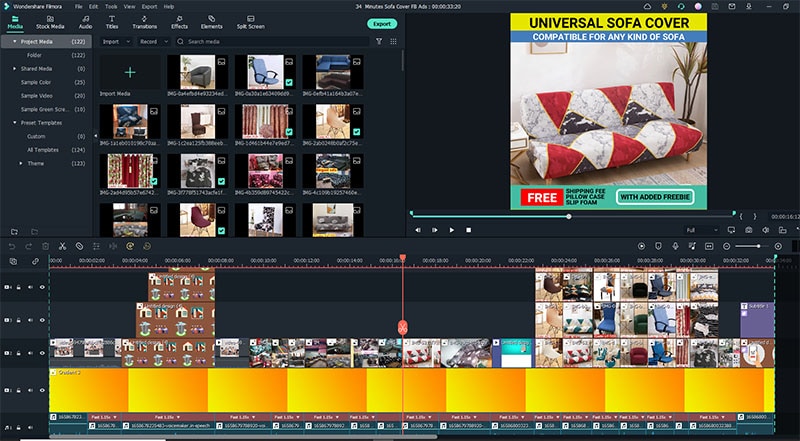
If you need to trim or split any of the photos or video clips, you can do so by using the “Trim” and “Split” options. To trim a photo or video clip, hover over the desired clip and click on the “ scissors “ icon. Then, drag it to the desired location. To split a photo or video clip, hover over the desired clip and click on the “ split “ icon. Then, drag it to the desired location.
You can also add some transitions between the video clips by going to the “Transitions” tab and dragging and dropping the desired transition into place.
Step10Add music to your video
Adding music to your video will help to set the mood and make your video more engaging. To do this, go to the “Audio” section the select your desired background music for your video. You can also download “no copyright background music” on Youtube.
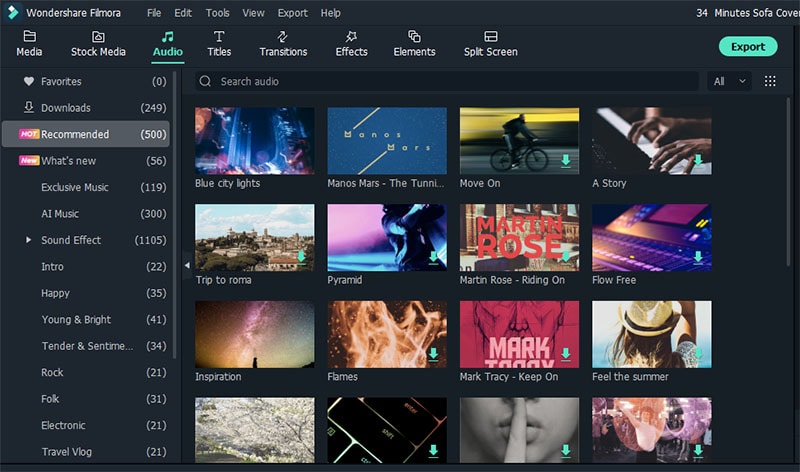
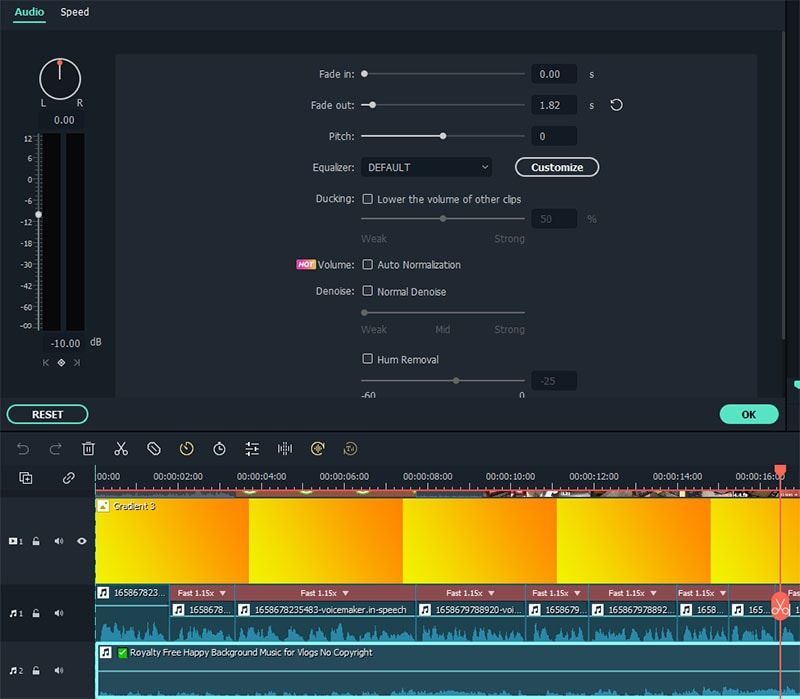
Drag and drop the audio file into place on the timeline. You can also use the “Fade In” and “Fade Out” options to make the music flow better with the video.
Step11Export your Video
To export your video, click on the “Export” button at the top section. Select the desired file format and click “Export” to save your video to your computer.
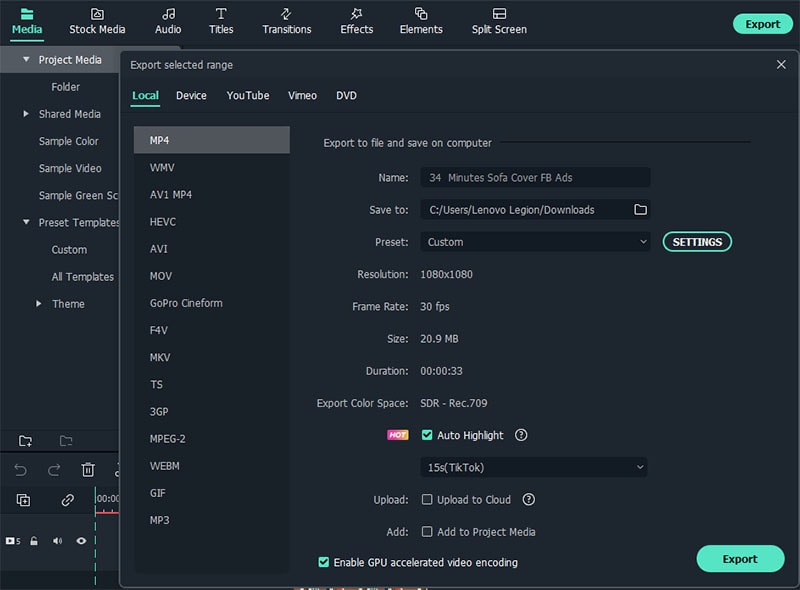
Recommended Export Quality
- Format: MP4
- Resolution: 720 or 1080
- Frame rate 30 fps
Conclusion
Now that you know how to create a Facebook video ad, it’s time to start creating some stellar videos that will help promote your business. By using the tips we’ve provided in this article, you can create videos that stand out from the competition and get noticed by your target audience. Make sure to use catchy headlines, text, and music to engage your viewers and keep them watching until the end. All the best!
Free Download For Win 7 or later(64-bit)
Free Download For macOS 10.14 or later
Free Download For macOS 10.14 or later
Steps to Edit Facebook Video Ads for E-commerce Business
Step1Prepare your script for Video Editing
To make your Facebook video ad, you need to have a clear idea of what you want to say in the video. This can be done by creating a script for your video. Once you have a script, you can start planning out your video and editing it in Filmora.
Step2Save your video materials
To gather all photos and video materials, you can either use your own personal footage or find stock images and videos online. Once you have all the desired media, save them to a designated folder on your computer so you can easily access them while editing in Filmora.
Step3Open Filmora and click on “Create a New Project.”
Now that you have your content ready, open Filmora and click on “Create a New Project.” This will create a new project file for you to start editing in.

Step4Select the right Project Aspect Ratio
It is important to use the correct project aspect ratio when creating a Facebook video ad because if you don’t, your video may not be in the correct format when it is uploaded to Facebook. When selecting the project aspect ratio, make sure to choose Widescreen (16:9) or Instagram (1:10) to ensure that your video is in the correct format.

Step5Import your media files into Filmora
Once you have decided on the project aspect ratio, you can start importing your video and photo files. To do this, go to the “Media Library” and click on “Import Media Files.” Find the folder where you saved your content and select all of the files that you want to use. Then, click “Open” to import the files into Filmora.

Step6Set the background color for your Facebook Video Ads
Now that you have all of your content imported into Filmora, you can start editing it. One thing you may want to do is set the background color for your video. To do this, go to the “Media” tab and click on the “Sample Color” section. Then, select the desired color for your background. Make sure to use your branding color palette.

Step7Add Catchy headline and text
This will help to grab the viewer’s attention and explain what your video is about. To do this, go to the “Titler” tab and select the “Titles” option. Then, click on the “Text” tab and type in your headline. You can also add some text to the video by going to the “Text” tab and clicking on the “Add Text” option.
Catchy headlines will help you stand out from the competition and get your video noticed.

Step8Convert your script into a voice-over narrator
By using text to voice feature, you can generate voice-over that will help you create a more professional video. To do this, go to the “Text” tab and click on the “Add Text” option. Then, type in your script. Once you have finished typing, click on the “Text-ti-Voice Over” button and select the desired language.

Step9Arrange your video clips
Now that you have all of your content imported into Filmora , you can start arranging them into a cohesive video. To do this, go to the “Timeline” tab and drag and drop the desired photos or video clips into the correct order.

If you need to trim or split any of the photos or video clips, you can do so by using the “Trim” and “Split” options. To trim a photo or video clip, hover over the desired clip and click on the “ scissors “ icon. Then, drag it to the desired location. To split a photo or video clip, hover over the desired clip and click on the “ split “ icon. Then, drag it to the desired location.
You can also add some transitions between the video clips by going to the “Transitions” tab and dragging and dropping the desired transition into place.
Step10Add music to your video
Adding music to your video will help to set the mood and make your video more engaging. To do this, go to the “Audio” section the select your desired background music for your video. You can also download “no copyright background music” on Youtube.

Drag and drop the audio file into place on the timeline. You can also use the “Fade In” and “Fade Out” options to make the music flow better with the video.

Step11Export your Video
To export your video, click on the “Export” button at the top section. Select the desired file format and click “Export” to save your video to your computer.

Recommended Export Quality
- Format: MP4
- Resolution: 720 or 1080
- Frame rate 30 fps
Conclusion
Now that you know how to create a Facebook video ad, it’s time to start creating some stellar videos that will help promote your business. By using the tips we’ve provided in this article, you can create videos that stand out from the competition and get noticed by your target audience. Make sure to use catchy headlines, text, and music to engage your viewers and keep them watching until the end. All the best!
Free Download For Win 7 or later(64-bit)
Free Download For macOS 10.14 or later
Easy Ways to Add Text Overlay to Video
Text overlay refers to adding a text element over a video scene. The viewers will see your text elements appear on the screen while watching the video. Adding text overlay is quite common in videos and movies. Starting from showing credits in intro and outro of video to showing topics and important points to emphasize on them, text overlay is highly useful.
If you want to add text overlay video, you will need a video editor on your device. Every video editor has text overlay option, but you need to choose that video editor which offers a wide range of text overlay options. We will illustrate how to add text overlay to your video on your computer, smartphone, as well as online from your web browser.
Part 1. Add Text Overlay to Video on PC
If you are a Windows user and you are looking for an all-around video editor, we recommend Wondershare Filmora . It is a professional video editor, and it is quite popular among regular video creators. Filmora has a diverse collection of video, audio, and text effects. You can also use transitions and elements as per your requirements. Here are the steps to add video overlay video in Filmora.
Free Download For Win 7 or later(64-bit)
Free Download For macOS 10.14 or later
Step1 Download and install Wondershare Filmora for Windows. Launch the application and click on New Project.

Step2 Import your video file into Project Media folder and drop it on Timeline.

Step3 Go to Titles option at the top and you will find different categories of text styles to apply to your video.

Step4 Select any category and any desired text style and drop it on Timeline. Place the text to that position on Timeline where you want the text to appear on the video.

Step5 Double-click on Text layer present on Timeline and customize the text label and other parameters as per your requirements.
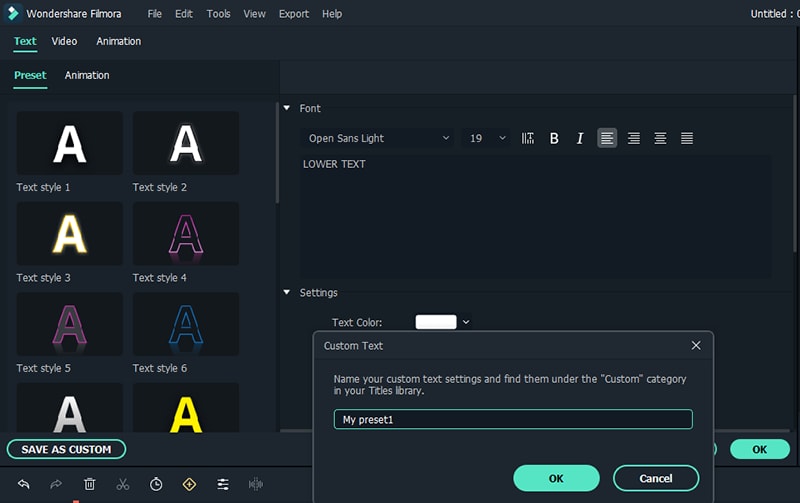
Step6 Finally, play the video and click on Export button to save the video on your hard drive.
Part 2. Add Text Overlay to Video on Mac
When it comes to editing videos on Mac, iMovie is a popular choice. This is because iMovie is an Apple product and it comes pre-installed on Mac. Adding text to your video is super easy on iMovie. There are different types of text styles available and here are the steps to add video overlay using iMovie.
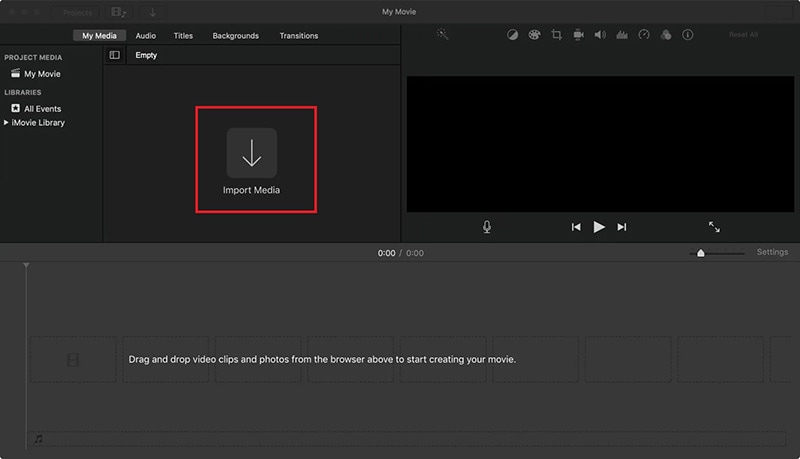
Step1 Open iMovie from Applications folder. Click on Create New button and thereafter, click on Import Media button to bring in your video clip.
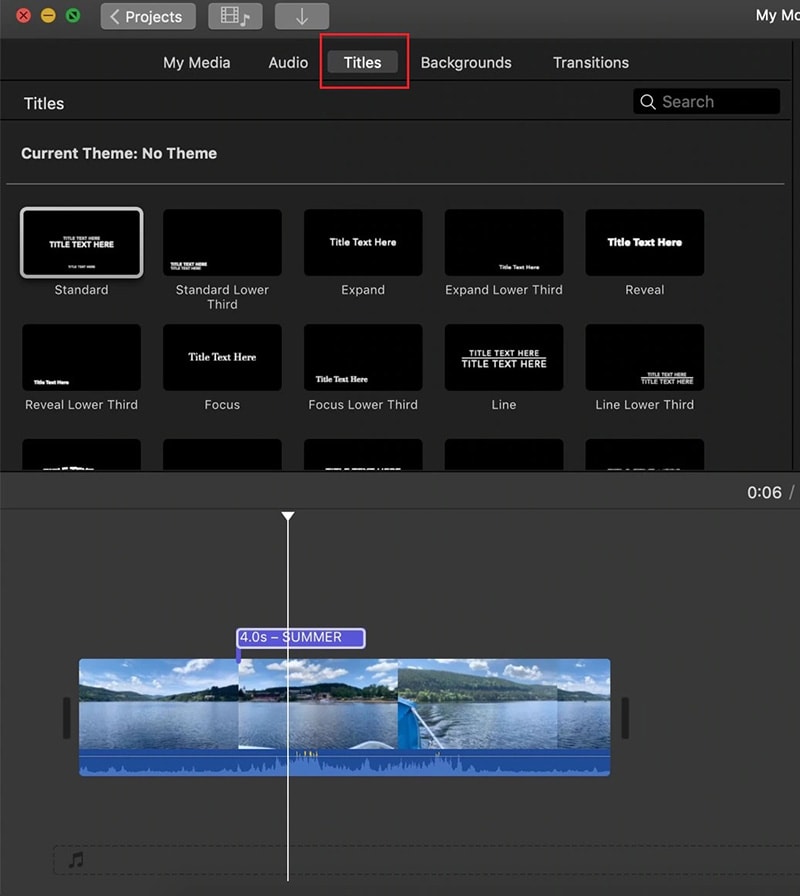
Step2 Drag and drop the video file from Media folder to Timeline. Select Titles at the top and you will see different text styles. Place your mouse pointer over them to preview them. Drag and drop any desired text style on Timeline and place it where you want it to appear in the video.
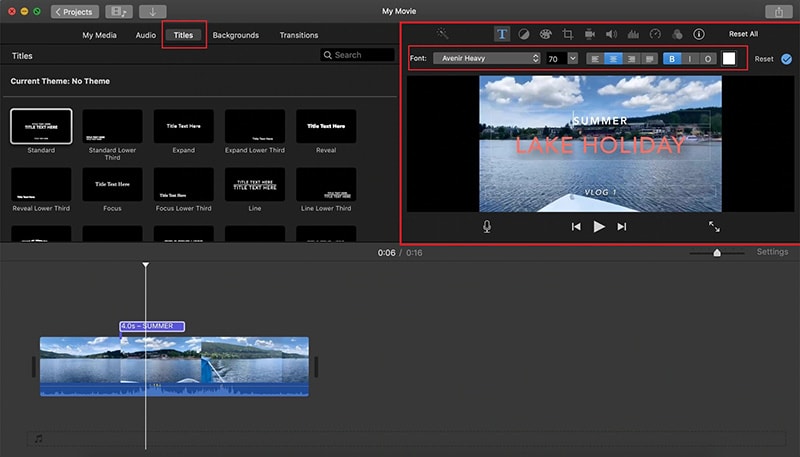
Step3 Edit the text from Preview Screen instantly. You can also change font, size, and other text elements.
Step4 If you are satisfied with the text overlay, go to File> Share> File to export the video file.
Part 3. Add Text Overlay to Video on iPhone
If you have captured a video on your iPhone and you want to add some texts over the video, you can do it instantly with iMovie app. Yes, iMovie app from Apple is available for iPhone as well. There is no need to transfer the video file to your PC or Mac for text overlay video. Here are the steps to follow.
Step1 Open iMovie app and tap on Plus icon to import your video clip to iMovie.
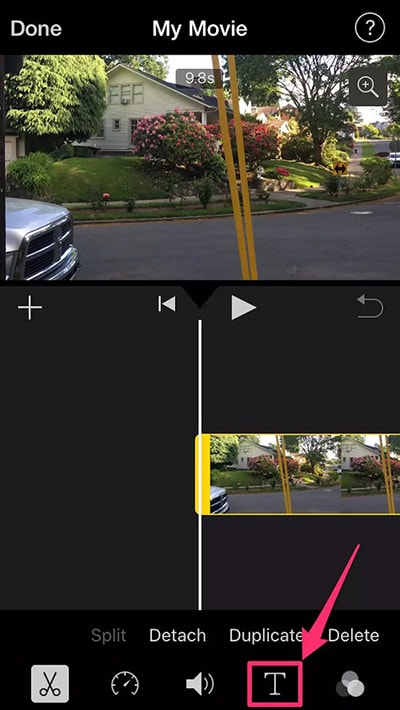
Step2 Tap on the video clip and tap on “T” icon located at the bottom.
Step3 You need to choose the text style as per your preference from the bottom.
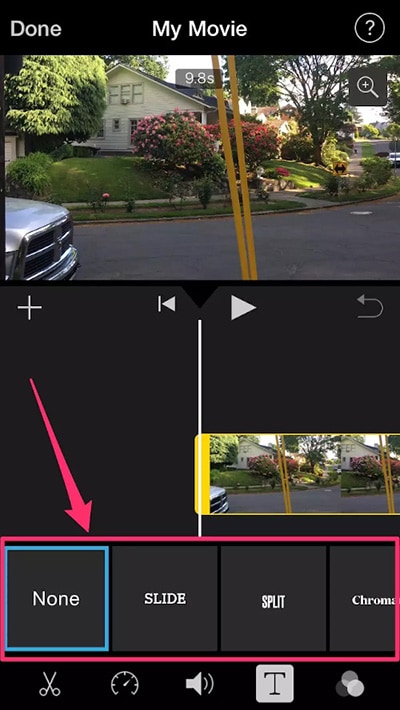
Step4 Tap on the Viewer to place the default text and tap on Edit option to change the text as per your requirements.
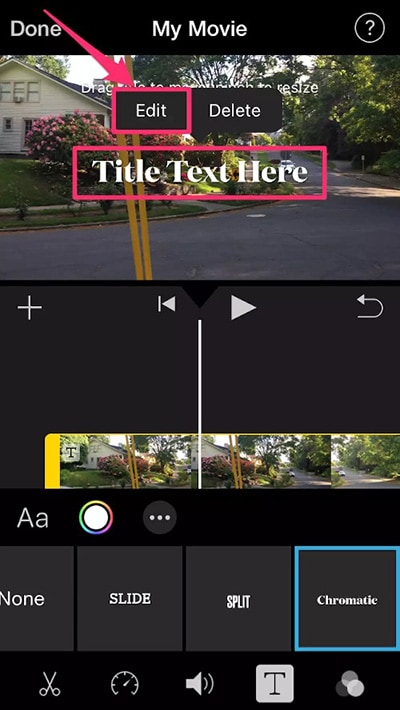
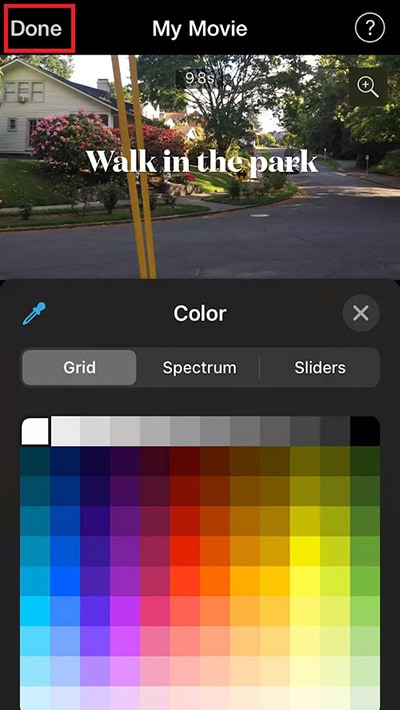
Step5 You can also reposition the text as well as adjust the size, font, as well as color. When you are satisfied, tap on Done.
Part 5. Add Text Overlay to Video Online
If you are not a regular video creator and you edit video rarely, installing an app on your phone or computer is going to be useless. You can use an online video editor to add text overlay to your video. This can be done on any device starting from smartphones to computers. Here are the steps to add overlay video online.
Step1 Open your web browser and visit “online-video-cutter.com/add-text-to-video”. Click on Open File button and select your video file from your storage device.
Step2 Wait for the video to get uploaded. Move the playhead on video navigation panel to where you want to add the text overlay. Click on Add Text button from the top.
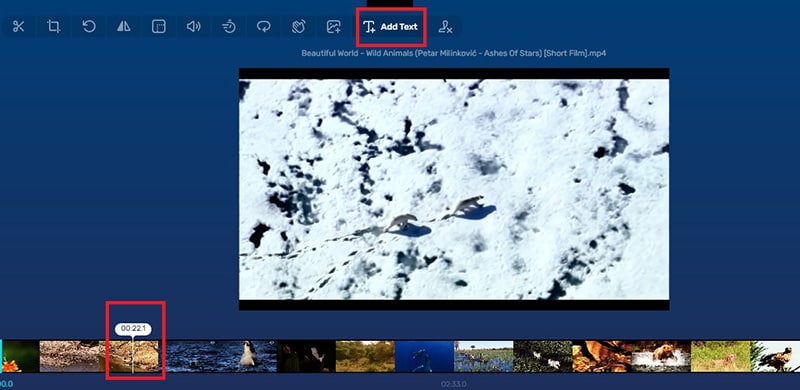
Step3 Click on the video where you want to place the text and type in the required text.
Step4 Select the text and below the navigation panel, you will find all the tools to customize the text as per your preference.
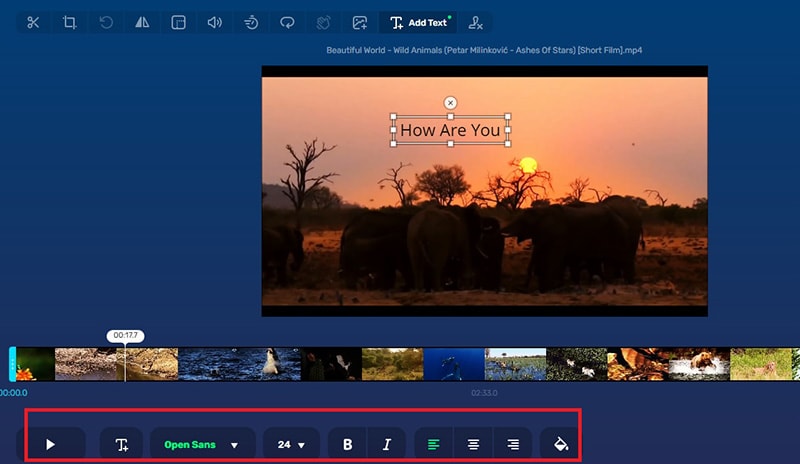
Step5 Once done and you are satisfied, click on Save button.
Conclusion
Adding text overlay to video is a basic operation in video editing. We have illustrated how you can use iMovie for Mac as well as iPhone to add text overlay video. For Windows users, Filmora is the perfect video editor with different categories of tile and text styles to add text to any video. Furthermore, you can use the online video editor for text overlay video on the go.
Free Download For macOS 10.14 or later
Step1 Download and install Wondershare Filmora for Windows. Launch the application and click on New Project.

Step2 Import your video file into Project Media folder and drop it on Timeline.

Step3 Go to Titles option at the top and you will find different categories of text styles to apply to your video.

Step4 Select any category and any desired text style and drop it on Timeline. Place the text to that position on Timeline where you want the text to appear on the video.

Step5 Double-click on Text layer present on Timeline and customize the text label and other parameters as per your requirements.

Step6 Finally, play the video and click on Export button to save the video on your hard drive.
Part 2. Add Text Overlay to Video on Mac
When it comes to editing videos on Mac, iMovie is a popular choice. This is because iMovie is an Apple product and it comes pre-installed on Mac. Adding text to your video is super easy on iMovie. There are different types of text styles available and here are the steps to add video overlay using iMovie.
Step1 Open iMovie from Applications folder. Click on Create New button and thereafter, click on Import Media button to bring in your video clip.

Step2 Drag and drop the video file from Media folder to Timeline. Select Titles at the top and you will see different text styles. Place your mouse pointer over them to preview them. Drag and drop any desired text style on Timeline and place it where you want it to appear in the video.

Step3 Edit the text from Preview Screen instantly. You can also change font, size, and other text elements.

Step4 If you are satisfied with the text overlay, go to File> Share> File to export the video file.
Part 3. Add Text Overlay to Video on iPhone
If you have captured a video on your iPhone and you want to add some texts over the video, you can do it instantly with iMovie app. Yes, iMovie app from Apple is available for iPhone as well. There is no need to transfer the video file to your PC or Mac for text overlay video. Here are the steps to follow.
Step1 Open iMovie app and tap on Plus icon to import your video clip to iMovie.
Step2 Tap on the video clip and tap on “T” icon located at the bottom.

Step3 You need to choose the text style as per your preference from the bottom.

Step4 Tap on the Viewer to place the default text and tap on Edit option to change the text as per your requirements.

Step5 You can also reposition the text as well as adjust the size, font, as well as color. When you are satisfied, tap on Done.

Part 5. Add Text Overlay to Video Online
If you are not a regular video creator and you edit video rarely, installing an app on your phone or computer is going to be useless. You can use an online video editor to add text overlay to your video. This can be done on any device starting from smartphones to computers. Here are the steps to add overlay video online.
Step1 Open your web browser and visit “online-video-cutter.com/add-text-to-video”. Click on Open File button and select your video file from your storage device.
Step2 Wait for the video to get uploaded. Move the playhead on video navigation panel to where you want to add the text overlay. Click on Add Text button from the top.

Step3 Click on the video where you want to place the text and type in the required text.
Step4 Select the text and below the navigation panel, you will find all the tools to customize the text as per your preference.

Step5 Once done and you are satisfied, click on Save button.
Conclusion
Adding text overlay to video is a basic operation in video editing. We have illustrated how you can use iMovie for Mac as well as iPhone to add text overlay video. For Windows users, Filmora is the perfect video editor with different categories of tile and text styles to add text to any video. Furthermore, you can use the online video editor for text overlay video on the go.
Also read:
- [New] Quick Insights 5 Easy Techniques for Effective Audio Capture on Windows 11 for 2024
- [Updated] 2024 Approved A Melodic Guide Navigating Copyright with Instagram
- [Updated] 2024 Approved Breakdown of Ad Revenue Average Income for YouTube Vids?
- 2024 Approved How to Use Blender Green Screen
- Diagnosing and Repairing Windows 11 Wireless Network Failure
- Do You Know How You Can Trim or Merge Using Wondershare Filmora? Trimming and Merging Using This Tool Is an Easy Task; Learn How for 2024
- Easy Steps to Loop YouTube Videos on iPhone
- How to Fade in Text in Adobe Premiere Pro for 2024
- In 2024, Recommended Video Background Online Changers
- In-Depth Moto G Play Analysis - Long-Lasting Battery Life Meets Solid Processor Speed
- Motorola's Moto G Power Unveiled: Examining Long-Lasting Battery Life & Robust Functionality
- Title: Create the Stranger Things Upside Down Effect Video for 2024
- Author: Chloe
- Created at : 2024-12-09 03:49:47
- Updated at : 2024-12-12 04:27:11
- Link: https://ai-editing-video.techidaily.com/create-the-stranger-things-upside-down-effect-video-for-2024/
- License: This work is licensed under CC BY-NC-SA 4.0.