:max_bytes(150000):strip_icc():format(webp)/GettyImages-597071115-37c5865742de421eafc8b7da4cc5a618.jpg)
Cropping a Video in Final Cut Pro Step by Step

Cropping a Video in Final Cut Pro [Step by Step]
“Storytelling at its most powerful”, - words we read on the first page of the official web-site of Final Cut Pro, non-linear video editing software program which runs on Mac computers. The software lets us to log and transfer videos onto a hard drive, where it can be edited, processed, and output to a wide variety of formats. Final Cut Pro is so advanced that it is used by hobbyist filmmakers and industry professionals in TV, Film, and media. Anyone can get a free trial of the software for their Macs, but, to purchase directly from the Mac App Store it costs $299.99. It’s evident that Final Cut Pro can’t be downloaded, installed, and thus used on Windows, which is unfortunate, but for Mac users, it’s a very powerful video editing software.

What are the features this advanced computer program offers to Mac users? – itreads on the web-site of Final Cut Pro:
- Object Tracker and Cinematic mode;
- Blazing pro performance;
- Editing, audio, motion graphics, color grading, and delivery;
- The best plug-ins, effects, and tools from leading developers.
One of the most impressive things about Final Cut Pro is that through it, you can create 2D and 3D titles right in the program, apply and modify filters, and use the built-in chroma key for high-quality green- and blue-screen effects. But, one should not be alarmed when it comes to experience and knowledge in editing – even though Final Cut Pro seems so advanced with its powerful tools and the possibilities it contains, it is designed for easy use and can be used by amateurs as well as professionals.
The interface, which, when it comes to editing, is one of the most important aspects (if not the main one!), seems quite standard - an ordinary window configuration, sidebar with libraries, events, projects, collections… If you want to know more about the basics of Final Cut Pro, it would be helpful to watch a beginner tutorial , with the length of only 20 minutes, an introduction of the whole program.

Anyway, the main topic of this article is about cropping – how to crop a video in Final Cut Pro? If you are a Mac user and have this program installed on your computer, and you as well have a footage where you want to remove some portions of the video and adjust the size of the cropped clip within a certain area, this article is for you. Even though cropping is especially used when it comes to the images, it is extremely helpful in certain situations about the video clips, as well. So, let’s dive into each step of cropping in Final Cut Pro!
Steps to crop a video in Final Cut Pro
After getting Final Cut Pro ready to work in and opening it, you need to start as always, as in any other software: Of course, choose Import Media.

The software will ask your permission to access files in your computer, so, in order to import some, guess you have to click on OK.

Then, it will let you choose your file – but not by opening the new window (as in most cases), rather, you can choose file within the software.

Once you have your file(s) chosen, you need to find Import Selected button on the down and right.

This will lead you towards the editor again, but if you try to drag and drop your file into the sequence, the program will not follow this simple order…

This is because what the window below reads and looks like – it offers you create a New Project first. So, you need to hit it.

This will create the sequence where you can add the video you have already selected and imported from your media.

Now, it’s time to find where the cropping option is. It’s quite simple – look at the icon below and a little left of the screen where your video clip shows, click on it and you will see three options: Transform, Crop, and Distort. Needless to say, you will choose crop in this case, even if other options sound quite interesting, too!

Choosing Crop also gives you three options: Trim, Crop, and Ken Burns. Stick with the Crop again!

You will notice the kind of rulers on the angles of the video clip – they are there so you can crop your footage manually, by holding and moving them with your cursor to your liking.

Of course, if you direct your cursor in the middle of the cropped video, you can move the whole cropping window around it, so you can find the area where you intend to crop better.

And when the selected area is ready, you need to click on Done button on the right top side of the screen. If you are not satisfied with the result, you can take the step back, by clicking on Reset button right next to Done and modify the area again.

On the right side of the screen, you notice a window where Crop is also written. Alongside it, if you hover over the option with your mouse, you will see the word: Show. Clicking on it will let you crop the video from each side from there, too.

There, you can “play around” with Left, Right, Top, and Bottom sides.

In the process, if you are unsure or you want to compare the original video to the cropped version of it, keep in mind that you can uncheck the Crop button.

Finally, when you feel the result is what you have imagined, you can proceed to saving your work. For it to be done, you need to now find an Export button top right of the whole editor, and then, choose Export File (or else, if that’s what you are willing to do).


The next step would be Export Settings. You will see a new window which has three sections: Info, Settings, and Roles. The most important one here would be considered Settings, where you choose your preferred Format, Video Codec, Resolution, Color Space, Audio Format, and Action.


When you click on Next, you then choose the Name of your project and the location where you want to save it exactly.

Then you click on Save, and in a short amount of time, you have your new cropped video where you chose to save it! So, that’s it with cropping in the Final Cut Pro!


An easier way to crop a video in Wondershare Filmora
When it comes down to Mac, we can also discussed another program which is available on Mac as well as Windows operating system. This software is Filmora Video Editor , which is a simple yet sophisticated video editor that empowers the stories with everything a video editor program can offer to its users. On its official web-site, Filmora is declared as the best video editor, which allows you to edit videos with minimal effort (and isn’t that exactly what one wants when trying to just crop a video?..), enhance videos with 800+ stunning effects, unleash creativity with Hollywood effects, and, import and export in almost any format. One can say that the interface looks quite like that of Final Cut Pro…
For Win 7 or later (64-bit)
For macOS 10.14 or later

So, shall we imagine we use Wondershare Filmora X to crop our video, what would be the steps to do it?..
Needless to say, downloading and installing the software is the first step. To add files, you need to click on Import Media Files Here.

Choose your clip(s) you would like to crop and then drag and drop it in the sequence.

Above your video in the sequence, you will see little icons and find a Crop one.

Click on it and a new window will open – it’s for Crop and Zoom, where you can choose a needed ratio or do it manually (for it, you have to select Custom first).

After clicking OK, your video will be cropped as you like. Then, you can proceed with Exporting it – click on Export, choose your preferred settings, and save the video.

So, in this article, we got to know to software Final Cut Pro better and learned about how to crop our footage using this program; we also discussed how to do the same in Wondershare Filmora X, shall we need a different software.
And now, you can choose your preferred one and follow these step, or, why not try both?..
What are the features this advanced computer program offers to Mac users? – itreads on the web-site of Final Cut Pro:
- Object Tracker and Cinematic mode;
- Blazing pro performance;
- Editing, audio, motion graphics, color grading, and delivery;
- The best plug-ins, effects, and tools from leading developers.
One of the most impressive things about Final Cut Pro is that through it, you can create 2D and 3D titles right in the program, apply and modify filters, and use the built-in chroma key for high-quality green- and blue-screen effects. But, one should not be alarmed when it comes to experience and knowledge in editing – even though Final Cut Pro seems so advanced with its powerful tools and the possibilities it contains, it is designed for easy use and can be used by amateurs as well as professionals.
The interface, which, when it comes to editing, is one of the most important aspects (if not the main one!), seems quite standard - an ordinary window configuration, sidebar with libraries, events, projects, collections… If you want to know more about the basics of Final Cut Pro, it would be helpful to watch a beginner tutorial , with the length of only 20 minutes, an introduction of the whole program.

Anyway, the main topic of this article is about cropping – how to crop a video in Final Cut Pro? If you are a Mac user and have this program installed on your computer, and you as well have a footage where you want to remove some portions of the video and adjust the size of the cropped clip within a certain area, this article is for you. Even though cropping is especially used when it comes to the images, it is extremely helpful in certain situations about the video clips, as well. So, let’s dive into each step of cropping in Final Cut Pro!
Steps to crop a video in Final Cut Pro
After getting Final Cut Pro ready to work in and opening it, you need to start as always, as in any other software: Of course, choose Import Media.

The software will ask your permission to access files in your computer, so, in order to import some, guess you have to click on OK.

Then, it will let you choose your file – but not by opening the new window (as in most cases), rather, you can choose file within the software.

Once you have your file(s) chosen, you need to find Import Selected button on the down and right.

This will lead you towards the editor again, but if you try to drag and drop your file into the sequence, the program will not follow this simple order…

This is because what the window below reads and looks like – it offers you create a New Project first. So, you need to hit it.

This will create the sequence where you can add the video you have already selected and imported from your media.

Now, it’s time to find where the cropping option is. It’s quite simple – look at the icon below and a little left of the screen where your video clip shows, click on it and you will see three options: Transform, Crop, and Distort. Needless to say, you will choose crop in this case, even if other options sound quite interesting, too!

Choosing Crop also gives you three options: Trim, Crop, and Ken Burns. Stick with the Crop again!

You will notice the kind of rulers on the angles of the video clip – they are there so you can crop your footage manually, by holding and moving them with your cursor to your liking.

Of course, if you direct your cursor in the middle of the cropped video, you can move the whole cropping window around it, so you can find the area where you intend to crop better.

And when the selected area is ready, you need to click on Done button on the right top side of the screen. If you are not satisfied with the result, you can take the step back, by clicking on Reset button right next to Done and modify the area again.

On the right side of the screen, you notice a window where Crop is also written. Alongside it, if you hover over the option with your mouse, you will see the word: Show. Clicking on it will let you crop the video from each side from there, too.

There, you can “play around” with Left, Right, Top, and Bottom sides.

In the process, if you are unsure or you want to compare the original video to the cropped version of it, keep in mind that you can uncheck the Crop button.

Finally, when you feel the result is what you have imagined, you can proceed to saving your work. For it to be done, you need to now find an Export button top right of the whole editor, and then, choose Export File (or else, if that’s what you are willing to do).


The next step would be Export Settings. You will see a new window which has three sections: Info, Settings, and Roles. The most important one here would be considered Settings, where you choose your preferred Format, Video Codec, Resolution, Color Space, Audio Format, and Action.


When you click on Next, you then choose the Name of your project and the location where you want to save it exactly.

Then you click on Save, and in a short amount of time, you have your new cropped video where you chose to save it! So, that’s it with cropping in the Final Cut Pro!


An easier way to crop a video in Wondershare Filmora
When it comes down to Mac, we can also discussed another program which is available on Mac as well as Windows operating system. This software is Filmora Video Editor , which is a simple yet sophisticated video editor that empowers the stories with everything a video editor program can offer to its users. On its official web-site, Filmora is declared as the best video editor, which allows you to edit videos with minimal effort (and isn’t that exactly what one wants when trying to just crop a video?..), enhance videos with 800+ stunning effects, unleash creativity with Hollywood effects, and, import and export in almost any format. One can say that the interface looks quite like that of Final Cut Pro…
For Win 7 or later (64-bit)
For macOS 10.14 or later

So, shall we imagine we use Wondershare Filmora X to crop our video, what would be the steps to do it?..
Needless to say, downloading and installing the software is the first step. To add files, you need to click on Import Media Files Here.

Choose your clip(s) you would like to crop and then drag and drop it in the sequence.

Above your video in the sequence, you will see little icons and find a Crop one.

Click on it and a new window will open – it’s for Crop and Zoom, where you can choose a needed ratio or do it manually (for it, you have to select Custom first).

After clicking OK, your video will be cropped as you like. Then, you can proceed with Exporting it – click on Export, choose your preferred settings, and save the video.

So, in this article, we got to know to software Final Cut Pro better and learned about how to crop our footage using this program; we also discussed how to do the same in Wondershare Filmora X, shall we need a different software.
And now, you can choose your preferred one and follow these step, or, why not try both?..
What are the features this advanced computer program offers to Mac users? – itreads on the web-site of Final Cut Pro:
- Object Tracker and Cinematic mode;
- Blazing pro performance;
- Editing, audio, motion graphics, color grading, and delivery;
- The best plug-ins, effects, and tools from leading developers.
One of the most impressive things about Final Cut Pro is that through it, you can create 2D and 3D titles right in the program, apply and modify filters, and use the built-in chroma key for high-quality green- and blue-screen effects. But, one should not be alarmed when it comes to experience and knowledge in editing – even though Final Cut Pro seems so advanced with its powerful tools and the possibilities it contains, it is designed for easy use and can be used by amateurs as well as professionals.
The interface, which, when it comes to editing, is one of the most important aspects (if not the main one!), seems quite standard - an ordinary window configuration, sidebar with libraries, events, projects, collections… If you want to know more about the basics of Final Cut Pro, it would be helpful to watch a beginner tutorial , with the length of only 20 minutes, an introduction of the whole program.

Anyway, the main topic of this article is about cropping – how to crop a video in Final Cut Pro? If you are a Mac user and have this program installed on your computer, and you as well have a footage where you want to remove some portions of the video and adjust the size of the cropped clip within a certain area, this article is for you. Even though cropping is especially used when it comes to the images, it is extremely helpful in certain situations about the video clips, as well. So, let’s dive into each step of cropping in Final Cut Pro!
Steps to crop a video in Final Cut Pro
After getting Final Cut Pro ready to work in and opening it, you need to start as always, as in any other software: Of course, choose Import Media.

The software will ask your permission to access files in your computer, so, in order to import some, guess you have to click on OK.

Then, it will let you choose your file – but not by opening the new window (as in most cases), rather, you can choose file within the software.

Once you have your file(s) chosen, you need to find Import Selected button on the down and right.

This will lead you towards the editor again, but if you try to drag and drop your file into the sequence, the program will not follow this simple order…

This is because what the window below reads and looks like – it offers you create a New Project first. So, you need to hit it.

This will create the sequence where you can add the video you have already selected and imported from your media.

Now, it’s time to find where the cropping option is. It’s quite simple – look at the icon below and a little left of the screen where your video clip shows, click on it and you will see three options: Transform, Crop, and Distort. Needless to say, you will choose crop in this case, even if other options sound quite interesting, too!

Choosing Crop also gives you three options: Trim, Crop, and Ken Burns. Stick with the Crop again!

You will notice the kind of rulers on the angles of the video clip – they are there so you can crop your footage manually, by holding and moving them with your cursor to your liking.

Of course, if you direct your cursor in the middle of the cropped video, you can move the whole cropping window around it, so you can find the area where you intend to crop better.

And when the selected area is ready, you need to click on Done button on the right top side of the screen. If you are not satisfied with the result, you can take the step back, by clicking on Reset button right next to Done and modify the area again.

On the right side of the screen, you notice a window where Crop is also written. Alongside it, if you hover over the option with your mouse, you will see the word: Show. Clicking on it will let you crop the video from each side from there, too.

There, you can “play around” with Left, Right, Top, and Bottom sides.

In the process, if you are unsure or you want to compare the original video to the cropped version of it, keep in mind that you can uncheck the Crop button.

Finally, when you feel the result is what you have imagined, you can proceed to saving your work. For it to be done, you need to now find an Export button top right of the whole editor, and then, choose Export File (or else, if that’s what you are willing to do).


The next step would be Export Settings. You will see a new window which has three sections: Info, Settings, and Roles. The most important one here would be considered Settings, where you choose your preferred Format, Video Codec, Resolution, Color Space, Audio Format, and Action.


When you click on Next, you then choose the Name of your project and the location where you want to save it exactly.

Then you click on Save, and in a short amount of time, you have your new cropped video where you chose to save it! So, that’s it with cropping in the Final Cut Pro!


An easier way to crop a video in Wondershare Filmora
When it comes down to Mac, we can also discussed another program which is available on Mac as well as Windows operating system. This software is Filmora Video Editor , which is a simple yet sophisticated video editor that empowers the stories with everything a video editor program can offer to its users. On its official web-site, Filmora is declared as the best video editor, which allows you to edit videos with minimal effort (and isn’t that exactly what one wants when trying to just crop a video?..), enhance videos with 800+ stunning effects, unleash creativity with Hollywood effects, and, import and export in almost any format. One can say that the interface looks quite like that of Final Cut Pro…
For Win 7 or later (64-bit)
For macOS 10.14 or later

So, shall we imagine we use Wondershare Filmora X to crop our video, what would be the steps to do it?..
Needless to say, downloading and installing the software is the first step. To add files, you need to click on Import Media Files Here.

Choose your clip(s) you would like to crop and then drag and drop it in the sequence.

Above your video in the sequence, you will see little icons and find a Crop one.

Click on it and a new window will open – it’s for Crop and Zoom, where you can choose a needed ratio or do it manually (for it, you have to select Custom first).

After clicking OK, your video will be cropped as you like. Then, you can proceed with Exporting it – click on Export, choose your preferred settings, and save the video.

So, in this article, we got to know to software Final Cut Pro better and learned about how to crop our footage using this program; we also discussed how to do the same in Wondershare Filmora X, shall we need a different software.
And now, you can choose your preferred one and follow these step, or, why not try both?..
What are the features this advanced computer program offers to Mac users? – itreads on the web-site of Final Cut Pro:
- Object Tracker and Cinematic mode;
- Blazing pro performance;
- Editing, audio, motion graphics, color grading, and delivery;
- The best plug-ins, effects, and tools from leading developers.
One of the most impressive things about Final Cut Pro is that through it, you can create 2D and 3D titles right in the program, apply and modify filters, and use the built-in chroma key for high-quality green- and blue-screen effects. But, one should not be alarmed when it comes to experience and knowledge in editing – even though Final Cut Pro seems so advanced with its powerful tools and the possibilities it contains, it is designed for easy use and can be used by amateurs as well as professionals.
The interface, which, when it comes to editing, is one of the most important aspects (if not the main one!), seems quite standard - an ordinary window configuration, sidebar with libraries, events, projects, collections… If you want to know more about the basics of Final Cut Pro, it would be helpful to watch a beginner tutorial , with the length of only 20 minutes, an introduction of the whole program.

Anyway, the main topic of this article is about cropping – how to crop a video in Final Cut Pro? If you are a Mac user and have this program installed on your computer, and you as well have a footage where you want to remove some portions of the video and adjust the size of the cropped clip within a certain area, this article is for you. Even though cropping is especially used when it comes to the images, it is extremely helpful in certain situations about the video clips, as well. So, let’s dive into each step of cropping in Final Cut Pro!
Steps to crop a video in Final Cut Pro
After getting Final Cut Pro ready to work in and opening it, you need to start as always, as in any other software: Of course, choose Import Media.

The software will ask your permission to access files in your computer, so, in order to import some, guess you have to click on OK.

Then, it will let you choose your file – but not by opening the new window (as in most cases), rather, you can choose file within the software.

Once you have your file(s) chosen, you need to find Import Selected button on the down and right.

This will lead you towards the editor again, but if you try to drag and drop your file into the sequence, the program will not follow this simple order…

This is because what the window below reads and looks like – it offers you create a New Project first. So, you need to hit it.

This will create the sequence where you can add the video you have already selected and imported from your media.

Now, it’s time to find where the cropping option is. It’s quite simple – look at the icon below and a little left of the screen where your video clip shows, click on it and you will see three options: Transform, Crop, and Distort. Needless to say, you will choose crop in this case, even if other options sound quite interesting, too!

Choosing Crop also gives you three options: Trim, Crop, and Ken Burns. Stick with the Crop again!

You will notice the kind of rulers on the angles of the video clip – they are there so you can crop your footage manually, by holding and moving them with your cursor to your liking.

Of course, if you direct your cursor in the middle of the cropped video, you can move the whole cropping window around it, so you can find the area where you intend to crop better.

And when the selected area is ready, you need to click on Done button on the right top side of the screen. If you are not satisfied with the result, you can take the step back, by clicking on Reset button right next to Done and modify the area again.

On the right side of the screen, you notice a window where Crop is also written. Alongside it, if you hover over the option with your mouse, you will see the word: Show. Clicking on it will let you crop the video from each side from there, too.

There, you can “play around” with Left, Right, Top, and Bottom sides.

In the process, if you are unsure or you want to compare the original video to the cropped version of it, keep in mind that you can uncheck the Crop button.

Finally, when you feel the result is what you have imagined, you can proceed to saving your work. For it to be done, you need to now find an Export button top right of the whole editor, and then, choose Export File (or else, if that’s what you are willing to do).


The next step would be Export Settings. You will see a new window which has three sections: Info, Settings, and Roles. The most important one here would be considered Settings, where you choose your preferred Format, Video Codec, Resolution, Color Space, Audio Format, and Action.


When you click on Next, you then choose the Name of your project and the location where you want to save it exactly.

Then you click on Save, and in a short amount of time, you have your new cropped video where you chose to save it! So, that’s it with cropping in the Final Cut Pro!


An easier way to crop a video in Wondershare Filmora
When it comes down to Mac, we can also discussed another program which is available on Mac as well as Windows operating system. This software is Filmora Video Editor , which is a simple yet sophisticated video editor that empowers the stories with everything a video editor program can offer to its users. On its official web-site, Filmora is declared as the best video editor, which allows you to edit videos with minimal effort (and isn’t that exactly what one wants when trying to just crop a video?..), enhance videos with 800+ stunning effects, unleash creativity with Hollywood effects, and, import and export in almost any format. One can say that the interface looks quite like that of Final Cut Pro…
For Win 7 or later (64-bit)
For macOS 10.14 or later

So, shall we imagine we use Wondershare Filmora X to crop our video, what would be the steps to do it?..
Needless to say, downloading and installing the software is the first step. To add files, you need to click on Import Media Files Here.

Choose your clip(s) you would like to crop and then drag and drop it in the sequence.

Above your video in the sequence, you will see little icons and find a Crop one.

Click on it and a new window will open – it’s for Crop and Zoom, where you can choose a needed ratio or do it manually (for it, you have to select Custom first).

After clicking OK, your video will be cropped as you like. Then, you can proceed with Exporting it – click on Export, choose your preferred settings, and save the video.

So, in this article, we got to know to software Final Cut Pro better and learned about how to crop our footage using this program; we also discussed how to do the same in Wondershare Filmora X, shall we need a different software.
And now, you can choose your preferred one and follow these step, or, why not try both?..
How to Merge Audio and Video in VLC Media Player
Merging audio and video is a common task for many content creators, whether you’re making a YouTube video, a podcast, or a movie. One of the most popular ways to do this is using VLC Media Player. It is a powerful media player with a built-in feature that allows you to merge audio and video files. This guide will show you how to easily use VLC Media Player to merge audio and video files.
VLC Media Player is a free, open-source program that can play various media formats. It’s available for Windows, Mac, and Linux and is widely used by content creators, media enthusiasts, and casual users. In addition to playing media files, VLC Media Player has several advanced features, including the ability to convert, record, and merge files. This guide will focus on how to merge audio and video in VLC Media Player.
How To Merge Audio and Video in VLC (VideoLan Media Player)
In addition to playing media files, VLC has a built-in feature that allows you to merge audio and video files into a single file. This guide will walk you through merging audio and video files in VLC, making it easy to create your videos, podcasts, or movies with a professional touch.
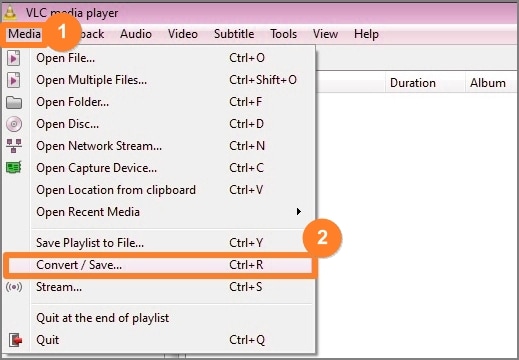
- Open VLC. Click on “Media” > “Convert / Save” from the dropdown menu.
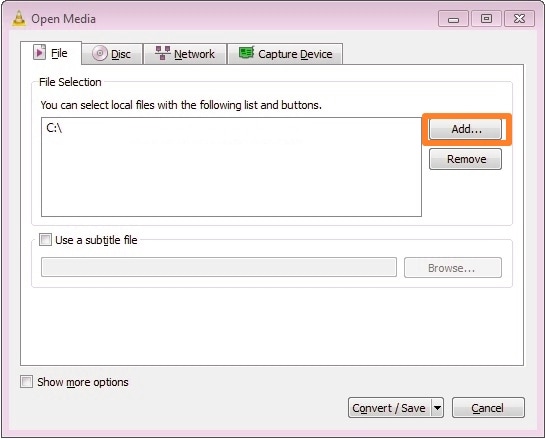
- Under the “File” tab, click on the “Add…” button to import the videos you want to merge.
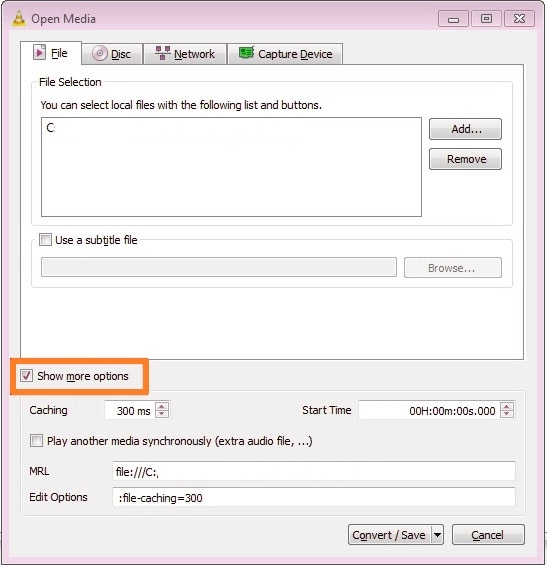
- Tick the “Show more options” checkbox at the bottom.
- Tick the “Play another media synchronously” to add the audio file.
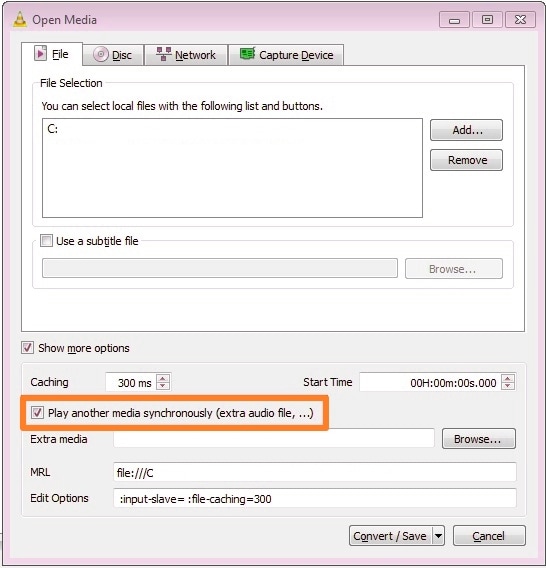
- Click on the “Browse” button and select the audio on your computer.

- Select the “Convert” radio button.
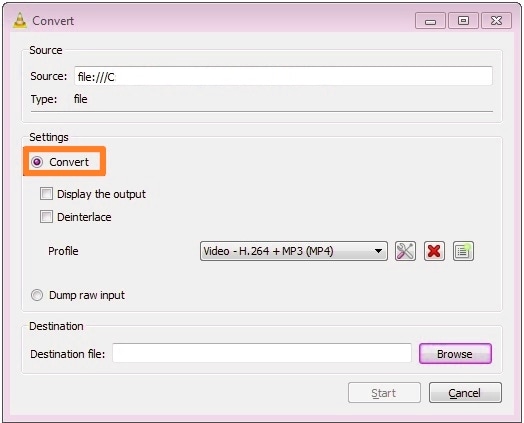
- Click on the “Browse” button and select a location on your computer to save the video.
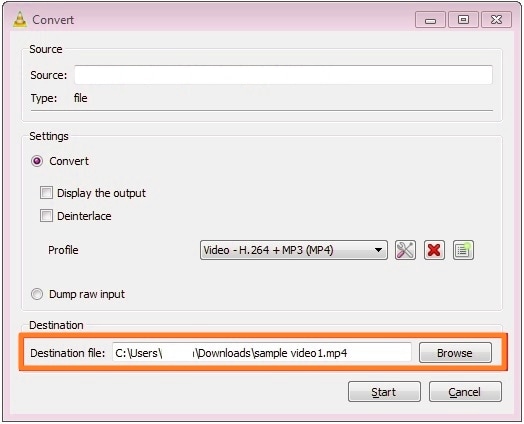
- Click on the “Start” button to save the video.

[Bonus] Filmora – Best Alternative to VLC to Combine Audio and Video
VLC is a great tool. But other tools may be better for people serious about making videos. VLC is more of an entry-level video editing software. It is good. But if it’s no longer enough for you, you should try its alternatives. Among the best ones is Wondershare Filmora . It has more advanced tools that answer the needs of video editing experts.
Free Download For Win 7 or later(64-bit)
Free Download For macOS 10.14 or later
Wondershare Filmore Features
Wondershare Filmora is a good alternative to VLC. To paint a picture, let’s look at its features. Filmora has:
- A library of carefully curated music.
- Speed controls that let you match your timing to a beat.
- Filters and effects to help you enhance the video.
- Transition effects to add more flare to the video.
- Integration with Instagram, YouTube, TikTok, or Vimeo, which allows you to publish with one tap.
Step-By-Step Guide To Merging Audio and Video With Filmora
So how to merge audio and video with Wondershare Filmora? Follow these steps to do so.
- Import the audio and videos that you want to merge into Filmora. You can do this through drag-and-drop or by clicking the link that says, “Click here to import media.”

- Drag the media files into the timeline. Adjust the video to align with the audio.

- Optionally, if you want to replace the video’s original audio, do this. Right-click on the video file. Select “Detach Audio.” The original audio will be separated from the video and put in the audio track. Delete it and replace it with the new audio.
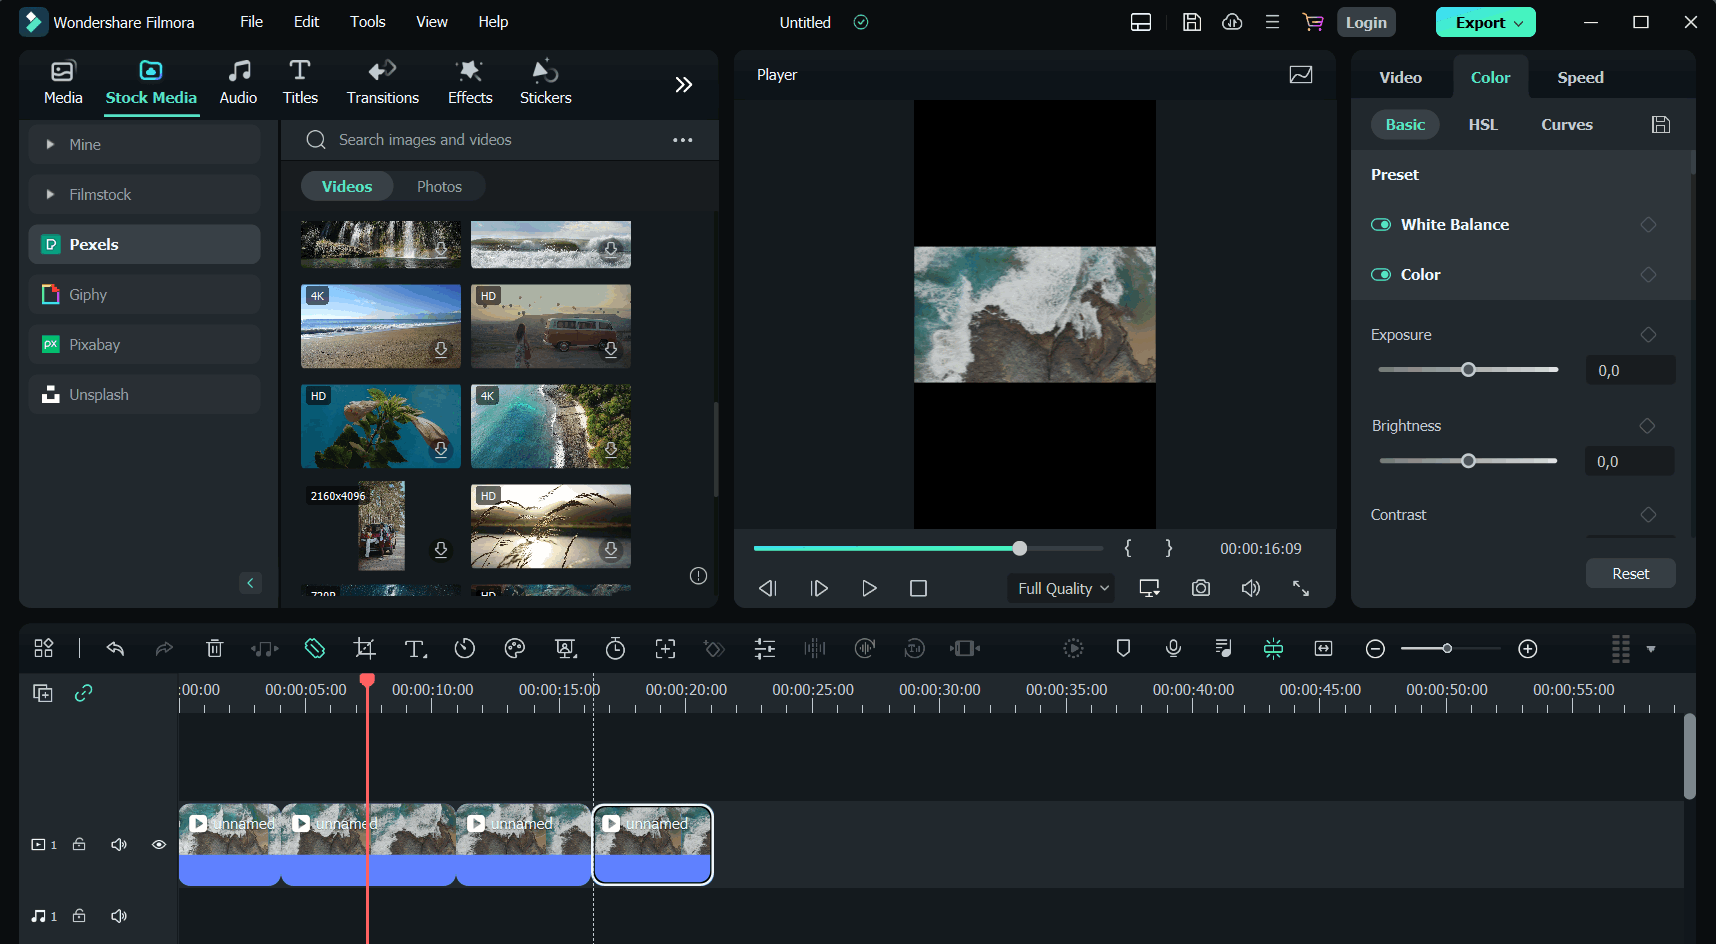
- Click “Export.” Select the format that you like, and click “Export” again. Alternatively, you can publish directly to YouTube or burn the video into a DVD.

You can watch this video to learn more about how to add audio to a video:
Combine Audio & Video? VLC or Filmora
Do you find it difficult to choose between VLC and Filmora for merging audio and video? Here’s a direct comparison between the two. It should help you decide.
| | VLC | Filmora | |
| —————————- | ———————————————————————————————————————————————————————————————————————————————————————————————————————— | ———————————————————————————————————————————————————————————————————————————————————————————————————————————————- |
| Customer Reviews from G2 | One G2 Validated Reviewer wrote that VideoLan is an “awesome all-in-one media player” that fulfills all their needs. It helps them play all audio and video media files without installing an external codec pack. The reviewer gave VLC 5 stars out of 5 stars. | A Validated Reviewer on G2 commented about Filmora’s audio editing. They said the most helpful feature is the ability to detach or mute the video. With that, you can add your own recordings or music to the video. This reviewer gave Wondershare Filmora 5 stars out of 5 stars. |
| Operating Systems | Windows; macOS; Linux; Android; iOS | Windows; macOS; Android; iOS |
| Pricing | ● VLC is an open-source program. Meaning it is completely free. | ● Wondershare Filmora’s annual plan for individual users costs $49.99.● The cross-platform plan costs $59.99 per year.● The perpetual plan costs $79.99. |
| Features | ● Plays all video and audio formats● Subtitle synchronization● Audio and video filters● Screen record without watermark | ● Split-screen● Speed ramping● Keyframing● Templates● Auto beat sync● Audio ducking● Silence detection● Audio synchronization● Video effects, filters, and transitions |
The main difference is that VLC is more of a media player. People use it to watch movies or play songs. Yes, it also lets you merge audio and video, convert videos, and screen record. But that’s about it; it does not give you features that challenge your creativity.
On the other hand, Wondershare Filmora is a video editor. It gives you tools that enable you to create original videos and enhance them. Therefore, it is the better option if you want to be a YouTuber or renowned video maker.
That said, the best use case for VLC is using it to play videos and music. It’s also a great free media converter. Meanwhile, Wondershare Filmora is better suited for video content creation. The tools it provides you with allow the creation of videos that are sure to captivate your audience.
Conclusion
Merging audio and video is easy. VLC and Wondershare Filmora are fantastic tools that can help you with that task. Suppose you want to do more than just merge audio and video. The latter is the better option. It includes powerful video editing tools that help you create amazing videos. Aside from merging, Filmora also offers audio synchronization, auto beat sync, audio detaching, and more. These features ensure the output file will be of high quality.
Free Download For macOS 10.14 or later
Wondershare Filmore Features
Wondershare Filmora is a good alternative to VLC. To paint a picture, let’s look at its features. Filmora has:
- A library of carefully curated music.
- Speed controls that let you match your timing to a beat.
- Filters and effects to help you enhance the video.
- Transition effects to add more flare to the video.
- Integration with Instagram, YouTube, TikTok, or Vimeo, which allows you to publish with one tap.
Step-By-Step Guide To Merging Audio and Video With Filmora
So how to merge audio and video with Wondershare Filmora? Follow these steps to do so.
- Import the audio and videos that you want to merge into Filmora. You can do this through drag-and-drop or by clicking the link that says, “Click here to import media.”

- Drag the media files into the timeline. Adjust the video to align with the audio.

- Optionally, if you want to replace the video’s original audio, do this. Right-click on the video file. Select “Detach Audio.” The original audio will be separated from the video and put in the audio track. Delete it and replace it with the new audio.

- Click “Export.” Select the format that you like, and click “Export” again. Alternatively, you can publish directly to YouTube or burn the video into a DVD.

You can watch this video to learn more about how to add audio to a video:
Combine Audio & Video? VLC or Filmora
Do you find it difficult to choose between VLC and Filmora for merging audio and video? Here’s a direct comparison between the two. It should help you decide.
| | VLC | Filmora | |
| —————————- | ———————————————————————————————————————————————————————————————————————————————————————————————————————— | ———————————————————————————————————————————————————————————————————————————————————————————————————————————————- |
| Customer Reviews from G2 | One G2 Validated Reviewer wrote that VideoLan is an “awesome all-in-one media player” that fulfills all their needs. It helps them play all audio and video media files without installing an external codec pack. The reviewer gave VLC 5 stars out of 5 stars. | A Validated Reviewer on G2 commented about Filmora’s audio editing. They said the most helpful feature is the ability to detach or mute the video. With that, you can add your own recordings or music to the video. This reviewer gave Wondershare Filmora 5 stars out of 5 stars. |
| Operating Systems | Windows; macOS; Linux; Android; iOS | Windows; macOS; Android; iOS |
| Pricing | ● VLC is an open-source program. Meaning it is completely free. | ● Wondershare Filmora’s annual plan for individual users costs $49.99.● The cross-platform plan costs $59.99 per year.● The perpetual plan costs $79.99. |
| Features | ● Plays all video and audio formats● Subtitle synchronization● Audio and video filters● Screen record without watermark | ● Split-screen● Speed ramping● Keyframing● Templates● Auto beat sync● Audio ducking● Silence detection● Audio synchronization● Video effects, filters, and transitions |
The main difference is that VLC is more of a media player. People use it to watch movies or play songs. Yes, it also lets you merge audio and video, convert videos, and screen record. But that’s about it; it does not give you features that challenge your creativity.
On the other hand, Wondershare Filmora is a video editor. It gives you tools that enable you to create original videos and enhance them. Therefore, it is the better option if you want to be a YouTuber or renowned video maker.
That said, the best use case for VLC is using it to play videos and music. It’s also a great free media converter. Meanwhile, Wondershare Filmora is better suited for video content creation. The tools it provides you with allow the creation of videos that are sure to captivate your audience.
Conclusion
Merging audio and video is easy. VLC and Wondershare Filmora are fantastic tools that can help you with that task. Suppose you want to do more than just merge audio and video. The latter is the better option. It includes powerful video editing tools that help you create amazing videos. Aside from merging, Filmora also offers audio synchronization, auto beat sync, audio detaching, and more. These features ensure the output file will be of high quality.
Being a Content Creator Means Creating a Slow-Mo at some Point. Study This Piece to Learn How to Play a Video in Slow Motion on iPhone
Before we dive into how to play a video in slow motion on iPhone, let’s see what they are. In slow motion, the video frame rate is usually manipulated. In manual or automated editing, frame rates increase to add extra seconds to the video. For instance, in normal videos, playback speed is 24, 30, or 60 fps. However, this frame rate can be increased up to 124 or 240 fps in slow motions.
These are the standard values and help achieve accurate and precise slow-motion effects. In this article, the discussion leans toward the making and playing slow-mo. Users will learn how to play videos in slow motion on iPhone. It will introduce tools to create a slow-mo effect and a guide to achieve it.
Part 1:Adding Slow Motion to Video on iPhone (Before & After)
Now that you have an insight into the significance of slow-motion videos, let’s move forward. This section involves a guide on how to play a video in slow motion on iPhone. Here is a guide to adding slow motion in your video before and after recording:
1. Making a Slow Motion Before Recording
This method involves recording a video in slow-motion mode from the start. Apple has already launched this feature in its iPhones and iPads. Here is a step-by-step guide to creating such videos:
Step 1
Open your iPhone and click on the “Camera” application. Once you access it, select “SLO-MO” mode from the bottom.
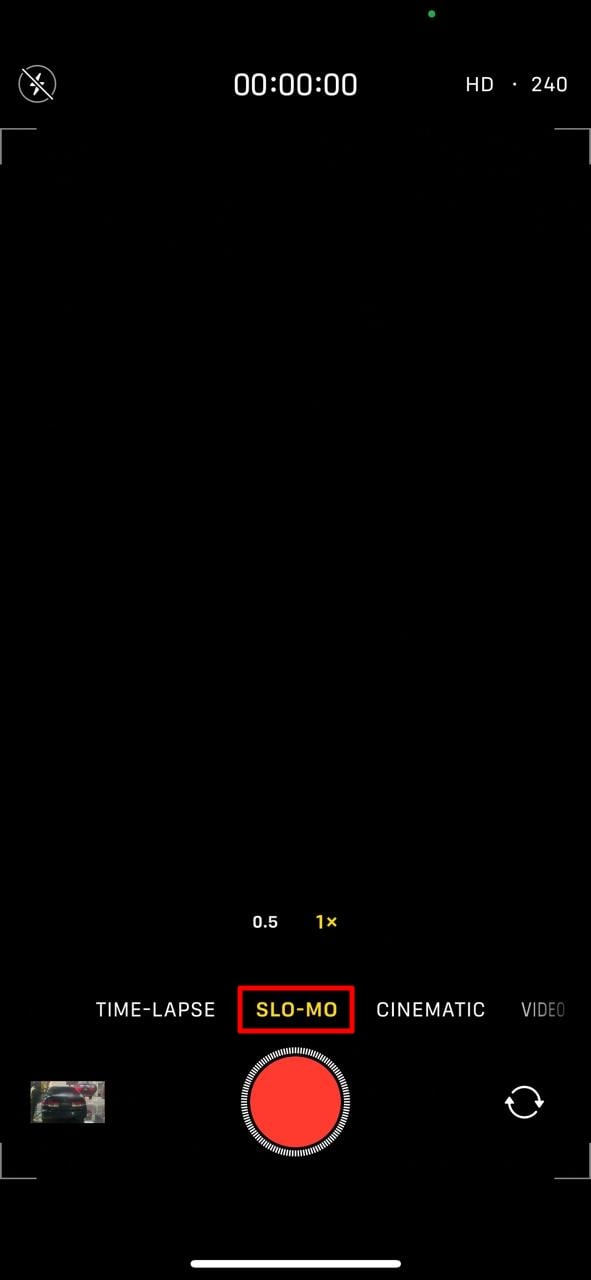
Step 2
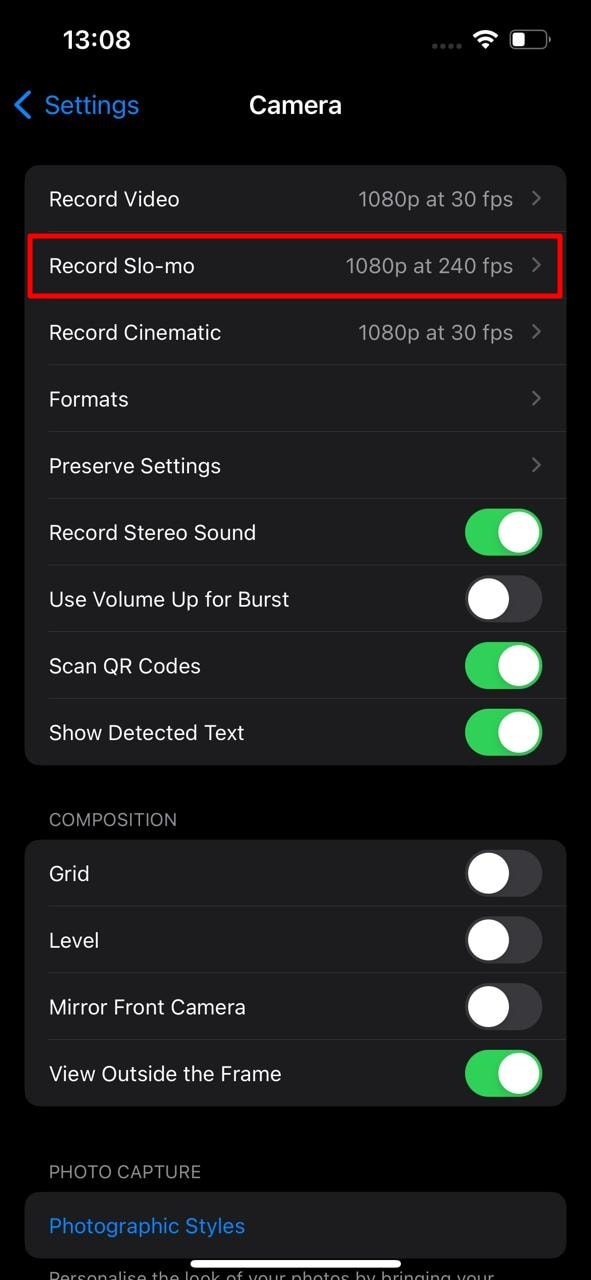
Go back and open the “Settings” and select the “Camera” section. In camera settings, select the “Record Slo-mo 1080p at 240 fps.”
2. Making a Slow Motion After Recording
The first method will record your overall video in slow motion. However, you can use the other method to add a slow-mo effect to a specific part. Follow the given instructions to learn how to operate it:
Step 1
Open the “Photos” application from your home screen and click “Albums.” From the featured slider, select the “Slow-mo” option.

Step 2
Choose a video from this album and go to the “Edit” option at the top right corner.

Step 3
Navigate towards the bottom and access the timeline. Choose the specific area for adding the effect and drag the sliders on the vertical lines below. Once satisfied with the slow-motion effect, click the “Done” button.

Part 2: Some Prominent Third-party Apps Available to Play Video in Slow-Motion
Slow-mo effects enhance the creativity of your videos and let the audience experience new things. Do you still want to learn how to play a video in slow motion on iPhone? Here is a comprehensive guide to creating slow motions:
- Video Speed: Fast, Slow Motion
- Slo Mo – Speed Up Video Editor
- Slow Mo and Fast Motion
- Video Speed Changer – Editor
1. Video Speed: Fast, Slow Motion
This is it if you are looking for an application with advanced features and manual editing. The application offers many video playback options for a suitable slow motion. You can add slow motion to a whole video or a part through timeline editing. The application offers multiple subscriptions with a trial period before use.

Key Features
- After editing a video in this application, you can integrate music and text.
- The speed manipulation doesn’t result in slow-mo but also offers fast speed options.
- It has an insightful and easy user interface; you can apply color filters after editing.
2. Slo Mo – Speed Up Video Editor
Finding answers about how to play videos in slow motion on iPhone? This is an intuitive application to create slow-mo with a high processing rate. To slow down a video using this application, you can manipulate the video frame to 240 fps. The speed modification is available to apply on specific video parts.

Key Features
- Direct video share options to Instagram, YouTube, Twitter, and Facebook.
- The premium version has 170+ music tracks to insert in your edited video.
- Users can record a live video using this application and apply speed options.
3. Slow Mo & Fast Motion
This video editor is specifically designed for those looking to modify video speed. It enables you to change the whole video speed or the marked area. Whether you want to slow an existing video or record a new one through it, the choice is yours. The video control options are not technical, and anyone can understand them.

Key Features
- The tool offers cutting options, and the timeline editing makes it more precise.
- You can use this application’s built-in features to enhance the visual outlook of video.
- The application shows support for multiple languages, including Spanish, French, and more.
4. Video Speed Changer – Editor
Whether it’s about changing speed or doing other types of speed edits, this app fits the best. It resolves your how to play videos in slow motion on iPhone problems. It allows you to change the video playback speed via a simple process. Just upload your video and drag the speed slider backward to create a slow-mo.

Key Features
- The tool offers to import or record media through its built-in recorder option.
- You can also add fast-motion elements like time-lapse, time warp, or hyper-lapse.
- The user interface is straightforward and leaves no room for confusion.
Bonus Part: Make and Play Your Video in Slow Motion: Use Wondershare Filmora
You might wonder if something is missing if you see a slow-motion video using these applications. This is where you need a professional editor for a smooth slow-mo. Wondershare Filmora is one of the editors that offers frame interpolation. With its optical flow option and high-resolution export settings, you can rely on it.
This AI video editor has two methods of creating a low-motion effect. One method involves uniform speed, and the other is speed ramping. The uniform speed option allows you to manipulate video playback speed using a slider. Meanwhile, speed ramping is a more precise method of modifying video parts.
Free Download For Win 7 or later(64-bit)
Free Download For macOS 10.14 or later
Playing and Adding Slow Motion Effect to Video Using Filmora
After hearing about this amazing software, you might want to create a slow-mo. You might wonder how to play videos in slow motion on iPhone using Filmora. Read the step-by-step guide to find your answer:
Step 1Create a New Project and Access Speed Options
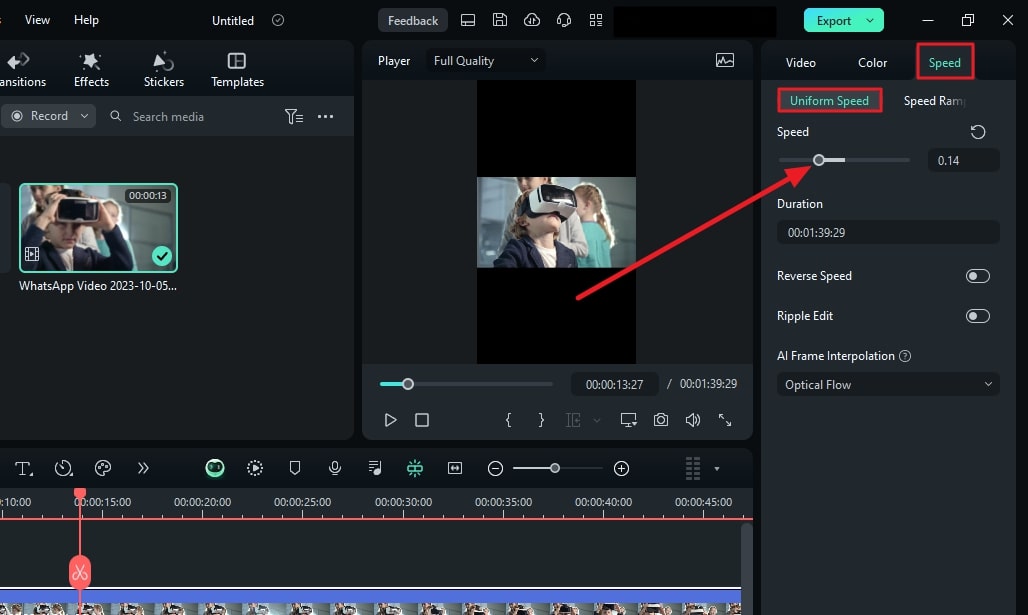
Once you have downloaded this software, access the “New Project” button. Then, use the “Command + I” keys to import media and bring it to the timeline. Select the media clip in the timeline and go to the settings panel. Under the “Speed” tab, choose “Uniform Speed” and drag the slider for speed change.
Step 2Activate AI Frame Interpolation Option
Once you finish the speed settings, there is a tip to enhance the slow-mo effect. Find the “AI Frame Interpolation” option in the same section and expand it. Select the “Optical Flow” option at the third to smoothen the video.

Step 3Rendering and Exporting
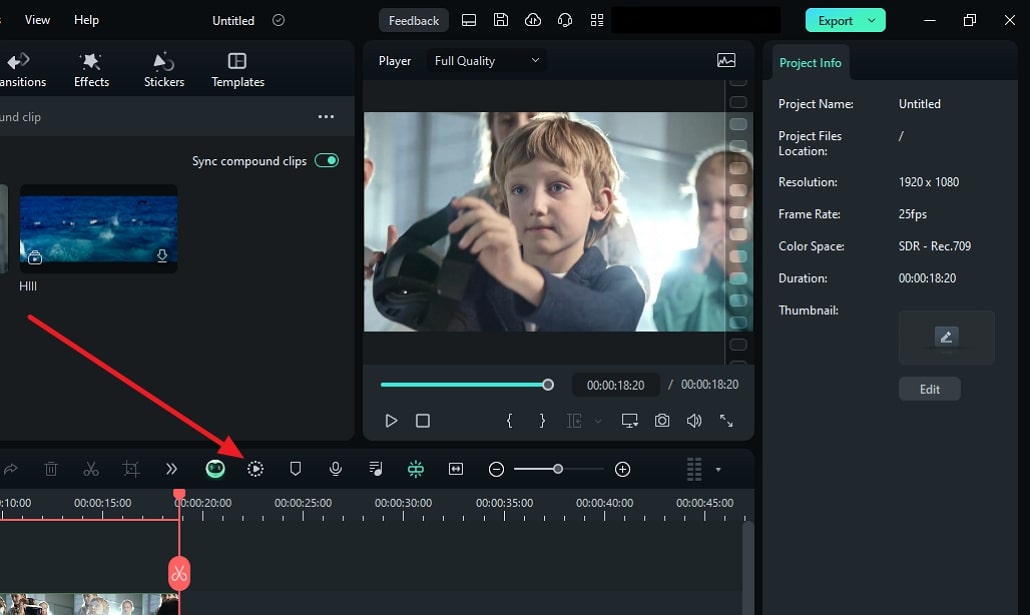
Once you have activated the optical flow, render it to see the results. For this, navigate towards the timeline toolbar and select the “Render Preview” option. It looks like a player with a doted circle around it. Preview the results, readjust if needed, and select the “Export” option to save the video.
Key Features of Wondershare Filmora
Along with speed modification, Filmora features unlimited features in its interface. The methods of accessing them are easy as accessibility is the concept it was built on. Here are some of the game-changing features for amateurs and professionals:
1. Compound Clip
We need to add a similar effect or filter to all videos in multiple situations. Instead of applying effects one by one, you can do it at once. This feature merges all videos into one and speeds up the workflow. It simplifies the complex sequences between clips and gives smooth results.
2. Green Screen
Running low on a budget for a film but want to shoot at beautiful locations. Use Filmora’s green screen or Chroma Key feature to replace backgrounds in an accurate manner. You can do this by shooting before a green screen and applying the chroma key later. Afterward, import the clip or picture you want in the background to add.
3. Motion Tracking
Do you want to blur out a whole person or apply an effect throughout the video? With Filmora’s motion tracking option, you can do these types of edits. You can insert motion graphics, animations, filters, and effects via it. Just select the object or person you want to track and activate the motion track.
4. Screen Recorder
Screen recording is important to content creation, especially in tutorial channels. In addition, the reaction or roasting channels and their owners also use this. Filmora offers an extensive screen recording option, including microphone and camera recording. You can manipulate the screen resolution, system settings, and more.
Conclusion
This article aimed to increase readers’ knowledge to effectively add slow-mo effect. Not only did we answer how to play videos in slow motion on iPhone, but we also guided to it. The article discussed some of the leading applications for slowing down video on iPhone. For precise and flawless slow-mo creation, we recommended Wondershare Filmora.
Step 2
Go back and open the “Settings” and select the “Camera” section. In camera settings, select the “Record Slo-mo 1080p at 240 fps.”

2. Making a Slow Motion After Recording
The first method will record your overall video in slow motion. However, you can use the other method to add a slow-mo effect to a specific part. Follow the given instructions to learn how to operate it:
Step 1
Open the “Photos” application from your home screen and click “Albums.” From the featured slider, select the “Slow-mo” option.

Step 2
Choose a video from this album and go to the “Edit” option at the top right corner.

Step 3
Navigate towards the bottom and access the timeline. Choose the specific area for adding the effect and drag the sliders on the vertical lines below. Once satisfied with the slow-motion effect, click the “Done” button.

Part 2: Some Prominent Third-party Apps Available to Play Video in Slow-Motion
Slow-mo effects enhance the creativity of your videos and let the audience experience new things. Do you still want to learn how to play a video in slow motion on iPhone? Here is a comprehensive guide to creating slow motions:
- Video Speed: Fast, Slow Motion
- Slo Mo – Speed Up Video Editor
- Slow Mo and Fast Motion
- Video Speed Changer – Editor
1. Video Speed: Fast, Slow Motion
This is it if you are looking for an application with advanced features and manual editing. The application offers many video playback options for a suitable slow motion. You can add slow motion to a whole video or a part through timeline editing. The application offers multiple subscriptions with a trial period before use.

Key Features
- After editing a video in this application, you can integrate music and text.
- The speed manipulation doesn’t result in slow-mo but also offers fast speed options.
- It has an insightful and easy user interface; you can apply color filters after editing.
2. Slo Mo – Speed Up Video Editor
Finding answers about how to play videos in slow motion on iPhone? This is an intuitive application to create slow-mo with a high processing rate. To slow down a video using this application, you can manipulate the video frame to 240 fps. The speed modification is available to apply on specific video parts.

Key Features
- Direct video share options to Instagram, YouTube, Twitter, and Facebook.
- The premium version has 170+ music tracks to insert in your edited video.
- Users can record a live video using this application and apply speed options.
3. Slow Mo & Fast Motion
This video editor is specifically designed for those looking to modify video speed. It enables you to change the whole video speed or the marked area. Whether you want to slow an existing video or record a new one through it, the choice is yours. The video control options are not technical, and anyone can understand them.

Key Features
- The tool offers cutting options, and the timeline editing makes it more precise.
- You can use this application’s built-in features to enhance the visual outlook of video.
- The application shows support for multiple languages, including Spanish, French, and more.
4. Video Speed Changer – Editor
Whether it’s about changing speed or doing other types of speed edits, this app fits the best. It resolves your how to play videos in slow motion on iPhone problems. It allows you to change the video playback speed via a simple process. Just upload your video and drag the speed slider backward to create a slow-mo.

Key Features
- The tool offers to import or record media through its built-in recorder option.
- You can also add fast-motion elements like time-lapse, time warp, or hyper-lapse.
- The user interface is straightforward and leaves no room for confusion.
Bonus Part: Make and Play Your Video in Slow Motion: Use Wondershare Filmora
You might wonder if something is missing if you see a slow-motion video using these applications. This is where you need a professional editor for a smooth slow-mo. Wondershare Filmora is one of the editors that offers frame interpolation. With its optical flow option and high-resolution export settings, you can rely on it.
This AI video editor has two methods of creating a low-motion effect. One method involves uniform speed, and the other is speed ramping. The uniform speed option allows you to manipulate video playback speed using a slider. Meanwhile, speed ramping is a more precise method of modifying video parts.
Free Download For Win 7 or later(64-bit)
Free Download For macOS 10.14 or later
Playing and Adding Slow Motion Effect to Video Using Filmora
After hearing about this amazing software, you might want to create a slow-mo. You might wonder how to play videos in slow motion on iPhone using Filmora. Read the step-by-step guide to find your answer:
Step 1Create a New Project and Access Speed Options
Once you have downloaded this software, access the “New Project” button. Then, use the “Command + I” keys to import media and bring it to the timeline. Select the media clip in the timeline and go to the settings panel. Under the “Speed” tab, choose “Uniform Speed” and drag the slider for speed change.

Step 2Activate AI Frame Interpolation Option
Once you finish the speed settings, there is a tip to enhance the slow-mo effect. Find the “AI Frame Interpolation” option in the same section and expand it. Select the “Optical Flow” option at the third to smoothen the video.

Step 3Rendering and Exporting
Once you have activated the optical flow, render it to see the results. For this, navigate towards the timeline toolbar and select the “Render Preview” option. It looks like a player with a doted circle around it. Preview the results, readjust if needed, and select the “Export” option to save the video.

Key Features of Wondershare Filmora
Along with speed modification, Filmora features unlimited features in its interface. The methods of accessing them are easy as accessibility is the concept it was built on. Here are some of the game-changing features for amateurs and professionals:
1. Compound Clip
We need to add a similar effect or filter to all videos in multiple situations. Instead of applying effects one by one, you can do it at once. This feature merges all videos into one and speeds up the workflow. It simplifies the complex sequences between clips and gives smooth results.
2. Green Screen
Running low on a budget for a film but want to shoot at beautiful locations. Use Filmora’s green screen or Chroma Key feature to replace backgrounds in an accurate manner. You can do this by shooting before a green screen and applying the chroma key later. Afterward, import the clip or picture you want in the background to add.
3. Motion Tracking
Do you want to blur out a whole person or apply an effect throughout the video? With Filmora’s motion tracking option, you can do these types of edits. You can insert motion graphics, animations, filters, and effects via it. Just select the object or person you want to track and activate the motion track.
4. Screen Recorder
Screen recording is important to content creation, especially in tutorial channels. In addition, the reaction or roasting channels and their owners also use this. Filmora offers an extensive screen recording option, including microphone and camera recording. You can manipulate the screen resolution, system settings, and more.
Conclusion
This article aimed to increase readers’ knowledge to effectively add slow-mo effect. Not only did we answer how to play videos in slow motion on iPhone, but we also guided to it. The article discussed some of the leading applications for slowing down video on iPhone. For precise and flawless slow-mo creation, we recommended Wondershare Filmora.
Deleting White Background in Photoshop Is Hard?
Deleting White Background in Photoshop Is Hard? No
An easy yet powerful editor
Numerous effects to choose from
Detailed tutorials provided by the official channel
Know how Photoshop make white background transparent. Learn to create transparent background in Photoshop in simple steps. How to delete white background in image?
In this article
01 [Why Shooting with a White Background Makes Sense](#Part 1)
02 [When We Need to Delete White Background and when Not?](#Part 2)
03 [How to Delete White Background in Photoshop (5 Fast Ways)](#Part 3)
04 [Which Photoshop Selection Tool is Best for White Backdrop Removal](#Part 4)
Part 1 Why Shooting with a White Background Makes Sense
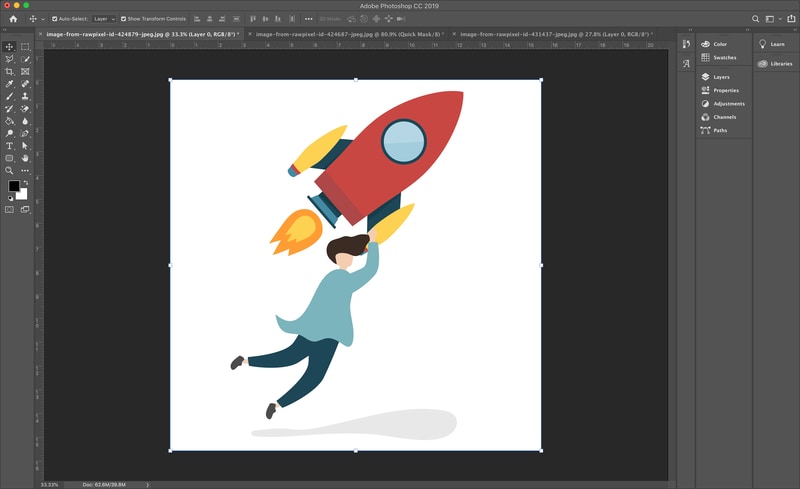
Products have gone online with E-commerce and people explore the products over internet more than they pick it from the stores. So, every business needs to showcase their products in a attractive way to get more customers. This needs an attractive photography by experts. Photography for e-commerce products requires expert product photography or commercial photography. They are very important for a business to get success in long run. To do branding the product image should be accurate and attractive.
So, if your company is going online, your products photography should be attractive enough to make buyers purchase your products. Background is essential part of any photography or video making. Whether it is product catalogue, shoot, advertising or commercial videos, white backdrop and white background are always good. With white background one can pay attention to the product. Every details of the product are highlighted when a white background is used.
When you need bright and highlighted images for any commercial videos, using a right technique for background color is must. White background creates a clean and bright commercial photo. If the same is not done correctly, the white background may turn to be off white or grey. A white background is good for isolating an object in the picture.
So, let’s know why shooting with white background make sense. Here are some reasons for it:

Removal of background becomes Easy and quick:
The most important benefit of applying white background is that it can be easily removed or replaced. In place of the blank white background, one can easily apply other background color or make it transparent. The white background has a speciality that it reflects the color of the product better which makes the product image visually good. This can be done with the help of any tool or application. Thus, using a white background gives an opportunity to apply any other background on it.
Promoting product in every occasion: An image with colorful background may not be useful to present in every event or occasion. For example a simple image with colorful background will not look good in a promotional event, while a colorful background will look happening in any festival event celebration. This, a blank background has the option to change as per the need of the occasion.
An image with white background can be changed as per the occasion. This helps a business to use a single image throughout the year without any additional cost for making a different picture. You can just change the white background of any image through various application or software.
Time saving: Removing white background is easy and streamlined as compared to any other color. The reason is that it does not require much editing and work on the edges. So, the steps in removing the white background are less and thus it saves time of the artist and the editors.
Saves location and bulk shooting expenses: When shooting with a white background is done; the same picture with some changes can be reused for number of times in several occasions. Thus, it saves the cost of shooting different in pictures in different location.
Good to celebrate every special day: A picture with white background is perfect and ready to edit for any special day. Whether it I a father’s day, mother’s day or any special day, a single picture can be edited as per the requirement. It will be a great gifting idea also after changing white background of the picture as per the special day.
Part 2 When We Need to Delete White Background and when Not?
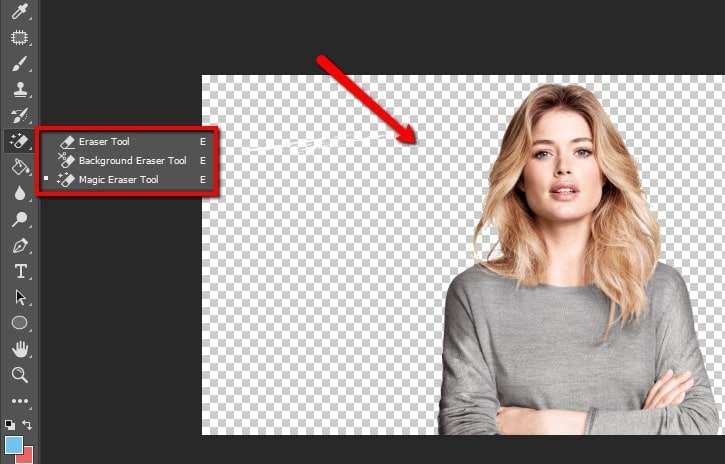
A single picture of a person or product cannot be used for a single instance or purpose. Especially when it is a promotional campaign or commercial advertisements, a product is required to be showcased in several marketing campaign for different categories of consumers. Thus, a white background image is good for several purposes while in some circumstances, it requires changes. So, let’s see when to delete white background and when not:
When a picture requires special editing: When a picture requires some special effects like reflection, highlights and shadow effects, the picture with white background is required to be changed. When improvement in picture is requires, the white, transparent and color background can be changed accordingly.
Enhancing the visual impact of the picture: A white background picture grab the attention of the customers. So, it is good for advertising and promotion. While this needs to be removed when one desire to add some visual impact on the pictures or deliver some message to the viewers. So, it requires adding colorful and visually good background in a picture.
Adding more items to a picture: A white background need to be removed when more items are required to be included in it. Special edits and enhancing the pictures requires removing or adding a white background as per the purpose of the picture.
Part 3 How to Delete White Background in Photoshop (5 Fast Ways)
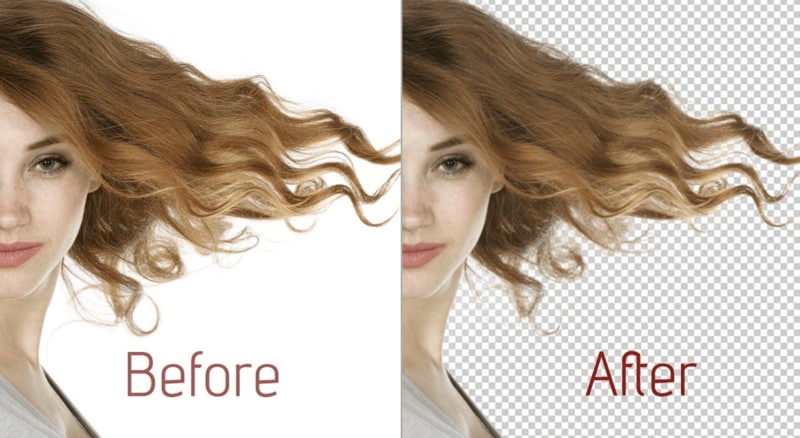
Editing a picture with white background can be done in easy steps through various applications. Deleting white background in Photoshop can be done through various tools. Some of the top 5 fast ways to clear background Photoshop are**:**
With the object selection tool:
● Start Photoshop and open the picture. Select the “object selection” from the tool bar. Hover cursor over subject till it turns blue. The subject is selected.
● Press the shift key to remove the background while selecting the objects which you want in the picture.
● To invert the selection go to Select>Inverse.
● Unlock the image based on what you want in the background. It will no longer be a background. It can be also used to create transparent background Photoshop.
● Click on Erase tool and start erasing the background.
Removing background with quick action
This is the quick method for removing a background when a user is going for own purpose. It is in-built quick action in Photoshop for removing the background. Although it is good for performing work, but the same cannot meet the perfection level that any other method does. It can be done by following the mentioned steps:
● Open the image in Photoshop, right click on background layer and click Duplicate layer. Then click on OK.
● Always try to open the properties panel by going to Window>Properties.
● Click on new layer at Layer panel. Go to Quick action and click on Remove Background.
● The background gets removed with quick action.
● At this point refinements and adjustments can be made.
Using pen tool to remove the background
● Open image in Photoshop, right click on background layer and go to Duplicate Layer. Name the layer and click OK.
● Select the Pen tool from the toolbox. Zoom the area. Start at the edge of subject. Start working on the object; add anchors which will outline the subject.
● Click-hold-drag to produce a curved line.
● Use the Direct Selection tool in the toolbox if you want to adjust an anchor point or directional lines for fine tuning
● Complete the path from where you started and save it by going to Windows>paths. Go to three bar menu, click New Path to name it and then save.
● Go to path panel and right click New Path. Choose Make selection and click OK. This will give the outline of the path.
● Go to Select> Inverse if you don’t want to delete what is inside the selection. An outline can be seen around the image.
● Press delete to delete the background. It can be also done to add Adobe Photoshop transparent background.
With Magnetic Lasso Tool
● Right click Background layer and click duplicate layer on the image opened in Photoshop. Name the layer and then click OK. From the toolbox, select Magic Lasso tool. Start drawing at the edges of subject.
● Move around the subject and complete till the start point. Marching ants can be seen around the selection.
● Go to Selection>Save selection to save and give it a name.
● Select>Inverse to delete the background. Photoshop checkered background is visible now.
With quick selection tool
● Click on Duplicate Layer by right clicking on background layer of the picture opened on the Photoshop. Name the layer and click OK.
● Go to the tool box and select quick selection tool.
● Paint the subject by using tool.
● Clean up the selection path with click by holding the Option key (macOS) or Alt key (Windows).
● Go to Selection>Save selection to save and give it a name.
● Select>Inverse to delete the background. The white background can be seen now.
Part 4 Which Photoshop Selection Tool is Best for White Backdrop Removal

There are various tools available at Photoshop to turn a background white. Each one of them has great utility based on the applications. Background Eraser tool is one of the good tools if there is need of more control over removing the background in Photoshop. It is highly effective and saves time of the user. It gives the desired outcome with perfection to an image. The visualization of image becomes better when the background is turned into white with the help of Background Eraser tool.
The other application that is very helpful in making background white to any image is Filmora.
Filmora is an excellent image and video editing software which helps the users in creating some amazing images and videos. It has wide range of image and video editing tools that can make any user a professional in image and video editing. It has features to add or remove background of an image to make it more visually good. Changing background and adding special effects to images and videos can be easily done through filmora.
Wondershare Filmora Video Editor allows transformation of pictures and videos in a better way by adding filters and graphics. Availability of support, drawing tools, editing tools, special effects and sound make it a complete application for both beginners and professionals. It can be used with various other applications also. Those who wish to know how to make a layer transparent in Photoshop can learn it from Filmora.
For Win 7 or later (64-bit)
For macOS 10.12 or later
● Ending Thoughts →
● Making white background or transparent background adobe photoshop has many benefits like it highlight the picture and make it good for various applications and occasions. It saves money and cost for the image editors and video makers.
● One should also know when to use the white background for images, catalogue and video shoot. Adding and deleting white background can only be done when required as per the demand of the occasion and the category of the user like marketing, media, customers etc.
● Various tools on Photoshop make it easy for the users to add or remove white background of images. Filmora is one of the applications that is very popular for its image editing features. It can be used to give special effects to any image or video.
Know how Photoshop make white background transparent. Learn to create transparent background in Photoshop in simple steps. How to delete white background in image?
In this article
01 [Why Shooting with a White Background Makes Sense](#Part 1)
02 [When We Need to Delete White Background and when Not?](#Part 2)
03 [How to Delete White Background in Photoshop (5 Fast Ways)](#Part 3)
04 [Which Photoshop Selection Tool is Best for White Backdrop Removal](#Part 4)
Part 1 Why Shooting with a White Background Makes Sense

Products have gone online with E-commerce and people explore the products over internet more than they pick it from the stores. So, every business needs to showcase their products in a attractive way to get more customers. This needs an attractive photography by experts. Photography for e-commerce products requires expert product photography or commercial photography. They are very important for a business to get success in long run. To do branding the product image should be accurate and attractive.
So, if your company is going online, your products photography should be attractive enough to make buyers purchase your products. Background is essential part of any photography or video making. Whether it is product catalogue, shoot, advertising or commercial videos, white backdrop and white background are always good. With white background one can pay attention to the product. Every details of the product are highlighted when a white background is used.
When you need bright and highlighted images for any commercial videos, using a right technique for background color is must. White background creates a clean and bright commercial photo. If the same is not done correctly, the white background may turn to be off white or grey. A white background is good for isolating an object in the picture.
So, let’s know why shooting with white background make sense. Here are some reasons for it:

Removal of background becomes Easy and quick:
The most important benefit of applying white background is that it can be easily removed or replaced. In place of the blank white background, one can easily apply other background color or make it transparent. The white background has a speciality that it reflects the color of the product better which makes the product image visually good. This can be done with the help of any tool or application. Thus, using a white background gives an opportunity to apply any other background on it.
Promoting product in every occasion: An image with colorful background may not be useful to present in every event or occasion. For example a simple image with colorful background will not look good in a promotional event, while a colorful background will look happening in any festival event celebration. This, a blank background has the option to change as per the need of the occasion.
An image with white background can be changed as per the occasion. This helps a business to use a single image throughout the year without any additional cost for making a different picture. You can just change the white background of any image through various application or software.
Time saving: Removing white background is easy and streamlined as compared to any other color. The reason is that it does not require much editing and work on the edges. So, the steps in removing the white background are less and thus it saves time of the artist and the editors.
Saves location and bulk shooting expenses: When shooting with a white background is done; the same picture with some changes can be reused for number of times in several occasions. Thus, it saves the cost of shooting different in pictures in different location.
Good to celebrate every special day: A picture with white background is perfect and ready to edit for any special day. Whether it I a father’s day, mother’s day or any special day, a single picture can be edited as per the requirement. It will be a great gifting idea also after changing white background of the picture as per the special day.
Part 2 When We Need to Delete White Background and when Not?

A single picture of a person or product cannot be used for a single instance or purpose. Especially when it is a promotional campaign or commercial advertisements, a product is required to be showcased in several marketing campaign for different categories of consumers. Thus, a white background image is good for several purposes while in some circumstances, it requires changes. So, let’s see when to delete white background and when not:
When a picture requires special editing: When a picture requires some special effects like reflection, highlights and shadow effects, the picture with white background is required to be changed. When improvement in picture is requires, the white, transparent and color background can be changed accordingly.
Enhancing the visual impact of the picture: A white background picture grab the attention of the customers. So, it is good for advertising and promotion. While this needs to be removed when one desire to add some visual impact on the pictures or deliver some message to the viewers. So, it requires adding colorful and visually good background in a picture.
Adding more items to a picture: A white background need to be removed when more items are required to be included in it. Special edits and enhancing the pictures requires removing or adding a white background as per the purpose of the picture.
Part 3 How to Delete White Background in Photoshop (5 Fast Ways)

Editing a picture with white background can be done in easy steps through various applications. Deleting white background in Photoshop can be done through various tools. Some of the top 5 fast ways to clear background Photoshop are**:**
With the object selection tool:
● Start Photoshop and open the picture. Select the “object selection” from the tool bar. Hover cursor over subject till it turns blue. The subject is selected.
● Press the shift key to remove the background while selecting the objects which you want in the picture.
● To invert the selection go to Select>Inverse.
● Unlock the image based on what you want in the background. It will no longer be a background. It can be also used to create transparent background Photoshop.
● Click on Erase tool and start erasing the background.
Removing background with quick action
This is the quick method for removing a background when a user is going for own purpose. It is in-built quick action in Photoshop for removing the background. Although it is good for performing work, but the same cannot meet the perfection level that any other method does. It can be done by following the mentioned steps:
● Open the image in Photoshop, right click on background layer and click Duplicate layer. Then click on OK.
● Always try to open the properties panel by going to Window>Properties.
● Click on new layer at Layer panel. Go to Quick action and click on Remove Background.
● The background gets removed with quick action.
● At this point refinements and adjustments can be made.
Using pen tool to remove the background
● Open image in Photoshop, right click on background layer and go to Duplicate Layer. Name the layer and click OK.
● Select the Pen tool from the toolbox. Zoom the area. Start at the edge of subject. Start working on the object; add anchors which will outline the subject.
● Click-hold-drag to produce a curved line.
● Use the Direct Selection tool in the toolbox if you want to adjust an anchor point or directional lines for fine tuning
● Complete the path from where you started and save it by going to Windows>paths. Go to three bar menu, click New Path to name it and then save.
● Go to path panel and right click New Path. Choose Make selection and click OK. This will give the outline of the path.
● Go to Select> Inverse if you don’t want to delete what is inside the selection. An outline can be seen around the image.
● Press delete to delete the background. It can be also done to add Adobe Photoshop transparent background.
With Magnetic Lasso Tool
● Right click Background layer and click duplicate layer on the image opened in Photoshop. Name the layer and then click OK. From the toolbox, select Magic Lasso tool. Start drawing at the edges of subject.
● Move around the subject and complete till the start point. Marching ants can be seen around the selection.
● Go to Selection>Save selection to save and give it a name.
● Select>Inverse to delete the background. Photoshop checkered background is visible now.
With quick selection tool
● Click on Duplicate Layer by right clicking on background layer of the picture opened on the Photoshop. Name the layer and click OK.
● Go to the tool box and select quick selection tool.
● Paint the subject by using tool.
● Clean up the selection path with click by holding the Option key (macOS) or Alt key (Windows).
● Go to Selection>Save selection to save and give it a name.
● Select>Inverse to delete the background. The white background can be seen now.
Part 4 Which Photoshop Selection Tool is Best for White Backdrop Removal

There are various tools available at Photoshop to turn a background white. Each one of them has great utility based on the applications. Background Eraser tool is one of the good tools if there is need of more control over removing the background in Photoshop. It is highly effective and saves time of the user. It gives the desired outcome with perfection to an image. The visualization of image becomes better when the background is turned into white with the help of Background Eraser tool.
The other application that is very helpful in making background white to any image is Filmora.
Filmora is an excellent image and video editing software which helps the users in creating some amazing images and videos. It has wide range of image and video editing tools that can make any user a professional in image and video editing. It has features to add or remove background of an image to make it more visually good. Changing background and adding special effects to images and videos can be easily done through filmora.
Wondershare Filmora Video Editor allows transformation of pictures and videos in a better way by adding filters and graphics. Availability of support, drawing tools, editing tools, special effects and sound make it a complete application for both beginners and professionals. It can be used with various other applications also. Those who wish to know how to make a layer transparent in Photoshop can learn it from Filmora.
For Win 7 or later (64-bit)
For macOS 10.12 or later
● Ending Thoughts →
● Making white background or transparent background adobe photoshop has many benefits like it highlight the picture and make it good for various applications and occasions. It saves money and cost for the image editors and video makers.
● One should also know when to use the white background for images, catalogue and video shoot. Adding and deleting white background can only be done when required as per the demand of the occasion and the category of the user like marketing, media, customers etc.
● Various tools on Photoshop make it easy for the users to add or remove white background of images. Filmora is one of the applications that is very popular for its image editing features. It can be used to give special effects to any image or video.
Know how Photoshop make white background transparent. Learn to create transparent background in Photoshop in simple steps. How to delete white background in image?
In this article
01 [Why Shooting with a White Background Makes Sense](#Part 1)
02 [When We Need to Delete White Background and when Not?](#Part 2)
03 [How to Delete White Background in Photoshop (5 Fast Ways)](#Part 3)
04 [Which Photoshop Selection Tool is Best for White Backdrop Removal](#Part 4)
Part 1 Why Shooting with a White Background Makes Sense

Products have gone online with E-commerce and people explore the products over internet more than they pick it from the stores. So, every business needs to showcase their products in a attractive way to get more customers. This needs an attractive photography by experts. Photography for e-commerce products requires expert product photography or commercial photography. They are very important for a business to get success in long run. To do branding the product image should be accurate and attractive.
So, if your company is going online, your products photography should be attractive enough to make buyers purchase your products. Background is essential part of any photography or video making. Whether it is product catalogue, shoot, advertising or commercial videos, white backdrop and white background are always good. With white background one can pay attention to the product. Every details of the product are highlighted when a white background is used.
When you need bright and highlighted images for any commercial videos, using a right technique for background color is must. White background creates a clean and bright commercial photo. If the same is not done correctly, the white background may turn to be off white or grey. A white background is good for isolating an object in the picture.
So, let’s know why shooting with white background make sense. Here are some reasons for it:

Removal of background becomes Easy and quick:
The most important benefit of applying white background is that it can be easily removed or replaced. In place of the blank white background, one can easily apply other background color or make it transparent. The white background has a speciality that it reflects the color of the product better which makes the product image visually good. This can be done with the help of any tool or application. Thus, using a white background gives an opportunity to apply any other background on it.
Promoting product in every occasion: An image with colorful background may not be useful to present in every event or occasion. For example a simple image with colorful background will not look good in a promotional event, while a colorful background will look happening in any festival event celebration. This, a blank background has the option to change as per the need of the occasion.
An image with white background can be changed as per the occasion. This helps a business to use a single image throughout the year without any additional cost for making a different picture. You can just change the white background of any image through various application or software.
Time saving: Removing white background is easy and streamlined as compared to any other color. The reason is that it does not require much editing and work on the edges. So, the steps in removing the white background are less and thus it saves time of the artist and the editors.
Saves location and bulk shooting expenses: When shooting with a white background is done; the same picture with some changes can be reused for number of times in several occasions. Thus, it saves the cost of shooting different in pictures in different location.
Good to celebrate every special day: A picture with white background is perfect and ready to edit for any special day. Whether it I a father’s day, mother’s day or any special day, a single picture can be edited as per the requirement. It will be a great gifting idea also after changing white background of the picture as per the special day.
Part 2 When We Need to Delete White Background and when Not?

A single picture of a person or product cannot be used for a single instance or purpose. Especially when it is a promotional campaign or commercial advertisements, a product is required to be showcased in several marketing campaign for different categories of consumers. Thus, a white background image is good for several purposes while in some circumstances, it requires changes. So, let’s see when to delete white background and when not:
When a picture requires special editing: When a picture requires some special effects like reflection, highlights and shadow effects, the picture with white background is required to be changed. When improvement in picture is requires, the white, transparent and color background can be changed accordingly.
Enhancing the visual impact of the picture: A white background picture grab the attention of the customers. So, it is good for advertising and promotion. While this needs to be removed when one desire to add some visual impact on the pictures or deliver some message to the viewers. So, it requires adding colorful and visually good background in a picture.
Adding more items to a picture: A white background need to be removed when more items are required to be included in it. Special edits and enhancing the pictures requires removing or adding a white background as per the purpose of the picture.
Part 3 How to Delete White Background in Photoshop (5 Fast Ways)

Editing a picture with white background can be done in easy steps through various applications. Deleting white background in Photoshop can be done through various tools. Some of the top 5 fast ways to clear background Photoshop are**:**
With the object selection tool:
● Start Photoshop and open the picture. Select the “object selection” from the tool bar. Hover cursor over subject till it turns blue. The subject is selected.
● Press the shift key to remove the background while selecting the objects which you want in the picture.
● To invert the selection go to Select>Inverse.
● Unlock the image based on what you want in the background. It will no longer be a background. It can be also used to create transparent background Photoshop.
● Click on Erase tool and start erasing the background.
Removing background with quick action
This is the quick method for removing a background when a user is going for own purpose. It is in-built quick action in Photoshop for removing the background. Although it is good for performing work, but the same cannot meet the perfection level that any other method does. It can be done by following the mentioned steps:
● Open the image in Photoshop, right click on background layer and click Duplicate layer. Then click on OK.
● Always try to open the properties panel by going to Window>Properties.
● Click on new layer at Layer panel. Go to Quick action and click on Remove Background.
● The background gets removed with quick action.
● At this point refinements and adjustments can be made.
Using pen tool to remove the background
● Open image in Photoshop, right click on background layer and go to Duplicate Layer. Name the layer and click OK.
● Select the Pen tool from the toolbox. Zoom the area. Start at the edge of subject. Start working on the object; add anchors which will outline the subject.
● Click-hold-drag to produce a curved line.
● Use the Direct Selection tool in the toolbox if you want to adjust an anchor point or directional lines for fine tuning
● Complete the path from where you started and save it by going to Windows>paths. Go to three bar menu, click New Path to name it and then save.
● Go to path panel and right click New Path. Choose Make selection and click OK. This will give the outline of the path.
● Go to Select> Inverse if you don’t want to delete what is inside the selection. An outline can be seen around the image.
● Press delete to delete the background. It can be also done to add Adobe Photoshop transparent background.
With Magnetic Lasso Tool
● Right click Background layer and click duplicate layer on the image opened in Photoshop. Name the layer and then click OK. From the toolbox, select Magic Lasso tool. Start drawing at the edges of subject.
● Move around the subject and complete till the start point. Marching ants can be seen around the selection.
● Go to Selection>Save selection to save and give it a name.
● Select>Inverse to delete the background. Photoshop checkered background is visible now.
With quick selection tool
● Click on Duplicate Layer by right clicking on background layer of the picture opened on the Photoshop. Name the layer and click OK.
● Go to the tool box and select quick selection tool.
● Paint the subject by using tool.
● Clean up the selection path with click by holding the Option key (macOS) or Alt key (Windows).
● Go to Selection>Save selection to save and give it a name.
● Select>Inverse to delete the background. The white background can be seen now.
Part 4 Which Photoshop Selection Tool is Best for White Backdrop Removal

There are various tools available at Photoshop to turn a background white. Each one of them has great utility based on the applications. Background Eraser tool is one of the good tools if there is need of more control over removing the background in Photoshop. It is highly effective and saves time of the user. It gives the desired outcome with perfection to an image. The visualization of image becomes better when the background is turned into white with the help of Background Eraser tool.
The other application that is very helpful in making background white to any image is Filmora.
Filmora is an excellent image and video editing software which helps the users in creating some amazing images and videos. It has wide range of image and video editing tools that can make any user a professional in image and video editing. It has features to add or remove background of an image to make it more visually good. Changing background and adding special effects to images and videos can be easily done through filmora.
Wondershare Filmora Video Editor allows transformation of pictures and videos in a better way by adding filters and graphics. Availability of support, drawing tools, editing tools, special effects and sound make it a complete application for both beginners and professionals. It can be used with various other applications also. Those who wish to know how to make a layer transparent in Photoshop can learn it from Filmora.
For Win 7 or later (64-bit)
For macOS 10.12 or later
● Ending Thoughts →
● Making white background or transparent background adobe photoshop has many benefits like it highlight the picture and make it good for various applications and occasions. It saves money and cost for the image editors and video makers.
● One should also know when to use the white background for images, catalogue and video shoot. Adding and deleting white background can only be done when required as per the demand of the occasion and the category of the user like marketing, media, customers etc.
● Various tools on Photoshop make it easy for the users to add or remove white background of images. Filmora is one of the applications that is very popular for its image editing features. It can be used to give special effects to any image or video.
Know how Photoshop make white background transparent. Learn to create transparent background in Photoshop in simple steps. How to delete white background in image?
In this article
01 [Why Shooting with a White Background Makes Sense](#Part 1)
02 [When We Need to Delete White Background and when Not?](#Part 2)
03 [How to Delete White Background in Photoshop (5 Fast Ways)](#Part 3)
04 [Which Photoshop Selection Tool is Best for White Backdrop Removal](#Part 4)
Part 1 Why Shooting with a White Background Makes Sense

Products have gone online with E-commerce and people explore the products over internet more than they pick it from the stores. So, every business needs to showcase their products in a attractive way to get more customers. This needs an attractive photography by experts. Photography for e-commerce products requires expert product photography or commercial photography. They are very important for a business to get success in long run. To do branding the product image should be accurate and attractive.
So, if your company is going online, your products photography should be attractive enough to make buyers purchase your products. Background is essential part of any photography or video making. Whether it is product catalogue, shoot, advertising or commercial videos, white backdrop and white background are always good. With white background one can pay attention to the product. Every details of the product are highlighted when a white background is used.
When you need bright and highlighted images for any commercial videos, using a right technique for background color is must. White background creates a clean and bright commercial photo. If the same is not done correctly, the white background may turn to be off white or grey. A white background is good for isolating an object in the picture.
So, let’s know why shooting with white background make sense. Here are some reasons for it:

Removal of background becomes Easy and quick:
The most important benefit of applying white background is that it can be easily removed or replaced. In place of the blank white background, one can easily apply other background color or make it transparent. The white background has a speciality that it reflects the color of the product better which makes the product image visually good. This can be done with the help of any tool or application. Thus, using a white background gives an opportunity to apply any other background on it.
Promoting product in every occasion: An image with colorful background may not be useful to present in every event or occasion. For example a simple image with colorful background will not look good in a promotional event, while a colorful background will look happening in any festival event celebration. This, a blank background has the option to change as per the need of the occasion.
An image with white background can be changed as per the occasion. This helps a business to use a single image throughout the year without any additional cost for making a different picture. You can just change the white background of any image through various application or software.
Time saving: Removing white background is easy and streamlined as compared to any other color. The reason is that it does not require much editing and work on the edges. So, the steps in removing the white background are less and thus it saves time of the artist and the editors.
Saves location and bulk shooting expenses: When shooting with a white background is done; the same picture with some changes can be reused for number of times in several occasions. Thus, it saves the cost of shooting different in pictures in different location.
Good to celebrate every special day: A picture with white background is perfect and ready to edit for any special day. Whether it I a father’s day, mother’s day or any special day, a single picture can be edited as per the requirement. It will be a great gifting idea also after changing white background of the picture as per the special day.
Part 2 When We Need to Delete White Background and when Not?

A single picture of a person or product cannot be used for a single instance or purpose. Especially when it is a promotional campaign or commercial advertisements, a product is required to be showcased in several marketing campaign for different categories of consumers. Thus, a white background image is good for several purposes while in some circumstances, it requires changes. So, let’s see when to delete white background and when not:
When a picture requires special editing: When a picture requires some special effects like reflection, highlights and shadow effects, the picture with white background is required to be changed. When improvement in picture is requires, the white, transparent and color background can be changed accordingly.
Enhancing the visual impact of the picture: A white background picture grab the attention of the customers. So, it is good for advertising and promotion. While this needs to be removed when one desire to add some visual impact on the pictures or deliver some message to the viewers. So, it requires adding colorful and visually good background in a picture.
Adding more items to a picture: A white background need to be removed when more items are required to be included in it. Special edits and enhancing the pictures requires removing or adding a white background as per the purpose of the picture.
Part 3 How to Delete White Background in Photoshop (5 Fast Ways)

Editing a picture with white background can be done in easy steps through various applications. Deleting white background in Photoshop can be done through various tools. Some of the top 5 fast ways to clear background Photoshop are**:**
With the object selection tool:
● Start Photoshop and open the picture. Select the “object selection” from the tool bar. Hover cursor over subject till it turns blue. The subject is selected.
● Press the shift key to remove the background while selecting the objects which you want in the picture.
● To invert the selection go to Select>Inverse.
● Unlock the image based on what you want in the background. It will no longer be a background. It can be also used to create transparent background Photoshop.
● Click on Erase tool and start erasing the background.
Removing background with quick action
This is the quick method for removing a background when a user is going for own purpose. It is in-built quick action in Photoshop for removing the background. Although it is good for performing work, but the same cannot meet the perfection level that any other method does. It can be done by following the mentioned steps:
● Open the image in Photoshop, right click on background layer and click Duplicate layer. Then click on OK.
● Always try to open the properties panel by going to Window>Properties.
● Click on new layer at Layer panel. Go to Quick action and click on Remove Background.
● The background gets removed with quick action.
● At this point refinements and adjustments can be made.
Using pen tool to remove the background
● Open image in Photoshop, right click on background layer and go to Duplicate Layer. Name the layer and click OK.
● Select the Pen tool from the toolbox. Zoom the area. Start at the edge of subject. Start working on the object; add anchors which will outline the subject.
● Click-hold-drag to produce a curved line.
● Use the Direct Selection tool in the toolbox if you want to adjust an anchor point or directional lines for fine tuning
● Complete the path from where you started and save it by going to Windows>paths. Go to three bar menu, click New Path to name it and then save.
● Go to path panel and right click New Path. Choose Make selection and click OK. This will give the outline of the path.
● Go to Select> Inverse if you don’t want to delete what is inside the selection. An outline can be seen around the image.
● Press delete to delete the background. It can be also done to add Adobe Photoshop transparent background.
With Magnetic Lasso Tool
● Right click Background layer and click duplicate layer on the image opened in Photoshop. Name the layer and then click OK. From the toolbox, select Magic Lasso tool. Start drawing at the edges of subject.
● Move around the subject and complete till the start point. Marching ants can be seen around the selection.
● Go to Selection>Save selection to save and give it a name.
● Select>Inverse to delete the background. Photoshop checkered background is visible now.
With quick selection tool
● Click on Duplicate Layer by right clicking on background layer of the picture opened on the Photoshop. Name the layer and click OK.
● Go to the tool box and select quick selection tool.
● Paint the subject by using tool.
● Clean up the selection path with click by holding the Option key (macOS) or Alt key (Windows).
● Go to Selection>Save selection to save and give it a name.
● Select>Inverse to delete the background. The white background can be seen now.
Part 4 Which Photoshop Selection Tool is Best for White Backdrop Removal

There are various tools available at Photoshop to turn a background white. Each one of them has great utility based on the applications. Background Eraser tool is one of the good tools if there is need of more control over removing the background in Photoshop. It is highly effective and saves time of the user. It gives the desired outcome with perfection to an image. The visualization of image becomes better when the background is turned into white with the help of Background Eraser tool.
The other application that is very helpful in making background white to any image is Filmora.
Filmora is an excellent image and video editing software which helps the users in creating some amazing images and videos. It has wide range of image and video editing tools that can make any user a professional in image and video editing. It has features to add or remove background of an image to make it more visually good. Changing background and adding special effects to images and videos can be easily done through filmora.
Wondershare Filmora Video Editor allows transformation of pictures and videos in a better way by adding filters and graphics. Availability of support, drawing tools, editing tools, special effects and sound make it a complete application for both beginners and professionals. It can be used with various other applications also. Those who wish to know how to make a layer transparent in Photoshop can learn it from Filmora.
For Win 7 or later (64-bit)
For macOS 10.12 or later
● Ending Thoughts →
● Making white background or transparent background adobe photoshop has many benefits like it highlight the picture and make it good for various applications and occasions. It saves money and cost for the image editors and video makers.
● One should also know when to use the white background for images, catalogue and video shoot. Adding and deleting white background can only be done when required as per the demand of the occasion and the category of the user like marketing, media, customers etc.
● Various tools on Photoshop make it easy for the users to add or remove white background of images. Filmora is one of the applications that is very popular for its image editing features. It can be used to give special effects to any image or video.
Also read:
- Updated 2024 Approved 5 Tried-And-True Ways to GIF Making
- Updated Are You Wondering How to Slow Down Videos or Speed Them up, Here Are Three Ways to Do It. Speed up or Slow Down Your Videos on PC, Online, and Phone
- In 2024, Mastering OpenCV Object Tracking A Comprehensive Guide for Beginners and Experts
- In 2024, How to Add Font Effects to Videos
- What Is MKV Format and How To Play MKV Video?
- 8 Unexpected Ways to Add Emoji to Photo Online for 2024
- Updated In 2024, Best Ai Generated Memes
- Updated LumaFusion – What Is It and the Best Alternative to Use for 2024
- Updated In 2024, A Comprehensive Guide on Converting Slo-Mo Videos to Normal Speed Videos On iPhone
- New Best 5 GIF to Video Converters You Cant-Miss for 2024
- New 2024 Approved 10 Best Slow-Motion Cameras to Try
- In 2024, How to Vlog? A Ultimate Guide for Beginners
- New In 2024, 4 Ways to Merge MP4 and MP3
- New How to Get VHS Filter and Glitch Filter to Your Images or Videos, In 2024
- In 2024, Best Tricks for Learning Photo Slideshow
- In 2024, How to Use LUTs in Lumafusion & Free Resource
- Updated In 2024, Best 10 Anime Movies for All Time
- New In 2024, The Right Ways to Slow Down a Video on iPhone
- Ever Wondered About the Similarity You Bear with an Anime Character? If You Have Not yet Looked Into This Exciting Aspect of Motion Graphic Design, You Can Very Well Break the Ice Here
- Updated To Get Cinematographs of a Music Video, You Need to Understand the Basics of Camera Movement. As Well Framing and Lighting of the Setup Are Illustrated in This Article
- Updated 6 Free Tools To Radial Blur Photos Online
- Discover How to Download Mobile Phone Green Screen Videos and Pictures for Free. Elevate Your Content with HD Quality Green Screen Frames for 2024
- New In 2024, How to Fade in Text in Adobe Premiere Pro
- Updated 10 Best Vloggers on YouTube
- Guaranteed 10 Storyboard Creators To Make Animation Easier
- How to fix error 1015 while restoring iPhone 6 Plus | Stellar
- In 2024, How to Transfer Data from Samsung Galaxy A34 5G to Other Android Devices? | Dr.fone
- Top 10 Password Cracking Tools For Poco F5 Pro 5G
- In 2024, The Best Methods to Unlock the iPhone Locked to Owner for Apple iPhone XS Max | Dr.fone
- How to Transfer from Apple iPhone 13 Pro Max to Samsung Galaxy S20? | Dr.fone
- In 2024, Ultimate Guide on Samsung Galaxy A15 5G FRP Bypass
- How to Change Netflix Location to Get More Country Version On Huawei Nova Y91 | Dr.fone
- In 2024, Tips And Tricks To Tell if Your Apple iPhone 13 Pro Max Is Unlocked
- In 2024, How to Bypass Google FRP Lock on OnePlus Ace 2 Pro Devices
- In 2024, Forgotten The Voicemail Password Of Poco C50? Try These Fixes
- Useful ways that can help to effectively recover deleted files from Xiaomi 14 Pro
- In 2024, Top 10 Password Cracking Tools For Itel P40+
- How To Repair iOS System Issues of Apple iPhone 15? | Dr.fone
- Edit and Send Fake Location on Telegram For your Vivo S17e in 3 Ways | Dr.fone
- In 2024, Best Nubia Red Magic 8S Pro+ Pattern Lock Removal Tools Remove Android Pattern Lock Without Losing Data
- In 2024, List of Pokémon Go Joysticks On Vivo Y36i | Dr.fone
- In 2024, Ultimate Guide from Samsung Galaxy A14 4G FRP Bypass
- In 2024, How to Transfer Data After Switching From Nubia Red Magic 9 Pro to Latest Samsung | Dr.fone
- Honor Magic 6 Not Connecting to Wi-Fi? 12 Quick Ways to Fix | Dr.fone
- In 2024, Top 10 AirPlay Apps in Tecno Spark Go (2023) for Streaming | Dr.fone
- Title: Cropping a Video in Final Cut Pro Step by Step
- Author: Chloe
- Created at : 2024-05-20 03:37:20
- Updated at : 2024-05-21 03:37:20
- Link: https://ai-editing-video.techidaily.com/cropping-a-video-in-final-cut-pro-step-by-step/
- License: This work is licensed under CC BY-NC-SA 4.0.


