
:max_bytes(150000):strip_icc():format(webp)/0010_21-best-teen-movies-on-netflix-5104880-b0e9832746854cabb4f33cafef96214b.jpg)
Detailed Guide to Merge Videos in VLC Media Player for 2024
Detailed Guide to Merge Videos in VLC Media Player
Sometimes, when working on a project, we really need to combine several videos - this way some content needs to be conveyed, there are shots that, when neatly sorted and merged together, really create visual and content value which we aspire to make; The process becomes more enjoyable if we work on the videos produced by ourselves, or if the work is to be done for our side project. People always take special care of their own work, and the same can be emphasized freely about the editing as well - about the packaging with which we have to deliver our videos to the audience. Even in the absence of an audience, maybe we want to make a kind of video collage for ourselves, our children, or in general, for the family to make delightful memories?
Of course, not everyone who has taken a camera or a mobile phone to take videos at least one time, even so, for family and friends, has the experience of editing and making various manipulations. However, the function of merging videos in various editing programs or on online platforms is so simple that it can be learned in just a few minutes, without the help of other people, and with a kind of small, though very useful result at the same time.
One of the programs where videos can be uploaded is VLC Media Player, which is a free-to-use, robust, and feature-packed software that plays a wide range of audio, image, and video files. It can play multimedia files directly from extractable devices or the PC. The program is unique, as it can stream from popular websites like Disney +, Hulu, Gaia, and Netflix. VLC Multimedia Player also accepts live video from PlayStation Live, Xbox Live, Facebook, Twitter, and YouTube. While most competing programs display advertisements, VLC Player does not, as it receives support from a non-profit organization.

Interestingly, we can, as though with the help of a magic wand, turn this particular video player into video editing software. When one computer program delivers too many functions, it might make us think of the situation where one person claims to serve ten professions at the same time - there is a mood that they will not be good in any of them. It’s not true with VLC Player, which, from experience, seems to be both a good “player” as well as a fairly user-friendly editing software with many interesting features and functions.
Before we move on to video streaming, let’s look at two features that we can use in VLC player:
In the player, right when our video clip starts to play, we may find that the footage is taken vertically instead of horizontally! This is not a nightmare just for video enthusiasts. If you don’t know how to rotate the video, then you have to rotate your head 90 degrees, and at this time you can not even get pleasure from watching, not to mention that it can even cause your neck to lock up. VLC Player took care of that - in the top panel, just click on Tools, then select Effects & Filters. In the opened window, we find Video Effects, select Geometry and check the Rotate option - so, the whole 360 degrees are at our disposal!
Sometimes it happens that we watch the video, we are crazy about one part of it, and the other part of it seems to spoil everything! Even if we are ready to publish the raw material on social media or just save it for ourselves, we just don’t want some parts of the video to be there. So, it can be said - we are not satisfied with the full version and we wish to cut our clip and/or reduce its timeframe. VLC Player solves this problem “without any problem” - we find the View in the top panel, then we demand the cursor to aim for Advanced Controls button. As a result, a sort of video editor will appear, with its red record button on which we will click and the video will play until we reach the point where we want to split the footage. The cut video will be automatically saved in My Computer’s My Video folder.
How to Merge Multiple Videos in VLC Media Player
Here we are, now the main topic of interest of this article - how to put together several videos so that they become one? This case, unlike other possibilities we discussed above, is more complicated, so we will study this feature step by step .
Technique one:
- Step one:
Open VLC media player.

Probably, you have already decided exactly which files you want to merge, so choose Open Multiple Files…

In the opened window, click on Add in the File tab.

Select the desired clips from the newly opened window (selecting order matters, because it dictates which clips will come first and which ones will be next in the finished version), then click Open.

- Step two:
The selected videos are shown in the File Selection list. At the bottom of the window, click the Arrow button next to the Play button, where you need to select Convert.

In the Profile, it is desirable to specify the following format: Video - + MP3 (MP4), and below you can choose the Destination file - the location where you want to save the merged video. Also, to find the edited video easily, check the following: Append ‘-converted’ to file name. Click on Start. Wait until it is done - then you can play the video.

Technique two:
- Create a New Folder and move the videos that you would like to merge Rename the videos (e.g. to 1, 2 etc.).

- Create a new text file. Copy and paste this line below:
vlc_location video1.mp4 video2.mp4 –sout “#gather:std{access=file,dst=final_file_name.mp4}” –sout-keep

- Type VLC in the taskbar search and right-click on the app. Choose Open File location.

Right-click on the app and choose Properties. A new window will be opened, where you need to go to Target. Select and copy the line.

Go to the text document file. Remove vlc_location and paste the copied text instead. Change the names of the video to match the names in the folder.

- Open the folder with videos. Click on the address line. Type cmd and press Enter.

sA new window will open. Cope the line from the text file and paste it into cmd window; then, click on Enter.

- VLC player will open and will play the merged video file.

An Easier Way to Merge Videos in A Few Clicks
It’s true that merging videos in VLC Media Player takes quite a few steps, so to speak. But is this the only editing program in which a similar operation can be performed? Of course not. Therefore, in our article, we decided to offer you an alternative, where you can also easily merge the videos. This is the famous Filmora Video Editor , a software that is one of the easiest and most convenient to work with, especially for those who want to edit videos without having much experience in “complicated” software before. So again, step by step guideline on how to put together our video clips in Wondershare Filmora.
For Win 7 or later (64-bit)
For macOS 10.14 or later
- Open the program.
- Choose Import Media Files Here.

- Choose your

- We can click and drag, essentially, “insert” a video in a sequence below. The Linear Timeline allows us to understand exactly when a video clip ends and when a new one starts.

- Accordingly, we can make one video “sit” next to another. If we want or need it, we will add the third video clip, fourth, and so on.

- We can view the entire video and save the video afterwards.
- Start to save video - we make sure the result is exactly what we wanted, find the Export button above the timeline and click on it.

- In the opened window, on the left side, to be precise, if we observe well, we can already choose in which format we want to save our clip. On the right we can indicate what name we want to give to our video; The location where we want to store it; Also, we see the resolution (which we can modify freely after clicking on Settings); Size; Duration.

- In Settings, we can decide how much quality the video should have, how many kbps will be the Bit Rate, how many fps the Frame Rate should be, etc., but most likely, beginners will not need to change all this.

- After selecting everything, right-click on the Export button in the lower right corner of the window and the program will start saving the material.


Filmora 9, though, works a little differently.
- In the Import dropdown menu, select Import with instant cutting tool…

This will open the Filmora Instant Cutter window with two options - Trim and Merge. Since we need Merge in this case, this is what we choose.

- Then Open File, which will allow you to select multiple clips. Select the desired video clips and to Import, click Open.

- The window will show the files we selected and the entire video, and to save it, we click on Export.

- Specify File name, Save to (location), When done - the latter is what the program should do after the material is exported, e.g. open the containing folder. The export window also shows the approximate size of the footage.

- After hitting on Ok, the project will be saved, which will happen very quickly, since the program does not decode and encode the material.


That’s it! In this article, we have tried to teach you how to use VLC Media Player as a video editor software, what features we can use and, most importantly, how to merge multiple videos in this dual program; We also learned an alternative way of how we can combine different video clips with the help of Wondershare Filmora. The choice is yours, the main thing is to know all the alternatives and find the most time and energy saving, preferable option for you personally!
Interestingly, we can, as though with the help of a magic wand, turn this particular video player into video editing software. When one computer program delivers too many functions, it might make us think of the situation where one person claims to serve ten professions at the same time - there is a mood that they will not be good in any of them. It’s not true with VLC Player, which, from experience, seems to be both a good “player” as well as a fairly user-friendly editing software with many interesting features and functions.
Before we move on to video streaming, let’s look at two features that we can use in VLC player:
In the player, right when our video clip starts to play, we may find that the footage is taken vertically instead of horizontally! This is not a nightmare just for video enthusiasts. If you don’t know how to rotate the video, then you have to rotate your head 90 degrees, and at this time you can not even get pleasure from watching, not to mention that it can even cause your neck to lock up. VLC Player took care of that - in the top panel, just click on Tools, then select Effects & Filters. In the opened window, we find Video Effects, select Geometry and check the Rotate option - so, the whole 360 degrees are at our disposal!
Sometimes it happens that we watch the video, we are crazy about one part of it, and the other part of it seems to spoil everything! Even if we are ready to publish the raw material on social media or just save it for ourselves, we just don’t want some parts of the video to be there. So, it can be said - we are not satisfied with the full version and we wish to cut our clip and/or reduce its timeframe. VLC Player solves this problem “without any problem” - we find the View in the top panel, then we demand the cursor to aim for Advanced Controls button. As a result, a sort of video editor will appear, with its red record button on which we will click and the video will play until we reach the point where we want to split the footage. The cut video will be automatically saved in My Computer’s My Video folder.
How to Merge Multiple Videos in VLC Media Player
Here we are, now the main topic of interest of this article - how to put together several videos so that they become one? This case, unlike other possibilities we discussed above, is more complicated, so we will study this feature step by step .
Technique one:
- Step one:
Open VLC media player.
Probably, you have already decided exactly which files you want to merge, so choose Open Multiple Files…
In the opened window, click on Add in the File tab.
Select the desired clips from the newly opened window (selecting order matters, because it dictates which clips will come first and which ones will be next in the finished version), then click Open.
- Step two:
The selected videos are shown in the File Selection list. At the bottom of the window, click the Arrow button next to the Play button, where you need to select Convert.
In the Profile, it is desirable to specify the following format: Video - + MP3 (MP4), and below you can choose the Destination file - the location where you want to save the merged video. Also, to find the edited video easily, check the following: Append ‘-converted’ to file name. Click on Start. Wait until it is done - then you can play the video.
Technique two:
- Create a New Folder and move the videos that you would like to merge Rename the videos (e.g. to 1, 2 etc.).
- Create a new text file. Copy and paste this line below:
vlc_location video1.mp4 video2.mp4 –sout “#gather:std{access=file,dst=final_file_name.mp4}” –sout-keep
- Type VLC in the taskbar search and right-click on the app. Choose Open File location.
Right-click on the app and choose Properties. A new window will be opened, where you need to go to Target. Select and copy the line.
Go to the text document file. Remove vlc_location and paste the copied text instead. Change the names of the video to match the names in the folder.
- Open the folder with videos. Click on the address line. Type cmd and press Enter.
sA new window will open. Cope the line from the text file and paste it into cmd window; then, click on Enter.
- VLC player will open and will play the merged video file.
An Easier Way to Merge Videos in A Few Clicks
It’s true that merging videos in VLC Media Player takes quite a few steps, so to speak. But is this the only editing program in which a similar operation can be performed? Of course not. Therefore, in our article, we decided to offer you an alternative, where you can also easily merge the videos. This is the famous Filmora Video Editor , a software that is one of the easiest and most convenient to work with, especially for those who want to edit videos without having much experience in “complicated” software before. So again, step by step guideline on how to put together our video clips in Wondershare Filmora.
For Win 7 or later (64-bit)
For macOS 10.14 or later
- Open the program.
- Choose Import Media Files Here.
- Choose your
- We can click and drag, essentially, “insert” a video in a sequence below. The Linear Timeline allows us to understand exactly when a video clip ends and when a new one starts.
- Accordingly, we can make one video “sit” next to another. If we want or need it, we will add the third video clip, fourth, and so on.
- We can view the entire video and save the video afterwards.
- Start to save video - we make sure the result is exactly what we wanted, find the Export button above the timeline and click on it.
- In the opened window, on the left side, to be precise, if we observe well, we can already choose in which format we want to save our clip. On the right we can indicate what name we want to give to our video; The location where we want to store it; Also, we see the resolution (which we can modify freely after clicking on Settings); Size; Duration.
- In Settings, we can decide how much quality the video should have, how many kbps will be the Bit Rate, how many fps the Frame Rate should be, etc., but most likely, beginners will not need to change all this.
- After selecting everything, right-click on the Export button in the lower right corner of the window and the program will start saving the material.
Filmora 9, though, works a little differently.
- In the Import dropdown menu, select Import with instant cutting tool…
This will open the Filmora Instant Cutter window with two options - Trim and Merge. Since we need Merge in this case, this is what we choose.
- Then Open File, which will allow you to select multiple clips. Select the desired video clips and to Import, click Open.
- The window will show the files we selected and the entire video, and to save it, we click on Export.
- Specify File name, Save to (location), When done - the latter is what the program should do after the material is exported, e.g. open the containing folder. The export window also shows the approximate size of the footage.
- After hitting on Ok, the project will be saved, which will happen very quickly, since the program does not decode and encode the material.
That’s it! In this article, we have tried to teach you how to use VLC Media Player as a video editor software, what features we can use and, most importantly, how to merge multiple videos in this dual program; We also learned an alternative way of how we can combine different video clips with the help of Wondershare Filmora. The choice is yours, the main thing is to know all the alternatives and find the most time and energy saving, preferable option for you personally!
Learn How to Make a Gaming Montage - Guide & Tips
The popularity of gaming montage is growing every day in today’s pop culture. There are currently more than 2.5 billion gamers, and most of them love watching gaming video content on YouTube. Whether people use a montage to parody gaming montages themselves or show off their skills, the effort and time put into them create impressive results.
We will explain how to create gaming montages and give you some tips that you might want to keep in mind to make epic videos.
How to Make a Gaming Montage
You have several options when it comes to creating gaming montages. You can include a random cut of great scenes, a mixture of the highlighted moments you found thrilling and would like to share with other gamers. In other cases, you’ll have to think of an engaging story in advance, then base your gameplay on this story.
Essentially, the workflow will be slightly different for these two scenarios. It’s much easier with the random cut type, especially when using a reliable video editor. Editing montages is as exciting as playing the game.
With that in mind, here is how to make a gaming montage.
1) Decide Your Montage Story/Type
Deciding your montage type beforehand helps clear your mind and create an epic gaming montage that will keep viewers watching. It allows you to choose the relevant video clips for your gaming montage.
Choose the topic of the video and decide the length of each clip and the sequence of the clips. Be sure to put the most epic or funny clips in the last section of your video. And this will make your viewers watch the video until the end.
2) Record Your Gameplay Footage
The methods to capture the gameplay varies depending on the platform where the game is. The most important thing you have to keep in mind is to ensure your recorder supports Replay Buffer; this will allow you to record scenes that occurred minutes or seconds ago.
That means you do not need to record the gameplay the whole time and burn your hardware. Instead, you’ll capture the moment after interesting things occur.
Game consoles like PS4 allow you to record the video natively for a maximum of one hour with the gamepad. A capture card lets you record it longer than 60 minutes.
Once you’ve all the clips you want on your PC, head over to https://filmora.wondershare.net/filmora-video-editor.html and download Filmora and install the software on your computer. This program allows you to edit your video clips and add cool effects that will make viewers keep watching.
3) Import You Videos to Media Library
You only have to import the videos to Filmora’s media library and then drag and drop them into the timeline, where you can start making the edits.
By right-clicking on the clip in your timeline, you’ll see the options to zoom, speed, change, split, or trim your videos. You can also add sound effects by going to the Audio Tab.

Import Videos
4) Choose Background Music for Your Montage
Music will help make your gaming montage engaging. Make sure you use a license-free track if you plan to post it on social media.
Using copyrighted music tracks and uploading the video on social media platforms can lead to video strikes. Luckily, Filmora has loads of non-copyrighted music tracks.
Navigate to Stock Media, where you’ll find non-copyrighted music on Pixabay, and choose the one you prefer.

Choose Background Music
5) Edit the Gaming Montage
With Filmora’s auto gaming montage maker, you can watch the video clip with the music you have selected. This tool will analyze beat points to change the video and effects.
Additionally, the tool can identify any bad parts in your video and delete them so that the video matches the music.
The Effects tab allows you to add multiple overlays and filters to your gaming montage video. Filmora has different categories of overlays that let you add emotions or personality to your montage. You can also use it to set the tone in your video.
Filters allow you to spice up your gaming videos. There are also different types of filters on Filmora.

Edit Gaming Montage
6) Export Your Gaming Montage Video
Once you have finished editing your video and added music, hit the Export button. Doing this will allow you to export your edited video and save it on your computer.
You can now enter your login details and upload your gaming montage video on your YouTube channel to share it with other players.
Useful Tips for Making a Gaming Montage
Making gaming montages can help you build a large online community if you do the right thing. When making a gaming montage, there are a few tips that you should keep in mind. They include:
1. Apply Velocity Effects
Adding velocity effects to your montage will help get the attention of viewers. You can couple the transition between scenes with a speed ramping effect.
Include slow motion where there is a gunshot or other big gaming moment. You can then speed up things to quickly move into another scene. You can create these velocity effects in Filmora and make it smooth.
2. Avoid Game Loading Scenes
Do not include game loading scenes or any unnecessary clips in the gaming montage. Your audience does not have the time to wait for the scenes to load because they want to see action fast.
3. Sync Gunshot with Music Beat
Try to match gunshot sounds with beats and rhythms in shooter video games. The beats of the music and the soothing sync of gunshots will catch viewers’ attention and your video will become popular among gamers.
4. Add Creative Transitions
You can spice up your gaming montage by adding transitions, especially when you have loads of clips for the montage. But avoid overusing it, as you could confuse your audience with a range of dazzling and glaring transitions.
5. Color Grade the Video for the Mood
Use color grading to your advantage, as it can set the mood of your viewers. You can decide to make some scenes black and white to catch the viewers’ attention.
6. Add Video Vignettes for Special Occasions
You can add dark edges around the corners of your video to highlight action or create a certain mood. For gameplay based on a story, use vignetting to add a sense of nostalgia or as a flashback that shows viewers the past.
You can use Filmora to apply the vignetting effect by heading to Advanced Color Tuning, then clicking the Vignette option. You can then add the vignette effect to the video. Additionally, you can adjust the vignette’s exposure, feather, roundness, size, and highlights.
Best Gaming Montage for Studying
Here are three gaming montages that are good for studying.
1. Call of Duty: Modern Warfare
Uploaded by DemixB, the Call of Duty Game Montage uses Jacques Offenbach’s Can Can Music track. It’s a happy song that has a tempo of 81 BPM. The track has average danceable energy, and it’s somewhat danceable.
DemixB set the gunshot in the montage video to the music tune. The track builds up to the climax when the gunshot echoes with the attention-grabbing orchestral explosions.

Call of Duty: Modern Warfare
2. ShutteR’s Gaming Montage
In the gaming montage uploaded by ShutteR on his YouTube channel, he used velocity effects to enhance the video. You’ll see that the transition in each scene is paired with adrenaline-pumping, speed-ramping effects.
ShutteR used a slow-motion to highlight action in each scene, then speeds up again when he wants to fast out into the next scene.; this makes the video more engaging to keep viewers glued to their screens.

ShutteR’s Gaming Montage
3. NEVERMORE [CS: GO]
NEVERMORE [CS: GO] was uploaded by Fuze on his YouTube channel, and it has creative gameplay. The gaming montage is based on a story. He did the project with Apel, an artist who designed the Fever Dream series skins in the video.
The basic idea of this gaming montage was that the main game character is a corrupted policeman with purple glowing eyes because he’s not human.
When the edits begin, the shape of the main character will shift from CS: GO CT models and turn into his real corrupt CT shape. So that’s why his name keeps changing. You can get his real identity by pausing some of the frames and looking at the “Killfeed.”

NEVERMORE [CS: GO]
Closing Thoughts:
Gaming montage involves picking and editing a range of video clips, which are brought together to create engaging video content. It consists of the best scenes from gameplay and non-copyrighted background music.
Use Filmora to edit and add effects to your video, including transitions and overlays. Your gaming montage will get more views, hence becoming popular among players.
The popularity of gaming montage is growing every day in today’s pop culture. There are currently more than 2.5 billion gamers, and most of them love watching gaming video content on YouTube. Whether people use a montage to parody gaming montages themselves or show off their skills, the effort and time put into them create impressive results.
We will explain how to create gaming montages and give you some tips that you might want to keep in mind to make epic videos.
How to Make a Gaming Montage
You have several options when it comes to creating gaming montages. You can include a random cut of great scenes, a mixture of the highlighted moments you found thrilling and would like to share with other gamers. In other cases, you’ll have to think of an engaging story in advance, then base your gameplay on this story.
Essentially, the workflow will be slightly different for these two scenarios. It’s much easier with the random cut type, especially when using a reliable video editor. Editing montages is as exciting as playing the game.
With that in mind, here is how to make a gaming montage.
1) Decide Your Montage Story/Type
Deciding your montage type beforehand helps clear your mind and create an epic gaming montage that will keep viewers watching. It allows you to choose the relevant video clips for your gaming montage.
Choose the topic of the video and decide the length of each clip and the sequence of the clips. Be sure to put the most epic or funny clips in the last section of your video. And this will make your viewers watch the video until the end.
2) Record Your Gameplay Footage
The methods to capture the gameplay varies depending on the platform where the game is. The most important thing you have to keep in mind is to ensure your recorder supports Replay Buffer; this will allow you to record scenes that occurred minutes or seconds ago.
That means you do not need to record the gameplay the whole time and burn your hardware. Instead, you’ll capture the moment after interesting things occur.
Game consoles like PS4 allow you to record the video natively for a maximum of one hour with the gamepad. A capture card lets you record it longer than 60 minutes.
Once you’ve all the clips you want on your PC, head over to https://filmora.wondershare.net/filmora-video-editor.html and download Filmora and install the software on your computer. This program allows you to edit your video clips and add cool effects that will make viewers keep watching.
3) Import You Videos to Media Library
You only have to import the videos to Filmora’s media library and then drag and drop them into the timeline, where you can start making the edits.
By right-clicking on the clip in your timeline, you’ll see the options to zoom, speed, change, split, or trim your videos. You can also add sound effects by going to the Audio Tab.
Import Videos
4) Choose Background Music for Your Montage
Music will help make your gaming montage engaging. Make sure you use a license-free track if you plan to post it on social media.
Using copyrighted music tracks and uploading the video on social media platforms can lead to video strikes. Luckily, Filmora has loads of non-copyrighted music tracks.
Navigate to Stock Media, where you’ll find non-copyrighted music on Pixabay, and choose the one you prefer.
Choose Background Music
5) Edit the Gaming Montage
With Filmora’s auto gaming montage maker, you can watch the video clip with the music you have selected. This tool will analyze beat points to change the video and effects.
Additionally, the tool can identify any bad parts in your video and delete them so that the video matches the music.
The Effects tab allows you to add multiple overlays and filters to your gaming montage video. Filmora has different categories of overlays that let you add emotions or personality to your montage. You can also use it to set the tone in your video.
Filters allow you to spice up your gaming videos. There are also different types of filters on Filmora.
Edit Gaming Montage
6) Export Your Gaming Montage Video
Once you have finished editing your video and added music, hit the Export button. Doing this will allow you to export your edited video and save it on your computer.
You can now enter your login details and upload your gaming montage video on your YouTube channel to share it with other players.
Useful Tips for Making a Gaming Montage
Making gaming montages can help you build a large online community if you do the right thing. When making a gaming montage, there are a few tips that you should keep in mind. They include:
1. Apply Velocity Effects
Adding velocity effects to your montage will help get the attention of viewers. You can couple the transition between scenes with a speed ramping effect.
Include slow motion where there is a gunshot or other big gaming moment. You can then speed up things to quickly move into another scene. You can create these velocity effects in Filmora and make it smooth.
2. Avoid Game Loading Scenes
Do not include game loading scenes or any unnecessary clips in the gaming montage. Your audience does not have the time to wait for the scenes to load because they want to see action fast.
3. Sync Gunshot with Music Beat
Try to match gunshot sounds with beats and rhythms in shooter video games. The beats of the music and the soothing sync of gunshots will catch viewers’ attention and your video will become popular among gamers.
4. Add Creative Transitions
You can spice up your gaming montage by adding transitions, especially when you have loads of clips for the montage. But avoid overusing it, as you could confuse your audience with a range of dazzling and glaring transitions.
5. Color Grade the Video for the Mood
Use color grading to your advantage, as it can set the mood of your viewers. You can decide to make some scenes black and white to catch the viewers’ attention.
6. Add Video Vignettes for Special Occasions
You can add dark edges around the corners of your video to highlight action or create a certain mood. For gameplay based on a story, use vignetting to add a sense of nostalgia or as a flashback that shows viewers the past.
You can use Filmora to apply the vignetting effect by heading to Advanced Color Tuning, then clicking the Vignette option. You can then add the vignette effect to the video. Additionally, you can adjust the vignette’s exposure, feather, roundness, size, and highlights.
Best Gaming Montage for Studying
Here are three gaming montages that are good for studying.
1. Call of Duty: Modern Warfare
Uploaded by DemixB, the Call of Duty Game Montage uses Jacques Offenbach’s Can Can Music track. It’s a happy song that has a tempo of 81 BPM. The track has average danceable energy, and it’s somewhat danceable.
DemixB set the gunshot in the montage video to the music tune. The track builds up to the climax when the gunshot echoes with the attention-grabbing orchestral explosions.
Call of Duty: Modern Warfare
2. ShutteR’s Gaming Montage
In the gaming montage uploaded by ShutteR on his YouTube channel, he used velocity effects to enhance the video. You’ll see that the transition in each scene is paired with adrenaline-pumping, speed-ramping effects.
ShutteR used a slow-motion to highlight action in each scene, then speeds up again when he wants to fast out into the next scene.; this makes the video more engaging to keep viewers glued to their screens.
ShutteR’s Gaming Montage
3. NEVERMORE [CS: GO]
NEVERMORE [CS: GO] was uploaded by Fuze on his YouTube channel, and it has creative gameplay. The gaming montage is based on a story. He did the project with Apel, an artist who designed the Fever Dream series skins in the video.
The basic idea of this gaming montage was that the main game character is a corrupted policeman with purple glowing eyes because he’s not human.
When the edits begin, the shape of the main character will shift from CS: GO CT models and turn into his real corrupt CT shape. So that’s why his name keeps changing. You can get his real identity by pausing some of the frames and looking at the “Killfeed.”
NEVERMORE [CS: GO]
Closing Thoughts:
Gaming montage involves picking and editing a range of video clips, which are brought together to create engaging video content. It consists of the best scenes from gameplay and non-copyrighted background music.
Use Filmora to edit and add effects to your video, including transitions and overlays. Your gaming montage will get more views, hence becoming popular among players.
How to Zoom Webcam on PC
Making certain our digital presence is the best it can be pays dividends as more and more of what we do online; similar is the case with how to zoom out webcam windows 10. The majority of experts advise against using the built-in camera that comes with your laptop or computer and instead advocate getting a webcam or an HD camera. These, however, may be hard to come by and pricy if you locate a nice one. If the built-in camera on your laptop doesn’t perform effectively during Zoom meetings, you may want to consider about investing in a separate, better webcam. Webcams offer automatic settings that are intended to function with the largest variety of lighting situations possible. This suggests that they average out a great number of responses to the content of the frame. Because of this, we have incorporated basic PC webcam zooming settings. These answers may be found in the portions that follow.
It’s vital to know how to zoom in on a webcam before visiting there. The camera wasn’t always as vital as it is today, and only very large corporations could afford to employ it as a convenience. But today, nearly everyone, from huge organizations to little firms, acknowledges its value. Everybody needs a webcam that works properly. The camera control software you are using determines the zoom function. The resolution of your picture window and the capabilities of the application dictate how far you can zoom in on the webcam’s video image. You can zoom in and out on camera photos using tools like YouCam and Windows Live Messenger. The most critical camera capabilities for the ideal video conferencing experience are zoom in and zoom out, which at first look may appear trivial. Here, we’ll walk you through each step, in detail. Continue reading, and we’ll check your understanding of webcam zoom in and zoom out skills!
Way 1: Zoom with Windows Live Messenger
When utilizing a camera for video conferencing, you may zoom in on a user’s face to get rid of the background. Webcam settings are not accessible by default in Microsoft Windows. However, camera zoom settings may be changed in instant chat systems. Through an instant messaging tool, such as Windows Live Messenger, you may simply access these options. This application provides private offline chat, video messaging, image and video sharing, and video chatting.
Step1Start Windows Live Messenger on your PC or laptop first. Enter your login name and password by clicking the “Sign In” button.

Step2On the top menu bar, pick “Tools.” And then select the “Audio and Video Setup”. Drag the slider next to “Speaker” to modify the speaker volume. Drag the slider next to “Microphone” to modify the microphone sensitivity. Press “Next.”

Step3From the drop-down list, pick the webcam. The “Camera Control” option is situated on the top; pick “Webcam Settings” after that.
Step4Now, to alter the zoom settings, drag the “Zoom” slider. To zoom in or out, drag the slider to the left or right. Press “OK.”
Way 2: Use Windows 10 Camera App
Wondering how to zoom your camera in the Windows 10 Camera app? The Camera app enables you to zoom in or out on your webcam in both image and video modes. To accomplish so, click or push the Magnification button, and then use the slider to modify the webcam’s zoom level. To operate the zoom feature manually, pick “Manual Zoom.” In the preview window, a square appears when you pick this option. To zoom in on a specific region of the capture window, drag the square there. To expand the image that was acquired by the webcam, slide the slider bar. In simply, The Camera app enables you zoom in or out of photographs and movies shot with your webcam. To do this, click on the “Zoom” button and drag the slider to the left or right as appropriate on your Windows 10 camera. the following steps:
Step1To open the “Start Menu,” make a right-click on “Start.” Now, to access the Camera app, type “Camera App” into the start menu’s search box.

Step2Tap the Camera Control icon when you start or join a meeting. To zoom and pan the camera to the appropriate spot, utilize the icons on the Camera Control panel.
![]()
Step3To exit the Camera Control window and return to the Meeting Controls, touch outside of it.
Way 3: Zoom with YouCam
Unfortunately, the default cameras or webcams bundled with the majority of Windows laptops and desktops don’t have an automatic zoom option. In fact, the only method to adjust their crop is to switch from “Standard” to “Widescreen,” which does slightly zoom in on you but not in the manner we’d want. This makes it inescapable that the only method to manually alter a webcam’s magnification is to acquire one separately and apply its software settings. , like YouCam. YouCam provides video calling, streaming, and broadcasting. includes an integrated app. To employ Zoom with YouCam, refer to the methods given below:
Step1Launch the YouCam camera program and activate the webcam.

Step2In the camera preview window, pick Settings. Then, select “Enable Video Zoom” from the menu.
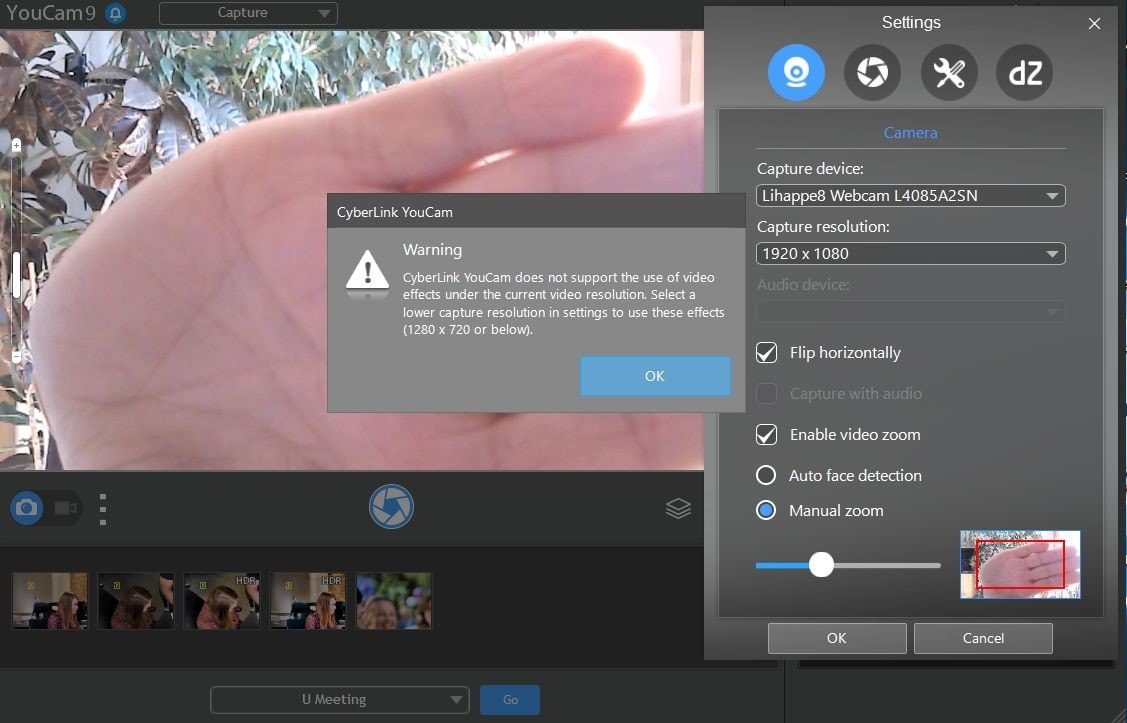
Step3Select “Automatic Face Detection” from the menu. As you wander about in the capture window, the camera watches your face and automatically zooms in on your photo as shown above.
Step4To handle the zoom feature manually, pick “Manual Zoom.” In the preview window, a square appears when you pick this option. To zoom in on a specific region of the capture window, drag the square there. To expand the image that was acquired by the webcam, slide the slider bar.

Way 4: Use iGlasses on Mac
For the perfect webcam look on a MAC, install the Chrome plugin iGlasses for video effects and style tweaks. Your videos will appear better on Zoom as a consequence. You may instantly enhance the appearance of your video interactions by utilizing the digital zoom on your iGlasses. Digital pan, tilt, and zoom are all possible with easy controls. For Macs that support it, an Apple Remote may be used to operate. iGlasses will become an option in Zoom’s video settings when it has been installed. You may improve your camera by altering the settings in iGlasses. You may experiment with a range of amusing effects, like 3-D distortions, using the virtual camera. Let’s learn how to utilize iGlasses on a Mac:
Step1Installing Ecamm’s iGlasses on a MacBook in the first step.
Step2To activate the camera, go to your video settings and pick iGlasses.
Step3Choose the Zoom window and execute the appropriate operations using the Zoom and Flip options. You may now zoom in and out using the camera on your MacBook as you like.

Conclusion
In conclusion, so many people currently take part in online conferences and virtual meetings. You want to create a lasting impression, don’t you? Not or whether you are the host of an online meeting or event, you must now maintain a professional image to prevent turning off attendees. You have discovered how to utilize the tools at your disposal to boost the zoom in and out quality of your camera in this post. However, as will be explained in the sections ahead, you may do it without the third-party plugins. With just one quick plugin, you can significantly transform how you look on a camera. Hence, try out the easy method from the above enlisted ones to get hold on your PC webcam to zoom in or out purposes.
Making certain our digital presence is the best it can be pays dividends as more and more of what we do online; similar is the case with how to zoom out webcam windows 10. The majority of experts advise against using the built-in camera that comes with your laptop or computer and instead advocate getting a webcam or an HD camera. These, however, may be hard to come by and pricy if you locate a nice one. If the built-in camera on your laptop doesn’t perform effectively during Zoom meetings, you may want to consider about investing in a separate, better webcam. Webcams offer automatic settings that are intended to function with the largest variety of lighting situations possible. This suggests that they average out a great number of responses to the content of the frame. Because of this, we have incorporated basic PC webcam zooming settings. These answers may be found in the portions that follow.
It’s vital to know how to zoom in on a webcam before visiting there. The camera wasn’t always as vital as it is today, and only very large corporations could afford to employ it as a convenience. But today, nearly everyone, from huge organizations to little firms, acknowledges its value. Everybody needs a webcam that works properly. The camera control software you are using determines the zoom function. The resolution of your picture window and the capabilities of the application dictate how far you can zoom in on the webcam’s video image. You can zoom in and out on camera photos using tools like YouCam and Windows Live Messenger. The most critical camera capabilities for the ideal video conferencing experience are zoom in and zoom out, which at first look may appear trivial. Here, we’ll walk you through each step, in detail. Continue reading, and we’ll check your understanding of webcam zoom in and zoom out skills!
Way 1: Zoom with Windows Live Messenger
When utilizing a camera for video conferencing, you may zoom in on a user’s face to get rid of the background. Webcam settings are not accessible by default in Microsoft Windows. However, camera zoom settings may be changed in instant chat systems. Through an instant messaging tool, such as Windows Live Messenger, you may simply access these options. This application provides private offline chat, video messaging, image and video sharing, and video chatting.
Step1Start Windows Live Messenger on your PC or laptop first. Enter your login name and password by clicking the “Sign In” button.
Step2On the top menu bar, pick “Tools.” And then select the “Audio and Video Setup”. Drag the slider next to “Speaker” to modify the speaker volume. Drag the slider next to “Microphone” to modify the microphone sensitivity. Press “Next.”
Step3From the drop-down list, pick the webcam. The “Camera Control” option is situated on the top; pick “Webcam Settings” after that.
Step4Now, to alter the zoom settings, drag the “Zoom” slider. To zoom in or out, drag the slider to the left or right. Press “OK.”
Way 2: Use Windows 10 Camera App
Wondering how to zoom your camera in the Windows 10 Camera app? The Camera app enables you to zoom in or out on your webcam in both image and video modes. To accomplish so, click or push the Magnification button, and then use the slider to modify the webcam’s zoom level. To operate the zoom feature manually, pick “Manual Zoom.” In the preview window, a square appears when you pick this option. To zoom in on a specific region of the capture window, drag the square there. To expand the image that was acquired by the webcam, slide the slider bar. In simply, The Camera app enables you zoom in or out of photographs and movies shot with your webcam. To do this, click on the “Zoom” button and drag the slider to the left or right as appropriate on your Windows 10 camera. the following steps:
Step1To open the “Start Menu,” make a right-click on “Start.” Now, to access the Camera app, type “Camera App” into the start menu’s search box.
Step2Tap the Camera Control icon when you start or join a meeting. To zoom and pan the camera to the appropriate spot, utilize the icons on the Camera Control panel.
![]()
Step3To exit the Camera Control window and return to the Meeting Controls, touch outside of it.
Way 3: Zoom with YouCam
Unfortunately, the default cameras or webcams bundled with the majority of Windows laptops and desktops don’t have an automatic zoom option. In fact, the only method to adjust their crop is to switch from “Standard” to “Widescreen,” which does slightly zoom in on you but not in the manner we’d want. This makes it inescapable that the only method to manually alter a webcam’s magnification is to acquire one separately and apply its software settings. , like YouCam. YouCam provides video calling, streaming, and broadcasting. includes an integrated app. To employ Zoom with YouCam, refer to the methods given below:
Step1Launch the YouCam camera program and activate the webcam.
Step2In the camera preview window, pick Settings. Then, select “Enable Video Zoom” from the menu.
Step3Select “Automatic Face Detection” from the menu. As you wander about in the capture window, the camera watches your face and automatically zooms in on your photo as shown above.
Step4To handle the zoom feature manually, pick “Manual Zoom.” In the preview window, a square appears when you pick this option. To zoom in on a specific region of the capture window, drag the square there. To expand the image that was acquired by the webcam, slide the slider bar.
Way 4: Use iGlasses on Mac
For the perfect webcam look on a MAC, install the Chrome plugin iGlasses for video effects and style tweaks. Your videos will appear better on Zoom as a consequence. You may instantly enhance the appearance of your video interactions by utilizing the digital zoom on your iGlasses. Digital pan, tilt, and zoom are all possible with easy controls. For Macs that support it, an Apple Remote may be used to operate. iGlasses will become an option in Zoom’s video settings when it has been installed. You may improve your camera by altering the settings in iGlasses. You may experiment with a range of amusing effects, like 3-D distortions, using the virtual camera. Let’s learn how to utilize iGlasses on a Mac:
Step1Installing Ecamm’s iGlasses on a MacBook in the first step.
Step2To activate the camera, go to your video settings and pick iGlasses.
Step3Choose the Zoom window and execute the appropriate operations using the Zoom and Flip options. You may now zoom in and out using the camera on your MacBook as you like.
Conclusion
In conclusion, so many people currently take part in online conferences and virtual meetings. You want to create a lasting impression, don’t you? Not or whether you are the host of an online meeting or event, you must now maintain a professional image to prevent turning off attendees. You have discovered how to utilize the tools at your disposal to boost the zoom in and out quality of your camera in this post. However, as will be explained in the sections ahead, you may do it without the third-party plugins. With just one quick plugin, you can significantly transform how you look on a camera. Hence, try out the easy method from the above enlisted ones to get hold on your PC webcam to zoom in or out purposes.
How to Speed Up Pictures on TikTok Slideshow
How to Speed Up Pictures on Tiktok Slideshow
An easy yet powerful editor
Numerous effects to choose from
Detailed tutorials provided by the official channel
Increasing the play speed of a TikTok slideshow may sometime appear a necessity. Stay here to have an insight into the process of making your TikTok slideshows faster!
In this article
01 [How Do You Change the Time on a Tiktok Slideshow?](#Part 1)
02 [How Do You Watch 3x Speed on Tiktok?](#Part 2)
03 [Why You Should Speed Up Pictures on Tiktok?](#Part 3)
04 [5 Best Ways to Speed Up a Video on Tiktok](#Part 4)
05 [FAQs of Speeding Up Pictures on Tiktok Slideshow](#Part 5)
Part 1 How Do You Change the Time on a Tiktok Slideshow?
TikTok slideshows are a guaranteed media of fun and entertainment among family and friends. Used mostly as a source of personal recreation, these are a storehouse of creativity and enjoyment. Such video presentations are short enough to last for a mere set of seconds to minutes, and consequently the play speed hardly gets noticed. However, there may be a few instances that put forward the concern of how to speed up TikTok slideshows.
Discussing along the line, let us look through solutions of modifying the play duration of TikTok slideshows in the following section:
User’s Guide to Adjust the Play Duration of a TikTok Slideshow
Step 1: Launch the Application
To proceed with the duration adjustment process, start with launching the TikTok application in your preferred device.
Step 2: Open a Slideshow
In the application’s main interface, open a preferred slideshow presentation that you wish to adjust the time duration of.
Step 3: Set the Play Duration
Navigate to the top right corner of the app screen and click on the ‘Adjust Clips’ icon. A duration slider holding you selected slideshow pops up on the screen. Drag the duration bars to the left and right sides for fixing the start and stop time of the presentation.
Step 4: Save Your Changes
As you finish setting the play duration, navigate to and click on the ‘Save’ button at the top right corner of the app screen to confirm and apply the changes to the TikTok slideshow.
Part 2 How Do You Watch 3x Speed on Tiktok?
Creating and watching TikTok slideshows is a mix and match of craft and fun. As already stated, such slideshows are small enough to escape the time frame; however, you may often require a speed modification of the same. When the talk is of speed adjustment, the beneficiary side generally lies in decreasing the slideshow run time.
Moving ahead with our discussion, let us look through the process of watching a TikTok slideshow in 3x speed while sorting out the issue of how to speed up photo slideshow on TikTok in the upcoming section of this article:
User’s Guide to Watch a TikTok Slideshow in 3x Speed
Step 1: Launch the TikTok App
In any of your preferred MacOs, Windows or Android devices, proceed to launch the TikTok application, as the first step to increase the slideshow speed.
Step 2: Create a Slideshow
Navigate to and tap the ‘+’ icon at the bottom of the app’s welcome screen to create a slideshow video or post.
Step 3: Adjust the Play Speed
You now need to head towards the top right corner of the interface and click on the ‘Speed’ button. You will see the ‘Speed Bar’ pop up over of the ‘Record’ button with a series of speed modification options. Select the desired speed you wish to watch the slideshow in. Addressing the specific concern of 3x speed, tap on the respective option.
Part 3 Why You Should Speed Up Pictures on Tiktok?
TikTok pictures are a delight to watch and share among friends and family on social media. While creating image and video posts on TikTok sounds good enough, it is common to land across instances that demand an increase of the image play speed. Extending our talk a bit further, let us dive into the credibility of speeding up images on the TikTok application in the following section:
Importance of Speeding Up TikTok Presentations
It is a commonly known fact that the play duration of TikTok slideshows can be 3 minutes at the most. This stands up as a problem when you have a series of images to include within the slideshow and there exists a significant time lapse between the transitions of any 2 successive images. This time gap may lead to a miss out of images from being uploaded to the slideshow before the expiry of the allotted 3 minute run time.
To escape the disappointment of an incomplete presentation, you can easily pick the alternative of speeding up the slideshow images, so that all the photos may become a part of the slideshow. If you are bothered by the concerns of image quality and output resolution, rest assured, as the speed adjustment utility of the TikTok application has nothing to do with these parameters.
Part 4 Best Ways to Speed Up a Video on Tiktok
As explained in the previous section, speeding up videos and images within the TikTok application is of great significance to make sure that all the required media content fits in the 180 second long post on the platform. Adhering to the same, let us look through some of the best and popular methods to set straight the issue of how to speed up slideshow on TikTok in what follows next:
01Using the Motion Effects of TikTok to Record Fast Motion Videos
The aforesaid method conveniently takes the credit of being the most widely preferred means to increase the play speed of TikTok videos. The method works to cater to the speed modification concern by recording a high speed motion video through the default motion effects of the TikTok application. This in turn, rescues you from the task of downloading the TikTok video to your device.
Working with the feature, you can opt to increase or decrease the play speed of the videos, along with simultaneously recording them prior to a social media export. The process is easy and simple enough to proceed with, as explained in the following user guide:
User’s Guide to Speed Up TikTok Videos by Recording
Step 1: Launch the TikTok Camera
To answer the query of how to speed up a TikTok slideshow, start with opening the TikTok application in any of your preferred devices. When you are welcomed by the app’s main interface, navigate to the bottom of the same and click on the ‘+’ icon. This will instantly cause the application’s camera to open up.
Step 2: Pick a Motion Effect
The TikTok camera launches to bring the ‘Motion Effects’ window into picture. You can choose a desired speed modification effect from the 5 choices available. If you are keen on increasing the video speed, pick any one of the 2x or 3x effects for recording a video in the fast-forward mode.
If however, the aforesaid motion effects do not appear on your app screen, navigate to the ‘Options’ menu at the top left corner of the same and tap on the ‘Speed’ icon.

Step 3: Record the Video
Hit the red colored ‘Record’ button to capture a TikTok video in the fast-forward motion. The app further allows you to create multiple speed recordings of a particular video clip. All you need to do is, click on the ‘Stop’ button, followed by making a desired adjustment in the recording speed, and lastly, resume the video recording process.
Step 4: Customize the Recorded Video
As you finish recording the high speed video, click on ‘OK’ to launch TikTok’s editing interface. Here, proceed to customize the recorded video with the app’s preset editing effects and filters. When you are happy with your work, move ahead with posting the same to tour TikTok account.
02Applying a High Speed Motion Effect to a Locally Saved TikTok Video
As stated earlier, the TikTok application comes with a built-in graphic editor to allow its users to create high quality media edits. Likewise, you can work with the aforesaid utility to increase the speed of TikTok videos prior to an upload across media sharing platforms as well as TikTok itself. Here’s a detailed, stepwise user guide to go about the process without a hustle:
User’s Guide to Speed Up Locally Saved TikTok Videos
Step 1: Open the Application Camera
Begin with launching the TikTok application in a suitable Windows, MacOS or Android device, followed by heading to the bottom of the app’s launch screen and clicking on the ‘+’ symbol to automatically open the latter’s camera.
Step 2: Upload the Videos
Navigate to the ‘Upload’ option beside the ‘Record’ button to open your device’s local media gallery. You can browse through this space to select and upload a desired video. You can also upload a set of videos, provided that all your uploaded clips should fall under the 3-minute constraint of TikTok posts. Tap ‘Next’ to complete the video upload process.

Step 3: Adjust the Video Play Speed
The completion of Step 2 causes a video timeline to pop up at the bottom the app’s working screen. To make adjustments in the video playback rate, hit the ‘Speed’ icon within the timeline, followed by selecting the 2x playback speed. You can further, trim the video by dragging the sliders, as well as change the video layout using the ‘Flip’ option. When you have made the required changes, tap ‘Next’ to proceed further.
the

Step 4: Customize the Video
As the video processing comes to an end, you will be directed to the app’s editing workspace, where you can customize your clip quickly and easily with texts, filters, sounds, stickers, voiceovers, etc.
03Speeding Up a TikTok Video Using the Wondershare Online UniConverter Program
While the TikTok application comes with an inbuilt feature to increase the playback rate of its videos, there are a range of third party programs and utilities that promise of adhering to the aforesaid concern with utmost ease. Moving along the line, there is the Wondershare Online UniConverter program that works to speed up Tiktok videos up to 2x the original playback rate.
You can additionally work with the program to customize the video in a variety of aspects, while exporting the same across a series of media sharing platforms in a diversity of file formats. Having talked enough about the program’s video editing credibility, let us look into the process of increasing the run speed of TikTok videos using the app in what follows next:
User’s Guide to Increase the TikTok Video Speed With Wondershare Online UniConverter
Step 1: Launch the Program
In any of your favorite web browsers, navigate to the official site of Wondershare and launch the Online UniConverter program from the list of available utilities.
Step 2: Open the Required Tool
in the application’s welcome interface, navigate to the ‘Online Tools’ tab in the top toolbar and click on the same to select the ‘Change Video Speed’ option from the drop down menu that follows.

Step 3: Upload the TikTok Video
As far as the video upload task is concerned, desktop users can directly upload their TikTok video to the utility by dragging and dropping the video file from its location in the device. In case of laptop, smartphone and iOS users, they can tap ‘Choose Files’ on the app’s main screen to select and upload the video file from the local media gallery of their device.

Step 4: Pick a Suitable Video Speed
When you have finished uploading the video, navigate to the toolbar at the top of the app’s welcome interface and hit the ‘Video Speed’ tab. A ‘Speed Slider’ will pop up, which you can use to make suitable speed adjustments by dragging the latter in the left or right directions to respectively, decrease or increase the video playback rate.

The app allows you to set a video run speed between 0.25x to 2x. Prefer watching a preview of the clip with the modified speed to ensure affordable results.
Step 5: Save the Fast-Forwarded Video
If the video playback preview in Step 3 satisfies you enough, proceed to save the clip locally to your device. All you need to do is, select a video file format, (MP4 is recommended to ensure affordable output quality), followed by navigating to the bottom right corner of the screen and hitting the ‘Start’ button.

04Speeding Up a TikTok Video Using the Clideo Online Tool
In line with the Wondershare Online UniConverter program, this one is another reliable web based utility to modify the speed of your TikTok videos. Working with the facility, you are permitted to change the playback speed of a video clip in a variety of file formats, along with getting to customize the latter with a range of tools and effects.
The app however, takes a bit longer time to render the speeded up video output, and leaves a watermark on the same. Nevertheless, let us try hands at understanding the procedure to increase the speed of TikTok videos with the app in the following section:
User’s Guide to Speed-up TikTok Videos With Clideo Online Tool
Step 1: Launch the Online Tool
Start with visiting the home website of Clideo in your preferred internet browser and launching the online program in your device. In the app’s main interface, navigate to and click on ‘Tools’ followed by selecting the ‘Speed Video’ option from the drop down menu that appears next.
Step 2: Select Your TikTok Video
As you complete Step 1, the ‘Choose File’ tab appears on the app screen. Click on the same to reach your device’s local media gallery and pick a desired TikTok video to upload to the program for modifying the latter’s speed. You can alternatively, ‘Drag and Drop’ the clip to the program’s file upload section.
Step 3: Change the Video Speed
As you upload the clip, the app’s video editing window pops up, where you can modify the playback speed of your clip, either by dragging the ‘Change Video Speed’ slider from left to right, or by setting a suitable playback speed value among 1.25x, 1.5x and 2.0x in the ‘Speed Chart’ at the right side of the editor window.

Step 4: Export Your Video
When you are satisfied with all the changes till here, proceed to choose a desired file format for sharing the video. Format options are available at the bottom ribbon of the editor window. When you have selected the preferred video format, navigate to and click on the ‘Export’ button at the bottom right corner of the editor workspace to share the video across different media handles.
05Fast Forwarding a TikTok Video With the Wondershare UniConverter Application
Entering the world of third party video editing software programs, you will come across a diversity of choices to work with. As far as the task of modifying the playback speed of TikTok videos is concerned, you can make a smart selection by picking the Wondershare UniConverter application to proceed with the process.
Continuing the legacy of Wondershare utilities, this one is an all-in-one video editor program that you can work with to customize your TikTok videos with a variety of effects and filters, apart from just increasing their playback speed. As of now, let us look through the knowhow of fast-forwarding TikTok clips with the software in the following section:
User’s Guide to Speed-up TikTok Videos with the Wondershare UniConverter Software
Step 1: Launch the Software Program
Visit the official Wondershare website and download the UniConverter program in your preferred desktop or PC, followed by installing and launching the same on your system. Upon being greeted by the app’s welcome screen, navigate to the ‘Features Panel’ at the left and select the ‘Video Editor’ tab. In the window that pops up navigate to and hit the ‘Effect’ option. You can now upload a desired TikTok video that you want to increase the speed of.

Step 2: Select an Incremental Video Playback Speed
Within the ‘Effect’ interface, head to and click on the ‘Change Speed’ tab at the right side of the window, followed by selecting a suitable playback speed greater than 1x and up to 2x. When you have made your choice; tap ‘OK’ to confirm your speed selection.

Step 3: Save the Fast-Forwarded Video
Proceed to save the high speed video by navigating to the bottom left corner and hitting the ‘Output Format’ tab. Now head to the ‘Functions Toolbar’ at the top of the app screen to hit the ‘Web Video’ tab. Within the new window that appears next, reach the left side panel and choose ‘TikTok’.
Select a preferred video format from the list that appears at the right side of the window and lastly, reach to and tap the ‘Start’ button at the bottom right corner to initiate the video conversion speed increment process.

06Fast Forwarding a TikTok Video with the VideoProc Vlogger Application
Moving ahead in the line of software utilities that work towards the requirement of how to speed up a slideshow on TikTok, the VideoProc Vlogger application offers a dependable credibility. This one is a Windows and Mac compatible video editor program that claims of a high end video customization facility along with playback rate adjustments, while assuring an appreciable output quality.
Working with the program, you are allowed to set a 16x faster or slower video speed in relation to the actual playback rate. You can further, choose to render the fast-forwarded video in a variety of file formats. As of now, let us see through the method of increasing the speed of a TikTok video within the app in what follows next:
User’s Guide to Speed-up TikTok Videos With the VideoProc Vlogger Program
Step 1: Launch the Application Program
Navigate to the official website of the software to download, install and launch the program in your preferred Windows and MacOS device, followed by clicking on the ‘New Project’ tab at the bottom right corner of the program’s welcome interface.
vui

Step 2: Import Your TikTok Video
The Within the ‘New Project’ window, proceed to import the desired TikTok video from your device’s local media gallery to the app’s media library, followed by dragging the same to the software’s editor timeline.
Step 3: Make Speed Adjustments
Navigate to and hit the ‘Play Speed’ tab at the right side of the app’s editing workspace. The speed adjustment window pops up, where you can choose to increase or decrease the speed of the uploaded video by clicking on the ‘Speed’ option. Tap the ‘Custom Menu’ to set a desired playback speed value within the speed box. In case you want to include advanced speed customization, click on the ‘Nonlinear Editor’ tab. When you have made the changes, hit ‘OK’ to apply the same.

Part 5 FAQs of Speeding Up Pictures on Tiktok Slideshow
● How can the speed of TikTok slideshows be slowed down?
Start with creating a new post by tapping the ‘+’ icon at the bottom of the app’s launch screen to slow down the speed of a TikTok slideshow. The ‘Recording Speed Options’ appear at the bottom of the screen, from where you can pick the 0.3x and 0.5x playback rates. Proceed to record a new video with reduced play speed by pressing the ‘Record’ button.
● How can the duration of TikTok images be modified?
To set the screen time of a TikTok picture, navigate to the desired image, followed by tapping on the ‘Time’ icon. An adjustment slider pops up, which you can drag from left to right for respectively, increasing or decreasing the image play duration.
● What is the best video editing program to create TikTok slideshows?
If you are keen on posting high quality slideshows on TikTok, consider editing them using the feature-rich library of the Wondershare Filmora video editor program. The app allows you to work with top rated and professionally advanced customization features to add an irresistible spark to your slideshows, with a guaranteed viewer attention.
For Win 7 or later (64-bit)
For macOS 10.12 or later
● How can the speed of a TikTok picture be increased?
To address the concern of how to speed up pictures on TikTok slideshow, navigate to the right side of the app screen and tap the ‘Speed’ icon. From the list of options that appears, you can choose to fast forward the video up to 3x the original playback speed. Select the speed option that suits your requirements and proceed to record the video in high speed by pressing the ‘Record’ button in red.
● How can a specific section of a TikTok video be sped up?
Start with selecting the desired TikTok Video in the app’s timeline, followed by heading to the right side of the launch screen and hitting the ‘Speed’ icon. From the speed options that pop up next, pick any one of the 2X, 4X, 8X, 20X and 50X playback rate choices to fast forward the video section. As an alternative, navigate to the ‘Speed Properties’ window, hit the ‘Speed’ button and move the speed slider to the right side to increase the clip’s running speed.
● Ending Thoughts →
● Creating TikTok videos and slideshow presentations for fun and entertainment has become an evergreen social media trend in today’s time.
● The short duration of TikTok slideshows poses the query of how to speed up picture slideshow on TikTok for including the entire content within the presentation.
● When browsing through software solutions to customize high speed TikTok slideshows, you can conveniently bank upon the Wondershare Filmora video editor program.
Increasing the play speed of a TikTok slideshow may sometime appear a necessity. Stay here to have an insight into the process of making your TikTok slideshows faster!
In this article
01 [How Do You Change the Time on a Tiktok Slideshow?](#Part 1)
02 [How Do You Watch 3x Speed on Tiktok?](#Part 2)
03 [Why You Should Speed Up Pictures on Tiktok?](#Part 3)
04 [5 Best Ways to Speed Up a Video on Tiktok](#Part 4)
05 [FAQs of Speeding Up Pictures on Tiktok Slideshow](#Part 5)
Part 1 How Do You Change the Time on a Tiktok Slideshow?
TikTok slideshows are a guaranteed media of fun and entertainment among family and friends. Used mostly as a source of personal recreation, these are a storehouse of creativity and enjoyment. Such video presentations are short enough to last for a mere set of seconds to minutes, and consequently the play speed hardly gets noticed. However, there may be a few instances that put forward the concern of how to speed up TikTok slideshows.
Discussing along the line, let us look through solutions of modifying the play duration of TikTok slideshows in the following section:
User’s Guide to Adjust the Play Duration of a TikTok Slideshow
Step 1: Launch the Application
To proceed with the duration adjustment process, start with launching the TikTok application in your preferred device.
Step 2: Open a Slideshow
In the application’s main interface, open a preferred slideshow presentation that you wish to adjust the time duration of.
Step 3: Set the Play Duration
Navigate to the top right corner of the app screen and click on the ‘Adjust Clips’ icon. A duration slider holding you selected slideshow pops up on the screen. Drag the duration bars to the left and right sides for fixing the start and stop time of the presentation.
Step 4: Save Your Changes
As you finish setting the play duration, navigate to and click on the ‘Save’ button at the top right corner of the app screen to confirm and apply the changes to the TikTok slideshow.
Part 2 How Do You Watch 3x Speed on Tiktok?
Creating and watching TikTok slideshows is a mix and match of craft and fun. As already stated, such slideshows are small enough to escape the time frame; however, you may often require a speed modification of the same. When the talk is of speed adjustment, the beneficiary side generally lies in decreasing the slideshow run time.
Moving ahead with our discussion, let us look through the process of watching a TikTok slideshow in 3x speed while sorting out the issue of how to speed up photo slideshow on TikTok in the upcoming section of this article:
User’s Guide to Watch a TikTok Slideshow in 3x Speed
Step 1: Launch the TikTok App
In any of your preferred MacOs, Windows or Android devices, proceed to launch the TikTok application, as the first step to increase the slideshow speed.
Step 2: Create a Slideshow
Navigate to and tap the ‘+’ icon at the bottom of the app’s welcome screen to create a slideshow video or post.
Step 3: Adjust the Play Speed
You now need to head towards the top right corner of the interface and click on the ‘Speed’ button. You will see the ‘Speed Bar’ pop up over of the ‘Record’ button with a series of speed modification options. Select the desired speed you wish to watch the slideshow in. Addressing the specific concern of 3x speed, tap on the respective option.
Part 3 Why You Should Speed Up Pictures on Tiktok?
TikTok pictures are a delight to watch and share among friends and family on social media. While creating image and video posts on TikTok sounds good enough, it is common to land across instances that demand an increase of the image play speed. Extending our talk a bit further, let us dive into the credibility of speeding up images on the TikTok application in the following section:
Importance of Speeding Up TikTok Presentations
It is a commonly known fact that the play duration of TikTok slideshows can be 3 minutes at the most. This stands up as a problem when you have a series of images to include within the slideshow and there exists a significant time lapse between the transitions of any 2 successive images. This time gap may lead to a miss out of images from being uploaded to the slideshow before the expiry of the allotted 3 minute run time.
To escape the disappointment of an incomplete presentation, you can easily pick the alternative of speeding up the slideshow images, so that all the photos may become a part of the slideshow. If you are bothered by the concerns of image quality and output resolution, rest assured, as the speed adjustment utility of the TikTok application has nothing to do with these parameters.
Part 4 Best Ways to Speed Up a Video on Tiktok
As explained in the previous section, speeding up videos and images within the TikTok application is of great significance to make sure that all the required media content fits in the 180 second long post on the platform. Adhering to the same, let us look through some of the best and popular methods to set straight the issue of how to speed up slideshow on TikTok in what follows next:
01Using the Motion Effects of TikTok to Record Fast Motion Videos
The aforesaid method conveniently takes the credit of being the most widely preferred means to increase the play speed of TikTok videos. The method works to cater to the speed modification concern by recording a high speed motion video through the default motion effects of the TikTok application. This in turn, rescues you from the task of downloading the TikTok video to your device.
Working with the feature, you can opt to increase or decrease the play speed of the videos, along with simultaneously recording them prior to a social media export. The process is easy and simple enough to proceed with, as explained in the following user guide:
User’s Guide to Speed Up TikTok Videos by Recording
Step 1: Launch the TikTok Camera
To answer the query of how to speed up a TikTok slideshow, start with opening the TikTok application in any of your preferred devices. When you are welcomed by the app’s main interface, navigate to the bottom of the same and click on the ‘+’ icon. This will instantly cause the application’s camera to open up.
Step 2: Pick a Motion Effect
The TikTok camera launches to bring the ‘Motion Effects’ window into picture. You can choose a desired speed modification effect from the 5 choices available. If you are keen on increasing the video speed, pick any one of the 2x or 3x effects for recording a video in the fast-forward mode.
If however, the aforesaid motion effects do not appear on your app screen, navigate to the ‘Options’ menu at the top left corner of the same and tap on the ‘Speed’ icon.
Step 3: Record the Video
Hit the red colored ‘Record’ button to capture a TikTok video in the fast-forward motion. The app further allows you to create multiple speed recordings of a particular video clip. All you need to do is, click on the ‘Stop’ button, followed by making a desired adjustment in the recording speed, and lastly, resume the video recording process.
Step 4: Customize the Recorded Video
As you finish recording the high speed video, click on ‘OK’ to launch TikTok’s editing interface. Here, proceed to customize the recorded video with the app’s preset editing effects and filters. When you are happy with your work, move ahead with posting the same to tour TikTok account.
02Applying a High Speed Motion Effect to a Locally Saved TikTok Video
As stated earlier, the TikTok application comes with a built-in graphic editor to allow its users to create high quality media edits. Likewise, you can work with the aforesaid utility to increase the speed of TikTok videos prior to an upload across media sharing platforms as well as TikTok itself. Here’s a detailed, stepwise user guide to go about the process without a hustle:
User’s Guide to Speed Up Locally Saved TikTok Videos
Step 1: Open the Application Camera
Begin with launching the TikTok application in a suitable Windows, MacOS or Android device, followed by heading to the bottom of the app’s launch screen and clicking on the ‘+’ symbol to automatically open the latter’s camera.
Step 2: Upload the Videos
Navigate to the ‘Upload’ option beside the ‘Record’ button to open your device’s local media gallery. You can browse through this space to select and upload a desired video. You can also upload a set of videos, provided that all your uploaded clips should fall under the 3-minute constraint of TikTok posts. Tap ‘Next’ to complete the video upload process.
Step 3: Adjust the Video Play Speed
The completion of Step 2 causes a video timeline to pop up at the bottom the app’s working screen. To make adjustments in the video playback rate, hit the ‘Speed’ icon within the timeline, followed by selecting the 2x playback speed. You can further, trim the video by dragging the sliders, as well as change the video layout using the ‘Flip’ option. When you have made the required changes, tap ‘Next’ to proceed further.
the
Step 4: Customize the Video
As the video processing comes to an end, you will be directed to the app’s editing workspace, where you can customize your clip quickly and easily with texts, filters, sounds, stickers, voiceovers, etc.
03Speeding Up a TikTok Video Using the Wondershare Online UniConverter Program
While the TikTok application comes with an inbuilt feature to increase the playback rate of its videos, there are a range of third party programs and utilities that promise of adhering to the aforesaid concern with utmost ease. Moving along the line, there is the Wondershare Online UniConverter program that works to speed up Tiktok videos up to 2x the original playback rate.
You can additionally work with the program to customize the video in a variety of aspects, while exporting the same across a series of media sharing platforms in a diversity of file formats. Having talked enough about the program’s video editing credibility, let us look into the process of increasing the run speed of TikTok videos using the app in what follows next:
User’s Guide to Increase the TikTok Video Speed With Wondershare Online UniConverter
Step 1: Launch the Program
In any of your favorite web browsers, navigate to the official site of Wondershare and launch the Online UniConverter program from the list of available utilities.
Step 2: Open the Required Tool
in the application’s welcome interface, navigate to the ‘Online Tools’ tab in the top toolbar and click on the same to select the ‘Change Video Speed’ option from the drop down menu that follows.
Step 3: Upload the TikTok Video
As far as the video upload task is concerned, desktop users can directly upload their TikTok video to the utility by dragging and dropping the video file from its location in the device. In case of laptop, smartphone and iOS users, they can tap ‘Choose Files’ on the app’s main screen to select and upload the video file from the local media gallery of their device.
Step 4: Pick a Suitable Video Speed
When you have finished uploading the video, navigate to the toolbar at the top of the app’s welcome interface and hit the ‘Video Speed’ tab. A ‘Speed Slider’ will pop up, which you can use to make suitable speed adjustments by dragging the latter in the left or right directions to respectively, decrease or increase the video playback rate.
The app allows you to set a video run speed between 0.25x to 2x. Prefer watching a preview of the clip with the modified speed to ensure affordable results.
Step 5: Save the Fast-Forwarded Video
If the video playback preview in Step 3 satisfies you enough, proceed to save the clip locally to your device. All you need to do is, select a video file format, (MP4 is recommended to ensure affordable output quality), followed by navigating to the bottom right corner of the screen and hitting the ‘Start’ button.
04Speeding Up a TikTok Video Using the Clideo Online Tool
In line with the Wondershare Online UniConverter program, this one is another reliable web based utility to modify the speed of your TikTok videos. Working with the facility, you are permitted to change the playback speed of a video clip in a variety of file formats, along with getting to customize the latter with a range of tools and effects.
The app however, takes a bit longer time to render the speeded up video output, and leaves a watermark on the same. Nevertheless, let us try hands at understanding the procedure to increase the speed of TikTok videos with the app in the following section:
User’s Guide to Speed-up TikTok Videos With Clideo Online Tool
Step 1: Launch the Online Tool
Start with visiting the home website of Clideo in your preferred internet browser and launching the online program in your device. In the app’s main interface, navigate to and click on ‘Tools’ followed by selecting the ‘Speed Video’ option from the drop down menu that appears next.
Step 2: Select Your TikTok Video
As you complete Step 1, the ‘Choose File’ tab appears on the app screen. Click on the same to reach your device’s local media gallery and pick a desired TikTok video to upload to the program for modifying the latter’s speed. You can alternatively, ‘Drag and Drop’ the clip to the program’s file upload section.
Step 3: Change the Video Speed
As you upload the clip, the app’s video editing window pops up, where you can modify the playback speed of your clip, either by dragging the ‘Change Video Speed’ slider from left to right, or by setting a suitable playback speed value among 1.25x, 1.5x and 2.0x in the ‘Speed Chart’ at the right side of the editor window.
Step 4: Export Your Video
When you are satisfied with all the changes till here, proceed to choose a desired file format for sharing the video. Format options are available at the bottom ribbon of the editor window. When you have selected the preferred video format, navigate to and click on the ‘Export’ button at the bottom right corner of the editor workspace to share the video across different media handles.
05Fast Forwarding a TikTok Video With the Wondershare UniConverter Application
Entering the world of third party video editing software programs, you will come across a diversity of choices to work with. As far as the task of modifying the playback speed of TikTok videos is concerned, you can make a smart selection by picking the Wondershare UniConverter application to proceed with the process.
Continuing the legacy of Wondershare utilities, this one is an all-in-one video editor program that you can work with to customize your TikTok videos with a variety of effects and filters, apart from just increasing their playback speed. As of now, let us look through the knowhow of fast-forwarding TikTok clips with the software in the following section:
User’s Guide to Speed-up TikTok Videos with the Wondershare UniConverter Software
Step 1: Launch the Software Program
Visit the official Wondershare website and download the UniConverter program in your preferred desktop or PC, followed by installing and launching the same on your system. Upon being greeted by the app’s welcome screen, navigate to the ‘Features Panel’ at the left and select the ‘Video Editor’ tab. In the window that pops up navigate to and hit the ‘Effect’ option. You can now upload a desired TikTok video that you want to increase the speed of.
Step 2: Select an Incremental Video Playback Speed
Within the ‘Effect’ interface, head to and click on the ‘Change Speed’ tab at the right side of the window, followed by selecting a suitable playback speed greater than 1x and up to 2x. When you have made your choice; tap ‘OK’ to confirm your speed selection.
Step 3: Save the Fast-Forwarded Video
Proceed to save the high speed video by navigating to the bottom left corner and hitting the ‘Output Format’ tab. Now head to the ‘Functions Toolbar’ at the top of the app screen to hit the ‘Web Video’ tab. Within the new window that appears next, reach the left side panel and choose ‘TikTok’.
Select a preferred video format from the list that appears at the right side of the window and lastly, reach to and tap the ‘Start’ button at the bottom right corner to initiate the video conversion speed increment process.
06Fast Forwarding a TikTok Video with the VideoProc Vlogger Application
Moving ahead in the line of software utilities that work towards the requirement of how to speed up a slideshow on TikTok, the VideoProc Vlogger application offers a dependable credibility. This one is a Windows and Mac compatible video editor program that claims of a high end video customization facility along with playback rate adjustments, while assuring an appreciable output quality.
Working with the program, you are allowed to set a 16x faster or slower video speed in relation to the actual playback rate. You can further, choose to render the fast-forwarded video in a variety of file formats. As of now, let us see through the method of increasing the speed of a TikTok video within the app in what follows next:
User’s Guide to Speed-up TikTok Videos With the VideoProc Vlogger Program
Step 1: Launch the Application Program
Navigate to the official website of the software to download, install and launch the program in your preferred Windows and MacOS device, followed by clicking on the ‘New Project’ tab at the bottom right corner of the program’s welcome interface.
vui
Step 2: Import Your TikTok Video
The Within the ‘New Project’ window, proceed to import the desired TikTok video from your device’s local media gallery to the app’s media library, followed by dragging the same to the software’s editor timeline.
Step 3: Make Speed Adjustments
Navigate to and hit the ‘Play Speed’ tab at the right side of the app’s editing workspace. The speed adjustment window pops up, where you can choose to increase or decrease the speed of the uploaded video by clicking on the ‘Speed’ option. Tap the ‘Custom Menu’ to set a desired playback speed value within the speed box. In case you want to include advanced speed customization, click on the ‘Nonlinear Editor’ tab. When you have made the changes, hit ‘OK’ to apply the same.
Part 5 FAQs of Speeding Up Pictures on Tiktok Slideshow
● How can the speed of TikTok slideshows be slowed down?
Start with creating a new post by tapping the ‘+’ icon at the bottom of the app’s launch screen to slow down the speed of a TikTok slideshow. The ‘Recording Speed Options’ appear at the bottom of the screen, from where you can pick the 0.3x and 0.5x playback rates. Proceed to record a new video with reduced play speed by pressing the ‘Record’ button.
● How can the duration of TikTok images be modified?
To set the screen time of a TikTok picture, navigate to the desired image, followed by tapping on the ‘Time’ icon. An adjustment slider pops up, which you can drag from left to right for respectively, increasing or decreasing the image play duration.
● What is the best video editing program to create TikTok slideshows?
If you are keen on posting high quality slideshows on TikTok, consider editing them using the feature-rich library of the Wondershare Filmora video editor program. The app allows you to work with top rated and professionally advanced customization features to add an irresistible spark to your slideshows, with a guaranteed viewer attention.
For Win 7 or later (64-bit)
For macOS 10.12 or later
● How can the speed of a TikTok picture be increased?
To address the concern of how to speed up pictures on TikTok slideshow, navigate to the right side of the app screen and tap the ‘Speed’ icon. From the list of options that appears, you can choose to fast forward the video up to 3x the original playback speed. Select the speed option that suits your requirements and proceed to record the video in high speed by pressing the ‘Record’ button in red.
● How can a specific section of a TikTok video be sped up?
Start with selecting the desired TikTok Video in the app’s timeline, followed by heading to the right side of the launch screen and hitting the ‘Speed’ icon. From the speed options that pop up next, pick any one of the 2X, 4X, 8X, 20X and 50X playback rate choices to fast forward the video section. As an alternative, navigate to the ‘Speed Properties’ window, hit the ‘Speed’ button and move the speed slider to the right side to increase the clip’s running speed.
● Ending Thoughts →
● Creating TikTok videos and slideshow presentations for fun and entertainment has become an evergreen social media trend in today’s time.
● The short duration of TikTok slideshows poses the query of how to speed up picture slideshow on TikTok for including the entire content within the presentation.
● When browsing through software solutions to customize high speed TikTok slideshows, you can conveniently bank upon the Wondershare Filmora video editor program.
Also read:
- In 2024, Online Calculate and Change Video Aspect Ratio
- New In 2024, Splitting Video in VSDC Step by Step
- Updated 2024 Approved Best Jump Cut Editing Tricks
- Do You Want to Make TikTok Videos More Elemental by Using Countdown but Dont Know How to Do This? Here We Will Thoroughly Guide You About This
- Updated 2024 Approved Easily Sync Audio With Video With Filmora
- Updated In 2024, How to Make an Aesthetic Slideshow
- 3 Methods to Combine 2 or 3 Videos Into 1
- New Top 7 Best GoPro Video Editors for Mac for 2024
- New Best 10 Fun Discord Bots You Need
- Updated In This Article, We Will Discuss How to Rotate Videos in the Lightworks Application. Below Is a Way to Rotate Videos in Lightworks Manually, Here, We Will Use the Z-Axis Rotation
- New Do You Wish to Know How FFmpeg Can Remove Audio From a Video? If Yes, Keep Scrolling This Guide to Remove Audio From Video with FFmpeg and Other Alternative Software
- Updated Detailed Steps to Cut a Video in QuickTime
- In 2024, Learn How Video Montages Were Used over Film History with Examples and the Types of Videos for Shorter Montages. Plus, Learn About the Best Software for It
- Top 5 Websites and Software to Convert Powerpoint to Mp4
- 2024 Approved How To Create A YouTube Intro
- 2024 Approved Want to Add Subtitles to Netflix Videos in Your Preferred Language? Read This Article to Learn Two Different Methods for Uploading Custom Subtitles to Netflix
- New Create Dynamic Text Animation in Filmora for 2024
- 3 Different Methods to Correct Color Distortion in Videos
- In 2024, Best Ways to Add Meme Text to Videos
- YouTube Being One of the Most Used Video Platforms Uses Artificial Intelligence to Recommend Videos. Click Here to Know About YouTube AI in Detail for 2024
- You Can Match Paint Colors From Pictures for Your Wall, as Well as for Your Videos. And to Know How to Do Both, We Have Laid Down the Following Discussion for 2024
- New What Is AI Composite Video App and AI Composite Video Tutorial for 2024
- Updated Do You Want to Stream and Record at the Same Time but Cant Find an Easy Solution? This Guide Will Help You Get This Done Using Three Easy-to-Follow Methods
- New How Can You Get VHS Filter and Glitch Filter to Your Images or Videos?
- New In 2024, Guide To Slowing Down Videos in Snapchat Discussing the Details
- Video Editors Use the Loading Text Effect to Create Impressive and Descriptive Videos. Let Us Understand the Detailed Steps to Customize the Loading Text Effect in Wondershare Filmora
- Updated In 2024, How to DIY VHS Overlay in After Effects?
- How to Transfer Photos From Oppo Find N3 to Samsung Galaxy S21 Ultra | Dr.fone
- In 2024, Unlock iPhone SE (2020) With Forgotten Passcode Different Methods You Can Try | Dr.fone
- In 2024, The Complete Guide to Tecno FRP Bypass Everything You Need to Know
- 5 Ways to Reset OnePlus Open Without Volume Buttons | Dr.fone
- How to Manually Install a Driver in Windows 11
- How to Remove Find My iPhone without Apple ID From your iPhone XS?
- Hard Resetting an Vivo S18 Pro Device Made Easy | Dr.fone
- How to Repair corrupt MP4 and AVI files of Nokia C210 with Video Repair Utility on Mac?
- Top 9 Motorola Edge 40 Neo Monitoring Apps for Parental Controls | Dr.fone
- MKV playback issues on Motorola G24 Power
- Top 10 Fixes for Phone Keep Disconnecting from Wi-Fi On Lava Yuva 2 Pro | Dr.fone
- Wondering the Best Alternative to Hola On Vivo Y100i? Here Is the Answer | Dr.fone
- In 2024, A Complete Guide To OEM Unlocking on Vivo X100
- Unlock Your Xiaomi Redmi K70E Phone with Ease The 3 Best Lock Screen Removal Tools
- In 2024, How To Change Your Apple ID Password On your iPhone 12 Pro | Dr.fone
- Forgot Your Apple ID Password and Email From Apple iPhone 11 Pro Max? Heres the Best Fixes
- In 2024, Complete Review & Guide to Techeligible FRP Bypass and More For Samsung Galaxy S23 Tactical Edition
- Title: Detailed Guide to Merge Videos in VLC Media Player for 2024
- Author: Chloe
- Created at : 2024-05-20 03:38:00
- Updated at : 2024-05-21 03:38:00
- Link: https://ai-editing-video.techidaily.com/detailed-guide-to-merge-videos-in-vlc-media-player-for-2024/
- License: This work is licensed under CC BY-NC-SA 4.0.
