
:max_bytes(150000):strip_icc():format(webp)/ipad-pro-pencil-56a533763df78cf77286e0e0.png)
Detailed Steps to Cut a Video in QuickTime for 2024
Detailed Steps to Cut a Video in QuickTime
Filming a video is fun and editing is more interesting and entertaining. Today, everyone is making videos and there are tons of videos on the internet. Editing videos is required to make the video stand out and retain the audience. Video trimming helps you cut out the unwanted part of the video and leave the desired portion of the viewers.
Cutting a video means your video starts quickly and you don’t lose your audience’s attention.
The first ten seconds of the video are very important when deciding whether to stay or move on to the next video.
How to cut a video in QuickTime
Quicktime is an authentic application developed by Apple in 1991. It allows the users to edit, record, play, and share videos and pictures. If some editing software confuses you, QuickTime is just for you.
You need to download the application and here are all the features you can enjoy. It is compatible with all versions of windows whereas, if you are a Mac user it is already installed in your system.
Cutting a video is one of the basic but useful functions of QuickTime. It requires a few simple steps and some features related to cutting, splitting, and trimming a video.
Let’s start…
1. Cutting/splitting a video
Cutting a video means splitting some parts of the video to edit and rearrange the clips to make a new video. Mostly, it is used where you want to edit all clips of the video differently. It is also needed as it allows you to focus on your message and delete the portion not required and make the video large. You can remove the extra fat from the video to give clarity, direction, and hope. You can convey your message in a clear and concise way.
These steps should be followed to cut/split the video in minutes.
- In the QuickTime player, open the desired video.
- Select show clips from the view on the menu bar.
- Move the red marker from right to left to select the desired portion.
- Hit split clip from the edit

- A yellow rectangular bar appears over the edges of your video.
- You can cut the desired portion and make editing as you like.
- Repeat the sequence until you are done.
- Press the done

Cutting the video by splitting is used when you have a long video and you can easily edit them by splitting them into two parts.
2. Trimming a video
If you are cutting some parts at the beginning and the end of the video, it is called trimming a video. You can say it as removing unnecessary preparation scenes. Normally, professionals start their cameras before the film scene to ensure not to miss any part of the video. Here’s, how to trim video in the QuickTime player.
Let’s dive in…
- Launch QuickTime
- Select your video from the system.
- Select edit from the top menu.
- Select the trim or command T, or you can select the hold option from the drop-down list.

- A yellow trimming bar will appear over the edges of your video.
- Remove the unwanted area by moving from the right or left trim edges also called handles.

Everything inside the yellow bars will remain. You can preview your video anytime during the editing process.
- Hit the trim from the bottom right corner.
- Select save from the file on the top menu bar.
Trimming is critical because it is the time to convince the viewers to stick around and stay with your video.
For more advanced editing without losing the quality of the video, I recommend you to use Wonder Share Filmora 11. It’s an amazing app and very easy to use even for a layman.
An easier way to cut a video with Filmora
Wonder Share Filmora is one of the best video editing tools for beginners. It simplifies the editing process using smart and congenital features that can automate repetitive tasks. It has a lot of exciting features and has collaborated with others to make the work easier.
So here, I recommend Filmora Video Editor , an easy and very powerful, all-in-one video editor software. It enables you to cut, crop, and trim the videos in a few clicks without losing the quality of the video.
For Win 7 or later (64-bit)
For macOS 10.14 or later
Point to be noted:
The cut is removing some unwanted parts of the video.
The Split is dividing the clips into two parts.
The trim is deleting the starting or endpoints of the video.
1. Cut video using Filmora video cutter
Cutting a video is necessary even if you shot a very good video because it contains some irrelevant and unwanted clips. Removing the unnecessary part of the video will make the video short, concise, and to the point. Moreover, it helps in grabbing the attention of your valuable viewers.
If your video has multiple scenes to cut, the scene detection function would be helpful.
- Install Filmora video cutter
- Select the New project.
- Select the video in the media library.
- Right-click and select scene detection to enter the scene detection window.

- Select Detect
This will automatically detach your unwanted videos based on the change in scene.

- Click add to timeline to add the separated video into the timeline.
You can also remove the unwanted videos by clicking the delete icon.
2. Manually cut/split videos
To cut the beginning and the end portion of the video, we can use the trim feature.
Let’s start…
- Import the video and drag it into the timeline.
- Add Marker in the timeline to spot a particular clip.

Pointing the Marker will help to find the unwanted potion without wasting the important portion of the clip.
Here is all about trimming the video from beginning to end but if you want to cut the video into parts to remove the rest of the fat from the clips. You can follow these steps:
- Click the split icon above the timeline.
- Drag the play head to make a rectangle to cover the unwanted portion of the video.
- Press delete from the timeline besides the split tab.

Repeat the process and cut the video into many segments to get the desired video.
Conclusion
Video editing is a critical part of creating eye-catching movies. Along with this, cutting and trimming a video is the core of the whole process as it makes sure that your audience is hooked with your content or not. Once you have downloaded the Wonder Share Filmora app, the art of cutting the video and transforming into a new film is really amazing.
- A yellow rectangular bar appears over the edges of your video.
- You can cut the desired portion and make editing as you like.
- Repeat the sequence until you are done.
- Press the done
Cutting the video by splitting is used when you have a long video and you can easily edit them by splitting them into two parts.
2. Trimming a video
If you are cutting some parts at the beginning and the end of the video, it is called trimming a video. You can say it as removing unnecessary preparation scenes. Normally, professionals start their cameras before the film scene to ensure not to miss any part of the video. Here’s, how to trim video in the QuickTime player.
Let’s dive in…
- Launch QuickTime
- Select your video from the system.
- Select edit from the top menu.
- Select the trim or command T, or you can select the hold option from the drop-down list.
- A yellow trimming bar will appear over the edges of your video.
- Remove the unwanted area by moving from the right or left trim edges also called handles.
Everything inside the yellow bars will remain. You can preview your video anytime during the editing process.
- Hit the trim from the bottom right corner.
- Select save from the file on the top menu bar.
Trimming is critical because it is the time to convince the viewers to stick around and stay with your video.
For more advanced editing without losing the quality of the video, I recommend you to use Wonder Share Filmora 11. It’s an amazing app and very easy to use even for a layman.
An easier way to cut a video with Filmora
Wonder Share Filmora is one of the best video editing tools for beginners. It simplifies the editing process using smart and congenital features that can automate repetitive tasks. It has a lot of exciting features and has collaborated with others to make the work easier.
So here, I recommend Filmora Video Editor , an easy and very powerful, all-in-one video editor software. It enables you to cut, crop, and trim the videos in a few clicks without losing the quality of the video.
For Win 7 or later (64-bit)
For macOS 10.14 or later
Point to be noted:
The cut is removing some unwanted parts of the video.
The Split is dividing the clips into two parts.
The trim is deleting the starting or endpoints of the video.
1. Cut video using Filmora video cutter
Cutting a video is necessary even if you shot a very good video because it contains some irrelevant and unwanted clips. Removing the unnecessary part of the video will make the video short, concise, and to the point. Moreover, it helps in grabbing the attention of your valuable viewers.
If your video has multiple scenes to cut, the scene detection function would be helpful.
- Install Filmora video cutter
- Select the New project.
- Select the video in the media library.
- Right-click and select scene detection to enter the scene detection window.
- Select Detect
This will automatically detach your unwanted videos based on the change in scene.
- Click add to timeline to add the separated video into the timeline.
You can also remove the unwanted videos by clicking the delete icon.
2. Manually cut/split videos
To cut the beginning and the end portion of the video, we can use the trim feature.
Let’s start…
- Import the video and drag it into the timeline.
- Add Marker in the timeline to spot a particular clip.
Pointing the Marker will help to find the unwanted potion without wasting the important portion of the clip.
Here is all about trimming the video from beginning to end but if you want to cut the video into parts to remove the rest of the fat from the clips. You can follow these steps:
- Click the split icon above the timeline.
- Drag the play head to make a rectangle to cover the unwanted portion of the video.
- Press delete from the timeline besides the split tab.
Repeat the process and cut the video into many segments to get the desired video.
Conclusion
Video editing is a critical part of creating eye-catching movies. Along with this, cutting and trimming a video is the core of the whole process as it makes sure that your audience is hooked with your content or not. Once you have downloaded the Wonder Share Filmora app, the art of cutting the video and transforming into a new film is really amazing.
20 Best Text To Speech Software [Windows, Mac, Android, iPhone & O
Best Text To Speech Converter and Video Editor
Filmora’s Text to Speech (TTS) function allows you to convert your text files to voiceover and bring more elements to enrich your video.
Free Download Free Download Free Download Learn More >

Listening has always been more enjoyable, easier, and faster than reading. We understand better when we are listening. So it is good news for us that our life has been made even easier with the development of TTS technology or Text-to-Speech technology.
As its name suggests, TTS or Text-to-Speech is a technology that can convert texts to speech or voices. In other words, it is a technology that reads aloud any type of digital text so one can just listen to it without having to manually read those texts himself/herself. Text-to-Speech is also known as speech synthesis, which means artificial human speech production.
Though Text-to-Speech might sound like a new technology to most people, it has been here for a long time now. It’s just that only the big companies and some authorities had access to it in the past. But now, we can easily find this technology around us. Some of the popular examples would be audiobooks, read-aloud functions on websites, voice assistants like Alexa, Siri, etc.
While text-to-speech service is widely used for convenience and ease of life, its importance is not just limited to that. This technology has been extremely helpful for those with visible imparities and those who cannot read or write. Not only that, but it also has a great contribution to the field of education, business, and technology itself.
So now that we’re a little familiar with this Text to Speech system, it’s about time we have a look at some of the best Text to Speech software or say, Text to Speech converters. In this article, we’ll be covering the Top 20 Best Text to Speech Software with their price, features, and cons along with the platforms they are available for like Windows, Mac, Android, iPhone, and Online:
1. Murf.ai

Supported system: It is a cloud-based platform, therefore can be used online on Windows, Mac, Android, and iPhone.
Basic Intro: Murf.ai is an AI-based voice generator and text to speech converter that is popular for its ability to make studio-quality voiceovers in minutes. Unlike most of the text-to-speech software out there, Murf is focused on creating human-like voices with the help of AI rather than the same old robotic voices. And it’s not just a text-to-speech converter. Its powerful studio allows you to convert speech to editable text, make studio-like quality voiceovers, add audio to videos, etc. Therefore, all these features and its quality service help it rank in the top position on our list.
Features:
- It provides 120+ different types of AI voices for men, and women to use.
- It offers the most natural-sounding AI voices in 20 different languages.
- It has different functionalities aside Text to speech conversion like transcription, making and editing voiceovers, etc.
- It has advanced options like pitch adjustment, adding pauses, emphasizing specific words, speed, etc. to generate the audio as you want.
- It is a simple yet powerful studio for creating, editing, and managing voiceovers and audio.
- It has free grammar and punctuation assistants for your text.
- Free trial allows you to render up to 10 minutes of voice from the text.
- It provides free royalty-free background music to add to videos or voiceovers.
Price: Murf has the following three pricing plans plus a free trial:
- Basic ($13/month):
Unlimited downloads, 24 hours of voice generation per year, Access to 60 voices & 10 languages, etc.
- Pro ($26/month):
96 hours of voice generation per year, 48 hours of transcription per year, Access to 120+ voices & 20 languages, etc.
- Enterprise ($166/month):
5+ users, Unlimited voice generation & transcription, Collaboration and Access Control, Service Agreement, etc.
Cons:
- Not available as a PC or mobile application
- Too limited in the free version
2. Play.ht

Supported system: It is a cloud-based platform, therefore can be used online on Windows, Mac, Android, and iPhone.
Basic intro: Play.ht is a web application that offers a huge library of AI voice options for converting text to speech. It generates realistic TTS audio using an online AI voice generator and the best synthetic voices from Google, Amazon, IBM & Microsoft. Play.ht can help you create professional voiceovers using AI voices from a collection of over 600 male and female voices available across 60+ different languages and accents. Along with converting text to audio, it can also help you enhance the audio with speech styles, pronunciations, and SSML tags.
Features:
- It uses synthetic voices from Google, Microsoft, IBM, and Amazon.
- Huge library of over 600 AI voices including male and female, and 60+ different languages and accents available.
- It supports exporting in MP3 and WAV format with full SSML support.
- Advanced settings for editing and enhancing the voice generated from text.
- Additional functionalities available like speech styles, multi-voice features, voice inflections, custom pronunciations, etc.
- It gives commercial & broadcast rights to use the generated speech files for commercial and personal use with full authority.
Price: Play.ht has the following four pricing plans plus a free trial:
- Personal ($14.25/month):
For personal use such as learning, proofreading, school projects, etc.
- Professional ($29.25/month):
For content creators, bloggers, and freelancers with commercial intent.
- Growth ($74.25/month):
For teams and small companies looking to grow with audio.
- Business ($149.25/month):
For companies and agencies looking to create audio at scale.
Cons:
- Can be a little advanced and difficult for beginners
- Voices other than English can be inconsistent
3. Notevibes
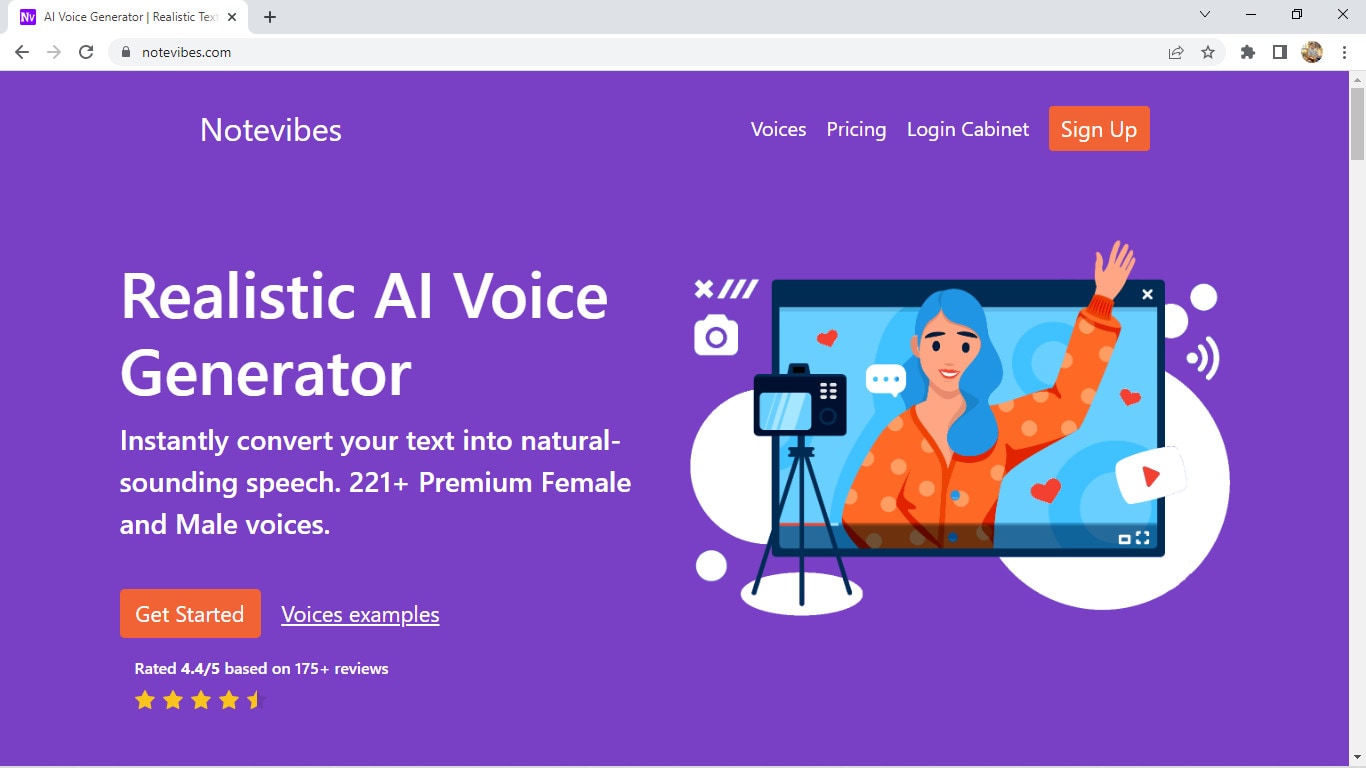
Supported systems: It is a cloud-based platform, therefore can be used online on Windows, Mac, Android, and iPhone.
Basic Intro: Notevibes is online text-to-speech software that can instantly convert your text into natural-sounding speech with AI. It offers over 221 high-quality voices and 25 languages from the most popular providers: Google, Amazon, Microsoft, and IBM to choose from. Notevibes can also convert text to audio and create videos with natural-sounding voices. Using it, you can save both your time and money without hiring professional voiceover artists.
Features:
- It generates realistic and natural human-like voices
- Large library of over 221 voices and 25 different languages
- Powerful editor to add pauses in one click, change speed, pitch, etc.
- Ability to control volume and emphasis on specific words.
- It grants you intellectual rights to freely use or sell voices.
- Backups are available for 14 days, so your work is safe.
- Advanced editor and high fidelity speech synthesys
Price: Notevibes has altogether 3 pricing plans plus a free version:
- Personal Pack ($9/month):
For personal use, private learning, and occasional or general purposes
- Commercial Pack ($90/month):
For Commercial use: Youtube, broadcasts, TV, IVR voiceover, and other businesses
- Corporate Pack ($4000/year):
For corporate or large-scale users with additional specific features
Cons:
- Not available as a PC or mobile application
- Too large gap between pricing plans
4. Lovo

Supported systems: It is a cloud-based platform, therefore can be used online on Windows, Mac, Android, and iPhone.
Basic intro: Lovo.ai is a web-based text to speech software that helps you create perfect voiceovers for audio ads, games, animations, e-learning, etc. It is a next-generation AI voiceover & text to speech converting platform that uses AI and the latest neural network models to generate human-like voices. Lovo offers a unique collection of 180+ voice skins in 33 different languages to choose from, plus, new voices are added on a monthly basis. Its advanced text-to-speech technology provides you the authentic voices that sound very realistic. And Lovo.ai also has the feature of Custom Voice Cloning which lets you create your own customized voice skins.
Features:
- Unique voice collection of 180+ voice skins in 33 different languages, each with unique traits to perfectly fit any content.
- It provides authentic and realistic voices with human emotions.
- Voice cloning technology that requires just 15 minutes of any voice to create the customized voice skins.
- Growing library of voices where new voices are added monthly.
- Voiceover API Integration is also available for the developers to use in their products.
- Well-optimized studio with a smooth interface for easy use.
Price: Lovo Studio offers two pricing plans and one free plan:
- Personal ($17.49/month):
Unlimited access to all voices, the Ability to add BGM and Commercial Rights, Up to 30 downloads per month
- Freelancer ($49.99/month):
Every feature in the Personal plan, Upto 100 downloads/month
Lovo also offers three different API Pricing plans, plus a free trial for 2 weeks without any credit card information:
- Base subscription: $45 per month per 1000 calls
- Overage: $0.04per overage call
- Enterprise license
Cons:
- Not available as a PC or mobile application
- Limits on the number of characters and downloads in paid plans
5. NaturalReader

Supported systems: Supports Windows, iPhone, Android, and online (also available as a chrome extension)
Basic intro: NaturalReader is a powerful application that can convert any text or document to audio anytime anywhere. It is one of the best and most popular text-to-speech software available today that can generate high-quality natural-sounding voices. One of its unique features is OCR Technology which reads aloud text from scanned documents or images for you. It can also be used to create audio from the text for commercial purposes with full rights. You can use NaturalReader online, through software, or with the help of its chrome extension.
Features:
- It offers 100+ natural-sounding voices available in 16 different languages.
- Its WebReader allows you to listen to the contents of any website.
- Specific features available for commercial purposes.
- OCR function available that can also read or convert the scanned documents or images into audios.
- With its pronunciation editor, you can manually modify the pronunciation of certain words.
- Specifically designed as a reading aid to help dyslexic readers.
Price: NaturalReader has three simple pricing plans including the free plan:
- Free ($0/month):
20 minutes per day with premium voices, Unlimited use with free voices, Pronunciation editor
- Premium ($9.99/month):
Unlimited use with premium voices, OCR functionality, MP3 conversion, Chrome extension with unlimited premium voices
- Plus ($19/month):
100+ Premium and Plus voices, Chrome extension with 100+ Premium and Plus voices, all the previous features
Cons:
- Free app requires Internet connectivity to access the voices.
- Not available as downloadable software for Mac devices
6. Amazon Polly

Supported systems: It is a cloud-based platform, therefore can be used online on Windows, Mac, Android, and iPhone.
Basic intro: Amazon Polly is a cloud-based service by Amazon that turns text into life-like speech, allowing you to create applications that talk, and build entirely new categories of speech-enabled products. Amazon Polly uses deep learning technologies and AI technology to synthesize realistic human speech in dozens of voices across many different languages. It is really a revolutionary TTS service that offers Neural Text-to-Speech voices in addition to Standard TTS voices that deliver advanced improvements in speech quality through a new machine learning approach. And, one of the best things is that Amazon Polly Brand Voice can create a custom voice for exclusive use.
Features:
- It provides one of the most realistic and natural-sounding voices.
- A large number of options available for voices and languages.
- Supports API integration for applications or any products.
- It can create a custom voice for the exclusive use of your organization.
- Ability to stream audio in real-time or store & redistribute speech.
- Customisation & control options available for speech output.
- It offers a free tier as well as pay-as-you-go pricing.
Price: Amazon Polly offers two different plans for its service:
- AWS Free Tier: Limited but free 5 million characters per month for 12 months
- Pay-as-you-go plan: Depends on your usage but low cost per character converted and unlimited replays
Cons:
- Not available as a desktop or mobile application
- Beginners might have a hard time using it.
- Their pay-as-you-go pricing plan can be a little difficult to understand
7. Voice Dream Reader

Supported systems: Supports Mac and iPhone (also available as a Safari extension)
Basic intro: Voice Dream Reader is a text-to-speech software specifically designed for Mac and devices running iOS. It is one of the best text-to-speech software for Mac and iOS devices that provides over 100 AI voices in about 20 different languages. It not only helps you convert text to audio, but it also reads the content from any Microsoft documents, Webpage, PDFs, etc. for you. Voice Dream Reader is meticulously designed for everyone including people with blindness, dyslexia, low vision, autism, etc. It has tons of features embedded inside it like synchronized highlighting, OCR recognition, library management, visual and audio controls, etc. Plus, it has some really special features for Mac and iOS devices like Safari extension, iCloud sync, etc. which makes it one of the best choices for text-to-speech conversion.
Features:
- It offers a huge library of over 100 AI voices from Ivona, Acapela, NeoSpeech, etc, across 20 different languages.
- It can read aloud content from any documents, and web pages with different reading modes.
- Enhanced audio and visual controls available.
- Specific features like Safari Extension, and iCloud Sync for Mac and iOS devices.
- Additional functionalities like OCR, Synchronized highlighting, Library management, Annotation, etc.
- Designed with people having blindness, dyslexia, autism, etc. in mind.
- It doesn’t require an internet connection.
- Different reputed awards and recognitions received by Voice Dream Reader.
Price: Voice Dream Reader is free to download from Mac App Store while costs $19.99 to download from iOS App Store. Its free version is pretty sufficient and is feature-rich, however, this software also offers in-app purchases on both platforms.
Cons:
- Only available for Mac and iOS devices.
- Offers in-app purchases to remove limitations.
8. Kukarella

Supported systems: It is a cloud-based platform, therefore can be used online on Windows, Mac, Android, and iPhone.
Basic intro: Kukarella is an online Text-to-Speech software powered by Google, Amazon, Microsoft, and IBM that lets you easily create beautiful voiceovers with realistic AI voices. It can be used both as a Text-to-voice software and an Audio-to-text software. With Kukarella, you can also narrate books or scripts with multiple voices which is a beta feature. It offers one of the largest libraries of around 670 voices across 100+ different languages and accents which is truly remarkable. Furthermore, it has a well-designed studio to work on and also includes commercial rights in its plan.
Features:
- It offers one of the largest collections of around 670 voices across 100+ different languages and accents.
- It provides the best AI neural voices with commercial rights included.
- Also works as an Audio Transcription software to transcribe audio, recordings, and videos.
- It includes the Table Reads feature to narrate books or scripts using multiple voices.
- Referral program for bonuses and free credits to use.
- Well-optimized studio with additional effects to use in the output audio like pitch, pause, speed, emphasis, etc.
Price: Kukarella has three different paid pricing plans available with which they also provide a 15-day money-back guarantee to refund your purchase if you’re not satisfied with their service:
- Free ($0/month): For testing purposes
- Pro ($15/month): For creative people
- Premium ($35/month): For film professionals and experts
- Studio ($99/month): For business and large-scale use
Aside from these four pricing plans, Kukarella also offers a Top Ups option to let you purchase additional credits like extra characters for text-to-speech and extra minutes for audio transcription.
Cons:
- Only available as an online application.
- Doesn’t let you clone your own voice.
9. Speechelo

Supported systems: Supports all devices like Windows, Mac, Linux, iPhone, and Android, and is available online too.
Basic intro: Speechelo is a new cloud-based text-to-speech software that instantly transforms any text into a 100% human-sounding voiceover. Despite being a new product in this huge marketplace, it has gained popularity very quickly due to its awesome text-to-speech conversion ability. All of their voices are said to have the necessary elements and expressions that make a voice sound real. It also claims that 98% of the people hearing a voiceover generated with Speechelo can’t tell if it is a real human voice or an AI-generated voice. However, the best thing about Speechelo is that it is available for all types of devices out there, so it has got you covered everywhere.
Features:
- It offers more than 50 natural-sounding voices in 24 different languages.
- Functionality to add inflections in the voice.
- Different voice styles and tones available.
- Has settings for adjusting the speed and pitch of the voice.
- Additional options to manually add breathing sounds and pauses, or its AI engine can automatically add them on its own.
- Compatible with all major operating systems, so it won’t matter whatever device you have.
Price: Speechelo has only one pricing plan i.e. Founders Special Offer which is basically a one-time payment for only $47 without any recurring monthly fees. On top of that, they provide a “Risk-Free 60 Days Money Back Guarantee” with which you can try Speechelo without any worries. In this one-time subscription plan, you’ll get lifetime updates and support.
Cons:
- No free version or free trial available to try
- Speechelo website might look a bit fishy or scammy
10. Nuance Dragon

Supported systems: Supports Windows, Android & iOS (previously supported Mac too but discontinued)
Basic intro: Nuance Dragon is an AI-based Text-to-Speech technology that leverages neural network techniques to deliver a human-like, engaging and personalized audio. It creates natural-sounding speech in 119 voice options across 53 different languages. With Nuance vocalizer, you can also establish a unique voice for your brand without having to hire, brief, or record voice talent. One of the best things about Nuance Dragon is that they pursue more natural and expressive speech synthesys to provide life-life audio output. And good news for the developers is that they also provide TTS API to use in the applications or any solutions.
Features:
- It supports HIPAA requirements that are important for security and confidentiality.
- It offers a big library of over 119 voice options and 53 different languages.
- AI-optimized text processing and enhanced expressivity.
- It provides text-to-speech API to use in applications and products.
- It can create a customized or unique voice for the brand.
- Has audio controls for managing or editing the generated audio.
- Dictation and transcribing features available.
Price: Nuance Dragon has 3 plans for individual and 3 plans for enterprise productivity, however, there is not a fixed price for enterprise solutions as it may depend:
- Dragon Professional Individual: Starting at $500
- Dragon Legal Individual: Starting at $500
- Dragon Anywhere Mobile: $15/month for both Android and iOS
They also have a free demo and a 30-day money-back guarantee program on every plan.
Cons:
- Not available for Mac devices
- Not much beginner-friendly to use
11. Synthesys

Supported systems: It is a cloud-based platform, therefore can be used online on Windows, Mac, Android, and iPhone.
Basic Intro: Synthesys is a popular web application that can help you produce professional AI voiceovers or even AI videos in just a few clicks. It generates clear and natural voiceovers through artificial intelligence that can help you build trust and connection between you and your customers or clients. This unique text-to-speech converter eliminates the robotic and strange sounds generated by AI to the minimum. Furthermore, this online platform can create beautiful AI videos for you with just text which you can share on social media or wherever you like. It also allows you to choose voices from different gender, style, accent, speed, etc. for the speech generated from text.
Features:
- It is a web application, so you can work on your projects from any device anywhere.
- Large library of professional AI voices: 35 female and 30 male to choose from.
- Can be used as both AI Voice Generator or AI Video Generator
- It allows you to use or sell the generated voices or videos with full rights.
- User-friendly interface and easy to use.
- Advanced options available to change speed, gender, style, and accent of the voice.
Price: Synthesys has a total of three subscription plans with a 3-day moneyback guarantee. Unfortunately, it doesn’t have a free plan or a free trial version.
- Audio Synthesys plan ($29/month):
Access to 20 real human voices, 66 languages & 254 general voices, and Unlimited voice-overs downloads
- Human Studio Synthesys plan ($39/month):
Access to 73 Humatars, Full video customization, Unlimited downloads, etc.
- Audio and Human Studio Synthesys plan ($59/month):
Unlimited videos and voices downloads, and all previous features included
Cons:
- Limited choices for humatars and voices
- No free trial version available
12. Linguatec Voice Reader

Supported systems: Supports only Windows operating system (all versions)
Basic intro: Linguatec Voice Reader is a downloadable text to speech software for Windows users. It offers a big collection of 67 natural-sounding voices in 45 different languages. Aside from converting text to speech, it can also convert Word documents, emails, ebooks, and pdfs to audio for listening to them on any device. Linguatec Voice Reader Home is specifically designed for private or personal use to listen to any content but it has other specific products like Linguatec Voice Reader Studio for professional purposes and Voice Reader Server for large-scale conversion of text to speech. And, it also has a Voice Reader Web which can automatically convert your website to audio. Therefore, it has got you covered in every aspect.
Features:
- It offers 67 natural-sounding voices in 45 different languages.
- It allows you to convert any word documents, emails, ebooks, or pdfs to audio.
- Text to speech software designed solely for personal usage.
- Intuitive editor to change the speed, volume, and pitch of the audio.
- Installable on Windows, so can be directly accessed without a browser.
- Specific products available for specific purposes like personal use, professional use, large scale use, etc.
Price: Linguatec Voice Reader has a single one-time pricing plan for its every product:
- Voice Reader Home: €49 (approximately $51)
- Voice Reader Studio: €499 (approximately $527)
- Voice Reader Web: €299 (approximately $316)
- Voice Reader Server: Depends on the company’s needs
Cons:
- Only available for Windows devices
- Interface is boring and old-fashioned.
- Only one voice and language per license.
13. Resemble AI

Supported systems: Supports Android and iOS devices, and can also be used online
Basic intro: Resemble.ai is professional text-to-speech software that generates realistic AI voices from the text. It can create your own AI voice by recording and cloning your voice data. And, it also comes with API functionality to embed TTS into any of your services or products. With its Resemble fill, it can blend human and synthetic voices for a seamless experience, and it even has a language dubber that can instantly dub your native voice into other languages. Furthermore, one of its best features is its ability to control the emotions of every word in a sentence which really provides a realistic experience.
Features:
- Voice cloning function to clone your own voice with AI.
- Flexible APIs ready for integration in applications, products, or any services.
- Resemble Fill function to blend human and synthetic voices for a seamless experience.
- It can instantly dub your native voice into other languages.
- Optimized interface and additional audio control settings.
- It can be accessed from mobile devices too with installable apps.
Price: Resemble AI has three pricing plans according to your need and a free trial:
- Entry ($30/month): For voices that are recorded right on our platform
- Build (Depends on your needs): For your own data, any voice, no script required
- Enterprise (Depends on your needs): For massive scale and custom deployment needs
Cons:
- Limited options for voices and languages
- Not available as a Windows or Mac program
14. WellSaid

Supported systems: It is a cloud-based platform, therefore can be used online on Windows, Mac, Android, and iPhone.
Basic intro: WellSaid is an AI-powered text-to-speech software that converts text to voice in real-time and it can help you create quality voiceovers for all your digital content easily. It is one of the best voiceover generators that is not only designed for individual use, but also for small teams and large companies to work on together. With WellSaid, you can also customize the output voices, create your own unique voice or even deploy its text-to-speech functionality through API. However, it is kinda limited on the number of voices and languages.
Features:
- Has a well-optimized studio to convert text to audio.
- WellSaid API available to deploy TTS functionality in apps and products.
- It allows you to build your own voices to meet your brand guidelines.
- Suitable for individuals, teams of any size, and even large enterprises.
- Around 50 different voice avatars to choose from.
- High quality and realistic voices.
- Live chat support and rights for commercial usage.
Price: WellSaid has altogether four pricing plans and a free trial:
- Maker ($49/month):
250 downloads, 5 projects, 4 voice avatars
- Creative ($99/month):
750 downloads, 50 projects, 50 voice avatars
- Producer ($199/month):
2500 downloads, Unlimited projects, live chat support
- Team (Not fixed):
Team members, Team projects, Volume licensing, Account manager
Cons:
- Limited number of voice avatars and languages to choose from.
- Lack of features to adjust and edit the audio.
15. TTSReader
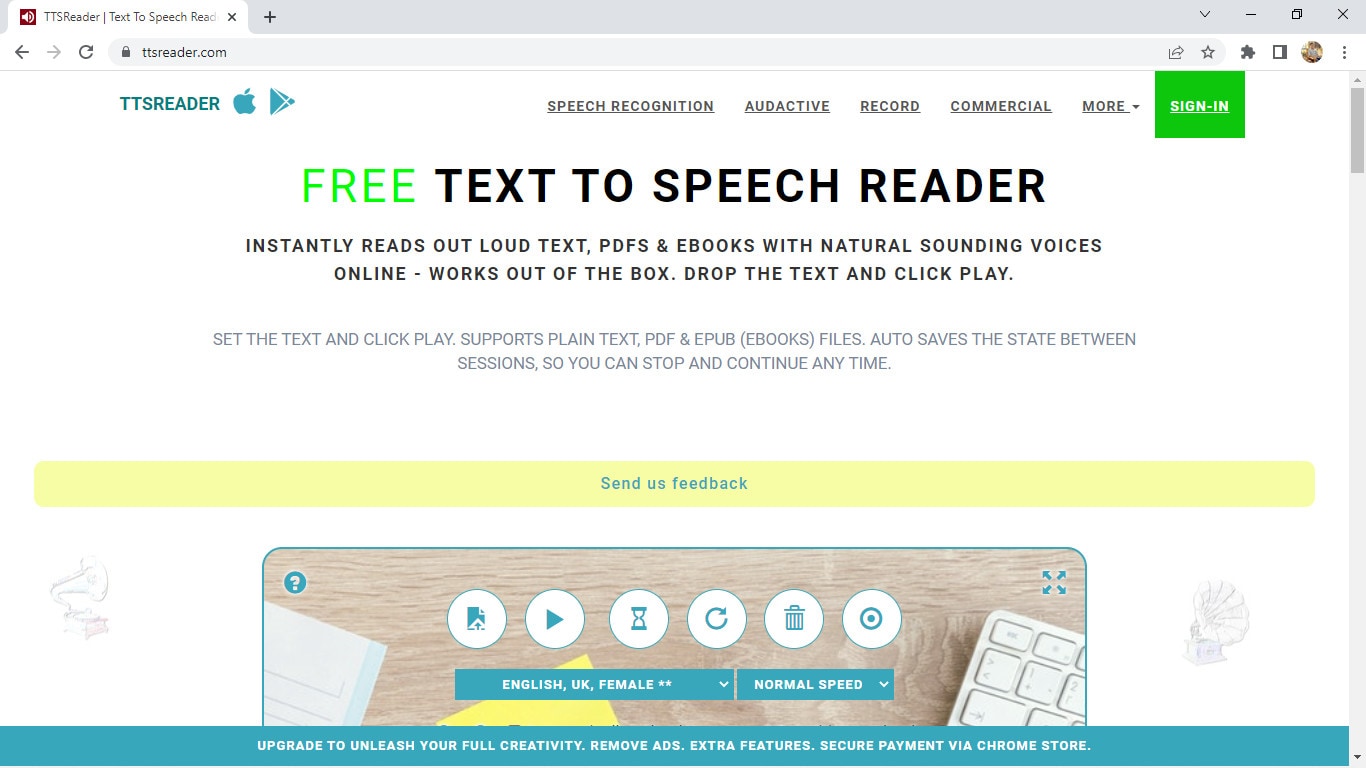
Supported systems: Supports iOS and Android devices, and is also available online and as a chrome extension
Basic intro: TTSReader is one of the simplest and best free text-to-speech readers that instantly reads aloud text, pdfs & ebooks with natural-sounding voices. It is a lightweight online application, so it works out of the box without the need to download and log in. Despite being free software, it has some really great features in it. There are various options of natural sounding voices in different languages and different accents, and it also reads aloud documents, and ebooks for you by uploading them. However, it does not allow you to directly download the audio, but you still have the option to record audio to save it in webm format.
Features:
- Simple and easy-to-use interface
- Completely free for personal or general use.
- It allows you to manually add pauses and alter the speed of the voice.
- Has many options for voices including male and female, accents, and languages.
- It reads aloud ebooks, pdfs, or any text files.
- Available for mobile devices for instant access.
- Automatically remembers the preferences of the previous session and also has options for screen recording.
Price: TTSReader is completely free without any pricing plans at all. However, they do have a premium chrome extension and a separate commercial version available for purchase.
Cons:
- Advanced features for audio are not available.
- May not be the best option for commercial purposes
16. Descript

Supported systems: It is a cloud-based platform, therefore can be used online on Windows, Mac, Android, and iPhone.
Basic intro: Descript is an all-in-one video editing, screen recording, transcription, and podcasting tool you can use online. Its podcasting tool can be a great example of Text-to-Speech software that creates quality podcasts from just text. Descript is that one tool that takes podcasting or TTS to whole another level. It uses AI technology that clones your voice and then allows you to convert any text to speech in your own AI-tailored voice. You can then directly edit the audio in real-time by editing texts. But what really separates it from other software are its unique features for adjusting texts, editing audio, adding effects, etc.
Features:
- Not just a TTS software, but also a video editing, recording, and transcription tool.
- Timeline editor for advanced level editing along with cloud media library
- Different audio effects like crossfading, automatic leveling, loudness normalization, etc.
- It can clone your voice with AI to convert text to speech.
- Free podcasting trial available which includes all the features.
- Has advanced features useful for professional podcasters.
- It supports integrations with API for applications or any services.
Price: Descript has a total of three pricing plans and a free trial version:
- Creator: $12/month
- Pro: $24/month
- Enterprise: (Not fixed)
Cons:
- Not originally a TTS software, but can be used as a one.
- Separate plans for podcasting are not available.
17. Wideo

Supported systems: It is a cloud-based platform, therefore can be used online on Windows, Mac, Android, and iPhone.
Basic intro: Wideo is originally an online video maker that helps you create promo videos, explainer videos, demo videos, presentations, etc. while its Text to Speech software is another added functionality. But still, Wideo is one of the best free TTS software that lets you easily convert text to audio in a fast and straightforward manner. It also allows you to directly add these voices in Wideo’s video maker. Wideo free Text to Speech software integrates with Google Text-to-Speech API, so the quality of voices is as good as other paid software. One of the best things about Wideo TTS software is that it is simple and easy to use.
Features:
- Free and easy-to-use Text to Speech converter.
- Professional video maker along with TTS functionality.
- A large list of voices and languages to choose from.
- Speed of the generated audio adjustable.
- It allows you to download the audio as an mp3 file for free.
Price: Wideo Text-to-Speech Software is basically free with no specific pricing plans. However, its limit in the number of characters can be removed by purchasing any two of their video maker plans:
- PRO: $39/month
- PRO+: $79/month
Cons:
- Advanced text-to-speech features not available
- Voices sound a bit robotic or unreal
- No separate pricing plans available, so will have to purchase the video maker plans to remove limitations
18. Balabolka

Supported systems: Supports all versions of Windows
Basic intro: Balabolka is a Windows text-to-speech software that has been in this field for a long time. It is old and feels outdated, but still is one of the most capable and useful free text to speech converters. Balabolka packs almost all the necessary features required as a TTS program in its lightweight package of just a few megabytes. This program uses various versions of Microsoft Speech API and allows to alter a voice’s parameters, including rate and pitch. Balabolka is also available as a portable version, and as a command-line utility which is a great thing.
Features:
- Lightweight, simple, and completely free to use.
- Can read text from clipboard, and documents, and save the on-screen text as an audio file.
- It uses Microsoft’s Speech API and also includes a spelling checker.
- It uses the pre-installed computer voices of your system.
- Also supports many different text file formats.
- Has options to alter a voice’s parameters, speed, pitch, etc.
- Available for download as a portable and command-line program too.
Price: Balabolka is absolutely free to use without any pricing plans and hidden charges.
Cons:
- Not suitable for large-scale and commercial purposes.
- Only available for Windows operating systems.
- Limited options for voices and languages.
19. iSpeech

Supported systems: Supports iOS, Android, and Online (also available as a chrome extension)
Basic intro: iSpeech is a straightforward and easy-to-use online text-to-speech converter that is also available for mobile devices. Its TTS functionality is powered by Speechelo but makes the whole process a lot simpler and easier. It supports various languages for text-to-speech conversion and also provides the options to change the speed of audio and select gender. And, it also supports Embedded and Hosted TTS services along with API integrations to use TTS in any program or service. Therefore, it acts as a simple yet powerful and professional text-to-speech software to create lifelike voiceovers.
Features:
- It supports over 30 different languages.
- Available online as well as for mobile devices (iOS and Android).
- Has options to select gender and choose audio speed.
- Simple and easy-to-use interface.
- Cloud and hosted services along with API integrations available
- Completely free to convert text to speech online and preview
Price: iSpeech is absolutely free to use online, but it has various pricing plans available for additional features like downloading audio, API integration, etc. They have different options like Pay Per Use, Pay Per Install, Creative Pricing, One-time fees, etc. so it actually depends on your needs.
Cons:
- Very limited in voice styles, accents, and tones.
- Not suitable for beginners and general users.
20. TextAloud

Supported systems: Supports all versions of Windows
Basic intro: TextAloud is a Windows text-to-speech software by NextUp technologies that help you easily generate audio for the given text. It is designed to save your time allowing you to be more productive while converting text to speech. It also allows one to convert texts from web pages, documents, and PDFs into natural-sounding speech. And, it includes assistive technology for people with Dyslexia to improve reading and comprehension. TextAloud by NextUp technologies also offers the natural-sounding Text-to-Speech voices from companies like Acapela, Ivona, Cerence, etc. And with many other features, it can be considered one of the best TTS software for your Windows device.
Features:
- Lightweight software with straightforward interface.
- It allows the conversion of texts on web pages, documents, and PDFs into speech.
- Assistive technology for people with Dyslexia to improve reading and comprehension.
- It uses the pre-installed voices on the system and also offers natural-sounding Text to Speech voices from companies like Acapela, Ivona, Cerence, etc.
- It uses Microsoft’s Speech API and also includes a spelling checker.
- Includes a lot of features and options related to TTS.
Price: TextAloud 4 offers a one-time payment for a Single User License at $34.95 and also has a free trial version to test this software. However, it also offers some additional features for extra fees.
Cons:
- Only available for Windows devices
- Not the best option for commercial purposes
- User interface can seem a little outdated.
Conclusion
Here, we presented you with a list of Top 20 Best Text-to-Speech Software with all their features and other information you need to know. While all of them are best in their own aspects, you should choose the one that suits your needs. For example, you can go for Balabolka or similar free softwares for basic personal use, or if you want something advanced like AI voice cloning, then you can use Murf, Descript, etc. So it all depends on what you intend to do with a TTS software.
However, we have made it easier for you to choose the best one among these many great softwares by breaking them down in terms of their main features, pricing, compatibility, cons, etc. So decide on the software that is best for you and have a happy time creating amazing voiceovers.
Listening has always been more enjoyable, easier, and faster than reading. We understand better when we are listening. So it is good news for us that our life has been made even easier with the development of TTS technology or Text-to-Speech technology.
As its name suggests, TTS or Text-to-Speech is a technology that can convert texts to speech or voices. In other words, it is a technology that reads aloud any type of digital text so one can just listen to it without having to manually read those texts himself/herself. Text-to-Speech is also known as speech synthesis, which means artificial human speech production.
Though Text-to-Speech might sound like a new technology to most people, it has been here for a long time now. It’s just that only the big companies and some authorities had access to it in the past. But now, we can easily find this technology around us. Some of the popular examples would be audiobooks, read-aloud functions on websites, voice assistants like Alexa, Siri, etc.
While text-to-speech service is widely used for convenience and ease of life, its importance is not just limited to that. This technology has been extremely helpful for those with visible imparities and those who cannot read or write. Not only that, but it also has a great contribution to the field of education, business, and technology itself.
So now that we’re a little familiar with this Text to Speech system, it’s about time we have a look at some of the best Text to Speech software or say, Text to Speech converters. In this article, we’ll be covering the Top 20 Best Text to Speech Software with their price, features, and cons along with the platforms they are available for like Windows, Mac, Android, iPhone, and Online:
1. Murf.ai
Supported system: It is a cloud-based platform, therefore can be used online on Windows, Mac, Android, and iPhone.
Basic Intro: Murf.ai is an AI-based voice generator and text to speech converter that is popular for its ability to make studio-quality voiceovers in minutes. Unlike most of the text-to-speech software out there, Murf is focused on creating human-like voices with the help of AI rather than the same old robotic voices. And it’s not just a text-to-speech converter. Its powerful studio allows you to convert speech to editable text, make studio-like quality voiceovers, add audio to videos, etc. Therefore, all these features and its quality service help it rank in the top position on our list.
Features:
- It provides 120+ different types of AI voices for men, and women to use.
- It offers the most natural-sounding AI voices in 20 different languages.
- It has different functionalities aside Text to speech conversion like transcription, making and editing voiceovers, etc.
- It has advanced options like pitch adjustment, adding pauses, emphasizing specific words, speed, etc. to generate the audio as you want.
- It is a simple yet powerful studio for creating, editing, and managing voiceovers and audio.
- It has free grammar and punctuation assistants for your text.
- Free trial allows you to render up to 10 minutes of voice from the text.
- It provides free royalty-free background music to add to videos or voiceovers.
Price: Murf has the following three pricing plans plus a free trial:
- Basic ($13/month):
Unlimited downloads, 24 hours of voice generation per year, Access to 60 voices & 10 languages, etc.
- Pro ($26/month):
96 hours of voice generation per year, 48 hours of transcription per year, Access to 120+ voices & 20 languages, etc.
- Enterprise ($166/month):
5+ users, Unlimited voice generation & transcription, Collaboration and Access Control, Service Agreement, etc.
Cons:
- Not available as a PC or mobile application
- Too limited in the free version
2. Play.ht
Supported system: It is a cloud-based platform, therefore can be used online on Windows, Mac, Android, and iPhone.
Basic intro: Play.ht is a web application that offers a huge library of AI voice options for converting text to speech. It generates realistic TTS audio using an online AI voice generator and the best synthetic voices from Google, Amazon, IBM & Microsoft. Play.ht can help you create professional voiceovers using AI voices from a collection of over 600 male and female voices available across 60+ different languages and accents. Along with converting text to audio, it can also help you enhance the audio with speech styles, pronunciations, and SSML tags.
Features:
- It uses synthetic voices from Google, Microsoft, IBM, and Amazon.
- Huge library of over 600 AI voices including male and female, and 60+ different languages and accents available.
- It supports exporting in MP3 and WAV format with full SSML support.
- Advanced settings for editing and enhancing the voice generated from text.
- Additional functionalities available like speech styles, multi-voice features, voice inflections, custom pronunciations, etc.
- It gives commercial & broadcast rights to use the generated speech files for commercial and personal use with full authority.
Price: Play.ht has the following four pricing plans plus a free trial:
- Personal ($14.25/month):
For personal use such as learning, proofreading, school projects, etc.
- Professional ($29.25/month):
For content creators, bloggers, and freelancers with commercial intent.
- Growth ($74.25/month):
For teams and small companies looking to grow with audio.
- Business ($149.25/month):
For companies and agencies looking to create audio at scale.
Cons:
- Can be a little advanced and difficult for beginners
- Voices other than English can be inconsistent
3. Notevibes
Supported systems: It is a cloud-based platform, therefore can be used online on Windows, Mac, Android, and iPhone.
Basic Intro: Notevibes is online text-to-speech software that can instantly convert your text into natural-sounding speech with AI. It offers over 221 high-quality voices and 25 languages from the most popular providers: Google, Amazon, Microsoft, and IBM to choose from. Notevibes can also convert text to audio and create videos with natural-sounding voices. Using it, you can save both your time and money without hiring professional voiceover artists.
Features:
- It generates realistic and natural human-like voices
- Large library of over 221 voices and 25 different languages
- Powerful editor to add pauses in one click, change speed, pitch, etc.
- Ability to control volume and emphasis on specific words.
- It grants you intellectual rights to freely use or sell voices.
- Backups are available for 14 days, so your work is safe.
- Advanced editor and high fidelity speech synthesys
Price: Notevibes has altogether 3 pricing plans plus a free version:
- Personal Pack ($9/month):
For personal use, private learning, and occasional or general purposes
- Commercial Pack ($90/month):
For Commercial use: Youtube, broadcasts, TV, IVR voiceover, and other businesses
- Corporate Pack ($4000/year):
For corporate or large-scale users with additional specific features
Cons:
- Not available as a PC or mobile application
- Too large gap between pricing plans
4. Lovo
Supported systems: It is a cloud-based platform, therefore can be used online on Windows, Mac, Android, and iPhone.
Basic intro: Lovo.ai is a web-based text to speech software that helps you create perfect voiceovers for audio ads, games, animations, e-learning, etc. It is a next-generation AI voiceover & text to speech converting platform that uses AI and the latest neural network models to generate human-like voices. Lovo offers a unique collection of 180+ voice skins in 33 different languages to choose from, plus, new voices are added on a monthly basis. Its advanced text-to-speech technology provides you the authentic voices that sound very realistic. And Lovo.ai also has the feature of Custom Voice Cloning which lets you create your own customized voice skins.
Features:
- Unique voice collection of 180+ voice skins in 33 different languages, each with unique traits to perfectly fit any content.
- It provides authentic and realistic voices with human emotions.
- Voice cloning technology that requires just 15 minutes of any voice to create the customized voice skins.
- Growing library of voices where new voices are added monthly.
- Voiceover API Integration is also available for the developers to use in their products.
- Well-optimized studio with a smooth interface for easy use.
Price: Lovo Studio offers two pricing plans and one free plan:
- Personal ($17.49/month):
Unlimited access to all voices, the Ability to add BGM and Commercial Rights, Up to 30 downloads per month
- Freelancer ($49.99/month):
Every feature in the Personal plan, Upto 100 downloads/month
Lovo also offers three different API Pricing plans, plus a free trial for 2 weeks without any credit card information:
- Base subscription: $45 per month per 1000 calls
- Overage: $0.04per overage call
- Enterprise license
Cons:
- Not available as a PC or mobile application
- Limits on the number of characters and downloads in paid plans
5. NaturalReader
Supported systems: Supports Windows, iPhone, Android, and online (also available as a chrome extension)
Basic intro: NaturalReader is a powerful application that can convert any text or document to audio anytime anywhere. It is one of the best and most popular text-to-speech software available today that can generate high-quality natural-sounding voices. One of its unique features is OCR Technology which reads aloud text from scanned documents or images for you. It can also be used to create audio from the text for commercial purposes with full rights. You can use NaturalReader online, through software, or with the help of its chrome extension.
Features:
- It offers 100+ natural-sounding voices available in 16 different languages.
- Its WebReader allows you to listen to the contents of any website.
- Specific features available for commercial purposes.
- OCR function available that can also read or convert the scanned documents or images into audios.
- With its pronunciation editor, you can manually modify the pronunciation of certain words.
- Specifically designed as a reading aid to help dyslexic readers.
Price: NaturalReader has three simple pricing plans including the free plan:
- Free ($0/month):
20 minutes per day with premium voices, Unlimited use with free voices, Pronunciation editor
- Premium ($9.99/month):
Unlimited use with premium voices, OCR functionality, MP3 conversion, Chrome extension with unlimited premium voices
- Plus ($19/month):
100+ Premium and Plus voices, Chrome extension with 100+ Premium and Plus voices, all the previous features
Cons:
- Free app requires Internet connectivity to access the voices.
- Not available as downloadable software for Mac devices
6. Amazon Polly
Supported systems: It is a cloud-based platform, therefore can be used online on Windows, Mac, Android, and iPhone.
Basic intro: Amazon Polly is a cloud-based service by Amazon that turns text into life-like speech, allowing you to create applications that talk, and build entirely new categories of speech-enabled products. Amazon Polly uses deep learning technologies and AI technology to synthesize realistic human speech in dozens of voices across many different languages. It is really a revolutionary TTS service that offers Neural Text-to-Speech voices in addition to Standard TTS voices that deliver advanced improvements in speech quality through a new machine learning approach. And, one of the best things is that Amazon Polly Brand Voice can create a custom voice for exclusive use.
Features:
- It provides one of the most realistic and natural-sounding voices.
- A large number of options available for voices and languages.
- Supports API integration for applications or any products.
- It can create a custom voice for the exclusive use of your organization.
- Ability to stream audio in real-time or store & redistribute speech.
- Customisation & control options available for speech output.
- It offers a free tier as well as pay-as-you-go pricing.
Price: Amazon Polly offers two different plans for its service:
- AWS Free Tier: Limited but free 5 million characters per month for 12 months
- Pay-as-you-go plan: Depends on your usage but low cost per character converted and unlimited replays
Cons:
- Not available as a desktop or mobile application
- Beginners might have a hard time using it.
- Their pay-as-you-go pricing plan can be a little difficult to understand
7. Voice Dream Reader
Supported systems: Supports Mac and iPhone (also available as a Safari extension)
Basic intro: Voice Dream Reader is a text-to-speech software specifically designed for Mac and devices running iOS. It is one of the best text-to-speech software for Mac and iOS devices that provides over 100 AI voices in about 20 different languages. It not only helps you convert text to audio, but it also reads the content from any Microsoft documents, Webpage, PDFs, etc. for you. Voice Dream Reader is meticulously designed for everyone including people with blindness, dyslexia, low vision, autism, etc. It has tons of features embedded inside it like synchronized highlighting, OCR recognition, library management, visual and audio controls, etc. Plus, it has some really special features for Mac and iOS devices like Safari extension, iCloud sync, etc. which makes it one of the best choices for text-to-speech conversion.
Features:
- It offers a huge library of over 100 AI voices from Ivona, Acapela, NeoSpeech, etc, across 20 different languages.
- It can read aloud content from any documents, and web pages with different reading modes.
- Enhanced audio and visual controls available.
- Specific features like Safari Extension, and iCloud Sync for Mac and iOS devices.
- Additional functionalities like OCR, Synchronized highlighting, Library management, Annotation, etc.
- Designed with people having blindness, dyslexia, autism, etc. in mind.
- It doesn’t require an internet connection.
- Different reputed awards and recognitions received by Voice Dream Reader.
Price: Voice Dream Reader is free to download from Mac App Store while costs $19.99 to download from iOS App Store. Its free version is pretty sufficient and is feature-rich, however, this software also offers in-app purchases on both platforms.
Cons:
- Only available for Mac and iOS devices.
- Offers in-app purchases to remove limitations.
8. Kukarella
Supported systems: It is a cloud-based platform, therefore can be used online on Windows, Mac, Android, and iPhone.
Basic intro: Kukarella is an online Text-to-Speech software powered by Google, Amazon, Microsoft, and IBM that lets you easily create beautiful voiceovers with realistic AI voices. It can be used both as a Text-to-voice software and an Audio-to-text software. With Kukarella, you can also narrate books or scripts with multiple voices which is a beta feature. It offers one of the largest libraries of around 670 voices across 100+ different languages and accents which is truly remarkable. Furthermore, it has a well-designed studio to work on and also includes commercial rights in its plan.
Features:
- It offers one of the largest collections of around 670 voices across 100+ different languages and accents.
- It provides the best AI neural voices with commercial rights included.
- Also works as an Audio Transcription software to transcribe audio, recordings, and videos.
- It includes the Table Reads feature to narrate books or scripts using multiple voices.
- Referral program for bonuses and free credits to use.
- Well-optimized studio with additional effects to use in the output audio like pitch, pause, speed, emphasis, etc.
Price: Kukarella has three different paid pricing plans available with which they also provide a 15-day money-back guarantee to refund your purchase if you’re not satisfied with their service:
- Free ($0/month): For testing purposes
- Pro ($15/month): For creative people
- Premium ($35/month): For film professionals and experts
- Studio ($99/month): For business and large-scale use
Aside from these four pricing plans, Kukarella also offers a Top Ups option to let you purchase additional credits like extra characters for text-to-speech and extra minutes for audio transcription.
Cons:
- Only available as an online application.
- Doesn’t let you clone your own voice.
9. Speechelo
Supported systems: Supports all devices like Windows, Mac, Linux, iPhone, and Android, and is available online too.
Basic intro: Speechelo is a new cloud-based text-to-speech software that instantly transforms any text into a 100% human-sounding voiceover. Despite being a new product in this huge marketplace, it has gained popularity very quickly due to its awesome text-to-speech conversion ability. All of their voices are said to have the necessary elements and expressions that make a voice sound real. It also claims that 98% of the people hearing a voiceover generated with Speechelo can’t tell if it is a real human voice or an AI-generated voice. However, the best thing about Speechelo is that it is available for all types of devices out there, so it has got you covered everywhere.
Features:
- It offers more than 50 natural-sounding voices in 24 different languages.
- Functionality to add inflections in the voice.
- Different voice styles and tones available.
- Has settings for adjusting the speed and pitch of the voice.
- Additional options to manually add breathing sounds and pauses, or its AI engine can automatically add them on its own.
- Compatible with all major operating systems, so it won’t matter whatever device you have.
Price: Speechelo has only one pricing plan i.e. Founders Special Offer which is basically a one-time payment for only $47 without any recurring monthly fees. On top of that, they provide a “Risk-Free 60 Days Money Back Guarantee” with which you can try Speechelo without any worries. In this one-time subscription plan, you’ll get lifetime updates and support.
Cons:
- No free version or free trial available to try
- Speechelo website might look a bit fishy or scammy
10. Nuance Dragon
Supported systems: Supports Windows, Android & iOS (previously supported Mac too but discontinued)
Basic intro: Nuance Dragon is an AI-based Text-to-Speech technology that leverages neural network techniques to deliver a human-like, engaging and personalized audio. It creates natural-sounding speech in 119 voice options across 53 different languages. With Nuance vocalizer, you can also establish a unique voice for your brand without having to hire, brief, or record voice talent. One of the best things about Nuance Dragon is that they pursue more natural and expressive speech synthesys to provide life-life audio output. And good news for the developers is that they also provide TTS API to use in the applications or any solutions.
Features:
- It supports HIPAA requirements that are important for security and confidentiality.
- It offers a big library of over 119 voice options and 53 different languages.
- AI-optimized text processing and enhanced expressivity.
- It provides text-to-speech API to use in applications and products.
- It can create a customized or unique voice for the brand.
- Has audio controls for managing or editing the generated audio.
- Dictation and transcribing features available.
Price: Nuance Dragon has 3 plans for individual and 3 plans for enterprise productivity, however, there is not a fixed price for enterprise solutions as it may depend:
- Dragon Professional Individual: Starting at $500
- Dragon Legal Individual: Starting at $500
- Dragon Anywhere Mobile: $15/month for both Android and iOS
They also have a free demo and a 30-day money-back guarantee program on every plan.
Cons:
- Not available for Mac devices
- Not much beginner-friendly to use
11. Synthesys
Supported systems: It is a cloud-based platform, therefore can be used online on Windows, Mac, Android, and iPhone.
Basic Intro: Synthesys is a popular web application that can help you produce professional AI voiceovers or even AI videos in just a few clicks. It generates clear and natural voiceovers through artificial intelligence that can help you build trust and connection between you and your customers or clients. This unique text-to-speech converter eliminates the robotic and strange sounds generated by AI to the minimum. Furthermore, this online platform can create beautiful AI videos for you with just text which you can share on social media or wherever you like. It also allows you to choose voices from different gender, style, accent, speed, etc. for the speech generated from text.
Features:
- It is a web application, so you can work on your projects from any device anywhere.
- Large library of professional AI voices: 35 female and 30 male to choose from.
- Can be used as both AI Voice Generator or AI Video Generator
- It allows you to use or sell the generated voices or videos with full rights.
- User-friendly interface and easy to use.
- Advanced options available to change speed, gender, style, and accent of the voice.
Price: Synthesys has a total of three subscription plans with a 3-day moneyback guarantee. Unfortunately, it doesn’t have a free plan or a free trial version.
- Audio Synthesys plan ($29/month):
Access to 20 real human voices, 66 languages & 254 general voices, and Unlimited voice-overs downloads
- Human Studio Synthesys plan ($39/month):
Access to 73 Humatars, Full video customization, Unlimited downloads, etc.
- Audio and Human Studio Synthesys plan ($59/month):
Unlimited videos and voices downloads, and all previous features included
Cons:
- Limited choices for humatars and voices
- No free trial version available
12. Linguatec Voice Reader
Supported systems: Supports only Windows operating system (all versions)
Basic intro: Linguatec Voice Reader is a downloadable text to speech software for Windows users. It offers a big collection of 67 natural-sounding voices in 45 different languages. Aside from converting text to speech, it can also convert Word documents, emails, ebooks, and pdfs to audio for listening to them on any device. Linguatec Voice Reader Home is specifically designed for private or personal use to listen to any content but it has other specific products like Linguatec Voice Reader Studio for professional purposes and Voice Reader Server for large-scale conversion of text to speech. And, it also has a Voice Reader Web which can automatically convert your website to audio. Therefore, it has got you covered in every aspect.
Features:
- It offers 67 natural-sounding voices in 45 different languages.
- It allows you to convert any word documents, emails, ebooks, or pdfs to audio.
- Text to speech software designed solely for personal usage.
- Intuitive editor to change the speed, volume, and pitch of the audio.
- Installable on Windows, so can be directly accessed without a browser.
- Specific products available for specific purposes like personal use, professional use, large scale use, etc.
Price: Linguatec Voice Reader has a single one-time pricing plan for its every product:
- Voice Reader Home: €49 (approximately $51)
- Voice Reader Studio: €499 (approximately $527)
- Voice Reader Web: €299 (approximately $316)
- Voice Reader Server: Depends on the company’s needs
Cons:
- Only available for Windows devices
- Interface is boring and old-fashioned.
- Only one voice and language per license.
13. Resemble AI
Supported systems: Supports Android and iOS devices, and can also be used online
Basic intro: Resemble.ai is professional text-to-speech software that generates realistic AI voices from the text. It can create your own AI voice by recording and cloning your voice data. And, it also comes with API functionality to embed TTS into any of your services or products. With its Resemble fill, it can blend human and synthetic voices for a seamless experience, and it even has a language dubber that can instantly dub your native voice into other languages. Furthermore, one of its best features is its ability to control the emotions of every word in a sentence which really provides a realistic experience.
Features:
- Voice cloning function to clone your own voice with AI.
- Flexible APIs ready for integration in applications, products, or any services.
- Resemble Fill function to blend human and synthetic voices for a seamless experience.
- It can instantly dub your native voice into other languages.
- Optimized interface and additional audio control settings.
- It can be accessed from mobile devices too with installable apps.
Price: Resemble AI has three pricing plans according to your need and a free trial:
- Entry ($30/month): For voices that are recorded right on our platform
- Build (Depends on your needs): For your own data, any voice, no script required
- Enterprise (Depends on your needs): For massive scale and custom deployment needs
Cons:
- Limited options for voices and languages
- Not available as a Windows or Mac program
14. WellSaid
Supported systems: It is a cloud-based platform, therefore can be used online on Windows, Mac, Android, and iPhone.
Basic intro: WellSaid is an AI-powered text-to-speech software that converts text to voice in real-time and it can help you create quality voiceovers for all your digital content easily. It is one of the best voiceover generators that is not only designed for individual use, but also for small teams and large companies to work on together. With WellSaid, you can also customize the output voices, create your own unique voice or even deploy its text-to-speech functionality through API. However, it is kinda limited on the number of voices and languages.
Features:
- Has a well-optimized studio to convert text to audio.
- WellSaid API available to deploy TTS functionality in apps and products.
- It allows you to build your own voices to meet your brand guidelines.
- Suitable for individuals, teams of any size, and even large enterprises.
- Around 50 different voice avatars to choose from.
- High quality and realistic voices.
- Live chat support and rights for commercial usage.
Price: WellSaid has altogether four pricing plans and a free trial:
- Maker ($49/month):
250 downloads, 5 projects, 4 voice avatars
- Creative ($99/month):
750 downloads, 50 projects, 50 voice avatars
- Producer ($199/month):
2500 downloads, Unlimited projects, live chat support
- Team (Not fixed):
Team members, Team projects, Volume licensing, Account manager
Cons:
- Limited number of voice avatars and languages to choose from.
- Lack of features to adjust and edit the audio.
15. TTSReader
Supported systems: Supports iOS and Android devices, and is also available online and as a chrome extension
Basic intro: TTSReader is one of the simplest and best free text-to-speech readers that instantly reads aloud text, pdfs & ebooks with natural-sounding voices. It is a lightweight online application, so it works out of the box without the need to download and log in. Despite being free software, it has some really great features in it. There are various options of natural sounding voices in different languages and different accents, and it also reads aloud documents, and ebooks for you by uploading them. However, it does not allow you to directly download the audio, but you still have the option to record audio to save it in webm format.
Features:
- Simple and easy-to-use interface
- Completely free for personal or general use.
- It allows you to manually add pauses and alter the speed of the voice.
- Has many options for voices including male and female, accents, and languages.
- It reads aloud ebooks, pdfs, or any text files.
- Available for mobile devices for instant access.
- Automatically remembers the preferences of the previous session and also has options for screen recording.
Price: TTSReader is completely free without any pricing plans at all. However, they do have a premium chrome extension and a separate commercial version available for purchase.
Cons:
- Advanced features for audio are not available.
- May not be the best option for commercial purposes
16. Descript
Supported systems: It is a cloud-based platform, therefore can be used online on Windows, Mac, Android, and iPhone.
Basic intro: Descript is an all-in-one video editing, screen recording, transcription, and podcasting tool you can use online. Its podcasting tool can be a great example of Text-to-Speech software that creates quality podcasts from just text. Descript is that one tool that takes podcasting or TTS to whole another level. It uses AI technology that clones your voice and then allows you to convert any text to speech in your own AI-tailored voice. You can then directly edit the audio in real-time by editing texts. But what really separates it from other software are its unique features for adjusting texts, editing audio, adding effects, etc.
Features:
- Not just a TTS software, but also a video editing, recording, and transcription tool.
- Timeline editor for advanced level editing along with cloud media library
- Different audio effects like crossfading, automatic leveling, loudness normalization, etc.
- It can clone your voice with AI to convert text to speech.
- Free podcasting trial available which includes all the features.
- Has advanced features useful for professional podcasters.
- It supports integrations with API for applications or any services.
Price: Descript has a total of three pricing plans and a free trial version:
- Creator: $12/month
- Pro: $24/month
- Enterprise: (Not fixed)
Cons:
- Not originally a TTS software, but can be used as a one.
- Separate plans for podcasting are not available.
17. Wideo
Supported systems: It is a cloud-based platform, therefore can be used online on Windows, Mac, Android, and iPhone.
Basic intro: Wideo is originally an online video maker that helps you create promo videos, explainer videos, demo videos, presentations, etc. while its Text to Speech software is another added functionality. But still, Wideo is one of the best free TTS software that lets you easily convert text to audio in a fast and straightforward manner. It also allows you to directly add these voices in Wideo’s video maker. Wideo free Text to Speech software integrates with Google Text-to-Speech API, so the quality of voices is as good as other paid software. One of the best things about Wideo TTS software is that it is simple and easy to use.
Features:
- Free and easy-to-use Text to Speech converter.
- Professional video maker along with TTS functionality.
- A large list of voices and languages to choose from.
- Speed of the generated audio adjustable.
- It allows you to download the audio as an mp3 file for free.
Price: Wideo Text-to-Speech Software is basically free with no specific pricing plans. However, its limit in the number of characters can be removed by purchasing any two of their video maker plans:
- PRO: $39/month
- PRO+: $79/month
Cons:
- Advanced text-to-speech features not available
- Voices sound a bit robotic or unreal
- No separate pricing plans available, so will have to purchase the video maker plans to remove limitations
18. Balabolka
Supported systems: Supports all versions of Windows
Basic intro: Balabolka is a Windows text-to-speech software that has been in this field for a long time. It is old and feels outdated, but still is one of the most capable and useful free text to speech converters. Balabolka packs almost all the necessary features required as a TTS program in its lightweight package of just a few megabytes. This program uses various versions of Microsoft Speech API and allows to alter a voice’s parameters, including rate and pitch. Balabolka is also available as a portable version, and as a command-line utility which is a great thing.
Features:
- Lightweight, simple, and completely free to use.
- Can read text from clipboard, and documents, and save the on-screen text as an audio file.
- It uses Microsoft’s Speech API and also includes a spelling checker.
- It uses the pre-installed computer voices of your system.
- Also supports many different text file formats.
- Has options to alter a voice’s parameters, speed, pitch, etc.
- Available for download as a portable and command-line program too.
Price: Balabolka is absolutely free to use without any pricing plans and hidden charges.
Cons:
- Not suitable for large-scale and commercial purposes.
- Only available for Windows operating systems.
- Limited options for voices and languages.
19. iSpeech
Supported systems: Supports iOS, Android, and Online (also available as a chrome extension)
Basic intro: iSpeech is a straightforward and easy-to-use online text-to-speech converter that is also available for mobile devices. Its TTS functionality is powered by Speechelo but makes the whole process a lot simpler and easier. It supports various languages for text-to-speech conversion and also provides the options to change the speed of audio and select gender. And, it also supports Embedded and Hosted TTS services along with API integrations to use TTS in any program or service. Therefore, it acts as a simple yet powerful and professional text-to-speech software to create lifelike voiceovers.
Features:
- It supports over 30 different languages.
- Available online as well as for mobile devices (iOS and Android).
- Has options to select gender and choose audio speed.
- Simple and easy-to-use interface.
- Cloud and hosted services along with API integrations available
- Completely free to convert text to speech online and preview
Price: iSpeech is absolutely free to use online, but it has various pricing plans available for additional features like downloading audio, API integration, etc. They have different options like Pay Per Use, Pay Per Install, Creative Pricing, One-time fees, etc. so it actually depends on your needs.
Cons:
- Very limited in voice styles, accents, and tones.
- Not suitable for beginners and general users.
20. TextAloud
Supported systems: Supports all versions of Windows
Basic intro: TextAloud is a Windows text-to-speech software by NextUp technologies that help you easily generate audio for the given text. It is designed to save your time allowing you to be more productive while converting text to speech. It also allows one to convert texts from web pages, documents, and PDFs into natural-sounding speech. And, it includes assistive technology for people with Dyslexia to improve reading and comprehension. TextAloud by NextUp technologies also offers the natural-sounding Text-to-Speech voices from companies like Acapela, Ivona, Cerence, etc. And with many other features, it can be considered one of the best TTS software for your Windows device.
Features:
- Lightweight software with straightforward interface.
- It allows the conversion of texts on web pages, documents, and PDFs into speech.
- Assistive technology for people with Dyslexia to improve reading and comprehension.
- It uses the pre-installed voices on the system and also offers natural-sounding Text to Speech voices from companies like Acapela, Ivona, Cerence, etc.
- It uses Microsoft’s Speech API and also includes a spelling checker.
- Includes a lot of features and options related to TTS.
Price: TextAloud 4 offers a one-time payment for a Single User License at $34.95 and also has a free trial version to test this software. However, it also offers some additional features for extra fees.
Cons:
- Only available for Windows devices
- Not the best option for commercial purposes
- User interface can seem a little outdated.
Conclusion
Here, we presented you with a list of Top 20 Best Text-to-Speech Software with all their features and other information you need to know. While all of them are best in their own aspects, you should choose the one that suits your needs. For example, you can go for Balabolka or similar free softwares for basic personal use, or if you want something advanced like AI voice cloning, then you can use Murf, Descript, etc. So it all depends on what you intend to do with a TTS software.
However, we have made it easier for you to choose the best one among these many great softwares by breaking them down in terms of their main features, pricing, compatibility, cons, etc. So decide on the software that is best for you and have a happy time creating amazing voiceovers.
How To Make A Video Longer
These days when you head on to social media, you can easily find 4-5 seconds video clips on the internet. However, many social media platforms like YouTube, Instagram, and other videos sharing platforms require you to make your video longer to meet the site’s minimum length requirements. So, for example, although Instagram’s minimum length is 3 seconds, you might want to find ways to engage your audience longer.
This article will describe the best ways to make a video longer. We’ll also offer a bonus tip on how you can edit your video to make it look better and attract more audience. On that note, let’s take a look.
6 Best Methods to Make a Video Longer
There are many methods out there to make your video longer. This section will touch on the six best methods to make a video longer.
Loop the Video

One of the best ways to make your video longer for most social media platforms is to loop the video. When you replay the video several times in a single row, it helps to multiply its length. An example is taking a 2-second video and looping it 4x. This automatically makes it into an 8-second video clip. With looping, you can simply replay the action of the clip rather than altering it in any way.
Many video editing software today allows you to loop your video for free. You have to upload the video and choose how many times you would like to loop it, and the software will get to work.
Slow Down the Video Speed

We would all agree that slow-motion makes everything seem longer automatically. You can utilize the same technique when you want to make a video longer. When you slow down a video clip, every second lasts longer. Using the slow-motion effect on a 3-second video will make the video 6 or even 9 seconds longer.
Add an Intro and Outro

Intro and outro are scenes you add before and after the video; these scenes are popular in YouTube videos. More generally, an intro is like a trailer. It shows the audience what the video is about, and the outro scene is usually used to show more information about the video maker. Adding an intro and outro to your video can add 2-4 seconds to your video clips.
It’s quite easy to add an intro and outro to any video. You can create them separately and then merge them with your video. The intro must be something relevant to the video clip; an example is adding a fast photo slideshow to the beginning of your video or a black frame. Relevant intro and outro scenes will make your video longer and maybe more engaging.
Add Images to the Video
This is another trick that most bloggers use to make their videos longer. It is an old trick in the book and makes your video significantly longer, depending on the number of videos you’re adding. A single picture can add a second or two to your video. You can simply use a video editor to merge the video clip and pictures into one seamless file.
Boomerang Your Video

If you have plans to upload your media to Instagram, then a top feature you can use to make your video longer is the boomerang feature. Instagram introduced the Boomerang feature to play short video clips forward and then repeat their reverse. So by using the Boomerang feature, you don’t only add a memory effect to your video, but you also make your video longer.
Alternatively, you can manually append your video clip to a reversed version; this option allows you to make a boomerang from an existing clip. Apart from Instagram, you can utilize many other editing tools to create a boomerang from an existing video.
Add More Content to Your Video Clip

Another step you can take is to add more materials to your video. This doesn’t necessarily mean you have to get your camera out and start shooting more scenes to add to your video. Instead, you can simply access online media libraries and get amazing materials from there that are relevant to your video clip.
Today, most professional video editors offer you access to royalty-free photos and music material. You can simply browse through their collections and pick materials relevant to your video. For example, you could add a soundtrack and videos or GIFs that make your videos engaging. Adding extra content to your video clip can make it longer by 10 seconds.
Bonus Tips: How to Edit Video Easily on a Computer
Social media platforms offer you basic video editing features that you can use to optimize your video. However, these features are limited in what they can provide you with. If you want to have more control over the editing of your video clip and make it look even more professional, you should try Wondershare Filmora. This video editing tool is powerful and provides you with more editing features to ensure you get the result you want.
Filmora offers users over 300 effects like motion elements, overlays, titles, music sounds, and many more features to make your video more engaging and attractive. Using this app is relatively easy as well, and it offers users the option of changing the file format of their video if the social media platform does not support the original format.
If you would like to edit your video to give it a more engaging and professional look, follow the simple steps below.
Step 1: Import Video to Wondershare Filmora
First, you need to download the app on your device. After that, you can download it from the official website. Luckily, Wondershare Filmora supports Windows and Mac OS. Once you download the file, install and launch the app to get started.
On the menu, click on create a new project to begin. Next, click on the import button, and from the dropdown menu, choose ‘import media file.’ Alternatively, you can simply drag the video directly to the media library of this video editor. In addition, Filmora allows you to preview your video as you add different features to optimize the video.

If your video is shaky, you can use the stabilization feature to make it more stable. Simply right-click on the video in the preview window and select the option. Once you are sure, the video is ok, drag and drop it into the timeline to start editing your video.
Step 2: Cut, Slip, Rotate, or Color-Tune Your Video

You can use many features to shape your video quickly on Wondershare Filmora. For example, you can use the scissors tool to cut or split your video. You can also use the transform tool to rotate and flip your video if you would prefer. In addition, Filmora allows you to add some advanced color tuning to your video with the color feature. This automatically makes your video even more beautiful.
Step 3: Add Filters and Effects to Your Video

Additionally, Wondershare Filmora allows you to choose different transitions, graphics, tiles, texts, sound effects, titles, filters, overlays, and elements for your videos. With this video editing tool, you can get the exact look and sound you’re looking to achieve. In addition, there are different effect tabs above the timeline that directs you to the right feature you would like to include in your video.
You can just drag these effects and drop them on the timeline to apply to your video. Filmora has over 100 in-built filters and royalty-free music you can implement on your video. If you’re not sure which feature you’re looking for. Simply experiment and undo the effect till you find exactly what you’re looking for.
Step 4: Save and Share Edited Video

Once you’re satisfied with your video clip, you can now proceed to save it. You can choose to save the video to your local folder or a storage device you’d prefer. Wondershare Filmora allows you to save in the original format or change the format to your preferred option. Filmora also allows you to change your video’s resolution and bit rate to your preference. Alternatively, you can upload your video to video-sharing platforms like Instagram, Vimeo, YouTube, etc. You can also burn the video into a DVD collection if that’s what you’re looking for.
Final Thoughts
Social media platforms are great for gaining recognition and promoting your brand. However, there are times when you don’t meet the right video length, and you would like to make your video longer. With the six methods explained above, you can make your video as long as you want and also make your video more engaging. Additionally, you can use Wondershare Filmora to make your video more professional-looking. It offers you hundreds of effects and filters you can use to optimize your video.
Meta Description: If your video is short and you need to make it longer, this article gives you six methods to make a video longer and optimize them.
One of the best ways to make your video longer for most social media platforms is to loop the video. When you replay the video several times in a single row, it helps to multiply its length. An example is taking a 2-second video and looping it 4x. This automatically makes it into an 8-second video clip. With looping, you can simply replay the action of the clip rather than altering it in any way.
Many video editing software today allows you to loop your video for free. You have to upload the video and choose how many times you would like to loop it, and the software will get to work.
Slow Down the Video Speed
We would all agree that slow-motion makes everything seem longer automatically. You can utilize the same technique when you want to make a video longer. When you slow down a video clip, every second lasts longer. Using the slow-motion effect on a 3-second video will make the video 6 or even 9 seconds longer.
Add an Intro and Outro
Intro and outro are scenes you add before and after the video; these scenes are popular in YouTube videos. More generally, an intro is like a trailer. It shows the audience what the video is about, and the outro scene is usually used to show more information about the video maker. Adding an intro and outro to your video can add 2-4 seconds to your video clips.
It’s quite easy to add an intro and outro to any video. You can create them separately and then merge them with your video. The intro must be something relevant to the video clip; an example is adding a fast photo slideshow to the beginning of your video or a black frame. Relevant intro and outro scenes will make your video longer and maybe more engaging.
Add Images to the Video
This is another trick that most bloggers use to make their videos longer. It is an old trick in the book and makes your video significantly longer, depending on the number of videos you’re adding. A single picture can add a second or two to your video. You can simply use a video editor to merge the video clip and pictures into one seamless file.
Boomerang Your Video
If you have plans to upload your media to Instagram, then a top feature you can use to make your video longer is the boomerang feature. Instagram introduced the Boomerang feature to play short video clips forward and then repeat their reverse. So by using the Boomerang feature, you don’t only add a memory effect to your video, but you also make your video longer.
Alternatively, you can manually append your video clip to a reversed version; this option allows you to make a boomerang from an existing clip. Apart from Instagram, you can utilize many other editing tools to create a boomerang from an existing video.
Add More Content to Your Video Clip
Another step you can take is to add more materials to your video. This doesn’t necessarily mean you have to get your camera out and start shooting more scenes to add to your video. Instead, you can simply access online media libraries and get amazing materials from there that are relevant to your video clip.
Today, most professional video editors offer you access to royalty-free photos and music material. You can simply browse through their collections and pick materials relevant to your video. For example, you could add a soundtrack and videos or GIFs that make your videos engaging. Adding extra content to your video clip can make it longer by 10 seconds.
Bonus Tips: How to Edit Video Easily on a Computer
Social media platforms offer you basic video editing features that you can use to optimize your video. However, these features are limited in what they can provide you with. If you want to have more control over the editing of your video clip and make it look even more professional, you should try Wondershare Filmora. This video editing tool is powerful and provides you with more editing features to ensure you get the result you want.
Filmora offers users over 300 effects like motion elements, overlays, titles, music sounds, and many more features to make your video more engaging and attractive. Using this app is relatively easy as well, and it offers users the option of changing the file format of their video if the social media platform does not support the original format.
If you would like to edit your video to give it a more engaging and professional look, follow the simple steps below.
Step 1: Import Video to Wondershare Filmora
First, you need to download the app on your device. After that, you can download it from the official website. Luckily, Wondershare Filmora supports Windows and Mac OS. Once you download the file, install and launch the app to get started.
On the menu, click on create a new project to begin. Next, click on the import button, and from the dropdown menu, choose ‘import media file.’ Alternatively, you can simply drag the video directly to the media library of this video editor. In addition, Filmora allows you to preview your video as you add different features to optimize the video.
If your video is shaky, you can use the stabilization feature to make it more stable. Simply right-click on the video in the preview window and select the option. Once you are sure, the video is ok, drag and drop it into the timeline to start editing your video.
Step 2: Cut, Slip, Rotate, or Color-Tune Your Video
You can use many features to shape your video quickly on Wondershare Filmora. For example, you can use the scissors tool to cut or split your video. You can also use the transform tool to rotate and flip your video if you would prefer. In addition, Filmora allows you to add some advanced color tuning to your video with the color feature. This automatically makes your video even more beautiful.
Step 3: Add Filters and Effects to Your Video
Additionally, Wondershare Filmora allows you to choose different transitions, graphics, tiles, texts, sound effects, titles, filters, overlays, and elements for your videos. With this video editing tool, you can get the exact look and sound you’re looking to achieve. In addition, there are different effect tabs above the timeline that directs you to the right feature you would like to include in your video.
You can just drag these effects and drop them on the timeline to apply to your video. Filmora has over 100 in-built filters and royalty-free music you can implement on your video. If you’re not sure which feature you’re looking for. Simply experiment and undo the effect till you find exactly what you’re looking for.
Step 4: Save and Share Edited Video
Once you’re satisfied with your video clip, you can now proceed to save it. You can choose to save the video to your local folder or a storage device you’d prefer. Wondershare Filmora allows you to save in the original format or change the format to your preferred option. Filmora also allows you to change your video’s resolution and bit rate to your preference. Alternatively, you can upload your video to video-sharing platforms like Instagram, Vimeo, YouTube, etc. You can also burn the video into a DVD collection if that’s what you’re looking for.
Final Thoughts
Social media platforms are great for gaining recognition and promoting your brand. However, there are times when you don’t meet the right video length, and you would like to make your video longer. With the six methods explained above, you can make your video as long as you want and also make your video more engaging. Additionally, you can use Wondershare Filmora to make your video more professional-looking. It offers you hundreds of effects and filters you can use to optimize your video.
Meta Description: If your video is short and you need to make it longer, this article gives you six methods to make a video longer and optimize them.
Best 22 Video Editing Tips to Know
Whether your video is short or long, you may want to make it better and appealing. Video editing involves the manipulation of your videos through which the desired transformation is achieved and you can flaunt every move of your video in a more preferable way. Video editing involves cutting the video short, changing the speed, organizing the video in a seamless flow. In short, the better the cuts of your videos, the better your message/story is conveyed.
Part 1: Things to Learn Before Editing First Draft
You have shot your video and now you’re stuck on the post-processing of that video. Don’t worry! We got you covered through this article which will guide you through the different things which you must learn before editing the first draft of your video.
Start a video project
Your smartphone and digital camera can let you record multiple videos but what now? You head out to edit your first draft by choosing a suitable platform or software and then you can surely lay back and see the software doing wonders to your raw videos. By starting off with editing, you choose your video editing preferences and then you just let the video editing tools do the magic.
Get to know the video editing software workspace
Video editing software offer customizable workspaces for different editing tasks. The software workspace streamlines routine actions you take with clips, like editing clips, making DVD and Blu-ray menus, and sharing movies. By placing panels in the layout that best matches your working style, you can personalize your workspace. The additional panels adjust automatically to fit the window as you rearrange them. For various jobs, such as one for editing and one for preview, you can build and store multiple workspaces.
Understand the timeline
The timeline of your video is the backbone of your digital video editing process. It’s called a timeline because the various pieces of video will be lined up horizontally. In a video editing software, the timeline is where you arrange your video clips and plan out all the modifications you want to do. As you work, you will see every single one of your video and audio clips, effects, and transitions sorted chronologically from beginning to end. All the fundamentals of video editing, including reordering, trimming, and enhancing your footage, are available. To preview how your adjustments will turn out, you can also play your project at any point in the timeline.
Add clips to timeline
When you have grasped the idea behind a timeline, the next step you need to follow is to add clips into your timeline. Before adding clips to your timeline, it is suggested that you label each clip. Although it does seem like a lot of work, it will be easier to locate all of the clips later on if you’re working on a large project. after the footages are gathered and named, add important clips in the beginning of the timeline to begin establishing the video’s overall structure and order.
Editing tools
Besides basic cutting, trimming and cropping, video editing software offer multiple professional editing tools which enhance the outlook your videos and make them 10x better. For example, instead of cutting up a clip into a bunch of small clips and unwanted gaps, use the Ripple Edit tool keep your timeline clean. This means when a clip is trimmed, it causes a ripple effect throughout the rest of your timeline, shifting all other clips into a new timeline position.
Similarly, when working with lengthy timelines, the Razor tool is also really helpful because you can select the clip you wish to cut by dragging your razor over it. So, the Razor cut is the tool to use if you need to make a lot of cuts in your videos quickly.
Syncing audio and video
You already know how annoying it can be if audio and video don’t sync while you’re listening to a podcast or viewing a YouTube vlog. The video editing software offer helpful manual and auto sync tools. It can be though a bit of hard work for beginners, but the ‘Lights, Camera, Action’ approach works best in syncing your audio with your video. To sync audio, you need to record audio first and then through matching the wavelengths displayed on your timeline, you can sync the audio with your video.
Edit download talking head/interview footage
Now with professional video editing tools, you can make ‘talking head videos’ if you want to share your expertise as a YouTube vlogger or if you want to do employee training. Talking head films are a fantastic way to stimulate the mind and the heart while increasing learner retention in this digital age.
Additionally, with other video editing tools, you can edit your interview footages and for that, you don’t have to mess with timestamps, cutting or splicing videos, or creating transitions between clips, you just edit the transcript of the video and the video edits itself to match.
Video properties: Scale, position, opacity
Any screen recording, camera-based video, imported video clips, and text picture clips can have their visuals altered using video properties. In video editing software, multiple video properties are offered which include scaling, positioning, rotating, changing the opacity, changing level of reflection and shadow. Additionally, Video properties also include editing the video as a whole or just altering a clip from the video.
Types of cuts: Straight, J-Cut, L-Cut etc
The different types of cuts used in the video editing process is an effective way to make the transitions in your video pop. Basically, these cuts join two or more clips together via audio. Professional editors call these cuts as ‘split edits. The most common cuts are called J-Cut and L-Cut. They help to mix the content’s flow and keep the on-screen narrative in motion. In essence, these edits are necessary to make your scenes feel warm and more authentic.
Part 2: Practical Video Editing Tips
Choose right software
The push start of video editing for beginners is based on one common step: know your software or workspace. Selecting the appropriate software for editing your video is the first step in streamlining your video editing process. Although all software often includes the tools that you need to make ordinary video edits, you could favor one over the others based on its usefulness, digital interface, and features. Instead of just using the latest and trending video editing software available, the key is to choose what functions for you and your editing style.
Use a fast computer
Slow rendering hinders video editing process and other commands given to a computer. From a practical point of view, it is recommended that irrespective of the model of the computer or version of your software; your computer must be efficient to help you to access your files and software easily and to speed up your export time. With a slow computer, you will definitely feel stuck and the video editing complications will haunt you in your dreams.
Watch video editing tutorials
None of us is a pro until we’ve practiced something enough to know everything about it. Video editing requires both; technical knowledge as well as your creativity, so it is better not to do try things on your own. A little guidance can surely help you get through the basics of the video editing process. There are tons of helpful tutorials for making excellent videos on YouTube, vlogs, and educational websites. The majority of tutorials you’ll discover online are free, making the readily available at the tip of your fingers.
Get the project files
Most of the beginner video editors prefer to use the same project files as the tutorial instructors when they are following along. Your work will exactly resemble the demo’s sample, which will aid in your understanding of the steps. For precisely this reason, many tutorials let you download the project files. You can repeat a process with your own video files once you’ve mastered this technique.
Edit for a story
Remembering your creative objective to create a wonderful story or message through your edited video is one of the most crucial lessons you should learn from this article. It is critically important that you make your film visually appealing and dramatically engaging to effectively evoke the right emotions and to communicate your desired message. Instead of merely adding a huge amount of effects to wow your audience, use your practical and technical skills to do this.
Maintain an efficient workflow
You’ll need to be systematic and organized in addition to having an editing software if you want to become a more competent editor. Putting your projects and files in folders that you may use repeatedly is one method to streamline your process. Besides this, organizing your projects and files into an external hard drive or USB is recommended in case of losing access to your intricately designed projects.
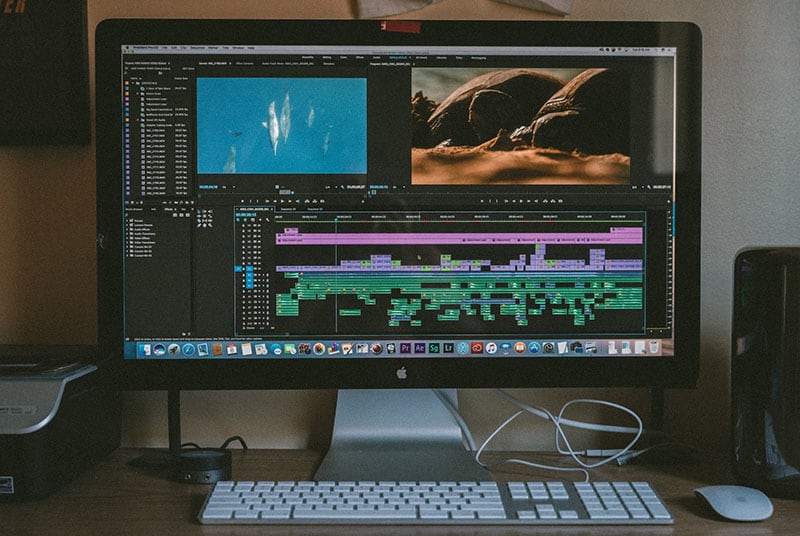
Utilize keyboard shortcuts
Keyboard shortcuts speed up the process of video editing and save you ample time. Different keyboard shortcuts are compatible with different video editing software; leaving a few which are mutual in every software. Don’t attempt to put all of these shortcuts into action at once. Pick a small number to begin with, and as they become instinctive, add more. You’ll progress more quickly if you use less mouse while editing your video.
Learn important terms
As a beginner, you may not want to feel a lump in the throat caused by the complicated dictionary of video editing software. There are some broad video editing terms that refer to videography as a whole as well as video editing terms specific to the process of editing footage. You must first learn what these terms means for example you may want to know what the terms like ‘aspect ratio, B-roll, bit rate, close up, compression, crop and compositing’ mean.
Color correct your clips
Do you own a rather boring video? Perhaps it’s a little too dull or the colors don’t stand out as much as they should? A crucial step is to modify the video’s color. This will assist in reducing the saturation and revive your video. Yet, there are some color correcting presets which can be easily accessed in different video editing apps.

Select good music
You ever saw an ad on YouTube or other social media platforms without an audio background. You may just want to skip it because the video, which may apparently be appealing, fails to strike you. Coordinating and complimenting your video with a music in the background is like cherry on top. It’s a huge plus to attract viewers’ attention. Though it is necessary that the music you choose must be relevant to your video file and should target the majority. So, choose good music to adorn your videos and trigger emotions in your target audience.
Add text and graphics
Some people are attracted more towards textual descriptions rather visual representation of content. It is crucial that considering the preferences of majority, you add significant details to your video which can target your audience in a multidimension. You might need to include more text in addition to the title, opening/closing billboards (for broadcasting), and film credits, depending on the type of film you’re making. However, you can make dazzling visuals using your editing program if you feel the urge to do so.
Export web versions
When your film is finished and is ready to be exported, you would have a natural urge to export it at the highest video resolution possible. If it’s going to be shown in theatres and on ultra-HD screens, this is unquestionably the best course of action. However, you should also export smaller, higher-quality versions for simpler viewing in the modern day where video projects are typically promoted online and on social media.
The objective of creating a file for the web is to keep its high quality while not making it too large for upload and online viewing. Don’t worry if you’re unsure of the export settings to utilize. Websites like Facebook, YouTube, and Vimeo all provide suggested export settings to assist you in correctly resizing your content.
Part 3: 10 Advanced Editing Tips for Professionals
We all definitely have experimented with video editing tools to some extent. But now, it is definitely time to become a pro. Don’t worry, the process isn’t as scary as we imagine it to be. This article is your best stop to grab some fine guidelines about how to become a video editor, in fact, a Pro video editor.
- Make titles stand out
You’re skilled in video editing, but do your titles seem a little…unfinished? Do those lower thirds strike you as being monotonous and boring? Is your typography competing for attention against your pictures? It appears that you would benefit from some basic title design advice, and lucky for you, we have some. Your title must be readable by majority and always choose your safe way in selecting texts for example, a sans-serif typeface is usually going to be a safe choice for video. You can also animate text to highlight it so that it is more captivating.
- Put video inside text or logos effects
Videos resonate with your brand and content if you add a specific logo or text effects to it. Almost all the video editors allow this featuring so that the identification of your work is maintained and copyright claim can be imposed if you see your content being copied or manipulated.
- Add light leaks, film burns and lens flares
Incorporating unique transitions into your monotonous videos can get you your viewer’s attention in a go. Lens flares, light leaks, and film burns can result in a unique look, but are not always easy to add naturally in-camera. Some of the best video editing software which allow access to adding lens flares, light leaks and film burns include: Free 4K Light Leaks – RocketStock, Motion Array Free Light Leaks, WZZLY Free Light Leaks, LIGHT LEAK FILM OVERLAY and many more.
- Add the vintage old film look
The quick Instagram-category of filters are common today but what makes your videos more natural and appealing is the addition of some presets which almost every video editor offers. These presets add a classic vintage old film look to your videos by manipulating color correction effects, framerate settings, overlays, and aspect ratio hacks. Some popular vintage old film effects are found in software namely VSDC, VEED, Adobe Premium Pro and many others in list.
- Add type-on effect
A type-on effect added to your videos comprehend your content more firmly. Simply by tabbing on ‘Add text effect’ in any video editor, you can add type-on effect to your videos and to add ravishing component to the overall structure of your video.
- Zoom in or out effect
The zoom-in or out feature (if available) in your video editing software can allow you to magnify any part of your video quickly and easily. Some of the best video editors featuring this specification include: Wondershare DemoCreator Zoom in Video Effect, DaVinci Resolve, Wondershare Filmora , Windows Movie Maker and Apowersoft Screen Recorder.
- Custom wipe on/off reveal effect
The wipe on/off reveal transition or effect is one of the earliest ways of transitioning from one scene to another. An object (usually a line) moves across the screen, revealing the next scene, while simultaneously removing (or wiping) the previous scene and when used properly, they can create a very powerful effect. It involves creative fading in and out transitions to give a more dramatic look.
- 4k, 8k, HD resolution
The latest video editing software offer the export your edited video in multiple formats, out of which 4k, 8k and HD resolution formats are preferable for majority of the professional video editors. It is necessary that even after the video is uploaded to a platform, the pixels do not decrease and the quality of the video is maintained. Although attractive to the viewers, the higher the resolution, the more the data with which you must deal. It is suggested that a standard or default resolution is chosen to play and replay the video in different computers.
- B-roll
B-roll is secondary video that is frequently used as cutaway video to add context and visual interest to your story. The term is originated from the early days of Hollywood when there used to be an A-roll which was the primary video and B-roll which served as a secondary video footage. This can help you visualize your video from different dimensions, giving it a more realistic look for captivating viewers.
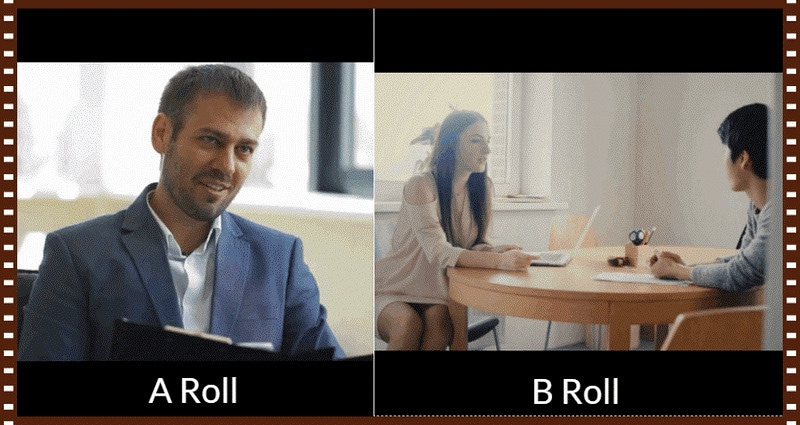
- Compression rate, bit depth, bit
The amount of data the camera records each second is referred to as bit rate. Every single second of a video is subject to significant data processing by cameras. The higher the quality of the video, the more is the bit rate. Bit depth refers to the number of colors your camera can read per pixel. Common bit depths are 8-bit and 10-bit, which enable a camera to read 256 million or 1.07 billion colors respectively. To upload your edited video, a compression is usually required to convert your resolution to internet quality so that the upload can be made simpler, without distorting the video resolution.
Whether your video is short or long, you may want to make it better and appealing. Video editing involves the manipulation of your videos through which the desired transformation is achieved and you can flaunt every move of your video in a more preferable way. Video editing involves cutting the video short, changing the speed, organizing the video in a seamless flow. In short, the better the cuts of your videos, the better your message/story is conveyed.
Part 1: Things to Learn Before Editing First Draft
You have shot your video and now you’re stuck on the post-processing of that video. Don’t worry! We got you covered through this article which will guide you through the different things which you must learn before editing the first draft of your video.
Start a video project
Your smartphone and digital camera can let you record multiple videos but what now? You head out to edit your first draft by choosing a suitable platform or software and then you can surely lay back and see the software doing wonders to your raw videos. By starting off with editing, you choose your video editing preferences and then you just let the video editing tools do the magic.
Get to know the video editing software workspace
Video editing software offer customizable workspaces for different editing tasks. The software workspace streamlines routine actions you take with clips, like editing clips, making DVD and Blu-ray menus, and sharing movies. By placing panels in the layout that best matches your working style, you can personalize your workspace. The additional panels adjust automatically to fit the window as you rearrange them. For various jobs, such as one for editing and one for preview, you can build and store multiple workspaces.
Understand the timeline
The timeline of your video is the backbone of your digital video editing process. It’s called a timeline because the various pieces of video will be lined up horizontally. In a video editing software, the timeline is where you arrange your video clips and plan out all the modifications you want to do. As you work, you will see every single one of your video and audio clips, effects, and transitions sorted chronologically from beginning to end. All the fundamentals of video editing, including reordering, trimming, and enhancing your footage, are available. To preview how your adjustments will turn out, you can also play your project at any point in the timeline.
Add clips to timeline
When you have grasped the idea behind a timeline, the next step you need to follow is to add clips into your timeline. Before adding clips to your timeline, it is suggested that you label each clip. Although it does seem like a lot of work, it will be easier to locate all of the clips later on if you’re working on a large project. after the footages are gathered and named, add important clips in the beginning of the timeline to begin establishing the video’s overall structure and order.
Editing tools
Besides basic cutting, trimming and cropping, video editing software offer multiple professional editing tools which enhance the outlook your videos and make them 10x better. For example, instead of cutting up a clip into a bunch of small clips and unwanted gaps, use the Ripple Edit tool keep your timeline clean. This means when a clip is trimmed, it causes a ripple effect throughout the rest of your timeline, shifting all other clips into a new timeline position.
Similarly, when working with lengthy timelines, the Razor tool is also really helpful because you can select the clip you wish to cut by dragging your razor over it. So, the Razor cut is the tool to use if you need to make a lot of cuts in your videos quickly.
Syncing audio and video
You already know how annoying it can be if audio and video don’t sync while you’re listening to a podcast or viewing a YouTube vlog. The video editing software offer helpful manual and auto sync tools. It can be though a bit of hard work for beginners, but the ‘Lights, Camera, Action’ approach works best in syncing your audio with your video. To sync audio, you need to record audio first and then through matching the wavelengths displayed on your timeline, you can sync the audio with your video.
Edit download talking head/interview footage
Now with professional video editing tools, you can make ‘talking head videos’ if you want to share your expertise as a YouTube vlogger or if you want to do employee training. Talking head films are a fantastic way to stimulate the mind and the heart while increasing learner retention in this digital age.
Additionally, with other video editing tools, you can edit your interview footages and for that, you don’t have to mess with timestamps, cutting or splicing videos, or creating transitions between clips, you just edit the transcript of the video and the video edits itself to match.
Video properties: Scale, position, opacity
Any screen recording, camera-based video, imported video clips, and text picture clips can have their visuals altered using video properties. In video editing software, multiple video properties are offered which include scaling, positioning, rotating, changing the opacity, changing level of reflection and shadow. Additionally, Video properties also include editing the video as a whole or just altering a clip from the video.
Types of cuts: Straight, J-Cut, L-Cut etc
The different types of cuts used in the video editing process is an effective way to make the transitions in your video pop. Basically, these cuts join two or more clips together via audio. Professional editors call these cuts as ‘split edits. The most common cuts are called J-Cut and L-Cut. They help to mix the content’s flow and keep the on-screen narrative in motion. In essence, these edits are necessary to make your scenes feel warm and more authentic.
Part 2: Practical Video Editing Tips
Choose right software
The push start of video editing for beginners is based on one common step: know your software or workspace. Selecting the appropriate software for editing your video is the first step in streamlining your video editing process. Although all software often includes the tools that you need to make ordinary video edits, you could favor one over the others based on its usefulness, digital interface, and features. Instead of just using the latest and trending video editing software available, the key is to choose what functions for you and your editing style.
Use a fast computer
Slow rendering hinders video editing process and other commands given to a computer. From a practical point of view, it is recommended that irrespective of the model of the computer or version of your software; your computer must be efficient to help you to access your files and software easily and to speed up your export time. With a slow computer, you will definitely feel stuck and the video editing complications will haunt you in your dreams.
Watch video editing tutorials
None of us is a pro until we’ve practiced something enough to know everything about it. Video editing requires both; technical knowledge as well as your creativity, so it is better not to do try things on your own. A little guidance can surely help you get through the basics of the video editing process. There are tons of helpful tutorials for making excellent videos on YouTube, vlogs, and educational websites. The majority of tutorials you’ll discover online are free, making the readily available at the tip of your fingers.
Get the project files
Most of the beginner video editors prefer to use the same project files as the tutorial instructors when they are following along. Your work will exactly resemble the demo’s sample, which will aid in your understanding of the steps. For precisely this reason, many tutorials let you download the project files. You can repeat a process with your own video files once you’ve mastered this technique.
Edit for a story
Remembering your creative objective to create a wonderful story or message through your edited video is one of the most crucial lessons you should learn from this article. It is critically important that you make your film visually appealing and dramatically engaging to effectively evoke the right emotions and to communicate your desired message. Instead of merely adding a huge amount of effects to wow your audience, use your practical and technical skills to do this.
Maintain an efficient workflow
You’ll need to be systematic and organized in addition to having an editing software if you want to become a more competent editor. Putting your projects and files in folders that you may use repeatedly is one method to streamline your process. Besides this, organizing your projects and files into an external hard drive or USB is recommended in case of losing access to your intricately designed projects.
Utilize keyboard shortcuts
Keyboard shortcuts speed up the process of video editing and save you ample time. Different keyboard shortcuts are compatible with different video editing software; leaving a few which are mutual in every software. Don’t attempt to put all of these shortcuts into action at once. Pick a small number to begin with, and as they become instinctive, add more. You’ll progress more quickly if you use less mouse while editing your video.
Learn important terms
As a beginner, you may not want to feel a lump in the throat caused by the complicated dictionary of video editing software. There are some broad video editing terms that refer to videography as a whole as well as video editing terms specific to the process of editing footage. You must first learn what these terms means for example you may want to know what the terms like ‘aspect ratio, B-roll, bit rate, close up, compression, crop and compositing’ mean.
Color correct your clips
Do you own a rather boring video? Perhaps it’s a little too dull or the colors don’t stand out as much as they should? A crucial step is to modify the video’s color. This will assist in reducing the saturation and revive your video. Yet, there are some color correcting presets which can be easily accessed in different video editing apps.
Select good music
You ever saw an ad on YouTube or other social media platforms without an audio background. You may just want to skip it because the video, which may apparently be appealing, fails to strike you. Coordinating and complimenting your video with a music in the background is like cherry on top. It’s a huge plus to attract viewers’ attention. Though it is necessary that the music you choose must be relevant to your video file and should target the majority. So, choose good music to adorn your videos and trigger emotions in your target audience.
Add text and graphics
Some people are attracted more towards textual descriptions rather visual representation of content. It is crucial that considering the preferences of majority, you add significant details to your video which can target your audience in a multidimension. You might need to include more text in addition to the title, opening/closing billboards (for broadcasting), and film credits, depending on the type of film you’re making. However, you can make dazzling visuals using your editing program if you feel the urge to do so.
Export web versions
When your film is finished and is ready to be exported, you would have a natural urge to export it at the highest video resolution possible. If it’s going to be shown in theatres and on ultra-HD screens, this is unquestionably the best course of action. However, you should also export smaller, higher-quality versions for simpler viewing in the modern day where video projects are typically promoted online and on social media.
The objective of creating a file for the web is to keep its high quality while not making it too large for upload and online viewing. Don’t worry if you’re unsure of the export settings to utilize. Websites like Facebook, YouTube, and Vimeo all provide suggested export settings to assist you in correctly resizing your content.
Part 3: 10 Advanced Editing Tips for Professionals
We all definitely have experimented with video editing tools to some extent. But now, it is definitely time to become a pro. Don’t worry, the process isn’t as scary as we imagine it to be. This article is your best stop to grab some fine guidelines about how to become a video editor, in fact, a Pro video editor.
- Make titles stand out
You’re skilled in video editing, but do your titles seem a little…unfinished? Do those lower thirds strike you as being monotonous and boring? Is your typography competing for attention against your pictures? It appears that you would benefit from some basic title design advice, and lucky for you, we have some. Your title must be readable by majority and always choose your safe way in selecting texts for example, a sans-serif typeface is usually going to be a safe choice for video. You can also animate text to highlight it so that it is more captivating.
- Put video inside text or logos effects
Videos resonate with your brand and content if you add a specific logo or text effects to it. Almost all the video editors allow this featuring so that the identification of your work is maintained and copyright claim can be imposed if you see your content being copied or manipulated.
- Add light leaks, film burns and lens flares
Incorporating unique transitions into your monotonous videos can get you your viewer’s attention in a go. Lens flares, light leaks, and film burns can result in a unique look, but are not always easy to add naturally in-camera. Some of the best video editing software which allow access to adding lens flares, light leaks and film burns include: Free 4K Light Leaks – RocketStock, Motion Array Free Light Leaks, WZZLY Free Light Leaks, LIGHT LEAK FILM OVERLAY and many more.
- Add the vintage old film look
The quick Instagram-category of filters are common today but what makes your videos more natural and appealing is the addition of some presets which almost every video editor offers. These presets add a classic vintage old film look to your videos by manipulating color correction effects, framerate settings, overlays, and aspect ratio hacks. Some popular vintage old film effects are found in software namely VSDC, VEED, Adobe Premium Pro and many others in list.
- Add type-on effect
A type-on effect added to your videos comprehend your content more firmly. Simply by tabbing on ‘Add text effect’ in any video editor, you can add type-on effect to your videos and to add ravishing component to the overall structure of your video.
- Zoom in or out effect
The zoom-in or out feature (if available) in your video editing software can allow you to magnify any part of your video quickly and easily. Some of the best video editors featuring this specification include: Wondershare DemoCreator Zoom in Video Effect, DaVinci Resolve, Wondershare Filmora , Windows Movie Maker and Apowersoft Screen Recorder.
- Custom wipe on/off reveal effect
The wipe on/off reveal transition or effect is one of the earliest ways of transitioning from one scene to another. An object (usually a line) moves across the screen, revealing the next scene, while simultaneously removing (or wiping) the previous scene and when used properly, they can create a very powerful effect. It involves creative fading in and out transitions to give a more dramatic look.
- 4k, 8k, HD resolution
The latest video editing software offer the export your edited video in multiple formats, out of which 4k, 8k and HD resolution formats are preferable for majority of the professional video editors. It is necessary that even after the video is uploaded to a platform, the pixels do not decrease and the quality of the video is maintained. Although attractive to the viewers, the higher the resolution, the more the data with which you must deal. It is suggested that a standard or default resolution is chosen to play and replay the video in different computers.
- B-roll
B-roll is secondary video that is frequently used as cutaway video to add context and visual interest to your story. The term is originated from the early days of Hollywood when there used to be an A-roll which was the primary video and B-roll which served as a secondary video footage. This can help you visualize your video from different dimensions, giving it a more realistic look for captivating viewers.
- Compression rate, bit depth, bit
The amount of data the camera records each second is referred to as bit rate. Every single second of a video is subject to significant data processing by cameras. The higher the quality of the video, the more is the bit rate. Bit depth refers to the number of colors your camera can read per pixel. Common bit depths are 8-bit and 10-bit, which enable a camera to read 256 million or 1.07 billion colors respectively. To upload your edited video, a compression is usually required to convert your resolution to internet quality so that the upload can be made simpler, without distorting the video resolution.
Also read:
- How to Make A Fantastic Café Vlog for 2024
- New 2 Easy Methods | How To Zoom In On TikTok Videos?
- New In 2024, 15 Best CapCut Templates for Slow Motion Editing
- Updated Updated 8 Ways to Merge SRT with MP4
- Updated Things You Need to Know About Color Grading in Photography
- Updated In 2024, The Ultimate Guide to Make a Text Collage
- Updated 2024 Approved How to Create Cooking Video Intro and End Screen for YouTube Channel?
- New How to Remove Background From a Video in Premier Pro
- Updated For Artists Who Are Making Videos for Show Their Knowledge or Projects, Add some Effects for the Video Can Always Provoke Interests and Attention. This Article Will Show You How to Do that Easily
- Updated 2024 Approved 10 Best Audio Visualizers Windows, Mac, Android, iPhone & Online
- Updated for 2024
- New In 2024, 6 Tips for Your First Facebook Ads
- Several Tips Can Facilitate How You Edit Videos Faster and Easier. All You Need to Do Is to Read This Article to Find Out What They Are
- New How to Trim Video in QuickTime Player on Your Mac
- New In 2024, How to Rotate a Video in Windows 10
- Updated Quick Answer What Is a Transparent Logo and Why Do You Need It
- In 2024, GIF Splitting Into Frames Is an Interesting Activity to Do with the Right Tools. Convert GIFs Into Frames Easily with Tools and Use Them as Needed
- New MP3 Cutter Download for Computer and Mobile for 2024
- 2024 Approved Everything That You Need to Know About Video Montages- Ideas, Techniqu
- Whatre the Best Alternatives to Pexels?
- New Splitting Audio From a Video in Sony Vegas Step by Step
- How to Use Color Grading in Final Cut Pro
- New Fast Method to Match Color in Photoshop
- Updated Slow Down Videos on Instagram With Perfection A Guide
- Updated 6 Top Online MP4 Croppers for 2024
- New In 2024, 15 Camera Shake Preset for Premiere Pro
- In 2024, How to Create Sony Vegas Freeze Frame
- In 2024, How to Merge Audio and Video in VLC Media Player
- Updated 2024 Approved Adding Text to Your Collage Not only Makes It Look Sophisticated but Also Versatile. So, if You Too Are Looking for Ways to Create a Collage Text, Check Out Our Article
- Updated In 2024, Best Things People Know About Wedding Slideshow
- Updated Mask Tracking Is Believed to Be a Helpful Procedure for Marking Proper Areas in Videos. Learn How to Perform Premiere Pro Mask Tracking in This Guide
- In 2024, Unlocking iPhone 14 Pro Max Lock Screen 3 Foolproof Methods that Actually Work | Dr.fone
- How To Fix Part of the Touch Screen Not Working on Nokia C12 | Dr.fone
- Forgot your Nokia C32 lock screen pattern, PIN or password? Here’s what to do
- New 2024 Approved Breakthrough How to Make A Picture Speak
- Best Solutions for Google Network Unlock
- In 2024, Top 12 Prominent Oppo Reno 11 Pro 5G Fingerprint Not Working Solutions
- In 2024, How to Fix Pokemon Go Route Not Working On Vivo Y100 5G? | Dr.fone
- iCloud Unlocker Download Unlock iCloud Lock for your Apple iPhone 7
- In 2024, Recommended Best Applications for Mirroring Your Honor Magic5 Ultimate Screen | Dr.fone
- Ways To Find Unlocking Codes For Xiaomi 13 Ultra Phones
- 8 Quick Fixes Unfortunately, Snapchat has Stopped on Vivo Y36i | Dr.fone
- How to share/fake gps on Uber for Tecno Spark 10 5G | Dr.fone
- How to Detect and Stop mSpy from Spying on Your Lava Yuva 3 | Dr.fone
- In 2024, A Step-by-Step Guide to Finding Your Apple ID From Your Apple iPhone 6s
- In 2024, How to Screen Mirroring Oppo Find X6? | Dr.fone
- How To Transfer Data From Apple iPhone 6s To Other iPhone 15 devices? | Dr.fone
- All Must-Knows to Use Fake GPS GO Location Spoofer On Itel P40+ | Dr.fone
- How and Where to Find a Shiny Stone Pokémon For Tecno Spark 20 Pro+? | Dr.fone
- How does the stardust trade cost In pokemon go On Apple iPhone 15 Pro? | Dr.fone
- In 2024, How Can We Unlock Our Vivo Y77t Phone Screen?
- Apple ID Unlock On iPhone 14 Plus? How to Fix it?
- Play HEVC H.265 on Motorola Moto G34 5G, is it possible?
- In 2024, Ultimate guide to get the meltan box pokemon go For Nubia Z50 Ultra | Dr.fone
- How Can I Unlock My iPhone 6 After Forgetting my PIN Code?
- How to Come up With the Best Pokemon Team On Realme 12 Pro+ 5G? | Dr.fone
- In 2024, Different Methods To Unlock Your iPhone 13
- Simple and Effective Ways to Change Your Country on YouTube App Of your Oppo A78 | Dr.fone
- Title: Detailed Steps to Cut a Video in QuickTime for 2024
- Author: Chloe
- Created at : 2024-05-20 03:38:00
- Updated at : 2024-05-21 03:38:00
- Link: https://ai-editing-video.techidaily.com/detailed-steps-to-cut-a-video-in-quicktime-for-2024/
- License: This work is licensed under CC BY-NC-SA 4.0.
