:max_bytes(150000):strip_icc():format(webp)/GettyImages-screen-mirroring-842272124-5a7897e104d1cf0037763c0a.jpg)
Detailed Tutorial to Rotate a Video in Cyberlink PowerDirector for 2024

Detailed Tutorial to Rotate a Video in Cyberlink PowerDirector
Video Editing is a craft that is highly dependent on various characteristics of your video. But the way one presents it or goes about filming clips also has a profound effect on the end product. And as you may know, not every aspect of a video production activity always goes without hiccups. But editing can come in clutch as it can easily solve minor problems like skewed footage that was shot at the wrong angle or is upside down (an issue that can happen while using mobile phones).
Thus, with this article, we will be looking at steps to rotate a video in Cyberlink PowerDirector to help you when required. We have also mentioned the steps you will need to follow in Wondershare Filmora.
Note: We documented the steps in this guide with PowerDirector 365 and WonderShare Filmora X.
Steps to Rotate Videos with CyberLink PowerDirector
Put yourself in a situation where you’ve just finished filming a project with your smartphone but end up realizing that the footage isn’t in the right orientation by default. While the error has an easy fix on most smartphones, you can also perform this action with video editing tools.
Also, while this form of rotating might be the most basic implementation of the feature, you can often use the feature to add a dynamic nature to your video with Keyframes.
Definition: Keyframes in Video Editing is a software feature that allows an editor to set start and endpoints (denoted by In and Out Markers), presenting the opportunity to custom clip properties between the two positions. The set changes occur gradually as the playhead continues moving through the clip. Properties that can undergo modification with this method are zoom, rotation, colors, positions, etc.
The process of rotating clips is fairly straightforward; once you have PowerDirector 365 open, follow the steps listed below.
If you do not have CyberLink PowerDirector 365, download the software by visiting Cyberlink’s official website.
Step 1: Create a new video project in Cyberlink PowerDirector 365 and choose Full Mode.

Note: Full Mode in Cyberlink PowerDirector 365 will provide users access to a full-featured video editing tool similar in function to Wondershare Filmora. The other option available is Ad Designer.
Step 2: Now, import media onto the Timeline from the Media Library.
For this guide, we used the pre-existing stock footage in Cyberlink PowerDirector.

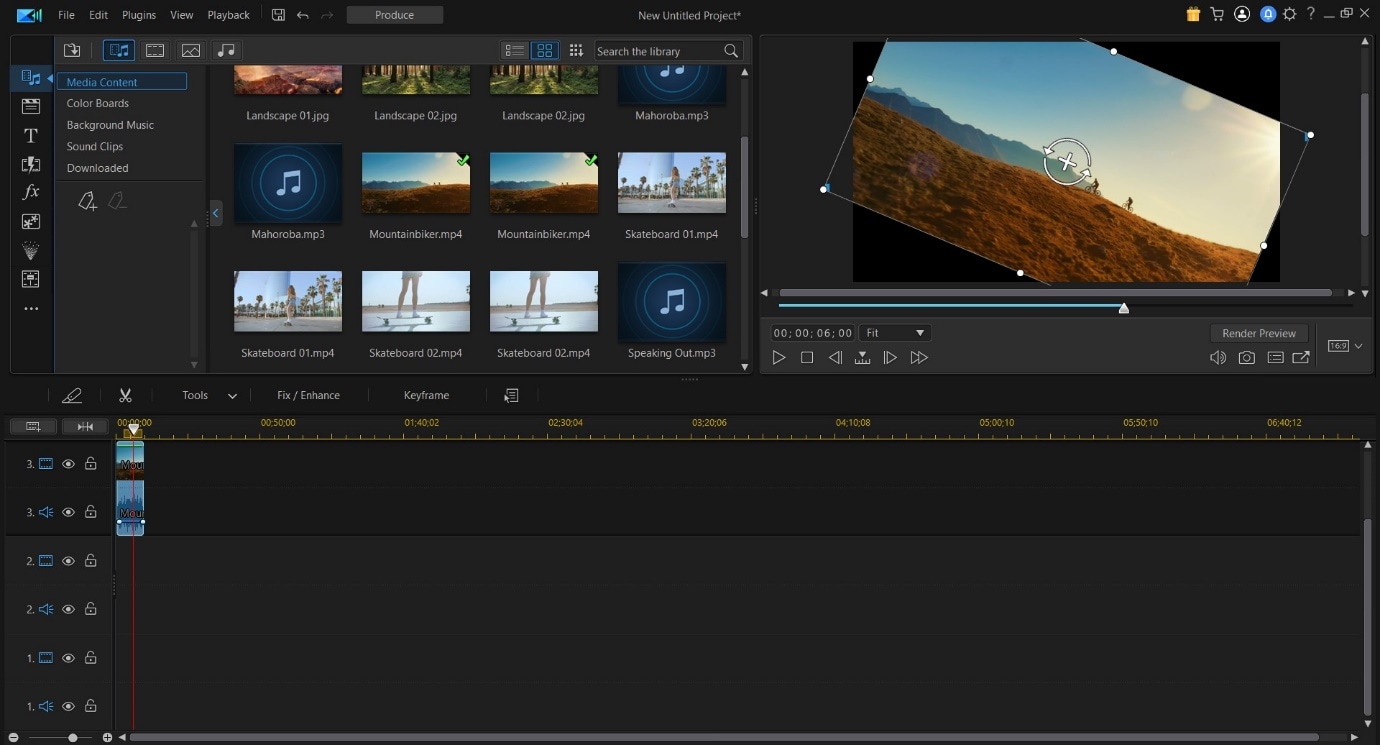
Step 3: Now, click on the video file on the Timeline; this will activate the video in the Preview Window. And it will provide you with access to the rotation circle, allowing you to change the orientation of the source file.
EXTRA
Rotation added in the PiP Designer will function as a keyframe-based rotation action. Right-click on the video in the preview window, choose Edit and then Modify to access this menu.
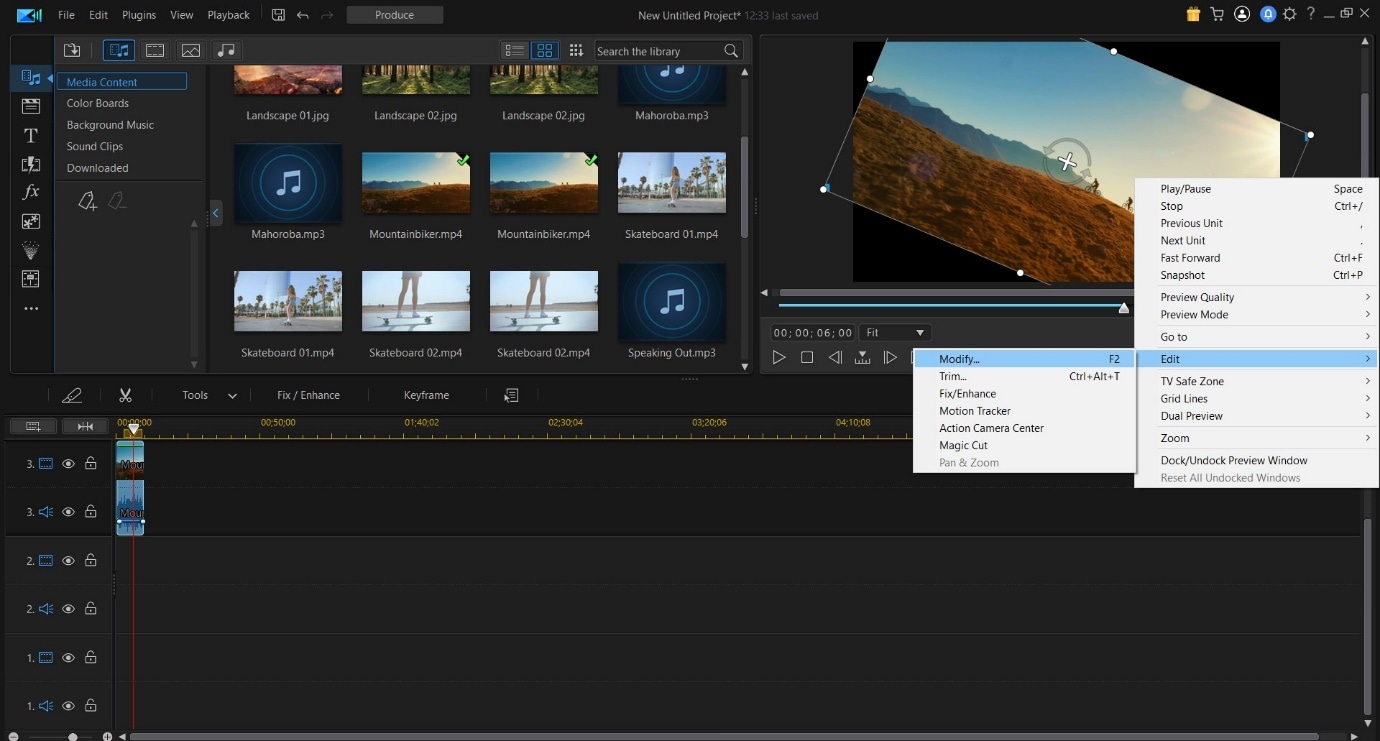
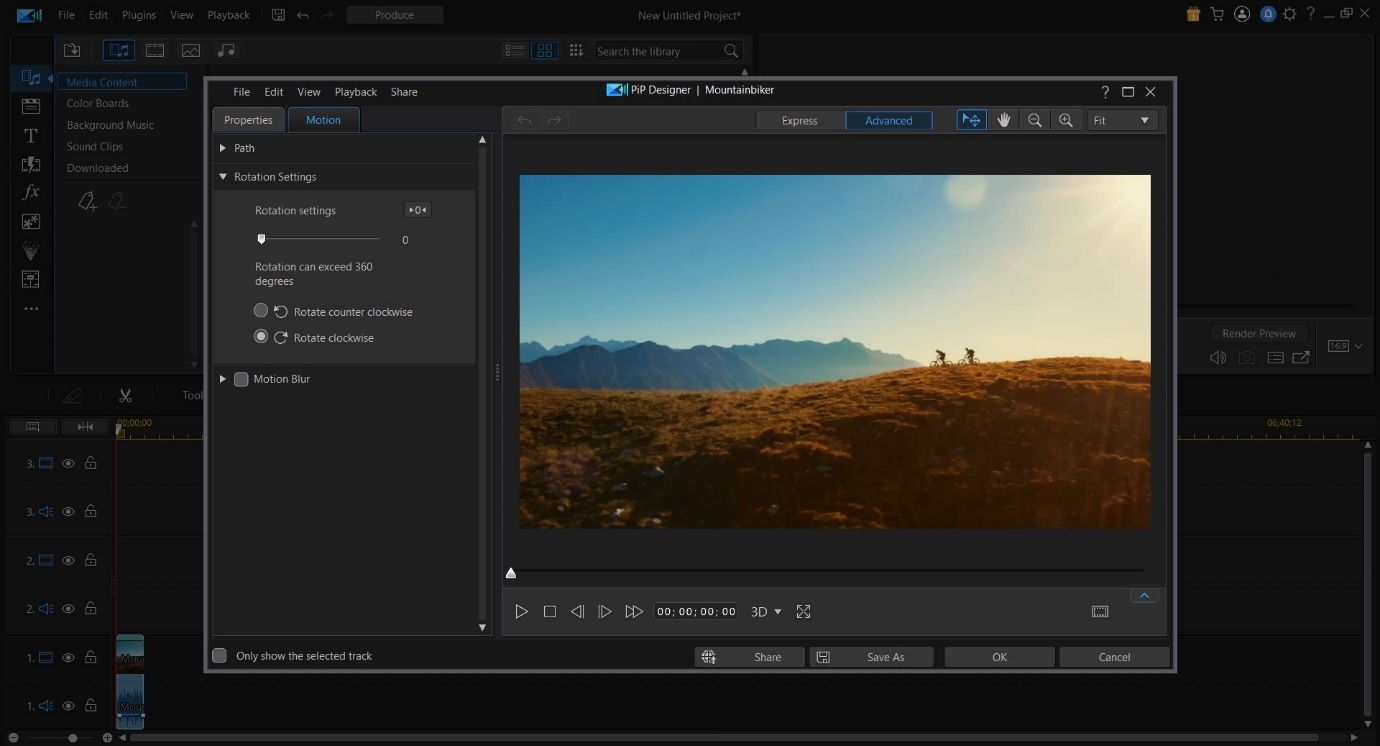
Following this, you can click on the Motion Tab, go into Rotation Settings, and modify the angle with greater precision. In the Preview Window, you will now be able to see the rotating video.
An Easier Way to Crop Video with Wondershare Filmora
Though Cyberlink PowerDirector 365 is a powerful video editing tool, we felt its menus were not as simple to navigate. Accessing the rotate function while available in the forefront, the use of PiP Designer didn’t feel intuitive.
In Wondershare Filmora Video Editor , rotating footage only happens via the Edit Option, and this straightforward approach felt simple. As for those who want to use Keyframes, the integration of this feature right above the Timeline is an appreciated convenience.
This emphasis on quick accessibility is present with almost every function in Filmora, and we believe this to be a significant advantage. The use of modern and unique iconography also increases familiarity, an aspect that will always be welcoming to new and budding creators.
If you do not already have Wondershare Filmora, you can download the software by visiting the official website.
To help you learn how to use the rotate function and show you an example of the easy accessibility in Filmora, here is how you can use the feature to get the output you desire.
For Win 7 or later (64-bit)
For macOS 10.14 or later
Once you have a new project open in Filmora, follow the steps listed below.
Step 1: Import a Media File to edit into your Video Project.

Step 2: Drag the video clip onto the Timeline and then select it with a mouse click to activate further interactions.

Step 3: Choose the Edit Option (marked in Red).
This will bring up the Edit Window in the left-top corner of your screen.

Step 4: Click on the Transform Menu and use the Rotation Slider to edit the orientation.

Having read this stretch of the guide, we believe you may have noticed how Filmora is more user-friendly and accessible due to its menu layout.
BONUS
Click on the Keyframe Button (marked in Green) to access the Keyframe Menu that allows you to set points between which a decided amount of rotation can happen.

The Bottom Line
This marks the end of our guide on how to rotate video in PowerDirector 365 and Wondershare Filmora X. Now, while both software are high-capable tools, we feel the keyframe-based working on rotation in Filmora is a lot more intuitive and easy to use. The ability to only have number-based rotation within the edit menu is also a positive, as rotating with a swivel like in PowerDirector isn’t always the most accurate.
And lastly, the modern iconography-based design of Wondershare Filmora is a factor to keep in mind, as this increases usability manifolds.
Note: Full Mode in Cyberlink PowerDirector 365 will provide users access to a full-featured video editing tool similar in function to Wondershare Filmora. The other option available is Ad Designer.
Step 2: Now, import media onto the Timeline from the Media Library.
For this guide, we used the pre-existing stock footage in Cyberlink PowerDirector.

Step 3: Now, click on the video file on the Timeline; this will activate the video in the Preview Window. And it will provide you with access to the rotation circle, allowing you to change the orientation of the source file.

EXTRA
Rotation added in the PiP Designer will function as a keyframe-based rotation action. Right-click on the video in the preview window, choose Edit and then Modify to access this menu.

Following this, you can click on the Motion Tab, go into Rotation Settings, and modify the angle with greater precision. In the Preview Window, you will now be able to see the rotating video.

An Easier Way to Crop Video with Wondershare Filmora
Though Cyberlink PowerDirector 365 is a powerful video editing tool, we felt its menus were not as simple to navigate. Accessing the rotate function while available in the forefront, the use of PiP Designer didn’t feel intuitive.
In Wondershare Filmora Video Editor , rotating footage only happens via the Edit Option, and this straightforward approach felt simple. As for those who want to use Keyframes, the integration of this feature right above the Timeline is an appreciated convenience.
This emphasis on quick accessibility is present with almost every function in Filmora, and we believe this to be a significant advantage. The use of modern and unique iconography also increases familiarity, an aspect that will always be welcoming to new and budding creators.
If you do not already have Wondershare Filmora, you can download the software by visiting the official website.
To help you learn how to use the rotate function and show you an example of the easy accessibility in Filmora, here is how you can use the feature to get the output you desire.
For Win 7 or later (64-bit)
For macOS 10.14 or later
Once you have a new project open in Filmora, follow the steps listed below.
Step 1: Import a Media File to edit into your Video Project.

Step 2: Drag the video clip onto the Timeline and then select it with a mouse click to activate further interactions.

Step 3: Choose the Edit Option (marked in Red).
This will bring up the Edit Window in the left-top corner of your screen.

Step 4: Click on the Transform Menu and use the Rotation Slider to edit the orientation.

Having read this stretch of the guide, we believe you may have noticed how Filmora is more user-friendly and accessible due to its menu layout.
BONUS
Click on the Keyframe Button (marked in Green) to access the Keyframe Menu that allows you to set points between which a decided amount of rotation can happen.

The Bottom Line
This marks the end of our guide on how to rotate video in PowerDirector 365 and Wondershare Filmora X. Now, while both software are high-capable tools, we feel the keyframe-based working on rotation in Filmora is a lot more intuitive and easy to use. The ability to only have number-based rotation within the edit menu is also a positive, as rotating with a swivel like in PowerDirector isn’t always the most accurate.
And lastly, the modern iconography-based design of Wondershare Filmora is a factor to keep in mind, as this increases usability manifolds.
Note: Full Mode in Cyberlink PowerDirector 365 will provide users access to a full-featured video editing tool similar in function to Wondershare Filmora. The other option available is Ad Designer.
Step 2: Now, import media onto the Timeline from the Media Library.
For this guide, we used the pre-existing stock footage in Cyberlink PowerDirector.

Step 3: Now, click on the video file on the Timeline; this will activate the video in the Preview Window. And it will provide you with access to the rotation circle, allowing you to change the orientation of the source file.

EXTRA
Rotation added in the PiP Designer will function as a keyframe-based rotation action. Right-click on the video in the preview window, choose Edit and then Modify to access this menu.

Following this, you can click on the Motion Tab, go into Rotation Settings, and modify the angle with greater precision. In the Preview Window, you will now be able to see the rotating video.

An Easier Way to Crop Video with Wondershare Filmora
Though Cyberlink PowerDirector 365 is a powerful video editing tool, we felt its menus were not as simple to navigate. Accessing the rotate function while available in the forefront, the use of PiP Designer didn’t feel intuitive.
In Wondershare Filmora Video Editor , rotating footage only happens via the Edit Option, and this straightforward approach felt simple. As for those who want to use Keyframes, the integration of this feature right above the Timeline is an appreciated convenience.
This emphasis on quick accessibility is present with almost every function in Filmora, and we believe this to be a significant advantage. The use of modern and unique iconography also increases familiarity, an aspect that will always be welcoming to new and budding creators.
If you do not already have Wondershare Filmora, you can download the software by visiting the official website.
To help you learn how to use the rotate function and show you an example of the easy accessibility in Filmora, here is how you can use the feature to get the output you desire.
For Win 7 or later (64-bit)
For macOS 10.14 or later
Once you have a new project open in Filmora, follow the steps listed below.
Step 1: Import a Media File to edit into your Video Project.

Step 2: Drag the video clip onto the Timeline and then select it with a mouse click to activate further interactions.

Step 3: Choose the Edit Option (marked in Red).
This will bring up the Edit Window in the left-top corner of your screen.

Step 4: Click on the Transform Menu and use the Rotation Slider to edit the orientation.

Having read this stretch of the guide, we believe you may have noticed how Filmora is more user-friendly and accessible due to its menu layout.
BONUS
Click on the Keyframe Button (marked in Green) to access the Keyframe Menu that allows you to set points between which a decided amount of rotation can happen.

The Bottom Line
This marks the end of our guide on how to rotate video in PowerDirector 365 and Wondershare Filmora X. Now, while both software are high-capable tools, we feel the keyframe-based working on rotation in Filmora is a lot more intuitive and easy to use. The ability to only have number-based rotation within the edit menu is also a positive, as rotating with a swivel like in PowerDirector isn’t always the most accurate.
And lastly, the modern iconography-based design of Wondershare Filmora is a factor to keep in mind, as this increases usability manifolds.
Note: Full Mode in Cyberlink PowerDirector 365 will provide users access to a full-featured video editing tool similar in function to Wondershare Filmora. The other option available is Ad Designer.
Step 2: Now, import media onto the Timeline from the Media Library.
For this guide, we used the pre-existing stock footage in Cyberlink PowerDirector.

Step 3: Now, click on the video file on the Timeline; this will activate the video in the Preview Window. And it will provide you with access to the rotation circle, allowing you to change the orientation of the source file.

EXTRA
Rotation added in the PiP Designer will function as a keyframe-based rotation action. Right-click on the video in the preview window, choose Edit and then Modify to access this menu.

Following this, you can click on the Motion Tab, go into Rotation Settings, and modify the angle with greater precision. In the Preview Window, you will now be able to see the rotating video.

An Easier Way to Crop Video with Wondershare Filmora
Though Cyberlink PowerDirector 365 is a powerful video editing tool, we felt its menus were not as simple to navigate. Accessing the rotate function while available in the forefront, the use of PiP Designer didn’t feel intuitive.
In Wondershare Filmora Video Editor , rotating footage only happens via the Edit Option, and this straightforward approach felt simple. As for those who want to use Keyframes, the integration of this feature right above the Timeline is an appreciated convenience.
This emphasis on quick accessibility is present with almost every function in Filmora, and we believe this to be a significant advantage. The use of modern and unique iconography also increases familiarity, an aspect that will always be welcoming to new and budding creators.
If you do not already have Wondershare Filmora, you can download the software by visiting the official website.
To help you learn how to use the rotate function and show you an example of the easy accessibility in Filmora, here is how you can use the feature to get the output you desire.
For Win 7 or later (64-bit)
For macOS 10.14 or later
Once you have a new project open in Filmora, follow the steps listed below.
Step 1: Import a Media File to edit into your Video Project.

Step 2: Drag the video clip onto the Timeline and then select it with a mouse click to activate further interactions.

Step 3: Choose the Edit Option (marked in Red).
This will bring up the Edit Window in the left-top corner of your screen.

Step 4: Click on the Transform Menu and use the Rotation Slider to edit the orientation.

Having read this stretch of the guide, we believe you may have noticed how Filmora is more user-friendly and accessible due to its menu layout.
BONUS
Click on the Keyframe Button (marked in Green) to access the Keyframe Menu that allows you to set points between which a decided amount of rotation can happen.

The Bottom Line
This marks the end of our guide on how to rotate video in PowerDirector 365 and Wondershare Filmora X. Now, while both software are high-capable tools, we feel the keyframe-based working on rotation in Filmora is a lot more intuitive and easy to use. The ability to only have number-based rotation within the edit menu is also a positive, as rotating with a swivel like in PowerDirector isn’t always the most accurate.
And lastly, the modern iconography-based design of Wondershare Filmora is a factor to keep in mind, as this increases usability manifolds.
Level Up Videos By Applying Keyframe with Filmora
Everyone is fascinated by a video portraying creativity and effort in each frame. Your films can easily have this captivity through the keyframe feature. It provides you the accessibility to make even a simple, plain shot pace up, slow down, or pan across the screen.
Wondershare Filmora offers you a simple yet great experience of Keyframing. It has been the editors’ favorite feature for years. Under its Grow and Win Program, Filmora presents the Keyframe creativity contest. It is the ultimate solution for bringing captivity and precision to your shots.
Part 1. What is the Keyframe Feature?
A keyframe, also spelled “key frame,” defines any smooth transition’s beginning and conclusion. In the case of animation or film, or video, that something may be a drawing or a specific frame of a shot.
The keyframe feature creates room for boundless creativity. The Keyframe feature could imitate any illusive or fascinating impact, from object enlargement to magical power effects. A key frame is a frame that serves as a marker for the start or stop of a parameter change.
You could use a keyframe to mark the spot where the audio will have faded up or down to a specific volume.
Part 2. Where to Use The Keyframe Feature?
Editors and creators use keyframing for all kinds of stuff. These uses include:
Animated Logo Intros
You can use the keyframe feature to create indigenous intros with animated logos. It helps the editors go for vlogging or tutorial videos.

Special Transparency Effects
Keyframing is famous for creating blended visuals through experimentation with the transparency of the clip.

Custom Picture-in-Picture Paths
We use the picture-in-picture effect in many editing formats, from tutorial videos to gaming streams and vlogs. Keyframing allows editors to execute the movement of the PIP as they wish. For instance, this video call was shot from a video.

The picture will move across the screen between the 30-second and 1-minute marks if you indicate that it will be in the upper left corner of the screen at the 30-second timestamp of your video and the bottom right corner at the 1-minute timestamp.
Part 3. What Would You Need to Make a Keyframe Video
Let us share the procedure for making a video using the keyframe feature.
1. A Video Clip or Photos
For experimenting and creating with the keyframe feature, first, you would need high-quality video clips or images.
The high-resolution requirement is a prerequisite for the complete experience of all parameters of the keyframe feature. For example, the zooming and varying opacity effects you add might look bland and dull if the clip or image appears pixelated upon zooming and scaling.
2. Motion Elements
Keyframing allows for a vast area of creativity with motion elements that you can download online. The keyframe feature adds charm to these elements by playing with their orientation and scale.
3. An Advanced Editing Software
To utilize the keyframe feature, you need high-end video and animation editing software with an interactive and easy-to-use user interface and good accessibility options. So, what better choice than Filmora to use for this feature? To do the editing process on Filmora , follow the steps below and enjoy!
Free Download For Win 7 or later(64-bit)
Free Download For macOS 10.14 or later
Part 4. How to Make a Keyframe Video With Filmora
Filmora can be one of the best video editors to achieve the effect. It can personalize anything in detail. There is plenty of footage from its built-in stock media with unlimited resources. By using this platform for editing, your editing time hugely can be greatly reduced.
- The keyframe tool is efficient for adding beautiful animations to podcast videos.
- More than 2,000 audio resources, including music, audio effects, and more.
- Multiple clips can be edited more quickly with the shortcut key.
- Choose from over 1,000 video effects, including transitions, filters, titles, and many others, to spice up your keyframe videos.
There are many different ways you can use keyframes on Filmora. To learn the complete step-by-step instructions, continue reading. Here we explain three examples of how to use keyframing and how to use the tool in Filmora.
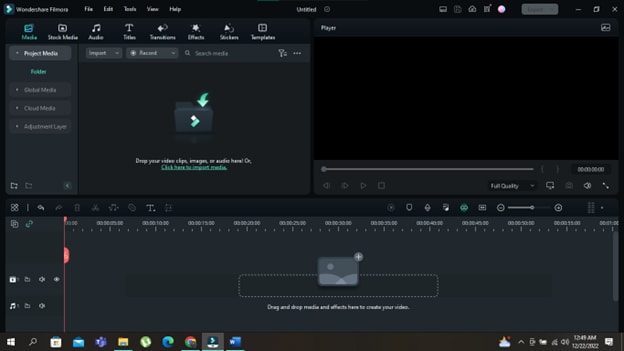
Step1 Install the Wondershare Filmora
Launch the most recent version of the software on your computer to produce an outstanding film. To do this, take the following actions.
- You must first download and open Wondershare Filmora on your PC or Mac.
Step2 Import your Photos and Videos
- When you open Wondershare Filmora, you will notice the main import window in the top left corner.
- Click in the center of the import window upon the import icon.
- After clicking, Wondershare Filmora will automatically direct you to your PC library.
- Browse to where your target Clips or Images are stored.
- Select all the objects you want to import.
- Click on Open, and you will have imported files.
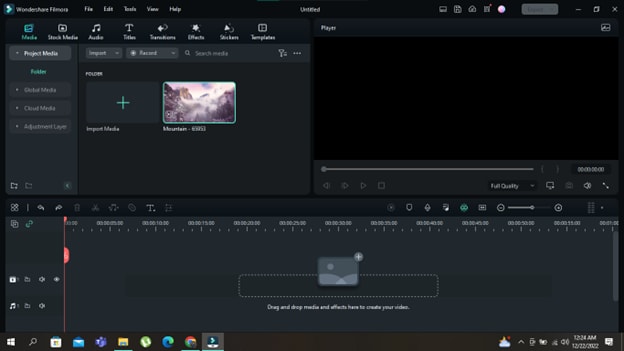
Step3 Add your Photos and Videos to the Timeline
Your next step will be to add the imported videos and images to the timeline. When you have many videos and photos imported into the timeline, you can add them simultaneously.
Or you can also add them one by one wherever you need. To add an item to your timeline, follow the steps mentioned.
- Right-click on the photo or video you want to add to the timeline.
- Keep holding the right-click and drag it down to the timeline.
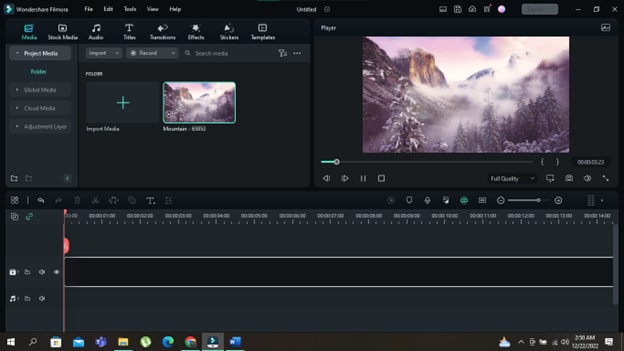
Step4 Adding Movement to your Shots
The next step would be to use the movement option in Keyframing, where you can pan and zoom a shot over a specified time. To do this, follow the bullet points below.
- After importing your clips to the timeline, double-click the clip to open the Editing Menu.
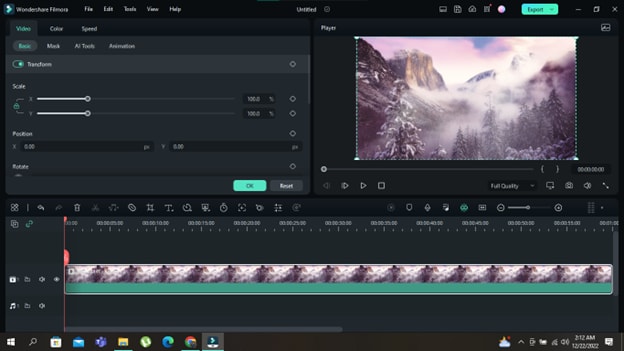
- Once opened, the editing menu will have a Basic tab; click it.
- Check the key-shaped button in front of the Transform button. It will create a Keyframe in the default form of your clip.
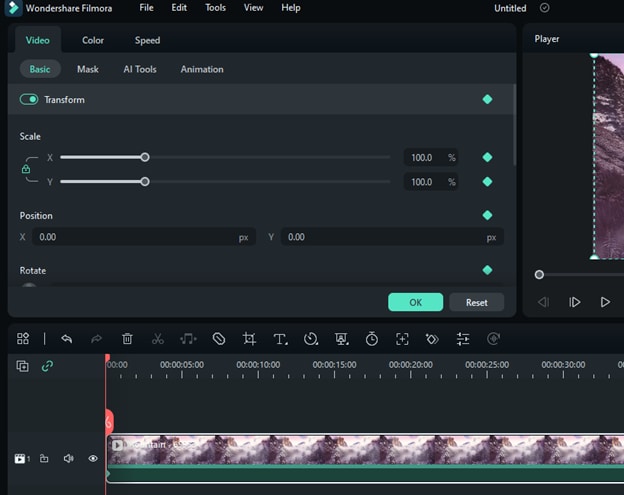
- You need to add a second keyframe at the end of the clip to create movement. First, move the timeline cursor to the end of the clip. Then, check the key-shaped button in front of the Transform button again for a second Keyframe.
- Now change the scale of the clip from the slider options in the Custom Animation
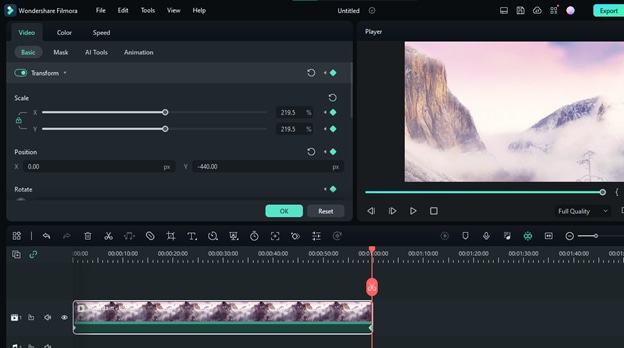
- Now play your clip, and you’ll see it zooms in and pans automatically to the state of the second keyframe over that timeline.

Step5 Adding Motion to your Shots
Keyframing can add motion to your project’s objects, clips, or images. To perform this in Filmora, follow these instructions:
- Go to the Stock Media tab on the top left ribbon in Filmora and download some motion elements (videos/GIFs) from accessible outlets like the Flora GIF used here.
- After importing elements to the timeline, double-click the element to open the Editing Menu.
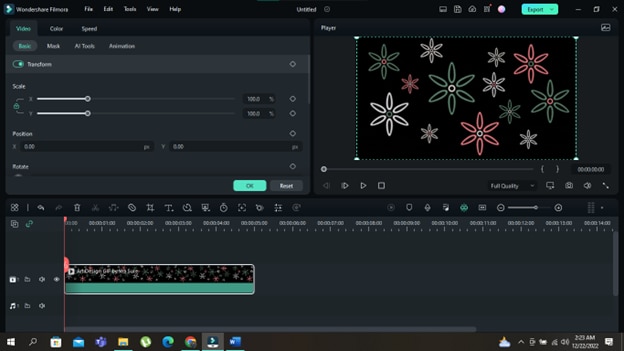
- Once opened, the editing menu will have a Basic tab; click
- Check the key-shaped button in the Basic Tab. It will create a Keyframe in the default form of your motion element.
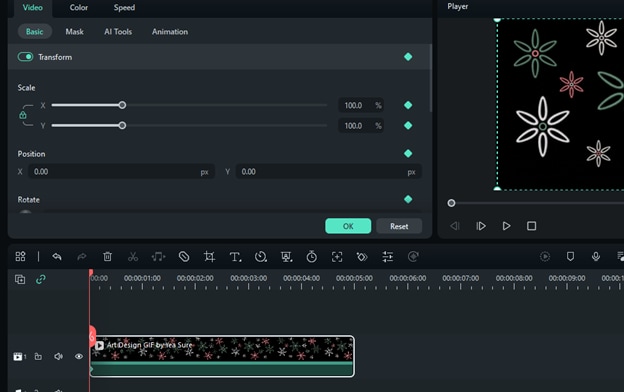
- Next, move it to the end of the clip, check the key-shaped button in front of the Transform button, and add another keyframe there, but this time, change its scale and rotation attributes as you like.
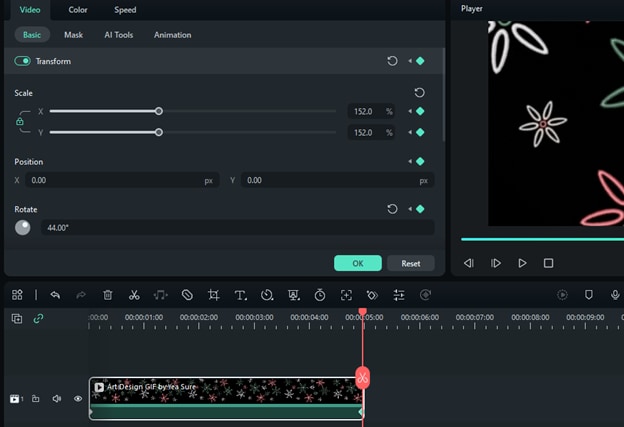
- Enter OK and play your clip to see the fantastic effect.

Step6 Keyframing Opacity
Keyframing allows creators to integrate variable opacity in their shots to instill a dramatic feel. This technique also helps create perfect fade-in and fade-out shots for your videos. Additionally, it is for theatrically dissolving shots too.
For an illustrated guide to keyframing opacity, keep on reading the following instructions:
- Add a Keyframe to a clip on your timeline. For it, double-click the clip to open the Editing Menu, Then go to Basic Tab.
- Check the key-shaped button in front of the Transform button. It will create a Keyframe in the default form of your motion element.
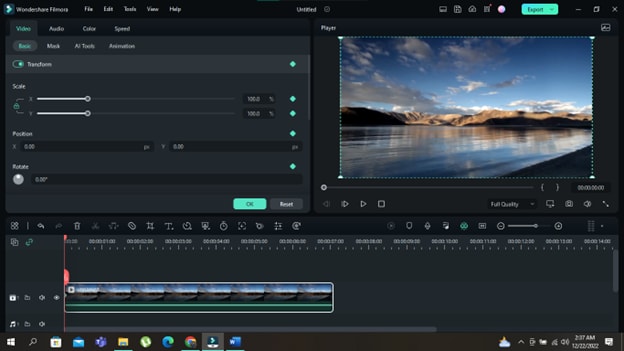
- Move the red cursor to the end of the clip.
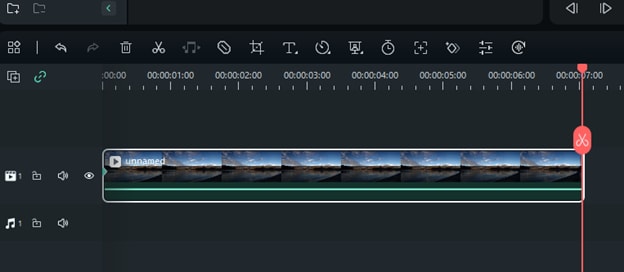
- Next, add another keyframe, scroll down in the editing menu, and remove the opacity from the slider below the Bend Mode option.
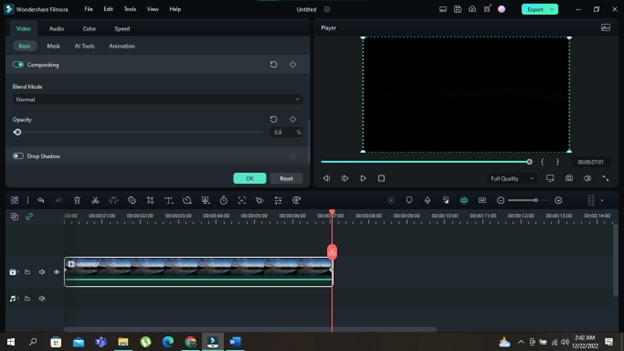
- That’s it; you have a theatrical variation of the clip’s visible opacity throughout the timeline.

Conclusion
On the whole, keyframing is all about creativity at your fingertips. When detailed effort becomes necessary, the keyframe feature is always there to save the day. This tool is a delight, from adding movement and motion to your playful and immersive shots to crafting a cinematic scene out of your films. This contest is your chance to show us how creative you can get with this beautiful feature. Good luck creating!
Free Download For macOS 10.14 or later
Part 4. How to Make a Keyframe Video With Filmora
Filmora can be one of the best video editors to achieve the effect. It can personalize anything in detail. There is plenty of footage from its built-in stock media with unlimited resources. By using this platform for editing, your editing time hugely can be greatly reduced.
- The keyframe tool is efficient for adding beautiful animations to podcast videos.
- More than 2,000 audio resources, including music, audio effects, and more.
- Multiple clips can be edited more quickly with the shortcut key.
- Choose from over 1,000 video effects, including transitions, filters, titles, and many others, to spice up your keyframe videos.
There are many different ways you can use keyframes on Filmora. To learn the complete step-by-step instructions, continue reading. Here we explain three examples of how to use keyframing and how to use the tool in Filmora.
Step1 Install the Wondershare Filmora
Launch the most recent version of the software on your computer to produce an outstanding film. To do this, take the following actions.
- You must first download and open Wondershare Filmora on your PC or Mac.

Step2 Import your Photos and Videos
- When you open Wondershare Filmora, you will notice the main import window in the top left corner.
- Click in the center of the import window upon the import icon.
- After clicking, Wondershare Filmora will automatically direct you to your PC library.
- Browse to where your target Clips or Images are stored.
- Select all the objects you want to import.
- Click on Open, and you will have imported files.

Step3 Add your Photos and Videos to the Timeline
Your next step will be to add the imported videos and images to the timeline. When you have many videos and photos imported into the timeline, you can add them simultaneously.
Or you can also add them one by one wherever you need. To add an item to your timeline, follow the steps mentioned.
- Right-click on the photo or video you want to add to the timeline.
- Keep holding the right-click and drag it down to the timeline.

Step4 Adding Movement to your Shots
The next step would be to use the movement option in Keyframing, where you can pan and zoom a shot over a specified time. To do this, follow the bullet points below.
- After importing your clips to the timeline, double-click the clip to open the Editing Menu.

- Once opened, the editing menu will have a Basic tab; click it.
- Check the key-shaped button in front of the Transform button. It will create a Keyframe in the default form of your clip.

- You need to add a second keyframe at the end of the clip to create movement. First, move the timeline cursor to the end of the clip. Then, check the key-shaped button in front of the Transform button again for a second Keyframe.
- Now change the scale of the clip from the slider options in the Custom Animation

- Now play your clip, and you’ll see it zooms in and pans automatically to the state of the second keyframe over that timeline.

Step5 Adding Motion to your Shots
Keyframing can add motion to your project’s objects, clips, or images. To perform this in Filmora, follow these instructions:
- Go to the Stock Media tab on the top left ribbon in Filmora and download some motion elements (videos/GIFs) from accessible outlets like the Flora GIF used here.
- After importing elements to the timeline, double-click the element to open the Editing Menu.

- Once opened, the editing menu will have a Basic tab; click
- Check the key-shaped button in the Basic Tab. It will create a Keyframe in the default form of your motion element.

- Next, move it to the end of the clip, check the key-shaped button in front of the Transform button, and add another keyframe there, but this time, change its scale and rotation attributes as you like.

- Enter OK and play your clip to see the fantastic effect.

Step6 Keyframing Opacity
Keyframing allows creators to integrate variable opacity in their shots to instill a dramatic feel. This technique also helps create perfect fade-in and fade-out shots for your videos. Additionally, it is for theatrically dissolving shots too.
For an illustrated guide to keyframing opacity, keep on reading the following instructions:
- Add a Keyframe to a clip on your timeline. For it, double-click the clip to open the Editing Menu, Then go to Basic Tab.
- Check the key-shaped button in front of the Transform button. It will create a Keyframe in the default form of your motion element.

- Move the red cursor to the end of the clip.

- Next, add another keyframe, scroll down in the editing menu, and remove the opacity from the slider below the Bend Mode option.

- That’s it; you have a theatrical variation of the clip’s visible opacity throughout the timeline.

Conclusion
On the whole, keyframing is all about creativity at your fingertips. When detailed effort becomes necessary, the keyframe feature is always there to save the day. This tool is a delight, from adding movement and motion to your playful and immersive shots to crafting a cinematic scene out of your films. This contest is your chance to show us how creative you can get with this beautiful feature. Good luck creating!
How to Zoom in Discord
Discord is the most popular platform for communication among gaming communities and even YouTubers. Discord allows users to send text, voice, and video messages. Most importantly, Discord is available for computer users, smartphone users as well as online browser users. There are times when you may need to zoom in on Discord for better readability of messages. There are different ways on how to zoom in Discord.
There could also be a scenario where you have excessive zoom in effect, and you need to zoom out for better readability. Similarly, if you have pressed the wrong shortcuts accidentally and the screen on Discord has zoomed in, you have to zoom out to bring the screen to its original state. We will illustrate how to zoom out in Discord as well for computer, smartphone, and online users.
Part 1: How to Zoom Discord on Computer
Since Discord is mostly popular among gamers, Discord desktop app is the most widely used. If you want to zoom in on Discord desktop app, you should know that the zoom option is not readily available under any menu, and there is no keyboard shortcut you can press to zoom in and zoom out instantly. Instead, here are the steps on how to zoom in on Discord.
Step1Launch Discord desktop app on your computer. Click on the Gear icon located at the bottom left corner by the side of your username.

Step2Once Settings window opens, go to App Settings section from the left side and click on Appearance option.
Step3On the right section, scroll down, and you will find three options for zooming – Chat font scaling, Space between message groups, and Zoom level.
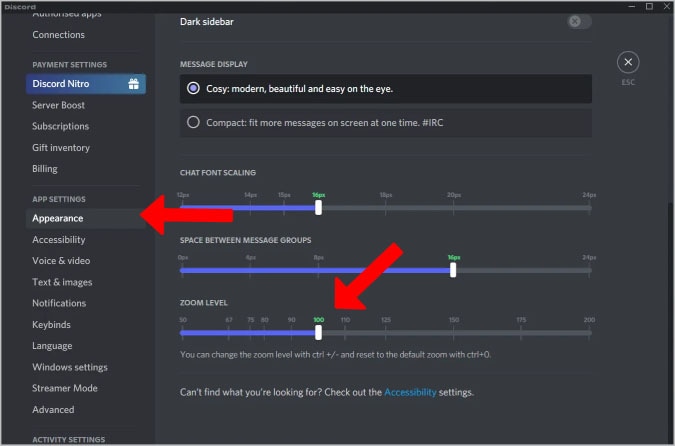
Step4According to your requirements, you can move the slider to the right to zoom in on Discord. You can also press Ctrl and “+” keys together to zoom in. Press Ctrl and “-“ keys together to zoom out. If you want to reset the changes, press Ctrl and O keys together.
Step5Once you are satisfied with the level of zooming, press Esc key on your keyboard to save the changes.
Part 2: How to Zoom Discord Online
If you are relatively new to Discord, you are likely to use its in-browser online version before downloading desktop or smartphone app. Zooming in and out on Discord is super easy when you use Discord online. This is because almost all browsers have in-built option to zoom in and zoom out any website including Discord. Here are the steps on how to zoom in Discord online.
Step1Open your web browser and visit the official website of Discord.
Step2Click on the three-dot icon at the top-right corner of the browser.
Step3From the drop-down menu, go to Zoom option. Click on “+” icon to zoom in and “-“ icon to zoom out.
![]()
Alternatively, you can simply launch Discord on any browser and press Ctrl and “+” or “-“ keys together for zooming in and out. You get to see by how much percentage the browser is zooming in and zooming out. If you want to reset, bring the percentage to 100%.

Part 3: How to Zoom Discord on Mobile
Discord is available for Android and iOS users. For any app, the zoom feature is generally unavailable. But Discord has included zoom in and zoom out options under accessibility features for the convenience of the users. Therefore, the zoom effect will only be reflected on Discord app rather than on all apps. Here are the steps on how to zoom in and how to zoom out in Discord app.
Step1On your smartphone, open Discord app. Tap on your Profile icon located at the bottom-right corner.

Step2You must be on User Settings page where you need to find and tap on Appearance present under App Settings.
Step3Scroll down and come to Chat Font Scaling and move the slider to the right for zooming in.
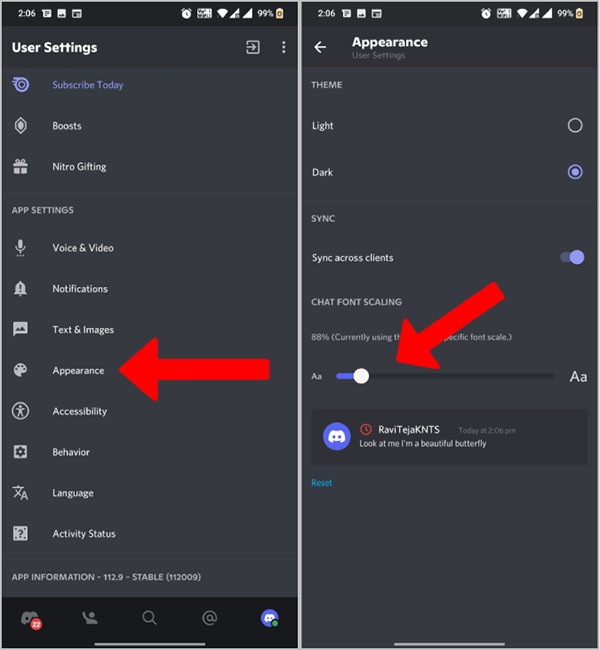
There is Reset option at the bottom to cancel out the changes made as far as zoom effect goes.
Conclusion
There are going to be times when you have to adjust the size displayed on Discord for better readability. We have illustrated how you can easily zoom in and zoom out whether you are accessing Discord from its desktop app or smartphone app. Besides, you can also zoom in and out if you are using Discord web version.
Discord is the most popular platform for communication among gaming communities and even YouTubers. Discord allows users to send text, voice, and video messages. Most importantly, Discord is available for computer users, smartphone users as well as online browser users. There are times when you may need to zoom in on Discord for better readability of messages. There are different ways on how to zoom in Discord.
There could also be a scenario where you have excessive zoom in effect, and you need to zoom out for better readability. Similarly, if you have pressed the wrong shortcuts accidentally and the screen on Discord has zoomed in, you have to zoom out to bring the screen to its original state. We will illustrate how to zoom out in Discord as well for computer, smartphone, and online users.
Part 1: How to Zoom Discord on Computer
Since Discord is mostly popular among gamers, Discord desktop app is the most widely used. If you want to zoom in on Discord desktop app, you should know that the zoom option is not readily available under any menu, and there is no keyboard shortcut you can press to zoom in and zoom out instantly. Instead, here are the steps on how to zoom in on Discord.
Step1Launch Discord desktop app on your computer. Click on the Gear icon located at the bottom left corner by the side of your username.

Step2Once Settings window opens, go to App Settings section from the left side and click on Appearance option.
Step3On the right section, scroll down, and you will find three options for zooming – Chat font scaling, Space between message groups, and Zoom level.

Step4According to your requirements, you can move the slider to the right to zoom in on Discord. You can also press Ctrl and “+” keys together to zoom in. Press Ctrl and “-“ keys together to zoom out. If you want to reset the changes, press Ctrl and O keys together.
Step5Once you are satisfied with the level of zooming, press Esc key on your keyboard to save the changes.
Part 2: How to Zoom Discord Online
If you are relatively new to Discord, you are likely to use its in-browser online version before downloading desktop or smartphone app. Zooming in and out on Discord is super easy when you use Discord online. This is because almost all browsers have in-built option to zoom in and zoom out any website including Discord. Here are the steps on how to zoom in Discord online.
Step1Open your web browser and visit the official website of Discord.
Step2Click on the three-dot icon at the top-right corner of the browser.
Step3From the drop-down menu, go to Zoom option. Click on “+” icon to zoom in and “-“ icon to zoom out.
![]()
Alternatively, you can simply launch Discord on any browser and press Ctrl and “+” or “-“ keys together for zooming in and out. You get to see by how much percentage the browser is zooming in and zooming out. If you want to reset, bring the percentage to 100%.

Part 3: How to Zoom Discord on Mobile
Discord is available for Android and iOS users. For any app, the zoom feature is generally unavailable. But Discord has included zoom in and zoom out options under accessibility features for the convenience of the users. Therefore, the zoom effect will only be reflected on Discord app rather than on all apps. Here are the steps on how to zoom in and how to zoom out in Discord app.
Step1On your smartphone, open Discord app. Tap on your Profile icon located at the bottom-right corner.

Step2You must be on User Settings page where you need to find and tap on Appearance present under App Settings.
Step3Scroll down and come to Chat Font Scaling and move the slider to the right for zooming in.

There is Reset option at the bottom to cancel out the changes made as far as zoom effect goes.
Conclusion
There are going to be times when you have to adjust the size displayed on Discord for better readability. We have illustrated how you can easily zoom in and zoom out whether you are accessing Discord from its desktop app or smartphone app. Besides, you can also zoom in and out if you are using Discord web version.
How to Crop a Video in Davinci Resolve [Step by Step]
Sometimes, when it comes to editing a video, we don’t even know where to start, because there are too many options –online platforms which instantly help us edit our clips, without lengthy process of downloading and installing computer programs;
Mobile applications with user-friendly interface, allowing us to manipulate the footage quickly, easily choose our preferred formats and effects and adjust the clips according to the requirements our target platforms set; more time-consuming and advanced software with even more options, but which seem to require us to be more skilled and experienced in editing.
Even though editing, as other innovative and creative actions, is limitless in its possibilities, sometimes we just need to make a little change in our project and it’s quite enough for us to be satisfied with our work and material. One of the things which is rather simple to do, but sometimes essential, when it comes to making our clips better and more picturesque for the audience, is cropping a video.
Cropping, in its essence, is great to “hide” some unnecessary objects in our video, and/or highlight the main ones. In this article, we discuss how to crop a video in a software called DaVinci Resolve, in simple little steps, how to export our work and lastly, what would be the alternate way to do the same in other computer program.
Part 1. How to crop a video in Davinci Resolve
First and foremost, let’s get to know Davinci Resolve! As mentioned above, it is a software, so let’s be well-aware that we have to download and install it on our computer systems. Of course, it takes a bit of time, but to be able to use an advanced software, it’s totally worth it. If we are to search for the information about Davinci Resolve, we come across the following description: “color grading and non-linear video editing application for macOS, Windows, and Linux”. So, no matter which system we have, we can count on this software, which is a real advantage!
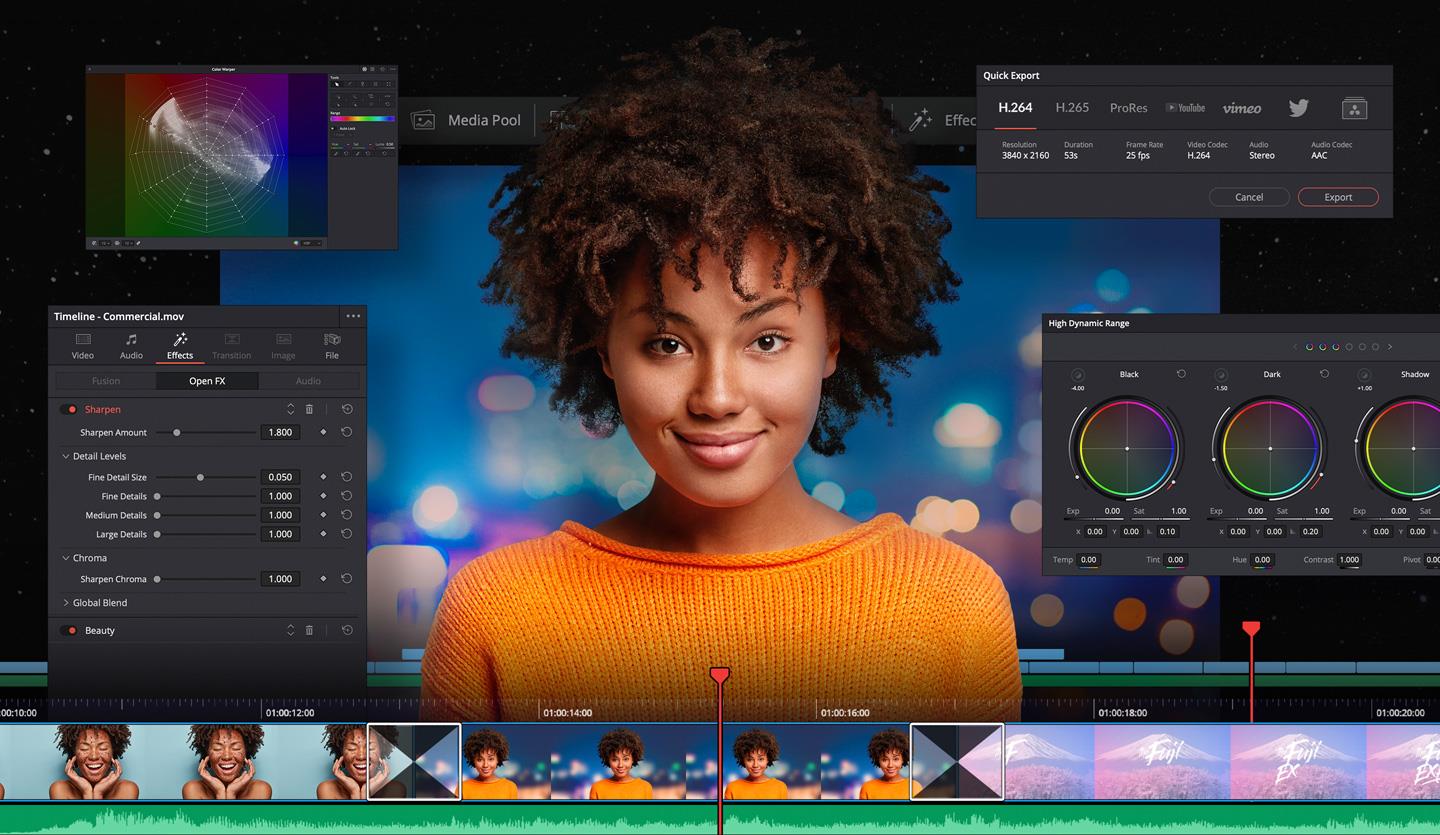
To touch upon the functions, Davinci Resolve includes modules for video editing, color correction, audio mixing and effects, and visual effects. The interface of it is quite advanced, but would be well and soon understandable for someone who has ever used a similar editing software, such as Adobe Premiere Pro. If you are interested in everything the software has to offer, we recommend watching this very viral beginner tutorial .
Now, back to cropping – so, you want to crop the video you took or got somehow, and you also think about using Davinci Resolve? Cropping, in most cases, meaning different applications, platforms and software, is not a complicated task at all, and you can do it in a very short amount of time in Davinci Resolve, too. Therefore, let’s delve into the steps on how to do it!
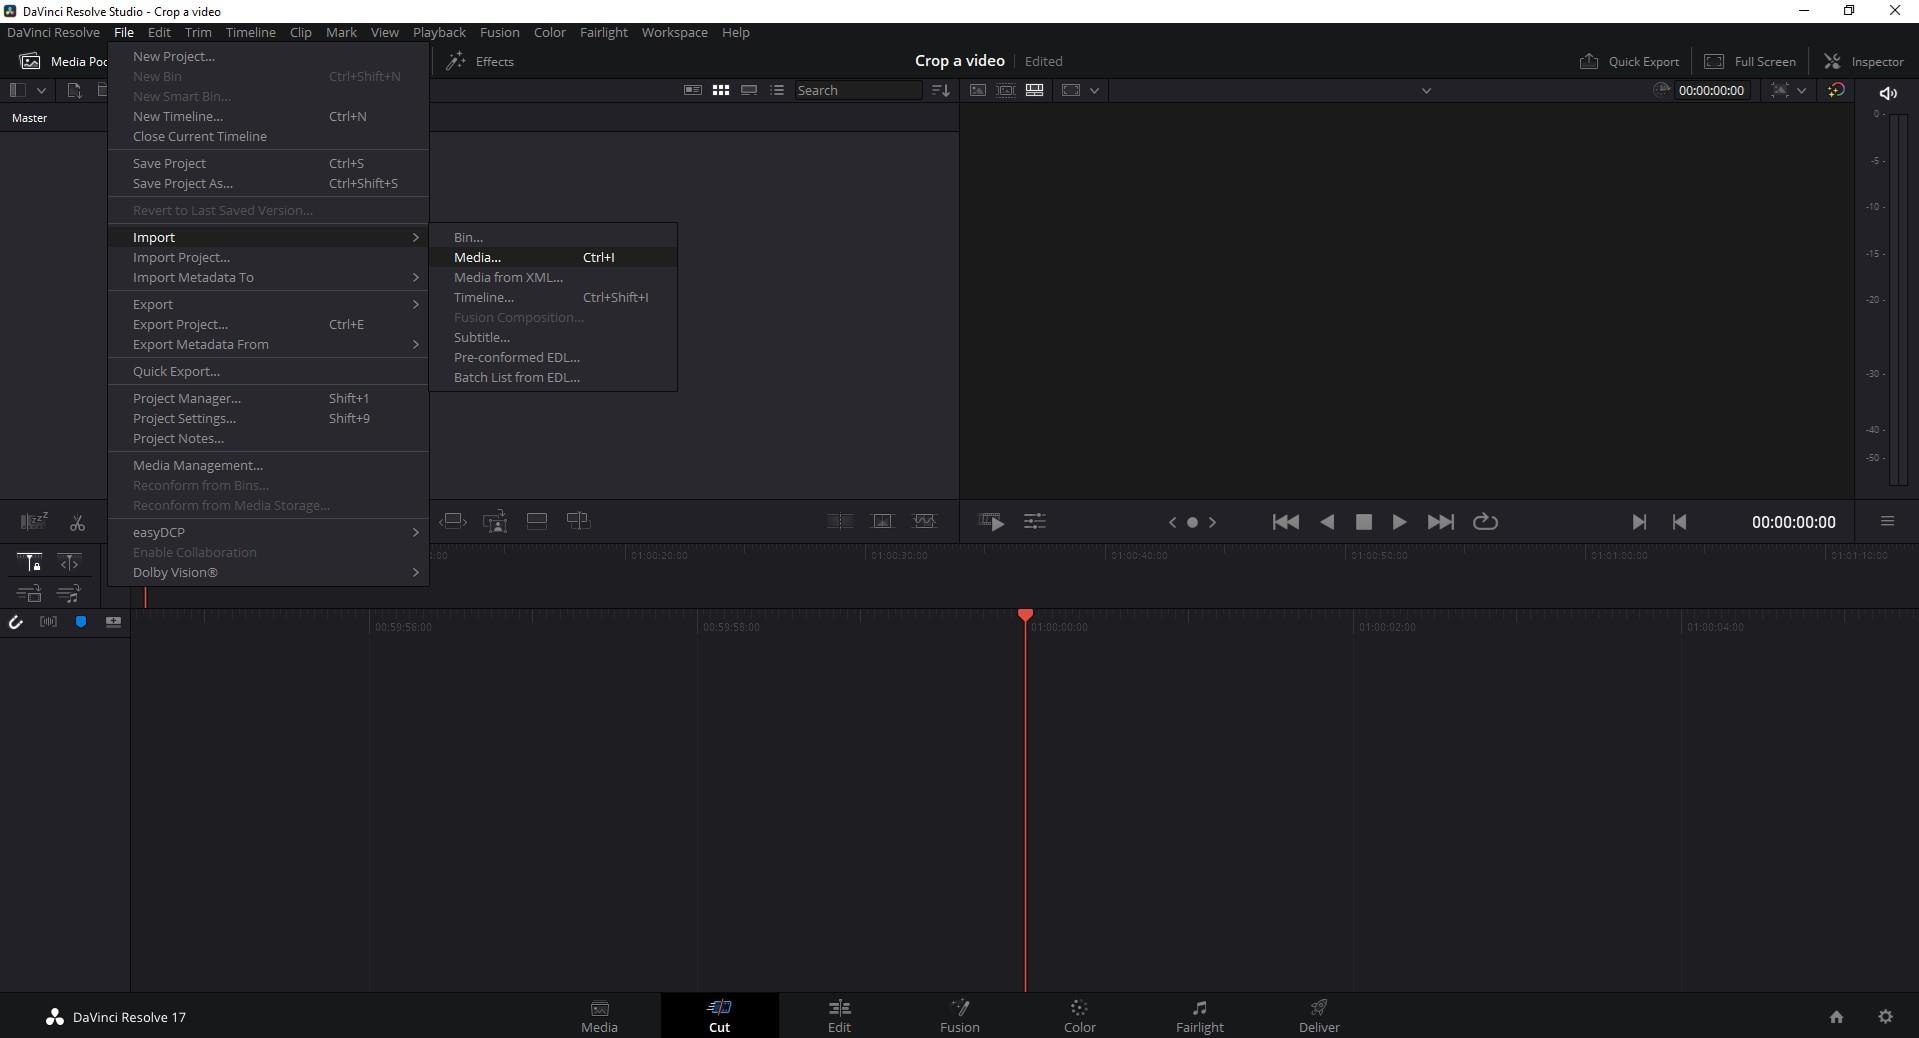
First, download and install the software, and when it is finished, launch it. You will see a totally clean program, until you add the video you want to work on. To do so, you have to find File in the top menu, find Import and then choose Media.
Then it will open a new window where you can choose your file…
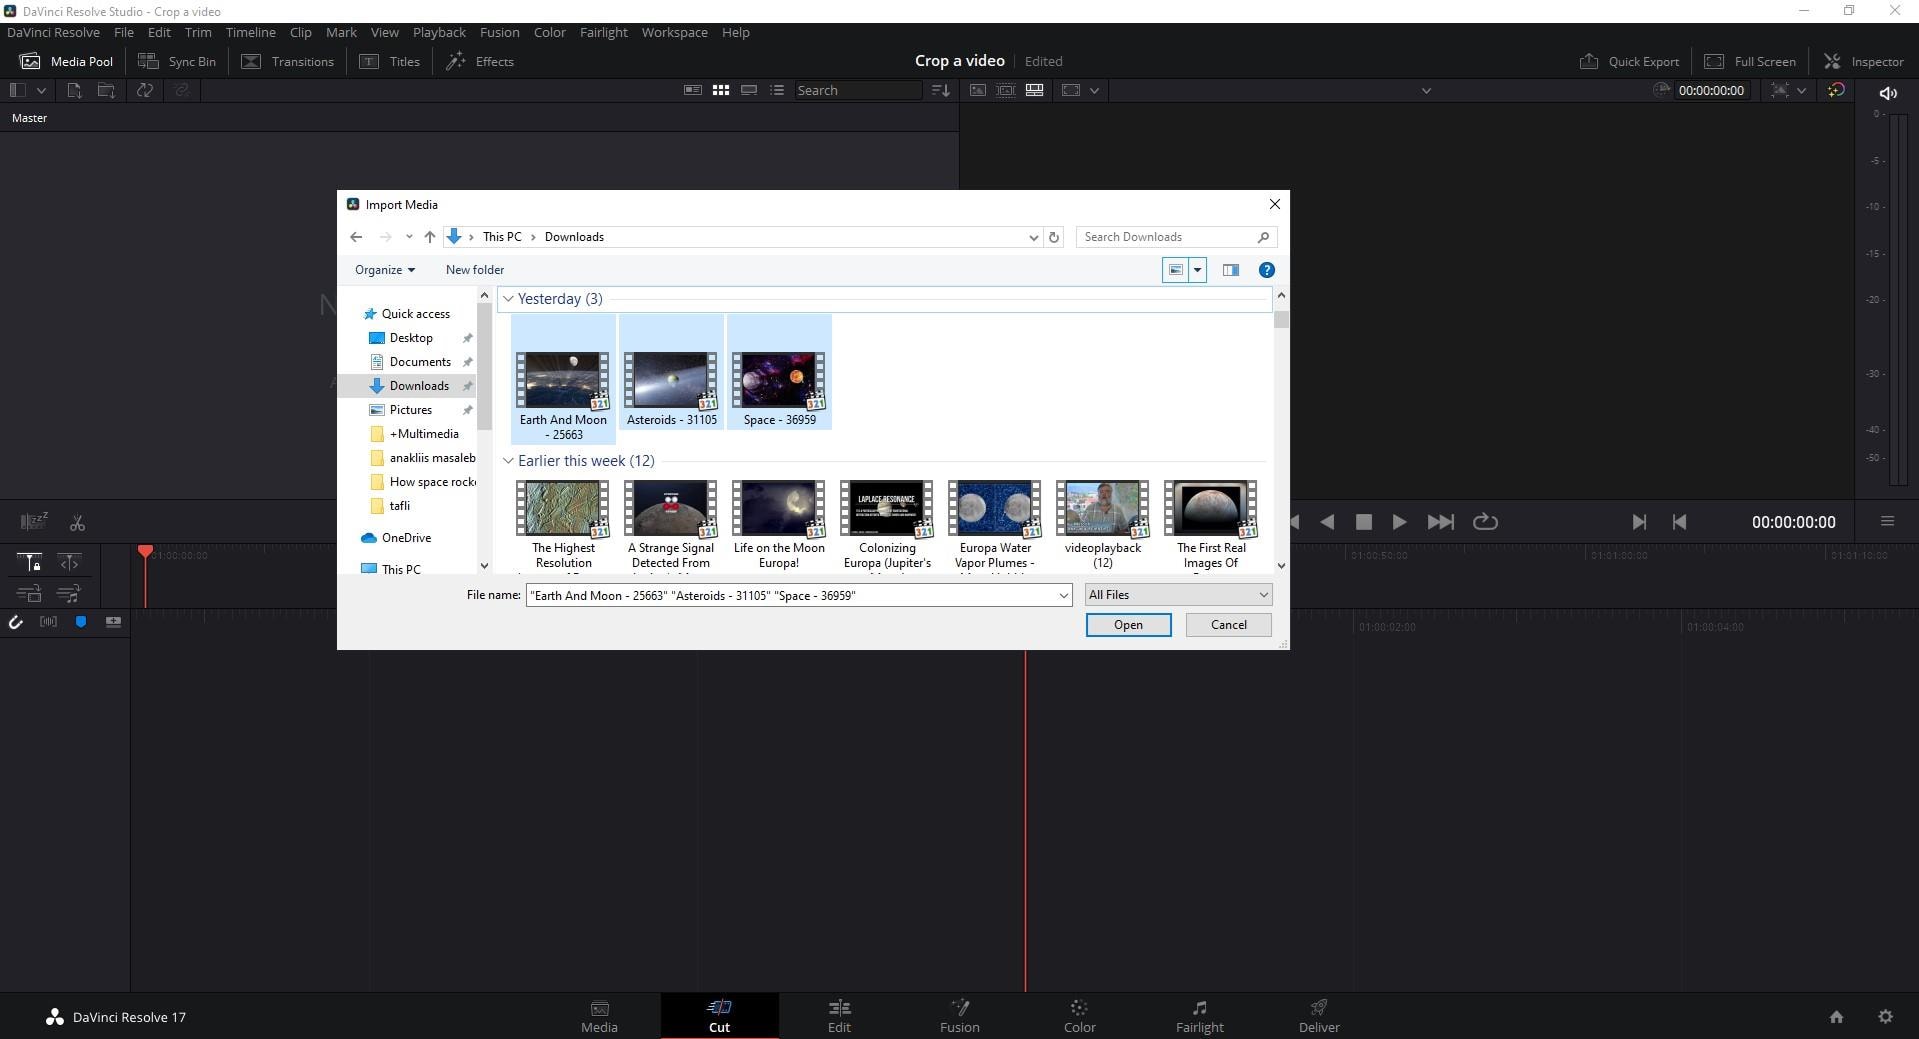
Your chosen file will be added in Media Pool, and to direct it into the sequence, you have to drag and drop it there.
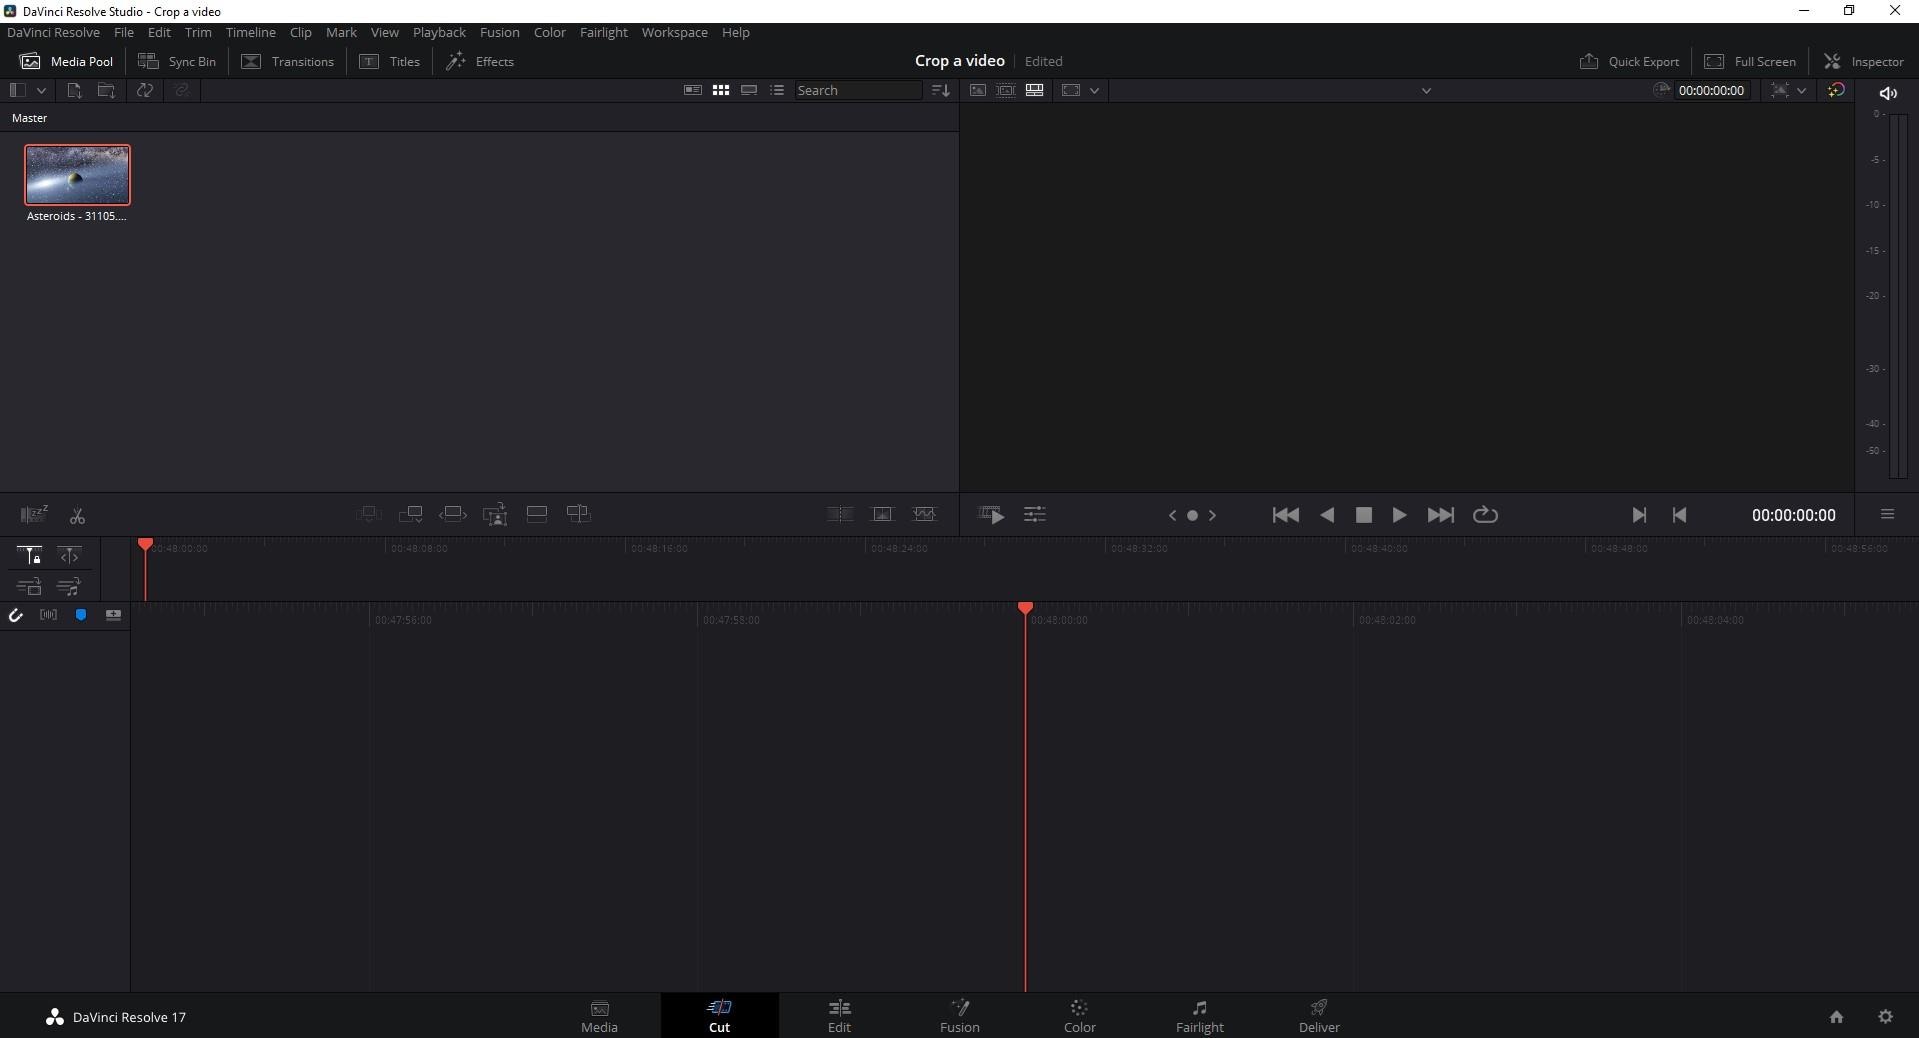
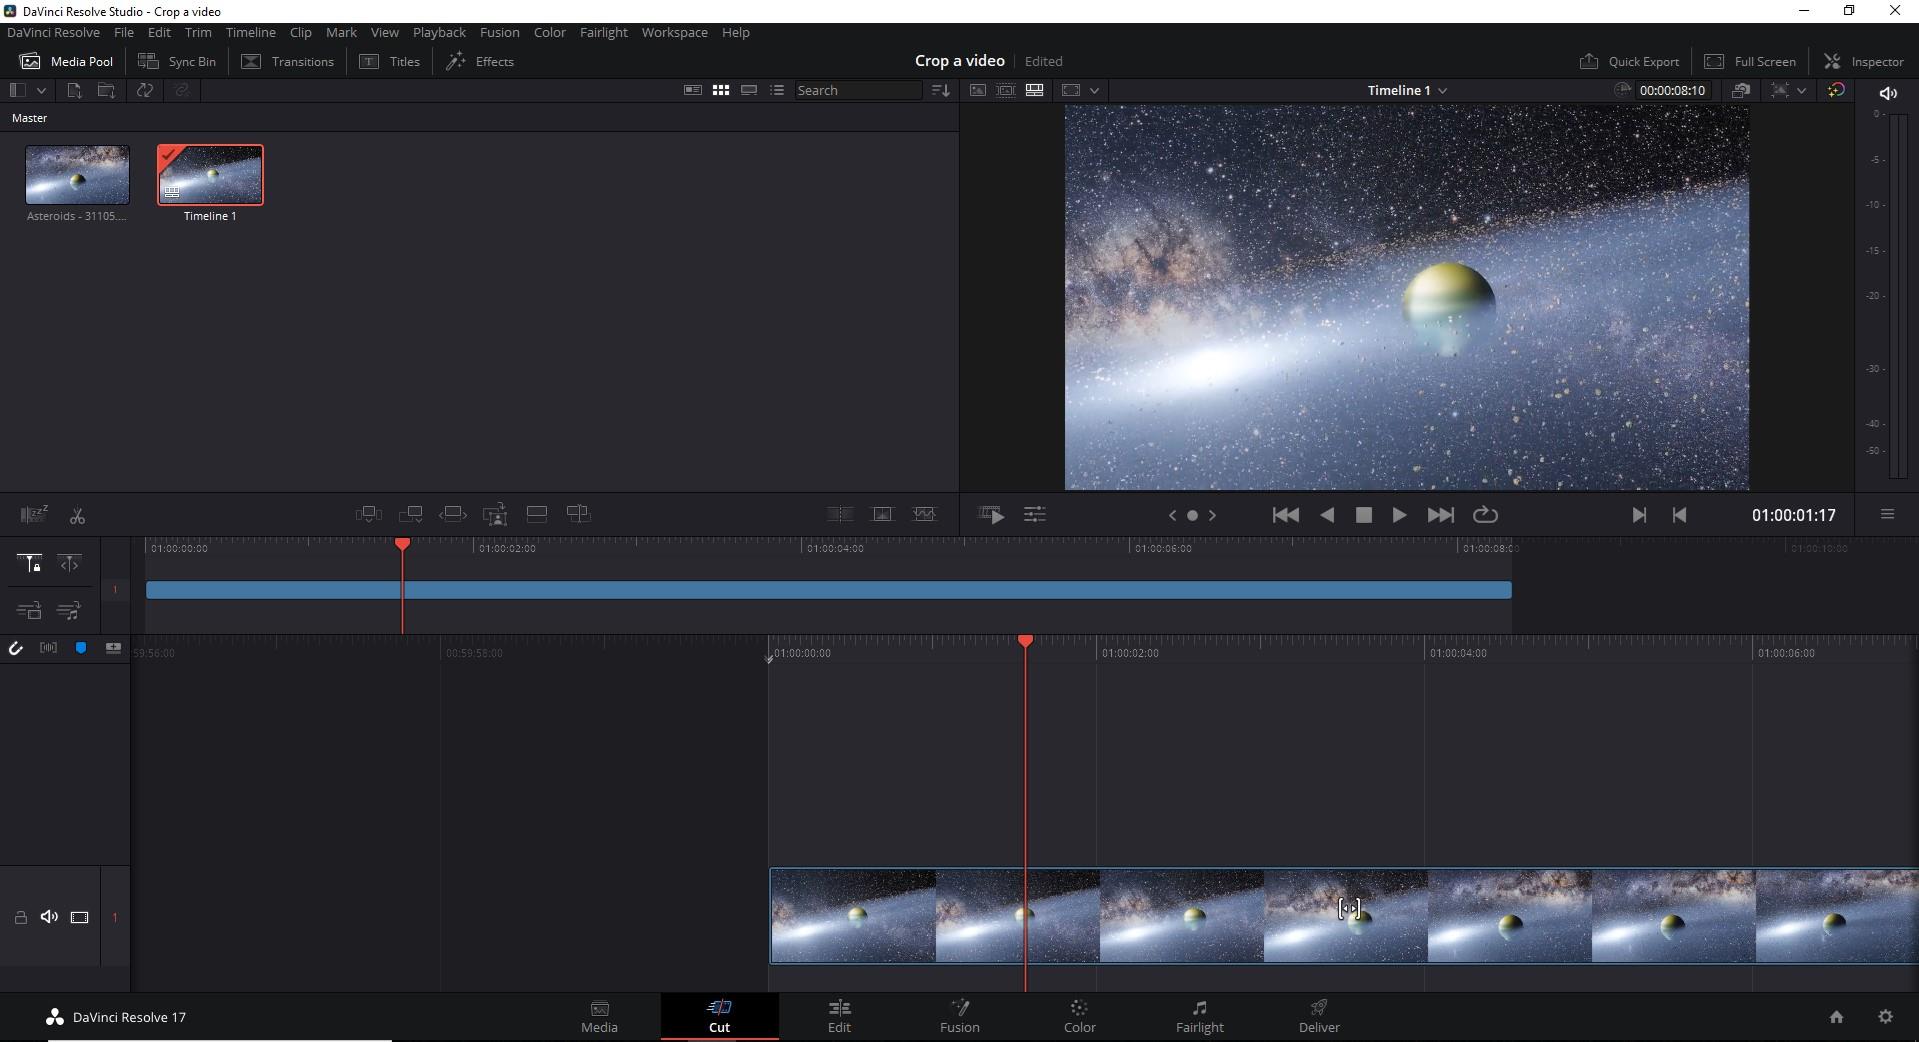
And then you might have difficulty to find the crop button. But here it is – below the screen, on the left, there are two icons, and the second one says – Tools…

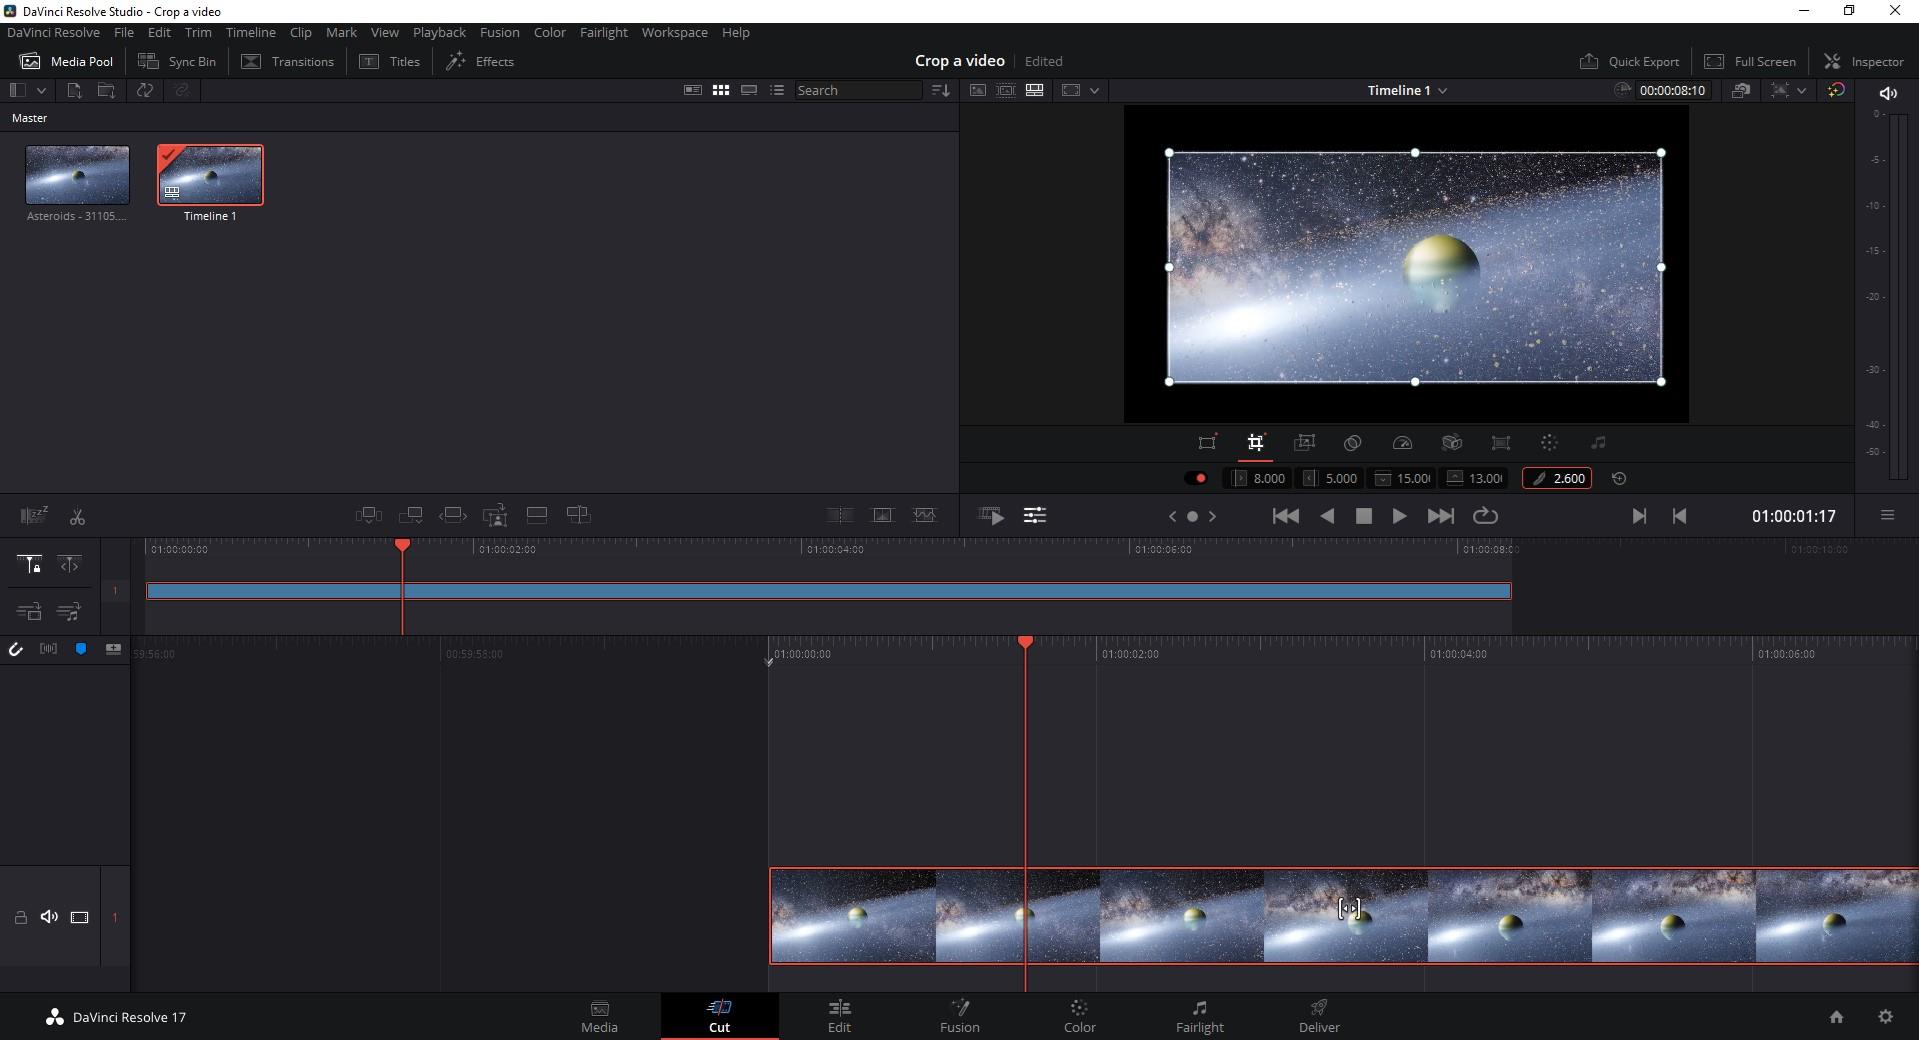
Click on the Tools button and more options will appear down the screen where the video clip is shown. And there, you will notice the famous Crop icon, just the second one, which will put your clip in a new window with the option below to crop each side, plus, to add feather around the cropped video.
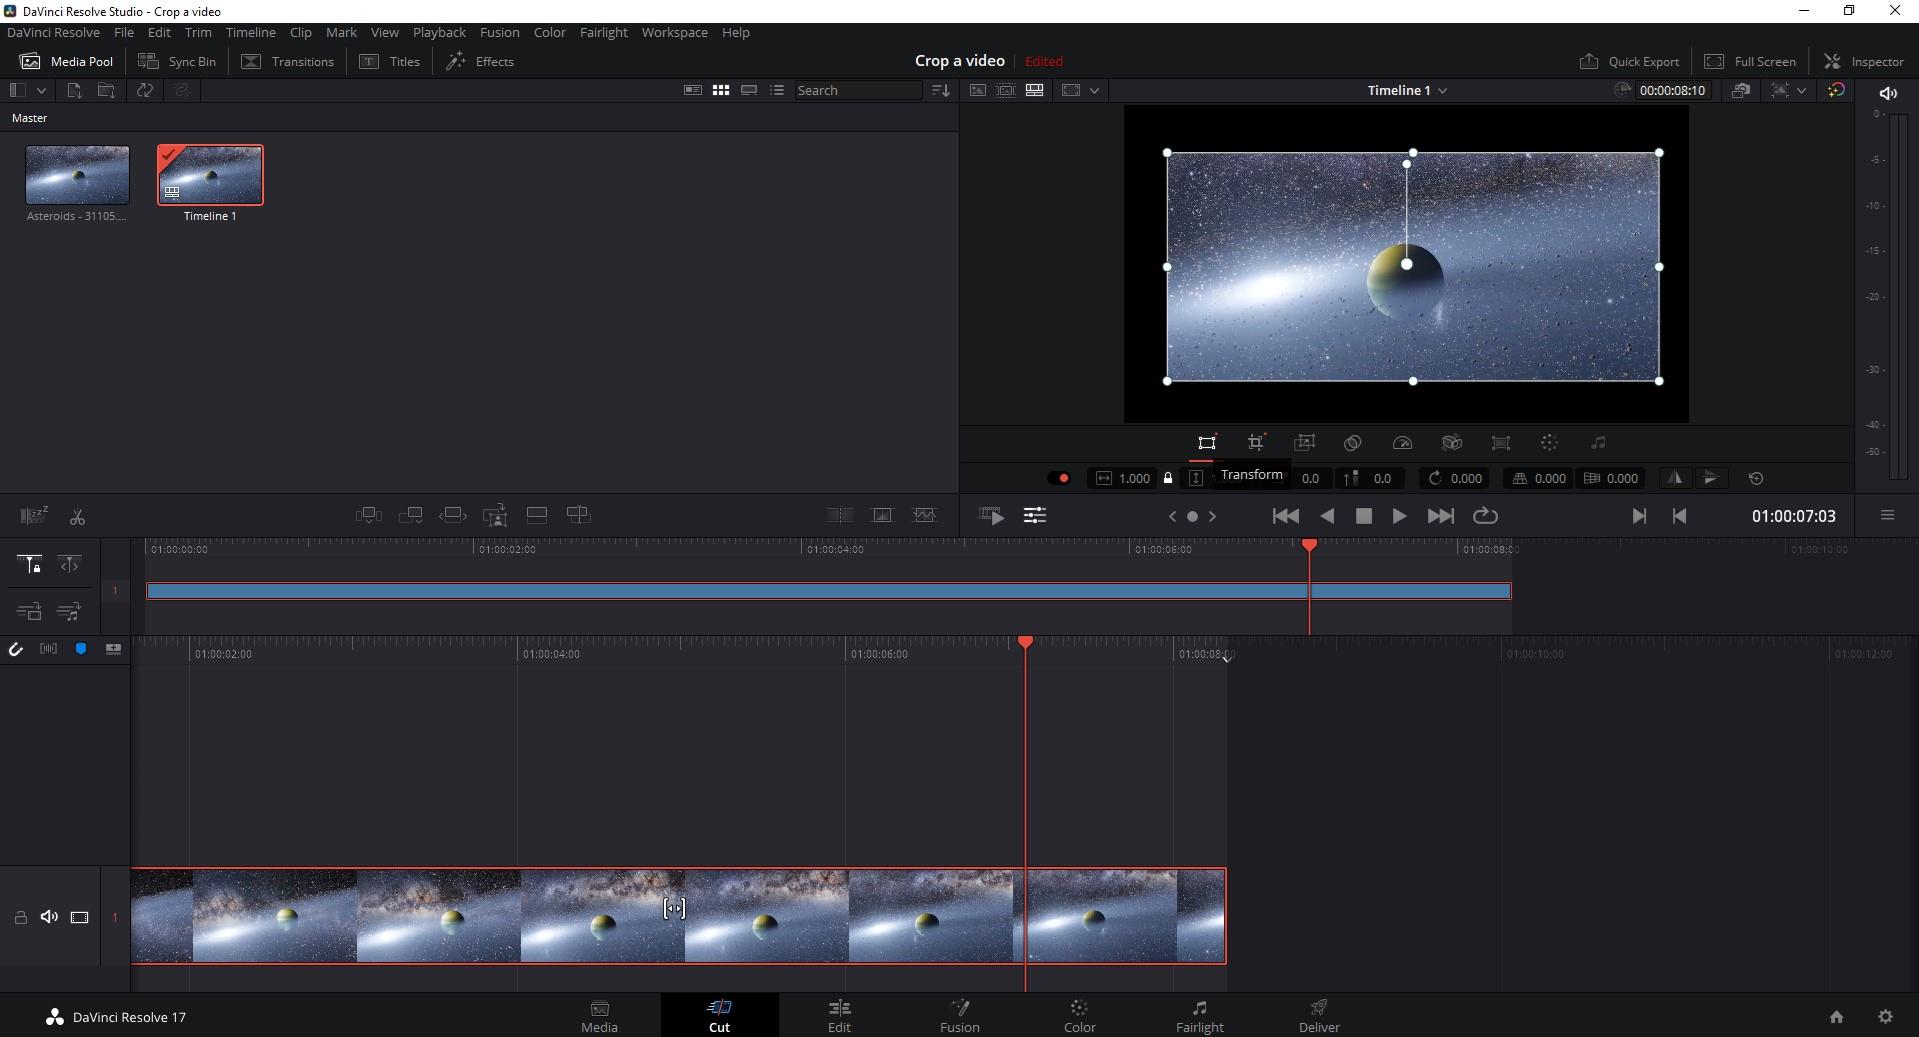
When you are ready to make a video bigger and adjust it to a frame size, you need to choose Transform button, left to the Crop icon. You can “touch” the dots on the video and manually manage the size of your cropped clip.
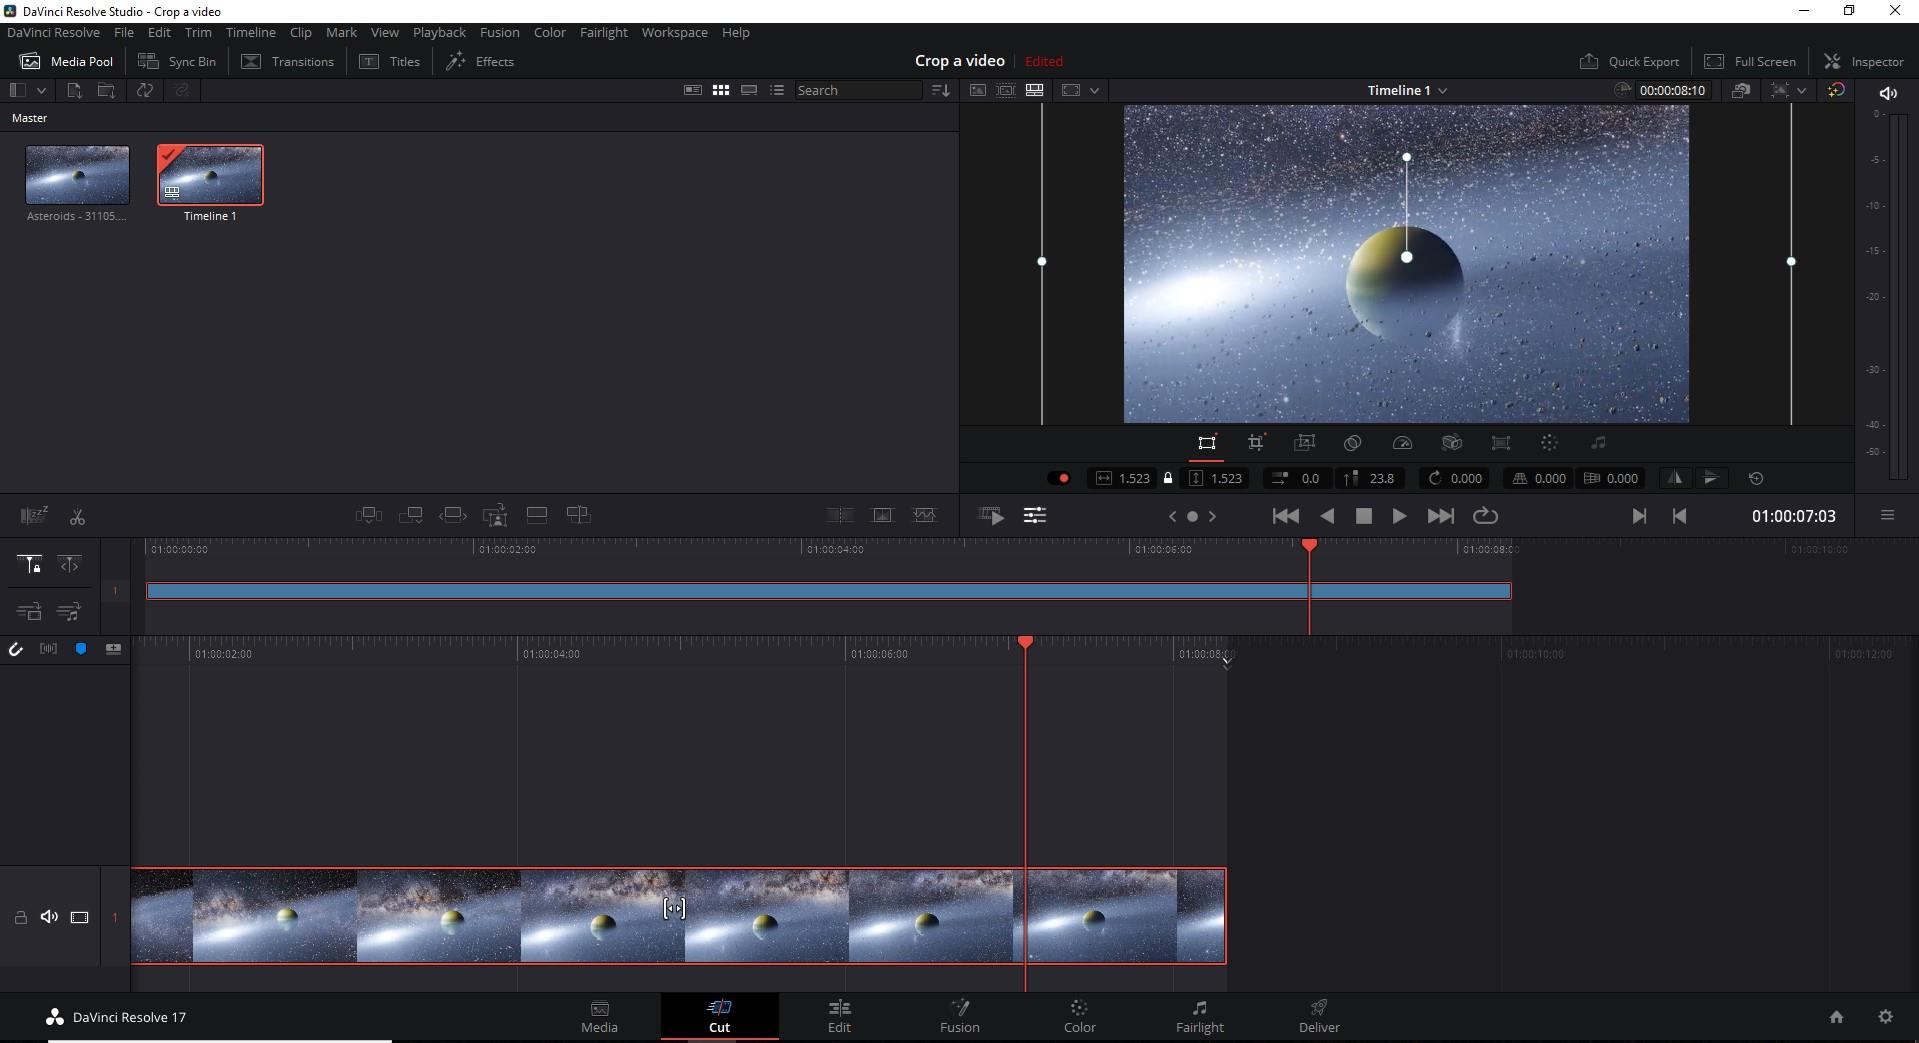
When you are ready to save the video you cropped, find Quick Export – you will see the button above the clip, on the right. A little window with settings will appear, so you can choose the format you want to save your video in, and then, of course, click on Export for the last time.
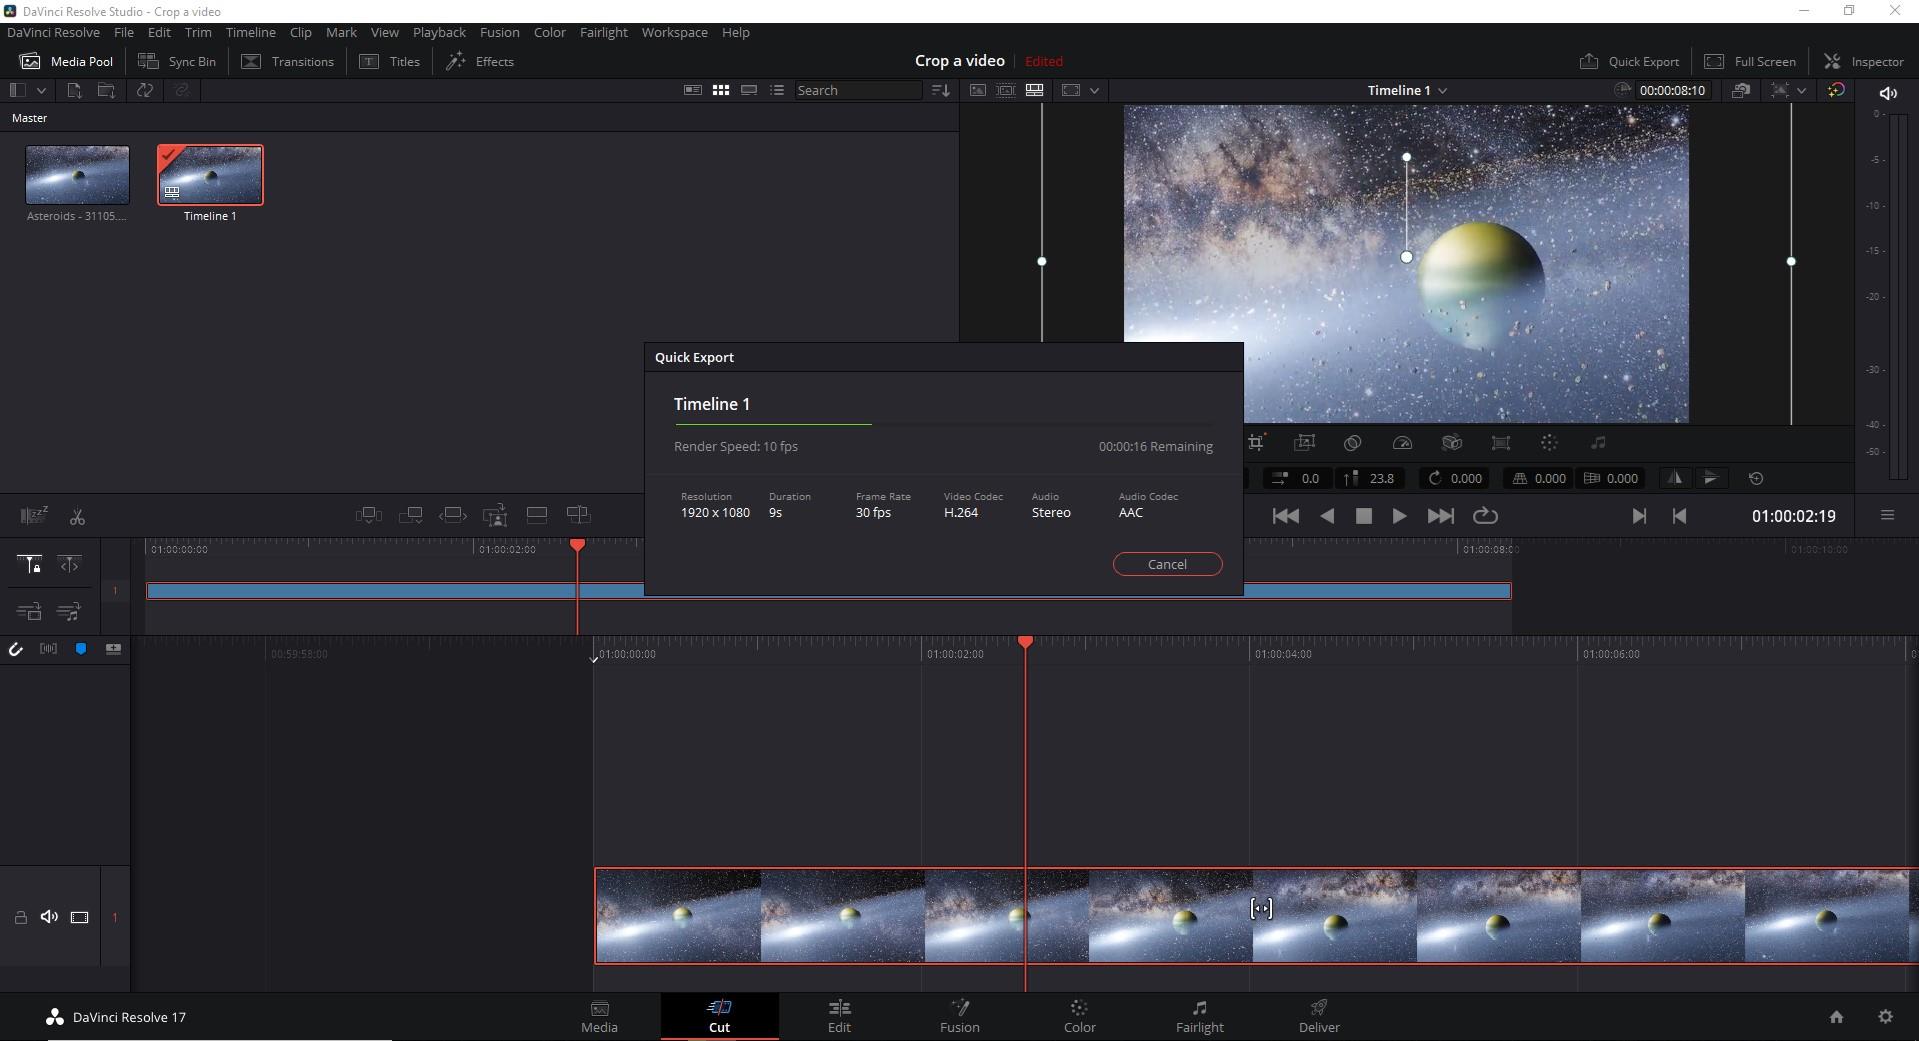
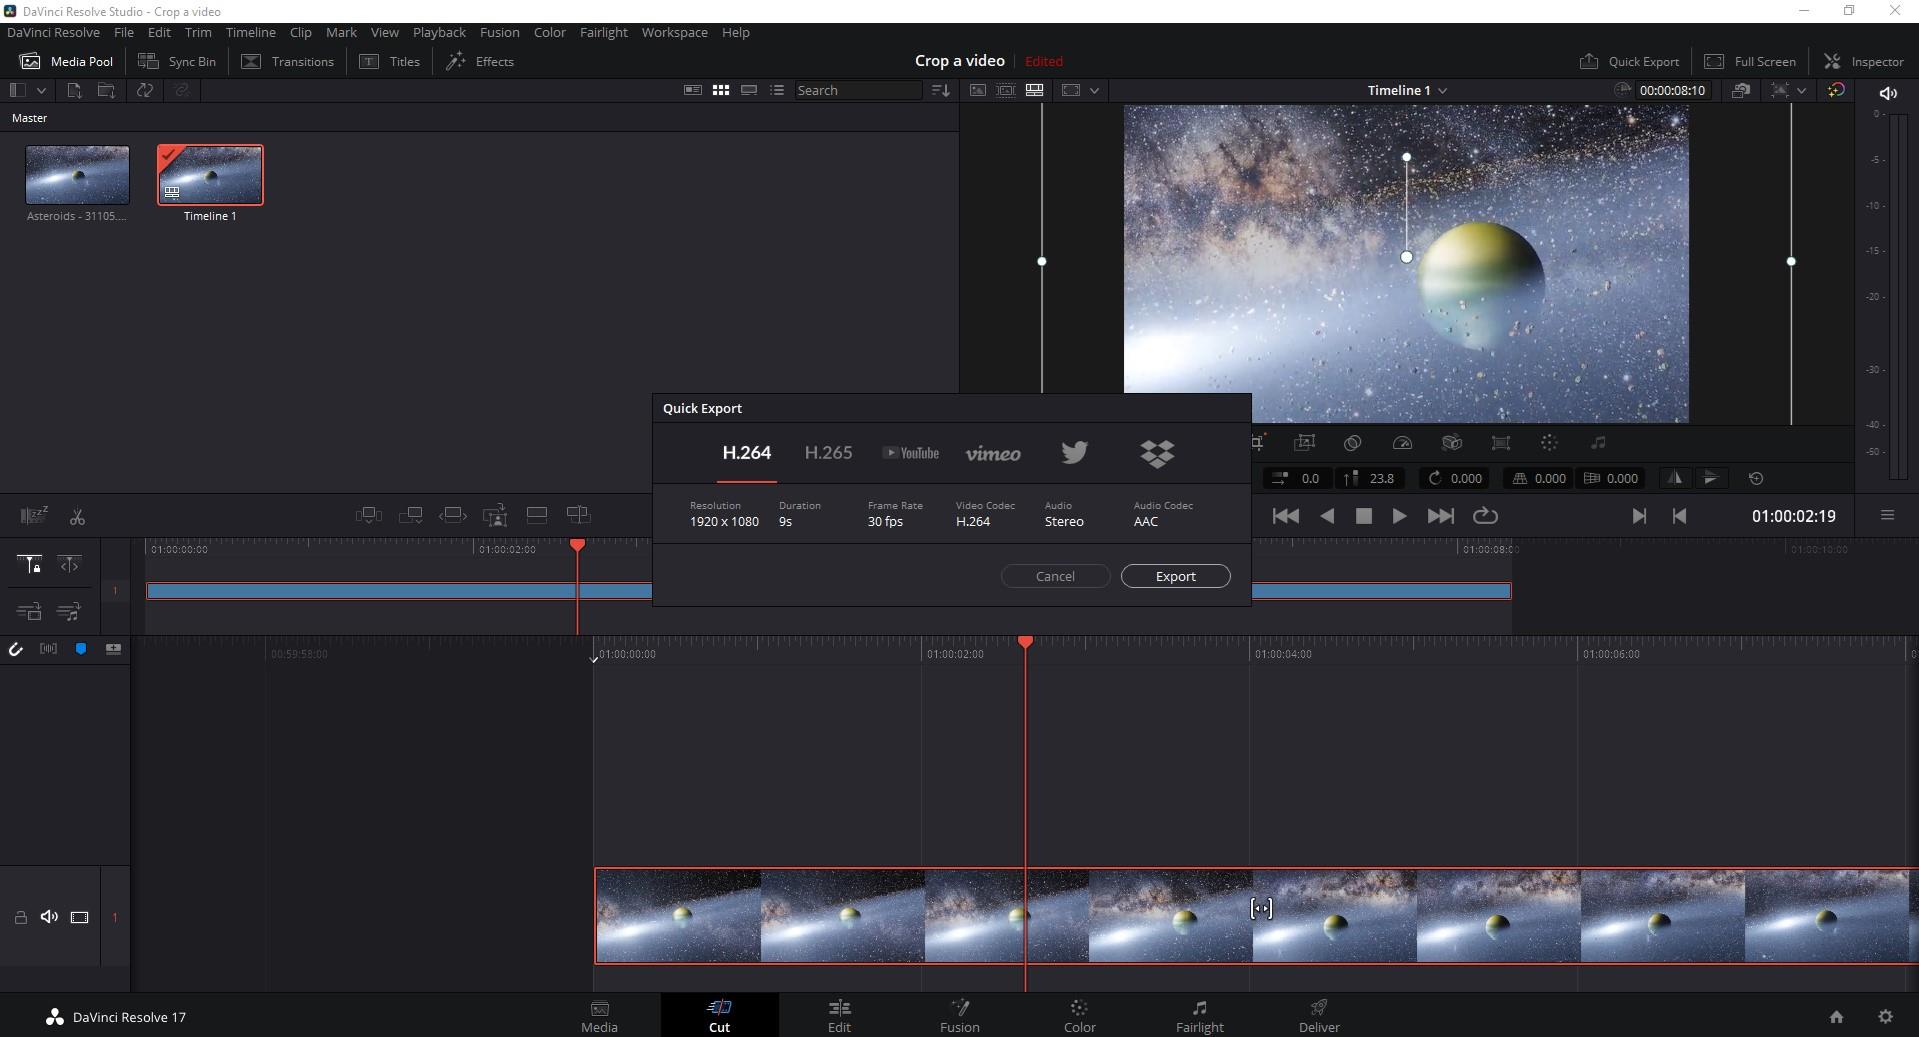
The video will be saved where you wanted to, so, you have just learned – how to crop a video in Davinci Resolve!
Part 2. An easier way to crop a video in Wondershare Filmora
Even though it’s quite easy to crop a video in Davinci Resolve, who knows, maybe for you, other software is preferable? It doesn’t always come down to which is best, but rather, it also boils down to an individual choice – which one do YOU prefer? Especially, let’s say, when it comes to a “cosy” one like Filmora Video Editor is, it’s worth a thought –a pleasant interface and great tools and features attract users and video enthusiasts from all around the world. Filmora is considered as one of the best, the most easy-to-use and, at the same time, advanced software for video editing. So, why not give it a try? Let’s discuss how to crop a video in Wondershare Filmora then, step by step.
For Win 7 or later (64-bit)
For macOS 10.14 or later
First off, we start in the same way – download and install Wondershare Filmora X. Oh – maybe, that is the step you have already taken?..
Click on Import Media Files Here, which will let you add the file(s) you are going to crop.

You will choose your clip(s) you would like to crop and then drag and drop it in the sequence.

Above your video in the sequence you will see little icons and find a Crop one.

After clicking on it, a new window will open – it’s for Crop and Zoom, where you can choose a needed ratio or do it manually (for it, you have to select Custom first).

After clicking OK, your video will be cropped as you like. Then, you can proceed with exporting it – click on Export, choose your preferred settings, and save the video where you want it to be accessible later.

So, in this article, we have discussed software Davinci Resolve and how to crop a video there. A step by step, written guides help you make the best out of your video clips and never lose track of what you are doing, also, comparing different video editing platforms and tools will make you understand which one works best for you or/and your company. Another part of this article was Wondershare Filmora X and how to crop a video there, also, with a detailed guide there. We hope you know a little more about programs, editing, and your own choice!
To touch upon the functions, Davinci Resolve includes modules for video editing, color correction, audio mixing and effects, and visual effects. The interface of it is quite advanced, but would be well and soon understandable for someone who has ever used a similar editing software, such as Adobe Premiere Pro. If you are interested in everything the software has to offer, we recommend watching this very viral beginner tutorial .
Now, back to cropping – so, you want to crop the video you took or got somehow, and you also think about using Davinci Resolve? Cropping, in most cases, meaning different applications, platforms and software, is not a complicated task at all, and you can do it in a very short amount of time in Davinci Resolve, too. Therefore, let’s delve into the steps on how to do it!
First, download and install the software, and when it is finished, launch it. You will see a totally clean program, until you add the video you want to work on. To do so, you have to find File in the top menu, find Import and then choose Media.

Then it will open a new window where you can choose your file…

Your chosen file will be added in Media Pool, and to direct it into the sequence, you have to drag and drop it there.


And then you might have difficulty to find the crop button. But here it is – below the screen, on the left, there are two icons, and the second one says – Tools…

Click on the Tools button and more options will appear down the screen where the video clip is shown. And there, you will notice the famous Crop icon, just the second one, which will put your clip in a new window with the option below to crop each side, plus, to add feather around the cropped video.

When you are ready to make a video bigger and adjust it to a frame size, you need to choose Transform button, left to the Crop icon. You can “touch” the dots on the video and manually manage the size of your cropped clip.


When you are ready to save the video you cropped, find Quick Export – you will see the button above the clip, on the right. A little window with settings will appear, so you can choose the format you want to save your video in, and then, of course, click on Export for the last time.


The video will be saved where you wanted to, so, you have just learned – how to crop a video in Davinci Resolve!
Part 2. An easier way to crop a video in Wondershare Filmora
Even though it’s quite easy to crop a video in Davinci Resolve, who knows, maybe for you, other software is preferable? It doesn’t always come down to which is best, but rather, it also boils down to an individual choice – which one do YOU prefer? Especially, let’s say, when it comes to a “cosy” one like Filmora Video Editor is, it’s worth a thought –a pleasant interface and great tools and features attract users and video enthusiasts from all around the world. Filmora is considered as one of the best, the most easy-to-use and, at the same time, advanced software for video editing. So, why not give it a try? Let’s discuss how to crop a video in Wondershare Filmora then, step by step.
For Win 7 or later (64-bit)
For macOS 10.14 or later
First off, we start in the same way – download and install Wondershare Filmora X. Oh – maybe, that is the step you have already taken?..
Click on Import Media Files Here, which will let you add the file(s) you are going to crop.

You will choose your clip(s) you would like to crop and then drag and drop it in the sequence.

Above your video in the sequence you will see little icons and find a Crop one.

After clicking on it, a new window will open – it’s for Crop and Zoom, where you can choose a needed ratio or do it manually (for it, you have to select Custom first).

After clicking OK, your video will be cropped as you like. Then, you can proceed with exporting it – click on Export, choose your preferred settings, and save the video where you want it to be accessible later.

So, in this article, we have discussed software Davinci Resolve and how to crop a video there. A step by step, written guides help you make the best out of your video clips and never lose track of what you are doing, also, comparing different video editing platforms and tools will make you understand which one works best for you or/and your company. Another part of this article was Wondershare Filmora X and how to crop a video there, also, with a detailed guide there. We hope you know a little more about programs, editing, and your own choice!
To touch upon the functions, Davinci Resolve includes modules for video editing, color correction, audio mixing and effects, and visual effects. The interface of it is quite advanced, but would be well and soon understandable for someone who has ever used a similar editing software, such as Adobe Premiere Pro. If you are interested in everything the software has to offer, we recommend watching this very viral beginner tutorial .
Now, back to cropping – so, you want to crop the video you took or got somehow, and you also think about using Davinci Resolve? Cropping, in most cases, meaning different applications, platforms and software, is not a complicated task at all, and you can do it in a very short amount of time in Davinci Resolve, too. Therefore, let’s delve into the steps on how to do it!
First, download and install the software, and when it is finished, launch it. You will see a totally clean program, until you add the video you want to work on. To do so, you have to find File in the top menu, find Import and then choose Media.

Then it will open a new window where you can choose your file…

Your chosen file will be added in Media Pool, and to direct it into the sequence, you have to drag and drop it there.


And then you might have difficulty to find the crop button. But here it is – below the screen, on the left, there are two icons, and the second one says – Tools…

Click on the Tools button and more options will appear down the screen where the video clip is shown. And there, you will notice the famous Crop icon, just the second one, which will put your clip in a new window with the option below to crop each side, plus, to add feather around the cropped video.

When you are ready to make a video bigger and adjust it to a frame size, you need to choose Transform button, left to the Crop icon. You can “touch” the dots on the video and manually manage the size of your cropped clip.


When you are ready to save the video you cropped, find Quick Export – you will see the button above the clip, on the right. A little window with settings will appear, so you can choose the format you want to save your video in, and then, of course, click on Export for the last time.


The video will be saved where you wanted to, so, you have just learned – how to crop a video in Davinci Resolve!
Part 2. An easier way to crop a video in Wondershare Filmora
Even though it’s quite easy to crop a video in Davinci Resolve, who knows, maybe for you, other software is preferable? It doesn’t always come down to which is best, but rather, it also boils down to an individual choice – which one do YOU prefer? Especially, let’s say, when it comes to a “cosy” one like Filmora Video Editor is, it’s worth a thought –a pleasant interface and great tools and features attract users and video enthusiasts from all around the world. Filmora is considered as one of the best, the most easy-to-use and, at the same time, advanced software for video editing. So, why not give it a try? Let’s discuss how to crop a video in Wondershare Filmora then, step by step.
For Win 7 or later (64-bit)
For macOS 10.14 or later
First off, we start in the same way – download and install Wondershare Filmora X. Oh – maybe, that is the step you have already taken?..
Click on Import Media Files Here, which will let you add the file(s) you are going to crop.

You will choose your clip(s) you would like to crop and then drag and drop it in the sequence.

Above your video in the sequence you will see little icons and find a Crop one.

After clicking on it, a new window will open – it’s for Crop and Zoom, where you can choose a needed ratio or do it manually (for it, you have to select Custom first).

After clicking OK, your video will be cropped as you like. Then, you can proceed with exporting it – click on Export, choose your preferred settings, and save the video where you want it to be accessible later.

So, in this article, we have discussed software Davinci Resolve and how to crop a video there. A step by step, written guides help you make the best out of your video clips and never lose track of what you are doing, also, comparing different video editing platforms and tools will make you understand which one works best for you or/and your company. Another part of this article was Wondershare Filmora X and how to crop a video there, also, with a detailed guide there. We hope you know a little more about programs, editing, and your own choice!
To touch upon the functions, Davinci Resolve includes modules for video editing, color correction, audio mixing and effects, and visual effects. The interface of it is quite advanced, but would be well and soon understandable for someone who has ever used a similar editing software, such as Adobe Premiere Pro. If you are interested in everything the software has to offer, we recommend watching this very viral beginner tutorial .
Now, back to cropping – so, you want to crop the video you took or got somehow, and you also think about using Davinci Resolve? Cropping, in most cases, meaning different applications, platforms and software, is not a complicated task at all, and you can do it in a very short amount of time in Davinci Resolve, too. Therefore, let’s delve into the steps on how to do it!
First, download and install the software, and when it is finished, launch it. You will see a totally clean program, until you add the video you want to work on. To do so, you have to find File in the top menu, find Import and then choose Media.

Then it will open a new window where you can choose your file…

Your chosen file will be added in Media Pool, and to direct it into the sequence, you have to drag and drop it there.


And then you might have difficulty to find the crop button. But here it is – below the screen, on the left, there are two icons, and the second one says – Tools…

Click on the Tools button and more options will appear down the screen where the video clip is shown. And there, you will notice the famous Crop icon, just the second one, which will put your clip in a new window with the option below to crop each side, plus, to add feather around the cropped video.

When you are ready to make a video bigger and adjust it to a frame size, you need to choose Transform button, left to the Crop icon. You can “touch” the dots on the video and manually manage the size of your cropped clip.


When you are ready to save the video you cropped, find Quick Export – you will see the button above the clip, on the right. A little window with settings will appear, so you can choose the format you want to save your video in, and then, of course, click on Export for the last time.


The video will be saved where you wanted to, so, you have just learned – how to crop a video in Davinci Resolve!
Part 2. An easier way to crop a video in Wondershare Filmora
Even though it’s quite easy to crop a video in Davinci Resolve, who knows, maybe for you, other software is preferable? It doesn’t always come down to which is best, but rather, it also boils down to an individual choice – which one do YOU prefer? Especially, let’s say, when it comes to a “cosy” one like Filmora Video Editor is, it’s worth a thought –a pleasant interface and great tools and features attract users and video enthusiasts from all around the world. Filmora is considered as one of the best, the most easy-to-use and, at the same time, advanced software for video editing. So, why not give it a try? Let’s discuss how to crop a video in Wondershare Filmora then, step by step.
For Win 7 or later (64-bit)
For macOS 10.14 or later
First off, we start in the same way – download and install Wondershare Filmora X. Oh – maybe, that is the step you have already taken?..
Click on Import Media Files Here, which will let you add the file(s) you are going to crop.

You will choose your clip(s) you would like to crop and then drag and drop it in the sequence.

Above your video in the sequence you will see little icons and find a Crop one.

After clicking on it, a new window will open – it’s for Crop and Zoom, where you can choose a needed ratio or do it manually (for it, you have to select Custom first).

After clicking OK, your video will be cropped as you like. Then, you can proceed with exporting it – click on Export, choose your preferred settings, and save the video where you want it to be accessible later.

So, in this article, we have discussed software Davinci Resolve and how to crop a video there. A step by step, written guides help you make the best out of your video clips and never lose track of what you are doing, also, comparing different video editing platforms and tools will make you understand which one works best for you or/and your company. Another part of this article was Wondershare Filmora X and how to crop a video there, also, with a detailed guide there. We hope you know a little more about programs, editing, and your own choice!
Also read:
- In 2024, WebM to GIF Converters (Online and Offline Solutions)
- 2024 Approved How to Customize Your Loading Text Effect?
- In 2024, 15 Best Free Cinematic LUTs for Your Film
- New In 2024, Adjust the TikTok Videos Length to Make Them Captivating
- New 5 Tried-And-True Methods to GIF Making for 2024
- New How to Create Cooking Video Intro and End Screen for YouTube Channel?
- In 2024, Kdenlive Video Editor Review
- New 2024 Approved VSDC Free Video Editor Review
- Updated Ways to Make Sure Your Recording Slideshow in Powerpoint Is Not Wrong
- New Learn Color Correction in After Effects with These Videos for 2024
- This Article Discusses the Splitting of the Video Clips in DaVinci Resolve Explicitly. There Is Also a Brief Description of Its Best Alternative, Wondershare Filmora. This Is Also Practically Relevant and Reasonable as Well
- New How to Create Your Own LOL Montage Video for 2024
- How to Create Discord GIF Avatar in Depth Guide
- In 2024, Do You Have Images in GIF Format, and Do You Find Converting Them to AVI Pretty Tricky? Please Stay on This Article as Well Guide You with Tools Thatll Help You Convert Your GIF to AVI Quickly and with Ease
- 2024 Approved Add Emoji to Linkedin Post – 5 Tips You Need to Know
- New Applying and Creating Gif Background on Your Devices and Presentations Is Not Hard. Read Below to Learn How to Apply a GIF Background on All Devices
- Exploring the Top Professional Tools to Perform Mask Tracking
- To Help You Perform This Action, in This Article, We List the Steps You Will Need for Cropping Into Video Clips with PowerDirector. As an Added Bonus, We Have Also Included the Method to Perform the Same Actions in WonderShare Filmora for 2024
- New Camtasia vs Final Cut Pro for 2024
- Updated How to Add Text Behind Objects in Video for 2024
- In 2024, Wish to Rock on YouTube, but Lacking Tricks? Here, We Will Tell You Everything About How the YouTube Algorithm AI Works and How You Can Perform Well According to AI
- New TEXT REVEAL Animation | Easy Masking Filmora
- Updated Want to Find a Good Camera for YouTube? This Article Brings You some of the Best Options of Different Varieties for Your Channel
- This Article Discusses What Is Adobe Premiere Pro, How to Download, Install and Use It, and Its Key Features. It Further Discusses Its Alternative for Editing Your Videos and More. Check Out Now
- Updated 2024 Approved Camtasia Review – Is It The Best Video Editor?
- Updated Ideas That Will Help You Out in Making Transparent Image for 2024
- 2024 Approved What Are the Best 10 GIF Creator?
- In 2024, Best Voice Changers for WhatsApp Free Included
- Updated How to Share YouTube Video on Zoom?
- Updated Turn Your Text Into a Podcast Made Possible (+ EASY Editing Tips) for 2024
- The Way to Make Dynamic Video Collages?
- In This Article Let Me Share with You How to Start a Vlog? Ideas and Any Tips for You to Start Your Own Vlogging Channel for 2024
- Updated An Easy-to-Understand Guide on How to Loop a Video on Canva. This Article Is Sure to Help You if This Is Your First Time Attempting a Loop Video
- 2024 Approved The Quicktime Software with Its Latest Version Gives You an Option to Change the Speed of an Audio or Video File. It Makes It Easy to Watch the Slow-Motion Video or Fast-Forward the Audio
- 2024 Approved 20 Must-Have Graduation Songs
- Updated How to Create Cinematic Style Videos? Easy Guide for Beginners
- In 2024, How To Use Slow Zoom Effect in Your Video?
- In 2024, Here You Can Lean About the Different Ways for GIMP Transparent Background PNG Format Files
- How Can You Make a Slideshow Look Aesthetic? Follow the Given Discussion to Learn About Creating an Aesthetic Slideshow All by Yourself for 2024
- 3 Solutions to Hard Reset ZTE Blade A73 5G Phone Using PC | Dr.fone
- In 2024, The Ultimate Guide How to Bypass Swipe Screen to Unlock on Xiaomi Redmi Note 13 Pro+ 5G Device
- In 2024, How to Change/Fake Your Realme 11 Pro Location on Viber | Dr.fone
- Calls on Motorola Moto E13 Go Straight to Voicemail? 12 Fixes | Dr.fone
- Top Apps and Online Tools To Track Infinix Hot 30 5G Phone With/Without IMEI Number
- In 2024, Hassle-Free Ways to Remove FRP Lock on Xiaomi Redmi Note 13 Pro 5G Phones with/without a PC
- In 2024, Ultimate Guide on Vivo X100 FRP Bypass
- In 2024, Top 6 Apps/Services to Trace Any Lenovo ThinkPhone Location By Mobile Number | Dr.fone
- 6 Fixes to Unfortunately WhatsApp has stopped Error Popups On Nubia Red Magic 9 Pro+ | Dr.fone
- A Complete Guide To OEM Unlocking on Realme 11 5G
- In 2024, Ultimate Guide to Catch the Regional-Located Pokemon For Vivo Y100 | Dr.fone
- In 2024, What You Want To Know About Two-Factor Authentication for iCloud On your iPhone 6
- 3 Solutions to Hard Reset Honor X9a Phone Using PC | Dr.fone
- 9 Best Phone Monitoring Apps for Honor Play 7T | Dr.fone
- Title: Detailed Tutorial to Rotate a Video in Cyberlink PowerDirector for 2024
- Author: Chloe
- Created at : 2024-05-20 03:38:28
- Updated at : 2024-05-21 03:38:28
- Link: https://ai-editing-video.techidaily.com/detailed-tutorial-to-rotate-a-video-in-cyberlink-powerdirector-for-2024/
- License: This work is licensed under CC BY-NC-SA 4.0.

