
:max_bytes(150000):strip_icc():format(webp)/photo-editor-working-on-computer-at-desk-in-office-946928370-5b85791746e0fb0025b40d84.jpg)
Do You Know Everything Related to Wondershare Filmoras Video Editing Interface? If You Are Unaware of It, Read and Learn About Filmoras Interface for 2024
Do You Know Everything Related to Wondershare Filmora’s Video Editing Interface? If You Are Unaware of It, Read and Learn About Filmora’s Interface
The importance of good editing software depends on its features and interface. A video editing interface is important when it comes to choosing editing software. The more user-friendly the interface, the easier it is to use the particular tool for editing. Many video editing software is available, but not every tool is popular. One of the reasons is their interface is not friendly enough for the user.
However, getting to know the software’s interface is as crucial as using the tool. Being familiar with the interface will help you understand the tool even better. An interface is like a map; if you’re familiar with the map, you can edit your videos using the tool. This article will explain the user interface design of Wondershare Filmora in detail.
Part 1: How Has Video Editing Improved Over the Years?
Video editing has significantly improved over the years due to advancements in technology. The development of new software and hardware has improved the editing process. You can read some of the most prominent ways video editing has improved.
Edit Video for Free For Win 7 or later(64-bit)
Edit Video for Free For macOS 10.14 or later


1. Digital Editing
The transition from analog to digital editing revolutionized the field. Digital editing eliminated the need for physical film and allowed for non-linear editing. In this way, video clips could be rearranged, trimmed, and modified on a computer. This digital workflow provided greater flexibility, efficiency, and creative possibilities.
2. Improved Software Capabilities
Video editing software has become more powerful with better features. Modern software offers a wide range of tools for editing for the user. These tools have offered color correction, visual effects, and audio mixing. The interfaces have become more friendly, making editing accessible to more people.
3. Real-Time Playback and Rendering
Advancements in hardware and software have enabled real-time video playback. It further eliminates the need for time-consuming rendering during the editing process. Additionally, it allows editors to see their changes, improving efficiency and productivity.
4. High-Resolution Video
With the availability of high-resolution cameras and displays, the quality has improved. Now, video editing has adapted to handle larger and more detailed video files. Such software can edit and export videos in higher resolutions, even up to 4K and 8K.
5. Special Effects and Visual Enhancements
These editing tools can handle complex visual effects and enhancements. Features such as green screens, motion tracking, and 3D effects have become easier to use. Furthermore, these tools allow editors to achieve sophisticated and professional-looking results.
6. Collaboration and Cloud-Based Editing
The rise of cloud computing has introduced new opportunities for collaboration in video editing. Such editing platforms enable multiple editors to work on the same project. Individuals can share files, get inspiration and collaborate remotely. This feature has facilitated more efficient workflows and improved collaboration among people.
Edit Video for Free For Win 7 or later(64-bit)
Edit Video for Free For macOS 10.14 or later
7. Faster Rendering and Exporting
Video editing software now utilizes multi-threading and GPU acceleration to speed up rendering. These new advancements in technology also help in exporting processes. It reduces the time required to generate the final video output. Additionally, it allows editors to meet tight deadlines and work more quickly.
8. Integration with Other Software and Formats
Editing tools have improved their compatibility with other software and formats. They now integrate with visual effects software, audio editing tools, and other tools. Additionally, these tools support a wide range of video file formats. This compatibility means easier import and export of videos from various sources.
9. Mobile Editing
Smartphones and tablets have brought video editing to mobile devices. Mobile apps now offer robust editing capabilities, allowing users to edit videos on the go. This advancement has increased accessibility and convenience for users as well. Now, people prefer to edit videos using their mobile devices.
10. AI-Assisted Editing
Artificial Intelligence (AI) is now integrated into photo and video editing tools. AI can automate certain repetitive tasks and suggest edits or effects based on patterns. This technology also makes change and even suggest edits by learning your preferences. This can save you time and assist editors in making creative decisions.
Part 2: What Should A Good Video Editing Software Constitute?
A good editing tool should possess several key features and functionalities. The purpose of these tools is to provide a comprehensive and efficient editing experience. Here are some important aspects that an excellent video editing tool should have. This help develops a narrative involving its user interface design:
Edit Video for Free For Win 7 or later(64-bit)
Edit Video for Free For macOS 10.14 or later
1. Comprehensive Editing Tools
The software should offer editing tools and features to accommodate different editing needs. This includes basic functions like trimming, cutting, and merging clips. Moreover, it should also offer some advanced capabilities and editing options as well. The software should provide flexibility and control over the editing process.
2. Support for Various Video Formats
Such software should support a wide range of video formats and codecs. This ensures compatibility with different cameras, file types, and video sources. It also allows editors to work with diverse content without the need for additional file conversion.
3. User-Friendly Interface
An editing tool should have a friendly interface and be easy to use. It also should allow users to navigate through the editing process smoothly. Such tools should provide easy access to tools, menus, and features. Additionally, a friendly video editing interface makes the tool simple for everyone.
4. High-Quality Output
These tools should be capable of producing high-quality video output. It should support exporting videos in different resolutions. This includes standard definition, high definition, and even 4K or higher resolutions. The ability to export in different formats and compression options is also valuable.
5. Efficient Performance
Video editing can be resource-intensive, so good software means efficient performance. It should utilize system resources and provide smooth playback for previewing. Additionally, it should minimize rendering times for quicker previews and exports.
6. Audio Editing Capabilities
Audio is one of the most important components of the video editing process. So, the software should offer different audio editing features. This includes the ability to adjust volume levels, apply audio effects, and much more. Furthermore, it should synchronize audio with video and support multiple audio tracks for editing as well.
7. Special Effects and Visual Enhancements
Advanced video editing software often includes special effects and other enhancement options. Filters, overlays, motion graphics, and other key functionalities should be offered. These features allow editors to improve their videos and achieve specific creative objectives.
8. Collaboration and Sharing Options
Powerful editing tools should facilitate collaboration among editors or team members. It should offer features like project sharing and version control. Also, it should provide users the option to work on the same project simultaneously. Additionally, seamless integration with cloud storage or online platforms can be beneficial.
9. Regular Updates and Support
Recommended tools should have a development team that regularly releases updates. The constant updates should address bugs, improve performance, and introduce new features. Timely customer support is also valuable for users to seek assistance.
10. Cost and Licensing Options
Consideration of the software’s pricing model and licensing options is important. Some software may offer a one-time purchase with perpetual usage. However, many others may have subscription-based models. It’s important to assess the pricing structure and determine if it aligns with your budget and editing needs.
Part 3: Wondershare Filmora: Does It Cover All The Points of a Good Video Editing Software?
Wondershare Filmora is a comprehensive video editing software that is available for everyone. One can download this tool from its official website and start editing. This tool provides a platform for professionals and for those who started editing. This tool allows you to edit your videos with many editing options. Additionally, this tool provides features from basic to more advanced ones.
Edit Video for Free For Win 7 or later(64-bit)
Edit Video for Free For macOS 10.14 or later
We have learned previously about what a good editing tool should offer. So, let’s discuss here what Wondershare Filmora has to offer its users.

Key Features of Wondershare Filmora
1. Wondershare Filmora is a complete editing software that you can download. It offers some basic editing options to more professional and advanced ones. You can find it to be the best platform to edit YouTube videos and more.
2. This tool has a friendly and easy-to-use interface. It makes navigation and editing easy, which further makes the process seamless.
3. The software interface supports different formats for images and videos. It includes PAL, MP4, JPEG, Cineform, and more. This makes the import and export of the files easier to share and edit.
4. Filmora is an editing platform that has the capability of handling higher resolutions. Using this tool, you can import and export your video files in up to 4K resolution.
5. Another excellent key feature of this tool is that you can add your audio files for edit . You can import your own audio files or can choose from the in-built library for your videos.
6. If you’re looking for a unique feature, then this feature will amaze you. Wondershare Filmora is equipped with the latest technology and is going through frequent updates. These updates help you to cut down the rendering speed.
7. You have so much to explore with this tool. Filmora has an in-built library that includes presets, effects, filters, and more. Users can use these presets for their editing work.
8. Additionally, if you want to share your videos for different platforms, you can with this tool. This software lets you change the aspect ratio of your video so you can easily share it on different platforms.
9. Besides editing options and features, this tool goes through constant updates and improvements. The latest version of Filmora comes with multiple AI features and support.
10. Lastly, Wondershare Filmora is free software but also offers premium plans for users. You can choose from different subscription plans.
Pricing Plans Offered by Wondershare Filmora
Are you satisfied with working on Wondershare Filmora’s interface? Look into the provided pricing table for some more prominent details:
| Type | Package | Pricing |
|---|---|---|
| Individual | Month Plan | $19.99 |
| Cross-Platform Plan | $69.99/Year | |
| Perpetual Plan | $79.99 | |
| Team & Business | Annual Plan | $155.88/User |
| Education | Monthly Plan | $19.99 |
| Annual Plan | $40.99 | |
| Perpetual Plan | $49.99 |
Part 4: Explaining The Interface - Wondershare Filmora
If you want to learn about the interface of Wondershare Filmora, you’re at the right place. Here you can learn about the video editing interface and the options available in the tool.
Edit Video for Free For Win 7 or later(64-bit)
Edit Video for Free For macOS 10.14 or later
1. The Main Screen
The main interface of the tool has all the essentials available. You will find a “New Project” tab, and beneath that, you will find different options for editing. Moreover, you will find the aspect ratio, from where you can choose preferred video dimensions. On the left side panel, you have the project options and the “Creator Hub” tab. Besides this, you have the search icon to find your previous projects.

2. Importing Videos
You can import your videos by pressing the designated key. This option allows you to import your media files. Furthermore, you can even import your media by dragging and dropping in the import tab. The import drop-down menu provides multiple import options. This menu also allows you to import your videos from your mobile or external camera.

3. Using the Stock Media
Wondershare Filmora allows you to add free stock media to your videos. The “Stock Media” option has a search option from where you can find your desired media files. Furthermore, this option has multiple free stock media tabs. You can choose the platform from the tabs where you can search and select stock media files.

4. Adding Audios to Videos
This tool allows you to add music or audio to your editing timeline. The tool has a separate “Audio” button, which allows you to select in-built audio files. You can search different sound effects and music files from this tab. Moreover, you can drag and drop your preferred audio file to the timeline. You can even select the audio file in the timeline to make further changes to the file.

5. Using Titles For Explanation
By pressing the “Titles” button, you can select the opening of your title template. This tool has many different title templates available that you can use for your video files. Moreover, you can find categorized titles from the list. This option also allows you to search for different title styles. You can even make changes to your title screen.

Edit Video for Free For Win 7 or later(64-bit)
Edit Video for Free For macOS 10.14 or later
6. Adding Transitions and Effects
Filmora interface is packed with many filters, overlays, and even transition effects. You can choose from different effects and filters by dragging and dropping to your layer. To apply a transition between two clips, simply place the transition effect between those clips. Additionally, you can change the opacity of the applied filters. Also, you can change the duration of your transition effects.

7. Inducing Elements for Improvement
In addition to overlays, filters, and effects, you can also use other elements too. For this, Wondershare Filmora allows you to add stickers to your video edit. By pressing the option, you will find stickers in many categories. You can select stickers from the list; otherwise, you can search for stickers using a keyword. Apply your favorite sticker by selecting and dropping it on a particular layer in the timeline.

8. Getting Aware of the Timeline
The timeline is the section where you add all the layers, effects, and other adjustments to your project. In the timeline section, you will find a particular layer’s hide and unhide option. Moreover, you can mute and unmute the audio of your media file. You can even find an option to manage your tracks in this section. Additionally, there is a Playhead that can also trim your video clip at a specific duration.

9. Things To Know While Exporting
While exporting your project, you will find many options, such as exporting to your device. Furthermore, you can even export your file directly to a specific platform from Filmora. In addition to this, you can even burn your video file to a DVD using this option. Users can also add a thumbnail of their edited video directly from this tool.

Conclusion
Understanding your video editing interface gives you greater creative control over your projects. You can explore and experiment with various editing options and more. Investing time in your tool is important if you’re a professional or an enthusiast. Wondershare Filmora is an amazing editing tool, and its interface is created to make things easy for you.
Edit Video for Free For macOS 10.14 or later
1. Digital Editing
The transition from analog to digital editing revolutionized the field. Digital editing eliminated the need for physical film and allowed for non-linear editing. In this way, video clips could be rearranged, trimmed, and modified on a computer. This digital workflow provided greater flexibility, efficiency, and creative possibilities.
2. Improved Software Capabilities
Video editing software has become more powerful with better features. Modern software offers a wide range of tools for editing for the user. These tools have offered color correction, visual effects, and audio mixing. The interfaces have become more friendly, making editing accessible to more people.
3. Real-Time Playback and Rendering
Advancements in hardware and software have enabled real-time video playback. It further eliminates the need for time-consuming rendering during the editing process. Additionally, it allows editors to see their changes, improving efficiency and productivity.
4. High-Resolution Video
With the availability of high-resolution cameras and displays, the quality has improved. Now, video editing has adapted to handle larger and more detailed video files. Such software can edit and export videos in higher resolutions, even up to 4K and 8K.
5. Special Effects and Visual Enhancements
These editing tools can handle complex visual effects and enhancements. Features such as green screens, motion tracking, and 3D effects have become easier to use. Furthermore, these tools allow editors to achieve sophisticated and professional-looking results.
6. Collaboration and Cloud-Based Editing
The rise of cloud computing has introduced new opportunities for collaboration in video editing. Such editing platforms enable multiple editors to work on the same project. Individuals can share files, get inspiration and collaborate remotely. This feature has facilitated more efficient workflows and improved collaboration among people.
Edit Video for Free For Win 7 or later(64-bit)
Edit Video for Free For macOS 10.14 or later
7. Faster Rendering and Exporting
Video editing software now utilizes multi-threading and GPU acceleration to speed up rendering. These new advancements in technology also help in exporting processes. It reduces the time required to generate the final video output. Additionally, it allows editors to meet tight deadlines and work more quickly.
8. Integration with Other Software and Formats
Editing tools have improved their compatibility with other software and formats. They now integrate with visual effects software, audio editing tools, and other tools. Additionally, these tools support a wide range of video file formats. This compatibility means easier import and export of videos from various sources.
9. Mobile Editing
Smartphones and tablets have brought video editing to mobile devices. Mobile apps now offer robust editing capabilities, allowing users to edit videos on the go. This advancement has increased accessibility and convenience for users as well. Now, people prefer to edit videos using their mobile devices.
10. AI-Assisted Editing
Artificial Intelligence (AI) is now integrated into photo and video editing tools. AI can automate certain repetitive tasks and suggest edits or effects based on patterns. This technology also makes change and even suggest edits by learning your preferences. This can save you time and assist editors in making creative decisions.
Part 2: What Should A Good Video Editing Software Constitute?
A good editing tool should possess several key features and functionalities. The purpose of these tools is to provide a comprehensive and efficient editing experience. Here are some important aspects that an excellent video editing tool should have. This help develops a narrative involving its user interface design:
Edit Video for Free For Win 7 or later(64-bit)
Edit Video for Free For macOS 10.14 or later
1. Comprehensive Editing Tools
The software should offer editing tools and features to accommodate different editing needs. This includes basic functions like trimming, cutting, and merging clips. Moreover, it should also offer some advanced capabilities and editing options as well. The software should provide flexibility and control over the editing process.
2. Support for Various Video Formats
Such software should support a wide range of video formats and codecs. This ensures compatibility with different cameras, file types, and video sources. It also allows editors to work with diverse content without the need for additional file conversion.
3. User-Friendly Interface
An editing tool should have a friendly interface and be easy to use. It also should allow users to navigate through the editing process smoothly. Such tools should provide easy access to tools, menus, and features. Additionally, a friendly video editing interface makes the tool simple for everyone.
4. High-Quality Output
These tools should be capable of producing high-quality video output. It should support exporting videos in different resolutions. This includes standard definition, high definition, and even 4K or higher resolutions. The ability to export in different formats and compression options is also valuable.
5. Efficient Performance
Video editing can be resource-intensive, so good software means efficient performance. It should utilize system resources and provide smooth playback for previewing. Additionally, it should minimize rendering times for quicker previews and exports.
6. Audio Editing Capabilities
Audio is one of the most important components of the video editing process. So, the software should offer different audio editing features. This includes the ability to adjust volume levels, apply audio effects, and much more. Furthermore, it should synchronize audio with video and support multiple audio tracks for editing as well.
7. Special Effects and Visual Enhancements
Advanced video editing software often includes special effects and other enhancement options. Filters, overlays, motion graphics, and other key functionalities should be offered. These features allow editors to improve their videos and achieve specific creative objectives.
8. Collaboration and Sharing Options
Powerful editing tools should facilitate collaboration among editors or team members. It should offer features like project sharing and version control. Also, it should provide users the option to work on the same project simultaneously. Additionally, seamless integration with cloud storage or online platforms can be beneficial.
9. Regular Updates and Support
Recommended tools should have a development team that regularly releases updates. The constant updates should address bugs, improve performance, and introduce new features. Timely customer support is also valuable for users to seek assistance.
10. Cost and Licensing Options
Consideration of the software’s pricing model and licensing options is important. Some software may offer a one-time purchase with perpetual usage. However, many others may have subscription-based models. It’s important to assess the pricing structure and determine if it aligns with your budget and editing needs.
Part 3: Wondershare Filmora: Does It Cover All The Points of a Good Video Editing Software?
Wondershare Filmora is a comprehensive video editing software that is available for everyone. One can download this tool from its official website and start editing. This tool provides a platform for professionals and for those who started editing. This tool allows you to edit your videos with many editing options. Additionally, this tool provides features from basic to more advanced ones.
Edit Video for Free For Win 7 or later(64-bit)
Edit Video for Free For macOS 10.14 or later
We have learned previously about what a good editing tool should offer. So, let’s discuss here what Wondershare Filmora has to offer its users.
Key Features of Wondershare Filmora
1. Wondershare Filmora is a complete editing software that you can download. It offers some basic editing options to more professional and advanced ones. You can find it to be the best platform to edit YouTube videos and more.
2. This tool has a friendly and easy-to-use interface. It makes navigation and editing easy, which further makes the process seamless.
3. The software interface supports different formats for images and videos. It includes PAL, MP4, JPEG, Cineform, and more. This makes the import and export of the files easier to share and edit.
4. Filmora is an editing platform that has the capability of handling higher resolutions. Using this tool, you can import and export your video files in up to 4K resolution.
5. Another excellent key feature of this tool is that you can add your audio files for edit . You can import your own audio files or can choose from the in-built library for your videos.
6. If you’re looking for a unique feature, then this feature will amaze you. Wondershare Filmora is equipped with the latest technology and is going through frequent updates. These updates help you to cut down the rendering speed.
7. You have so much to explore with this tool. Filmora has an in-built library that includes presets, effects, filters, and more. Users can use these presets for their editing work.
8. Additionally, if you want to share your videos for different platforms, you can with this tool. This software lets you change the aspect ratio of your video so you can easily share it on different platforms.
9. Besides editing options and features, this tool goes through constant updates and improvements. The latest version of Filmora comes with multiple AI features and support.
10. Lastly, Wondershare Filmora is free software but also offers premium plans for users. You can choose from different subscription plans.
Pricing Plans Offered by Wondershare Filmora
Are you satisfied with working on Wondershare Filmora’s interface? Look into the provided pricing table for some more prominent details:
| Type | Package | Pricing |
|---|---|---|
| Individual | Month Plan | $19.99 |
| Cross-Platform Plan | $69.99/Year | |
| Perpetual Plan | $79.99 | |
| Team & Business | Annual Plan | $155.88/User |
| Education | Monthly Plan | $19.99 |
| Annual Plan | $40.99 | |
| Perpetual Plan | $49.99 |
Part 4: Explaining The Interface - Wondershare Filmora
If you want to learn about the interface of Wondershare Filmora, you’re at the right place. Here you can learn about the video editing interface and the options available in the tool.
Edit Video for Free For Win 7 or later(64-bit)
Edit Video for Free For macOS 10.14 or later
1. The Main Screen
The main interface of the tool has all the essentials available. You will find a “New Project” tab, and beneath that, you will find different options for editing. Moreover, you will find the aspect ratio, from where you can choose preferred video dimensions. On the left side panel, you have the project options and the “Creator Hub” tab. Besides this, you have the search icon to find your previous projects.
2. Importing Videos
You can import your videos by pressing the designated key. This option allows you to import your media files. Furthermore, you can even import your media by dragging and dropping in the import tab. The import drop-down menu provides multiple import options. This menu also allows you to import your videos from your mobile or external camera.
3. Using the Stock Media
Wondershare Filmora allows you to add free stock media to your videos. The “Stock Media” option has a search option from where you can find your desired media files. Furthermore, this option has multiple free stock media tabs. You can choose the platform from the tabs where you can search and select stock media files.
4. Adding Audios to Videos
This tool allows you to add music or audio to your editing timeline. The tool has a separate “Audio” button, which allows you to select in-built audio files. You can search different sound effects and music files from this tab. Moreover, you can drag and drop your preferred audio file to the timeline. You can even select the audio file in the timeline to make further changes to the file.
5. Using Titles For Explanation
By pressing the “Titles” button, you can select the opening of your title template. This tool has many different title templates available that you can use for your video files. Moreover, you can find categorized titles from the list. This option also allows you to search for different title styles. You can even make changes to your title screen.
Edit Video for Free For Win 7 or later(64-bit)
Edit Video for Free For macOS 10.14 or later
6. Adding Transitions and Effects
Filmora interface is packed with many filters, overlays, and even transition effects. You can choose from different effects and filters by dragging and dropping to your layer. To apply a transition between two clips, simply place the transition effect between those clips. Additionally, you can change the opacity of the applied filters. Also, you can change the duration of your transition effects.
7. Inducing Elements for Improvement
In addition to overlays, filters, and effects, you can also use other elements too. For this, Wondershare Filmora allows you to add stickers to your video edit. By pressing the option, you will find stickers in many categories. You can select stickers from the list; otherwise, you can search for stickers using a keyword. Apply your favorite sticker by selecting and dropping it on a particular layer in the timeline.
8. Getting Aware of the Timeline
The timeline is the section where you add all the layers, effects, and other adjustments to your project. In the timeline section, you will find a particular layer’s hide and unhide option. Moreover, you can mute and unmute the audio of your media file. You can even find an option to manage your tracks in this section. Additionally, there is a Playhead that can also trim your video clip at a specific duration.
9. Things To Know While Exporting
While exporting your project, you will find many options, such as exporting to your device. Furthermore, you can even export your file directly to a specific platform from Filmora. In addition to this, you can even burn your video file to a DVD using this option. Users can also add a thumbnail of their edited video directly from this tool.
Conclusion
Understanding your video editing interface gives you greater creative control over your projects. You can explore and experiment with various editing options and more. Investing time in your tool is important if you’re a professional or an enthusiast. Wondershare Filmora is an amazing editing tool, and its interface is created to make things easy for you.
Adjust Background to Black for Your Product Review Video
Are you planning to make a product review video but wondering how to set up your background? If so, then you’re in the right place. This post will show you how to adjust the background to black for your product review video.
It’s essential to have a smooth black background without texture for your product review videos. Having a clean background is visually appealing and enhances the video. It will make sure that your viewers can see the product clearly without any distractions.
Do the following steps to change the background to black for your product review video:

Part 1. How to change the parameters in Filmora
For this tutorial, we will do it using Wondershare Filmora . So, if you haven’t installed it yet, you can download it here:
Free Download For Win 7 or later(64-bit)
Free Download For macOS 10.14 or later
Step1 Right-click the clip in the editing timeline > Edit Properties.

Step2 Select the Color menu > Advanced.

Step3 Setting the color parameters.
Click the adjust button in the upper left, scroll down to the vignette, and then decrease the amount and size value until the oval surrounds the subject.

Scroll up to the color options and increase the contrast to 100.

Go to the light menu, then decrease the shadows to cover any remaining light spots.

Part 2. Tips: How to improve product review video
Following these tips will help you improve the quality of your product review videos and make them more enjoyable for your audience.
1) Make sure your video has the correct resolution and scale
Having the correct resolution and scale for your video will make sure that it has a high-definition (HD) or high-quality resolution. Also, it will ensure that your video is the correct size when exporting.
If the scale is different from the resolution, then the empty space will be filled with black, and you will get black bars border that makes your video smaller.
2) Use proper lighting to ensure your video looks clear and bright
To get proper lighting, you should use natural lighting whenever possible, such as sunlight. However, if you can’t shoot during the day or it’s difficult to get natural light, you will need to use artificial lighting.
Next, adjust the white balance on your camera. You can also edit the color grading to finalize the look and improve the overall color of your video.
3) Make sure the audio quality of your video is good
Poor audio can make your video harder to listen to and turn off viewers.
Summary
It is essential to know how to adjust the background to black in your product review video. This is because it can help to make your video content more professional and stand out. By the end of this tutorial, you can now try and create a professional-looking video with a black background to improve your product review video.
Free Download For macOS 10.14 or later
Step1 Right-click the clip in the editing timeline > Edit Properties.
Step2 Select the Color menu > Advanced.
Step3 Setting the color parameters.
Click the adjust button in the upper left, scroll down to the vignette, and then decrease the amount and size value until the oval surrounds the subject.
Scroll up to the color options and increase the contrast to 100.
Go to the light menu, then decrease the shadows to cover any remaining light spots.
Part 2. Tips: How to improve product review video
Following these tips will help you improve the quality of your product review videos and make them more enjoyable for your audience.
1) Make sure your video has the correct resolution and scale
Having the correct resolution and scale for your video will make sure that it has a high-definition (HD) or high-quality resolution. Also, it will ensure that your video is the correct size when exporting.
If the scale is different from the resolution, then the empty space will be filled with black, and you will get black bars border that makes your video smaller.
2) Use proper lighting to ensure your video looks clear and bright
To get proper lighting, you should use natural lighting whenever possible, such as sunlight. However, if you can’t shoot during the day or it’s difficult to get natural light, you will need to use artificial lighting.
Next, adjust the white balance on your camera. You can also edit the color grading to finalize the look and improve the overall color of your video.
3) Make sure the audio quality of your video is good
Poor audio can make your video harder to listen to and turn off viewers.
Summary
It is essential to know how to adjust the background to black in your product review video. This is because it can help to make your video content more professional and stand out. By the end of this tutorial, you can now try and create a professional-looking video with a black background to improve your product review video.
Best 8 Top Premiere Pro Slideshow Templates
Best 8 Top Premiere Pro Slideshow Templates
An easy yet powerful editor
Numerous effects to choose from
Detailed tutorials provided by the official channel
Making slideshows quickly is the demand of modern professional world. Here you can go through top 8 Premiere pro Slideshow Templates available online. The slideshow template premiere pro free download versions are ready for media to be inserted for creating beautiful slideshows.

In this article
01 [Top 9 Premiere Pro Slideshow Templates worth utilizing](#Part 1)
02 [How Do I Create a Slideshow Template in Premiere Pro?](#Part 2)
03 [FAQ of Premiere Pro Slideshow Templates](#Part 3)
Part 1 Top 8 Premiere Pro Slideshow Templates worth Utilizing
01Square Photo
If you are looking for a really awesome slideshow premiere pro which can make your square-shaped photos more attractive, you can employ slideshow – Square Photo. The presentation of pictures in this slideshow occurs like scrolling an album full of family clicks. You will love the way it presents calm pictures with your friends and family. It**’**s satisfying, nostalgic and fun to use this slideshow.
02Vintage by motion shape
Want to give your slideshow a vintage touch? Well, vintage slideshow premiere template free by Motionshape is particularly for you. It makes your creation memorable and provides an exciting template full of flickers, dust, scratch and light effects. Ultimately, the project seems to run on historical timeline. All you need to do is adding photos and putting new captions as per your picture collection.
03Digital Slideshow by Zorrin
You will be in love with this slideshow for sure. Digital slideshow by Zorrin is a beautiful way to represent you. Whether you want to create a corporate slideshow or you are interested in promotion and broadcasting of your products, you can use this slideshow without any doubt. It possesses 50 places for the photos and 25 places for text as well. You will love the creative transitions between the slides.
04Emotional memory slideshow
Planning to create an emotional and memory based slideshow? If yes, this is the best slideshow premiere pro template free that you can use. It will enhance the importance of pictures which are close to your heart and full of passion. The analogous aesthetics of this slideshow hits your mind and replays your special memories.
05Corporate slideshow
So, you are working for a company and making a corporate slideshow for presentation? If yes, this corporate premiere slideshow template is for you. It gives a classic look to the pictures and put the story of your business in an exciting manner. You can use the timeline smartly and describe the establishment and progress of your company, management and teamwork, research and production and client base etc.
06Inspire slideshow by Quartz
Inspire is a good slideshow full of custom options in color palette and you can even make the changes directly while using its pro version. It involves a simple way to move slide-wise and is really a well organized template to insert your own media and move further.

07Transmaxx’s Education Slideshow
Never bother about creating your own free premiere pro slideshow template regarding education when you can already access this exclusive education slideshow. It is based upon the theme around education and has lots of places for pictures, videos and texts. You can add captions and additional write-ups wherever required.
08Motion Media Group’s Family Slideshow
You can choose any of the four versions of this wonderful free slideshow template premiere pro that provides platform for adding your family pictures. Whether you want to make a slideshow of celebrations in your family or making a digital collage of family photos, this is the best template you can go with. The romantic and calm pace is really touchy to be used as a wedding slideshow as well.
09**Wondershare Filmora Video Editor **
One more interesting video editor and slideshow template is Filmora by wondershare which promises to meet all your editorial demands while making a slideshow. As the slideshow template premiere pro free version offers high end motion graphic, you can use it for making highly professional videos. Make creative presentations on Filmora and give your projects a technical finishing with best outcome.
For Win 7 or later (64-bit)
For macOS 10.12 or later
Part 2 How Do I Create a Slideshow Template in Premiere Pro?
Creating a slideshow template in premiere pro is not at all tough, even it is really fun. You need nothing much to do and have all the controls of customizing the presentation as per your preference. Just follow the steps mentioned below –

Step 1 Download the app and install it in your device.
Step 2 Open the adobe premiere pro slideshow templates free and select ‘new project‘ by clicking on it. The term can differ in different versions of premiere. For instance, may be you will find the way to start a new project by clicking on ‘file‘ and then ‘new‘ or something like that. So follow the path accordingly.
Step 3 It**’**s time to understand workspace in premiere. A blank workspace will be provided to you to start with your new project. There will be a set of insert and editing options, buttons and information to get help in the form of panels. You can select a panel to work on your project with the help of that particular panel. For instance, to insert your videos and pictures in the timeline, you can select ‘insert‘ panel and proceed.
Step 4 Create your project with the help of panels in adobe premiere pro slideshow template free. In the lower left of the project, you will see your sequence of videos and picture which can be controlled by you. For example, if you want to change the sequence, apply filters and effects or add text on the video clips and photos, you can do the same by clicking on that particular clip. Then choose the operation you want to apply from the project panel and edit your project as per your choice.
Step 5 In the menu bar, you can see file. Select ‘file‘ and go to ‘new‘, then ‘sequence‘. Add the audio of your choice, select the frame you want and set resolution as per your preference from here. You can also control color, depth, warmth and speed of the video etc. from this task bar.
Step 6 Once ready, you can proceed to save your project. Various resolutions will be available when you click on ‘download or save‘. Choose the resolution you prefer and save your free premiere pro templates slideshow for future use. Don**’**t forget to enter a name to describe your project such as ‘my company‘, ‘holidays 2022‘ etc.
Part 3 FAQ of Premiere Pro Slideshow Templates

Can I have Premiere Pro slideshow templates for free?
Yes, you can definitely have a premiere pro slideshow templates free download version. All you need to do is downloading the free premiere pro app from Motion Array, run and install it in your device and it**’**s ready to be used.
How many placeholders are there in Premiere Pro slideshow templates?
The no. of placeholders varies editor to editor. In Premiere pro slideshow templates, you can have more than 30 placeholders for photos and approx 23 placeholders for texts. The number is enough to create a calm, gentle slideshow without much load of content for distraction.
What are the main features of Premiere Pro slideshow templates?
The best thing to know about premiere pro slideshow template is that it is so easy to use that even a beginner can create a good slideshow on it. The user friendly interface of the app provides custom operational functions such as changing the font, color and speed of slideshow. Directly drag and drop feature is there to insert media in the slideshow and also you can control the transitions and effects. The most important thing is that all this you can get for free also.
Can I use Premiere Pro slideshow templates for making promotional videos?
Of course, you can create impressive adobe premiere slideshow templates with the help of premiere pro slideshow template. Just choose the pictures and videos of your business/company wisely and generate high tech content to catch attention. Write touchy content on your company and upload in the slideshow in the form of text use beautiful font, catchy captions and subtle background colors to make it more interesting.
How to remove watermark in Premiere Pro slideshow templates?
In the premium version, you won**’t have to employ your efforts for removing watermark as you won‘**t find it there while in the free version, you will have to remove the watermark by applying a watermark removing app or watching a small promo video shown by the app.
When should I use Premiere Pro slideshow templates?
You can use premiere slideshow template free whenever you feel the need of making a slideshow. When you come back from a vacation and want to compile all the pictures; when there is an important business meeting and you want to represent your project, when you want to make a family or friends**’** slideshow on special occasions and even personal slideshows can be created to wish someone happy birthday.
● Ending Thoughts →
● The trend of ‘ready-to-use‘ slideshow makers is on its peak as nobody have enough time to create a complete slideshow by its own nowadays. In such condition, you should choose a premiere pro slideshow template free wisely to go well with your theme.
● The procedure of slideshow making varies app to app. You should first understand the interface of a slideshow maker before putting your head into slideshow making. It**’**s better to choose a slideshow maker with user friendly interface.
● Don**’**t go with the professional version or a slideshow maker created to be used by expert only. Pick one with simple operations and quick assistance if are not so well-versed in slideshow making.
Making slideshows quickly is the demand of modern professional world. Here you can go through top 8 Premiere pro Slideshow Templates available online. The slideshow template premiere pro free download versions are ready for media to be inserted for creating beautiful slideshows.
In this article
01 [Top 9 Premiere Pro Slideshow Templates worth utilizing](#Part 1)
02 [How Do I Create a Slideshow Template in Premiere Pro?](#Part 2)
03 [FAQ of Premiere Pro Slideshow Templates](#Part 3)
Part 1 Top 8 Premiere Pro Slideshow Templates worth Utilizing
01Square Photo
If you are looking for a really awesome slideshow premiere pro which can make your square-shaped photos more attractive, you can employ slideshow – Square Photo. The presentation of pictures in this slideshow occurs like scrolling an album full of family clicks. You will love the way it presents calm pictures with your friends and family. It**’**s satisfying, nostalgic and fun to use this slideshow.
02Vintage by motion shape
Want to give your slideshow a vintage touch? Well, vintage slideshow premiere template free by Motionshape is particularly for you. It makes your creation memorable and provides an exciting template full of flickers, dust, scratch and light effects. Ultimately, the project seems to run on historical timeline. All you need to do is adding photos and putting new captions as per your picture collection.
03Digital Slideshow by Zorrin
You will be in love with this slideshow for sure. Digital slideshow by Zorrin is a beautiful way to represent you. Whether you want to create a corporate slideshow or you are interested in promotion and broadcasting of your products, you can use this slideshow without any doubt. It possesses 50 places for the photos and 25 places for text as well. You will love the creative transitions between the slides.
04Emotional memory slideshow
Planning to create an emotional and memory based slideshow? If yes, this is the best slideshow premiere pro template free that you can use. It will enhance the importance of pictures which are close to your heart and full of passion. The analogous aesthetics of this slideshow hits your mind and replays your special memories.
05Corporate slideshow
So, you are working for a company and making a corporate slideshow for presentation? If yes, this corporate premiere slideshow template is for you. It gives a classic look to the pictures and put the story of your business in an exciting manner. You can use the timeline smartly and describe the establishment and progress of your company, management and teamwork, research and production and client base etc.
06Inspire slideshow by Quartz
Inspire is a good slideshow full of custom options in color palette and you can even make the changes directly while using its pro version. It involves a simple way to move slide-wise and is really a well organized template to insert your own media and move further.
07Transmaxx’s Education Slideshow
Never bother about creating your own free premiere pro slideshow template regarding education when you can already access this exclusive education slideshow. It is based upon the theme around education and has lots of places for pictures, videos and texts. You can add captions and additional write-ups wherever required.
08Motion Media Group’s Family Slideshow
You can choose any of the four versions of this wonderful free slideshow template premiere pro that provides platform for adding your family pictures. Whether you want to make a slideshow of celebrations in your family or making a digital collage of family photos, this is the best template you can go with. The romantic and calm pace is really touchy to be used as a wedding slideshow as well.
09**Wondershare Filmora Video Editor **
One more interesting video editor and slideshow template is Filmora by wondershare which promises to meet all your editorial demands while making a slideshow. As the slideshow template premiere pro free version offers high end motion graphic, you can use it for making highly professional videos. Make creative presentations on Filmora and give your projects a technical finishing with best outcome.
For Win 7 or later (64-bit)
For macOS 10.12 or later
Part 2 How Do I Create a Slideshow Template in Premiere Pro?
Creating a slideshow template in premiere pro is not at all tough, even it is really fun. You need nothing much to do and have all the controls of customizing the presentation as per your preference. Just follow the steps mentioned below –
Step 1 Download the app and install it in your device.
Step 2 Open the adobe premiere pro slideshow templates free and select ‘new project‘ by clicking on it. The term can differ in different versions of premiere. For instance, may be you will find the way to start a new project by clicking on ‘file‘ and then ‘new‘ or something like that. So follow the path accordingly.
Step 3 It**’**s time to understand workspace in premiere. A blank workspace will be provided to you to start with your new project. There will be a set of insert and editing options, buttons and information to get help in the form of panels. You can select a panel to work on your project with the help of that particular panel. For instance, to insert your videos and pictures in the timeline, you can select ‘insert‘ panel and proceed.
Step 4 Create your project with the help of panels in adobe premiere pro slideshow template free. In the lower left of the project, you will see your sequence of videos and picture which can be controlled by you. For example, if you want to change the sequence, apply filters and effects or add text on the video clips and photos, you can do the same by clicking on that particular clip. Then choose the operation you want to apply from the project panel and edit your project as per your choice.
Step 5 In the menu bar, you can see file. Select ‘file‘ and go to ‘new‘, then ‘sequence‘. Add the audio of your choice, select the frame you want and set resolution as per your preference from here. You can also control color, depth, warmth and speed of the video etc. from this task bar.
Step 6 Once ready, you can proceed to save your project. Various resolutions will be available when you click on ‘download or save‘. Choose the resolution you prefer and save your free premiere pro templates slideshow for future use. Don**’**t forget to enter a name to describe your project such as ‘my company‘, ‘holidays 2022‘ etc.
Part 3 FAQ of Premiere Pro Slideshow Templates
Can I have Premiere Pro slideshow templates for free?
Yes, you can definitely have a premiere pro slideshow templates free download version. All you need to do is downloading the free premiere pro app from Motion Array, run and install it in your device and it**’**s ready to be used.
How many placeholders are there in Premiere Pro slideshow templates?
The no. of placeholders varies editor to editor. In Premiere pro slideshow templates, you can have more than 30 placeholders for photos and approx 23 placeholders for texts. The number is enough to create a calm, gentle slideshow without much load of content for distraction.
What are the main features of Premiere Pro slideshow templates?
The best thing to know about premiere pro slideshow template is that it is so easy to use that even a beginner can create a good slideshow on it. The user friendly interface of the app provides custom operational functions such as changing the font, color and speed of slideshow. Directly drag and drop feature is there to insert media in the slideshow and also you can control the transitions and effects. The most important thing is that all this you can get for free also.
Can I use Premiere Pro slideshow templates for making promotional videos?
Of course, you can create impressive adobe premiere slideshow templates with the help of premiere pro slideshow template. Just choose the pictures and videos of your business/company wisely and generate high tech content to catch attention. Write touchy content on your company and upload in the slideshow in the form of text use beautiful font, catchy captions and subtle background colors to make it more interesting.
How to remove watermark in Premiere Pro slideshow templates?
In the premium version, you won**’t have to employ your efforts for removing watermark as you won‘**t find it there while in the free version, you will have to remove the watermark by applying a watermark removing app or watching a small promo video shown by the app.
When should I use Premiere Pro slideshow templates?
You can use premiere slideshow template free whenever you feel the need of making a slideshow. When you come back from a vacation and want to compile all the pictures; when there is an important business meeting and you want to represent your project, when you want to make a family or friends**’** slideshow on special occasions and even personal slideshows can be created to wish someone happy birthday.
● Ending Thoughts →
● The trend of ‘ready-to-use‘ slideshow makers is on its peak as nobody have enough time to create a complete slideshow by its own nowadays. In such condition, you should choose a premiere pro slideshow template free wisely to go well with your theme.
● The procedure of slideshow making varies app to app. You should first understand the interface of a slideshow maker before putting your head into slideshow making. It**’**s better to choose a slideshow maker with user friendly interface.
● Don**’**t go with the professional version or a slideshow maker created to be used by expert only. Pick one with simple operations and quick assistance if are not so well-versed in slideshow making.
Create Glitch Text Effect
Glitch text effect is a trending video effect whereby the texts get distorted for a few seconds. The effect is comparable to the glitch you face when your screen starts to malfunction, and the screen appears to be wavy and disoriented. A glitch text effect is better than a regular animated text effect as it helps to get the attention of the viewers immediately and get the message across clearly.
The glitch effect can be applied to the entire video as well as the text as per your preference. There are several video editors available where the glitch text effect comes pre-loaded. All you need to do is to apply it to the text and get it done in a few steps. We will illustrate how to add glitch text effect Premiere Pro. But we recommend Filmora for the best glitter text effect that you can add to your video instantly.
Part 1. Create Glitch Text in Video with Filmora
We have already stated that Wondershare Filmora is the best video editor for the best glitch text effect download and apply to your video in simple steps. Filmora is a premium video editor that is widely used by amateur and professional video editors. You can get all glitch text effect After Effects and add them to your video conveniently in comparison to After Effects.
As a matter of fact, there are literally unlimited video and text effects available, and you can find different types of glitch text effects to apply to your titles and texts. Filmora is available for both Windows and mac users. Here are the steps to create glitch text in video with Filmora.
Free Download For Win 7 or later(64-bit)
Free Download For macOS 10.14 or later
Step1 Download and install Filmora on your computer. Go to File> New Project from the menu bar to start video editing project.

Step2 Go to File> Import Media > Import Media Files to import the video clips where you want to add glitch text effect. Drop the clip into the Timeline to get started.

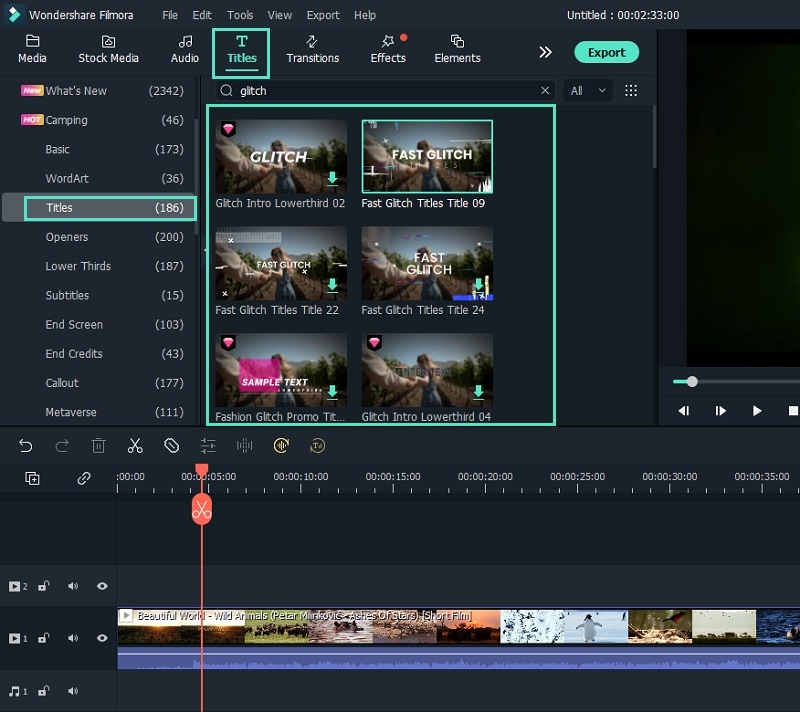
Step3 Go to Titles tab located at the top. From the left panel, click on Titles option. Search “glitch” in the search field and you will see all the glitch text effects that you can apply to the text in your video.
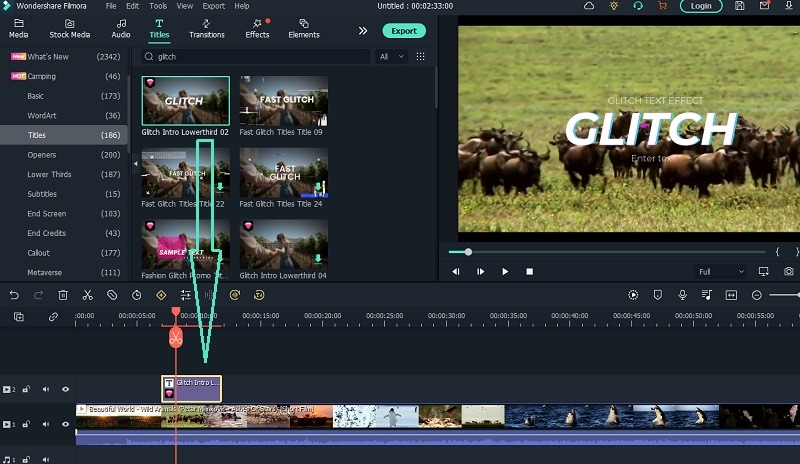
Step4 Select any glitch text effect and drop it into the Timeline above the video clip exactly where you want the text and the effect to appear.
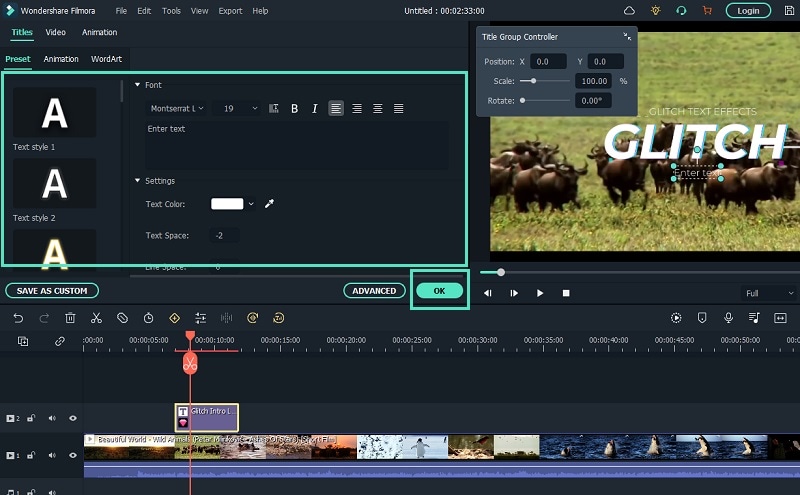
Step5 Double-click on the glitch text effect located on Timeline and edit the text, style, and other parameters as per your preference. Click on Ok and play the video to see your edited video with the glitch text effect.
Part 2. How to Make Glitch Text Effect with Premiere Pro
Adobe Premiere Pro is another renowned video editor where you can add glitch text effect to your video. Premiere Pro is strictly for professional video editors as the user interface is not as intuitive as Filmora . The learning curve is steep, and therefore, you need to go through the steps to add glitch text effect Premiere Pro. There are several glitch text effect presets available that you can apply to any text on your video to make them engaging. Here are the steps to make glitch text effect with Premiere Pro.
Step1 Launch Adobe Premiere Pro and go to New> Project to get started. Import your video and drop it into Timeline.
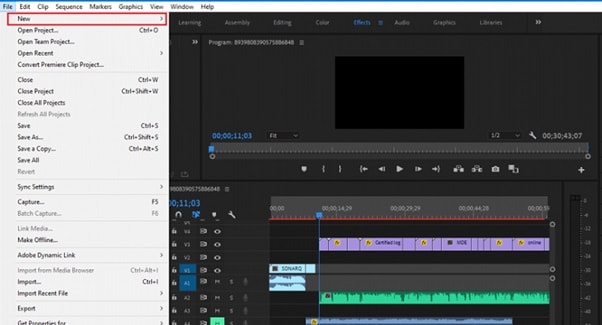
Step2 Use the Type tool to write any text on your video to add glitch text effect. You should have a text layer on Timeline.
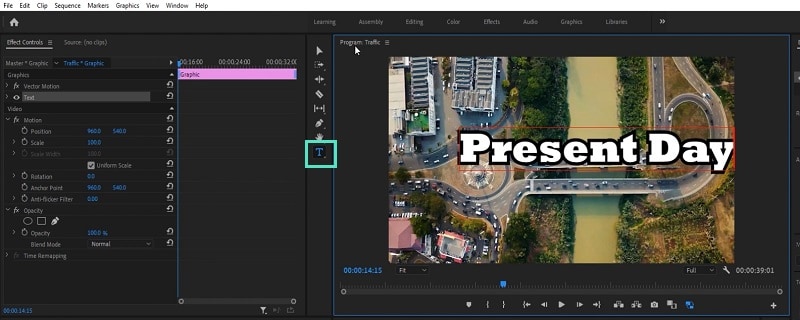
Step3 Go to Effects> Immersive Video> VR Digital Glitch option. Drag and drop the effect to text layer.
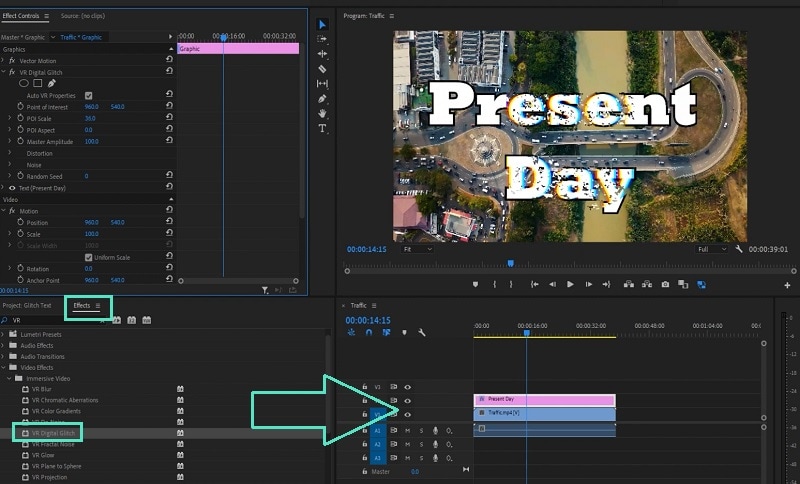
Step4 Under Effect Controls tab, you will find all the different parameters that you can adjust to get the glitch text effect perfectly.
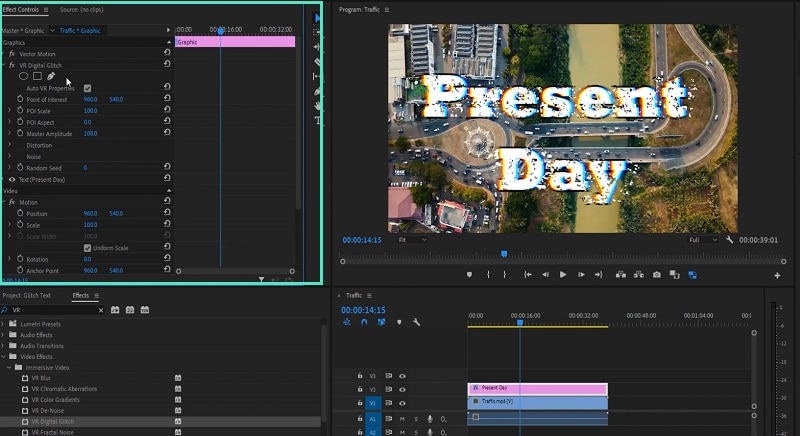
Step5 Turn on Master Amplitude and add multiple keyframes as different points in the Timeline and change the distortion value to make the effect prominent.
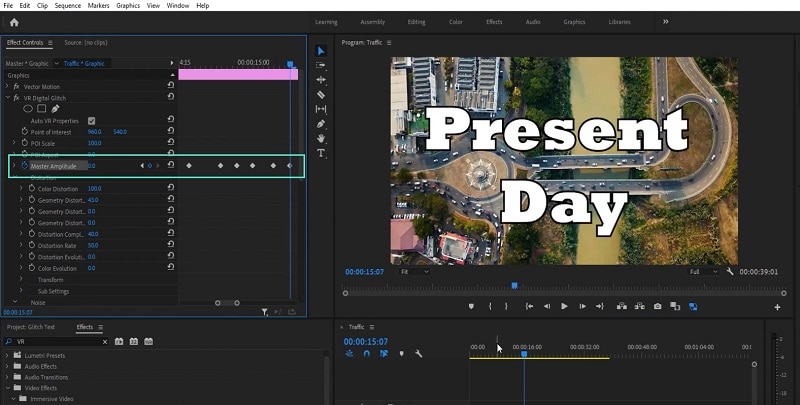
Step6 Go to the first keyframe and turn on Random Seed effect. Go to the last keyframe and turn on Random Seed effect and change the value to 75. Play the video to check the entire video with glitch text effect.
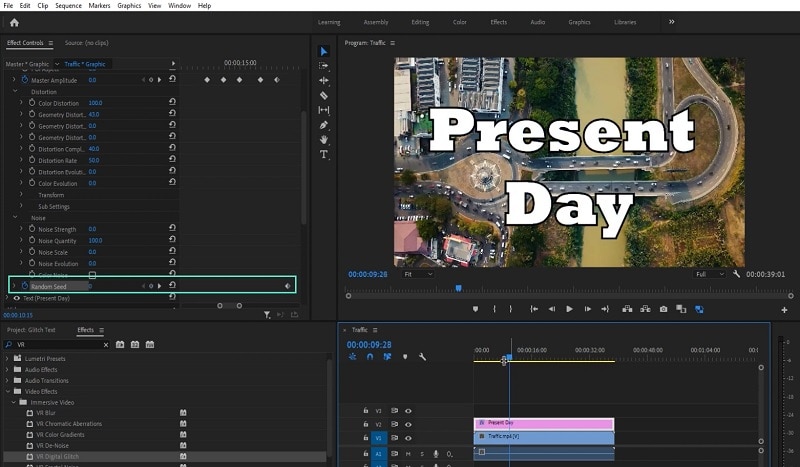
Part 3. Use VSDC Video Editor to Create Glitch Text
If you do not have any premium video editor on your computer and you do not want to purchase any premium video editor, you can still get glitter text effect free. You need to download and install VSDC free video editor on your computer. But the steps to create glitch text on VSDC video editor are slightly complicated as the user interface is not as intuitive as Filmora . Here are the steps to add free glitch text effect on your video.
Step1 Download and install VSDC video editor. Launch the editor and click on New Project to get started. Import your video to your project where you want to add glitch text effect.
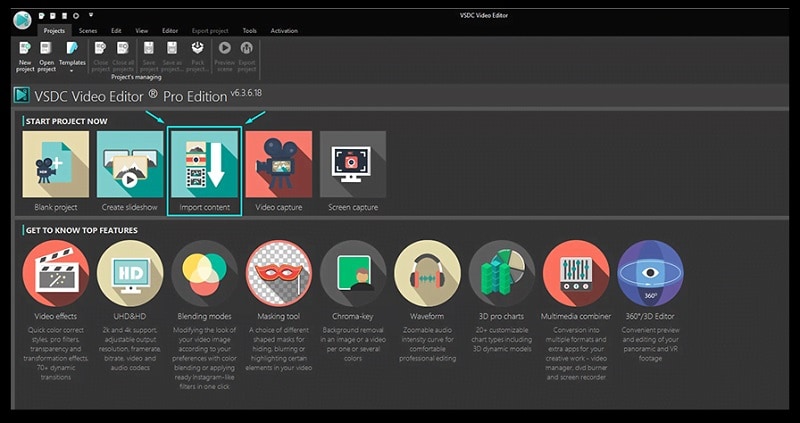
Step2 Use Type tool to write a text on the video. You can press Shift+T shortcut as well. After typing the text, adjust the text style as per your preference.
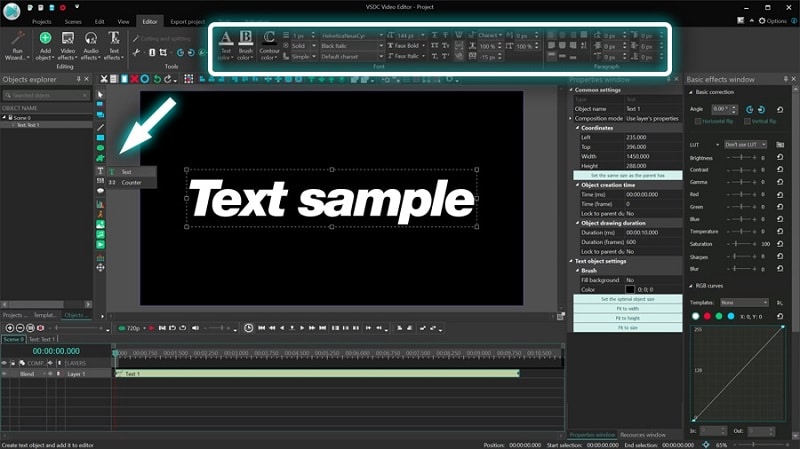
Step3 Double-click on the text layer on Timeline and go to Video Effects> Special FX and click on Glitch option.
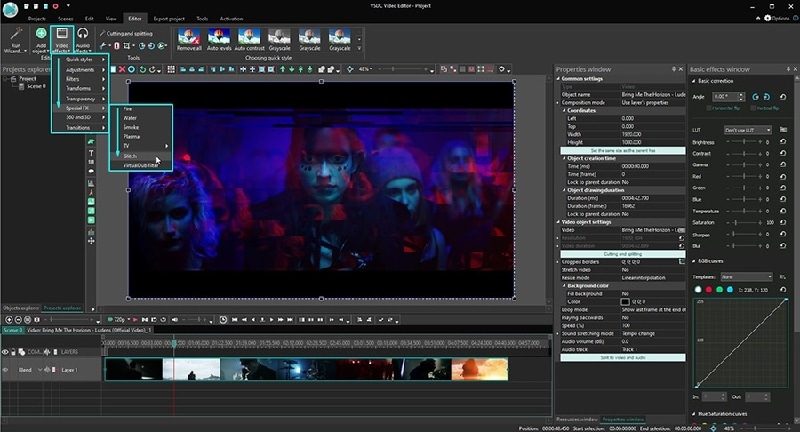
Step4 A window will appear where you can set the starting point, duration, and different parameters. Click on Ok button.
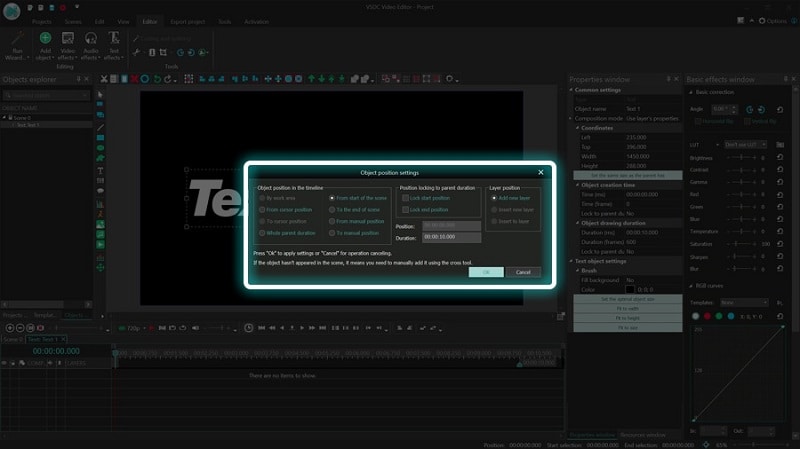
Step5 Go to Properties Windows and click on Presets to select different types of glitch text effects. You can also adjust the intensity of the text effects and other parameters as you feel.
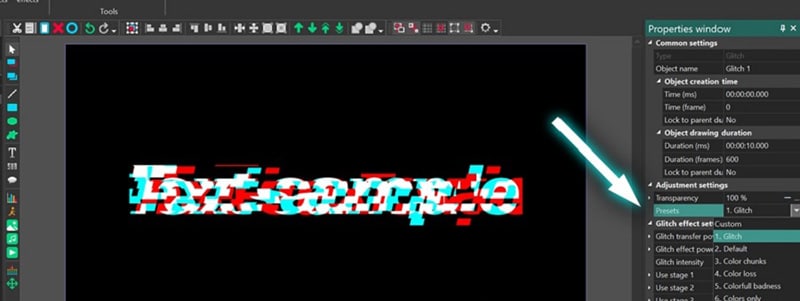
Part 4. Related FAQs about Glitch Text
1. How do you animate glitch text?
If you want to animate glitch text for free, VSDC video editor is ideal as you can customize the effect on any text in simple steps. If you want to use a premium video editor, we recommend Filmora as there are various glitch text effects available to apply to any text on your video instantly.
2. How do you glitch text on video?
First, you have to import your video in your video editor. Type the desired text and set the style. Thereafter, go to glitch text effect presets available on the video editor and apply it to the text instantly. You can customize the glitch text effect as per your preference to make the animation more prominent.
3. How do you glitch text on Android?
You should first install Glitch Video Effect: Glitch FX app from Play Store. Edit your video on the app to add any text, and thereafter, add glitch text effect instantly. In fact, the glitch text effect is available in almost all popular video editor apps on Android due to the effect being trendy and viral.
Free Download For macOS 10.14 or later
Step1 Download and install Filmora on your computer. Go to File> New Project from the menu bar to start video editing project.
Step2 Go to File> Import Media > Import Media Files to import the video clips where you want to add glitch text effect. Drop the clip into the Timeline to get started.
Step3 Go to Titles tab located at the top. From the left panel, click on Titles option. Search “glitch” in the search field and you will see all the glitch text effects that you can apply to the text in your video.
Step4 Select any glitch text effect and drop it into the Timeline above the video clip exactly where you want the text and the effect to appear.
Step5 Double-click on the glitch text effect located on Timeline and edit the text, style, and other parameters as per your preference. Click on Ok and play the video to see your edited video with the glitch text effect.
Part 2. How to Make Glitch Text Effect with Premiere Pro
Adobe Premiere Pro is another renowned video editor where you can add glitch text effect to your video. Premiere Pro is strictly for professional video editors as the user interface is not as intuitive as Filmora . The learning curve is steep, and therefore, you need to go through the steps to add glitch text effect Premiere Pro. There are several glitch text effect presets available that you can apply to any text on your video to make them engaging. Here are the steps to make glitch text effect with Premiere Pro.
Step1 Launch Adobe Premiere Pro and go to New> Project to get started. Import your video and drop it into Timeline.
Step2 Use the Type tool to write any text on your video to add glitch text effect. You should have a text layer on Timeline.
Step3 Go to Effects> Immersive Video> VR Digital Glitch option. Drag and drop the effect to text layer.
Step4 Under Effect Controls tab, you will find all the different parameters that you can adjust to get the glitch text effect perfectly.
Step5 Turn on Master Amplitude and add multiple keyframes as different points in the Timeline and change the distortion value to make the effect prominent.
Step6 Go to the first keyframe and turn on Random Seed effect. Go to the last keyframe and turn on Random Seed effect and change the value to 75. Play the video to check the entire video with glitch text effect.
Part 3. Use VSDC Video Editor to Create Glitch Text
If you do not have any premium video editor on your computer and you do not want to purchase any premium video editor, you can still get glitter text effect free. You need to download and install VSDC free video editor on your computer. But the steps to create glitch text on VSDC video editor are slightly complicated as the user interface is not as intuitive as Filmora . Here are the steps to add free glitch text effect on your video.
Step1 Download and install VSDC video editor. Launch the editor and click on New Project to get started. Import your video to your project where you want to add glitch text effect.
Step2 Use Type tool to write a text on the video. You can press Shift+T shortcut as well. After typing the text, adjust the text style as per your preference.
Step3 Double-click on the text layer on Timeline and go to Video Effects> Special FX and click on Glitch option.
Step4 A window will appear where you can set the starting point, duration, and different parameters. Click on Ok button.
Step5 Go to Properties Windows and click on Presets to select different types of glitch text effects. You can also adjust the intensity of the text effects and other parameters as you feel.
Part 4. Related FAQs about Glitch Text
1. How do you animate glitch text?
If you want to animate glitch text for free, VSDC video editor is ideal as you can customize the effect on any text in simple steps. If you want to use a premium video editor, we recommend Filmora as there are various glitch text effects available to apply to any text on your video instantly.
2. How do you glitch text on video?
First, you have to import your video in your video editor. Type the desired text and set the style. Thereafter, go to glitch text effect presets available on the video editor and apply it to the text instantly. You can customize the glitch text effect as per your preference to make the animation more prominent.
3. How do you glitch text on Android?
You should first install Glitch Video Effect: Glitch FX app from Play Store. Edit your video on the app to add any text, and thereafter, add glitch text effect instantly. In fact, the glitch text effect is available in almost all popular video editor apps on Android due to the effect being trendy and viral.
Also read:
- New Slow-Motion Edits Are Pretty Mesmerizing, and Weve All Imagined Ourselves in One of Those Visually Appealing, Slowed-Down Movies. Well Teach You How to Make a Smooth Slo-Mo Video Using Twixtor in This Article. Stay Tuned Until the End
- New 2024 Approved How to Create Simple Slideshow Word
- New 10 Best Audio Visualizers Windows, Mac, Android, iPhone & Online for 2024
- In This Article, You Will Learn How to Record Creative Cinematic Videos Using a Smartphone and Edit the Video with Wondershare Filmora
- New Unlock Your Video Editing Potential With Wondershare Filmora for 2024
- Updated Are You Looking to Finish Your YouTube Video in Style? The Following Are the Best End Screen Makers to Choose From
- In 2024, Guide to Create a Timelapse Video in After Effects
- Updated A Guide to Create Your Own LOL Montage Video
- Updated 2024 Approved Funny Content Ideas for YouTube Videos and Funny Music Background
- How Do You Use the Splice App on Android and Which Useful Video Splice Apps Are Best Suited? This Article Expands More on It
- New Top 8 Sites to Download Glitch Transition for Premiere Pro
- New Splitting the Clips in Adobe After Effects Step by Step for 2024
- Logo Intro Videos Are the Hottest Trend in Town and Are Gaining Popularity Quickly. Keep Reading This Article to Learn Their Importance and How to Design One
- Updated In 2024, How to Add Echo Effect to Video
- 2024 Approved How Do You Create In-Camera Transitions in Your Videos? A Complete Guide for Beginners to Create These Transitions Using Their Camera at Home
- Updated 2024 Approved Best Android Apps For Creating Slow Motion Videos
- New A Guide to Speed up a Video on Splice for 2024
- Updated How To Polish Your Music Video Edits Using Filmora
- New In 2024, 3D Ray Traced Settings In After Effects A Comprehensive Guide
- This Guide Will Help You to Understand Everything About the Zoho Show. Also, Know What the Zoho Show Slide Is, Why It Is Used and All Related Information
- New Add Green Screen Video on TikTok for 2024
- Top 10 Free Text to Speech Software Windows, Mac,Android, iPhone & O
- New In 2024, How to Resize FLV Videos Efficiently Windows, Mac,Android, iPhone & Online
- How to Easily Add VHS Green Screen to Your Video for 2024
- New How to Turn On/Off Motion Blur in Fortnite? Is It Good for Fortnite?
- Do You Know How to Zoom on Facebook Livestream Videos? Through This Article, You Will Find Multiple Ways and Detailed Steps to Zoom in on the Facebook Livestream Videos
- Updated In 2024, How To Slow Down GIF Building an Understanding
- Updated 2024 Approved How to Create the Night-to-Day Effect Video
- New 2024 Approved Featuring The Use of Camera Shake in Creating the Best Videos
- New Have You Ever Tried DaVinci Resolve for Creating a Motion Blur Effect? Read This Article to Discover How to Use DaVinci Resolve Motion Blur with the Help of Detailed Instructions
- New Add Neon Effects to Your Dance Videos with the Help of Wondershare Filmora After Reading This Article. It Will Give a More Thrilling and Exciting Appearance for 2024
- Some Facts That Few People Know on How to Make Transparent Background in Canva for 2024
- 6 Ways to Change Spotify Location On Your Realme 12 Pro 5G | Dr.fone
- How Can I Create My Pokemon Overworld Maps On Apple iPhone 15 Pro Max? | Dr.fone
- Why Is My Samsung Galaxy F34 5G Offline? Troubleshooting Guide | Dr.fone
- How to Transfer Data from Xiaomi Redmi 12 to BlackBerry | Dr.fone
- The Magnificent Art of Pokemon Go Streaming On Nubia Red Magic 9 Pro+? | Dr.fone
- Mastering Lock Screen Settings How to Enable and Disable on Realme Narzo 60 5G
- 9 Quick Fixes to Unfortunately TouchWiz has stopped Of Motorola Edge 2023 | Dr.fone
- How to fix error 1015 while restoring iPhone 15 Pro | Stellar
- In 2024, Unlock iPhone 13 Pro With Forgotten Passcode Different Methods You Can Try | Dr.fone
- Simple ways to get recent calls back from Motorola Moto G34 5G
- Simple ways to get lost videos back from Vivo S17
- In 2024, How To Unlock The Apple iPhone 13 Pro SIM Lock 4 Easy Methods
- In 2024, For People Wanting to Mock GPS on Vivo X100 Devices | Dr.fone
- Is GSM Flasher ADB Legit? Full Review To Bypass Your Samsung Galaxy S23 Tactical Edition Phone FRP Lock
- How to Hard Reset Honor Magic5 Ultimate Without Password | Dr.fone
- A Step-by-Step Guide on Using ADB and Fastboot to Remove FRP Lock on your Huawei P60
- Tips And Tricks To Tell if Your iPhone X Is Unlocked
- The Easiest Methods to Hard Reset Vivo V27 | Dr.fone
- Top 7 Skype Hacker to Hack Any Skype Account On your Apple iPhone 6 Plus | Dr.fone
- Full Guide to Hard Reset Your Infinix Note 30 VIP | Dr.fone
- In 2024, How to Change Lock Screen Wallpaper on Realme 11 Pro
- In 2024, 8 Ways to Transfer Photos from Infinix Note 30 VIP Racing Edition to iPhone Easily | Dr.fone
- 3 Things You Must Know about Fake Snapchat Location On Xiaomi Redmi Note 12 5G | Dr.fone
- My Videos Arent Playing on Infinix Hot 30 5G – What Can I Do? | Dr.fone
- How to Easily Hard reset my Samsung Galaxy M34 | Dr.fone
- How to Track Xiaomi Redmi 12 Location by Number | Dr.fone
- 3 Solutions to Find Your Vivo Y78+ Current Location of a Mobile Number | Dr.fone
- 3uTools Virtual Location Not Working On Lava Agni 2 5G? Fix Now | Dr.fone
- Apply These Techniques to Improve How to Detect Fake GPS Location On Xiaomi Redmi Note 13 5G | Dr.fone
- In 2024, Apple ID Locked or Disabled On Apple iPhone 12? 7 Mehtods You Cant-Miss
- In 2024, How to Remove the Activation Lock On your iPad and Apple iPhone 11 without Apple Account
- Title: Do You Know Everything Related to Wondershare Filmoras Video Editing Interface? If You Are Unaware of It, Read and Learn About Filmoras Interface for 2024
- Author: Chloe
- Created at : 2024-04-24 07:08:18
- Updated at : 2024-04-25 07:08:18
- Link: https://ai-editing-video.techidaily.com/do-you-know-everything-related-to-wondershare-filmoras-video-editing-interface-if-you-are-unaware-of-it-read-and-learn-about-filmoras-interface-for-2024/
- License: This work is licensed under CC BY-NC-SA 4.0.
