
:max_bytes(150000):strip_icc():format(webp)/GettyImages-538600261-56c643115f9b5879cc3d6bde.jpg)
Do You Know How Boring a Video Can Be with Silent Moments? Some Tools with Silent Detection Features Help You Delete Those Moments for 2024
Do You Know How Boring a Video Can Be with Silent Moments? Some Tools with Silent Detection Features Help You Delete Those Moments
Sometimes awkward silent moments can make a video look cringe and boring. Silence in videos can often be a major drawback, making the content dull and unengaging. However, fear not because there are ways to eliminate them and keep your viewers hooked. One effective solution is to utilize certain features that help in removing silence from videos.
Silence detection is a feature that lets you detect silence and awkward pauses in your content. It can detect those instances where there is no audio or any significant sound present. By utilizing this feature, you can easily identify and remove these silent parts from your videos. Wondershare Filmora is a tool that offers this AI-powered feature to remove silence from videos.
Part 1: How Can Silencing in Videos Damage It?
Silence can negatively affect videos, making them less engaging and captivating. Many video silence removers are available, but first, learn how silence affects video content. Let’s explore some of how silence can damage the quality of video content:
1. Loss of Interest
When viewers encounter long silent moments in a video, they lose interest. Silence fails to hold their attention and leaves them craving for something more stimulating. As a result, they may lose interest in the content and look for other videos. This is somewhat discouraging for a content creator. That’s why short and meaningful content is what the audience demand.
2. Lack of Emotional Connection
Sound and audio play an essential role in creating an emotional connection with the audience. Silence, on the other hand, fails to start any emotional response. Without appropriate sound effects or dialogue, videos can feel empty and emotionless. The absence of audio elements also fails to establish a connection with the viewer.
3. Breaks the Flow
Silent moments in videos can disrupt the natural flow and rhythm of the content. Viewers expect a seamless progression from one scene to another. However, sudden silences in a video may create frustration for some individuals. It may also lead to a disjointed viewing experience for the viewer. Meanwhile, the audience sometimes couldn’t understand the intended message.
4. Awkwardness and Uncomfortable Silence
Silence can create awkward moments in videos, especially when it’s unexpected or prolonged. These silent gaps can make viewers feel uncomfortable. The viewer becomes unsure of what to expect or how to interpret the situation. Moreover, awkward silences can detract from the overall viewing experience. It also leaves a negative impression and makes the content less enjoyable.
5. Reduced Engagement and Sharing
Videos that contain excessive silence are less likely to be shared or discussed among viewers. Silent moments fail to generate excitement or spark conversations. In contrast, videos with dynamic audio elements are more likely to capture attention. If your video has long pauses or awkward silent moments, it may not get the expected response.
Video Slience Detector
Easily and precisely detect slience in video with Filmora Video Editor ! Experience the magic of cool to make great videos.
Detect Slience in Video Detect Slience in Video Learn More >


Part 2: Silence Detection Feature of Wondershare Filmora - An Understanding
Wondershare Filmora Video Editor always surprises you with its unique editing options and features. Its many features make it easy and pretty straightforward for you like. With another excellent feature, you can detect silence in audio files and videos. This unique feature will automatically detect awkward silence or long pauses.
Furthermore, you can remove those moments from your project to create a seamless experience. This video silence remover uses AI to find silent intervals in your video. You can also change the volume threshold by helping the tool find more such moments in your project. Additionally, you can change the minimum duration of such silent intervals of your video.
Part 3: Gathering Details About the Other AI Features of Filmora
Wondershare Filmora can auto remove silence in videos, but it has other AI features too. Learn more about Filmora’s AI features in this section.
Edit Video with AI For Win 7 or later(64-bit)
Edit Video with AI For macOS 10.14 or later
AI Image
This feature of the Wondershare Filmora employs AI to improve the appearance of images in videos. It automatically fixes imperfections like noise and color asymmetry. Furthermore, it also corrects brightness, giving your videos a better, more polished appearance. You can fast and easily enhance the quality of your video with the help of this feature.
Auto Reframe
If you want to change the aspect ratio of your video automatically, then this is the feature for you. The Auto Reframe function in Filmora automatically modifies aspect ratios for your video .
Motion Tracking
Filmora’s motion tracking feature tracks and follows moving objects in videos . It allows you to add effects, text, or graphics that move along with the object. Furthermore, this feature makes it easy to highlight and enhance specific elements in a video. You can even create engaging and professional-looking effects using the motion tracking feature. This feature makes it simple to add dynamic elements to videos.
Instant Mode
Wondershare Filmora has an Instant Mode feature that lets users create videos easily and quickly. You can choose a template, import your video, and let the software will edit it automatically. This feature can automatically apply transitions, effects, and music to your videos. It’s a simple and convenient way to make polished videos without needing advanced editing skills.
Auto Beat Sync
It is a feature that synchronizes video clips and effects with the beats of background music. This feature can automatically detect the rhythm and aligns the visuals accordingly. Moreover, it can save you time and make your videos more engaging. You can edit and synchronize audio with video without having expertise by using this AI feature of Filmora.
Part 4: Tutorial: Using The Silence Detection Feature in Filmora
Wondershare Filmora can automatically remove silence from videos in no time. With its silent detection feature, you can easily remove awkward silence from your videos. Follow these guided steps to remove such moments from your videos.
Detect Slience in Video For Win 7 or later(64-bit)
Detect Slience in Video For macOS 10.14 or later
Step 1Open Wondershare Filmora
To auto remove silence in videos, start by opening Wondershare Filmora on your system. Look for the “Silence Detection” button located just beneath the “New Project” option.

Step 2Import and Detect Silence
Click on the “Silence Detection“ button, and then import your video file into the tool. If needed, you can adjust the parameters in the “Settings” menu according to your requirements. Continue to select the “Start” button, and Filmora will automatically detect any silent intervals in your video or audio file.

Step 3Delete Silence and Merge Clips
Continue to remove the silent portions from the timeline by merging the clips together. To merge the remaining clips together, drag and place each clip right next to each other. Once done, click the “Export to Timeline” button to lead into the main interface.

Conclusion
To conclude, silence detection eliminates boring stretches of silence from a video. Additionally, it allows you to enhance the overall flow of your video. By removing such intervals, you can maintain a consistent pace throughout your video. Wondershare Filmora is a fantastic tool that automatically removes silence from video and audio files.
Detect Slience in Video Detect Slience in Video Learn More >
Part 2: Silence Detection Feature of Wondershare Filmora - An Understanding
Wondershare Filmora Video Editor always surprises you with its unique editing options and features. Its many features make it easy and pretty straightforward for you like. With another excellent feature, you can detect silence in audio files and videos. This unique feature will automatically detect awkward silence or long pauses.
Furthermore, you can remove those moments from your project to create a seamless experience. This video silence remover uses AI to find silent intervals in your video. You can also change the volume threshold by helping the tool find more such moments in your project. Additionally, you can change the minimum duration of such silent intervals of your video.
Part 3: Gathering Details About the Other AI Features of Filmora
Wondershare Filmora can auto remove silence in videos, but it has other AI features too. Learn more about Filmora’s AI features in this section.
Edit Video with AI For Win 7 or later(64-bit)
Edit Video with AI For macOS 10.14 or later
AI Image
This feature of the Wondershare Filmora employs AI to improve the appearance of images in videos. It automatically fixes imperfections like noise and color asymmetry. Furthermore, it also corrects brightness, giving your videos a better, more polished appearance. You can fast and easily enhance the quality of your video with the help of this feature.
Auto Reframe
If you want to change the aspect ratio of your video automatically, then this is the feature for you. The Auto Reframe function in Filmora automatically modifies aspect ratios for your video .
Motion Tracking
Filmora’s motion tracking feature tracks and follows moving objects in videos . It allows you to add effects, text, or graphics that move along with the object. Furthermore, this feature makes it easy to highlight and enhance specific elements in a video. You can even create engaging and professional-looking effects using the motion tracking feature. This feature makes it simple to add dynamic elements to videos.
Instant Mode
Wondershare Filmora has an Instant Mode feature that lets users create videos easily and quickly. You can choose a template, import your video, and let the software will edit it automatically. This feature can automatically apply transitions, effects, and music to your videos. It’s a simple and convenient way to make polished videos without needing advanced editing skills.
Auto Beat Sync
It is a feature that synchronizes video clips and effects with the beats of background music. This feature can automatically detect the rhythm and aligns the visuals accordingly. Moreover, it can save you time and make your videos more engaging. You can edit and synchronize audio with video without having expertise by using this AI feature of Filmora.
Part 4: Tutorial: Using The Silence Detection Feature in Filmora
Wondershare Filmora can automatically remove silence from videos in no time. With its silent detection feature, you can easily remove awkward silence from your videos. Follow these guided steps to remove such moments from your videos.
Detect Slience in Video For Win 7 or later(64-bit)
Detect Slience in Video For macOS 10.14 or later
Step 1Open Wondershare Filmora
To auto remove silence in videos, start by opening Wondershare Filmora on your system. Look for the “Silence Detection” button located just beneath the “New Project” option.
Step 2Import and Detect Silence
Click on the “Silence Detection“ button, and then import your video file into the tool. If needed, you can adjust the parameters in the “Settings” menu according to your requirements. Continue to select the “Start” button, and Filmora will automatically detect any silent intervals in your video or audio file.
Step 3Delete Silence and Merge Clips
Continue to remove the silent portions from the timeline by merging the clips together. To merge the remaining clips together, drag and place each clip right next to each other. Once done, click the “Export to Timeline” button to lead into the main interface.
Conclusion
To conclude, silence detection eliminates boring stretches of silence from a video. Additionally, it allows you to enhance the overall flow of your video. By removing such intervals, you can maintain a consistent pace throughout your video. Wondershare Filmora is a fantastic tool that automatically removes silence from video and audio files.
Top 7 Easy Ways to Convert a Video to a GIF Online
Looking for the best video to gif online conversion tools? No worries, as we have done all the research work and have shortlisted the best tools that can assist you with the task. GIF is short and cute animated files that help in interestingly conveying a message. These short-animated visuals help in reaching and creating an impact on the target audience. So, if you have some videos, GIF animations can be created from them using a good converter tool which can be an online program or system software.
Online programs are preferred by the users owing to their simple and hassle-free use, support for basic features, and cost-saving options. So, here in this topic, we will discuss the top and easy ways to convert video to GIF online.

Part 1: Top 7 Easy Ways to Convert a Video to a GIF Online
Several online tools can be used for converting a video file into GIF, but all do not stand up to the tall claims it makes. So, if you are in search of an easy yet effective tool, shortlisted below are the top 7 tools for video into GIF online conversion.
1. Adobe Express
Powered by Adobe Premiere, this is an excellent online tool that allows converting videos in all key formats in GIF format. The free version allows adding videos for up to 1 hour and the processed files can be downloaded to the local system.
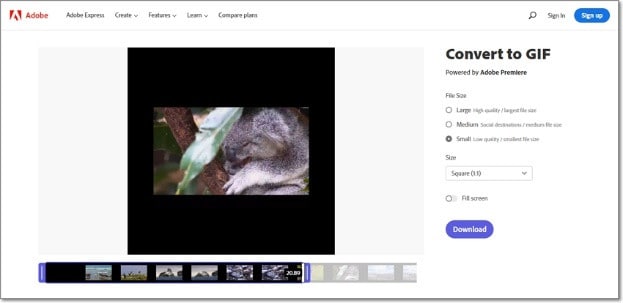
Key features
- Video files in all key formats can be converted to GIF.
- Allows selecting the aspect ratio and the file size of the target file.
- This video to GIF converter online tool support drag and drop feature.
- Allows trimming the video so that the file portion can be selected.
Pros:
- Simple and clean interface.
- Quick file processing.
- Allows selecting aspect ratio and file size.
Cons:
- Only one file at a time can be processed.
- Only desktop files can be added.
- To download the file, you need to free sign-up.
User Review:
A good online multi-platform service that works with interesting features. -TechRadar
This is one of the best programs that comes packed with wide range of features that can assist you in getting the target customized files.
2. Ezgif
Using this browser-based tool, local as well as online videos in key formats can be converted to GIFs. The interface is simple where you just need to add the file and the conversion will be done automatically.
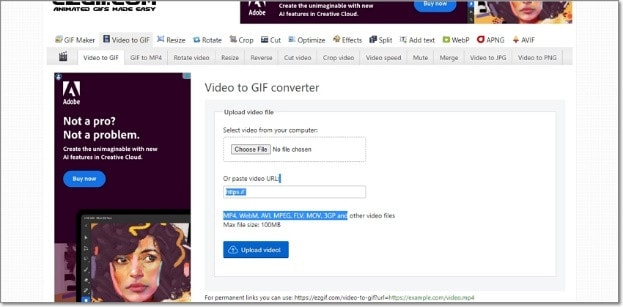
Key features
- GIF can be created from the local and online video files in all key formats.
- Choose the video part for creating the GIF file else by default, the first 5 seconds of the video are used.
Pros:
- All popular video formats like MP4, MPEG, FLV, MOV, and others are supported for conversion to GIF.
- Local, as well as file links in case of online files, can be added.
- Allows selecting the video part for which the GIF has to be created.
- Allows choosing the frame rate, and the size of the video.
This online GIF converter has an option to set static background.
Cons:
- File size limitation of 100 MB.
- Internet dependency.
User Review
“A website with many important and good tools that facilitates making your task easier. You get all features in one place. -Sasa011, Mywot.
This simple online tool is a pocket friendly option for converting your videos into GIF with added option for editing them. Supporting all key formats, the program supports additional tools as well.
3. Img2Go
Your videos on the system, cloud storage, as well as using URLs can be added to this online tool for conversion to GIF format. The look and the quality of GIFs can be adjusted by making changes in the file parameters.

Key features
- Convert all key video files like MP4, MOV, MPEG, and others to GIF.
- Customize the GIF look by editing the file size and applying the color filter.
- This online video to GIF converter allows to choose to enhance, sharpen, equalize, and edit files in other ways.
- Files to be converted can be added from the desktop, Google Drive, Dropbox, as well as URL.
- Processed files can be saved to the cloud storage in addition to the local system.
Pros:
- Multiple sources to add the video file.
- Customize the file parameters and enhance its look.
- Converted file is downloaded automatically to the local system.
Cons:
- Free version allows converting only 3 files at a time.
- Dependency on internet connectivity.
User review:
“This is the best online converter app I have discovered. It is really easy and fast to use. I absolutely recommend it and it really works.”-Maria Ancil, ChromeStats
When you need to convert only a few files at a time in a hassle-free manner consider this simple online tool. After the conversion is done, you would not have any hassles of file downloading as it is automatically saved to the system.
4. CloudConvert
Convert your videos in MP4, FLV, WebM, and other key formats to GIF using this browser-based tool that is simple and free to use. Multiple file parameters can be changed using the tool to get the desired file.

Key Features:
- Allows converting all key video formats.
- Files to be converted can be added from the desktop, URL, Dropbox, Google Drive, and OneDrive.
- Allows adjusting the fit, codec, resolution, aspect ratio, and fps.
- Option to trim the file and also add a watermark.
Pros:
- Files to be converted can be added from multiple sources.
- All key video formats supported.
- Option to control the video size, quality, and aspect ratio.
Cons:
- Free version allows only 25 conversions per day.
- Converted files need to be downloaded.
User Review
“Instant way of converting small-sized files online in many different formats.”
-Sushil, SoftwareAdvice
When conversion of cloud-based files is needed, this works a good online tool that also allows you to edit and change the key file parameters.
5. io
This is a free browser-based tool that allows creating of animated GIF files from videos. There are several video editing options also supported by the tool like split, cut, adding text, and more. You can even add a YouTube video or its link to create a GIF.

Key features:
- Free online tool for creating a GIF file.
- Support all key video formats like MP4, MOV, FLV, and others.
- Local, YouTube as well as videos from Dropbox can be added.
- Option to record the video and create its GIF.
- ‘Allows choosing the size, duration, background color, and several other file parameters.
Pros:
- Videos from multiple sources can be added.
- YouTube videos can also be converted to GIFs.
- Option to record the video and create its GIF.
- Support multiple video editing options.
Cons:
- Slow processing speed.
- Files processed through the free version have a watermark.
- Free version allows processing files under 10 minutes and of 250Mb in size.
User Review:
“It is just a perfect tool and easy to use. It supports a wide variety of media files.” - Koi, Trustpilot.
Option to convert the YouTube videos as well as the recorded videos make this tool different from the others. All popular file formats are supported and you can even customize and change the file parameters as per your requirements.
6. VistaCreate
This is another simple-to-use tool that allows converting all key video formats to a GIF file. The program allows setting various parameters as needed.
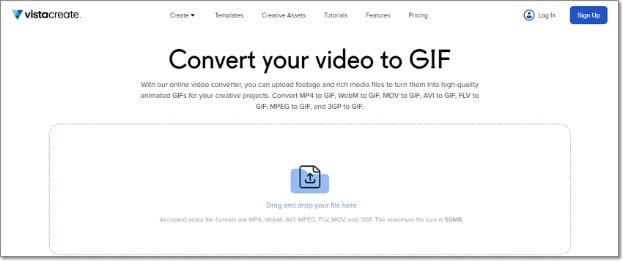
Key Features
- Convert MP4, WebM, AVI, MPEG, FLV, MOV, and 3GP to GIF.
- Support Drag and Drop feature.
- Videos up to 50MB can be processed.
- Allows choosing the video start and the end time for which GIF is to be created. If no time is selected, the first 5 seconds of the video are used.
Pros:
- Simple user interface.
- Allows selecting the video part for which GIF is to be created.
- Choose the frame rate and the speed.
Cons:
- Limited format support.
- Free version has a limitation of 50Mb file size.
- Processing speed is slow.
User Review:
“It is a simple and fast online tool that works. The program allows creating eye-catchy visuals and is free to use.”-Kshitij T, G2. Com
Simple to use, this online tool is apt when you need selected parts of the video for creating a GIF. Though it is compatible with a few selected formats, the process of conversion is simple.
7. XConvert
This online tool support conversion of wide range of file types and formats including videos to GIF. The supported video formats are MP4, WebM, MOV, and MKV. The tool also allows changing the target file parameters.

Key Features
- Free to use online tool with a simple interface.
- Allows converting MO4, MOV, WebM, and MKV videos to GIF.
- Frame Rate and resolution of the target GIF file can be selected.
- Allows adding local as well as files saved to the cloud storage.
Pros:
- Add videos from the desktop, Google Drive, and Dropbox.
- Choose the desired frame rate and resolution.
- Option to save the processed file to the system or Dropbox. Option to get the converted file download link.
Cons:
- Limited file support.
- Converted files need to be downloaded.
- Internet dependency.
User Review:
Portable, nice UI, cross-platform tool and has a lot of actions and run fast. -Roflpancake, Alternativeto
When simple conversion with basic file editing is needed, consider this online tool for your task. In addition to the local system, you can even save the files to your cloud storage.
Part 2: Comparison Table of the Best Video to GIF Converters
The table below compares the above 7 listed tools based on the formats supports, speed of file processing, and the watermark on the processed files.
| Features/Tool | Supported Format | Free Version with watermark or not | Speed of conversion |
|---|---|---|---|
| Adobe Express | All key video formats | No watermark | 2 (Fast) |
| Ezgif | All key formats including MP4, MPEG, FLV, MOV, and others. | No watermark. | 4 (Slow) |
| Img2Go | MP4, FLV, MOV, and all key video formats. | No Watermark | 2 (Fast) |
| CloudConvert | All popular video formats including MP4, MOV, FLV, MPEG, and more. | No Watermark | 2(Fast) |
| Veed.io | All key formats | Yes, free version has a watermark. | 5 (very Slow) |
| VistaCreate | MP4, WebM, AVI, MPEG, FLV, MOV, and 3GP. | No watermark | 5 (Very Slow) |
| XConvert | MP4, WebM, MOV, MKV. | No watermark | 3 (Average) |
Part 3: Best Solution to Convert Video to GIF on Windows/Mac
To convert videos to GIF on your Windows and Mac without worrying about any limitations or internet dependency, desktop software works as the best option. If you too have been looking for one such desktop program, we recommend Filmora Video Editor as the best choice. Though the software is used majorly for advanced video editing options, it is capable of performing a variety of other tasks as well including video to GIF conversion. The software allows file conversion through its export feature.
For Win 7 or later (64-bit)
For macOS 10.14 or later
Key Features
- Almost all video formats like MOV, MP4, MKV, FLV, and others can be converted to GIF.
- High-quality conversion at a fast speed.
- Support batch processing so that multiple files can be processed at a time.
- Allows editing and customizing videos using the built-in features of the software like effects, subtitles, crop, cut, and more.
Pros:
- The interface is simple which makes the software suitable even for beginners.
- Almost all popular video formats are supported.
- High-quality conversion in a hassle-free manner.
- Windows and Mac support.
Cons:
- Being a desktop software, it needs download and installation.
- Need to purchase the software subscription.
Steps to convert videos to GIF using Wondershare Filmora
Step 1. Launch the installed software on your system and the main interface select Create Project > New Project.

Step 2. Click on Import Media Files Here option under the Media tab to browse and add the local video file. Multiple files for batch processing can be added here.

Step 3. After the files are added, now it’s time to move them to the time and for this, you can simply drag and drop them to the bottom. Now at the timeline, using the built-in editing features, customization can be done as required.

Step 4. Finally, tap on the Export button and then choose GIF as the desired target format and also the location to save the converted files.

Conclusion
If one of the above-listed online tools serves your videos for GIF conversion purposes, it’s great. If not, you can use the Wondershare Filmora software. Once downloaded, the software can be used for several editing and other video-related tasks.
For macOS 10.14 or later
Key Features
- Almost all video formats like MOV, MP4, MKV, FLV, and others can be converted to GIF.
- High-quality conversion at a fast speed.
- Support batch processing so that multiple files can be processed at a time.
- Allows editing and customizing videos using the built-in features of the software like effects, subtitles, crop, cut, and more.
Pros:
- The interface is simple which makes the software suitable even for beginners.
- Almost all popular video formats are supported.
- High-quality conversion in a hassle-free manner.
- Windows and Mac support.
Cons:
- Being a desktop software, it needs download and installation.
- Need to purchase the software subscription.
Steps to convert videos to GIF using Wondershare Filmora
Step 1. Launch the installed software on your system and the main interface select Create Project > New Project.
Step 2. Click on Import Media Files Here option under the Media tab to browse and add the local video file. Multiple files for batch processing can be added here.
Step 3. After the files are added, now it’s time to move them to the time and for this, you can simply drag and drop them to the bottom. Now at the timeline, using the built-in editing features, customization can be done as required.
Step 4. Finally, tap on the Export button and then choose GIF as the desired target format and also the location to save the converted files.
Conclusion
If one of the above-listed online tools serves your videos for GIF conversion purposes, it’s great. If not, you can use the Wondershare Filmora software. Once downloaded, the software can be used for several editing and other video-related tasks.
Backup and Organize Your Footage in Minutes
Backing up your data is deemed significantly necessary among video editing communities. Files get corrupted easily. Having a backup drive can save your day and countless hours. You can back up your data any way you deem fit. However, it will do you right if you follow the advice of professionals.
The article is written explicitly after due consideration and suggestions from the professional video editor. You can follow the steps in it to make backup files. Let us start with very straightforward steps to help you understand the professional way of backing up and organizing your footage.
Part 1. Back Up Your Files
Backing up your files gives you peace of mind. If one file is lost, the whole project becomes vulnerable to failure. Therefore, every effort must be made to ensure the protection of files. The best way to protect the files from any misfortune is to back them up.
Remember, there is no specific way to back up your files. Depending on the project’s requirements, you can do that differently. The following steps will light up how you can back up your files.
Step1Back up your files in two different places
It is crucial to do that. If one backup drive corrupts, you have the second option. It gives you an opportunity to back up files.
- You can make two different external backup hard drives.

- You can also use your internal and external devices as two backup options.

Step2Make specific folders for each purpose of the video
The next step is how you back up your files properly and safely. Make separate folders for the different formats you are importing in your drive. Always use the primary source to make a copy of your files.
Follow the steps below to understand how to back up your files in two drives.
- Create a folder in your drive.
- Name it. You can name it according to the given format. The choice is yours.

- Your backup folder is created.
- Make new folders based on the files that are imported into the file. We are making two folders for the project, 01 Footage, and 02 Audio.
- 01 Footage is for the original footage.
- 02 Audio is for audio files provided by the music artist.

Step3Repeat the same process in your second backup drive
- Make the same folders and sub-folders in your secondary backup drive.

Step4Transfer files to your primary and secondary folders
- Transfer files to folders and sub-folders in your first backup drive.
- Transfer files to folders and sub-folders in your secondary backup drive.
![]()
Note: Most people make the mistake of making a backup drive and then using the same drive to make the second backup. The approach needs to be corrected.
We are done with backing up our files. It is time to organize the files in your drive.
Part 2. Organize Your Files in Filmora
Organizing your files is vital for any operation in video and editing. It makes everything streamlined. The risk of losing your data become negligible. Let us enlighten you on how you can organize your files.
Free Download For Win 7 or later(64-bit)
Free Download For macOS 10.14 or later
Step1Create new folders to lay the foundation for your video editing project
You can imitate the format we have chosen. However, you can choose any way you deem fit.
- Create 02 Project Files and 03 Exports.
- 02 Project contains the files that we will edit in Filmora .
- 03 Exports will have files that will be exported out of Filmora.

- In the 01 Media folder, create a new folder, 03 Graphics. It will contain graphics the artist will provide, such as a logo. You can also add your graphics to the folder if you want.

The format will help you if you move files from one device to the next case. In that case, you will only have to move one folder with the artist’s name.

Step2Create a new project
In this step, we will organize our files in Filmora. It will help us to keep discipline and order in file organization. It makes work easy and fun.
- Create a new project when you open Filmora on your PC or Mac.

- Save the project in any name you want. We have saved the project in the format explained above.
- Save the file in 02 Project Files.

Step3Edit your workspace if you want
Users can edit the workspace in Filmora. You can customize it to your liking. Also, it is entirely optional.
- Go to layout mode. Change the layout if you want.

- You can manually change the panels by simply dragging them across the screen.

The workspace settings will be saved automatically. The next time you start Filmora, you will not need to readjust the panels.
- Save the file
Step4Recreate the file structure in your 02 project files
Now, you create folders in your project. For that, you can follow our structure, or you can follow your instincts.
- Create the folders in Filmora, as you have created them in your drive. The folders will be created in your 02 Project Files.
These new folders are the exact copies of your media files that you have got from the producer and music artist.

- Import the files into respective folders. Footage should include all the original videos given to your producers.

Step5Save the project
You can save the file using the button on Filmora, as shown below.

- You can save the files using short keys.

Conclusion
Making a backup file for your project is crucial. For a video editor, it is quite painful to learn that the final product has a missing file. Therefore, one must ensure that all the files are backed up before beginning the editing phase.
Apart from that, one must also keep updating the files in Filmora . You performed some editing. Make sure to save the file then and there. Any minor mistake can cause great worry for the professional editor. Thus, it is better to take proactive actions.
Free Download For Win 7 or later(64-bit)
Free Download For macOS 10.14 or later
We are done with backing up our files. It is time to organize the files in your drive.
Part 2. Organize Your Files in Filmora
Organizing your files is vital for any operation in video and editing. It makes everything streamlined. The risk of losing your data become negligible. Let us enlighten you on how you can organize your files.
Free Download For Win 7 or later(64-bit)
Free Download For macOS 10.14 or later
Step1Create new folders to lay the foundation for your video editing project
You can imitate the format we have chosen. However, you can choose any way you deem fit.
- Create 02 Project Files and 03 Exports.
- 02 Project contains the files that we will edit in Filmora .
- 03 Exports will have files that will be exported out of Filmora.
- In the 01 Media folder, create a new folder, 03 Graphics. It will contain graphics the artist will provide, such as a logo. You can also add your graphics to the folder if you want.
The format will help you if you move files from one device to the next case. In that case, you will only have to move one folder with the artist’s name.
Step2Create a new project
In this step, we will organize our files in Filmora. It will help us to keep discipline and order in file organization. It makes work easy and fun.
- Create a new project when you open Filmora on your PC or Mac.
- Save the project in any name you want. We have saved the project in the format explained above.
- Save the file in 02 Project Files.
Step3Edit your workspace if you want
Users can edit the workspace in Filmora. You can customize it to your liking. Also, it is entirely optional.
- Go to layout mode. Change the layout if you want.
- You can manually change the panels by simply dragging them across the screen.
The workspace settings will be saved automatically. The next time you start Filmora, you will not need to readjust the panels.
- Save the file
Step4Recreate the file structure in your 02 project files
Now, you create folders in your project. For that, you can follow our structure, or you can follow your instincts.
- Create the folders in Filmora, as you have created them in your drive. The folders will be created in your 02 Project Files.
These new folders are the exact copies of your media files that you have got from the producer and music artist.
- Import the files into respective folders. Footage should include all the original videos given to your producers.
Step5Save the project
You can save the file using the button on Filmora, as shown below.
- You can save the files using short keys.
Conclusion
Making a backup file for your project is crucial. For a video editor, it is quite painful to learn that the final product has a missing file. Therefore, one must ensure that all the files are backed up before beginning the editing phase.
Apart from that, one must also keep updating the files in Filmora . You performed some editing. Make sure to save the file then and there. Any minor mistake can cause great worry for the professional editor. Thus, it is better to take proactive actions.
Free Download For Win 7 or later(64-bit)
Free Download For macOS 10.14 or later
How to Add a Green Screen to Zoom
If you are a regular user of Zoom app because you have to attend meetings and video conferences every now and then, you should know how to create a green screen for Zoom calls. There are going to be times when you would not want to show what is in your background because it might look distracting. Besides, changing the background from time to time breaks the monotony of your Zoom calls.
Zoom app allows you to change your background and set any available virtual background. However, the effect of virtual background may not be accurate and smooth unless you have a uniform background color. If you use green screen background for Zoom, you can replace it with any virtual background that will look very realistic to your audiences. We will illustrate how to create a green screen background for Zoom.
Part 1. How to add green screen to Zoom on computer?
Regular Zoom users prefer arranging and attending video conferences from their computers. Zoom desktop app makes it more convenient to attend Zoom conference with a wider screen and better visibility. Make sure you have a uniform green screen in your background before attending Zoom call so that you can replace it with any available virtual background on Zoom. Here are the steps on how to create a green screen for Zoom app on your computer.
Step1Open Zoom app and make sure you are logged into your account. Adjust the webcam so that only you and your green screen should be visible in the frame.
Step2Click on Settings (gear icon) located in the top-right corner.

Step3Once Settings window opens, click on Virtual background option on the left panel.
Step4Turn on the option “I have a green screen” located at the bottom. Thereafter, choose a virtual background with which you want to replace the green screen in your video.

Step5Apart from the present virtual background, you can add photo or video to replace green screen background.

Step6Close Settings window and you will see that your green screen is replaced by your selected virtual background.
Part 2. How to add green screen to Zoom on mobile?
If you are an occasional Zoom user, you are more likely to use your smartphone to attend Zoom conferences. If you want green screen effect on your Zoom call, make sure you have a sizeable green screen in your background. This is because even if you happen to move your phone during the meeting, green screen background should come in the video frame all the time.
It is recommended to use a tripod to keep your smartphone fixed in one spot for better and consistent green screen effect. Here are the steps to answer your question how do you add a green screen to Zoom app on your mobile phone. The steps are the same for Android and iOS users.
Step1Open Zoom app on your smartphone and make sure you are signed into your account.
Step2Start a Zoom meeting and tap on More option located in the bottom-right corner.

Step3Tap on Virtual background and you can select any preset virtual background.

Step4If you want to replace green screen with a customized background, tap on “+” icon and select any photo or video from your phone.

Step5Tap on Close option and the selected virtual background will be applied to your Zoom video.
Part 3. Tips to use green screen on Zoom video
Here are some important tips to use green screen on Zoom video for a better outcome.
Buy Large Green Screen - Since you are going to invest in buying green screen, you should buy a large green screen instead of buying two. Firstly, when you have one large green screen, you can set it up without any wrinkles or overlaps.
Secondly, a large green screen means greater surface area, and even when you slightly change the angle of your camera, your background will still have green screen instead of the exterior wall showing up and ruining virtual background effect.
Buy Green Screen Stand - Along with green screen, you should buy a sizeable green screen stand. A regular green screen stand contains two vertical supports at both ends and one horizontal support where you hand the green screen.
You can buy it according to the size of green screen you have bought. And you need to buy stand because you cannot fix the green screen on the wall properly. If you use any other means, there are going to be wrinkles and uneven virtual background effect.
Green Screen Quality - You can purchase any shade of green screen, but we recommend you opt for vibrant green color for a better outcome. Most importantly, the color should be even across the surface, and there should not be light and dark patches to dampen the virtual background effect and make it look unrealistic. That is why you should not compromise with quality.
Avoid Green Objects - You should not wear anything green. If your green screen has a lighter shade, you can wear deep color dresses and vice versa. Most importantly, you should not keep anything that is green while attending Zoom attending as it will disturb the green screen effect and it will look embarrassing. If you need to keep any green objects in your Zoom meetings, you should have blue screen instead of green screen.
Focus On Lighting - Lighting is extremely important when you want to use green screen. You should place the light so that it spreads evenly across the green screen. Otherwise, there are going to be light and dark patches, and the effect can get disturbed. Make sure you do not cast any shadow on the green screen by positioning the green screen accordingly.
Select A Proper Background - Last but not least, when you change your green screen to any virtual background photo or video, make sure you keep your audiences in mind. If you are attending a meeting, you should keep a professional-looking background. The background should not be distracting and match the theme of your meeting.
Conclusion
We have answered your question, “How do you add a green screen to zoom?” You can use green screen on your Zoom desktop app as well as smartphone app. This will help you to make your usual background cover up with green screen and replace green screen with any virtual background. Keep in mind all the tips we have provided you so that the green screen effect is perfect.
Free Download For Win 7 or later(64-bit)
Free Download For macOS 10.14 or later
Also read:
- New 2024 Approved How To Create A YouTube Intro
- Updated Do You Seek to Blur Out Your Video and Photo to Display some Motion Blur? This Article Provides a List of the Best Motion Blur Apps for Videos and Photos
- How To Add Motion Blur Effect To Photos in GIMP for 2024
- New 15 Stunning GIF Splitter Examples You Need to Bookmark
- New Do You Want to Use the Best LUTs for Your Media Content but Need Help Finding Them? Here Is the Overview of the Best Free LUTs for You to Use
- How to Change Aspect Ratio in iMovie
- New In 2024, Top 8 Video Editor with Useful Masking
- New 2024 Approved Cropping Videos in Final Cut Pro Step by Step
- New Achieving GoPro Slow Motion with Quality An In-Depth Overview
- Top Things People Know About Wedding Slideshow for 2024
- How to Correct Lens Distortion With Filmora
- Updated 2024 Approved How D AI Video Games Act More Human Than Human?
- What Is Motion Tracking and How to Use It for 2024
- Updated In 2024, Finding Best GIF Websites Is Easy as Pie
- In 2024, Sync Audio With Video With Filmora
- Updated Do You Know Anything About the Video Format Supported by WhatsApp? If Not, Then This Is the Right Time to Learn About WhatsApp-Supported Video Formats for 2024
- New A Vacation Slideshow Is a Great Way to Relive the Vacation Memories and Also Share Them with Your Loved Ones. If You Are Looking for Ways to Create a Slideshow in Just a Few Minutes, We Will Help You with the Best Tool
- New Want to Explore the Exciting World of GIFs? Here Is Everything You Will Ever Want to Know and Learn About the Most Appealing GIF Libraries, All at Once Place
- Updated 2024 Approved Create the Night-to-Day Effect Videos
- What Is First Impression Review Video for 2024
- With the Datamoshing Effect, the User Can Damage the Video Clips to Offer a Glitch Effect. The Article Introduces Datamosh After Effects Its Workability in the Industry for 2024
- Updated In 2024, Some of the Top Sites to Replace a Sky Background in Videos
- In 2024, Funny Content Ideas for YouTube Videos
- Updated 2024 Approved Add some Sci-Fi Touch to Your Next Video Content Using Wondershare Filmora Editing Tools to Create an Alternate Reality Effect
- Updated Slow-Motion Innovation with Sony S&Q Feature
- New Learn How to Add Dynamic Shake Effects to Your Videos Using Alight Motion. Our Step-by-Step Guide Makes It Easy to Create Cinematic Footage
- Updated Easy Guide to Zoom Video in VLC
- In 2024, How to Change Location On Facebook Dating for your Sony Xperia 5 V | Dr.fone
- Life360 Learn How Everything Works On Vivo Y100A | Dr.fone
- 15 Best Strongest Pokémon To Use in Pokémon GO PvP Leagues For Xiaomi Redmi 12 5G | Dr.fone
- In 2024, How to Transfer Data from OnePlus Ace 2V to BlackBerry | Dr.fone
- In 2024, Full Guide to Catch 100 IV Pokémon Using a Map On Realme C67 5G | Dr.fone
- In 2024, Android to Apple How To Transfer Photos From Xiaomi Civi 3 to iPad Easily | Dr.fone
- In 2024, Unlock Apple ID without Phone Number On Apple iPhone XS Max
- The Ultimate Guide to Samsung Galaxy A23 5G Pattern Lock Screen Everything You Need to Know
- AVCHD on Redmi Note 12 4G-convert MTS for Redmi Note 12 4G
- How to Unlock SIM Card on Apple iPhone 11 online without jailbreak
- Quick Fixes for Why Is My Xiaomi Redmi A2 Black and White | Dr.fone
- Unlocking iPhone XS Lock Screen 3 Foolproof Methods that Actually Work | Dr.fone
- Read This Guide to Find a Reliable Alternative to Fake GPS On Nubia Red Magic 9 Pro | Dr.fone
- Hot 40i Messages Recovery - Recover Deleted Messages from Hot 40i
- Easy Steps to Make Excel 2023 Hyperlinks Working
- 6 Solutions to Fix Error 505 in Google Play Store on Lava Blaze 2 | Dr.fone
- In 2024, What Legendaries Are In Pokemon Platinum On Nokia C12 Plus? | Dr.fone
- Sim Unlock Nokia G310 Phones without Code 2 Ways to Remove Android Sim Lock
- Best 3 Samsung Galaxy F54 5G Emulator for Mac to Run Your Wanted Android Apps | Dr.fone
- How to Lock Apps on Samsung Galaxy A14 4G to Protect Your Individual Information
- Recover Apple iPhone 12 Data From iTunes | Dr.fone
- Downloading SamFw FRP Tool 3.0 for OnePlus Ace 2
- Did Your iPhone X Passcode Change Itself? Unlock It Now
- How Honor Magic 5 Mirror Screen to PC? | Dr.fone
- In 2024, Here are Some Pro Tips for Pokemon Go PvP Battles On Gionee F3 Pro | Dr.fone
- iSpoofer is not working On Apple iPhone 14 Pro? Fixed | Dr.fone
- In 2024, How To Unlock Stolen iPhone 15 Pro Max In Different Conditionsin | Dr.fone
- Title: Do You Know How Boring a Video Can Be with Silent Moments? Some Tools with Silent Detection Features Help You Delete Those Moments for 2024
- Author: Chloe
- Created at : 2024-04-24 07:08:18
- Updated at : 2024-04-25 07:08:18
- Link: https://ai-editing-video.techidaily.com/do-you-know-how-boring-a-video-can-be-with-silent-moments-some-tools-with-silent-detection-features-help-you-delete-those-moments-for-2024/
- License: This work is licensed under CC BY-NC-SA 4.0.
