:max_bytes(150000):strip_icc():format(webp)/google-logo-dbc6703838ab40ffac436f7f360b79f7.png)
Do You Want to Crop a TikTok Video? In This Article, We Will Provide You with Detailed Steps Through Which You Can Discover How to Crop TikTok Videos Easily

Do You Want to Crop a TikTok Video? In This Article, We Will Provide You with Detailed Steps Through Which You Can Discover How to Crop TikTok Videos Easily
TikTok videos are popular and always trending on various platforms. If you want to use or share a TikTok video by removing unwanted elements from it, you would require to crop it. Moreover, you would be able to manage the aspect ratio and the size of the video. It will also help you in producing a better composition of your video by highlighting a specific part.
Therefore, you must properly know about the cropping of a TikTok video. To learn how to crop video on TikTok, this article will provide detailed steps for mobile devices and desktop platforms.

Part 1: How to Crop Videos on TikTok on iPhone and Android
Each phone has a built-in feature through which users can crop or edit videos within a few taps. On your Android and iPhone, you can crop TikTok videos without using the additional editor. Read this section carefully to learn the steps for cropping TikTok videos to the aspect ratio of 9:16 on iPhone and Android.
For iPhone
Step 1: On your iPhone, open your gallery and scroll down to find your desired video. Afterward, tap on the “Edit” option in the top-right corner.
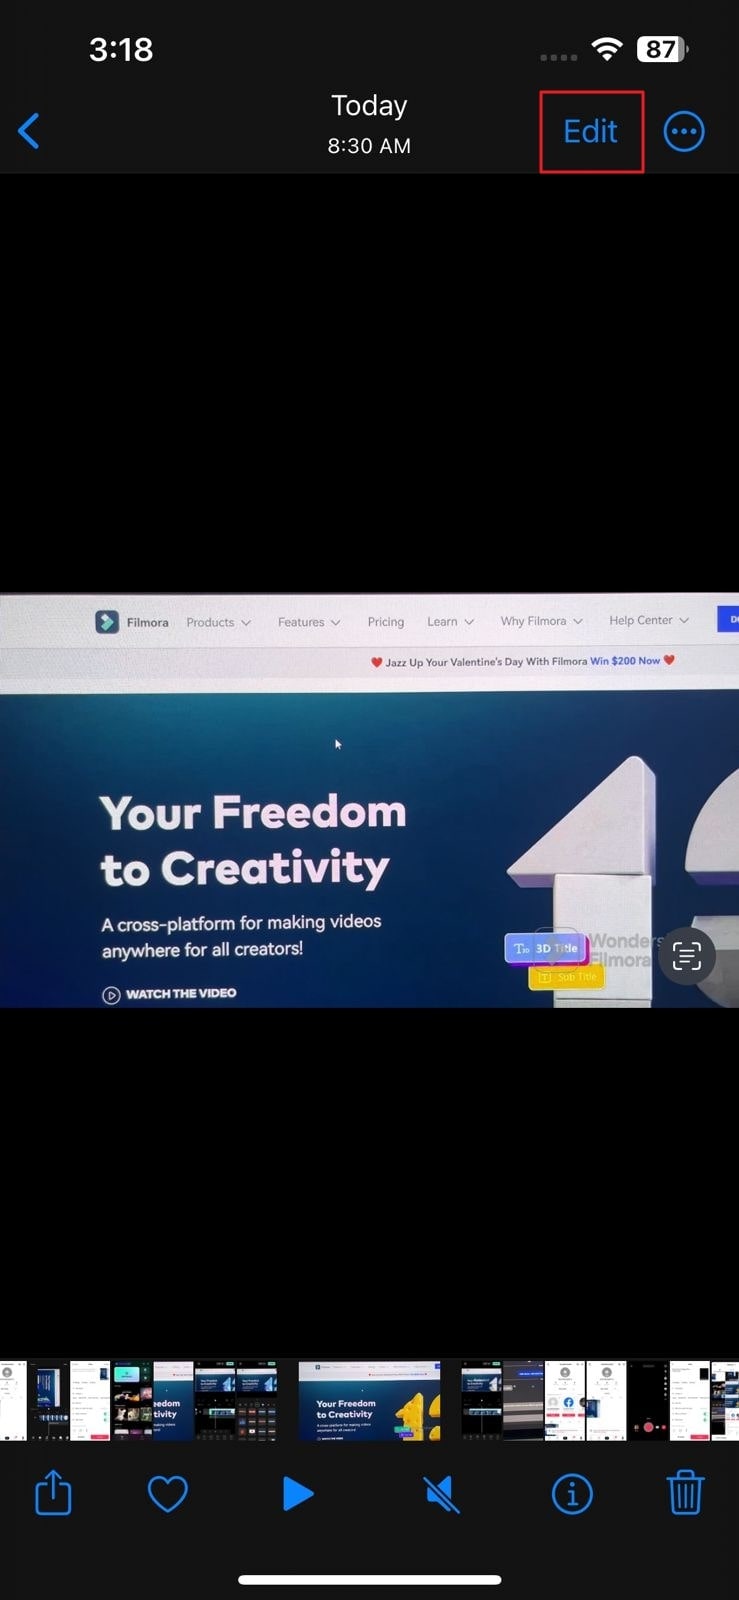
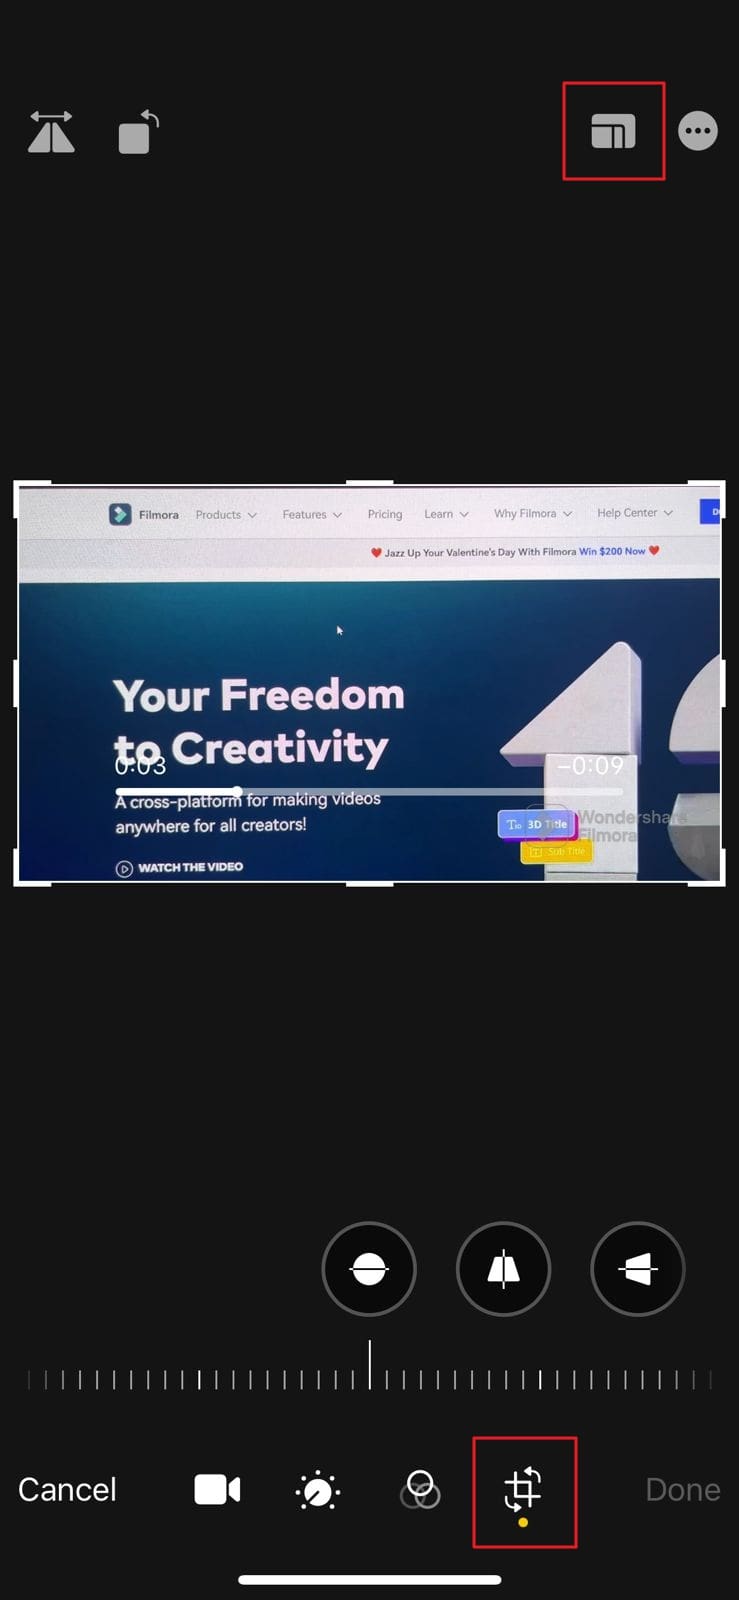
Step 2: Now, you will be able to find all the tools located at the bottom of the screen. Select the “Crop” icon given at the bottom right and then adjust the video. You can also change the aspect ratio by accessing the “Aspect Ratio” icon on the top toolbar. To save the changes, tap on the “Done” button.
For Android
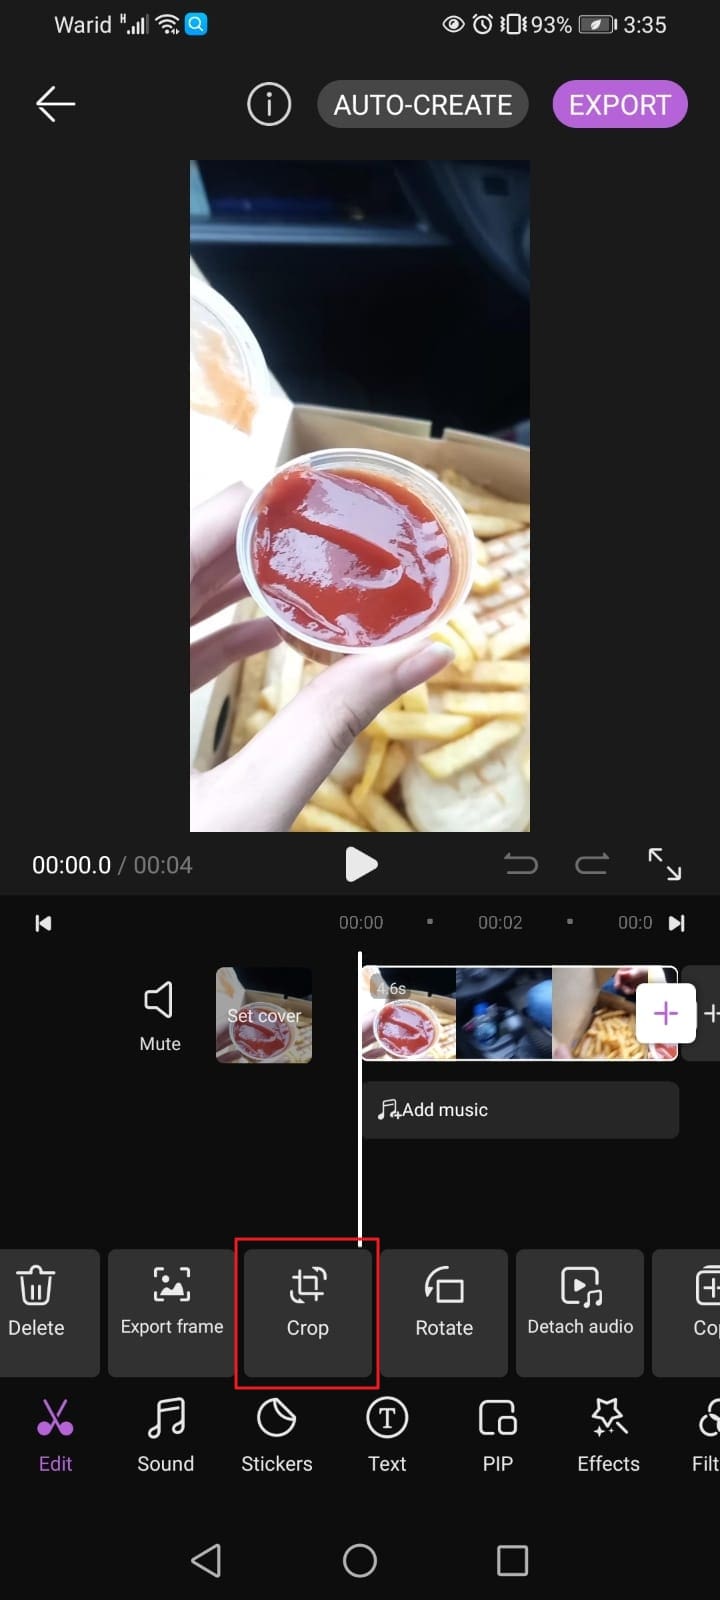
Step 1: On your Android phone, open the gallery and locate the video you want to crop. Tap on the “Edit” option to open the editing section.

Step 2: Select the “Crop” option and remove the unwanted parts from your video. Once you are done, tap on the “Tick” icon to save the changes.
Part 2: How to Crop Videos on TikTok with the Third-party App
If you find your video blurry after cropping it on your phone, you won’t be able to post it on TikTok. Thus, you would need a third-party app like Filmora , which you can download on iOS and Android devices. It’s a friendly video editor through which you can modify your TikTok videos without affecting their original quality.
You can also add visual effects and filters to make the colors of the video prominent and vibrant. It has an easy-to-use interface, so you can edit your videos on its timeline without complications. Moreover, it offers a professional crop feature through which you can manage your video’s aspect ratio. You can choose different aspect ratios from the given options to adjust the frame accordingly.
Steps to Crop TikTok Video Using Filmora
Have you ever used Filmora app before? This section will guide you on how to crop TikTok videos through the Filmora app on your phone.
Step 1: Create a New Filmora Project
Launch Filmora on your phone and tap “New Project” to import your video. Choose the video from your phone and tap on “Import.”

Step 2: Access the Crop Tool
Once done, tap on the “Trim” option and select the “Crop” feature to change the TikTok aspect ratio. After adjusting the aspect ratio, preferably, tap on the “Tick” icon to save the changes. After editing, choose the “Export” button to save or share your video.

Part 3: How to Crop Videos on TikTok on Desktop
Some people don’t prefer mobile apps for editing or cropping TikTok videos. That’s why people use desktop software to crop their videos on a larger screen. Fortunately, Wondershare Filmora is also available for desktop platforms that can be launched on Windows and Mac operating systems. Moreover, TikTok is also available on browsers, so you can directly upload the video on TikTok after editing it on TikTok.
Online video editors can also be preferred for video cropping. They can be accessed from any web browser through an active internet connection. Thus, you can also use online video editors as a reliable solution to crop TikTok videos.
download filmora app for ios ](https://app.adjust.com/b0k9hf2%5F4bsu85t ) download filmora app for android ](https://app.adjust.com/b0k9hf2%5F4bsu85t )
Conclusion
During filming videos, you may capture unnecessary objects, which can ruin the whole impression. To post flawless videos on TikTok, use the crop feature to eliminate all unwanted elements. In this article, we have provided comprehensive steps on how to crop TikTok videos on mobile devices. To fetch high-quality results, you should try Wondershare Filmora on desktop and mobile devices.
5 Ways to Denoise a Video
In today’s world, the quality of digital product such as photos and videos increase day by day, prompting us to create our content crystal clear and keep it that way. Of course, different kinds of effects and filters are great, and something called “noise” is one of them, but sometimes it is actually unwanted and makes our footage less likable. What is noise, or denoising, anyway? Well, instead of clear video, it’s something quite different – the footage looks grainy, sometimes excessively, and makes our eyes hurt, or simply, more difficult to see what’s going on on the screen. And if you didn’t decide to use a noise effect, then from where does it appear?..
Noise means a mix of different variations of brightness or color information in the shot. It is likely to show up when there is a low light, and/or when the video is taken with small sensors such as smartphones and action cameras. It works as follows: if someone tries to compensate for low-light settings with gain and ISO, more noise is produced.
But, as our readers already know, almost nothing is ever impossible to solve. There is a way to get rid of this annoying grain, and it is called, as pretty obvious, denoising. Hence, denoising in image and video production is used as a technique to take footage from grainy to crystal-clear. And, as you may already agree, it improves a viewer’s quality of experience. And how does this happen? - There are varied techniques, and each of them uses different mathematical and statistical models.
What is considered a good noise reduction? The technique is successful when it suppresses noise effectively in uniform regions; preserves edges and other characteristics, such as fine details and textures; and provides a visually natural experience.
and here you will learn 5 ways, as in 5 software to denoise a video. We’ll touch upon the following ones: Final Cut Pro, Adobe After Effects, Adobe Premiere Pro, DaVinci Resolve and Movavi Video Editor. But, we are not limited to these ones, so maybe there is one more you could use? You’ll find out in the article!
- Final Cut Pro
Noise that appears as unwanted grain or artifacts in the video image can be removed in Final Cut Pro pretty easily, you just have to follow the little steps for it. Keep in mind that Final Cut Pro is not eligible for PC, this editor is only available for Mac (but Windows users, tune in for the editors functioning on PC’s!)
So, you have your grained footage, which you already chose to denoise, and for which you will need a video reduction effect.
First, you will need to open Final Cut Pro and import abovementioned video. Select this clip in the timeline,

and position the play head in a way that the clip appears in the viewer, that is, on the big screen - for you to see well.

Click the Effects button in the top-right corner of the timeline, or, to use the shortcut, press Command & 5.

In the Effects browser, select the Basics category in the list of Video effects on the left, then select the Noise Reduction effect. For 360° clips, select the 360° category, then select the 360° Noise Reduction effect.
And you will need to do one of the following:
Drag the effect to the timeline clip you want to apply it to, or double-click the effect thumbnail to apply the effect to the selected clip.
When the effect is applied, Final Cut Pro analyzes the clip for noise, so you might need to wait for a little while the process is complete and only then see the result.
Interesting tip you can remember is that if you are using several effects to your video clip, then adding Noise Reduction as the first effect would guarantee the best results for you. So, Mac users, you can start denoising your videos in Final Cut Pro now!
- Adobe After Effects
Adobe After Effects is a digital visual effects, motion graphics, and compositing application… Pretty intense, right? This very software has endless powers, and one of them is, you guessed correctly – denoising the video! So, how are we going to do that in this monster of the industry?
Sometimes what’s annoying about this kind of programs is that you need plugins, so let’s try to find a way to achieve our desired result without using anything external.
So, first of all (as in all cases!) import your video into After Effects. Then, you will need to find Effect in the menu, and find: Noise and Grain. There, you will choose Remove Grain and click on it.

On the left side of the program layout, the Effects Control will be opened. Now, you see viewing mode, where you need to change Preview to Final Output.

So, this will be the video with Preview checked:

Which will look like this when Final Output is checked:

Somewhat different and looking better, right?..
By the way, you can watch the whole process video here !
- Adobe Premiere Pro
Adobe Premiere Pro is one of the most and sophisticated video editor. So, of course, there is a way to reduce noise in this software as well, and this can be reached using effect called Median.
First of all, you add your footage to the Timeline in Premiere Pro and then go find the Effects Panel, where Median can be found. You need to drag and drop the Median effect to your video clip.

The next step is to make sure that adding the effect to the grainiest parts of the clip, which can be done using masks. So, in the Effects Control panel, you’ll need to select the mask shape for your clip – you can either choose rectangle, circle, or pen tool. With the latter you can move the Mask around the screen and resize it to cover the area.

And if you Change the Feather setting to 100, the effect will not have a very visible edge and some smoothness will cover for it.

You will need to repeat the process with more than one mask, if you would like to have covered all of the grainy area of your shot.
Lastly, you’ll need to adjust the effect settings to reduce the noise.

The Median effect doesn’t actually take away the graininess, it just blurs it. You’ll need to experiment with the Radius settings until you are happy with the result.
- DaVinci Resolve
When it comes to DaVinci Resolve, the process is somewhat different in the free version of it. So, first of all, off course, you add your footage into the timeline. Then,you are going to find the fusion tab underneath the timeline panel.

You will see MediaIn1 and MediaOut1, you click on MediaIn1, which will ensure the scene appears in the first viewer – and MediaOut1 by default is appearing in the second. So, now you stay on MediaIn1, hit shift+spacebar, and find the option which says: Remove Noise (RN) and then click Add, which adds the Remove Noise1 node. On the top right corner you will find Inspector, and if you click on it, you will see all the properties you can modify.
After going only into the second viewer, and in the top bar we can find channel icons. We open it and click on red, which makes the footage black and white for a while. Then, we go back to the Inspector, increase Softness Red and Detail Red.

This removes much grain from the red channel. Then we repeat the same for green, as well as for blue channel. Once you finish, you go to the same channel button in the bar and change it to “back to color”. So, the footage will have its colors back and you will see that it has become clearer, compared to the first viewer.

You can play around with the Chroma and Luma channels in the Inspector, if that is something you have ever had experience with!
- Movavi Video Editor
In Movavi Video Editor, it is pretty straightforward – unlike DaVinci Resolve, of course! So, getting to the point: the first thing you need to do is Entering the Edit Mode. In order to achieve it, you’ll need to click the Edit button next to the file you want to adjust or select Adjustments in the Tools tab.

After this, you will be able to select the Noise removal option, and then, move the Noise level slider to reflect the amount of noise you can see in the preview. The more noise you need to remove, the higher the Noise level, and vice versa.

When you’re finished removing the noise, click Apply, but in case you need to remove noise from several files, select Apply to all files, which ensures the same noise level will be applied on all your files there.
Lastly, of course, Wondershare Filmora X offers the same option as well. The steps are ase follows: You need to go to the Effects panel and type: “Smart Denoise”. Then, right-click on the video and choose Edit Properties.

This will make sure you go inside the Smart Denoise, where you can change opacity of the clip, threshold and radius.

You should reduce Opacity until you are satisfied with the result. Then, you can use the box next to Smart Denoise in order to see the scene before and after noise and grain removal.
So, that’s it! – We learned how to remove/reduce noise and grain from the videos, using several video editors. So you might as well start making your video clips look better right away!
Noise that appears as unwanted grain or artifacts in the video image can be removed in Final Cut Pro pretty easily, you just have to follow the little steps for it. Keep in mind that Final Cut Pro is not eligible for PC, this editor is only available for Mac (but Windows users, tune in for the editors functioning on PC’s!)
So, you have your grained footage, which you already chose to denoise, and for which you will need a video reduction effect.
First, you will need to open Final Cut Pro and import abovementioned video. Select this clip in the timeline,

and position the play head in a way that the clip appears in the viewer, that is, on the big screen - for you to see well.

Click the Effects button in the top-right corner of the timeline, or, to use the shortcut, press Command & 5.

In the Effects browser, select the Basics category in the list of Video effects on the left, then select the Noise Reduction effect. For 360° clips, select the 360° category, then select the 360° Noise Reduction effect.
And you will need to do one of the following:
Drag the effect to the timeline clip you want to apply it to, or double-click the effect thumbnail to apply the effect to the selected clip.
When the effect is applied, Final Cut Pro analyzes the clip for noise, so you might need to wait for a little while the process is complete and only then see the result.
Interesting tip you can remember is that if you are using several effects to your video clip, then adding Noise Reduction as the first effect would guarantee the best results for you. So, Mac users, you can start denoising your videos in Final Cut Pro now!
- Adobe After Effects
Adobe After Effects is a digital visual effects, motion graphics, and compositing application… Pretty intense, right? This very software has endless powers, and one of them is, you guessed correctly – denoising the video! So, how are we going to do that in this monster of the industry?
Sometimes what’s annoying about this kind of programs is that you need plugins, so let’s try to find a way to achieve our desired result without using anything external.
So, first of all (as in all cases!) import your video into After Effects. Then, you will need to find Effect in the menu, and find: Noise and Grain. There, you will choose Remove Grain and click on it.

On the left side of the program layout, the Effects Control will be opened. Now, you see viewing mode, where you need to change Preview to Final Output.

So, this will be the video with Preview checked:

Which will look like this when Final Output is checked:

Somewhat different and looking better, right?..
By the way, you can watch the whole process video here !
- Adobe Premiere Pro
Adobe Premiere Pro is one of the most and sophisticated video editor. So, of course, there is a way to reduce noise in this software as well, and this can be reached using effect called Median.
First of all, you add your footage to the Timeline in Premiere Pro and then go find the Effects Panel, where Median can be found. You need to drag and drop the Median effect to your video clip.

The next step is to make sure that adding the effect to the grainiest parts of the clip, which can be done using masks. So, in the Effects Control panel, you’ll need to select the mask shape for your clip – you can either choose rectangle, circle, or pen tool. With the latter you can move the Mask around the screen and resize it to cover the area.

And if you Change the Feather setting to 100, the effect will not have a very visible edge and some smoothness will cover for it.

You will need to repeat the process with more than one mask, if you would like to have covered all of the grainy area of your shot.
Lastly, you’ll need to adjust the effect settings to reduce the noise.

The Median effect doesn’t actually take away the graininess, it just blurs it. You’ll need to experiment with the Radius settings until you are happy with the result.
- DaVinci Resolve
When it comes to DaVinci Resolve, the process is somewhat different in the free version of it. So, first of all, off course, you add your footage into the timeline. Then,you are going to find the fusion tab underneath the timeline panel.

You will see MediaIn1 and MediaOut1, you click on MediaIn1, which will ensure the scene appears in the first viewer – and MediaOut1 by default is appearing in the second. So, now you stay on MediaIn1, hit shift+spacebar, and find the option which says: Remove Noise (RN) and then click Add, which adds the Remove Noise1 node. On the top right corner you will find Inspector, and if you click on it, you will see all the properties you can modify.
After going only into the second viewer, and in the top bar we can find channel icons. We open it and click on red, which makes the footage black and white for a while. Then, we go back to the Inspector, increase Softness Red and Detail Red.

This removes much grain from the red channel. Then we repeat the same for green, as well as for blue channel. Once you finish, you go to the same channel button in the bar and change it to “back to color”. So, the footage will have its colors back and you will see that it has become clearer, compared to the first viewer.

You can play around with the Chroma and Luma channels in the Inspector, if that is something you have ever had experience with!
- Movavi Video Editor
In Movavi Video Editor, it is pretty straightforward – unlike DaVinci Resolve, of course! So, getting to the point: the first thing you need to do is Entering the Edit Mode. In order to achieve it, you’ll need to click the Edit button next to the file you want to adjust or select Adjustments in the Tools tab.

After this, you will be able to select the Noise removal option, and then, move the Noise level slider to reflect the amount of noise you can see in the preview. The more noise you need to remove, the higher the Noise level, and vice versa.

When you’re finished removing the noise, click Apply, but in case you need to remove noise from several files, select Apply to all files, which ensures the same noise level will be applied on all your files there.
Lastly, of course, Wondershare Filmora X offers the same option as well. The steps are ase follows: You need to go to the Effects panel and type: “Smart Denoise”. Then, right-click on the video and choose Edit Properties.

This will make sure you go inside the Smart Denoise, where you can change opacity of the clip, threshold and radius.

You should reduce Opacity until you are satisfied with the result. Then, you can use the box next to Smart Denoise in order to see the scene before and after noise and grain removal.
So, that’s it! – We learned how to remove/reduce noise and grain from the videos, using several video editors. So you might as well start making your video clips look better right away!
Noise that appears as unwanted grain or artifacts in the video image can be removed in Final Cut Pro pretty easily, you just have to follow the little steps for it. Keep in mind that Final Cut Pro is not eligible for PC, this editor is only available for Mac (but Windows users, tune in for the editors functioning on PC’s!)
So, you have your grained footage, which you already chose to denoise, and for which you will need a video reduction effect.
First, you will need to open Final Cut Pro and import abovementioned video. Select this clip in the timeline,

and position the play head in a way that the clip appears in the viewer, that is, on the big screen - for you to see well.

Click the Effects button in the top-right corner of the timeline, or, to use the shortcut, press Command & 5.

In the Effects browser, select the Basics category in the list of Video effects on the left, then select the Noise Reduction effect. For 360° clips, select the 360° category, then select the 360° Noise Reduction effect.
And you will need to do one of the following:
Drag the effect to the timeline clip you want to apply it to, or double-click the effect thumbnail to apply the effect to the selected clip.
When the effect is applied, Final Cut Pro analyzes the clip for noise, so you might need to wait for a little while the process is complete and only then see the result.
Interesting tip you can remember is that if you are using several effects to your video clip, then adding Noise Reduction as the first effect would guarantee the best results for you. So, Mac users, you can start denoising your videos in Final Cut Pro now!
- Adobe After Effects
Adobe After Effects is a digital visual effects, motion graphics, and compositing application… Pretty intense, right? This very software has endless powers, and one of them is, you guessed correctly – denoising the video! So, how are we going to do that in this monster of the industry?
Sometimes what’s annoying about this kind of programs is that you need plugins, so let’s try to find a way to achieve our desired result without using anything external.
So, first of all (as in all cases!) import your video into After Effects. Then, you will need to find Effect in the menu, and find: Noise and Grain. There, you will choose Remove Grain and click on it.

On the left side of the program layout, the Effects Control will be opened. Now, you see viewing mode, where you need to change Preview to Final Output.

So, this will be the video with Preview checked:

Which will look like this when Final Output is checked:

Somewhat different and looking better, right?..
By the way, you can watch the whole process video here !
- Adobe Premiere Pro
Adobe Premiere Pro is one of the most and sophisticated video editor. So, of course, there is a way to reduce noise in this software as well, and this can be reached using effect called Median.
First of all, you add your footage to the Timeline in Premiere Pro and then go find the Effects Panel, where Median can be found. You need to drag and drop the Median effect to your video clip.

The next step is to make sure that adding the effect to the grainiest parts of the clip, which can be done using masks. So, in the Effects Control panel, you’ll need to select the mask shape for your clip – you can either choose rectangle, circle, or pen tool. With the latter you can move the Mask around the screen and resize it to cover the area.

And if you Change the Feather setting to 100, the effect will not have a very visible edge and some smoothness will cover for it.

You will need to repeat the process with more than one mask, if you would like to have covered all of the grainy area of your shot.
Lastly, you’ll need to adjust the effect settings to reduce the noise.

The Median effect doesn’t actually take away the graininess, it just blurs it. You’ll need to experiment with the Radius settings until you are happy with the result.
- DaVinci Resolve
When it comes to DaVinci Resolve, the process is somewhat different in the free version of it. So, first of all, off course, you add your footage into the timeline. Then,you are going to find the fusion tab underneath the timeline panel.

You will see MediaIn1 and MediaOut1, you click on MediaIn1, which will ensure the scene appears in the first viewer – and MediaOut1 by default is appearing in the second. So, now you stay on MediaIn1, hit shift+spacebar, and find the option which says: Remove Noise (RN) and then click Add, which adds the Remove Noise1 node. On the top right corner you will find Inspector, and if you click on it, you will see all the properties you can modify.
After going only into the second viewer, and in the top bar we can find channel icons. We open it and click on red, which makes the footage black and white for a while. Then, we go back to the Inspector, increase Softness Red and Detail Red.

This removes much grain from the red channel. Then we repeat the same for green, as well as for blue channel. Once you finish, you go to the same channel button in the bar and change it to “back to color”. So, the footage will have its colors back and you will see that it has become clearer, compared to the first viewer.

You can play around with the Chroma and Luma channels in the Inspector, if that is something you have ever had experience with!
- Movavi Video Editor
In Movavi Video Editor, it is pretty straightforward – unlike DaVinci Resolve, of course! So, getting to the point: the first thing you need to do is Entering the Edit Mode. In order to achieve it, you’ll need to click the Edit button next to the file you want to adjust or select Adjustments in the Tools tab.

After this, you will be able to select the Noise removal option, and then, move the Noise level slider to reflect the amount of noise you can see in the preview. The more noise you need to remove, the higher the Noise level, and vice versa.

When you’re finished removing the noise, click Apply, but in case you need to remove noise from several files, select Apply to all files, which ensures the same noise level will be applied on all your files there.
Lastly, of course, Wondershare Filmora X offers the same option as well. The steps are ase follows: You need to go to the Effects panel and type: “Smart Denoise”. Then, right-click on the video and choose Edit Properties.

This will make sure you go inside the Smart Denoise, where you can change opacity of the clip, threshold and radius.

You should reduce Opacity until you are satisfied with the result. Then, you can use the box next to Smart Denoise in order to see the scene before and after noise and grain removal.
So, that’s it! – We learned how to remove/reduce noise and grain from the videos, using several video editors. So you might as well start making your video clips look better right away!
Noise that appears as unwanted grain or artifacts in the video image can be removed in Final Cut Pro pretty easily, you just have to follow the little steps for it. Keep in mind that Final Cut Pro is not eligible for PC, this editor is only available for Mac (but Windows users, tune in for the editors functioning on PC’s!)
So, you have your grained footage, which you already chose to denoise, and for which you will need a video reduction effect.
First, you will need to open Final Cut Pro and import abovementioned video. Select this clip in the timeline,

and position the play head in a way that the clip appears in the viewer, that is, on the big screen - for you to see well.

Click the Effects button in the top-right corner of the timeline, or, to use the shortcut, press Command & 5.

In the Effects browser, select the Basics category in the list of Video effects on the left, then select the Noise Reduction effect. For 360° clips, select the 360° category, then select the 360° Noise Reduction effect.
And you will need to do one of the following:
Drag the effect to the timeline clip you want to apply it to, or double-click the effect thumbnail to apply the effect to the selected clip.
When the effect is applied, Final Cut Pro analyzes the clip for noise, so you might need to wait for a little while the process is complete and only then see the result.
Interesting tip you can remember is that if you are using several effects to your video clip, then adding Noise Reduction as the first effect would guarantee the best results for you. So, Mac users, you can start denoising your videos in Final Cut Pro now!
- Adobe After Effects
Adobe After Effects is a digital visual effects, motion graphics, and compositing application… Pretty intense, right? This very software has endless powers, and one of them is, you guessed correctly – denoising the video! So, how are we going to do that in this monster of the industry?
Sometimes what’s annoying about this kind of programs is that you need plugins, so let’s try to find a way to achieve our desired result without using anything external.
So, first of all (as in all cases!) import your video into After Effects. Then, you will need to find Effect in the menu, and find: Noise and Grain. There, you will choose Remove Grain and click on it.

On the left side of the program layout, the Effects Control will be opened. Now, you see viewing mode, where you need to change Preview to Final Output.

So, this will be the video with Preview checked:

Which will look like this when Final Output is checked:

Somewhat different and looking better, right?..
By the way, you can watch the whole process video here !
- Adobe Premiere Pro
Adobe Premiere Pro is one of the most and sophisticated video editor. So, of course, there is a way to reduce noise in this software as well, and this can be reached using effect called Median.
First of all, you add your footage to the Timeline in Premiere Pro and then go find the Effects Panel, where Median can be found. You need to drag and drop the Median effect to your video clip.

The next step is to make sure that adding the effect to the grainiest parts of the clip, which can be done using masks. So, in the Effects Control panel, you’ll need to select the mask shape for your clip – you can either choose rectangle, circle, or pen tool. With the latter you can move the Mask around the screen and resize it to cover the area.

And if you Change the Feather setting to 100, the effect will not have a very visible edge and some smoothness will cover for it.

You will need to repeat the process with more than one mask, if you would like to have covered all of the grainy area of your shot.
Lastly, you’ll need to adjust the effect settings to reduce the noise.

The Median effect doesn’t actually take away the graininess, it just blurs it. You’ll need to experiment with the Radius settings until you are happy with the result.
- DaVinci Resolve
When it comes to DaVinci Resolve, the process is somewhat different in the free version of it. So, first of all, off course, you add your footage into the timeline. Then,you are going to find the fusion tab underneath the timeline panel.

You will see MediaIn1 and MediaOut1, you click on MediaIn1, which will ensure the scene appears in the first viewer – and MediaOut1 by default is appearing in the second. So, now you stay on MediaIn1, hit shift+spacebar, and find the option which says: Remove Noise (RN) and then click Add, which adds the Remove Noise1 node. On the top right corner you will find Inspector, and if you click on it, you will see all the properties you can modify.
After going only into the second viewer, and in the top bar we can find channel icons. We open it and click on red, which makes the footage black and white for a while. Then, we go back to the Inspector, increase Softness Red and Detail Red.

This removes much grain from the red channel. Then we repeat the same for green, as well as for blue channel. Once you finish, you go to the same channel button in the bar and change it to “back to color”. So, the footage will have its colors back and you will see that it has become clearer, compared to the first viewer.

You can play around with the Chroma and Luma channels in the Inspector, if that is something you have ever had experience with!
- Movavi Video Editor
In Movavi Video Editor, it is pretty straightforward – unlike DaVinci Resolve, of course! So, getting to the point: the first thing you need to do is Entering the Edit Mode. In order to achieve it, you’ll need to click the Edit button next to the file you want to adjust or select Adjustments in the Tools tab.

After this, you will be able to select the Noise removal option, and then, move the Noise level slider to reflect the amount of noise you can see in the preview. The more noise you need to remove, the higher the Noise level, and vice versa.

When you’re finished removing the noise, click Apply, but in case you need to remove noise from several files, select Apply to all files, which ensures the same noise level will be applied on all your files there.
Lastly, of course, Wondershare Filmora X offers the same option as well. The steps are ase follows: You need to go to the Effects panel and type: “Smart Denoise”. Then, right-click on the video and choose Edit Properties.

This will make sure you go inside the Smart Denoise, where you can change opacity of the clip, threshold and radius.

You should reduce Opacity until you are satisfied with the result. Then, you can use the box next to Smart Denoise in order to see the scene before and after noise and grain removal.
So, that’s it! – We learned how to remove/reduce noise and grain from the videos, using several video editors. So you might as well start making your video clips look better right away!
REVIEW: What’s Top 10 Software to Make AI Upscaling Video
REVIEW: What’s Best 10 Software to Make AI Upscaling Video
An easy yet powerful editor
Numerous effects to choose from
Detailed tutorials provided by the official channel
AI Upscaling is often used to improve the video quality. Here are some of the methods to do AI video upscaling. Follow these methods to successfully enhance your video quality.
In this article
01 [What Is AI Upscaling? And Why AI Upscaling Is Significant?](#Part 1)
02 [How to Easily AI Upscale Video to 1080p or 4K?](#Part 2)
03 [Best 10 Software to Make AI Upscaling Video](#Part 3)
Part 1 What Is AI Upscaling? And Why AI Upscaling Is Significant?
The process of generating or creating additional pixels of an image or frame in a video is AI Upscaling. This has many good results on the final video output.
This is mainly done to raise the bit rate of the video and, therefore, slightly improve the visual quality of the video. This is also used to improve the picture quality of DVDs and other low-quality videos. It is done to support lower quality videos or pictures on higher resolution screens like TV. This kind of upscaling is mostly done in TVs automatically.
Part 2 How to Easily AI Upscale Video to 1080p or 4K?
The interesting part is that this upscaling is done by the higher resolution device itself. If you display a lower resolution video on a high-resolution TV, the TV will upscale the video quality of the lower resolution video. This process mainly happens by the displaying device itself. But you can try to upscale videos by yourself using this software, which will help you achieve the best results.
Part 3 Best 10 Software to Make AI Upscaling Video
There are numerous AI upscale video software on the internet. The software listed below is the best among the numerous software because of its extraordinary features and interface. The 10 best AI video upscaling software are:
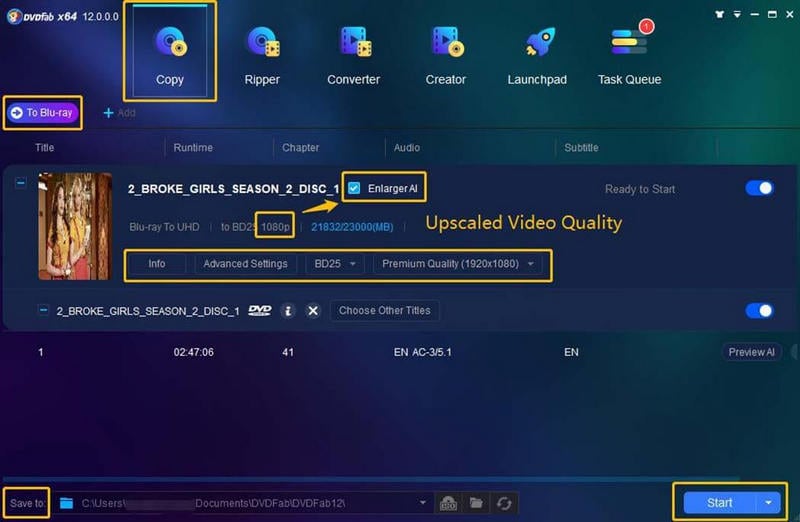
01DVDFab Enlarger AI
DVDFab Enlarger AI is an AI upscale video software published by Fengtao Software Limited. You can upscale any video you want to 4k. There are a few highlights of this software, and they are:
● This software is available onWindows.
● The price of the software ranges from $44.99 to $139.99
● You can use this software to rip videos from both DVDs and Blu-ray.
● You can save the output from the software in MP4 or MKV form.
● This software allows you to boost your fps up to 60.
Pros
Upscale your video to 4K resolution.
Boost your video to 60 fps.
Appropriate for beginners.
Cons
Available only on Windows.
Very Expensive.
No slow-motion is available.
02Video2X
Video2X is popular ai video upscaling software that is developed by Open-source. It is quite popular among the professionals for various reasons like:
● Video2X is available exclusive to Windows.
● You can avail this software without paying any money.
● You can upscale old low-resolution videos.
● Upscale your videos to 4K.
● You can save the output from the software in MP4 or MKV form.
Pros
You can availthis software for free.
You can upscale GIFs.
You can decide your output format.
Cons
It is not beginner-friendly.
No slow-motion editing is available.
There is no fps boosting.

03Pixop
Pixop ai video upscaling online software is published or developed by Pixop ApS. The main features of this software are:
● It is available online.
● Available both for Windows and Mac.
● Allows to upscale videos up to 8K.
● Supports MP4, MXF, M2TS, and MOV formats of output.
● Allows custom fps boost in videos.
Pros
Available online for both Windows and Mac.
Allows video upscaling up to 8K.
Allows custom fps boost.
Cons
Expensive for longer videos.
Does not support slow-motion editing.
Only supports MP4, MXF, M2TS, and MOV formats of output.

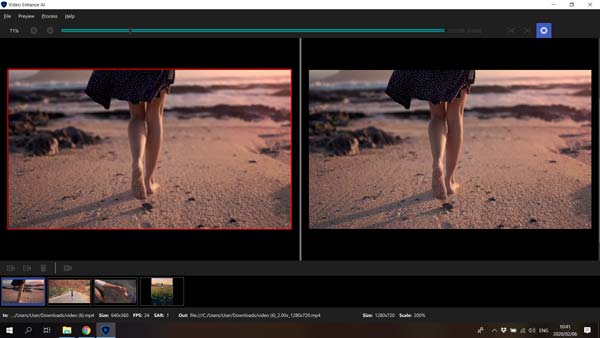
04Topaz Video Enhance AI
Topaz Video Enhance AI is an ai upscaling video enhancing app developed by the Topaz labs. The built-in AI system in topaz ai upscale software has been experimented on numerous videos, and it has been successful each time to edit every pixel in every frame of the video. The main features of this software are:
● The software is available for both os that is Mac and Windows.
● You can use this software to edit your video into slow motion, two thousand percent.
● This software can enhance any video up to 8K resolution.
● You can save the output from the software in any form, like MP4, PNG, TIFF, JPG, or MOV.
● This software allows fps boosting up to 120.
Pros
You can have a free trial.
You can upscale any video up to 8K resolution.
You can edit the video into slow motion to 2000%.
Cons
The app is expensive.
A watermark remains on the videos edited through these apps.
This software is not beginner-friendly software.
05AVCLabs Video Enhancer AI
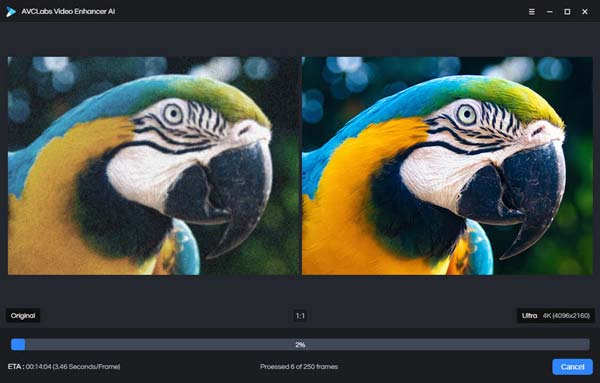
AVCLabs Video Enhancer AI is ai video upscaling software developed by Anvsoft Inc. The most interesting features of this software are:
● Available for Windows only.
● It can be accessed through payment of $39.95/Month.
● Enhance video quality up to 4K.
● ‘Multi-frame feature’ helps to edit every frame of the video minutely.
● Manual settings for upscaling video or converting to low-quality video up to 480p.
Pros
Excellent video enhancing quality.
Allows enhancing video up to 4K.
This software can remove noise, overlay, and blurriness from the videos.
Cons
Expensive
Available only on Windows
Only for professional or expert users.
06GDFLab
GDFLab is an AI video enhancer online software. You can edit both images and videos with this software. This app is used in many fields, and it has been successful in all those fields due to its outstanding features like:
● This ai video upscaling online software gives a full free trial for its users.
● It is available online.
● It can be used both in Windows and Mac.
● You can upscale your videos up to 4K.
● The price of the software depends on the size of the video or photo you are enhancing.
Pros
This software is available both in Windows and Mac.
You can upscale your videos up to 4K.
You can use this app to restore your images to 4x.
Cons
Interruption in editing for internet problems.
You cannot use this app until you register.
This software is too complex for beginners to handle.

07iSize
iSize is an ai upscaler video online enhancer published by iSize technologies. It is said that this app excels in its field. This may happen for its extraordinary features like:
● This software is available both for Mac and Windows.
● A must-use software for professionals.
● High-end video codec capacity.
● You can use this app to upscale videos and also images.
Pros
You can use this software to upscale both videos and photos.
The video conversion process is fast.
This software supports batch conversion of videos.
Cons
Hardware is not upgraded regularly.
Expensive to avail.
Not for beginners.
● You can upscale your videos up to 8K.

08Cupscale
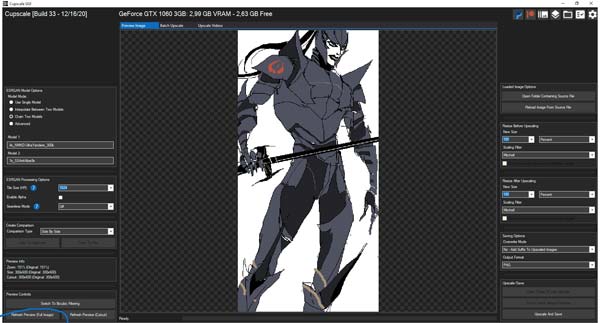
Cupscale is another such ai upscaling video software. The main features of this software are:
● This software uses the very popular ESRGAN algorithm.
● This software is available both for PC and Mac.
● This software is available for free.
● This software can be used to upscale videos up to 8K.
● This software does not change the actual video format while editing the video.
Pros
Available for both Windows and Mac.
Available free.
Allows you to upscale videos up to 8K.
Cons
Supports only MP4, PNG, and JPG output formats.
Complex interface.
The AI used by this software is not stable.
09MiniTool Video Converter
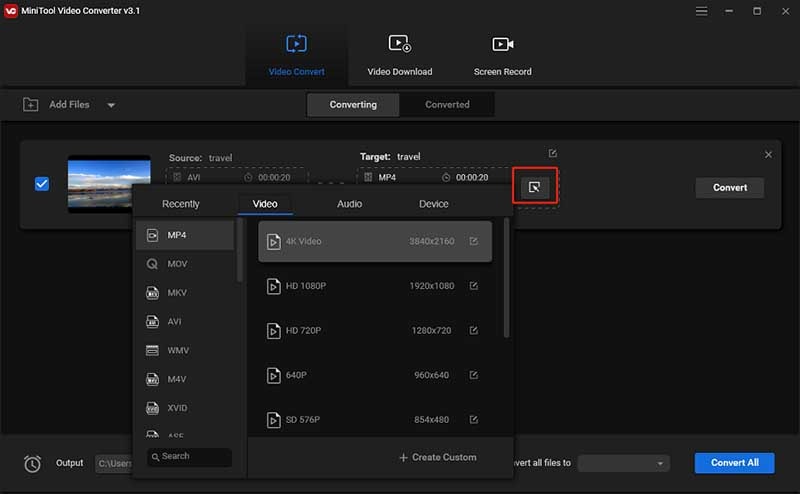
MiniTool Video Converter is another AI-driven video upscaling software. This app can also be used to upscale videos. It has some exciting features which can make your editing experience outstanding. The features are:
● This software is available for free.
● It is available only for Windows.
● This software supports more than 1000 output formats.
● You can use this video to enhance videos as well as audio.
● You can record your computer screen without a watermark.
Pros
Available free.
Supports more than 1000 different output formats.
Allows to the record computer screen without watermark.
Cons
Available only on Windows.
To run this software, high-end PC specifications are required.
This software is not for beginner use.
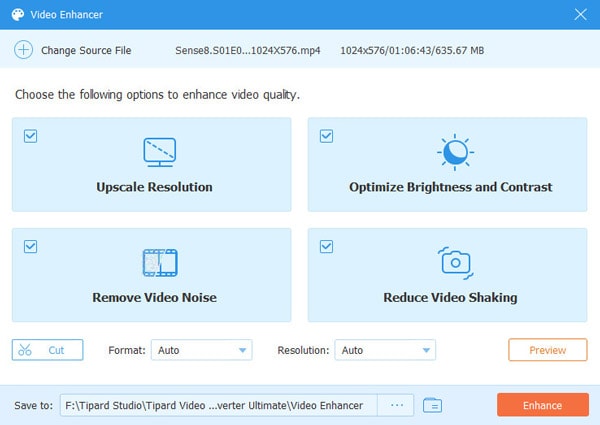
10Tipard Video Converter Ultimate
Tipard Video Converter Ultimate has some mind-boggling features, making this software one of the bestai upscale video software**.** This software is an all-in-one solution for the editors. The main features of this app are:
● Available in both Windows and Mac.
● Supports almost all different video formats.
● Upscale videos from DVDs to UHD videos.
● You can upscale your videos up to 8K.
● This app allows you to edit or retouch your videos on the timeline.
Pros
Available both for Windows and Mac.
You can rip videos from DVDs.
Allows you to upscale your videos up to 8K resolution.
Cons
It has a time-consuming editing process.
Does not support any usual PC.
Not beginner-friendly software.
Tip:Comparison between different AI Video Upscaling software
| Software | Windows/Mac/Both | 8K/4K Upscaling | Expensive | Beginner Friendly |
|---|---|---|---|---|
| DVDFab Enlarger AI | Windows | 4k | Yes | Yes |
| Video2x | Windows | 4k | No | No |
| Pixop | Both | 8k | Yes | No |
| Topaz Video Enhance AI | Both | 8k | Yes | No |
| AVCLabs Video Enhancer AI | Both | 8k | Yes | No |
| Windows | Both | 4k | Yes | No |
| GDFLab | Both | 4k | No | No |
| iSize | Both | 8k | Yes | No |
| Cupscale | Both | 8k | No | No |
| MiniTool Video Converter | Windows | 8k | No | No |
| Tipard Video Converter | Both | 8k | No | No |
There is another video editing app, which is Wondershare Filmora Video Editor . It is not an AI-driven video upscaling app. You can use this app to upscale videos of any format and create outputs of any format. This app allows you to upscale videos to 4K. You can use this app also for other video editing purposes to add new meaning and engagement to your video.
For Win 7 or later (64-bit)
For macOS 10.12 or later
● Ending Thoughts →
● I hope by now you know different software to upscale your low-quality video.
● Though this is an automatic process, you can use any software mentioned above to make your work smooth and hustle-free.
● You can access most software from any device and get output in any format with high-quality editing. This software will help you achieve the best results in your editing experience.
AI Upscaling is often used to improve the video quality. Here are some of the methods to do AI video upscaling. Follow these methods to successfully enhance your video quality.
In this article
01 [What Is AI Upscaling? And Why AI Upscaling Is Significant?](#Part 1)
02 [How to Easily AI Upscale Video to 1080p or 4K?](#Part 2)
03 [Best 10 Software to Make AI Upscaling Video](#Part 3)
Part 1 What Is AI Upscaling? And Why AI Upscaling Is Significant?
The process of generating or creating additional pixels of an image or frame in a video is AI Upscaling. This has many good results on the final video output.
This is mainly done to raise the bit rate of the video and, therefore, slightly improve the visual quality of the video. This is also used to improve the picture quality of DVDs and other low-quality videos. It is done to support lower quality videos or pictures on higher resolution screens like TV. This kind of upscaling is mostly done in TVs automatically.
Part 2 How to Easily AI Upscale Video to 1080p or 4K?
The interesting part is that this upscaling is done by the higher resolution device itself. If you display a lower resolution video on a high-resolution TV, the TV will upscale the video quality of the lower resolution video. This process mainly happens by the displaying device itself. But you can try to upscale videos by yourself using this software, which will help you achieve the best results.
Part 3 Best 10 Software to Make AI Upscaling Video
There are numerous AI upscale video software on the internet. The software listed below is the best among the numerous software because of its extraordinary features and interface. The 10 best AI video upscaling software are:
01DVDFab Enlarger AI
DVDFab Enlarger AI is an AI upscale video software published by Fengtao Software Limited. You can upscale any video you want to 4k. There are a few highlights of this software, and they are:
● This software is available onWindows.
● The price of the software ranges from $44.99 to $139.99
● You can use this software to rip videos from both DVDs and Blu-ray.
● You can save the output from the software in MP4 or MKV form.
● This software allows you to boost your fps up to 60.
Pros
Upscale your video to 4K resolution.
Boost your video to 60 fps.
Appropriate for beginners.
Cons
Available only on Windows.
Very Expensive.
No slow-motion is available.

02Video2X
Video2X is popular ai video upscaling software that is developed by Open-source. It is quite popular among the professionals for various reasons like:
● Video2X is available exclusive to Windows.
● You can avail this software without paying any money.
● You can upscale old low-resolution videos.
● Upscale your videos to 4K.
● You can save the output from the software in MP4 or MKV form.
Pros
You can availthis software for free.
You can upscale GIFs.
You can decide your output format.
Cons
It is not beginner-friendly.
No slow-motion editing is available.
There is no fps boosting.

03Pixop
Pixop ai video upscaling online software is published or developed by Pixop ApS. The main features of this software are:
● It is available online.
● Available both for Windows and Mac.
● Allows to upscale videos up to 8K.
● Supports MP4, MXF, M2TS, and MOV formats of output.
● Allows custom fps boost in videos.
Pros
Available online for both Windows and Mac.
Allows video upscaling up to 8K.
Allows custom fps boost.
Cons
Expensive for longer videos.
Does not support slow-motion editing.
Only supports MP4, MXF, M2TS, and MOV formats of output.

04Topaz Video Enhance AI
Topaz Video Enhance AI is an ai upscaling video enhancing app developed by the Topaz labs. The built-in AI system in topaz ai upscale software has been experimented on numerous videos, and it has been successful each time to edit every pixel in every frame of the video. The main features of this software are:
● The software is available for both os that is Mac and Windows.
● You can use this software to edit your video into slow motion, two thousand percent.
● This software can enhance any video up to 8K resolution.
● You can save the output from the software in any form, like MP4, PNG, TIFF, JPG, or MOV.
● This software allows fps boosting up to 120.
Pros
You can have a free trial.
You can upscale any video up to 8K resolution.
You can edit the video into slow motion to 2000%.
Cons
The app is expensive.
A watermark remains on the videos edited through these apps.
This software is not beginner-friendly software.

05AVCLabs Video Enhancer AI
AVCLabs Video Enhancer AI is ai video upscaling software developed by Anvsoft Inc. The most interesting features of this software are:
● Available for Windows only.
● It can be accessed through payment of $39.95/Month.
● Enhance video quality up to 4K.
● ‘Multi-frame feature’ helps to edit every frame of the video minutely.
● Manual settings for upscaling video or converting to low-quality video up to 480p.
Pros
Excellent video enhancing quality.
Allows enhancing video up to 4K.
This software can remove noise, overlay, and blurriness from the videos.
Cons
Expensive
Available only on Windows
Only for professional or expert users.

06GDFLab
GDFLab is an AI video enhancer online software. You can edit both images and videos with this software. This app is used in many fields, and it has been successful in all those fields due to its outstanding features like:
● This ai video upscaling online software gives a full free trial for its users.
● It is available online.
● It can be used both in Windows and Mac.
● You can upscale your videos up to 4K.
● The price of the software depends on the size of the video or photo you are enhancing.
Pros
This software is available both in Windows and Mac.
You can upscale your videos up to 4K.
You can use this app to restore your images to 4x.
Cons
Interruption in editing for internet problems.
You cannot use this app until you register.
This software is too complex for beginners to handle.

07iSize
iSize is an ai upscaler video online enhancer published by iSize technologies. It is said that this app excels in its field. This may happen for its extraordinary features like:
● This software is available both for Mac and Windows.
● A must-use software for professionals.
● High-end video codec capacity.
● You can use this app to upscale videos and also images.
Pros
You can use this software to upscale both videos and photos.
The video conversion process is fast.
This software supports batch conversion of videos.
Cons
Hardware is not upgraded regularly.
Expensive to avail.
Not for beginners.
● You can upscale your videos up to 8K.

08Cupscale
Cupscale is another such ai upscaling video software. The main features of this software are:
● This software uses the very popular ESRGAN algorithm.
● This software is available both for PC and Mac.
● This software is available for free.
● This software can be used to upscale videos up to 8K.
● This software does not change the actual video format while editing the video.
Pros
Available for both Windows and Mac.
Available free.
Allows you to upscale videos up to 8K.
Cons
Supports only MP4, PNG, and JPG output formats.
Complex interface.
The AI used by this software is not stable.

09MiniTool Video Converter
MiniTool Video Converter is another AI-driven video upscaling software. This app can also be used to upscale videos. It has some exciting features which can make your editing experience outstanding. The features are:
● This software is available for free.
● It is available only for Windows.
● This software supports more than 1000 output formats.
● You can use this video to enhance videos as well as audio.
● You can record your computer screen without a watermark.
Pros
Available free.
Supports more than 1000 different output formats.
Allows to the record computer screen without watermark.
Cons
Available only on Windows.
To run this software, high-end PC specifications are required.
This software is not for beginner use.

10Tipard Video Converter Ultimate
Tipard Video Converter Ultimate has some mind-boggling features, making this software one of the bestai upscale video software**.** This software is an all-in-one solution for the editors. The main features of this app are:
● Available in both Windows and Mac.
● Supports almost all different video formats.
● Upscale videos from DVDs to UHD videos.
● You can upscale your videos up to 8K.
● This app allows you to edit or retouch your videos on the timeline.
Pros
Available both for Windows and Mac.
You can rip videos from DVDs.
Allows you to upscale your videos up to 8K resolution.
Cons
It has a time-consuming editing process.
Does not support any usual PC.
Not beginner-friendly software.

Tip:Comparison between different AI Video Upscaling software
| Software | Windows/Mac/Both | 8K/4K Upscaling | Expensive | Beginner Friendly |
|---|---|---|---|---|
| DVDFab Enlarger AI | Windows | 4k | Yes | Yes |
| Video2x | Windows | 4k | No | No |
| Pixop | Both | 8k | Yes | No |
| Topaz Video Enhance AI | Both | 8k | Yes | No |
| AVCLabs Video Enhancer AI | Both | 8k | Yes | No |
| Windows | Both | 4k | Yes | No |
| GDFLab | Both | 4k | No | No |
| iSize | Both | 8k | Yes | No |
| Cupscale | Both | 8k | No | No |
| MiniTool Video Converter | Windows | 8k | No | No |
| Tipard Video Converter | Both | 8k | No | No |
There is another video editing app, which is Wondershare Filmora Video Editor . It is not an AI-driven video upscaling app. You can use this app to upscale videos of any format and create outputs of any format. This app allows you to upscale videos to 4K. You can use this app also for other video editing purposes to add new meaning and engagement to your video.
For Win 7 or later (64-bit)
For macOS 10.12 or later
● Ending Thoughts →
● I hope by now you know different software to upscale your low-quality video.
● Though this is an automatic process, you can use any software mentioned above to make your work smooth and hustle-free.
● You can access most software from any device and get output in any format with high-quality editing. This software will help you achieve the best results in your editing experience.
AI Upscaling is often used to improve the video quality. Here are some of the methods to do AI video upscaling. Follow these methods to successfully enhance your video quality.
In this article
01 [What Is AI Upscaling? And Why AI Upscaling Is Significant?](#Part 1)
02 [How to Easily AI Upscale Video to 1080p or 4K?](#Part 2)
03 [Best 10 Software to Make AI Upscaling Video](#Part 3)
Part 1 What Is AI Upscaling? And Why AI Upscaling Is Significant?
The process of generating or creating additional pixels of an image or frame in a video is AI Upscaling. This has many good results on the final video output.
This is mainly done to raise the bit rate of the video and, therefore, slightly improve the visual quality of the video. This is also used to improve the picture quality of DVDs and other low-quality videos. It is done to support lower quality videos or pictures on higher resolution screens like TV. This kind of upscaling is mostly done in TVs automatically.
Part 2 How to Easily AI Upscale Video to 1080p or 4K?
The interesting part is that this upscaling is done by the higher resolution device itself. If you display a lower resolution video on a high-resolution TV, the TV will upscale the video quality of the lower resolution video. This process mainly happens by the displaying device itself. But you can try to upscale videos by yourself using this software, which will help you achieve the best results.
Part 3 Best 10 Software to Make AI Upscaling Video
There are numerous AI upscale video software on the internet. The software listed below is the best among the numerous software because of its extraordinary features and interface. The 10 best AI video upscaling software are:
01DVDFab Enlarger AI
DVDFab Enlarger AI is an AI upscale video software published by Fengtao Software Limited. You can upscale any video you want to 4k. There are a few highlights of this software, and they are:
● This software is available onWindows.
● The price of the software ranges from $44.99 to $139.99
● You can use this software to rip videos from both DVDs and Blu-ray.
● You can save the output from the software in MP4 or MKV form.
● This software allows you to boost your fps up to 60.
Pros
Upscale your video to 4K resolution.
Boost your video to 60 fps.
Appropriate for beginners.
Cons
Available only on Windows.
Very Expensive.
No slow-motion is available.

02Video2X
Video2X is popular ai video upscaling software that is developed by Open-source. It is quite popular among the professionals for various reasons like:
● Video2X is available exclusive to Windows.
● You can avail this software without paying any money.
● You can upscale old low-resolution videos.
● Upscale your videos to 4K.
● You can save the output from the software in MP4 or MKV form.
Pros
You can availthis software for free.
You can upscale GIFs.
You can decide your output format.
Cons
It is not beginner-friendly.
No slow-motion editing is available.
There is no fps boosting.

03Pixop
Pixop ai video upscaling online software is published or developed by Pixop ApS. The main features of this software are:
● It is available online.
● Available both for Windows and Mac.
● Allows to upscale videos up to 8K.
● Supports MP4, MXF, M2TS, and MOV formats of output.
● Allows custom fps boost in videos.
Pros
Available online for both Windows and Mac.
Allows video upscaling up to 8K.
Allows custom fps boost.
Cons
Expensive for longer videos.
Does not support slow-motion editing.
Only supports MP4, MXF, M2TS, and MOV formats of output.

04Topaz Video Enhance AI
Topaz Video Enhance AI is an ai upscaling video enhancing app developed by the Topaz labs. The built-in AI system in topaz ai upscale software has been experimented on numerous videos, and it has been successful each time to edit every pixel in every frame of the video. The main features of this software are:
● The software is available for both os that is Mac and Windows.
● You can use this software to edit your video into slow motion, two thousand percent.
● This software can enhance any video up to 8K resolution.
● You can save the output from the software in any form, like MP4, PNG, TIFF, JPG, or MOV.
● This software allows fps boosting up to 120.
Pros
You can have a free trial.
You can upscale any video up to 8K resolution.
You can edit the video into slow motion to 2000%.
Cons
The app is expensive.
A watermark remains on the videos edited through these apps.
This software is not beginner-friendly software.

05AVCLabs Video Enhancer AI
AVCLabs Video Enhancer AI is ai video upscaling software developed by Anvsoft Inc. The most interesting features of this software are:
● Available for Windows only.
● It can be accessed through payment of $39.95/Month.
● Enhance video quality up to 4K.
● ‘Multi-frame feature’ helps to edit every frame of the video minutely.
● Manual settings for upscaling video or converting to low-quality video up to 480p.
Pros
Excellent video enhancing quality.
Allows enhancing video up to 4K.
This software can remove noise, overlay, and blurriness from the videos.
Cons
Expensive
Available only on Windows
Only for professional or expert users.

06GDFLab
GDFLab is an AI video enhancer online software. You can edit both images and videos with this software. This app is used in many fields, and it has been successful in all those fields due to its outstanding features like:
● This ai video upscaling online software gives a full free trial for its users.
● It is available online.
● It can be used both in Windows and Mac.
● You can upscale your videos up to 4K.
● The price of the software depends on the size of the video or photo you are enhancing.
Pros
This software is available both in Windows and Mac.
You can upscale your videos up to 4K.
You can use this app to restore your images to 4x.
Cons
Interruption in editing for internet problems.
You cannot use this app until you register.
This software is too complex for beginners to handle.

07iSize
iSize is an ai upscaler video online enhancer published by iSize technologies. It is said that this app excels in its field. This may happen for its extraordinary features like:
● This software is available both for Mac and Windows.
● A must-use software for professionals.
● High-end video codec capacity.
● You can use this app to upscale videos and also images.
Pros
You can use this software to upscale both videos and photos.
The video conversion process is fast.
This software supports batch conversion of videos.
Cons
Hardware is not upgraded regularly.
Expensive to avail.
Not for beginners.
● You can upscale your videos up to 8K.

08Cupscale
Cupscale is another such ai upscaling video software. The main features of this software are:
● This software uses the very popular ESRGAN algorithm.
● This software is available both for PC and Mac.
● This software is available for free.
● This software can be used to upscale videos up to 8K.
● This software does not change the actual video format while editing the video.
Pros
Available for both Windows and Mac.
Available free.
Allows you to upscale videos up to 8K.
Cons
Supports only MP4, PNG, and JPG output formats.
Complex interface.
The AI used by this software is not stable.

09MiniTool Video Converter
MiniTool Video Converter is another AI-driven video upscaling software. This app can also be used to upscale videos. It has some exciting features which can make your editing experience outstanding. The features are:
● This software is available for free.
● It is available only for Windows.
● This software supports more than 1000 output formats.
● You can use this video to enhance videos as well as audio.
● You can record your computer screen without a watermark.
Pros
Available free.
Supports more than 1000 different output formats.
Allows to the record computer screen without watermark.
Cons
Available only on Windows.
To run this software, high-end PC specifications are required.
This software is not for beginner use.

10Tipard Video Converter Ultimate
Tipard Video Converter Ultimate has some mind-boggling features, making this software one of the bestai upscale video software**.** This software is an all-in-one solution for the editors. The main features of this app are:
● Available in both Windows and Mac.
● Supports almost all different video formats.
● Upscale videos from DVDs to UHD videos.
● You can upscale your videos up to 8K.
● This app allows you to edit or retouch your videos on the timeline.
Pros
Available both for Windows and Mac.
You can rip videos from DVDs.
Allows you to upscale your videos up to 8K resolution.
Cons
It has a time-consuming editing process.
Does not support any usual PC.
Not beginner-friendly software.

Tip:Comparison between different AI Video Upscaling software
| Software | Windows/Mac/Both | 8K/4K Upscaling | Expensive | Beginner Friendly |
|---|---|---|---|---|
| DVDFab Enlarger AI | Windows | 4k | Yes | Yes |
| Video2x | Windows | 4k | No | No |
| Pixop | Both | 8k | Yes | No |
| Topaz Video Enhance AI | Both | 8k | Yes | No |
| AVCLabs Video Enhancer AI | Both | 8k | Yes | No |
| Windows | Both | 4k | Yes | No |
| GDFLab | Both | 4k | No | No |
| iSize | Both | 8k | Yes | No |
| Cupscale | Both | 8k | No | No |
| MiniTool Video Converter | Windows | 8k | No | No |
| Tipard Video Converter | Both | 8k | No | No |
There is another video editing app, which is Wondershare Filmora Video Editor . It is not an AI-driven video upscaling app. You can use this app to upscale videos of any format and create outputs of any format. This app allows you to upscale videos to 4K. You can use this app also for other video editing purposes to add new meaning and engagement to your video.
For Win 7 or later (64-bit)
For macOS 10.12 or later
● Ending Thoughts →
● I hope by now you know different software to upscale your low-quality video.
● Though this is an automatic process, you can use any software mentioned above to make your work smooth and hustle-free.
● You can access most software from any device and get output in any format with high-quality editing. This software will help you achieve the best results in your editing experience.
AI Upscaling is often used to improve the video quality. Here are some of the methods to do AI video upscaling. Follow these methods to successfully enhance your video quality.
In this article
01 [What Is AI Upscaling? And Why AI Upscaling Is Significant?](#Part 1)
02 [How to Easily AI Upscale Video to 1080p or 4K?](#Part 2)
03 [Best 10 Software to Make AI Upscaling Video](#Part 3)
Part 1 What Is AI Upscaling? And Why AI Upscaling Is Significant?
The process of generating or creating additional pixels of an image or frame in a video is AI Upscaling. This has many good results on the final video output.
This is mainly done to raise the bit rate of the video and, therefore, slightly improve the visual quality of the video. This is also used to improve the picture quality of DVDs and other low-quality videos. It is done to support lower quality videos or pictures on higher resolution screens like TV. This kind of upscaling is mostly done in TVs automatically.
Part 2 How to Easily AI Upscale Video to 1080p or 4K?
The interesting part is that this upscaling is done by the higher resolution device itself. If you display a lower resolution video on a high-resolution TV, the TV will upscale the video quality of the lower resolution video. This process mainly happens by the displaying device itself. But you can try to upscale videos by yourself using this software, which will help you achieve the best results.
Part 3 Best 10 Software to Make AI Upscaling Video
There are numerous AI upscale video software on the internet. The software listed below is the best among the numerous software because of its extraordinary features and interface. The 10 best AI video upscaling software are:
01DVDFab Enlarger AI
DVDFab Enlarger AI is an AI upscale video software published by Fengtao Software Limited. You can upscale any video you want to 4k. There are a few highlights of this software, and they are:
● This software is available onWindows.
● The price of the software ranges from $44.99 to $139.99
● You can use this software to rip videos from both DVDs and Blu-ray.
● You can save the output from the software in MP4 or MKV form.
● This software allows you to boost your fps up to 60.
Pros
Upscale your video to 4K resolution.
Boost your video to 60 fps.
Appropriate for beginners.
Cons
Available only on Windows.
Very Expensive.
No slow-motion is available.

02Video2X
Video2X is popular ai video upscaling software that is developed by Open-source. It is quite popular among the professionals for various reasons like:
● Video2X is available exclusive to Windows.
● You can avail this software without paying any money.
● You can upscale old low-resolution videos.
● Upscale your videos to 4K.
● You can save the output from the software in MP4 or MKV form.
Pros
You can availthis software for free.
You can upscale GIFs.
You can decide your output format.
Cons
It is not beginner-friendly.
No slow-motion editing is available.
There is no fps boosting.

03Pixop
Pixop ai video upscaling online software is published or developed by Pixop ApS. The main features of this software are:
● It is available online.
● Available both for Windows and Mac.
● Allows to upscale videos up to 8K.
● Supports MP4, MXF, M2TS, and MOV formats of output.
● Allows custom fps boost in videos.
Pros
Available online for both Windows and Mac.
Allows video upscaling up to 8K.
Allows custom fps boost.
Cons
Expensive for longer videos.
Does not support slow-motion editing.
Only supports MP4, MXF, M2TS, and MOV formats of output.

04Topaz Video Enhance AI
Topaz Video Enhance AI is an ai upscaling video enhancing app developed by the Topaz labs. The built-in AI system in topaz ai upscale software has been experimented on numerous videos, and it has been successful each time to edit every pixel in every frame of the video. The main features of this software are:
● The software is available for both os that is Mac and Windows.
● You can use this software to edit your video into slow motion, two thousand percent.
● This software can enhance any video up to 8K resolution.
● You can save the output from the software in any form, like MP4, PNG, TIFF, JPG, or MOV.
● This software allows fps boosting up to 120.
Pros
You can have a free trial.
You can upscale any video up to 8K resolution.
You can edit the video into slow motion to 2000%.
Cons
The app is expensive.
A watermark remains on the videos edited through these apps.
This software is not beginner-friendly software.

05AVCLabs Video Enhancer AI
AVCLabs Video Enhancer AI is ai video upscaling software developed by Anvsoft Inc. The most interesting features of this software are:
● Available for Windows only.
● It can be accessed through payment of $39.95/Month.
● Enhance video quality up to 4K.
● ‘Multi-frame feature’ helps to edit every frame of the video minutely.
● Manual settings for upscaling video or converting to low-quality video up to 480p.
Pros
Excellent video enhancing quality.
Allows enhancing video up to 4K.
This software can remove noise, overlay, and blurriness from the videos.
Cons
Expensive
Available only on Windows
Only for professional or expert users.

06GDFLab
GDFLab is an AI video enhancer online software. You can edit both images and videos with this software. This app is used in many fields, and it has been successful in all those fields due to its outstanding features like:
● This ai video upscaling online software gives a full free trial for its users.
● It is available online.
● It can be used both in Windows and Mac.
● You can upscale your videos up to 4K.
● The price of the software depends on the size of the video or photo you are enhancing.
Pros
This software is available both in Windows and Mac.
You can upscale your videos up to 4K.
You can use this app to restore your images to 4x.
Cons
Interruption in editing for internet problems.
You cannot use this app until you register.
This software is too complex for beginners to handle.

07iSize
iSize is an ai upscaler video online enhancer published by iSize technologies. It is said that this app excels in its field. This may happen for its extraordinary features like:
● This software is available both for Mac and Windows.
● A must-use software for professionals.
● High-end video codec capacity.
● You can use this app to upscale videos and also images.
Pros
You can use this software to upscale both videos and photos.
The video conversion process is fast.
This software supports batch conversion of videos.
Cons
Hardware is not upgraded regularly.
Expensive to avail.
Not for beginners.
● You can upscale your videos up to 8K.

08Cupscale
Cupscale is another such ai upscaling video software. The main features of this software are:
● This software uses the very popular ESRGAN algorithm.
● This software is available both for PC and Mac.
● This software is available for free.
● This software can be used to upscale videos up to 8K.
● This software does not change the actual video format while editing the video.
Pros
Available for both Windows and Mac.
Available free.
Allows you to upscale videos up to 8K.
Cons
Supports only MP4, PNG, and JPG output formats.
Complex interface.
The AI used by this software is not stable.

09MiniTool Video Converter
MiniTool Video Converter is another AI-driven video upscaling software. This app can also be used to upscale videos. It has some exciting features which can make your editing experience outstanding. The features are:
● This software is available for free.
● It is available only for Windows.
● This software supports more than 1000 output formats.
● You can use this video to enhance videos as well as audio.
● You can record your computer screen without a watermark.
Pros
Available free.
Supports more than 1000 different output formats.
Allows to the record computer screen without watermark.
Cons
Available only on Windows.
To run this software, high-end PC specifications are required.
This software is not for beginner use.

10Tipard Video Converter Ultimate
Tipard Video Converter Ultimate has some mind-boggling features, making this software one of the bestai upscale video software**.** This software is an all-in-one solution for the editors. The main features of this app are:
● Available in both Windows and Mac.
● Supports almost all different video formats.
● Upscale videos from DVDs to UHD videos.
● You can upscale your videos up to 8K.
● This app allows you to edit or retouch your videos on the timeline.
Pros
Available both for Windows and Mac.
You can rip videos from DVDs.
Allows you to upscale your videos up to 8K resolution.
Cons
It has a time-consuming editing process.
Does not support any usual PC.
Not beginner-friendly software.

Tip:Comparison between different AI Video Upscaling software
| Software | Windows/Mac/Both | 8K/4K Upscaling | Expensive | Beginner Friendly |
|---|---|---|---|---|
| DVDFab Enlarger AI | Windows | 4k | Yes | Yes |
| Video2x | Windows | 4k | No | No |
| Pixop | Both | 8k | Yes | No |
| Topaz Video Enhance AI | Both | 8k | Yes | No |
| AVCLabs Video Enhancer AI | Both | 8k | Yes | No |
| Windows | Both | 4k | Yes | No |
| GDFLab | Both | 4k | No | No |
| iSize | Both | 8k | Yes | No |
| Cupscale | Both | 8k | No | No |
| MiniTool Video Converter | Windows | 8k | No | No |
| Tipard Video Converter | Both | 8k | No | No |
There is another video editing app, which is Wondershare Filmora Video Editor . It is not an AI-driven video upscaling app. You can use this app to upscale videos of any format and create outputs of any format. This app allows you to upscale videos to 4K. You can use this app also for other video editing purposes to add new meaning and engagement to your video.
For Win 7 or later (64-bit)
For macOS 10.12 or later
● Ending Thoughts →
● I hope by now you know different software to upscale your low-quality video.
● Though this is an automatic process, you can use any software mentioned above to make your work smooth and hustle-free.
● You can access most software from any device and get output in any format with high-quality editing. This software will help you achieve the best results in your editing experience.
8 Tips to Apply Cinematic Color Grading to Your Video
Create High-Quality Video - Wondershare Filmora
An easy and powerful YouTube video editor
Numerous video and audio effects to choose from
Detailed tutorials are provided by the official channel
After a successful video shoot, video editing tends to wrap up the video production process. However, a video cannot be enlivened by using simple video editing tools, i.e., cut, crop, and trim, but rather tools such as cinematic color grading. Usually, directors want their video to evoke their intended ambiance and appear more realistic – This can only be achieved through cinematic color grading.
Color grading is the alteration and enhancement of color in a video, motion picture, or still image. Color grading is an essential tool for videographers since it enables them to enhance the mood or tone. Stick to this article and learn about the eight tips to apply cinematic color grading to your video.
In this article
02 8 Tips to Apply Cinematic Color Grading to Your Video
Don’t Make These Mistakes
Even though to err is human, there are some mistakes that colorists and video editors need to avoid at all costs. It is not only because they will make them look amateurish but also undermines the message and impact of the video.
Some people assume color grading is as simple as adding filters to their Instagram photos which they are absolutely wrong. Color grading is a long and frustrating process, and it only requires “persons with a thick skin.”
Some mistakes are not only committed by amateurs alone but also professional colorists who are in a rush to complete their projects on due time. Usually, these mistakes degrade the quality output. Some of the mistakes that one needs not make include:
1. Using a Poorly Calibrated Monitor
Almost every videographer and colorist’s goal is to design footages that distinctively display their primary colors and decipher the intended message. And this can only be achieved using a properly calibrated monitor.
Before working on a project, you ought to crosscheck your monitor calibration. Most people assume that the calibration is accurate since they possess a new, out-of-the-box monitor. It is utterly wrong since retailer shops usually adjust the monitor settings to overblown saturation and contrast to attract customers.
Furthermore, if you opt to edit your videos without adjusting your monitor calibration, you will have a poor footage.
2. Poor Prepping of the Video Footage
One major mistake that videographers often make is not prepping their video correctly. A poorly prepped footage is one that has a bad color space conversion. Usually, the outcome result of poorly prepped footage is an imbalanced image.
Prepping footage is not as easy as an apple pie. Besides, most videographers tend to follow a shortcut by starting messing with the gains and individual nodes, forgetting that a shortcut is often a wrong cut.
The best way of prepping a video is to start by making separate nodes and labeling them differently.
3. Imbalancing the Shadow
Have you ever seen video footage with partially opaque shadows? And when you look keenly, you see tinted greens and reds. Usually, this is a result of an imbalanced shadow.
This mistake is not only carried out by beginner videographers but also professionals who are always in a hurry to complete a project. When you look at your scope, you see the shadows are lifted or down in other scenarios – This is also a result of shadow imbalance.
4. Overusing LUTs
A mistake that beginner editors often make is overusing LUTs. Footages with overly used LUTs often appear to be dull. A thing that videographers need to observe when using LUTs is consistency.
When using LUTs, you need to ensure that your project has similar saturation, colors, and contrast throughout your video project. Moreover, it would be best to choose your LUTs based on the film color palette and your story.
5. Having Limited break
Having enough break enables one’s eyes to recalibrate. As a colorist, your eyes are often considered the main asset. Sitting for long periods in your workstation and staring for long hours at your monitor may cause one to add more saturation and contrast, thus making the video dull. Therefore the best remedy is to take a break from your monitor.
Besides, coming from a break enables one to have another different perspective about the color grading of the project.
8 Tips to Apply Cinematic Color Grading to Your Video
When it comes to creating cinematic looks in video footage, the camera type is usually non-essential. What matters is that you capture quality videos with the right angles then leave the rest to color grading.
For a video clip to look more cinematic, a couple of elements are put together. Here, we will look at those elements and create stunning videos.
1. Use Lumetri Color to adjust brightness, contrast, and saturation
The Lumeri color is an essential color grading functionality in most premiere software, including Wondershare Filmora, Adobe After Effects, and Davinci Resolve 17. With this functionality tool, you can carry out a wide range of customizable settings such as hue, saturation, contrasts, brightness, and tone.
The lumetri panel contains a histogram, vectorscope, parade scope, and waveform monitor. In your lumetri panel, you can measure the brightness and tonal values using a histogram, the light intensity with a waveform monitor, saturation and hue using vectorscope, and color channel using parade scope.
Adjusting the brightness, contrast, hue, saturation, and tone to moderate levels will give your video clip that cinematic look.

2. Use Cosmo functionality to adjust skin tones
Due to the light effect, shots taken during the day will have inconsistent color matches, especially skin tone. In the post-production process, one needs to make uniformity in skin tone and the clip. To rectify this, you need to involve a professional color grading functionality, Cosmo.
With cosmo, you can adjust the skin color, squeeze the skin, and soften the skin. Generally, Cosmo makes people in video clips look their best.

3. Use Highlights and Shadows adjustment
A clip will look more cinematic when the shadows and highlights are brought out as separate entities. The shadows become more vivid when adjusted to either teal, purple or blue. You can go a mile and adjust the highlights to become crystal clear by making the footage become yellow, red, or orange.
When carrying out color grading, you need to know the various video demands, such as the horror clips demand more of the dark shadow.

4. Use Vectorscope to get the accurate adjustment
Naked eyes cannot effectively see all the errors in a video project, which is the essence of having a vectorscope. A vectorscope provides all the quantitative information about a video image – This lessens work for video editors.
Vectorscope provides extensive details, such as how intense a given color is – This will help you make necessary adjustments to your footage.

5. Use the black and white functionality to change the opacity
Even though you can change your footage to black and white using the hue and saturation functionality, the black and white tool gives you more control.
This functionality feature can make your footage blend with the soft light part. Besides, it is best to first lower the contrast of your image or video to black and white to be able to highlight the unclear parts.

6. Use levels to unveil the whites, blacks, and mids of an image
Levels is a functionality feature that displays the blacks, whites, and mids of footage. With this functionality, you can make the highlight parts lighter and the shadows appear darker, which is essential in making cinematic videos.
In the levels histogram, the left slider defines the darkest part, the right defines the brightest part, and the top defines distributions.
In software such as Adobe After Effects, you can set this functionality to automatic or customize it based on your preference.

7. Use Vibrance to control other levels of saturation
The saturation of video footage or a clip can be regulated using vibrance functionality. With vibrance, you can alter the saturation levels of your clip while simultaneously minimizing clippings for the colors to approach complete saturation.
When you want to use this functionality in After Effects, you drag and drop it right on top of your footage – The exact part you want to apply it.

8. Use a Vignette to fade edges
To increase the point of focus, you need to fade your edges. In color grading, you can only fade your edges with a vignette.
This functionality allows you to center images or certain video parts and make the edges unclear. Your emphasis will be more on the central region.

Bottom line
● Color grading is not a piece of cake. Besides, you should not use it as an excuse for making simple mistakes such as the ones highlighted above. You need to pay close attention when color grading your films, and you will have your video project mapping out its intended meaning.
● Moreover, you need not be a pro to carry out cinematic color grading. You need to follow the above eight tips altogether to apply color grading to your video. You will create stunning video files that leave your viewers’ eyes gorged out.
After a successful video shoot, video editing tends to wrap up the video production process. However, a video cannot be enlivened by using simple video editing tools, i.e., cut, crop, and trim, but rather tools such as cinematic color grading. Usually, directors want their video to evoke their intended ambiance and appear more realistic – This can only be achieved through cinematic color grading.
Color grading is the alteration and enhancement of color in a video, motion picture, or still image. Color grading is an essential tool for videographers since it enables them to enhance the mood or tone. Stick to this article and learn about the eight tips to apply cinematic color grading to your video.
In this article
02 8 Tips to Apply Cinematic Color Grading to Your Video
Don’t Make These Mistakes
Even though to err is human, there are some mistakes that colorists and video editors need to avoid at all costs. It is not only because they will make them look amateurish but also undermines the message and impact of the video.
Some people assume color grading is as simple as adding filters to their Instagram photos which they are absolutely wrong. Color grading is a long and frustrating process, and it only requires “persons with a thick skin.”
Some mistakes are not only committed by amateurs alone but also professional colorists who are in a rush to complete their projects on due time. Usually, these mistakes degrade the quality output. Some of the mistakes that one needs not make include:
1. Using a Poorly Calibrated Monitor
Almost every videographer and colorist’s goal is to design footages that distinctively display their primary colors and decipher the intended message. And this can only be achieved using a properly calibrated monitor.
Before working on a project, you ought to crosscheck your monitor calibration. Most people assume that the calibration is accurate since they possess a new, out-of-the-box monitor. It is utterly wrong since retailer shops usually adjust the monitor settings to overblown saturation and contrast to attract customers.
Furthermore, if you opt to edit your videos without adjusting your monitor calibration, you will have a poor footage.
2. Poor Prepping of the Video Footage
One major mistake that videographers often make is not prepping their video correctly. A poorly prepped footage is one that has a bad color space conversion. Usually, the outcome result of poorly prepped footage is an imbalanced image.
Prepping footage is not as easy as an apple pie. Besides, most videographers tend to follow a shortcut by starting messing with the gains and individual nodes, forgetting that a shortcut is often a wrong cut.
The best way of prepping a video is to start by making separate nodes and labeling them differently.
3. Imbalancing the Shadow
Have you ever seen video footage with partially opaque shadows? And when you look keenly, you see tinted greens and reds. Usually, this is a result of an imbalanced shadow.
This mistake is not only carried out by beginner videographers but also professionals who are always in a hurry to complete a project. When you look at your scope, you see the shadows are lifted or down in other scenarios – This is also a result of shadow imbalance.
4. Overusing LUTs
A mistake that beginner editors often make is overusing LUTs. Footages with overly used LUTs often appear to be dull. A thing that videographers need to observe when using LUTs is consistency.
When using LUTs, you need to ensure that your project has similar saturation, colors, and contrast throughout your video project. Moreover, it would be best to choose your LUTs based on the film color palette and your story.
5. Having Limited break
Having enough break enables one’s eyes to recalibrate. As a colorist, your eyes are often considered the main asset. Sitting for long periods in your workstation and staring for long hours at your monitor may cause one to add more saturation and contrast, thus making the video dull. Therefore the best remedy is to take a break from your monitor.
Besides, coming from a break enables one to have another different perspective about the color grading of the project.
8 Tips to Apply Cinematic Color Grading to Your Video
When it comes to creating cinematic looks in video footage, the camera type is usually non-essential. What matters is that you capture quality videos with the right angles then leave the rest to color grading.
For a video clip to look more cinematic, a couple of elements are put together. Here, we will look at those elements and create stunning videos.
1. Use Lumetri Color to adjust brightness, contrast, and saturation
The Lumeri color is an essential color grading functionality in most premiere software, including Wondershare Filmora, Adobe After Effects, and Davinci Resolve 17. With this functionality tool, you can carry out a wide range of customizable settings such as hue, saturation, contrasts, brightness, and tone.
The lumetri panel contains a histogram, vectorscope, parade scope, and waveform monitor. In your lumetri panel, you can measure the brightness and tonal values using a histogram, the light intensity with a waveform monitor, saturation and hue using vectorscope, and color channel using parade scope.
Adjusting the brightness, contrast, hue, saturation, and tone to moderate levels will give your video clip that cinematic look.

2. Use Cosmo functionality to adjust skin tones
Due to the light effect, shots taken during the day will have inconsistent color matches, especially skin tone. In the post-production process, one needs to make uniformity in skin tone and the clip. To rectify this, you need to involve a professional color grading functionality, Cosmo.
With cosmo, you can adjust the skin color, squeeze the skin, and soften the skin. Generally, Cosmo makes people in video clips look their best.

3. Use Highlights and Shadows adjustment
A clip will look more cinematic when the shadows and highlights are brought out as separate entities. The shadows become more vivid when adjusted to either teal, purple or blue. You can go a mile and adjust the highlights to become crystal clear by making the footage become yellow, red, or orange.
When carrying out color grading, you need to know the various video demands, such as the horror clips demand more of the dark shadow.

4. Use Vectorscope to get the accurate adjustment
Naked eyes cannot effectively see all the errors in a video project, which is the essence of having a vectorscope. A vectorscope provides all the quantitative information about a video image – This lessens work for video editors.
Vectorscope provides extensive details, such as how intense a given color is – This will help you make necessary adjustments to your footage.

5. Use the black and white functionality to change the opacity
Even though you can change your footage to black and white using the hue and saturation functionality, the black and white tool gives you more control.
This functionality feature can make your footage blend with the soft light part. Besides, it is best to first lower the contrast of your image or video to black and white to be able to highlight the unclear parts.

6. Use levels to unveil the whites, blacks, and mids of an image
Levels is a functionality feature that displays the blacks, whites, and mids of footage. With this functionality, you can make the highlight parts lighter and the shadows appear darker, which is essential in making cinematic videos.
In the levels histogram, the left slider defines the darkest part, the right defines the brightest part, and the top defines distributions.
In software such as Adobe After Effects, you can set this functionality to automatic or customize it based on your preference.

7. Use Vibrance to control other levels of saturation
The saturation of video footage or a clip can be regulated using vibrance functionality. With vibrance, you can alter the saturation levels of your clip while simultaneously minimizing clippings for the colors to approach complete saturation.
When you want to use this functionality in After Effects, you drag and drop it right on top of your footage – The exact part you want to apply it.

8. Use a Vignette to fade edges
To increase the point of focus, you need to fade your edges. In color grading, you can only fade your edges with a vignette.
This functionality allows you to center images or certain video parts and make the edges unclear. Your emphasis will be more on the central region.

Bottom line
● Color grading is not a piece of cake. Besides, you should not use it as an excuse for making simple mistakes such as the ones highlighted above. You need to pay close attention when color grading your films, and you will have your video project mapping out its intended meaning.
● Moreover, you need not be a pro to carry out cinematic color grading. You need to follow the above eight tips altogether to apply color grading to your video. You will create stunning video files that leave your viewers’ eyes gorged out.
After a successful video shoot, video editing tends to wrap up the video production process. However, a video cannot be enlivened by using simple video editing tools, i.e., cut, crop, and trim, but rather tools such as cinematic color grading. Usually, directors want their video to evoke their intended ambiance and appear more realistic – This can only be achieved through cinematic color grading.
Color grading is the alteration and enhancement of color in a video, motion picture, or still image. Color grading is an essential tool for videographers since it enables them to enhance the mood or tone. Stick to this article and learn about the eight tips to apply cinematic color grading to your video.
In this article
02 8 Tips to Apply Cinematic Color Grading to Your Video
Don’t Make These Mistakes
Even though to err is human, there are some mistakes that colorists and video editors need to avoid at all costs. It is not only because they will make them look amateurish but also undermines the message and impact of the video.
Some people assume color grading is as simple as adding filters to their Instagram photos which they are absolutely wrong. Color grading is a long and frustrating process, and it only requires “persons with a thick skin.”
Some mistakes are not only committed by amateurs alone but also professional colorists who are in a rush to complete their projects on due time. Usually, these mistakes degrade the quality output. Some of the mistakes that one needs not make include:
1. Using a Poorly Calibrated Monitor
Almost every videographer and colorist’s goal is to design footages that distinctively display their primary colors and decipher the intended message. And this can only be achieved using a properly calibrated monitor.
Before working on a project, you ought to crosscheck your monitor calibration. Most people assume that the calibration is accurate since they possess a new, out-of-the-box monitor. It is utterly wrong since retailer shops usually adjust the monitor settings to overblown saturation and contrast to attract customers.
Furthermore, if you opt to edit your videos without adjusting your monitor calibration, you will have a poor footage.
2. Poor Prepping of the Video Footage
One major mistake that videographers often make is not prepping their video correctly. A poorly prepped footage is one that has a bad color space conversion. Usually, the outcome result of poorly prepped footage is an imbalanced image.
Prepping footage is not as easy as an apple pie. Besides, most videographers tend to follow a shortcut by starting messing with the gains and individual nodes, forgetting that a shortcut is often a wrong cut.
The best way of prepping a video is to start by making separate nodes and labeling them differently.
3. Imbalancing the Shadow
Have you ever seen video footage with partially opaque shadows? And when you look keenly, you see tinted greens and reds. Usually, this is a result of an imbalanced shadow.
This mistake is not only carried out by beginner videographers but also professionals who are always in a hurry to complete a project. When you look at your scope, you see the shadows are lifted or down in other scenarios – This is also a result of shadow imbalance.
4. Overusing LUTs
A mistake that beginner editors often make is overusing LUTs. Footages with overly used LUTs often appear to be dull. A thing that videographers need to observe when using LUTs is consistency.
When using LUTs, you need to ensure that your project has similar saturation, colors, and contrast throughout your video project. Moreover, it would be best to choose your LUTs based on the film color palette and your story.
5. Having Limited break
Having enough break enables one’s eyes to recalibrate. As a colorist, your eyes are often considered the main asset. Sitting for long periods in your workstation and staring for long hours at your monitor may cause one to add more saturation and contrast, thus making the video dull. Therefore the best remedy is to take a break from your monitor.
Besides, coming from a break enables one to have another different perspective about the color grading of the project.
8 Tips to Apply Cinematic Color Grading to Your Video
When it comes to creating cinematic looks in video footage, the camera type is usually non-essential. What matters is that you capture quality videos with the right angles then leave the rest to color grading.
For a video clip to look more cinematic, a couple of elements are put together. Here, we will look at those elements and create stunning videos.
1. Use Lumetri Color to adjust brightness, contrast, and saturation
The Lumeri color is an essential color grading functionality in most premiere software, including Wondershare Filmora, Adobe After Effects, and Davinci Resolve 17. With this functionality tool, you can carry out a wide range of customizable settings such as hue, saturation, contrasts, brightness, and tone.
The lumetri panel contains a histogram, vectorscope, parade scope, and waveform monitor. In your lumetri panel, you can measure the brightness and tonal values using a histogram, the light intensity with a waveform monitor, saturation and hue using vectorscope, and color channel using parade scope.
Adjusting the brightness, contrast, hue, saturation, and tone to moderate levels will give your video clip that cinematic look.

2. Use Cosmo functionality to adjust skin tones
Due to the light effect, shots taken during the day will have inconsistent color matches, especially skin tone. In the post-production process, one needs to make uniformity in skin tone and the clip. To rectify this, you need to involve a professional color grading functionality, Cosmo.
With cosmo, you can adjust the skin color, squeeze the skin, and soften the skin. Generally, Cosmo makes people in video clips look their best.

3. Use Highlights and Shadows adjustment
A clip will look more cinematic when the shadows and highlights are brought out as separate entities. The shadows become more vivid when adjusted to either teal, purple or blue. You can go a mile and adjust the highlights to become crystal clear by making the footage become yellow, red, or orange.
When carrying out color grading, you need to know the various video demands, such as the horror clips demand more of the dark shadow.

4. Use Vectorscope to get the accurate adjustment
Naked eyes cannot effectively see all the errors in a video project, which is the essence of having a vectorscope. A vectorscope provides all the quantitative information about a video image – This lessens work for video editors.
Vectorscope provides extensive details, such as how intense a given color is – This will help you make necessary adjustments to your footage.

5. Use the black and white functionality to change the opacity
Even though you can change your footage to black and white using the hue and saturation functionality, the black and white tool gives you more control.
This functionality feature can make your footage blend with the soft light part. Besides, it is best to first lower the contrast of your image or video to black and white to be able to highlight the unclear parts.

6. Use levels to unveil the whites, blacks, and mids of an image
Levels is a functionality feature that displays the blacks, whites, and mids of footage. With this functionality, you can make the highlight parts lighter and the shadows appear darker, which is essential in making cinematic videos.
In the levels histogram, the left slider defines the darkest part, the right defines the brightest part, and the top defines distributions.
In software such as Adobe After Effects, you can set this functionality to automatic or customize it based on your preference.

7. Use Vibrance to control other levels of saturation
The saturation of video footage or a clip can be regulated using vibrance functionality. With vibrance, you can alter the saturation levels of your clip while simultaneously minimizing clippings for the colors to approach complete saturation.
When you want to use this functionality in After Effects, you drag and drop it right on top of your footage – The exact part you want to apply it.

8. Use a Vignette to fade edges
To increase the point of focus, you need to fade your edges. In color grading, you can only fade your edges with a vignette.
This functionality allows you to center images or certain video parts and make the edges unclear. Your emphasis will be more on the central region.

Bottom line
● Color grading is not a piece of cake. Besides, you should not use it as an excuse for making simple mistakes such as the ones highlighted above. You need to pay close attention when color grading your films, and you will have your video project mapping out its intended meaning.
● Moreover, you need not be a pro to carry out cinematic color grading. You need to follow the above eight tips altogether to apply color grading to your video. You will create stunning video files that leave your viewers’ eyes gorged out.
After a successful video shoot, video editing tends to wrap up the video production process. However, a video cannot be enlivened by using simple video editing tools, i.e., cut, crop, and trim, but rather tools such as cinematic color grading. Usually, directors want their video to evoke their intended ambiance and appear more realistic – This can only be achieved through cinematic color grading.
Color grading is the alteration and enhancement of color in a video, motion picture, or still image. Color grading is an essential tool for videographers since it enables them to enhance the mood or tone. Stick to this article and learn about the eight tips to apply cinematic color grading to your video.
In this article
02 8 Tips to Apply Cinematic Color Grading to Your Video
Don’t Make These Mistakes
Even though to err is human, there are some mistakes that colorists and video editors need to avoid at all costs. It is not only because they will make them look amateurish but also undermines the message and impact of the video.
Some people assume color grading is as simple as adding filters to their Instagram photos which they are absolutely wrong. Color grading is a long and frustrating process, and it only requires “persons with a thick skin.”
Some mistakes are not only committed by amateurs alone but also professional colorists who are in a rush to complete their projects on due time. Usually, these mistakes degrade the quality output. Some of the mistakes that one needs not make include:
1. Using a Poorly Calibrated Monitor
Almost every videographer and colorist’s goal is to design footages that distinctively display their primary colors and decipher the intended message. And this can only be achieved using a properly calibrated monitor.
Before working on a project, you ought to crosscheck your monitor calibration. Most people assume that the calibration is accurate since they possess a new, out-of-the-box monitor. It is utterly wrong since retailer shops usually adjust the monitor settings to overblown saturation and contrast to attract customers.
Furthermore, if you opt to edit your videos without adjusting your monitor calibration, you will have a poor footage.
2. Poor Prepping of the Video Footage
One major mistake that videographers often make is not prepping their video correctly. A poorly prepped footage is one that has a bad color space conversion. Usually, the outcome result of poorly prepped footage is an imbalanced image.
Prepping footage is not as easy as an apple pie. Besides, most videographers tend to follow a shortcut by starting messing with the gains and individual nodes, forgetting that a shortcut is often a wrong cut.
The best way of prepping a video is to start by making separate nodes and labeling them differently.
3. Imbalancing the Shadow
Have you ever seen video footage with partially opaque shadows? And when you look keenly, you see tinted greens and reds. Usually, this is a result of an imbalanced shadow.
This mistake is not only carried out by beginner videographers but also professionals who are always in a hurry to complete a project. When you look at your scope, you see the shadows are lifted or down in other scenarios – This is also a result of shadow imbalance.
4. Overusing LUTs
A mistake that beginner editors often make is overusing LUTs. Footages with overly used LUTs often appear to be dull. A thing that videographers need to observe when using LUTs is consistency.
When using LUTs, you need to ensure that your project has similar saturation, colors, and contrast throughout your video project. Moreover, it would be best to choose your LUTs based on the film color palette and your story.
5. Having Limited break
Having enough break enables one’s eyes to recalibrate. As a colorist, your eyes are often considered the main asset. Sitting for long periods in your workstation and staring for long hours at your monitor may cause one to add more saturation and contrast, thus making the video dull. Therefore the best remedy is to take a break from your monitor.
Besides, coming from a break enables one to have another different perspective about the color grading of the project.
8 Tips to Apply Cinematic Color Grading to Your Video
When it comes to creating cinematic looks in video footage, the camera type is usually non-essential. What matters is that you capture quality videos with the right angles then leave the rest to color grading.
For a video clip to look more cinematic, a couple of elements are put together. Here, we will look at those elements and create stunning videos.
1. Use Lumetri Color to adjust brightness, contrast, and saturation
The Lumeri color is an essential color grading functionality in most premiere software, including Wondershare Filmora, Adobe After Effects, and Davinci Resolve 17. With this functionality tool, you can carry out a wide range of customizable settings such as hue, saturation, contrasts, brightness, and tone.
The lumetri panel contains a histogram, vectorscope, parade scope, and waveform monitor. In your lumetri panel, you can measure the brightness and tonal values using a histogram, the light intensity with a waveform monitor, saturation and hue using vectorscope, and color channel using parade scope.
Adjusting the brightness, contrast, hue, saturation, and tone to moderate levels will give your video clip that cinematic look.

2. Use Cosmo functionality to adjust skin tones
Due to the light effect, shots taken during the day will have inconsistent color matches, especially skin tone. In the post-production process, one needs to make uniformity in skin tone and the clip. To rectify this, you need to involve a professional color grading functionality, Cosmo.
With cosmo, you can adjust the skin color, squeeze the skin, and soften the skin. Generally, Cosmo makes people in video clips look their best.

3. Use Highlights and Shadows adjustment
A clip will look more cinematic when the shadows and highlights are brought out as separate entities. The shadows become more vivid when adjusted to either teal, purple or blue. You can go a mile and adjust the highlights to become crystal clear by making the footage become yellow, red, or orange.
When carrying out color grading, you need to know the various video demands, such as the horror clips demand more of the dark shadow.

4. Use Vectorscope to get the accurate adjustment
Naked eyes cannot effectively see all the errors in a video project, which is the essence of having a vectorscope. A vectorscope provides all the quantitative information about a video image – This lessens work for video editors.
Vectorscope provides extensive details, such as how intense a given color is – This will help you make necessary adjustments to your footage.

5. Use the black and white functionality to change the opacity
Even though you can change your footage to black and white using the hue and saturation functionality, the black and white tool gives you more control.
This functionality feature can make your footage blend with the soft light part. Besides, it is best to first lower the contrast of your image or video to black and white to be able to highlight the unclear parts.

6. Use levels to unveil the whites, blacks, and mids of an image
Levels is a functionality feature that displays the blacks, whites, and mids of footage. With this functionality, you can make the highlight parts lighter and the shadows appear darker, which is essential in making cinematic videos.
In the levels histogram, the left slider defines the darkest part, the right defines the brightest part, and the top defines distributions.
In software such as Adobe After Effects, you can set this functionality to automatic or customize it based on your preference.

7. Use Vibrance to control other levels of saturation
The saturation of video footage or a clip can be regulated using vibrance functionality. With vibrance, you can alter the saturation levels of your clip while simultaneously minimizing clippings for the colors to approach complete saturation.
When you want to use this functionality in After Effects, you drag and drop it right on top of your footage – The exact part you want to apply it.

8. Use a Vignette to fade edges
To increase the point of focus, you need to fade your edges. In color grading, you can only fade your edges with a vignette.
This functionality allows you to center images or certain video parts and make the edges unclear. Your emphasis will be more on the central region.

Bottom line
● Color grading is not a piece of cake. Besides, you should not use it as an excuse for making simple mistakes such as the ones highlighted above. You need to pay close attention when color grading your films, and you will have your video project mapping out its intended meaning.
● Moreover, you need not be a pro to carry out cinematic color grading. You need to follow the above eight tips altogether to apply color grading to your video. You will create stunning video files that leave your viewers’ eyes gorged out.
Also read:
- New Do You Know What Is Motion Blur in Fortnite? Read This Article to Find Out How to Apply Motion Blur in Fortnite Efficiently and with Ease
- Updated How to Speed Up Video on Instagram Reels?
- 2024 Approved Which Is the Best Video Slideshow Maker Available Online? Methods to Prepare Custom Slideshows for Google Presentation. How to Make a Slide Show Video?
- New 2024 Approved How to Set Up Twitch Green Screen
- In 2024, Do You Use Premiere Pro and Want to Learn How to Change a Videos Frame Rate Using the Tool? Here Are the Steps that You Need to Follow
- 2024 Approved How to Download and Use Vegas Pro
- New Final Cut Pro for iPad for 2024
- 2024 Approved Do You Know How to Zoom on Facebook Livestream Videos? Through This Article, You Will Find Multiple Ways and Detailed Steps to Zoom in on the Facebook Livestream Videos
- Updated 2024 Approved 8 Top Premiere Pro Slideshow Templates
- Advancements in Game Recording Software A Comprehensive Overview
- 2024 Approved 12 Top Picks of Video Enhancer Software
- Updated Unraveling How the Slow Motion Guys Have Revolutionized The Slow Motion Game for 2024
- Updated 2024 Approved Best AR Video Apps
- New Wondershare Filmora Tutorial | Using The AI Auto Reframe Feature for 2024
- New In 2024, Convert Slow Motion Videos to Regular Videos in Your iOS Device |A How
- Embrace Creativity in Your Media by Replacing Backgrounds. Learn to Replace the Sky in Lightroom Through the Steps and Details Discussed in This Article for 2024
- 2024 Approved 6 Instant Ways to Make Windows 10 Slideshow
- New Easily Cut Large Video Faster on Mac for 2024
- Being an After Effects Editor, You Often Find Yourself the Need to Add Motion Blur After Effects. This Guide Has Got You Covered. Follow to Find Out How to Add Motion Blur in After Effects
- Updated In 2024, Best 8 Online GIF to APNG Converters
- 2024 Approved As a Designer, Color Is the Most Powerful and the Most Diverse Tool at Your Disposal. Here Are Ten Matching Color Combinations to Get You Started on Your Next Project
- Updated In 2024, How to Add Filters on iMovie
- Updated 2024 Approved A Guide to Use Distortion Effect in Premeiere Pro
- New Facts About GIF Background You Didnt Know for 2024
- Updated How to Color Grading in Final Cut Pro for 2024
- 2024 Approved What Are the 10 Best GIF Creator?
- Updated The Art of Fashioning Slow Motions Has Remained Popular Ever Since. Read This Article to Learn How to Do Slow-Mo in CapCut and Other Powerful Tools
- Updated In 2024, Facts About GIF Background You Didnt Know
- In 2024, Are You Looking for Different Solutions to Add VHS Effects to Your Videos? Dont Worry; This Article Will Provide Easy Solutions to Apply VHS
- Updated 2024 Approved Quick Answer What Is a GIF File?
- Add Neon Effects to Your Dance Videos with the Help of Wondershare Filmora After Reading This Article. It Will Give a More Thrilling and Exciting Appearance for 2024
- New In 2024, How to Use the Logo Intro Templates for Your Next Video
- In 2024, 2 Effective Ways to Make SRT File Translation Like a Pro
- How to Edit a TikTok Video After Posting
- How to Color Grade Your Picture in LightRoom for 2024
- New In 2024, A Comprehensive Review of LUTs Finding LUTs Made by Danny Gevirtz
- In 2024, How To Change Your SIM PIN Code on Your Samsung Galaxy M34 5G Phone
- Easily Unlock Your OnePlus Ace 2V Device SIM
- Pokemon Go No GPS Signal? Heres Every Possible Solution On Poco X5 | Dr.fone
- Forgot Your Apple ID Password and Email On Apple iPhone 12 Pro Max? Heres the Best Fixes
- In 2024, 3 Solutions to Find Your Oppo A78 Current Location of a Mobile Number | Dr.fone
- Easy steps to recover deleted photos from Infinix Hot 40.
- How to Factory Reset Motorola Moto G23 If I Forgot Security Code or Password? | Dr.fone
- Life360 Circle Everything You Need to Know On Realme GT 5 | Dr.fone
- Reasons for Lava Yuva 2 Pro Stuck on Boot Screen and Ways To Fix Them | Dr.fone
- Complete Fixes To Solve iPhone 6s Randomly Asking for Apple ID Password
- In 2024, 6 Solutions to Unlock Itel Phones If You Forgot Password, PIN, Pattern
- 8 Quick Fixes Unfortunately, Snapchat has Stopped on Samsung Galaxy F54 5G | Dr.fone
- How to Rescue Lost Videos from Xiaomi Redmi Note 13 5G
- In 2024, Unlock iPhone 11 Pro With Forgotten Passcode Different Methods You Can Try | Dr.fone
- How to Bypass Google FRP Lock from Vivo Y27 4G Devices
- How to Unlock Oppo Find N3 Flip Phone Pattern Lock without Factory Reset
- In 2024, What Is a SIM Network Unlock PIN? Get Your Vivo S17 Phone Network-Ready
- In 2024, PassFab Apple iPhone 13 Pro Max Backup Unlocker Top 4 Alternatives
- In 2024, Ultimate guide to get the meltan box pokemon go For Apple iPhone 13 Pro Max | Dr.fone
- How to Change Location on TikTok to See More Content On your Poco F5 5G | Dr.fone
- How to Fix Videos Not Playing on Huawei P60 Art?
- Vivo Data Recovery – recover lost data from Vivo Y78t
- In 2024, A Guide Vivo Y100t Wireless and Wired Screen Mirroring | Dr.fone
- In 2024, About Vivo Y27 5G FRP Bypass
- In 2024, Top 10 Telegram Spy Tools On Oppo Reno 10 5G for Parents | Dr.fone
- How to Unlock Vivo V29e Phone without Google Account?
- Your Complete Guide To Reset Samsung Galaxy Z Fold 5 | Dr.fone
- How To Leave a Life360 Group On Realme C53 Without Anyone Knowing? | Dr.fone
- In 2024, Sim Unlock Vivo Y78 5G Phones without Code 2 Ways to Remove Android Sim Lock
- In 2024, Ultimate Guide to Catch the Regional-Located Pokemon For Samsung Galaxy A14 5G | Dr.fone
- Ultimate Guide to Catch the Regional-Located Pokemon For Tecno Phantom V Fold | Dr.fone
- Undelete lost music from Tecno Spark Go (2024)
- Title: Do You Want to Crop a TikTok Video? In This Article, We Will Provide You with Detailed Steps Through Which You Can Discover How to Crop TikTok Videos Easily
- Author: Chloe
- Created at : 2024-05-20 03:37:33
- Updated at : 2024-05-21 03:37:33
- Link: https://ai-editing-video.techidaily.com/do-you-want-to-crop-a-tiktok-video-in-this-article-we-will-provide-you-with-detailed-steps-through-which-you-can-discover-how-to-crop-tiktok-videos-easily.m/
- License: This work is licensed under CC BY-NC-SA 4.0.

