
Do You Want to Make Your Background Disappear and Replace with an Attractive Background? Here Is How to Add a Green Screen to Zoom App and Add Any Virtual Background of Your Choice

Do You Want to Make Your Background Disappear and Replace with an Attractive Background? Here Is How to Add a Green Screen to Zoom App and Add Any Virtual Background of Your Choice
If you are a regular user of Zoom app because you have to attend meetings and video conferences every now and then, you should know how to create a green screen for Zoom calls. There are going to be times when you would not want to show what is in your background because it might look distracting. Besides, changing the background from time to time breaks the monotony of your Zoom calls.
Zoom app allows you to change your background and set any available virtual background. However, the effect of virtual background may not be accurate and smooth unless you have a uniform background color. If you use green screen background for Zoom, you can replace it with any virtual background that will look very realistic to your audiences. We will illustrate how to create a green screen background for Zoom.
Part 1. How to add green screen to Zoom on computer?
Regular Zoom users prefer arranging and attending video conferences from their computers. Zoom desktop app makes it more convenient to attend Zoom conference with a wider screen and better visibility. Make sure you have a uniform green screen in your background before attending Zoom call so that you can replace it with any available virtual background on Zoom. Here are the steps on how to create a green screen for Zoom app on your computer.
Step1Open Zoom app and make sure you are logged into your account. Adjust the webcam so that only you and your green screen should be visible in the frame.
Step2Click on Settings (gear icon) located in the top-right corner.
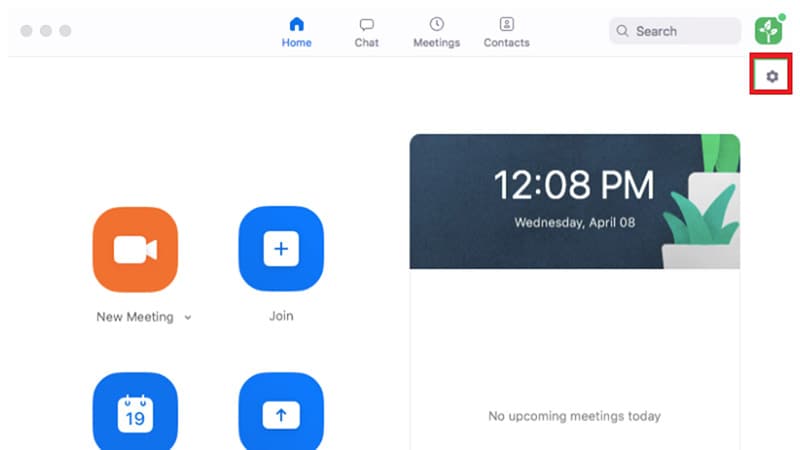
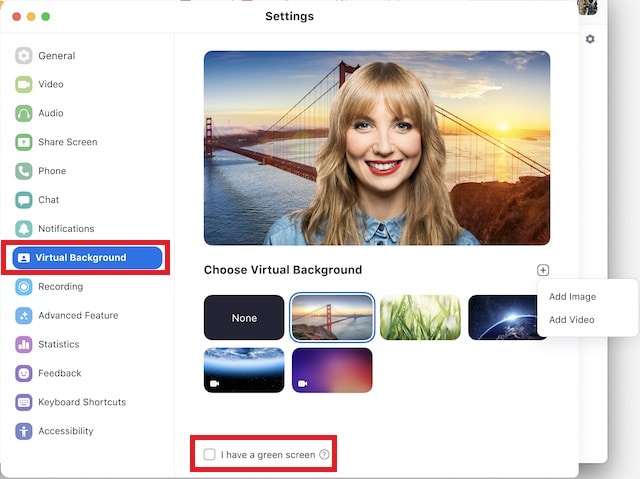
Step3Once Settings window opens, click on Virtual background option on the left panel.
Step4Turn on the option “I have a green screen” located at the bottom. Thereafter, choose a virtual background with which you want to replace the green screen in your video.
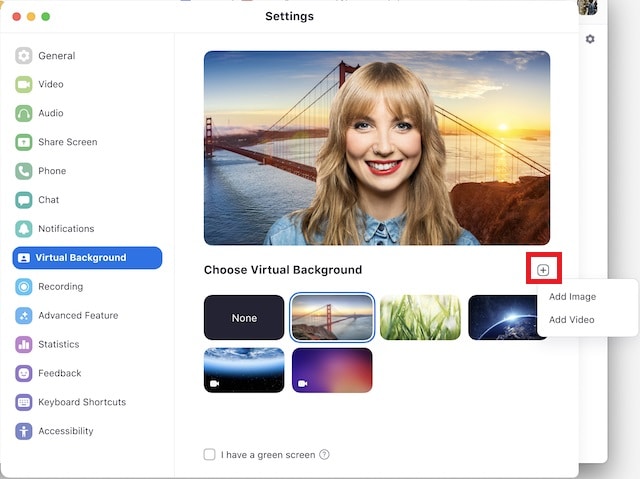
Step5Apart from the present virtual background, you can add photo or video to replace green screen background.
Step6Close Settings window and you will see that your green screen is replaced by your selected virtual background.
Part 2. How to add green screen to Zoom on mobile?
If you are an occasional Zoom user, you are more likely to use your smartphone to attend Zoom conferences. If you want green screen effect on your Zoom call, make sure you have a sizeable green screen in your background. This is because even if you happen to move your phone during the meeting, green screen background should come in the video frame all the time.
It is recommended to use a tripod to keep your smartphone fixed in one spot for better and consistent green screen effect. Here are the steps to answer your question how do you add a green screen to Zoom app on your mobile phone. The steps are the same for Android and iOS users.
Step1Open Zoom app on your smartphone and make sure you are signed into your account.
Step2Start a Zoom meeting and tap on More option located in the bottom-right corner.

Step3Tap on Virtual background and you can select any preset virtual background.
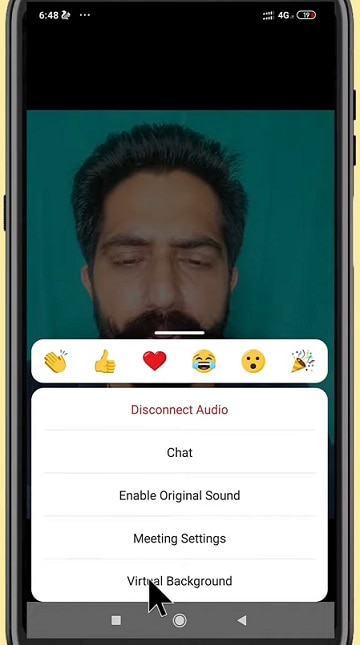
Step4If you want to replace green screen with a customized background, tap on “+” icon and select any photo or video from your phone.
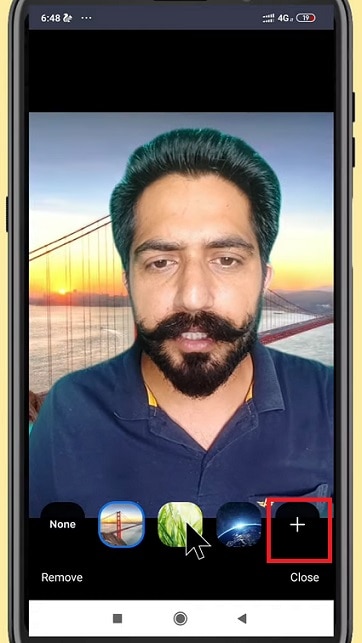
Step5Tap on Close option and the selected virtual background will be applied to your Zoom video.
Part 3. Tips to use green screen on Zoom video
Here are some important tips to use green screen on Zoom video for a better outcome.
Buy Large Green Screen - Since you are going to invest in buying green screen, you should buy a large green screen instead of buying two. Firstly, when you have one large green screen, you can set it up without any wrinkles or overlaps.
Secondly, a large green screen means greater surface area, and even when you slightly change the angle of your camera, your background will still have green screen instead of the exterior wall showing up and ruining virtual background effect.
Buy Green Screen Stand - Along with green screen, you should buy a sizeable green screen stand. A regular green screen stand contains two vertical supports at both ends and one horizontal support where you hand the green screen.
You can buy it according to the size of green screen you have bought. And you need to buy stand because you cannot fix the green screen on the wall properly. If you use any other means, there are going to be wrinkles and uneven virtual background effect.
Green Screen Quality - You can purchase any shade of green screen, but we recommend you opt for vibrant green color for a better outcome. Most importantly, the color should be even across the surface, and there should not be light and dark patches to dampen the virtual background effect and make it look unrealistic. That is why you should not compromise with quality.
Avoid Green Objects - You should not wear anything green. If your green screen has a lighter shade, you can wear deep color dresses and vice versa. Most importantly, you should not keep anything that is green while attending Zoom attending as it will disturb the green screen effect and it will look embarrassing. If you need to keep any green objects in your Zoom meetings, you should have blue screen instead of green screen.
Focus On Lighting - Lighting is extremely important when you want to use green screen. You should place the light so that it spreads evenly across the green screen. Otherwise, there are going to be light and dark patches, and the effect can get disturbed. Make sure you do not cast any shadow on the green screen by positioning the green screen accordingly.
Select A Proper Background - Last but not least, when you change your green screen to any virtual background photo or video, make sure you keep your audiences in mind. If you are attending a meeting, you should keep a professional-looking background. The background should not be distracting and match the theme of your meeting.
Conclusion
We have answered your question, “How do you add a green screen to zoom?” You can use green screen on your Zoom desktop app as well as smartphone app. This will help you to make your usual background cover up with green screen and replace green screen with any virtual background. Keep in mind all the tips we have provided you so that the green screen effect is perfect.
Free Download For Win 7 or later(64-bit)
Free Download For macOS 10.14 or later
Premiere Pro Text Effects Beginner Guide
If you want to edit your raw video footage and turn ordinary clips into eye-catching videos, you will need a professional video editor. Adobe Premiere Pro is the most commonly used premium video editor that most professionals prefer. When it comes to editing videos, text effects play a major role along with video effects and animations.
If you are new to Adobe Premiere Pro, you will experience a steep learning curve. This is because the user interface is specially designed for professional video editors. Therefore, you might not get Premiere Pro text effects readily available. In this article, we will illustrate how you can add Adobe Premiere Pro text effects to your video project. We will also state the best alternative to Premiere Pro to add stunning text effects easily.
Part 1. Steps to Add Text Effects to Adobe Premiere
Text effects are an essential part of videos to enhance the video content immensely. You can add opening titles and end credits with text effects and animations. You can display the dialogues on the screen as subtitles. Showing location information and shooting date through text effects is quite regular these days. Besides, the use of lower thirds for social media promotion in videos is common. Without further ado, let us look at the steps to add Premiere text effects.
Step1 Add Your Text
First of all, you need to import your video and add text to it and apply different text effects. Here we are starting from scratch for better illustration. Go to Window> Essential Graphics> Text Tool(T). Type your text as per your requirements. You will notice a new text layer appearing under Edit tab.
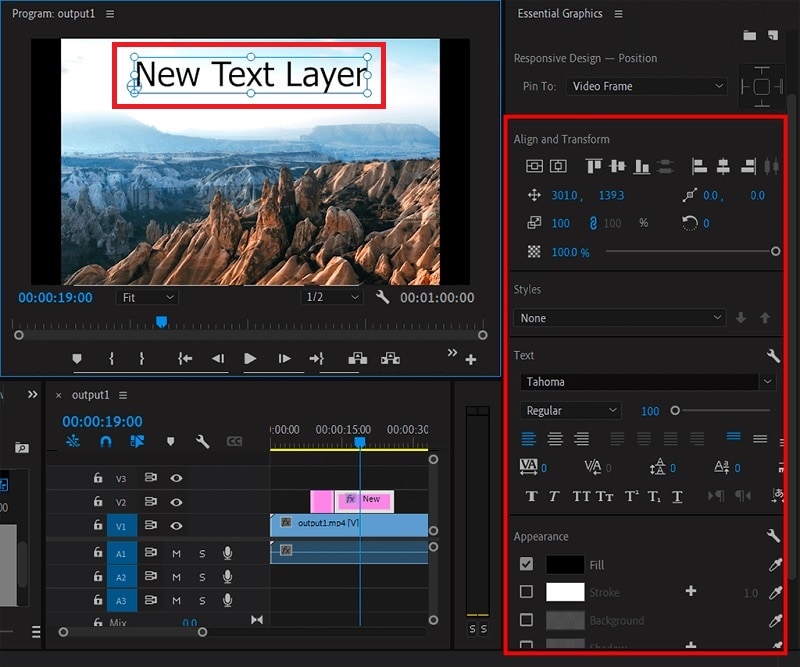
Select the text layer and you will see all the properties that you can tweak. For example, go to Align and Transform section to reposition and resize your text properly. Go to Text section to change the style of the text. Similarly, there is an Appearance section to adjust color, shadow, and much more.
Step2 Apply Pre-Animated Template
Go to Graphics> Essential Graphics and browser through the title templates available to match your requirements. Once you have selected one title template, drag and drop it into your timeline above your video clip.
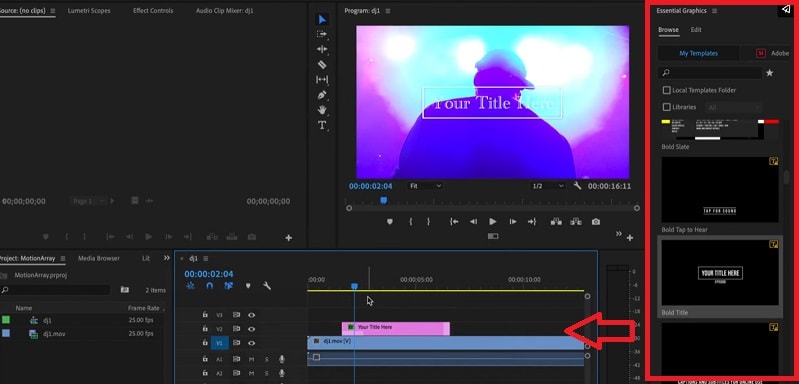
Double-click on the text to edit the content and type your title. Go to Essential Graphics panel and customize the text effect as per your preference. You can also choose the available elements included in the template to enhance the text effects as you think fit.
Step3 Edit the Text Effect and Animation
Select the text layer on your timeline to check out the keyframes applied in the template. Go to Effects Control panel and open Keyframe box by dragging it to the right. Adjust the keyframe to speed up or slow down the animation.
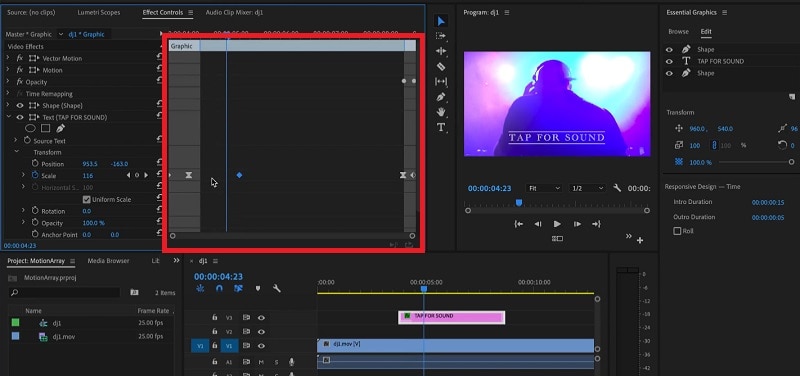
Bring the keyframes closer or spread them apart respectively. You can also adjust Velocity Controls present under different text properties as per the speed requirements.
Part 2. Alternative Way to Make Text Effects
If you are new to Adobe Premiere Pro, you will find title effects Premiere Pro difficult to add and edit as per your requirements. It is very common for amateur video editors to look for an easy alternative to Premiere Pro. We recommend Wondershare Filmora as the best alternative to Adobe Premiere text effects.
Filmora has a super intuitive user interface that is suitable for everyone including those who do not have prior video editing experience. There are more text effects and animations available that you can customize to get the desired effect. Here are the steps to add text effects to your video on Filmora.
Free Download For Win 7 or later(64-bit)
Free Download For macOS 10.14 or later
Step1 Download and install Wondershare Filmora and it is available for both Windows and macOS. Launch the application and click on New Project on the welcome screen.

Step2 Drag and drop your video clips under Project Media folder and then onto the timeline. Go to Titles and you will see different categories of text effects and templates.
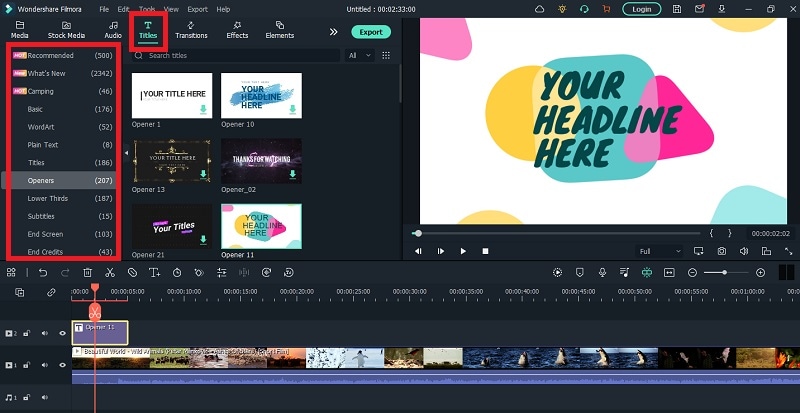
Step3 Select a template whichever you think is perfect for your project and drop it on the timeline. Adjust its position on the timeline as per where you want it to appear. Double-click on it to edit the title and type in your text. Similarly, you can reposition the text from Viewer as per your need.
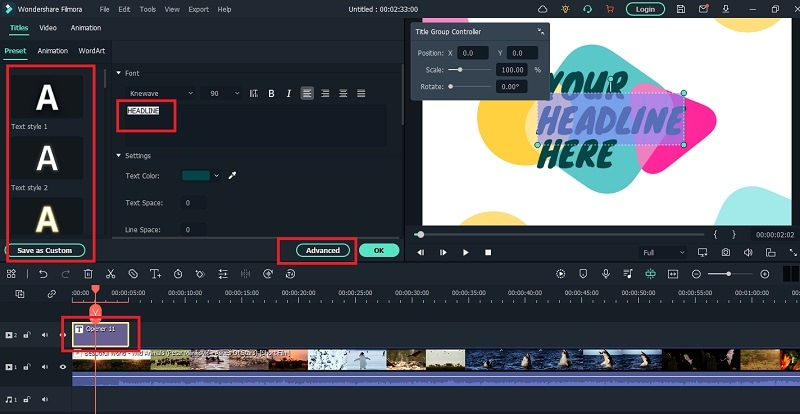
Select the text style as well as adjust fonts and settings to get different styles for your texts. There is also an Advanced section available for detailed editing and getting the desired text effect.
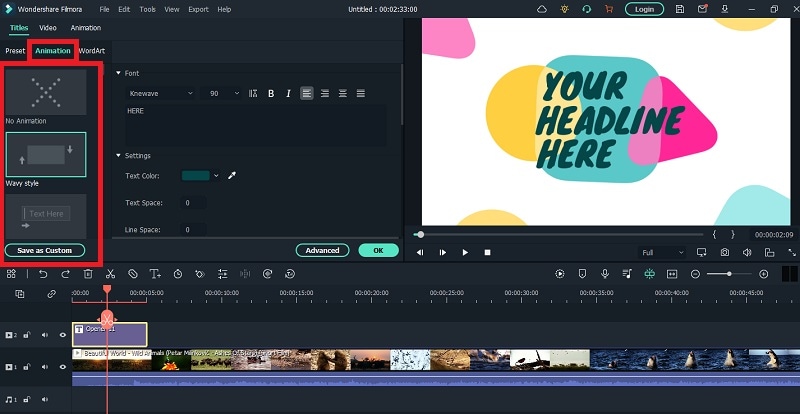
Step4 You can animate the texts in your video from Animation section. Choose from the animation presets to animate individual text in the video. Besides, you can also add keyframes and animate the text as per your preference.
Part 3. Related FAQs on Adobe Premiere Pro
1. How do you make text look good in Premiere Pro?
There are several steps you need to take to make text look good in Premiere Pro. First of all, the color of the text should be in contrast to the background. You can add a rectangle highlighter in the background. Experiment with font and text of the text. Apply a text effect from the different templates available. Customize the effect to get the desired result.
2. How do you add typing effects in Premiere?
Add your text to your video so that a text layer appears on the timeline. Animate the text Effects> Video Effects> Liner Wipe and double-click to get the typing effect. Tweak the parameters like transition completion, wipe angle, and others to smoothen out the animation. Draw a cursor icon using rectangle tool and animation it to move with the text using keyframes.
3. How do I open text effects controls in Premiere Pro?
Select the text layer from the timeline of the project. From the main menu, go to Windows> Effects Control option to open effect controls for text. Otherwise, you can directly go to Effects Control tab located below the menu bar after selecting your text layer.
The Bottom Line
Adding text effects in Premiere Pro can be slightly overwhelming for an amateur video editor who does not have enough experience with Premiere Pro. We have stated the simple steps to apply Premiere Pro text effects to your video project. However, we recommend Wondershare Filmora as the best and the easiest alternative to Premiere Pro where you get more text effects and add them instantly and effortlessly.
Free Download For macOS 10.14 or later
Step1 Download and install Wondershare Filmora and it is available for both Windows and macOS. Launch the application and click on New Project on the welcome screen.

Step2 Drag and drop your video clips under Project Media folder and then onto the timeline. Go to Titles and you will see different categories of text effects and templates.

Step3 Select a template whichever you think is perfect for your project and drop it on the timeline. Adjust its position on the timeline as per where you want it to appear. Double-click on it to edit the title and type in your text. Similarly, you can reposition the text from Viewer as per your need.

Select the text style as well as adjust fonts and settings to get different styles for your texts. There is also an Advanced section available for detailed editing and getting the desired text effect.
Step4 You can animate the texts in your video from Animation section. Choose from the animation presets to animate individual text in the video. Besides, you can also add keyframes and animate the text as per your preference.

Part 3. Related FAQs on Adobe Premiere Pro
1. How do you make text look good in Premiere Pro?
There are several steps you need to take to make text look good in Premiere Pro. First of all, the color of the text should be in contrast to the background. You can add a rectangle highlighter in the background. Experiment with font and text of the text. Apply a text effect from the different templates available. Customize the effect to get the desired result.
2. How do you add typing effects in Premiere?
Add your text to your video so that a text layer appears on the timeline. Animate the text Effects> Video Effects> Liner Wipe and double-click to get the typing effect. Tweak the parameters like transition completion, wipe angle, and others to smoothen out the animation. Draw a cursor icon using rectangle tool and animation it to move with the text using keyframes.
3. How do I open text effects controls in Premiere Pro?
Select the text layer from the timeline of the project. From the main menu, go to Windows> Effects Control option to open effect controls for text. Otherwise, you can directly go to Effects Control tab located below the menu bar after selecting your text layer.
The Bottom Line
Adding text effects in Premiere Pro can be slightly overwhelming for an amateur video editor who does not have enough experience with Premiere Pro. We have stated the simple steps to apply Premiere Pro text effects to your video project. However, we recommend Wondershare Filmora as the best and the easiest alternative to Premiere Pro where you get more text effects and add them instantly and effortlessly.
Mastering the Technique: Playing Videos in Slow Motion on Your iPhone Like a Pro
Before we dive into how to play a video in slow motion on iPhone, let’s see what they are. In slow motion, the video frame rate is usually manipulated. In manual or automated editing, frame rates increase to add extra seconds to the video. For instance, in normal videos, playback speed is 24, 30, or 60 fps. However, this frame rate can be increased up to 124 or 240 fps in slow motions.
These are the standard values and help achieve accurate and precise slow-motion effects. In this article, the discussion leans toward the making and playing slow-mo. Users will learn how to play videos in slow motion on iPhone. It will introduce tools to create a slow-mo effect and a guide to achieve it.
Part 1:Adding Slow Motion to Video on iPhone (Before & After)
Now that you have an insight into the significance of slow-motion videos, let’s move forward. This section involves a guide on how to play a video in slow motion on iPhone. Here is a guide to adding slow motion in your video before and after recording:
1. Making a Slow Motion Before Recording
This method involves recording a video in slow-motion mode from the start. Apple has already launched this feature in its iPhones and iPads. Here is a step-by-step guide to creating such videos:
Step 1
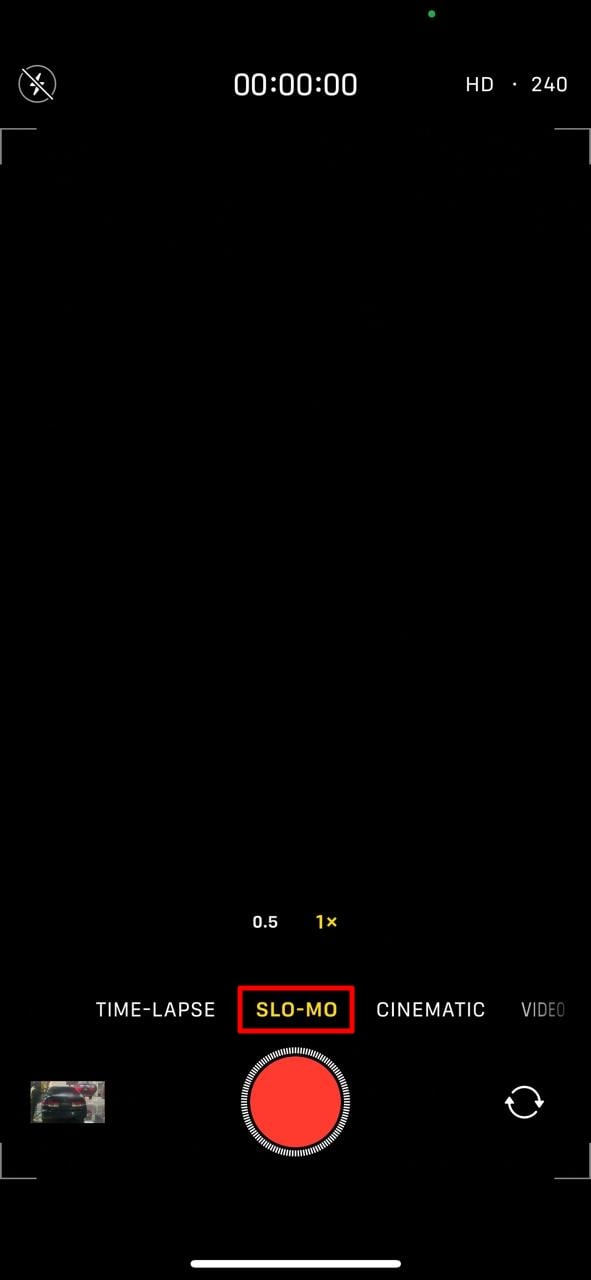
Open your iPhone and click on the “Camera” application. Once you access it, select “SLO-MO” mode from the bottom.
Step 2
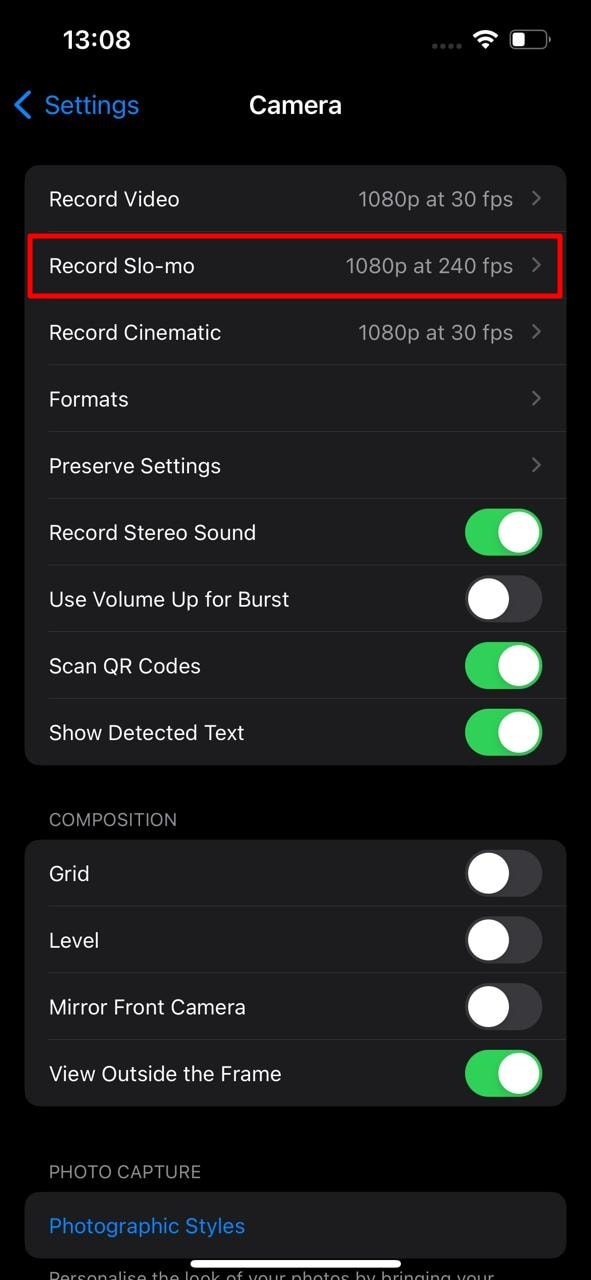
Go back and open the “Settings” and select the “Camera” section. In camera settings, select the “Record Slo-mo 1080p at 240 fps.”
2. Making a Slow Motion After Recording
The first method will record your overall video in slow motion. However, you can use the other method to add a slow-mo effect to a specific part. Follow the given instructions to learn how to operate it:
Step 1
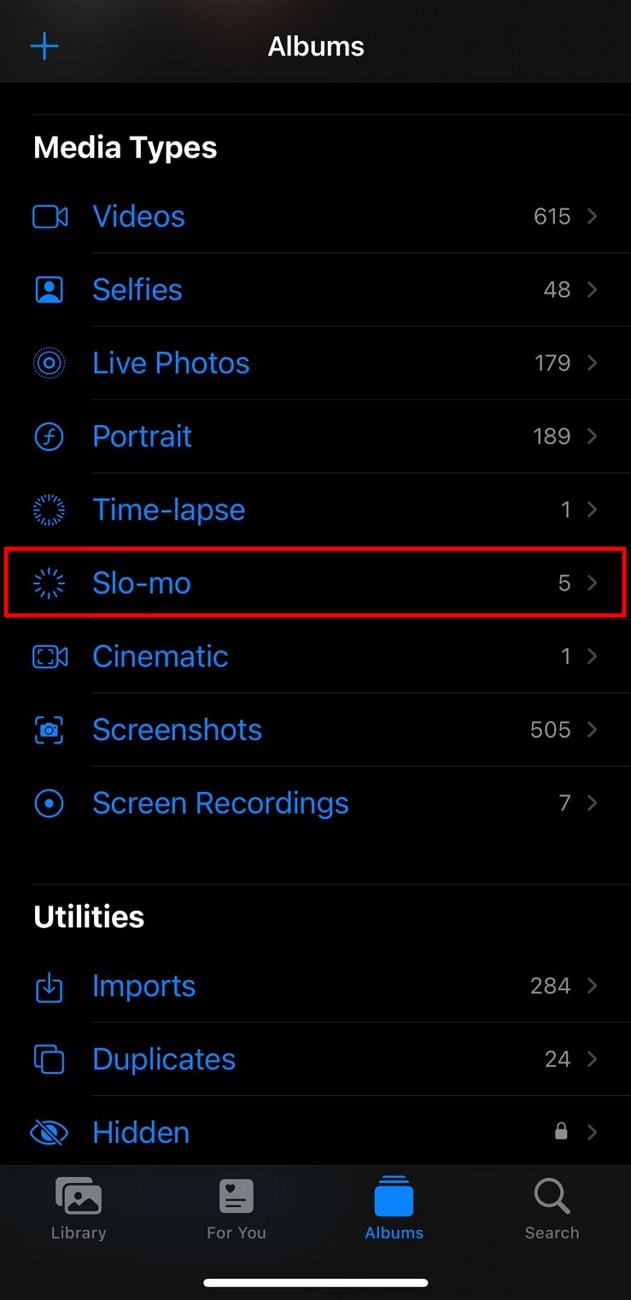
Open the “Photos” application from your home screen and click “Albums.” From the featured slider, select the “Slow-mo” option.
Step 2
Choose a video from this album and go to the “Edit” option at the top right corner.

Step 3
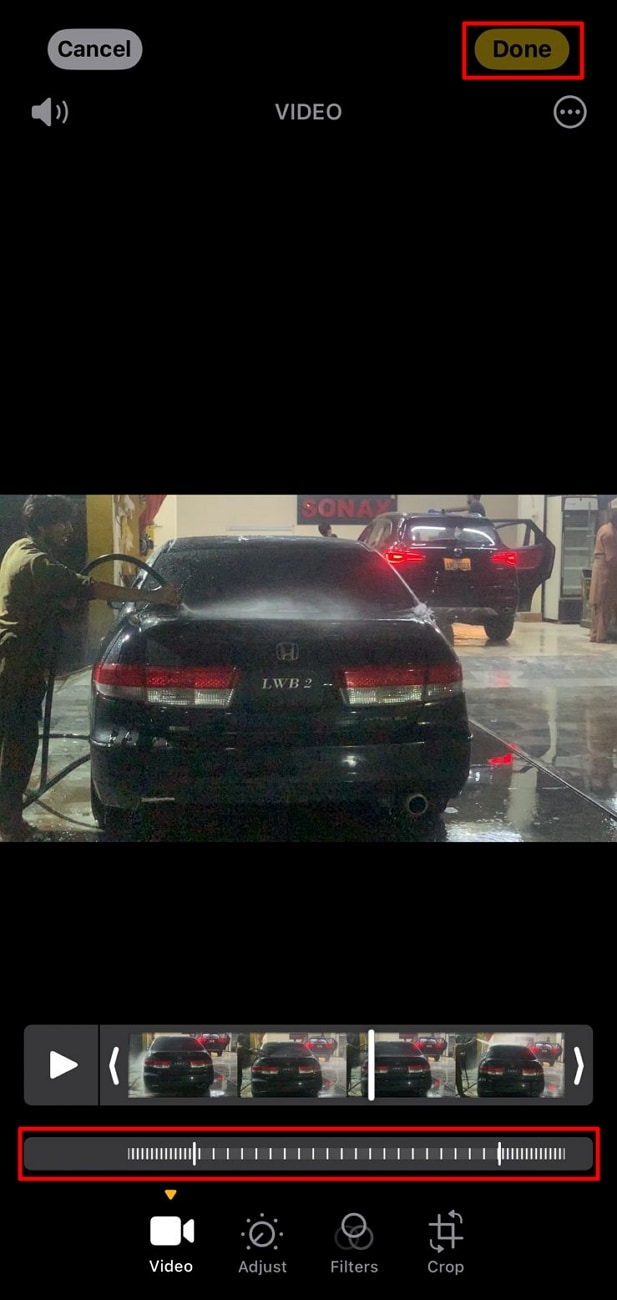
Navigate towards the bottom and access the timeline. Choose the specific area for adding the effect and drag the sliders on the vertical lines below. Once satisfied with the slow-motion effect, click the “Done” button.
Part 2: Some Prominent Third-party Apps Available to Play Video in Slow-Motion
Slow-mo effects enhance the creativity of your videos and let the audience experience new things. Do you still want to learn how to play a video in slow motion on iPhone? Here is a comprehensive guide to creating slow motions:
- Video Speed: Fast, Slow Motion
- Slo Mo – Speed Up Video Editor
- Slow Mo and Fast Motion
- Video Speed Changer – Editor
1. Video Speed: Fast, Slow Motion
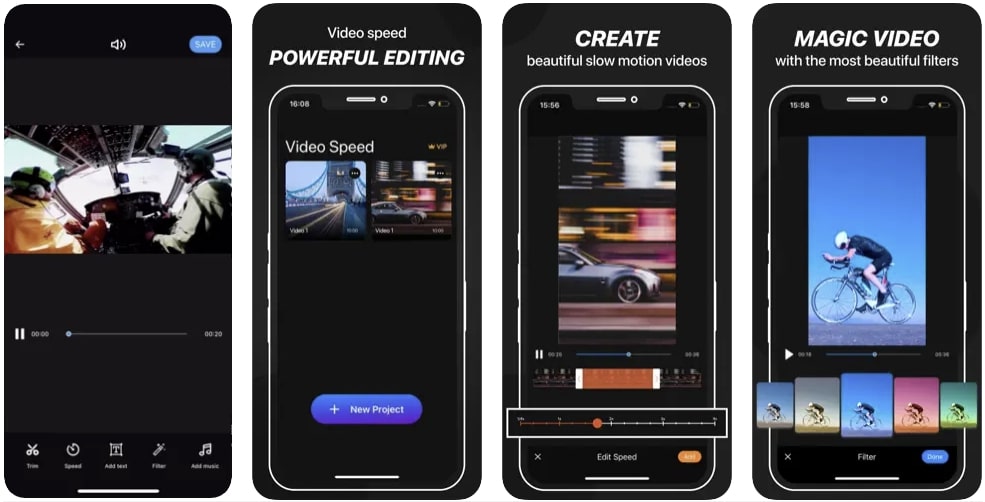
This is it if you are looking for an application with advanced features and manual editing. The application offers many video playback options for a suitable slow motion. You can add slow motion to a whole video or a part through timeline editing. The application offers multiple subscriptions with a trial period before use.
Key Features
- After editing a video in this application, you can integrate music and text.
- The speed manipulation doesn’t result in slow-mo but also offers fast speed options.
- It has an insightful and easy user interface; you can apply color filters after editing.
2. Slo Mo – Speed Up Video Editor
Finding answers about how to play videos in slow motion on iPhone? This is an intuitive application to create slow-mo with a high processing rate. To slow down a video using this application, you can manipulate the video frame to 240 fps. The speed modification is available to apply on specific video parts.
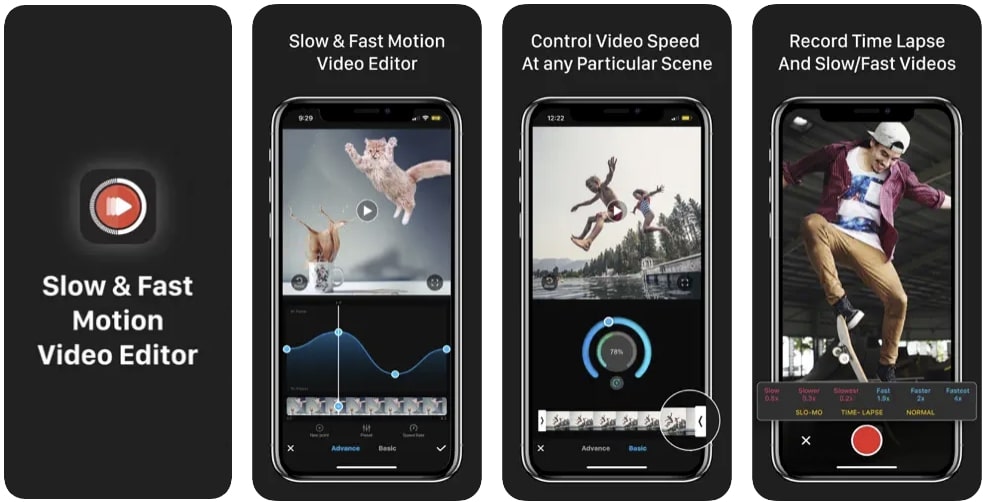
Key Features
- Direct video share options to Instagram, YouTube, Twitter, and Facebook.
- The premium version has 170+ music tracks to insert in your edited video.
- Users can record a live video using this application and apply speed options.
3. Slow Mo & Fast Motion
This video editor is specifically designed for those looking to modify video speed. It enables you to change the whole video speed or the marked area. Whether you want to slow an existing video or record a new one through it, the choice is yours. The video control options are not technical, and anyone can understand them.
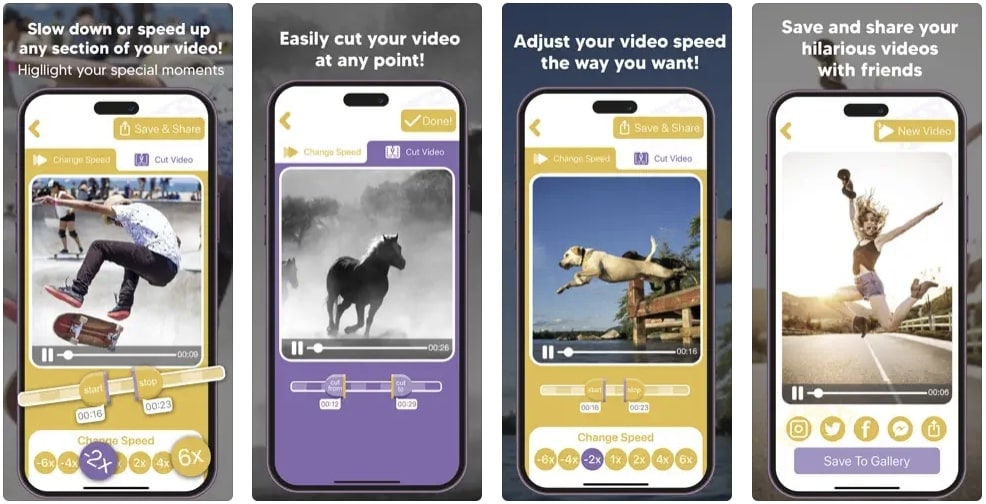
Key Features
- The tool offers cutting options, and the timeline editing makes it more precise.
- You can use this application’s built-in features to enhance the visual outlook of video.
- The application shows support for multiple languages, including Spanish, French, and more.
4. Video Speed Changer – Editor
Whether it’s about changing speed or doing other types of speed edits, this app fits the best. It resolves your how to play videos in slow motion on iPhone problems. It allows you to change the video playback speed via a simple process. Just upload your video and drag the speed slider backward to create a slow-mo.
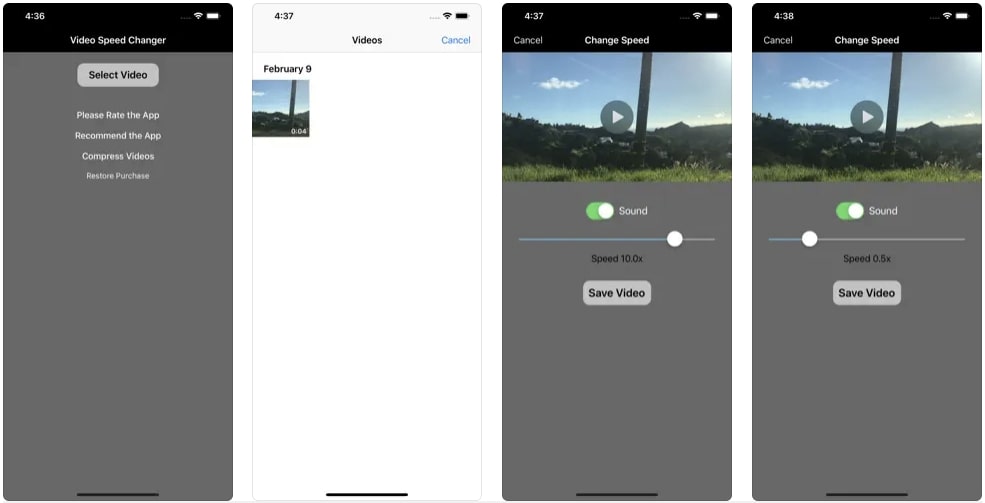
Key Features
- The tool offers to import or record media through its built-in recorder option.
- You can also add fast-motion elements like time-lapse, time warp, or hyper-lapse.
- The user interface is straightforward and leaves no room for confusion.
Bonus Part: Make and Play Your Video in Slow Motion: Use Wondershare Filmora
You might wonder if something is missing if you see a slow-motion video using these applications. This is where you need a professional editor for a smooth slow-mo. Wondershare Filmora is one of the editors that offers frame interpolation. With its optical flow option and high-resolution export settings, you can rely on it.
This AI video editor has two methods of creating a low-motion effect. One method involves uniform speed, and the other is speed ramping. The uniform speed option allows you to manipulate video playback speed using a slider. Meanwhile, speed ramping is a more precise method of modifying video parts.
Free Download For Win 7 or later(64-bit)
Free Download For macOS 10.14 or later
Playing and Adding Slow Motion Effect to Video Using Filmora
After hearing about this amazing software, you might want to create a slow-mo. You might wonder how to play videos in slow motion on iPhone using Filmora. Read the step-by-step guide to find your answer:
Step 1Create a New Project and Access Speed Options
Once you have downloaded this software, access the “New Project” button. Then, use the “Command + I” keys to import media and bring it to the timeline. Select the media clip in the timeline and go to the settings panel. Under the “Speed” tab, choose “Uniform Speed” and drag the slider for speed change.
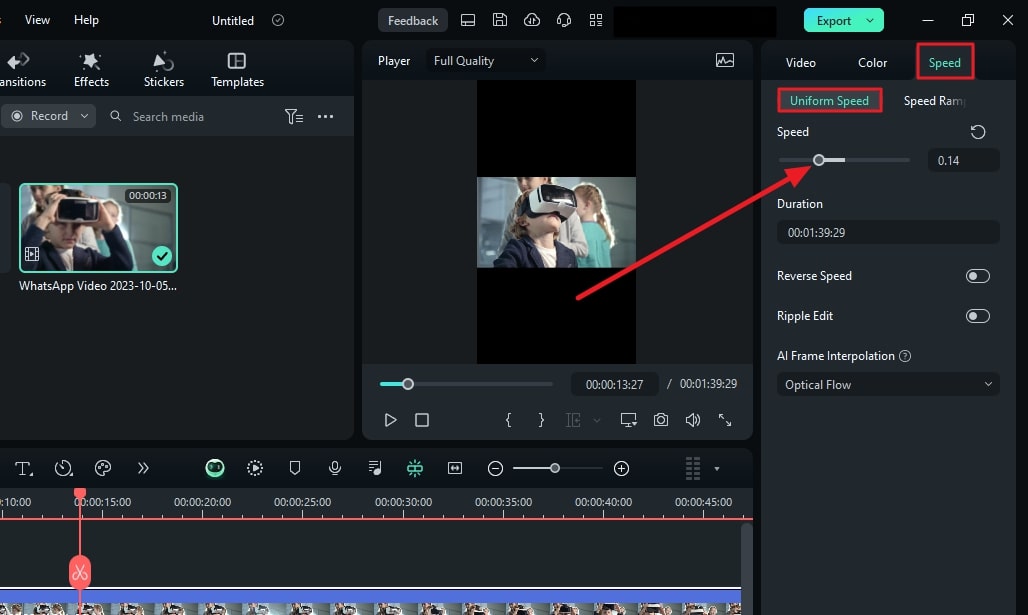
Step 2Activate AI Frame Interpolation Option
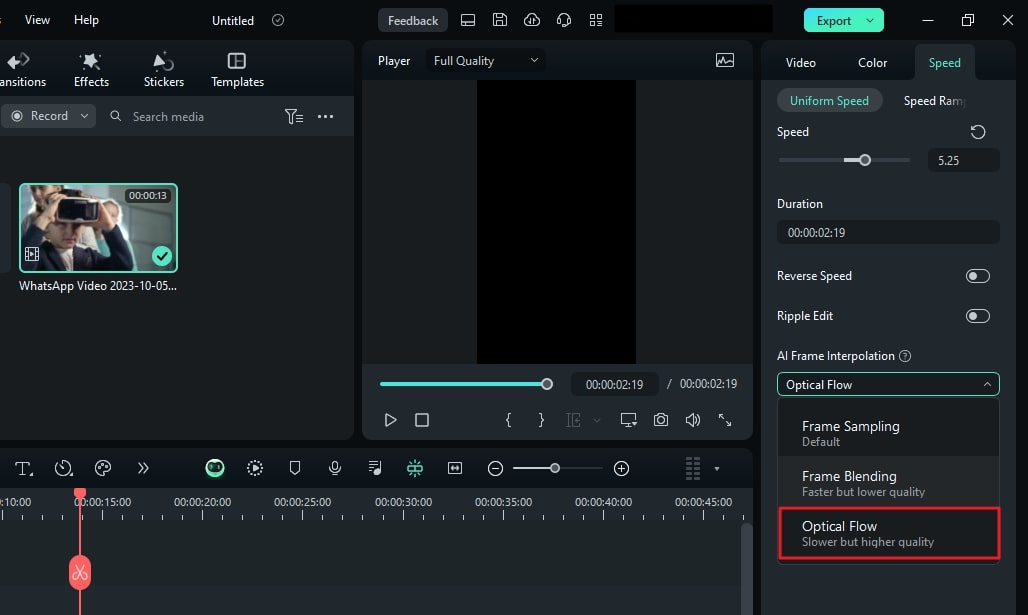
Once you finish the speed settings, there is a tip to enhance the slow-mo effect. Find the “AI Frame Interpolation” option in the same section and expand it. Select the “Optical Flow” option at the third to smoothen the video.
Step 3Rendering and Exporting
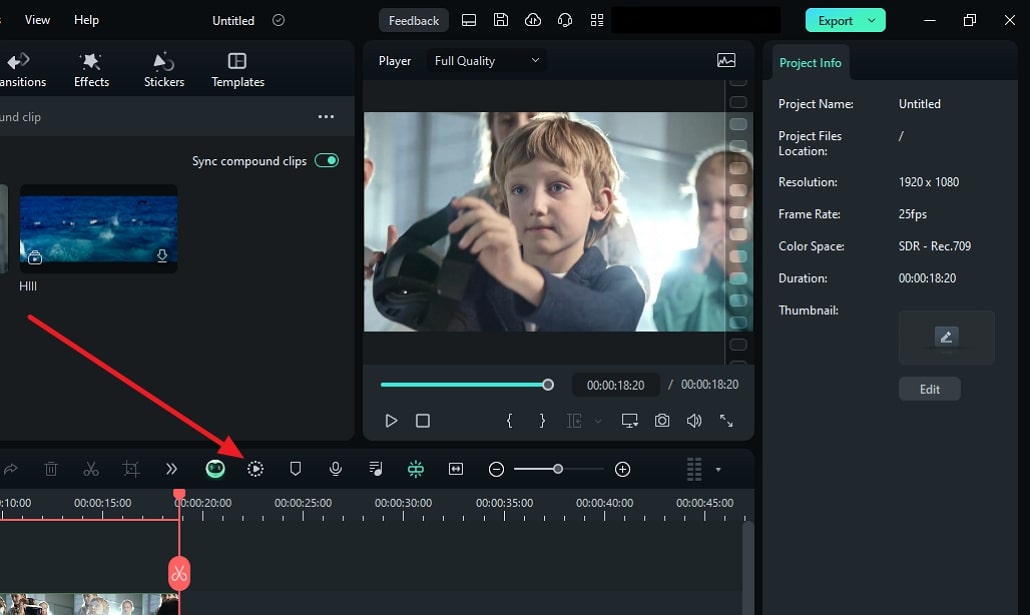
Once you have activated the optical flow, render it to see the results. For this, navigate towards the timeline toolbar and select the “Render Preview” option. It looks like a player with a doted circle around it. Preview the results, readjust if needed, and select the “Export” option to save the video.
Key Features of Wondershare Filmora
Along with speed modification, Filmora features unlimited features in its interface. The methods of accessing them are easy as accessibility is the concept it was built on. Here are some of the game-changing features for amateurs and professionals:
1. Compound Clip
We need to add a similar effect or filter to all videos in multiple situations. Instead of applying effects one by one, you can do it at once. This feature merges all videos into one and speeds up the workflow. It simplifies the complex sequences between clips and gives smooth results.
2. Green Screen
Running low on a budget for a film but want to shoot at beautiful locations. Use Filmora’s green screen or Chroma Key feature to replace backgrounds in an accurate manner. You can do this by shooting before a green screen and applying the chroma key later. Afterward, import the clip or picture you want in the background to add.
3. Motion Tracking
Do you want to blur out a whole person or apply an effect throughout the video? With Filmora’s motion tracking option, you can do these types of edits. You can insert motion graphics, animations, filters, and effects via it. Just select the object or person you want to track and activate the motion track.
4. Screen Recorder
Screen recording is important to content creation, especially in tutorial channels. In addition, the reaction or roasting channels and their owners also use this. Filmora offers an extensive screen recording option, including microphone and camera recording. You can manipulate the screen resolution, system settings, and more.
Conclusion
This article aimed to increase readers’ knowledge to effectively add slow-mo effect. Not only did we answer how to play videos in slow motion on iPhone, but we also guided to it. The article discussed some of the leading applications for slowing down video on iPhone. For precise and flawless slow-mo creation, we recommended Wondershare Filmora.
Step 2
Go back and open the “Settings” and select the “Camera” section. In camera settings, select the “Record Slo-mo 1080p at 240 fps.”

2. Making a Slow Motion After Recording
The first method will record your overall video in slow motion. However, you can use the other method to add a slow-mo effect to a specific part. Follow the given instructions to learn how to operate it:
Step 1
Open the “Photos” application from your home screen and click “Albums.” From the featured slider, select the “Slow-mo” option.

Step 2
Choose a video from this album and go to the “Edit” option at the top right corner.

Step 3
Navigate towards the bottom and access the timeline. Choose the specific area for adding the effect and drag the sliders on the vertical lines below. Once satisfied with the slow-motion effect, click the “Done” button.

Part 2: Some Prominent Third-party Apps Available to Play Video in Slow-Motion
Slow-mo effects enhance the creativity of your videos and let the audience experience new things. Do you still want to learn how to play a video in slow motion on iPhone? Here is a comprehensive guide to creating slow motions:
- Video Speed: Fast, Slow Motion
- Slo Mo – Speed Up Video Editor
- Slow Mo and Fast Motion
- Video Speed Changer – Editor
1. Video Speed: Fast, Slow Motion
This is it if you are looking for an application with advanced features and manual editing. The application offers many video playback options for a suitable slow motion. You can add slow motion to a whole video or a part through timeline editing. The application offers multiple subscriptions with a trial period before use.

Key Features
- After editing a video in this application, you can integrate music and text.
- The speed manipulation doesn’t result in slow-mo but also offers fast speed options.
- It has an insightful and easy user interface; you can apply color filters after editing.
2. Slo Mo – Speed Up Video Editor
Finding answers about how to play videos in slow motion on iPhone? This is an intuitive application to create slow-mo with a high processing rate. To slow down a video using this application, you can manipulate the video frame to 240 fps. The speed modification is available to apply on specific video parts.

Key Features
- Direct video share options to Instagram, YouTube, Twitter, and Facebook.
- The premium version has 170+ music tracks to insert in your edited video.
- Users can record a live video using this application and apply speed options.
3. Slow Mo & Fast Motion
This video editor is specifically designed for those looking to modify video speed. It enables you to change the whole video speed or the marked area. Whether you want to slow an existing video or record a new one through it, the choice is yours. The video control options are not technical, and anyone can understand them.

Key Features
- The tool offers cutting options, and the timeline editing makes it more precise.
- You can use this application’s built-in features to enhance the visual outlook of video.
- The application shows support for multiple languages, including Spanish, French, and more.
4. Video Speed Changer – Editor
Whether it’s about changing speed or doing other types of speed edits, this app fits the best. It resolves your how to play videos in slow motion on iPhone problems. It allows you to change the video playback speed via a simple process. Just upload your video and drag the speed slider backward to create a slow-mo.

Key Features
- The tool offers to import or record media through its built-in recorder option.
- You can also add fast-motion elements like time-lapse, time warp, or hyper-lapse.
- The user interface is straightforward and leaves no room for confusion.
Bonus Part: Make and Play Your Video in Slow Motion: Use Wondershare Filmora
You might wonder if something is missing if you see a slow-motion video using these applications. This is where you need a professional editor for a smooth slow-mo. Wondershare Filmora is one of the editors that offers frame interpolation. With its optical flow option and high-resolution export settings, you can rely on it.
This AI video editor has two methods of creating a low-motion effect. One method involves uniform speed, and the other is speed ramping. The uniform speed option allows you to manipulate video playback speed using a slider. Meanwhile, speed ramping is a more precise method of modifying video parts.
Free Download For Win 7 or later(64-bit)
Free Download For macOS 10.14 or later
Playing and Adding Slow Motion Effect to Video Using Filmora
After hearing about this amazing software, you might want to create a slow-mo. You might wonder how to play videos in slow motion on iPhone using Filmora. Read the step-by-step guide to find your answer:
Step 1Create a New Project and Access Speed Options
Once you have downloaded this software, access the “New Project” button. Then, use the “Command + I” keys to import media and bring it to the timeline. Select the media clip in the timeline and go to the settings panel. Under the “Speed” tab, choose “Uniform Speed” and drag the slider for speed change.

Step 2Activate AI Frame Interpolation Option
Once you finish the speed settings, there is a tip to enhance the slow-mo effect. Find the “AI Frame Interpolation” option in the same section and expand it. Select the “Optical Flow” option at the third to smoothen the video.

Step 3Rendering and Exporting
Once you have activated the optical flow, render it to see the results. For this, navigate towards the timeline toolbar and select the “Render Preview” option. It looks like a player with a doted circle around it. Preview the results, readjust if needed, and select the “Export” option to save the video.

Key Features of Wondershare Filmora
Along with speed modification, Filmora features unlimited features in its interface. The methods of accessing them are easy as accessibility is the concept it was built on. Here are some of the game-changing features for amateurs and professionals:
1. Compound Clip
We need to add a similar effect or filter to all videos in multiple situations. Instead of applying effects one by one, you can do it at once. This feature merges all videos into one and speeds up the workflow. It simplifies the complex sequences between clips and gives smooth results.
2. Green Screen
Running low on a budget for a film but want to shoot at beautiful locations. Use Filmora’s green screen or Chroma Key feature to replace backgrounds in an accurate manner. You can do this by shooting before a green screen and applying the chroma key later. Afterward, import the clip or picture you want in the background to add.
3. Motion Tracking
Do you want to blur out a whole person or apply an effect throughout the video? With Filmora’s motion tracking option, you can do these types of edits. You can insert motion graphics, animations, filters, and effects via it. Just select the object or person you want to track and activate the motion track.
4. Screen Recorder
Screen recording is important to content creation, especially in tutorial channels. In addition, the reaction or roasting channels and their owners also use this. Filmora offers an extensive screen recording option, including microphone and camera recording. You can manipulate the screen resolution, system settings, and more.
Conclusion
This article aimed to increase readers’ knowledge to effectively add slow-mo effect. Not only did we answer how to play videos in slow motion on iPhone, but we also guided to it. The article discussed some of the leading applications for slowing down video on iPhone. For precise and flawless slow-mo creation, we recommended Wondershare Filmora.
Step-By-Step Guide To Creating Halftone Effects In Photoshop
Halftone is a technique that uses dots to create a deliberate screen-like image and textured effect. In recent years, it has become trendy in digital design.
This effect is often used in magazines, newspapers, and other printed materials. When applied correctly, it can add depth and dimension to an image, resulting in a softer, more pleasing, and appealing look.
So, if you have ever wanted to add interesting effects and textures to your images, but weren’t sure where to start, then keep on reading to discover and learn everything you need to know regarding creating the halftone printing effect in Photoshop.
Without further ado, let’s get started!
What Are Halftone Effects?
Before we know how to create a halftone effect in Photoshop, let’s have a basic understanding of it first.
In the 19th century, William Henry Fox Talbot introduced the halftone screen printing effect to create the illusion of tones in black and white images.
The halftone originated from printers who previously only worked with cyan, magenta, yellow, and black (CMYK ). The solid colors were tiny dots placed together closely with continuous tones that remained unchanged. From the mixing and matching of these four colors, a wide range of colors emerged.
The effect is usually created by putting dots of ink on paper in different sizes and positions. This illusion uses optical bleeding to make the desired impression on the human eye. These color dots act like analog pixels that result in a recognizable image.
For instance, when you look at a pixelated picture and zoom it, you will see missing details. When you zoom out, the photo gets more minor and back to its original form.
Modern Definition and Usage
In the 21st century, the halftone is a static-visual technique applied in print and digital images to create continuous tone imagery using dots that vary in spacing and size to create a gradient effect.
Halftone produces a deliberate screen-like image distortion in different fields, such as pop art, graphic designing, and screen printing, to create nostalgic or vintage effects and make the images more captivating.
How To Use Photoshop To Create Halftone Printing Effect
Below we’ve provided detailed step-by-step guidance on creating a color halftone effect as well as black and white halftone printing effects in Photoshop:
1. How to Create Color Halftone Effect
If you want to create a color halftone effect in Photoshop, do the following steps in a sequence:
Step1 Launch the Photoshop software on your laptop/desktop, and drag and drop the image file on which you want to apply the Halftone effect.
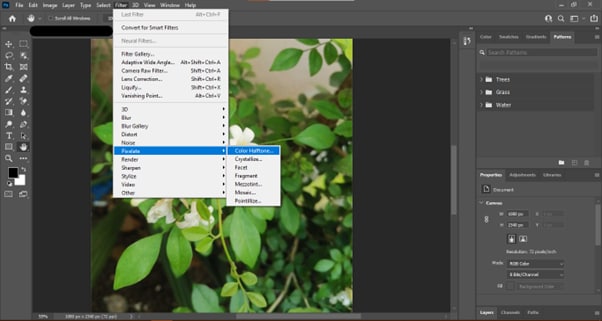
Step2 Click “Filters” in the top toolbar and select the “Pixelate” option from the drop-down menu.
Step3 Click the “Color Halftone” option from the menu. On the new pop-up window, adjust the radius and channel to configure the appearance of the effect.
That’s about it! You have successfully created the color halftone effect in Photoshop.
2. How to Create Black and White Halftone Effect
Follow these steps to create black and white halftone printing effect:
Step1 Open your image in Adobe Photoshop and click the “Image” option from the top taskbar.
Step2 Now, click the “Mode” option from the drop-down menu and select “Greyscale” to convert your RGB image.
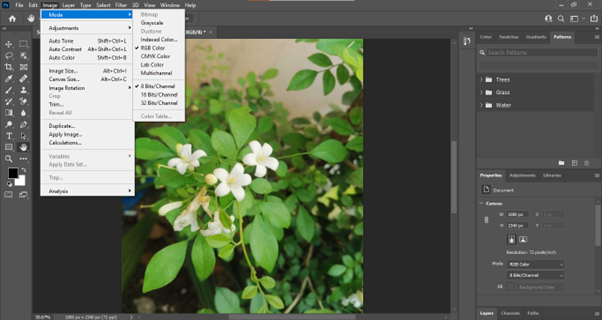
Step3 Again, open the image menu and click the “Mode” option. From the drop-down options, click “Bitmap…”
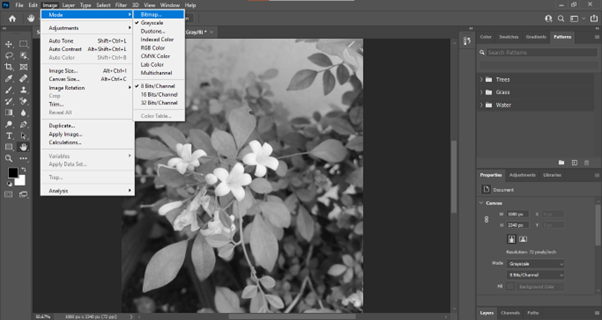
Step4 A dialogue box will open. Set the resolution to 1000, 1,500, or 2,000ppi to create smooth edges on your halftone. Next, click “Halftone Screen…” under the “Method” header and click “OK” to proceed further.
Now, you can adjust the frequency (Lines/Inch), angle (Degrees), and shape (Circle, Line, Cross, etc.) to determine how big your halftone dots are at the maximum diameter and their direction.
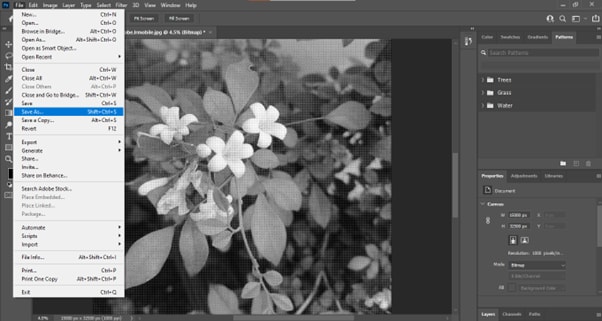
Step5 Finally, click “Files” from the top taskbar, scroll down, and select “Save As…” Save your file as PSD or TIFF and import it to InDesign to apply color.
Video Tutorial - How To Create Halftone Effect | Photoshop 2022
To help you better put the guidance into practice, we have prepared a video tutorial to deepen your understanding.
Two Concepts You Should Know In Creating Halftone Effect
Apart from the practical guidance, there are two important concepts you need to be aware of: radius and channels. Below, we’ve discussed both of them in detail to make things more understandable to you:
1. Radius
Radius refers to the size of the dots that make up the halftone image and is an important factor in determining the overall look of the photo.
You can adjust the sizes of the dots to change the gradient, spacing in between, and blur of the color and image. However, if you want a more subtle effect, you will need to use a smaller radius. For a more dramatic effect, like vintage comics, old ads, or DIY grunge zines., you will need to use a larger radius.
2. Channel
Channel refers to the number of values that are used to create the image. The more values you use, the more details will be visible.
The Channel setting of halftone effects affects how the dots are positioned and overlap. Each Channel is governed by a Screen Angle setting, which is listed in degrees. Changing the value modifies the angle at which Cyan, Magenta, Yellow, and Black dots are added to the pattern. When the dots overlap, a new color is created depending on the combination of the primary colors and black.
Conclusion
In this comprehensive guide, we’ve explored the halftone effect, how it originated and discussed its modern definition and usage. We’ve also provided step-by-step processes to help you create the halftone effect in Photoshop, both colored and black and white.
Furthermore, we discussed two important concepts (radius and channel) of the halftone screen printing effect to help you understand the technique in detail.
Hopefully, you’ve found this article helpful and can now add a new level of creativity to your images using the halftone effect in Adobe Photoshop.
Free Download For Win 7 or later(64-bit)
Free Download For macOS 10.14 or later
Also read:
- [New] Why Visual Narratives From Customers Boost Business Appeal for 2024
- [Updated] Intense Meetings Perfect Your Screen Focus in MSTEAMS
- 2024 Approved Exclusive Deals on Superior-Quality, Economical ASMR Mics
- A Complete Course on Managing and Editing SRT on Mac
- Beat the Game Crashing Dilemma - Eliminating DirectX Problems in FIFA 20
- Create the Stranger Things Upside Down Effect Video for 2024
- High-Quality Real-Time Broadcast Frameworks for 2024
- How to to Mimic Professional Filming Gears for 2024
- In 2024, Charismatic Charm of Moving Text on Screen
- In 2024, How to Create A Freeze Frame Sequence in Video
- In 2024, Learn How to Create a Kinetic Typography Text Effect in Filmora, One of the Best Video Editors for All Skill Levels. Check Out This Simple Step-by-Step Guide
- New 2024 Approved Working Through the Details of iMovie Slow Motion Video Making 100 Effective
- New Guide To Using Luts Perfectly in Final Cut Pro for 2024
- New If You Want to Know What to Prepare and How to Make the Wedding Video Perfect for Videographers, Check Out This Menu Here
- Remedies for Disabling OBS Fullscreen
- Ultimate Guide: Solving Your Disconnected Mouse Woes
- Updated How To Quickly Create A Screen Print Effect In Photoshop Detailed Gui
- Title: Do You Want to Make Your Background Disappear and Replace with an Attractive Background? Here Is How to Add a Green Screen to Zoom App and Add Any Virtual Background of Your Choice
- Author: Chloe
- Created at : 2024-12-04 18:58:21
- Updated at : 2024-12-12 10:11:39
- Link: https://ai-editing-video.techidaily.com/do-you-want-to-make-your-background-disappear-and-replace-with-an-attractive-background-here-is-how-to-add-a-green-screen-to-zoom-app-and-add-any-virtual-ba/
- License: This work is licensed under CC BY-NC-SA 4.0.