
:max_bytes(150000):strip_icc():format(webp)/iPad-Air-5-e11857a8d117450e9e09d770e300a872.jpg)
Do You Want to Remove Unnecessary Sound From Your Video? We Are Providing You the List of the Best Software to Remove Audio From Video for Mac and Apple
Do You Want to Remove Unnecessary Sound From Your Video? We Are Providing You the List of the Best Software to Remove Audio From Video for Mac and Apple
Videography is getting into a trend nowadays. Everyone is recording videos for different reasons. However, when shooting outside, background sounds and noise reduce video quality.
You can remove audio from your video on Mac devices using different software. For instance, you can go for iMovie to remove sound from video on Mac. Filmora also allows you to remove audio from video on Mac.
Method 1: Use online and free solutions to mute audio in videos
1. Canva
Canva is a free design platform for anyone. It has both web and app versions. A very user-friendly graphic design tool that is easy to use, even for those with no design experience.
Canva offers a wide selection of templates and over 1 million templates. A library of over 2 million stock photos and illustrations for free. It also has a paid option at an affordable price.
An Ultimate Guide to How to remove audio from video in Canva?
To remove audio from your video in Canva, you can do so by following these simple steps:
Step1 Open the video in Canva.

Step2 Click on the “Audio” tab in the toolbar and remove the audio.

Step3 Save the video in desired option.
2. Clideo
Clideo is a cloud-based video editing tool that offers a simple yet powerful way to edit videos. With Cleo, you can trim, crop, merge, and audio or text to their videos.
Its user-friendly interface makes it easy to edit videos. Clideo offers a variety of effects and transitions that let you create videos that look unique. It supports a wide range of video formats, making it easy to export your videos.
An Ultimate Guide to How to remove audio from video in Clideo?
This online video editor offers a straightforward way to remove audio from any video file.
Here’s how you can do it:
Step1 Go to clideo.com and upload the video from which you want to remove the audio. You can either drag and drop the file into the designated area or click the “Choose file” button.

Step2 Once the video is uploaded, select the “Mute” option from the toolbar above the video player.

Step3 Click on “Export” to save the video without audio.

3. Ezgif
Ezgif.com is a great online resource for creating and editing GIF images. This online software has a user-friendly interface.
You can upload images or video files from your computer or a URL, and Ezgif will create a GIF for you. It lets you edit your GIFs before you download them. You can crop, resize, rotate, and reverse your GIFs and add text, filters, audio, and other effects.
How to remove audio from video in Ezgif?
To remove audio from a video using Ezgif, follow the steps below;
Step1 Upload the video to the website.

Step2 Once the video is uploaded, select the “Audio” tab and click on the “Remove audio” button.

Step3 It will remove the audio from the video, and you can download the new video file.
Method2: Use Apple official tools to remove audio from videos
1.QuickTime
QuickTime is a video editor that comes installed on all Mac computers. It is easy to use yet packed with features that allow you to create, edit, and share your work.
QuickTime includes a basic set of video editing features perfect for simple tasks like trimming a clip or adding a title. You can export your video in various formats or upload it directly to YouTube.
An Ultimate Guide to How to remove audio from video in QuickTime?
You can remove and mute the audio from video in Quicktime as follows:
Step1 Open the video with “QuickTime Player,” from which you want to remove the audio.

Step2 Select “Edit” from the taskbar and click “Remove Audio.”

Step3 Now select ‘File” and then click “Save.” It will save the muted video.

2. iMovie:
iMovie is a video editing software application by Apple Inc. It was released in 1999 as a Mac OS. iMovie is a cross-platform application with the Mac OS X operating system and iOS.
It is easy to use and free. You can use iMovie to make movies from your photos and video clips. You can add titles, transitions, filters, text, background music, audio, color correction, animations, and video effects.
How to remove audio from video in iMovie?
There are a few different ways that you can remove audio from video in iMovie.
Step1 Click on the “Movie” button. Select the video whose audio is to be removed.

Step2 Now press and hold the timeline. Some options will appear. Click on the “Volume” button.

Step3 Mute the audio.

Step4 Now release the timeline and click the “arrow “button.

Step5 Save the muted file on your Mac by clicking “Save.”

Step6 Muted videos will get exported to your library.

3. Final Cut Pro
Final Cut Pro is a powerful video editor that allows users to create professional-quality videos. With its intuitive design and wide range of features, Final Cut Pro is the perfect tool for anyone looking to create videos for personal or professional use.
Final Cut Pro is a professional-grade video editing software for some of the biggest Hollywood movies. It’s also become a favorite among YouTubers and filmmakers.
How to remove audio from video in Final Cut Pro?
You can remove audio from your video in either of two ways.
Step1 Open the video from which the audio is to be removed.

Step2 Now select the timeline.

Step3 Double-click on the timeline. It will detach the audio from the video.
Now press the “Delete key” on the keyboard. The audio will get removed.

Method 3: Use Filmora to remove audio from the video
Filmora
If you’re looking for easy-to-use video editing software, Filmora is a great option. It’s simple to use yet still offers a wide range of features. Plus, it’s affordable and supports both Windows and Mac computers.
Free Download For Win 7 or later(64-bit)
Free Download For macOS 10.14 or later
An Ultimate Guide to How to remove audio from video in Filmora?
One way is to mute the audio track. To do this, follow the given steps.
Step1 Open a new project in Filmora.

Step2 Click on the audio track in the timeline.

Step3 Now, click the mute button.

Another way to remove the audio from a video is to delete the audio track. To do this:
Step1 Click on the audio track in the timeline
Step2 Press the delete key on your keyboard.

Step3 Click on the export button.

Special Features:
#Silent Detection
With silence detection, you can quickly and easily find the silent moments in your footage. It is great for finding those perfect moments of silence that can impact your film much.
#Audio Ducking
Audio Ducking is a feature in Filmora that automatically lowers the volume of an audio track when another audio track is getting played. It can help ensure that dialog is always audible, even when other sounds are playing in the background.
#TTS and STT
TTS and STT are two features in Filmora that you can use to create subtitles for your video.
TTS stands for text-to-speech, meaning you can create subtitles by typing in the text you want to speak in the video.
STT stands for speech-to-text, meaning you can create subtitles by recording your voice and having Filmora transcribe the text.
Conclusion
Here you go, the best solutions to remove audio from video on Mac. You may choose anyone as per your need.
However, Wondershare Filmora is recommended due to its cross-platform nature and unlimited features.
Free Download For macOS 10.14 or later
An Ultimate Guide to How to remove audio from video in Filmora?
One way is to mute the audio track. To do this, follow the given steps.
Step1 Open a new project in Filmora.
Step2 Click on the audio track in the timeline.
Step3 Now, click the mute button.
Another way to remove the audio from a video is to delete the audio track. To do this:
Step1 Click on the audio track in the timeline
Step2 Press the delete key on your keyboard.
Step3 Click on the export button.
Special Features:
#Silent Detection
With silence detection, you can quickly and easily find the silent moments in your footage. It is great for finding those perfect moments of silence that can impact your film much.
#Audio Ducking
Audio Ducking is a feature in Filmora that automatically lowers the volume of an audio track when another audio track is getting played. It can help ensure that dialog is always audible, even when other sounds are playing in the background.
#TTS and STT
TTS and STT are two features in Filmora that you can use to create subtitles for your video.
TTS stands for text-to-speech, meaning you can create subtitles by typing in the text you want to speak in the video.
STT stands for speech-to-text, meaning you can create subtitles by recording your voice and having Filmora transcribe the text.
Conclusion
Here you go, the best solutions to remove audio from video on Mac. You may choose anyone as per your need.
However, Wondershare Filmora is recommended due to its cross-platform nature and unlimited features.
How to Zoom Webcam on PC
Making certain our digital presence is the best it can be pays dividends as more and more of what we do online; similar is the case with how to zoom out webcam windows 10. The majority of experts advise against using the built-in camera that comes with your laptop or computer and instead advocate getting a webcam or an HD camera. These, however, may be hard to come by and pricy if you locate a nice one. If the built-in camera on your laptop doesn’t perform effectively during Zoom meetings, you may want to consider about investing in a separate, better webcam. Webcams offer automatic settings that are intended to function with the largest variety of lighting situations possible. This suggests that they average out a great number of responses to the content of the frame. Because of this, we have incorporated basic PC webcam zooming settings. These answers may be found in the portions that follow.
It’s vital to know how to zoom in on a webcam before visiting there. The camera wasn’t always as vital as it is today, and only very large corporations could afford to employ it as a convenience. But today, nearly everyone, from huge organizations to little firms, acknowledges its value. Everybody needs a webcam that works properly. The camera control software you are using determines the zoom function. The resolution of your picture window and the capabilities of the application dictate how far you can zoom in on the webcam’s video image. You can zoom in and out on camera photos using tools like YouCam and Windows Live Messenger. The most critical camera capabilities for the ideal video conferencing experience are zoom in and zoom out, which at first look may appear trivial. Here, we’ll walk you through each step, in detail. Continue reading, and we’ll check your understanding of webcam zoom in and zoom out skills!
Way 1: Zoom with Windows Live Messenger
When utilizing a camera for video conferencing, you may zoom in on a user’s face to get rid of the background. Webcam settings are not accessible by default in Microsoft Windows. However, camera zoom settings may be changed in instant chat systems. Through an instant messaging tool, such as Windows Live Messenger, you may simply access these options. This application provides private offline chat, video messaging, image and video sharing, and video chatting.
Step1Start Windows Live Messenger on your PC or laptop first. Enter your login name and password by clicking the “Sign In” button.

Step2On the top menu bar, pick “Tools.” And then select the “Audio and Video Setup”. Drag the slider next to “Speaker” to modify the speaker volume. Drag the slider next to “Microphone” to modify the microphone sensitivity. Press “Next.”

Step3From the drop-down list, pick the webcam. The “Camera Control” option is situated on the top; pick “Webcam Settings” after that.
Step4Now, to alter the zoom settings, drag the “Zoom” slider. To zoom in or out, drag the slider to the left or right. Press “OK.”
Way 2: Use Windows 10 Camera App
Wondering how to zoom your camera in the Windows 10 Camera app? The Camera app enables you to zoom in or out on your webcam in both image and video modes. To accomplish so, click or push the Magnification button, and then use the slider to modify the webcam’s zoom level. To operate the zoom feature manually, pick “Manual Zoom.” In the preview window, a square appears when you pick this option. To zoom in on a specific region of the capture window, drag the square there. To expand the image that was acquired by the webcam, slide the slider bar. In simply, The Camera app enables you zoom in or out of photographs and movies shot with your webcam. To do this, click on the “Zoom” button and drag the slider to the left or right as appropriate on your Windows 10 camera. the following steps:
Step1To open the “Start Menu,” make a right-click on “Start.” Now, to access the Camera app, type “Camera App” into the start menu’s search box.

Step2Tap the Camera Control icon when you start or join a meeting. To zoom and pan the camera to the appropriate spot, utilize the icons on the Camera Control panel.
![]()
Step3To exit the Camera Control window and return to the Meeting Controls, touch outside of it.
Way 3: Zoom with YouCam
Unfortunately, the default cameras or webcams bundled with the majority of Windows laptops and desktops don’t have an automatic zoom option. In fact, the only method to adjust their crop is to switch from “Standard” to “Widescreen,” which does slightly zoom in on you but not in the manner we’d want. This makes it inescapable that the only method to manually alter a webcam’s magnification is to acquire one separately and apply its software settings. , like YouCam. YouCam provides video calling, streaming, and broadcasting. includes an integrated app. To employ Zoom with YouCam, refer to the methods given below:
Step1Launch the YouCam camera program and activate the webcam.

Step2In the camera preview window, pick Settings. Then, select “Enable Video Zoom” from the menu.
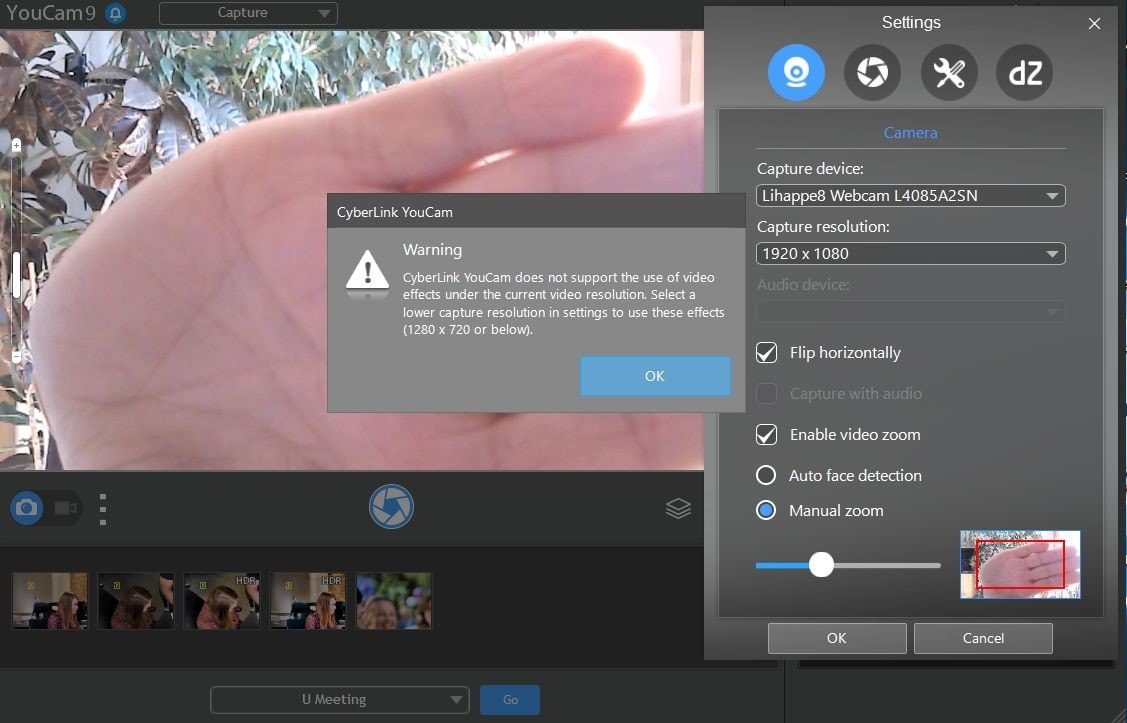
Step3Select “Automatic Face Detection” from the menu. As you wander about in the capture window, the camera watches your face and automatically zooms in on your photo as shown above.
Step4To handle the zoom feature manually, pick “Manual Zoom.” In the preview window, a square appears when you pick this option. To zoom in on a specific region of the capture window, drag the square there. To expand the image that was acquired by the webcam, slide the slider bar.

Way 4: Use iGlasses on Mac
For the perfect webcam look on a MAC, install the Chrome plugin iGlasses for video effects and style tweaks. Your videos will appear better on Zoom as a consequence. You may instantly enhance the appearance of your video interactions by utilizing the digital zoom on your iGlasses. Digital pan, tilt, and zoom are all possible with easy controls. For Macs that support it, an Apple Remote may be used to operate. iGlasses will become an option in Zoom’s video settings when it has been installed. You may improve your camera by altering the settings in iGlasses. You may experiment with a range of amusing effects, like 3-D distortions, using the virtual camera. Let’s learn how to utilize iGlasses on a Mac:
Step1Installing Ecamm’s iGlasses on a MacBook in the first step.
Step2To activate the camera, go to your video settings and pick iGlasses.
Step3Choose the Zoom window and execute the appropriate operations using the Zoom and Flip options. You may now zoom in and out using the camera on your MacBook as you like.

Conclusion
In conclusion, so many people currently take part in online conferences and virtual meetings. You want to create a lasting impression, don’t you? Not or whether you are the host of an online meeting or event, you must now maintain a professional image to prevent turning off attendees. You have discovered how to utilize the tools at your disposal to boost the zoom in and out quality of your camera in this post. However, as will be explained in the sections ahead, you may do it without the third-party plugins. With just one quick plugin, you can significantly transform how you look on a camera. Hence, try out the easy method from the above enlisted ones to get hold on your PC webcam to zoom in or out purposes.
Making certain our digital presence is the best it can be pays dividends as more and more of what we do online; similar is the case with how to zoom out webcam windows 10. The majority of experts advise against using the built-in camera that comes with your laptop or computer and instead advocate getting a webcam or an HD camera. These, however, may be hard to come by and pricy if you locate a nice one. If the built-in camera on your laptop doesn’t perform effectively during Zoom meetings, you may want to consider about investing in a separate, better webcam. Webcams offer automatic settings that are intended to function with the largest variety of lighting situations possible. This suggests that they average out a great number of responses to the content of the frame. Because of this, we have incorporated basic PC webcam zooming settings. These answers may be found in the portions that follow.
It’s vital to know how to zoom in on a webcam before visiting there. The camera wasn’t always as vital as it is today, and only very large corporations could afford to employ it as a convenience. But today, nearly everyone, from huge organizations to little firms, acknowledges its value. Everybody needs a webcam that works properly. The camera control software you are using determines the zoom function. The resolution of your picture window and the capabilities of the application dictate how far you can zoom in on the webcam’s video image. You can zoom in and out on camera photos using tools like YouCam and Windows Live Messenger. The most critical camera capabilities for the ideal video conferencing experience are zoom in and zoom out, which at first look may appear trivial. Here, we’ll walk you through each step, in detail. Continue reading, and we’ll check your understanding of webcam zoom in and zoom out skills!
Way 1: Zoom with Windows Live Messenger
When utilizing a camera for video conferencing, you may zoom in on a user’s face to get rid of the background. Webcam settings are not accessible by default in Microsoft Windows. However, camera zoom settings may be changed in instant chat systems. Through an instant messaging tool, such as Windows Live Messenger, you may simply access these options. This application provides private offline chat, video messaging, image and video sharing, and video chatting.
Step1Start Windows Live Messenger on your PC or laptop first. Enter your login name and password by clicking the “Sign In” button.
Step2On the top menu bar, pick “Tools.” And then select the “Audio and Video Setup”. Drag the slider next to “Speaker” to modify the speaker volume. Drag the slider next to “Microphone” to modify the microphone sensitivity. Press “Next.”
Step3From the drop-down list, pick the webcam. The “Camera Control” option is situated on the top; pick “Webcam Settings” after that.
Step4Now, to alter the zoom settings, drag the “Zoom” slider. To zoom in or out, drag the slider to the left or right. Press “OK.”
Way 2: Use Windows 10 Camera App
Wondering how to zoom your camera in the Windows 10 Camera app? The Camera app enables you to zoom in or out on your webcam in both image and video modes. To accomplish so, click or push the Magnification button, and then use the slider to modify the webcam’s zoom level. To operate the zoom feature manually, pick “Manual Zoom.” In the preview window, a square appears when you pick this option. To zoom in on a specific region of the capture window, drag the square there. To expand the image that was acquired by the webcam, slide the slider bar. In simply, The Camera app enables you zoom in or out of photographs and movies shot with your webcam. To do this, click on the “Zoom” button and drag the slider to the left or right as appropriate on your Windows 10 camera. the following steps:
Step1To open the “Start Menu,” make a right-click on “Start.” Now, to access the Camera app, type “Camera App” into the start menu’s search box.
Step2Tap the Camera Control icon when you start or join a meeting. To zoom and pan the camera to the appropriate spot, utilize the icons on the Camera Control panel.
![]()
Step3To exit the Camera Control window and return to the Meeting Controls, touch outside of it.
Way 3: Zoom with YouCam
Unfortunately, the default cameras or webcams bundled with the majority of Windows laptops and desktops don’t have an automatic zoom option. In fact, the only method to adjust their crop is to switch from “Standard” to “Widescreen,” which does slightly zoom in on you but not in the manner we’d want. This makes it inescapable that the only method to manually alter a webcam’s magnification is to acquire one separately and apply its software settings. , like YouCam. YouCam provides video calling, streaming, and broadcasting. includes an integrated app. To employ Zoom with YouCam, refer to the methods given below:
Step1Launch the YouCam camera program and activate the webcam.
Step2In the camera preview window, pick Settings. Then, select “Enable Video Zoom” from the menu.
Step3Select “Automatic Face Detection” from the menu. As you wander about in the capture window, the camera watches your face and automatically zooms in on your photo as shown above.
Step4To handle the zoom feature manually, pick “Manual Zoom.” In the preview window, a square appears when you pick this option. To zoom in on a specific region of the capture window, drag the square there. To expand the image that was acquired by the webcam, slide the slider bar.
Way 4: Use iGlasses on Mac
For the perfect webcam look on a MAC, install the Chrome plugin iGlasses for video effects and style tweaks. Your videos will appear better on Zoom as a consequence. You may instantly enhance the appearance of your video interactions by utilizing the digital zoom on your iGlasses. Digital pan, tilt, and zoom are all possible with easy controls. For Macs that support it, an Apple Remote may be used to operate. iGlasses will become an option in Zoom’s video settings when it has been installed. You may improve your camera by altering the settings in iGlasses. You may experiment with a range of amusing effects, like 3-D distortions, using the virtual camera. Let’s learn how to utilize iGlasses on a Mac:
Step1Installing Ecamm’s iGlasses on a MacBook in the first step.
Step2To activate the camera, go to your video settings and pick iGlasses.
Step3Choose the Zoom window and execute the appropriate operations using the Zoom and Flip options. You may now zoom in and out using the camera on your MacBook as you like.
Conclusion
In conclusion, so many people currently take part in online conferences and virtual meetings. You want to create a lasting impression, don’t you? Not or whether you are the host of an online meeting or event, you must now maintain a professional image to prevent turning off attendees. You have discovered how to utilize the tools at your disposal to boost the zoom in and out quality of your camera in this post. However, as will be explained in the sections ahead, you may do it without the third-party plugins. With just one quick plugin, you can significantly transform how you look on a camera. Hence, try out the easy method from the above enlisted ones to get hold on your PC webcam to zoom in or out purposes.
Designed for You! Best Image (JPG/PNG) to GIF Converters
Great Video Converter - Wondershare Filmora
Provide abundant video effects - A creative video editor
Powerful color correction and grading
Detailed tutorials provided by the official channel
Introduction
GIF images have become a viral trend due to the high level of social media usage. Often, people like to share GIF images on social media websites to impress their family and friends or catch fun. One reason for the popularity of GIF images is that these images play like videos but without any voice and usually occupy less space compared to larger video files.
In addition, the format of this image uses lossless compression, which allows images to be saved multiple times without compromising the quality or originality. Therefore, if you have a lot of JPEG or PNG images and are looking for a way to combine them into a GIF format, you can do it very quickly as there are many professional tools available on the internet. This article will guide you on various methods to convert PNG or JPG into GIF and list the several PNG or JPG to GIF converters online and on desktop software.
Let us go through the following one by one:
In this article
Part 1: Top Online JPG/PNG to GIF Converters
Part 2: Best JPG/PNG to GIF Software
Part 3: Convert JPG/PNG to GIF Using Online Solution
Part 4: Convert JPG/PNG to GIF Using Wondershare Filmora

Part 1: Top Online JPG/PNG to GIF Converters
1. io
This is the best online free GIF maker that can convert images to GIF and video to GIF. It is a free online tool that leaves no watermark or ads on the website. Additionally, it does not require any download or payment and works for both JPG and PNG files.
Features
- Free to use
- No watermark
- Works for all image type
- No download
Cons
- No advanced customization in the free version
- Requires the use of the internet to use

2. Ezgif
This online website allows users to convert PNG or JPG to GIF animation online without requiring any installation on their computer. This JPG to GIF converter website is free and accessible in nearly all major browsers. It allows users to easily convert PNG or JPG to an animated GIF using this website without making much effort. This website also offers other services, including optimizing GIFs, resizing, cropping, adding text, converting video to GIF, applying special effects, etc. All services on this website are free of charge.
Pros
It is free and speedy.
No watermark.
No Ads.
No downloads.
Cons
It allows the conversion of one file at a time.

3. Online-Convert
Online Convert is a straightforward online GIF converter that instantly gets the job done. It uploads files from Dropbox, Google Drive, or computer storage. After importing the files, this tool has many customization features, including changing the color scale, applying effects, resizing, etc.
Pros
Over 100 image formats supported
Very easy to use
Supports multiple customization options
Cons
Lots on Ad
The slow conversion speed and upload

4. Imgflip
Imgflip is another excellent online maker to turn images into GIFs. On it, you can add files from URL or local storage before converting to GIF. You can create GIFs from YouTube, Vimeo, Metacafe, and other video-sharing sites. The supported image formats include PNG, JPEG, GIF, and others.
Pros
Quick conversions
Multiple formats supported
No Ads
Cons
GIF output has a watermark
Limited conversion size of 35MB

Part 2: Best JPG/PNG to GIF Software
1 Filmora
Filmora is a straightforward and practical software converter available for Windows and Mac PC. This software has a lot of excellent optimization tools that can make your GIFs stand out. Furthermore, aside from being a superb GIF converter, it is also a meme-maker.
Features
- It is super easy to use
- Allows creation of GIF form still images
- GIFs created from videos can be in any format, such as MKV, MP4, WMV, WAV, DAT, EVO, AVI, MPEG, etc.
- You can edit GIFs with excellent texts, effects, and subtitles
- Change GIFs with basic editing like combine, crop, rotate, color correction, slow down, and speed up
Pros
GIF output is high quality
The editing tool is powerful
No Ads
Cons
No functionality to share
The file size is limited to 50MB

2 Photoscape
With Photoscape video editing software, you can do many fun editing effects for your videos. It includes features such as Editing, Viewing, Crop, Page merging, Animated GIF, Filter, Color picker, etc., and a Photo splitter to cut up a single photo into several pieces.
Pros
A lot of users discovered this software as relatively easy to use
Cons
Some users find it to be a bit slow

3 Gifted Motion
This software runs independently of a platform but makes use of JAVA. However, it can work on all Operating Systems. No additional installations are required; users can get to work right away.
Features
- Edit existing pictures
- PNG, JPEG, BMP, GIF supported
- No cost for licensing
Pros
Very Simple to use
Cons
Take some time in loading big size images

4 SSuite Gif Animator
This software is compatible with all windows, including 32 and 64bit software. However, it is one of the very few Green Software programs that utilize less energy when running the program. With this software, you can create movies, animated gifs, slide shows, etc.
Pros
Energy-efficient and straightforward to use,
It does not need windows registration.
Cons
There are a few restrictions on the ability to take control of editing fully

Part 4: Convert JPG/PNG to GIF Using Wondershare Filmora
Here is how to Convert your PNG or JPEG to GIF using the Wondershare Filmora converter
Step 1: Install Filmora and Upload Image
Open the Filmora software or click on Filmora Meme maker on your browser and click on Upload option or drag and drop the image on your timeline. Maximum file size: 50MB.
Step 2: Choose and Enter GIF
Enter your desired text, color, size, font, and position for your image, GIF, or video meme.
Step 3: Save the Final GIF
Export and Download your GIF, and enjoy

Conclusion
This article explained all you need to know about PNG/JPG to GIF converter and gave a step-by-step guide on converting images to GIF easily. The report also presents different online tools and software you can use to easily turn a photo into a GIF.
Lastly, as a complete video editing tool, we recommend Filmora as the best tool as it can be used both as software and Media.io as an online tool.
Introduction
GIF images have become a viral trend due to the high level of social media usage. Often, people like to share GIF images on social media websites to impress their family and friends or catch fun. One reason for the popularity of GIF images is that these images play like videos but without any voice and usually occupy less space compared to larger video files.
In addition, the format of this image uses lossless compression, which allows images to be saved multiple times without compromising the quality or originality. Therefore, if you have a lot of JPEG or PNG images and are looking for a way to combine them into a GIF format, you can do it very quickly as there are many professional tools available on the internet. This article will guide you on various methods to convert PNG or JPG into GIF and list the several PNG or JPG to GIF converters online and on desktop software.
Let us go through the following one by one:
In this article
Part 1: Top Online JPG/PNG to GIF Converters
Part 2: Best JPG/PNG to GIF Software
Part 3: Convert JPG/PNG to GIF Using Online Solution
Part 4: Convert JPG/PNG to GIF Using Wondershare Filmora
Part 1: Top Online JPG/PNG to GIF Converters
1. io
This is the best online free GIF maker that can convert images to GIF and video to GIF. It is a free online tool that leaves no watermark or ads on the website. Additionally, it does not require any download or payment and works for both JPG and PNG files.
Features
- Free to use
- No watermark
- Works for all image type
- No download
Cons
- No advanced customization in the free version
- Requires the use of the internet to use
2. Ezgif
This online website allows users to convert PNG or JPG to GIF animation online without requiring any installation on their computer. This JPG to GIF converter website is free and accessible in nearly all major browsers. It allows users to easily convert PNG or JPG to an animated GIF using this website without making much effort. This website also offers other services, including optimizing GIFs, resizing, cropping, adding text, converting video to GIF, applying special effects, etc. All services on this website are free of charge.
Pros
It is free and speedy.
No watermark.
No Ads.
No downloads.
Cons
It allows the conversion of one file at a time.
3. Online-Convert
Online Convert is a straightforward online GIF converter that instantly gets the job done. It uploads files from Dropbox, Google Drive, or computer storage. After importing the files, this tool has many customization features, including changing the color scale, applying effects, resizing, etc.
Pros
Over 100 image formats supported
Very easy to use
Supports multiple customization options
Cons
Lots on Ad
The slow conversion speed and upload
4. Imgflip
Imgflip is another excellent online maker to turn images into GIFs. On it, you can add files from URL or local storage before converting to GIF. You can create GIFs from YouTube, Vimeo, Metacafe, and other video-sharing sites. The supported image formats include PNG, JPEG, GIF, and others.
Pros
Quick conversions
Multiple formats supported
No Ads
Cons
GIF output has a watermark
Limited conversion size of 35MB
Part 2: Best JPG/PNG to GIF Software
1 Filmora
Filmora is a straightforward and practical software converter available for Windows and Mac PC. This software has a lot of excellent optimization tools that can make your GIFs stand out. Furthermore, aside from being a superb GIF converter, it is also a meme-maker.
Features
- It is super easy to use
- Allows creation of GIF form still images
- GIFs created from videos can be in any format, such as MKV, MP4, WMV, WAV, DAT, EVO, AVI, MPEG, etc.
- You can edit GIFs with excellent texts, effects, and subtitles
- Change GIFs with basic editing like combine, crop, rotate, color correction, slow down, and speed up
Pros
GIF output is high quality
The editing tool is powerful
No Ads
Cons
No functionality to share
The file size is limited to 50MB
2 Photoscape
With Photoscape video editing software, you can do many fun editing effects for your videos. It includes features such as Editing, Viewing, Crop, Page merging, Animated GIF, Filter, Color picker, etc., and a Photo splitter to cut up a single photo into several pieces.
Pros
A lot of users discovered this software as relatively easy to use
Cons
Some users find it to be a bit slow
3 Gifted Motion
This software runs independently of a platform but makes use of JAVA. However, it can work on all Operating Systems. No additional installations are required; users can get to work right away.
Features
- Edit existing pictures
- PNG, JPEG, BMP, GIF supported
- No cost for licensing
Pros
Very Simple to use
Cons
Take some time in loading big size images
4 SSuite Gif Animator
This software is compatible with all windows, including 32 and 64bit software. However, it is one of the very few Green Software programs that utilize less energy when running the program. With this software, you can create movies, animated gifs, slide shows, etc.
Pros
Energy-efficient and straightforward to use,
It does not need windows registration.
Cons
There are a few restrictions on the ability to take control of editing fully
Part 4: Convert JPG/PNG to GIF Using Wondershare Filmora
Here is how to Convert your PNG or JPEG to GIF using the Wondershare Filmora converter
Step 1: Install Filmora and Upload Image
Open the Filmora software or click on Filmora Meme maker on your browser and click on Upload option or drag and drop the image on your timeline. Maximum file size: 50MB.
Step 2: Choose and Enter GIF
Enter your desired text, color, size, font, and position for your image, GIF, or video meme.
Step 3: Save the Final GIF
Export and Download your GIF, and enjoy
Conclusion
This article explained all you need to know about PNG/JPG to GIF converter and gave a step-by-step guide on converting images to GIF easily. The report also presents different online tools and software you can use to easily turn a photo into a GIF.
Lastly, as a complete video editing tool, we recommend Filmora as the best tool as it can be used both as software and Media.io as an online tool.
How to Download and Use Vegas Pro
Vegas Pro is one of the best video and audio editing software for professionals. It provides one of the best editing tools with which you will be able to create professional videos. It was a product of Sony’s electronic giant, but now it is seen by Magix. It is suitable for serious amateurs and professionals who want to use it as a part of their career. However, the more recent version is a bit user-friendly, but if you are not interested in it seriously, then Vegas Pro is not your cup of tea.
One of the most significant advantages of using the high voltage Vegas Pro is that it gives you all the tools to make a professional video and multiple audio-visual effects. The software is exciting for those who already know about video and audio editing. Moreover, the price of the software is affordable and cost-effective as you get some royalty-free stock content.
How to download and install Vegas Pro?
Unshackle your creativity using Vegas Pro, one of the best professional video and audio editing software. If you have an idea for video editing, you will find the Vegas Pro video editor high on speed and editing. It will be like a new world of various professional editing tools in front of you, sure to keep you in front of the monitor without any distractions. You will be able to add images, sounds, and videos without any effort. The entire work of the software is impressive as you can make changes to your main storyboard according to your convenience.
It is an excellent way of boosting your confidence in professional video editing. Therefore, if you are serious about making professional videos, you must try your hand in Vegas Pros.
Steps to downloading and installing Vegas Pro
Vegas Pro video editor needs a good amount of space on your hard disk. Therefore, it is advisable that you either free the space or install a secondary hard disk for the Vegas Pro. Moreover, you will need Windows 7 to Windows 10 to run the Vegas Pro on your computer.

- If you are using an older version of Vegas Pro, you can upgrade it to a newer version. However, if you are downloading for the first time, you need to open the official website of Vegas Pro.
- Click on purchase.
- You will find the payment option.
- You can choose a monthly or yearly subscription.
- Once you make the payment, you will get a link for the download option.
- You can now download the Vegas Pro on your computer.
- When the process is complete, you will get an icon of Vegas Pro on your desktop.
- Click on the icon and start your exciting journey with Vegas Pro.

Key Features of Vegas Pro
Vegas Pro video editing software has some of the best features to enhance your creativity. Following are some of its key features:
**OFX Plug-ins for special effects
Vegas Pro offers OFX plug-ins that help professionals create their videos with new techniques with various special effects. You can also use different filters in your videos to give them a professional look.
**Picture-in-Picture Plug-ins
With the help of Picture-in-Picture plug-ins, users will be able to edit the pictures of their own will. You will be able to control the movement of the images and even place them accordingly.
**Editing Timeline
One of the most significant advantages of using Vegas Pro video editing software is that the timeline is much simpler and faster. Various features will help you create professional videos with the help of the timeline.
You will be able to arrange the clips in the timeline quickly and smoothly with special effects like crossfades and similar other products.
**Instant Freeze time
With the help of the Freeze option of Vegas Pro, you will be able to control the playback speed of the video. Professionals use the instant freeze time to portray a dramatic scene that requires some special effects.
It is a specific feature where you need to place the cursor on a particular frame to apply the freeze and time.
**Look-up table OFX Plug-in
The look-up table is a handy feature of Vegas Pro as you can access editing software like Adobe. It helps you to edit the images accordingly. You can also modify the clips of a particular video.
There are also various other features of the look-up table like color grading, cinematic effects, camera, and similar other attributes.
**Authoring Blu-Ray Discs and DVDs
With the help of Vegas Pro, you will be able to create exciting videos and be able to create a DVD layout with a professional look. There are various sets of effects and animations that you can choose while making the final layout of your video.
Moreover, you will be able to burn the DVDs and Blu-Ray Discs to end the final process of your video creation.
How to Edit Videos with Vegas Pro?
Video editing is an art. Hence, before creating a video, you need to have a plan. The clips must be in sequential order so that it makes a story. With the help of Vegas Pro, you can turn all your video footage into an exciting account. However, you need to have some basic skills in video editing before you lay your hands on the powerful Vegas Pro video editing software.
Following is a brief guideline that will give you an idea of how to edit videos with Vegas Pro.
**Previewing
The first step in creating a video is to have a plan of action. Before you start making the video, you must decide the clips you want to import. It is because importing all the video clips and selecting them can be a waste of time.

However, do not delete the clips permanently, as you may require them at some point in time if the need arises. Vegas Pro has some exciting editing tools where you will be able to perform color correction and also stabilize the shaky videos.
**Planning
To make an excellent sensible video, you must have a plan. Your video must have a story. Hence, you must decide beforehand how to start the video with a good beginning, the middle, and the end.
It would be best if you placed the clips in sequential order so that it creates a story. It would be best also to decide how to put the text and the transitions in your video.
**A rough cut
It is advisable to place the video clips in sequential order before you start editing, and it will give you a rough idea of the outcome of the video. You can make the changes in the initial stage in the storyboard and check the outcome before you start the editing.
**Editing
Once you are happy with the final layout of the video clips, you can start with your creativity. Vegas Pro has many exciting editing tools to give your video a professional look.
You can use transitions, trimming, fades, and other editing features to make a great video. You can also add titles, music, and other elements to your video.

**Delivery
Now that you are final with the process of creating a video, it is time to show the world your creativity and talent. You will be able to either stream it online or burn a DVD to share with your friends and loved ones.
Vegas Pro Alternative to Edit Videos
If there is one video editing platform where you want to unleash your talent and creativity, then Filmora is the one. It has all the resources you need to edit your videos and exciting editing tools. Moreover, it is easy to use as it offers many tutorials on creating videos in simple steps. With the help of Filmora, you can adjust the speed of your videos and even work on multiple screens. One of the most outstanding features of Filmora is that you use various video effects like filters and titles and even change the background of your video.
For Win 7 or later (64-bit)
For macOS 10.12 or later

Following are the steps on how to use Filmora:
- Click on a new project from the file menu
- If you want to import media files, click on the ‘+’ icon to browse the files from your hard drive.
- Drag and drop the video clips on your timeline.
- You can now add titles, transitions, and even music.
- Arrange the video clips in sequential order.
- Once you finish the process, you will be able to export it or share it with your friends and loved ones.
FAQs about Vegas Pro
Q1. How much does Vegas Pro cost?
Ans: The cost of Vegas Pro is affordable as you can get it for $155.88 a year, and it means that you pay only about $12.99 per month. You will also get free royalty-free stock videos and 20 GB of online storage.
Q2. Is Vegas Pro a good software?
Ans: If you check the Vegas Pro review, you will understand its popularity. It is an ideal software for professionals who want to unleash their talent and creativity, and it has some high-end editing features to enhance a professional video.
Q3. Is Vegas Pro better than Premiere Pro?
Ans: Vegas Pro is better than Premiere Pro in the user interface. When you compare Vegas Pro with other video editing software, you will find that the software is much easier. Moreover, it has some great editing tools to make a great video.
Conclusion
Vegas Pro gives you all the exciting editing features to create a professional video. It is compelling and user-friendly with simple, easy to understand user interfaces. You can use the trial version to get a feel of the video editing software. Once you are ready to take full command, you can go with the Pro version of Vegas Pro. It is one of the best software where you can learn video editing in a better way. You can check the Vegas Pro review online if you want to know about its usage.
Key Features of Vegas Pro
Vegas Pro video editing software has some of the best features to enhance your creativity. Following are some of its key features:
**OFX Plug-ins for special effects
Vegas Pro offers OFX plug-ins that help professionals create their videos with new techniques with various special effects. You can also use different filters in your videos to give them a professional look.
**Picture-in-Picture Plug-ins
With the help of Picture-in-Picture plug-ins, users will be able to edit the pictures of their own will. You will be able to control the movement of the images and even place them accordingly.
**Editing Timeline
One of the most significant advantages of using Vegas Pro video editing software is that the timeline is much simpler and faster. Various features will help you create professional videos with the help of the timeline.
You will be able to arrange the clips in the timeline quickly and smoothly with special effects like crossfades and similar other products.
**Instant Freeze time
With the help of the Freeze option of Vegas Pro, you will be able to control the playback speed of the video. Professionals use the instant freeze time to portray a dramatic scene that requires some special effects.
It is a specific feature where you need to place the cursor on a particular frame to apply the freeze and time.
**Look-up table OFX Plug-in
The look-up table is a handy feature of Vegas Pro as you can access editing software like Adobe. It helps you to edit the images accordingly. You can also modify the clips of a particular video.
There are also various other features of the look-up table like color grading, cinematic effects, camera, and similar other attributes.
**Authoring Blu-Ray Discs and DVDs
With the help of Vegas Pro, you will be able to create exciting videos and be able to create a DVD layout with a professional look. There are various sets of effects and animations that you can choose while making the final layout of your video.
Moreover, you will be able to burn the DVDs and Blu-Ray Discs to end the final process of your video creation.
How to Edit Videos with Vegas Pro?
Video editing is an art. Hence, before creating a video, you need to have a plan. The clips must be in sequential order so that it makes a story. With the help of Vegas Pro, you can turn all your video footage into an exciting account. However, you need to have some basic skills in video editing before you lay your hands on the powerful Vegas Pro video editing software.
Following is a brief guideline that will give you an idea of how to edit videos with Vegas Pro.
**Previewing
The first step in creating a video is to have a plan of action. Before you start making the video, you must decide the clips you want to import. It is because importing all the video clips and selecting them can be a waste of time.
However, do not delete the clips permanently, as you may require them at some point in time if the need arises. Vegas Pro has some exciting editing tools where you will be able to perform color correction and also stabilize the shaky videos.
**Planning
To make an excellent sensible video, you must have a plan. Your video must have a story. Hence, you must decide beforehand how to start the video with a good beginning, the middle, and the end.
It would be best if you placed the clips in sequential order so that it creates a story. It would be best also to decide how to put the text and the transitions in your video.
**A rough cut
It is advisable to place the video clips in sequential order before you start editing, and it will give you a rough idea of the outcome of the video. You can make the changes in the initial stage in the storyboard and check the outcome before you start the editing.
**Editing
Once you are happy with the final layout of the video clips, you can start with your creativity. Vegas Pro has many exciting editing tools to give your video a professional look.
You can use transitions, trimming, fades, and other editing features to make a great video. You can also add titles, music, and other elements to your video.
**Delivery
Now that you are final with the process of creating a video, it is time to show the world your creativity and talent. You will be able to either stream it online or burn a DVD to share with your friends and loved ones.
Vegas Pro Alternative to Edit Videos
If there is one video editing platform where you want to unleash your talent and creativity, then Filmora is the one. It has all the resources you need to edit your videos and exciting editing tools. Moreover, it is easy to use as it offers many tutorials on creating videos in simple steps. With the help of Filmora, you can adjust the speed of your videos and even work on multiple screens. One of the most outstanding features of Filmora is that you use various video effects like filters and titles and even change the background of your video.
For Win 7 or later (64-bit)
For macOS 10.12 or later
Following are the steps on how to use Filmora:
- Click on a new project from the file menu
- If you want to import media files, click on the ‘+’ icon to browse the files from your hard drive.
- Drag and drop the video clips on your timeline.
- You can now add titles, transitions, and even music.
- Arrange the video clips in sequential order.
- Once you finish the process, you will be able to export it or share it with your friends and loved ones.
FAQs about Vegas Pro
Q1. How much does Vegas Pro cost?
Ans: The cost of Vegas Pro is affordable as you can get it for $155.88 a year, and it means that you pay only about $12.99 per month. You will also get free royalty-free stock videos and 20 GB of online storage.
Q2. Is Vegas Pro a good software?
Ans: If you check the Vegas Pro review, you will understand its popularity. It is an ideal software for professionals who want to unleash their talent and creativity, and it has some high-end editing features to enhance a professional video.
Q3. Is Vegas Pro better than Premiere Pro?
Ans: Vegas Pro is better than Premiere Pro in the user interface. When you compare Vegas Pro with other video editing software, you will find that the software is much easier. Moreover, it has some great editing tools to make a great video.
Conclusion
Vegas Pro gives you all the exciting editing features to create a professional video. It is compelling and user-friendly with simple, easy to understand user interfaces. You can use the trial version to get a feel of the video editing software. Once you are ready to take full command, you can go with the Pro version of Vegas Pro. It is one of the best software where you can learn video editing in a better way. You can check the Vegas Pro review online if you want to know about its usage.
Also read:
- Updated Change Video Speed with FFmpeg for 2024
- Updated In 2024, Progressive Solutions to Adding VHS Effects to Video with Ease
- Updated 10 Top Suggestions for AI Video Interviews for 2024
- Step by Step to Split Clips in VLC
- How to Animate Text in A Video for 2024
- Updated Learn the Step-by-Step Process of Slowing Down Time-Lapse Videos on Your iPhone
- New In 2024, Top 10 3D Slideshow Software Review
- New 2024 Approved How to Trim/Crop Video in Microsoft Powerpoint
- Deleting White Background in Photoshop Is Hard for 2024
- In 2024, Want to Find some Creative, Entertaining Ways to Preserve Precious Memories& Pass Them On-To Upcoming Generations? Well, Surely You Can Do It
- New A Normal Video Brings More Editing Opportunities than a Slow-Motion One. This Text Explores How to Convert Slow Motion Video to Normal on iPhone for 2024
- 2024 Approved How to Change the Speed of Video in DaVinci Resolve?
- New In 2024, Best 8 Top Premiere Pro Slideshow Templates
- Splice App for Android - How to Download & Use
- Updated Here, the Main Discussion Is Regarding the Split of the Audio From the Video in the Sony Vegas Pro. There Are Also some Details About the Substitute, Which Is Wondershare Filmora
- Updated How to Create Intro with Legend Intro Maker for 2024
- In 2024, Learn How to Feather Shapes in After Effects and Add a Professional Touch to Your Designs. This Comprehensive Guide Covers Everything From the Basics to Advanced Techniques. Perfect for Beginners and Experts Alike
- Updated How to Remove Background From a Video in Premier Pro
- In 2024, How to Add Filter to Video Online
- Updated 2024 Approved Free Green Screen Mobile Frame Downloads
- 2024 Approved Top 10 Text to Robot Voice Generators Windows, Mac, Android, iPhone
- Converting an SRT (SRT/Sorted Reader) Into a DOCX File Is a Process. Here We Will Discuss Converting a Set File to a Docx File and More Details About This
- 2024 Approved Create a Stunning Light Sweep Effect in Filmora. Use Simple and Easy Steps to Export a High-Quality Video that Will Impress Even Pro Video Editors
- In This Article, You Will Learn How to Record Creative Cinematic Videos Using a Smartphone and Edit the Video with Wondershare Filmora
- Updated 2024 Approved How to Create Realistic Fire Effects
- How to Use GIMP GREEN SCREEN for 2024
- New Bored of Extraneous Software Downloads and Program Installations to Edit Your Videos? The Best Video Editing Online Utilities Are Here at Your Rescue
- Updated How to Create Chroma Key Written Text Effects in Filmora for 2024
- Do You Have a Sony Camera and Want to Try Different LUTs on Your Digital Content? Youre at the Right Place, as You Can Apply Sony HLG LUTs to Your Media
- If You Want to Prompt Your eCommerce Business in Facebook, Then Using Facebook Video Ads Is One of the Effective Methods. This Post Will Show You How to Edit Videos for Facebook Advertisement
- New How to Make a Slideshow GIF?
- Updated Some Top Methods to Create AI Slow Motion Videos
- How to Create Datamoshing Effect to Your Footage in After Effects for 2024
- Updated 10 Amazing Anime Character Designs to Inspire You
- 2024 Approved Ultimate Guidelines to Help You Better Use VLC Media Player
- 2024 Approved How to Add Text to Video
- 2024 Approved Is Augmented Reality Conferencing the Future of Workplace Collaboratio
- In 2024, How to Windows Online Movie Maker Complete Guide
- New How Did AI Video Games Act More Human Than Human?
- How to Loop Videos on Android Phones
- New How to Edit FLV Video Files with FLV Editor Windows, Mac,Android, iPhone & Online
- Discover Vintage LUTs Premiere Pro Free and Paid Options Available
- Updated Top 9 Best Solutions To Go For When Creating an AI Thumbnail for 2024
- 2024 Approved 10+ Best Unlimited FCPX Slideshow Templates
- Updated In 2024, Working Out All Important Details of Slowing Down Video in After Effects
- 2024 Approved Quick Solved How to Add Subtitles to a Video on iPhones
- Can’t view HEVC H.265 content on Sony
- How to Change Spotify Location After Moving to Another Country On Itel P40+ | Dr.fone
- How to Unlock iPhone SE (2020) without Passcode or Face ID
- How to use Device Manager to reinstall your hardware drivers on Windows 11/10/7
- In 2024, How to Unlock Disabled Apple iPhone SE/iPad Without Computer
- How to Bypass Activation Lock from iPhone SE (2020) or iPad?
- How to get the dragon scale and evolution-enabled pokemon On OnePlus Ace 2? | Dr.fone
- In 2024, Full Guide to Fix iToolab AnyGO Not Working On Apple iPhone 7 Plus | Dr.fone
- How to Detect and Stop mSpy from Spying on Your Apple iPhone 7 Plus | Dr.fone
- In 2024, Apple ID Locked or Disabled On iPhone SE (2022)? 7 Mehtods You Cant-Miss
- Can I use iTools gpx file to catch the rare Pokemon On OnePlus 12R | Dr.fone
- How To Unlink Your Apple iPhone 13 Pro From Your Apple ID
- How To Unlock Any Vivo Phone Password Using Emergency Call
- In 2024, How To Unlock Vivo V29 Phone Without Password?
- In 2024, Top 4 SIM Location Trackers To Easily Find Your Lost Samsung Galaxy M34 Device
- Spoofing Life360 How to Do it on Oppo Reno 10 Pro 5G? | Dr.fone
- Does Samsung has native HEVC support?
- Top 10 Fixes for Phone Keep Disconnecting from Wi-Fi On Realme 12 Pro+ 5G | Dr.fone
- In 2024, How to Use Life360 on Windows PC For Vivo X100? | Dr.fone
- How to identify some outdated hardware drivers with Windows Device Manager on Windows 11/10
- How to Watch Hulu Outside US On Motorola Edge+ (2023) | Dr.fone
- In 2024, Guide to Mirror Your Infinix Smart 7 HD to Other Android devices | Dr.fone
- Thinking About Changing Your Netflix Region Without a VPN On Apple iPhone 15 Plus? | Dr.fone
- How to Fake GPS on Android without Mock Location For your Honor Magic 6 Lite | Dr.fone
- Locked Out of Apple iPhone 6 Plus? 5 Ways to get into a Locked Apple iPhone 6 Plus
- 3 Ways to Erase Apple iPhone XS Max When Its Locked Within Seconds
- In 2024, A Complete Guide To OEM Unlocking on Vivo Y200
- The Easy Way to Remove an Apple ID from Your MacBook For your Apple iPhone X
- In 2024, Trouble with iPhone 13 Swipe-Up? Try These 11 Solutions | Dr.fone
- 2 Ways to Monitor Realme GT Neo 5 SE Activity | Dr.fone
- Title: Do You Want to Remove Unnecessary Sound From Your Video? We Are Providing You the List of the Best Software to Remove Audio From Video for Mac and Apple
- Author: Chloe
- Created at : 2024-05-20 03:37:33
- Updated at : 2024-05-21 03:37:33
- Link: https://ai-editing-video.techidaily.com/do-you-want-to-remove-unnecessary-sound-from-your-video-we-are-providing-you-the-list-of-the-best-software-to-remove-audio-from-video-for-mac-and-apple/
- License: This work is licensed under CC BY-NC-SA 4.0.
