
:max_bytes(150000):strip_icc():format(webp)/GettyImages-534572567-56facec43df78c784197b92d.jpg)
Easiest Fix Included! Top 5 Ways to Convert HDR to SDR Videos for 2024
[Easiest Fix Included!] Top 5 Ways to Convert HDR to SDR Videos
HDR or the High Dynamic Range Images points out the brightest and the darkest spots on an image, while an SDR has fewer details and colors. In comparison, HDR has a resolution four times as excellent as an SDR video. With a higher contrast ratio and color information, HDR videos are more vivid and pleasing.
Then why is there a need to convert HDR to SDR? An HDR file is huge and is currently incompatible with many old and some new devices. To view HDR videos, you need to lower the resolution and change the size of the file tidbit to convert it to 1080 SDR without compromising on the quality.
Plenty of HDR converters can perform the task, but only a few have the benefit of retaining the 4K quality of the original video. This article will walk you through the five easiest ways of converting videos from HDR to SDR format. So without further ado, let’s begin.
Easiest Fix - Edit and Convert HDR Videos in Wondershare Filmora [PC & Mac]
You must be living under a rock if you are still unaware of Wondershare Filmora . Filmora is an excellent app to make and edit your videos with the finesse of a professional. Wondershare Filmora comes with professional video editing tools packaged perfectly for beginners.
Filmora is especially a blessing for content creators looking to create unique and exciting videos in any resolution, video quality, and format they want. Apart from its usual video editing tools, a perk of having Wondershare Filmora is that you can easily change the videos from one format to another. For example, you can convert an HDR video to SDR in Filmora so that users with older devices incompatible with HDR can also view the video without burning their eyes.
It does not matter if you have iPhone 12 HDR videos or an HDR clip shot with a professional camera; Filmora can handle it all. The best part of converting the video is that Filmora supports efficient transferring of HDR files from your phone to your PC. So, without further ado, let us start with how you can convert an HDR video to SDR in Filmora.
Free Download For Win 7 or later(64-bit)
Free Download For macOS 10.14 or later
How to Convert an HDR video to SDR without data loss in Filmora
To convert your video to SDR, start by downloading Wondershare Filmora if you do not already have it downloaded.
Download the Application
Download Wondershare Filmora according to your PC type, i.e., Mac or Windows. Install it and run it. Launch the application to get working.
Import Your Videos
- Next, import your HDR video file. To import, click on the Import button in the primary window. From there, select the video file you want to convert to SDR.
- Once imported, drag the file to the timeline. You can tweak or edit it too before converting. You may trim it or cut an unwanted section.

- If you want to change to SDR while editing the project, click the File button and select Project Settings. From the settings, go to Colour space and select the SDR-Rec709 option.

Exporting the File
- If you want to only change the color space setting for the exported file, go to Export and then click on Settings.
- From settings, click on the Colour Space option, and from the drop-down menu, select SDR-Rec709.

- Press Ok to save the changes and export the file in your desired format.
- If you want to adjust the resolution according to the device like iPhone, Samsung, Playstation, or Xbox you can also do that directly with Filmora by clicking the Device tab in the Export Confirm the settings and press Ok.

This is the easiest and cleanest way to get an SDR copy of an HDR file. Filmora does it effortlessly, allowing you to get an SDR video out of an HDR one.
Decode Video from HDR to SDR with a Video Converter
If you have ever worked with converting videos, then you are probably familiar with Handbrake. Handbrake is a household name for video converting, especially when it comes to 4KHDR to SDR video conversions. It has a free open source feature that allows you to convert to SDR videos with an MP4 or MKV format.
Steps of Decoding HDR Video to SDR with Handbrake
Before converting your HDR video to SDR, make sure you have downloaded Handbrake on your computer.
- Open the Handbrake app.
- To import your video to Handbrake, click on File, then Source Selection. You can also drag and drop the video to scan it. Next, wait for Handbrake to scan the title. Once the video scan is complete, all the information will be displayed in the source section.

- Once the file is imported, you can now select the output format from the right panel under General. The default format already specified in Handbrake is Fast 1080p30; you can change that if you are looking for a different form.

- You can also change the format depending on the device type in Handbrake.
- Lastly, go to Presets, click Production, and select Production Standard to convert 4K HDR video to 4K SDR. You can also do that by going to General Profile under the Legacy column.

- Now, select format, quality, resolution, and video codec.
- Lastly, select the destination for the file from the Browse button and press encode to start the conversion.

With a few simple clicks, your HDR file can easily be converted to SDR using Handbrake.
Transcode Video from HDR to SDR by Image Editing [Samsung only]
If you own the latest Samsung S22 phone, you are probably aware of its feature that allows you to record in an HDR10 view. But, what do you do if you want to send the video to someone whose phone is incompatible with HDR? The video will appear too bright and washed out.
By converting the video to SDR, you can send them the video without burning their retinas. This method to convert HDR videos to SDR is especially for Samsung Galaxy phones. The gallery app initially used to have a built-in option to do that, but it’s not there anymore. While the original option is removed, you can still use the method below to convert an HDR video to SDR with just a few taps.
- To convert HDR10+ video to SDR on a Samsung Galaxy phone, you can directly proceed with it on your phone.
- Head to and open Gallery, choose your HDR10+ video and tap three dots in the bottom right corner.
- From the pop-up menu, select Open in Video Player.
- Once the video opens in the video player, click on another three dots in the top right corner.
- From there, tap on the Editor
- In the editor, tap again on three dots on the bottom right and now select Size and Format.
- From this menu, you can change the resolution of the video as well as its format. From the format drop-down, you can select SDR to convert your video to SDR.
- Make sure you do not tap on Save; instead, click on the three dots again and tap on Save as Copy. This will leave your original HDR video untouched and save a copy for the SDR video.
Convert HDR 4K Video to SDR with YouTube [Untested]
HDR videos on Youtube show higher color dynamics and contrast ratios than an SDR video. Viewers with HDR-compatible devices will see ‘HDR’ after every video quality option in the video settings (1080p HDR).
However, the videos uploaded as HDR on youtube can be viewed on HDR unsupported devices too. This happens because youtube automatically converts all HDR videos to SDR to be viewed on non-HDR devices. Here is a brief introduction to the steps of converting HDR to SDR on Youtube:
- Record the metadata by exporting it from an HDR-supported application like Wondershare Filmora . The metadata should be in a codec or container to be played by Youtube correctly.
- Grade your HDR properly as Rec. 2020 with PQ or HLG. Ensure the videos are graded correctly using an HDR transfer function to retain the quality. If you are unsure about the videos graded as HDR, you should not use this method because it can distort the video.
- rectly using an HDR transfer function to retain the quality. If you are not sure about the videos graded as HDR, you should not use this method because it can distort the video.

- Once done, upload it on Youtube. If it detects HDR metadata during the upload, Youtube automatically produces an SDR conversion for non-HDR compatible devices.

- Downloading the video from HDR unsupported devices will save an SDR video.
This method seems easy but has greater risks involved such as distortion of video if improper HDR grading is done.
Get Real-time Video HDR to SDR Conversion by Video Content Providers
With gaming becoming almost a sport, online streaming has grown immensely popular. These streaming services allow you to stream in 4K HDR format. However, a significant downside of this is that many devices are still incompatible with HDR video.
We have listed multiple methods to convert your HDR video clips to SDR, but what about a live stream? We highly recommend checking out the Intel official blog post for converting your HDR videos to SDR in real-time. The blog post describes how you can convert your live stream to SDR with different methods. You can give it a read if you are interested in that.
Hot FAQs on How to Convert HDR to SDR
1. Is SDR better than HDR?
SDR is Standard Dynamic Range, while HDR stands for High Dynamic Range. HDR is the latest technology concerning quality, clear and detailed images. HDR is perfect for videos that require high contrast, shadows, and mixed light.
HDR is definitely better than SDR because the “High” definition takes everything to the next level. However, SDR is frequently used as most devices are not compatible with HDR.
2. Why is HDR smaller than SDR?
Undoubtedly, HDR provides better image quality, colors, and clarity than SDR, but why is the file size smaller then? The answer is quite simple. HDR10 files are equipped with HVAC. HVAC is a very efficient file compressor that compresses the file while keeping its quality intact. SDR files are not compressed with SDR; hence the file size is much bigger.
3. Why does HDR look washed out?
An HDR video might look too bright or washed out if your device is incompatible with HDR color space. Unlike the iPhone 12 or Samsung Galaxy S22, phones have a built-in HDR recording feature. However, older versions may not be able to enjoy the clarity and colors offered by an HDR recording. Hence when an HDR video is sent to someone with an older phone, it looks as if the video is washed out.
Final Words
While HDR might be a superior color space, SDR is frequently used for video clips so maximum people can enjoy the video despite what their devices are compatible with. You can easily convert an HDR video to SDR using Wondershare Filmora or any other methods listed above.
An important point to note is that HDR videos converted to SDR might look a little off sometimes with darker shadows and sharpness. It might be a better idea to record in SDR rather than convert it to SDR later. However, converting is still a popular way to go with an HDR video; you will also have a beautiful high-quality video and an SDR copy.
Free Download For macOS 10.14 or later
How to Convert an HDR video to SDR without data loss in Filmora
To convert your video to SDR, start by downloading Wondershare Filmora if you do not already have it downloaded.
Download the Application
Download Wondershare Filmora according to your PC type, i.e., Mac or Windows. Install it and run it. Launch the application to get working.
Import Your Videos
- Next, import your HDR video file. To import, click on the Import button in the primary window. From there, select the video file you want to convert to SDR.
- Once imported, drag the file to the timeline. You can tweak or edit it too before converting. You may trim it or cut an unwanted section.
- If you want to change to SDR while editing the project, click the File button and select Project Settings. From the settings, go to Colour space and select the SDR-Rec709 option.
Exporting the File
- If you want to only change the color space setting for the exported file, go to Export and then click on Settings.
- From settings, click on the Colour Space option, and from the drop-down menu, select SDR-Rec709.
- Press Ok to save the changes and export the file in your desired format.
- If you want to adjust the resolution according to the device like iPhone, Samsung, Playstation, or Xbox you can also do that directly with Filmora by clicking the Device tab in the Export Confirm the settings and press Ok.
This is the easiest and cleanest way to get an SDR copy of an HDR file. Filmora does it effortlessly, allowing you to get an SDR video out of an HDR one.
Decode Video from HDR to SDR with a Video Converter
If you have ever worked with converting videos, then you are probably familiar with Handbrake. Handbrake is a household name for video converting, especially when it comes to 4KHDR to SDR video conversions. It has a free open source feature that allows you to convert to SDR videos with an MP4 or MKV format.
Steps of Decoding HDR Video to SDR with Handbrake
Before converting your HDR video to SDR, make sure you have downloaded Handbrake on your computer.
- Open the Handbrake app.
- To import your video to Handbrake, click on File, then Source Selection. You can also drag and drop the video to scan it. Next, wait for Handbrake to scan the title. Once the video scan is complete, all the information will be displayed in the source section.
- Once the file is imported, you can now select the output format from the right panel under General. The default format already specified in Handbrake is Fast 1080p30; you can change that if you are looking for a different form.
- You can also change the format depending on the device type in Handbrake.
- Lastly, go to Presets, click Production, and select Production Standard to convert 4K HDR video to 4K SDR. You can also do that by going to General Profile under the Legacy column.
- Now, select format, quality, resolution, and video codec.
- Lastly, select the destination for the file from the Browse button and press encode to start the conversion.
With a few simple clicks, your HDR file can easily be converted to SDR using Handbrake.
Transcode Video from HDR to SDR by Image Editing [Samsung only]
If you own the latest Samsung S22 phone, you are probably aware of its feature that allows you to record in an HDR10 view. But, what do you do if you want to send the video to someone whose phone is incompatible with HDR? The video will appear too bright and washed out.
By converting the video to SDR, you can send them the video without burning their retinas. This method to convert HDR videos to SDR is especially for Samsung Galaxy phones. The gallery app initially used to have a built-in option to do that, but it’s not there anymore. While the original option is removed, you can still use the method below to convert an HDR video to SDR with just a few taps.
- To convert HDR10+ video to SDR on a Samsung Galaxy phone, you can directly proceed with it on your phone.
- Head to and open Gallery, choose your HDR10+ video and tap three dots in the bottom right corner.
- From the pop-up menu, select Open in Video Player.
- Once the video opens in the video player, click on another three dots in the top right corner.
- From there, tap on the Editor
- In the editor, tap again on three dots on the bottom right and now select Size and Format.
- From this menu, you can change the resolution of the video as well as its format. From the format drop-down, you can select SDR to convert your video to SDR.
- Make sure you do not tap on Save; instead, click on the three dots again and tap on Save as Copy. This will leave your original HDR video untouched and save a copy for the SDR video.
Convert HDR 4K Video to SDR with YouTube [Untested]
HDR videos on Youtube show higher color dynamics and contrast ratios than an SDR video. Viewers with HDR-compatible devices will see ‘HDR’ after every video quality option in the video settings (1080p HDR).
However, the videos uploaded as HDR on youtube can be viewed on HDR unsupported devices too. This happens because youtube automatically converts all HDR videos to SDR to be viewed on non-HDR devices. Here is a brief introduction to the steps of converting HDR to SDR on Youtube:
- Record the metadata by exporting it from an HDR-supported application like Wondershare Filmora . The metadata should be in a codec or container to be played by Youtube correctly.
- Grade your HDR properly as Rec. 2020 with PQ or HLG. Ensure the videos are graded correctly using an HDR transfer function to retain the quality. If you are unsure about the videos graded as HDR, you should not use this method because it can distort the video.
- rectly using an HDR transfer function to retain the quality. If you are not sure about the videos graded as HDR, you should not use this method because it can distort the video.
- Once done, upload it on Youtube. If it detects HDR metadata during the upload, Youtube automatically produces an SDR conversion for non-HDR compatible devices.
- Downloading the video from HDR unsupported devices will save an SDR video.
This method seems easy but has greater risks involved such as distortion of video if improper HDR grading is done.
Get Real-time Video HDR to SDR Conversion by Video Content Providers
With gaming becoming almost a sport, online streaming has grown immensely popular. These streaming services allow you to stream in 4K HDR format. However, a significant downside of this is that many devices are still incompatible with HDR video.
We have listed multiple methods to convert your HDR video clips to SDR, but what about a live stream? We highly recommend checking out the Intel official blog post for converting your HDR videos to SDR in real-time. The blog post describes how you can convert your live stream to SDR with different methods. You can give it a read if you are interested in that.
Hot FAQs on How to Convert HDR to SDR
1. Is SDR better than HDR?
SDR is Standard Dynamic Range, while HDR stands for High Dynamic Range. HDR is the latest technology concerning quality, clear and detailed images. HDR is perfect for videos that require high contrast, shadows, and mixed light.
HDR is definitely better than SDR because the “High” definition takes everything to the next level. However, SDR is frequently used as most devices are not compatible with HDR.
2. Why is HDR smaller than SDR?
Undoubtedly, HDR provides better image quality, colors, and clarity than SDR, but why is the file size smaller then? The answer is quite simple. HDR10 files are equipped with HVAC. HVAC is a very efficient file compressor that compresses the file while keeping its quality intact. SDR files are not compressed with SDR; hence the file size is much bigger.
3. Why does HDR look washed out?
An HDR video might look too bright or washed out if your device is incompatible with HDR color space. Unlike the iPhone 12 or Samsung Galaxy S22, phones have a built-in HDR recording feature. However, older versions may not be able to enjoy the clarity and colors offered by an HDR recording. Hence when an HDR video is sent to someone with an older phone, it looks as if the video is washed out.
Final Words
While HDR might be a superior color space, SDR is frequently used for video clips so maximum people can enjoy the video despite what their devices are compatible with. You can easily convert an HDR video to SDR using Wondershare Filmora or any other methods listed above.
An important point to note is that HDR videos converted to SDR might look a little off sometimes with darker shadows and sharpness. It might be a better idea to record in SDR rather than convert it to SDR later. However, converting is still a popular way to go with an HDR video; you will also have a beautiful high-quality video and an SDR copy.
Why Vimeo Slideshow Maker Become Popular
Why Vimeo Slideshow Maker Become Popular
An easy yet powerful editor
Numerous effects to choose from
Detailed tutorials provided by the official channel
Have you recently heard about Vimeo from any of your friends or colleagues? Or have you come through it and want to know more about it? Then here you can get all information needed about the platform. Vimeo slideshow creator is a wonderful tool launched by a group of filmmakers in 2004.

It has gained a lot of popularity over the past decade and appears as the competitor of largest video sharing giant YouTube. The platform has approximately 80 million users and 1 million subscribers. In some ways, Vimeo is even better than YouTube.
In this article
01 [What Is Vimeo for & Why It Become Popular](#Part 1)
02 [Tips for a Great Slideshow Video](#Part 2)
Part 1: What Is Vimeo for & Why It Become Popular
Vimeo is an online video streaming and editing tool which is designed for video creators and artists. The platform provides various tools to its users including monetization, marketing, collaboration, post-production, management, storage, etc. It provides a great user experience because it is ad-free. The mode of revenue for the owners of Vimeo is a software as a service (SaaS). They provide paid subscription plans for creating and editing videos, broadcasting tools, connecting with clients, etc.

It works in a “freemium” model. That means the users have limited access to the platform if they are using it for free. For example, a basic free membership allows the user to have access to a total of 5GB of storage and can upload 500MB on a weekly basis. As a free or paid member of Vimeo Slideshow maker, you can like, comment on videos, and at the same time save, watch, and upload them. Also, you can create playlists. What features you will be able to access totally depends on your membership level and plan.
Vimeo is becoming popular due to the following reasons:
01Vimeo offers better encoding and video quality
Vimeo is more focused on the quality of the video that gets uploaded on it. Its processing load is lighter and it follows strict guidelines to accept videos. The platform uses better encoding techniques to maximize the quality of the video.
02Vimeo offers greater prestige
Being on Vimeo is a matter of prestige. Vimeo videos are considered more professional as compared to Youtube. There is a limit on what kind of channels one can run on Vimeo.
03Vimeo has a more sophisticated audience
Because of the high quality of videos and its prestigious nature, Vimeo has a more sophisticated fan base. The content offered by the platform is more knowledgeable and determined. The audience here is more sophisticated. Also, the creators are more insightful, mature, and constructive.
04Vimeo offers greater artistic freedom
Vimeo always welcomes the creators with their videos to show their art. It offers artistic freedom to its users. The platform checks the artistic value of the video and talent of the creator and allows them to upload, unlike Youtube.
05Vimeo boasts unique features and customizations
There are certain unique features of YouTube which make it a great platform for its users.
● Plus, Pro, Business, Premium Plans
Vimeo is funded by its community and you have to purchase the plan to use it apart from the free features. Different Vimeo plans are:
Vimeo - $7/month
Pro - $20/month
Business - $50/month
Top-tier Vimeo Premium - $75/month.
● Make money with pay per view
Just like Google’s PPC program, Vimeo also features a pay per program view where viewers need to pay in order to watch certain videos. With this, you can sell your art anywhere in the country or worldwide and make money with it.
● Advanced analytics
The subscribers of Vimeo are offered different levels of analytics. You will get the analytics according to your subscription level. The analytics levels on Vimeo consist of Google Analytics integration, engagement graphs, custom reports, and a traffic dashboard.
● Web player branding
Vimeo allows the users to use their own branding and logo in their videos. It makes all the embedded videos share the same look and ends with an unsightly suggestions page.
● Domain-restricted embeds
Vimeo offers the users a feature of domain-restricted embeds. It means the users can set the domains to embed any particular or a set of videos. This feature lets you hide the video on Vimeo and make it visible on the allowed domain.
● Password protection
It is an extraordinary feature that Vimeo offers. The user can set a password for the particular video to restrict the video’s visibility. Only those people who will have access to the password will be able to watch that particular video.
● Replace video but keep URL
This one is also an amazing and unique feature of Vimeo. With this feature, you can replace any existing video with the new one by keeping the same URL. Also, it will keep the stats, comments, likes, etc as it is.
Part 2 Tips for a Great Slideshow Video
Videos are gaining much popularity these days. It is an easy way to connect with people and show emotions to them. In the same way, slideshow videos also are important in their place. Slides are the collection of traditional photos or negatives which are out of trend now. And slideshow videos are the perfect way to use those slides and relieve those faded memories with loved ones. Creating the slideshow video is also easy and can be done easily with the help of some tools. You don’t need to be professional, but the only need is to follow certain tips carefully. Here, we are sharing the essential tips to prepare a great slideshow video. Also, you will get to know about the best tool for video creation.
● Tell a story
Prepare the slideshow video in the form of storytelling. Whatever is the theme of your slideshow, prepare the script of the video right from the start. Make a meaningful and impressive story. Select and collect the raw materials according to the requirement.
● Keep it cohesive
The cohesion of photos or images is very important in a video slideshow. It is advised not to mix and match still photos and videos in 1 slideshow. Also, choose the photos belonging to the same color family. Mixing different varieties of photos divert the attention of the viewer. Also, one warm photo, then one cool and so on are not the efficient choices for a slideshow. All the images should appear as part of one color family and are similar to one another. Always maintain the quality of photos throughout the slideshow. Gradual jumps between grainy portrait mode photos and some screenshots, meanwhile photos of other modes lead to distracting the viewer and blurring their experience.
● Make it personal
Video slideshows are a powerful tool to show your personality and your personal message. The videos should contain your feelings. So, customize them and make them as personal as you can. Give your uniqueness to your slideshows. For this, you can customize the color palette, text, etc and make them unique and personal. So that the people with whom you share the videos may also feel your touch.
● Keep slideshow videos short
There might be different aims for creating a slideshow video. You might want to share it with loved ones or any of your friends’ circle. Or you might be wanting it to post as an ad on social media platforms such as Instagram, or Facebook. Whatever the purpose of your making the video, keep them concise and short. Short video clips are best for grabbing the attention of the viewers. Everyone does not find it interesting to watch long-form videos. If you are aiming to make a longer-form video slideshow which contains both images and video clips, then keep each photo for 3 to 5 seconds and each video clip a maximum of 20 seconds. It is recommended to maintain the user’s interest throughout.
● Create a storyboard to plan your slideshow video
As we have already discussed in the above point, the video should depict your story. Also, it should be in sync to make it more compelling. Creating a storyboard or outline is the perfect way to predict the right flow as well as choose the right elements for the video.
The storyboard helps to prepare a plan and develop the logical sequence of the photos. Also, if you want to add photos, video clips, texts, etc in a single slideshow, the storyboard can help to outline the sequence. With this, you will be able to create a video that will be logically correct.
● Add text to videos and images to convey your message clearly
Text or captions are very crucial to be added to the slideshow especially if you are preparing them for social media. People these days do watch the videos by keeping the sound off on social media. So, they will not be able to get your message without captions. Keep all your key messages highlighted in the video. The first few seconds of the video play an important role. It is the deciding factor whether the viewer will watch the whole video or will just bounce back. So, give a captivating hook to the slideshow to capture the viewer’s attention and make them hit the unmute button.
Wondershare Filmora Video Editor is an effective tool which can help you to create wonderful video slideshows. It provides all the functionalities which you need to make the slideshow convincing. You can make appealing videos to show your impressions to the viewers. It enables you to create slideshows with photos, videos, and captions. The color correction and gradient option in the Filmora allow you to change the look of the photos or old slides according to your choices. You can edit the slides with this tool, to make them cohesively right and create a slideshow out of them. In short, Filmora is the perfect way to make a slideshow video that can be interesting and engaging for the viewers.
For Win 7 or later (64-bit)
For macOS 10.12 or later

● Ending Thoughts →
● So, here we can conclude that Vimeo slideshow maker is an impressive platform. Despite having a smaller user base, it is gaining much popularity because of its unique features.
● Moreover, you can generate great videos by following the tips we have shared. By uploading those videos on Vimeo, you will be able to gain a decent audience base. If you are aiming to have a genuine and sophisticated fanbase for your videos, then Vimeo would be a great choice.
● Using Filmora will make your process of creating slideshows easy. The variety of features available by the tool will let you create wonderful storytelling out of your old memories.
Have you recently heard about Vimeo from any of your friends or colleagues? Or have you come through it and want to know more about it? Then here you can get all information needed about the platform. Vimeo slideshow creator is a wonderful tool launched by a group of filmmakers in 2004.
It has gained a lot of popularity over the past decade and appears as the competitor of largest video sharing giant YouTube. The platform has approximately 80 million users and 1 million subscribers. In some ways, Vimeo is even better than YouTube.
In this article
01 [What Is Vimeo for & Why It Become Popular](#Part 1)
02 [Tips for a Great Slideshow Video](#Part 2)
Part 1: What Is Vimeo for & Why It Become Popular
Vimeo is an online video streaming and editing tool which is designed for video creators and artists. The platform provides various tools to its users including monetization, marketing, collaboration, post-production, management, storage, etc. It provides a great user experience because it is ad-free. The mode of revenue for the owners of Vimeo is a software as a service (SaaS). They provide paid subscription plans for creating and editing videos, broadcasting tools, connecting with clients, etc.
It works in a “freemium” model. That means the users have limited access to the platform if they are using it for free. For example, a basic free membership allows the user to have access to a total of 5GB of storage and can upload 500MB on a weekly basis. As a free or paid member of Vimeo Slideshow maker, you can like, comment on videos, and at the same time save, watch, and upload them. Also, you can create playlists. What features you will be able to access totally depends on your membership level and plan.
Vimeo is becoming popular due to the following reasons:
01Vimeo offers better encoding and video quality
Vimeo is more focused on the quality of the video that gets uploaded on it. Its processing load is lighter and it follows strict guidelines to accept videos. The platform uses better encoding techniques to maximize the quality of the video.
02Vimeo offers greater prestige
Being on Vimeo is a matter of prestige. Vimeo videos are considered more professional as compared to Youtube. There is a limit on what kind of channels one can run on Vimeo.
03Vimeo has a more sophisticated audience
Because of the high quality of videos and its prestigious nature, Vimeo has a more sophisticated fan base. The content offered by the platform is more knowledgeable and determined. The audience here is more sophisticated. Also, the creators are more insightful, mature, and constructive.
04Vimeo offers greater artistic freedom
Vimeo always welcomes the creators with their videos to show their art. It offers artistic freedom to its users. The platform checks the artistic value of the video and talent of the creator and allows them to upload, unlike Youtube.
05Vimeo boasts unique features and customizations
There are certain unique features of YouTube which make it a great platform for its users.
● Plus, Pro, Business, Premium Plans
Vimeo is funded by its community and you have to purchase the plan to use it apart from the free features. Different Vimeo plans are:
Vimeo - $7/month
Pro - $20/month
Business - $50/month
Top-tier Vimeo Premium - $75/month.
● Make money with pay per view
Just like Google’s PPC program, Vimeo also features a pay per program view where viewers need to pay in order to watch certain videos. With this, you can sell your art anywhere in the country or worldwide and make money with it.
● Advanced analytics
The subscribers of Vimeo are offered different levels of analytics. You will get the analytics according to your subscription level. The analytics levels on Vimeo consist of Google Analytics integration, engagement graphs, custom reports, and a traffic dashboard.
● Web player branding
Vimeo allows the users to use their own branding and logo in their videos. It makes all the embedded videos share the same look and ends with an unsightly suggestions page.
● Domain-restricted embeds
Vimeo offers the users a feature of domain-restricted embeds. It means the users can set the domains to embed any particular or a set of videos. This feature lets you hide the video on Vimeo and make it visible on the allowed domain.
● Password protection
It is an extraordinary feature that Vimeo offers. The user can set a password for the particular video to restrict the video’s visibility. Only those people who will have access to the password will be able to watch that particular video.
● Replace video but keep URL
This one is also an amazing and unique feature of Vimeo. With this feature, you can replace any existing video with the new one by keeping the same URL. Also, it will keep the stats, comments, likes, etc as it is.
Part 2 Tips for a Great Slideshow Video
Videos are gaining much popularity these days. It is an easy way to connect with people and show emotions to them. In the same way, slideshow videos also are important in their place. Slides are the collection of traditional photos or negatives which are out of trend now. And slideshow videos are the perfect way to use those slides and relieve those faded memories with loved ones. Creating the slideshow video is also easy and can be done easily with the help of some tools. You don’t need to be professional, but the only need is to follow certain tips carefully. Here, we are sharing the essential tips to prepare a great slideshow video. Also, you will get to know about the best tool for video creation.
● Tell a story
Prepare the slideshow video in the form of storytelling. Whatever is the theme of your slideshow, prepare the script of the video right from the start. Make a meaningful and impressive story. Select and collect the raw materials according to the requirement.
● Keep it cohesive
The cohesion of photos or images is very important in a video slideshow. It is advised not to mix and match still photos and videos in 1 slideshow. Also, choose the photos belonging to the same color family. Mixing different varieties of photos divert the attention of the viewer. Also, one warm photo, then one cool and so on are not the efficient choices for a slideshow. All the images should appear as part of one color family and are similar to one another. Always maintain the quality of photos throughout the slideshow. Gradual jumps between grainy portrait mode photos and some screenshots, meanwhile photos of other modes lead to distracting the viewer and blurring their experience.
● Make it personal
Video slideshows are a powerful tool to show your personality and your personal message. The videos should contain your feelings. So, customize them and make them as personal as you can. Give your uniqueness to your slideshows. For this, you can customize the color palette, text, etc and make them unique and personal. So that the people with whom you share the videos may also feel your touch.
● Keep slideshow videos short
There might be different aims for creating a slideshow video. You might want to share it with loved ones or any of your friends’ circle. Or you might be wanting it to post as an ad on social media platforms such as Instagram, or Facebook. Whatever the purpose of your making the video, keep them concise and short. Short video clips are best for grabbing the attention of the viewers. Everyone does not find it interesting to watch long-form videos. If you are aiming to make a longer-form video slideshow which contains both images and video clips, then keep each photo for 3 to 5 seconds and each video clip a maximum of 20 seconds. It is recommended to maintain the user’s interest throughout.
● Create a storyboard to plan your slideshow video
As we have already discussed in the above point, the video should depict your story. Also, it should be in sync to make it more compelling. Creating a storyboard or outline is the perfect way to predict the right flow as well as choose the right elements for the video.
The storyboard helps to prepare a plan and develop the logical sequence of the photos. Also, if you want to add photos, video clips, texts, etc in a single slideshow, the storyboard can help to outline the sequence. With this, you will be able to create a video that will be logically correct.
● Add text to videos and images to convey your message clearly
Text or captions are very crucial to be added to the slideshow especially if you are preparing them for social media. People these days do watch the videos by keeping the sound off on social media. So, they will not be able to get your message without captions. Keep all your key messages highlighted in the video. The first few seconds of the video play an important role. It is the deciding factor whether the viewer will watch the whole video or will just bounce back. So, give a captivating hook to the slideshow to capture the viewer’s attention and make them hit the unmute button.
Wondershare Filmora Video Editor is an effective tool which can help you to create wonderful video slideshows. It provides all the functionalities which you need to make the slideshow convincing. You can make appealing videos to show your impressions to the viewers. It enables you to create slideshows with photos, videos, and captions. The color correction and gradient option in the Filmora allow you to change the look of the photos or old slides according to your choices. You can edit the slides with this tool, to make them cohesively right and create a slideshow out of them. In short, Filmora is the perfect way to make a slideshow video that can be interesting and engaging for the viewers.
For Win 7 or later (64-bit)
For macOS 10.12 or later
● Ending Thoughts →
● So, here we can conclude that Vimeo slideshow maker is an impressive platform. Despite having a smaller user base, it is gaining much popularity because of its unique features.
● Moreover, you can generate great videos by following the tips we have shared. By uploading those videos on Vimeo, you will be able to gain a decent audience base. If you are aiming to have a genuine and sophisticated fanbase for your videos, then Vimeo would be a great choice.
● Using Filmora will make your process of creating slideshows easy. The variety of features available by the tool will let you create wonderful storytelling out of your old memories.
How To Split Screen On Tiktok
TikTok is probably the most popular video-sharing app in the world right now. Many TikTokers have become famous for making videos that have a significant impact and encourage creativity and new ideas. One of the most popular TikTok trends is the split-screen effect. You’ve probably seen a lot of TikTok split-screen videos with cool effects that made you wonder how the user split their screen. Becoming skilled in using TikTok effects is not as difficult as it might look. It only requires a significant amount of practice. Read on as we show you how to make a TikTok split-screen video.
Using CapCut To Split Screen
CapCut is the official free TikTok Video Maker and Video Editor with Music for TikTok that is multifunctional. Its interface is quite similar and easy to use.
CapCut includes free advanced capabilities such as keyframe animation, stabilization, and Picture-in-Picture (PIP). These are in addition to its fundamental functions, such as video editing, adding stickers, text, and music.
Steps to Split Screen Video with CapCut On Android and IOS Devices
- To use the app, you need to install it first. iPhone and Android users can download CapCut. Navigate to the appropriate app store of your choice and download CapCut.
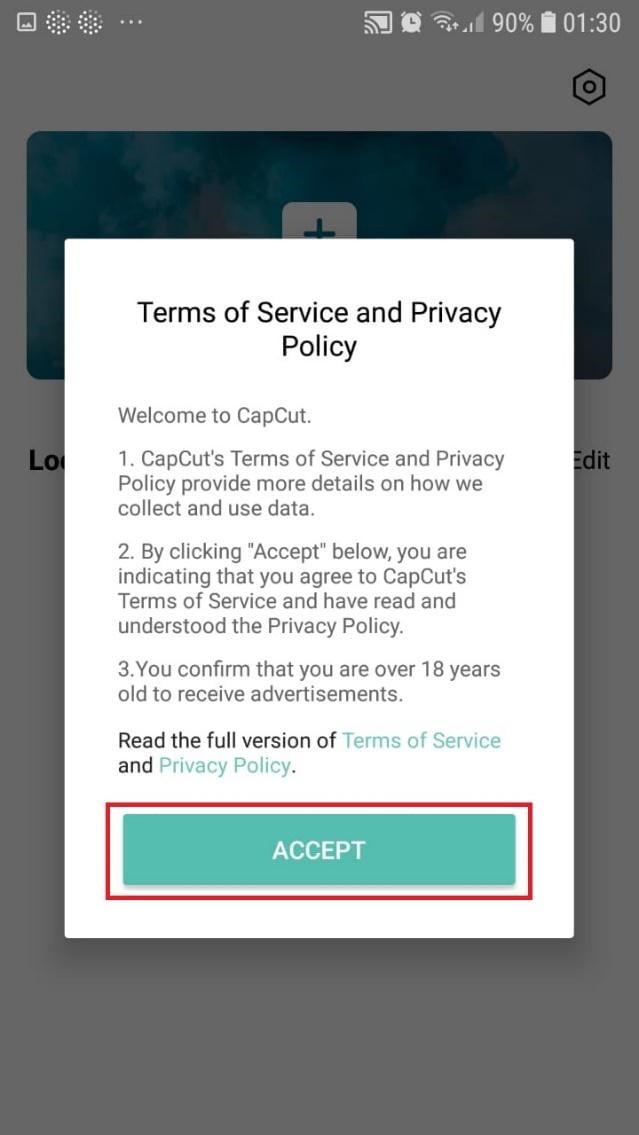
- After installation, launch the app.
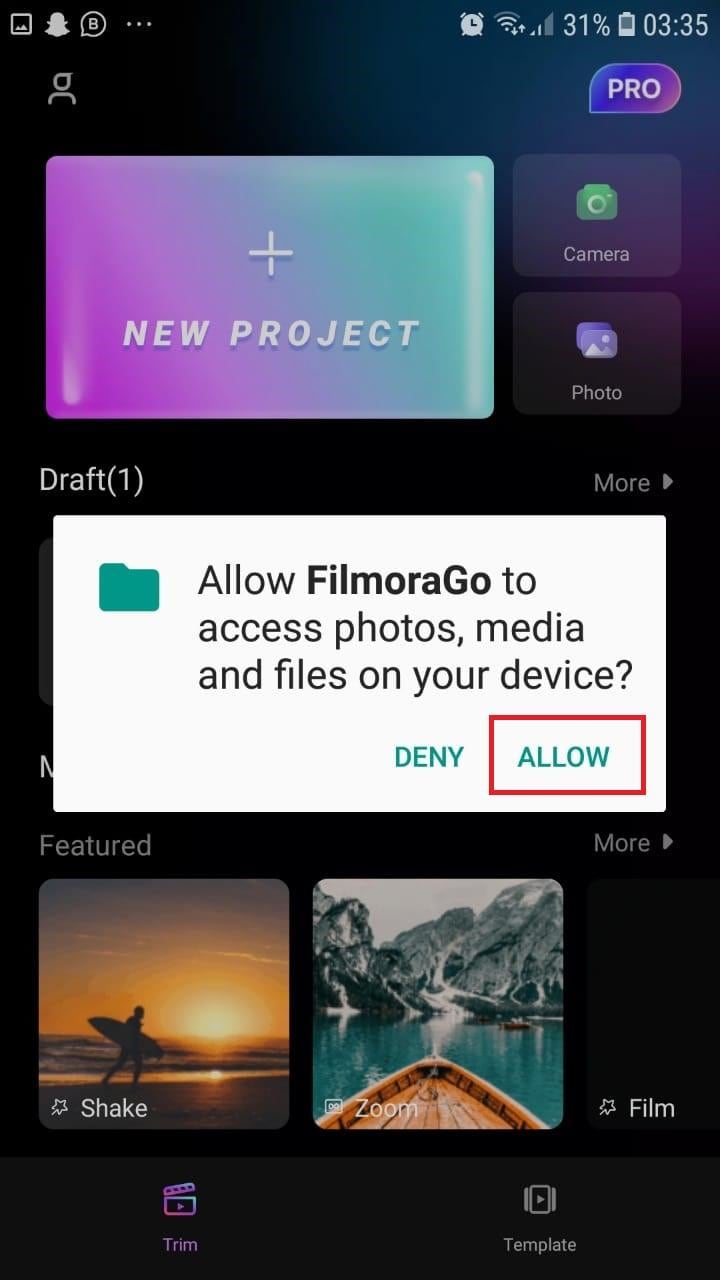
- Then go ahead and grant CapCut permission to view your camera roll. Incorporating video clips into your project has never been easier. Go to the app’s main screen and select “New Project“ from the drop-down menu.
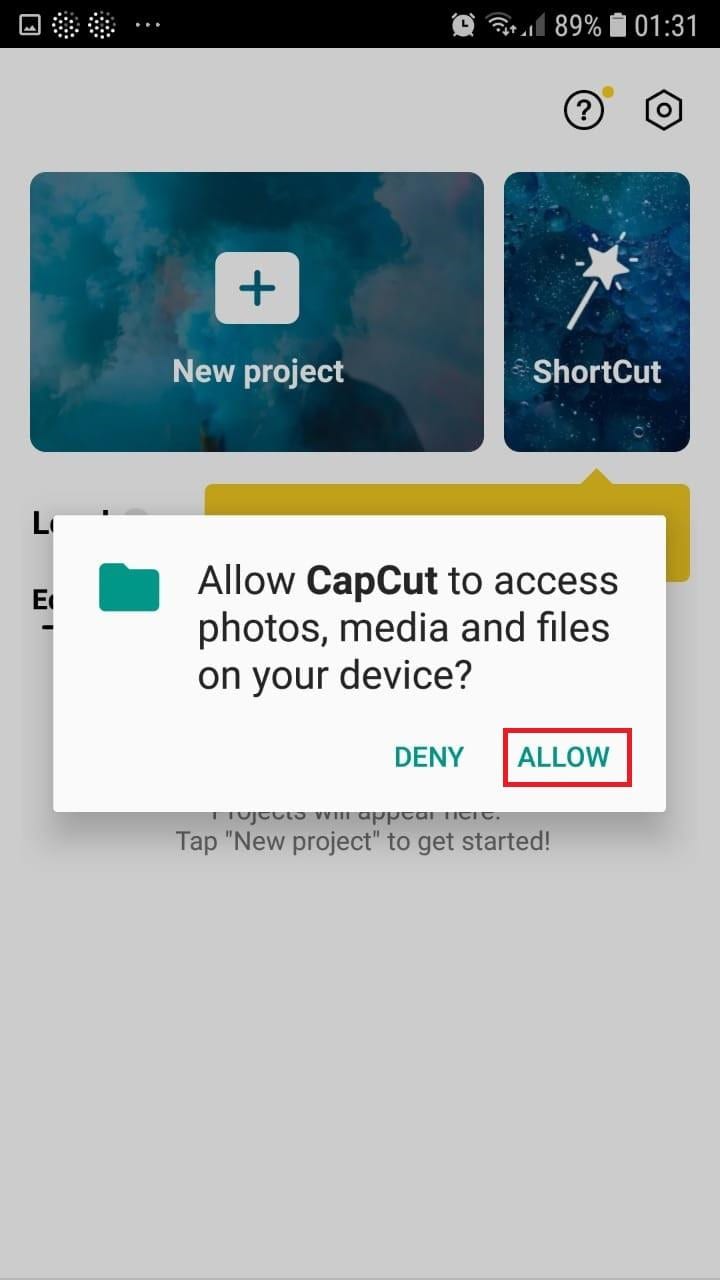
- To confirm your selection, click the green Accept This confirms that CapCut requires access to your photographs to function correctly. Tap on the button on the following pop-up window to gain access to all the photos. This is a one-time process that must be carried out the first time you launch the application.
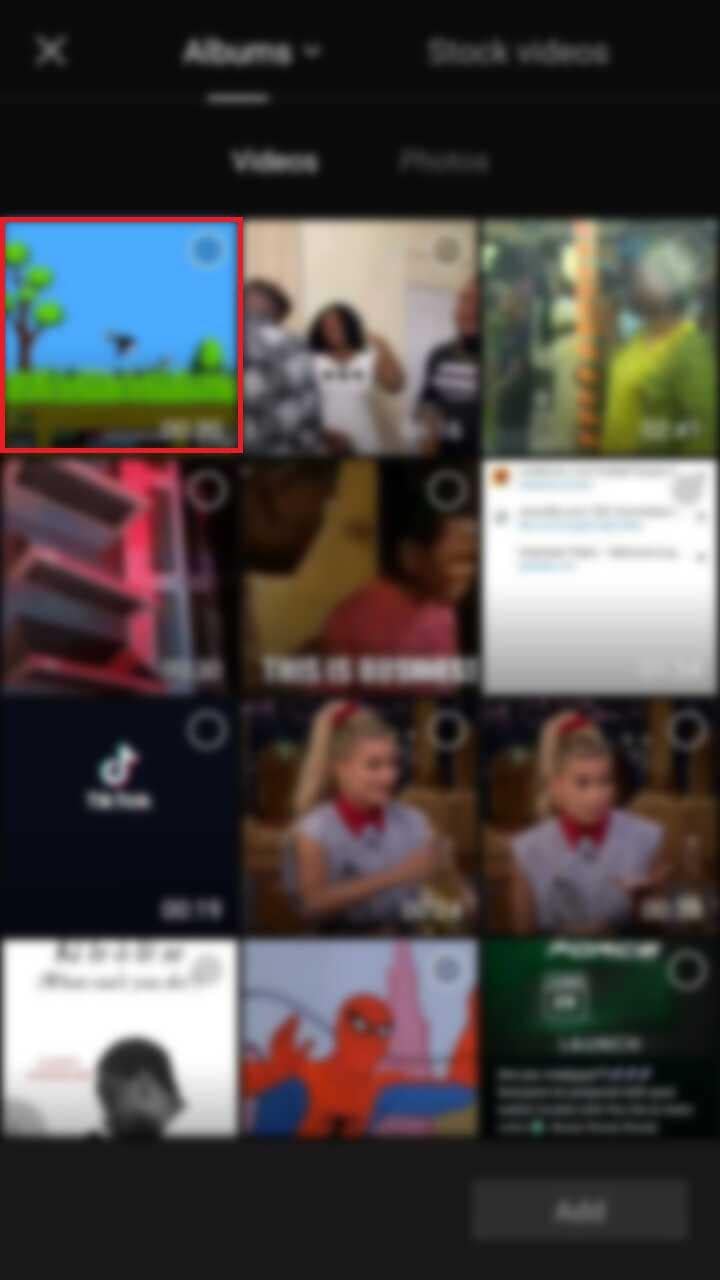
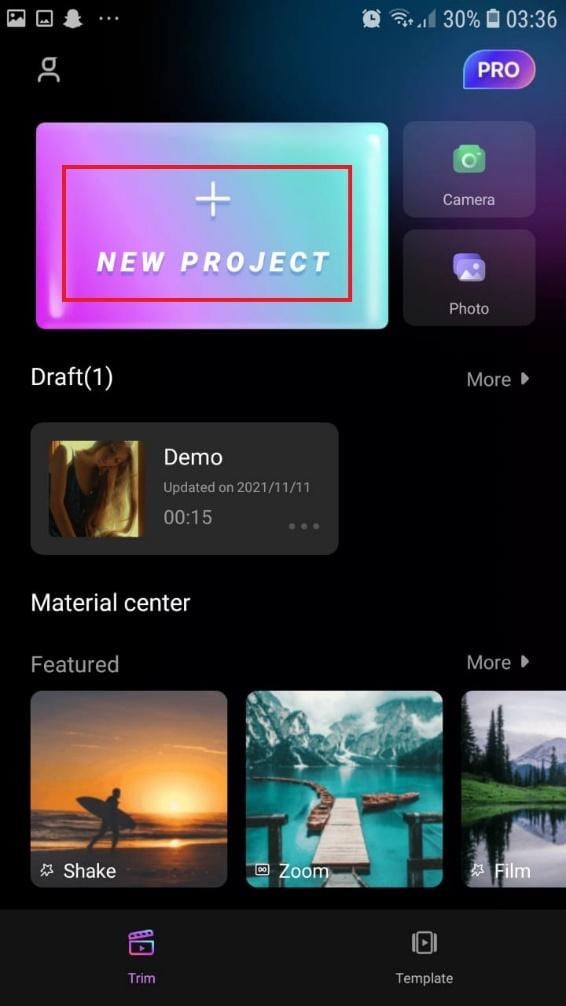
- Begin a New Project. After opening the app, press the “New Project“ icon to bring up a new screen showing your device’s videos.

- Choose a video clip. Locate the desired video clip for your project by scrolling through the pages displaying your camera roll. Tap the video’s thumbnail and then tap the “Add“ icon in the screen’s lower part.
- Get familiar with your workspace. Upon uploading your first clip, CapCut leads you to the primary workspace. This is where you will spend most of your time within the app. The preview panel, the timeline, and the toolbar are in order from top to bottom.
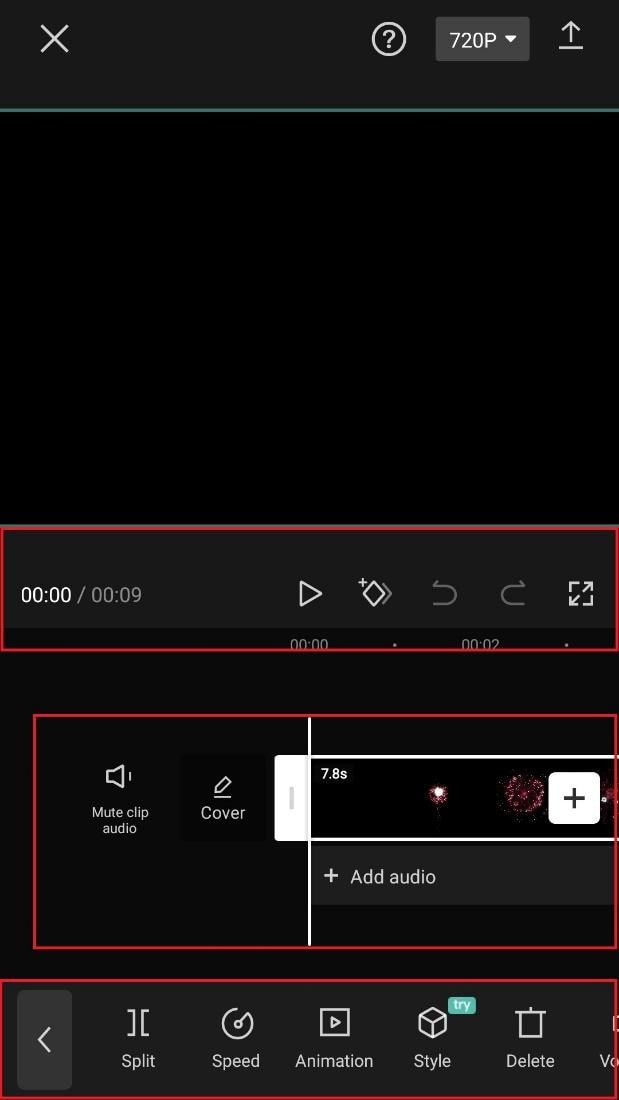
- View the toolbar and timeline. They represent your screen’s bottom half. The timeline, located below the preview panel, is where you’ll make all your adjustments. You can access all your video editing tools, including split, text, audio, effects, stickers, and more, on the toolbar at the bottom of your screen.
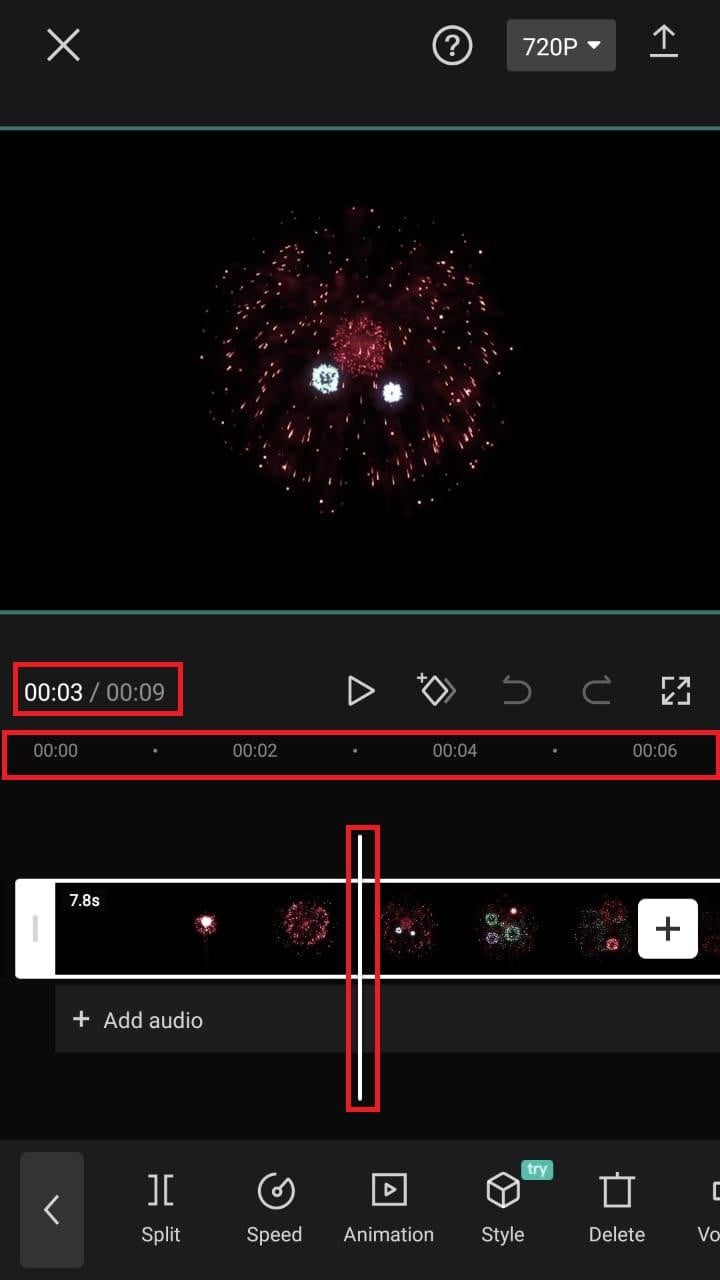
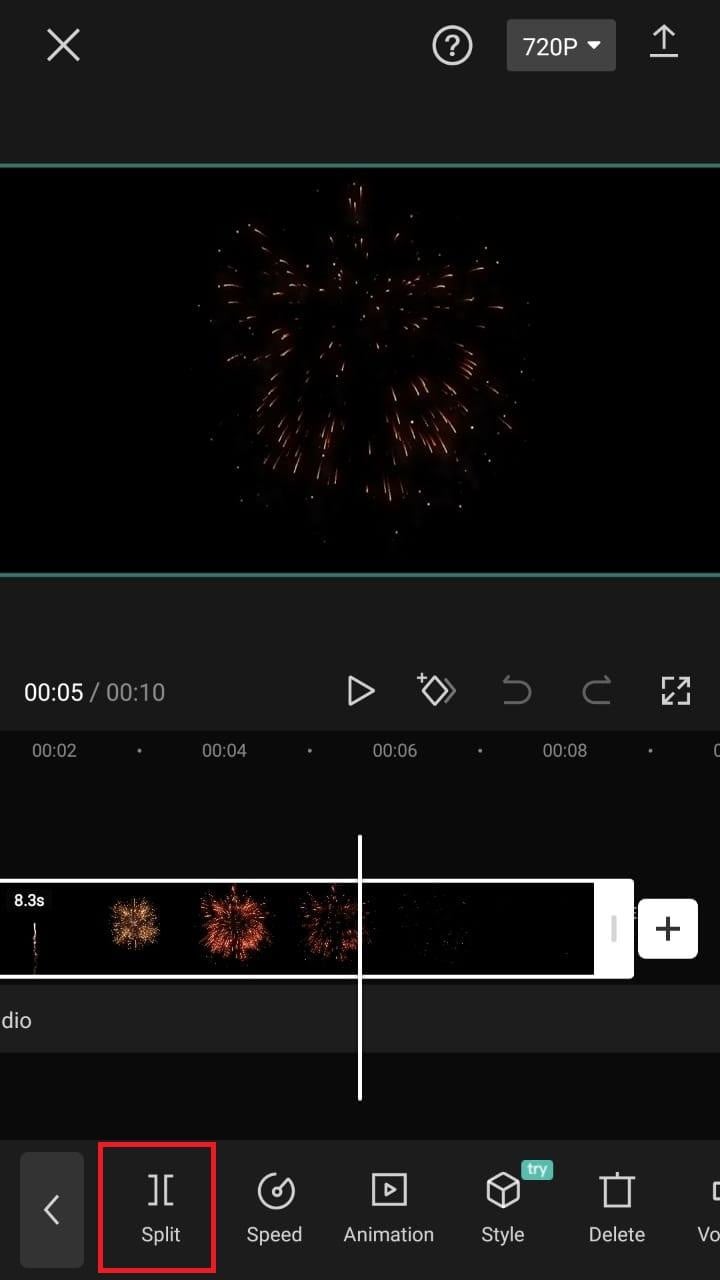
- Split video clips. To split a video clip in half, move the play head to the desired location on the timeline. Tap on your clip, then press the “Split“ toolbar icon. Your result now shows two different clips, not just one.
A Better Split-Screen Effect Video Editor
Filmora is one of the best free HD video makers and video editors with several functionalities, including text, backgrounds, filters, special effects, emoji, audio, and special effects.
Filmora is a feature-packed video editor which has a variety of tools to work with. With this video editor, producing memes, videos with images, pictures, music, stickers, and sound effects and editing videos for YouTube, Twitter, WhatsApp, Facebook, TikTok, and Instagram is simple and entertaining.
Free Download For Win 7 or later(64-bit)
Free Download For macOS 10.14 or later
Steps to Split Screen Video with Filmora
- Download Filmora from the App store
- After installation, launch it.
- Click on “Continue” to continue to use the app.

- Click on Allow to grant Filmora access to your photos and videos.
- You can now tap on “New Project” with the + Symbol.
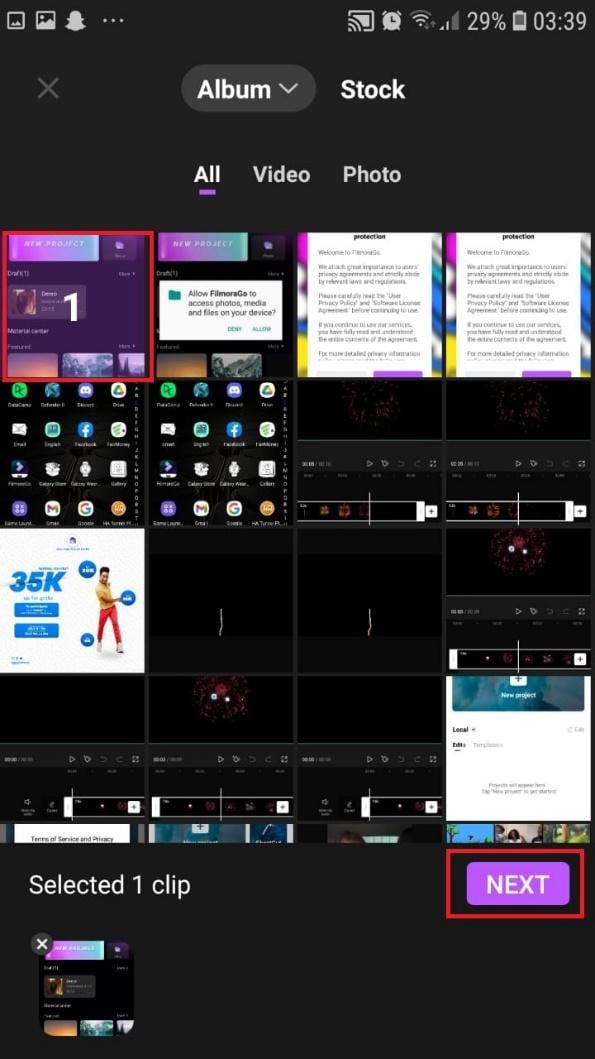
- Select your desired video and tap on “Next” at the bottom right of your screen
- You can select various options from the bottom of your screen to edit the selected video the way you like.

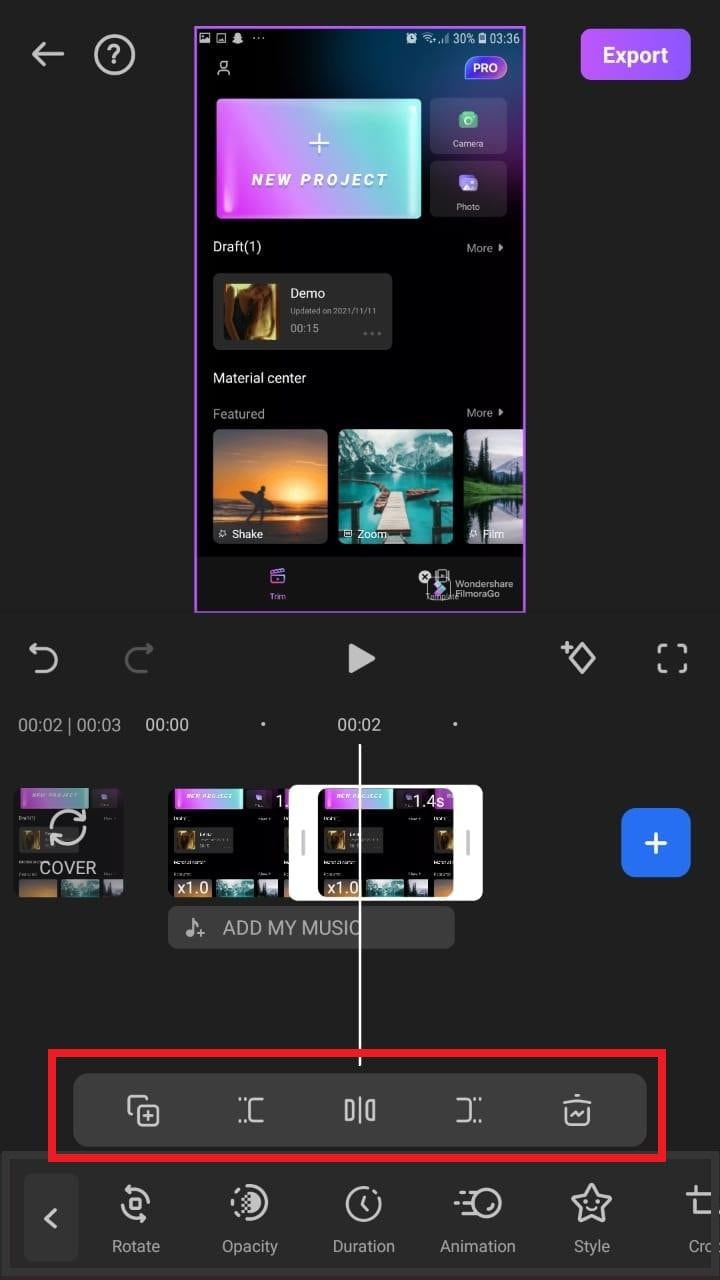
- Click on trim, and then you will see the different split-screen and collage feature options. Pick any that appeals to you.
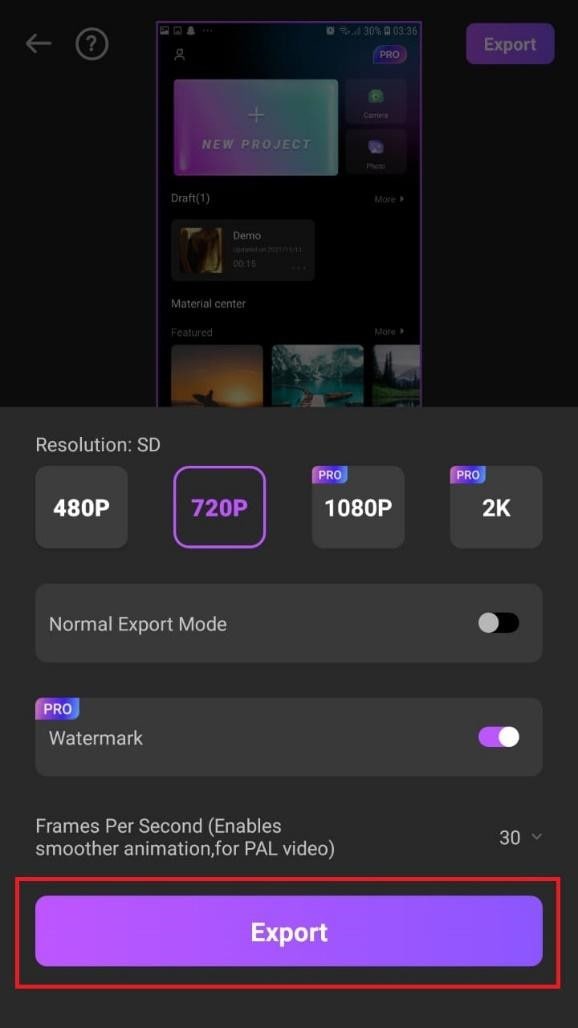
- When you are done with the editing, tap on “Export” at the top right of your screen.

- Go ahead and tap on “Export” on the next screen. Your video will be successfully exported and saved to your camera roll.
Using Filmora is very efficient in splitting your videos and making collage features for TikTok. It is a very simplified app available on both the Google Play Store and Apple Appstore.
Conclusion
TikTok is a platform that users use worldwide to create and share content. It could be pictures, videos, reels, or any other media type. Some people create videos for their audience on TikTok to educate them, while others do it to entertain them.
In any case, the goal is to build a more significant following on TikTok and garner greater attention from its users. You could even make money off the app.
One of the methods to impress your fans and explore multiple possibilities to build unique reels is to use the TikTok split-screen and collage feature effect available on TikTok. Although there are a few different ways to create a Split Screen on TikTok, the steps highlighted in this article are the most straightforward.
Free Download For macOS 10.14 or later
Steps to Split Screen Video with Filmora
- Download Filmora from the App store
- After installation, launch it.
- Click on “Continue” to continue to use the app.
- Click on Allow to grant Filmora access to your photos and videos.
- You can now tap on “New Project” with the + Symbol.
- Select your desired video and tap on “Next” at the bottom right of your screen
- You can select various options from the bottom of your screen to edit the selected video the way you like.
- Click on trim, and then you will see the different split-screen and collage feature options. Pick any that appeals to you.
- When you are done with the editing, tap on “Export” at the top right of your screen.
- Go ahead and tap on “Export” on the next screen. Your video will be successfully exported and saved to your camera roll.
Using Filmora is very efficient in splitting your videos and making collage features for TikTok. It is a very simplified app available on both the Google Play Store and Apple Appstore.
Conclusion
TikTok is a platform that users use worldwide to create and share content. It could be pictures, videos, reels, or any other media type. Some people create videos for their audience on TikTok to educate them, while others do it to entertain them.
In any case, the goal is to build a more significant following on TikTok and garner greater attention from its users. You could even make money off the app.
One of the methods to impress your fans and explore multiple possibilities to build unique reels is to use the TikTok split-screen and collage feature effect available on TikTok. Although there are a few different ways to create a Split Screen on TikTok, the steps highlighted in this article are the most straightforward.
If You Are Trying to Create a Countdown Effect, but You’re Not Sure Where to Start, Then This Post Is Going to Show You some Ways to Create a Countdown Animation for Your Videos
Many online marketers find that the animated countdown timer is the perfect way to bring a visual element to their videos while maintaining the quality and effectiveness of the video itself.
There are many ways to show a countdown timer on videos using animated GIFs. But they can be hard to implement or could cost a lot of money. You can use some free services, but they are limited in terms of features.
But not to worry, this post will go through a detailed process of creating an animated timer with 3 different methods. Before that, let’s discuss the benefits of using a timer for videos.
- Method 1: Make a Countdown Animation with a Professional Video Editing Software
- Method 2: Generate the timer with Free Online Countdown Timer Video Generators
- Method 3: Make a Countdown Timer with a Graphic Design Platform
- Cool Countdown
- Fitness Countdown
- Cinematic Countdown
- Neon Countdown
- Cyber Countdown
- Digital Countdown Pack
- Big Metal Countdown
- Glitch Countdown Transition
- Countdown To New Year
- Flashing Light Countdown
What are the benefits of using a countdown timer for videos/live streams?
Countdowns are a great way to get your message across and get your viewers excited about your product or service. A countdown timer provides a very simple visual cue to help motivate yourself and your audience to start watching the video.
It also works well with vlogs and YouTube, seamlessly transitioning from one part of your video to the next. This works best when your video isn’t about the product itself (but rather a review, a demo, or something else that lends itself well to a countdown).
As you can see, the Vlogger uses a countdown timer at the beginning of his video. Vlogger uses a countdown timer to make it appear as if the time is running out because it adds urgency and suspense. As a viewer, you’ll want to hurry up and watch this video, so you don’t miss out on anything.
Let’s now dive deep into methods of creating countdown animation for videos.
Method 1: Make a Countdown Animation with a Professional Video Editing Software
The most common trend today is video content creation, and it’s everywhere. Videos are not only entertaining, but they have a significant impact on audience retention.
With a video editor, you can create compelling content that will entice your viewers to watch the whole thing. Moreover, it can also help you get started by adding captions, transitions, effects, etc.
If you’re ready to make your next project more engaging and interactive, you can try the best video editing software, Wondershare Filmora !

Wondershare Filmora is the industry standard when it comes to editing video. The video editing software industry is filled with features that promise to be faster, smarter, and easier to use than others.
Moreover, Wondershare has Filmstock effects that have revolutionized the world of video creators.
Filmstock is a collection of videos ready to be used with Filmora that contains more than 1,000 free stock footage clips of various scenes and locations, plus video effects, transitions, and titles, to make creating professional-quality videos faster and easier.
Let’s see some of its features that help us make animation countdown timers easily.
- Rich effects for you to choose customizing countdown animation at ease.
- You’re not stuck with traditional slow motion in your videos; you can add dynamism and energy to your videos with smooth animations.
- It has various countdown animation templates simplify the whole process, just drag-and-drop, everything gets done.
How to make a countdown animation with Filmora
You’re looking for an animated countdown timer for your website or your very first YouTube video, but you want one that stands out. You don’t want your visitors to think it’s generic or boring, so you’re thinking about how to make your countdown timer more interesting.
That’s where Filmora comes in. It’s an amazing tool that makes it easy to create countdown animations on websites or videos for almost any purpose. Let’s look at how to create your own cool, creative countdown timers using Filmora.
Free Download For Win 7 or later(64-bit)
Free Download For macOS 10.14 or later
Step1 Open Filmora and import the background video file from the media section.

Step2 After importing the video, go to elements options from the top tab.

Step3 After choosing elements, you’ll see the countdown tab on your left. Click on the countdown and choose any animation. You can adjust the animation duration, size, and audio.

Step4 Adjust the animation duration according to the background video, and finally, export your animated countdown timer.

Pros and Cons of using Video Editing Software to make a countdown animation
Pros
- You can save any countdown effects project as a project to be used in future videos
- You can create a vision of your brand concept in your way
- Free templates are available according to your brand and target audience
- More stable
Cons
- Standard out-of-the-box video editing software isn’t enough to create a professional-quality video
Method 2: Generate the timer with Free Online Countdown Timer Video Generators
If you’re trying to catch your audience’s attention by giving them a reason to ‘countdown’ to something, then you’ll want to use a countdown timer with some great free online countdown videos.
There are many countdown timer websites like;Biteable ,Kapwing ,Movavi ,and MakeWebVideo . But we’ve rounded up the best countdown video generator site you’ll ever see:
FlexClip

FlexClip is a powerful yet easy-to-use online video editor. Its music library is versatile and high-quality. It lets you pick and add favorite tracks without infringing worries. Apply interesting editing to make your videos look better by adding transitions, filters, text, and more.
FlexClip’s biggest advantage is its extensive amount of free media assets. Whether you’re a master or rookie with FlexClip, you’re capable of producing excellent videos with music. You can be a video guru or a video beginner. You’re capable of producing awesome videos with great sound using FlexClip.
Key Features:
- Provides a complete set of video-making processes.
- A diverse range of royalty-free music selection
- Loads of handy editing tools
- Thousands of ready-made templates
- Multiple advanced features like adding text, emoji, effects, and more
How to make a countdown animation with FlexClip
The FlexClip countdown creator is a leading video editor with many powerful features. To make your countdown video, click the Create a Video button below.
Step1 Set Your Countdown Video Background
Set your timer to how long you want your message to start your countdown. Usually, it’s 10 seconds.
Then add scenes and adjust the duration of scenes to make them all length. You can use the background color to make it more appealing to your audience.

Step2 Highlight Your Countdown with Animated Elements
Using the amazing elements, you can make your countdown interactive and much more fun. Just go to the sidebar and switch to the Elements options. Apply the elements you want, then customize them on size, position, and color.

Step3 Add the Number to Your Countdown
Now, add the numbers for the countdown, e.g., if you want a 10-second countdown, type in the number “10”. You can pick a basic text effect and manually enter the number.
After you’ve created the number, go to the timeline and control how long the number will appear and when it will disappear.

Step4 Add Music or Sound Effects to Your Countdown Video
FlexClip lets you upload your audio files from a local folder, or you can select one from FlexClip’s library. Once you’re done adding the countdown music, you can trim the duration, set it to start and end at any time, and use the fade-in/out effect to make the music match your countdown. Plus, you can also adjust the volume to make the music softer.

Step5 Preview and Export Your Countdown Video
You can preview it to see how the countdown video will look in the end, finally, hit export, and you’re done!
Method 3: Make a Countdown Timer with a Graphic Design Platform
Today’s graphic design platforms give designers more options than ever before, but many designers struggle to make the most of these resources. Let us share some tips and tricks on designing a countdown timer using the tools available through Canva, a graphic design platform.
Canva

Many types of graphic design software are available, and Canva is one of the best. While its critics may disagree, Canva is an undeniable tool to help millions of business owners and marketers improve their social media graphics and redesign their brand image without needing to learn graphic design.
Key Features:
- Drag and drop feature
- Free templates
- Background Removal Tool
- Canva Brand Kit
- Magic Resizing
How to make a countdown animation with Canva
Canva offers a range of great-looking countdown templates that’ll help you create one in just a few minutes. And if you need a simple countdown animation, you can download one of their free templates. Let’s make it from scratch:
Step1 Select The Background
With Canva, you get a wide range of free backgrounds. Click on the button labeled “Search.” Now choose the “light old film” background element and click Add.

Step2 Enter Your Text (Number)
Then select the text tab and choose any font style, color, and size.

Step3 Animate Text
Next, select the font again, and then, at the top, there’s an option for Text Animation.
Adding text animation to your countdown timer will make it more realistic and match your background better than a straight-up countdown timer.

Step4 Edit The Page Timing
Next, click on the “Edit Timing” option. You can set the timer for each page as per your choice

Step5 Duplicate The Page
Now, select the duplicate page option and change the number of duplicate pages from 3 to 2,1, with the same design and formatting.

Step6 Export / Download Video
You’re finally done! Click the Download button to export your design.
The background of this photo is not a static image, so you cannot select the JPG, PNG, or SVG. You must choose an MP4 video or a GIF when creating an animation.

Top 10 animated countdown effects to make your video like a Pro
Animated countdown effects are a great way to add some “pizzazz” to a simple video. They look awesome and are extremely effective in creating a memorable video. When used well, they can add some excitement to a boring video. We’ll go over the top 10 animated countdown effects from Filmstock
1. Cool Countdown

2. Fitness Countdown

3. Cinematic Countdown

4. Neon Countdown

5. Cyber Countdown

6. Digital Countdown Pack

7. Big Metal Countdown

8. Glitch Countdown Transition

9. Countdown To New Year

10. Flashing Light Countdown

How to use these effects in Wondershare Filmora
You can access Filmstock directly from the Filmora application or by visiting the website:
- Create a new project by clicking Filmora Video Editor in the menu.
- Select the audio effects tab, or go to the Audio tab, title tab. You will see the film stock option.
- Click the Visit Filmstock button, and you will be taken to the Filmstock website.
Free Download For Win 7 or later(64-bit)
Free Download For macOS 10.14 or later

- Log in to Filmstock using your Wondershare account.

- After the download, the new effects will be added to your project in the appropriate section (Audio, Title, Transitions, and Elements). You’ll also be able to preview each effect from this window.

![]()
Note: it is highly recommended to log in to Filmstock and Filmora with the same Wondershare ID.
Final Words
A countdown is a powerful tool to add suspense to your videos. It gives your audience more incentive to watch your video all the way through. Get this article, as it is the ultimate guide to making your countdown animations, plus the best video editing software, Wondershare Filmora.
Wondershare Filmora is an excellent place to be creative and make some terrific countdown timers that can improve your viewers’ overall experience. Use their templates to create a strong and engaging online presence. Your audience won’t be able to resist the mesmerizing, hypnotizing, and enthralling effects of Wondershare Filmora.
Free Download For Win 7 or later(64-bit)
Free Download For macOS 10.14 or later
- Cool Countdown
- Fitness Countdown
- Cinematic Countdown
- Neon Countdown
- Cyber Countdown
- Digital Countdown Pack
- Big Metal Countdown
- Glitch Countdown Transition
- Countdown To New Year
- Flashing Light Countdown
What are the benefits of using a countdown timer for videos/live streams?
Countdowns are a great way to get your message across and get your viewers excited about your product or service. A countdown timer provides a very simple visual cue to help motivate yourself and your audience to start watching the video.
It also works well with vlogs and YouTube, seamlessly transitioning from one part of your video to the next. This works best when your video isn’t about the product itself (but rather a review, a demo, or something else that lends itself well to a countdown).
As you can see, the Vlogger uses a countdown timer at the beginning of his video. Vlogger uses a countdown timer to make it appear as if the time is running out because it adds urgency and suspense. As a viewer, you’ll want to hurry up and watch this video, so you don’t miss out on anything.
Let’s now dive deep into methods of creating countdown animation for videos.
Method 1: Make a Countdown Animation with a Professional Video Editing Software
The most common trend today is video content creation, and it’s everywhere. Videos are not only entertaining, but they have a significant impact on audience retention.
With a video editor, you can create compelling content that will entice your viewers to watch the whole thing. Moreover, it can also help you get started by adding captions, transitions, effects, etc.
If you’re ready to make your next project more engaging and interactive, you can try the best video editing software, Wondershare Filmora !
Wondershare Filmora is the industry standard when it comes to editing video. The video editing software industry is filled with features that promise to be faster, smarter, and easier to use than others.
Moreover, Wondershare has Filmstock effects that have revolutionized the world of video creators.
Filmstock is a collection of videos ready to be used with Filmora that contains more than 1,000 free stock footage clips of various scenes and locations, plus video effects, transitions, and titles, to make creating professional-quality videos faster and easier.
Let’s see some of its features that help us make animation countdown timers easily.
- Rich effects for you to choose customizing countdown animation at ease.
- You’re not stuck with traditional slow motion in your videos; you can add dynamism and energy to your videos with smooth animations.
- It has various countdown animation templates simplify the whole process, just drag-and-drop, everything gets done.
How to make a countdown animation with Filmora
You’re looking for an animated countdown timer for your website or your very first YouTube video, but you want one that stands out. You don’t want your visitors to think it’s generic or boring, so you’re thinking about how to make your countdown timer more interesting.
That’s where Filmora comes in. It’s an amazing tool that makes it easy to create countdown animations on websites or videos for almost any purpose. Let’s look at how to create your own cool, creative countdown timers using Filmora.
Free Download For Win 7 or later(64-bit)
Free Download For macOS 10.14 or later
Step1 Open Filmora and import the background video file from the media section.
Step2 After importing the video, go to elements options from the top tab.
Step3 After choosing elements, you’ll see the countdown tab on your left. Click on the countdown and choose any animation. You can adjust the animation duration, size, and audio.
Step4 Adjust the animation duration according to the background video, and finally, export your animated countdown timer.
Pros and Cons of using Video Editing Software to make a countdown animation
Pros
- You can save any countdown effects project as a project to be used in future videos
- You can create a vision of your brand concept in your way
- Free templates are available according to your brand and target audience
- More stable
Cons
- Standard out-of-the-box video editing software isn’t enough to create a professional-quality video
Method 2: Generate the timer with Free Online Countdown Timer Video Generators
If you’re trying to catch your audience’s attention by giving them a reason to ‘countdown’ to something, then you’ll want to use a countdown timer with some great free online countdown videos.
There are many countdown timer websites like;Biteable ,Kapwing ,Movavi ,and MakeWebVideo . But we’ve rounded up the best countdown video generator site you’ll ever see:
FlexClip
FlexClip is a powerful yet easy-to-use online video editor. Its music library is versatile and high-quality. It lets you pick and add favorite tracks without infringing worries. Apply interesting editing to make your videos look better by adding transitions, filters, text, and more.
FlexClip’s biggest advantage is its extensive amount of free media assets. Whether you’re a master or rookie with FlexClip, you’re capable of producing excellent videos with music. You can be a video guru or a video beginner. You’re capable of producing awesome videos with great sound using FlexClip.
Key Features:
- Provides a complete set of video-making processes.
- A diverse range of royalty-free music selection
- Loads of handy editing tools
- Thousands of ready-made templates
- Multiple advanced features like adding text, emoji, effects, and more
How to make a countdown animation with FlexClip
The FlexClip countdown creator is a leading video editor with many powerful features. To make your countdown video, click the Create a Video button below.
Step1 Set Your Countdown Video Background
Set your timer to how long you want your message to start your countdown. Usually, it’s 10 seconds.
Then add scenes and adjust the duration of scenes to make them all length. You can use the background color to make it more appealing to your audience.
Step2 Highlight Your Countdown with Animated Elements
Using the amazing elements, you can make your countdown interactive and much more fun. Just go to the sidebar and switch to the Elements options. Apply the elements you want, then customize them on size, position, and color.
Step3 Add the Number to Your Countdown
Now, add the numbers for the countdown, e.g., if you want a 10-second countdown, type in the number “10”. You can pick a basic text effect and manually enter the number.
After you’ve created the number, go to the timeline and control how long the number will appear and when it will disappear.
Step4 Add Music or Sound Effects to Your Countdown Video
FlexClip lets you upload your audio files from a local folder, or you can select one from FlexClip’s library. Once you’re done adding the countdown music, you can trim the duration, set it to start and end at any time, and use the fade-in/out effect to make the music match your countdown. Plus, you can also adjust the volume to make the music softer.
Step5 Preview and Export Your Countdown Video
You can preview it to see how the countdown video will look in the end, finally, hit export, and you’re done!
Method 3: Make a Countdown Timer with a Graphic Design Platform
Today’s graphic design platforms give designers more options than ever before, but many designers struggle to make the most of these resources. Let us share some tips and tricks on designing a countdown timer using the tools available through Canva, a graphic design platform.
Canva
Many types of graphic design software are available, and Canva is one of the best. While its critics may disagree, Canva is an undeniable tool to help millions of business owners and marketers improve their social media graphics and redesign their brand image without needing to learn graphic design.
Key Features:
- Drag and drop feature
- Free templates
- Background Removal Tool
- Canva Brand Kit
- Magic Resizing
How to make a countdown animation with Canva
Canva offers a range of great-looking countdown templates that’ll help you create one in just a few minutes. And if you need a simple countdown animation, you can download one of their free templates. Let’s make it from scratch:
Step1 Select The Background
With Canva, you get a wide range of free backgrounds. Click on the button labeled “Search.” Now choose the “light old film” background element and click Add.
Step2 Enter Your Text (Number)
Then select the text tab and choose any font style, color, and size.
Step3 Animate Text
Next, select the font again, and then, at the top, there’s an option for Text Animation.
Adding text animation to your countdown timer will make it more realistic and match your background better than a straight-up countdown timer.
Step4 Edit The Page Timing
Next, click on the “Edit Timing” option. You can set the timer for each page as per your choice
Step5 Duplicate The Page
Now, select the duplicate page option and change the number of duplicate pages from 3 to 2,1, with the same design and formatting.
Step6 Export / Download Video
You’re finally done! Click the Download button to export your design.
The background of this photo is not a static image, so you cannot select the JPG, PNG, or SVG. You must choose an MP4 video or a GIF when creating an animation.
Top 10 animated countdown effects to make your video like a Pro
Animated countdown effects are a great way to add some “pizzazz” to a simple video. They look awesome and are extremely effective in creating a memorable video. When used well, they can add some excitement to a boring video. We’ll go over the top 10 animated countdown effects from Filmstock
1. Cool Countdown
2. Fitness Countdown
3. Cinematic Countdown
4. Neon Countdown
5. Cyber Countdown
6. Digital Countdown Pack
7. Big Metal Countdown
8. Glitch Countdown Transition
9. Countdown To New Year
10. Flashing Light Countdown
How to use these effects in Wondershare Filmora
You can access Filmstock directly from the Filmora application or by visiting the website:
- Create a new project by clicking Filmora Video Editor in the menu.
- Select the audio effects tab, or go to the Audio tab, title tab. You will see the film stock option.
- Click the Visit Filmstock button, and you will be taken to the Filmstock website.
Free Download For Win 7 or later(64-bit)
Free Download For macOS 10.14 or later
- Log in to Filmstock using your Wondershare account.
- After the download, the new effects will be added to your project in the appropriate section (Audio, Title, Transitions, and Elements). You’ll also be able to preview each effect from this window.
![]()
Note: it is highly recommended to log in to Filmstock and Filmora with the same Wondershare ID.
Final Words
A countdown is a powerful tool to add suspense to your videos. It gives your audience more incentive to watch your video all the way through. Get this article, as it is the ultimate guide to making your countdown animations, plus the best video editing software, Wondershare Filmora.
Wondershare Filmora is an excellent place to be creative and make some terrific countdown timers that can improve your viewers’ overall experience. Use their templates to create a strong and engaging online presence. Your audience won’t be able to resist the mesmerizing, hypnotizing, and enthralling effects of Wondershare Filmora.
Free Download For Win 7 or later(64-bit)
Free Download For macOS 10.14 or later
Also read:
- New 12 Top Marketing Slideshow Templates for 2024
- In 2024, Is Augmented Reality Conferencing the Future of Workplace Collaboration?
- Updated In 2024, Final Cut Pro - How to Download and Install It
- New The Ultimate Guide to Slideshow Maker with Music for 2024
- New Detailed Tutorial to Merge Videos in VLC Media Player for 2024
- Do You Wish to Learn About some Tools to Slow Down a Video? Discover How to Slow Down Time Lapse on iPhone Throughout This Article for 2024
- Kdenlive Review – Is It The Best Video Editor?
- Updated Using the Best Templates to Create Slow Motion Videos on CapCut
- Updated Why You Should Master Slideshows In Lightroom, Fresh Insight for 2024
- Updated AI Features of Wondershare Filmora - Silence Detection in Videos
- Updated Learning Unique Ways to Slow Down Time Lapse on iPhone
- New Best 10 Fun Discord Bots You Need
- 2024 Approved Want to Buy a Drone for Better Videography Creating? This Article Will Review 6 of the Best Drones on the Market for You to Consider
- Updated In 2024, Learn Color Correction in After Effects with These Videos
- Best Applications That Can Help Apply The Best VHS Camera Effect
- Best Android Data Recovery - Retrieve Lost Photos from Nokia C110.
- Everything You Need To Know About Unlocked Apple iPhone 14 Plus
- In 2024, How to Turn Off Google Location to Stop Tracking You on Vivo Y100i | Dr.fone
- In 2024, Unlock Your Vivo X100 Phone with Ease The 3 Best Lock Screen Removal Tools
- Device unlock Oppo A79 5G
- Undelete lost messages from Motorola Edge 40 Pro
- In 2024, 2 Ways to Transfer Text Messages from Lava Blaze 2 Pro to iPhone 15/14/13/12/11/X/8/ | Dr.fone
- How Do You Get Sun Stone Evolutions in Pokémon For Apple iPhone 12? | Dr.fone
- In 2024, Why does the pokemon go battle league not available On Vivo S18 | Dr.fone
- How to Fix Android App Not Installed Error on Infinix Hot 40 Quickly? | Dr.fone
- Top 4 SIM Location Trackers To Easily Find Your Lost Samsung Galaxy A15 5G Device
- Troubleshooting Error Connecting to the Apple ID Server On iPhone 11 Pro
- In 2024, Easy Ways to Manage Your Motorola Razr 40 Ultra Location Settings | Dr.fone
- Why Does My Samsung Galaxy S23 FE Keep Turning Off By Itself? 6 Fixes Are Here | Dr.fone
- In 2024, How to Change/Fake Your Apple iPhone 13 Pro Location on Viber | Dr.fone
- Title: Easiest Fix Included! Top 5 Ways to Convert HDR to SDR Videos for 2024
- Author: Chloe
- Created at : 2024-05-20 03:38:01
- Updated at : 2024-05-21 03:38:01
- Link: https://ai-editing-video.techidaily.com/easiest-fix-included-top-5-ways-to-convert-hdr-to-sdr-videos-for-2024/
- License: This work is licensed under CC BY-NC-SA 4.0.
