
Easily Sync Audio With Video With Filmora

Easily Sync Audio With Video With Filmora
Syncing audio with video is an integral part of video editing for any video creator. But believe me; it’s not such a difficult task if you know what to do. The point is IF YOU KNOW WHAT TO DO.
That’s why in this brief guide, we’ll show you the simplest way to sync audio with video using a fantastic video editor easily. But wait a minute, some of you might be confused about why we even need to sync separate audio & video when a single camera can record both. So let’s first answer this simple question.
Part 1: Why Do We Need to Sync Separate Audio & Video?
Creating great video needs extraordinary video graphics, content, and top-notch audio. And you can’t expect a single camera to achieve all these goals. That’s why all professional video creators use a specialized camera for recording with a separate audio recording device.
You might think it’s an exaggeration, but this small change can have massive effects on the quality of your video. Especially the background noise removal effect of separate external microphones.
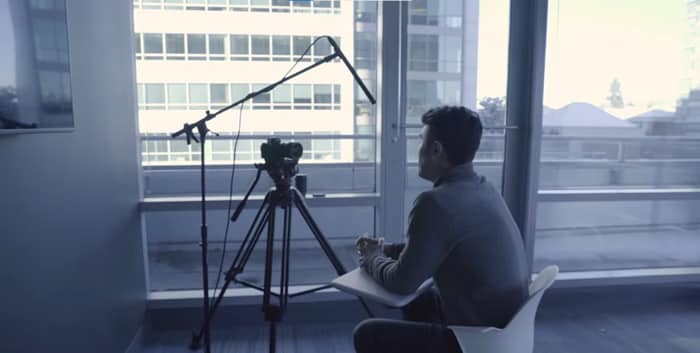
But the downside of using this method is that after the recording is complete, you must sync these audio and video files. And if you don’t do it right, all the effort goes to the drain within a split second. Well, nobody wants to watch a video with an audio lag. Isn’t it?
Correctly synching an audio file with a video is easier than you think. You just need to prepare beforehand and use a suitable video editing tool. So considering these factors, let’s first see what preparations we need. After that, we’ll recommend a top-class video editing tool to achieve this goal in detailed steps. Why are we still waiting? Let’s begin our journey.
Part 2: Preparation for Syncing Audio With Video During Recording
You must make some preparations to sync an audio file with a video properly. It’s to have a sound spike to match the footage properly with the separate audio file. And it might look disturbing, but even a simple Clap might do the job.
And if you want a professional way, just imagine the clapper board. You must have seen it in the film industry. This clapper board is used not only to mark the shot but also to create a sound spike when it claps. We use this audio spike as a reference to sync the audio files with the video.

Every time you cut your shot, remember to clap on camera again the next time you roll. It’s best to clap before you say “Action” or speak so that it’s easy to find and sync when editing. But if you forget, you can also clap at the end of the shot before you cut. That is called a Tail Slate!!!
After you’ve recorded your video like this, the next step is pretty simple. The video editor we recommend is no other than the world’s leading tool in the market, Wondershare Filmora. Let’s move forward and see how to sync audio with video using Filmora .
Part 3: How To Sync Audio With Video Using Filmora
Before we dive into the step-by-step guide, here’s a brief overview of Filmora.
Wondershare Filmora
Filmora is one of the most used video editors that can help all video creators to deliver the best they can. This incredible software from Wondershare contains multiple features that can polish any video.
Free Download For Win 7 or later(64-bit)
Free Download For macOS 10.14 or later
Moreover, the vast arsenal of video effects, images, short clips, AI avatars, and many other things are also available. You just have to pick out the one you like and add it to your video with just a single click.
On top of that, you can also adjust the audio files like audio ducking, silent detection, audio mixing, and synching audio with the video files.
As far as the audio synching is concerned, you can do it either manually or with auto synchronization. And we will explain both of these processes in a stepwise manner to give you complete mastery over your audio synching. Let’s start with the manual process first.
Steps To Manually Sync Audio With Video Using Filmora
Step1Download & install
If you haven’t downloaded the latest version of Filmora yet, click the button below to download it without any cost. And after the download is completed, you can install it on your device right away.
Free Download For Win 7 or later(64-bit)
Free Download For macOS 10.14 or later
Step2Import your files
The next step is to import all the files. Launch the Filmora and click on the “New Project” button from the opening interface.

When a new project is created, you’ll see an “Import Media” section on it. Click on this section to browse your audio and video files from the computer. Or you can also drag and drop these files here to import them.

Step3Prepare your files
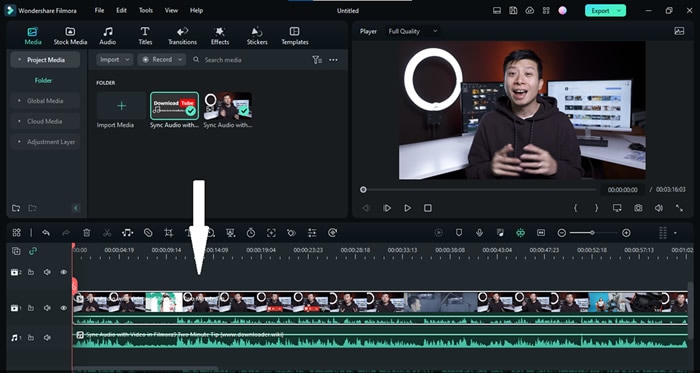
Now, it’s time to prepare our files for synchronization. First, drag the video file down to the timeline from the “Import Media” section. After that, drag the audio file in the same way below the video on the panel.
Step4Sync the audio & video files using the audio spike
Now that the video and audio files are on the timeline, you’ll have to find the moment you clap your hands. Look at the waveform from the in-camera audio and the independent audio track. At the moment you clap, we’ll see a spike.
Bonus Tip: If you can’t find the audio spike, zoom the panel to make it easier.
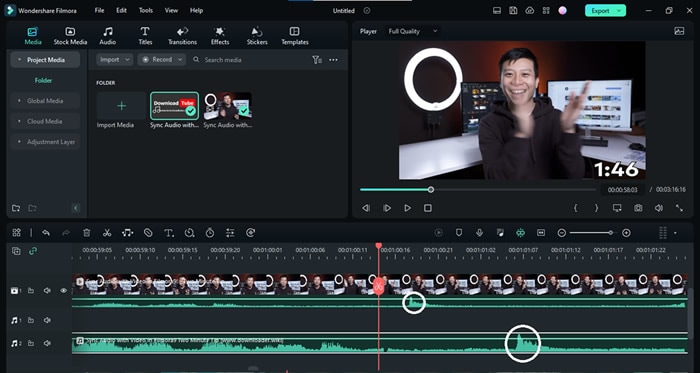
Now take the independent audio clip and align it so that both the spikes match.
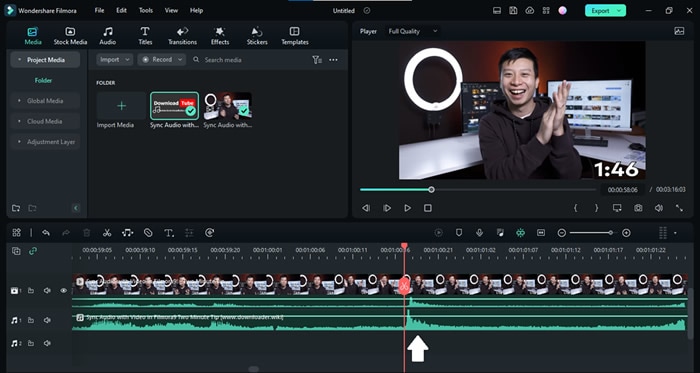
That’s it! We just need to remove the in-camera audio now. Let’s see how to do it now.
Step5Remove the audio from the video footage
To detach the audio in the video footage, right-click on this file and select the “Detach Audio” option. Or you can also use the “Ctrl+Alt+D” as the hotkey.
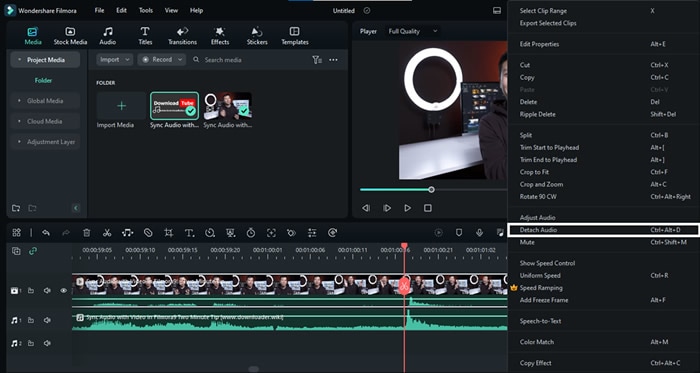
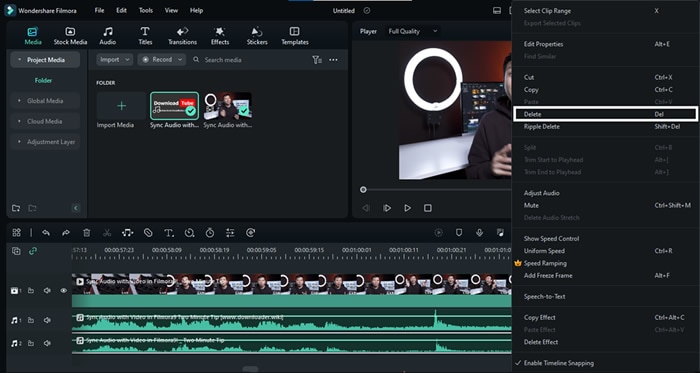
Once the audio file has been separated, you can move forward and delete it. To delete this audio, right-click on it and select “Delete.”
Step6Enjoy your video with the new audio track
So here we go. Our video file has been synced with the high-quality audio file. You can now hit the Export button to get this edited file. But wait a minute. Didn’t we say we’ll show you a method to automatically sync audio with video? Let’s start this method now.
Steps To Automatically Sync Audio With Video Using Filmora
Did you find the above method troubling? Well, be assured because Wondershare Filmora can also automatically sync your audio file with video in a single click. Here are the steps to achieve this feat.
Free Download For Win 7 or later(64-bit)
Free Download For macOS 10.14 or later
Step1Prepare your files
This method’s starting process is the same as the previous one. You’ll need to download the Filmora and prepare your file on the timeline by importing them on a New Project.
Step2Select both audio & video files
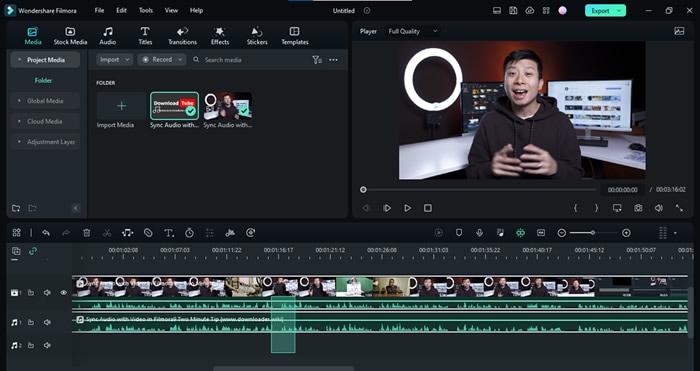
Once you’ve got everything ready, select both your audio and files from the timeline.
Step3Click on the auto synchronization icon
When you select these files, you’ll see that the “Auto Synchronization” icon has appeared on the toolbar below the Import Media section. Click on this icon and wait for the magic.
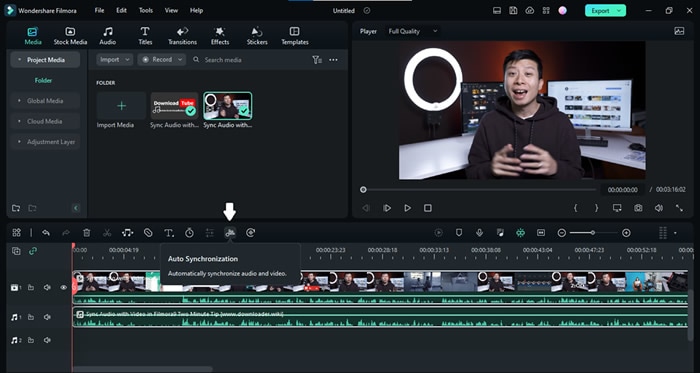
Remember that you need a Premium ID of Wondershare Filmora to use the Auto Synchronization option.
Step4Wait until the syncing is completed
Filmora will start synchronizing your files, and you’ll see the “Synchronization in process” prompt on the screen. Wait until the process is completed.
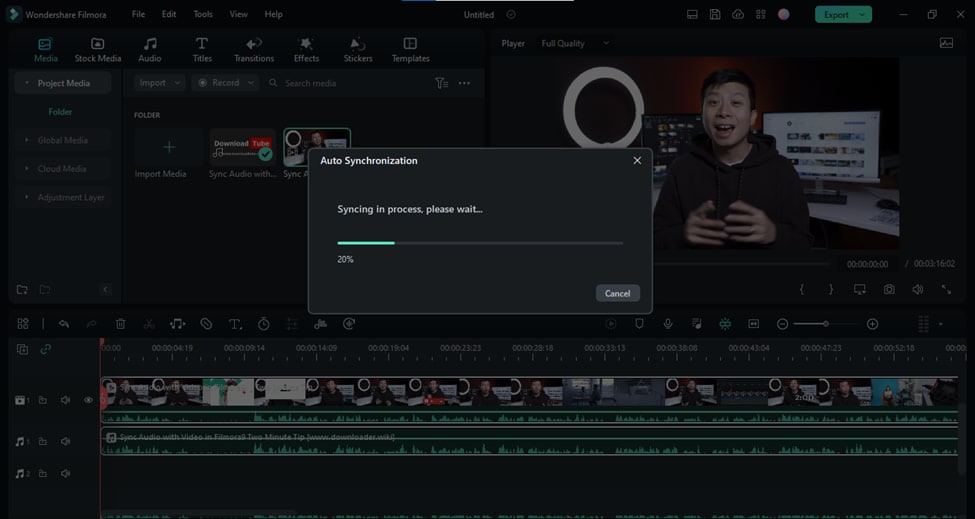
Step5Finish your editing
You can finish your editing when the separate audio file perfectly aligns with the video file. Delete the audio from the in-camera video file and hit the “Export” button.
Congratulations! We have successfully synced separate audio and video files. Now let’s take a look at some hot FAQs before we end our guide.
Part 4: FAQs About Synching Audio With Video
Is auto synchronization better than manual syncing?
Well, auto synchronization is no doubt easier than manual syncing. But that doesn’t mean you don’t need the manual process anymore. Many situations may arise where you may be left with no choice but to use the manual syncing of separate audio and video files. So make sure to properly learn both these methods, and each one of them will definitely come in handy someday.
How can we sync audio & video for free?
Syncing audio and video files for free is not a difficult task. Download the Filmora right now, and after installation, you can freely sync any Audio file with its corresponding video file by using the manual method described above.
Conclusion
For any video creator, knowing how to sync audio with video is a must. That’s because most creators record audio and video separately for higher quality.
This brief guide has covered all the details about how to sync audio and video files using an outstanding video editor, Wondershare Filmora . We hope it comes in handy.
Free Download For Win 7 or later(64-bit)
Free Download For macOS 10.14 or later
Free Download For macOS 10.14 or later
Moreover, the vast arsenal of video effects, images, short clips, AI avatars, and many other things are also available. You just have to pick out the one you like and add it to your video with just a single click.
On top of that, you can also adjust the audio files like audio ducking, silent detection, audio mixing, and synching audio with the video files.

As far as the audio synching is concerned, you can do it either manually or with auto synchronization. And we will explain both of these processes in a stepwise manner to give you complete mastery over your audio synching. Let’s start with the manual process first.
Steps To Manually Sync Audio With Video Using Filmora
Step1Download & install
If you haven’t downloaded the latest version of Filmora yet, click the button below to download it without any cost. And after the download is completed, you can install it on your device right away.
Free Download For Win 7 or later(64-bit)
Free Download For macOS 10.14 or later
Step2Import your files
The next step is to import all the files. Launch the Filmora and click on the “New Project” button from the opening interface.

When a new project is created, you’ll see an “Import Media” section on it. Click on this section to browse your audio and video files from the computer. Or you can also drag and drop these files here to import them.

Step3Prepare your files
Now, it’s time to prepare our files for synchronization. First, drag the video file down to the timeline from the “Import Media” section. After that, drag the audio file in the same way below the video on the panel.

Step4Sync the audio & video files using the audio spike
Now that the video and audio files are on the timeline, you’ll have to find the moment you clap your hands. Look at the waveform from the in-camera audio and the independent audio track. At the moment you clap, we’ll see a spike.
Bonus Tip: If you can’t find the audio spike, zoom the panel to make it easier.

Now take the independent audio clip and align it so that both the spikes match.

That’s it! We just need to remove the in-camera audio now. Let’s see how to do it now.
Step5Remove the audio from the video footage
To detach the audio in the video footage, right-click on this file and select the “Detach Audio” option. Or you can also use the “Ctrl+Alt+D” as the hotkey.

Once the audio file has been separated, you can move forward and delete it. To delete this audio, right-click on it and select “Delete.”

Step6Enjoy your video with the new audio track
So here we go. Our video file has been synced with the high-quality audio file. You can now hit the Export button to get this edited file. But wait a minute. Didn’t we say we’ll show you a method to automatically sync audio with video? Let’s start this method now.
Steps To Automatically Sync Audio With Video Using Filmora
Did you find the above method troubling? Well, be assured because Wondershare Filmora can also automatically sync your audio file with video in a single click. Here are the steps to achieve this feat.
Free Download For Win 7 or later(64-bit)
Free Download For macOS 10.14 or later
Step1Prepare your files
This method’s starting process is the same as the previous one. You’ll need to download the Filmora and prepare your file on the timeline by importing them on a New Project.
Step2Select both audio & video files
Once you’ve got everything ready, select both your audio and files from the timeline.

Step3Click on the auto synchronization icon
When you select these files, you’ll see that the “Auto Synchronization” icon has appeared on the toolbar below the Import Media section. Click on this icon and wait for the magic.

Remember that you need a Premium ID of Wondershare Filmora to use the Auto Synchronization option.
Step4Wait until the syncing is completed
Filmora will start synchronizing your files, and you’ll see the “Synchronization in process” prompt on the screen. Wait until the process is completed.

Step5Finish your editing
You can finish your editing when the separate audio file perfectly aligns with the video file. Delete the audio from the in-camera video file and hit the “Export” button.
Congratulations! We have successfully synced separate audio and video files. Now let’s take a look at some hot FAQs before we end our guide.
Part 4: FAQs About Synching Audio With Video
Is auto synchronization better than manual syncing?
Well, auto synchronization is no doubt easier than manual syncing. But that doesn’t mean you don’t need the manual process anymore. Many situations may arise where you may be left with no choice but to use the manual syncing of separate audio and video files. So make sure to properly learn both these methods, and each one of them will definitely come in handy someday.
How can we sync audio & video for free?
Syncing audio and video files for free is not a difficult task. Download the Filmora right now, and after installation, you can freely sync any Audio file with its corresponding video file by using the manual method described above.
Conclusion
For any video creator, knowing how to sync audio with video is a must. That’s because most creators record audio and video separately for higher quality.
This brief guide has covered all the details about how to sync audio and video files using an outstanding video editor, Wondershare Filmora . We hope it comes in handy.
Free Download For Win 7 or later(64-bit)
Free Download For macOS 10.14 or later
Kinetic Typography Text Effect 【EASY&FAST】
Preparation
What you need to prepare:
- A computer (Windows or macOS)
- Your video materials.
- Filmora video editor
Step 1
Go ahead and download the Filmora video editor before all else. The program will install and start automatically. Just hit “Download” and then “Install”.
Step 2
Once the program starts, open a New Project. Then, go to “Sample Color” and drag any color you want to the Timeline.
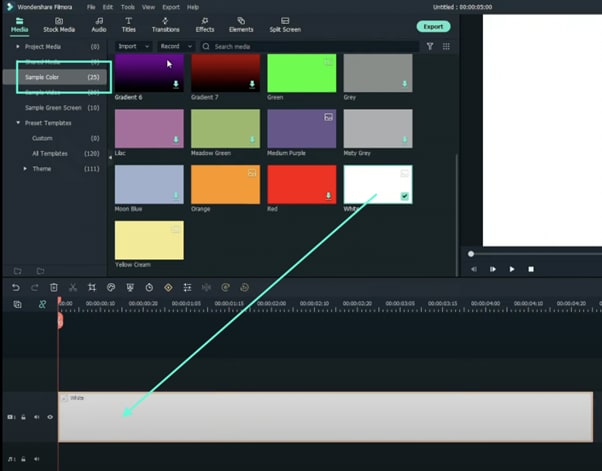
Step 3
Now, head over to the “Titles” tab and drag the Basic Title to the Timeline. Place it above the Sample Color clip.
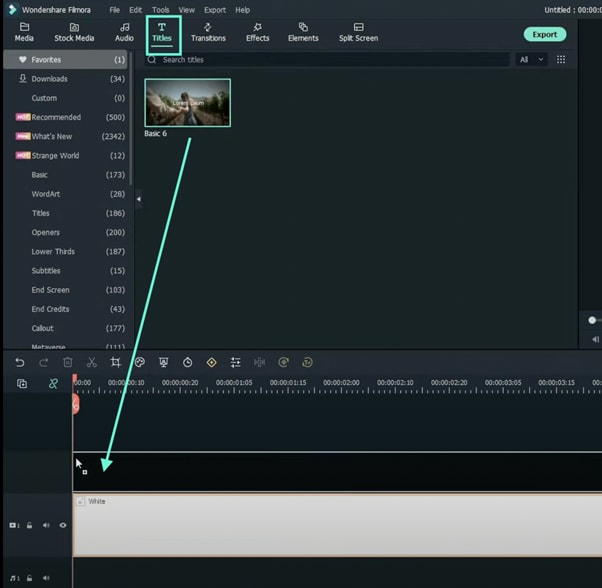
Step 4
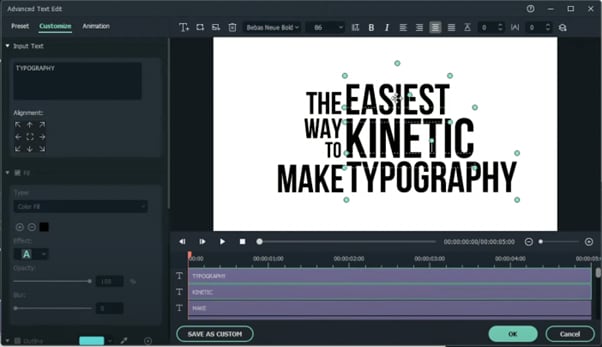
Right-click on the Title clip in the Timeline and select Edit Properties from the menu. From there, click on “ADVANCED” to open the advanced settings. Here, you can change the font, adjust the text size, and place your titles wherever you want on the screen.
Step 5
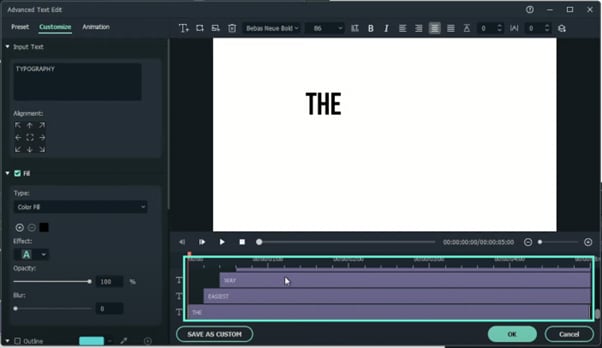
Now, start with the second text layer from the bottom and move it 5 frames forward. Move each text layer above 5 layers forward from the previous layer. This will display each word a few milliseconds after the previous one.
When you’re done, click OK.
Step 6
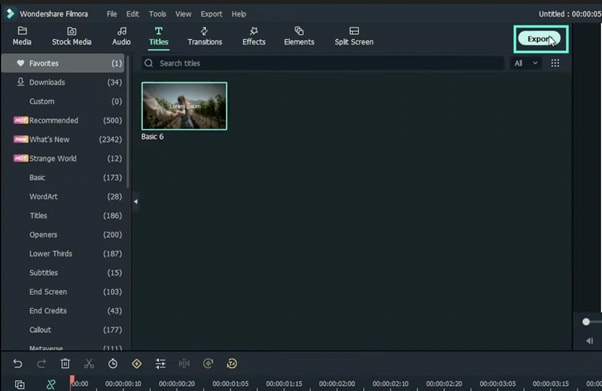
Export the Timeline to save your text animation as a new clip.
Step 7
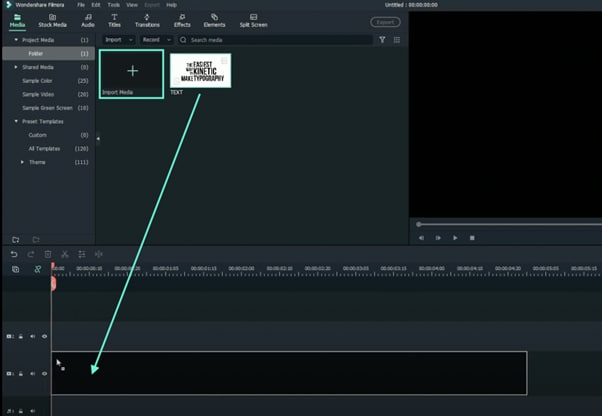
Now, delete all the clips from the Timeline and import the text video you just exported. Drag it to the Timeline.
Step 8
Right-click on the clip in the Timeline and go to Edit Properties.
Step 9
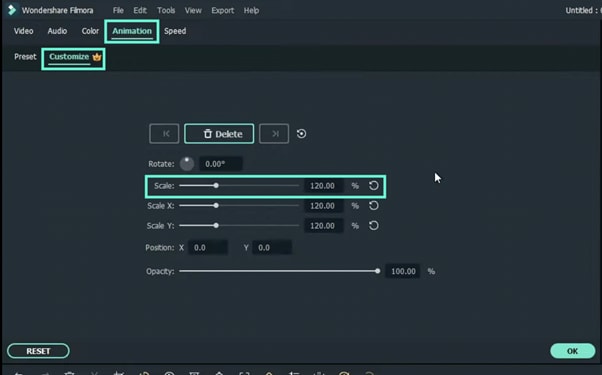
Click on the Animation tab. Then, go to the Customize tab. Here, change the Scale setting to 120%.
Step 10
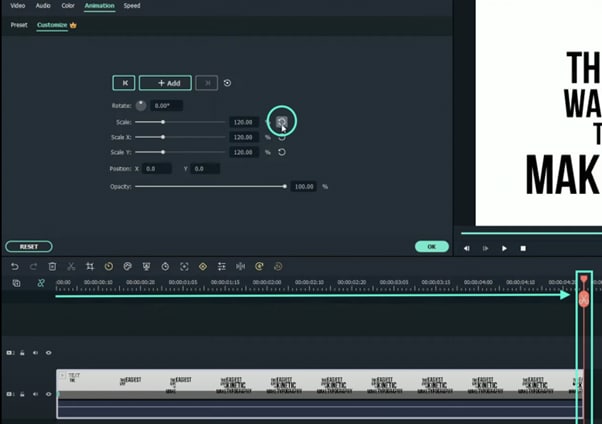
Next, move the Playhead to the end of the clip in the timeline. Then, reset the Scale and click OK.
Step 11
Watch the final preview. Then, Render and Export the video and you’re done. Congratulations.
Summary
What you’ve learned:
- How to create a kinetic movement effect on text in Filmora
- How to adjust the scale of a video in Filmora
- Adjust and manipulate text layers
What you need to prepare:
- A computer (Windows or macOS)
- Your video materials.
- Filmora video editor
Step 1
Go ahead and download the Filmora video editor before all else. The program will install and start automatically. Just hit “Download” and then “Install”.
Step 2
Once the program starts, open a New Project. Then, go to “Sample Color” and drag any color you want to the Timeline.

Step 3
Now, head over to the “Titles” tab and drag the Basic Title to the Timeline. Place it above the Sample Color clip.

Step 4
Right-click on the Title clip in the Timeline and select Edit Properties from the menu. From there, click on “ADVANCED” to open the advanced settings. Here, you can change the font, adjust the text size, and place your titles wherever you want on the screen.

Step 5
Now, start with the second text layer from the bottom and move it 5 frames forward. Move each text layer above 5 layers forward from the previous layer. This will display each word a few milliseconds after the previous one.
When you’re done, click OK.

Step 6
Export the Timeline to save your text animation as a new clip.

Step 7
Now, delete all the clips from the Timeline and import the text video you just exported. Drag it to the Timeline.

Step 8
Right-click on the clip in the Timeline and go to Edit Properties.
Step 9
Click on the Animation tab. Then, go to the Customize tab. Here, change the Scale setting to 120%.

Step 10
Next, move the Playhead to the end of the clip in the timeline. Then, reset the Scale and click OK.

Step 11
Watch the final preview. Then, Render and Export the video and you’re done. Congratulations.
Summary
What you’ve learned:
- How to create a kinetic movement effect on text in Filmora
- How to adjust the scale of a video in Filmora
- Adjust and manipulate text layers
What you need to prepare:
- A computer (Windows or macOS)
- Your video materials.
- Filmora video editor
Step 1
Go ahead and download the Filmora video editor before all else. The program will install and start automatically. Just hit “Download” and then “Install”.
Step 2
Once the program starts, open a New Project. Then, go to “Sample Color” and drag any color you want to the Timeline.

Step 3
Now, head over to the “Titles” tab and drag the Basic Title to the Timeline. Place it above the Sample Color clip.

Step 4
Right-click on the Title clip in the Timeline and select Edit Properties from the menu. From there, click on “ADVANCED” to open the advanced settings. Here, you can change the font, adjust the text size, and place your titles wherever you want on the screen.

Step 5
Now, start with the second text layer from the bottom and move it 5 frames forward. Move each text layer above 5 layers forward from the previous layer. This will display each word a few milliseconds after the previous one.
When you’re done, click OK.

Step 6
Export the Timeline to save your text animation as a new clip.

Step 7
Now, delete all the clips from the Timeline and import the text video you just exported. Drag it to the Timeline.

Step 8
Right-click on the clip in the Timeline and go to Edit Properties.
Step 9
Click on the Animation tab. Then, go to the Customize tab. Here, change the Scale setting to 120%.

Step 10
Next, move the Playhead to the end of the clip in the timeline. Then, reset the Scale and click OK.

Step 11
Watch the final preview. Then, Render and Export the video and you’re done. Congratulations.
Summary
What you’ve learned:
- How to create a kinetic movement effect on text in Filmora
- How to adjust the scale of a video in Filmora
- Adjust and manipulate text layers
What you need to prepare:
- A computer (Windows or macOS)
- Your video materials.
- Filmora video editor
Step 1
Go ahead and download the Filmora video editor before all else. The program will install and start automatically. Just hit “Download” and then “Install”.
Step 2
Once the program starts, open a New Project. Then, go to “Sample Color” and drag any color you want to the Timeline.

Step 3
Now, head over to the “Titles” tab and drag the Basic Title to the Timeline. Place it above the Sample Color clip.

Step 4
Right-click on the Title clip in the Timeline and select Edit Properties from the menu. From there, click on “ADVANCED” to open the advanced settings. Here, you can change the font, adjust the text size, and place your titles wherever you want on the screen.

Step 5
Now, start with the second text layer from the bottom and move it 5 frames forward. Move each text layer above 5 layers forward from the previous layer. This will display each word a few milliseconds after the previous one.
When you’re done, click OK.

Step 6
Export the Timeline to save your text animation as a new clip.

Step 7
Now, delete all the clips from the Timeline and import the text video you just exported. Drag it to the Timeline.

Step 8
Right-click on the clip in the Timeline and go to Edit Properties.
Step 9
Click on the Animation tab. Then, go to the Customize tab. Here, change the Scale setting to 120%.

Step 10
Next, move the Playhead to the end of the clip in the timeline. Then, reset the Scale and click OK.

Step 11
Watch the final preview. Then, Render and Export the video and you’re done. Congratulations.
Summary
What you’ve learned:
- How to create a kinetic movement effect on text in Filmora
- How to adjust the scale of a video in Filmora
- Adjust and manipulate text layers
Make Super Easy Coin Magic With Filmora
Do you want to become a magician in your videos? Now, everyone can look like a magician with the magic of editing. This article will show you how to do a cool coin trick in Filmora 11 .
Part 1: What is the filmmaking technique “Cutting on action”
Cutting on action is a technique the editors use to cut in the middle of an action to another shot that matches the first shot’s action. Typically, the subject starts an action in one shot and continues the action in another, creating a smooth transition. For example, when you make the coin trick video, you need to cut on the tapping so it can trick the eyes, and the cut won’t be noticeable.
Part 2: Things You Need to Prepare for The Coin Magic Trick
- Glass and two coins

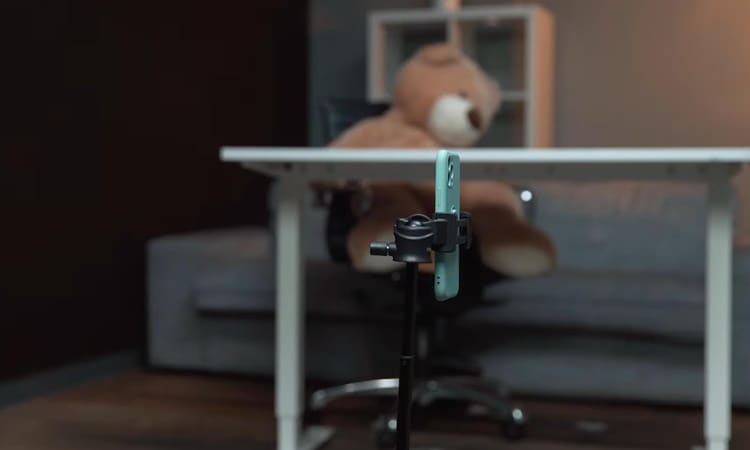
- Set the phone on a tripod. Because utilizing a tripod can significantly improve the recording’s stability.
Part 3: Start Filming
Step1 Firstly, you must show the coin and the bottom of the glass.
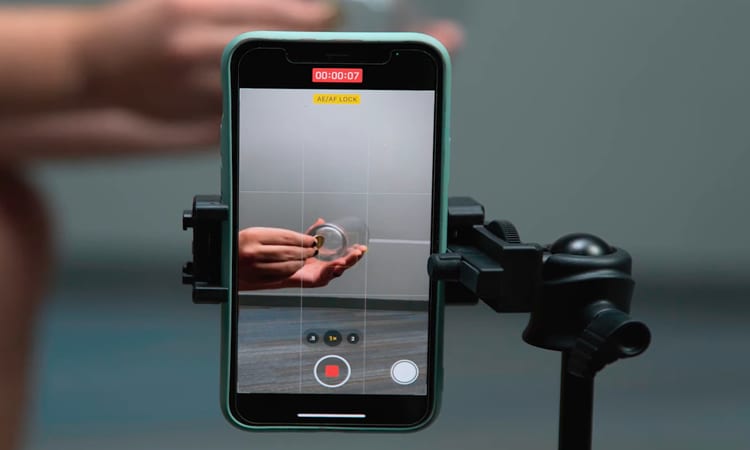
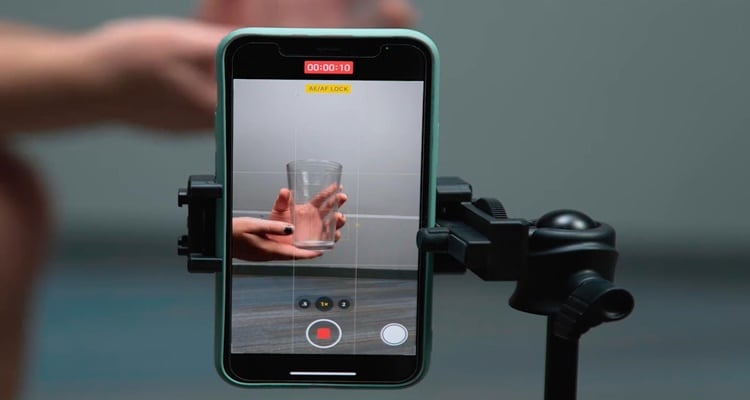
Step2 After that, you need to hold the coin with the fingers part of one hand and tap down on the coin. Make sure it looks like the coin is going through straight to the glass.
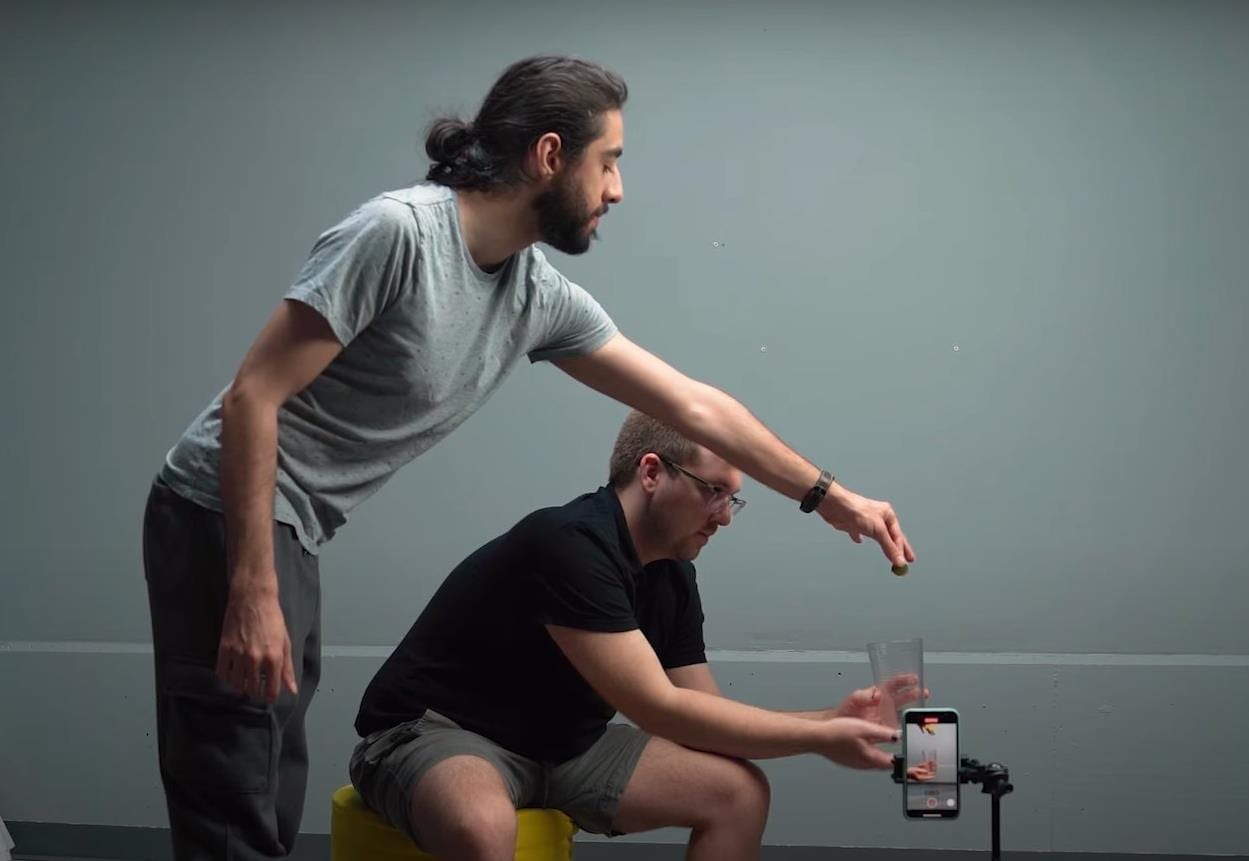
Step3 You need someone else to drop the other coin from the top. Meanwhile, you are pretending to tap a coin on the glass. You don’t need to worry about someone else hand in the frame. Since you can remove it easily with the masking feature in Filmora.
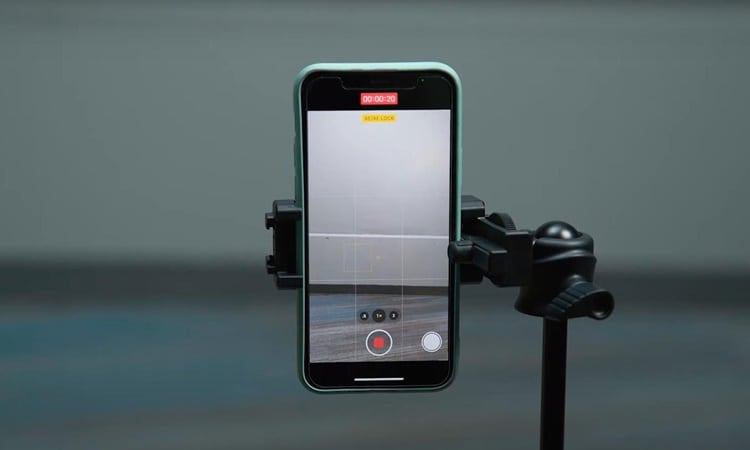
Step4 It would help if you had a second shot for a clean plate of the background. You can record background for 20 seconds.
Part 4: Bring the clips into Filmora 11
Step1 If you have not downloaded Filmora, you can visit filmora.wondershare.com to download Filmora’s new version.

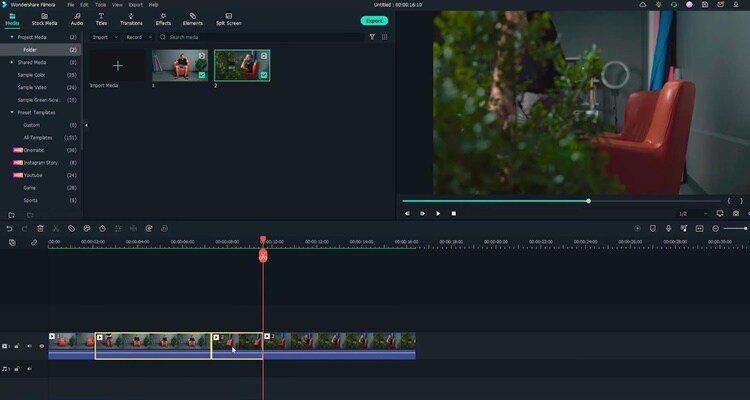
Step2 Drag and drop the clip onto the first track of the timeline.Afterward, move the playhead to the right and find the spot where you tapped the coin last time before your friend drops the other coin. Additionally, make sure it is in the middle of the tapping action and cut.
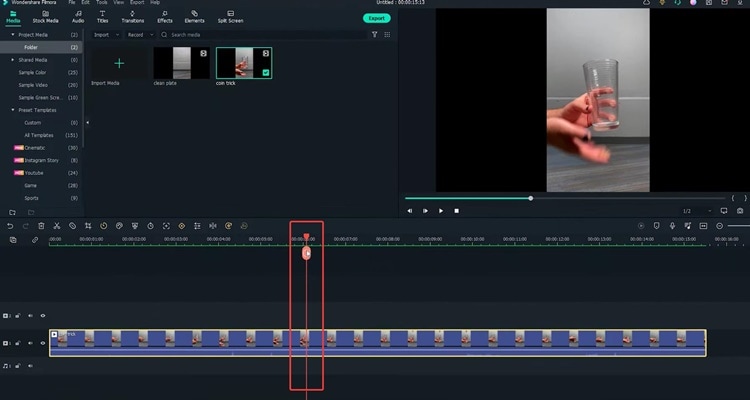
Step3 Then move the playhead to the right and find the spot where your friend drops the coin while you tap without the coin in your hand. Make sure it is in the middle of the tapping action, and the position of your hand roughly matches that in the last cut and make a cut.
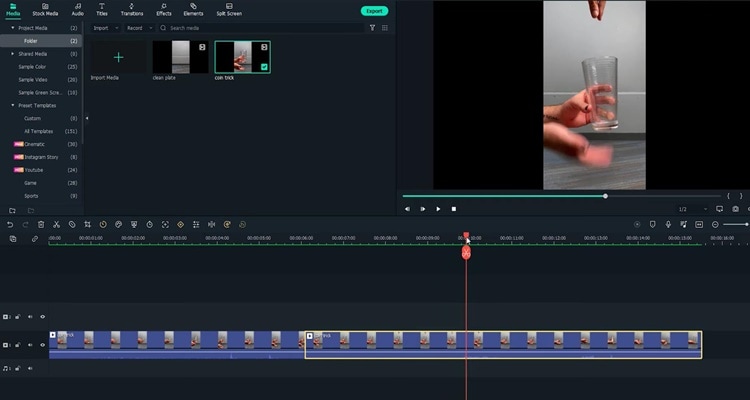
Step4 Now you need to delete the middle part and play it back. Indeed, cutting on action is the key to creating the illusion that the action is continued without editing.
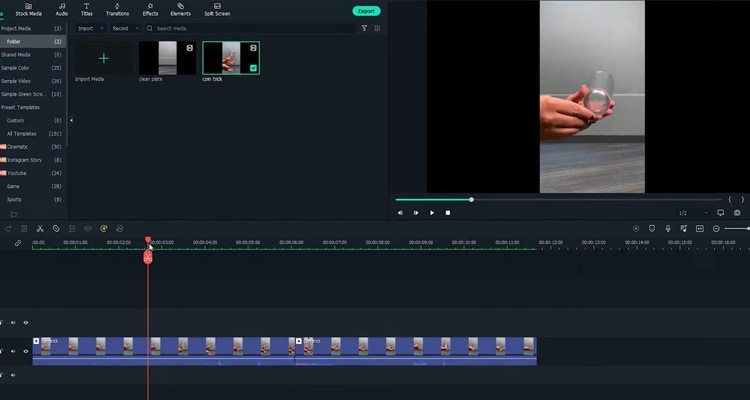
Step5 Next, you must remove your friend’s hand in the frame with the Filmora masking feature. Afterwards. drag and drop the clean plate video onto the second track of the timeline.
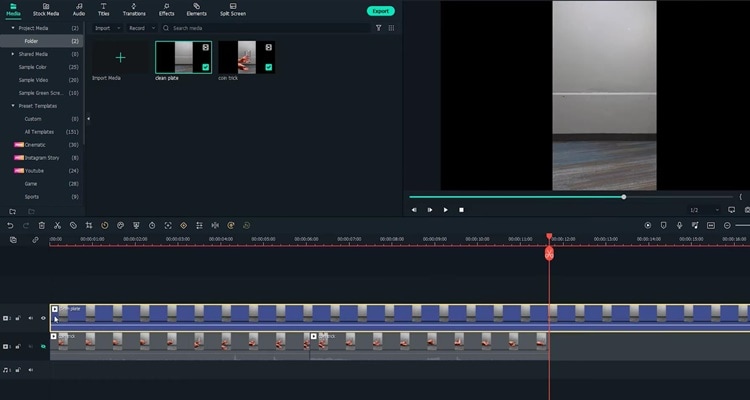
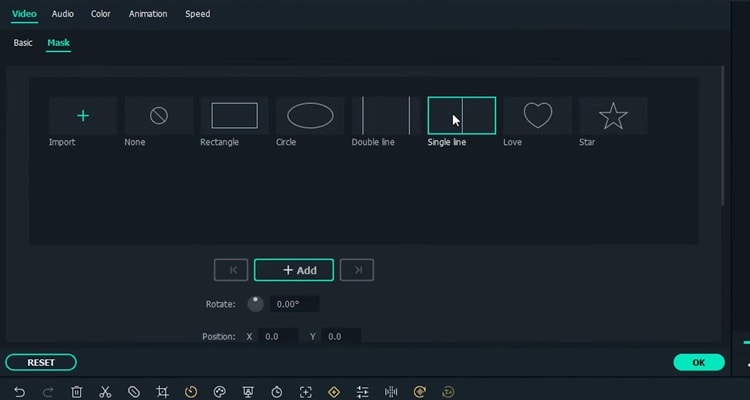
Step6 Next, double-click the clip to open the setting video. Find the Mask Section and select the single line.
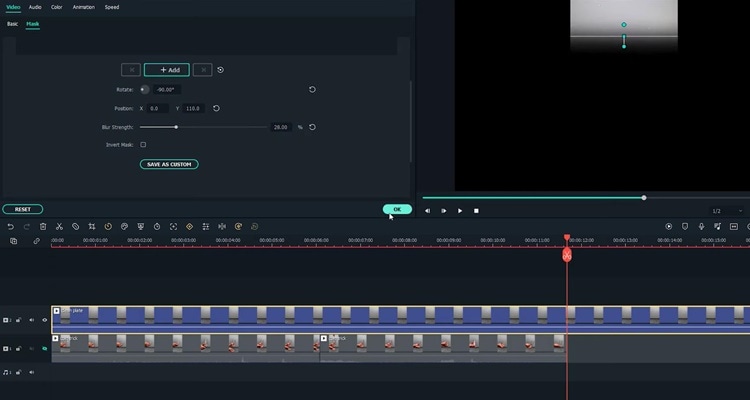
Step7 Here you can see the mask is applied.First, adjust the angle and position of the mask to only show the top part of the frame. Then you have to change the Blur Strength to add more blur to the edge of the mask.
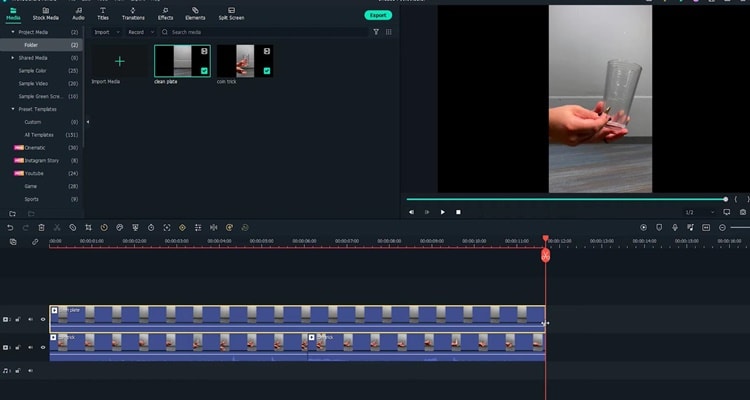
Step8 With the mask finalized, unhide the first video track and adjust the length of the clip on the timeline. Finally, playback the video and see how it looks.
Summary
That’s how to make a coin move through a glass-like MAGIC with the cutting on action editing technique. You can pay close attention to the steps above and follow each step for perfect results.
Free Download For Win 7 or later(64-bit)
Free Download For macOS 10.14 or later
Free Download For macOS 10.14 or later
Are You Tired of Long Video Edits? Do You Speed up the Video in Canva without a Hassle? Well, Stick with Us as We Guide You Through the Process Step by Step
Canva video speed-ups are getting popular daily, and so is the art of making viral content.

One of the crucial features that every editing software should have is the ability to adjust the video speed. This is great for those who are creating YouTube shorts or simply looking to play with the slow-motion effects in their content. Now while talking about such edits, Canva is one such name that comes to mind.
It is a popular video editor and graphic designer you probably have heard of. Canva has tons of built-in functions, accompanied by an intuitive layout that users can’t get enough of. However, in terms of things like video speed-ups, it can get a bit complicated.
That’s why today we will go through the Canva video editor in detail and figure out whether it is possible to speed up the video in Canva or not. In the end, you will also discover other alternatives that provide the same functionality without any strings attached. So, let’s get straight into the topic!
Part I. Basic Understanding of Canva
Before jumping to Canva video speed-ups, it’s best to know a little about this tool. So Canva is an online media designing tool that enables you to create amazing content without much technical knowledge. It was launched back in 2013 and, until then, has managed to empower millions of people globally.
Whether it’s image editing, CV creation, or graphic modification, Canva is the forefront of modern tools. They even have a built-in video optimization feature that lets you boost your content without compromising quality. Everything in Canva is clutter-free, and the layout of their main website is beginners friendly.
There are also tons of free templates that you can use in Canva and format according to your preferred size and needs. Besides that, Canva’s native application is now available for all major operating systems. This means you can enjoy this tool as long as you have iOS 10 or higher (<Android 4.1).
Features of Creating and Editing with Canva
Some amazing perks that you get with Filmora include:
- ✅Dozens of customizable templates
- ✅Available with its drag-and-drop layout
- ✅Ability to add custom elements and transitions
- ✅Precise graphic movement
- ✅Supports single-key shortcuts
- ✅Cut and trim access
- ✅On-site recording
- ✅Up-loadable third-party content
- ✅ Mobile phone compatibility
- ✅Wide range of download formats
Part II. How to Speed Up a Video in Canva?
Managing video duration on your preferred domain is so crucial these days, mainly because of our smaller attention spans. This is why you should be looking to change video speed in Canva as soon as you get your hands on the project. Unfortunately, at the time of writing, there are no known features in which you can speed up the video in Canva. However, there are some alternative methods for archiving sped-up videos.
An Ultimate Guide to Speed Up a Canva Video

Step1Create a New Video Project with Canva
- Head over to Canva’s official webpage and open a new video project through the “Create“ button in the top right corner.
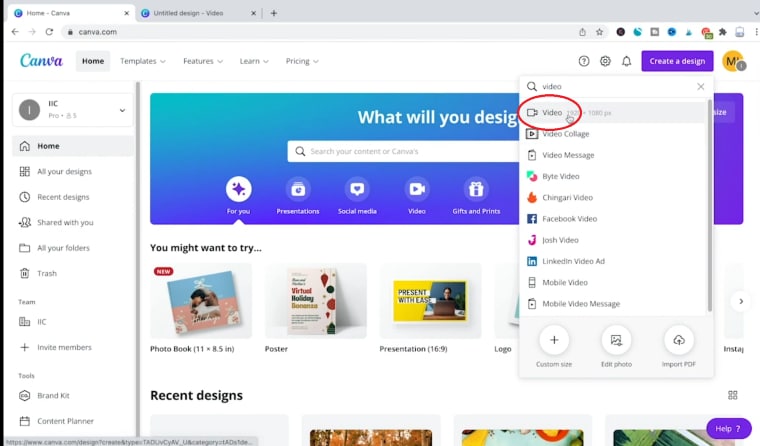
Step2Upload Your Speed Up Canva Video on the Console
- Now, you can either upload your video project into the console through the “Upload“ tab or use the provided video templates from the “Videos“ section.
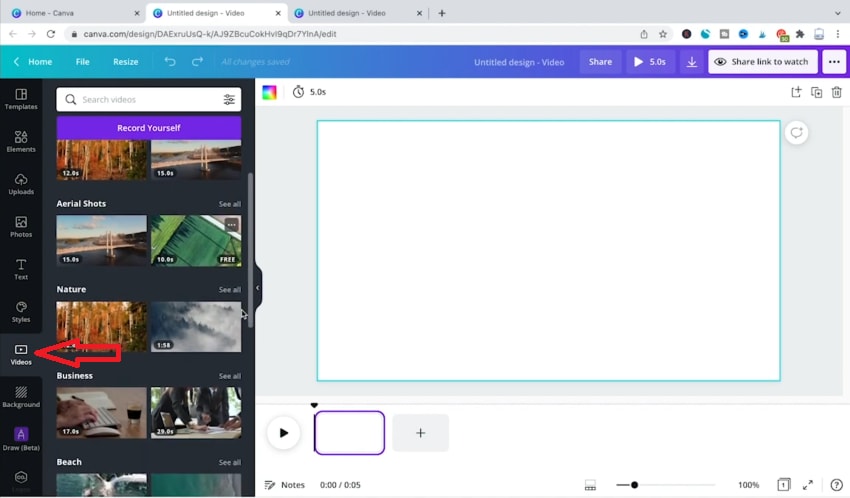
- Once that’s done, drag and drop your clip on the timeline and adjust it according to your requirements.
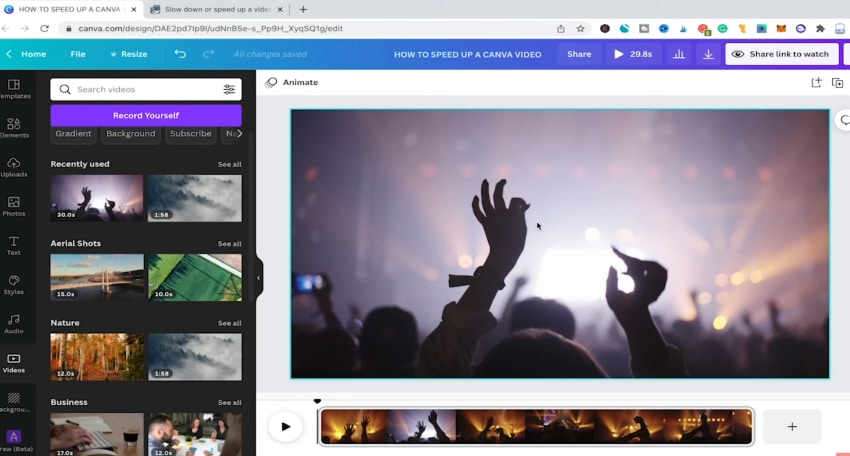
Hit preview once you are comfortable with video positioning
Step3Download the Non-speed Up Video in Canva
After previewing the clip, you will soon realize that your video is going too slow and needs to be adjusted. Unfortunately, no feature as of right now could directly fix the issue. It needs to be revamped in a third-party program requiring video download.
- To download the original video in Canva, move your cursor to the top and select the “share“ button.
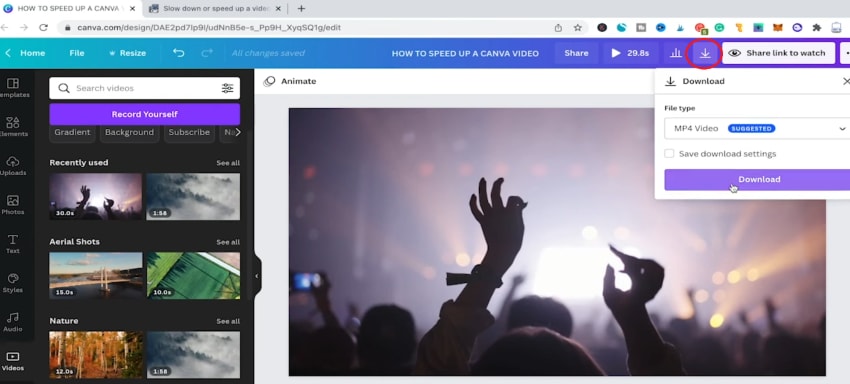
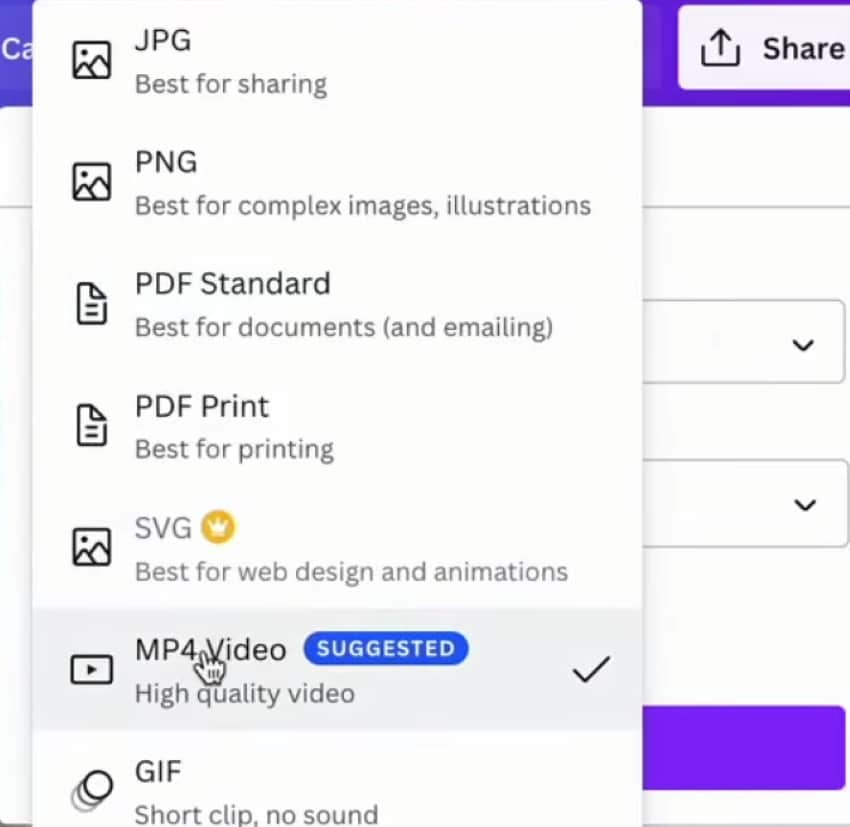
- Before you download the file, make sure that you have the MP4 format selected.
Step4Use Third-Party Software (Eizgif) to Change Video Speed In Canva
- Once you’ve downloaded your video file onto the system, open a new browser tab and search for Eizgif (or related speed-up video in the Canva tool). Now upload the same video on the given window.
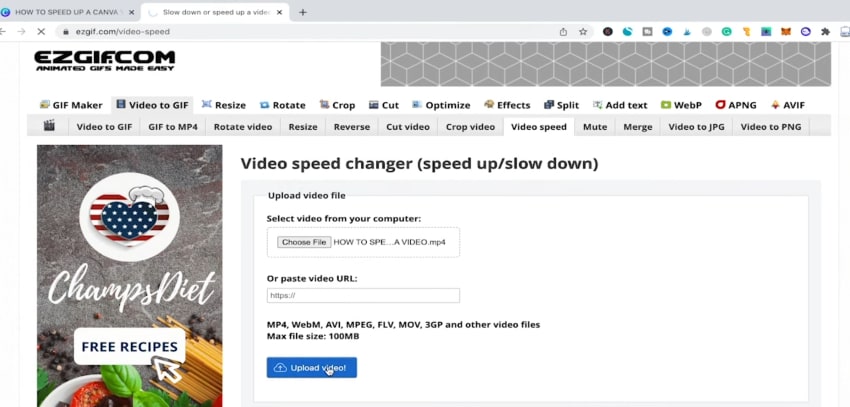
- After the clip has been uploaded, a new tab will open up. Here you will find an option named “multiplier.” Changing its value from greater than one will make your video move fast.
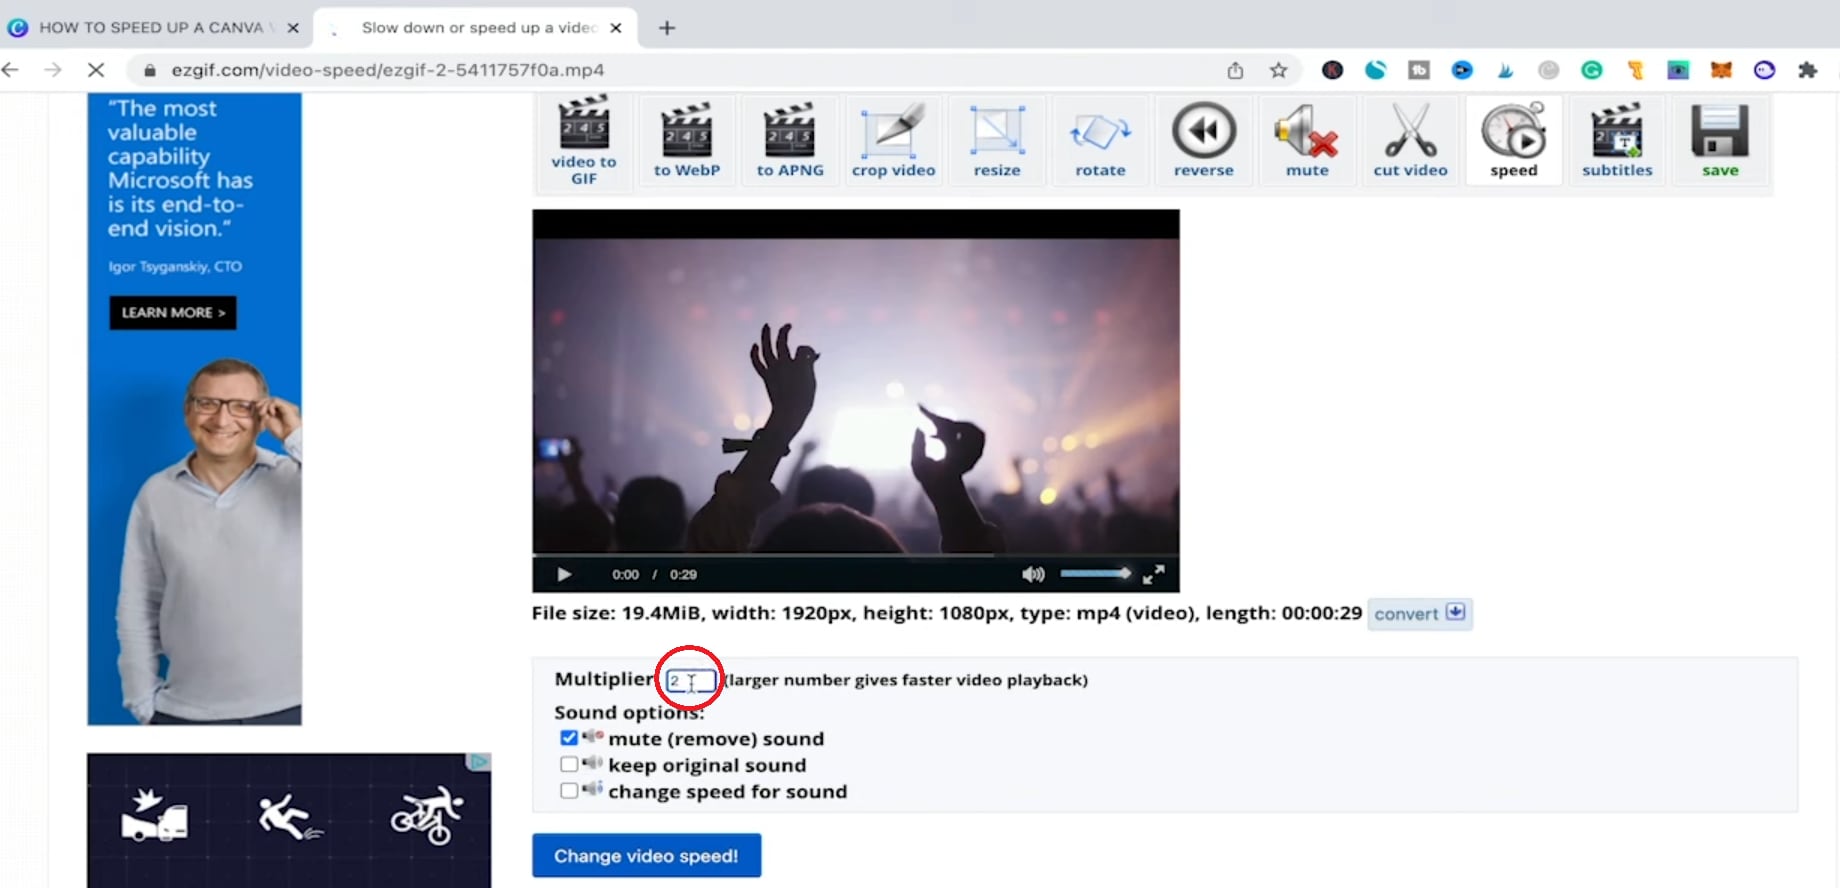
- Adjustust the desired multiplier value and select “change video speed.”
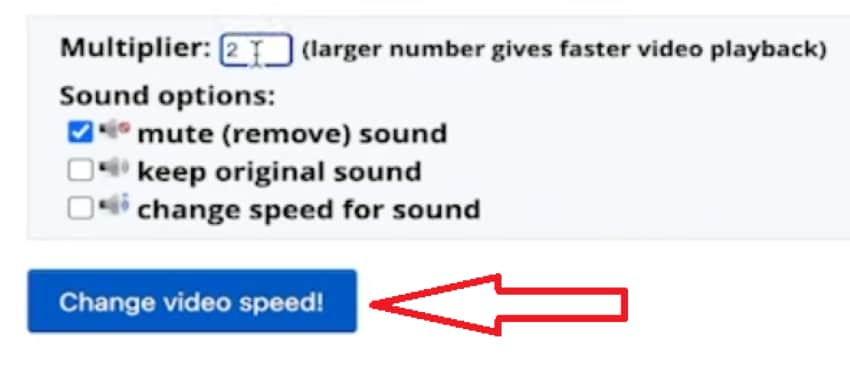
Eizgif also gives you the freedom to adjust sound, if your video has any
Step5Re-upload the Speed-Up Video In Canva Editor
- When you feel like your video has a perfect speed, save it in your system directory.
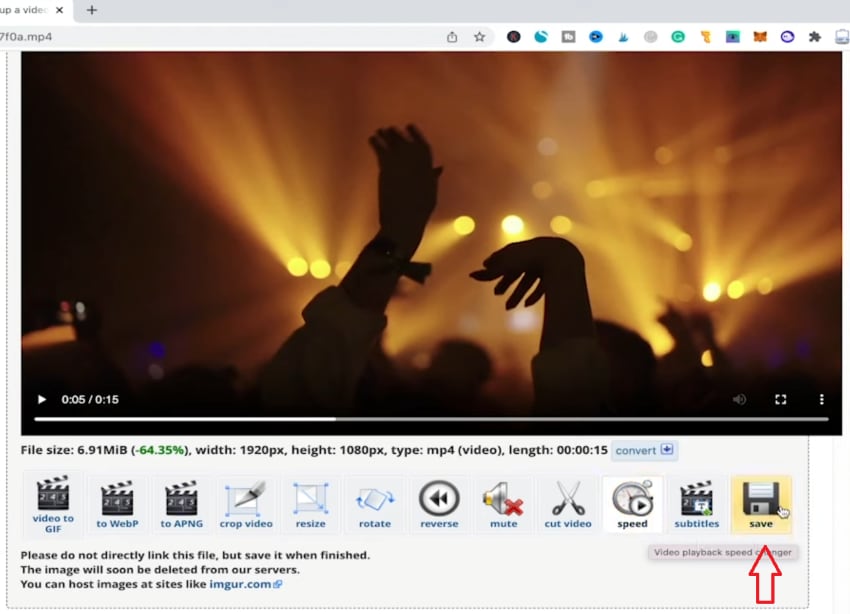
- Now re-upload your changed video speed in Canva and drag it onto the timeline through the “Videos“ tab.
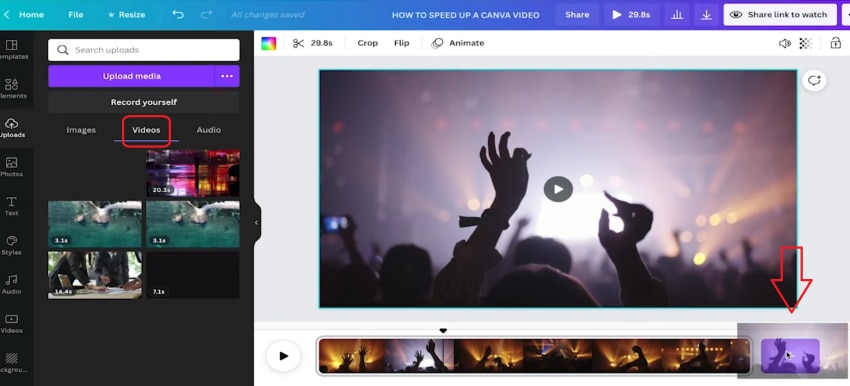
- Review the clip and notice the enhanced video speed from the Canva editor when it’s done.

So technically, you can change video speed in Canva, but the process can be time-consuming, especially for starters.
Part III. Wondershare Filmora - The Best All-in-one Video Speed-Up Alternative to Canva
Canva is no doubt a great video and graphic editor, but there are a handful of features that it needs to provide. For once, it can’t store files without internet access. Similarly, you need third-party applications even to use the most basic features, such as video speed-ups.
To work on these downsides, dozens of alternatives are available on the market; one of the better ones is Wondershare Filmora . It’s a full-proof video and audio editing app with tons of customizations under its belt. Individuals can use this powerful tool to create unique media content.
Everything is seamless in Filmora, and it’s supported on all major operating systems. There is no technical jargon in its application, and even beginners will be able to enjoy its interface.
Highlights of Filmora Compared to Canva Video Speed-Ups
- ✅Work on your speed-up projects without an internet connection
- ✅Not limited to download formats
- ✅Lack of template limitation on the free version
- ✅Beginner to advanced level UI
Free Download For Win 7 or later(64-bit)
Free Download For macOS 10.14 or later
How to Speed Up a Video Using Filmora?
Step1Create a New Project With Filmora Video Editor
First, if you don’t have it already, download the latest version of this tool from the web .
Once it’s installed, open the app and upload your new project straight into its console.
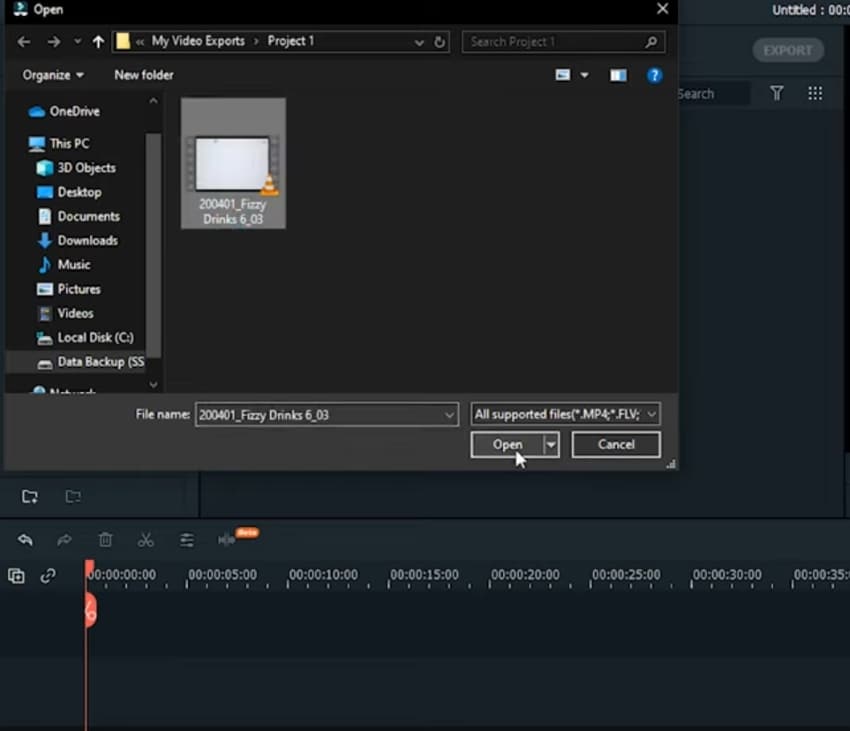
Step2Change the Speed Or Duration of Your Clip
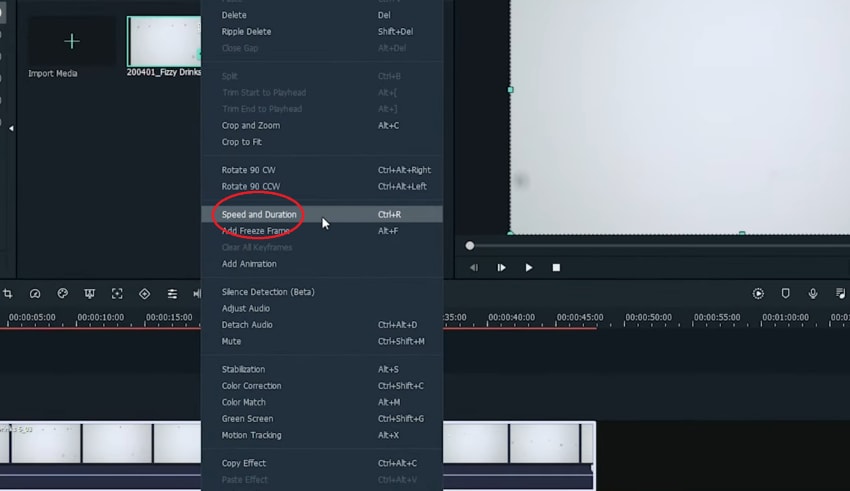
- Now that your video is in the timeline, right-click it and select the custom “Speed & duration“ button.
- In the new window, change the speed value greater than 1, just like you did in the case of Eizgif. You can also adjust the speed slider for better coverage.
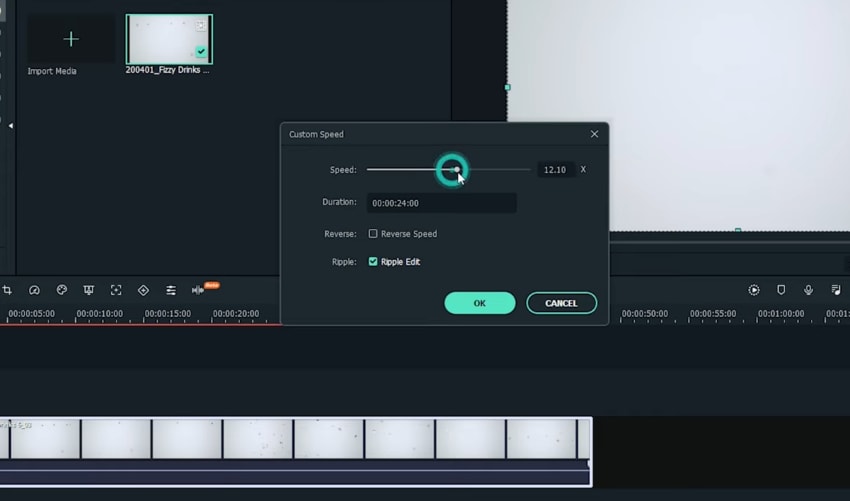
- After finishing, click “Ok“ and preview your clip to see the fast video effect in-placed.
BONUS STEPEnable the Speed Ramping Effects
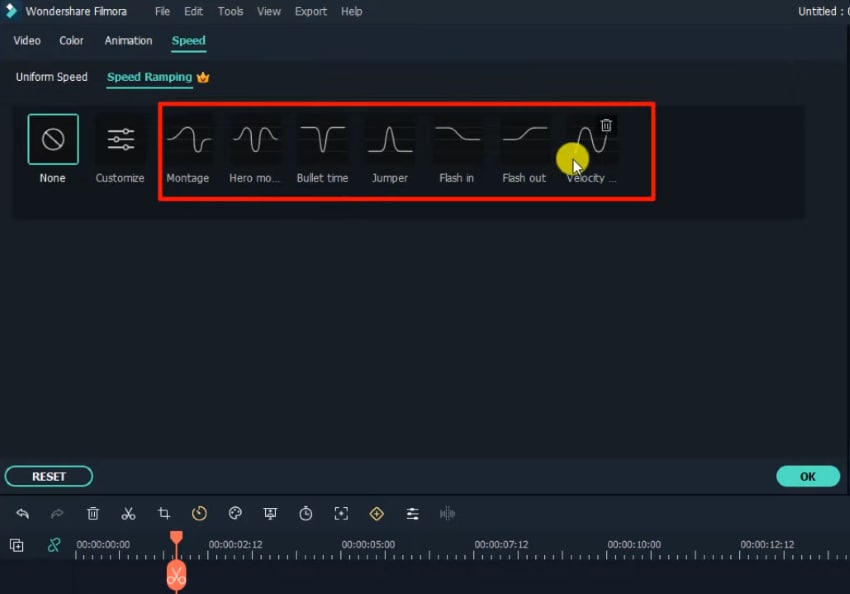
Speed ramp is a unique feature in Filmora which allows you to apply acceleration or deceleration at any point in your clip, creating unique effects. To use these settings, you need to:
- Select your timeline video and choose the “Speed“ button on the bottom bar. After that, click on “Speed Ramping.”
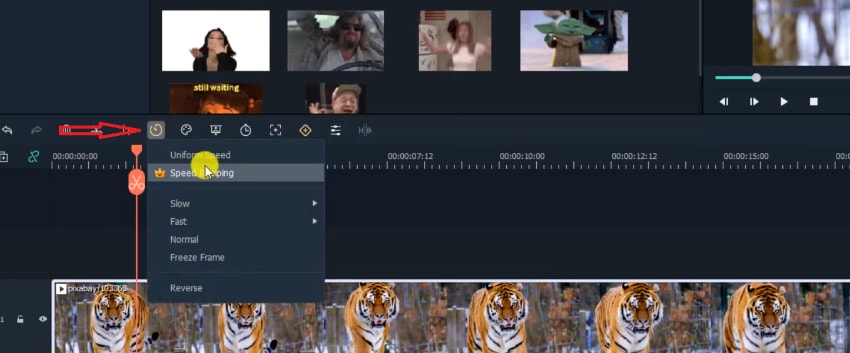
- You can now apply multiple speed ramping effects based on your preference. Select it (for example, flash-out effect), and it will be used for your whole video.
Step3Export the Final Speed-Up Video
- After changing the video speed in Filmora, save it on your desktop. For that, move to the top left corner and select “File<Save Project.”
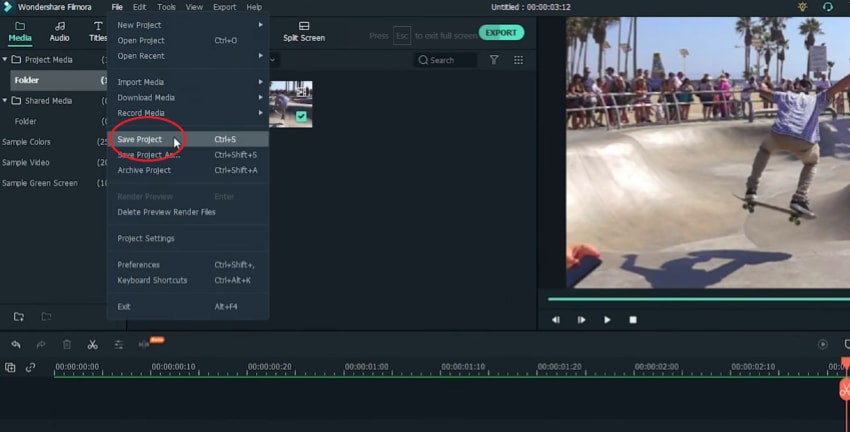
- You can also use the “Export“ option to move it to a local folder.
Conclusion
This was our two cents on how you can speed up a video on Canva. In the end, speeding up a video is a great way to keep your audience engaged in video production. It lets you make your content short and precise or introduce dramatic effects. If you want to use such features in your videos, then Filmora is a great way to start. Not only do you get fast video effects, but you can also save them without any internet access. So, give it a try and see the difference yourself!
Free Download For macOS 10.14 or later
How to Speed Up a Video Using Filmora?
Step1Create a New Project With Filmora Video Editor
First, if you don’t have it already, download the latest version of this tool from the web .
Once it’s installed, open the app and upload your new project straight into its console.

Step2Change the Speed Or Duration of Your Clip
- Now that your video is in the timeline, right-click it and select the custom “Speed & duration“ button.

- In the new window, change the speed value greater than 1, just like you did in the case of Eizgif. You can also adjust the speed slider for better coverage.

- After finishing, click “Ok“ and preview your clip to see the fast video effect in-placed.
BONUS STEPEnable the Speed Ramping Effects
Speed ramp is a unique feature in Filmora which allows you to apply acceleration or deceleration at any point in your clip, creating unique effects. To use these settings, you need to:
- Select your timeline video and choose the “Speed“ button on the bottom bar. After that, click on “Speed Ramping.”

- You can now apply multiple speed ramping effects based on your preference. Select it (for example, flash-out effect), and it will be used for your whole video.

Step3Export the Final Speed-Up Video
- After changing the video speed in Filmora, save it on your desktop. For that, move to the top left corner and select “File<Save Project.”

- You can also use the “Export“ option to move it to a local folder.
Conclusion
This was our two cents on how you can speed up a video on Canva. In the end, speeding up a video is a great way to keep your audience engaged in video production. It lets you make your content short and precise or introduce dramatic effects. If you want to use such features in your videos, then Filmora is a great way to start. Not only do you get fast video effects, but you can also save them without any internet access. So, give it a try and see the difference yourself!
Also read:
- [New] In 2024, Legal Footprints in the Digital Age Photowatermarking for Instagram
- 2024 Approved Best Ways to Add Meme Text to Videos
- 2024 Approved Do You Want to Rotate Your TikTok Video to Stylize It More? This Article Will Provide Simple Methods of Rotating TikTok Videos to Improve the Audience Viewing Experience
- Hassle-Free Ways to Remove FRP Lock on OnePlus Nord 3 5Gwith/without a PC
- How to Create Vintage Film Effect 1920S
- In 2024, How to Fake Snapchat Location without Jailbreak On Infinix Zero 5G 2023 Turbo | Dr.fone
- Logitech G29 Driver Download for Windows 11/11/7
- Mastering the Art of Calculating Storage Space via Windows Powershell
- Overheating iPhone/iPad? Find Out Why and Repair Tips Inside
- Things You Dont Know About Realme GT 3 Reset Code | Dr.fone
- Updated 2024 Approved Best Tips on How to Design Travel Slideshow
- Title: Easily Sync Audio With Video With Filmora
- Author: Chloe
- Created at : 2024-09-29 22:51:45
- Updated at : 2024-10-02 17:25:04
- Link: https://ai-editing-video.techidaily.com/easily-sync-audio-with-video-with-filmora/
- License: This work is licensed under CC BY-NC-SA 4.0.