
Easy Ways to Remove Motion Blur In Photoshop for 2024

Easy Ways to Remove Motion Blur In Photoshop
The motion blur effect is created in photos when the picture is taken in poor light conditions or due to a fast-moving object. Moreover, if the shutter speed of the camera is too low, it will also produce a motion blur effect. In such a situation, the captured picture may look out of focus and tedious. In order to fix this issue, this article can help you.
By reading this article, you can learn how to remove motion blur in Photoshop with simple steps. Moreover, we will also provide the best alternatives to Photoshop that you can utilize to remove motion blur from your photos.
Part 1: How to Remove the Motion Blur in Photoshop?
To fix a motion blur in an image, you would require a professional tool such as Adobe Photoshop . Photoshop is a well-recognized tool comprising tons of features for image editing and graphic designing. It offers selection tools that enable you to choose the specific parts of a photo efficiently. You can also add layers to your photo to modify and edit specific areas of the image.
You can also apply appealing filters from this platform to transform an ordinary image drastically. Moreover, using this precise tool, you can also fix motion blur in Photoshop. You can choose the blurry areas of your photo through its selection tools. Thus, with a few clicks, you can eliminate the flaws from your image easily.
Steps to Fix Motion Blur in Photos Using Photoshop
If you are new to Photoshop and don’t know how to fix motion blur in photos, then follow the instructions described below:
Step1 Open the Photoshop tool on your PC or Mac and upload your photo. From the “Layers” section, press “Ctrl + J” or “Command + J” to copy the first layer. Afterward, convert the first layer by choosing the option “Smart Object.”

Step2 Now head to the “Filter” section and tap on “Sharpen” to proceed. Afterward, proceed with the option of “Shake Reduction” by clicking on it. Now Photoshop will automatically reduce the blur effect. From the displayed panel, uncheck the option called “Artifact Suppression.”

Step3 To continue, open the “Advanced” tab from the left panel and enhance the size of your rectangular. Manage the position of the rectangle according to your preference. By doing so, you can see the details of the image clearly.

Step4 From the left panel, manage the options like “Blur Trace Bounds” and “Smoothing” according to your desire. Once done, press the “OK” button. For adding more modifications, add a blank layer and choose the “Clone Stamp Tool.” Afterward, select “Soft Round Brush” from the general brushes.

Step5 Now adjust the Opacity to 100% and Flow to 50%. Moreover, select “Current & Below” as the sample. Press the Alt key to take a sample of any flawless part of your photo and apply it to the blurry area. Make sure that the color of the sample taken is the same as the blurry area in the photo.

Part 2: Remove the Motion Blur with an Alternative to Photoshop
It may be possible that you don’t get satisfactory results from Photoshop removing motion blur. Or, if you find the interface of Photoshop intimidating, it can affect your productivity. For your assistance, this section will bring you the best alternatives to Photoshop.
1. IMAGamigo
IMAGamigo is an online tool that allows you to perform different operations on pictures efficiently. To fix motion blur, it offers a Deblurrer feature. Using this feature, you can automatically remove blur from your photos without any external effort. It also provides other distinct features such as Background Remover, Restorer, Colorizer, Upscale, etc.
To use this tool, first, navigate to its official website. From its tools, select “Deblurrer” to proceed. A new window will open on your screen instantly. Scroll down a little bit and locate the area saying, “Drop Image Here.” Click on this area and upload your image. Afterward, the tool will automatically start analyzing the picture. Once the process gets finished, click on the Download button to save your photo.

2. Vance.AI
This online platform is also a well-trusted tool by professionals and content creators. It provides AI-supported tools such as AI Image Denoiser, AI Image Upscaler, AI Photo Enhancer, etc. You can use its AI Image Sharpener to eliminate motion blur from pictures. It supports all popular image file formats, such as JPEG, PNG, and JPG. Thus, without any installations, you can quickly utilize this tool to fix motion blur photos.
To use this tool, access the official webpage of Vance.AI and select the “AI Image Sharpener” feature. Once done, click on the “Upload Image” option and import your blurry photo. Afterward, a new window will be open from which you can adjust the settings. Select the “Sharpen” option and choose the preferred Sharpen Mode. Afterward, click on the “Start to Process” option. Once the process ends, you can download the picture with a single click.

3. AKVIS Refocus AI
AKVIS is an offline tool that produces high-end results at a fast processing speed. You can find multiple options in this tool, such as Airbrush, Retoucher, Sketch, Decorator, etc. When it comes to fixing blurry pictures, this tool provides an exclusive feature called “Refocus AI.” Through this feature, you can instantly increase the sharpness of your photo. Also, it offers different modes such as Motion Blur, Radial Blur, Refocus-AI, and Tilt-Shift.
To fix motion blur:
Step1 Launch this tool and navigate to its Refocus AI option.
Step2 Select Refocus AI as your mode and upload the blurry picture. The default preset will be AKVIS Default AI.
Step3 Disable the “Image Sharpening” feature and navigate to the “Motion Deblur AI” section.
Step4 From there, adjust your Focus accordingly.
Step5 For more enhancements, enable the Image Sharpening feature and adjust the parameters.

Bonus Tip – How to Add Motion Blur to Your Images?
Do you want to add motion blur to your images? Many people like to intentionally add a motion blur effect in their images to add an artistic element. If you are interested in doing so, the best desktop tool you can try is Wondershare Filmora . This tool offers trending and high-quality effects that you can easily apply to your images.
Free Download For Win 7 or later(64-bit)
Free Download For macOS 10.14 or later
To add a motion blur effect:
Step1 Launch Filmora and create a new project.
Step2 Import your photo on this tool and drop it into the timeline.
Step3 Split the clip where you want to add the blur effect.
Once done, go to the Effects tab and search “Blur.” By doing so, you would be able to check all the blur effects on your screen. Choose and apply the blur effect to the split part of your clip. Once done, hit the Export button.

Conclusion
Photoshop is an excellent tool to edit and modify your pictures in great quality. You can use this article to take guidance to remove motion blur from photos. However, if you are not getting desired results from Photoshop, we have also provided the best alternatives to Photoshop to remove motion blur. Moreover, to create a motion blur effect in your images, you can explore the Wondershare Filmora tool.
Part 1: How to Remove the Motion Blur in Photoshop?
To fix a motion blur in an image, you would require a professional tool such as Adobe Photoshop . Photoshop is a well-recognized tool comprising tons of features for image editing and graphic designing. It offers selection tools that enable you to choose the specific parts of a photo efficiently. You can also add layers to your photo to modify and edit specific areas of the image.
You can also apply appealing filters from this platform to transform an ordinary image drastically. Moreover, using this precise tool, you can also fix motion blur in Photoshop. You can choose the blurry areas of your photo through its selection tools. Thus, with a few clicks, you can eliminate the flaws from your image easily.
Steps to Fix Motion Blur in Photos Using Photoshop
If you are new to Photoshop and don’t know how to fix motion blur in photos, then follow the instructions described below:
Step1 Open the Photoshop tool on your PC or Mac and upload your photo. From the “Layers” section, press “Ctrl + J” or “Command + J” to copy the first layer. Afterward, convert the first layer by choosing the option “Smart Object.”

Step2 Now head to the “Filter” section and tap on “Sharpen” to proceed. Afterward, proceed with the option of “Shake Reduction” by clicking on it. Now Photoshop will automatically reduce the blur effect. From the displayed panel, uncheck the option called “Artifact Suppression.”

Step3 To continue, open the “Advanced” tab from the left panel and enhance the size of your rectangular. Manage the position of the rectangle according to your preference. By doing so, you can see the details of the image clearly.

Step4 From the left panel, manage the options like “Blur Trace Bounds” and “Smoothing” according to your desire. Once done, press the “OK” button. For adding more modifications, add a blank layer and choose the “Clone Stamp Tool.” Afterward, select “Soft Round Brush” from the general brushes.

Step5 Now adjust the Opacity to 100% and Flow to 50%. Moreover, select “Current & Below” as the sample. Press the Alt key to take a sample of any flawless part of your photo and apply it to the blurry area. Make sure that the color of the sample taken is the same as the blurry area in the photo.

Part 2: Remove the Motion Blur with an Alternative to Photoshop
It may be possible that you don’t get satisfactory results from Photoshop removing motion blur. Or, if you find the interface of Photoshop intimidating, it can affect your productivity. For your assistance, this section will bring you the best alternatives to Photoshop.
1. IMAGamigo
IMAGamigo is an online tool that allows you to perform different operations on pictures efficiently. To fix motion blur, it offers a Deblurrer feature. Using this feature, you can automatically remove blur from your photos without any external effort. It also provides other distinct features such as Background Remover, Restorer, Colorizer, Upscale, etc.
To use this tool, first, navigate to its official website. From its tools, select “Deblurrer” to proceed. A new window will open on your screen instantly. Scroll down a little bit and locate the area saying, “Drop Image Here.” Click on this area and upload your image. Afterward, the tool will automatically start analyzing the picture. Once the process gets finished, click on the Download button to save your photo.

2. Vance.AI
This online platform is also a well-trusted tool by professionals and content creators. It provides AI-supported tools such as AI Image Denoiser, AI Image Upscaler, AI Photo Enhancer, etc. You can use its AI Image Sharpener to eliminate motion blur from pictures. It supports all popular image file formats, such as JPEG, PNG, and JPG. Thus, without any installations, you can quickly utilize this tool to fix motion blur photos.
To use this tool, access the official webpage of Vance.AI and select the “AI Image Sharpener” feature. Once done, click on the “Upload Image” option and import your blurry photo. Afterward, a new window will be open from which you can adjust the settings. Select the “Sharpen” option and choose the preferred Sharpen Mode. Afterward, click on the “Start to Process” option. Once the process ends, you can download the picture with a single click.

3. AKVIS Refocus AI
AKVIS is an offline tool that produces high-end results at a fast processing speed. You can find multiple options in this tool, such as Airbrush, Retoucher, Sketch, Decorator, etc. When it comes to fixing blurry pictures, this tool provides an exclusive feature called “Refocus AI.” Through this feature, you can instantly increase the sharpness of your photo. Also, it offers different modes such as Motion Blur, Radial Blur, Refocus-AI, and Tilt-Shift.
To fix motion blur:
Step1 Launch this tool and navigate to its Refocus AI option.
Step2 Select Refocus AI as your mode and upload the blurry picture. The default preset will be AKVIS Default AI.
Step3 Disable the “Image Sharpening” feature and navigate to the “Motion Deblur AI” section.
Step4 From there, adjust your Focus accordingly.
Step5 For more enhancements, enable the Image Sharpening feature and adjust the parameters.

Bonus Tip – How to Add Motion Blur to Your Images?
Do you want to add motion blur to your images? Many people like to intentionally add a motion blur effect in their images to add an artistic element. If you are interested in doing so, the best desktop tool you can try is Wondershare Filmora . This tool offers trending and high-quality effects that you can easily apply to your images.
Free Download For Win 7 or later(64-bit)
Free Download For macOS 10.14 or later
To add a motion blur effect:
Step1 Launch Filmora and create a new project.
Step2 Import your photo on this tool and drop it into the timeline.
Step3 Split the clip where you want to add the blur effect.
Once done, go to the Effects tab and search “Blur.” By doing so, you would be able to check all the blur effects on your screen. Choose and apply the blur effect to the split part of your clip. Once done, hit the Export button.

Conclusion
Photoshop is an excellent tool to edit and modify your pictures in great quality. You can use this article to take guidance to remove motion blur from photos. However, if you are not getting desired results from Photoshop, we have also provided the best alternatives to Photoshop to remove motion blur. Moreover, to create a motion blur effect in your images, you can explore the Wondershare Filmora tool.
Make Time-Lapse Video on MacBook [Complete Guide]
The process of time-lapse speeds up the passage of time so that events seem to be happening faster. A time-lapse video is to create photos at regular intervals and assemble them into the video to record changes that would be slow for the human eye to see. Time-Lapse video shows the technique of slow-motion videos using the same principle.
Time-lapse is usually for several purposes but mostly it is utilized to show the passage of time in a fast-forward format. time-lapse means that the camera takes the picture and then combined them into one video that seems to something happen in quickly. The lapse is set into video form in post-production, so movie mode is not necessary. Once the lapse is finished, it’s time to take it into post-production to bring it to life.
Part 1. Use QuickTime Player to Create Timelapse Video
QuickTime player creates a high-resolution video file from the series of photos without having to render the photos twice. The result of QuickTime is a much higher quality result. With this toolkit, after the recording is done, the illusion of fast-moving footage i-e time-lapse is to be created. QuickTime will always ask you what frame rate would you like to video in.
Steps to Create Timelapse Video with QuickTime Player:
To produce a timelapse movie using QuickTime Player, follow these steps:
Step 1: Launch the Recording
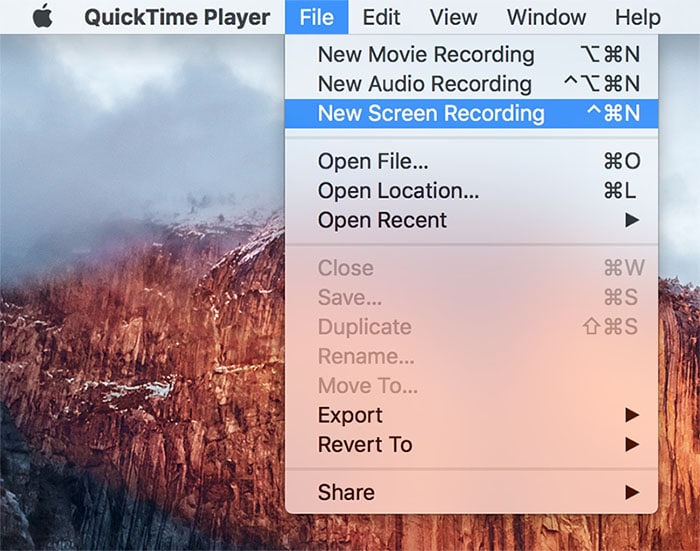
By selecting the File * New Screen Recording option in QuickTime, you may record your screen. After choosing the region to record, your screen will start to be recorded. Real-time video will be captured, and it will be archived.
Step 2: Import the Files
Go to the file > Open Image Sequence menu after starting QuickTime. One of the video files you want to turn into a time-lapse should be opened in QuickTime Player. “Open File.” may be found by clicking the File menu link in the menu bar.
Step 3: Create the Timelapse
Within QuickTime, the series of images will be turned into time-lapse films. Choose one picture from the series, and then change the settings as necessary. Use the Higher Quality Apple Pro Resolution video codec, Actual size resolution, and 25 frames per second.

Step 4: Export Your Video
Finally, you may access the Speed option by selecting Tools>Edit from the top menu’s Imported section. At the conclusion, this will produce your time-lapse, and then choose Save under File. This will open a window where you can choose the codec you want to export it in.

Part 2. Create Timelapse Video with iMovie
To make an iMovie time-lapse on Mac, you have to capture the video and create a time-lapse out of it. For a multiple-hour recording in a few seconds to be fit, you will need software of time-lapse. Timelapse is utilized for accelerated or slow-motion videos with changes in the frame rate and playback videos in speed. The time-lapse software is available to handle the tasks without sacrificing the quality, size, and format of the video.
Steps To Create Timelapse Video with iMovie
Step 1: Launch iMovie
On your Mac, launch the iMovie application, and then import the video clip from the library that you wish to use to create a time-lapse. Drag the video to the timeline. Then you may see additional frames in the timeline by clicking the setting bar below.

Step 2: Import videos and adjust
By clicking the icon that resembles a camera below the Viewer panel, drag images into the project library. Drag the desired images to the Project Library. By choosing File and then selecting Project Properties, you may modify the default settings. Set the first picture location to Fit Frame and the transition length to 1 second.

Step 3: Modify the Clips’ Speed
Select it if you wish to alter the clip’s pace. On the preview window’s top toolbar, tap the clock symbol. You may pick “8x” for the default frame rate or “20x” for “Speed” > “Fast.” In iMovie, the minimum time is 0.1 seconds or around 10 frames. As a result, you must first export the time-lapse sequence before speeding up the clip.

Step 4: Share the Video
Using the Share option at the bottom, you can then save, export, or share your slowed-down time-lapse film. Refer to the “Share” option to decide whether to store or immediately share the iMovie time-lapse.

Part 3. Turn Video into Timelapse with Filmora
Time-Lapse videos can be easily created using Wondershare Filmora which is a very powerful video editing tool . The speed change feature of Filmora works well for time-lapse video editing. Filmora software can be used on both Windows and Mac platforms, it contains the features of a wide range of video effects with filters. it allows you to produce and create amazing video creations from images or video clips.
Filmora is packed with a plethora of editing features that will make your time lapses more appalling. The color tuning feature can be used to adjust the white balance and dynamic range of the video clips. The advanced text editor allows you to edit the size, font, color, and even the animation of text. The feature of video stabilization eliminates the effects of the camera shake. All in all, you can have an all-in-one editor to create your timelapse handily.
Wondershare Filmora Best Way to Make Timelapse Video on Computer.
Free Download Free Download Learn More

Steps to Create a Timelapse Video with Filmora:
Step 1: Launch Filmora Editor
Download the program and launch Filmora in full feature mode. Drag and drop the video clip into the application after selecting the Import option from the software’s menu. Drag the imported video clip to the timeline below, as seen in the figure above.

Free Download For Win 7 or later(64-bit)
Free Download For macOS 10.14 or later
Step 2: Setup the Footage Speed
To adjust the speed, drag the video clip into the timeline by clicking twice, and then slide the speed tool to the desired speed for your time-lapse. The speed is changed to be 100 times faster.

Step 3: Render the Timelapse
The Render Timeline button is recognized by the window’s preview when you click it to guarantee the speed changes your clip has to be adjusted to. You would take off the audio that was in the original video. Utilizing the image’s visible volume tool button, change the volume and then render it again by hitting the render icon as shown here:
Step 4: Edit the Video
To change the perspective of the video to wherever you want it, click right on the video clip on the timeline and choose Crop & Zoom, followed by Pan & Zoom. Additionally, you may add text using the text and title tool that is already built-in, add music using royalty-free music files or apply filters and other features.

Step 5: Share your Timelapse
As you can see, you can drag and drop the pre-built templates from the library onto the timeline. Next, click the Export button at the top to start exporting. The Filmora’s features include support for 4K editing, GIF compatibility, noise reduction, color tuning, a sophisticated text editor, an audio mixer, video stabilization, scene identification, and audio equalization.
Conclusion
Time-lapse is the video editing technique in that the speed is lower and the frequency of video and picture. A time-lapse software, Filmora is a video editor that lets you create a smooth time-lapse where time appears to be passing quickly. This app is very helpful to create the video on time-lapse, making the appearance in the series of quick succession about a long term or period to denote something that happens over a long period.
Free Download Free Download Learn More

Steps to Create a Timelapse Video with Filmora:
Step 1: Launch Filmora Editor
Download the program and launch Filmora in full feature mode. Drag and drop the video clip into the application after selecting the Import option from the software’s menu. Drag the imported video clip to the timeline below, as seen in the figure above.

Free Download For Win 7 or later(64-bit)
Free Download For macOS 10.14 or later
Step 2: Setup the Footage Speed
To adjust the speed, drag the video clip into the timeline by clicking twice, and then slide the speed tool to the desired speed for your time-lapse. The speed is changed to be 100 times faster.

Step 3: Render the Timelapse
The Render Timeline button is recognized by the window’s preview when you click it to guarantee the speed changes your clip has to be adjusted to. You would take off the audio that was in the original video. Utilizing the image’s visible volume tool button, change the volume and then render it again by hitting the render icon as shown here:
Step 4: Edit the Video
To change the perspective of the video to wherever you want it, click right on the video clip on the timeline and choose Crop & Zoom, followed by Pan & Zoom. Additionally, you may add text using the text and title tool that is already built-in, add music using royalty-free music files or apply filters and other features.

Step 5: Share your Timelapse
As you can see, you can drag and drop the pre-built templates from the library onto the timeline. Next, click the Export button at the top to start exporting. The Filmora’s features include support for 4K editing, GIF compatibility, noise reduction, color tuning, a sophisticated text editor, an audio mixer, video stabilization, scene identification, and audio equalization.
Conclusion
Time-lapse is the video editing technique in that the speed is lower and the frequency of video and picture. A time-lapse software, Filmora is a video editor that lets you create a smooth time-lapse where time appears to be passing quickly. This app is very helpful to create the video on time-lapse, making the appearance in the series of quick succession about a long term or period to denote something that happens over a long period.
How to Make a Gaming Montage - Guide & Tips
The popularity of gaming montage is growing every day in today’s pop culture. There are currently more than 2.5 billion gamers, and most of them love watching gaming video content on YouTube. Whether people use a montage to parody gaming montages themselves or show off their skills, the effort and time put into them create impressive results.
We will explain how to create gaming montages and give you some tips that you might want to keep in mind to make epic videos.
How to Make a Gaming Montage
You have several options when it comes to creating gaming montages. You can include a random cut of great scenes, a mixture of the highlighted moments you found thrilling and would like to share with other gamers. In other cases, you’ll have to think of an engaging story in advance, then base your gameplay on this story.
Essentially, the workflow will be slightly different for these two scenarios. It’s much easier with the random cut type, especially when using a reliable video editor. Editing montages is as exciting as playing the game.
With that in mind, here is how to make a gaming montage.
1) Decide Your Montage Story/Type
Deciding your montage type beforehand helps clear your mind and create an epic gaming montage that will keep viewers watching. It allows you to choose the relevant video clips for your gaming montage.
Choose the topic of the video and decide the length of each clip and the sequence of the clips. Be sure to put the most epic or funny clips in the last section of your video. And this will make your viewers watch the video until the end.
2) Record Your Gameplay Footage
The methods to capture the gameplay varies depending on the platform where the game is. The most important thing you have to keep in mind is to ensure your recorder supports Replay Buffer; this will allow you to record scenes that occurred minutes or seconds ago.
That means you do not need to record the gameplay the whole time and burn your hardware. Instead, you’ll capture the moment after interesting things occur.
Game consoles like PS4 allow you to record the video natively for a maximum of one hour with the gamepad. A capture card lets you record it longer than 60 minutes.
Once you’ve all the clips you want on your PC, head over to https://filmora.wondershare.net/filmora-video-editor.html and download Filmora and install the software on your computer. This program allows you to edit your video clips and add cool effects that will make viewers keep watching.
3) Import You Videos to Media Library
You only have to import the videos to Filmora’s media library and then drag and drop them into the timeline, where you can start making the edits.
By right-clicking on the clip in your timeline, you’ll see the options to zoom, speed, change, split, or trim your videos. You can also add sound effects by going to the Audio Tab.
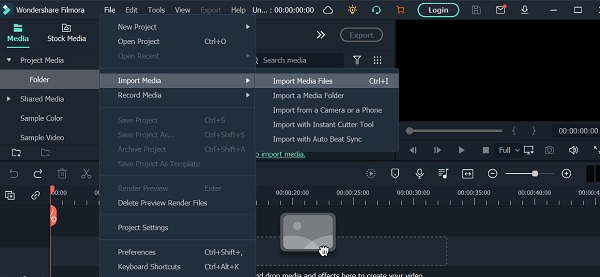
Import Videos
4) Choose Background Music for Your Montage
Music will help make your gaming montage engaging. Make sure you use a license-free track if you plan to post it on social media.
Using copyrighted music tracks and uploading the video on social media platforms can lead to video strikes. Luckily, Filmora has loads of non-copyrighted music tracks.
Navigate to Stock Media, where you’ll find non-copyrighted music on Pixabay, and choose the one you prefer.

Choose Background Music
5) Edit the Gaming Montage
With Filmora’s auto gaming montage maker, you can watch the video clip with the music you have selected. This tool will analyze beat points to change the video and effects.
Additionally, the tool can identify any bad parts in your video and delete them so that the video matches the music.
The Effects tab allows you to add multiple overlays and filters to your gaming montage video. Filmora has different categories of overlays that let you add emotions or personality to your montage. You can also use it to set the tone in your video.
Filters allow you to spice up your gaming videos. There are also different types of filters on Filmora.
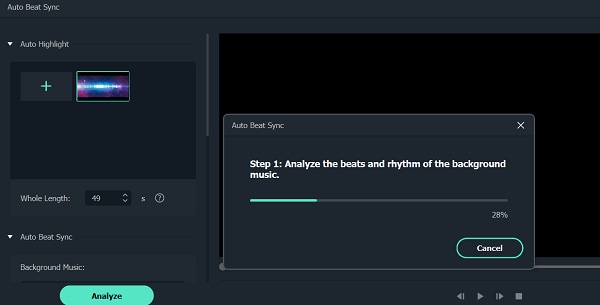
Edit Gaming Montage
6) Export Your Gaming Montage Video
Once you have finished editing your video and added music, hit the Export button. Doing this will allow you to export your edited video and save it on your computer.
You can now enter your login details and upload your gaming montage video on your YouTube channel to share it with other players.
Useful Tips for Making a Gaming Montage
Making gaming montages can help you build a large online community if you do the right thing. When making a gaming montage, there are a few tips that you should keep in mind. They include:
1. Apply Velocity Effects
Adding velocity effects to your montage will help get the attention of viewers. You can couple the transition between scenes with a speed ramping effect.
Include slow motion where there is a gunshot or other big gaming moment. You can then speed up things to quickly move into another scene. You can create these velocity effects in Filmora and make it smooth.
2. Avoid Game Loading Scenes
Do not include game loading scenes or any unnecessary clips in the gaming montage. Your audience does not have the time to wait for the scenes to load because they want to see action fast.
3. Sync Gunshot with Music Beat
Try to match gunshot sounds with beats and rhythms in shooter video games. The beats of the music and the soothing sync of gunshots will catch viewers’ attention and your video will become popular among gamers.
4. Add Creative Transitions
You can spice up your gaming montage by adding transitions, especially when you have loads of clips for the montage. But avoid overusing it, as you could confuse your audience with a range of dazzling and glaring transitions.
5. Color Grade the Video for the Mood
Use color grading to your advantage, as it can set the mood of your viewers. You can decide to make some scenes black and white to catch the viewers’ attention.
6. Add Video Vignettes for Special Occasions
You can add dark edges around the corners of your video to highlight action or create a certain mood. For gameplay based on a story, use vignetting to add a sense of nostalgia or as a flashback that shows viewers the past.
You can use Filmora to apply the vignetting effect by heading to Advanced Color Tuning, then clicking the Vignette option. You can then add the vignette effect to the video. Additionally, you can adjust the vignette’s exposure, feather, roundness, size, and highlights.
Best Gaming Montage for Studying
Here are three gaming montages that are good for studying.
1. Call of Duty: Modern Warfare
Uploaded by DemixB, the Call of Duty Game Montage uses Jacques Offenbach’s Can Can Music track. It’s a happy song that has a tempo of 81 BPM. The track has average danceable energy, and it’s somewhat danceable.
DemixB set the gunshot in the montage video to the music tune. The track builds up to the climax when the gunshot echoes with the attention-grabbing orchestral explosions.
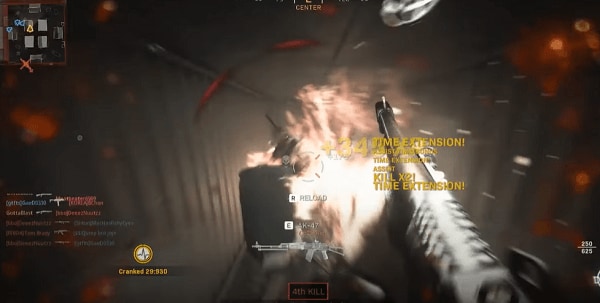
Call of Duty: Modern Warfare
2. ShutteR’s Gaming Montage
In the gaming montage uploaded by ShutteR on his YouTube channel, he used velocity effects to enhance the video. You’ll see that the transition in each scene is paired with adrenaline-pumping, speed-ramping effects.
ShutteR used a slow-motion to highlight action in each scene, then speeds up again when he wants to fast out into the next scene.; this makes the video more engaging to keep viewers glued to their screens.
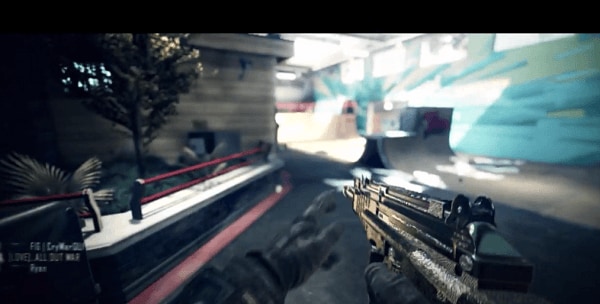
ShutteR’s Gaming Montage
3. NEVERMORE [CS: GO]
NEVERMORE [CS: GO] was uploaded by Fuze on his YouTube channel, and it has creative gameplay. The gaming montage is based on a story. He did the project with Apel, an artist who designed the Fever Dream series skins in the video.
The basic idea of this gaming montage was that the main game character is a corrupted policeman with purple glowing eyes because he’s not human.
When the edits begin, the shape of the main character will shift from CS: GO CT models and turn into his real corrupt CT shape. So that’s why his name keeps changing. You can get his real identity by pausing some of the frames and looking at the “Killfeed.”
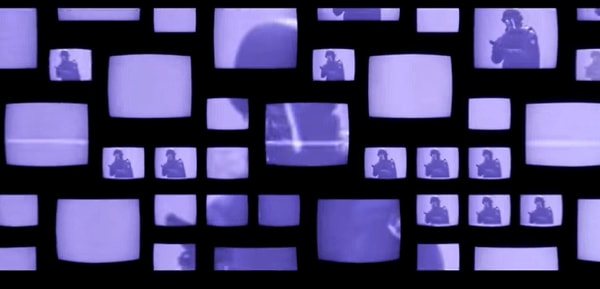
NEVERMORE [CS: GO]
Closing Thoughts:
Gaming montage involves picking and editing a range of video clips, which are brought together to create engaging video content. It consists of the best scenes from gameplay and non-copyrighted background music.
Use Filmora to edit and add effects to your video, including transitions and overlays. Your gaming montage will get more views, hence becoming popular among players.
The popularity of gaming montage is growing every day in today’s pop culture. There are currently more than 2.5 billion gamers, and most of them love watching gaming video content on YouTube. Whether people use a montage to parody gaming montages themselves or show off their skills, the effort and time put into them create impressive results.
We will explain how to create gaming montages and give you some tips that you might want to keep in mind to make epic videos.
How to Make a Gaming Montage
You have several options when it comes to creating gaming montages. You can include a random cut of great scenes, a mixture of the highlighted moments you found thrilling and would like to share with other gamers. In other cases, you’ll have to think of an engaging story in advance, then base your gameplay on this story.
Essentially, the workflow will be slightly different for these two scenarios. It’s much easier with the random cut type, especially when using a reliable video editor. Editing montages is as exciting as playing the game.
With that in mind, here is how to make a gaming montage.
1) Decide Your Montage Story/Type
Deciding your montage type beforehand helps clear your mind and create an epic gaming montage that will keep viewers watching. It allows you to choose the relevant video clips for your gaming montage.
Choose the topic of the video and decide the length of each clip and the sequence of the clips. Be sure to put the most epic or funny clips in the last section of your video. And this will make your viewers watch the video until the end.
2) Record Your Gameplay Footage
The methods to capture the gameplay varies depending on the platform where the game is. The most important thing you have to keep in mind is to ensure your recorder supports Replay Buffer; this will allow you to record scenes that occurred minutes or seconds ago.
That means you do not need to record the gameplay the whole time and burn your hardware. Instead, you’ll capture the moment after interesting things occur.
Game consoles like PS4 allow you to record the video natively for a maximum of one hour with the gamepad. A capture card lets you record it longer than 60 minutes.
Once you’ve all the clips you want on your PC, head over to https://filmora.wondershare.net/filmora-video-editor.html and download Filmora and install the software on your computer. This program allows you to edit your video clips and add cool effects that will make viewers keep watching.
3) Import You Videos to Media Library
You only have to import the videos to Filmora’s media library and then drag and drop them into the timeline, where you can start making the edits.
By right-clicking on the clip in your timeline, you’ll see the options to zoom, speed, change, split, or trim your videos. You can also add sound effects by going to the Audio Tab.

Import Videos
4) Choose Background Music for Your Montage
Music will help make your gaming montage engaging. Make sure you use a license-free track if you plan to post it on social media.
Using copyrighted music tracks and uploading the video on social media platforms can lead to video strikes. Luckily, Filmora has loads of non-copyrighted music tracks.
Navigate to Stock Media, where you’ll find non-copyrighted music on Pixabay, and choose the one you prefer.

Choose Background Music
5) Edit the Gaming Montage
With Filmora’s auto gaming montage maker, you can watch the video clip with the music you have selected. This tool will analyze beat points to change the video and effects.
Additionally, the tool can identify any bad parts in your video and delete them so that the video matches the music.
The Effects tab allows you to add multiple overlays and filters to your gaming montage video. Filmora has different categories of overlays that let you add emotions or personality to your montage. You can also use it to set the tone in your video.
Filters allow you to spice up your gaming videos. There are also different types of filters on Filmora.

Edit Gaming Montage
6) Export Your Gaming Montage Video
Once you have finished editing your video and added music, hit the Export button. Doing this will allow you to export your edited video and save it on your computer.
You can now enter your login details and upload your gaming montage video on your YouTube channel to share it with other players.
Useful Tips for Making a Gaming Montage
Making gaming montages can help you build a large online community if you do the right thing. When making a gaming montage, there are a few tips that you should keep in mind. They include:
1. Apply Velocity Effects
Adding velocity effects to your montage will help get the attention of viewers. You can couple the transition between scenes with a speed ramping effect.
Include slow motion where there is a gunshot or other big gaming moment. You can then speed up things to quickly move into another scene. You can create these velocity effects in Filmora and make it smooth.
2. Avoid Game Loading Scenes
Do not include game loading scenes or any unnecessary clips in the gaming montage. Your audience does not have the time to wait for the scenes to load because they want to see action fast.
3. Sync Gunshot with Music Beat
Try to match gunshot sounds with beats and rhythms in shooter video games. The beats of the music and the soothing sync of gunshots will catch viewers’ attention and your video will become popular among gamers.
4. Add Creative Transitions
You can spice up your gaming montage by adding transitions, especially when you have loads of clips for the montage. But avoid overusing it, as you could confuse your audience with a range of dazzling and glaring transitions.
5. Color Grade the Video for the Mood
Use color grading to your advantage, as it can set the mood of your viewers. You can decide to make some scenes black and white to catch the viewers’ attention.
6. Add Video Vignettes for Special Occasions
You can add dark edges around the corners of your video to highlight action or create a certain mood. For gameplay based on a story, use vignetting to add a sense of nostalgia or as a flashback that shows viewers the past.
You can use Filmora to apply the vignetting effect by heading to Advanced Color Tuning, then clicking the Vignette option. You can then add the vignette effect to the video. Additionally, you can adjust the vignette’s exposure, feather, roundness, size, and highlights.
Best Gaming Montage for Studying
Here are three gaming montages that are good for studying.
1. Call of Duty: Modern Warfare
Uploaded by DemixB, the Call of Duty Game Montage uses Jacques Offenbach’s Can Can Music track. It’s a happy song that has a tempo of 81 BPM. The track has average danceable energy, and it’s somewhat danceable.
DemixB set the gunshot in the montage video to the music tune. The track builds up to the climax when the gunshot echoes with the attention-grabbing orchestral explosions.

Call of Duty: Modern Warfare
2. ShutteR’s Gaming Montage
In the gaming montage uploaded by ShutteR on his YouTube channel, he used velocity effects to enhance the video. You’ll see that the transition in each scene is paired with adrenaline-pumping, speed-ramping effects.
ShutteR used a slow-motion to highlight action in each scene, then speeds up again when he wants to fast out into the next scene.; this makes the video more engaging to keep viewers glued to their screens.

ShutteR’s Gaming Montage
3. NEVERMORE [CS: GO]
NEVERMORE [CS: GO] was uploaded by Fuze on his YouTube channel, and it has creative gameplay. The gaming montage is based on a story. He did the project with Apel, an artist who designed the Fever Dream series skins in the video.
The basic idea of this gaming montage was that the main game character is a corrupted policeman with purple glowing eyes because he’s not human.
When the edits begin, the shape of the main character will shift from CS: GO CT models and turn into his real corrupt CT shape. So that’s why his name keeps changing. You can get his real identity by pausing some of the frames and looking at the “Killfeed.”

NEVERMORE [CS: GO]
Closing Thoughts:
Gaming montage involves picking and editing a range of video clips, which are brought together to create engaging video content. It consists of the best scenes from gameplay and non-copyrighted background music.
Use Filmora to edit and add effects to your video, including transitions and overlays. Your gaming montage will get more views, hence becoming popular among players.
How to Add Font Effects to Videos
Adding titles and texts to a video clip during the post-production phase is a common thing. You may need to add texts in the intro and outro of the video as well as to highlight important parts in the middle of the video. Showing regular and static texts and titles is very unappealing, and that is why everyone includes font effects to animate the texts.
There are different types of font effects available to apply to the texts and titles in your video. There are premium video editors available with a wide range of effects such as After Effect font effects. If you are an occasional video creator, you can use online font effects while you edit your videos on the go. We will illustrate how to add font effects to videos on any device.
Part 1. Add Font Effects to Video on Windows PC
If you have the video where you want to edit and add font effect on your Windows PC, you will need a video editor where the font effects are available. If you are a regular video creator, you should opt for a premium video editor, and we recommend Wondershare Filmora. Filmora is a professional video editor with a super intuitive user interface. You can add texts and titles and add animation to the text conveniently without any prior knowledge or experience.
Filmora has a wide range of effects and animations that you can add to the text of the video. In fact, there are categorized so that you can choose from them as per your requirements. All you have to do is go for font effect download and apply them to any text on your video. Here are the steps to add font effects to video on your Windows computer.
Step1Download and install Wondershare Filmora for Windows PC. Launch the application to edit your video.
Step2To start a new project, click on New Project option on the welcome screen. Alternatively, you can go to File> New Project from the menu bar.

Step3Import your video file from your hard drive by going to File> Import Media> Import Media Files from the menu bar. Alternatively, you can drag and drop the video file into Project Media folder.

Step4Drag and drop the video file into the Timeline. You can add multiple video clips. Thereafter, you can arrange them in proper order on the Timeline.

Step5Go to Titles located at the top bar. From the left panel, select any category of text effect and drop into the Timeline on top of the video clip. You should place the text effect on the Timeline wherever you want it to appear in the video. You can also stretch the duration of the text effect as per your preference.

Step6Customize the text effect by double clicking on the text effect located on Timeline. Under Preset tab, you will find different font effects and styles. Change the text, font, size, color, and every other parameter as required. For more customization, you can click on Advanced button. Finally, click on OK button.

Step7Play the video and click on Export button. Select your desired file format and save the edited video on your hard drive.
Part 2. Add Video Font Effects on Mac
If you are using a Mac where you want to edit your video and add font effects, you do not have to install any external video editor. This is because Mac comes with a built-in video editor called iMovie by Apple where you can easily add font effects. There are different types of video font effects available on iMovie starting from animated titles to credits and callouts. You can get similar font for After Effect on iMovie. Here are the steps to add video font effects on Mac.
Step1Open iMovie on your Mac from Applications folder. Go to File> Import Media option to import your video under Project Media.

Step2Drag and drop the selected video into Timeline for your iMovie project. Click on Titles tab located at the top.

Step3Place the mouse point over the different text styles to check them. Drag and drop the desired text style into the Timeline and place it where you want the text to appear. You can stretch the duration of the text effect.

Step4From Viewer interface, double click on the text part of the video to customize the text. You will see options to change the font, font size, color and much more.

Step5Play the video and once you are satisfied, go to File> Share> File and save the edited video on your storage device.
Part 3. How to Add Font Effects Online
If you edit videos occasionally and you want to add font effects to your video without downloading any video editor, you can use an online video editor. There are several online video editors you will come across, but for adding free font effects, we recommend FlexClip video editor. It is a completely free online video editor where you can edit and export video without any watermark. There are several elegant font effects available, and you can make easy adjustments instantly. Here are the steps to add font effects to your video.
Step1Open your web browser and visit on “flexclip.com/tools/add-text-to-video”. Click on Browser Video button. Select the video from your storage device.

Step2Once the video is uploaded, you will see Text tab already selected. Go through the list of font effects available. Drag and drop the desired font effect into the video on the Viewer.

Step3Double-click on the font effect on the Viewer and customize all the parameters such as text, size, and style.

Step4Once you are satisfied, click on Export button in the top-right corner.

Conclusion
Adding font effects on video is a common practice especially when you have intro and outro in your video clip. Instead of the regular titles and texts, you should opt for creative font effects so that the text parts on your video look attractive. If it is a one-time thing, you can opt for an online video editor. If you use a Mac, you can use iMovie, and for Windows PC, we recommend Wondershare Filmora .
Free Download For Win 7 or later(64-bit)
Free Download For macOS 10.14 or later
Free Download For macOS 10.14 or later
Also read:
- [New] In 2024, Streamlabs or OBS Picking the Best Software for Your Channel
- [Updated] In 2024, Earning More Utilizing YouTube's Income Tools on All Devices
- 2024 Approved Do You Want to Add Subtitles to Your Videos Efficiently? This Article Will Introduce an Online Subtitle Editor that Will Help You to Create Subtitles for Your Video
- 2024 Approved Pinnacle Creation Hub Synopsis, Studio Assessment 2023
- Essential Mobile Tools: 4 Apps That Revolutionize DIY House Painting
- How to Perform an AMD Graphics Drivers Update on Windows 10, 8 & 7
- How To Simulate GPS Movement With Location Spoofer On Itel A70? | Dr.fone
- Interaktive Datensynchronisation in Beide Richtungen - Optimieren Sie Ihre Informationsflüsse!
- Navigating the Digital Age: Mastery of Facebook, Twitter, Instagram & YouTube for Optimal Engagement
- New 2024 Approved How to Add Subtitles in Canva?
- New In 2024, How to Use Rule of Thirds in Video
- Top 6 Ways to Transfer Text Messages from Motorola Edge 40 Neo to Other Android Devices | Dr.fone
- Updated 2024 Approved 15 Best LUTS to Buy
- Updated 6 Websites to Free Download Motivational Video Footage
- Updated Ideas for Time-Lapse Video
- Updated In 2024, Easy Steps to Create Intro Video with After Effects
- Title: Easy Ways to Remove Motion Blur In Photoshop for 2024
- Author: Chloe
- Created at : 2025-01-21 17:32:03
- Updated at : 2025-01-24 09:26:52
- Link: https://ai-editing-video.techidaily.com/easy-ways-to-remove-motion-blur-in-photoshop-for-2024/
- License: This work is licensed under CC BY-NC-SA 4.0.
