:max_bytes(150000):strip_icc():format(webp)/best-sports-movies-creed-michael-b-jordan-cbca95120e5243edb7eca00403eaa626.jpg)
Efficient Ways to Change Slow Motion Video to Normal on iPhone

Efficient Ways to Change Slow Motion Video to Normal on iPhone
Slow-motion videos bring your videos to life by highlighting the emotions and details of a story. However, transforming a slow motion into a normal video has its benefits. For instance, you can make boomerangs or GIFs with normal videos. In addition, you can introduce limitless transitions and animations to them. Thus, are you also finding how to change slow-motion video to a normal iPhone?
This article is the perfect stop for you as it covers all your slow-motion queries from here. It will focus on how to unslow-mo a video on an iPhone and related tools. We will discuss the iPhone’s pre-built feature and some tools to achieve this. There will be a bonus tip on how to change slow-mo video to normal on iPhone.
Slow Motion Video Maker Slow your video’s speed with better control of your keyframes to create unique cinematic effects!
Make A Slow Motion Video Make A Slow Motion Video More Features

Part 1: Direct Method: Changing Slow Motion Video to Normal on iPhone
You might not be aware of this feature if you are a previous user or have just started using an iPhone. This is Apple’s built-in feature, found in iPhones and iPads. In this section, we have tailored a step-by-step guide to doing this. Here is a brief overview of how to convert a slow-motion video to a normal iPhone:
Step 1
Move to its bottom after opening the “Photos” application on your iPhone. From there, select the “Albums” option and scroll down to the “Slo-mo” option in “Media Types.”

Step 2
In the slow-mo section, find a video you want to reverse and select it to open. Navigate towards the top right corner of this video and click the “Edit” option.

Step 3
An editing panel will appear at the bottom of this video. If you’d notice, a vertical lined bar is under the video timeline. This indicates slow-mo duration, which you can change by repositioning sliders. Afterward, click the “Done” button at the right bottom of this screen to finalize.

Part 2: Top Applications That Can Be Used to Change Slow Motion Video to Normal
The iPhone’s built-in feature is equally effective for reversing a slow-mo back to normal. However, sometimes, one requires a tool for detailed editing. In such cases, we recommend you use a third party to help you achieve the desired results. We have assembled some tools on how to take slow-mo off a video on iPhone below:
- SpeedPro Slow Speed Video Edit
- Slow-Fast Motion Video Editor
- Slow Motion Video Fx Editor
- Reverse Cam – Slow Motion Video
- Slow Motion Video Editor
1. SpeedPro Slow Speed Video Edit
This is a versatile application designed explicitly to resolve the slow speed queries on iPhone. Users can effortlessly manipulate the speed of video during editing. The best part about this editor is that you can select a specific video section. It is up to you to reverse a complete slow-mo video or a part of it.

Key Features
- Facilitates both professionals and amateurs with its reachable user interface.
- After editing a video as super slow or super-fast, you can incorporate music.
- The application offers direct sharing options to vast applications like Instagram or YouTube.
2. Slow-Fast Motion Video Editor
If how to convert slow motion video to normal on an iPhone was a bet, this application would be worth your money. Many content creators have used it, and everyone has positively reviewed it. You can transform a slow-mo into a normal video using its speed option. The highest speed option is 2x, and the slowest speed option is 1/4th. There is no limitation on the video’s length or resolution for conversion.

Key Features
- You can apply different time transitions (fast or slow) to distinct video segments.
- The application doesn’t export with a Watermark addition to maintain professionalism.
- Upon converting a video or reversing it, you can adjust the audio pitch to align with it.
3. SloMo Slow Motion Video Editor
With technological advancements, the editing industry has taken up a notch. This application uses modern algorithms to create or reverse a slow with customizations. To reverse a slow-mo, you just need to upload it and increase the video’s speed. It offers three sorts of speed editing, including slow-mo, time-lapse, and stop-motion. The video speed is adjustable up to 240fps and 12x with quick processing.

Key Features
- With its independent frame manipulation, you can edit specific parts of a video.
- You can incorporate music behind your tracks out of 170+ pre-built music tracks.
- This iPhone editor retains the natural resolution of video to maintain its quality.
4. Reverse Cam – Slow Motion Video
Surfing through the internet to find how to unslow-mo a video on an iPhone? This application assists you in controlling or reversing video speed. You just need to import a previously created slow-mo into the application. In addition to reversing a video, you can also reverse audio tracks with it. There are multiple speed options like 0.25, 0.5x, and more.

Key Features
- After modifying the video speed, you can apply multiple effects to it.
- The application is compatible with iOS 9.0 or newer versions.
- It has a built-in library that users can use to save the edited videos and share them directly.
5. Slow Motion’ Video Editor
Solve all your queries related to how to change slo-mo video to normal on iPhone here. Designed to give your videos a perfect slow-motion or high-speed effect. To convert a slow-mo video into a normal one, it offers speed increase options. You can have complete control over your videos with this application.

Key Features
- It has an accessible and intuitive editing interface for user comprehension.
- It allows you to manipulate the speed of your video from 60 to 240 frames.
- It has multiple subscription options, weekly, monthly, or yearly, that you can avail accordingly.
Bonus Part: Speed Up Your iPhone Video on Desktop Using Wondershare Filmora
All these methods of transforming a slow-mo to normal are accurate and efficient. However, when it comes to perfection, one software stands tall than the others.Wondershare Filmora is a premium video editing software for precise editing. There are two methods of manipulating a slow-motion video to normal in it.
The speed ramping involves slow-mo reverse action from specific video frames. On the other hand, uniform speed modifies the complete video speed. You can add specific values for manipulating the frame rate or change the sliders. In addition, you can also add multiple effects to your video afterward. Moreover, you can also export the video in high resolution and desired format.
Free Download For Win 7 or later(64-bit)
Free Download For macOS 10.14 or later
Step-by-Step Guide to Shift Your Slow-Motion Video to Normal with Filmora
This segment involves a step-by-step guide to reverse a slow-mo. Let’s see how to change slo-mo video to normal on iPhone with Filmora below:
Step 1Import Media Files from iPhone
First, connect your iPhone to the source device you are using Filmora on. Once you have connected the devices, navigate towards the “Import” button. Expand this option, and from the dropdown menu, select “Import from a Camera or Phone.” Select the name of your iPhone in the “Import from” section and click “OK.” Once imported, place the clip in the timeline.

Step 2Access Uniform Speed Option
Then, select the clip in the timeline and navigate towards the settings panel. Afterward, go to the “Speed” tab under “Uniform Speed” set values. Drag the Speed slider towards the right to increase the video speed.

Step 3Export the Edited Video
Hit the “Play” button from the preview window to preview your video. Afterward, navigate towards the “Export” button at the top right corner. You can also set the framerate in the Export window according to preference. Further, hit the “Export” button in the Export window to save the file on the device.

Top Features to Note About Wondershare Filmora
There is more to Filmora than how to unslow-mo a video on an iPhone. The tool shows support with multiple devices like Windows, iOS, Linux, and more. Following are some of the top-notch AI features of Filmora:
1. AI Text-to-Video
Use this tool to craft creative and graphic-based videos along with voice integration. With its generative AI, it allows you to tailor videos in different contexts. It uses text-based instructions to analyze demands and follow them.
2. AI Text-Based Editing
Cutting and Trimming videos in a timeline might be difficult for some people. It requires proper skills; however, there is an alternate option. The text-based editing AI uses voice recognition to convert speech to text. Once the video has been converted, you can eliminate the parts you want.
3. AI Music Generator
If you want to generate music based on your video’s mood or context, use this AI. It asks for a few directions like theme, mood, and language to curate music. The song is efficient in what it is designed for and generates results in seconds.
4. AI Vocal Remover
Background noises always decline the quality of an audio track or overall video. With Filmora, you can separate vocals from background noise and delete the track. Both tracks are shown in the timeline and are easy to remove. Afterward, you can apply effects or introduce music before export.
Conclusion
After reaching a conclusion, one should have fully understood the merits of how to change slow-motion video to a normal iPhone. It provided insights into several useful applications for achieving this effect. Wondershare Filmora emerged as a worthy AI-driven desktop application tailored for crafting such videos. It is recommended to help you with your creative endeavors in this domain.
Make A Slow Motion Video Make A Slow Motion Video More Features

Part 1: Direct Method: Changing Slow Motion Video to Normal on iPhone
You might not be aware of this feature if you are a previous user or have just started using an iPhone. This is Apple’s built-in feature, found in iPhones and iPads. In this section, we have tailored a step-by-step guide to doing this. Here is a brief overview of how to convert a slow-motion video to a normal iPhone:
Step 1
Move to its bottom after opening the “Photos” application on your iPhone. From there, select the “Albums” option and scroll down to the “Slo-mo” option in “Media Types.”

Step 2
In the slow-mo section, find a video you want to reverse and select it to open. Navigate towards the top right corner of this video and click the “Edit” option.

Step 3
An editing panel will appear at the bottom of this video. If you’d notice, a vertical lined bar is under the video timeline. This indicates slow-mo duration, which you can change by repositioning sliders. Afterward, click the “Done” button at the right bottom of this screen to finalize.

Part 2: Top Applications That Can Be Used to Change Slow Motion Video to Normal
The iPhone’s built-in feature is equally effective for reversing a slow-mo back to normal. However, sometimes, one requires a tool for detailed editing. In such cases, we recommend you use a third party to help you achieve the desired results. We have assembled some tools on how to take slow-mo off a video on iPhone below:
- SpeedPro Slow Speed Video Edit
- Slow-Fast Motion Video Editor
- Slow Motion Video Fx Editor
- Reverse Cam – Slow Motion Video
- Slow Motion Video Editor
1. SpeedPro Slow Speed Video Edit
This is a versatile application designed explicitly to resolve the slow speed queries on iPhone. Users can effortlessly manipulate the speed of video during editing. The best part about this editor is that you can select a specific video section. It is up to you to reverse a complete slow-mo video or a part of it.

Key Features
- Facilitates both professionals and amateurs with its reachable user interface.
- After editing a video as super slow or super-fast, you can incorporate music.
- The application offers direct sharing options to vast applications like Instagram or YouTube.
2. Slow-Fast Motion Video Editor
If how to convert slow motion video to normal on an iPhone was a bet, this application would be worth your money. Many content creators have used it, and everyone has positively reviewed it. You can transform a slow-mo into a normal video using its speed option. The highest speed option is 2x, and the slowest speed option is 1/4th. There is no limitation on the video’s length or resolution for conversion.

Key Features
- You can apply different time transitions (fast or slow) to distinct video segments.
- The application doesn’t export with a Watermark addition to maintain professionalism.
- Upon converting a video or reversing it, you can adjust the audio pitch to align with it.
3. SloMo Slow Motion Video Editor
With technological advancements, the editing industry has taken up a notch. This application uses modern algorithms to create or reverse a slow with customizations. To reverse a slow-mo, you just need to upload it and increase the video’s speed. It offers three sorts of speed editing, including slow-mo, time-lapse, and stop-motion. The video speed is adjustable up to 240fps and 12x with quick processing.

Key Features
- With its independent frame manipulation, you can edit specific parts of a video.
- You can incorporate music behind your tracks out of 170+ pre-built music tracks.
- This iPhone editor retains the natural resolution of video to maintain its quality.
4. Reverse Cam – Slow Motion Video
Surfing through the internet to find how to unslow-mo a video on an iPhone? This application assists you in controlling or reversing video speed. You just need to import a previously created slow-mo into the application. In addition to reversing a video, you can also reverse audio tracks with it. There are multiple speed options like 0.25, 0.5x, and more.

Key Features
- After modifying the video speed, you can apply multiple effects to it.
- The application is compatible with iOS 9.0 or newer versions.
- It has a built-in library that users can use to save the edited videos and share them directly.
5. Slow Motion’ Video Editor
Solve all your queries related to how to change slo-mo video to normal on iPhone here. Designed to give your videos a perfect slow-motion or high-speed effect. To convert a slow-mo video into a normal one, it offers speed increase options. You can have complete control over your videos with this application.

Key Features
- It has an accessible and intuitive editing interface for user comprehension.
- It allows you to manipulate the speed of your video from 60 to 240 frames.
- It has multiple subscription options, weekly, monthly, or yearly, that you can avail accordingly.
Bonus Part: Speed Up Your iPhone Video on Desktop Using Wondershare Filmora
All these methods of transforming a slow-mo to normal are accurate and efficient. However, when it comes to perfection, one software stands tall than the others.Wondershare Filmora is a premium video editing software for precise editing. There are two methods of manipulating a slow-motion video to normal in it.
The speed ramping involves slow-mo reverse action from specific video frames. On the other hand, uniform speed modifies the complete video speed. You can add specific values for manipulating the frame rate or change the sliders. In addition, you can also add multiple effects to your video afterward. Moreover, you can also export the video in high resolution and desired format.
Free Download For Win 7 or later(64-bit)
Free Download For macOS 10.14 or later
Step-by-Step Guide to Shift Your Slow-Motion Video to Normal with Filmora
This segment involves a step-by-step guide to reverse a slow-mo. Let’s see how to change slo-mo video to normal on iPhone with Filmora below:
Step 1Import Media Files from iPhone
First, connect your iPhone to the source device you are using Filmora on. Once you have connected the devices, navigate towards the “Import” button. Expand this option, and from the dropdown menu, select “Import from a Camera or Phone.” Select the name of your iPhone in the “Import from” section and click “OK.” Once imported, place the clip in the timeline.

Step 2Access Uniform Speed Option
Then, select the clip in the timeline and navigate towards the settings panel. Afterward, go to the “Speed” tab under “Uniform Speed” set values. Drag the Speed slider towards the right to increase the video speed.

Step 3Export the Edited Video
Hit the “Play” button from the preview window to preview your video. Afterward, navigate towards the “Export” button at the top right corner. You can also set the framerate in the Export window according to preference. Further, hit the “Export” button in the Export window to save the file on the device.

Top Features to Note About Wondershare Filmora
There is more to Filmora than how to unslow-mo a video on an iPhone. The tool shows support with multiple devices like Windows, iOS, Linux, and more. Following are some of the top-notch AI features of Filmora:
1. AI Text-to-Video
Use this tool to craft creative and graphic-based videos along with voice integration. With its generative AI, it allows you to tailor videos in different contexts. It uses text-based instructions to analyze demands and follow them.
2. AI Text-Based Editing
Cutting and Trimming videos in a timeline might be difficult for some people. It requires proper skills; however, there is an alternate option. The text-based editing AI uses voice recognition to convert speech to text. Once the video has been converted, you can eliminate the parts you want.
3. AI Music Generator
If you want to generate music based on your video’s mood or context, use this AI. It asks for a few directions like theme, mood, and language to curate music. The song is efficient in what it is designed for and generates results in seconds.
4. AI Vocal Remover
Background noises always decline the quality of an audio track or overall video. With Filmora, you can separate vocals from background noise and delete the track. Both tracks are shown in the timeline and are easy to remove. Afterward, you can apply effects or introduce music before export.
Conclusion
After reaching a conclusion, one should have fully understood the merits of how to change slow-motion video to a normal iPhone. It provided insights into several useful applications for achieving this effect. Wondershare Filmora emerged as a worthy AI-driven desktop application tailored for crafting such videos. It is recommended to help you with your creative endeavors in this domain.
Learning Some Perfect Ways to Convert a Slow-Motion Video to Normal
Maintain consistency in your projects by adding all video clips simultaneously. Sometimes, you have to include a slow-motion video due to its content. In such cases, convert them into a normal video for an even flow in the media. Turning slow-motion videos into the normal is essential in several cases. Unfortunately, many people don’t know how to make a slow-mo video at normal speed.
To address this concern, we have enlisted perfect ways to make slow-mo to usual video. Read this guide and learn how to convert a slow-motion video to normal step-wise. Besides, you will also find some online and desktop solutions to make the best choice.
Slow Motion Video Maker Slow your video’s speed with better control of your keyframes to create unique cinematic effects!
Make A Slow Motion Video Make A Slow Motion Video More Features

Part 1: Android User’s Solution: Converting Slow Motion Video to Normal
Android cameras can record slow-motion videos and turn them into normal as well. For this purpose, you have to upload your clips on Google Photos. Let’s discover how to convert slow-motion video to normal in Google Photos for Android. Remember that these steps might vary across different Android models.
Step 1
Enter your Google Photos app and pick one of your intended Slow-motion videos. While previewing it, look for the “Slow Motion” option at the top and touch it.

Step 2
Read the instructions from the displayed pop-up and hit the “OK.” Drag the two sliders and enclose them from both ends. Your slow-motion video is converted into the normal one.

Part 2: iOS User’s Solution: Converting Slow Motion Video to Normal
iPhone also offers a built-in option to change the speed of videos. Almost all iPhone series follow the same steps to change the video speed. Thus, you can quickly learn how to make slow-motion videos at regular speed, regardless of the version. Without further delay, make a slow-motion video and read the given steps:
Step 1
Unlock your iPhone and open the “Photos” app from the main screen. There, reach the “Albums” icon from the bottom and scroll until you get the “Slo-mo” option. Click on it and get a preview of your slow-motion video.

Step 2
Now, hit “Edit” from the top right side and find an editing screen. From the bottom, enclose the sliders from both sides and tap the “Done” button. This way, you will get a standard video instantly saved on your iPhone.

Part 3: Online Solution: Converting Slow Motion Video to Normal
Use this online tool if you cannot perform slow-motion to normal video conversion. Clideo is an online platform that allows you to change the video speed without causing playback issues. It offers a high level of security where only you can access your files. Some of its additional editing options allow you to pick an output format. Besides, users can keep their media sound or mute while making the conversion.
This tool supports MP4, MPG, VOB, MOV, and WMV media file formats. The following is a step-by-step guide to using this online solution:
Step 1
Access the official site of Clideo Stop Motion Maker and click the “Choose File” button. Browse your slow-motion video and press the “Open” button. Now, wait for a while until it gets uploaded on the site.

Step 2
Afterward, set the “Speed” from three given options. Choose to set the video to “Medium” speed. Moreover, you can also set the “Clip Rate” of the video as per requirements.

Step 3
When you get the desired outcome, click the “Export” button from the bottom-right corner. You will get a preview of the video on the next screen. Tap on the downward “ Download “ symbol and pick the file export destination. You can simply hit “Download” to get the file in your system.

Part 4: Desktop Recommendation: Converting Slow Motion Video to Normal Using Wondershare Filmora
In the above sections, you have learned how to turn slow-mo into normal. Now, it is time to look for an effective offline solution. That’s where you can count on Wondershare Filmora , which is the simplest but powerful video editor. Fortunately, it can speed up and slow down videos within the highest quality. Filmora provides more advanced editing options than the above solutions.
Free Download For Win 7 or later(64-bit)
Free Download For macOS 10.14 or later
Steps to Perform Slow Motion and Speed Up Videos to Normal with Filmora
Unlike other tools, Filmora can quickly convert your video speed to your desired extent. Head below and transform your video easily with this step-by-step guide.
Step 1Install Filmora and Export Your Media to Start a Project
Successfully launch Filmora in your system and access its home screen. Click on the “New Project” option to initiate media editing. Bring your video to the timeline after importing it into the media panel. To import the file, press the “Ctrl + I” keys using your keyboard.

Step 2Slow Down or Speed Up the Video with Optical Flow
Right-click on your slow-motion video in the timeline to get an extended list. From that list, tap the “Uniform Speed” option and find an editing panel on the right. Now, drag the “Speed” slider right to speed up the video. You can move it to the left side to slow down the video. To ensure a smooth quality, extend the “AI Frame Interpolation” menu and pick the “Optical Flow.”

Step 3Save the File Through the Export Button
Press the Space bar from your keyboard and preview the video. Navigate toward the “Export” button at the top right corner. You can adjust the export parameters and tap “Export” to save the file on your device.

Other Exceptional Features of Filmora
Filmora is more than a simple video editing app. AI integration can generate music, images, and scripts to embrace creativity in your content. Read the following points to learn more about Filmora’s incredible features.
- AI Vocal Remover: If you want to dub a video, use this feature to remove existing vocals. It can separate music and vocal soundtracks while keeping their quality high. Once AI removes vocals, you can quickly edit or remove unwanted elements from the tracks.
- AI Text to Video: Content creators can get instant engagement in their content with this feature. Users just have to write their ideas and let AI transform them into a visual story. They can later customize fonts, styles, and other elements to achieve desired results.
- AI Smart Masking: Professionals can improve their multi-dimensional scenes using this option. It enables multi-layer overlay editing that isolates subjects. Users can freeze frames and perform auto-correction for visual enhancements of the projects.
Conclusion
In short, slow-motion to normal video conversion is possible and serves fruitful purposes. In this regard, iPhone and Android offer built-in options that are explained earlier. Besides, you get familiar with how to convert a slow-motion video to normal using an online tool. For an effective desktop solution, try using Filmora, which is a top-notch video editor so far.
Make A Slow Motion Video Make A Slow Motion Video More Features

Part 1: Android User’s Solution: Converting Slow Motion Video to Normal
Android cameras can record slow-motion videos and turn them into normal as well. For this purpose, you have to upload your clips on Google Photos. Let’s discover how to convert slow-motion video to normal in Google Photos for Android. Remember that these steps might vary across different Android models.
Step 1
Enter your Google Photos app and pick one of your intended Slow-motion videos. While previewing it, look for the “Slow Motion” option at the top and touch it.

Step 2
Read the instructions from the displayed pop-up and hit the “OK.” Drag the two sliders and enclose them from both ends. Your slow-motion video is converted into the normal one.

Part 2: iOS User’s Solution: Converting Slow Motion Video to Normal
iPhone also offers a built-in option to change the speed of videos. Almost all iPhone series follow the same steps to change the video speed. Thus, you can quickly learn how to make slow-motion videos at regular speed, regardless of the version. Without further delay, make a slow-motion video and read the given steps:
Step 1
Unlock your iPhone and open the “Photos” app from the main screen. There, reach the “Albums” icon from the bottom and scroll until you get the “Slo-mo” option. Click on it and get a preview of your slow-motion video.

Step 2
Now, hit “Edit” from the top right side and find an editing screen. From the bottom, enclose the sliders from both sides and tap the “Done” button. This way, you will get a standard video instantly saved on your iPhone.

Part 3: Online Solution: Converting Slow Motion Video to Normal
Use this online tool if you cannot perform slow-motion to normal video conversion. Clideo is an online platform that allows you to change the video speed without causing playback issues. It offers a high level of security where only you can access your files. Some of its additional editing options allow you to pick an output format. Besides, users can keep their media sound or mute while making the conversion.
This tool supports MP4, MPG, VOB, MOV, and WMV media file formats. The following is a step-by-step guide to using this online solution:
Step 1
Access the official site of Clideo Stop Motion Maker and click the “Choose File” button. Browse your slow-motion video and press the “Open” button. Now, wait for a while until it gets uploaded on the site.

Step 2
Afterward, set the “Speed” from three given options. Choose to set the video to “Medium” speed. Moreover, you can also set the “Clip Rate” of the video as per requirements.

Step 3
When you get the desired outcome, click the “Export” button from the bottom-right corner. You will get a preview of the video on the next screen. Tap on the downward “ Download “ symbol and pick the file export destination. You can simply hit “Download” to get the file in your system.

Part 4: Desktop Recommendation: Converting Slow Motion Video to Normal Using Wondershare Filmora
In the above sections, you have learned how to turn slow-mo into normal. Now, it is time to look for an effective offline solution. That’s where you can count on Wondershare Filmora , which is the simplest but powerful video editor. Fortunately, it can speed up and slow down videos within the highest quality. Filmora provides more advanced editing options than the above solutions.
Free Download For Win 7 or later(64-bit)
Free Download For macOS 10.14 or later
Steps to Perform Slow Motion and Speed Up Videos to Normal with Filmora
Unlike other tools, Filmora can quickly convert your video speed to your desired extent. Head below and transform your video easily with this step-by-step guide.
Step 1Install Filmora and Export Your Media to Start a Project
Successfully launch Filmora in your system and access its home screen. Click on the “New Project” option to initiate media editing. Bring your video to the timeline after importing it into the media panel. To import the file, press the “Ctrl + I” keys using your keyboard.

Step 2Slow Down or Speed Up the Video with Optical Flow
Right-click on your slow-motion video in the timeline to get an extended list. From that list, tap the “Uniform Speed” option and find an editing panel on the right. Now, drag the “Speed” slider right to speed up the video. You can move it to the left side to slow down the video. To ensure a smooth quality, extend the “AI Frame Interpolation” menu and pick the “Optical Flow.”

Step 3Save the File Through the Export Button
Press the Space bar from your keyboard and preview the video. Navigate toward the “Export” button at the top right corner. You can adjust the export parameters and tap “Export” to save the file on your device.

Other Exceptional Features of Filmora
Filmora is more than a simple video editing app. AI integration can generate music, images, and scripts to embrace creativity in your content. Read the following points to learn more about Filmora’s incredible features.
- AI Vocal Remover: If you want to dub a video, use this feature to remove existing vocals. It can separate music and vocal soundtracks while keeping their quality high. Once AI removes vocals, you can quickly edit or remove unwanted elements from the tracks.
- AI Text to Video: Content creators can get instant engagement in their content with this feature. Users just have to write their ideas and let AI transform them into a visual story. They can later customize fonts, styles, and other elements to achieve desired results.
- AI Smart Masking: Professionals can improve their multi-dimensional scenes using this option. It enables multi-layer overlay editing that isolates subjects. Users can freeze frames and perform auto-correction for visual enhancements of the projects.
Conclusion
In short, slow-motion to normal video conversion is possible and serves fruitful purposes. In this regard, iPhone and Android offer built-in options that are explained earlier. Besides, you get familiar with how to convert a slow-motion video to normal using an online tool. For an effective desktop solution, try using Filmora, which is a top-notch video editor so far.
Add VHS Effects to Videos for Free: A 2024 Guide
2023 has ushered in a wave of nostalgia, sweeping across various domains, from fashion to technology. Amidst this, videos have become a powerful medium to relive the past. If you’re aiming to infuse your videos with a touch of the ‘90s, look no further than the VHS effect.
For those who need a quick trip down memory lane, VHS tapes were once the cornerstone of home entertainment. These clunky plastic cassettes captured countless memories, from family gatherings to favorite films and TV shows. While they might be alien to newer generations, they hold a special place in the chronicles of video evolution.
The VHS effect isn’t just about mimicking the look of these tapes. It’s about encapsulating their essence—grainy visuals, occasional jitters, and that characteristic static. Incorporating these imperfections into today’s high-definition videos imparts a distinctive vintage flair. It’s akin to applying an Instagram filter to a photo, where a simple touch can transport a viewer back in time. Dive in as we guide you on adding this retro charm to your free videos.
Part 1: Free VHS overlay video resource download website
In today’s digital age, with so many resources out there, finding the right ones for our specific needs can be quite challenging, like searching for a needle in a haystack.
To achieve that authentic VHS look for your videos, starting with the right VHS overlays is crucial. Here are some websites that offer free VHS overlay video resources:
01Freepik
Renowned for its seemingly endless library of graphic resources, Freepik is not just about captivating images and vectors. Dive deeper into their platform and uncover a treasure trove of VHS video overlays. For those unfamiliar with the platform, the search functionality is intuitive.
Enter “VHS overlay video,” and you’re instantly presented with nostalgic results, each ready to seamlessly integrate into your project. Freepik’s resources are often high-quality, ensuring that your video doesn’t just look retro but feels authentic.
02Color grading central
Primarily catered to the more seasoned video editors, Color Grading Central is not your average overlay repository.
It’s an immersive platform that delves deep into the art of video editing. Beyond their remarkable VHS overlays, which promise a genuine vintage touch, the website is a haven for tips and tutorials on color grading.
This is your go-to platform for those keen on mastering the art of video editing while achieving the VHS look. The overlays here, particularly the VHS ones, have been meticulously crafted, ensuring every pixel exudes the 90s charm.
03Vecteezy
If you’ve spent some time in the video editing, you’ve likely stumbled upon or actively sought out Vecteezy. Lauded as a video editor’s dream, Vecteezy doesn’t disappoint regarding VHS effects.
Their vast collection ensures that you’re not limited to one generic VHS look but have the luxury to pick and choose, ensuring your video remains unique. Input “VHS filter video” in their search bar, and you’re met with a smorgasbord of overlays, each bringing its flavor of the past. From subtle grains to pronounced static lines, the choice is all yours.
04Brusheezy
A designer’s paradise for its exquisite collection of Photoshop brushes, Brusheezy has recently expanded its offerings. Recognizing the growing trend of video content, they’ve ventured into video overlays, and it’s no surprise they’ve added VHS effects to their roster.
Their overlays capture the essence of VHS, ensuring videos are tinged with a touch of the past. For those who trust Brusheezy for design resources, this is a familiar and reliable platform to source your VHS video overlays.
Part 2: Use Filmora’s built-in VHS effects presets
For those unfamiliar, Filmora is more than just another video editing tool. It’s a platform that has been applauded by beginners and professionals alike for its intuitive interface and powerful editing capabilities.
Among its vast array of features is a collection of built-in VHS effects presets, ensuring that users can achieve that much-coveted retro look without relying on external resources.
Here’s a comprehensive guide:
VHS Effects Editor
VHS Effects Editor For Win 7 or later(64-bit)
VHS Effects Editor For macOS 10.14 or later
Step 1: Navigate to the Filters Feature
Kickstart your editing journey by launching your desired project within Filmora. As you familiarize yourself with the interface, direct your attention to the left sidebar. You’ll spot the ‘Filters’ option among the various icons, symbolized by an artistic palette. This section houses a myriad of filters ready to elevate your video content. Give it a click to delve deeper into the world of Filmora filters.
Step 2: Dive into the Retro Realm with VHS and Glitch Effects
Now that you’re in the Filters section, the search bar at the top beckons. This feature ensures you can quickly access desired effects without sifting through the extensive collection. Begin by typing “VHS” or “Glitch.”
As you type, the list below starts to populate with related effects. These aren’t just your run-of-the-mill effects. Each has been crafted to bring a distinct vintage vibe, ensuring that every video has its unique touch of the past.
Step 3: Instantly Apply the Chosen Effect with a Double Click
With the list of VHS effects now at your disposal, take a moment to preview each one by hovering over them. Found one that captures the essence of your vision?
It’s time to apply the magic. Simply double-click on your chosen effect. Like that, your video segment, currently active on the timeline, gets transported back in time, imbued with all the charm of the VHS era.
For those who wish to refine the effect further, Filmora offers adjustment tools, allowing you to tweak the intensity, hue, and other parameters of the filter, ensuring your video looks just the way you envisioned.
Part 3: Summary
Giving your videos a vintage VHS look has never been easier. With the availability of free resources online and built-in presets in editing software like Filmora, you’re only a few clicks away from transporting your audience back to the 90s.
Whether for aesthetic or nostalgic reasons, the VHS effect is a fun way to spice up your videos. So, grab your camcorder (or smartphone) and start filming!
6 Best MP4 Mergers to Join Videos Easily
Not all software allows you to combine videos in the MP4 format. And even if they do, the quality you get is not satisfying. The reason is pretty basic – overrated and underrated video merging software. Some tools are complicated, while others are extremely user-friendly with the interface and options.
So, after spending several days on the research, finally, here are the 6 best mp4 mergers along with their tutorials to help you understand the process and complexity of each software and pick the best one in terms of simplicity and user-friendliness.
In this article
04 Media Cope
Part 1: Free Video Joiner (For Windows Users Only)
Free Video Joiner is a free tool to use for Windows users. You can join multiple videos to turn into a big video file. The software allows you to convert WMV, MPG, MPEG, AVI, and MOV files into MP4, MOV, WMV, and AVI. You can also “Save As” videos in VCD and DVD, iPhone, iPod, Zune, or PSP video formats.
The company claims “no quality loss” when the complete video is out. However, you have to be very picky when selecting the first video in your list to merge with others because the Free Video Joiner keeps the same width and height of the merged file as of the first video.
So, for instance, if you have 10 videos in the list to merge in the MP4 format, the first video has 1280 x 720 dimensions while the rest are 1920 x 1080. Then, the final merged video will be available to you in the same width and height as the first video (1280 x 720).
Merging Videos in Free Video Joiner
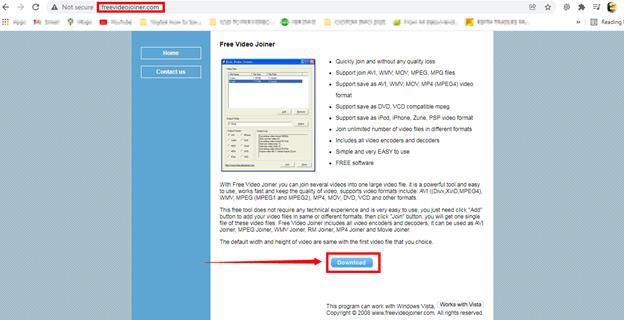
Step1: Download Free Video Joiner
Open your browser and go to the Free Video Joiner website. Then, click the “Download” button on the page to save the setup on your computer.
Step 2: Install and Run Free Video Joiner
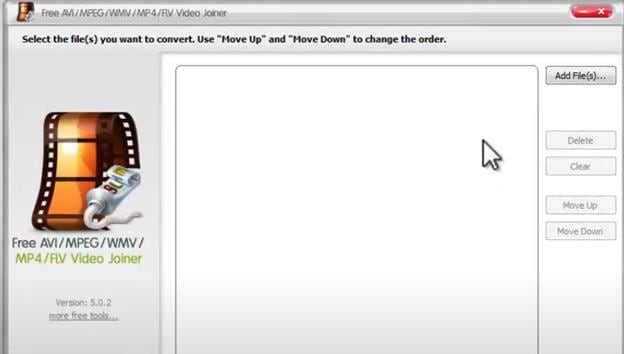
Now, double-click on the Free Video Joiner set up to install it in your system. It will hardly take a few seconds for the entire software to get into your system’s hard drive.
Once the software is installed, open the software, and you will see the interface like this.
Step 3: Add Files
Click on the “Add Files” button.
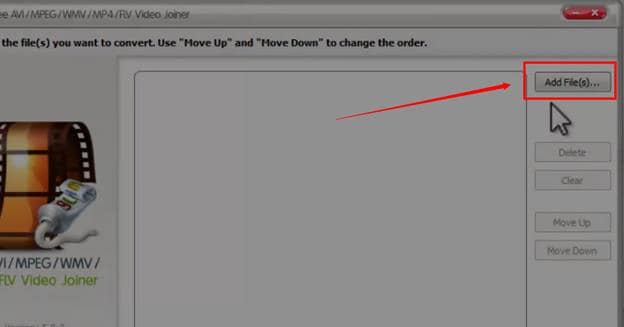
And select the clips you want to merge in MP4.
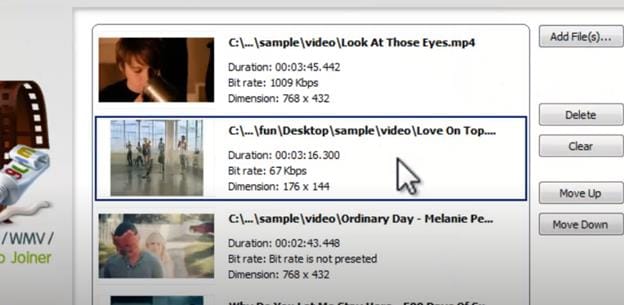
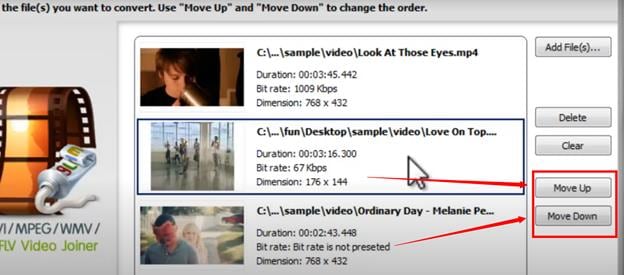
To change the order of the videos, you can use the “Move Up” or “Move Down” button.
Step 4: Select Output Folder
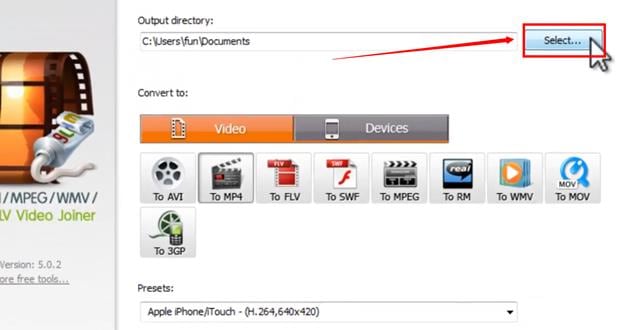
Choose your output directory to save the merged file by clicking on the “Select” button.
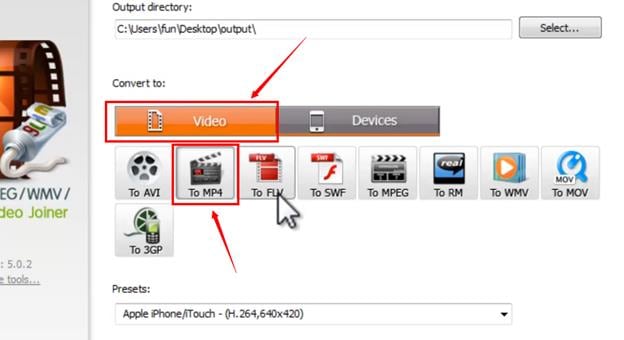
Then, click on the “Video” tab to choose the format of your joined video. Also, take your time to choose the “Presets” from the drop-down menu below the video tab.
As you can see, MP4 is selected in the screenshot below.
Step 5: Staring Merging in MP4
Now, click on the “Join Now” button.

You will see that the “Overall Progress” bar will begin to increase.
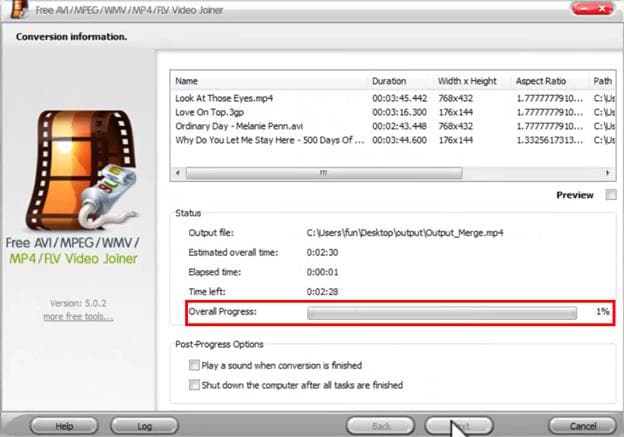
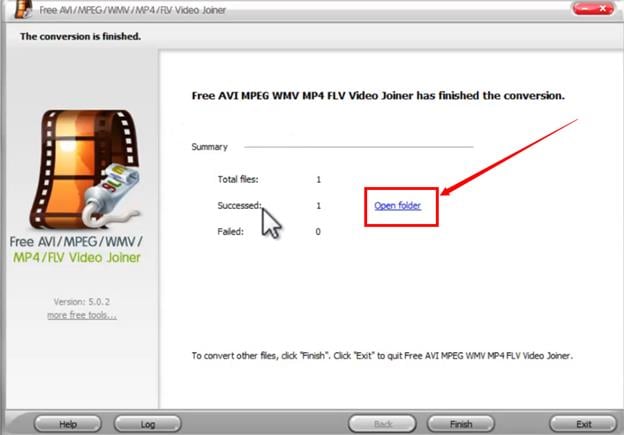
Once the bar is 100%, click on the “Open Folder” button to directly visit the folder where you will find the merged video. Or click the “Finish” button if you wish to start another project.
Part 2: Freemake Video Converter (For Windows Users Only)
Freemake Video Converter is reliable software to convert videos without registration. The program is free to download with more than 180 million users worldwide. And not just the MP4, but you can convert videos in all the popular formats and use the program to copy and burn DVDs.
Apart from the video conversion feature, you can use Freemake to merge your MP4 videos from your Windows operating system. However, the software is unavailable for MAC users, and it is one of the major drawbacks of this video merger.
Merging Videos in Freemake Video Converter
Step 1: Download Freemake Video Converter
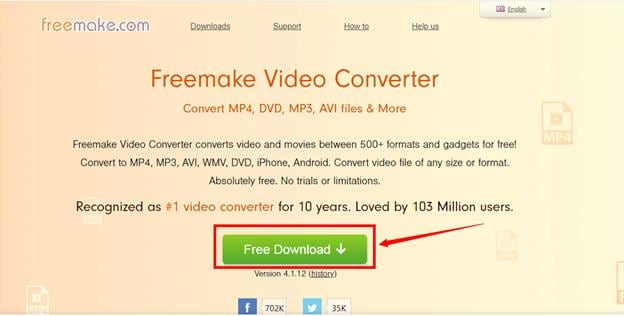
First, go to the Freemake Video Converter website and click on the “Free Download” button.
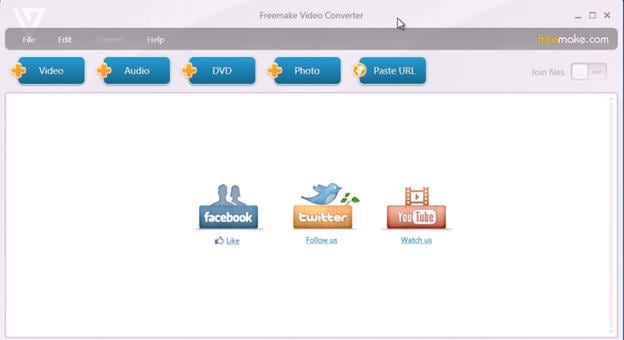
Then, install the software on your computer and open it. The software appears to be simple like this.
Step 2: Add Videos
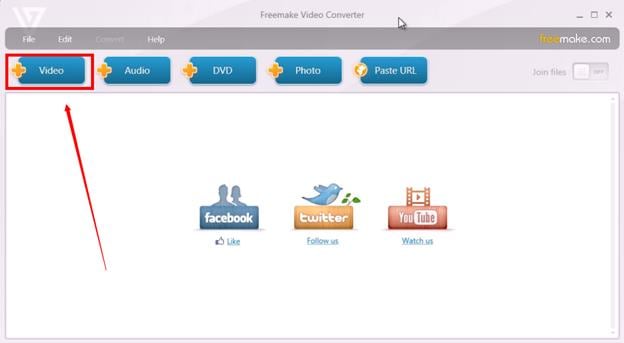
Click on the “Video” tab from the top menu to select videos you want to merge.
As you can see below, two videos are uploaded on the software.
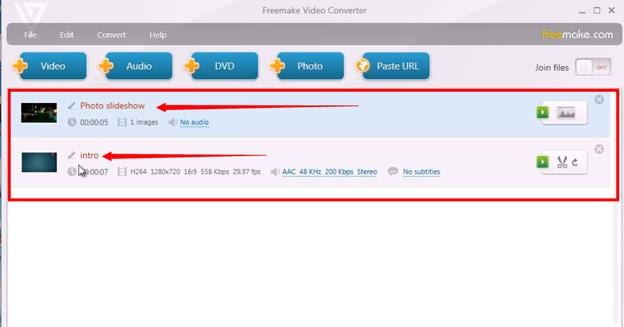
Step 3: Rearrange Video Order
If you wish to rearrange the videos, you can do it by simply dragging the video up or down with the help of your mouse.
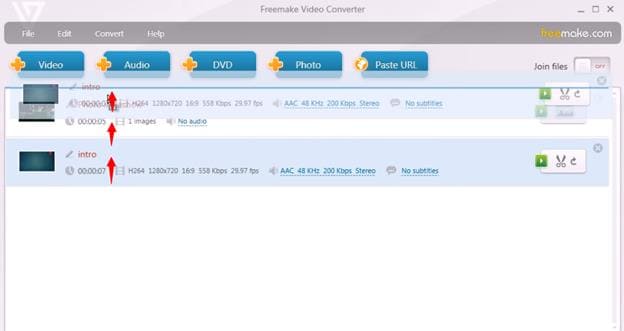
For example, the “Photo Slideshow” video, which was previously on the top, is now placed beneath the “Intro” video.

That means the merged video will begin from the “Intro” video, and then the “Photo Slideshow” will continue right after the first clip ends. All be done without any break or pause.
Step 4: Join Videos
After rearranging the videos, use your mouse to select clips by clicking once on each video. All selected videos will be highlighted in the “light blue” color.
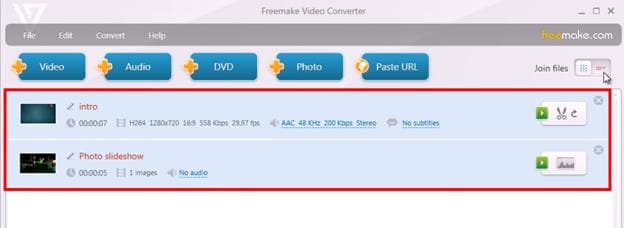
Then, take the mouse cursor on the top-right side of the software and turn on the “Join Files” button by clicking on it.
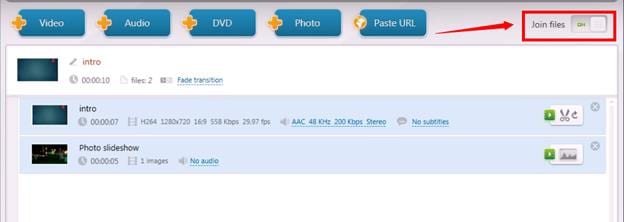
You will see that a merged video will be added to the software.
For instance, you can see that a new file has been added to the interface, showing the number of merged files in the red circle.

The above screenshot represents a single merged video that includes two files.
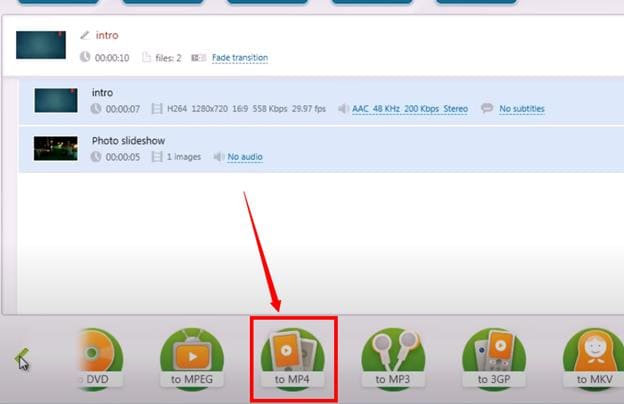
Step 5: Choose Your Output Video Format
Look at the bottom of the software to see different video formats, and click on “MP4.”
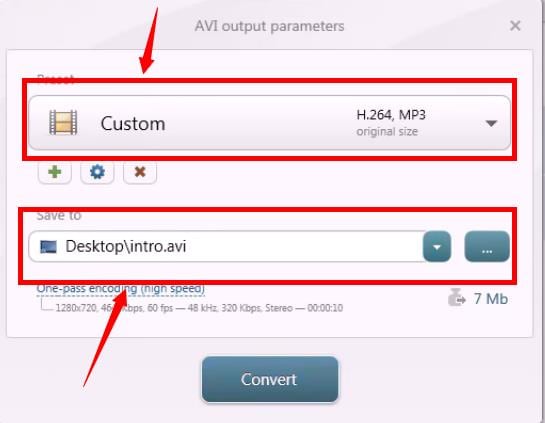
Click on the “Preset” menu to choose the format and size of the output video. Then, select the output folder.
Step 6: Save Your Video
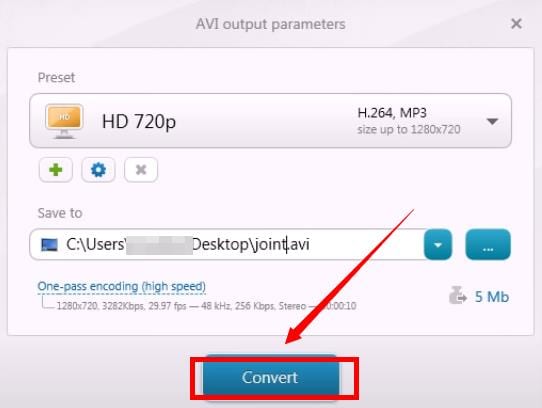
Lastly, click on the “Convert” button to allow the software to merge the video in MP4 format and save it on your computer.
Part 3: Boilsoft Video Joiner (For Windows and MAC Users)
Boilsoft Video Joiner is a video merger tool to join MP4, WMA, WMV, ASF, 3GP, RMVB/RM, MPG, MPEG, AVI, VOB, FLV, and MKV clips into one complete single video. You can download the free trial version or buy the full software for your MAC and Windows operating systems.
Boilsoft Video Joiner also offers Encode mode and Direct Stream mode, allowing you to merge clips efficiently into different formats at great speed.
Merging Videos in Boilsoft Video Joiner
Step 1: Download and Install Boilsoft Video Joiner
Visit the Boilsoft Video Joiner website from your computer browser and click on the “Download” tab.
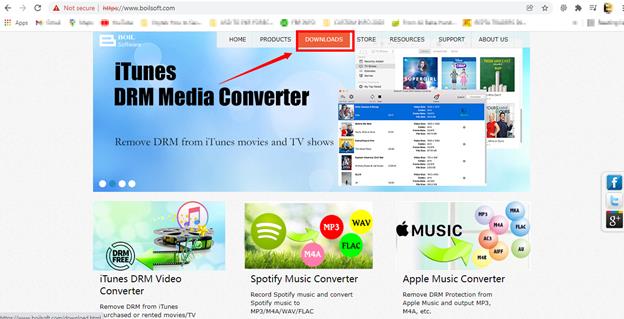
If you want to install the software on Windows OS, then click on the “Windows” tab and then click on the “Download” button next to the “Boilsoft Video Joiner” software.
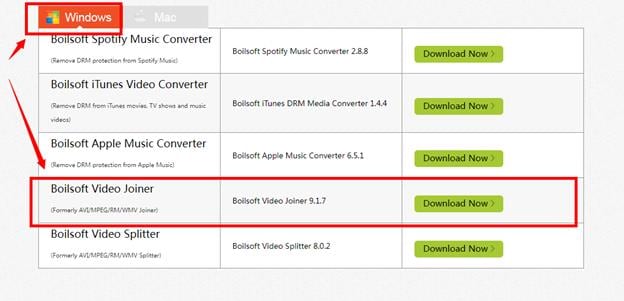
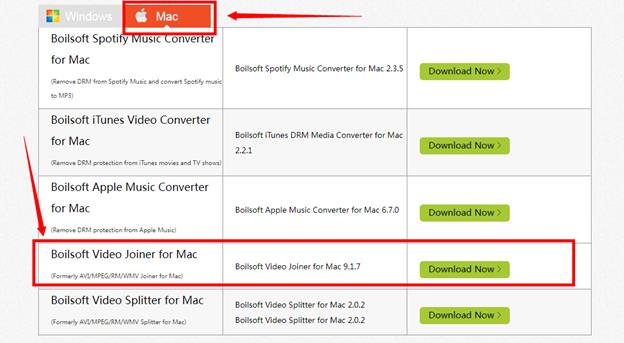
Contrarily, you can download the program for MAC operating system by clicking on the “Mac” tab and clicking the “Download” button.
Now, run the installer to install the software on your computer and open it.
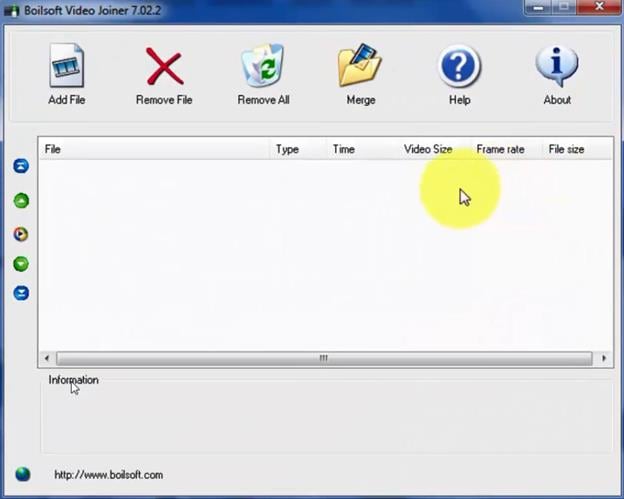
Note: The screenshots are from the previous version of Boilsoft Video Joiner. However, this tutorial’s steps to merge MP4 videos are workable on the latest version.
Step 2: Add Videos in Boilsoft Video Joiner
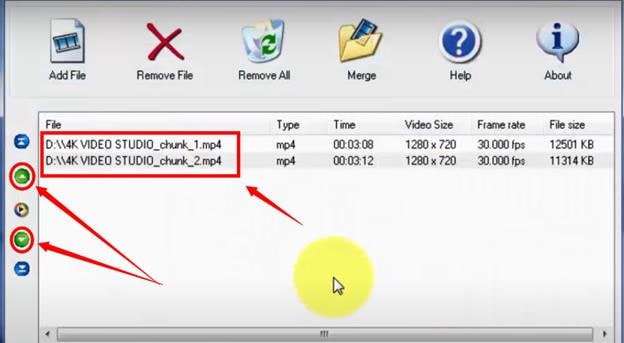
Click on the “Add File” icon on the top menu to add the clips you want to join together.
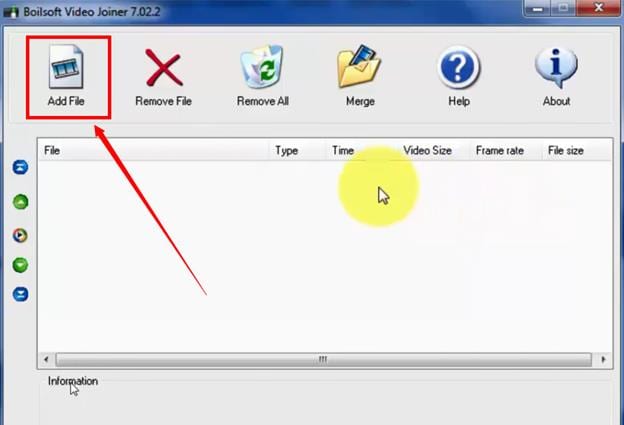
Here you can see that two files have been uploaded. Plus, with the small green “arrow” buttons, you can rearrange the order of the clips.
Step 3: Merge Videos
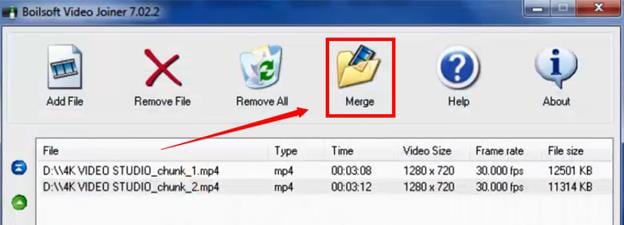
Find the “Merge” option on the top menu, and click it.
Then, choose the “Direct Stream” mode or “Encode Mode” from the merge mode options, and click on the “OK” button.
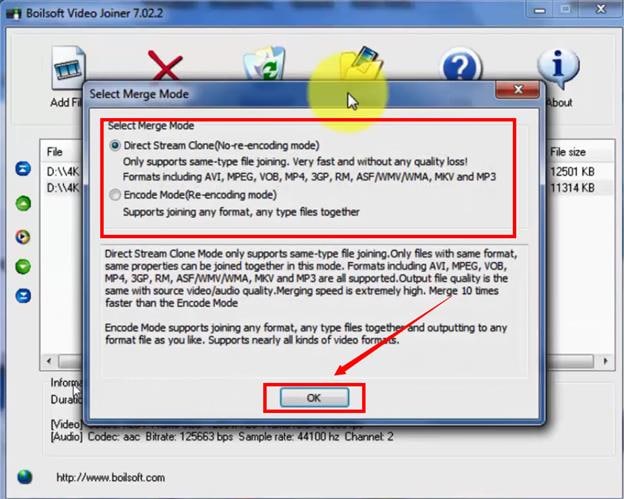
Note: It is suggested to choose the “Direct Stream” mode if you want files to be converted in the MP4 format.
Step 4: Save Joined Video
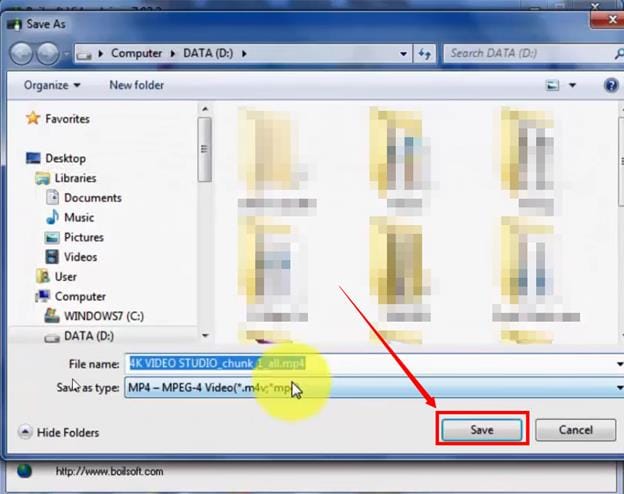
After clicking the “OK” button, choose the folder to save the merged video on your computer. And click the “Save” button.
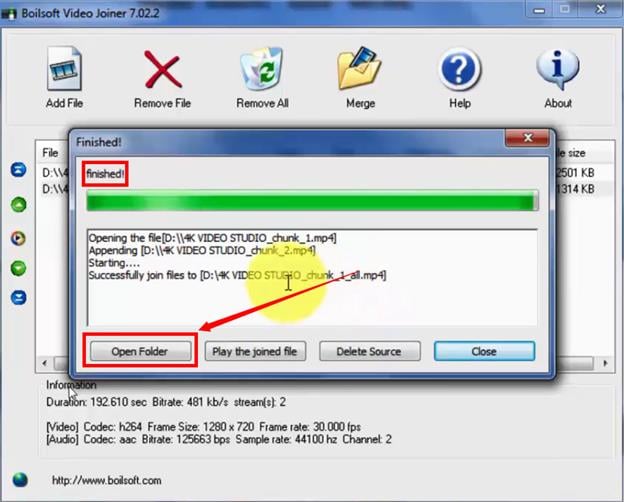
A green progress bar will start until you see the “Finished” message above the bar, confirming that the video has been merged. So, click the “Open Folder” button to see the joined video in MP4 format.
Part 4: Media Cope (For Windows Users Only)
Media Cope is free software with multiple features, including audio and video joiner. The software is available for Windows users only but does not support the latest Windows versions. So, if you are running XP, Vista, Windows 7, or Windows 8, you can easily install the software on your computer.
Although the software doesn’t support MAC, you can still join and save the videos on your iPhone. Nevertheless, the developers assure that the software supports all major formats, such as MP4, MOV, 3GP, AC3, AMR, WAV, MKV, FLV, DIVX, AVI, and many more.
Merging Videos in Media Cope
Step 1: Download and Install Media Cope
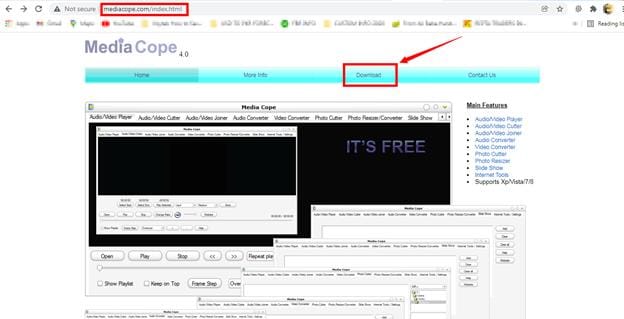
Downloading Media Cope is no big deal. All you need to do is go to the official Media Cope’s website and click on the “Download” tab on the top menu.
Once you are taken to another page, click on the “Download” button to save the setup on your computer.
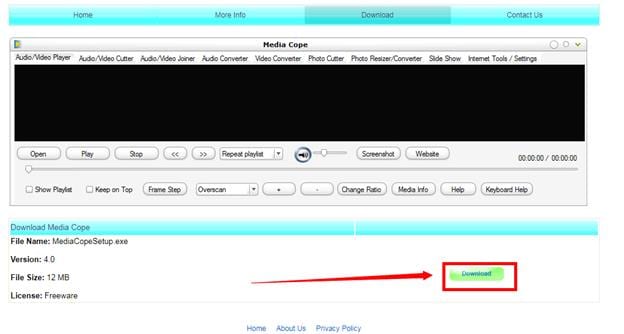
Double click the “MediaCopeSetup.exe” file to install the software. It will only take a few minutes to install the complete program on your PC.
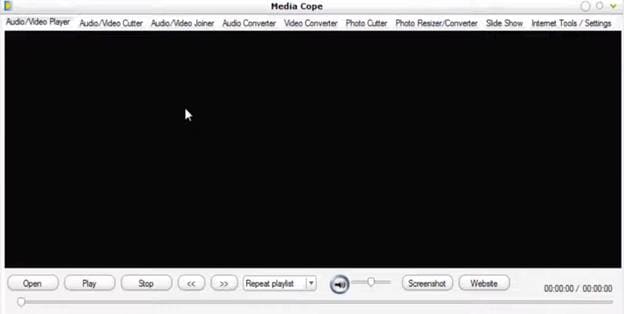
So, after installing Media Cope, open the program, and you will see a blank screen with several options on the top and bottom of the interface.
Step 2: Add Files
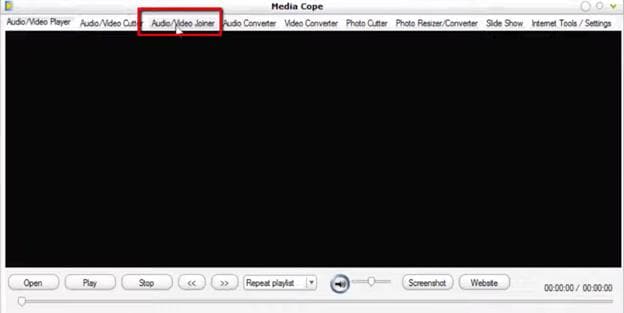
Click on the “Audio/Video Joiner” tab to select your video clips.
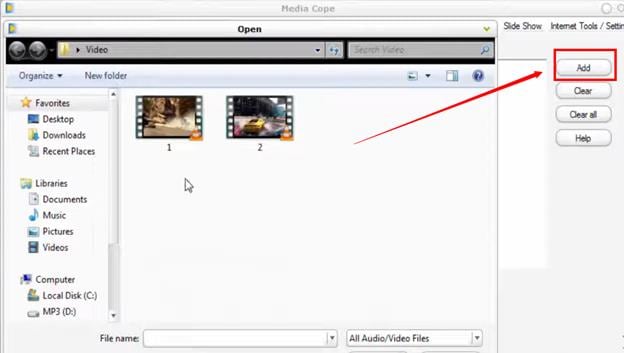
Select your clips and click on the “Add” button to transfer files on the software.
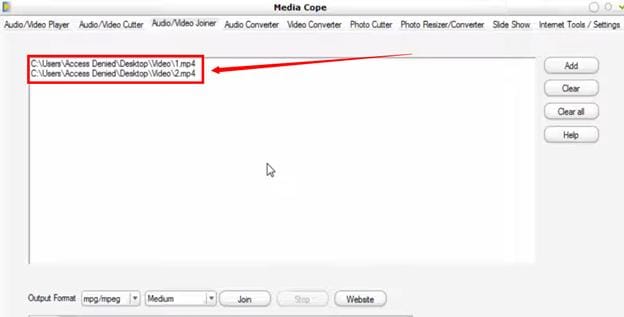
As you can see, two video files are added to the platform.
Step 3: Choose Output Format
If you look down in the software, you will find the “Output Format” options. So, choose your format (MP4 recommended) and select the video quality from the drop-down menu.

Step 4: Merge Videos and Save
Now, click on the “Join” button, choose your output folder, and give time to complete the process.
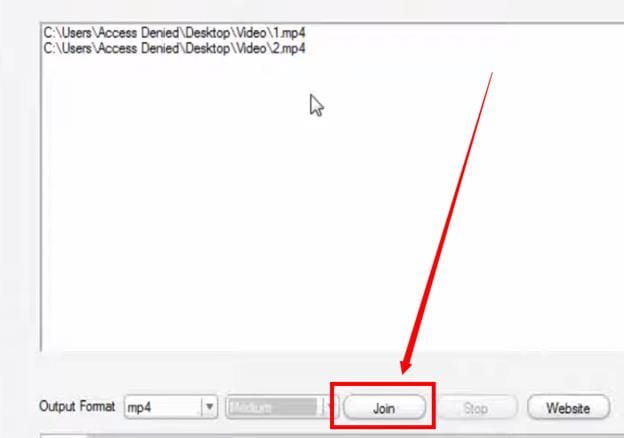
After the process ends, enjoy your merged video in the output folder.
Part 5: MP4Joiner by MP4Tools (For Windows, MAC, and Linux Users)
MP4Joiner is a free software to join MP4 format videos into one single video that comes with an MP4Splitter. This software duo is called MP4Tools. So don’t get confused by the name when downloading the program on your PC.
A good thing about MP4Joiner is that it is developed for multiple platforms, such as Windows, MAC, and Linux. But unfortunately, it only supports “win32,” “Mac 10.10 and Catalina,” and “BZ2” file extension.
Merging Videos in MP4Joiner
Step 1: Download MP4Joiner
The first step requires downloading MP4Joiner on your computer according to your operating system. To do that, go to the MP4Joiner’s site. And click on any one of the following “.exe” files to download the setup.
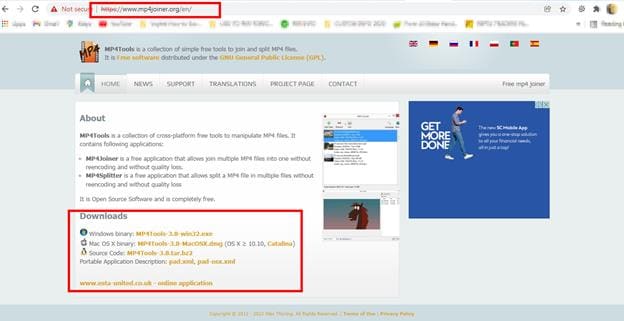
Then, install the program in your Windows, MAC, or Linux, and run it. The interface is extremely simple, with no confusing options.

Step 2: Add Files in MP4Joiner
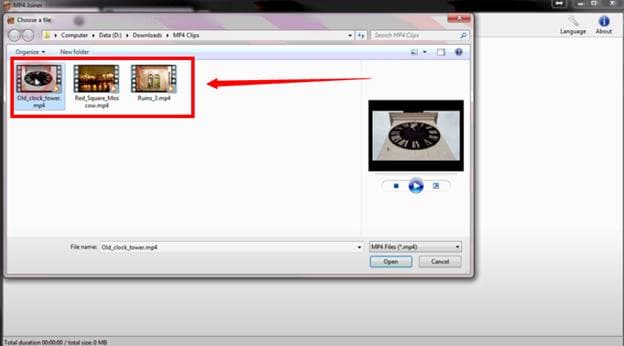
Next, click on the “Add Video” tab with a green “+” sign.

Doing so will help you choose videos you want to join together. So, select the videos and click on the “Open” button, as shown in the screenshot below.
Step 3: Start Joining Videos
Once all your selected videos are imported on the interface, click on the “Join” tab.

Then, choose the folder where you want the merged video to be saved, and click the “Save” button.
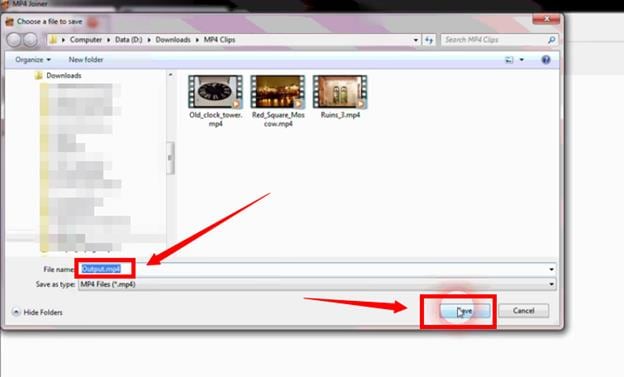
A new window will appear, showing a green progress bar.
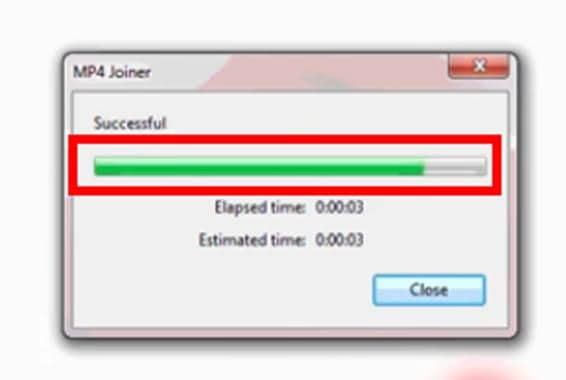
Wait until you see the “Successful” note on the top of the progress bar, and then click on the “Close” button.
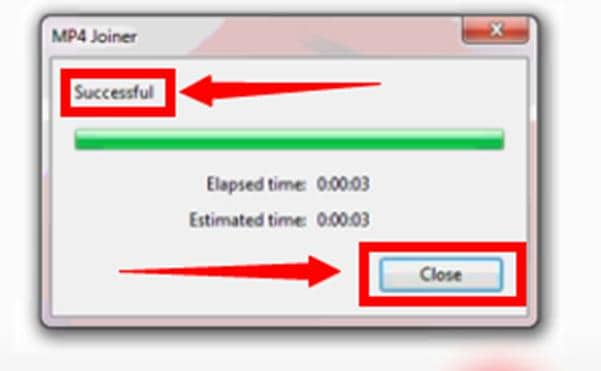
Go to your output folder to watch the joined video in the MP4 format.
Part 6: Filmora by Wondershare (For Windows and MAC Users - Recommended)
Filmora Video Editor is one of the famous video editing software by Wondershare. It is like a gateway to creativity for beginner and experienced editors. The software offers a wide range of tools and presets, which makes video editing quick and easy.
This video editing tool is for both MAC and Windows users. You can use the software by choosing a suitable pricing plan or downloading the free version if the watermark is not an issue.
Gladly, Filmora can help you merge your videos without destroying a pixel in any format of your choice, including MP4. Also, the process is pretty simple, time-saving, and fun. Furthermore, you can also include flavors to your video merger by adding several transitions and effects to your videos.
For Win 7 or later (64-bit)
For macOS 10.14 or later
Merging Videos in MP4Joiner
Step 1: Download Filmora by Wondershare
Enter Filmora’s website in your browser to visit the homepage and click on the blue “Free Download” button.

After downloading the setup, install the software on your device. The process will only take a few minutes. Then, open Filmora, and you will see a modern-designed interface with all the tools and presets right in front of your eyes.
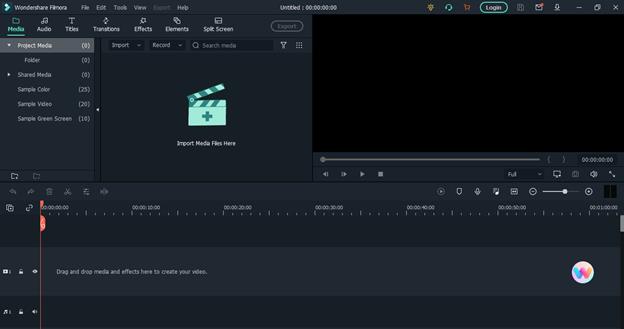
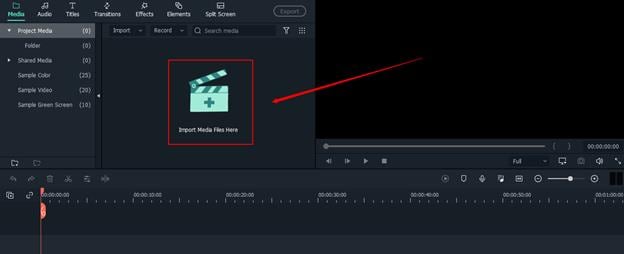
Step 2: Import Videos You Want to Merge
Use your mouse to click the blue “+” icon in the center of the software to import videos from your computer.
Then, drag-and-drop the videos to your timeline. But make sure that you place both clips on the same timeline. As you can see below, there are two clips. The first clip is named “Travel 05,” while the second video is called “Travel 06.”
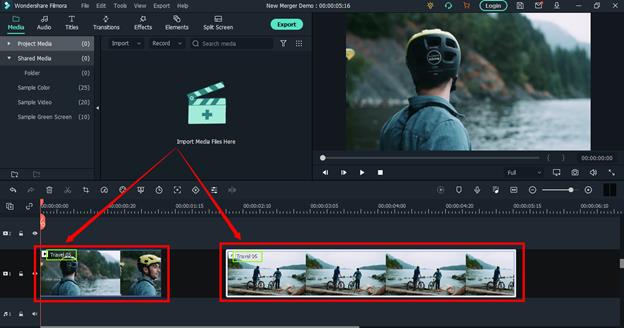
Step 3: Fill the Gap to Merge
When you will drag-and-drop videos on the timeline, the chances are that there will be a gap or a blank space between the two clips, like this.
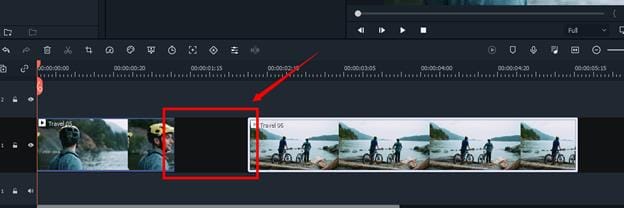
If this blank space is left untreated, the merged video will include this empty black space, as you can see on the preview screen.
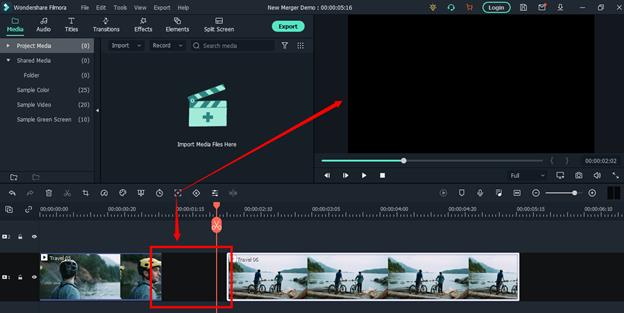
Therefore, use your right mouse click to hold the second video and drag it to the wall of the first video without leaving any gap in between both clips.

Great! You have already merged the videos. Now, let’s move on to the final step.
Step 4: Export the Joined Video and Save in MP4
Click on the “Export” option on the left of the preview screen to see the settings window.
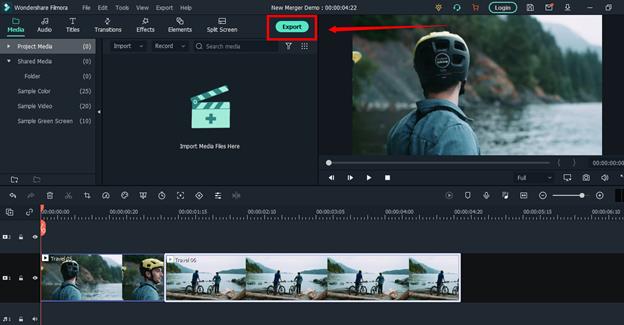
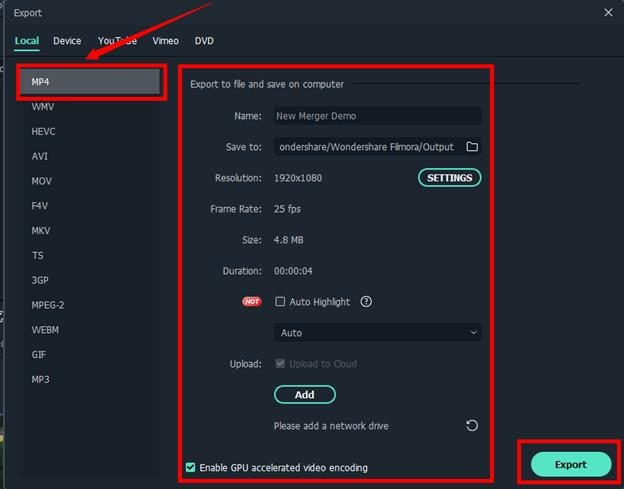
Under the “Local” tab, select “MP4” and feel free to perform other changes, such as choosing an output folder, renaming the merged video, picking the resolution, and more. Once you are satisfied with the settings, click on the “Export” button (on the right bottom of the screen) to save the video on your computer.
And it’s done!
Bottom Line
Among the 6 best MP4 mergers, Filmora seems to be winning. It’s not just a video editor with plenty of tools, but you can also join two or more videos in MP4 format without sacrificing the video quality.
On the other hand, video merges like Free Video Joiner, Freemake, Media Cope, Boilsoft Video Joiner, and MP4 Joiner have limited options. Plus, they are time-consuming, and some of them even disturb the video and audio quality when clips are merged through them.
FAQs
Q1. What is the best video merger for MP4?
There are many excellent video mergers to combine MP4 videos. Most users recommend Filmora because it works flawlessly on MAC and Windows operating systems. Besides, it’s a user-friendly software that even non-professional people can use to join MP4 videos.
Q2. What is the fastest video merger for MP4 clips?
Filmora by Wondershare is one of the fastest video mergers. You can merge videos by working on the timeline, which ultimately saves your time. And you can export merged videos in MP4 or any other format without many struggles. The second and third options are Media Cope and Boilsoft Video Joiner. Although they are a bit old-fashioned, you will still find them more accessible and fast than other MP4 mergers.
Q3. How do I merge MP4 videos without losing quality?
Merging MP4 videos without losing the quality depends on your software to combine videos. Filmora never disappoints its users when it comes to quality. As a matter of fact, you can choose your own resolution from the export settings menu when saving the merged MP4 video in your Windows or MAC computer.
04 Media Cope
Part 1: Free Video Joiner (For Windows Users Only)
Free Video Joiner is a free tool to use for Windows users. You can join multiple videos to turn into a big video file. The software allows you to convert WMV, MPG, MPEG, AVI, and MOV files into MP4, MOV, WMV, and AVI. You can also “Save As” videos in VCD and DVD, iPhone, iPod, Zune, or PSP video formats.
The company claims “no quality loss” when the complete video is out. However, you have to be very picky when selecting the first video in your list to merge with others because the Free Video Joiner keeps the same width and height of the merged file as of the first video.
So, for instance, if you have 10 videos in the list to merge in the MP4 format, the first video has 1280 x 720 dimensions while the rest are 1920 x 1080. Then, the final merged video will be available to you in the same width and height as the first video (1280 x 720).
Merging Videos in Free Video Joiner
Step1: Download Free Video Joiner
Open your browser and go to the Free Video Joiner website. Then, click the “Download” button on the page to save the setup on your computer.

Step 2: Install and Run Free Video Joiner
Now, double-click on the Free Video Joiner set up to install it in your system. It will hardly take a few seconds for the entire software to get into your system’s hard drive.
Once the software is installed, open the software, and you will see the interface like this.

Step 3: Add Files
Click on the “Add Files” button.

And select the clips you want to merge in MP4.

To change the order of the videos, you can use the “Move Up” or “Move Down” button.

Step 4: Select Output Folder
Choose your output directory to save the merged file by clicking on the “Select” button.

Then, click on the “Video” tab to choose the format of your joined video. Also, take your time to choose the “Presets” from the drop-down menu below the video tab.
As you can see, MP4 is selected in the screenshot below.

Step 5: Staring Merging in MP4
Now, click on the “Join Now” button.

You will see that the “Overall Progress” bar will begin to increase.

Once the bar is 100%, click on the “Open Folder” button to directly visit the folder where you will find the merged video. Or click the “Finish” button if you wish to start another project.

Part 2: Freemake Video Converter (For Windows Users Only)
Freemake Video Converter is reliable software to convert videos without registration. The program is free to download with more than 180 million users worldwide. And not just the MP4, but you can convert videos in all the popular formats and use the program to copy and burn DVDs.
Apart from the video conversion feature, you can use Freemake to merge your MP4 videos from your Windows operating system. However, the software is unavailable for MAC users, and it is one of the major drawbacks of this video merger.
Merging Videos in Freemake Video Converter
Step 1: Download Freemake Video Converter
First, go to the Freemake Video Converter website and click on the “Free Download” button.

Then, install the software on your computer and open it. The software appears to be simple like this.

Step 2: Add Videos
Click on the “Video” tab from the top menu to select videos you want to merge.

As you can see below, two videos are uploaded on the software.

Step 3: Rearrange Video Order
If you wish to rearrange the videos, you can do it by simply dragging the video up or down with the help of your mouse.

For example, the “Photo Slideshow” video, which was previously on the top, is now placed beneath the “Intro” video.

That means the merged video will begin from the “Intro” video, and then the “Photo Slideshow” will continue right after the first clip ends. All be done without any break or pause.
Step 4: Join Videos
After rearranging the videos, use your mouse to select clips by clicking once on each video. All selected videos will be highlighted in the “light blue” color.

Then, take the mouse cursor on the top-right side of the software and turn on the “Join Files” button by clicking on it.

You will see that a merged video will be added to the software.
For instance, you can see that a new file has been added to the interface, showing the number of merged files in the red circle.

The above screenshot represents a single merged video that includes two files.
Step 5: Choose Your Output Video Format
Look at the bottom of the software to see different video formats, and click on “MP4.”

Click on the “Preset” menu to choose the format and size of the output video. Then, select the output folder.

Step 6: Save Your Video
Lastly, click on the “Convert” button to allow the software to merge the video in MP4 format and save it on your computer.

Part 3: Boilsoft Video Joiner (For Windows and MAC Users)
Boilsoft Video Joiner is a video merger tool to join MP4, WMA, WMV, ASF, 3GP, RMVB/RM, MPG, MPEG, AVI, VOB, FLV, and MKV clips into one complete single video. You can download the free trial version or buy the full software for your MAC and Windows operating systems.
Boilsoft Video Joiner also offers Encode mode and Direct Stream mode, allowing you to merge clips efficiently into different formats at great speed.
Merging Videos in Boilsoft Video Joiner
Step 1: Download and Install Boilsoft Video Joiner
Visit the Boilsoft Video Joiner website from your computer browser and click on the “Download” tab.

If you want to install the software on Windows OS, then click on the “Windows” tab and then click on the “Download” button next to the “Boilsoft Video Joiner” software.

Contrarily, you can download the program for MAC operating system by clicking on the “Mac” tab and clicking the “Download” button.

Now, run the installer to install the software on your computer and open it.

Note: The screenshots are from the previous version of Boilsoft Video Joiner. However, this tutorial’s steps to merge MP4 videos are workable on the latest version.
Step 2: Add Videos in Boilsoft Video Joiner
Click on the “Add File” icon on the top menu to add the clips you want to join together.

Here you can see that two files have been uploaded. Plus, with the small green “arrow” buttons, you can rearrange the order of the clips.

Step 3: Merge Videos
Find the “Merge” option on the top menu, and click it.

Then, choose the “Direct Stream” mode or “Encode Mode” from the merge mode options, and click on the “OK” button.

Note: It is suggested to choose the “Direct Stream” mode if you want files to be converted in the MP4 format.
Step 4: Save Joined Video
After clicking the “OK” button, choose the folder to save the merged video on your computer. And click the “Save” button.

A green progress bar will start until you see the “Finished” message above the bar, confirming that the video has been merged. So, click the “Open Folder” button to see the joined video in MP4 format.

Part 4: Media Cope (For Windows Users Only)
Media Cope is free software with multiple features, including audio and video joiner. The software is available for Windows users only but does not support the latest Windows versions. So, if you are running XP, Vista, Windows 7, or Windows 8, you can easily install the software on your computer.
Although the software doesn’t support MAC, you can still join and save the videos on your iPhone. Nevertheless, the developers assure that the software supports all major formats, such as MP4, MOV, 3GP, AC3, AMR, WAV, MKV, FLV, DIVX, AVI, and many more.
Merging Videos in Media Cope
Step 1: Download and Install Media Cope
Downloading Media Cope is no big deal. All you need to do is go to the official Media Cope’s website and click on the “Download” tab on the top menu.

Once you are taken to another page, click on the “Download” button to save the setup on your computer.

Double click the “MediaCopeSetup.exe” file to install the software. It will only take a few minutes to install the complete program on your PC.
So, after installing Media Cope, open the program, and you will see a blank screen with several options on the top and bottom of the interface.

Step 2: Add Files
Click on the “Audio/Video Joiner” tab to select your video clips.

Select your clips and click on the “Add” button to transfer files on the software.

As you can see, two video files are added to the platform.

Step 3: Choose Output Format
If you look down in the software, you will find the “Output Format” options. So, choose your format (MP4 recommended) and select the video quality from the drop-down menu.

Step 4: Merge Videos and Save
Now, click on the “Join” button, choose your output folder, and give time to complete the process.

After the process ends, enjoy your merged video in the output folder.
Part 5: MP4Joiner by MP4Tools (For Windows, MAC, and Linux Users)
MP4Joiner is a free software to join MP4 format videos into one single video that comes with an MP4Splitter. This software duo is called MP4Tools. So don’t get confused by the name when downloading the program on your PC.
A good thing about MP4Joiner is that it is developed for multiple platforms, such as Windows, MAC, and Linux. But unfortunately, it only supports “win32,” “Mac 10.10 and Catalina,” and “BZ2” file extension.
Merging Videos in MP4Joiner
Step 1: Download MP4Joiner
The first step requires downloading MP4Joiner on your computer according to your operating system. To do that, go to the MP4Joiner’s site. And click on any one of the following “.exe” files to download the setup.

Then, install the program in your Windows, MAC, or Linux, and run it. The interface is extremely simple, with no confusing options.

Step 2: Add Files in MP4Joiner
Next, click on the “Add Video” tab with a green “+” sign.

Doing so will help you choose videos you want to join together. So, select the videos and click on the “Open” button, as shown in the screenshot below.

Step 3: Start Joining Videos
Once all your selected videos are imported on the interface, click on the “Join” tab.

Then, choose the folder where you want the merged video to be saved, and click the “Save” button.

A new window will appear, showing a green progress bar.

Wait until you see the “Successful” note on the top of the progress bar, and then click on the “Close” button.

Go to your output folder to watch the joined video in the MP4 format.
Part 6: Filmora by Wondershare (For Windows and MAC Users - Recommended)
Filmora Video Editor is one of the famous video editing software by Wondershare. It is like a gateway to creativity for beginner and experienced editors. The software offers a wide range of tools and presets, which makes video editing quick and easy.
This video editing tool is for both MAC and Windows users. You can use the software by choosing a suitable pricing plan or downloading the free version if the watermark is not an issue.
Gladly, Filmora can help you merge your videos without destroying a pixel in any format of your choice, including MP4. Also, the process is pretty simple, time-saving, and fun. Furthermore, you can also include flavors to your video merger by adding several transitions and effects to your videos.
For Win 7 or later (64-bit)
For macOS 10.14 or later
Merging Videos in MP4Joiner
Step 1: Download Filmora by Wondershare
Enter Filmora’s website in your browser to visit the homepage and click on the blue “Free Download” button.

After downloading the setup, install the software on your device. The process will only take a few minutes. Then, open Filmora, and you will see a modern-designed interface with all the tools and presets right in front of your eyes.

Step 2: Import Videos You Want to Merge
Use your mouse to click the blue “+” icon in the center of the software to import videos from your computer.

Then, drag-and-drop the videos to your timeline. But make sure that you place both clips on the same timeline. As you can see below, there are two clips. The first clip is named “Travel 05,” while the second video is called “Travel 06.”

Step 3: Fill the Gap to Merge
When you will drag-and-drop videos on the timeline, the chances are that there will be a gap or a blank space between the two clips, like this.

If this blank space is left untreated, the merged video will include this empty black space, as you can see on the preview screen.

Therefore, use your right mouse click to hold the second video and drag it to the wall of the first video without leaving any gap in between both clips.

Great! You have already merged the videos. Now, let’s move on to the final step.
Step 4: Export the Joined Video and Save in MP4
Click on the “Export” option on the left of the preview screen to see the settings window.

Under the “Local” tab, select “MP4” and feel free to perform other changes, such as choosing an output folder, renaming the merged video, picking the resolution, and more. Once you are satisfied with the settings, click on the “Export” button (on the right bottom of the screen) to save the video on your computer.

And it’s done!
Bottom Line
Among the 6 best MP4 mergers, Filmora seems to be winning. It’s not just a video editor with plenty of tools, but you can also join two or more videos in MP4 format without sacrificing the video quality.
On the other hand, video merges like Free Video Joiner, Freemake, Media Cope, Boilsoft Video Joiner, and MP4 Joiner have limited options. Plus, they are time-consuming, and some of them even disturb the video and audio quality when clips are merged through them.
FAQs
Q1. What is the best video merger for MP4?
There are many excellent video mergers to combine MP4 videos. Most users recommend Filmora because it works flawlessly on MAC and Windows operating systems. Besides, it’s a user-friendly software that even non-professional people can use to join MP4 videos.
Q2. What is the fastest video merger for MP4 clips?
Filmora by Wondershare is one of the fastest video mergers. You can merge videos by working on the timeline, which ultimately saves your time. And you can export merged videos in MP4 or any other format without many struggles. The second and third options are Media Cope and Boilsoft Video Joiner. Although they are a bit old-fashioned, you will still find them more accessible and fast than other MP4 mergers.
Q3. How do I merge MP4 videos without losing quality?
Merging MP4 videos without losing the quality depends on your software to combine videos. Filmora never disappoints its users when it comes to quality. As a matter of fact, you can choose your own resolution from the export settings menu when saving the merged MP4 video in your Windows or MAC computer.
04 Media Cope
Part 1: Free Video Joiner (For Windows Users Only)
Free Video Joiner is a free tool to use for Windows users. You can join multiple videos to turn into a big video file. The software allows you to convert WMV, MPG, MPEG, AVI, and MOV files into MP4, MOV, WMV, and AVI. You can also “Save As” videos in VCD and DVD, iPhone, iPod, Zune, or PSP video formats.
The company claims “no quality loss” when the complete video is out. However, you have to be very picky when selecting the first video in your list to merge with others because the Free Video Joiner keeps the same width and height of the merged file as of the first video.
So, for instance, if you have 10 videos in the list to merge in the MP4 format, the first video has 1280 x 720 dimensions while the rest are 1920 x 1080. Then, the final merged video will be available to you in the same width and height as the first video (1280 x 720).
Merging Videos in Free Video Joiner
Step1: Download Free Video Joiner
Open your browser and go to the Free Video Joiner website. Then, click the “Download” button on the page to save the setup on your computer.

Step 2: Install and Run Free Video Joiner
Now, double-click on the Free Video Joiner set up to install it in your system. It will hardly take a few seconds for the entire software to get into your system’s hard drive.
Once the software is installed, open the software, and you will see the interface like this.

Step 3: Add Files
Click on the “Add Files” button.

And select the clips you want to merge in MP4.

To change the order of the videos, you can use the “Move Up” or “Move Down” button.

Step 4: Select Output Folder
Choose your output directory to save the merged file by clicking on the “Select” button.

Then, click on the “Video” tab to choose the format of your joined video. Also, take your time to choose the “Presets” from the drop-down menu below the video tab.
As you can see, MP4 is selected in the screenshot below.

Step 5: Staring Merging in MP4
Now, click on the “Join Now” button.

You will see that the “Overall Progress” bar will begin to increase.

Once the bar is 100%, click on the “Open Folder” button to directly visit the folder where you will find the merged video. Or click the “Finish” button if you wish to start another project.

Part 2: Freemake Video Converter (For Windows Users Only)
Freemake Video Converter is reliable software to convert videos without registration. The program is free to download with more than 180 million users worldwide. And not just the MP4, but you can convert videos in all the popular formats and use the program to copy and burn DVDs.
Apart from the video conversion feature, you can use Freemake to merge your MP4 videos from your Windows operating system. However, the software is unavailable for MAC users, and it is one of the major drawbacks of this video merger.
Merging Videos in Freemake Video Converter
Step 1: Download Freemake Video Converter
First, go to the Freemake Video Converter website and click on the “Free Download” button.

Then, install the software on your computer and open it. The software appears to be simple like this.

Step 2: Add Videos
Click on the “Video” tab from the top menu to select videos you want to merge.

As you can see below, two videos are uploaded on the software.

Step 3: Rearrange Video Order
If you wish to rearrange the videos, you can do it by simply dragging the video up or down with the help of your mouse.

For example, the “Photo Slideshow” video, which was previously on the top, is now placed beneath the “Intro” video.

That means the merged video will begin from the “Intro” video, and then the “Photo Slideshow” will continue right after the first clip ends. All be done without any break or pause.
Step 4: Join Videos
After rearranging the videos, use your mouse to select clips by clicking once on each video. All selected videos will be highlighted in the “light blue” color.

Then, take the mouse cursor on the top-right side of the software and turn on the “Join Files” button by clicking on it.

You will see that a merged video will be added to the software.
For instance, you can see that a new file has been added to the interface, showing the number of merged files in the red circle.

The above screenshot represents a single merged video that includes two files.
Step 5: Choose Your Output Video Format
Look at the bottom of the software to see different video formats, and click on “MP4.”

Click on the “Preset” menu to choose the format and size of the output video. Then, select the output folder.

Step 6: Save Your Video
Lastly, click on the “Convert” button to allow the software to merge the video in MP4 format and save it on your computer.

Part 3: Boilsoft Video Joiner (For Windows and MAC Users)
Boilsoft Video Joiner is a video merger tool to join MP4, WMA, WMV, ASF, 3GP, RMVB/RM, MPG, MPEG, AVI, VOB, FLV, and MKV clips into one complete single video. You can download the free trial version or buy the full software for your MAC and Windows operating systems.
Boilsoft Video Joiner also offers Encode mode and Direct Stream mode, allowing you to merge clips efficiently into different formats at great speed.
Merging Videos in Boilsoft Video Joiner
Step 1: Download and Install Boilsoft Video Joiner
Visit the Boilsoft Video Joiner website from your computer browser and click on the “Download” tab.

If you want to install the software on Windows OS, then click on the “Windows” tab and then click on the “Download” button next to the “Boilsoft Video Joiner” software.

Contrarily, you can download the program for MAC operating system by clicking on the “Mac” tab and clicking the “Download” button.

Now, run the installer to install the software on your computer and open it.

Note: The screenshots are from the previous version of Boilsoft Video Joiner. However, this tutorial’s steps to merge MP4 videos are workable on the latest version.
Step 2: Add Videos in Boilsoft Video Joiner
Click on the “Add File” icon on the top menu to add the clips you want to join together.

Here you can see that two files have been uploaded. Plus, with the small green “arrow” buttons, you can rearrange the order of the clips.

Step 3: Merge Videos
Find the “Merge” option on the top menu, and click it.

Then, choose the “Direct Stream” mode or “Encode Mode” from the merge mode options, and click on the “OK” button.

Note: It is suggested to choose the “Direct Stream” mode if you want files to be converted in the MP4 format.
Step 4: Save Joined Video
After clicking the “OK” button, choose the folder to save the merged video on your computer. And click the “Save” button.

A green progress bar will start until you see the “Finished” message above the bar, confirming that the video has been merged. So, click the “Open Folder” button to see the joined video in MP4 format.

Part 4: Media Cope (For Windows Users Only)
Media Cope is free software with multiple features, including audio and video joiner. The software is available for Windows users only but does not support the latest Windows versions. So, if you are running XP, Vista, Windows 7, or Windows 8, you can easily install the software on your computer.
Although the software doesn’t support MAC, you can still join and save the videos on your iPhone. Nevertheless, the developers assure that the software supports all major formats, such as MP4, MOV, 3GP, AC3, AMR, WAV, MKV, FLV, DIVX, AVI, and many more.
Merging Videos in Media Cope
Step 1: Download and Install Media Cope
Downloading Media Cope is no big deal. All you need to do is go to the official Media Cope’s website and click on the “Download” tab on the top menu.

Once you are taken to another page, click on the “Download” button to save the setup on your computer.

Double click the “MediaCopeSetup.exe” file to install the software. It will only take a few minutes to install the complete program on your PC.
So, after installing Media Cope, open the program, and you will see a blank screen with several options on the top and bottom of the interface.

Step 2: Add Files
Click on the “Audio/Video Joiner” tab to select your video clips.

Select your clips and click on the “Add” button to transfer files on the software.

As you can see, two video files are added to the platform.

Step 3: Choose Output Format
If you look down in the software, you will find the “Output Format” options. So, choose your format (MP4 recommended) and select the video quality from the drop-down menu.

Step 4: Merge Videos and Save
Now, click on the “Join” button, choose your output folder, and give time to complete the process.

After the process ends, enjoy your merged video in the output folder.
Part 5: MP4Joiner by MP4Tools (For Windows, MAC, and Linux Users)
MP4Joiner is a free software to join MP4 format videos into one single video that comes with an MP4Splitter. This software duo is called MP4Tools. So don’t get confused by the name when downloading the program on your PC.
A good thing about MP4Joiner is that it is developed for multiple platforms, such as Windows, MAC, and Linux. But unfortunately, it only supports “win32,” “Mac 10.10 and Catalina,” and “BZ2” file extension.
Merging Videos in MP4Joiner
Step 1: Download MP4Joiner
The first step requires downloading MP4Joiner on your computer according to your operating system. To do that, go to the MP4Joiner’s site. And click on any one of the following “.exe” files to download the setup.

Then, install the program in your Windows, MAC, or Linux, and run it. The interface is extremely simple, with no confusing options.

Step 2: Add Files in MP4Joiner
Next, click on the “Add Video” tab with a green “+” sign.

Doing so will help you choose videos you want to join together. So, select the videos and click on the “Open” button, as shown in the screenshot below.

Step 3: Start Joining Videos
Once all your selected videos are imported on the interface, click on the “Join” tab.

Then, choose the folder where you want the merged video to be saved, and click the “Save” button.

A new window will appear, showing a green progress bar.

Wait until you see the “Successful” note on the top of the progress bar, and then click on the “Close” button.

Go to your output folder to watch the joined video in the MP4 format.
Part 6: Filmora by Wondershare (For Windows and MAC Users - Recommended)
Filmora Video Editor is one of the famous video editing software by Wondershare. It is like a gateway to creativity for beginner and experienced editors. The software offers a wide range of tools and presets, which makes video editing quick and easy.
This video editing tool is for both MAC and Windows users. You can use the software by choosing a suitable pricing plan or downloading the free version if the watermark is not an issue.
Gladly, Filmora can help you merge your videos without destroying a pixel in any format of your choice, including MP4. Also, the process is pretty simple, time-saving, and fun. Furthermore, you can also include flavors to your video merger by adding several transitions and effects to your videos.
For Win 7 or later (64-bit)
For macOS 10.14 or later
Merging Videos in MP4Joiner
Step 1: Download Filmora by Wondershare
Enter Filmora’s website in your browser to visit the homepage and click on the blue “Free Download” button.

After downloading the setup, install the software on your device. The process will only take a few minutes. Then, open Filmora, and you will see a modern-designed interface with all the tools and presets right in front of your eyes.

Step 2: Import Videos You Want to Merge
Use your mouse to click the blue “+” icon in the center of the software to import videos from your computer.

Then, drag-and-drop the videos to your timeline. But make sure that you place both clips on the same timeline. As you can see below, there are two clips. The first clip is named “Travel 05,” while the second video is called “Travel 06.”

Step 3: Fill the Gap to Merge
When you will drag-and-drop videos on the timeline, the chances are that there will be a gap or a blank space between the two clips, like this.

If this blank space is left untreated, the merged video will include this empty black space, as you can see on the preview screen.

Therefore, use your right mouse click to hold the second video and drag it to the wall of the first video without leaving any gap in between both clips.

Great! You have already merged the videos. Now, let’s move on to the final step.
Step 4: Export the Joined Video and Save in MP4
Click on the “Export” option on the left of the preview screen to see the settings window.

Under the “Local” tab, select “MP4” and feel free to perform other changes, such as choosing an output folder, renaming the merged video, picking the resolution, and more. Once you are satisfied with the settings, click on the “Export” button (on the right bottom of the screen) to save the video on your computer.

And it’s done!
Bottom Line
Among the 6 best MP4 mergers, Filmora seems to be winning. It’s not just a video editor with plenty of tools, but you can also join two or more videos in MP4 format without sacrificing the video quality.
On the other hand, video merges like Free Video Joiner, Freemake, Media Cope, Boilsoft Video Joiner, and MP4 Joiner have limited options. Plus, they are time-consuming, and some of them even disturb the video and audio quality when clips are merged through them.
FAQs
Q1. What is the best video merger for MP4?
There are many excellent video mergers to combine MP4 videos. Most users recommend Filmora because it works flawlessly on MAC and Windows operating systems. Besides, it’s a user-friendly software that even non-professional people can use to join MP4 videos.
Q2. What is the fastest video merger for MP4 clips?
Filmora by Wondershare is one of the fastest video mergers. You can merge videos by working on the timeline, which ultimately saves your time. And you can export merged videos in MP4 or any other format without many struggles. The second and third options are Media Cope and Boilsoft Video Joiner. Although they are a bit old-fashioned, you will still find them more accessible and fast than other MP4 mergers.
Q3. How do I merge MP4 videos without losing quality?
Merging MP4 videos without losing the quality depends on your software to combine videos. Filmora never disappoints its users when it comes to quality. As a matter of fact, you can choose your own resolution from the export settings menu when saving the merged MP4 video in your Windows or MAC computer.
04 Media Cope
Part 1: Free Video Joiner (For Windows Users Only)
Free Video Joiner is a free tool to use for Windows users. You can join multiple videos to turn into a big video file. The software allows you to convert WMV, MPG, MPEG, AVI, and MOV files into MP4, MOV, WMV, and AVI. You can also “Save As” videos in VCD and DVD, iPhone, iPod, Zune, or PSP video formats.
The company claims “no quality loss” when the complete video is out. However, you have to be very picky when selecting the first video in your list to merge with others because the Free Video Joiner keeps the same width and height of the merged file as of the first video.
So, for instance, if you have 10 videos in the list to merge in the MP4 format, the first video has 1280 x 720 dimensions while the rest are 1920 x 1080. Then, the final merged video will be available to you in the same width and height as the first video (1280 x 720).
Merging Videos in Free Video Joiner
Step1: Download Free Video Joiner
Open your browser and go to the Free Video Joiner website. Then, click the “Download” button on the page to save the setup on your computer.

Step 2: Install and Run Free Video Joiner
Now, double-click on the Free Video Joiner set up to install it in your system. It will hardly take a few seconds for the entire software to get into your system’s hard drive.
Once the software is installed, open the software, and you will see the interface like this.

Step 3: Add Files
Click on the “Add Files” button.

And select the clips you want to merge in MP4.

To change the order of the videos, you can use the “Move Up” or “Move Down” button.

Step 4: Select Output Folder
Choose your output directory to save the merged file by clicking on the “Select” button.

Then, click on the “Video” tab to choose the format of your joined video. Also, take your time to choose the “Presets” from the drop-down menu below the video tab.
As you can see, MP4 is selected in the screenshot below.

Step 5: Staring Merging in MP4
Now, click on the “Join Now” button.

You will see that the “Overall Progress” bar will begin to increase.

Once the bar is 100%, click on the “Open Folder” button to directly visit the folder where you will find the merged video. Or click the “Finish” button if you wish to start another project.

Part 2: Freemake Video Converter (For Windows Users Only)
Freemake Video Converter is reliable software to convert videos without registration. The program is free to download with more than 180 million users worldwide. And not just the MP4, but you can convert videos in all the popular formats and use the program to copy and burn DVDs.
Apart from the video conversion feature, you can use Freemake to merge your MP4 videos from your Windows operating system. However, the software is unavailable for MAC users, and it is one of the major drawbacks of this video merger.
Merging Videos in Freemake Video Converter
Step 1: Download Freemake Video Converter
First, go to the Freemake Video Converter website and click on the “Free Download” button.

Then, install the software on your computer and open it. The software appears to be simple like this.

Step 2: Add Videos
Click on the “Video” tab from the top menu to select videos you want to merge.

As you can see below, two videos are uploaded on the software.

Step 3: Rearrange Video Order
If you wish to rearrange the videos, you can do it by simply dragging the video up or down with the help of your mouse.

For example, the “Photo Slideshow” video, which was previously on the top, is now placed beneath the “Intro” video.

That means the merged video will begin from the “Intro” video, and then the “Photo Slideshow” will continue right after the first clip ends. All be done without any break or pause.
Step 4: Join Videos
After rearranging the videos, use your mouse to select clips by clicking once on each video. All selected videos will be highlighted in the “light blue” color.

Then, take the mouse cursor on the top-right side of the software and turn on the “Join Files” button by clicking on it.

You will see that a merged video will be added to the software.
For instance, you can see that a new file has been added to the interface, showing the number of merged files in the red circle.

The above screenshot represents a single merged video that includes two files.
Step 5: Choose Your Output Video Format
Look at the bottom of the software to see different video formats, and click on “MP4.”

Click on the “Preset” menu to choose the format and size of the output video. Then, select the output folder.

Step 6: Save Your Video
Lastly, click on the “Convert” button to allow the software to merge the video in MP4 format and save it on your computer.

Part 3: Boilsoft Video Joiner (For Windows and MAC Users)
Boilsoft Video Joiner is a video merger tool to join MP4, WMA, WMV, ASF, 3GP, RMVB/RM, MPG, MPEG, AVI, VOB, FLV, and MKV clips into one complete single video. You can download the free trial version or buy the full software for your MAC and Windows operating systems.
Boilsoft Video Joiner also offers Encode mode and Direct Stream mode, allowing you to merge clips efficiently into different formats at great speed.
Merging Videos in Boilsoft Video Joiner
Step 1: Download and Install Boilsoft Video Joiner
Visit the Boilsoft Video Joiner website from your computer browser and click on the “Download” tab.

If you want to install the software on Windows OS, then click on the “Windows” tab and then click on the “Download” button next to the “Boilsoft Video Joiner” software.

Contrarily, you can download the program for MAC operating system by clicking on the “Mac” tab and clicking the “Download” button.

Now, run the installer to install the software on your computer and open it.

Note: The screenshots are from the previous version of Boilsoft Video Joiner. However, this tutorial’s steps to merge MP4 videos are workable on the latest version.
Step 2: Add Videos in Boilsoft Video Joiner
Click on the “Add File” icon on the top menu to add the clips you want to join together.

Here you can see that two files have been uploaded. Plus, with the small green “arrow” buttons, you can rearrange the order of the clips.

Step 3: Merge Videos
Find the “Merge” option on the top menu, and click it.

Then, choose the “Direct Stream” mode or “Encode Mode” from the merge mode options, and click on the “OK” button.

Note: It is suggested to choose the “Direct Stream” mode if you want files to be converted in the MP4 format.
Step 4: Save Joined Video
After clicking the “OK” button, choose the folder to save the merged video on your computer. And click the “Save” button.

A green progress bar will start until you see the “Finished” message above the bar, confirming that the video has been merged. So, click the “Open Folder” button to see the joined video in MP4 format.

Part 4: Media Cope (For Windows Users Only)
Media Cope is free software with multiple features, including audio and video joiner. The software is available for Windows users only but does not support the latest Windows versions. So, if you are running XP, Vista, Windows 7, or Windows 8, you can easily install the software on your computer.
Although the software doesn’t support MAC, you can still join and save the videos on your iPhone. Nevertheless, the developers assure that the software supports all major formats, such as MP4, MOV, 3GP, AC3, AMR, WAV, MKV, FLV, DIVX, AVI, and many more.
Merging Videos in Media Cope
Step 1: Download and Install Media Cope
Downloading Media Cope is no big deal. All you need to do is go to the official Media Cope’s website and click on the “Download” tab on the top menu.

Once you are taken to another page, click on the “Download” button to save the setup on your computer.

Double click the “MediaCopeSetup.exe” file to install the software. It will only take a few minutes to install the complete program on your PC.
So, after installing Media Cope, open the program, and you will see a blank screen with several options on the top and bottom of the interface.

Step 2: Add Files
Click on the “Audio/Video Joiner” tab to select your video clips.

Select your clips and click on the “Add” button to transfer files on the software.

As you can see, two video files are added to the platform.

Step 3: Choose Output Format
If you look down in the software, you will find the “Output Format” options. So, choose your format (MP4 recommended) and select the video quality from the drop-down menu.

Step 4: Merge Videos and Save
Now, click on the “Join” button, choose your output folder, and give time to complete the process.

After the process ends, enjoy your merged video in the output folder.
Part 5: MP4Joiner by MP4Tools (For Windows, MAC, and Linux Users)
MP4Joiner is a free software to join MP4 format videos into one single video that comes with an MP4Splitter. This software duo is called MP4Tools. So don’t get confused by the name when downloading the program on your PC.
A good thing about MP4Joiner is that it is developed for multiple platforms, such as Windows, MAC, and Linux. But unfortunately, it only supports “win32,” “Mac 10.10 and Catalina,” and “BZ2” file extension.
Merging Videos in MP4Joiner
Step 1: Download MP4Joiner
The first step requires downloading MP4Joiner on your computer according to your operating system. To do that, go to the MP4Joiner’s site. And click on any one of the following “.exe” files to download the setup.

Then, install the program in your Windows, MAC, or Linux, and run it. The interface is extremely simple, with no confusing options.

Step 2: Add Files in MP4Joiner
Next, click on the “Add Video” tab with a green “+” sign.

Doing so will help you choose videos you want to join together. So, select the videos and click on the “Open” button, as shown in the screenshot below.

Step 3: Start Joining Videos
Once all your selected videos are imported on the interface, click on the “Join” tab.

Then, choose the folder where you want the merged video to be saved, and click the “Save” button.

A new window will appear, showing a green progress bar.

Wait until you see the “Successful” note on the top of the progress bar, and then click on the “Close” button.

Go to your output folder to watch the joined video in the MP4 format.
Part 6: Filmora by Wondershare (For Windows and MAC Users - Recommended)
Filmora Video Editor is one of the famous video editing software by Wondershare. It is like a gateway to creativity for beginner and experienced editors. The software offers a wide range of tools and presets, which makes video editing quick and easy.
This video editing tool is for both MAC and Windows users. You can use the software by choosing a suitable pricing plan or downloading the free version if the watermark is not an issue.
Gladly, Filmora can help you merge your videos without destroying a pixel in any format of your choice, including MP4. Also, the process is pretty simple, time-saving, and fun. Furthermore, you can also include flavors to your video merger by adding several transitions and effects to your videos.
For Win 7 or later (64-bit)
For macOS 10.14 or later
Merging Videos in MP4Joiner
Step 1: Download Filmora by Wondershare
Enter Filmora’s website in your browser to visit the homepage and click on the blue “Free Download” button.

After downloading the setup, install the software on your device. The process will only take a few minutes. Then, open Filmora, and you will see a modern-designed interface with all the tools and presets right in front of your eyes.

Step 2: Import Videos You Want to Merge
Use your mouse to click the blue “+” icon in the center of the software to import videos from your computer.

Then, drag-and-drop the videos to your timeline. But make sure that you place both clips on the same timeline. As you can see below, there are two clips. The first clip is named “Travel 05,” while the second video is called “Travel 06.”

Step 3: Fill the Gap to Merge
When you will drag-and-drop videos on the timeline, the chances are that there will be a gap or a blank space between the two clips, like this.

If this blank space is left untreated, the merged video will include this empty black space, as you can see on the preview screen.

Therefore, use your right mouse click to hold the second video and drag it to the wall of the first video without leaving any gap in between both clips.

Great! You have already merged the videos. Now, let’s move on to the final step.
Step 4: Export the Joined Video and Save in MP4
Click on the “Export” option on the left of the preview screen to see the settings window.

Under the “Local” tab, select “MP4” and feel free to perform other changes, such as choosing an output folder, renaming the merged video, picking the resolution, and more. Once you are satisfied with the settings, click on the “Export” button (on the right bottom of the screen) to save the video on your computer.

And it’s done!
Bottom Line
Among the 6 best MP4 mergers, Filmora seems to be winning. It’s not just a video editor with plenty of tools, but you can also join two or more videos in MP4 format without sacrificing the video quality.
On the other hand, video merges like Free Video Joiner, Freemake, Media Cope, Boilsoft Video Joiner, and MP4 Joiner have limited options. Plus, they are time-consuming, and some of them even disturb the video and audio quality when clips are merged through them.
FAQs
Q1. What is the best video merger for MP4?
There are many excellent video mergers to combine MP4 videos. Most users recommend Filmora because it works flawlessly on MAC and Windows operating systems. Besides, it’s a user-friendly software that even non-professional people can use to join MP4 videos.
Q2. What is the fastest video merger for MP4 clips?
Filmora by Wondershare is one of the fastest video mergers. You can merge videos by working on the timeline, which ultimately saves your time. And you can export merged videos in MP4 or any other format without many struggles. The second and third options are Media Cope and Boilsoft Video Joiner. Although they are a bit old-fashioned, you will still find them more accessible and fast than other MP4 mergers.
Q3. How do I merge MP4 videos without losing quality?
Merging MP4 videos without losing the quality depends on your software to combine videos. Filmora never disappoints its users when it comes to quality. As a matter of fact, you can choose your own resolution from the export settings menu when saving the merged MP4 video in your Windows or MAC computer.
Also read:
- Updated In 2024, Overview About Supported iPhone Video Formats and Best iPhone Video Editor & Converter
- New How to Add Filter to Video Online for 2024
- In 2024, Tutorial | How to Make a Smooth Speed Ramping in Premiere Pro?
- Updated Top 12 Sony Vegas Slideshow Templates for Free Download for 2024
- New 2024 Approved Best Dark Moody LUTs During Editing
- New How To Fix Slow Playback Issues in DaVinci Resolve Finding the Best Solutions
- New Split a Clip in DaVinci Resolve Step by Step
- 2024 Approved A Review of Efectum App Making Slow Motion Video
- New In 2024, How to Add Subtitles in Canva?
- New Learn How to Create Custom Titles in Filmora and Add a Unique Lower Third Animation Effect in Six Simple Steps
- In 2024, Fun & Easy Masking Tricks Wondershare Filmora Tutorial
- In 2024, How to Color Grade Your Picture in LightRoom
- Updated Top 20 Best Text To Speech Software Windows, Mac, Android, iPhone & Online for 2024
- Updated Intro Videos Have the Potential to Make a First Impression on Viewers, and You Know How They Say that the First Impression Is the Last Impression
- New Best Video Grabbers for Chrome for 2024
- In 2024, How to Transfer Apps from Realme C53 to Another | Dr.fone
- Apply These Techniques to Improve How to Detect Fake GPS Location On Vivo G2 | Dr.fone
- Use Device Manager to identify missing or malfunctioning drivers with Windows Device Manager on Windows 11 & 10 & 7
- Life360 Learn How Everything Works On Realme C53 | Dr.fone
- Restore Missing App Icon on Samsung Galaxy Z Flip 5 Step-by-Step Solutions | Dr.fone
- How To Transfer WhatsApp From iPhone 13 mini to other iPhone? | Dr.fone
- In 2024, 9 Mind-Blowing Tricks to Hatch Eggs in Pokemon Go Without Walking On OnePlus 12 | Dr.fone
- In 2024, How Can I Use a Fake GPS Without Mock Location On Honor X50? | Dr.fone
- In 2024, Latest Guide How To Bypass Xiaomi 13 Ultra FRP Without Computer
- How to Unlock SIM Card on Vivo V30 online without jailbreak
- How To Unlock SIM Cards Of Samsung Galaxy M34 Without PUK Codes
- In 2024, 2 Ways to Transfer Text Messages from Infinix Hot 30i to iPhone 15/14/13/12/11/X/8/ | Dr.fone
- In 2024, How to Make the Most of Your Apple iPhone 6s Plus Lock Screen with Notifications? | Dr.fone
- 3 Ways to Track Samsung Galaxy A05s without Them Knowing | Dr.fone
- 4 Ways to Sync Contacts from Apple iPhone SE (2022) to iPad Easily | Dr.fone
- Title: Efficient Ways to Change Slow Motion Video to Normal on iPhone
- Author: Chloe
- Created at : 2024-05-20 03:37:26
- Updated at : 2024-05-21 03:37:26
- Link: https://ai-editing-video.techidaily.com/efficient-ways-to-change-slow-motion-video-to-normal-on-iphone/
- License: This work is licensed under CC BY-NC-SA 4.0.

