:max_bytes(150000):strip_icc():format(webp)/GettyImages-1168002788-1bccccf67a1f4988bd355c09748383ab.jpg)
Everything That You Need to Know About Video Montages- Ideas, Techniques, and Software for 2024

Everything That You Need to Know About Video Montages- Ideas, Techniques, and Software
Video montages are one of the best types of video formats people enjoy, and they are useful for different occasions. Whether you want to create a montage of your memories as an anniversary gift or create a montage of product photos for promotions, uses are multiple here. This prompts the need for users to learn how to make a montage, and that is what we will cover in this post.
These videos, with a series of shots and information edited together cohesively in sequence, are useful for showcasing storyline progress. Here, you will learn about use cases of the process, like a birthday video montage, more ideas, and the process of making them. Read on if any of that interests you.

Part 1. Classic Montage Ideas in Art and Film
Video montages play a major role in films, art productions, and gaming, like the call of duty montage.
In terms of the first example, when you watch movies, you might notice this technique used in many movies, utilized more prominently since the 1920s when Sergei Eisenstein coined the term first. These scenes appear as stitched-together shots of the characters showing time passage, enjoying activities or memories.
Different techniques are common, like rhythmic, metric, intellectual, or tonal. For example, the 2000 movie “Requiem for a Dream” showcased an intellectual/metric style of video montage to show the disorientating effect of the character under drug influence. A relatively recent example would be Benedict Cumberbatch’s 2016 movie “Doctor Strange”, where the montage shows the titular character’s interaction with the villain (no spoilers).
3 Top Montages in Film for All Times
If the above two examples did not fully express what is a montage video, seeing more examples should help. For this, here are three of the top montage examples available in Film History, each version representing a separate video montage style.
1. Rocky (1976)
One of the most notable montages is available in the 1976 action movie, the Sylvester Stallone-starrer “Rocky”. The type of video montage that is visible in this movie is rhythmic in nature, showcasing the training the character undergoes. This is edited with a musical background score, summarising some shots’ full training progression process.
To add an emotive tone to the video, music is added to the video clip that engages audiences to feel the character’s passion. A rhythmic style of video montage technique is used to cut the shorts as per the content. The lengths of each clip are not similar and differ as per the action going on in the scene.
2. Mulan (1998)
Video montages are also visible in animated movies, as seen in the 1998 version of Disney’s “Mulan”. The scene in question is where the song “I’ll Make a Man Out of You” plays while Mulan undergoes strict training for the military from the male lead. A sequence of shots showing her progress is shown.
Here, the video montage is shown with the background music that perfectly aligns with what is occurring in the video. The visuals and the audio in the background cohesively show the main character’s struggle, which creates an emotional response in the audience. Therefore, the style of video montage here falls under tonal or overtonal categories.
Watch this video to get an idea of how music and visuals can partner for tonal video montages.
3. Creed (2015)
Like in the Rocky movie, its 2015 sequel, “Creed”, also has a video montage. Here, the clips in the sequence are also used to depict the intense training progress. However, where it differs from the rhythmic formula is that the sequence highlights the emotional journey or determination of Adonis Creed to succeed.
Plus, this video montage is a homage to the original version; the tonal effect is further noticeable in the scene of Rocky’s health deterioration against Creed’s training. Thus, it juxtaposes the two scenes, creating an emotional impact on viewers to root for the main character.
Watch this video to understand what is a montage video of the tonal type.
Part 2. Creative Montage Ideas for Social Media
Of course, movies and TV shows are the only types of media where video montage techniques are useful. Many non-professionals use options like a fortnite montage editor to create and edit montage videos for other projects they can share across platforms. Some even create video montages to create videos for social media.
These include vlog-like videos that people record and then edit together into a montage which different techniques. Plus, some users create montages of different things that interest them, like gameplay. Then, they share those videos across social media for views, like on TikTok or YouTube.
· Gaming Montages
Different creators focus on developing gaming montages to create projects for the games they operate. These can include videos showcasing the skills or gameplays of the creation, all explaining a specific theme in some cases.
There are different games that the users focus on for showcasing their gaming prowess in action. Common examples include Fortnite, Call of Duty, CSGO, or PUBG montage videos.
Watch this video to get an idea.
· Wedding Montages
Many users turn to edit video montages for specific occasions, adding clips of different moments instead of one long-running documentary. They incorporate stylish effects like slow motion and transitions, incorporate a moving background score, and more.
Many top influencers and celebrities have used this technique for their wedding videos on social media. Additionally, regular people also adopt the style.
Watch this video as an example.
· Birthday Montages
Like wedding videos, users can try out the video montage technique to create videos for birthdays. These can include scenes of the main creator throughout their preparation phase for the party. Alternately, some users create video montages of their experience leading up to the video celebration, through a longer period or the same day.
Watch this video to understand how these videos may look.
Part 3. How Can I Create Easily a Montage Video?
After understanding the types of video montage techniques and ideas, the next point of concern is learning how to make a montage.
One of the best editing software to use for this process is Wondershare Filmora . With this editor, you can create different video montages as per the theme, customized or instantly. Filmora includes premium-quality effects and transitions, including free stock media that you can also add. Plus, the software allows the ability to record voiceover and adjust background scores in the video.
You can also choose the aspect ratio for the video, depending on the platform you post it on. For example, if you are creating a full professional-level scene montage, use the widescreen (16:9) aspect ratio, like in YouTube videos. Or, use the portrait (9:16) for mobile-based videos for TikTok videos or a 1:1 aspect ratio for Instagram videos.
Watch this video to know how it works.
Free Download For Win 7 or later(64-bit)
Free Download For macOS 10.14 or later
Features of Filmora for Video Montage Making
There are multiple top-quality features available in the Filmora software that is useful for creating and editing video montages. Use them and create dynamic videos.
1. Screen Recorder
The Screen Recorder feature is accessible through the home page of the Filmora software after launching. Since the first stage of making a montage involves getting the video clips for it, you can use this to record the video. For example, if you have a movie saved on your desktop, use the screen recorder and tap the Play button to record the screen.

You can adjust further settings, like which headphone or speaker to use for the audio recording.
2. Preset Templates
Next comes the editing process. After completing the recording process for the montage video, you can use preset templates on Filmora via Instant Mode. This is useful for users who do not have enough time to fully edit a long montage video or have the technical skills for it.
You can click on the Instant Mode tab on the home page. Then, choose the specific theme of the video montage you will create, like Birthday, Wedding, Business, etc. After selecting the theme, you can insert multiple video clips into the editor. Adjust the clips in sequence and press the “Auto-Create” button.

3. Abundant Video Effects and Music Resources
If you want to customize the video montage video manually, you can use the various effects and advanced features in the main editor timeline. For example, click on the Effects tab to find your options.

After importing the file(s) into the editor and dragging it to the timeline, you can use the Crop icon to cut clips. Then, rearrange them and merge them. Plus, further editing features are available for premium-level edits, like the Chroma Key. Click on it and add a green screen in the background.

The AI Portrait feature is also available, automatically detecting the main character and accurately removing the background.
You can adjust the speed of transitions in the video with the Speed Ramping function. Many high-quality effects are available under the Effects tab, and you can add audio to the video through the Media tab.

Conclusion
Video montages are one of the tried-and-tested methods used in film-making, gaming videos, and social media videos. You can use Filmora to create such video montages based on the type of video montage technique that fits it. Then, share it directly to YouTube or save it for transferring across different platforms.
Free Download For Win 7 or later(64-bit)
Free Download For macOS 10.14 or later
Part 1. Classic Montage Ideas in Art and Film
Video montages play a major role in films, art productions, and gaming, like the call of duty montage.
In terms of the first example, when you watch movies, you might notice this technique used in many movies, utilized more prominently since the 1920s when Sergei Eisenstein coined the term first. These scenes appear as stitched-together shots of the characters showing time passage, enjoying activities or memories.
Different techniques are common, like rhythmic, metric, intellectual, or tonal. For example, the 2000 movie “Requiem for a Dream” showcased an intellectual/metric style of video montage to show the disorientating effect of the character under drug influence. A relatively recent example would be Benedict Cumberbatch’s 2016 movie “Doctor Strange”, where the montage shows the titular character’s interaction with the villain (no spoilers).
3 Top Montages in Film for All Times
If the above two examples did not fully express what is a montage video, seeing more examples should help. For this, here are three of the top montage examples available in Film History, each version representing a separate video montage style.
1. Rocky (1976)
One of the most notable montages is available in the 1976 action movie, the Sylvester Stallone-starrer “Rocky”. The type of video montage that is visible in this movie is rhythmic in nature, showcasing the training the character undergoes. This is edited with a musical background score, summarising some shots’ full training progression process.
To add an emotive tone to the video, music is added to the video clip that engages audiences to feel the character’s passion. A rhythmic style of video montage technique is used to cut the shorts as per the content. The lengths of each clip are not similar and differ as per the action going on in the scene.
2. Mulan (1998)
Video montages are also visible in animated movies, as seen in the 1998 version of Disney’s “Mulan”. The scene in question is where the song “I’ll Make a Man Out of You” plays while Mulan undergoes strict training for the military from the male lead. A sequence of shots showing her progress is shown.
Here, the video montage is shown with the background music that perfectly aligns with what is occurring in the video. The visuals and the audio in the background cohesively show the main character’s struggle, which creates an emotional response in the audience. Therefore, the style of video montage here falls under tonal or overtonal categories.
Watch this video to get an idea of how music and visuals can partner for tonal video montages.
3. Creed (2015)
Like in the Rocky movie, its 2015 sequel, “Creed”, also has a video montage. Here, the clips in the sequence are also used to depict the intense training progress. However, where it differs from the rhythmic formula is that the sequence highlights the emotional journey or determination of Adonis Creed to succeed.
Plus, this video montage is a homage to the original version; the tonal effect is further noticeable in the scene of Rocky’s health deterioration against Creed’s training. Thus, it juxtaposes the two scenes, creating an emotional impact on viewers to root for the main character.
Watch this video to understand what is a montage video of the tonal type.
Part 2. Creative Montage Ideas for Social Media
Of course, movies and TV shows are the only types of media where video montage techniques are useful. Many non-professionals use options like a fortnite montage editor to create and edit montage videos for other projects they can share across platforms. Some even create video montages to create videos for social media.
These include vlog-like videos that people record and then edit together into a montage which different techniques. Plus, some users create montages of different things that interest them, like gameplay. Then, they share those videos across social media for views, like on TikTok or YouTube.
· Gaming Montages
Different creators focus on developing gaming montages to create projects for the games they operate. These can include videos showcasing the skills or gameplays of the creation, all explaining a specific theme in some cases.
There are different games that the users focus on for showcasing their gaming prowess in action. Common examples include Fortnite, Call of Duty, CSGO, or PUBG montage videos.
Watch this video to get an idea.
· Wedding Montages
Many users turn to edit video montages for specific occasions, adding clips of different moments instead of one long-running documentary. They incorporate stylish effects like slow motion and transitions, incorporate a moving background score, and more.
Many top influencers and celebrities have used this technique for their wedding videos on social media. Additionally, regular people also adopt the style.
Watch this video as an example.
· Birthday Montages
Like wedding videos, users can try out the video montage technique to create videos for birthdays. These can include scenes of the main creator throughout their preparation phase for the party. Alternately, some users create video montages of their experience leading up to the video celebration, through a longer period or the same day.
Watch this video to understand how these videos may look.
Part 3. How Can I Create Easily a Montage Video?
After understanding the types of video montage techniques and ideas, the next point of concern is learning how to make a montage.
One of the best editing software to use for this process is Wondershare Filmora . With this editor, you can create different video montages as per the theme, customized or instantly. Filmora includes premium-quality effects and transitions, including free stock media that you can also add. Plus, the software allows the ability to record voiceover and adjust background scores in the video.
You can also choose the aspect ratio for the video, depending on the platform you post it on. For example, if you are creating a full professional-level scene montage, use the widescreen (16:9) aspect ratio, like in YouTube videos. Or, use the portrait (9:16) for mobile-based videos for TikTok videos or a 1:1 aspect ratio for Instagram videos.
Watch this video to know how it works.
Free Download For Win 7 or later(64-bit)
Free Download For macOS 10.14 or later
Features of Filmora for Video Montage Making
There are multiple top-quality features available in the Filmora software that is useful for creating and editing video montages. Use them and create dynamic videos.
1. Screen Recorder
The Screen Recorder feature is accessible through the home page of the Filmora software after launching. Since the first stage of making a montage involves getting the video clips for it, you can use this to record the video. For example, if you have a movie saved on your desktop, use the screen recorder and tap the Play button to record the screen.

You can adjust further settings, like which headphone or speaker to use for the audio recording.
2. Preset Templates
Next comes the editing process. After completing the recording process for the montage video, you can use preset templates on Filmora via Instant Mode. This is useful for users who do not have enough time to fully edit a long montage video or have the technical skills for it.
You can click on the Instant Mode tab on the home page. Then, choose the specific theme of the video montage you will create, like Birthday, Wedding, Business, etc. After selecting the theme, you can insert multiple video clips into the editor. Adjust the clips in sequence and press the “Auto-Create” button.

3. Abundant Video Effects and Music Resources
If you want to customize the video montage video manually, you can use the various effects and advanced features in the main editor timeline. For example, click on the Effects tab to find your options.

After importing the file(s) into the editor and dragging it to the timeline, you can use the Crop icon to cut clips. Then, rearrange them and merge them. Plus, further editing features are available for premium-level edits, like the Chroma Key. Click on it and add a green screen in the background.

The AI Portrait feature is also available, automatically detecting the main character and accurately removing the background.
You can adjust the speed of transitions in the video with the Speed Ramping function. Many high-quality effects are available under the Effects tab, and you can add audio to the video through the Media tab.

Conclusion
Video montages are one of the tried-and-tested methods used in film-making, gaming videos, and social media videos. You can use Filmora to create such video montages based on the type of video montage technique that fits it. Then, share it directly to YouTube or save it for transferring across different platforms.
Free Download For Win 7 or later(64-bit)
Free Download For macOS 10.14 or later
Every Compositor Should Know The Tips of Color Match in After Effects
Every Compositor Should Know The Trick of Color Match in After Effects
An easy yet powerful editor
Numerous effects to choose from
Detailed tutorials provided by the official channel
After Effects is one of the most exciting applications put forward by Adobe. You can readily use this application for film-making; that is, you can edit videos with After Effects. The features of this application are highly proficient, effective and intuitive. And one of the most exciting and incredible features of After Effects is the “Colour Match” feature.
The “Color Match” of After Effects has numerous advantages, and there are some steps that you need to follow to use this feature. So, in the following discussion, we have discussed how you can match colours in After Effects its advantages. Lastly, we have introduced a video editing tool that can ideally be an alternative to the “Color Match” of After Effects.
In this article
01 [What Are the Obvious Advantages of the Color Match of After Effects?](#Part 1)
02 [Quick Tip - Matching Colors in After Effects](#Part 2)
03 [Alternative to After Effects Color Match](#Part 3)
Part 1 What Are the Obvious Advantages of the Color Match of After Effects?
As we have mentioned earlier, the colour matcher plugin of After Effects has numerous advantages, we will now be discussing what they are. So, the following list states the different benefits of using the “Color Match” of After Effects.
● You can add shadows and highlights.
Sometimes, our photos are underexposed, while sometimes, they are overexposed. Either way, they do not look quite pleasing. But you efficiently use “Colour Match” of After Effects to correct the exposure. And it will be possible when you adjust the highlights and shadows of the picture or the video through this feature. You can access this advantage in the “Shadows and Highlights” option of After Effects.

● Adjuting Vibrance
Another benefit you get from this feature of After Effects is that you can quickly fix the appropriate saturation of the picture or the video you want to edit. You can adjust the saturation, thus, making the picture or the video more vibrant and natural-looking. The option to adjust the saturation or the vibrance of any image or video is present in the “Vibrance” option. Click on the option and set the saturation of the colours of the images perfectly.

● Access to incredible filters
After Effects’ “Colour Match” feature filters make your photos and videos look all-natural. You can readily adjust the settings of the filters and set them according to the essence you want to have in your picture. The filters make your picture and videos look like they have been shot naturally on high-quality camera lenses. So, your videos and pictures look more natural and of the highest quality.
● Choose and match any colour for your images and videos
You might want to change or alter the colours of a particular video clip or an image with the colour of some other image. The “Colour Match” feature of Adobe After Effect makes it readily possible for you to carry this function.
● Intuitive but proficient feature
The “Colour Match” feature of Adobe After Effect helps you edit your videos and images most profoundly. But at the same time, apart from being a professional feature, it is not difficult to use. You can easily understand how to use the feature and make your videos and images match the colours you want.
Part 2 Quick Tip - Matching Colors in After Effects
Here are the steps by which you can avail of the incredible “Colour Match” feature of after-effects to match the colour between clips.
Step 1The first step requires you to access the “Composition Settings” and make the required changes accordingly. You can find the options in the “Composition Settings” and readily make the needed changes.

Step 2Choose the background color according to your choice.
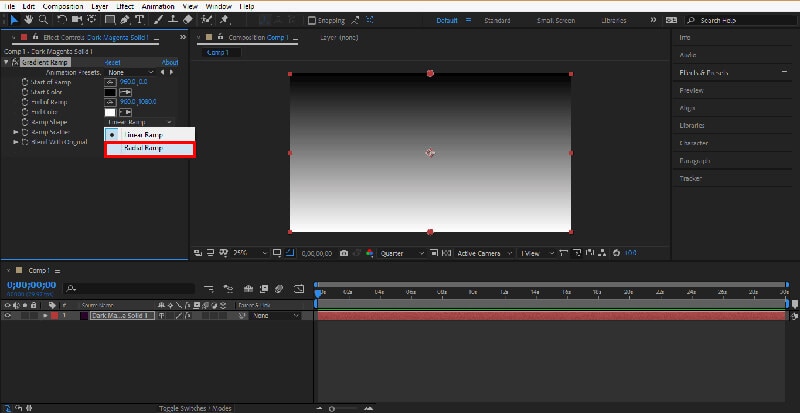
Step 3Now, import the image you want to edit. First, right-click and then you will find an “Import” option. Click on it to import the image you want.
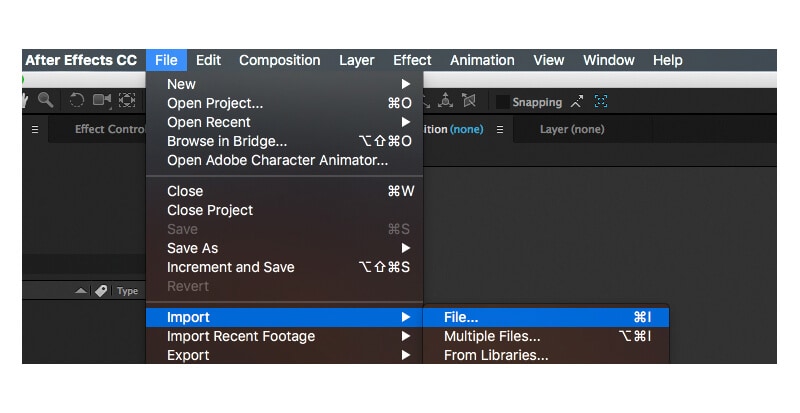
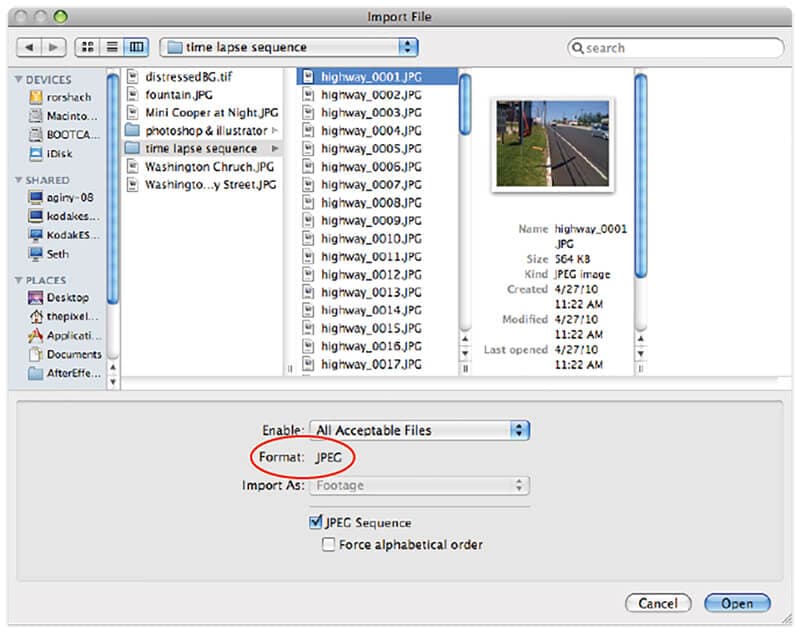
Step 4As you select the “Import” option, you will see a dialogue box. Select the folder in which the image has been saved and then select the image from the folder.
Step 5After importing the image, you need to select After Effects’ “Effects & Presets” option. And there, you will find the “Colour Correction” option. Click on that option.

Step 6You will see an “Auto-colour” option. Double-click on that option. It will automatically make your image look more realistic ad natural. Adobe After Effects will choose the most suitable colour correction shade for your photo and apply it. As a result, you will see a vibrant change in the image.

Many other features under this tool will help you make your images look as vibrant and incredible as possible. And now, we will be discussing the various features and tips that you can use in “After Effects” to make your images look more fabulous than ever.
● Change the contrast of the image to make it look more vibrant
You can change the settings of the image if you want. Also, you can use the “Blend” feature of After Effects to bring out better changes and edits in your picture. Another feature that can help you edit the colours of your image in After Effects is the “Auto Contrast” feature of After Effects.
In this feature, the tool automatically adjusts the exposure of the image’s colours, lights, and shadows, thereby making it look more realistic and natural. The image quality is also enhanced through this feature. It is because the colour contrast gets automatically adjusted to the perfect settings by the feature.
You will get the “Auto Contrast” feature exactly below the “Auto Colour” option, in the “Colour Contrast” drop-down panel.
● Change the level of your image to make it look more natural
You can readily make your images look more natural and realistic than ever. And that is possible through the “Colour Correction” feature of After Effects. Opt for the “Auto Levels” option present in the “Colour Correction” drop-down box.
Then right below the “Auto Contrast” option, you will find the “Auto-Levels” option. After you click on the option, your image will automatically get its colour adjusted by the tool, correctly adjusting all its required settings to make your image look as realistic and natural as possible.
● Bring a black-and-white effect on your image through the option in After effects
The Black-and-White effect on the images has been one of the most popular trends and styles one chooses to edit. And in order to make your efforts minimal and the quality of with the finest, the After Effects has a “Black & white” option as well.
So, if you want to edit your pictures in the black and white filter, you can readily do so in the highest quality and with the least effort. Open the “Colour Contrast” feature in After Effects and click on its drop-down box. The fourth option is the one that is below the “Auto Levels” option, and you will find the “Black & White” option present.
Click on that option, and you will find your image edited in the black-white hues, in the most impeccable shade, light, shadow and effect.
● Change the tint and the brightness or contrast
Under the “Black & White” option in the “Colour Correction” option of After effects, you can avail of the further edit option that is available under the “Black & White” option. There, the last option will be “Tint”. When you opt for the option of “Tint”. You can select the colour you want to be entirely dominant in your image.
And below the “Black & White” option, you will find the “Brightness & Contrast” option. Click on it to adjust and set the brightness and contrast of the image. It will make the image’s colour and shades look more vibrant because you can change its contrast according to your wish.
Part 3 Alternative to After Effects Color Match
And now, we will be introducing you to another video and image editing tool that will help you match the colours of your videos and images as proficiently as the colour matcher after effects plugin. And the tool is Wondershare Filmora Video Editor . Its incredible feature of “Colour Match” allows you to match the colours of your videos and images, making them more vibrancy, sometimes even monochromatic.
You can choose a particular theme or shade for the entire image or video and the “Colour Match” will help you bring your imagination into reality. If you want to edit or match colours in a particular clip or option of the video, you are all set to do so with Filmora 11.
For Win 7 or later (64-bit)
For macOS 10.12 or later
● Key Takeaways from This Episode →
● The advantages that you receive from “Colour Match” of After effects
● The quick steps of how to use “Colour Match” of “After Effects”
● The “Colour Match” feature of Filmora can readily make your videos alter colors and become more vibrant and incredible.
After Effects is one of the most exciting applications put forward by Adobe. You can readily use this application for film-making; that is, you can edit videos with After Effects. The features of this application are highly proficient, effective and intuitive. And one of the most exciting and incredible features of After Effects is the “Colour Match” feature.
The “Color Match” of After Effects has numerous advantages, and there are some steps that you need to follow to use this feature. So, in the following discussion, we have discussed how you can match colours in After Effects its advantages. Lastly, we have introduced a video editing tool that can ideally be an alternative to the “Color Match” of After Effects.
In this article
01 [What Are the Obvious Advantages of the Color Match of After Effects?](#Part 1)
02 [Quick Tip - Matching Colors in After Effects](#Part 2)
03 [Alternative to After Effects Color Match](#Part 3)
Part 1 What Are the Obvious Advantages of the Color Match of After Effects?
As we have mentioned earlier, the colour matcher plugin of After Effects has numerous advantages, we will now be discussing what they are. So, the following list states the different benefits of using the “Color Match” of After Effects.
● You can add shadows and highlights.
Sometimes, our photos are underexposed, while sometimes, they are overexposed. Either way, they do not look quite pleasing. But you efficiently use “Colour Match” of After Effects to correct the exposure. And it will be possible when you adjust the highlights and shadows of the picture or the video through this feature. You can access this advantage in the “Shadows and Highlights” option of After Effects.

● Adjuting Vibrance
Another benefit you get from this feature of After Effects is that you can quickly fix the appropriate saturation of the picture or the video you want to edit. You can adjust the saturation, thus, making the picture or the video more vibrant and natural-looking. The option to adjust the saturation or the vibrance of any image or video is present in the “Vibrance” option. Click on the option and set the saturation of the colours of the images perfectly.

● Access to incredible filters
After Effects’ “Colour Match” feature filters make your photos and videos look all-natural. You can readily adjust the settings of the filters and set them according to the essence you want to have in your picture. The filters make your picture and videos look like they have been shot naturally on high-quality camera lenses. So, your videos and pictures look more natural and of the highest quality.
● Choose and match any colour for your images and videos
You might want to change or alter the colours of a particular video clip or an image with the colour of some other image. The “Colour Match” feature of Adobe After Effect makes it readily possible for you to carry this function.
● Intuitive but proficient feature
The “Colour Match” feature of Adobe After Effect helps you edit your videos and images most profoundly. But at the same time, apart from being a professional feature, it is not difficult to use. You can easily understand how to use the feature and make your videos and images match the colours you want.
Part 2 Quick Tip - Matching Colors in After Effects
Here are the steps by which you can avail of the incredible “Colour Match” feature of after-effects to match the colour between clips.
Step 1The first step requires you to access the “Composition Settings” and make the required changes accordingly. You can find the options in the “Composition Settings” and readily make the needed changes.

Step 2Choose the background color according to your choice.

Step 3Now, import the image you want to edit. First, right-click and then you will find an “Import” option. Click on it to import the image you want.

Step 4As you select the “Import” option, you will see a dialogue box. Select the folder in which the image has been saved and then select the image from the folder.

Step 5After importing the image, you need to select After Effects’ “Effects & Presets” option. And there, you will find the “Colour Correction” option. Click on that option.

Step 6You will see an “Auto-colour” option. Double-click on that option. It will automatically make your image look more realistic ad natural. Adobe After Effects will choose the most suitable colour correction shade for your photo and apply it. As a result, you will see a vibrant change in the image.

Many other features under this tool will help you make your images look as vibrant and incredible as possible. And now, we will be discussing the various features and tips that you can use in “After Effects” to make your images look more fabulous than ever.
● Change the contrast of the image to make it look more vibrant
You can change the settings of the image if you want. Also, you can use the “Blend” feature of After Effects to bring out better changes and edits in your picture. Another feature that can help you edit the colours of your image in After Effects is the “Auto Contrast” feature of After Effects.
In this feature, the tool automatically adjusts the exposure of the image’s colours, lights, and shadows, thereby making it look more realistic and natural. The image quality is also enhanced through this feature. It is because the colour contrast gets automatically adjusted to the perfect settings by the feature.
You will get the “Auto Contrast” feature exactly below the “Auto Colour” option, in the “Colour Contrast” drop-down panel.
● Change the level of your image to make it look more natural
You can readily make your images look more natural and realistic than ever. And that is possible through the “Colour Correction” feature of After Effects. Opt for the “Auto Levels” option present in the “Colour Correction” drop-down box.
Then right below the “Auto Contrast” option, you will find the “Auto-Levels” option. After you click on the option, your image will automatically get its colour adjusted by the tool, correctly adjusting all its required settings to make your image look as realistic and natural as possible.
● Bring a black-and-white effect on your image through the option in After effects
The Black-and-White effect on the images has been one of the most popular trends and styles one chooses to edit. And in order to make your efforts minimal and the quality of with the finest, the After Effects has a “Black & white” option as well.
So, if you want to edit your pictures in the black and white filter, you can readily do so in the highest quality and with the least effort. Open the “Colour Contrast” feature in After Effects and click on its drop-down box. The fourth option is the one that is below the “Auto Levels” option, and you will find the “Black & White” option present.
Click on that option, and you will find your image edited in the black-white hues, in the most impeccable shade, light, shadow and effect.
● Change the tint and the brightness or contrast
Under the “Black & White” option in the “Colour Correction” option of After effects, you can avail of the further edit option that is available under the “Black & White” option. There, the last option will be “Tint”. When you opt for the option of “Tint”. You can select the colour you want to be entirely dominant in your image.
And below the “Black & White” option, you will find the “Brightness & Contrast” option. Click on it to adjust and set the brightness and contrast of the image. It will make the image’s colour and shades look more vibrant because you can change its contrast according to your wish.
Part 3 Alternative to After Effects Color Match
And now, we will be introducing you to another video and image editing tool that will help you match the colours of your videos and images as proficiently as the colour matcher after effects plugin. And the tool is Wondershare Filmora Video Editor . Its incredible feature of “Colour Match” allows you to match the colours of your videos and images, making them more vibrancy, sometimes even monochromatic.
You can choose a particular theme or shade for the entire image or video and the “Colour Match” will help you bring your imagination into reality. If you want to edit or match colours in a particular clip or option of the video, you are all set to do so with Filmora 11.
For Win 7 or later (64-bit)
For macOS 10.12 or later
● Key Takeaways from This Episode →
● The advantages that you receive from “Colour Match” of After effects
● The quick steps of how to use “Colour Match” of “After Effects”
● The “Colour Match” feature of Filmora can readily make your videos alter colors and become more vibrant and incredible.
After Effects is one of the most exciting applications put forward by Adobe. You can readily use this application for film-making; that is, you can edit videos with After Effects. The features of this application are highly proficient, effective and intuitive. And one of the most exciting and incredible features of After Effects is the “Colour Match” feature.
The “Color Match” of After Effects has numerous advantages, and there are some steps that you need to follow to use this feature. So, in the following discussion, we have discussed how you can match colours in After Effects its advantages. Lastly, we have introduced a video editing tool that can ideally be an alternative to the “Color Match” of After Effects.
In this article
01 [What Are the Obvious Advantages of the Color Match of After Effects?](#Part 1)
02 [Quick Tip - Matching Colors in After Effects](#Part 2)
03 [Alternative to After Effects Color Match](#Part 3)
Part 1 What Are the Obvious Advantages of the Color Match of After Effects?
As we have mentioned earlier, the colour matcher plugin of After Effects has numerous advantages, we will now be discussing what they are. So, the following list states the different benefits of using the “Color Match” of After Effects.
● You can add shadows and highlights.
Sometimes, our photos are underexposed, while sometimes, they are overexposed. Either way, they do not look quite pleasing. But you efficiently use “Colour Match” of After Effects to correct the exposure. And it will be possible when you adjust the highlights and shadows of the picture or the video through this feature. You can access this advantage in the “Shadows and Highlights” option of After Effects.

● Adjuting Vibrance
Another benefit you get from this feature of After Effects is that you can quickly fix the appropriate saturation of the picture or the video you want to edit. You can adjust the saturation, thus, making the picture or the video more vibrant and natural-looking. The option to adjust the saturation or the vibrance of any image or video is present in the “Vibrance” option. Click on the option and set the saturation of the colours of the images perfectly.

● Access to incredible filters
After Effects’ “Colour Match” feature filters make your photos and videos look all-natural. You can readily adjust the settings of the filters and set them according to the essence you want to have in your picture. The filters make your picture and videos look like they have been shot naturally on high-quality camera lenses. So, your videos and pictures look more natural and of the highest quality.
● Choose and match any colour for your images and videos
You might want to change or alter the colours of a particular video clip or an image with the colour of some other image. The “Colour Match” feature of Adobe After Effect makes it readily possible for you to carry this function.
● Intuitive but proficient feature
The “Colour Match” feature of Adobe After Effect helps you edit your videos and images most profoundly. But at the same time, apart from being a professional feature, it is not difficult to use. You can easily understand how to use the feature and make your videos and images match the colours you want.
Part 2 Quick Tip - Matching Colors in After Effects
Here are the steps by which you can avail of the incredible “Colour Match” feature of after-effects to match the colour between clips.
Step 1The first step requires you to access the “Composition Settings” and make the required changes accordingly. You can find the options in the “Composition Settings” and readily make the needed changes.

Step 2Choose the background color according to your choice.

Step 3Now, import the image you want to edit. First, right-click and then you will find an “Import” option. Click on it to import the image you want.

Step 4As you select the “Import” option, you will see a dialogue box. Select the folder in which the image has been saved and then select the image from the folder.

Step 5After importing the image, you need to select After Effects’ “Effects & Presets” option. And there, you will find the “Colour Correction” option. Click on that option.

Step 6You will see an “Auto-colour” option. Double-click on that option. It will automatically make your image look more realistic ad natural. Adobe After Effects will choose the most suitable colour correction shade for your photo and apply it. As a result, you will see a vibrant change in the image.

Many other features under this tool will help you make your images look as vibrant and incredible as possible. And now, we will be discussing the various features and tips that you can use in “After Effects” to make your images look more fabulous than ever.
● Change the contrast of the image to make it look more vibrant
You can change the settings of the image if you want. Also, you can use the “Blend” feature of After Effects to bring out better changes and edits in your picture. Another feature that can help you edit the colours of your image in After Effects is the “Auto Contrast” feature of After Effects.
In this feature, the tool automatically adjusts the exposure of the image’s colours, lights, and shadows, thereby making it look more realistic and natural. The image quality is also enhanced through this feature. It is because the colour contrast gets automatically adjusted to the perfect settings by the feature.
You will get the “Auto Contrast” feature exactly below the “Auto Colour” option, in the “Colour Contrast” drop-down panel.
● Change the level of your image to make it look more natural
You can readily make your images look more natural and realistic than ever. And that is possible through the “Colour Correction” feature of After Effects. Opt for the “Auto Levels” option present in the “Colour Correction” drop-down box.
Then right below the “Auto Contrast” option, you will find the “Auto-Levels” option. After you click on the option, your image will automatically get its colour adjusted by the tool, correctly adjusting all its required settings to make your image look as realistic and natural as possible.
● Bring a black-and-white effect on your image through the option in After effects
The Black-and-White effect on the images has been one of the most popular trends and styles one chooses to edit. And in order to make your efforts minimal and the quality of with the finest, the After Effects has a “Black & white” option as well.
So, if you want to edit your pictures in the black and white filter, you can readily do so in the highest quality and with the least effort. Open the “Colour Contrast” feature in After Effects and click on its drop-down box. The fourth option is the one that is below the “Auto Levels” option, and you will find the “Black & White” option present.
Click on that option, and you will find your image edited in the black-white hues, in the most impeccable shade, light, shadow and effect.
● Change the tint and the brightness or contrast
Under the “Black & White” option in the “Colour Correction” option of After effects, you can avail of the further edit option that is available under the “Black & White” option. There, the last option will be “Tint”. When you opt for the option of “Tint”. You can select the colour you want to be entirely dominant in your image.
And below the “Black & White” option, you will find the “Brightness & Contrast” option. Click on it to adjust and set the brightness and contrast of the image. It will make the image’s colour and shades look more vibrant because you can change its contrast according to your wish.
Part 3 Alternative to After Effects Color Match
And now, we will be introducing you to another video and image editing tool that will help you match the colours of your videos and images as proficiently as the colour matcher after effects plugin. And the tool is Wondershare Filmora Video Editor . Its incredible feature of “Colour Match” allows you to match the colours of your videos and images, making them more vibrancy, sometimes even monochromatic.
You can choose a particular theme or shade for the entire image or video and the “Colour Match” will help you bring your imagination into reality. If you want to edit or match colours in a particular clip or option of the video, you are all set to do so with Filmora 11.
For Win 7 or later (64-bit)
For macOS 10.12 or later
● Key Takeaways from This Episode →
● The advantages that you receive from “Colour Match” of After effects
● The quick steps of how to use “Colour Match” of “After Effects”
● The “Colour Match” feature of Filmora can readily make your videos alter colors and become more vibrant and incredible.
After Effects is one of the most exciting applications put forward by Adobe. You can readily use this application for film-making; that is, you can edit videos with After Effects. The features of this application are highly proficient, effective and intuitive. And one of the most exciting and incredible features of After Effects is the “Colour Match” feature.
The “Color Match” of After Effects has numerous advantages, and there are some steps that you need to follow to use this feature. So, in the following discussion, we have discussed how you can match colours in After Effects its advantages. Lastly, we have introduced a video editing tool that can ideally be an alternative to the “Color Match” of After Effects.
In this article
01 [What Are the Obvious Advantages of the Color Match of After Effects?](#Part 1)
02 [Quick Tip - Matching Colors in After Effects](#Part 2)
03 [Alternative to After Effects Color Match](#Part 3)
Part 1 What Are the Obvious Advantages of the Color Match of After Effects?
As we have mentioned earlier, the colour matcher plugin of After Effects has numerous advantages, we will now be discussing what they are. So, the following list states the different benefits of using the “Color Match” of After Effects.
● You can add shadows and highlights.
Sometimes, our photos are underexposed, while sometimes, they are overexposed. Either way, they do not look quite pleasing. But you efficiently use “Colour Match” of After Effects to correct the exposure. And it will be possible when you adjust the highlights and shadows of the picture or the video through this feature. You can access this advantage in the “Shadows and Highlights” option of After Effects.

● Adjuting Vibrance
Another benefit you get from this feature of After Effects is that you can quickly fix the appropriate saturation of the picture or the video you want to edit. You can adjust the saturation, thus, making the picture or the video more vibrant and natural-looking. The option to adjust the saturation or the vibrance of any image or video is present in the “Vibrance” option. Click on the option and set the saturation of the colours of the images perfectly.

● Access to incredible filters
After Effects’ “Colour Match” feature filters make your photos and videos look all-natural. You can readily adjust the settings of the filters and set them according to the essence you want to have in your picture. The filters make your picture and videos look like they have been shot naturally on high-quality camera lenses. So, your videos and pictures look more natural and of the highest quality.
● Choose and match any colour for your images and videos
You might want to change or alter the colours of a particular video clip or an image with the colour of some other image. The “Colour Match” feature of Adobe After Effect makes it readily possible for you to carry this function.
● Intuitive but proficient feature
The “Colour Match” feature of Adobe After Effect helps you edit your videos and images most profoundly. But at the same time, apart from being a professional feature, it is not difficult to use. You can easily understand how to use the feature and make your videos and images match the colours you want.
Part 2 Quick Tip - Matching Colors in After Effects
Here are the steps by which you can avail of the incredible “Colour Match” feature of after-effects to match the colour between clips.
Step 1The first step requires you to access the “Composition Settings” and make the required changes accordingly. You can find the options in the “Composition Settings” and readily make the needed changes.

Step 2Choose the background color according to your choice.

Step 3Now, import the image you want to edit. First, right-click and then you will find an “Import” option. Click on it to import the image you want.

Step 4As you select the “Import” option, you will see a dialogue box. Select the folder in which the image has been saved and then select the image from the folder.

Step 5After importing the image, you need to select After Effects’ “Effects & Presets” option. And there, you will find the “Colour Correction” option. Click on that option.

Step 6You will see an “Auto-colour” option. Double-click on that option. It will automatically make your image look more realistic ad natural. Adobe After Effects will choose the most suitable colour correction shade for your photo and apply it. As a result, you will see a vibrant change in the image.

Many other features under this tool will help you make your images look as vibrant and incredible as possible. And now, we will be discussing the various features and tips that you can use in “After Effects” to make your images look more fabulous than ever.
● Change the contrast of the image to make it look more vibrant
You can change the settings of the image if you want. Also, you can use the “Blend” feature of After Effects to bring out better changes and edits in your picture. Another feature that can help you edit the colours of your image in After Effects is the “Auto Contrast” feature of After Effects.
In this feature, the tool automatically adjusts the exposure of the image’s colours, lights, and shadows, thereby making it look more realistic and natural. The image quality is also enhanced through this feature. It is because the colour contrast gets automatically adjusted to the perfect settings by the feature.
You will get the “Auto Contrast” feature exactly below the “Auto Colour” option, in the “Colour Contrast” drop-down panel.
● Change the level of your image to make it look more natural
You can readily make your images look more natural and realistic than ever. And that is possible through the “Colour Correction” feature of After Effects. Opt for the “Auto Levels” option present in the “Colour Correction” drop-down box.
Then right below the “Auto Contrast” option, you will find the “Auto-Levels” option. After you click on the option, your image will automatically get its colour adjusted by the tool, correctly adjusting all its required settings to make your image look as realistic and natural as possible.
● Bring a black-and-white effect on your image through the option in After effects
The Black-and-White effect on the images has been one of the most popular trends and styles one chooses to edit. And in order to make your efforts minimal and the quality of with the finest, the After Effects has a “Black & white” option as well.
So, if you want to edit your pictures in the black and white filter, you can readily do so in the highest quality and with the least effort. Open the “Colour Contrast” feature in After Effects and click on its drop-down box. The fourth option is the one that is below the “Auto Levels” option, and you will find the “Black & White” option present.
Click on that option, and you will find your image edited in the black-white hues, in the most impeccable shade, light, shadow and effect.
● Change the tint and the brightness or contrast
Under the “Black & White” option in the “Colour Correction” option of After effects, you can avail of the further edit option that is available under the “Black & White” option. There, the last option will be “Tint”. When you opt for the option of “Tint”. You can select the colour you want to be entirely dominant in your image.
And below the “Black & White” option, you will find the “Brightness & Contrast” option. Click on it to adjust and set the brightness and contrast of the image. It will make the image’s colour and shades look more vibrant because you can change its contrast according to your wish.
Part 3 Alternative to After Effects Color Match
And now, we will be introducing you to another video and image editing tool that will help you match the colours of your videos and images as proficiently as the colour matcher after effects plugin. And the tool is Wondershare Filmora Video Editor . Its incredible feature of “Colour Match” allows you to match the colours of your videos and images, making them more vibrancy, sometimes even monochromatic.
You can choose a particular theme or shade for the entire image or video and the “Colour Match” will help you bring your imagination into reality. If you want to edit or match colours in a particular clip or option of the video, you are all set to do so with Filmora 11.
For Win 7 or later (64-bit)
For macOS 10.12 or later
● Key Takeaways from This Episode →
● The advantages that you receive from “Colour Match” of After effects
● The quick steps of how to use “Colour Match” of “After Effects”
● The “Colour Match” feature of Filmora can readily make your videos alter colors and become more vibrant and incredible.
This Article Will Help You Understand How to Create Flying Objects Using Editing Tools Such as Wondershare Filmora
Let us be honest here, you want to create fly objects in the air but don’t want to get into the witchcraft school. In that case, we have got your back!
In this article, you can learn how to make objects fly in the air! Technically you will not do that in real-time, but with the latest technology and editing tools at your disposal, you will exactly do that.
Use Wondershare Filmora to create the flying object effect. Scroll below to get the guide to the whole process of creation.
Part 1. What will you need to make a flying object?
This is not witchcraft, so we will abstain from using potions and herbs. Instead, to fly objects in our videos, we will use simple techniques that you may also be familiar with.
Video Cameras
The camera, in this scenario, will be the essential accessory as it will capture your video with the proper aspect ratio. This video camera can now be from a mobile phone or a high-quality DSLR. It will all depend upon your preference for quality and frame rate.

Tri-Pod or camera stands
Selecting the Tri-Pod is also crucial to your quality of video taking as it will ensure stability while capturing the video from the camera.

Stability is the key here, as the captured videos will be masked and combined in the later stages of the steps. To do so, consistently capturing the video in the same ratio is necessary. You can stabilize the video with a simple gorilla pod that you can get of good quality or a simple tripod.
The prop
The prop will be the object that we will be flying in the video. It could be a fluffy toy, a ball, a box, or anything you desire to be flying in your video.
![]()
Note: In this article, we are going to use a ball as a prop.

Wondershare Filmora
Now that we have all the physical requirements for the video, our next goal is to ensure that we have the correct video editing software. And what’s best than Wondershare Filmora? Obviously, there’s nothing!
Filmora allows you to edit your videos with ease and comfort. With its interactive UI, even a beginner feels easy to edit a video. With skills on hand, an expert can edit videos ranging from green screen effects to flying objects.
Free Download For Win 7 or later(64-bit)
Free Download For macOS 10.14 or later

Good presentation
Now, if you want your video to shine like the good ones, you will need to know how to present it. In this section, the requirement will be yourself. As you are not flying an object, you must act the part.
A good presentation will allow you to make the video more natural. Because no matter how skilled you are with video editing, a video with props will only be of quality until the subject acts their part with quality.
Part 2. How to capture the footage?
Before we get into how we edit our footage, we need to know how to shoot the video to edit. Follow the steps mentioned below:
- Set up your camera on a tripod or a gorilla pod.
- After setting up the camera, record an empty frame.
![]()
Note: An empty frame video will be the one you will use to mask the original clip.
Reference video
Start recording a five-second clip of the sofa where you will be sitting without yourself or the prop. Here you don’t need to add anything except the reference. Follow the guidelines below when making the reference video:
- The video should be plain.
- It should be simple.
- There should be no moving object or subject.

Main video
After shooting the empty frame video, move on to shooting the video with yourself in it. Follow the below to achieve something unique:
- Your focus should be on the prop.
- Use a thread or a rope to attach the prop to it. (In this case, we are using a ball.)
- Attach the ball to the thread and hand it on the roof.
- Record yourself now with the prop with your desired content or script.

After completing the video, simply stop recording. Now you will end up with two video clips.
Adding these two clips in the Wondershare Filmora , you can easily create the flying object effect. To do so, follow the steps explained in the section ahead.
Part 3. Stepwise guide to making flying objects in Wondershare Filmora
Now that we have looked into our requirements, let us dive into how we will apply our skills to achieve an object to fly in Wondershare Filmora .
Of course, without the software, our editing will not be possible, so download Wondershare Filmora from the steps explained below.
Free Download For Win 7 or later(64-bit)
Free Download For macOS 10.14 or later
Step1Open the Wondershare Filmora software
- Open the Wondershare Filmora software and Click on the New Project icon on the window.
- After you have clicked on the New Project icon, our main workplace will be launched.
- Here you can see various options.
- To get started, we need to import our video clips to edit them.

- Here, you can see two ways to import your clips in Wondershare Filmora.
- Shows you how to import by Right-Clicking on File and selecting the import media option.
- Shows you to drag and drop the file from your main directory simply.
You can choose whatever suits you the best!
Step2Add your clips to your timeline
Now that we have imported our videos into the timeline, our next step will be to add our videos to the timeline.
- Simply click on the imported clips on the import window.
- Then drag it to the timeline below.
- Doing so will create a working timeline you can view and edit as you go along the editing process.

Step3Size the reference video to the original video
Now, remember that we recorded a five-second clip that we will use to create the masking effect. You will need to size it to the original video for that to work. Doing so is simple and will require you to take some easy steps.
- First, click on the clip.
- Then, when it is selected, move on to the tab above to choose the speed option from the bar.
- Here, you will also see options such as cropping, Green screen, and color.
- Choose the option of speed.
- Then, a drop-down tile will pop up. Here you can see different options available to speed up your video.

- You can speed up your video and slow it down.
- For now, we will have to slow it down.
![]()
Note: Slowing it down will increase the time of the video clip and allow you to match it with the original video clip.
Don’t worry about the speed, as the video is already empty, and there will be no distractions to disturb our editing.
Step4Add the masking effect
Now that we have our video aligned with the reference video we are using. Let’s move to the next step.
This step will try to remove the thread attached to the ball; otherwise, it will show in the video, and our effect will be ruined. However, before we do that, we will need to know what masking is.
What is the Masking effect in Wondershare Filmora?
Have you ever seen the behind-the-scenes of those big-budget movies? Then you might have seen the actors and the stunt workers hanging from big ropes performing stunts in front of green screens.
Well, the directors capture the video in real-time. But they can do those big stunts on TV with editing and CGI, and one of the effects is “Masking.”
The masking effect allows you to mask the object on the screen with a reference video. So that’s how the ropes attached to the stuntmen get removed in the original videos.
How to add a masking effect?
Although there are numerous ways to do that, the one we will use in this video is to remove the thread. For this, follow the below steps:
- Simply go to the effect icon that you can see in the bar above.
- In the effects bar, move to the utility tab.
- You will see a window showing you the many effects Wondershare Filmora provides you from default.
- Select the shape mask tile.
- Now drag and drop it on the timeline below.

![]()
Note: You must ensure the effect is applied to the main video, not the reference video.
- When you drag the effect into the main video, you will notice a transparent shape added to the video. This is your Mask.
Step5Edit the masking effect
You must hide the thread attached to the ball with the masking effect. To do this, follow the below guidelines:
- Double-click on the effect added to the main video.
- You will notice another window pop up on the import library.
![]()
Note: In the pop-up window, you will see the multiple options and edits you can apply to the masking effect, such as Transform, Compositing, Motion tracking, and stabilization.

- Scroll down on the window and notice a video effect tab.
In the effect tab, you will have multiple options, such as the shape mask, X, Y, and scale and blur strength options, as shown below.
- Now adjust the mask to hide the string. It may be easy to invert the mask.
![]()
Note: That the borders of the mask are blurred. But you can also change them by inverting the mask, which turns the borders and the space between them.
Remember the invisibility cloak from Harry Potter? It works just like that, only with a solid shape.
- Now use the X and Y options to move the mask anywhere in the video.

Step6Hide the sharp borders
You may notice the shape of borders that do not blend with the background. To blend the borders with the background, follow the steps below:
- Simply Double-click on the effect in the timeline.
- Then, in the editing tab, find out the blur strength option.

- Simply drag the bar to increase the blur strength.
![]()
Note: Please keep looking in the window on the right. Check and increase the blur strength until you are satisfied with the result.
- Lastly, click on OK when you are done.
Step7Creating the popup effect
Now, if you want your object to appear out of thin air, you must create that pop-up effect. You can create the pop-up effect in simple and easy steps, as shown below:
- First, drag the timeline dragger to the point where you want the prop or the ball to pop up.
Your presentation should be accurate and precise!
Imagine you were doing a “swoosh“ action, similar to swinging a wand. Now you want your object to appear at that time.
Split the Video:
- Drag the timeline dragger to that point.
- Now press Ctrl+B to split both videos.
Add Popup Effect:
The masking effect will be applied from the start. Our goal is to hide the masking effect before the ball pop-ups. For this, follow the below steps:
- Go into the setting by Double-Clicking the masking effect on the original video.
- Then move the mask over the ball instead of on the thread. Doing so would make the ball disappear.

Final Results:
- Lastly, click on Ok when done.
Play the clip from the start, and you will notice the ball popping up according to your action.

Congratulations! You did it. You are now able to fly objects with the power of your mind.
Following the abovementioned steps, you can control objects and make them fly in the air. The catch is that you will have to use Wondershare Filmora . But, of course, this is not a witchcraft school now.
Free Download For Win 7 or later(64-bit)
Free Download For macOS 10.14 or later
Conclusion
Well, there comes a time when one needs to make flying objects. Wondershare Filmora is an excellent tool that will allow you to add the masking effect to create the illusion of flying objects in the air.
The video quality at the end will only depend upon how clearly you show during the editing process. Try the above steps and enjoy the results!

Wondershare Filmora
Now that we have all the physical requirements for the video, our next goal is to ensure that we have the correct video editing software. And what’s best than Wondershare Filmora? Obviously, there’s nothing!
Filmora allows you to edit your videos with ease and comfort. With its interactive UI, even a beginner feels easy to edit a video. With skills on hand, an expert can edit videos ranging from green screen effects to flying objects.
Free Download For Win 7 or later(64-bit)
Free Download For macOS 10.14 or later

Good presentation
Now, if you want your video to shine like the good ones, you will need to know how to present it. In this section, the requirement will be yourself. As you are not flying an object, you must act the part.
A good presentation will allow you to make the video more natural. Because no matter how skilled you are with video editing, a video with props will only be of quality until the subject acts their part with quality.
Part 2. How to capture the footage?
Before we get into how we edit our footage, we need to know how to shoot the video to edit. Follow the steps mentioned below:
- Set up your camera on a tripod or a gorilla pod.
- After setting up the camera, record an empty frame.
![]()
Note: An empty frame video will be the one you will use to mask the original clip.
Reference video
Start recording a five-second clip of the sofa where you will be sitting without yourself or the prop. Here you don’t need to add anything except the reference. Follow the guidelines below when making the reference video:
- The video should be plain.
- It should be simple.
- There should be no moving object or subject.

Main video
After shooting the empty frame video, move on to shooting the video with yourself in it. Follow the below to achieve something unique:
- Your focus should be on the prop.
- Use a thread or a rope to attach the prop to it. (In this case, we are using a ball.)
- Attach the ball to the thread and hand it on the roof.
- Record yourself now with the prop with your desired content or script.

After completing the video, simply stop recording. Now you will end up with two video clips.
Adding these two clips in the Wondershare Filmora , you can easily create the flying object effect. To do so, follow the steps explained in the section ahead.
Part 3. Stepwise guide to making flying objects in Wondershare Filmora
Now that we have looked into our requirements, let us dive into how we will apply our skills to achieve an object to fly in Wondershare Filmora .
Of course, without the software, our editing will not be possible, so download Wondershare Filmora from the steps explained below.
Free Download For Win 7 or later(64-bit)
Free Download For macOS 10.14 or later
Step1Open the Wondershare Filmora software
- Open the Wondershare Filmora software and Click on the New Project icon on the window.
- After you have clicked on the New Project icon, our main workplace will be launched.
- Here you can see various options.
- To get started, we need to import our video clips to edit them.

- Here, you can see two ways to import your clips in Wondershare Filmora.
- Shows you how to import by Right-Clicking on File and selecting the import media option.
- Shows you to drag and drop the file from your main directory simply.
You can choose whatever suits you the best!
Step2Add your clips to your timeline
Now that we have imported our videos into the timeline, our next step will be to add our videos to the timeline.
- Simply click on the imported clips on the import window.
- Then drag it to the timeline below.
- Doing so will create a working timeline you can view and edit as you go along the editing process.

Step3Size the reference video to the original video
Now, remember that we recorded a five-second clip that we will use to create the masking effect. You will need to size it to the original video for that to work. Doing so is simple and will require you to take some easy steps.
- First, click on the clip.
- Then, when it is selected, move on to the tab above to choose the speed option from the bar.
- Here, you will also see options such as cropping, Green screen, and color.
- Choose the option of speed.
- Then, a drop-down tile will pop up. Here you can see different options available to speed up your video.

- You can speed up your video and slow it down.
- For now, we will have to slow it down.
![]()
Note: Slowing it down will increase the time of the video clip and allow you to match it with the original video clip.
Don’t worry about the speed, as the video is already empty, and there will be no distractions to disturb our editing.
Step4Add the masking effect
Now that we have our video aligned with the reference video we are using. Let’s move to the next step.
This step will try to remove the thread attached to the ball; otherwise, it will show in the video, and our effect will be ruined. However, before we do that, we will need to know what masking is.
What is the Masking effect in Wondershare Filmora?
Have you ever seen the behind-the-scenes of those big-budget movies? Then you might have seen the actors and the stunt workers hanging from big ropes performing stunts in front of green screens.
Well, the directors capture the video in real-time. But they can do those big stunts on TV with editing and CGI, and one of the effects is “Masking.”
The masking effect allows you to mask the object on the screen with a reference video. So that’s how the ropes attached to the stuntmen get removed in the original videos.
How to add a masking effect?
Although there are numerous ways to do that, the one we will use in this video is to remove the thread. For this, follow the below steps:
- Simply go to the effect icon that you can see in the bar above.
- In the effects bar, move to the utility tab.
- You will see a window showing you the many effects Wondershare Filmora provides you from default.
- Select the shape mask tile.
- Now drag and drop it on the timeline below.

![]()
Note: You must ensure the effect is applied to the main video, not the reference video.
- When you drag the effect into the main video, you will notice a transparent shape added to the video. This is your Mask.
Step5Edit the masking effect
You must hide the thread attached to the ball with the masking effect. To do this, follow the below guidelines:
- Double-click on the effect added to the main video.
- You will notice another window pop up on the import library.
![]()
Note: In the pop-up window, you will see the multiple options and edits you can apply to the masking effect, such as Transform, Compositing, Motion tracking, and stabilization.

- Scroll down on the window and notice a video effect tab.
In the effect tab, you will have multiple options, such as the shape mask, X, Y, and scale and blur strength options, as shown below.
- Now adjust the mask to hide the string. It may be easy to invert the mask.
![]()
Note: That the borders of the mask are blurred. But you can also change them by inverting the mask, which turns the borders and the space between them.
Remember the invisibility cloak from Harry Potter? It works just like that, only with a solid shape.
- Now use the X and Y options to move the mask anywhere in the video.

Step6Hide the sharp borders
You may notice the shape of borders that do not blend with the background. To blend the borders with the background, follow the steps below:
- Simply Double-click on the effect in the timeline.
- Then, in the editing tab, find out the blur strength option.

- Simply drag the bar to increase the blur strength.
![]()
Note: Please keep looking in the window on the right. Check and increase the blur strength until you are satisfied with the result.
- Lastly, click on OK when you are done.
Step7Creating the popup effect
Now, if you want your object to appear out of thin air, you must create that pop-up effect. You can create the pop-up effect in simple and easy steps, as shown below:
- First, drag the timeline dragger to the point where you want the prop or the ball to pop up.
Your presentation should be accurate and precise!
Imagine you were doing a “swoosh“ action, similar to swinging a wand. Now you want your object to appear at that time.
Split the Video:
- Drag the timeline dragger to that point.
- Now press Ctrl+B to split both videos.
Add Popup Effect:
The masking effect will be applied from the start. Our goal is to hide the masking effect before the ball pop-ups. For this, follow the below steps:
- Go into the setting by Double-Clicking the masking effect on the original video.
- Then move the mask over the ball instead of on the thread. Doing so would make the ball disappear.

Final Results:
- Lastly, click on Ok when done.
Play the clip from the start, and you will notice the ball popping up according to your action.

Congratulations! You did it. You are now able to fly objects with the power of your mind.
Following the abovementioned steps, you can control objects and make them fly in the air. The catch is that you will have to use Wondershare Filmora . But, of course, this is not a witchcraft school now.
Free Download For Win 7 or later(64-bit)
Free Download For macOS 10.14 or later
Conclusion
Well, there comes a time when one needs to make flying objects. Wondershare Filmora is an excellent tool that will allow you to add the masking effect to create the illusion of flying objects in the air.
The video quality at the end will only depend upon how clearly you show during the editing process. Try the above steps and enjoy the results!
Top Things People Know About Wedding Slideshow
Top Things People Know About Wedding Slideshow
An easy yet powerful editor
Numerous effects to choose from
Detailed tutorials provided by the official channel
A wedding slideshow is a great way not only to save memories of your special day but also to connect with your guests and let them know your love story in an interesting and creative manner. A well-made wedding slideshow will certainly spice up the entire event and will make it a memorable day for you as well as your dear ones.
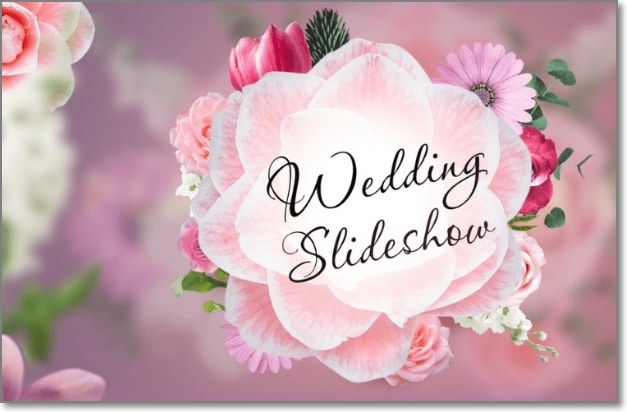
To create an eye-grabbing and engaging wedding slideshow there are several factors to be considered as the right selection of the images, effects, music, and much more. The content below will you to know about these factors and tools that will help you create a memorable slideshow.
In this article
01 [Key Steps for Creating a Wedding Slideshow](#Part 1)
02 [Tips to Further Spice Up and Make the Wedding Slideshow Even More Interesting](#Part 2)
03 [Hassle-free Tool for Finding Templates and Creating a Slideshow- Wondershare Filmora](#Part 3)
Part 1 Key Steps For Creating A Wedding Slideshow
There are key steps that go into the making of a wedding slideshow. Check them as below.
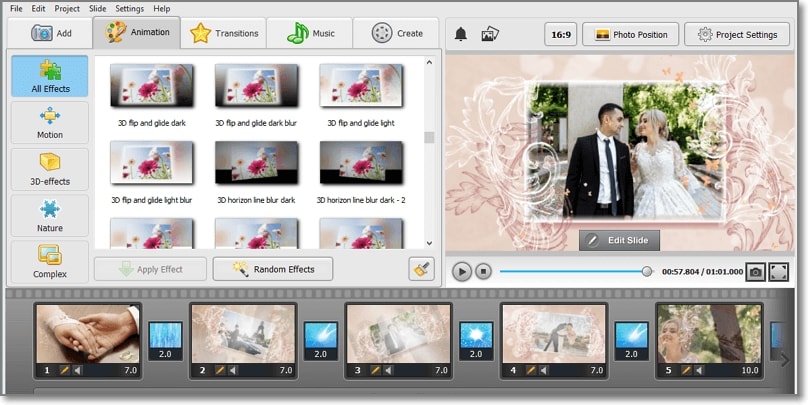
01Choose The Appropriate Software
For creating an impressive and engaging wedding slideshow it is very important to choose the right software that comes packed in with all your required features. There is an array of these online and desktop-based programs available. Check out the features, pros, and cons of each of these wedding slideshow maker, and then make a choice. Some of the popular ones include Wondershare Filmora, Animotica, Animoto, Adobe Spark, and others.
02Select A Theme And A Story
Another important thing to be considered before you start making the actual slideshow is deciding the story or the theme. Depending on the theme, the images, videos, and other elements of the wedding photo slideshow will be added. Choose a theme that matches the personality of the couple. The selection of the theme can make a huge difference to the overall creation of the slideshow.
03Duration Of The Slideshow
Next, you need to decide on the total duration for which you need to create the slideshow. A too-short video will not be able to convey your story while a long one can be boring for the viewers. So ideally, a slideshow between 7-10 minutes is good enough.
04Pick Up The Best Images And Videos
Next, comes the crucial and the major part of the slideshow- videos and images. First of all, make sure to choose high-quality clear images that if seen from a distance and on a bigger screen looks clear. Choose the pictures and the videos that go along with your selected story and the theme and portray the couple’s romance and relationship. In addition to the couple, the images of friends, relatives, colleagues, and other dear ones can be included.
Add effects, filters, templates, and other elements
To further spice up your slideshow and make it more interesting, add some filters, transitions, text, effects, and other elements. A lot of professional slideshow-making tools come with built-in effects that can be added. Wedding slide template also work as a great tool for making a slideshow in a hassle-free manner. Choose a design and keep adding the elements.
05Add An Appropriate Music
No matter how well created your wedding slideshow is, it looks incomplete until a music file is added. Depending on your slideshow theme you can either choose simple soft music, a peppy latest song, or any other audio file. The favorite song of the couple can also be included. Using an audio editing tool, you can add multiple audio clips to create a single file to be used for the slideshow.
Part 2 Tips To Further Spice Up And Make The Wedding Slideshow Even More Interesting
Above we have listed the key steps for creating a wedding slideshow. So, if you want to spice up and make your slideshow even more engaging and make it different from all regular others, the below-listed tips will be useful.
● Including some short video clips and images of relatives, best friends, and other dear ones.
● Add short video-based interviews of parents, siblings, and other dear ones about the couple, their relationship, and more.
● Marriage advise from married colleagues and friends.
● Wishes from the relatives and friends who cannot make it to the wedding for some reason.
● Including short clips of the wedding preparations.
● A voiceover of a friend or a relative can be added to the slideshow in a manner as if some script is being narrated.
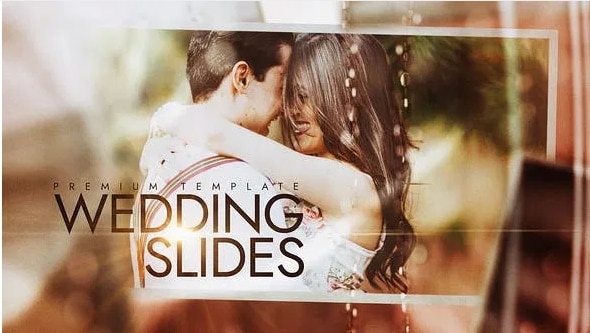
Part 3 Hassle-Free Tool For Finding Templates And Creating A Slideshow- Wondershare Filmora
Wondershare Filmora Video Editor is a one-stop solution for all your wedding slideshow creation needs. This excellent Windows and Mac-based software is a professional video editing tool supporting advanced features. All your slideshow clips and videos can be processed and customized like a pro using the built-in features of the software like effects, filters, transitions, and more.
For Win 7 or later (64-bit)
For macOS 10.12 or later
A wide range of templates in different categories for creating a slideshow is also available and above all the software allows for creating an impressive slideshow in just a few simple steps. If needed, you can even use the stock footage as well as music files available at the site for your slideshow.
Steps to create a wedding slideshow using Wondershare Filmora
Step 1. Launch the installed software on your system and on the main interface choose the New Project button.
Step 2. The videos and the images that have to be added to the slideshow now have to be imported to the software Media Library.
The added media files can be customized using the editing tool in the software.
Now drag and move the images and videos to the timeline.
Step 3. Next comes the step of adding transitions. Multiple styles of transitions are available in the tool to choose from. You can also adjust the transition duration as needed.
Step 4. Next, add the music to your slideshow. Use a locally saved music file or choose the one from the software media library. The option for adding a voice-over is also there.
Step 5. Finally, save and then export the slideshow. You can save it locally or to a DVD. Sharing option on social media sites is also present.
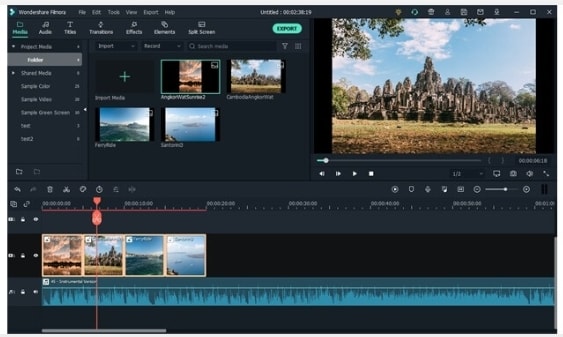
● Ending Thoughts →
● A wedding slideshow helps the guests at the wedding to know about the love story of the couple and is also a presentation to relive the wedding moments forever.
● There are several key factors and tips that should be followed for creating an engaging, and interesting slideshow.
● Wondershare Filmora is the best slideshow maker for wedding as it comes with variety of templates, editing tools and other functions.
A wedding slideshow is a great way not only to save memories of your special day but also to connect with your guests and let them know your love story in an interesting and creative manner. A well-made wedding slideshow will certainly spice up the entire event and will make it a memorable day for you as well as your dear ones.

To create an eye-grabbing and engaging wedding slideshow there are several factors to be considered as the right selection of the images, effects, music, and much more. The content below will you to know about these factors and tools that will help you create a memorable slideshow.
In this article
01 [Key Steps for Creating a Wedding Slideshow](#Part 1)
02 [Tips to Further Spice Up and Make the Wedding Slideshow Even More Interesting](#Part 2)
03 [Hassle-free Tool for Finding Templates and Creating a Slideshow- Wondershare Filmora](#Part 3)
Part 1 Key Steps For Creating A Wedding Slideshow
There are key steps that go into the making of a wedding slideshow. Check them as below.

01Choose The Appropriate Software
For creating an impressive and engaging wedding slideshow it is very important to choose the right software that comes packed in with all your required features. There is an array of these online and desktop-based programs available. Check out the features, pros, and cons of each of these wedding slideshow maker, and then make a choice. Some of the popular ones include Wondershare Filmora, Animotica, Animoto, Adobe Spark, and others.
02Select A Theme And A Story
Another important thing to be considered before you start making the actual slideshow is deciding the story or the theme. Depending on the theme, the images, videos, and other elements of the wedding photo slideshow will be added. Choose a theme that matches the personality of the couple. The selection of the theme can make a huge difference to the overall creation of the slideshow.
03Duration Of The Slideshow
Next, you need to decide on the total duration for which you need to create the slideshow. A too-short video will not be able to convey your story while a long one can be boring for the viewers. So ideally, a slideshow between 7-10 minutes is good enough.
04Pick Up The Best Images And Videos
Next, comes the crucial and the major part of the slideshow- videos and images. First of all, make sure to choose high-quality clear images that if seen from a distance and on a bigger screen looks clear. Choose the pictures and the videos that go along with your selected story and the theme and portray the couple’s romance and relationship. In addition to the couple, the images of friends, relatives, colleagues, and other dear ones can be included.
Add effects, filters, templates, and other elements
To further spice up your slideshow and make it more interesting, add some filters, transitions, text, effects, and other elements. A lot of professional slideshow-making tools come with built-in effects that can be added. Wedding slide template also work as a great tool for making a slideshow in a hassle-free manner. Choose a design and keep adding the elements.
05Add An Appropriate Music
No matter how well created your wedding slideshow is, it looks incomplete until a music file is added. Depending on your slideshow theme you can either choose simple soft music, a peppy latest song, or any other audio file. The favorite song of the couple can also be included. Using an audio editing tool, you can add multiple audio clips to create a single file to be used for the slideshow.
Part 2 Tips To Further Spice Up And Make The Wedding Slideshow Even More Interesting
Above we have listed the key steps for creating a wedding slideshow. So, if you want to spice up and make your slideshow even more engaging and make it different from all regular others, the below-listed tips will be useful.
● Including some short video clips and images of relatives, best friends, and other dear ones.
● Add short video-based interviews of parents, siblings, and other dear ones about the couple, their relationship, and more.
● Marriage advise from married colleagues and friends.
● Wishes from the relatives and friends who cannot make it to the wedding for some reason.
● Including short clips of the wedding preparations.
● A voiceover of a friend or a relative can be added to the slideshow in a manner as if some script is being narrated.

Part 3 Hassle-Free Tool For Finding Templates And Creating A Slideshow- Wondershare Filmora
Wondershare Filmora Video Editor is a one-stop solution for all your wedding slideshow creation needs. This excellent Windows and Mac-based software is a professional video editing tool supporting advanced features. All your slideshow clips and videos can be processed and customized like a pro using the built-in features of the software like effects, filters, transitions, and more.
For Win 7 or later (64-bit)
For macOS 10.12 or later
A wide range of templates in different categories for creating a slideshow is also available and above all the software allows for creating an impressive slideshow in just a few simple steps. If needed, you can even use the stock footage as well as music files available at the site for your slideshow.
Steps to create a wedding slideshow using Wondershare Filmora
Step 1. Launch the installed software on your system and on the main interface choose the New Project button.
Step 2. The videos and the images that have to be added to the slideshow now have to be imported to the software Media Library.
The added media files can be customized using the editing tool in the software.
Now drag and move the images and videos to the timeline.
Step 3. Next comes the step of adding transitions. Multiple styles of transitions are available in the tool to choose from. You can also adjust the transition duration as needed.
Step 4. Next, add the music to your slideshow. Use a locally saved music file or choose the one from the software media library. The option for adding a voice-over is also there.
Step 5. Finally, save and then export the slideshow. You can save it locally or to a DVD. Sharing option on social media sites is also present.

● Ending Thoughts →
● A wedding slideshow helps the guests at the wedding to know about the love story of the couple and is also a presentation to relive the wedding moments forever.
● There are several key factors and tips that should be followed for creating an engaging, and interesting slideshow.
● Wondershare Filmora is the best slideshow maker for wedding as it comes with variety of templates, editing tools and other functions.
A wedding slideshow is a great way not only to save memories of your special day but also to connect with your guests and let them know your love story in an interesting and creative manner. A well-made wedding slideshow will certainly spice up the entire event and will make it a memorable day for you as well as your dear ones.

To create an eye-grabbing and engaging wedding slideshow there are several factors to be considered as the right selection of the images, effects, music, and much more. The content below will you to know about these factors and tools that will help you create a memorable slideshow.
In this article
01 [Key Steps for Creating a Wedding Slideshow](#Part 1)
02 [Tips to Further Spice Up and Make the Wedding Slideshow Even More Interesting](#Part 2)
03 [Hassle-free Tool for Finding Templates and Creating a Slideshow- Wondershare Filmora](#Part 3)
Part 1 Key Steps For Creating A Wedding Slideshow
There are key steps that go into the making of a wedding slideshow. Check them as below.

01Choose The Appropriate Software
For creating an impressive and engaging wedding slideshow it is very important to choose the right software that comes packed in with all your required features. There is an array of these online and desktop-based programs available. Check out the features, pros, and cons of each of these wedding slideshow maker, and then make a choice. Some of the popular ones include Wondershare Filmora, Animotica, Animoto, Adobe Spark, and others.
02Select A Theme And A Story
Another important thing to be considered before you start making the actual slideshow is deciding the story or the theme. Depending on the theme, the images, videos, and other elements of the wedding photo slideshow will be added. Choose a theme that matches the personality of the couple. The selection of the theme can make a huge difference to the overall creation of the slideshow.
03Duration Of The Slideshow
Next, you need to decide on the total duration for which you need to create the slideshow. A too-short video will not be able to convey your story while a long one can be boring for the viewers. So ideally, a slideshow between 7-10 minutes is good enough.
04Pick Up The Best Images And Videos
Next, comes the crucial and the major part of the slideshow- videos and images. First of all, make sure to choose high-quality clear images that if seen from a distance and on a bigger screen looks clear. Choose the pictures and the videos that go along with your selected story and the theme and portray the couple’s romance and relationship. In addition to the couple, the images of friends, relatives, colleagues, and other dear ones can be included.
Add effects, filters, templates, and other elements
To further spice up your slideshow and make it more interesting, add some filters, transitions, text, effects, and other elements. A lot of professional slideshow-making tools come with built-in effects that can be added. Wedding slide template also work as a great tool for making a slideshow in a hassle-free manner. Choose a design and keep adding the elements.
05Add An Appropriate Music
No matter how well created your wedding slideshow is, it looks incomplete until a music file is added. Depending on your slideshow theme you can either choose simple soft music, a peppy latest song, or any other audio file. The favorite song of the couple can also be included. Using an audio editing tool, you can add multiple audio clips to create a single file to be used for the slideshow.
Part 2 Tips To Further Spice Up And Make The Wedding Slideshow Even More Interesting
Above we have listed the key steps for creating a wedding slideshow. So, if you want to spice up and make your slideshow even more engaging and make it different from all regular others, the below-listed tips will be useful.
● Including some short video clips and images of relatives, best friends, and other dear ones.
● Add short video-based interviews of parents, siblings, and other dear ones about the couple, their relationship, and more.
● Marriage advise from married colleagues and friends.
● Wishes from the relatives and friends who cannot make it to the wedding for some reason.
● Including short clips of the wedding preparations.
● A voiceover of a friend or a relative can be added to the slideshow in a manner as if some script is being narrated.

Part 3 Hassle-Free Tool For Finding Templates And Creating A Slideshow- Wondershare Filmora
Wondershare Filmora Video Editor is a one-stop solution for all your wedding slideshow creation needs. This excellent Windows and Mac-based software is a professional video editing tool supporting advanced features. All your slideshow clips and videos can be processed and customized like a pro using the built-in features of the software like effects, filters, transitions, and more.
For Win 7 or later (64-bit)
For macOS 10.12 or later
A wide range of templates in different categories for creating a slideshow is also available and above all the software allows for creating an impressive slideshow in just a few simple steps. If needed, you can even use the stock footage as well as music files available at the site for your slideshow.
Steps to create a wedding slideshow using Wondershare Filmora
Step 1. Launch the installed software on your system and on the main interface choose the New Project button.
Step 2. The videos and the images that have to be added to the slideshow now have to be imported to the software Media Library.
The added media files can be customized using the editing tool in the software.
Now drag and move the images and videos to the timeline.
Step 3. Next comes the step of adding transitions. Multiple styles of transitions are available in the tool to choose from. You can also adjust the transition duration as needed.
Step 4. Next, add the music to your slideshow. Use a locally saved music file or choose the one from the software media library. The option for adding a voice-over is also there.
Step 5. Finally, save and then export the slideshow. You can save it locally or to a DVD. Sharing option on social media sites is also present.

● Ending Thoughts →
● A wedding slideshow helps the guests at the wedding to know about the love story of the couple and is also a presentation to relive the wedding moments forever.
● There are several key factors and tips that should be followed for creating an engaging, and interesting slideshow.
● Wondershare Filmora is the best slideshow maker for wedding as it comes with variety of templates, editing tools and other functions.
A wedding slideshow is a great way not only to save memories of your special day but also to connect with your guests and let them know your love story in an interesting and creative manner. A well-made wedding slideshow will certainly spice up the entire event and will make it a memorable day for you as well as your dear ones.

To create an eye-grabbing and engaging wedding slideshow there are several factors to be considered as the right selection of the images, effects, music, and much more. The content below will you to know about these factors and tools that will help you create a memorable slideshow.
In this article
01 [Key Steps for Creating a Wedding Slideshow](#Part 1)
02 [Tips to Further Spice Up and Make the Wedding Slideshow Even More Interesting](#Part 2)
03 [Hassle-free Tool for Finding Templates and Creating a Slideshow- Wondershare Filmora](#Part 3)
Part 1 Key Steps For Creating A Wedding Slideshow
There are key steps that go into the making of a wedding slideshow. Check them as below.

01Choose The Appropriate Software
For creating an impressive and engaging wedding slideshow it is very important to choose the right software that comes packed in with all your required features. There is an array of these online and desktop-based programs available. Check out the features, pros, and cons of each of these wedding slideshow maker, and then make a choice. Some of the popular ones include Wondershare Filmora, Animotica, Animoto, Adobe Spark, and others.
02Select A Theme And A Story
Another important thing to be considered before you start making the actual slideshow is deciding the story or the theme. Depending on the theme, the images, videos, and other elements of the wedding photo slideshow will be added. Choose a theme that matches the personality of the couple. The selection of the theme can make a huge difference to the overall creation of the slideshow.
03Duration Of The Slideshow
Next, you need to decide on the total duration for which you need to create the slideshow. A too-short video will not be able to convey your story while a long one can be boring for the viewers. So ideally, a slideshow between 7-10 minutes is good enough.
04Pick Up The Best Images And Videos
Next, comes the crucial and the major part of the slideshow- videos and images. First of all, make sure to choose high-quality clear images that if seen from a distance and on a bigger screen looks clear. Choose the pictures and the videos that go along with your selected story and the theme and portray the couple’s romance and relationship. In addition to the couple, the images of friends, relatives, colleagues, and other dear ones can be included.
Add effects, filters, templates, and other elements
To further spice up your slideshow and make it more interesting, add some filters, transitions, text, effects, and other elements. A lot of professional slideshow-making tools come with built-in effects that can be added. Wedding slide template also work as a great tool for making a slideshow in a hassle-free manner. Choose a design and keep adding the elements.
05Add An Appropriate Music
No matter how well created your wedding slideshow is, it looks incomplete until a music file is added. Depending on your slideshow theme you can either choose simple soft music, a peppy latest song, or any other audio file. The favorite song of the couple can also be included. Using an audio editing tool, you can add multiple audio clips to create a single file to be used for the slideshow.
Part 2 Tips To Further Spice Up And Make The Wedding Slideshow Even More Interesting
Above we have listed the key steps for creating a wedding slideshow. So, if you want to spice up and make your slideshow even more engaging and make it different from all regular others, the below-listed tips will be useful.
● Including some short video clips and images of relatives, best friends, and other dear ones.
● Add short video-based interviews of parents, siblings, and other dear ones about the couple, their relationship, and more.
● Marriage advise from married colleagues and friends.
● Wishes from the relatives and friends who cannot make it to the wedding for some reason.
● Including short clips of the wedding preparations.
● A voiceover of a friend or a relative can be added to the slideshow in a manner as if some script is being narrated.

Part 3 Hassle-Free Tool For Finding Templates And Creating A Slideshow- Wondershare Filmora
Wondershare Filmora Video Editor is a one-stop solution for all your wedding slideshow creation needs. This excellent Windows and Mac-based software is a professional video editing tool supporting advanced features. All your slideshow clips and videos can be processed and customized like a pro using the built-in features of the software like effects, filters, transitions, and more.
For Win 7 or later (64-bit)
For macOS 10.12 or later
A wide range of templates in different categories for creating a slideshow is also available and above all the software allows for creating an impressive slideshow in just a few simple steps. If needed, you can even use the stock footage as well as music files available at the site for your slideshow.
Steps to create a wedding slideshow using Wondershare Filmora
Step 1. Launch the installed software on your system and on the main interface choose the New Project button.
Step 2. The videos and the images that have to be added to the slideshow now have to be imported to the software Media Library.
The added media files can be customized using the editing tool in the software.
Now drag and move the images and videos to the timeline.
Step 3. Next comes the step of adding transitions. Multiple styles of transitions are available in the tool to choose from. You can also adjust the transition duration as needed.
Step 4. Next, add the music to your slideshow. Use a locally saved music file or choose the one from the software media library. The option for adding a voice-over is also there.
Step 5. Finally, save and then export the slideshow. You can save it locally or to a DVD. Sharing option on social media sites is also present.

● Ending Thoughts →
● A wedding slideshow helps the guests at the wedding to know about the love story of the couple and is also a presentation to relive the wedding moments forever.
● There are several key factors and tips that should be followed for creating an engaging, and interesting slideshow.
● Wondershare Filmora is the best slideshow maker for wedding as it comes with variety of templates, editing tools and other functions.
Also read:
- How to Add Green Screen Effects In Phhotoshop
- Updated 2024 Approved How To Change Text In Premiere Pro
- Updated Steps to Create One Click Video Reverse Effect in Filmora
- New In 2024, 3 Different Methods to Correct Color Distortion in Videos
- New In 2024, A Complete Guide to the Best Brand Story Videos
- Updated 2024 Approved How to Add VHS Green Screen to Your Video
- 2024 Approved If You Are Trying to Create a Countdown Effect, but Youre Not Sure Where to Start, Then This Post Is Going to Show You some Ways to Create a Countdown Animation for Your Videos
- In 2024, Do You Need a Royalty-Free 5 Seconds Countdown Video for Your Video but Dont Not Where to Find One? We Will Introduce You to the Best HD and 4K Clips that You Can Always Try Anytime
- The Ultimate Guide to Use LUTS to Color Grade on iPhone for 2024
- Updated The Frames per Second Can Enhance or Hamper Your Ability to Enjoy Watching a Video on YouTube. This Article Will Define Frame Rates and Help You Choose the Best FPS
- How to Create Your Own LOL Montage Video for 2024
- In 2024, Final Cut Pro for iPad
- Updated 2024 Approved | Top GIF to MP4 Converters
- New Guide to Make Timelapse Video with iMovie
- New Have You Ever Heard of the Video Format for PowerPoint? Allow Us to Help You Learn More About PowerPoint. It Will Help You Make an Impression by Making Good Slides
- Updated 2024 Approved Best Guide of 8 Photo Collage Apps for PC
- New How Long Does It Take To Edit A Video
- Updated Color Finale Is a Color Grading Plugin for Final Cur Pro. It Allows Users to Make Cinematic Looking Video Scenes by Adjusting the Color. Here Well Share You some Basic Information About This Plugin
- All About Factory Reset, What Is It and What It Does to Your Infinix Hot 40? | Dr.fone
- 11 Ways to Fix it When My Vivo V27e Wont Charge | Dr.fone
- Best 10 Mock Location Apps Worth Trying On Samsung Galaxy A05s | Dr.fone
- In 2024, How Can I Use a Fake GPS Without Mock Location On Vivo Y100 5G? | Dr.fone
- Complete Review & Guide to Techeligible FRP Bypass and More For Vivo V30 Lite 5G
- In 2024, 4 solution to get rid of pokemon fail to detect location On Poco M6 Pro 5G | Dr.fone
- Google Play Services Wont Update? 12 Fixes are Here on Xiaomi Redmi Note 13 Pro+ 5G | Dr.fone
- How To Transfer Data From Apple iPhone 8 Plus To Android? | Dr.fone
- In 2024, Hassle-Free Ways to Remove FRP Lock on Lava Yuva 2with/without a PC
- Getting the Pokemon Go GPS Signal Not Found 11 Error in Nubia Red Magic 9 Pro+ | Dr.fone
- Updated In 2024, How To Get More NFL Viewers For Your Sports Live Streaming Channel
- Reasons for Samsung Galaxy A24 Stuck on Startup Screen and Ways To Fix Them | Dr.fone
- Disable screen lock on Asus ROG Phone 7 Ultimate
- In 2024, Top 5 Car Locator Apps for Poco X6 Pro | Dr.fone
- My Videos Arent Playing on Nokia C110 – What Can I Do? | Dr.fone
- 10 Best Fake GPS Location Spoofers for Tecno Spark 20 Pro | Dr.fone
- Title: Everything That You Need to Know About Video Montages- Ideas, Techniques, and Software for 2024
- Author: Chloe
- Created at : 2024-05-20 03:38:02
- Updated at : 2024-05-21 03:38:02
- Link: https://ai-editing-video.techidaily.com/everything-that-you-need-to-know-about-video-montages-ideas-techniques-and-software-for-2024/
- License: This work is licensed under CC BY-NC-SA 4.0.

