

Experience Time Differently with The Top Slow-Motion Applications
Experience Time Differently with The Top Slow-Motion Applications
In today’s era, plain and boring views do not get as much audience attention. Effects and presets are important for creating Instagram-worthy reels or content for other social platforms. Adding a slow-motion effect to your videos is one of the tactics to enhance engagement. However, the question comes to downloading slow-motion apps for this purpose.
The Android and iOS devices offer a built-in slo-mo feature for users’ ease. However, when it comes to going to the next level, there are slow-motion video apps downloaded. These apps permit seamless editing tools and techniques for creating effective slo-mos. This article will discuss the top video slow-motion app downloads for both Android and iOS. Ultimately, we’ll give you a tip on creating slo-mos using an alternative.
Slow Motion Video Maker Slow your video’s speed with better control of your keyframes to create unique cinematic effects  Make A Slow Motion Video More Features

Part 1: Leading Down to The Top Slow-Motion App to Download Right Now
This section will cover both users, whether you prefer an Android interface or an iPhone camera. Find the top video editing apps for slow motion for both devices. The brief review and key features of applications are discussed below for your ease:
Slow Motion Applications for Android
Google Play is a versatile platform for downloading slo-mo video apps. However, out of so many options, it might become hard for you to select an app. Hence, in this section, we’ll discuss some reliable Android apps for that purpose:
- Slow Motion: Slow mo, Fast mo
- Slow Motion Video Fast&Slow Mo
- Slow Motion Video Editor
- Slow Motion Video Maker
- Slow Motion Editor
1. Slow Motion: Slow mo, Fast mo
To want an editing application with multiple slow-motion settings is natural. This slow-motion app bestows users with 10 precise playback speed options for creating slow-mos. The playback speed range is from 0.1x to 0.95x, which means a detailed slow-motion appearance. In addition, users can fashion the slo-mos effects at different speeds on different video fragments within a clip.

Key Features
- You can curate a multi-effect video by adding a fast-speed effect at specific frames.
- Trim and cut videos to add different effects to different segments while maintaining quality.
- Enables the previewing option to analyze and alter any mistakes or make further adjustments.
2. Slow Motion Video Fast&Slow Mo
This is a video editing app for slow motion where the creation possibilities do not stop. The application not only offers video speed change options but also audio speed change. This app lets you add funny voices and edit pranking videos easily. The simple settings enable slo-mo on complete video, while the advanced settings can separate video frames.

Key Features
- Add both slow-motion and high-speed effects at once in your dancing videos for inspiration.
- You can slow down a video to 1/2nd, 1/3rd, and 1/5th of its original speed.
- Adding any speed effect doesn’t change video quality, and you can export them in HD quality.
3. Slow Motion Video Editor
Create first-rate slo-mos using this slo-mo video editor app and embed multiple effects in them. This application is curated for content creators to inspire their audience. There are four speed change options for fashioning a slow motion:- 2x,- 4x,- 8x, and 16x. This means the app enables you to decelerate a video to 1/16th of its original speed.

Key Features
- Frame split options to apply slow motion effect to distinct video segments.
- Ability to apply and adjust music tracks on your video within the app.
- Multiple video and image frames enhance the visual stability of your videos.
4. Slow Motion Video Maker
Get a completely creative and innovative package with this app to slow down video. The application enables the reduction of video speed along with the option to apply music. You can even record a video in slow motion or add the slow motion to a pre-recorded one. Adjust your video duration according to the requirements using the Trim tool.

Key Features
- Add the element of laughter to your videos using the high playback speed options 2x, 3x, and 4x.
- Avoid losing video pixels and publish videos directly to Instagram, Facebook, and more.
- Speed up your videos at different durations to express your artistic ideas.
5. Slow Motion Editor
Instead of completing the formality of creating a slow motion, use this app to create compelling slow motion. The video editor offers multiple filters and effects to uplift a video and make it worthy of viewing. The app offers professional tools to cut and customize videos according to your taste. If your phone’s Slomo camera doesn’t respond, utilize this app to capture scenes in slow motion.

Key Features
- Add diverse speed effects like time-lapse, reverse speed, and live camera capturing.
- This slow-motion app is compatible with Android 4.0 and higher versions.
- The application offers special slow-motion effects like Hair Flips, Baseball Swings, and more.
Slow Motion Applications for iPhone
The app store choices may confuse the audience when choosing a suitable app. This section reflects some reliable iPhone applications tailored to fulfill slo-mo creation:
- SloMo Slow Motion Video Editor
- Slow Motion Video Editor
- Slow Mo & Fast Motion
- Slow Motion Video Fx Editor
- TimeFreeze
1. SloMo Slow Motion Video Editor
Step into epic creativity with this slow video app to craft high-quality slo-mos. The application creates smooth slow motion by manipulating the frame rate to 120 or 240 fps. You can manipulate frames at specific durations to add craft to a cinematic scene. Change the video playback speed for slow motion up to 12x and add a freeze frame effect for highlighting several points.

Key Features
- Share your creation directly on social apps to gain popularity.
- Multiple video export ratios to fulfill the requirements for each application.
- Bring the best out of your creation via colors by employing 40+ built-in features.
2. Slow Motion Video Editor
Say goodbye to the manual methods of creating slow motions and use this automated slow video app. It offers various speed templates to add uniqueness to your content. To create a pure slow-motion video, you can use the custom playback option. While creating slow motion, the app offers an audio speed adjustment option to optimize the video.

Key Features
- Immerse your videos with this application’s amazing and interactive built-in music collection.
- Use this app as a source to directly share your creations with friends and audience.
- This app is accessible on iOS 11.0 and newer versions with support for other Apple devices.
3. Slow Mo & Fast Motion
Shoot slow-motion videos directly with this slow-motion video maker app. Along with a Slomo recorder, the app also has a speed changer that transforms basic videos into slow motion. Its multiple ranged speed options can add details to your videos. The timeline interface enables users to seamlessly add slow-motion effects to some scenes.

Key Features
- Trim your videos to eliminate any unnecessary or glitched scenes.
- Turn up the fastest speed for a scene and give it a funny effect.
- The application is only available for iOS 14.0, macOS 14.0, and higher versions.
4. Slow Motion Video Fx Editor
Utilize the powers of this iOS app to create the slowest slow-motioned video on 12x playback speed along with 240 fps framerate. This Slomo video editor app can turn the whole video upside down with its amazing live speed control action. In addition, there are no limits to its other editing features to enhance the video graphics.

Key Features
- Liberates you from low-quality content and offers the high-resolution export option.
- Works seamlessly with social platforms to help you showcase your creations.
- A laid-back user interface to help both skilled and seasoned editors to craft perfection.
5. TimeFreeze
This is one of the best slow-motion apps to fashion smooth, slow-motion videos. TimeFreeze uses frame rate functioning to curate slow motion in a professional manner. Users can select from 4 frame rate options: 24 fps, 60 fps, 120 fps, and 240 fps. The 120 and 240 fps are usually integrated framerates of professional cameras to record with precision.

Key Features
- Simple and intuitive interface crafted specifically for the creation of slo-mo videos.
- Supports iOS 12.1 and higher versions to craft slow motions seamlessly.
- The application is free to utilize and takes up only 25.3 MB of your iOS storage.
Part 2: Desktop Alternative: Make Better Slow-Motion Videos with Wondershare Filmora
Filmora is considered the best slow-motion app for making videos in slow motion with just a few clicks. The speed ramping feature is user-friendly and caters to both beginners and seasoned video editors. It provides the flexibility to select various speeds for your videos to grant precise control. Moreover, the software lets you edit video by highlighting a serene moment or adding excitement to an action scene.
Additionally, this feature simplifies the process of crafting professional-looking videos. Filmora offers an array of templates, filters, and transitions to add cinematic quality. Plus, it works with different types of video files, and you can export high-quality videos. This slow-motion app is nothing but a game changer for those who like to use speed effects.
Free Download For Win 7 or later(64-bit)
Free Download For macOS 10.14 or later
Steps to Slow Down Video with Speed Ramping
Speed Ramping lets you smoothly switch between fast and slow motion in one video. It’s not just fancy but helps you make certain parts stand out or show off details. Now, let’s learn the detailed steps to slow down video by utilizing this feature of Filmora:
Step 1Download the Software and Import the Video File
Initiate the process by downloading Filmora’s latest version, 13, from your favorite web browser. Now, complete the installation process and launch the software at your end. Then, proceed further by accessing the main interface of the tool and selecting the “New Project.” This action will lead you to a new window and allow you to import media from your system.

Step 2Access the Speed Ramping Feature and Choose Template
Once you have imported your video file, drag it to the timeline section. Now, navigate to the video and right-click to access the “Speed Ramping” feature by searching a drop-down menu. Then, you will find an editing panel on the right of the same window. Here, you can choose any of the templates according to your requirements for seamless speed ramping.

Step 3Personalize Video via Speed Ramping Adjustments
In addition to choosing preset templates, you can click on the “Customize” tab and move downward. Afterward, visit the editing panel and place the dots to move downward to slow down the speed. Plus, if you hold the dots upward, this action will speed up the playback speed of the video. After making all required changes, preview your changes and move forward to save changes through the “Export” button.

Exclusive AI Video Editing Features of Wondershare Filmora
Wondershare Filmora is a modern video editing application that is capable of much more than just being a slow video app. The below section contains a brief introduction to a few of its AI editing features. Read the following segment to enhance your video editing experience in Filmora:
1. Remove Background
Filmora’s intuitive background remover feature removes unwanted backgrounds from your videos. You can say goodbye to the green screen as it also provides various visual effects. Moreover, create exotic compositions by transporting yourself to different locations. This tool is perfect for vloggers as they can unlock endless editing possibilities. You can also make unforgettable storylines with your videos and amaze your audience.
2. Motion Tracking
The motion tracking feature brings magic to videos by tracking down moving objects. Consider capturing a stunning scenic view with your camera. With the help of motion tracking, you can add various texts along the waterfall. Furthermore, imagine highlighting the special moments in an epic advantage with dynamic effects. Therefore, take a leap of faith by captivating the audience with your stunning videos.
3. Auto Beat Sync
Auto beat sync by Filmora is like having a personal DJ that helps edit your videos. This tool perfectly matches the music to the rhythm of your moving video. Additionally, create an epic montage with the beat syncing with your video. The feature adds professionalism to your videos and makes them note-worthy. That is why you take your videos to the next level with auto beta sync.
4. Auto Reframe
The auto reframe feature adjusts your footage to fit various ratios perfectly. Say you want to upload that landscape image you took to other mediums. Therefore, with auto reframe, you can select the desired aspect ratio. It crops and pans out the video within the respect frame of choice. Furthermore, you can save a lot of time and resources and ensure a stunning video.
Conclusion
Upon reaching a conclusion, this article has provided users with some insights into the significance of slow-motion apps. The article took into consideration some of the download slow-motion apps that show compatibility with iPhone and Android.
In times when you need to create professional slo-mos, we suggest using Wondershare Filmora. This editing software isn’t just compatible with iOS and Android but also with macOS, Windows, and Linux systems. In addition, the application offers multiple editing tools and techniques to create and enhance slo-mos.
Make A Slow Motion Video Make A Slow Motion Video More Features
Part 1: Leading Down to The Top Slow-Motion App to Download Right Now
This section will cover both users, whether you prefer an Android interface or an iPhone camera. Find the top video editing apps for slow motion for both devices. The brief review and key features of applications are discussed below for your ease:
Slow Motion Applications for Android
Google Play is a versatile platform for downloading slo-mo video apps. However, out of so many options, it might become hard for you to select an app. Hence, in this section, we’ll discuss some reliable Android apps for that purpose:
- Slow Motion: Slow mo, Fast mo
- Slow Motion Video Fast&Slow Mo
- Slow Motion Video Editor
- Slow Motion Video Maker
- Slow Motion Editor
1. Slow Motion: Slow mo, Fast mo
To want an editing application with multiple slow-motion settings is natural. This slow-motion app bestows users with 10 precise playback speed options for creating slow-mos. The playback speed range is from 0.1x to 0.95x, which means a detailed slow-motion appearance. In addition, users can fashion the slo-mos effects at different speeds on different video fragments within a clip.
Key Features
- You can curate a multi-effect video by adding a fast-speed effect at specific frames.
- Trim and cut videos to add different effects to different segments while maintaining quality.
- Enables the previewing option to analyze and alter any mistakes or make further adjustments.
2. Slow Motion Video Fast&Slow Mo
This is a video editing app for slow motion where the creation possibilities do not stop. The application not only offers video speed change options but also audio speed change. This app lets you add funny voices and edit pranking videos easily. The simple settings enable slo-mo on complete video, while the advanced settings can separate video frames.
Key Features
- Add both slow-motion and high-speed effects at once in your dancing videos for inspiration.
- You can slow down a video to 1/2nd, 1/3rd, and 1/5th of its original speed.
- Adding any speed effect doesn’t change video quality, and you can export them in HD quality.
3. Slow Motion Video Editor
Create first-rate slo-mos using this slo-mo video editor app and embed multiple effects in them. This application is curated for content creators to inspire their audience. There are four speed change options for fashioning a slow motion:- 2x,- 4x,- 8x, and 16x. This means the app enables you to decelerate a video to 1/16th of its original speed.
Key Features
- Frame split options to apply slow motion effect to distinct video segments.
- Ability to apply and adjust music tracks on your video within the app.
- Multiple video and image frames enhance the visual stability of your videos.
4. Slow Motion Video Maker
Get a completely creative and innovative package with this app to slow down video. The application enables the reduction of video speed along with the option to apply music. You can even record a video in slow motion or add the slow motion to a pre-recorded one. Adjust your video duration according to the requirements using the Trim tool.
Key Features
- Add the element of laughter to your videos using the high playback speed options 2x, 3x, and 4x.
- Avoid losing video pixels and publish videos directly to Instagram, Facebook, and more.
- Speed up your videos at different durations to express your artistic ideas.
5. Slow Motion Editor
Instead of completing the formality of creating a slow motion, use this app to create compelling slow motion. The video editor offers multiple filters and effects to uplift a video and make it worthy of viewing. The app offers professional tools to cut and customize videos according to your taste. If your phone’s Slomo camera doesn’t respond, utilize this app to capture scenes in slow motion.
Key Features
- Add diverse speed effects like time-lapse, reverse speed, and live camera capturing.
- This slow-motion app is compatible with Android 4.0 and higher versions.
- The application offers special slow-motion effects like Hair Flips, Baseball Swings, and more.
Slow Motion Applications for iPhone
The app store choices may confuse the audience when choosing a suitable app. This section reflects some reliable iPhone applications tailored to fulfill slo-mo creation:
- SloMo Slow Motion Video Editor
- Slow Motion Video Editor
- Slow Mo & Fast Motion
- Slow Motion Video Fx Editor
- TimeFreeze
1. SloMo Slow Motion Video Editor
Step into epic creativity with this slow video app to craft high-quality slo-mos. The application creates smooth slow motion by manipulating the frame rate to 120 or 240 fps. You can manipulate frames at specific durations to add craft to a cinematic scene. Change the video playback speed for slow motion up to 12x and add a freeze frame effect for highlighting several points.
Key Features
- Share your creation directly on social apps to gain popularity.
- Multiple video export ratios to fulfill the requirements for each application.
- Bring the best out of your creation via colors by employing 40+ built-in features.
2. Slow Motion Video Editor
Say goodbye to the manual methods of creating slow motions and use this automated slow video app. It offers various speed templates to add uniqueness to your content. To create a pure slow-motion video, you can use the custom playback option. While creating slow motion, the app offers an audio speed adjustment option to optimize the video.
Key Features
- Immerse your videos with this application’s amazing and interactive built-in music collection.
- Use this app as a source to directly share your creations with friends and audience.
- This app is accessible on iOS 11.0 and newer versions with support for other Apple devices.
3. Slow Mo & Fast Motion
Shoot slow-motion videos directly with this slow-motion video maker app. Along with a Slomo recorder, the app also has a speed changer that transforms basic videos into slow motion. Its multiple ranged speed options can add details to your videos. The timeline interface enables users to seamlessly add slow-motion effects to some scenes.
Key Features
- Trim your videos to eliminate any unnecessary or glitched scenes.
- Turn up the fastest speed for a scene and give it a funny effect.
- The application is only available for iOS 14.0, macOS 14.0, and higher versions.
4. Slow Motion Video Fx Editor
Utilize the powers of this iOS app to create the slowest slow-motioned video on 12x playback speed along with 240 fps framerate. This Slomo video editor app can turn the whole video upside down with its amazing live speed control action. In addition, there are no limits to its other editing features to enhance the video graphics.
Key Features
- Liberates you from low-quality content and offers the high-resolution export option.
- Works seamlessly with social platforms to help you showcase your creations.
- A laid-back user interface to help both skilled and seasoned editors to craft perfection.
5. TimeFreeze
This is one of the best slow-motion apps to fashion smooth, slow-motion videos. TimeFreeze uses frame rate functioning to curate slow motion in a professional manner. Users can select from 4 frame rate options: 24 fps, 60 fps, 120 fps, and 240 fps. The 120 and 240 fps are usually integrated framerates of professional cameras to record with precision.
Key Features
- Simple and intuitive interface crafted specifically for the creation of slo-mo videos.
- Supports iOS 12.1 and higher versions to craft slow motions seamlessly.
- The application is free to utilize and takes up only 25.3 MB of your iOS storage.
Part 2: Desktop Alternative: Make Better Slow-Motion Videos with Wondershare Filmora
Filmora is considered the best slow-motion app for making videos in slow motion with just a few clicks. The speed ramping feature is user-friendly and caters to both beginners and seasoned video editors. It provides the flexibility to select various speeds for your videos to grant precise control. Moreover, the software lets you edit video by highlighting a serene moment or adding excitement to an action scene.
Additionally, this feature simplifies the process of crafting professional-looking videos. Filmora offers an array of templates, filters, and transitions to add cinematic quality. Plus, it works with different types of video files, and you can export high-quality videos. This slow-motion app is nothing but a game changer for those who like to use speed effects.
Free Download For Win 7 or later(64-bit)
Free Download For macOS 10.14 or later
Steps to Slow Down Video with Speed Ramping
Speed Ramping lets you smoothly switch between fast and slow motion in one video. It’s not just fancy but helps you make certain parts stand out or show off details. Now, let’s learn the detailed steps to slow down video by utilizing this feature of Filmora:
Step 1Download the Software and Import the Video File
Initiate the process by downloading Filmora’s latest version, 13, from your favorite web browser. Now, complete the installation process and launch the software at your end. Then, proceed further by accessing the main interface of the tool and selecting the “New Project.” This action will lead you to a new window and allow you to import media from your system.
Step 2Access the Speed Ramping Feature and Choose Template
Once you have imported your video file, drag it to the timeline section. Now, navigate to the video and right-click to access the “Speed Ramping” feature by searching a drop-down menu. Then, you will find an editing panel on the right of the same window. Here, you can choose any of the templates according to your requirements for seamless speed ramping.
Step 3Personalize Video via Speed Ramping Adjustments
In addition to choosing preset templates, you can click on the “Customize” tab and move downward. Afterward, visit the editing panel and place the dots to move downward to slow down the speed. Plus, if you hold the dots upward, this action will speed up the playback speed of the video. After making all required changes, preview your changes and move forward to save changes through the “Export” button.
Exclusive AI Video Editing Features of Wondershare Filmora
Wondershare Filmora is a modern video editing application that is capable of much more than just being a slow video app. The below section contains a brief introduction to a few of its AI editing features. Read the following segment to enhance your video editing experience in Filmora:
1. Remove Background
Filmora’s intuitive background remover feature removes unwanted backgrounds from your videos. You can say goodbye to the green screen as it also provides various visual effects. Moreover, create exotic compositions by transporting yourself to different locations. This tool is perfect for vloggers as they can unlock endless editing possibilities. You can also make unforgettable storylines with your videos and amaze your audience.
2. Motion Tracking
The motion tracking feature brings magic to videos by tracking down moving objects. Consider capturing a stunning scenic view with your camera. With the help of motion tracking, you can add various texts along the waterfall. Furthermore, imagine highlighting the special moments in an epic advantage with dynamic effects. Therefore, take a leap of faith by captivating the audience with your stunning videos.
3. Auto Beat Sync
Auto beat sync by Filmora is like having a personal DJ that helps edit your videos. This tool perfectly matches the music to the rhythm of your moving video. Additionally, create an epic montage with the beat syncing with your video. The feature adds professionalism to your videos and makes them note-worthy. That is why you take your videos to the next level with auto beta sync.
4. Auto Reframe
The auto reframe feature adjusts your footage to fit various ratios perfectly. Say you want to upload that landscape image you took to other mediums. Therefore, with auto reframe, you can select the desired aspect ratio. It crops and pans out the video within the respect frame of choice. Furthermore, you can save a lot of time and resources and ensure a stunning video.
Conclusion
Upon reaching a conclusion, this article has provided users with some insights into the significance of slow-motion apps. The article took into consideration some of the download slow-motion apps that show compatibility with iPhone and Android.
In times when you need to create professional slo-mos, we suggest using Wondershare Filmora. This editing software isn’t just compatible with iOS and Android but also with macOS, Windows, and Linux systems. In addition, the application offers multiple editing tools and techniques to create and enhance slo-mos.
How to Get VHS Filter and Glitch Filter to Your Images or Videos?
A glitch in the video or an image gives the notion of an error in the video recording process, and it was not accepted in the media industry. However, presently, creative professionals are incorporating the VHS filters to give a vintage impression. The visual distortions are used by gamers and streaming creators extensively.
For this very reason, the article discusses the procedure to create a glitch filter in Photoshop, Instagram, TikTok, and in one of your impeccable travel videos. Time to start!
In this article
01 How to Make VHS Filter in Photoshop?
02 How to Get VHS Filter in Instagram?
03 How to Get VHS Filter in TikTok?
04 How to Add VHS Effects to your Travel Video?
Part 1: How to Make VHS Filter in Photoshop?
There are a lot of steps associated with VHS filter Photoshop. The procedure can be tricky for a beginner in the industry. Therefore, we have sketched out a guide to make a VHS image filter in Photoshop. Follow it carefully to have desirable results.
Step 1: Open Photoshop
Open Photoshop from your computer and click on “New.” Use the “Custom” option from the windows that appear. After that, click on “File” and launch the imagery. Drag and drop that picture to the customized workspace.

Step 2: Apply the Transformation
Head to the “Edit” from the top panel and press “Transform” from there. Click on “Scale” from the context menu. The user is recommended to set the scale as required using arrows from the mouse. After that, apply the transformation.

Step 3: Changing the Parameters
Now, right-click on your layer to click on “Brightness and Contrast.” Change it as you need. After that, move on to the “Curves” and play with the graphs of the picture. Change the “Solid Color” as well. Make the color white and change the opacity levels.

Step 4: Adding Noise
Moving on, click on the first layer and navigate to the “Filter” bar on the top of the interface. Hit “Noise” and then “Add Noise.” Make the necessary changes as you like and press “Enter.” Scroll up to the “File” and hit “Open Recent” to launch the VHS texture photo. Drag and drop the texture to the photo layer that we are working on.

Step 5: Inserting VHS Texture
Resize the VHS texture and then apply the transformation. By default, the blend mode is “Normal.” Change it to “Darken” from the right panel. The picture will get dark. Again, change the mode to “Screen.” Moving on, input another VHS Filter texture and drag and drop it to the layer we are working on. Resize it and apply the transformation.

Step 6: Altering the Blend Mode
Alter the blend mode to “Darker” and then to “Screen.” Apply another filter and then drag and drop the layer. Change the blend mode to “Screen.” Pick up the eraser from the left panel of tools and make necessary edits.

Step 7: Duplicating the Layer
Duplicate the photo layer and move it up. Again, click on “Filter” then “Noise” to add the noise as needed. Alter the blend mode to “Soft Light” and set the opacity value. After that, add any solid color and switch the blend mode back to Soft Light.

Step 8: Playing with the Layers
Duplicate the layer again to change the color. After that, double click the layer and deselect “R.” Move to left or right. Perform the same procedure for the rest of the layers. Use the erase tool to offer fine imprinting to the transition. Duplicate the final layer and deselect “R” and “C.” Move left and right.

Step 9: Final Process
Use the eraser tool one last time, and you are done with the VCR filter.
Part 2: How to Get VHS Filter in Instagram?
Now that you know how to add glitch filter Photoshop let us move on to Instagram. The sub-section of this write-up shall focus on VHS filter Instagram. If you are an Instagram user wishing to get a retro VHS filter, follow our lead.
Step 1: Finding the Filters
The first step revolves around clicking on the Instagram app to open it. Navigate to the “Story.” The user will find a number of filters in the top panel along a circle.

Step 2: Picking the Vintage Filter
Swipe right towards those filters until a “Search” option is seen. Type “Vintage DV” and press “Enter,” where several VHS video filters will be displayed. Pick one and save it to your camera roll.

Step 3: Using the VHS Filter
Head back to the “Story” and select the “Effects” option. Select the filter that you saved and initiate the recording process. You have got the VHS filter for videos.

Part 3: How to Get VHS Filter in TikTok?
The following section of the write-up shall highlight finding and getting the 90s VHS filter in TikTok. So, what are we waiting for? Let us start the procedure.
Find the VHS Filter in TikTok
Step 1: Navigate to the App
Use your computer to launch the TikTok application. As soon as the interface appears, click on “Trends” in the bottom left corner.
Step 2: Open the Effects
Type Retro VHS in the search bar and click on the second result that is displayed. Click on the “Effects” that says, “VHS Retro.”
Step 3: Add in Favorites
Add it to the favorites and then tap on the video icon located at the center of the screen.

Use the VHS Filter in TikTok
Step 1: Deactivating the Filter</p
With the camera open, click on “Effects” right next to the camera icon. The filter is activated, but we need to deactivate it by clicking on the stop icon with the effects. Click anywhere on the screen to exit the “Effects” panel.
Step 2: Recording Process
Now, click on the red video sign and begin recording for some seconds without the filter. It is important to record the video by pointing at the targeted person. After the first part of the video is recorded, head back to the “Effects” menu and navigate to the tab that says, “Add to Favorites.”

Step 3: Publishing the Video
Choose the Retro VHS Filter and point the camera at the person that needs the filter. Hit the “Register” button. Make the recording and press the red popcorn. Hit “Next” and “Publish” the video finally.

Part 4: How to Add VHS Effects to your Travel Video?
With vacation season on, bloggers are into adding VHS photo filters to their videos to be uploaded on YouTube channels. The section shall convey the detailed procedure of adding a glitch effect filter to the travel and vacation videos in Wondershare Filmora .
For Win 7 or later (64-bit)
For macOS 10.12 or later
Step 1: Initiating the Process
Begin the process by launching Wondershare Filmora. For starters, let us work on the perfect music for the video. The Audio tab shows an awful collection. Choose the “Young and Bright” category for the music.

Step 2: Picking the Music
Select any music and drag and drop it to the timeline. Now, trim the music into 15 seconds long. Now, input the travel videos to start their editing. Set the order for the video afterward.

Step 3: Choosing the Overlays
Navigate to the “Effects” panel and search for VHS. The software would offer multiple choices to pick from. Choose different overlays and place them onto the video tracks as you like.

Step 4: Adding the Transition
To add the transition, head to the “Transition” tab and find VHS. Drag and drop the transitions among the cuts between the video clips. Adjust their duration as needed. Preview the video, and the mission is accomplished.

Final Thoughts
Grabbing the attention of the audience is not as easy as it sounds. The creative industry uses a vast range of effects to compel the viewers to be on the edge of their seats. The article introduced the VHS filter while covering its procedure. If you are a TikTok, Instagram, or Photoshop user, we have got you. Wondershare Filmora helps perfectly to add the glitch filter to the vacation videos.
Versatile Video Editor - Wondershare Filmora
An easy yet powerful editor
Numerous effects to choose from
Detailed tutorials provided by the official channel
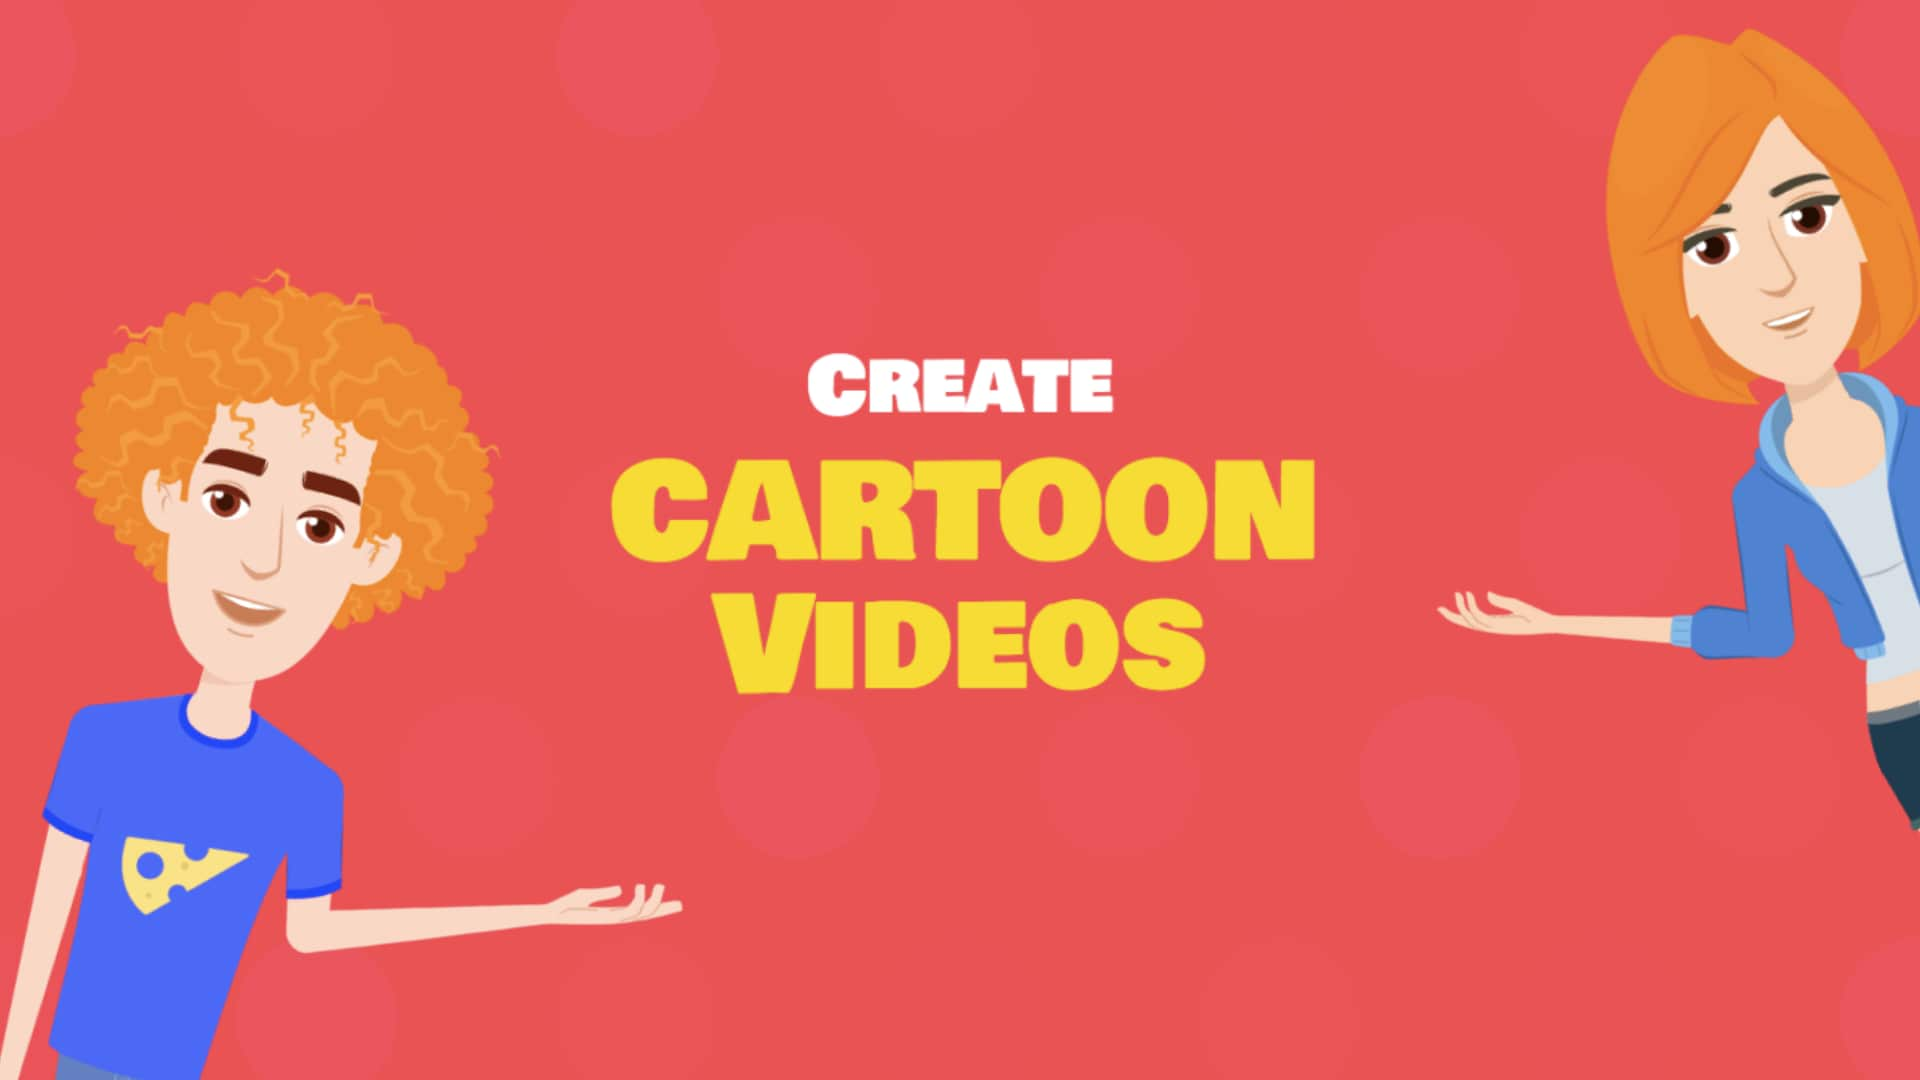
10 Best Cartoon Video Makers (Online and Desktop Solution)
Abundant Video Effects - Wondershare Filmora
Provide abundant video effects - A creative video editor
Powerful color correction and grading
Detailed tutorials are provided by the official channel
Introduction
There are some issues common to the video production process. However, animated or cartoon videos have helped to combat such issues. You do not need to scout for locations, go through a seemingly endless casting process, or rent the pricey equipment. A cartoon is simply a type of animation or an illustration that usually appears in a semi-realistic or an unreal style. In addition, it uses simple, satirical, and humorous drawing language to tell the story.
Although there are restrictions, there are a lot of possibilities cartoon video makers still offer to their users. Therefore, this article will share the top 10 best cartoon video makers online and on PC that you can use before diving into an animated video world.
So, here is what we shall learn about cartoon makers today:
In this article
01 Best 5 Online Cartoon Makers
02 Cartoon Video Maker for Desktop (Win and Mac)
03 How Can I Create My Own Cartoon Using Wondershare Anireel
Part 1: Best 5 Online Cartoon Makers
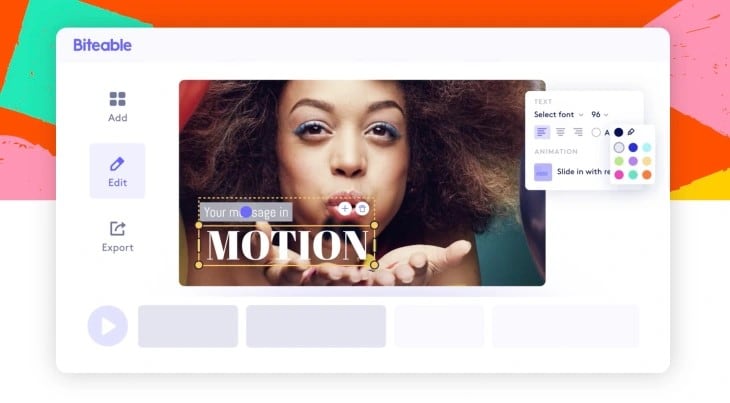
1. Biteable
Biteable provides a seemingly endless list of template categories to cater to your online media marketing needs. Aside from offering entertaining cartoon-making templates, the platform also allows users to create motion graphics or content, and Facebook covers for their social media channels.
Price: Free, $23 per month, billed annually.
Features:
- Offering library with lots of templates to choose from
- Free to use, except you are looking for additional features
- Five simple steps to an incredible cartoon video
- It has an easily customizable template
Pros
- It is a perfect option for social media managers
- Quickly create entertaining cartoons
- Used by biggies like Amazon, Microsoft, Google, Disney, BBC, Shopify, Samsung, and salesforce.
- Over 9 million users
Cons
- There is a mandatory registration
- There are no audio editing options
- The file-sharing capabilities are limited to YouTube and Facebook
- The download option is disabled in the free version
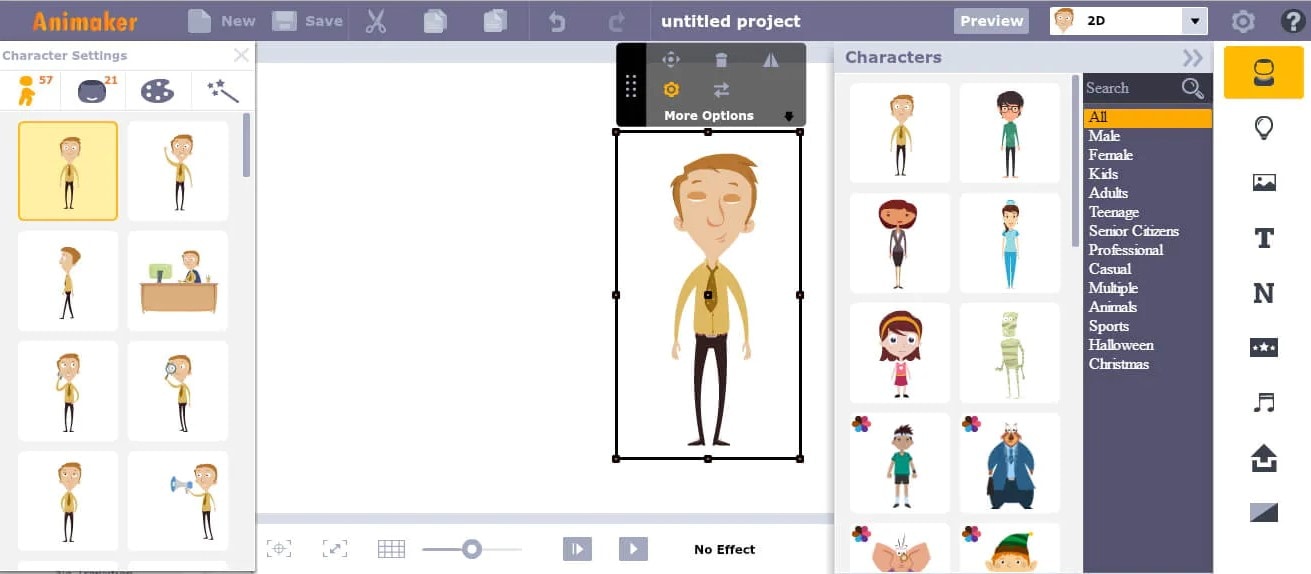
2. Animaker
With this animated maker, you get access to hundreds of animated characters, maps, and backgrounds. There are six (6) video styles available in this cartoon maker: Typography, Infographic, or 2D for different types of projects.
Price: Free version available. Subscription plans start at $12 per month/billed annually.
Features
- Different video styles, marketing, explainer, or 2D animation.
- Posts itself as the number 1 cartoon maker
- No need for a credit card to start.
- Four-step process; select template, customize it, add music, and download or share.
- 200+ voices, 25+ languages, and loads of customizable options.
- It offers auto-lip sync with advanced animation effects.
- There is a rich selection of 1000+ templates
Pros:
- Superb audio editing options
- Excellent and quick animation tools.
- Over 10 million users so far and still counting.
- Currently used by Amazon, Bosch, HP, Nokia, and Philips.
Cons:
- The monthly fee is pricey
- Account creation is mandatory for a free version
- The free version contains a watermark
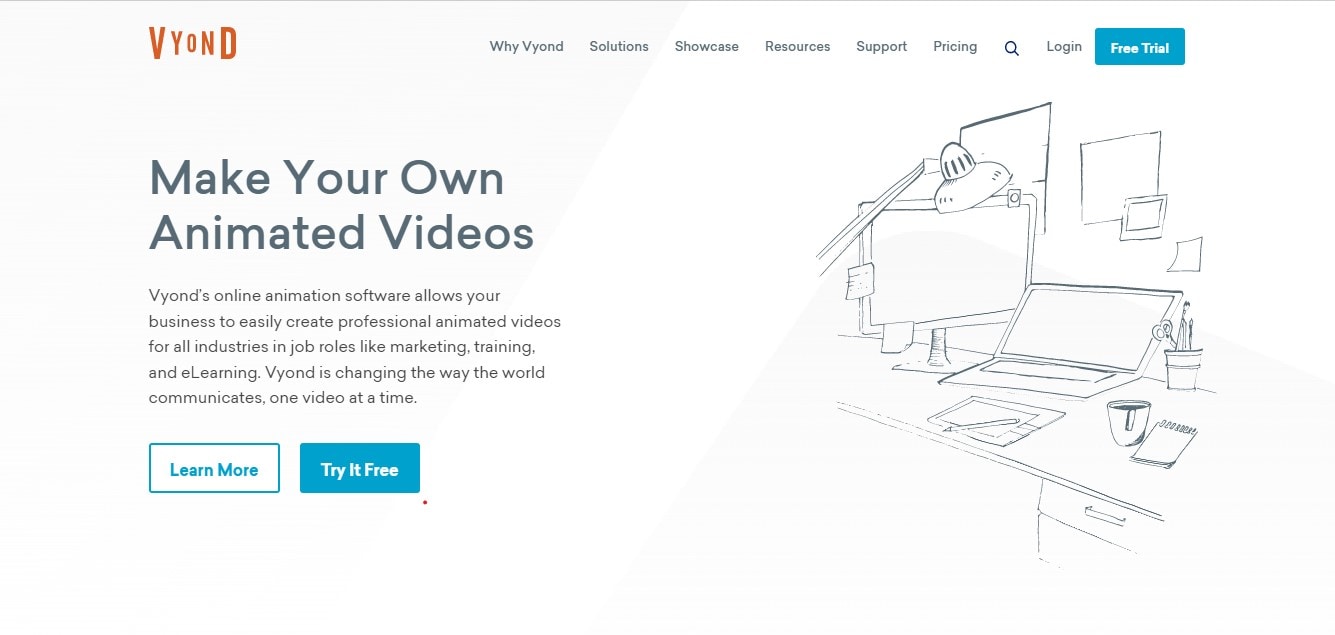
3. Vyond
Vyond, the cartoon creator launched in 2007, is probably one of the oldest online cartoon video makers. Additionally, it is still one of the most popular online destinations meant for anyone who wants to create an animated video quickly.
Price: Subscription plans start from $39 per month, billed annually.
Features:
- Perfect for animated video creation
- There is automatic character lip-syncing
- Try it for free before purchasing
- Make videos for training, e-learning, marketing, human resources, etc.
- The maximum duration of the video is 120 minutes
Pros:
- It has a fully customizable template
- There are high-end object and character animated features
- Certified by GDPR, TrustArc, BSI, and CCPA
- A wholesome cartoon makerfor enterprise and individual
- Data security and privacy assurance by BSI, CCPA, and GPDR.
Cons:
- It is quite expensive
- Vyond is not the best option for inexperienced animators
- The features depend on the subscription model
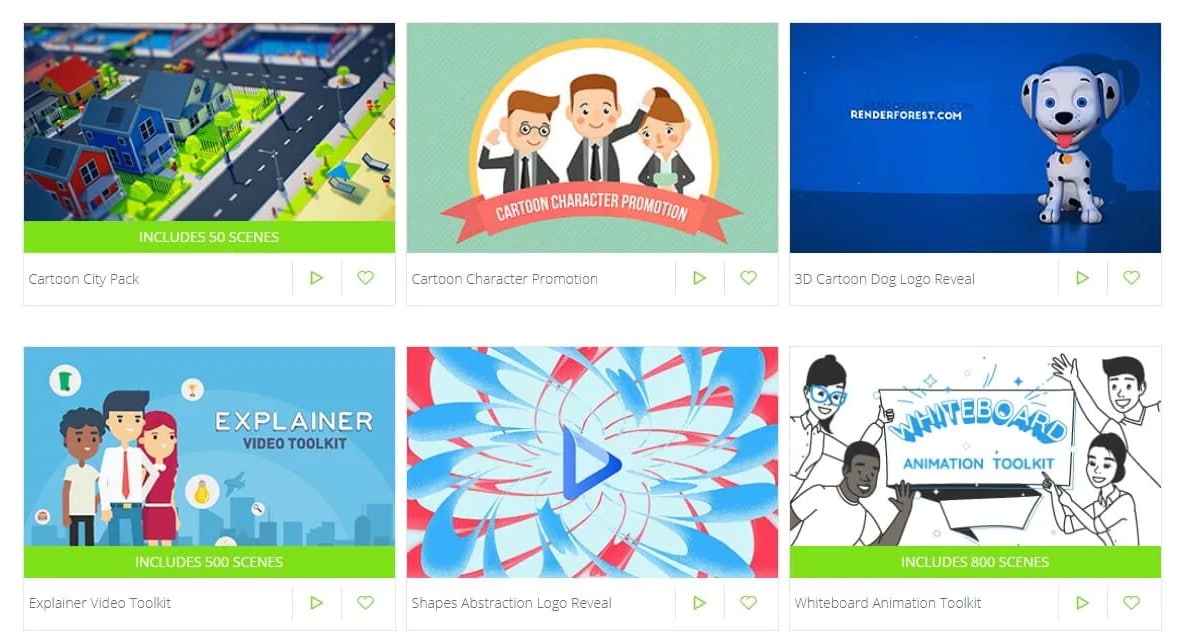
4. Renderforest
This is a famous online cartoon video maker for many purposes. Among the numerous options, the platform offers to its user. They include; 3D explainer videos, logo animations, or professional presentations.
Price: Free version available. Subscription plans start at $16 per month, billed annually.
Features:
- There is an extensive library of templates with numerous options
- Has a large online storage
- Was among the top 100 software companies in 2019.
- Top ranked solution holder for 2020
- Up to 250GB of online storage space
- Use the in-built template to make a story, customize the video, and then export it to share with your friends.
- Amadeus, Bose, BBC, Vodafone, Sony Music, and many others use Renderforest.
Pros:
- Produce videos like a pro
- Comes with an ultimate animation pack.
- Trusted by millions and one of the oldest cartoon makers.
Cons:
- A limited amount of commercial music tracks
- There are modest export options
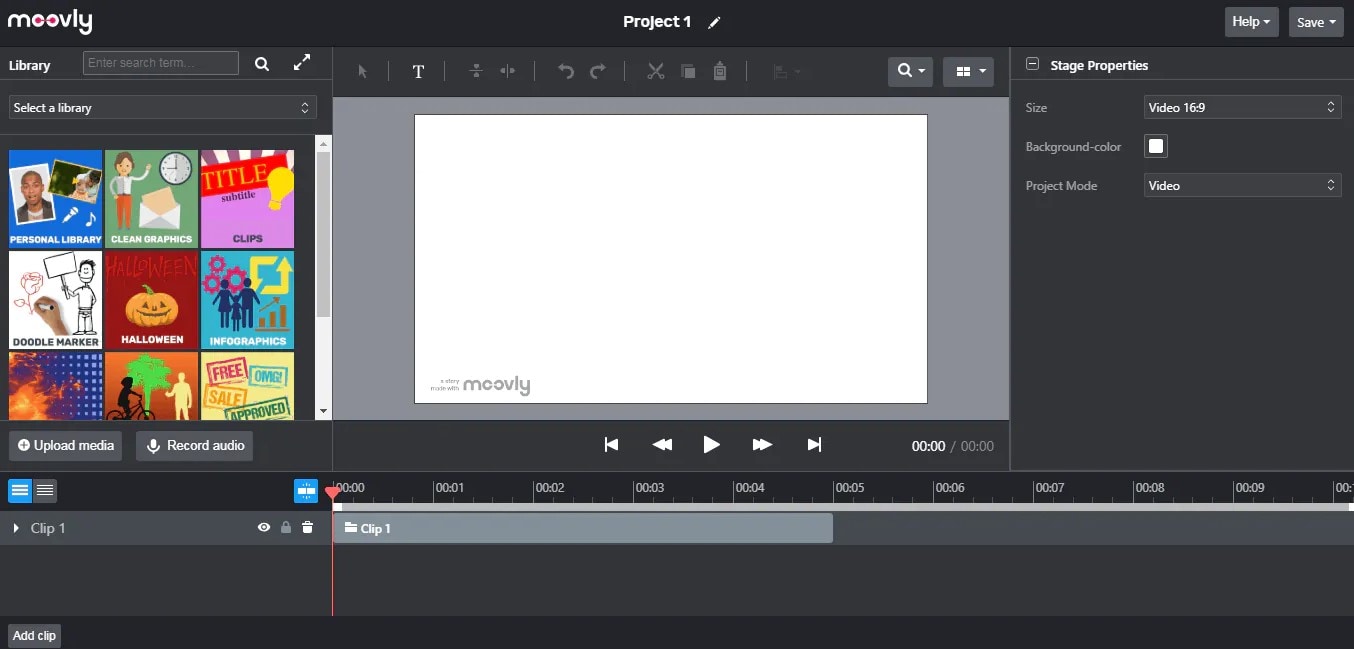
5. Moovly
With this cartoon maker, users must first log in. However, there is no need to create a new account as you can use your LinkedIn or Google account to sign in quickly.
Price: Free 30-day trial, $24.92 per month billed annually.
Features:
- Moovly is the perfect cartoon video maker for sales&marketing, human resources, internal communication, learning&development, agencies, and education.
- Apply expert features in one click with Moovly.
- Create videos and edit with browser-based or drag and drop features without installing software.
- Moovly has over 1.3 million free media, like images, sounds, music, and royalty-free stock videos at no extra charge.
- Besides, it offers 100 million extra media you can try and then purchase.
- You can add your images, music, and videos to create unique clips in style.
- Add text, remove color, add subtitles or generate them, auto-translate your text and subtitles, import PPT files, structure your content, record yourself or your computer screen, edit, mix, etc.
Pros:
- Even if users need to log in, they don’t need to create an account
- Allows users to import content from online sources like Storyblock, Shutterstock, etc.
- It is the number 1 customizable and straightforward solution to making cartoons.
- Use by Colgate-Palmolive, NHS, Teradata, Amadeus, Cisco, Continental, and Logitech.
- The interface is intuitive and user-friendly.
Cons:
- Watermarked videos during the free trial
- To export videos in HD 1080p quality, one needs to purchase one of the available plans.
Renderforest is the best cartoon maker online of the listed five in this article due to the vast library template and large online bandwidth.
Part 2: Cartoon Video Maker for Desktop (Win and Mac)
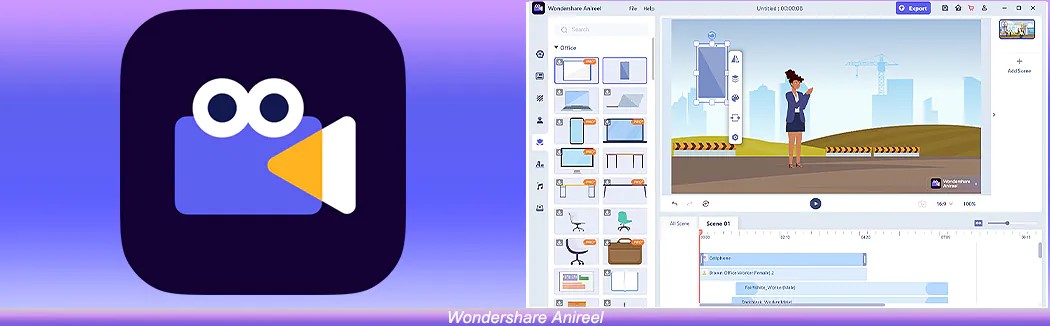
1. Wondershare Anireel
Anireel is one of the top animation software on the internet that allows users to bring their imaginations to life with a huge range of customizable elements and features.
Price: $9.99 per month billed annually and $19.99 monthly
Features:
- 40+ customizable templates
- Top animation software
- Compatible with Windows 11/10/8.1 (64 bit OS)
- Only three steps to an excellent animated video.
- Import images, videos, and sound in almost all formats.
- Create unique avatar, logo images, and more specific to your brand.
- The Deep Learning tech offers quick text-to-speech conversion.
- Animate camera movements, entry and exit effects, motion path, etc.
- Use the one-click option and change scripts to clips.
- Anireel cartoon video makercan lip-sync your characters with perfection.
- Quick and easy drag and drop editing.
Pros:
- It is convenient and simple to use
- Anireel has an intuitive interface
- The cartoon makeroffers a practical and seamless animated video editing
- It comes at an affordable and competitive price
Cons:
- It has a limited amount of assets
- Not suitable for too professional people to use.
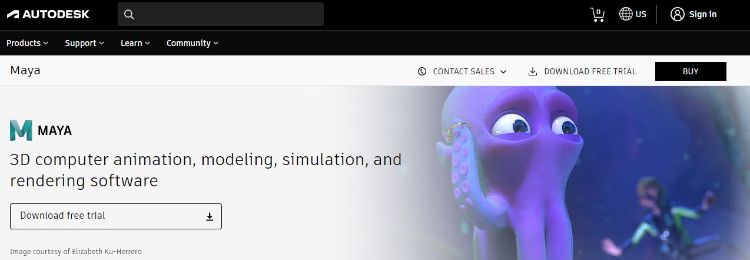
2. Autodesk Maya
Autodesk Maya is one of the best animation tools used to create animation pictures, video games, and add 3D effects in motion pictures. Plus, this cartoon maker is the best if you require a high-quality visual impact.
Price: Free trial, $225 billed monthly.
Features:
- It offers AutoDesk financing for new buyers.
- Maya is the go-to shop for architects, engineers, designers, media, and entertainment.
- Shape 3D objects and add realistic effects with Maya cartoon maker’s NURBS modeling.
- The Integrated Arnold rendering technology lets you view scene changes in real-time.
- Maya has been part of the top movie makers, including the MCU.
- This cartoon video maker offers geometry-based polygon modeling and helps create accurate simulations for visual programming.
- Maya can load and change vast data sets at a faster pace.
Pros:
- It makes complex hand-made animation tasks extremely easy
- Efficient color management
- Allows the creation of realistic effects like cloth simulations and explosions
- 30-day free trial and 30-day money-back guarantee
- Meet deadlines, add fine details to develop even the most complex shots or characters.
- Excellent tool for professionals
Cons:
- The pro is quite expensive
3. Adobe Animate
This is one of the most powerful animation software products on the internet that has been available for decades. It can animate images used for games, film, or online and produce HTML 5, WebGL, or Flash content.
Price: This cartoon creator offers three pricing plans starting at US$24.14/month
Features:
- Excellent for complex animation
- The capability of freehand drawing
- Animate, illustrate, and make 3D typography.
- Import and add vector drawings for further editing.
- Export your work as HTML5 Canvas, WebGL, Flash/Adobe AIR, GIF, or QuickTime movie.
- With the Bone tool, make your cartoon characters fluid and natural.
- Synchronize sounds and music for your project.
- Choose parts of the clip to be animated.
Pros:
- It has Puppeting features
- It is an excellent choice for complex animations
- It includes freehand drawing capability
Cons:
- It is not suitable for beginners
- Other Adobe software may be required while working on a project
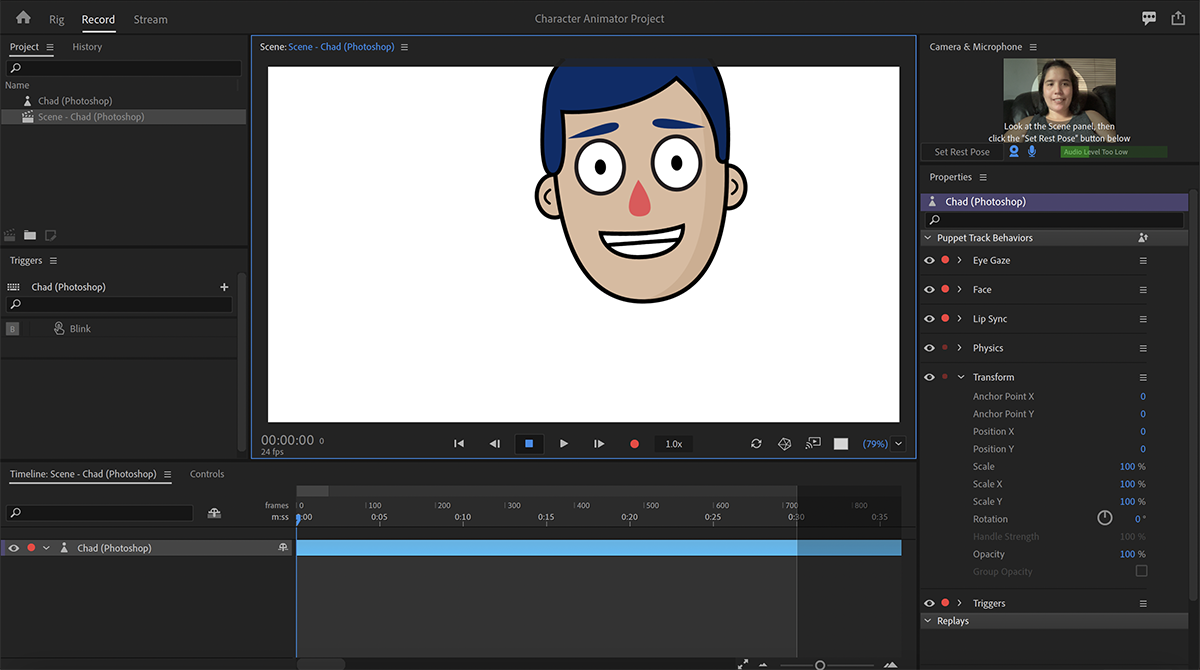
4. Adobe Character Animator
Adobe Character Animator is another type of Adobe’s animation software stack that allows users to use motion to capture and create live animations of their 2D characters.
Price: Adobe Character Animator has two pricing plans starting at US$34,49/month for the first year
Features:
- This product requires other Adobe products to function
- Lots of options to export and import.
- Make your real-life cartoon using the Motion Capture feature in five steps.
- The Avatar will walk, talk, and copy your expressions in real-time.
- Integrate and add assets from other Adobe Creative Cloud apps.
- Auto lip-syncing and real-time facial movement capture.
- Works on iOS and Android.
Pros:
- Easy to replicate real-life movements and expressions with facial tracking.
- There are various import and export options.
Cons:
- It is not a standalone product.
- Users need to have a webcam and microphone to use the motion capture feature.
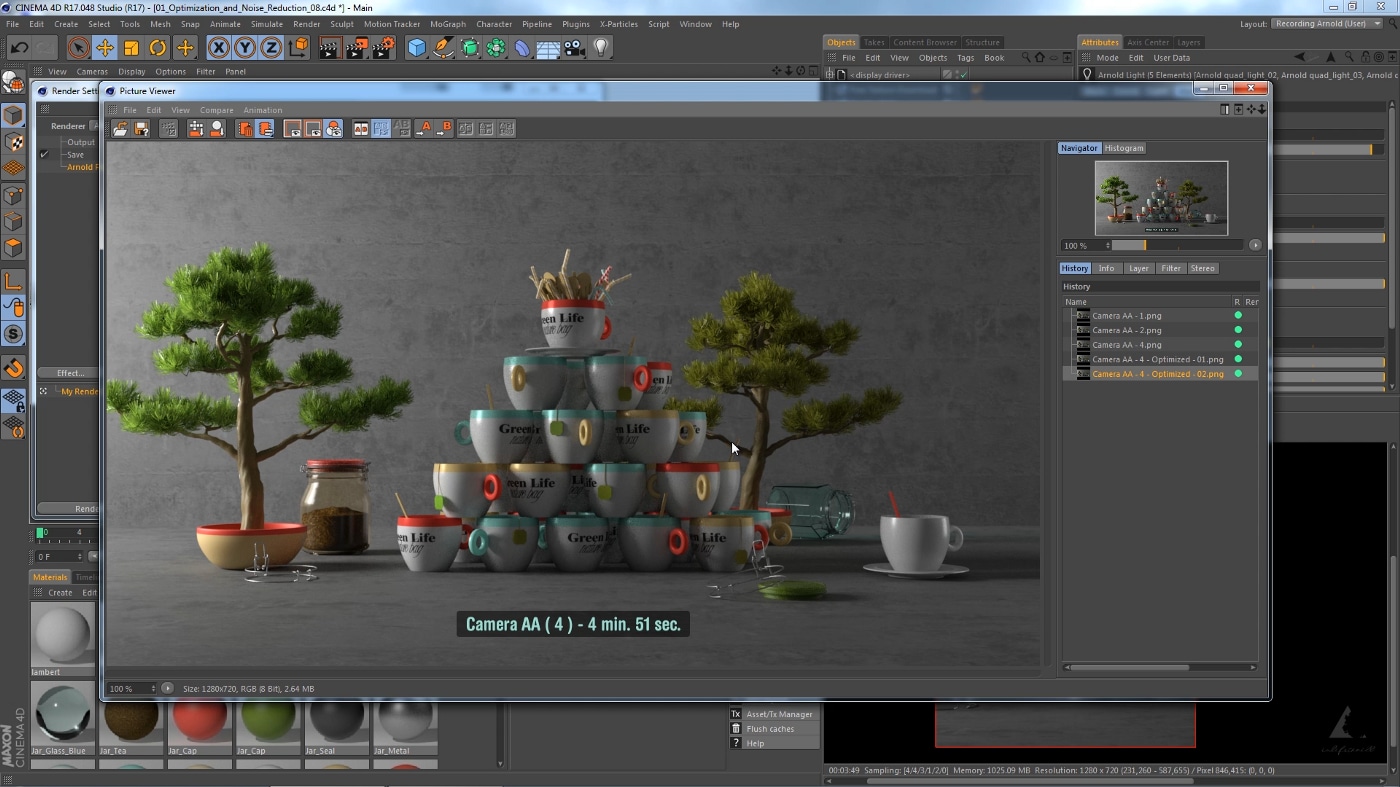
5. Cinema 4D
This cartoon maker has a 3D application interface that offers a keyframe animation, life-like characters, simulation building, object tracking, flexible rig building, cartoon styling, and animation basics.
Price: 4 pricing plans, starting at $99.91/month and $1199.00 billed annually.
Features:
- Keyframing animation effect
- It has a 3d interface
- The ZRemesher for retopology and new tools for modeling add to the new features.
- The Cloth Simulation features help make your cartoon more real.
- It supports CPU rendering with Redshift, which helps you preview, import, and export in high quality.
Pros:
- It is pretty easy to use.
- Lots of exciting design templates are available
- Many editing features are available
Cons
- It is pretty expensive compared to other software
- Not good for beginners
Wondershare Anireel is the best cartoon maker of the five listed in this article. It has lots of advanced features and templates to choose from.
Part 3: How Can I Create My Own Cartoon Using Wondershare Anireel
As stated, Wondershare Anireel has become our top cartoon creator pick due to its affordable pricing, secure server, and ease of use.
So, let us view the simple steps to create your cartoon using the Anireel software.
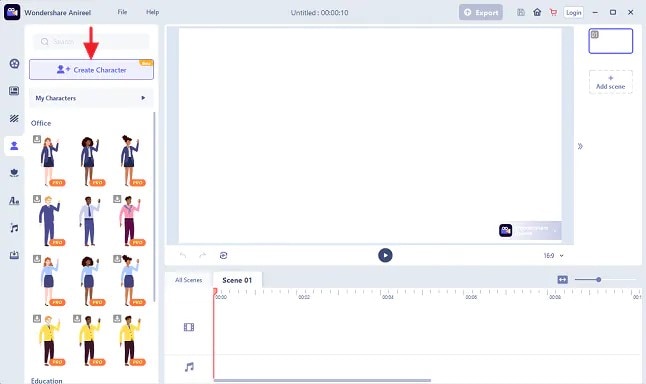
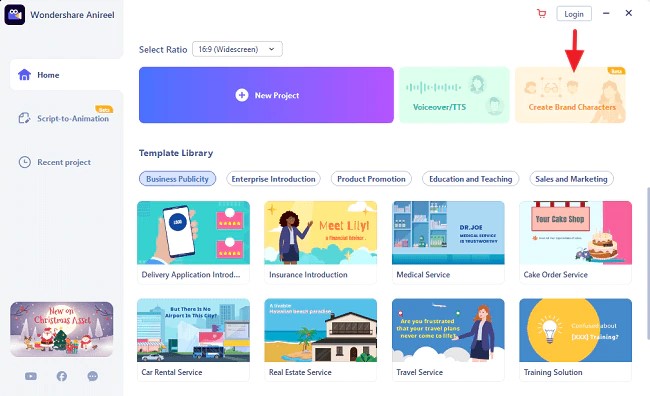
Step 1: Download, install and Create Character
Run Anireel on your device, visit Characters Tab and then click on Create a Character option, or you may click on the Create Brand Characters tab on the home screen.
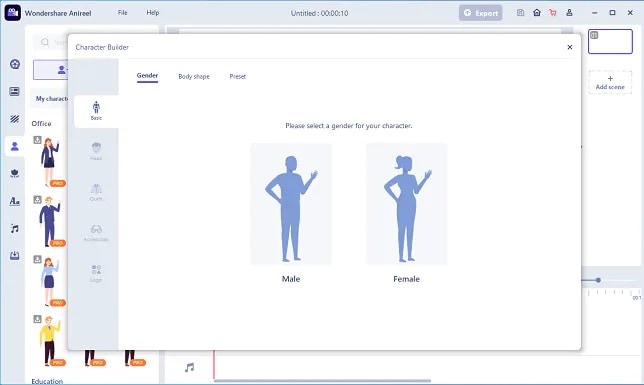
Step 2: Start Creating your Cartoon Character
Choose your gender and body shape, and apply some preset suits.
Now, you can start building facial features using the Head tab to customize the shape of the face, eyes, hairstyle, nose, mouth, ears, and eyebrows.
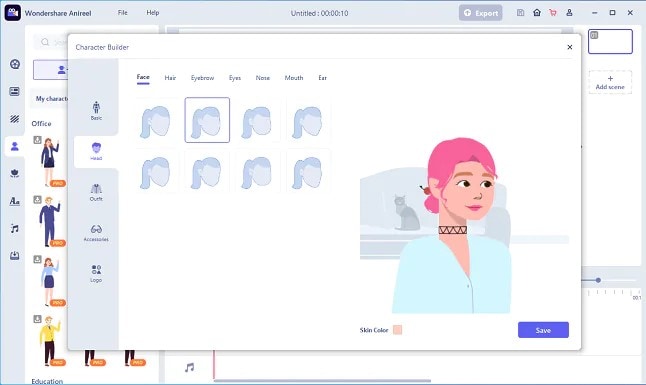
You can also choose to change the skin tone to match yours.
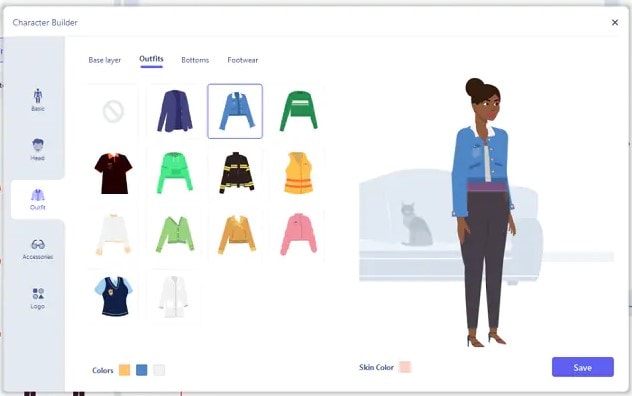
Step 3: Add an Outfit and Accessories
Choose the Outfit tab in Character Builder to select the base layer, outfit, bottom wear, and footwear. Pick what you want to use on your cartoon and keep adding.
Next, reach the Accessories tab to add glasses, necklaces, and more to your cartoon character.
Step 4: Name your Cartoon and Apply
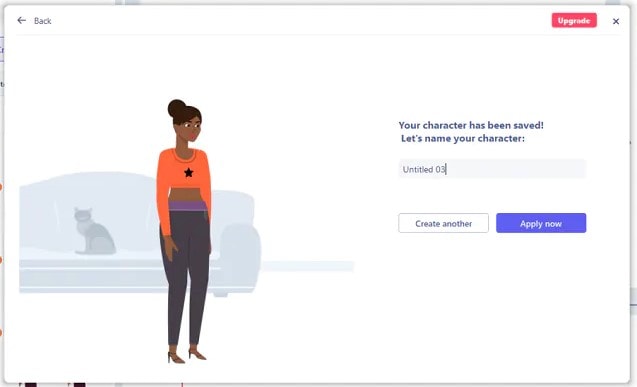
Click on Save and add a name to your cartoon when all done. Finally, click Apply Now to add your cartoon character to your Anireel cartoon maker canvas or My Characters tab.
Part 4: People Also Want to Know
Below are some answers to a few queries about cartoon creators. Let us look at them one by one.
1. What is the best free cartoon maker?
Wondershare Anireel is the best cartoon maker for Android as it is free to use with lots of advanced features and templates to choose from.
2. What is the best app to make a cartoon?
Wondershare Anireel’s Microsoft app is also one of the best cartoon applications that are very flexible and easy to use on the go.
Conclusion
In this article, we explained the best cartoon creators in the industry. Also, we gave the best cartoon video maker from the list. Thus, as you saw, in this report, we have summarized a few essential points regarding cartoon video makers. You learned:
- The cartoon video maker for free that you should know of.
- The ten best cartoon video makers.
- Why are Wondershare Anireel and Renderforest excellent online cartoon video makers?
- How does Anireel, cartoon creator, work?
- Finally, a few FAQs for users to better understand the cartoon maker
Introduction
There are some issues common to the video production process. However, animated or cartoon videos have helped to combat such issues. You do not need to scout for locations, go through a seemingly endless casting process, or rent the pricey equipment. A cartoon is simply a type of animation or an illustration that usually appears in a semi-realistic or an unreal style. In addition, it uses simple, satirical, and humorous drawing language to tell the story.
Although there are restrictions, there are a lot of possibilities cartoon video makers still offer to their users. Therefore, this article will share the top 10 best cartoon video makers online and on PC that you can use before diving into an animated video world.
So, here is what we shall learn about cartoon makers today:
In this article
01 Best 5 Online Cartoon Makers
02 Cartoon Video Maker for Desktop (Win and Mac)
03 How Can I Create My Own Cartoon Using Wondershare Anireel
Part 1: Best 5 Online Cartoon Makers
1. Biteable
Biteable provides a seemingly endless list of template categories to cater to your online media marketing needs. Aside from offering entertaining cartoon-making templates, the platform also allows users to create motion graphics or content, and Facebook covers for their social media channels.
Price: Free, $23 per month, billed annually.
Features:
- Offering library with lots of templates to choose from
- Free to use, except you are looking for additional features
- Five simple steps to an incredible cartoon video
- It has an easily customizable template
Pros
- It is a perfect option for social media managers
- Quickly create entertaining cartoons
- Used by biggies like Amazon, Microsoft, Google, Disney, BBC, Shopify, Samsung, and salesforce.
- Over 9 million users
Cons
- There is a mandatory registration
- There are no audio editing options
- The file-sharing capabilities are limited to YouTube and Facebook
- The download option is disabled in the free version
2. Animaker
With this animated maker, you get access to hundreds of animated characters, maps, and backgrounds. There are six (6) video styles available in this cartoon maker: Typography, Infographic, or 2D for different types of projects.
Price: Free version available. Subscription plans start at $12 per month/billed annually.
Features
- Different video styles, marketing, explainer, or 2D animation.
- Posts itself as the number 1 cartoon maker
- No need for a credit card to start.
- Four-step process; select template, customize it, add music, and download or share.
- 200+ voices, 25+ languages, and loads of customizable options.
- It offers auto-lip sync with advanced animation effects.
- There is a rich selection of 1000+ templates
Pros:
- Superb audio editing options
- Excellent and quick animation tools.
- Over 10 million users so far and still counting.
- Currently used by Amazon, Bosch, HP, Nokia, and Philips.
Cons:
- The monthly fee is pricey
- Account creation is mandatory for a free version
- The free version contains a watermark
3. Vyond
Vyond, the cartoon creator launched in 2007, is probably one of the oldest online cartoon video makers. Additionally, it is still one of the most popular online destinations meant for anyone who wants to create an animated video quickly.
Price: Subscription plans start from $39 per month, billed annually.
Features:
- Perfect for animated video creation
- There is automatic character lip-syncing
- Try it for free before purchasing
- Make videos for training, e-learning, marketing, human resources, etc.
- The maximum duration of the video is 120 minutes
Pros:
- It has a fully customizable template
- There are high-end object and character animated features
- Certified by GDPR, TrustArc, BSI, and CCPA
- A wholesome cartoon makerfor enterprise and individual
- Data security and privacy assurance by BSI, CCPA, and GPDR.
Cons:
- It is quite expensive
- Vyond is not the best option for inexperienced animators
- The features depend on the subscription model
4. Renderforest
This is a famous online cartoon video maker for many purposes. Among the numerous options, the platform offers to its user. They include; 3D explainer videos, logo animations, or professional presentations.
Price: Free version available. Subscription plans start at $16 per month, billed annually.
Features:
- There is an extensive library of templates with numerous options
- Has a large online storage
- Was among the top 100 software companies in 2019.
- Top ranked solution holder for 2020
- Up to 250GB of online storage space
- Use the in-built template to make a story, customize the video, and then export it to share with your friends.
- Amadeus, Bose, BBC, Vodafone, Sony Music, and many others use Renderforest.
Pros:
- Produce videos like a pro
- Comes with an ultimate animation pack.
- Trusted by millions and one of the oldest cartoon makers.
Cons:
- A limited amount of commercial music tracks
- There are modest export options
5. Moovly
With this cartoon maker, users must first log in. However, there is no need to create a new account as you can use your LinkedIn or Google account to sign in quickly.
Price: Free 30-day trial, $24.92 per month billed annually.
Features:
- Moovly is the perfect cartoon video maker for sales&marketing, human resources, internal communication, learning&development, agencies, and education.
- Apply expert features in one click with Moovly.
- Create videos and edit with browser-based or drag and drop features without installing software.
- Moovly has over 1.3 million free media, like images, sounds, music, and royalty-free stock videos at no extra charge.
- Besides, it offers 100 million extra media you can try and then purchase.
- You can add your images, music, and videos to create unique clips in style.
- Add text, remove color, add subtitles or generate them, auto-translate your text and subtitles, import PPT files, structure your content, record yourself or your computer screen, edit, mix, etc.
Pros:
- Even if users need to log in, they don’t need to create an account
- Allows users to import content from online sources like Storyblock, Shutterstock, etc.
- It is the number 1 customizable and straightforward solution to making cartoons.
- Use by Colgate-Palmolive, NHS, Teradata, Amadeus, Cisco, Continental, and Logitech.
- The interface is intuitive and user-friendly.
Cons:
- Watermarked videos during the free trial
- To export videos in HD 1080p quality, one needs to purchase one of the available plans.
Renderforest is the best cartoon maker online of the listed five in this article due to the vast library template and large online bandwidth.
Part 2: Cartoon Video Maker for Desktop (Win and Mac)
1. Wondershare Anireel
Anireel is one of the top animation software on the internet that allows users to bring their imaginations to life with a huge range of customizable elements and features.
Price: $9.99 per month billed annually and $19.99 monthly
Features:
- 40+ customizable templates
- Top animation software
- Compatible with Windows 11/10/8.1 (64 bit OS)
- Only three steps to an excellent animated video.
- Import images, videos, and sound in almost all formats.
- Create unique avatar, logo images, and more specific to your brand.
- The Deep Learning tech offers quick text-to-speech conversion.
- Animate camera movements, entry and exit effects, motion path, etc.
- Use the one-click option and change scripts to clips.
- Anireel cartoon video makercan lip-sync your characters with perfection.
- Quick and easy drag and drop editing.
Pros:
- It is convenient and simple to use
- Anireel has an intuitive interface
- The cartoon makeroffers a practical and seamless animated video editing
- It comes at an affordable and competitive price
Cons:
- It has a limited amount of assets
- Not suitable for too professional people to use.
2. Autodesk Maya
Autodesk Maya is one of the best animation tools used to create animation pictures, video games, and add 3D effects in motion pictures. Plus, this cartoon maker is the best if you require a high-quality visual impact.
Price: Free trial, $225 billed monthly.
Features:
- It offers AutoDesk financing for new buyers.
- Maya is the go-to shop for architects, engineers, designers, media, and entertainment.
- Shape 3D objects and add realistic effects with Maya cartoon maker’s NURBS modeling.
- The Integrated Arnold rendering technology lets you view scene changes in real-time.
- Maya has been part of the top movie makers, including the MCU.
- This cartoon video maker offers geometry-based polygon modeling and helps create accurate simulations for visual programming.
- Maya can load and change vast data sets at a faster pace.
Pros:
- It makes complex hand-made animation tasks extremely easy
- Efficient color management
- Allows the creation of realistic effects like cloth simulations and explosions
- 30-day free trial and 30-day money-back guarantee
- Meet deadlines, add fine details to develop even the most complex shots or characters.
- Excellent tool for professionals
Cons:
- The pro is quite expensive
3. Adobe Animate
This is one of the most powerful animation software products on the internet that has been available for decades. It can animate images used for games, film, or online and produce HTML 5, WebGL, or Flash content.
Price: This cartoon creator offers three pricing plans starting at US$24.14/month
Features:
- Excellent for complex animation
- The capability of freehand drawing
- Animate, illustrate, and make 3D typography.
- Import and add vector drawings for further editing.
- Export your work as HTML5 Canvas, WebGL, Flash/Adobe AIR, GIF, or QuickTime movie.
- With the Bone tool, make your cartoon characters fluid and natural.
- Synchronize sounds and music for your project.
- Choose parts of the clip to be animated.
Pros:
- It has Puppeting features
- It is an excellent choice for complex animations
- It includes freehand drawing capability
Cons:
- It is not suitable for beginners
- Other Adobe software may be required while working on a project
4. Adobe Character Animator
Adobe Character Animator is another type of Adobe’s animation software stack that allows users to use motion to capture and create live animations of their 2D characters.
Price: Adobe Character Animator has two pricing plans starting at US$34,49/month for the first year
Features:
- This product requires other Adobe products to function
- Lots of options to export and import.
- Make your real-life cartoon using the Motion Capture feature in five steps.
- The Avatar will walk, talk, and copy your expressions in real-time.
- Integrate and add assets from other Adobe Creative Cloud apps.
- Auto lip-syncing and real-time facial movement capture.
- Works on iOS and Android.
Pros:
- Easy to replicate real-life movements and expressions with facial tracking.
- There are various import and export options.
Cons:
- It is not a standalone product.
- Users need to have a webcam and microphone to use the motion capture feature.
5. Cinema 4D
This cartoon maker has a 3D application interface that offers a keyframe animation, life-like characters, simulation building, object tracking, flexible rig building, cartoon styling, and animation basics.
Price: 4 pricing plans, starting at $99.91/month and $1199.00 billed annually.
Features:
- Keyframing animation effect
- It has a 3d interface
- The ZRemesher for retopology and new tools for modeling add to the new features.
- The Cloth Simulation features help make your cartoon more real.
- It supports CPU rendering with Redshift, which helps you preview, import, and export in high quality.
Pros:
- It is pretty easy to use.
- Lots of exciting design templates are available
- Many editing features are available
Cons
- It is pretty expensive compared to other software
- Not good for beginners
Wondershare Anireel is the best cartoon maker of the five listed in this article. It has lots of advanced features and templates to choose from.
Part 3: How Can I Create My Own Cartoon Using Wondershare Anireel
As stated, Wondershare Anireel has become our top cartoon creator pick due to its affordable pricing, secure server, and ease of use.
So, let us view the simple steps to create your cartoon using the Anireel software.
Step 1: Download, install and Create Character
Run Anireel on your device, visit Characters Tab and then click on Create a Character option, or you may click on the Create Brand Characters tab on the home screen.
Step 2: Start Creating your Cartoon Character
Choose your gender and body shape, and apply some preset suits.
Now, you can start building facial features using the Head tab to customize the shape of the face, eyes, hairstyle, nose, mouth, ears, and eyebrows.
You can also choose to change the skin tone to match yours.
Step 3: Add an Outfit and Accessories
Choose the Outfit tab in Character Builder to select the base layer, outfit, bottom wear, and footwear. Pick what you want to use on your cartoon and keep adding.
Next, reach the Accessories tab to add glasses, necklaces, and more to your cartoon character.
Step 4: Name your Cartoon and Apply
Click on Save and add a name to your cartoon when all done. Finally, click Apply Now to add your cartoon character to your Anireel cartoon maker canvas or My Characters tab.
Part 4: People Also Want to Know
Below are some answers to a few queries about cartoon creators. Let us look at them one by one.
1. What is the best free cartoon maker?
Wondershare Anireel is the best cartoon maker for Android as it is free to use with lots of advanced features and templates to choose from.
2. What is the best app to make a cartoon?
Wondershare Anireel’s Microsoft app is also one of the best cartoon applications that are very flexible and easy to use on the go.
Conclusion
In this article, we explained the best cartoon creators in the industry. Also, we gave the best cartoon video maker from the list. Thus, as you saw, in this report, we have summarized a few essential points regarding cartoon video makers. You learned:
- The cartoon video maker for free that you should know of.
- The ten best cartoon video makers.
- Why are Wondershare Anireel and Renderforest excellent online cartoon video makers?
- How does Anireel, cartoon creator, work?
- Finally, a few FAQs for users to better understand the cartoon maker
Also read:
- Updated 2024 Approved Detailed Review of Kodak LUTs
- Updated Ultimate Guide to Making Cinematography for Music Video for 2024
- Updated Step by Step to Cut Videos in Lightworks for 2024
- Add Camera Shake to Video in Adobe After Effects
- New Simple Step by Step Tutorial on Creating a Lightroom Collage
- New In 2024, FLV Editors for Windows 11/10/8.1/8/7 Easily Edit FLV Videos on PC
- How to Correct Lens Distortion in Videos
- Updated 2024 Approved 20 Best Text To Speech Software Windows, Mac, Android, iPhone & O
- Updated Detailed Tutorial to Merge Videos in VLC Media Player for 2024
- Updated How Can You DIY VHS Overlay in After Effects for 2024
- New 2024 Approved Mastering DaVinci Resolve Scopes A Comprehensive Guide
- Ultimate Guidelines to Help You Better Use VLC Media Player
- 2024 Approved This Article Is Actually the Guide Regarding Editing the Videos Through VEED. As a Substitute, Wondershare Filmora Is Also Under Discussion that Is Also Available for the Same Purpose
- New In 2024, Unlock Your Video Editing Potential With Wondershare Filmora
- New The Easiest Way to Make Time-Lapse Videos. Yes, You Can Make a Time-Lapse Video with Your Phone. It Powers a Very Simple and Easy Way to Make Time-Lapse Videos
- New 8 Best Sites to Get Glitch Transition for Premiere Pro for 2024
- Updated In 2024, Step by Step to Cut Video in Adobe Premiere Pro
- Updated Splitting Audio From Video in Sony Vegas Step by Step for 2024
- In 2024, 6 Top Online MP4 Croppers
- New If You Want to Know What to Prepare and How to Make the Wedding Video Perfect for Videographers, Check Out This Menu Here
- 2024 Approved Do You Want to Make Your Video Look Like Its From the 90S? Then, Make Sure to Add Vintage Overlays and VHS Sound Effects to Give It the Old Feel
- Different Ways to Crop TikTok Video in High-Quality
- In 2024, Applications and Software Take up Your Devices Storage to Create Slow-Mo. Explore This Piece to Learn About some Slow-Motion Video Online Makers
- Top 5 Solutions on How to Add Emojis to iPhone for 2024
- Updated In 2024, Best 12 Best Freeze Frame Video Editing Examples
- Updated 2024 Approved Quick Answer What Is a Transparent Logo and Why Do You Need It
- How To Unbrick a Dead Oppo A18 | Dr.fone
- How To Turn Yourself Into Anime Character
- 9 Best Free Android Monitoring Apps to Monitor Phone Remotely For your Realme 10T 5G | Dr.fone
- In 2024, Unlocking Apple iPhone 14 Lock Screen 3 Foolproof Methods that Actually Work | Dr.fone
- Unlocking the Power of Smart Lock A Beginners Guide for Infinix GT 10 Pro Users
- Want to Uninstall Google Play Service from Oppo Find X7 Ultra? Here is How | Dr.fone
- Easy steps to recover deleted messages from Ace 2 Pro
- New In 2024, Download/Install/Register/Uninstall | Wondershare Virbo
- In 2024, How to Transfer Data After Switching From Lava Yuva 2 to Latest Samsung | Dr.fone
- Fix Cant Take Screenshot Due to Security Policy on Oppo A38 | Dr.fone
- In 2024, Bypass iCloud Activation Lock with IMEI Code From Apple iPhone 15 Plus
- In 2024, Edit and Send Fake Location on Telegram For your Vivo Y55s 5G (2023) in 3 Ways | Dr.fone
- How to Get and Use Pokemon Go Promo Codes On Gionee F3 Pro | Dr.fone
- How To Revive Your Bricked Poco M6 Pro 5G in Minutes | Dr.fone
- In 2024, 3 Solutions to Find Your Oppo K11x Current Location of a Mobile Number | Dr.fone
- Three Ways to Sim Unlock Oppo Find X7 Ultra
- In 2024, Reasons why Pokémon GPS does not Work On Apple iPhone XS Max? | Dr.fone
- How To Recover Lost Data of Apple iPhone 14? | Dr.fone
- Fix the Error of Unfortunately the Process.com.android.phone Has Stopped on Oppo A78 5G | Dr.fone
- Why Your Tecno Pop 7 Pro Screen Might be Unresponsive and How to Fix It | Dr.fone
- Title: Experience Time Differently with The Top Slow-Motion Applications
- Author: Chloe
- Created at : 2024-06-26 06:24:33
- Updated at : 2024-06-27 06:24:33
- Link: https://ai-editing-video.techidaily.com/experience-time-differently-with-the-top-slow-motion-applications/
- License: This work is licensed under CC BY-NC-SA 4.0.
