
:max_bytes(150000):strip_icc():format(webp)/6g-4717cafbb03b4d0eb3dae878b5ad134e.png)
Final Cut Pro for iPad- Is It Available, In 2024
Final Cut Pro for iPad- Is It Available?
Final Cut Pro by Apple is the most popular premium video editor among macOS users. Starting from social media videos to short films and movies, Final Cut Pro is a popular choice. Even though video editing using FCP is mostly done on Mac, there are many who prefer video editing on their powerful phones. It is quite shocking that Final Cut Pro for Android and iOS users is not yet available.
Since it is an Apple-exclusive application, you would have expected FCP mobile app for iPhone and iPad. But Apple is yet to develop a mobile app for Final Cut Pro. Naturally, we have to look for Final Cut Pro alternative mobile apps for smartphone users. The alternatives need to be as feature-rich and powerful as FCP. Here is the list of the best Final Cut Pro alternative apps for Android and iOS users.
Part 1. Final Cut Pro Alternative App for Android
There is no Final Cut Pro app available for Android users. It is not surprising because Final Cut Pro is an Apple product. When you search for Final Cut Pro on Play Store, you will come across an FCP app. But it is a fake app and not developed by Apple. Here is our recommendation of the best Final Cut Pro alternative app for Android users.
1. Filmora
Filmora is the best alternative to Final Cut Pro for Android users. The app has a super high rating on Play Store. Filmora is available for free and you can create amazing HD videos. You can add stunning effects, animations, texts, filters, backgrounds, and much more. You can obviously perform the basic video edits such as trim, cut, join, and likewise. The app allows easy sharing of edited videos on social media platforms.
You can add keyframes for personalized creativity animations. There is a wide range of music available to pick from. Besides, there are amazing stickers and emojis available to apply to your video. The user interface is super intuitive for everyone to use easily without prior experience. The free version attaches a watermark and you can remove it by upgrading to VIP membership.

Link – https://play.google.com/store/apps/details?id=com.wondershare.filmorago&hl=en\_IN&gl=US
2. InShot
InShot is an extremely popular video editor app among Android users. It is featured as the Editor’s Choice on Play Store. The app has all the features and functionalities you need for basic and advanced video editing. In spite of being a powerful app, the graphical interface is user-friendly.
There are beautiful transitions, stickers, text effects, voice effects, and frames available. You can make picture-in-picture videos, slideshow videos, and slow-motion videos. You can also create stories and GIFs for social media. Besides, there is a keyframe option for texts and stickers. You can easily add voiceover, music, and voice effect to enhance the video content.

Link –https://play.google.com/store/apps/details?id=com.camerasideas.instashot&hl=en\_IN&gl=US
3. KineMaster
KineMaster is a popular video editing app among beginners. You can create your video from scratch using its video templates. KineMaster has a wide range of different categories of video templates to get started. Starting from basic adjustments to adding filters and effects, everything is available on KineMaster.
The user interface is super easy to operate. The app comes with an incredible collection of assets such as animations and clip graphics. You can remove the background from your video or photo instantly. Besides, you can save the edited video in desired video quality and share it instantly on social media platforms.

Link – https://play.google.com/store/apps/details?id=com.nexstreaming.app.kinemasterfree&hl=en\_IN&gl=US
4. Funimate
Funimate is a relatively new video editing app. But in a short time, the app has managed to become a top video editor app on Play Store. This is because it is extremely powerful and it is comparable to Final Cut Pro in terms of features. The app has a stunning collection of video and text effects that will enhance video content. You can work with multiple video layers just like Final Cut Pro.
The keyframe effect is a strong point for customized and personalized animations. You can choose from the different transitions, overlays, and backgrounds. Besides, there is a wide range of chic effects and filters to go with modern video trends. There is a dedicated 3D space available to experiment with object and text animations. You can sync music and choose AI effects and video masks.

Link – https://play.google.com/store/apps/details?id=com.avcrbt.funimate&hl=en\_IN&gl=US
5. Splice
This is another relatively new video editor app but has a superb rating from users. The powerful video editor app makes it easy for beginners to edit videos comfortably. It has a dedicated timeline to work on your video clip and edit as per your requirements. There are beautiful text effects and overlays available.
Besides, you can add and sync music perfectly. Moreover, you can adjust the speed of your video to get the slow-motion effect. The basic video editing tools are available and you can create videos from your photos. There are amazing transitions and video effects present to apply to your photos and video clips. Overall, the video editor is suitable for beginners as well as professionals.

Link – https://play.google.com/store/apps/details?id=com.splice.video.editor&hl=en\_IN&gl=US
Part 2. Final Cut Pro Alternative App for iPhone
Since Final Cut Pro is from Apple, you would have expected an FCP app for iPhone and iPad. Unfortunately, Apple has no plan yet to launch Final Cut Pro mobile app. Here are the Final Cut Pro alternative apps for iPhone and iPad users.
1. iMovie
iMovie by Apple is considered to be an ideal alternative to Final Cut Pro. Even though it is not as advanced as FCP, but there are powerful features for professionals as well. You can create videos from scratch and there are beautiful templates available to get started. You can also make Hollywood-style cinematic trailers to get your viewers excited.
Apart from templates of different categories, there are different text styles and textures available to pick from. You can get the popular picture-in-picture, split screen, and green screen effect options. It supports editing 4K videos at 60 fps. You can send your video projects to iPad and Mac conveniently.

Link – https://apps.apple.com/us/app/imovie/id377298193
2. Quik
Quik by GoPro is one of the most popular video editors. GoPro is the leading action camera brand. Naturally, there is huge traction for its video editor. First of all, its speed adjustment feature is the highlight of the app. You can go for super slow, regular slow, freeze, timelapse, hyper-lapse, and fast motion.
Select from a wide range of themes to get started. There is no dearth of filters, transitions, and effects. Some of the filters are super exclusive to the app. You can share your edited video on social media platforms instantly. The multi-selection timeline is suitable for advanced video editors. The app has exclusive features for GoPro owners.

Link – https://apps.apple.com/us/app/gopro-quik-video-editor/id561350520
3. Magisto
If you are into storytelling with your videos, this is the best app to edit your videos. It has all the features and options to make your video look classic and eye-catching. As a matter of fact, it is arguably the best video editor for social media video creators. You can use its artificial intelligence feature to select the best parts of your video automatically.
There are ready-made templates available to make your video look professional as well as entertaining. You can perform all the basic video editing tasks swiftly. You can work with the music part comfortably so that your video content enhances. Starting from slideshow videos to short videos for social media, the app is perfect for different genres of video making.

Link – https://apps.apple.com/us/app/magisto-video-editor-maker/id486781045
4. VivaVideo
VivaVideo is a highly rated video editing app. The app lets you change video speed, supports high-resolution output, and comes with dynamic effects. You can make short videos with your photos. You can decorate them beautifully with frames and objects available.
There are several cinematic filters available to enhance video quality. Apart from these, you get to select from a wide collection of text effects and emojis. You can work with keyframes and export video in 4k resolution. You can also create GIFs for social media platforms instantly.

Link – https://apps.apple.com/us/app/vivavideo-video-editor-maker/id738897668
5. Adobe Premiere Rush
Adobe Premiere is the biggest competitor of Final Cut Pro. But Adobe has gone one step ahead of FCP by releasing its mobile app. Adobe Premiere Rush is undoubtedly a powerful video editor. It is true that all the features of the Adobe Premiere desktop application are not available. But it is still great for a professional video creator.
There are multi-track timeline, customizable animated templates, and stunning video and text effects. The app has AI sensors for automated color balancing. The premium content library has everything you need. There are different aspect ratios available for creating videos for all devices. You can export edited videos in 4K resolution.

Link – https://apps.apple.com/us/app/adobe-premiere-rush-edit-video/id1188753863
Part 3. Related FAQs
1. Is Final Cut Pro a free app?
No, Final Cut Pro is not a free app. It is a paid app that costs $299.99 for lifetime access. However, you can download the free trial version of Final Cut Pro. You can use the trial version for 90 days before purchasing the product.
2. Does Final Cut Pro have a mobile app?
No, Final Cut Pro does not have any mobile app as of now. It is exclusively for iMac and MacBook users. You can use Filmora mobile app if you are looking for an FCP alternative.
3. Is Final Cut Pro Apple only?
Apple is the developer of Final Cut Pro. Therefore, it is an Apple-exclusive product. Naturally, it works only on macOS-based devices such as iMac and MacBook.
Free Download For Win 7 or later(64-bit)
Free Download For macOS 10.14 or later
Part 1. Final Cut Pro Alternative App for Android
There is no Final Cut Pro app available for Android users. It is not surprising because Final Cut Pro is an Apple product. When you search for Final Cut Pro on Play Store, you will come across an FCP app. But it is a fake app and not developed by Apple. Here is our recommendation of the best Final Cut Pro alternative app for Android users.
1. Filmora
Filmora is the best alternative to Final Cut Pro for Android users. The app has a super high rating on Play Store. Filmora is available for free and you can create amazing HD videos. You can add stunning effects, animations, texts, filters, backgrounds, and much more. You can obviously perform the basic video edits such as trim, cut, join, and likewise. The app allows easy sharing of edited videos on social media platforms.
You can add keyframes for personalized creativity animations. There is a wide range of music available to pick from. Besides, there are amazing stickers and emojis available to apply to your video. The user interface is super intuitive for everyone to use easily without prior experience. The free version attaches a watermark and you can remove it by upgrading to VIP membership.
Link – https://play.google.com/store/apps/details?id=com.wondershare.filmorago&hl=en\_IN&gl=US
2. InShot
InShot is an extremely popular video editor app among Android users. It is featured as the Editor’s Choice on Play Store. The app has all the features and functionalities you need for basic and advanced video editing. In spite of being a powerful app, the graphical interface is user-friendly.
There are beautiful transitions, stickers, text effects, voice effects, and frames available. You can make picture-in-picture videos, slideshow videos, and slow-motion videos. You can also create stories and GIFs for social media. Besides, there is a keyframe option for texts and stickers. You can easily add voiceover, music, and voice effect to enhance the video content.
Link –https://play.google.com/store/apps/details?id=com.camerasideas.instashot&hl=en\_IN&gl=US
3. KineMaster
KineMaster is a popular video editing app among beginners. You can create your video from scratch using its video templates. KineMaster has a wide range of different categories of video templates to get started. Starting from basic adjustments to adding filters and effects, everything is available on KineMaster.
The user interface is super easy to operate. The app comes with an incredible collection of assets such as animations and clip graphics. You can remove the background from your video or photo instantly. Besides, you can save the edited video in desired video quality and share it instantly on social media platforms.
Link – https://play.google.com/store/apps/details?id=com.nexstreaming.app.kinemasterfree&hl=en\_IN&gl=US
4. Funimate
Funimate is a relatively new video editing app. But in a short time, the app has managed to become a top video editor app on Play Store. This is because it is extremely powerful and it is comparable to Final Cut Pro in terms of features. The app has a stunning collection of video and text effects that will enhance video content. You can work with multiple video layers just like Final Cut Pro.
The keyframe effect is a strong point for customized and personalized animations. You can choose from the different transitions, overlays, and backgrounds. Besides, there is a wide range of chic effects and filters to go with modern video trends. There is a dedicated 3D space available to experiment with object and text animations. You can sync music and choose AI effects and video masks.
Link – https://play.google.com/store/apps/details?id=com.avcrbt.funimate&hl=en\_IN&gl=US
5. Splice
This is another relatively new video editor app but has a superb rating from users. The powerful video editor app makes it easy for beginners to edit videos comfortably. It has a dedicated timeline to work on your video clip and edit as per your requirements. There are beautiful text effects and overlays available.
Besides, you can add and sync music perfectly. Moreover, you can adjust the speed of your video to get the slow-motion effect. The basic video editing tools are available and you can create videos from your photos. There are amazing transitions and video effects present to apply to your photos and video clips. Overall, the video editor is suitable for beginners as well as professionals.
Link – https://play.google.com/store/apps/details?id=com.splice.video.editor&hl=en\_IN&gl=US
Part 2. Final Cut Pro Alternative App for iPhone
Since Final Cut Pro is from Apple, you would have expected an FCP app for iPhone and iPad. Unfortunately, Apple has no plan yet to launch Final Cut Pro mobile app. Here are the Final Cut Pro alternative apps for iPhone and iPad users.
1. iMovie
iMovie by Apple is considered to be an ideal alternative to Final Cut Pro. Even though it is not as advanced as FCP, but there are powerful features for professionals as well. You can create videos from scratch and there are beautiful templates available to get started. You can also make Hollywood-style cinematic trailers to get your viewers excited.
Apart from templates of different categories, there are different text styles and textures available to pick from. You can get the popular picture-in-picture, split screen, and green screen effect options. It supports editing 4K videos at 60 fps. You can send your video projects to iPad and Mac conveniently.
Link – https://apps.apple.com/us/app/imovie/id377298193
2. Quik
Quik by GoPro is one of the most popular video editors. GoPro is the leading action camera brand. Naturally, there is huge traction for its video editor. First of all, its speed adjustment feature is the highlight of the app. You can go for super slow, regular slow, freeze, timelapse, hyper-lapse, and fast motion.
Select from a wide range of themes to get started. There is no dearth of filters, transitions, and effects. Some of the filters are super exclusive to the app. You can share your edited video on social media platforms instantly. The multi-selection timeline is suitable for advanced video editors. The app has exclusive features for GoPro owners.
Link – https://apps.apple.com/us/app/gopro-quik-video-editor/id561350520
3. Magisto
If you are into storytelling with your videos, this is the best app to edit your videos. It has all the features and options to make your video look classic and eye-catching. As a matter of fact, it is arguably the best video editor for social media video creators. You can use its artificial intelligence feature to select the best parts of your video automatically.
There are ready-made templates available to make your video look professional as well as entertaining. You can perform all the basic video editing tasks swiftly. You can work with the music part comfortably so that your video content enhances. Starting from slideshow videos to short videos for social media, the app is perfect for different genres of video making.
Link – https://apps.apple.com/us/app/magisto-video-editor-maker/id486781045
4. VivaVideo
VivaVideo is a highly rated video editing app. The app lets you change video speed, supports high-resolution output, and comes with dynamic effects. You can make short videos with your photos. You can decorate them beautifully with frames and objects available.
There are several cinematic filters available to enhance video quality. Apart from these, you get to select from a wide collection of text effects and emojis. You can work with keyframes and export video in 4k resolution. You can also create GIFs for social media platforms instantly.
Link – https://apps.apple.com/us/app/vivavideo-video-editor-maker/id738897668
5. Adobe Premiere Rush
Adobe Premiere is the biggest competitor of Final Cut Pro. But Adobe has gone one step ahead of FCP by releasing its mobile app. Adobe Premiere Rush is undoubtedly a powerful video editor. It is true that all the features of the Adobe Premiere desktop application are not available. But it is still great for a professional video creator.
There are multi-track timeline, customizable animated templates, and stunning video and text effects. The app has AI sensors for automated color balancing. The premium content library has everything you need. There are different aspect ratios available for creating videos for all devices. You can export edited videos in 4K resolution.
Link – https://apps.apple.com/us/app/adobe-premiere-rush-edit-video/id1188753863
Part 3. Related FAQs
1. Is Final Cut Pro a free app?
No, Final Cut Pro is not a free app. It is a paid app that costs $299.99 for lifetime access. However, you can download the free trial version of Final Cut Pro. You can use the trial version for 90 days before purchasing the product.
2. Does Final Cut Pro have a mobile app?
No, Final Cut Pro does not have any mobile app as of now. It is exclusively for iMac and MacBook users. You can use Filmora mobile app if you are looking for an FCP alternative.
3. Is Final Cut Pro Apple only?
Apple is the developer of Final Cut Pro. Therefore, it is an Apple-exclusive product. Naturally, it works only on macOS-based devices such as iMac and MacBook.
Free Download For Win 7 or later(64-bit)
Free Download For macOS 10.14 or later
How to Create Cinematic Style Videos?
Do you find cinematic-style videos appealing? Do you wish to give your content a cinematic vibe? Hold on to this article for more!
A cinematic video style resembles a film. The act is employed in film making and visual storytelling that considers aspect ratio, composition, color, lighting style, type of film, editing, filters, and set design. The cinematic background music plays an equally important role. The article is a guide to creating a cinematic intro for YouTube.
Additionally, we will discuss the procedure to work on travel intro for a vlog. So, let us not waste time anymore! Time to start the adventure!
In this article
01 How to Create a Cinematic Intro for Your Video?
02 How to Cinematic Travel Intro for Your Travel Vlog?
03 3 Trendy Sites to Download Cinematic Background Music
Part 1: How to Create a Cinematic Intro for Your Video?
Every content creator wishes to bring new ideas to the set. The part played by cinematic background music cannot be avoided no matter what innovation is ahead of us. A cinematic and classy intro to your video displays the effort performed on your work. It compels the audience to keep following you.
For this very reason, the article conveys a guide to creating a powerful cinematic intro. Let us begin this!
For Win 7 or later (64-bit)
For macOS 10.12 or later
Step 1: Launch Wondershare Filmora to begin. Import the targeted music in the program and drag it to the timeline. Now, trim the music to 30 seconds and listen to the end part. Select the last note to match the beat in the beginning part of the music.

Step 2: Moving on, add markers to the music. Use “M” from the keyboard to mark the specific part of the track. After you are done, drag the first track onto the timeline. Trim the video to match it to the first marker.

Step 3: Perform a similar process for the rest of the video clips and trim them according to the markers. The user is directed to create a 2.35:1 widescreen cinemascope bar opener. To do so, drag two black mattes onto the timeline on top of each other.

Step 4: Drag the end of both clips to match the length of the whole video. Now, it is time to animate it. Insert 240° in the y-axis for the first keyframe. Similarly, use 422.2° for the second keyframe. For the bottom y-axis, use -240° for the first keyframe and -422.2° for the second keyframe.

Step 5: After the animation is completed, head to the “Titles” tab and look for cinematic packs. Choose one and drag it onto the timeline. Secondly, alter the duration and animation of the title. The user is expected to insert a dissolve transition at the end of the title.

Step 6: Perform the same process for the rest of the tracks. Time the titles to match the clip’s ending. Now, add a dissolve transition at the end of the clip. Trim the clip into two parts and apply square blur by navigating to the “Effects” tab to blur the video clips.

Step 7: Moving on, adjust the alpha for blur intensity. Add a dissolve transition between the cuts. In the final step, go to the “Animation” and then “Customize.” Reframe the last clip and animate a zoom-out effect. Reduce the “Scale” percent to do so. A creative cinematic intro is ready!

Part 2: How to Cinematic Travel Intro for Your Travel Vlog?
Vacationing and traveling offer exposure to learn more about people and the world around us. Are you a traveler? Do you prefer a solo vacation or with your family? Whatever your answer might be, we have got you!
To make an astonishing and engaging cinematic travel for your travel vlog, Filmora is there for us. The section shall reflect on the whole procedure using royalty-free cinematic music. Let us initiate!
For Win 7 or later (64-bit)
For macOS 10.12 or later
Step 1: The first step is simple. Open Wondershare Filmora and head to the “Media” tab. Import the targeted travel video clips onto the timeline and rearrange them. Now, navigate to the “Effects” section and search “cinematic.”

Step 2: Pick one and drag it onto the second track to present cinematic bars and a widescreen look to the video. Now, move to the “Titles” section and choose the suitable one. Drag it to the third track. Double click on it to access the “Advanced settings” and make the required alterations.

Step 3: You can modify the font size, color, and timing of the video. Again, use the “Titles” panel and hit the “Subtitles” category. Select one and drag to the third track. Make relevant changes through the same procedure as above.

Step 4: After that, duplicate the subtitle track on the timeline and repeat the required changes. Sync the text to the audio once you are done with the process.

Step 5: The user is instructed to go back to the “Titles” section and search “cinematic end credits.” Pick one and drag it to the third track. Double click on it to make a few alterations. You have performed the procedure successfully.

Part 3: 3 Trendy Sites to Download Cinematic Background Music
The use of royalty-free cinematic music creates an unmatched vibe. If you do not use it, you might not run for competition. Therefore, you need to access a great music platform for this purpose. Allow us to introduce you to three workable marketplaces. The cinematic background music that they offer is mind-boggling for sure. So, let’s go? Shall we?
Pixabay
Pixabay is an online marketplace that can be accessed effortlessly. The user is free to tailor the filter options to give the system an idea of the music requirement. You can change the results from genre to movement and theme to categories as needed. Essentially, royalty-free cinematic music can be downloaded with one tap of a button.
Moreover, the duration of the track is shown to decide consciously. Cinematic dramatic, caves of dawn, honor and sword, the introvert, and chill abstract are some music offered by Pixabay.

Chosic
Chosic is a house for a wide range of cinematic background music tracks. You can preview the audio tracks before downloading them and tackle the search bar according to your movie themes and type of set design.
Furthermore, the search filters are tailored based on relevancy, popularity, and random audios. Press the download button to have the audio in MP3 format. Epic cinematic, the inspiration, discovery, and the battle are renowned cinematic background music from Chosic.

Mixkit
Mixkit has got to be an excellent choice to deal with your everyday needs of royalty-free cinematic music. With Mixkit in the frame, the user can create movie magic using the impeccable cinematic music collection. Cinematic trailer, slow trail, piano horror, motivational cinematic, and silent descent are a few examples of a strong cinematic collection.

Final Thoughts
Every content creator wishes to transform their work using different effects and filters. Adding a cinematic style video compels the audience to be on the verge of their seats, giving them a film notion. The article highlighted three apps to download good quality and cinematic background music. Filmora also brought a thrill to the vlogs and YouTube intros.
Versatile Video Editor - Wondershare Filmora
An easy yet powerful editor
Numerous effects to choose from
Detailed tutorials provided by the official channel
02 How to Cinematic Travel Intro for Your Travel Vlog?
03 3 Trendy Sites to Download Cinematic Background Music
Part 1: How to Create a Cinematic Intro for Your Video?
Every content creator wishes to bring new ideas to the set. The part played by cinematic background music cannot be avoided no matter what innovation is ahead of us. A cinematic and classy intro to your video displays the effort performed on your work. It compels the audience to keep following you.
For this very reason, the article conveys a guide to creating a powerful cinematic intro. Let us begin this!
For Win 7 or later (64-bit)
For macOS 10.12 or later
Step 1: Launch Wondershare Filmora to begin. Import the targeted music in the program and drag it to the timeline. Now, trim the music to 30 seconds and listen to the end part. Select the last note to match the beat in the beginning part of the music.
Step 2: Moving on, add markers to the music. Use “M” from the keyboard to mark the specific part of the track. After you are done, drag the first track onto the timeline. Trim the video to match it to the first marker.
Step 3: Perform a similar process for the rest of the video clips and trim them according to the markers. The user is directed to create a 2.35:1 widescreen cinemascope bar opener. To do so, drag two black mattes onto the timeline on top of each other.
Step 4: Drag the end of both clips to match the length of the whole video. Now, it is time to animate it. Insert 240° in the y-axis for the first keyframe. Similarly, use 422.2° for the second keyframe. For the bottom y-axis, use -240° for the first keyframe and -422.2° for the second keyframe.
Step 5: After the animation is completed, head to the “Titles” tab and look for cinematic packs. Choose one and drag it onto the timeline. Secondly, alter the duration and animation of the title. The user is expected to insert a dissolve transition at the end of the title.
Step 6: Perform the same process for the rest of the tracks. Time the titles to match the clip’s ending. Now, add a dissolve transition at the end of the clip. Trim the clip into two parts and apply square blur by navigating to the “Effects” tab to blur the video clips.
Step 7: Moving on, adjust the alpha for blur intensity. Add a dissolve transition between the cuts. In the final step, go to the “Animation” and then “Customize.” Reframe the last clip and animate a zoom-out effect. Reduce the “Scale” percent to do so. A creative cinematic intro is ready!
Part 2: How to Cinematic Travel Intro for Your Travel Vlog?
Vacationing and traveling offer exposure to learn more about people and the world around us. Are you a traveler? Do you prefer a solo vacation or with your family? Whatever your answer might be, we have got you!
To make an astonishing and engaging cinematic travel for your travel vlog, Filmora is there for us. The section shall reflect on the whole procedure using royalty-free cinematic music. Let us initiate!
For Win 7 or later (64-bit)
For macOS 10.12 or later
Step 1: The first step is simple. Open Wondershare Filmora and head to the “Media” tab. Import the targeted travel video clips onto the timeline and rearrange them. Now, navigate to the “Effects” section and search “cinematic.”
Step 2: Pick one and drag it onto the second track to present cinematic bars and a widescreen look to the video. Now, move to the “Titles” section and choose the suitable one. Drag it to the third track. Double click on it to access the “Advanced settings” and make the required alterations.
Step 3: You can modify the font size, color, and timing of the video. Again, use the “Titles” panel and hit the “Subtitles” category. Select one and drag to the third track. Make relevant changes through the same procedure as above.
Step 4: After that, duplicate the subtitle track on the timeline and repeat the required changes. Sync the text to the audio once you are done with the process.
Step 5: The user is instructed to go back to the “Titles” section and search “cinematic end credits.” Pick one and drag it to the third track. Double click on it to make a few alterations. You have performed the procedure successfully.
Part 3: 3 Trendy Sites to Download Cinematic Background Music
The use of royalty-free cinematic music creates an unmatched vibe. If you do not use it, you might not run for competition. Therefore, you need to access a great music platform for this purpose. Allow us to introduce you to three workable marketplaces. The cinematic background music that they offer is mind-boggling for sure. So, let’s go? Shall we?
Pixabay
Pixabay is an online marketplace that can be accessed effortlessly. The user is free to tailor the filter options to give the system an idea of the music requirement. You can change the results from genre to movement and theme to categories as needed. Essentially, royalty-free cinematic music can be downloaded with one tap of a button.
Moreover, the duration of the track is shown to decide consciously. Cinematic dramatic, caves of dawn, honor and sword, the introvert, and chill abstract are some music offered by Pixabay.
Chosic
Chosic is a house for a wide range of cinematic background music tracks. You can preview the audio tracks before downloading them and tackle the search bar according to your movie themes and type of set design.
Furthermore, the search filters are tailored based on relevancy, popularity, and random audios. Press the download button to have the audio in MP3 format. Epic cinematic, the inspiration, discovery, and the battle are renowned cinematic background music from Chosic.
Mixkit
Mixkit has got to be an excellent choice to deal with your everyday needs of royalty-free cinematic music. With Mixkit in the frame, the user can create movie magic using the impeccable cinematic music collection. Cinematic trailer, slow trail, piano horror, motivational cinematic, and silent descent are a few examples of a strong cinematic collection.
Final Thoughts
Every content creator wishes to transform their work using different effects and filters. Adding a cinematic style video compels the audience to be on the verge of their seats, giving them a film notion. The article highlighted three apps to download good quality and cinematic background music. Filmora also brought a thrill to the vlogs and YouTube intros.
Versatile Video Editor - Wondershare Filmora
An easy yet powerful editor
Numerous effects to choose from
Detailed tutorials provided by the official channel
Add Green Screen Effects in Final Cut Pro
No matter the type of video you are shooting, the background of the video plays a major play. The background determines how eye-pleasing the frame of the entire video looks. A beautiful background enhances the video content while a distracting background can deteriorate the video outlook. You do not need to be in exotic locations or have eye-catching backgrounds in reality while shooting a video thanks to the use of the green screen effect.
Once you shoot a video with green screen background, you can replace the green screen with anything you want. You will need a video editor to replace the green screen, and Final Cut Pro is the most widely used video editor among Mac Users. We will illustrate how to add green screen in Final Cut Pro and get any background for your recorded video. We will also recommend an alternative watt to add green screen effect to your video.
Part 1. How to add green screen on Final Cut Pro
Final Cut Pro is the most popular professional video editor among Mac users. The learning curve is slightly steep, but once you get used to Final Cut Pro, you can take your recorded video to the next level with profound editing. The most important part of adding green screen effect to a video is shooting the video with a proper green screen in the background. Once you have successfully recorded your video, here are the steps on how to add background to green screen Final Cut Pro.
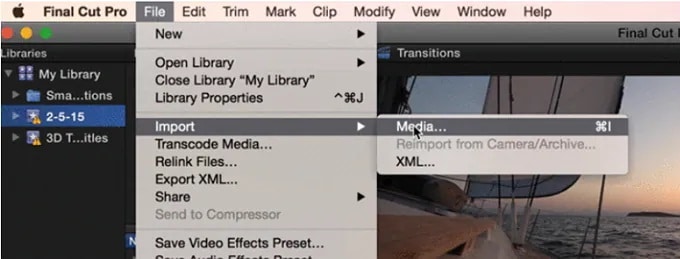
Step1 Launch Final Cut Pro and go to File> Import> Media. Select the video file with green screen background from your storage to import the file into FCP. Similarly, you should import the video or photo with which you want to replace the green screen.
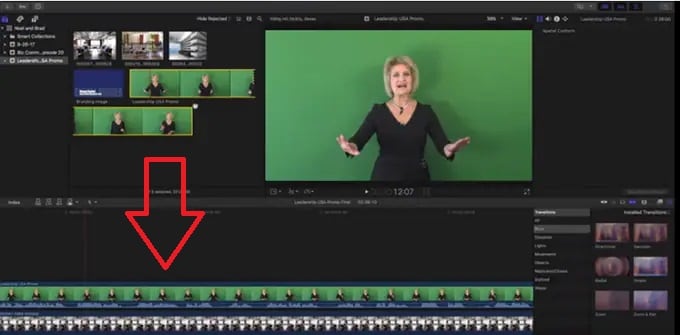
Step2 Drag the video clip with green screen background (called foreground clip) to Timeline and place it to Primary Storyline. Drag the replacement video (called background clip) below the foreground clip in Timeline.
Step3 Select the foreground clip and click on Effects button present at the extreme top-right corner of the Timeline.
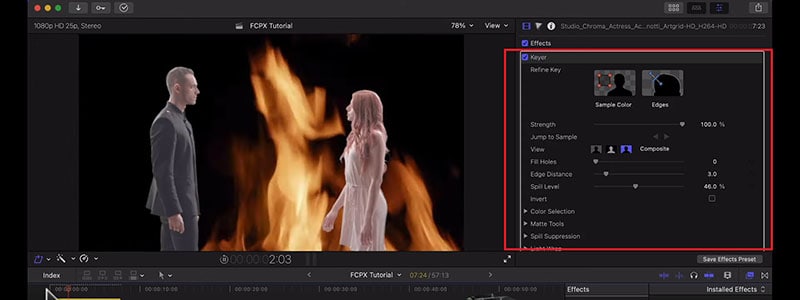
Step4 From the Effects options, select Keyer effect. If you cannot spot it immediately, you can search for it from the search field.
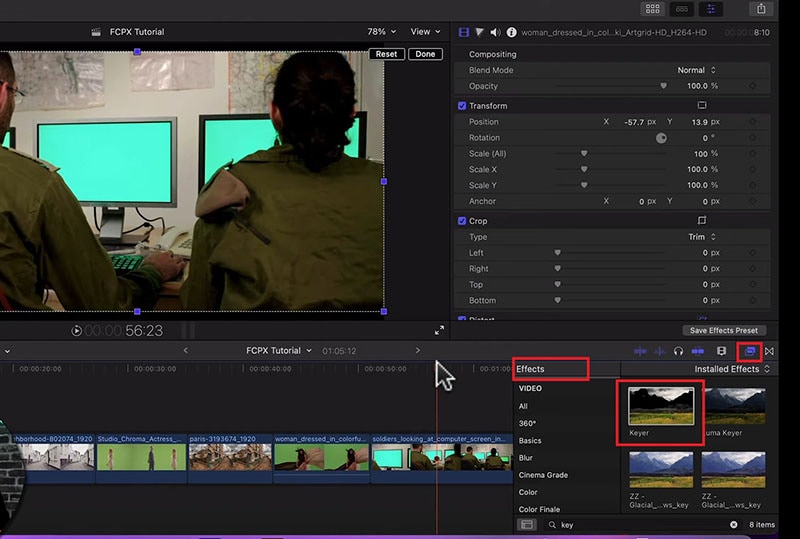
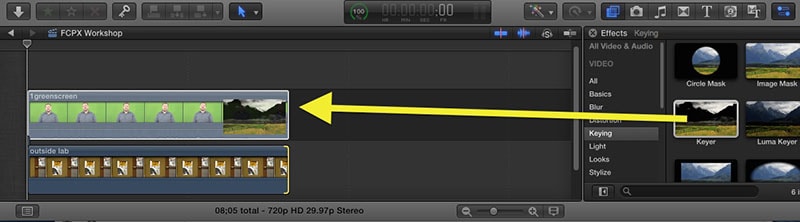
Step5 Drag and drop Keyer effect to the foreground clip. The effect detects the green screen and replaces it with the available background clip.
Step6 You might have to adjust the Keyer effect settings to get the green screen effect perfectly. Go to Inspector Window and click on Sample color and fine-tune the available settings to get it correct.
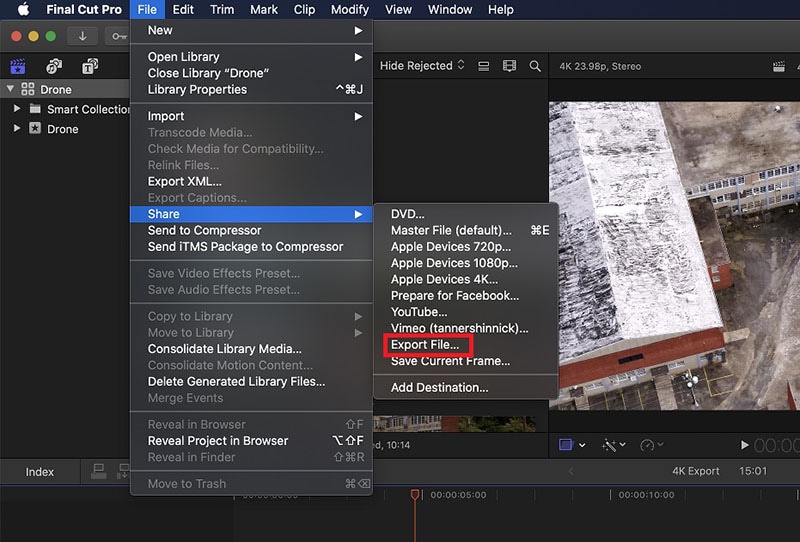
Step7 Once you are satisfied with the effect, go to File> Share> Export File and save the modified video.
Part 2. Alternative Way to Add Green Screen to Videos
Final Cut Pro is a professional but highly expensive video editor. The learning curve is not very suitable for amateur video editors. That is why if you are looking for a better alternative way to add green screen to videos, we recommend Wondershare Filmora . Filmora is a popular video editor that is available for Mac and Windows users. The user interface is extremely intuitive, and adding green screen effect is super easy. Here are the steps on how to add background to green screen effect.
Free Download For Win 7 or later(64-bit)
Free Download For macOS 10.14 or later
Step1 Download and install Filmora on your computer. Launch Filmora and click on New Projects.
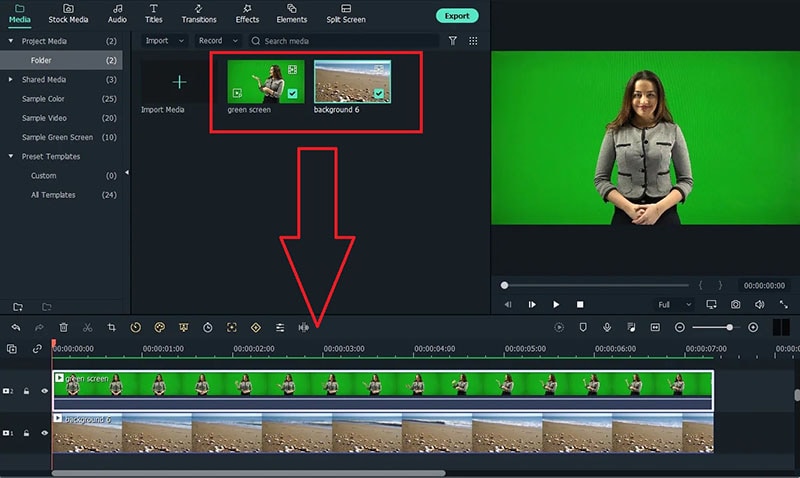
Step2 Under Project Media folder, Drag and drop the video clip with green screen background as well as the photo or video with which you want to replace the green screen.
Step3 Drag and drop the video clips on the Timeline. The video with green screen should be at the top while the replacement video or photo should be below it.
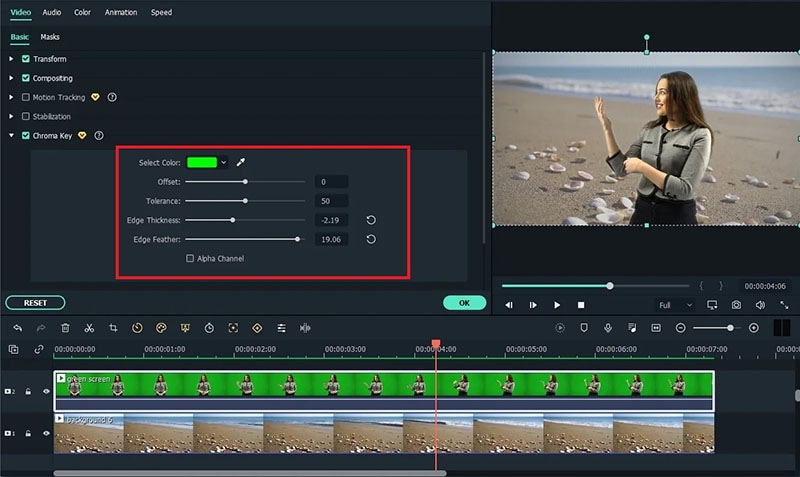
Step4 Double-click on the green screen video clip on Timeline. Go to Video>Basic and turn on Chroma key option.
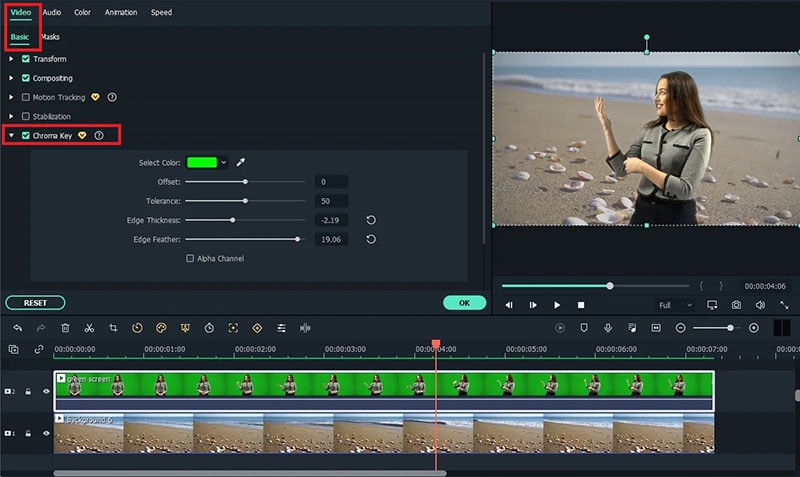
Step5 Adjust the different parameters such as offset to get the effect perfect and click on Ok button.
Step6 Play the video and if you are satisfied with the result, click on Export button to save the modified video file.
Part 3. Green Screen Video Tips to Use
We have already stated that replacing green screen in your video with an eye-catching background is the easiest part. On the contrary, shooting the green screen video is the most important part. If you shoot the video perfectly, replacing the background accurately in the video editor becomes super easy. Here are some important tips to use while shooting green screen video.
Distance – There should be enough distance between the subject and the green screen background so that the subject does not cast a shadow on the green screen. This distance is also important to place lights in between so that the green screen is perfectly lit for a great video shooting session.
Quality – You should opt for a high-quality green screen cloth for the background. This means the green screen should have a solid color instead of light and dark patches here and there. Besides, you should ensure that there are no wrinkles on the green screen.
Otherwise, when you will apply green screen effect through the video editor, the transformation will be uneven. You have to spend a lot of time adjusting the parameters to cover up uneven patches in the background.
Lighting – The way you set up your lights plays a major role in shooting green screen video perfectly. The light falling on the green screen will light up the screen evenly so that there are no light and dark patches. Transforming the green screen in the video editor will become that much easier.
You should focus on soft and even lighting for the entire green screen, and you should check through your camera to ensure the lighting is perfect. Sometimes, you can place lights behind the subject if the subject is staying stationary throughout the video. Otherwise, you can place the light above the subject for even distribution.
Aperture – The settings of your camera are equally important to smoothen out the green screen in the background and focus on the subject sharply. That is where aperture comes into the scene, and you need to use low aperture while shooting green screen videos. Low aperture opens up the camera lens, and the green screen turns softer in the background. The subject stands out while the background turns uniformly green.
Shutter Speed – While shooting a green screen video, you should keep a high shutter speed to prevent motion blur and uneven background. If the subject stays fixed throughout, the shutter speed should be double the frame rate. If the subject is moving throughout, the shutter speed should be around 4 times the frame rate such as 1/100.
ISO – The last thing you want in a green screen video is grainy footage. Your life will turn upside down editing the video and getting the green screen effect perfectly in any video editor. ISO determines the sensitivity and thereby, the grainy effect in your video. When the ISO is too high, the chance of getting grains in the video is high. It is better to use a native ISO for green screen effect, but you need to check with a sample recording and adjust if required.
Conclusion
We have answered how to add background to green screen Final Cut Pro. You can replace any green screen in your video with any video or photo for the background of the video. If you do not have Final Cut Pro or you find the steps slightly complicated, we recommend you to use Wondershare Filmora for instant green screen effect and quick adjustments for the best outcome.
Free Download For macOS 10.14 or later
Step1 Download and install Filmora on your computer. Launch Filmora and click on New Projects.
Step2 Under Project Media folder, Drag and drop the video clip with green screen background as well as the photo or video with which you want to replace the green screen.
Step3 Drag and drop the video clips on the Timeline. The video with green screen should be at the top while the replacement video or photo should be below it.
Step4 Double-click on the green screen video clip on Timeline. Go to Video>Basic and turn on Chroma key option.
Step5 Adjust the different parameters such as offset to get the effect perfect and click on Ok button.
Step6 Play the video and if you are satisfied with the result, click on Export button to save the modified video file.
Part 3. Green Screen Video Tips to Use
We have already stated that replacing green screen in your video with an eye-catching background is the easiest part. On the contrary, shooting the green screen video is the most important part. If you shoot the video perfectly, replacing the background accurately in the video editor becomes super easy. Here are some important tips to use while shooting green screen video.
Distance – There should be enough distance between the subject and the green screen background so that the subject does not cast a shadow on the green screen. This distance is also important to place lights in between so that the green screen is perfectly lit for a great video shooting session.
Quality – You should opt for a high-quality green screen cloth for the background. This means the green screen should have a solid color instead of light and dark patches here and there. Besides, you should ensure that there are no wrinkles on the green screen.
Otherwise, when you will apply green screen effect through the video editor, the transformation will be uneven. You have to spend a lot of time adjusting the parameters to cover up uneven patches in the background.
Lighting – The way you set up your lights plays a major role in shooting green screen video perfectly. The light falling on the green screen will light up the screen evenly so that there are no light and dark patches. Transforming the green screen in the video editor will become that much easier.
You should focus on soft and even lighting for the entire green screen, and you should check through your camera to ensure the lighting is perfect. Sometimes, you can place lights behind the subject if the subject is staying stationary throughout the video. Otherwise, you can place the light above the subject for even distribution.
Aperture – The settings of your camera are equally important to smoothen out the green screen in the background and focus on the subject sharply. That is where aperture comes into the scene, and you need to use low aperture while shooting green screen videos. Low aperture opens up the camera lens, and the green screen turns softer in the background. The subject stands out while the background turns uniformly green.
Shutter Speed – While shooting a green screen video, you should keep a high shutter speed to prevent motion blur and uneven background. If the subject stays fixed throughout, the shutter speed should be double the frame rate. If the subject is moving throughout, the shutter speed should be around 4 times the frame rate such as 1/100.
ISO – The last thing you want in a green screen video is grainy footage. Your life will turn upside down editing the video and getting the green screen effect perfectly in any video editor. ISO determines the sensitivity and thereby, the grainy effect in your video. When the ISO is too high, the chance of getting grains in the video is high. It is better to use a native ISO for green screen effect, but you need to check with a sample recording and adjust if required.
Conclusion
We have answered how to add background to green screen Final Cut Pro. You can replace any green screen in your video with any video or photo for the background of the video. If you do not have Final Cut Pro or you find the steps slightly complicated, we recommend you to use Wondershare Filmora for instant green screen effect and quick adjustments for the best outcome.
Turn Your Text Into a Podcast Made Possible
Being a content creator, either writing or generating videos, requires podcast text-to-speech knowledge. The impact of content depends on how many people see it. It means finding new ways to get it into real and virtual places where customers and users might be.
Depending on the context, podcasting can be a perfect alternative for sharing content.
This article will address your questions about the easiest way to turn a blog into a podcast. Let’s begin with the reasons why you should do a podcast.
Part 1. Why You Should Podcast
Podcasts are one of the simplest and most cost-effective ways. It helps to advertise yourself and your products to a highly targeted audience. Podcasts are also excellent for engaging with potential clients interested in your content. In your field, you can achieve fame and expertise.

Repurposing of Content
Podcasters can maximize their potential for successful episodes and repurposing their podcast into multiple content pieces.
This podcasting strategy can help you reach more people by putting your podcasts on more channels and engaging more people who might be interested.
More Fulfilling than Articles
Unlike music, news, TV, and social media, podcast listeners don’t have to watch the screen like they do with YouTube videos or TV shows. This means they can listen while walking or driving home from work.
Podcasts are the best way to get people to pay attention and make fundamental societal changes. They can keep people interested for a long time, so you can go into detail and get personal without turning off your audience.
Minimal Start-Up Costs
To start a podcast, you can spend a little money. Even some of the most famous podcasts use a microphone, a computer, and software for recording. But it’s common to spend more money on advertising and better hosting.
Starting a podcast doesn’t cost much, as you can get everything you need for about $145.
Expansion of Search Potential
In the past few years, many big brands and small to medium-sized businesses have started using podcasts as a marketing strategy. This is because podcasts are becoming more and more popular and can help raise your company’s profile.
Podcasting is another way to disseminate your study to a broader audience, whether that audience consists of policymakers or interested citizens.
Potential to Monetize
Using an affiliate program podcast, you can earn money. Businesses can increase their income by offering paid advertising sponsorships to monetize podcasts. Suppose you accept an affiliate offer to sell ads. In that case, you become the company’s voice and put recorded ads in your podcast episodes.
The most common way to make money from a podcast is through sponsorship. It’s also the easiest way to make money because you don’t have to make or sell anything. You just have to make a deal with a sponsor.
Part 2. Why Are Writers Hesitant to Start a Podcast?
Even after knowing all these benefits, writers are still hesitant to start a podcast. One of the main reasons a writer may be reluctant to launch a podcast is the cost of the necessary equipment. You will need at least $80 to $500 for this unpromissing business.
However, let me tell you a secret that many podcastors didn’t buy any audio equipment for the launch of their podcast channel on Spotify.
Moreover, many writers don’t want to show their voice through recordings. This is because they couldn’t just make a recording and hand it off to a sound specialist. Besides, finding their voice through the stories they write is the routine.
But we all need to get the truth that many podcastors don’t record a single word of the podcast with their own voice. Due to a solution: text-to-speech, technology like this has been around for a while and continues to improve.
The two important issues have been solved, so what are you waiting for? Platform building has always relied heavily on content marketing. With blog posts and social media, additional support was provided, and now podcasts are becoming more commonplace.
Part 3. How to Turn a Text Into a Podcast?
Text To Speech
To turn your text into audible content, Text-to-speech (TTS) is an assistive technology. With a single click, TTS reads your written text aloud. Many people also use it for writing and editing to maintain audience concentration.
Text-to-speech technology is compatible with all digital devices, including computers, tablets, and smartphones. Increasing numbers of websites and products now have developed this function. For example, you can find it within the trusted video editing software like Filmora. With Filmora’s Text to Speech (TTS) feature , you may add extra aspects to your video by turning your text files into voiceovers.
Free Download For Win 7 or later(64-bit)
Free Download For macOS 10.14 or later
Why we regard text to speech as a good
For writers, imagination is the only tool to construct their stories. To bring our stories to life, all we need is a laptop. The same holds for text-to-speech technologies, which can significantly assist writing and editing by allowing the author to hear their words without using their voice.
- Text-to-speech applications can assist you in repurposing your material.
Your written work can be converted into spoken language or a podcast. A podcast can be converted into a YouTube video with a few alterations. All of these factors can help you reach new audiences.
Repurposing material permits your audience to consume it in a variety of ways. The audience can read, listen to, or view your content.
- Text-to-speech systems enable authors to create information that is accessible.
As per World Health Organization, there are almost 285 million visually impaired persons and 39 million blind people. We writers can create a more inclusive world by constantly keeping accessibility in mind.
The limitations of text to speech
Text-to-speech software is becoming increasingly lifelike thanks to technological advancements. However, it cannot still express genuine human emotions. However, this should allow you to utilize these tools. The positives significantly exceed the disadvantages, and technology is continually improving.
Easiest Fix: Turn Texts Into Podcasts With TTS in Filmora
So how can you use text-to-speech? Andhow you can turn your texts into audio podcasts in a daily routine? Filmora, a all-in-one video editor, gets you the solution.
Step1 Download and install Filmora on your PC or Mac.

Step2 Open Filmora and select the video on which you wish to add audio.

Step3 After adding your selected video, select the option “Titles” to add text to your video.

Step4 Select your favorite position for text in the video, like “lower third,” which is used the most in video titles.

Step5 Add text to the timeline and click “Ok.” You can move the red timeline marker if you want your text in a certain spot.

Click the “+” button marked in the picture below to add text.

You can also edit the text by changing its style, color, and font or by animating it.

Step6 Press the “Text-to-Speech” button in the lower right side and choose your preferred voice. For example, Lilly’s voice resembles Siri.

You can also choose another language other than English.

Click “Ok” once you’ve selected everything according to your requirements.
Step7 Once the transcription is completed, go ahead and test the video and audio to see if it’s synching.

And that’s done. This is how easy it is to turn your texts into speech using Filmora.
Part 4. Hot FAQs on Podcast Text to Speech
How do I convert podcasts to text?
With the help of the smartphone app Google Recorder you can easily convert podcasts to texts for free.
- Open the app on your phone, start recording to it, and start recording your podcast simultaneously.
- The words will be automatically recorded and entered into the application as you talk into your phone’s microphone.
- After you click stop on the app, you can store and share the files once you finish your recording.
You have an option of sharing the text, the audio, or both. Alternatively, you can save them to your Google Drive if you don’t want to share them.
How to turn my podcast into a sound?
To convert your video podcasts into audio through Filmora. Follow these steps:
- Drag the imported video from the media library into the video timeline.
- To extract the audio from the video, right-click the video clip and select “Audio Detach.”
- After a while, audio and video will be seen on separate tracks.
Can I save the sound after converting text to speech?
Once the text has been converted to speech, you can save the sound. Select your preferred format after clicking the “export” option in Filmora.
Conclusion
Many of us wish to launch a podcast and blog. A productive podcast’s essence is turning writing into audio using various podcasting techniques. AI-powered text-to-speech softwares can quickly convert articles into podcasts. Or, you can invite significant people to your podcast to personalize it. Podcasting can give outdated content a new life.
Free Download For macOS 10.14 or later
Why we regard text to speech as a good
For writers, imagination is the only tool to construct their stories. To bring our stories to life, all we need is a laptop. The same holds for text-to-speech technologies, which can significantly assist writing and editing by allowing the author to hear their words without using their voice.
- Text-to-speech applications can assist you in repurposing your material.
Your written work can be converted into spoken language or a podcast. A podcast can be converted into a YouTube video with a few alterations. All of these factors can help you reach new audiences.
Repurposing material permits your audience to consume it in a variety of ways. The audience can read, listen to, or view your content.
- Text-to-speech systems enable authors to create information that is accessible.
As per World Health Organization, there are almost 285 million visually impaired persons and 39 million blind people. We writers can create a more inclusive world by constantly keeping accessibility in mind.
The limitations of text to speech
Text-to-speech software is becoming increasingly lifelike thanks to technological advancements. However, it cannot still express genuine human emotions. However, this should allow you to utilize these tools. The positives significantly exceed the disadvantages, and technology is continually improving.
Easiest Fix: Turn Texts Into Podcasts With TTS in Filmora
So how can you use text-to-speech? Andhow you can turn your texts into audio podcasts in a daily routine? Filmora, a all-in-one video editor, gets you the solution.
Step1 Download and install Filmora on your PC or Mac.
Step2 Open Filmora and select the video on which you wish to add audio.
Step3 After adding your selected video, select the option “Titles” to add text to your video.
Step4 Select your favorite position for text in the video, like “lower third,” which is used the most in video titles.
Step5 Add text to the timeline and click “Ok.” You can move the red timeline marker if you want your text in a certain spot.
Click the “+” button marked in the picture below to add text.
You can also edit the text by changing its style, color, and font or by animating it.
Step6 Press the “Text-to-Speech” button in the lower right side and choose your preferred voice. For example, Lilly’s voice resembles Siri.
You can also choose another language other than English.
Click “Ok” once you’ve selected everything according to your requirements.
Step7 Once the transcription is completed, go ahead and test the video and audio to see if it’s synching.
And that’s done. This is how easy it is to turn your texts into speech using Filmora.
Part 4. Hot FAQs on Podcast Text to Speech
How do I convert podcasts to text?
With the help of the smartphone app Google Recorder you can easily convert podcasts to texts for free.
- Open the app on your phone, start recording to it, and start recording your podcast simultaneously.
- The words will be automatically recorded and entered into the application as you talk into your phone’s microphone.
- After you click stop on the app, you can store and share the files once you finish your recording.
You have an option of sharing the text, the audio, or both. Alternatively, you can save them to your Google Drive if you don’t want to share them.
How to turn my podcast into a sound?
To convert your video podcasts into audio through Filmora. Follow these steps:
- Drag the imported video from the media library into the video timeline.
- To extract the audio from the video, right-click the video clip and select “Audio Detach.”
- After a while, audio and video will be seen on separate tracks.
Can I save the sound after converting text to speech?
Once the text has been converted to speech, you can save the sound. Select your preferred format after clicking the “export” option in Filmora.
Conclusion
Many of us wish to launch a podcast and blog. A productive podcast’s essence is turning writing into audio using various podcasting techniques. AI-powered text-to-speech softwares can quickly convert articles into podcasts. Or, you can invite significant people to your podcast to personalize it. Podcasting can give outdated content a new life.
Also read:
- Updated In 2024, How to Shoot Cinematic Footage From a Smartphone
- Top Ways to Make Fast Motion Video on iPhone Solved
- Updated Best Things People Know About Wedding Slideshow for 2024
- In 2024, Dollar-Store DIY Hacks to Use for Filmmaking
- 2024 Approved A Guide to Understanding Efectum App and Some Top Alternatives
- Making Slow Motion Videos in Premiere Pro A Review on The Best Method for 2024
- New 2024 Approved Best Youtube Video Meme Maker
- Updated 15 Best Travel Vloggers That You Should Follow
- New Finding The Finest Way To Add Subtitles to Videos | Filmora for 2024
- New If You Want to Replace or Delete the Sky Pictures or Background Media, Then Give a Quick Read to This Article for Effective Solutions
- Top 7 Color Match Paint Apps
- How to Save As MP4 File on Windows Movie Maker?
- 2024 Approved Tactics to Make Transparent Image in Minimal Steps
- 2024 Approved Repeated Text Animation Tutorial in Filmora
- New Here, the Main Discussion Is Regarding the Split of the Audio From the Video in the Sony Vegas Pro. There Are Also some Details About the Substitute, Which Is Wondershare Filmora
- New In 2024, Top 9 Best Solutions To Go For When Creating an AI Thumbnail
- Updated How to Use Twixtor Effect to Create Super Slow-Motion Video, In 2024
- Updated How to Add a Custom Transition to OBS
- New Best Cinematic LUTs For Premiere Pro Recommendation for 2024
- In 2024, Splitting a Video Into Frames with the FFmpeg Step by Step
- Updated Easy Ways to Add Text Overlay to Video for 2024
- Color Lut in Video -How to Color Grade Your Video for 2024
- How to Color-Correct an S-Log Footage for 2024
- Updated 2024 Approved Best 10 Anime Movies for All Time
- 2024 Approved Spooky Halloween Best 15+ Halloween Countdown Video Clips
- New The Power of Music in Videos
- 2024 Approved Guaranteed 10 Storyboard Creators To Make Animation Easier For You
- Updated In 2024, Best Love Video Maker with Music
- In 2024, 10 Best Suggestions for AI Video Interviews
- 2024 Approved The Actual Discussion Is Regarding the Splitting of the Video by Using the VSDC. Also, Recommendation of Using Wondershare Filmora as the Better Substitute in Place of VSDC
- How to Zoom in on PowerPoint Easy Ways for 2024
- Updated The Upcoming Generation of AR and VR Is Going to Define Augmented Reality Conferencing as the New Normal for All Business Purposes. With a Global Perspective to Build Better Communication, AR Can Be the Future of Collaborative Workspace
- New 2024 Approved 10 Top Suggestions for AI Video Interviews
- In 2024, In This Article, Youll Find Four Solutions for Rotating Your Go-Pro Videos. The Following Tools Will Be Used for This Purpose
- New Vintage Film Effect 1990S - How to Make for 2024
- Updated 2024 Approved Quick Answer What Is a GIF File?
- Updated 2024 Approved How to Make Glitch Effect with Filmora
- In 2024, How to Display Apple iPhone 14 Pro Max Screen on PC Easily? | Dr.fone
- In 2024, Apple iPhone 13 Mirror to PC? Top Apps You Must Know | Dr.fone
- In 2024, 9 Mind-Blowing Tricks to Hatch Eggs in Pokemon Go Without Walking On Honor 100 | Dr.fone
- In 2024, Top IMEI Unlokers for iPhone 11 and Android Phones
- New Demystifying AI Game Generators | Wondershare Virbo Glossary for 2024
- In 2024, How to Transfer Contacts from Oppo F25 Pro 5G to Other Android Devices Using Bluetooth? | Dr.fone
- How to Reset Samsung Galaxy A15 5G Without the Home Button | Dr.fone
- How To Restore Missing Messages Files from Tecno Pop 8
- Easy Guide How To Bypass HTC FRP Android 10/11/12/13
- How Can Samsung Galaxy XCover 7Mirror Share to PC? | Dr.fone
- How To Bypass Google FRP on Oppo K11 5G
- 4 Solutions to Fix Unfortunately Your App Has Stopped Error on Vivo S18 | Dr.fone
- In 2024, How to Unlock iCloud lock from your Apple iPhone 6 Plus and iPad?
- In 2024, Hacks to do pokemon go trainer battles For Vivo S18 | Dr.fone
- How to Exit Android Factory Mode On Infinix Smart 8 Pro? | Dr.fone
- In 2024, 8 Best Apps for Screen Mirroring Realme 12 Pro 5G PC | Dr.fone
- In 2024, How to Migrate Android Data From Samsung Galaxy S24 to New Android Phone? | Dr.fone
- In 2024, How to Watch Hulu Outside US On Samsung Galaxy M54 5G | Dr.fone
- How to Fake Snapchat Location on Apple iPhone XS Max | Dr.fone
- In 2024, 3 Things You Must Know about Fake Snapchat Location On Apple iPhone 6 Plus | Dr.fone
- Undelete lost photos from Magic5 Ultimate.
- In 2024, Here Are Some Reliable Ways to Get Pokemon Go Friend Codes For Motorola Edge+ (2023) | Dr.fone
- In 2024, Top Apps and Online Tools To Track Vivo Y56 5G Phone With/Without IMEI Number
- In 2024, How To Reset the Security Questions of Your Apple ID From Your iPhone 13
- In 2024, Bypassing Google Account With vnROM Bypass For Samsung Galaxy S24
- In 2024, Full Guide to Unlock Your Samsung Galaxy XCover 7
- New Top AI Rap Voice Generators Upgrade Your Rap for 2024
- Complete Tutorial to Use VPNa to Fake GPS Location On Oppo F23 5G | Dr.fone
- 5 Easy Ways to Change Location on YouTube TV On Huawei P60 | Dr.fone
- How to Unlock iPhone 11 Pro Max When We Dont Have Apple ID or Password?
- How to Change Location on TikTok to See More Content On your Realme GT 5 Pro | Dr.fone
- How to restore wiped messages on Lava
- Title: Final Cut Pro for iPad- Is It Available, In 2024
- Author: Chloe
- Created at : 2024-05-20 03:38:30
- Updated at : 2024-05-21 03:38:30
- Link: https://ai-editing-video.techidaily.com/final-cut-pro-for-ipad-is-it-available-in-2024/
- License: This work is licensed under CC BY-NC-SA 4.0.
