
:max_bytes(150000):strip_icc():format(webp)/how-to-use-remote-access-on-your-samsung-smart-tv-4688935-01-29c7de5dc77e4747a8070d12f0c3d84c.jpg)
For Artists Who Are Making Videos for Show Their Knowledge or Projects, Add some Effects for the Video Can Always Provoke Interests and Attention. This Article Will Show You How to Do that Easily
For Artists Who Are Making Videos for Show Their Knowledge or Projects, Add some Effects for the Video Can Always Provoke Interests and Attention. This Article Will Show You How to Do that Easily
Filmora is a powerful tool and with the know-how can make your art be more than just a still image. Whether it is for a music video or a portfolio showreel, there are better ways than just inserting an image and letting it fade to the next still image. We can make use of effects and transitions to put our art to better use.
In this guide I’m going to show a couple of ways to enhance your images within Filmora for your videos.
Transitions
By inserting a transition to your image, you can add some diversity to how the viewer first see’s your image, You may want to emphasis a certain element of your art and therefore would select a transition that zooms in on that element before zooming out to the whole image or maybe you have a painting of a cyberpunk angel and wish to have the image enter in a grid formation. The point is that by experimenting with transitions and trying to select the best ones based on the element in your work you will achieve a better first impression. This is true for all aspects of video creation.
Having multiple transitions can create a unique look for your videos with minimal understanding of how to create a transition but there needs to be an understanding of how the layers work in Filmora being that a layer on top is in front of the one below, remember this when you start to add transitions as sometime you may need to duplicate your art as to keep it in the shot.
Free Download For Win 7 or later(64-bit)
Free Download For macOS 10.14 or later

As you can see here, I have duplicated my image onto separate channels as to always keep the image in the scene.

In the image above you can see how I used multiple transitions, I did this as my image is off center and I wanted to emphasize that, I picked transitions that had clear symmetry and lines so that the viewer had a reference point of where center was without me having to place that in my art. This is a very useful way of adding information to your art without telling the viewer directly. As for the color theory, I went with oranges and yellows predominantly here as they are neighboring colors on the color wheel and we know they work well together with my main color of yellow. As for the composition I have tried to keep all the eye-catching points along the top third of the image as to create a piece more pleasing to the eye even with all this information going on.
Effects
The inclusion of effect onto your art should not be discouraged depending on what the art is used for, in my example i created this as though it was album art and the musician wanted to upload a simple music video using that art, on its own it is static and can loose engagement but by applying relevant effects you can capture the viewer’s eye and make the listening experience more enjoyable. Effects can also be stacked to create unique assets for your art and help tell a story, if your art includes fire why not add a fire effect breaking the stillness of the image or maybe your art has motion, you could include a motion effect to your still image and give the viewer more information.
Even when using effects you can use fundamentals such as color theory or composition to better enhance your imagery.

In this image you can see I have added an audio visualizer effect as well as a spectral light effect. I did this to reinforce the face of my image having a strong light source, it creates dynamic movement and the audio visualizer was added due to the nature of the video being music oriented but I felt this could have been done better. The composition of the audio visualizer was front and center and seemed boring and uninteresting. This is where the research into art fundamentals comes into play as remembering the rule of thirds and how all the main features of the image are in the top horizontal third, we can make use of the vertical thirds to gain a better composition and hopefully create more engagement.

As you can see, we have duplicated the audio visualizer and made better use of the thirds nor having opposing placement within the scene, the same information is being given by the effect but we have managed to use the space more effectively and created a visually pleasing aesthetic to our video. Trick like this can make your still image feel more animated and have more purpose within the video itself.
Adding Titles and Text
Adding text is another way of adding information to your art. It’s said an image can speak a thousand words but sometimes you need words to talk for an image. When words are needed for your video, there should be some thought into how them words are presented as just selecting any text and inserting that to your video may look jarring to the viewer and result in a loss of interest towards your videos. Selecting the right transition for your text or the color or even the font can have different results and can help with affordance depending on what you’re looking to portray.

In my example I wanted to say thank you and felt sharp edges would seem formal and because of the main image it would be too similar so I went with a font that was more rounded. When inserting text onto a scene such as this one you are given a lot of information for your selections, we already have color in there to help us choose our font and background color, I went with yellow and pink due to the fact it was already in the scene and I didn’t want to take the attention away from the focus. The way the text transitions onto the screen secures just enough attention to itself that the viewer knows it’s there and can read it if they wish to. If I wanted to gain full attention i would have picked a transition that overlaps the key element and picked complementary colors on the opposite sides of the color wheel guaranteeing the viewer’s eyes would notice and engage with the motion.
Conclusion
By incorporating all the art fundamentals and skills we have learned we can use the tools provided by Filmora more effectively and create dynamic and engaging videos that are aesthetically pleasing for our audience. Upon learning the many different types and styles of transitions, effects, and titles we can enhance our artwork for use within our video. This includes artwork specifically made for use in video or even to show off your art and gain a wider audience. These are forever evolving and what you find is pleasing now may change in the future but that’s part of the fun with learning a new skill as you will find what you like and progress from there creating an identifiable style that viewers will recognize and associate you with.
Free Download For macOS 10.14 or later
As you can see here, I have duplicated my image onto separate channels as to always keep the image in the scene.
In the image above you can see how I used multiple transitions, I did this as my image is off center and I wanted to emphasize that, I picked transitions that had clear symmetry and lines so that the viewer had a reference point of where center was without me having to place that in my art. This is a very useful way of adding information to your art without telling the viewer directly. As for the color theory, I went with oranges and yellows predominantly here as they are neighboring colors on the color wheel and we know they work well together with my main color of yellow. As for the composition I have tried to keep all the eye-catching points along the top third of the image as to create a piece more pleasing to the eye even with all this information going on.
Effects
The inclusion of effect onto your art should not be discouraged depending on what the art is used for, in my example i created this as though it was album art and the musician wanted to upload a simple music video using that art, on its own it is static and can loose engagement but by applying relevant effects you can capture the viewer’s eye and make the listening experience more enjoyable. Effects can also be stacked to create unique assets for your art and help tell a story, if your art includes fire why not add a fire effect breaking the stillness of the image or maybe your art has motion, you could include a motion effect to your still image and give the viewer more information.
Even when using effects you can use fundamentals such as color theory or composition to better enhance your imagery.
In this image you can see I have added an audio visualizer effect as well as a spectral light effect. I did this to reinforce the face of my image having a strong light source, it creates dynamic movement and the audio visualizer was added due to the nature of the video being music oriented but I felt this could have been done better. The composition of the audio visualizer was front and center and seemed boring and uninteresting. This is where the research into art fundamentals comes into play as remembering the rule of thirds and how all the main features of the image are in the top horizontal third, we can make use of the vertical thirds to gain a better composition and hopefully create more engagement.
As you can see, we have duplicated the audio visualizer and made better use of the thirds nor having opposing placement within the scene, the same information is being given by the effect but we have managed to use the space more effectively and created a visually pleasing aesthetic to our video. Trick like this can make your still image feel more animated and have more purpose within the video itself.
Adding Titles and Text
Adding text is another way of adding information to your art. It’s said an image can speak a thousand words but sometimes you need words to talk for an image. When words are needed for your video, there should be some thought into how them words are presented as just selecting any text and inserting that to your video may look jarring to the viewer and result in a loss of interest towards your videos. Selecting the right transition for your text or the color or even the font can have different results and can help with affordance depending on what you’re looking to portray.
In my example I wanted to say thank you and felt sharp edges would seem formal and because of the main image it would be too similar so I went with a font that was more rounded. When inserting text onto a scene such as this one you are given a lot of information for your selections, we already have color in there to help us choose our font and background color, I went with yellow and pink due to the fact it was already in the scene and I didn’t want to take the attention away from the focus. The way the text transitions onto the screen secures just enough attention to itself that the viewer knows it’s there and can read it if they wish to. If I wanted to gain full attention i would have picked a transition that overlaps the key element and picked complementary colors on the opposite sides of the color wheel guaranteeing the viewer’s eyes would notice and engage with the motion.
Conclusion
By incorporating all the art fundamentals and skills we have learned we can use the tools provided by Filmora more effectively and create dynamic and engaging videos that are aesthetically pleasing for our audience. Upon learning the many different types and styles of transitions, effects, and titles we can enhance our artwork for use within our video. This includes artwork specifically made for use in video or even to show off your art and gain a wider audience. These are forever evolving and what you find is pleasing now may change in the future but that’s part of the fun with learning a new skill as you will find what you like and progress from there creating an identifiable style that viewers will recognize and associate you with.
Overview of Best LUTs for Vlog
Color grading and color correction are essential tools in post-production videos and photos. Many tools can be used for this purpose, such as LUTs. LUTs, or Look Up Tables, are among the most popular color grading and correction tools. It can help to apply a specific color grade or look at your videos and photos.
However, you can choose from different LUT styles if you are a vlogger or a traveler. There are many LUTs vlog options available to choose from, each with a unique look and feel. This article will provide you with different vlog LUTs options that you can try.
- Best LUTs for Vlog to Use in 2024 Editing
- How Has Wondershare Filmora Changed the Dynamics of LUTs in Video Editing?
Part 1: How Can LUTs Help in Vlogging?
If you want to make your vlogs look more professional, try using LUTs. These tables can help you correct the color of your footage easily and quickly while you’re on the go. You can use LUTs for vlogs to fix issues like your clips’ white balance and exposure. Furthermore, many other uses of LUTs for vlogging are discussed below.
Consistency
Consistency is the key when it comes to vlogging. You want your vlog to have a consistent look and feel thorough. With LUTs, you can ensure that the color grading of all your clips is the same. It gives your vlog a cohesive look and makes it stand out from others in the same genre.
Creative Look
Vlog LUTs also allow you to add a unique and creative look to your vlogs. You can set the mood of your vlog by adjusting the colors and tones to match the overall tone of your content. It helps you create a recognizable brand and establish your unique style.
Time-Saving
If you’re short on time, LUTs can help you vlog more efficiently. They save time, allowing you to focus on the storytelling aspect of your vlog. LUTs can also help you to edit your videos and publish them online quickly. It lets you stay on top of trends and maintain an active presence on social media.
Lighting Correction
Sometimes, capturing footage under mixed lighting conditions can be challenging. LUTs can help you to correct this and create a cohesive look for your vlog. You can even use LUTs on mobile editing apps to quickly edit your vlogs to publish them on the go.
Part 2: Best LUTs for Vlog to Use in 2024 Editing
Besides benefits and uses, the real part is to choose the best LUTs for vlogging. With so many LUTs vlog options, choosing a good one takes time and effort. Here are some of the best LUTs that you can use for vlogs.
1. Artist Found LUTs Collection
Are you a vlogger looking for a LUT that can help enhance the colors and brightness of your videos? The Artist Found LUTs Collection is a great option. This LUT is perfect for giving your vlogs a professional look that will capture the attention of your viewers. Furthermore, you can make your videos brighter and more vibrant with this LUTs pack.

2. B&W
B&W is the best LUT for vlog that can be a great addition to your vlogging toolkit. This LUT allows you to transform your videos into black and white. It gives your vlogs and videos a more serious and dramatic look. You can add a touch of nostalgia and a vintage feel to your videos, giving them an artistic feel. With B&W, you can create a timeless and classic look for your vlogs, making them more memorable and impactful.

3. Travel Video LUTs by Matteo Martignago
If you’re looking for a LUT to use in your travel vlogs, consider the Travel Video LUTs by Matteo Martignago. In this LUT pack, you’ll find five different LUTs, each with its unique look and feel. Moreover, this pack has warm and cold LUTs, giving you multiple options. The warm LUTs give your videos a cozy feel, while the cold LUTs can create a sense of adventure and excitement.

4. BRIGHT INSTA LUTS
Bright Insta LUTs is the suitable LUT vlog pack for you if you’re a makeup or fashion vlogger. This LUT pack gives your makeup or fashion vlogs a bright and vibrant look. With 20 different LUTs, for instance, you can experiment with various color palettes and find the perfect look for your videos. These LUTs can help you achieve a bright, vibrant, and exposed feel for better fashion and makeup vlogs.

5. Kurt Von Studios Retro Film LUTs
Kurt Von Studios Retro Film LUTs is a great tool for outdoor vloggers who want to add a vintage feel to their videos. It creates a cinematic look with earthy tones and rusty textures that give your content an authentic vintage feel. With this LUT, you can achieve a retro-style feel, adding character to your vlogs and making them more visually appealing.

6. Limit Color
Give your indoor vlogs and podcasts more feel by using Limit Color. This vlog LUT adds an artistic touch to your footage by limiting the color and light in your videos. It creates darker shadows and underexposed colors by focusing on the subject. Similarly, it helps to create a dramatic look that adds emotion to your vlogs and podcasts.

Part 3: How Has Wondershare Filmora Changed the Dynamics of LUTs in Video Editing?
Wondershare Filmora is an excellent video editing software option if you’re a vlogger. The most important element in vlogging is its lighting and color composition. With its latest update, you can use different LUTs to enhance your vlogs. Filmora provides over 200+ LUTs, including many free vlog LUTs, to help you achieve your videos’ desired look and feel.
Apart from LUTs, you can also make color adjustments and corrections to your vlogs. Moreover, you can adjust brightness, contrast, saturation, and hue to create a perfect vlog. If you’re a travel vlogger, you can make certain adjustments to give your vlogs an earthy and warm feel. You can also use different in-built filters and effects to create the perfect ambiance for your travel vlogs.

Key Features
- With this powerful AI video editing tool, you can use its motion tracking feature. This feature tracks the subject in motion so that you can add creative effects to your videos.
- Wondershare Filmora has over 1000 video templates available. You can choose any desired template that suits the style and mood of your vlog.
- This tool provides you with more control with its speed ramping feature. Using this feature, you can increase or decrease the speed of your videos at any point.
Empower your videos with a new mood using different LUTs. Filmora now offers 100+ top-quality 3D LUTs cover a broad range of scenarios. Transform your videos with Filmora’s powerful 3D LUTs.
Apply LUT on Videos Apply LUT on Videos Learn More


Conclusion
To sum up, LUTs are not an option but more of becoming a necessity, especially for vloggers. LUTs not only color-grade your videos but also add depth and perspective to your videos. Your content looks more engaging and interactive with the correct colors and lighting. However, you can use the best LUTs for vlogs even in the Wondershare Filmora tool. This tool lets you create and edit creative vlogs in no time.
Part 1: How Can LUTs Help in Vlogging?
If you want to make your vlogs look more professional, try using LUTs. These tables can help you correct the color of your footage easily and quickly while you’re on the go. You can use LUTs for vlogs to fix issues like your clips’ white balance and exposure. Furthermore, many other uses of LUTs for vlogging are discussed below.
Consistency
Consistency is the key when it comes to vlogging. You want your vlog to have a consistent look and feel thorough. With LUTs, you can ensure that the color grading of all your clips is the same. It gives your vlog a cohesive look and makes it stand out from others in the same genre.
Creative Look
Vlog LUTs also allow you to add a unique and creative look to your vlogs. You can set the mood of your vlog by adjusting the colors and tones to match the overall tone of your content. It helps you create a recognizable brand and establish your unique style.
Time-Saving
If you’re short on time, LUTs can help you vlog more efficiently. They save time, allowing you to focus on the storytelling aspect of your vlog. LUTs can also help you to edit your videos and publish them online quickly. It lets you stay on top of trends and maintain an active presence on social media.
Lighting Correction
Sometimes, capturing footage under mixed lighting conditions can be challenging. LUTs can help you to correct this and create a cohesive look for your vlog. You can even use LUTs on mobile editing apps to quickly edit your vlogs to publish them on the go.
Part 2: Best LUTs for Vlog to Use in 2024 Editing
Besides benefits and uses, the real part is to choose the best LUTs for vlogging. With so many LUTs vlog options, choosing a good one takes time and effort. Here are some of the best LUTs that you can use for vlogs.
1. Artist Found LUTs Collection
Are you a vlogger looking for a LUT that can help enhance the colors and brightness of your videos? The Artist Found LUTs Collection is a great option. This LUT is perfect for giving your vlogs a professional look that will capture the attention of your viewers. Furthermore, you can make your videos brighter and more vibrant with this LUTs pack.
2. B&W
B&W is the best LUT for vlog that can be a great addition to your vlogging toolkit. This LUT allows you to transform your videos into black and white. It gives your vlogs and videos a more serious and dramatic look. You can add a touch of nostalgia and a vintage feel to your videos, giving them an artistic feel. With B&W, you can create a timeless and classic look for your vlogs, making them more memorable and impactful.
3. Travel Video LUTs by Matteo Martignago
If you’re looking for a LUT to use in your travel vlogs, consider the Travel Video LUTs by Matteo Martignago. In this LUT pack, you’ll find five different LUTs, each with its unique look and feel. Moreover, this pack has warm and cold LUTs, giving you multiple options. The warm LUTs give your videos a cozy feel, while the cold LUTs can create a sense of adventure and excitement.
4. BRIGHT INSTA LUTS
Bright Insta LUTs is the suitable LUT vlog pack for you if you’re a makeup or fashion vlogger. This LUT pack gives your makeup or fashion vlogs a bright and vibrant look. With 20 different LUTs, for instance, you can experiment with various color palettes and find the perfect look for your videos. These LUTs can help you achieve a bright, vibrant, and exposed feel for better fashion and makeup vlogs.
5. Kurt Von Studios Retro Film LUTs
Kurt Von Studios Retro Film LUTs is a great tool for outdoor vloggers who want to add a vintage feel to their videos. It creates a cinematic look with earthy tones and rusty textures that give your content an authentic vintage feel. With this LUT, you can achieve a retro-style feel, adding character to your vlogs and making them more visually appealing.
6. Limit Color
Give your indoor vlogs and podcasts more feel by using Limit Color. This vlog LUT adds an artistic touch to your footage by limiting the color and light in your videos. It creates darker shadows and underexposed colors by focusing on the subject. Similarly, it helps to create a dramatic look that adds emotion to your vlogs and podcasts.
Part 3: How Has Wondershare Filmora Changed the Dynamics of LUTs in Video Editing?
Wondershare Filmora is an excellent video editing software option if you’re a vlogger. The most important element in vlogging is its lighting and color composition. With its latest update, you can use different LUTs to enhance your vlogs. Filmora provides over 200+ LUTs, including many free vlog LUTs, to help you achieve your videos’ desired look and feel.
Apart from LUTs, you can also make color adjustments and corrections to your vlogs. Moreover, you can adjust brightness, contrast, saturation, and hue to create a perfect vlog. If you’re a travel vlogger, you can make certain adjustments to give your vlogs an earthy and warm feel. You can also use different in-built filters and effects to create the perfect ambiance for your travel vlogs.
Key Features
- With this powerful AI video editing tool, you can use its motion tracking feature. This feature tracks the subject in motion so that you can add creative effects to your videos.
- Wondershare Filmora has over 1000 video templates available. You can choose any desired template that suits the style and mood of your vlog.
- This tool provides you with more control with its speed ramping feature. Using this feature, you can increase or decrease the speed of your videos at any point.
Empower your videos with a new mood using different LUTs. Filmora now offers 100+ top-quality 3D LUTs cover a broad range of scenarios. Transform your videos with Filmora’s powerful 3D LUTs.
Apply LUT on Videos Apply LUT on Videos Learn More
Conclusion
To sum up, LUTs are not an option but more of becoming a necessity, especially for vloggers. LUTs not only color-grade your videos but also add depth and perspective to your videos. Your content looks more engaging and interactive with the correct colors and lighting. However, you can use the best LUTs for vlogs even in the Wondershare Filmora tool. This tool lets you create and edit creative vlogs in no time.
Deleting White Background in Photoshop Is Hard?
Deleting White Background in Photoshop Is Hard? No
An easy yet powerful editor
Numerous effects to choose from
Detailed tutorials provided by the official channel
Know how Photoshop make white background transparent. Learn to create transparent background in Photoshop in simple steps. How to delete white background in image?
In this article
01 [Why Shooting with a White Background Makes Sense](#Part 1)
02 [When We Need to Delete White Background and when Not?](#Part 2)
03 [How to Delete White Background in Photoshop (5 Fast Ways)](#Part 3)
04 [Which Photoshop Selection Tool is Best for White Backdrop Removal](#Part 4)
Part 1 Why Shooting with a White Background Makes Sense

Products have gone online with E-commerce and people explore the products over internet more than they pick it from the stores. So, every business needs to showcase their products in a attractive way to get more customers. This needs an attractive photography by experts. Photography for e-commerce products requires expert product photography or commercial photography. They are very important for a business to get success in long run. To do branding the product image should be accurate and attractive.
So, if your company is going online, your products photography should be attractive enough to make buyers purchase your products. Background is essential part of any photography or video making. Whether it is product catalogue, shoot, advertising or commercial videos, white backdrop and white background are always good. With white background one can pay attention to the product. Every details of the product are highlighted when a white background is used.
When you need bright and highlighted images for any commercial videos, using a right technique for background color is must. White background creates a clean and bright commercial photo. If the same is not done correctly, the white background may turn to be off white or grey. A white background is good for isolating an object in the picture.
So, let’s know why shooting with white background make sense. Here are some reasons for it:

Removal of background becomes Easy and quick:
The most important benefit of applying white background is that it can be easily removed or replaced. In place of the blank white background, one can easily apply other background color or make it transparent. The white background has a speciality that it reflects the color of the product better which makes the product image visually good. This can be done with the help of any tool or application. Thus, using a white background gives an opportunity to apply any other background on it.
Promoting product in every occasion: An image with colorful background may not be useful to present in every event or occasion. For example a simple image with colorful background will not look good in a promotional event, while a colorful background will look happening in any festival event celebration. This, a blank background has the option to change as per the need of the occasion.
An image with white background can be changed as per the occasion. This helps a business to use a single image throughout the year without any additional cost for making a different picture. You can just change the white background of any image through various application or software.
Time saving: Removing white background is easy and streamlined as compared to any other color. The reason is that it does not require much editing and work on the edges. So, the steps in removing the white background are less and thus it saves time of the artist and the editors.
Saves location and bulk shooting expenses: When shooting with a white background is done; the same picture with some changes can be reused for number of times in several occasions. Thus, it saves the cost of shooting different in pictures in different location.
Good to celebrate every special day: A picture with white background is perfect and ready to edit for any special day. Whether it I a father’s day, mother’s day or any special day, a single picture can be edited as per the requirement. It will be a great gifting idea also after changing white background of the picture as per the special day.
Part 2 When We Need to Delete White Background and when Not?

A single picture of a person or product cannot be used for a single instance or purpose. Especially when it is a promotional campaign or commercial advertisements, a product is required to be showcased in several marketing campaign for different categories of consumers. Thus, a white background image is good for several purposes while in some circumstances, it requires changes. So, let’s see when to delete white background and when not:
When a picture requires special editing: When a picture requires some special effects like reflection, highlights and shadow effects, the picture with white background is required to be changed. When improvement in picture is requires, the white, transparent and color background can be changed accordingly.
Enhancing the visual impact of the picture: A white background picture grab the attention of the customers. So, it is good for advertising and promotion. While this needs to be removed when one desire to add some visual impact on the pictures or deliver some message to the viewers. So, it requires adding colorful and visually good background in a picture.
Adding more items to a picture: A white background need to be removed when more items are required to be included in it. Special edits and enhancing the pictures requires removing or adding a white background as per the purpose of the picture.
Part 3 How to Delete White Background in Photoshop (5 Fast Ways)

Editing a picture with white background can be done in easy steps through various applications. Deleting white background in Photoshop can be done through various tools. Some of the top 5 fast ways to clear background Photoshop are**:**
With the object selection tool:
● Start Photoshop and open the picture. Select the “object selection” from the tool bar. Hover cursor over subject till it turns blue. The subject is selected.
● Press the shift key to remove the background while selecting the objects which you want in the picture.
● To invert the selection go to Select>Inverse.
● Unlock the image based on what you want in the background. It will no longer be a background. It can be also used to create transparent background Photoshop.
● Click on Erase tool and start erasing the background.
Removing background with quick action
This is the quick method for removing a background when a user is going for own purpose. It is in-built quick action in Photoshop for removing the background. Although it is good for performing work, but the same cannot meet the perfection level that any other method does. It can be done by following the mentioned steps:
● Open the image in Photoshop, right click on background layer and click Duplicate layer. Then click on OK.
● Always try to open the properties panel by going to Window>Properties.
● Click on new layer at Layer panel. Go to Quick action and click on Remove Background.
● The background gets removed with quick action.
● At this point refinements and adjustments can be made.
Using pen tool to remove the background
● Open image in Photoshop, right click on background layer and go to Duplicate Layer. Name the layer and click OK.
● Select the Pen tool from the toolbox. Zoom the area. Start at the edge of subject. Start working on the object; add anchors which will outline the subject.
● Click-hold-drag to produce a curved line.
● Use the Direct Selection tool in the toolbox if you want to adjust an anchor point or directional lines for fine tuning
● Complete the path from where you started and save it by going to Windows>paths. Go to three bar menu, click New Path to name it and then save.
● Go to path panel and right click New Path. Choose Make selection and click OK. This will give the outline of the path.
● Go to Select> Inverse if you don’t want to delete what is inside the selection. An outline can be seen around the image.
● Press delete to delete the background. It can be also done to add Adobe Photoshop transparent background.
With Magnetic Lasso Tool
● Right click Background layer and click duplicate layer on the image opened in Photoshop. Name the layer and then click OK. From the toolbox, select Magic Lasso tool. Start drawing at the edges of subject.
● Move around the subject and complete till the start point. Marching ants can be seen around the selection.
● Go to Selection>Save selection to save and give it a name.
● Select>Inverse to delete the background. Photoshop checkered background is visible now.
With quick selection tool
● Click on Duplicate Layer by right clicking on background layer of the picture opened on the Photoshop. Name the layer and click OK.
● Go to the tool box and select quick selection tool.
● Paint the subject by using tool.
● Clean up the selection path with click by holding the Option key (macOS) or Alt key (Windows).
● Go to Selection>Save selection to save and give it a name.
● Select>Inverse to delete the background. The white background can be seen now.
Part 4 Which Photoshop Selection Tool is Best for White Backdrop Removal

There are various tools available at Photoshop to turn a background white. Each one of them has great utility based on the applications. Background Eraser tool is one of the good tools if there is need of more control over removing the background in Photoshop. It is highly effective and saves time of the user. It gives the desired outcome with perfection to an image. The visualization of image becomes better when the background is turned into white with the help of Background Eraser tool.
The other application that is very helpful in making background white to any image is Filmora.
Filmora is an excellent image and video editing software which helps the users in creating some amazing images and videos. It has wide range of image and video editing tools that can make any user a professional in image and video editing. It has features to add or remove background of an image to make it more visually good. Changing background and adding special effects to images and videos can be easily done through filmora.
Wondershare Filmora Video Editor allows transformation of pictures and videos in a better way by adding filters and graphics. Availability of support, drawing tools, editing tools, special effects and sound make it a complete application for both beginners and professionals. It can be used with various other applications also. Those who wish to know how to make a layer transparent in Photoshop can learn it from Filmora.
For Win 7 or later (64-bit)
For macOS 10.12 or later
● Ending Thoughts →
● Making white background or transparent background adobe photoshop has many benefits like it highlight the picture and make it good for various applications and occasions. It saves money and cost for the image editors and video makers.
● One should also know when to use the white background for images, catalogue and video shoot. Adding and deleting white background can only be done when required as per the demand of the occasion and the category of the user like marketing, media, customers etc.
● Various tools on Photoshop make it easy for the users to add or remove white background of images. Filmora is one of the applications that is very popular for its image editing features. It can be used to give special effects to any image or video.
Know how Photoshop make white background transparent. Learn to create transparent background in Photoshop in simple steps. How to delete white background in image?
In this article
01 [Why Shooting with a White Background Makes Sense](#Part 1)
02 [When We Need to Delete White Background and when Not?](#Part 2)
03 [How to Delete White Background in Photoshop (5 Fast Ways)](#Part 3)
04 [Which Photoshop Selection Tool is Best for White Backdrop Removal](#Part 4)
Part 1 Why Shooting with a White Background Makes Sense
Products have gone online with E-commerce and people explore the products over internet more than they pick it from the stores. So, every business needs to showcase their products in a attractive way to get more customers. This needs an attractive photography by experts. Photography for e-commerce products requires expert product photography or commercial photography. They are very important for a business to get success in long run. To do branding the product image should be accurate and attractive.
So, if your company is going online, your products photography should be attractive enough to make buyers purchase your products. Background is essential part of any photography or video making. Whether it is product catalogue, shoot, advertising or commercial videos, white backdrop and white background are always good. With white background one can pay attention to the product. Every details of the product are highlighted when a white background is used.
When you need bright and highlighted images for any commercial videos, using a right technique for background color is must. White background creates a clean and bright commercial photo. If the same is not done correctly, the white background may turn to be off white or grey. A white background is good for isolating an object in the picture.
So, let’s know why shooting with white background make sense. Here are some reasons for it:
Removal of background becomes Easy and quick:
The most important benefit of applying white background is that it can be easily removed or replaced. In place of the blank white background, one can easily apply other background color or make it transparent. The white background has a speciality that it reflects the color of the product better which makes the product image visually good. This can be done with the help of any tool or application. Thus, using a white background gives an opportunity to apply any other background on it.
Promoting product in every occasion: An image with colorful background may not be useful to present in every event or occasion. For example a simple image with colorful background will not look good in a promotional event, while a colorful background will look happening in any festival event celebration. This, a blank background has the option to change as per the need of the occasion.
An image with white background can be changed as per the occasion. This helps a business to use a single image throughout the year without any additional cost for making a different picture. You can just change the white background of any image through various application or software.
Time saving: Removing white background is easy and streamlined as compared to any other color. The reason is that it does not require much editing and work on the edges. So, the steps in removing the white background are less and thus it saves time of the artist and the editors.
Saves location and bulk shooting expenses: When shooting with a white background is done; the same picture with some changes can be reused for number of times in several occasions. Thus, it saves the cost of shooting different in pictures in different location.
Good to celebrate every special day: A picture with white background is perfect and ready to edit for any special day. Whether it I a father’s day, mother’s day or any special day, a single picture can be edited as per the requirement. It will be a great gifting idea also after changing white background of the picture as per the special day.
Part 2 When We Need to Delete White Background and when Not?
A single picture of a person or product cannot be used for a single instance or purpose. Especially when it is a promotional campaign or commercial advertisements, a product is required to be showcased in several marketing campaign for different categories of consumers. Thus, a white background image is good for several purposes while in some circumstances, it requires changes. So, let’s see when to delete white background and when not:
When a picture requires special editing: When a picture requires some special effects like reflection, highlights and shadow effects, the picture with white background is required to be changed. When improvement in picture is requires, the white, transparent and color background can be changed accordingly.
Enhancing the visual impact of the picture: A white background picture grab the attention of the customers. So, it is good for advertising and promotion. While this needs to be removed when one desire to add some visual impact on the pictures or deliver some message to the viewers. So, it requires adding colorful and visually good background in a picture.
Adding more items to a picture: A white background need to be removed when more items are required to be included in it. Special edits and enhancing the pictures requires removing or adding a white background as per the purpose of the picture.
Part 3 How to Delete White Background in Photoshop (5 Fast Ways)
Editing a picture with white background can be done in easy steps through various applications. Deleting white background in Photoshop can be done through various tools. Some of the top 5 fast ways to clear background Photoshop are**:**
With the object selection tool:
● Start Photoshop and open the picture. Select the “object selection” from the tool bar. Hover cursor over subject till it turns blue. The subject is selected.
● Press the shift key to remove the background while selecting the objects which you want in the picture.
● To invert the selection go to Select>Inverse.
● Unlock the image based on what you want in the background. It will no longer be a background. It can be also used to create transparent background Photoshop.
● Click on Erase tool and start erasing the background.
Removing background with quick action
This is the quick method for removing a background when a user is going for own purpose. It is in-built quick action in Photoshop for removing the background. Although it is good for performing work, but the same cannot meet the perfection level that any other method does. It can be done by following the mentioned steps:
● Open the image in Photoshop, right click on background layer and click Duplicate layer. Then click on OK.
● Always try to open the properties panel by going to Window>Properties.
● Click on new layer at Layer panel. Go to Quick action and click on Remove Background.
● The background gets removed with quick action.
● At this point refinements and adjustments can be made.
Using pen tool to remove the background
● Open image in Photoshop, right click on background layer and go to Duplicate Layer. Name the layer and click OK.
● Select the Pen tool from the toolbox. Zoom the area. Start at the edge of subject. Start working on the object; add anchors which will outline the subject.
● Click-hold-drag to produce a curved line.
● Use the Direct Selection tool in the toolbox if you want to adjust an anchor point or directional lines for fine tuning
● Complete the path from where you started and save it by going to Windows>paths. Go to three bar menu, click New Path to name it and then save.
● Go to path panel and right click New Path. Choose Make selection and click OK. This will give the outline of the path.
● Go to Select> Inverse if you don’t want to delete what is inside the selection. An outline can be seen around the image.
● Press delete to delete the background. It can be also done to add Adobe Photoshop transparent background.
With Magnetic Lasso Tool
● Right click Background layer and click duplicate layer on the image opened in Photoshop. Name the layer and then click OK. From the toolbox, select Magic Lasso tool. Start drawing at the edges of subject.
● Move around the subject and complete till the start point. Marching ants can be seen around the selection.
● Go to Selection>Save selection to save and give it a name.
● Select>Inverse to delete the background. Photoshop checkered background is visible now.
With quick selection tool
● Click on Duplicate Layer by right clicking on background layer of the picture opened on the Photoshop. Name the layer and click OK.
● Go to the tool box and select quick selection tool.
● Paint the subject by using tool.
● Clean up the selection path with click by holding the Option key (macOS) or Alt key (Windows).
● Go to Selection>Save selection to save and give it a name.
● Select>Inverse to delete the background. The white background can be seen now.
Part 4 Which Photoshop Selection Tool is Best for White Backdrop Removal
There are various tools available at Photoshop to turn a background white. Each one of them has great utility based on the applications. Background Eraser tool is one of the good tools if there is need of more control over removing the background in Photoshop. It is highly effective and saves time of the user. It gives the desired outcome with perfection to an image. The visualization of image becomes better when the background is turned into white with the help of Background Eraser tool.
The other application that is very helpful in making background white to any image is Filmora.
Filmora is an excellent image and video editing software which helps the users in creating some amazing images and videos. It has wide range of image and video editing tools that can make any user a professional in image and video editing. It has features to add or remove background of an image to make it more visually good. Changing background and adding special effects to images and videos can be easily done through filmora.
Wondershare Filmora Video Editor allows transformation of pictures and videos in a better way by adding filters and graphics. Availability of support, drawing tools, editing tools, special effects and sound make it a complete application for both beginners and professionals. It can be used with various other applications also. Those who wish to know how to make a layer transparent in Photoshop can learn it from Filmora.
For Win 7 or later (64-bit)
For macOS 10.12 or later
● Ending Thoughts →
● Making white background or transparent background adobe photoshop has many benefits like it highlight the picture and make it good for various applications and occasions. It saves money and cost for the image editors and video makers.
● One should also know when to use the white background for images, catalogue and video shoot. Adding and deleting white background can only be done when required as per the demand of the occasion and the category of the user like marketing, media, customers etc.
● Various tools on Photoshop make it easy for the users to add or remove white background of images. Filmora is one of the applications that is very popular for its image editing features. It can be used to give special effects to any image or video.
How to Use Visual Effect for Zoom
Zoom, a video calling software, has been quite popular over the last several months and is still one of the most used videos calling applications by millions of people worldwide. The site is a favorite among working professionals, but it is also utilized by individuals to connect with their friends and loved ones. Additionally, despite the app’s abundance of practical built-in tools and functions, it lacks the fun filters and special effects that the majority of users are used to when using a camera. Zoom has ingrained itself in our vocabulary during the last year. It seemed almost inevitable given that everything, from meetings to parties, has moved online.
You don’t need to seek farther than Zoom visual effects to inject a little jazz into the routine Zoom meetings during these hard times. By making adjustments to your Video configuration either before or during a video call, you may add visual effects in Zoom. Zoom meetings may be tedious to conduct over extended periods of time. Additionally, it would be helpful if you recorded the condition of your room before any Zoom meetings. You wouldn’t want to reveal your disorganized space while in a meeting. In these situations, adding visual effects will keep your private area private while also making your Zoom meetings entertaining and exciting. It will also prevent others from seeing your filthy room. This tutorial will walk you through the process of adding visual effects to Zoom step-by-step. In addition, you will get acquainted with the numerous camera functions and visual effects that you may employ during a Zoom video conversation.
- 1. What apps can add visual effect on Zoom?
- 2. How do I add visual effects to Zoom in Mobile?
- 3. How do you download Zoom effects?
Part 1: Popular Visual Effects you can add to Zoom
You may apply one of four main graphic effects to your Zoom meetings. The visual effects that you may use in your next Zoom video chat are briefly summarized below.
1. Visual Backgrounds
Virtual backdrops may transform any plain wall into an artistic setting. Zoom provides you the choice to add photographs to your backdrop in addition to offering you a few pre-made backdrops. Zoom lets you add a movie to your backdrop in addition to simply photographs. With the help of this imaginative feature, gather your pals and enjoy your favorite meme or video. A presentation’s collection of photos, a video, or a single image may all serve as virtual backdrops. A green screen would often be used as your real backdrop and consistent lighting would be required.
To avoid having to reveal your real surroundings while in a conference, you may add any picture or video as a virtual backdrop in Zoom. You have the option of adding own photos and movies or selecting from the pre-existing backdrop films and images. The file type for video backgrounds should be MP4 or MOV, and the resolution should range from 360p to a maximum of 1080p. Ensure that the mirroring of your video is deselected in the Zoom’s Video settings if your backdrop picture has text that may be read. By using virtual backdrops, you may alter the background of your video as it appears to the audience member with whom you are speaking. During the video conference you’re in, the other participants will be able to view your face and body overlaid on the backdrop of your choice.
2. Filters
With these filters, you can have fun in all of your Zoom meetings! Filters are a fun way to spend time with loved ones who are far away, particularly at a period when maintaining social distance is crucial. Filters are the modifications you make to yourself during Zoom meetings (such as a mustache, beard, etc.). They enliven the proceedings and contribute to the fun and memorability of your Zoom meetings.
Your films’ colors may be changed, and video filters can also add new aspects. By selecting a filter appropriate for each event, like team meetings or game nights, you may create the right atmosphere. You may embellish your face in the video with flowers or animal traits by using Zoom’s various filters. Alternately, you might just convert your video’s color to black and white. The video filters from a different program, however, allow you to apply more vibrant filters and place a greater emphasis on special effects.
3. Lighting and Touch-ups
The Lighting function enhances lighting effects and makes adjustments for low light situations to make you seem more professional during a Zoom conference. Similar to this, Touch-up enhances your facial characteristics by making your skin shine, erasing wrinkles, and giving your face a radiant appearance.
On your Zoom videos, changing your lighting and applying touch-ups may improve how you seem. By adjusting your lighting, you can make even dim illumination look bright. By doing touch-ups, you may get a smoother skin texture and get rid of any obvious imperfections.
4. Studio Effects
Zoom has been developing on a new feature called Studio Effects that would give customers the option of using virtual cosmetics in their movies. They are still checking it out before formally releasing it since it is still in beta. However, it is still available to users under the Backgrounds & Filters area. You may adjust the opacity as you like. You have the option to choose a new color or one of the predefined colors. Additionally, you may decide to employ the face effects in all of your next meetings, albeit doing so might be problematic if you use Zoom for business. Don’t worry if you’re running late. Zoom can give your face a natural-looking cosmetic makeover in only one minute!
This function is intended for less formal settings, such as gatherings of friends or family. Anyone who wants to seem more professional during meetings has access to Studio Effects, which offers the choice of various eyebrow colors, beards, and lipsticks. These are a few recently added features. You may add mustaches, beards, and brows in a variety of designs, hues, and intensities. Additionally, you have the option of coloring your lips.
Part 2: How to Add Visual Effects to Zoom
Along with facilitating online meetings, the Zoom program also lets you play with its visual effects. You just need to make a few adjustments to the video settings or utilize another third-party program to be ready to go.
Step1Start a Zoom meeting
You can download Zoom, install it on your computer, and log into your account if you don’t already have it if you don’t already have it.
Step2Tap Background and Filters
After logging in to Zoom, use these settings. - Options > Camera > Video

Step3Faucet Filters
Here, you may play with a variety of visual effects and customize them to suit your tastes. Pick one of the numerous filters that are offered. To activate the filter, tap it.
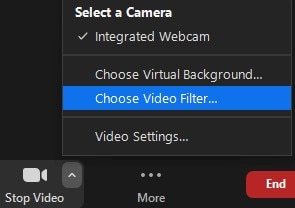
Step4Set Lighting Effects to on
Select “Adjust for low light” in the video options. For your lighting, you may choose between Auto and Manual effects. Zoom will automatically detect and adapt for the lighting in your room if you choose Auto.
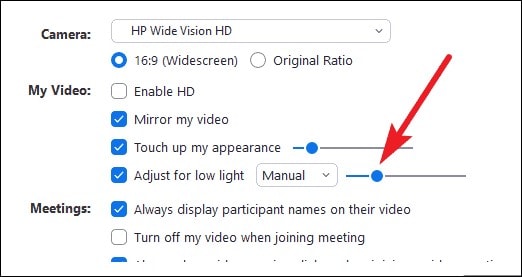
Use Zoom’s noise reduction option to keep your conversation focused during your video conference in addition to adding visual elements. To do this, go to “Audio Settings” and choose “High” under “Suppress background noise.” Once you start speaking during the video conference, this essentially cancels out any background noise.
Part 3: Related FAQs
1. What apps can add visual effect on Zoom?
Following is the list of top three apps that you can use to utilize visual effects Zoom application:
Snap Camera is regarded as the most user-friendly. It is a software that you can download for Windows or Mac that works with live broadcasts and video chats. Because it was created by the people who founded Snapchat, it shares a broad variety of filters with that platform.
Link: Snap Camera
The Mac is the only platform on which CamTwist may be used. You may also use it to give your movies additional filters and unique effects. This program lets you pick from a variety of pre-made effects while also allowing you to create your own.
Link: CamTwist
Another desktop application that lets you change and even blur your backdrop is ManyCam. It enables you to apply digital effects, filters, and 3-D masks to your face. Using this tool, you can also build layers and presets.
Link: ManyCam
2. How do I add visual effects to Zoom in Mobile?
Zoom includes a function that might be useful if you don’t want to tidy up or want to add some entertainment to your calls. You may utilize Zoom virtual backdrops to alter your surroundings and take you to a more pleasant location on both the desktop and mobile apps. After joining one on a mobile device, pick Virtual backdrop by tapping the More icon in the bottom right corner. Choose a photo from the list of choices, or click the plus sign (+) to add a photo or video from your gallery.
3. How do you download Zoom effects?
Pressing the Studio Effects button after installing Zoom for the first time will prompt a pop-up asking you to download the Studio Effects package. Several filters, suited for both business meetings and conversations with friends, let you customize the video and audio during your video calls. To start downloading the Effects bundle, click the Download button. The “Studio Effects” window will appear on the right-hand side of the Background & Filter page after the download is finished. All the face components and choices are available in this Studio Effects window.
Conclusion
The most popular video meeting tool worldwide is Zoom. Family, friends, coworkers, and any two people who want to video chat utilize it. Zoom visual effects are the ideal tool for injecting some humor into otherwise dull Zoom sessions and meetings. A few simple steps will get you a striking backdrop, a humorous filter, and some interesting effects. Since the majority of formal work is now completed from home, Zoom has taken over as the standard video conferencing program. Try out as many of the effects as you like, and use this page as a companion and a map to help you along the way.
- 1. What apps can add visual effect on Zoom?
- 2. How do I add visual effects to Zoom in Mobile?
- 3. How do you download Zoom effects?
Part 1: Popular Visual Effects you can add to Zoom
You may apply one of four main graphic effects to your Zoom meetings. The visual effects that you may use in your next Zoom video chat are briefly summarized below.
1. Visual Backgrounds
Virtual backdrops may transform any plain wall into an artistic setting. Zoom provides you the choice to add photographs to your backdrop in addition to offering you a few pre-made backdrops. Zoom lets you add a movie to your backdrop in addition to simply photographs. With the help of this imaginative feature, gather your pals and enjoy your favorite meme or video. A presentation’s collection of photos, a video, or a single image may all serve as virtual backdrops. A green screen would often be used as your real backdrop and consistent lighting would be required.
To avoid having to reveal your real surroundings while in a conference, you may add any picture or video as a virtual backdrop in Zoom. You have the option of adding own photos and movies or selecting from the pre-existing backdrop films and images. The file type for video backgrounds should be MP4 or MOV, and the resolution should range from 360p to a maximum of 1080p. Ensure that the mirroring of your video is deselected in the Zoom’s Video settings if your backdrop picture has text that may be read. By using virtual backdrops, you may alter the background of your video as it appears to the audience member with whom you are speaking. During the video conference you’re in, the other participants will be able to view your face and body overlaid on the backdrop of your choice.
2. Filters
With these filters, you can have fun in all of your Zoom meetings! Filters are a fun way to spend time with loved ones who are far away, particularly at a period when maintaining social distance is crucial. Filters are the modifications you make to yourself during Zoom meetings (such as a mustache, beard, etc.). They enliven the proceedings and contribute to the fun and memorability of your Zoom meetings.
Your films’ colors may be changed, and video filters can also add new aspects. By selecting a filter appropriate for each event, like team meetings or game nights, you may create the right atmosphere. You may embellish your face in the video with flowers or animal traits by using Zoom’s various filters. Alternately, you might just convert your video’s color to black and white. The video filters from a different program, however, allow you to apply more vibrant filters and place a greater emphasis on special effects.
3. Lighting and Touch-ups
The Lighting function enhances lighting effects and makes adjustments for low light situations to make you seem more professional during a Zoom conference. Similar to this, Touch-up enhances your facial characteristics by making your skin shine, erasing wrinkles, and giving your face a radiant appearance.
On your Zoom videos, changing your lighting and applying touch-ups may improve how you seem. By adjusting your lighting, you can make even dim illumination look bright. By doing touch-ups, you may get a smoother skin texture and get rid of any obvious imperfections.
4. Studio Effects
Zoom has been developing on a new feature called Studio Effects that would give customers the option of using virtual cosmetics in their movies. They are still checking it out before formally releasing it since it is still in beta. However, it is still available to users under the Backgrounds & Filters area. You may adjust the opacity as you like. You have the option to choose a new color or one of the predefined colors. Additionally, you may decide to employ the face effects in all of your next meetings, albeit doing so might be problematic if you use Zoom for business. Don’t worry if you’re running late. Zoom can give your face a natural-looking cosmetic makeover in only one minute!
This function is intended for less formal settings, such as gatherings of friends or family. Anyone who wants to seem more professional during meetings has access to Studio Effects, which offers the choice of various eyebrow colors, beards, and lipsticks. These are a few recently added features. You may add mustaches, beards, and brows in a variety of designs, hues, and intensities. Additionally, you have the option of coloring your lips.
Part 2: How to Add Visual Effects to Zoom
Along with facilitating online meetings, the Zoom program also lets you play with its visual effects. You just need to make a few adjustments to the video settings or utilize another third-party program to be ready to go.
Step1Start a Zoom meeting
You can download Zoom, install it on your computer, and log into your account if you don’t already have it if you don’t already have it.
Step2Tap Background and Filters
After logging in to Zoom, use these settings. - Options > Camera > Video
Step3Faucet Filters
Here, you may play with a variety of visual effects and customize them to suit your tastes. Pick one of the numerous filters that are offered. To activate the filter, tap it.
Step4Set Lighting Effects to on
Select “Adjust for low light” in the video options. For your lighting, you may choose between Auto and Manual effects. Zoom will automatically detect and adapt for the lighting in your room if you choose Auto.
Use Zoom’s noise reduction option to keep your conversation focused during your video conference in addition to adding visual elements. To do this, go to “Audio Settings” and choose “High” under “Suppress background noise.” Once you start speaking during the video conference, this essentially cancels out any background noise.
Part 3: Related FAQs
1. What apps can add visual effect on Zoom?
Following is the list of top three apps that you can use to utilize visual effects Zoom application:
Snap Camera is regarded as the most user-friendly. It is a software that you can download for Windows or Mac that works with live broadcasts and video chats. Because it was created by the people who founded Snapchat, it shares a broad variety of filters with that platform.
Link: Snap Camera
The Mac is the only platform on which CamTwist may be used. You may also use it to give your movies additional filters and unique effects. This program lets you pick from a variety of pre-made effects while also allowing you to create your own.
Link: CamTwist
Another desktop application that lets you change and even blur your backdrop is ManyCam. It enables you to apply digital effects, filters, and 3-D masks to your face. Using this tool, you can also build layers and presets.
Link: ManyCam
2. How do I add visual effects to Zoom in Mobile?
Zoom includes a function that might be useful if you don’t want to tidy up or want to add some entertainment to your calls. You may utilize Zoom virtual backdrops to alter your surroundings and take you to a more pleasant location on both the desktop and mobile apps. After joining one on a mobile device, pick Virtual backdrop by tapping the More icon in the bottom right corner. Choose a photo from the list of choices, or click the plus sign (+) to add a photo or video from your gallery.
3. How do you download Zoom effects?
Pressing the Studio Effects button after installing Zoom for the first time will prompt a pop-up asking you to download the Studio Effects package. Several filters, suited for both business meetings and conversations with friends, let you customize the video and audio during your video calls. To start downloading the Effects bundle, click the Download button. The “Studio Effects” window will appear on the right-hand side of the Background & Filter page after the download is finished. All the face components and choices are available in this Studio Effects window.
Conclusion
The most popular video meeting tool worldwide is Zoom. Family, friends, coworkers, and any two people who want to video chat utilize it. Zoom visual effects are the ideal tool for injecting some humor into otherwise dull Zoom sessions and meetings. A few simple steps will get you a striking backdrop, a humorous filter, and some interesting effects. Since the majority of formal work is now completed from home, Zoom has taken over as the standard video conferencing program. Try out as many of the effects as you like, and use this page as a companion and a map to help you along the way.
Also read:
- Updated Ideas for Time-Lapse Video
- In 2024, This Article Aims to Show You How to Improve Your Lighting in the Sun
- Updated In This Article, You Will Learn How to Record Creative Cinematic Videos Using a Smartphone and Edit the Video with Wondershare Filmora
- New 2024 Approved All Things About Adding Effects In Kinemaster
- In 2024, Do You Want to Create a Motion Blur Effect in Your Videos? Read This Well-Described Guide to Learn How to Add Motion Blur on CapCut on iPhone and Android Devices
- Updated Adding Slow Motion in DaVinci Resolve A Comprehensive Overview for 2024
- Updated In 2024, Best Ai Generated Memes
- Updated WMV File Format Has Many Benefits over the Video Industry. If You Are Excited to Know More About the Format and Its Pros and Cons, Then Lets Start the Discussion
- 2024 Approved The Craziest 10 AI Editors Youve Seen
- 2024 Approved AVI Editors for Windows 11/10/8.1/8/7 Easily Edit AVI Files on PC
- Updated 2024 Approved How To Create 3D Text In Video
- New Time Lapse Videos Play an Important Part in Videography. If You Want to Start Video Shooting, Then You Shouldnt Miss Time Lapse Video. This Article Will Show You some Ideas over This
- New Adjust the TikTok Videos Length to Make Them Captivating for 2024
- The Art of Fashioning Slow Motions Has Remained Popular Ever Since. Read This Article to Learn How to Do Slow-Mo in CapCut and Other Powerful Tools
- 2024 Approved Top 10 Free WhatsApp Video Converter
- Updated 2024 Approved Recording Video in Slow Motion Some Considerable Points
- How to Create a Custom Sequence Preset in Premiere Pro for 2024
- Updated 2024 Approved 10 Best Music Video Templates to Make Your Video Popular
- New In 2024, 3 Ways To Stream And Record At The Same Time
- New 2024 Approved Best Love Video Maker with Music
- New Best 10 Tools To Make Quiz Videos for 2024
- New Create Intro Video with Flixpress
- New 11 Ways To Radial Blur To Images (iPhone/Android/Mac/Windows)
- 2024 Approved The Top Tips for Becoming a Good Podcast Host Are Presented in This Article. How to Start and End the Podcast Show Is All Set Below. You Can Also Learn About the Ways to Call Guests to Your Show
- Updated In 2024, Tips to Make Cinematic Color Grading
- New With an SRT Editor Online, You Can Synchronize the Subtitles with the Video, Change the Font, and Make Them More Readable. Read on to Know Your Options
- In 2024, Guiding Principles of Track Matte and Tracking in Adobe After Effects
- In 2024, Top 15 LUTS to Buy
- New 2024 Approved How to Add VHS Green Screen to Your Video
- Updated In 2024, Best 10 Tools To Make Quiz Videos
- What Is Lumetri Color and How Do You Use It in Adobe After Effects? Find Out the Numerous Functions of Lumetri Panel and Ways to Apply Them to Your Video for 2024
- Updated In 2024, How to Change Aspect Ratio of Video?
- In 2024, Adjust Background to Black for Your Product Review Video
- New How to Get Motion Blur in Roblox?
- Time Lapse Video Is Very Interesting and Creative, Which Usually Attracts More Attention. This Article Will Show You How to Make a Time Lapse Video with Adobe After Effects
- New Learn How to Use 3D Camera Tracking in Adobe After Effects and Take Your Skills to the Next Level
- 2024 Approved Some Facts That Few People Know on How to Make Transparent Background in Canva
- In 2024, Find Out About MAGIX Vegas Pro Pricing Plan and Features to See How the Software Can Help You with Your Video Editing Tasks
- New Customize PowerPoint Slideshow Icon in Simple Ways for 2024
- Updated In 2024, How to Create Glowing Edge Effect in TikTok Dancing Video
- Learn How to Blur the Background in Adobe Premiere Pro with Our Quick and Simple Step-by-Step Instructions to Make Your Subject More Attention-Grabbing for 2024
- How To Create an Apple Developer Account On Apple iPhone 8 Plus
- How to recover lost data from Honor 90 GT?
- In 2024, Simple and Effective Ways to Change Your Country on YouTube App Of your Honor Magic 6 Pro | Dr.fone
- In 2024, Complete Review & Guide to Techeligible FRP Bypass and More For Vivo Y78t
- Why does the pokemon go battle league not available On Samsung Galaxy XCover 6 Pro Tactical Edition | Dr.fone
- What is the best Pokemon for pokemon pvp ranking On Samsung Galaxy A34 5G? | Dr.fone
- In 2024, 3 Ways to Track Motorola Moto G23 without Them Knowing | Dr.fone
- How to Access Your iPhone SE (2020) When You Forget the Passcode? | Dr.fone
- In 2024, How To Stream Anything From Samsung Galaxy S23+ to Apple TV | Dr.fone
- Ways You Can Master to Find 10 Best Free Animated Text Generator for 2024
- Top 6 Apps/Services to Trace Any Samsung Galaxy F34 5G Location By Mobile Number | Dr.fone
- Unlock Oppo A18 Phone Password Without Factory Reset Full Guide Here
- How to Reset OnePlus 12 without Losing Data | Dr.fone
- In 2024, Will Pokémon Go Ban the Account if You Use PGSharp On Honor 80 Pro Straight Screen Edition | Dr.fone
- How to Share/Fake Location on WhatsApp for Apple iPhone 14 Pro | Dr.fone
- In 2024, Why does the pokemon go battle league not available On Apple iPhone 15 Pro Max | Dr.fone
- In 2024, Here are Some of the Best Pokemon Discord Servers to Join On Samsung Galaxy S24 Ultra | Dr.fone
- How to share/fake gps on Uber for Itel S23 | Dr.fone
- Title: For Artists Who Are Making Videos for Show Their Knowledge or Projects, Add some Effects for the Video Can Always Provoke Interests and Attention. This Article Will Show You How to Do that Easily
- Author: Chloe
- Created at : 2024-05-20 03:37:34
- Updated at : 2024-05-21 03:37:34
- Link: https://ai-editing-video.techidaily.com/for-artists-who-are-making-videos-for-show-their-knowledge-or-projects-add-some-effects-for-the-video-can-always-provoke-interests-and-attention-this-articl/
- License: This work is licensed under CC BY-NC-SA 4.0.
