:max_bytes(150000):strip_icc():format(webp)/GettyImages-136612668-5c640cc5c9e77c00010a4ff4.jpg)
Frame Rates, Speed, and Wondershare Filmora An Overview

Frame Rates, Speed, and Wondershare Filmora: An Overview
Ensuring smoother playback along with enhanced fluidity is a crucial part of boosting the engagement of videos. You also need to add the slow-motion effect at some points in videos. Along with this, syncing audio to video is also essential. Thus, you can take assistance from frame rates and speed to ensure you have these key features in the videos.
There is no need to be concerned about what video editor to choose because Wondershare Filmora can help you with this issue. In this article, you will find basic information about Filmora and the uses of frame rate and speed ramping. We will also provide the procedure for changing video frame rates with Filmora.
- Part 1: What is Frame Rate and How Important It Is In Videos?
- Part 2: What Are The Different Uses of Speed Ramping in Video Editing?
- Part 3: Perform Basic Speed Adjustments and Speed Ramping on Wondershare Filmora
- Part 4: [Basic] How to Change The Frame Rate in Wondershare Filmora?
- Conclusion
Part 1: What is Frame Rate and How Important It Is In Videos?
One of the most important metrics in videos is the frame rate. This term refers to the individual frames present in the video. While the frame represents a single second, this defines the frequency of the video. This is the display of consecutive frames every second, which brings up the illusion of motion for the viewers. In this way, the entire frame rate is explained as terminology to users new to video editing.
Importance of Frame Rate in Videos
We will highlight some prominent points explaining the importance of video frame rates. Continuing with these points, this will help users understand how essential video frame rate is:
01of 04Defines Smoothness in Videos
Having a higher frame rate in a video is equivalent to a smooth video. Users who consider having smoothness in their videos always consider the frame rates. Higher frame rates have better transitions and seamless motion.
02of 04The detail in the Video
If you have a low frame rate in your video, you cannot observe the details in the fast-moving objects. In such a scenario, you need to have a video with a good frame rate. This will help display the explicit details of the video, which cannot be viewed under every frame rate quality.
03of 04Realistic Effects
Old videos never had the kick that made them feel real. Videos with higher frame rates have changed the dynamics in the current system. Realism and immersive video experience are prominent getaways achieved with better frame rates.
04of 04Realistic Effects
The use of better frame rates gives the option of improving the effects of the video. Videos that did not have impressive frame rates are not able to display the mood or atmosphere. Better frame rates help display the environment better, thus explaining the importance.
Changing Video Frame Rates And Speed Editor A wonderful video editor - Wondershare Filmora providing frame rate and speed ramping features for all creators.
Free Download Free Download Learn More

Part 2: What Are The Different Uses of Speed Ramping in Video Editing?
Speed ramping and video frame rate are one of the most known techniques which are widely used in video editing. You must be wondering why paying attention to speed ramping is so important. Nothing to worry about because this part will give you the most implementable uses of speed ramping in video editing. Have a look below to discover further information about this:
Highlighting Actions and Dramas
You can use speed ramping to emphasize the actional and dramatic sequences. It also helps you draw the audience’s attention and make the essential factors more notable. Above all, the speed ramping also integrates the useable effects which can add a drastic touch of drama to your videos,
Transitions and Motion Tracking
With the good use of speed ramping, you can achieve a smooth transition in videos. It also helps you add seamless transitions in the videos to add a sense of consistency. One of the best things is adding slow-motion and motion-tracking effects in simple videos.
Syncing Audios
Syncing the audio beats with videos is crucial to enhance the user experience. Speed ramping offers capabilities through which you can easily sync the audio to the length of videos. As it never compromises the content or layout of videos, you don’t have to worry about anything.
Emphasized Storytelling
If you need to induce a sense of storytelling and optimize the video quality, consider speed ramping. You can control the overall speed of actions and dramas and convey a particular narrative to add depth to videos. It also helps to increase the frame rate of video.
Part 3: Perform Basic Speed Adjustments and Speed Ramping on Wondershare Filmora
Wondershare Filmora is a great video editor providing exquisite features and details to users. It embeds simple video editing tools and AI functionalities to provide a quick editing experience. However, the focus on the details is not lacking in this tool. Filmora provides a comprehensive set of effects, transitions, and elements to induce in videos.
Free Download For Win 7 or later(64-bit)
Free Download For macOS 10.14 or later
Along with that, it also includes multiple functionalities which cannot be observed in many video editors. However, since we are putting our focus on discussing the speed adjustments in Filmora, let’s look at the comprehensive steps explained below:
Method 1: Uniform Speed Adjustments in Videos
Step 1Import Video on Filmora for Speed Adjustments
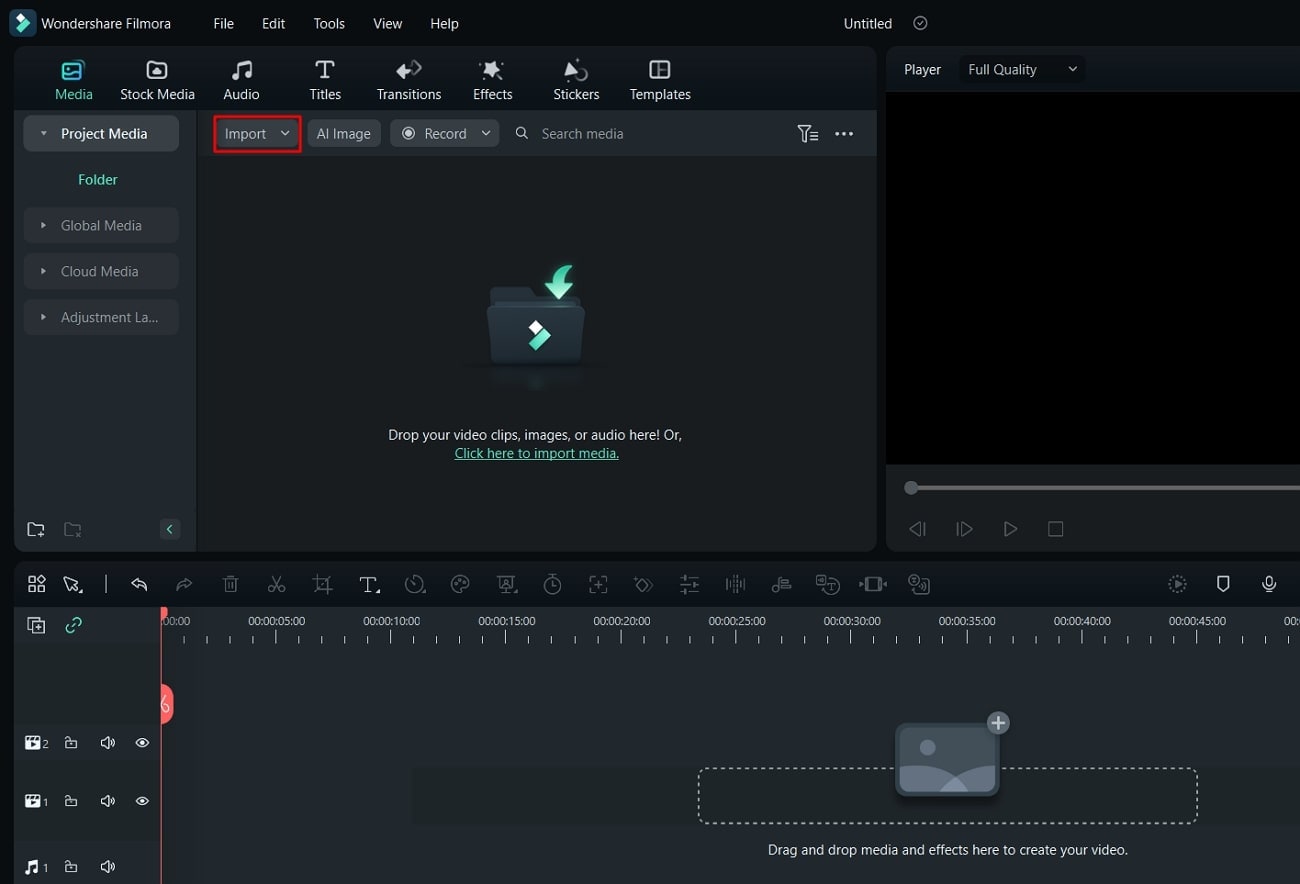
Firstly, launch Wondershare Filmora on your computer and continue to open a new project. Once a window enters the display, lead into the “Import” section for importing the media files that need adjustment.
Step 2Select the Speed Option
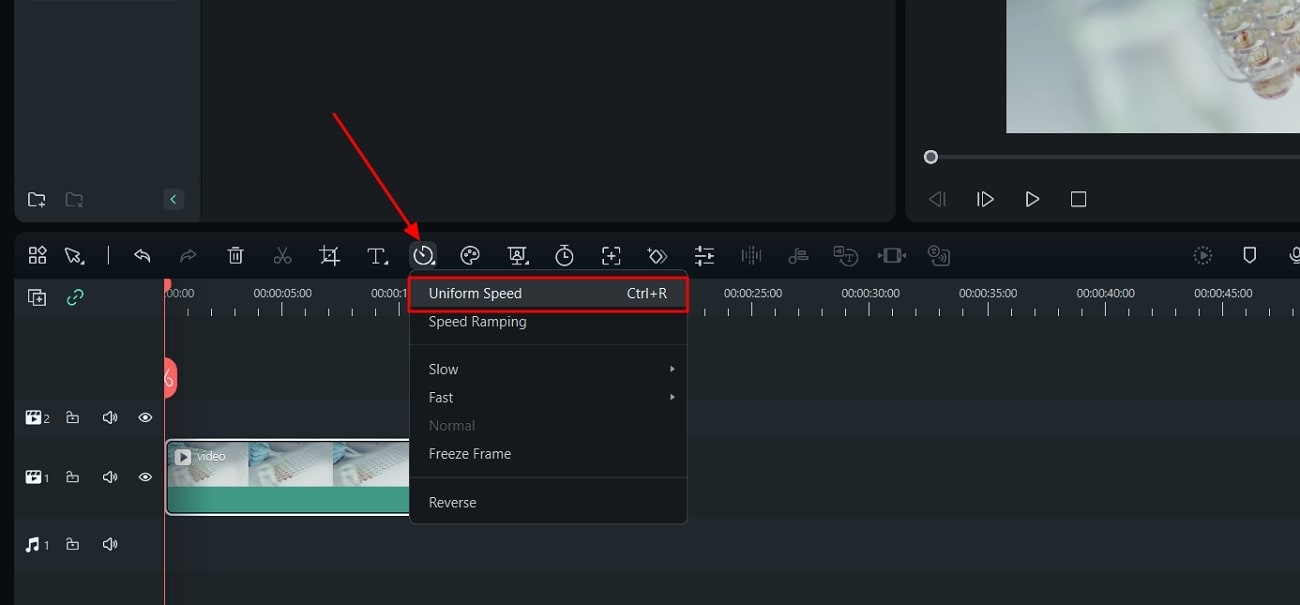
After adding the videos and dragging them to the timeline, continue to locate the “Speed “ option in the bar above the timeline. This opens a drop-down menu where you have to select “Uniform Speed” or use “Ctrl + R.”
Step 3Manage Speed Uniformly
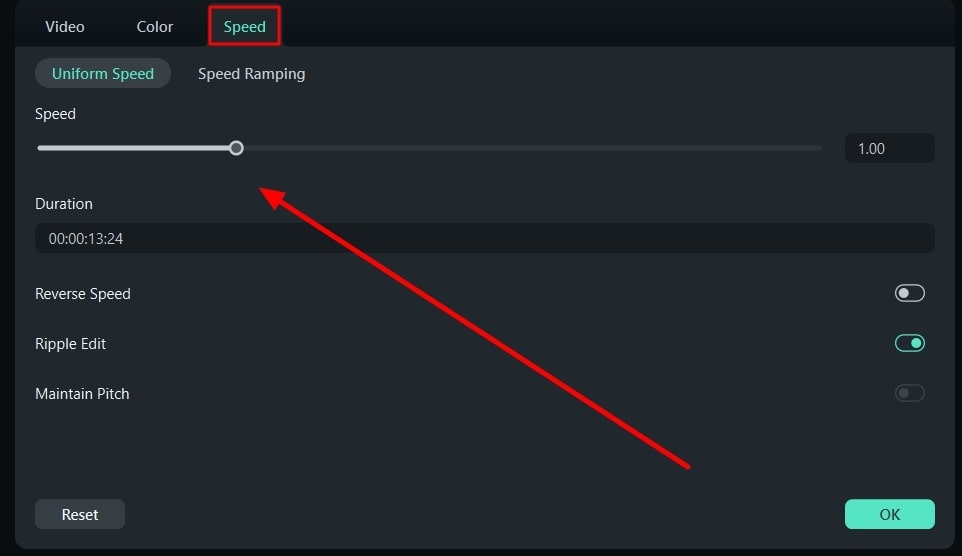
A new section opens on the video editor where you can define the speed using the slider. Also, you can activate options like “Reverse Speed,” “Ripple Edit,” and “Maintain Pitch,” if needed.
Method 2: Utilize the Option of Speed Ramping
Step 1Access Speed Ramping Option
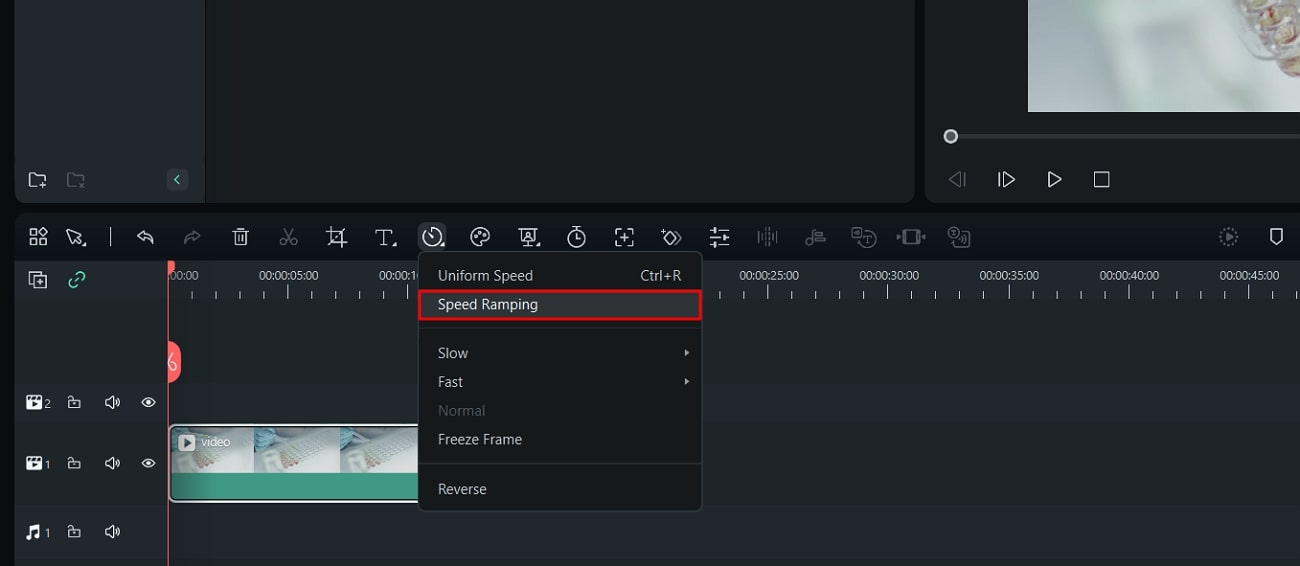
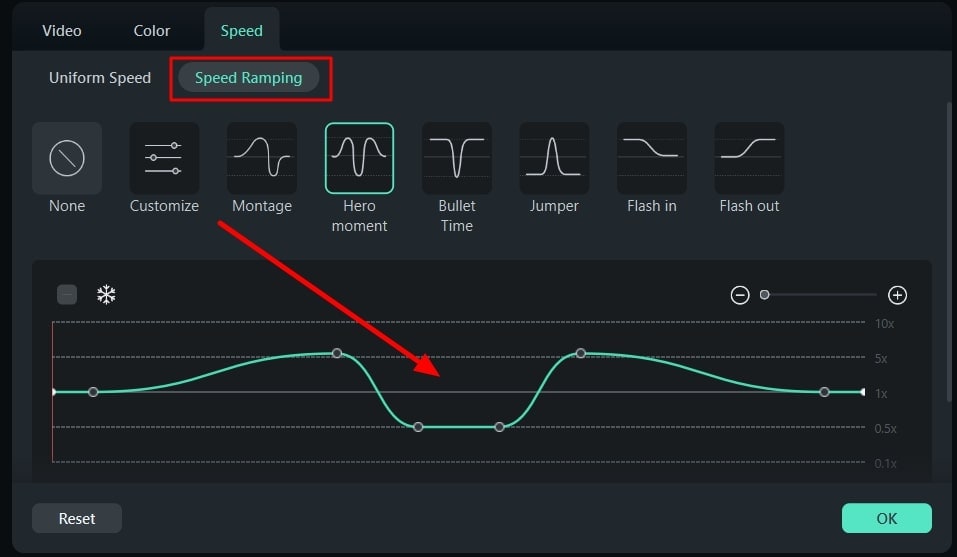
Once you have opened Filmora and imported a video on the timeline, lead to the “Speed” button again. Select the option of “Speed Ramping ” in the drop-down to continue.
Step 2Manage Speed Ramping of Video
As you find a new screen on your front, select the type of Speed Ramping you want to perform. Adjust the speed ramp on the line graph that comes in display and click “OK” to conclude.
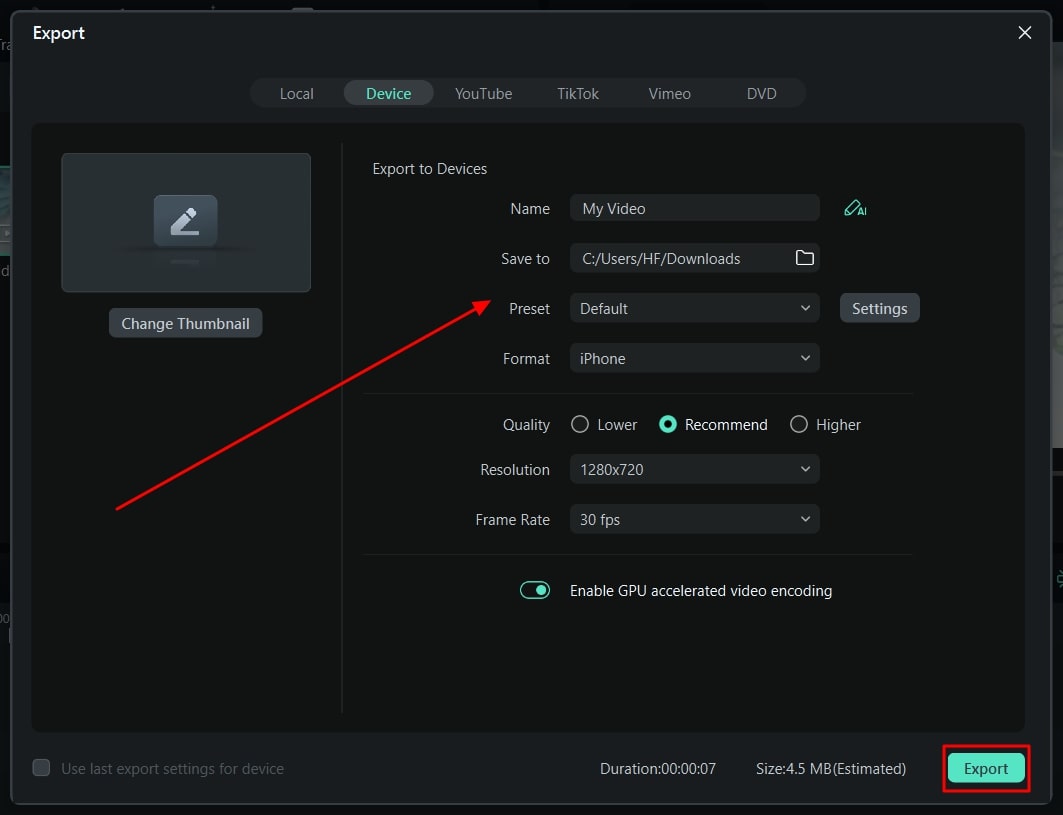
Step 3Export the Final Video
Once you are done editing your videos, lead to the “Export” button to save the videos on the device.
Part 4: [Basic] How to Change The Frame Rate in Wondershare Filmora?
While you find out the ways to change the speed of your videos, you can also change their frame rate. Filmora offers dedicated options on its platform to its users, which can be understood in the steps below:
Free Download For Win 7 or later(64-bit)
Free Download For macOS 10.14 or later
Step 1Open Settings For Changing Frame Rate
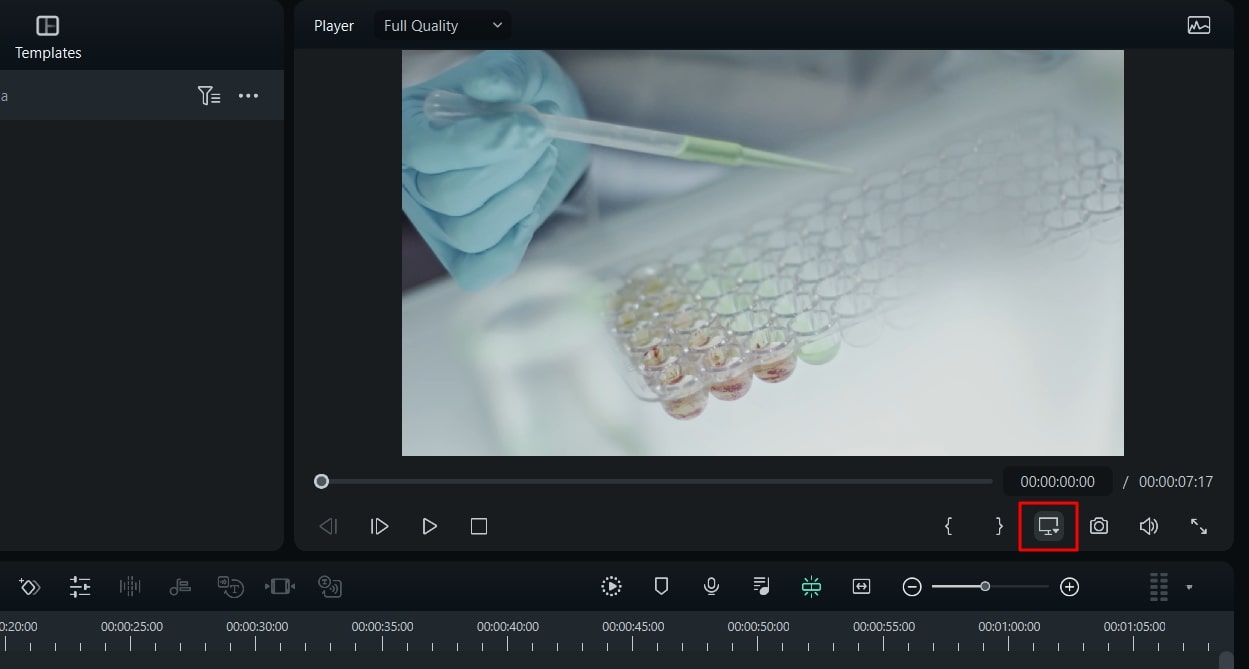
As you open Filmora and import a video, drag it to the timeline. Once the video is imported, lead to the “Preview quality and display settings” button on the right side of the screen.
Step 2Manage Speed Ramping of Video
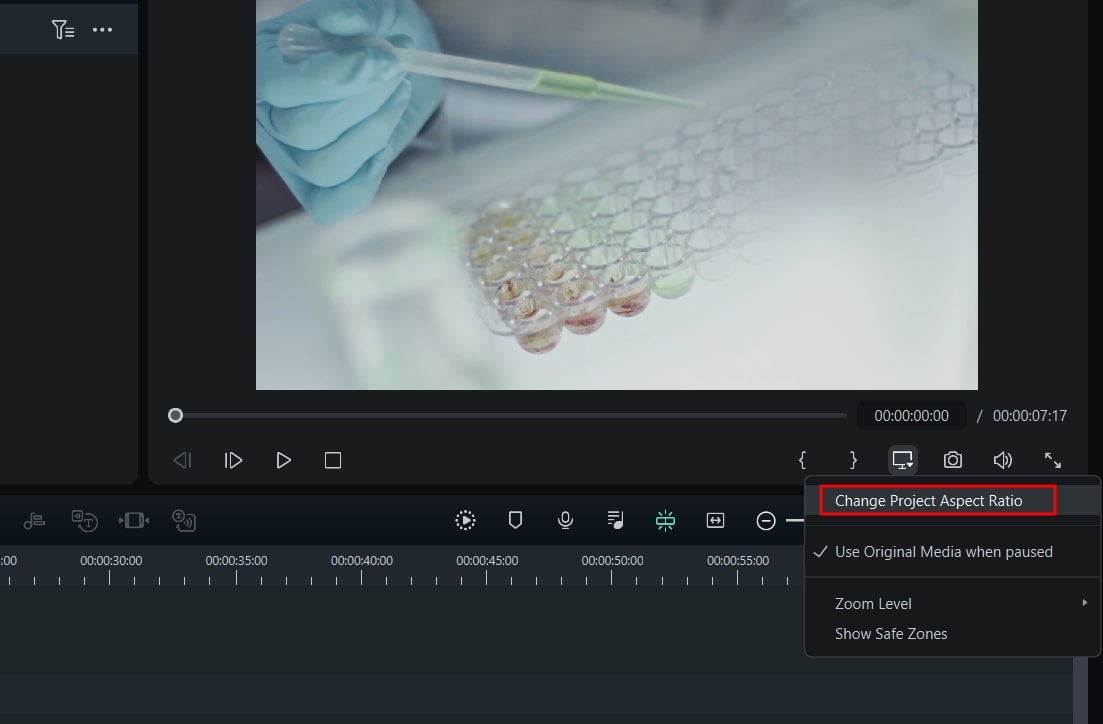
This opens a drop-down menu where you have to select the option “Change Project Aspect Ratio.”
Step 3Change Frame Rate Successfully
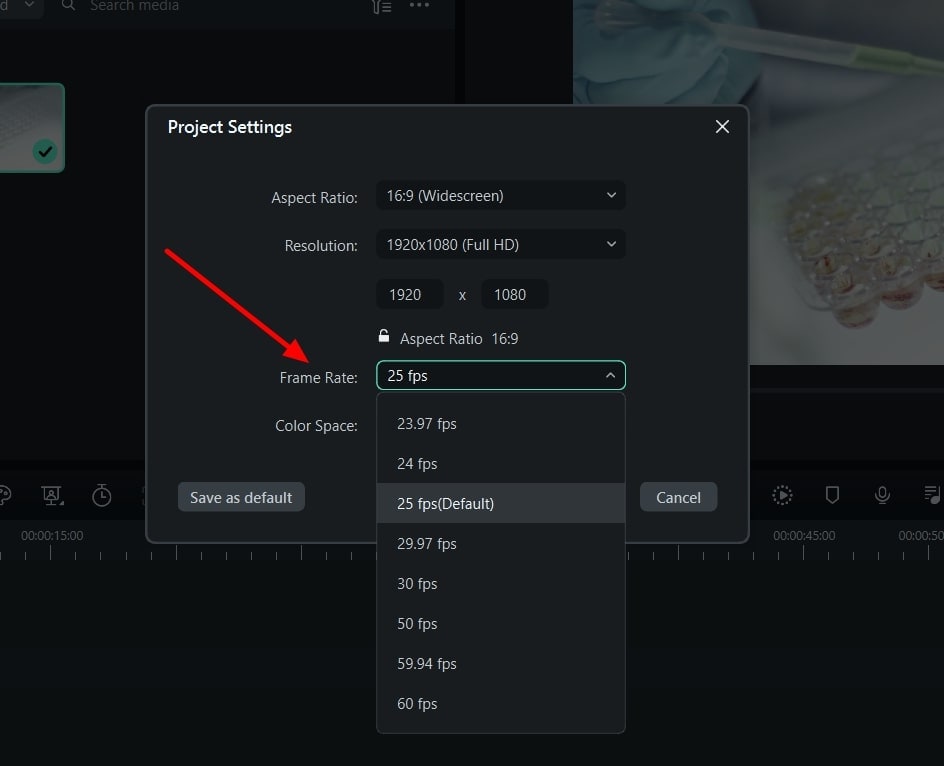
You will be led to a new screen where you can find the option of “Frame Rate” in the list. Change the frame rate according to the requirements and options available and click “OK.” The frame rate of your video will be changed using Filmora.
Conclusion
This article has displayed a conspicuous detail of what the frame rate in the video is and how it implicates video editing. Wondershare Filmora has been observed as the perfect way to manage the speeds of videos. Video frame rates can also be managed using the exquisite video editor. Those who wish to manage such features of the videos should consider using this tool.
Part 1: What is Frame Rate and How Important It Is In Videos?
One of the most important metrics in videos is the frame rate. This term refers to the individual frames present in the video. While the frame represents a single second, this defines the frequency of the video. This is the display of consecutive frames every second, which brings up the illusion of motion for the viewers. In this way, the entire frame rate is explained as terminology to users new to video editing.
Importance of Frame Rate in Videos
We will highlight some prominent points explaining the importance of video frame rates. Continuing with these points, this will help users understand how essential video frame rate is:
01of 04Defines Smoothness in Videos
Having a higher frame rate in a video is equivalent to a smooth video. Users who consider having smoothness in their videos always consider the frame rates. Higher frame rates have better transitions and seamless motion.
02of 04The detail in the Video
If you have a low frame rate in your video, you cannot observe the details in the fast-moving objects. In such a scenario, you need to have a video with a good frame rate. This will help display the explicit details of the video, which cannot be viewed under every frame rate quality.
03of 04Realistic Effects
Old videos never had the kick that made them feel real. Videos with higher frame rates have changed the dynamics in the current system. Realism and immersive video experience are prominent getaways achieved with better frame rates.
04of 04Realistic Effects
The use of better frame rates gives the option of improving the effects of the video. Videos that did not have impressive frame rates are not able to display the mood or atmosphere. Better frame rates help display the environment better, thus explaining the importance.
Changing Video Frame Rates And Speed Editor A wonderful video editor - Wondershare Filmora providing frame rate and speed ramping features for all creators.
Free Download Free Download Learn More

Part 2: What Are The Different Uses of Speed Ramping in Video Editing?
Speed ramping and video frame rate are one of the most known techniques which are widely used in video editing. You must be wondering why paying attention to speed ramping is so important. Nothing to worry about because this part will give you the most implementable uses of speed ramping in video editing. Have a look below to discover further information about this:
Highlighting Actions and Dramas
You can use speed ramping to emphasize the actional and dramatic sequences. It also helps you draw the audience’s attention and make the essential factors more notable. Above all, the speed ramping also integrates the useable effects which can add a drastic touch of drama to your videos,
Transitions and Motion Tracking
With the good use of speed ramping, you can achieve a smooth transition in videos. It also helps you add seamless transitions in the videos to add a sense of consistency. One of the best things is adding slow-motion and motion-tracking effects in simple videos.
Syncing Audios
Syncing the audio beats with videos is crucial to enhance the user experience. Speed ramping offers capabilities through which you can easily sync the audio to the length of videos. As it never compromises the content or layout of videos, you don’t have to worry about anything.
Emphasized Storytelling
If you need to induce a sense of storytelling and optimize the video quality, consider speed ramping. You can control the overall speed of actions and dramas and convey a particular narrative to add depth to videos. It also helps to increase the frame rate of video.
Part 3: Perform Basic Speed Adjustments and Speed Ramping on Wondershare Filmora
Wondershare Filmora is a great video editor providing exquisite features and details to users. It embeds simple video editing tools and AI functionalities to provide a quick editing experience. However, the focus on the details is not lacking in this tool. Filmora provides a comprehensive set of effects, transitions, and elements to induce in videos.
Free Download For Win 7 or later(64-bit)
Free Download For macOS 10.14 or later
Along with that, it also includes multiple functionalities which cannot be observed in many video editors. However, since we are putting our focus on discussing the speed adjustments in Filmora, let’s look at the comprehensive steps explained below:
Method 1: Uniform Speed Adjustments in Videos
Step 1Import Video on Filmora for Speed Adjustments
Firstly, launch Wondershare Filmora on your computer and continue to open a new project. Once a window enters the display, lead into the “Import” section for importing the media files that need adjustment.

Step 2Select the Speed Option
After adding the videos and dragging them to the timeline, continue to locate the “Speed “ option in the bar above the timeline. This opens a drop-down menu where you have to select “Uniform Speed” or use “Ctrl + R.”

Step 3Manage Speed Uniformly
A new section opens on the video editor where you can define the speed using the slider. Also, you can activate options like “Reverse Speed,” “Ripple Edit,” and “Maintain Pitch,” if needed.

Method 2: Utilize the Option of Speed Ramping
Step 1Access Speed Ramping Option
Once you have opened Filmora and imported a video on the timeline, lead to the “Speed” button again. Select the option of “Speed Ramping ” in the drop-down to continue.

Step 2Manage Speed Ramping of Video
As you find a new screen on your front, select the type of Speed Ramping you want to perform. Adjust the speed ramp on the line graph that comes in display and click “OK” to conclude.

Step 3Export the Final Video
Once you are done editing your videos, lead to the “Export” button to save the videos on the device.

Part 4: [Basic] How to Change The Frame Rate in Wondershare Filmora?
While you find out the ways to change the speed of your videos, you can also change their frame rate. Filmora offers dedicated options on its platform to its users, which can be understood in the steps below:
Free Download For Win 7 or later(64-bit)
Free Download For macOS 10.14 or later
Step 1Open Settings For Changing Frame Rate
As you open Filmora and import a video, drag it to the timeline. Once the video is imported, lead to the “Preview quality and display settings” button on the right side of the screen.

Step 2Manage Speed Ramping of Video
This opens a drop-down menu where you have to select the option “Change Project Aspect Ratio.”

Step 3Change Frame Rate Successfully
You will be led to a new screen where you can find the option of “Frame Rate” in the list. Change the frame rate according to the requirements and options available and click “OK.” The frame rate of your video will be changed using Filmora.

Conclusion
This article has displayed a conspicuous detail of what the frame rate in the video is and how it implicates video editing. Wondershare Filmora has been observed as the perfect way to manage the speeds of videos. Video frame rates can also be managed using the exquisite video editor. Those who wish to manage such features of the videos should consider using this tool.
Part 1: What is Frame Rate and How Important It Is In Videos?
One of the most important metrics in videos is the frame rate. This term refers to the individual frames present in the video. While the frame represents a single second, this defines the frequency of the video. This is the display of consecutive frames every second, which brings up the illusion of motion for the viewers. In this way, the entire frame rate is explained as terminology to users new to video editing.
Importance of Frame Rate in Videos
We will highlight some prominent points explaining the importance of video frame rates. Continuing with these points, this will help users understand how essential video frame rate is:
01of 04Defines Smoothness in Videos
Having a higher frame rate in a video is equivalent to a smooth video. Users who consider having smoothness in their videos always consider the frame rates. Higher frame rates have better transitions and seamless motion.
02of 04The detail in the Video
If you have a low frame rate in your video, you cannot observe the details in the fast-moving objects. In such a scenario, you need to have a video with a good frame rate. This will help display the explicit details of the video, which cannot be viewed under every frame rate quality.
03of 04Realistic Effects
Old videos never had the kick that made them feel real. Videos with higher frame rates have changed the dynamics in the current system. Realism and immersive video experience are prominent getaways achieved with better frame rates.
04of 04Realistic Effects
The use of better frame rates gives the option of improving the effects of the video. Videos that did not have impressive frame rates are not able to display the mood or atmosphere. Better frame rates help display the environment better, thus explaining the importance.
Changing Video Frame Rates And Speed Editor A wonderful video editor - Wondershare Filmora providing frame rate and speed ramping features for all creators.
Free Download Free Download Learn More

Part 2: What Are The Different Uses of Speed Ramping in Video Editing?
Speed ramping and video frame rate are one of the most known techniques which are widely used in video editing. You must be wondering why paying attention to speed ramping is so important. Nothing to worry about because this part will give you the most implementable uses of speed ramping in video editing. Have a look below to discover further information about this:
Highlighting Actions and Dramas
You can use speed ramping to emphasize the actional and dramatic sequences. It also helps you draw the audience’s attention and make the essential factors more notable. Above all, the speed ramping also integrates the useable effects which can add a drastic touch of drama to your videos,
Transitions and Motion Tracking
With the good use of speed ramping, you can achieve a smooth transition in videos. It also helps you add seamless transitions in the videos to add a sense of consistency. One of the best things is adding slow-motion and motion-tracking effects in simple videos.
Syncing Audios
Syncing the audio beats with videos is crucial to enhance the user experience. Speed ramping offers capabilities through which you can easily sync the audio to the length of videos. As it never compromises the content or layout of videos, you don’t have to worry about anything.
Emphasized Storytelling
If you need to induce a sense of storytelling and optimize the video quality, consider speed ramping. You can control the overall speed of actions and dramas and convey a particular narrative to add depth to videos. It also helps to increase the frame rate of video.
Part 3: Perform Basic Speed Adjustments and Speed Ramping on Wondershare Filmora
Wondershare Filmora is a great video editor providing exquisite features and details to users. It embeds simple video editing tools and AI functionalities to provide a quick editing experience. However, the focus on the details is not lacking in this tool. Filmora provides a comprehensive set of effects, transitions, and elements to induce in videos.
Free Download For Win 7 or later(64-bit)
Free Download For macOS 10.14 or later
Along with that, it also includes multiple functionalities which cannot be observed in many video editors. However, since we are putting our focus on discussing the speed adjustments in Filmora, let’s look at the comprehensive steps explained below:
Method 1: Uniform Speed Adjustments in Videos
Step 1Import Video on Filmora for Speed Adjustments
Firstly, launch Wondershare Filmora on your computer and continue to open a new project. Once a window enters the display, lead into the “Import” section for importing the media files that need adjustment.

Step 2Select the Speed Option
After adding the videos and dragging them to the timeline, continue to locate the “Speed “ option in the bar above the timeline. This opens a drop-down menu where you have to select “Uniform Speed” or use “Ctrl + R.”

Step 3Manage Speed Uniformly
A new section opens on the video editor where you can define the speed using the slider. Also, you can activate options like “Reverse Speed,” “Ripple Edit,” and “Maintain Pitch,” if needed.

Method 2: Utilize the Option of Speed Ramping
Step 1Access Speed Ramping Option
Once you have opened Filmora and imported a video on the timeline, lead to the “Speed” button again. Select the option of “Speed Ramping ” in the drop-down to continue.

Step 2Manage Speed Ramping of Video
As you find a new screen on your front, select the type of Speed Ramping you want to perform. Adjust the speed ramp on the line graph that comes in display and click “OK” to conclude.

Step 3Export the Final Video
Once you are done editing your videos, lead to the “Export” button to save the videos on the device.

Part 4: [Basic] How to Change The Frame Rate in Wondershare Filmora?
While you find out the ways to change the speed of your videos, you can also change their frame rate. Filmora offers dedicated options on its platform to its users, which can be understood in the steps below:
Free Download For Win 7 or later(64-bit)
Free Download For macOS 10.14 or later
Step 1Open Settings For Changing Frame Rate
As you open Filmora and import a video, drag it to the timeline. Once the video is imported, lead to the “Preview quality and display settings” button on the right side of the screen.

Step 2Manage Speed Ramping of Video
This opens a drop-down menu where you have to select the option “Change Project Aspect Ratio.”

Step 3Change Frame Rate Successfully
You will be led to a new screen where you can find the option of “Frame Rate” in the list. Change the frame rate according to the requirements and options available and click “OK.” The frame rate of your video will be changed using Filmora.

Conclusion
This article has displayed a conspicuous detail of what the frame rate in the video is and how it implicates video editing. Wondershare Filmora has been observed as the perfect way to manage the speeds of videos. Video frame rates can also be managed using the exquisite video editor. Those who wish to manage such features of the videos should consider using this tool.
Part 1: What is Frame Rate and How Important It Is In Videos?
One of the most important metrics in videos is the frame rate. This term refers to the individual frames present in the video. While the frame represents a single second, this defines the frequency of the video. This is the display of consecutive frames every second, which brings up the illusion of motion for the viewers. In this way, the entire frame rate is explained as terminology to users new to video editing.
Importance of Frame Rate in Videos
We will highlight some prominent points explaining the importance of video frame rates. Continuing with these points, this will help users understand how essential video frame rate is:
01of 04Defines Smoothness in Videos
Having a higher frame rate in a video is equivalent to a smooth video. Users who consider having smoothness in their videos always consider the frame rates. Higher frame rates have better transitions and seamless motion.
02of 04The detail in the Video
If you have a low frame rate in your video, you cannot observe the details in the fast-moving objects. In such a scenario, you need to have a video with a good frame rate. This will help display the explicit details of the video, which cannot be viewed under every frame rate quality.
03of 04Realistic Effects
Old videos never had the kick that made them feel real. Videos with higher frame rates have changed the dynamics in the current system. Realism and immersive video experience are prominent getaways achieved with better frame rates.
04of 04Realistic Effects
The use of better frame rates gives the option of improving the effects of the video. Videos that did not have impressive frame rates are not able to display the mood or atmosphere. Better frame rates help display the environment better, thus explaining the importance.
Changing Video Frame Rates And Speed Editor A wonderful video editor - Wondershare Filmora providing frame rate and speed ramping features for all creators.
Free Download Free Download Learn More

Part 2: What Are The Different Uses of Speed Ramping in Video Editing?
Speed ramping and video frame rate are one of the most known techniques which are widely used in video editing. You must be wondering why paying attention to speed ramping is so important. Nothing to worry about because this part will give you the most implementable uses of speed ramping in video editing. Have a look below to discover further information about this:
Highlighting Actions and Dramas
You can use speed ramping to emphasize the actional and dramatic sequences. It also helps you draw the audience’s attention and make the essential factors more notable. Above all, the speed ramping also integrates the useable effects which can add a drastic touch of drama to your videos,
Transitions and Motion Tracking
With the good use of speed ramping, you can achieve a smooth transition in videos. It also helps you add seamless transitions in the videos to add a sense of consistency. One of the best things is adding slow-motion and motion-tracking effects in simple videos.
Syncing Audios
Syncing the audio beats with videos is crucial to enhance the user experience. Speed ramping offers capabilities through which you can easily sync the audio to the length of videos. As it never compromises the content or layout of videos, you don’t have to worry about anything.
Emphasized Storytelling
If you need to induce a sense of storytelling and optimize the video quality, consider speed ramping. You can control the overall speed of actions and dramas and convey a particular narrative to add depth to videos. It also helps to increase the frame rate of video.
Part 3: Perform Basic Speed Adjustments and Speed Ramping on Wondershare Filmora
Wondershare Filmora is a great video editor providing exquisite features and details to users. It embeds simple video editing tools and AI functionalities to provide a quick editing experience. However, the focus on the details is not lacking in this tool. Filmora provides a comprehensive set of effects, transitions, and elements to induce in videos.
Free Download For Win 7 or later(64-bit)
Free Download For macOS 10.14 or later
Along with that, it also includes multiple functionalities which cannot be observed in many video editors. However, since we are putting our focus on discussing the speed adjustments in Filmora, let’s look at the comprehensive steps explained below:
Method 1: Uniform Speed Adjustments in Videos
Step 1Import Video on Filmora for Speed Adjustments
Firstly, launch Wondershare Filmora on your computer and continue to open a new project. Once a window enters the display, lead into the “Import” section for importing the media files that need adjustment.

Step 2Select the Speed Option
After adding the videos and dragging them to the timeline, continue to locate the “Speed “ option in the bar above the timeline. This opens a drop-down menu where you have to select “Uniform Speed” or use “Ctrl + R.”

Step 3Manage Speed Uniformly
A new section opens on the video editor where you can define the speed using the slider. Also, you can activate options like “Reverse Speed,” “Ripple Edit,” and “Maintain Pitch,” if needed.

Method 2: Utilize the Option of Speed Ramping
Step 1Access Speed Ramping Option
Once you have opened Filmora and imported a video on the timeline, lead to the “Speed” button again. Select the option of “Speed Ramping ” in the drop-down to continue.

Step 2Manage Speed Ramping of Video
As you find a new screen on your front, select the type of Speed Ramping you want to perform. Adjust the speed ramp on the line graph that comes in display and click “OK” to conclude.

Step 3Export the Final Video
Once you are done editing your videos, lead to the “Export” button to save the videos on the device.

Part 4: [Basic] How to Change The Frame Rate in Wondershare Filmora?
While you find out the ways to change the speed of your videos, you can also change their frame rate. Filmora offers dedicated options on its platform to its users, which can be understood in the steps below:
Free Download For Win 7 or later(64-bit)
Free Download For macOS 10.14 or later
Step 1Open Settings For Changing Frame Rate
As you open Filmora and import a video, drag it to the timeline. Once the video is imported, lead to the “Preview quality and display settings” button on the right side of the screen.

Step 2Manage Speed Ramping of Video
This opens a drop-down menu where you have to select the option “Change Project Aspect Ratio.”

Step 3Change Frame Rate Successfully
You will be led to a new screen where you can find the option of “Frame Rate” in the list. Change the frame rate according to the requirements and options available and click “OK.” The frame rate of your video will be changed using Filmora.

Conclusion
This article has displayed a conspicuous detail of what the frame rate in the video is and how it implicates video editing. Wondershare Filmora has been observed as the perfect way to manage the speeds of videos. Video frame rates can also be managed using the exquisite video editor. Those who wish to manage such features of the videos should consider using this tool.
Create Perfect Slow Motion Videos With The Best CapCut Templates
Editing from scratch is a time-consuming process, especially when you’re a beginner. Even skilled editors opt for different ways to maintain productivity. One of the means to save time is the use of templates for creating or editing videos. Slow-motion videos require the manipulation of speed or framerate to produce results. Slow-motion CapCut templates prove to be a valuable source.
In this article, readers will learn about slow-mo CapCut templates for crafting slow-motion videos. For those unfamiliar with CapCut, a brief overview of its functions will be provided. In addition, we’ll introduce some remarkable slow-mo CapCut templates. Moreover, you can learn about an extraordinary alternative for fashioning amazing slow-motion videos.
Slow Motion Video Maker Slow your video’s speed with better control of your keyframes to create unique cinematic effects!
Make A Slow Motion Video Make A Slow Motion Video More Features

Part 1. CapCut Video Editor for Smartphone: Reading Out the Detailed Review
CapCut is a content editing platform that acts as a smartphone application and computing software. The application serves in various video editing tasks while giving professional outcomes. Most of CapCut’s features are free to use; however, there is an affordable subscription plan.
It has AI and manual functioning features to help you edit how you like. In its “Explore” section, you can find various effects, text styles, stickers, and audio tracks. Moreover, you can also introduce subtitles and captions with its “Caption” tool. Plus, it offers camera recording where you can adjust record time, effects, multi-clip options, and more. Here are some of CapCut’s limitless editing features:

- Templates: CapCut enables you to access its pre-built templates for distinct purposes. You can access it all from there, be it fast-motion, cinematic effect, or CapCut slow-mo template. Moreover, when you add the keyword for search, it can show you trending templates and hashtags.
- Remove Background: If you couldn’t decide on a good background while recording, CapCut has got you covered. This feature not only removes the background but also offers a setting for bringing precision. You can adjust the edge setting or intensity of these settings accordingly.
- Smart User-Interface: This application has an intuitive, clean, and smart smartphone interface. The themes and the positioning of features are done minimally, where nothing looks stuffed. In addition, you can expand or collapse the display menu accordingly.
- Image Enhancement: As discussed before, CapCut is a content editing app that offers image enhancements as well. The feature automatically compresses your content quality to 1080p. Moreover, you can resize the image post-enhancement and add an AI background to it.
- Cloud Storage and Collaboration: You can edit without any prior account information in CapCut. However, signing up comes with various benefits, such as accessing pre-edited projects. In addition, you can connect with other editors on CapCut and take your editing up a notch.
Part 2. Some Top-Rated CapCut Templates to Try for Creating Perfect Slow-Motion Videos
With a wide range of features and effects, CapCut also has the power to turn videos into slow-mos. You can craft a slow-motion video via manual speed change or be smart with its templates. CapCut slow-motion templates are easily accessible in its Template section. While there are hundreds of slow-mo templates CapCut, take a look at these that we’ve compiled for you:
1. Slowmo
This template is reachable via the CapCut slow-mo edit template gallery and is open for access. The template possesses an aspect ratio of 9:16 and is a suitable fit for your Instagram reels and YouTube shorts. It only requires a video of 16 seconds to get started with this trending template. The template slows down your video at specific durations, giving it a majestic resonance.

2. Slowmotion Smooth
With a catchy song and visually striking filter, this is perfect for aesthetic dress-up videos. This CapCut video slow motion template applies to a single clip of 14 seconds duration. With its 9:16 aspect ratio, it is well-fitted for a majority of social platforms. The template has over 316.3K uses, and you can replace its background song using CapCut.

3. Trend Slowmo
Use this trending slow-motion song CapCut template with over 1.1 million uses to make viral slo-mos. It doesn’t offer a basic Slomo effect but has a trendy background song. In addition, the template is a collaboration between slow motion and blur effect. Users only require a video to employ this effect, offering a 9:16 aspect ratio.

4. Slowmo Aesthetic
Make your modeling and dress-up video look aesthetic with this slow-mo CapCut template. It is a beautiful blend of slow-motion effects on specific scenes with an aesthetic filter. The video will start with a black-and-white look with a smooth transition toward colors and slo-mo. With its 9:16 aspect ratio and 6-second duration, it is perfect for showcasing dresses and fashion.

5. Healing Slowmo
Craft aesthetic travel videos and capture landscapes using this CapCut slow-mo template. It appears as a combination of slow motion and blur effect at multiple periods. You only require a portrait clip to use this template in an efficient way. You can fashion captivating Instagram, Facebook, and Pinterest reels with its 9:16 ratio.

Part 3. How to Create Proper Slow-Motion Videos on CapCut Video Editor?
CapCut slow-mo edit not only slows down video but also helps in post-editing. The user interface is self-explanatory, and you can find the features with ease. However, this section will provide you with a detailed guide on using the template CapCut slow-mo. Here is a step-by-step guide to creating a slo-mo in CapCut via its templates collection:
Step 1. After downloading CapCut on your smartphone, launch it to access its main menu. From there, navigate towards the downward bar and click the “Templates” option.

Step 2. In the templates collection, go to the search bar and type slow motion. Multiple options will appear on the screen in the Trending section. From there, select a template to employ it. Once you have selected the template, observe if it is right for your video. Afterward, click the “Use template” button to start editing with it.

Step 3. Once you have selected a video, click the “Preview” button. Notice that you can only select the number of videos the template offers.

Step 4. Afterward, click on the “Text” option and add text if you want. After all the editing is done, click on the “Export” button to download the video.

Part 4. Smartphone Alternative: Creating Slow Motion Videos with Wondershare Filmora App
Wondershare Filmora is a versatile platform for creating or editing slow motions with smartphone services. You can access the application from the Play Store or App Store and start editing instantly. The Filmora app displays a clearly laid out interface with easy access to features. Here, you can use advanced and basic speed editing to create a slow motion:

Method 1. Using the Normal Speed Option
The normal method in this CapCut slow-mo edit alternative uses playback speed. It involves a simple slider positioning and some enhancement options. Here is how to create a slow motion in the Filmora app using the standard approach:
Step 1. After downloading the Filmora application, navigate towards the top tools. From there, select the “Speed” option and choose a clip for import.

Step 2. Select the “Normal” section and drag the playback towards the left. This will slow down the video, and you can set the speed up to 0.2x for slo-mo. After speed settings, click the “ü” icon, and if you want, do other settings.

Step 3. Once you are done with post-slow motion settings, click the “Export” button.

Method 2. Using the Speed Curve Option
This method involves slightly advanced speed settings for slow-motion creation. This method features many templates alternative to CapCut slow-mo templates. Further, you can use the custom setting template to edit as per your taste. Here is how to create a slow motion using Filmora’s speed curve:
Step 1. Repeat the same process of importing the video and go to the “Curve” section. Select a pre-designed speed template if it fits your video. If not, go for the “Customize” template, and a panel will display.

Step 2. In this panel, adjust the slider position in the downward direction. This will slow down your video at specific durations. You can also enable the “+ Add beat” option for audio adjustments.

Step 3. Click the “ü” icon a couple of times in the respective panels to finalize settings. Afterward, export the video by opting for the “Export” button.

Bonus Part. Make Your Video Editing Perfect with Wondershare Filmora
For beginners, smartphone editing might be satisfactory. However, for a skilled professional with a passion for editing, it’s not enough. For more precise editing and smooth slow motions, we recommend a desktop solution. This CapCut slow-motion edit alternative is Wondershare Filmora’s computing software.
It is an adaptable editing software offering basic as well as advanced video editing features. The features rest on its intuitive interface and are reachable to all. It has a resource library that is filled with transition templates, effects, presets, and more. It has both visual and audio editing options along with AI abilities for production purposes. All in all, the software is an amazing pick for those who prefer high-quality results.
Free Download For Win 7 or later(64-bit)
Free Download For macOS 10.14 or later
AI-Backed Professional Video Editing Features of Filmora
If you are looking to create high-grade slow motions using speed templates, Filmora is for you. There are multiple settings to enhance visuals, audio tracks, and texts. You can do amazing color corrections or add mesmerizing effects to videos. Here are some of its video editing features to consider during editing:
1. AI Copilot Editing
For instance, you are using Filmora for slow motion and don’t know where to start. Employ its copilot assistant and ask it about slo-mo creation. It will direct you towards the speed options with insights on editing. Moreover, the copilot provides one-click access buttons for you to access the feature.
2. AI Text-to-Video
If you are a big fan of AI applications, then Filmora is the right stop for you. Its text-to-video AI allows you to generate videos via prompts or scripts. The function automatically adds graphics and AI voice to videos.
3. Remove Background
The video background remover of Filmora uses high-end AI technology to do the work. It analyzes and cuts out the background with accuracy while providing replacements. You employ three background options: solid color, gradients, and graphics. Users can also add a custom image or video in the timeline to use a background.
4. Instant Mode
If you are not familiar with video and need to start editing videos, this feature is for you. It is an automated video editor for you that uses AI algorithms to edit videos. It color-corrects or enhances any flaws and adds templates and beats to the video. Moreover, it has 115+ multi-contextual templates for diverse video editing.
Conclusion
Slow-motion CapCut templates serve as a powerful resource for creating slo-mos. The con is that with automated templates, there is no room for customizations. However, Wondershare Filmora is a powerful software application with no such limit. It offers visual, audio, and more custom options after some creation. Hence, if you are looking for an editor to broaden your editing game, use Filmora.
Make A Slow Motion Video Make A Slow Motion Video More Features

Part 1. CapCut Video Editor for Smartphone: Reading Out the Detailed Review
CapCut is a content editing platform that acts as a smartphone application and computing software. The application serves in various video editing tasks while giving professional outcomes. Most of CapCut’s features are free to use; however, there is an affordable subscription plan.
It has AI and manual functioning features to help you edit how you like. In its “Explore” section, you can find various effects, text styles, stickers, and audio tracks. Moreover, you can also introduce subtitles and captions with its “Caption” tool. Plus, it offers camera recording where you can adjust record time, effects, multi-clip options, and more. Here are some of CapCut’s limitless editing features:

- Templates: CapCut enables you to access its pre-built templates for distinct purposes. You can access it all from there, be it fast-motion, cinematic effect, or CapCut slow-mo template. Moreover, when you add the keyword for search, it can show you trending templates and hashtags.
- Remove Background: If you couldn’t decide on a good background while recording, CapCut has got you covered. This feature not only removes the background but also offers a setting for bringing precision. You can adjust the edge setting or intensity of these settings accordingly.
- Smart User-Interface: This application has an intuitive, clean, and smart smartphone interface. The themes and the positioning of features are done minimally, where nothing looks stuffed. In addition, you can expand or collapse the display menu accordingly.
- Image Enhancement: As discussed before, CapCut is a content editing app that offers image enhancements as well. The feature automatically compresses your content quality to 1080p. Moreover, you can resize the image post-enhancement and add an AI background to it.
- Cloud Storage and Collaboration: You can edit without any prior account information in CapCut. However, signing up comes with various benefits, such as accessing pre-edited projects. In addition, you can connect with other editors on CapCut and take your editing up a notch.
Part 2. Some Top-Rated CapCut Templates to Try for Creating Perfect Slow-Motion Videos
With a wide range of features and effects, CapCut also has the power to turn videos into slow-mos. You can craft a slow-motion video via manual speed change or be smart with its templates. CapCut slow-motion templates are easily accessible in its Template section. While there are hundreds of slow-mo templates CapCut, take a look at these that we’ve compiled for you:
1. Slowmo
This template is reachable via the CapCut slow-mo edit template gallery and is open for access. The template possesses an aspect ratio of 9:16 and is a suitable fit for your Instagram reels and YouTube shorts. It only requires a video of 16 seconds to get started with this trending template. The template slows down your video at specific durations, giving it a majestic resonance.

2. Slowmotion Smooth
With a catchy song and visually striking filter, this is perfect for aesthetic dress-up videos. This CapCut video slow motion template applies to a single clip of 14 seconds duration. With its 9:16 aspect ratio, it is well-fitted for a majority of social platforms. The template has over 316.3K uses, and you can replace its background song using CapCut.

3. Trend Slowmo
Use this trending slow-motion song CapCut template with over 1.1 million uses to make viral slo-mos. It doesn’t offer a basic Slomo effect but has a trendy background song. In addition, the template is a collaboration between slow motion and blur effect. Users only require a video to employ this effect, offering a 9:16 aspect ratio.

4. Slowmo Aesthetic
Make your modeling and dress-up video look aesthetic with this slow-mo CapCut template. It is a beautiful blend of slow-motion effects on specific scenes with an aesthetic filter. The video will start with a black-and-white look with a smooth transition toward colors and slo-mo. With its 9:16 aspect ratio and 6-second duration, it is perfect for showcasing dresses and fashion.

5. Healing Slowmo
Craft aesthetic travel videos and capture landscapes using this CapCut slow-mo template. It appears as a combination of slow motion and blur effect at multiple periods. You only require a portrait clip to use this template in an efficient way. You can fashion captivating Instagram, Facebook, and Pinterest reels with its 9:16 ratio.

Part 3. How to Create Proper Slow-Motion Videos on CapCut Video Editor?
CapCut slow-mo edit not only slows down video but also helps in post-editing. The user interface is self-explanatory, and you can find the features with ease. However, this section will provide you with a detailed guide on using the template CapCut slow-mo. Here is a step-by-step guide to creating a slo-mo in CapCut via its templates collection:
Step 1. After downloading CapCut on your smartphone, launch it to access its main menu. From there, navigate towards the downward bar and click the “Templates” option.

Step 2. In the templates collection, go to the search bar and type slow motion. Multiple options will appear on the screen in the Trending section. From there, select a template to employ it. Once you have selected the template, observe if it is right for your video. Afterward, click the “Use template” button to start editing with it.

Step 3. Once you have selected a video, click the “Preview” button. Notice that you can only select the number of videos the template offers.

Step 4. Afterward, click on the “Text” option and add text if you want. After all the editing is done, click on the “Export” button to download the video.

Part 4. Smartphone Alternative: Creating Slow Motion Videos with Wondershare Filmora App
Wondershare Filmora is a versatile platform for creating or editing slow motions with smartphone services. You can access the application from the Play Store or App Store and start editing instantly. The Filmora app displays a clearly laid out interface with easy access to features. Here, you can use advanced and basic speed editing to create a slow motion:

Method 1. Using the Normal Speed Option
The normal method in this CapCut slow-mo edit alternative uses playback speed. It involves a simple slider positioning and some enhancement options. Here is how to create a slow motion in the Filmora app using the standard approach:
Step 1. After downloading the Filmora application, navigate towards the top tools. From there, select the “Speed” option and choose a clip for import.

Step 2. Select the “Normal” section and drag the playback towards the left. This will slow down the video, and you can set the speed up to 0.2x for slo-mo. After speed settings, click the “ü” icon, and if you want, do other settings.

Step 3. Once you are done with post-slow motion settings, click the “Export” button.

Method 2. Using the Speed Curve Option
This method involves slightly advanced speed settings for slow-motion creation. This method features many templates alternative to CapCut slow-mo templates. Further, you can use the custom setting template to edit as per your taste. Here is how to create a slow motion using Filmora’s speed curve:
Step 1. Repeat the same process of importing the video and go to the “Curve” section. Select a pre-designed speed template if it fits your video. If not, go for the “Customize” template, and a panel will display.

Step 2. In this panel, adjust the slider position in the downward direction. This will slow down your video at specific durations. You can also enable the “+ Add beat” option for audio adjustments.

Step 3. Click the “ü” icon a couple of times in the respective panels to finalize settings. Afterward, export the video by opting for the “Export” button.

Bonus Part. Make Your Video Editing Perfect with Wondershare Filmora
For beginners, smartphone editing might be satisfactory. However, for a skilled professional with a passion for editing, it’s not enough. For more precise editing and smooth slow motions, we recommend a desktop solution. This CapCut slow-motion edit alternative is Wondershare Filmora’s computing software.
It is an adaptable editing software offering basic as well as advanced video editing features. The features rest on its intuitive interface and are reachable to all. It has a resource library that is filled with transition templates, effects, presets, and more. It has both visual and audio editing options along with AI abilities for production purposes. All in all, the software is an amazing pick for those who prefer high-quality results.
Free Download For Win 7 or later(64-bit)
Free Download For macOS 10.14 or later
AI-Backed Professional Video Editing Features of Filmora
If you are looking to create high-grade slow motions using speed templates, Filmora is for you. There are multiple settings to enhance visuals, audio tracks, and texts. You can do amazing color corrections or add mesmerizing effects to videos. Here are some of its video editing features to consider during editing:
1. AI Copilot Editing
For instance, you are using Filmora for slow motion and don’t know where to start. Employ its copilot assistant and ask it about slo-mo creation. It will direct you towards the speed options with insights on editing. Moreover, the copilot provides one-click access buttons for you to access the feature.
2. AI Text-to-Video
If you are a big fan of AI applications, then Filmora is the right stop for you. Its text-to-video AI allows you to generate videos via prompts or scripts. The function automatically adds graphics and AI voice to videos.
3. Remove Background
The video background remover of Filmora uses high-end AI technology to do the work. It analyzes and cuts out the background with accuracy while providing replacements. You employ three background options: solid color, gradients, and graphics. Users can also add a custom image or video in the timeline to use a background.
4. Instant Mode
If you are not familiar with video and need to start editing videos, this feature is for you. It is an automated video editor for you that uses AI algorithms to edit videos. It color-corrects or enhances any flaws and adds templates and beats to the video. Moreover, it has 115+ multi-contextual templates for diverse video editing.
Conclusion
Slow-motion CapCut templates serve as a powerful resource for creating slo-mos. The con is that with automated templates, there is no room for customizations. However, Wondershare Filmora is a powerful software application with no such limit. It offers visual, audio, and more custom options after some creation. Hence, if you are looking for an editor to broaden your editing game, use Filmora.
Easy Way to Create an Alternate Reality Effect
Ditch boring one-dimensional videos and create a mesmerizing video with this alternative reality effect you can easily create using Wondershare Filmora.
This cool effect enables you to show a dream-like scene where two mirrored footages appear within the same frame using the Masking feature. But why stop there?
Keep reading to find out how you can use this style of effect to spice up your daily vlog bumper intro or even for your upcoming sci-fi content.

Preparing the footage
There are not many restrictions on preparing the footage for this effect. However, depending on the results you’re aiming for, you might need to consider a few things.
First, a wider view and some camera panning, or tilting will deliver a better result as it provides angle variations. This will later enhance the dynamic of the scene, making it feels even more uncanny.
Then, while you’re at it, you need to also figure out the purpose of the video itself. If you want to upload it to certain platforms where vertical videos are more popular, you will want to work on that as well. When you’re shooting your footage, make sure that you’re taking it at the correct angle that would fit the ratio you’re aiming for.
Last but not least, consider the length of the footage. If you’re planning to make a bumper video, you might want a quick yet comprehensive shot of the objects you want to highlight. You can always trim and adjust the timing later, but it is better to also plan it early.
Editing the video
If you have your footage or stock video ready, then you can start editing. Follow this simple step-by-step guide to create your own alternate reality using Filmora .
Free Download For Win 7 or later(64-bit)
Free Download For macOS 10.14 or later
Step 1: Drag and drop the video footage into the timeline - this will be the bottom part of the scene. Go to Effect > Utility > Image Mask. Drag and drop it onto the video footage.

Step 2: Adjust the mask by double-clicking the video footage. Go to Setting > Mask Setting and choose any shape you like. Set the feather number to 100.

Step 3: Scroll up the Setting > Transform. Adjust the position of the video footage on the x and y-axis to ensure that the mask shows the bottom of the landscape view. Click Ok.

Step 4: Drag and drop the same video footage onto the timeline next to the first video footage. Place an Image Mask as well on this footage. This will be the upper part of the scene.

Step 5: Double-click the second footage to open the Setting menu on the top left. Choose Transform > Vertical Flip.

Step 6: Scroll down the Setting menu to find the mask settings. Choose an opposing mask shape for this second footage then set the feather number to 100 as well.

Step 7: Adjust the video footage position by dragging the second footage to the second video track and aligning it with the first video footage.

Step 8: Double-click to open the Setting > Transform, then, adjust the x and y-axis numbers to ensure that the mask reveals only the top half of the landscape. Click Ok.

You can recheck the preview at this stage and just save it as it is if you’re already satisfied with the result. However, if you want a more dynamic alternate reality scene, continue reading to see advanced tips you can follow to make your video looks even more otherworldly.
Enhancing the effect with rotation keyframes
If you’re using stock videos or encountering limitations when making your footage, chances are your alternate reality is not looking as dynamic as you want it to be. Go all out by adding the rotation keyframes to the video footage so that the alternate reality looks more unreal.
Step 1: Double-click the video footage on the first video track to open the Animation Settings > Customize.

Step 2: Move the playhead to the beginning of the first video footage and add a keyframe by clicking on the Add button. Set the rotation of this keyframe at 0 and the scale at 100.

Step 3: Now move the playhead to the end of the video footage and add another keyframe. This time, set the rotation to 20 and adjust the scale number to 115.

Step 4: Do Steps 1 to 3 to the second video footage. Don’t forget to preview the result to see if both footages are rotated properly.

Your alternate reality is now more dynamic with more movement. You can also add more filters or effects to further enhance the sci-fi ambiance. Once you’re satisfied, you can export the file to a format that is compatible with your destination platform.
Conclusion
Wondershare Filmora aims to empower your inner video creator with its robust yet easy-to-use editing suite. You can easily mimic the scenes from the latest blockbuster superhero movies with some simple clicks.
Not only it offers a strapping video editing menu with simple visual effects plug-ins and beginner-friendly smart templates, but you can also access its rich royalty-free stock media library. You can operate the program on both Windows and Mac. Install the program and let it do wonders to your content.
Free Download For macOS 10.14 or later
Step 1: Drag and drop the video footage into the timeline - this will be the bottom part of the scene. Go to Effect > Utility > Image Mask. Drag and drop it onto the video footage.

Step 2: Adjust the mask by double-clicking the video footage. Go to Setting > Mask Setting and choose any shape you like. Set the feather number to 100.

Step 3: Scroll up the Setting > Transform. Adjust the position of the video footage on the x and y-axis to ensure that the mask shows the bottom of the landscape view. Click Ok.

Step 4: Drag and drop the same video footage onto the timeline next to the first video footage. Place an Image Mask as well on this footage. This will be the upper part of the scene.

Step 5: Double-click the second footage to open the Setting menu on the top left. Choose Transform > Vertical Flip.

Step 6: Scroll down the Setting menu to find the mask settings. Choose an opposing mask shape for this second footage then set the feather number to 100 as well.

Step 7: Adjust the video footage position by dragging the second footage to the second video track and aligning it with the first video footage.

Step 8: Double-click to open the Setting > Transform, then, adjust the x and y-axis numbers to ensure that the mask reveals only the top half of the landscape. Click Ok.

You can recheck the preview at this stage and just save it as it is if you’re already satisfied with the result. However, if you want a more dynamic alternate reality scene, continue reading to see advanced tips you can follow to make your video looks even more otherworldly.
Enhancing the effect with rotation keyframes
If you’re using stock videos or encountering limitations when making your footage, chances are your alternate reality is not looking as dynamic as you want it to be. Go all out by adding the rotation keyframes to the video footage so that the alternate reality looks more unreal.
Step 1: Double-click the video footage on the first video track to open the Animation Settings > Customize.

Step 2: Move the playhead to the beginning of the first video footage and add a keyframe by clicking on the Add button. Set the rotation of this keyframe at 0 and the scale at 100.

Step 3: Now move the playhead to the end of the video footage and add another keyframe. This time, set the rotation to 20 and adjust the scale number to 115.

Step 4: Do Steps 1 to 3 to the second video footage. Don’t forget to preview the result to see if both footages are rotated properly.

Your alternate reality is now more dynamic with more movement. You can also add more filters or effects to further enhance the sci-fi ambiance. Once you’re satisfied, you can export the file to a format that is compatible with your destination platform.
Conclusion
Wondershare Filmora aims to empower your inner video creator with its robust yet easy-to-use editing suite. You can easily mimic the scenes from the latest blockbuster superhero movies with some simple clicks.
Not only it offers a strapping video editing menu with simple visual effects plug-ins and beginner-friendly smart templates, but you can also access its rich royalty-free stock media library. You can operate the program on both Windows and Mac. Install the program and let it do wonders to your content.
Read on to Learn About OpenCV Object Tracking, What It Is, and How to Implement It in Python, and OpenCV
OpenCV Tracking is a popular method used for tracking objects in a video in real-time. OpenCV is a powerful library used for image processing and computer vision applications.
From real-time video analysis to Augmented Reality, OpenCV Tracking has a wide range of uses and can help both private and public sectors to detect and track the desired object in an image or video.
In this comprehensive guide, we’ll explore OpenCV Tracking and its pre-built trackers**.** We will use the OpenCV library and Python to implement this Object Tracking application.
- What Is OpenCV
- The Pre-Built Algorithms OpenCV Offers For Object Tracking
- Implementation In Python And OpenCV
Part 1. What Is Object Tracking?
Object Tracking determines the location of an object in a video and can be used for a variety of purposes, including surveillance, security, traffic control, digital forensics, anomaly detection, gesture recognition, visual surveillance, human-computer interaction, augmented reality, and robot vision.
Even though it may seem easy for an average person, object tracking is quite complex for computers because they have to analyze a set of frames and estimate the object’s trajectory based on numbers instead of images.
Because of how complicated it is, Object Tracking is considered one of the most difficult tasks in computer vision. Even though it’s a challenge, it’s not impossible to accomplish.
And there are two levels of Object Tracking that you should learn about:
1. SOT & MOT
- Single Object Tracking (SOT): SOT is a tracking algorithm that creates advanced appearance models and/or motion models to manage difficult issues like out-of-plane rotations, illumination variations, or scale changes.
- Multiple Object Tracking (MOT): MOT tracks every part of a video and is mainly concerned with mid-level tasks and serves as a foundation for high-level tasks.
2. The Difference Between Tracking And Detection
After knowing what Object Tracking is, there is another concept you should also be aware of - Object Detection.
The Object Tracking and Object Detection are two important methods in computer vision. Object Tracking tracks the position of a given object in an image in real-time, while Object Detection identifies and localizes objects in an image or video. That is the difference.
Part 2. Types Of Object Tracking
Image Tracking
Image tracking allows users to interact with digital content more naturally and helps users move and interact with digital objects in the same manner as they will with real-world physical objects.
Image tracking can be used in various augmented reality (AR) applications, such as AR gaming, shopping, and navigation. Moreover, you can also use it for educational purposes, such as teaching anatomy or providing instructions for a difficult task.
Video Tracking
Video tracking is the process of tracking objects in a video sequence and can be used for various applications, such as detecting and counting objects in a scene, understanding their motions, and recognizing activities.
Part 3. What Are The Difficulties Of Object Tracking?
As what has been mentioned above, the use of object tracking is versatile. However, there are some challenges associated with Object Tracking, such as:
Background Clutter: The background can impact extracting an object’s features. If the background is more densely populated, detecting or tracking the object of interest can be more difficult.
Occlusion: This is a phenomenon where the object being tracked is affected by the background or foreground. This causes the tracking algorithm to get confused due to multiple objects coming close together, hence, losing track of the object.
Varying spatial scales: Varying spatial scales refer to the target object being of a different size or shape, which can confuse the algorithm, leading to errors.
Training and Tracking Speed: If the object is moving too fast or is too small, it can be difficult to track. Therefore, the tracking module has to be designed to track, identify, and localize objects in a matter of seconds.
Part 4. Stages Of The Object Tracking Process
After the introduction of object tracking technically, let’s learn about its mechanism of it from two sides: periods of the working process and the way it tracks.
1. Stages Of The Object Tracking Process
Following are the stages of the Object Tracking process:
Target Initialization
Target initialization is the first step in Object Tracking and involves defining the targets or objects of interest and drawing a bounding box around them in the initial frame. After that, the tracker has to detect the position of the object in the frame while drawing the bounding box.
Appearance Modeling
Appearance modeling is important for understanding how an object will look under different circumstances. If the object being tracked changes appearance due to different lighting, angle, or speed, the tracking algorithm may lose its information and the object itself. Therefore, it has to be conducted to let the algorithm detect the changes and distortion.
Motion Estimation
Motion estimation entails the capacity of the model to anticipate an object’s future position with precision.
Target Positioning
Motion estimation is a process of approximating the most likely region where an object could be present. After the object’s location is approximated, a visual model can be used to determine the target’s location more accurately.
2. Methods Of Object Tracking
Here’re some methods of Object Tracking:
OpenCV-Based Object Tracking
OpenCV Object Tracking method is widely used because it offers several built-in functions designed specifically for this purpose, such as GOTURN, MIL, MediandFlow, and CSRT. The tracker type you select will depend on your specific application design. Each tracker has its pros and cons, so there is not a single type of tracker ideal for all applications.
MDNet
Multi-Domain Convolutional Neural Network Tracker is a convolutional neural-based visual tracker and has won the VOT2015 challenge. Moreover, it is composed of domain-specific layers, branches, and multiple shared layers.
The MDNetT tracker is a deep neural network that is trained on numerous Object Tracking datasets. The tracker is designed to work in multiple domains, including video, text, and images.
DeepSort
DeepSort algorithm can track objects in real-time and uses YOLO v3 to compute the bounding boxes around the objects in a frame.
DeepSort uses Kalman filter from Simple Online and Realtime Tracking algorithm and an identification model, ReID to interlink bounding boxes and object tracks.
ROLO
ROLO is a novel Object Tracking method that uses recurrent neural networks (RNNs) to learn object-specific Spatio-temporal representations. This method works with YOLO, an object detection algorithm, and an LTSM for determining the trajectory of an object.
Part 5. The powerful backup: OpenCV
We have demonstrated how powerful OpenCV Tracking is and how it works. However, do you wonder what OpenCV is? How it supports the tracking goals being achieved? In this part, we will focus on OpenCV and help you better understand the the underlying mechanisms.
1. What Is OpenCV?
OpenCV is a powerful library that allows you to perform image processing, deep learning, machine learning, and computer vision tasks on live video feeds. Moreover, it can be used to detect objects, track their movements, and recognize faces.
It can help process the data that have videos and images and has been used in various applications, such as object recognition and detection, autonomous cars, robots, medical image analysis, automated surveillance, and anomaly detection.
2. The Pre-Built Algorithms OpenCV Offers For Object Tracking
There are 8 pre-built algorithms that OpenCV offers for Objects Tracking. All of them have their uniquility and here we will present their pros and cons for your better understadning.
| Tracker | Pros | Cons |
|---|---|---|
| BOOSTING Tracker | Track objects accurately. | Relatively slow. Unable to stop when an object is lost. |
| MIL Tracker | Strong resistance to noise. Gives accurate results. | Low speed. Unable to stop tracking once the object is lost. |
| KCF Tracker | High speed and accuracy. Stops tracking when the object is lost. | Inability to continue tracking objects once lost. |
| TLD Tracker | Resistance to overlapping and object scaling. | Unstable in object detection and tracking. Constantly loses object. |
| MEDIANFLOW Tracker | High accuracy and speed. Accurate in determining the object’s loss. | Loses object quickly due to high speed. |
| GOTURN Tracker | Shows resistance to obstructions and noise. | If the speed of an object is high, it shifts to another object. |
| MOSSE Tracker | Able to continue tracking after the object is lost. High speed. | Loses object easily if very high speed. |
| CSRT Tracker | Good resistance to overlapping. High accuracy. | Low speed. Unstable when an object is lost. |
3. Implementation In Python And OpenCV
Now, after theoretical explanation of OpenCV and OpenCV Tracking, let’s learn Object Tracking OpenCV Python with coding and our simple and step-by-step instructions:
Install The Dependencies
Install the pycharm app on your PC, and launch it. Create a new project and go to Terminal. Install the opencv-contrib-python package by pasting the following command into the Terminal.
Set Up the Trackers
Now, create a Jupyter-notebook and set up the trackers with this code:
Tasks:
- cv2. version returns the OpenCV library version number.
- Save the name of the eight trackers.
- Check the list for the version you are working on and create a tracker object based on the number.
Capture The Video Input
For capturing the video input, write the following lines of code:
Tasks:
- Use the VideoCapture class to capture a video via the webcam or get a saved one from your PC.
- In VideoCapture - line 2, give the path to your video.
- Comment on the second line to use the webcam for tracking and uncomment the third one.
Creating The Bounding Box And Initializing The Tracker
Define an initial random bounding box or select the choices for the object you want to track with the following code:
Start The Tracker And Check The Output
Finally, write the below code lines to start the tracker:
Tasks
- Read each video frame.
- Start the timer and, through the tracker, determine the trajectory of the object.
- Use the trajectory to draw the bounding box.
- The program will start tracking. Afterward, press the space bar to stop tracking.
Video – Object Tracking with Opencv and Python
Conclusion
In this article, we’ve discussed Object Tracking in detail and how it compares with Object Detection. Furthermore, we explored the methods used for tracking objects and provided complete guidance on the OpenCV Tracking method and its built-in functionalities.
Hopefully, you find this guide helpful, and you can now track objects in real-time without any issues.
Free Download For Win 7 or later(64-bit)
Free Download For macOS 10.14 or later
- Image Tracking
- Video Tracking
- What Are The Difficulties Of Object Tracking
- Stages Of The Object Tracking Process
- What Is OpenCV
- The Pre-Built Algorithms OpenCV Offers For Object Tracking
- Implementation In Python And OpenCV
Part 1. What Is Object Tracking?
Object Tracking determines the location of an object in a video and can be used for a variety of purposes, including surveillance, security, traffic control, digital forensics, anomaly detection, gesture recognition, visual surveillance, human-computer interaction, augmented reality, and robot vision.
Even though it may seem easy for an average person, object tracking is quite complex for computers because they have to analyze a set of frames and estimate the object’s trajectory based on numbers instead of images.
Because of how complicated it is, Object Tracking is considered one of the most difficult tasks in computer vision. Even though it’s a challenge, it’s not impossible to accomplish.
And there are two levels of Object Tracking that you should learn about:
1. SOT & MOT
- Single Object Tracking (SOT): SOT is a tracking algorithm that creates advanced appearance models and/or motion models to manage difficult issues like out-of-plane rotations, illumination variations, or scale changes.
- Multiple Object Tracking (MOT): MOT tracks every part of a video and is mainly concerned with mid-level tasks and serves as a foundation for high-level tasks.
2. The Difference Between Tracking And Detection
After knowing what Object Tracking is, there is another concept you should also be aware of - Object Detection.
The Object Tracking and Object Detection are two important methods in computer vision. Object Tracking tracks the position of a given object in an image in real-time, while Object Detection identifies and localizes objects in an image or video. That is the difference.
Part 2. Types Of Object Tracking
Image Tracking
Image tracking allows users to interact with digital content more naturally and helps users move and interact with digital objects in the same manner as they will with real-world physical objects.
Image tracking can be used in various augmented reality (AR) applications, such as AR gaming, shopping, and navigation. Moreover, you can also use it for educational purposes, such as teaching anatomy or providing instructions for a difficult task.
Video Tracking
Video tracking is the process of tracking objects in a video sequence and can be used for various applications, such as detecting and counting objects in a scene, understanding their motions, and recognizing activities.
Part 3. What Are The Difficulties Of Object Tracking?
As what has been mentioned above, the use of object tracking is versatile. However, there are some challenges associated with Object Tracking, such as:
Background Clutter: The background can impact extracting an object’s features. If the background is more densely populated, detecting or tracking the object of interest can be more difficult.
Occlusion: This is a phenomenon where the object being tracked is affected by the background or foreground. This causes the tracking algorithm to get confused due to multiple objects coming close together, hence, losing track of the object.
Varying spatial scales: Varying spatial scales refer to the target object being of a different size or shape, which can confuse the algorithm, leading to errors.
Training and Tracking Speed: If the object is moving too fast or is too small, it can be difficult to track. Therefore, the tracking module has to be designed to track, identify, and localize objects in a matter of seconds.
Part 4. Stages Of The Object Tracking Process
After the introduction of object tracking technically, let’s learn about its mechanism of it from two sides: periods of the working process and the way it tracks.
1. Stages Of The Object Tracking Process
Following are the stages of the Object Tracking process:
Target Initialization
Target initialization is the first step in Object Tracking and involves defining the targets or objects of interest and drawing a bounding box around them in the initial frame. After that, the tracker has to detect the position of the object in the frame while drawing the bounding box.
Appearance Modeling
Appearance modeling is important for understanding how an object will look under different circumstances. If the object being tracked changes appearance due to different lighting, angle, or speed, the tracking algorithm may lose its information and the object itself. Therefore, it has to be conducted to let the algorithm detect the changes and distortion.
Motion Estimation
Motion estimation entails the capacity of the model to anticipate an object’s future position with precision.
Target Positioning
Motion estimation is a process of approximating the most likely region where an object could be present. After the object’s location is approximated, a visual model can be used to determine the target’s location more accurately.
2. Methods Of Object Tracking
Here’re some methods of Object Tracking:
OpenCV-Based Object Tracking
OpenCV Object Tracking method is widely used because it offers several built-in functions designed specifically for this purpose, such as GOTURN, MIL, MediandFlow, and CSRT. The tracker type you select will depend on your specific application design. Each tracker has its pros and cons, so there is not a single type of tracker ideal for all applications.
MDNet
Multi-Domain Convolutional Neural Network Tracker is a convolutional neural-based visual tracker and has won the VOT2015 challenge. Moreover, it is composed of domain-specific layers, branches, and multiple shared layers.
The MDNetT tracker is a deep neural network that is trained on numerous Object Tracking datasets. The tracker is designed to work in multiple domains, including video, text, and images.
DeepSort
DeepSort algorithm can track objects in real-time and uses YOLO v3 to compute the bounding boxes around the objects in a frame.
DeepSort uses Kalman filter from Simple Online and Realtime Tracking algorithm and an identification model, ReID to interlink bounding boxes and object tracks.
ROLO
ROLO is a novel Object Tracking method that uses recurrent neural networks (RNNs) to learn object-specific Spatio-temporal representations. This method works with YOLO, an object detection algorithm, and an LTSM for determining the trajectory of an object.
Part 5. The powerful backup: OpenCV
We have demonstrated how powerful OpenCV Tracking is and how it works. However, do you wonder what OpenCV is? How it supports the tracking goals being achieved? In this part, we will focus on OpenCV and help you better understand the the underlying mechanisms.
1. What Is OpenCV?
OpenCV is a powerful library that allows you to perform image processing, deep learning, machine learning, and computer vision tasks on live video feeds. Moreover, it can be used to detect objects, track their movements, and recognize faces.
It can help process the data that have videos and images and has been used in various applications, such as object recognition and detection, autonomous cars, robots, medical image analysis, automated surveillance, and anomaly detection.
2. The Pre-Built Algorithms OpenCV Offers For Object Tracking
There are 8 pre-built algorithms that OpenCV offers for Objects Tracking. All of them have their uniquility and here we will present their pros and cons for your better understadning.
| Tracker | Pros | Cons |
|---|---|---|
| BOOSTING Tracker | Track objects accurately. | Relatively slow. Unable to stop when an object is lost. |
| MIL Tracker | Strong resistance to noise. Gives accurate results. | Low speed. Unable to stop tracking once the object is lost. |
| KCF Tracker | High speed and accuracy. Stops tracking when the object is lost. | Inability to continue tracking objects once lost. |
| TLD Tracker | Resistance to overlapping and object scaling. | Unstable in object detection and tracking. Constantly loses object. |
| MEDIANFLOW Tracker | High accuracy and speed. Accurate in determining the object’s loss. | Loses object quickly due to high speed. |
| GOTURN Tracker | Shows resistance to obstructions and noise. | If the speed of an object is high, it shifts to another object. |
| MOSSE Tracker | Able to continue tracking after the object is lost. High speed. | Loses object easily if very high speed. |
| CSRT Tracker | Good resistance to overlapping. High accuracy. | Low speed. Unstable when an object is lost. |
3. Implementation In Python And OpenCV
Now, after theoretical explanation of OpenCV and OpenCV Tracking, let’s learn Object Tracking OpenCV Python with coding and our simple and step-by-step instructions:
Install The Dependencies
Install the pycharm app on your PC, and launch it. Create a new project and go to Terminal. Install the opencv-contrib-python package by pasting the following command into the Terminal.
Set Up the Trackers
Now, create a Jupyter-notebook and set up the trackers with this code:
Tasks:
- cv2. version returns the OpenCV library version number.
- Save the name of the eight trackers.
- Check the list for the version you are working on and create a tracker object based on the number.
Capture The Video Input
For capturing the video input, write the following lines of code:
Tasks:
- Use the VideoCapture class to capture a video via the webcam or get a saved one from your PC.
- In VideoCapture - line 2, give the path to your video.
- Comment on the second line to use the webcam for tracking and uncomment the third one.
Creating The Bounding Box And Initializing The Tracker
Define an initial random bounding box or select the choices for the object you want to track with the following code:
Start The Tracker And Check The Output
Finally, write the below code lines to start the tracker:
Tasks
- Read each video frame.
- Start the timer and, through the tracker, determine the trajectory of the object.
- Use the trajectory to draw the bounding box.
- The program will start tracking. Afterward, press the space bar to stop tracking.
Video – Object Tracking with Opencv and Python
Conclusion
In this article, we’ve discussed Object Tracking in detail and how it compares with Object Detection. Furthermore, we explored the methods used for tracking objects and provided complete guidance on the OpenCV Tracking method and its built-in functionalities.
Hopefully, you find this guide helpful, and you can now track objects in real-time without any issues.
Free Download For Win 7 or later(64-bit)
Free Download For macOS 10.14 or later
Also read:
- New Enhance Social Media Posts with Transparent GIFs that Leave Your Peers in Awe
- New In 2024, Best Free Video Editing Software to Boost Your Content Creation
- 2024 Approved In This Article, We Will Cover the Stages of Film Production You Need to Keep in Mind.Without Further Ado, Lets Get Started
- New Complete Guide to Make a Super Easy Rotating Video Effect
- Updated How to Add Filters on iMovie
- Updated In 2024, How to Make a Slow Motion Video in Wondershare Filmora
- Updated 2024 Approved What Is Motion Tracking and How to Use It
- New In 2024, Working Through the Details of iMovie Slow Motion Video Making 100 Effective
- 2024 Approved How to Select and Use The Best BRAW LUTs
- New In 2024, 6 Tips for Your First Facebook Ads
- New In 2024, How to Create a Glitch Text Effect?
- How To Use Voicemod On Discord Desktop+Mobile for 2024
- In 2024, The Premiere Pro Video Templates Help Make Original Content of Broadcast Quality. The Article Introduces 10 Free Premiere Pro Templates that Are Sure to Make Your Life Easy
- Updated Create A Freeze Frame Sequence In Your Videos
- Updated 2024 Approved Updated 8 Ways to Merge SRT with MP4
- Updated Guide of 8 Photo Collage Apps for PC
- Updated 10 Mind-Blowing Video Collage Maker for PC
- Looking for the Best Free Video Editing Software Reddit to Make Your Video Perfectly? Check Out Our List of the Best Video Editors for Reddit and You Can Choose Any of Them for 2024
- 2024 Approved Event Videography Is Popular in Weddings, Graduation, Family Reunion and Other Great Moments. Here Im Going to Share some of the Tips to Make a Better Event Videography
- 2024 Approved Top 10 3D Slideshow Software Review
- New In 2024, 5 Tried-And-True Methods to GIF Making
- New Want to Create an Impressive Video Collage but Clueless About the Best Tools? No Worries as We Are Here and Will Help You to Learn About the Best Video Collage Maker PC Tools
- New Detailed Tutorial to Crop a Video Using Openshot for 2024
- Updated In 2024, Overview About Supported iPhone Video Formats and Best iPhone Video Editor & Converter
- In 2024, Top 10 Free Text to Speech Software Windows, Mac,Android, iPhone & O
- Updated In 2024, How to Create LUTs with LUTs Generator
- Updated 2024 Approved 2 Solutions to Crop a Video Using After Effects
- New Best Practical Tips to Improve Your Lighting in the Sun for 2024
- New 3D Ray Traced Settings In After Effects
- Updated In 2024, A Full Review of Leeming LUT Pro
- 2024 Approved When It Comes to Video Editing, There Are Countless Software Options Available on the Market. However, Not All of Them Come with Useful Masking Tools. In This Article, We Will Be Discussing the Top 8 Video Editor with Useful Masking Tools
- Quickest Guide | Zoom In and Out on Snapchat for 2024
- Updated The Only Guide Youll Ever Need to Learn GIF Design That Get Shared Like Crazy
- Whatre the Best Alternatives to Pexels for 2024
- Updated Get to Know How Excellent Sparkle Video Effects Can Significantly Impact Different Projects. Its Miraculous. Read Below to Learn More and Add Sparkle Effect to Your Videos
- Want to Capture Captivating, Detailed Videos? If Yes, Then You Need to Learn the Recording of Super Slow Motion Videos. In This Article, I Will Show You How to Record a Super Slow-Motion Video on Your Android and iPhone
- Updated How to Create a Text Effect Video with Filmora for 2024
- New Find The Best Free Canon LUTs
- 7 Solutions to Cut Video on Mac without Using FFmpeg, In 2024
- Learn About some of the Best Apps for Photo Collage for PC for 2024
- Updated Learn How to Effortlessly Mirror Video Clips in Adobe Premiere Pro with This Step-by-Step Guide. Perfect for Creating a Symmetrical Look in Your Videos
- 2024 Approved Converting an SRT File to VTT Is Extremely Easy. The Article Enlists Various Methods You Can Use to Convert an SRT File to VTT, Introducing You to Filmora, Which Allows You to Edit Your SRT Files
- In 2024, Detailed Tutorial to Crop a Video Using Openshot?
- Updated 7 Best MP4 Editors on Mac Edit MP4 in Mac
- 2024 Approved Most-Used 3 Ways to Compress Video for Instagram Story, Feed, and IGTV
- A Detailed VPNa Fake GPS Location Free Review On Vivo Y17s | Dr.fone
- What to Do if Google Play Services Keeps Stopping on Honor 90 Pro | Dr.fone
- 9 Best Free Android Monitoring Apps to Monitor Phone Remotely For your OnePlus 11 5G | Dr.fone
- Detailed Review of doctorSIM Unlock Service For Apple iPhone 13 | Dr.fone
- In 2024, 6 Proven Ways to Unlock Xiaomi Redmi Note 12 4G Phone When You Forget the Password
- Best Infinix Hot 40 Pro Pattern Lock Removal Tools Remove Android Pattern Lock Without Losing Data
- A Comprehensive Guide to iCloud Unlock From Apple iPhone 13 Online
- Does Galaxy M34 5G support AVCHD video?
- Can I recover permanently deleted photos from Motorola G24 Power
- 3 Ways to Unlock iPhone 6 Plus without Passcode or Face ID
- 7 Top Ways To Resolve Apple ID Not Active Issue For Apple iPhone 7 Plus | Dr.fone
- In 2024, How to Intercept Text Messages on Oppo Reno 8T 5G | Dr.fone
- How to Unlock iPhone SE (2020) with a Mask On | Dr.fone
- In 2024, Bypass iCloud Activation Lock with IMEI Code On your Apple iPhone SE (2020)
- How to Exit Android Factory Mode On Asus ROG Phone 8? | Dr.fone
- Guide to Mirror Your Realme GT 5 to Other Android devices | Dr.fone
- Title: Frame Rates, Speed, and Wondershare Filmora An Overview
- Author: Chloe
- Created at : 2024-05-20 03:37:21
- Updated at : 2024-05-21 03:37:21
- Link: https://ai-editing-video.techidaily.com/frame-rates-speed-and-wondershare-filmora-an-overview/
- License: This work is licensed under CC BY-NC-SA 4.0.

