:max_bytes(150000):strip_icc():format(webp)/should-you-buy-a-kindle-5270180-b1c49aad9c1142dc8722cfdb5d02072c.jpg)
Free for 2024

Repeated Text Animation Tutorial in Filmora
Preparation
What you need to prepare:
- A computer (Windows or macOS)
- Your video materials.
- Filmora video editor
Step 1
Download Filmora . Let it install and wait for it to run. Then, click on “New Project”. Now, you’re ready to edit!
Step 2
First, go to Titles and drag the Default Title to the Timeline.

Step 3
Now, double-click on the Default Title clip. Here, change its font to any bold font. Increase the text size to 120. Type in your text in the box. Scroll a bit down and change the Text Spacing to 8. Click OK.

Step 4
Take a Snapshot of this Default Title.

Step 5
Double-click on the Default Title clip once again. This time, click on its Advanced settings. Here, turn OFF Text Fill → turn ON Outline → change the Outline color to White → reduce Thickness to 1. Click OK. Now, take another Snapshot.

Step 6
Delete the Default Title clip from the Timeline. Now, drag the Outline snapshot that we just created to the Timeline. Open the Crop tool → change the Ratio to Custom → replace “1080” with “540”. Lastly, move the highlighted crop section to the top. Click OK.

Step 7
Double-click on the Snapshot to open its settings panel. Go to the Animation tab. Here, change the value of the Y-axis to “275”**.** Click OK. Now, take a Snapshot.

Step 8
Next, click on the Crop tool again and simply move the highlighted crop section to the bottom part of the screen. Click OK. Then, double-click on the snapshot clip in the Timeline and change the value of the Y-axis from “275” to “-275”**.** Click OK. Take a Snapshot again.
Step 9
Import a background image to My Media. Drag the background image to the Timeline. Double-click on it and drag the Scale bar until the background image covers the whole screen. Click OK. You should cut the background clip to make it 3 seconds long as well.

Step 10
Lock this track in the Timeline by pressing the highlighted button on the left. Then, go to “Track Manager” and add 6 new Tracks to the Timeline. Click OK.

Step 11
Drag the first Snapshot we made before to Track 6. Cut it so it’s 3 seconds long. Then, Lock the Track.

Step 12
Set the Playhead at the 15th frame on the Timeline. Then, drag the Upward Outline snapshot to this point. Double-click on it and change the Y-axis value to “**-4%**”. Then, reduce the Opacity to 0%. Now, move the Playhead 5 frames further. Next, increase the Opacity to 100% and increase the Y-axis value to around “105”. Don’t click OK yet.
Step 13
Move the Playhead to 1 minute and 5 seconds on the Timeline. Add a keyframe by clicking on the “+Add” button. Then, move the Playhead 5 frames forward. Here, change the Zoom Level to 25%.

Step 14
Double-click on the clip in Track 5. Drag the text like in the image below. Then, delete the part of the clip on the right side after 1 minute and 15 seconds.

Step 15
Hide the clips on Track 6 and Track 1 by clicking the “eye” icons next to them. Then, take a Snapshot. Now, drag this Snapshot right next to the clip on Track 5.

Step 16
Move the Playhead 3 frames forward from the starting point of the clip you just added. Unhide Track 6. Double-click on the clip on the right side of Track 5 and click on “+Add”. Move the Playhead 5 seconds forward and adjust the Upward Outline to fit the text.

Step 17
Move the Playhead 5 frames forward again. Drag the Y-axis value to the left until the outline clip overlaps the main text. Then, reduce the Opacity to 0%. Move the Playhead to 2 minutes and 10 seconds. Cut the Track and delete the clip on the right side. Lastly, Lock Track 5.

Step 18
Drag the Downward Outline snapshot to Track 4. Then, repeat the same process as in Step 16 and Step 17.
Step 19
Drag the Upward Outline snapshot to Track 3 at the 17th frame. Double-click on it and change the Opacity to 0%.

Step 20
Now, move 5 frames forward and increase the Opacity back to 100%. Then, drag the Y-axis value to the right until the screen looks like this.

Step 21
Move the Playhead to 1 minute and 5 seconds. Click on “+Add” to add a keyframe. Then, move the Playhead 5 frames forward. Double-click on the clip and stretch it from side to side to match something like this.

Step 22
Move the Playhead to 1 minute and 16 seconds. Split the clip and delete the part on the right side. Hide Track 4, 5, and 6. Then, take a Snapshot. Drag this Snapshot next to the clip on Track 3. Place the Playhead on 1 minute and 18 seconds. Then, unhide Track 4, 5, and 6.
Step 23
Double-click on the clip on the right side of Track 3. Add a keyframe by pressing “+Add”. Move the Playhead to 1 minute and 23 seconds. Now, resize the clip back to its original size by moving the rectangle left and right. Right now, it should look like this.

Step 24
Move the Playhead 5 frames forward. Drag the Y-axis value to the left until the screen looks like this.

Step 25
Move the Playhead 5 frames forward again. Drag the value of the Y-axis to the left until the screen looks like this. Then, change the Opacity to 0%. Finally, split the clip at 2 minutes and 10 seconds. Delete the part on the right side. Lock Track 3.

Step 26
Next, drag the Downward Snapshot on Track 2 and follow the same process as in Steps 19 through 25.
Step 27
Unhide the Background clip at the bottom of the Timeline. Then, Unlock Track 6. Split the clip on Track 6 at the 15th frame.

Step 28
Move the Playhead at the beginning of the Timeline. Click on the first part of the clip on Track 6. Add a keyframe. Drag the X-axis value to the right until the word disappears out of the screen. Like this. 👇Then, move the Playhead to the 6th frame and Reset the X-axis value to 0.0.

Step 29
Take the Playhead to 2 minutes and 10 seconds. Split it. Now, move the Playhead to 2 minutes and 19 seconds and add a keyframe. Lastly, take the Playhead to the very end of the clip and drag the text to the right side until it’s out of the screen once again.

Step 30
Go to the Effects tab. Select Glitch from the panel on the left. Then, apply “Glitch Dispersion” and “Glitch Stripe 2” to the clips at the start and at the end.

Step 31
Finally, Render the video to watch the final preview. And, you’re done! Congratulations on creating a repeated text animation in Filmora.

Summary
What you’ve learned:
- How to create text animations in Filmora
- Applying animation effects
- Make advanced edits on Titles in Filmora
- Hide and lock Tracks and Clips in Filmora
What you need to prepare:
- A computer (Windows or macOS)
- Your video materials.
- Filmora video editor
Step 1
Download Filmora . Let it install and wait for it to run. Then, click on “New Project”. Now, you’re ready to edit!
Step 2
First, go to Titles and drag the Default Title to the Timeline.

Step 3
Now, double-click on the Default Title clip. Here, change its font to any bold font. Increase the text size to 120. Type in your text in the box. Scroll a bit down and change the Text Spacing to 8. Click OK.

Step 4
Take a Snapshot of this Default Title.

Step 5
Double-click on the Default Title clip once again. This time, click on its Advanced settings. Here, turn OFF Text Fill → turn ON Outline → change the Outline color to White → reduce Thickness to 1. Click OK. Now, take another Snapshot.

Step 6
Delete the Default Title clip from the Timeline. Now, drag the Outline snapshot that we just created to the Timeline. Open the Crop tool → change the Ratio to Custom → replace “1080” with “540”. Lastly, move the highlighted crop section to the top. Click OK.

Step 7
Double-click on the Snapshot to open its settings panel. Go to the Animation tab. Here, change the value of the Y-axis to “275”**.** Click OK. Now, take a Snapshot.

Step 8
Next, click on the Crop tool again and simply move the highlighted crop section to the bottom part of the screen. Click OK. Then, double-click on the snapshot clip in the Timeline and change the value of the Y-axis from “275” to “-275”**.** Click OK. Take a Snapshot again.
Step 9
Import a background image to My Media. Drag the background image to the Timeline. Double-click on it and drag the Scale bar until the background image covers the whole screen. Click OK. You should cut the background clip to make it 3 seconds long as well.

Step 10
Lock this track in the Timeline by pressing the highlighted button on the left. Then, go to “Track Manager” and add 6 new Tracks to the Timeline. Click OK.

Step 11
Drag the first Snapshot we made before to Track 6. Cut it so it’s 3 seconds long. Then, Lock the Track.

Step 12
Set the Playhead at the 15th frame on the Timeline. Then, drag the Upward Outline snapshot to this point. Double-click on it and change the Y-axis value to “**-4%**”. Then, reduce the Opacity to 0%. Now, move the Playhead 5 frames further. Next, increase the Opacity to 100% and increase the Y-axis value to around “105”. Don’t click OK yet.
Step 13
Move the Playhead to 1 minute and 5 seconds on the Timeline. Add a keyframe by clicking on the “+Add” button. Then, move the Playhead 5 frames forward. Here, change the Zoom Level to 25%.

Step 14
Double-click on the clip in Track 5. Drag the text like in the image below. Then, delete the part of the clip on the right side after 1 minute and 15 seconds.

Step 15
Hide the clips on Track 6 and Track 1 by clicking the “eye” icons next to them. Then, take a Snapshot. Now, drag this Snapshot right next to the clip on Track 5.

Step 16
Move the Playhead 3 frames forward from the starting point of the clip you just added. Unhide Track 6. Double-click on the clip on the right side of Track 5 and click on “+Add”. Move the Playhead 5 seconds forward and adjust the Upward Outline to fit the text.

Step 17
Move the Playhead 5 frames forward again. Drag the Y-axis value to the left until the outline clip overlaps the main text. Then, reduce the Opacity to 0%. Move the Playhead to 2 minutes and 10 seconds. Cut the Track and delete the clip on the right side. Lastly, Lock Track 5.

Step 18
Drag the Downward Outline snapshot to Track 4. Then, repeat the same process as in Step 16 and Step 17.
Step 19
Drag the Upward Outline snapshot to Track 3 at the 17th frame. Double-click on it and change the Opacity to 0%.

Step 20
Now, move 5 frames forward and increase the Opacity back to 100%. Then, drag the Y-axis value to the right until the screen looks like this.

Step 21
Move the Playhead to 1 minute and 5 seconds. Click on “+Add” to add a keyframe. Then, move the Playhead 5 frames forward. Double-click on the clip and stretch it from side to side to match something like this.

Step 22
Move the Playhead to 1 minute and 16 seconds. Split the clip and delete the part on the right side. Hide Track 4, 5, and 6. Then, take a Snapshot. Drag this Snapshot next to the clip on Track 3. Place the Playhead on 1 minute and 18 seconds. Then, unhide Track 4, 5, and 6.
Step 23
Double-click on the clip on the right side of Track 3. Add a keyframe by pressing “+Add”. Move the Playhead to 1 minute and 23 seconds. Now, resize the clip back to its original size by moving the rectangle left and right. Right now, it should look like this.

Step 24
Move the Playhead 5 frames forward. Drag the Y-axis value to the left until the screen looks like this.

Step 25
Move the Playhead 5 frames forward again. Drag the value of the Y-axis to the left until the screen looks like this. Then, change the Opacity to 0%. Finally, split the clip at 2 minutes and 10 seconds. Delete the part on the right side. Lock Track 3.

Step 26
Next, drag the Downward Snapshot on Track 2 and follow the same process as in Steps 19 through 25.
Step 27
Unhide the Background clip at the bottom of the Timeline. Then, Unlock Track 6. Split the clip on Track 6 at the 15th frame.

Step 28
Move the Playhead at the beginning of the Timeline. Click on the first part of the clip on Track 6. Add a keyframe. Drag the X-axis value to the right until the word disappears out of the screen. Like this. 👇Then, move the Playhead to the 6th frame and Reset the X-axis value to 0.0.

Step 29
Take the Playhead to 2 minutes and 10 seconds. Split it. Now, move the Playhead to 2 minutes and 19 seconds and add a keyframe. Lastly, take the Playhead to the very end of the clip and drag the text to the right side until it’s out of the screen once again.

Step 30
Go to the Effects tab. Select Glitch from the panel on the left. Then, apply “Glitch Dispersion” and “Glitch Stripe 2” to the clips at the start and at the end.

Step 31
Finally, Render the video to watch the final preview. And, you’re done! Congratulations on creating a repeated text animation in Filmora.

Summary
What you’ve learned:
- How to create text animations in Filmora
- Applying animation effects
- Make advanced edits on Titles in Filmora
- Hide and lock Tracks and Clips in Filmora
What you need to prepare:
- A computer (Windows or macOS)
- Your video materials.
- Filmora video editor
Step 1
Download Filmora . Let it install and wait for it to run. Then, click on “New Project”. Now, you’re ready to edit!
Step 2
First, go to Titles and drag the Default Title to the Timeline.

Step 3
Now, double-click on the Default Title clip. Here, change its font to any bold font. Increase the text size to 120. Type in your text in the box. Scroll a bit down and change the Text Spacing to 8. Click OK.

Step 4
Take a Snapshot of this Default Title.

Step 5
Double-click on the Default Title clip once again. This time, click on its Advanced settings. Here, turn OFF Text Fill → turn ON Outline → change the Outline color to White → reduce Thickness to 1. Click OK. Now, take another Snapshot.

Step 6
Delete the Default Title clip from the Timeline. Now, drag the Outline snapshot that we just created to the Timeline. Open the Crop tool → change the Ratio to Custom → replace “1080” with “540”. Lastly, move the highlighted crop section to the top. Click OK.

Step 7
Double-click on the Snapshot to open its settings panel. Go to the Animation tab. Here, change the value of the Y-axis to “275”**.** Click OK. Now, take a Snapshot.

Step 8
Next, click on the Crop tool again and simply move the highlighted crop section to the bottom part of the screen. Click OK. Then, double-click on the snapshot clip in the Timeline and change the value of the Y-axis from “275” to “-275”**.** Click OK. Take a Snapshot again.
Step 9
Import a background image to My Media. Drag the background image to the Timeline. Double-click on it and drag the Scale bar until the background image covers the whole screen. Click OK. You should cut the background clip to make it 3 seconds long as well.

Step 10
Lock this track in the Timeline by pressing the highlighted button on the left. Then, go to “Track Manager” and add 6 new Tracks to the Timeline. Click OK.

Step 11
Drag the first Snapshot we made before to Track 6. Cut it so it’s 3 seconds long. Then, Lock the Track.

Step 12
Set the Playhead at the 15th frame on the Timeline. Then, drag the Upward Outline snapshot to this point. Double-click on it and change the Y-axis value to “**-4%**”. Then, reduce the Opacity to 0%. Now, move the Playhead 5 frames further. Next, increase the Opacity to 100% and increase the Y-axis value to around “105”. Don’t click OK yet.
Step 13
Move the Playhead to 1 minute and 5 seconds on the Timeline. Add a keyframe by clicking on the “+Add” button. Then, move the Playhead 5 frames forward. Here, change the Zoom Level to 25%.

Step 14
Double-click on the clip in Track 5. Drag the text like in the image below. Then, delete the part of the clip on the right side after 1 minute and 15 seconds.

Step 15
Hide the clips on Track 6 and Track 1 by clicking the “eye” icons next to them. Then, take a Snapshot. Now, drag this Snapshot right next to the clip on Track 5.

Step 16
Move the Playhead 3 frames forward from the starting point of the clip you just added. Unhide Track 6. Double-click on the clip on the right side of Track 5 and click on “+Add”. Move the Playhead 5 seconds forward and adjust the Upward Outline to fit the text.

Step 17
Move the Playhead 5 frames forward again. Drag the Y-axis value to the left until the outline clip overlaps the main text. Then, reduce the Opacity to 0%. Move the Playhead to 2 minutes and 10 seconds. Cut the Track and delete the clip on the right side. Lastly, Lock Track 5.

Step 18
Drag the Downward Outline snapshot to Track 4. Then, repeat the same process as in Step 16 and Step 17.
Step 19
Drag the Upward Outline snapshot to Track 3 at the 17th frame. Double-click on it and change the Opacity to 0%.

Step 20
Now, move 5 frames forward and increase the Opacity back to 100%. Then, drag the Y-axis value to the right until the screen looks like this.

Step 21
Move the Playhead to 1 minute and 5 seconds. Click on “+Add” to add a keyframe. Then, move the Playhead 5 frames forward. Double-click on the clip and stretch it from side to side to match something like this.

Step 22
Move the Playhead to 1 minute and 16 seconds. Split the clip and delete the part on the right side. Hide Track 4, 5, and 6. Then, take a Snapshot. Drag this Snapshot next to the clip on Track 3. Place the Playhead on 1 minute and 18 seconds. Then, unhide Track 4, 5, and 6.
Step 23
Double-click on the clip on the right side of Track 3. Add a keyframe by pressing “+Add”. Move the Playhead to 1 minute and 23 seconds. Now, resize the clip back to its original size by moving the rectangle left and right. Right now, it should look like this.

Step 24
Move the Playhead 5 frames forward. Drag the Y-axis value to the left until the screen looks like this.

Step 25
Move the Playhead 5 frames forward again. Drag the value of the Y-axis to the left until the screen looks like this. Then, change the Opacity to 0%. Finally, split the clip at 2 minutes and 10 seconds. Delete the part on the right side. Lock Track 3.

Step 26
Next, drag the Downward Snapshot on Track 2 and follow the same process as in Steps 19 through 25.
Step 27
Unhide the Background clip at the bottom of the Timeline. Then, Unlock Track 6. Split the clip on Track 6 at the 15th frame.

Step 28
Move the Playhead at the beginning of the Timeline. Click on the first part of the clip on Track 6. Add a keyframe. Drag the X-axis value to the right until the word disappears out of the screen. Like this. 👇Then, move the Playhead to the 6th frame and Reset the X-axis value to 0.0.

Step 29
Take the Playhead to 2 minutes and 10 seconds. Split it. Now, move the Playhead to 2 minutes and 19 seconds and add a keyframe. Lastly, take the Playhead to the very end of the clip and drag the text to the right side until it’s out of the screen once again.

Step 30
Go to the Effects tab. Select Glitch from the panel on the left. Then, apply “Glitch Dispersion” and “Glitch Stripe 2” to the clips at the start and at the end.

Step 31
Finally, Render the video to watch the final preview. And, you’re done! Congratulations on creating a repeated text animation in Filmora.

Summary
What you’ve learned:
- How to create text animations in Filmora
- Applying animation effects
- Make advanced edits on Titles in Filmora
- Hide and lock Tracks and Clips in Filmora
What you need to prepare:
- A computer (Windows or macOS)
- Your video materials.
- Filmora video editor
Step 1
Download Filmora . Let it install and wait for it to run. Then, click on “New Project”. Now, you’re ready to edit!
Step 2
First, go to Titles and drag the Default Title to the Timeline.

Step 3
Now, double-click on the Default Title clip. Here, change its font to any bold font. Increase the text size to 120. Type in your text in the box. Scroll a bit down and change the Text Spacing to 8. Click OK.

Step 4
Take a Snapshot of this Default Title.

Step 5
Double-click on the Default Title clip once again. This time, click on its Advanced settings. Here, turn OFF Text Fill → turn ON Outline → change the Outline color to White → reduce Thickness to 1. Click OK. Now, take another Snapshot.

Step 6
Delete the Default Title clip from the Timeline. Now, drag the Outline snapshot that we just created to the Timeline. Open the Crop tool → change the Ratio to Custom → replace “1080” with “540”. Lastly, move the highlighted crop section to the top. Click OK.

Step 7
Double-click on the Snapshot to open its settings panel. Go to the Animation tab. Here, change the value of the Y-axis to “275”**.** Click OK. Now, take a Snapshot.

Step 8
Next, click on the Crop tool again and simply move the highlighted crop section to the bottom part of the screen. Click OK. Then, double-click on the snapshot clip in the Timeline and change the value of the Y-axis from “275” to “-275”**.** Click OK. Take a Snapshot again.
Step 9
Import a background image to My Media. Drag the background image to the Timeline. Double-click on it and drag the Scale bar until the background image covers the whole screen. Click OK. You should cut the background clip to make it 3 seconds long as well.

Step 10
Lock this track in the Timeline by pressing the highlighted button on the left. Then, go to “Track Manager” and add 6 new Tracks to the Timeline. Click OK.

Step 11
Drag the first Snapshot we made before to Track 6. Cut it so it’s 3 seconds long. Then, Lock the Track.

Step 12
Set the Playhead at the 15th frame on the Timeline. Then, drag the Upward Outline snapshot to this point. Double-click on it and change the Y-axis value to “**-4%**”. Then, reduce the Opacity to 0%. Now, move the Playhead 5 frames further. Next, increase the Opacity to 100% and increase the Y-axis value to around “105”. Don’t click OK yet.
Step 13
Move the Playhead to 1 minute and 5 seconds on the Timeline. Add a keyframe by clicking on the “+Add” button. Then, move the Playhead 5 frames forward. Here, change the Zoom Level to 25%.

Step 14
Double-click on the clip in Track 5. Drag the text like in the image below. Then, delete the part of the clip on the right side after 1 minute and 15 seconds.

Step 15
Hide the clips on Track 6 and Track 1 by clicking the “eye” icons next to them. Then, take a Snapshot. Now, drag this Snapshot right next to the clip on Track 5.

Step 16
Move the Playhead 3 frames forward from the starting point of the clip you just added. Unhide Track 6. Double-click on the clip on the right side of Track 5 and click on “+Add”. Move the Playhead 5 seconds forward and adjust the Upward Outline to fit the text.

Step 17
Move the Playhead 5 frames forward again. Drag the Y-axis value to the left until the outline clip overlaps the main text. Then, reduce the Opacity to 0%. Move the Playhead to 2 minutes and 10 seconds. Cut the Track and delete the clip on the right side. Lastly, Lock Track 5.

Step 18
Drag the Downward Outline snapshot to Track 4. Then, repeat the same process as in Step 16 and Step 17.
Step 19
Drag the Upward Outline snapshot to Track 3 at the 17th frame. Double-click on it and change the Opacity to 0%.

Step 20
Now, move 5 frames forward and increase the Opacity back to 100%. Then, drag the Y-axis value to the right until the screen looks like this.

Step 21
Move the Playhead to 1 minute and 5 seconds. Click on “+Add” to add a keyframe. Then, move the Playhead 5 frames forward. Double-click on the clip and stretch it from side to side to match something like this.

Step 22
Move the Playhead to 1 minute and 16 seconds. Split the clip and delete the part on the right side. Hide Track 4, 5, and 6. Then, take a Snapshot. Drag this Snapshot next to the clip on Track 3. Place the Playhead on 1 minute and 18 seconds. Then, unhide Track 4, 5, and 6.
Step 23
Double-click on the clip on the right side of Track 3. Add a keyframe by pressing “+Add”. Move the Playhead to 1 minute and 23 seconds. Now, resize the clip back to its original size by moving the rectangle left and right. Right now, it should look like this.

Step 24
Move the Playhead 5 frames forward. Drag the Y-axis value to the left until the screen looks like this.

Step 25
Move the Playhead 5 frames forward again. Drag the value of the Y-axis to the left until the screen looks like this. Then, change the Opacity to 0%. Finally, split the clip at 2 minutes and 10 seconds. Delete the part on the right side. Lock Track 3.

Step 26
Next, drag the Downward Snapshot on Track 2 and follow the same process as in Steps 19 through 25.
Step 27
Unhide the Background clip at the bottom of the Timeline. Then, Unlock Track 6. Split the clip on Track 6 at the 15th frame.

Step 28
Move the Playhead at the beginning of the Timeline. Click on the first part of the clip on Track 6. Add a keyframe. Drag the X-axis value to the right until the word disappears out of the screen. Like this. 👇Then, move the Playhead to the 6th frame and Reset the X-axis value to 0.0.

Step 29
Take the Playhead to 2 minutes and 10 seconds. Split it. Now, move the Playhead to 2 minutes and 19 seconds and add a keyframe. Lastly, take the Playhead to the very end of the clip and drag the text to the right side until it’s out of the screen once again.

Step 30
Go to the Effects tab. Select Glitch from the panel on the left. Then, apply “Glitch Dispersion” and “Glitch Stripe 2” to the clips at the start and at the end.

Step 31
Finally, Render the video to watch the final preview. And, you’re done! Congratulations on creating a repeated text animation in Filmora.

Summary
What you’ve learned:
- How to create text animations in Filmora
- Applying animation effects
- Make advanced edits on Titles in Filmora
- Hide and lock Tracks and Clips in Filmora
How to Make Eye Zoom Transition Effect with Filmora
What is an eye zoom transition effect? It’s a close-up video effect allowing viewers to transit to the next clip from the eye. This effect is commonly used by musicians and travel bloggers to give their videos a more cinematic feel. So, without wasting time, let’s learn how to create an eye zoom transition with Wondershare Filmora .
Free Download For Win 7 or later(64-bit)
Free Download For macOS 10.14 or later
Preparation:
First, you need to create a close-up eye video. Although you can do that with your digital camera, a standard smartphone should do it just fine. Just ask a friend or family member to use your phone’s rear camera to record your eye centered on the screen. Ensure that the eye is as close as possible and you don’t lose focus. The camera should be around 10cm away from your face. And lest I forget, the flash should be ON.

How to Create an Eye-zoom Transition
Step 1 Align the video clips on Filmora
After recording a close-up eye video, add it on Wondershare Filmora and duplicate it. Alternatively, you can add the video to the first and second tracks.

Step 2 Add a freeze frame to the video
Next, we want to add a freeze frame to the section where the eye opens fully. To do that, select the second video track and place the playhead where the eye is fully open. After that, right-click the video track, then choose the Add Freeze Frame option.

Now trim the first video track from where the freeze frame starts on the second video. Also, cut the second video track to leave only the freeze frame
Step 3 Add a masking effect to the eye
With the two video tracks ready, it’s time to apply a masking effect. Tap the Effect tab on the top menu bar and then find the Shape Mask under the utility section. Now drag and drop the effect to the freeze frame.

Double-click on the freeze frame clip to adjust the Shape Mask on the preview screen. Ensure the mask reveals the eye pupil only and check the Invert Mask box. Also, set the Feather number to 10.

Step 4 Add the transition video
Next, add the video you want to edit with an eye-zoom effect next to the first video track. Preview the video, and you’ll notice your new video playing inside the eye mask.
With that done, move the playhead to the start of the freeze frame video and double-click the video clip to launch the settings window. Click the Animation tab before clicking Customize to see the keyframe settings. Tap the Add button to add a keyframe. Then, add a few frames using the playhead before clicking Add. But because we’re zooming in, increase the scale to 160%. You can also add the rotation and position.

After setting the second keyframe, move the playhead to the right and add the third keyframe. This time, increase the scale number to 400%, as well as the rotation and position. Now preview the video, and you’ll notice the rotating eye-zoom effect.
Summary
There you go! That’s how to create an eye-zoom transition using Wondershare Filmora. Don’t forget to play around with this feature-rich video editor to unlock its full capabilities. Enjoy!
Free Download For macOS 10.14 or later
Preparation:
First, you need to create a close-up eye video. Although you can do that with your digital camera, a standard smartphone should do it just fine. Just ask a friend or family member to use your phone’s rear camera to record your eye centered on the screen. Ensure that the eye is as close as possible and you don’t lose focus. The camera should be around 10cm away from your face. And lest I forget, the flash should be ON.

How to Create an Eye-zoom Transition
Step 1 Align the video clips on Filmora
After recording a close-up eye video, add it on Wondershare Filmora and duplicate it. Alternatively, you can add the video to the first and second tracks.

Step 2 Add a freeze frame to the video
Next, we want to add a freeze frame to the section where the eye opens fully. To do that, select the second video track and place the playhead where the eye is fully open. After that, right-click the video track, then choose the Add Freeze Frame option.

Now trim the first video track from where the freeze frame starts on the second video. Also, cut the second video track to leave only the freeze frame
Step 3 Add a masking effect to the eye
With the two video tracks ready, it’s time to apply a masking effect. Tap the Effect tab on the top menu bar and then find the Shape Mask under the utility section. Now drag and drop the effect to the freeze frame.

Double-click on the freeze frame clip to adjust the Shape Mask on the preview screen. Ensure the mask reveals the eye pupil only and check the Invert Mask box. Also, set the Feather number to 10.

Step 4 Add the transition video
Next, add the video you want to edit with an eye-zoom effect next to the first video track. Preview the video, and you’ll notice your new video playing inside the eye mask.
With that done, move the playhead to the start of the freeze frame video and double-click the video clip to launch the settings window. Click the Animation tab before clicking Customize to see the keyframe settings. Tap the Add button to add a keyframe. Then, add a few frames using the playhead before clicking Add. But because we’re zooming in, increase the scale to 160%. You can also add the rotation and position.

After setting the second keyframe, move the playhead to the right and add the third keyframe. This time, increase the scale number to 400%, as well as the rotation and position. Now preview the video, and you’ll notice the rotating eye-zoom effect.
Summary
There you go! That’s how to create an eye-zoom transition using Wondershare Filmora. Don’t forget to play around with this feature-rich video editor to unlock its full capabilities. Enjoy!
Free Download For macOS 10.14 or later
Preparation:
First, you need to create a close-up eye video. Although you can do that with your digital camera, a standard smartphone should do it just fine. Just ask a friend or family member to use your phone’s rear camera to record your eye centered on the screen. Ensure that the eye is as close as possible and you don’t lose focus. The camera should be around 10cm away from your face. And lest I forget, the flash should be ON.

How to Create an Eye-zoom Transition
Step 1 Align the video clips on Filmora
After recording a close-up eye video, add it on Wondershare Filmora and duplicate it. Alternatively, you can add the video to the first and second tracks.

Step 2 Add a freeze frame to the video
Next, we want to add a freeze frame to the section where the eye opens fully. To do that, select the second video track and place the playhead where the eye is fully open. After that, right-click the video track, then choose the Add Freeze Frame option.

Now trim the first video track from where the freeze frame starts on the second video. Also, cut the second video track to leave only the freeze frame
Step 3 Add a masking effect to the eye
With the two video tracks ready, it’s time to apply a masking effect. Tap the Effect tab on the top menu bar and then find the Shape Mask under the utility section. Now drag and drop the effect to the freeze frame.

Double-click on the freeze frame clip to adjust the Shape Mask on the preview screen. Ensure the mask reveals the eye pupil only and check the Invert Mask box. Also, set the Feather number to 10.

Step 4 Add the transition video
Next, add the video you want to edit with an eye-zoom effect next to the first video track. Preview the video, and you’ll notice your new video playing inside the eye mask.
With that done, move the playhead to the start of the freeze frame video and double-click the video clip to launch the settings window. Click the Animation tab before clicking Customize to see the keyframe settings. Tap the Add button to add a keyframe. Then, add a few frames using the playhead before clicking Add. But because we’re zooming in, increase the scale to 160%. You can also add the rotation and position.

After setting the second keyframe, move the playhead to the right and add the third keyframe. This time, increase the scale number to 400%, as well as the rotation and position. Now preview the video, and you’ll notice the rotating eye-zoom effect.
Summary
There you go! That’s how to create an eye-zoom transition using Wondershare Filmora. Don’t forget to play around with this feature-rich video editor to unlock its full capabilities. Enjoy!
Free Download For macOS 10.14 or later
Preparation:
First, you need to create a close-up eye video. Although you can do that with your digital camera, a standard smartphone should do it just fine. Just ask a friend or family member to use your phone’s rear camera to record your eye centered on the screen. Ensure that the eye is as close as possible and you don’t lose focus. The camera should be around 10cm away from your face. And lest I forget, the flash should be ON.

How to Create an Eye-zoom Transition
Step 1 Align the video clips on Filmora
After recording a close-up eye video, add it on Wondershare Filmora and duplicate it. Alternatively, you can add the video to the first and second tracks.

Step 2 Add a freeze frame to the video
Next, we want to add a freeze frame to the section where the eye opens fully. To do that, select the second video track and place the playhead where the eye is fully open. After that, right-click the video track, then choose the Add Freeze Frame option.

Now trim the first video track from where the freeze frame starts on the second video. Also, cut the second video track to leave only the freeze frame
Step 3 Add a masking effect to the eye
With the two video tracks ready, it’s time to apply a masking effect. Tap the Effect tab on the top menu bar and then find the Shape Mask under the utility section. Now drag and drop the effect to the freeze frame.

Double-click on the freeze frame clip to adjust the Shape Mask on the preview screen. Ensure the mask reveals the eye pupil only and check the Invert Mask box. Also, set the Feather number to 10.

Step 4 Add the transition video
Next, add the video you want to edit with an eye-zoom effect next to the first video track. Preview the video, and you’ll notice your new video playing inside the eye mask.
With that done, move the playhead to the start of the freeze frame video and double-click the video clip to launch the settings window. Click the Animation tab before clicking Customize to see the keyframe settings. Tap the Add button to add a keyframe. Then, add a few frames using the playhead before clicking Add. But because we’re zooming in, increase the scale to 160%. You can also add the rotation and position.

After setting the second keyframe, move the playhead to the right and add the third keyframe. This time, increase the scale number to 400%, as well as the rotation and position. Now preview the video, and you’ll notice the rotating eye-zoom effect.
Summary
There you go! That’s how to create an eye-zoom transition using Wondershare Filmora. Don’t forget to play around with this feature-rich video editor to unlock its full capabilities. Enjoy!
How To Make a Photo Collage in Microsoft Word
Any Differences in Making Collages in Different Versions of Microsoft Wor
An easy yet powerful editor
Numerous effects to choose from
Detailed tutorials provided by the official channel
Are you having trouble making a collage Microsoft Word? Well, at times it might prove tricky to make a photo collage using Microsoft Word as it is predominantly software that is used for text. Therefore, if one is trying to make a photo collage in Microsoft Word, one might need to know the purpose and use of Microsoft collage maker as the kit can greatly help to create a photo collage in Word.
There are also other things to know about the process such as the difference between making photo collages in different versions of Microsoft Word or which version of the Microsoft Word is most commonly used by all people.
In this article
01 [Any Differences in Making Collages in Different Versions of Microsoft Word?](#Part 1)
02 [How To Make A Photo Collage In Microsoft Word](#Part 2)
Part 1 Any Differences in Making Collages in Different Versions of Microsoft Word?
The usability of Microsoft Word does not end at simply writing text. It extends to the usage of photos and the creation of photo collages using these photos. Microsoft Word has the right features which you can easily use to organize pictures and photos in a certain way to make a photo collage. The collage maker Microsoft is not a hard operation to access if one knows the various options and operations of Microsoft Word well. There are different versions of Microsoft Word, all of which serve the same purposes but have different options and different icons representing various features. No matter which version you are using, the primary process of creating remains the same in all of those processes as it is simply the collection of the desired pictures, deciding on a particular shape and dimension of the page where you will arrange the pictures, inserting the pictures into the page, and then arranging them in a certain order.
Up until now, Microsoft has launched more than ten versions of Microsoft Word, with the preliminary ones being named “Microsoft Office”. In recent times, the newer version of Microsoft Word has become more user-friendly and thus it has become easier to perform so-called more complex tasks with the software, such as the creation of photo collages. With the addition of options and features to each newer version of Microsoft Word, it has become easier to work with graphics and arrange them or resize them or edit them in the desired way. More templates have been included in the newer versions to make it easy for the users to come to a decision when it comes to the shape of the collage and the number of pictures in it. Thus, it has various collage Microsoft Word options available now, which make the job much easier. There are a variety of options that are offered by the newer versions of Microsoft Word which will surely greatly help the user in creating photo collages as they open up the path to more features.
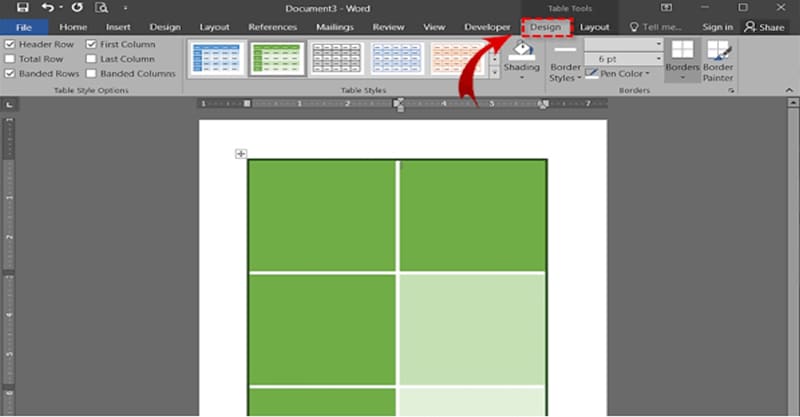
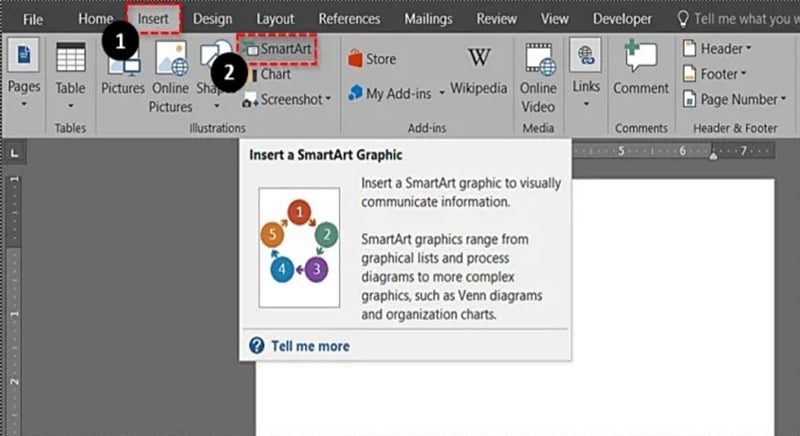
The difference has been in the quality and the quantity of the features that each of the new versions of Microsoft Word contains. For example, the older versions were predominantly used for text, and thus, there were not any viable options for pictures and arranging them, and creating a collage. The newer versions of Microsoft Word have sections and options entirely dedicated to the creation of collages and thus contain special Microsoft collage maker options which make it much easier to arrange pictures in certain ways and create collages. For example, the newer versions consist of features such as ‘SmartArt” which is a built-in feature to create collages in Microsoft Word. It is available in the newer versions of Word. ‘SmartArt” works as a Microsoft auto collage option.
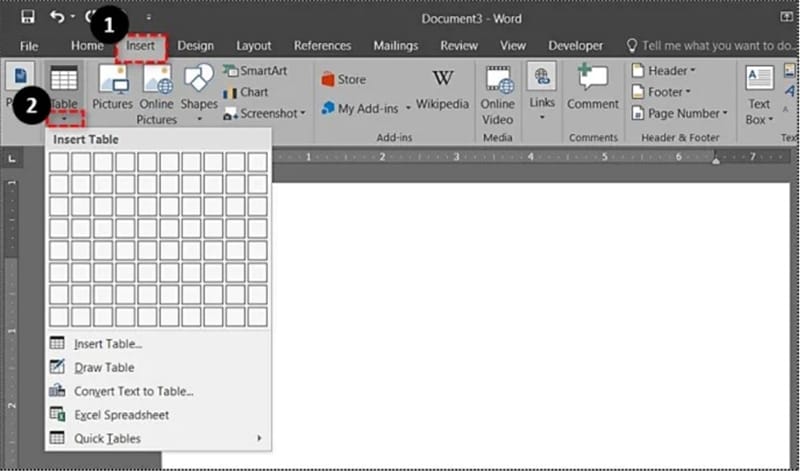
The 2013 and 2016 versions of Microsoft Word also contain something called the ‘Developer” option, which can be accessed from the ‘Customizing the Ribbon” section. You can use it to specify the number of pictures and then insert pictures from a file. There is also the option of using Word Tables which can be used in any version of Microsoft Word to create a certain arrangement for your photo collage. Word Tables give the user complete control over the layout of the collage and this makes it easier for the user to arrange the pictures of the collage.

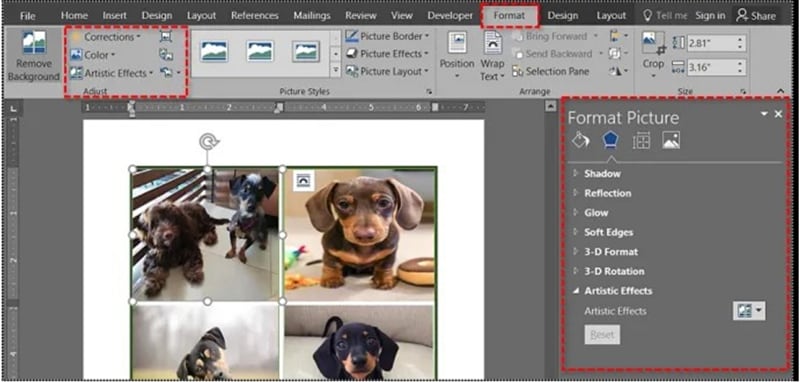
There is so something called the ‘Effect” option which can be found in the ‘Format Picture” option, and this can be efficiently used to add various artistic effects and modify the pictures in ways that the user wants.
The most commonly used version of the Microsoft Word software to create photo collages is expectedly the newest as it comes with the maximum features which enable the user to go beyond text and control designs, graphics, and everything else.
Part 2 How To Make A Photo Collage In Microsoft Word
The process to make a photo collage in Microsoft Word consists of several steps and each of them is equally important in this part of the article, we shall take a close look at each of these steps and how you can implement them, and how you can efficiently use the various features that Microsoft Word has to offer. Now, there are many ways in which one can create a collage in Microsoft Word using various Microsoft collage maker options. Read the options given below to understand them in proper details.
● Creating a photo collage by freestyle – This is the simplest method and is quite easy and thus, does not require much expertise to be followed.
● Firstly, go to the Ribbon. From there click on “Developer” option which can be found there. In case the option is not activated, the user can activate it by clicking on the “Customize The Ribbon” From there activate the ‘Developer” option.
● The second step follows the user clicking on the ‘Picture Content Control” button and this can be found easily in the ‘Controls” section of the Ribbon. This option is used to create placeholders for all the desired pictures.
● The cursor is placed on each placeholder and the ‘Picture” option is clicked upon. This gives you access to the pictures and following this, you will need to specify the source from where you shall obtain the pictures to paste them into the Word document.
● Now, the problem arises when each picture is pasted in the document in a random way and sizes and shapes. This can easily be solved by right-clicking on the picture and then clicking on “Wrap Text”, followed by ‘More Layout Options”, ‘In Front Of Text”, and this will enable you to arrange the pictures in whichever way you like.
● Now, the pictures can be organized in any way you want, and thus, the entire collage can be created in any you want. You can go ahead and shrink or stretch a photo without distorting it. You can use the various options of the “Picture Tools” tab to format the images which have borders and preset styles and shadows.
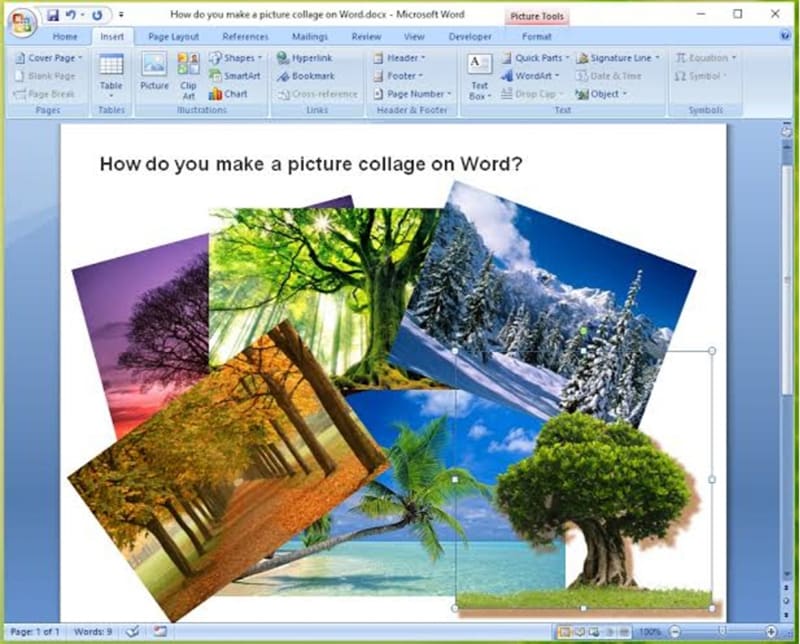
● Creating a collage using ‘SmartArt” – ‘SmartArt” is the easiest way to create a collage in Microsoft Word and in the shortest time possible. It is a pretty straightforward procedure. Let us take a look at the steps.
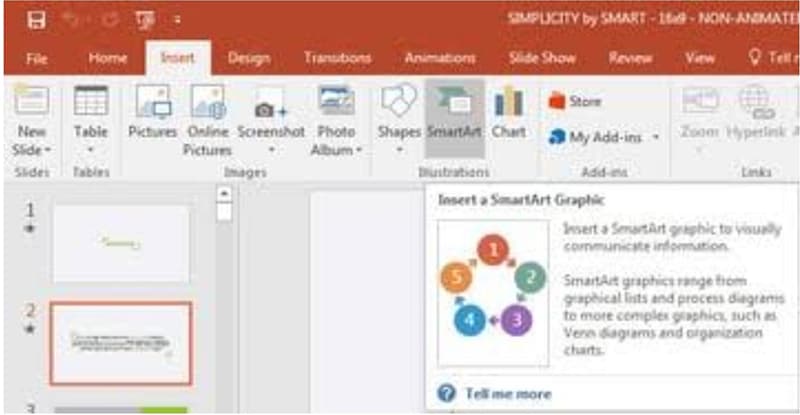
● Go to the ‘Insert” option and click on ‘SmartArt”, and then go and click on ‘Picture”, and out of the photo collages that appear in front of you, select one that is either photo-only or is photo-and-text and looks perfect for your purpose.
● By clicking on the picture icon on each photo placeholder, and then choosing ‘Insert”, you can choose to insert photos proportionally, as you please.
● Select a photo and click on the ‘Picture Tools” tab, while moving the photo into a placeholder. You can click on the ‘Crop” button to stretch or shrink a picture according to your wish. Thus, you can easily resize and reshape your pictures and photos in any way you like.
● The last and final step of the Microsoft auto collage option is repositioning the pictures by choosing ‘Move Up” or ‘Move Down”, which can be found under the double-arrow in the ‘SmartArt” frame’s the left side. Thus, you can easily change the entire arrangement of the entire photo collage, quite having to do much.
If you are trying to make a photo collage, you can also go with the **Wondershare Filmora **Video Editor, which has some amazing features, to make your job much easier. It has over 10 million stock media, a huge number of preset templates, and a feature called “Speed Ramping”, which you can use to adjust the speed of your video. It has various kinds of stock media such as “Pixabay”, “Giphy” and “Unsplash”.
For Win 7 or later (64-bit)
For macOS 10.12 or later
It works on a variety of operating systems, such as Windows 7, Windows 8.1, Windows 10, and also Windows 1It has a minimum RAM requirement of 4GB, though 8 GB is recommended for 4K and HD videos. It also requires a minimum of Intel HD Graphics 5000 or newer versions.
● Key Takeaways from This Episode →
●Thus, the entire article can be summarized by saying that there are quite a few ways in which you can create a photo collage in Microsoft Word, using collage Microsoft word and various other Microsoft auto collage options which can be used to make photo collages easily in Microsoft Word.
●With the release of newer versions with more and more features and options, it becomes easier to exercise control over graphical content in Microsoft Word.
●So, the processes are quite straightforward and simple and there should not be much problem in following them as mentioned so many times, there are many collage maker Microsoft options which you can use to make a photo collage with pictures and shapes that you desire.
●The immensity of options enables you to create collages in whichever you like.
Are you having trouble making a collage Microsoft Word? Well, at times it might prove tricky to make a photo collage using Microsoft Word as it is predominantly software that is used for text. Therefore, if one is trying to make a photo collage in Microsoft Word, one might need to know the purpose and use of Microsoft collage maker as the kit can greatly help to create a photo collage in Word.
There are also other things to know about the process such as the difference between making photo collages in different versions of Microsoft Word or which version of the Microsoft Word is most commonly used by all people.
In this article
01 [Any Differences in Making Collages in Different Versions of Microsoft Word?](#Part 1)
02 [How To Make A Photo Collage In Microsoft Word](#Part 2)
Part 1 Any Differences in Making Collages in Different Versions of Microsoft Word?
The usability of Microsoft Word does not end at simply writing text. It extends to the usage of photos and the creation of photo collages using these photos. Microsoft Word has the right features which you can easily use to organize pictures and photos in a certain way to make a photo collage. The collage maker Microsoft is not a hard operation to access if one knows the various options and operations of Microsoft Word well. There are different versions of Microsoft Word, all of which serve the same purposes but have different options and different icons representing various features. No matter which version you are using, the primary process of creating remains the same in all of those processes as it is simply the collection of the desired pictures, deciding on a particular shape and dimension of the page where you will arrange the pictures, inserting the pictures into the page, and then arranging them in a certain order.
Up until now, Microsoft has launched more than ten versions of Microsoft Word, with the preliminary ones being named “Microsoft Office”. In recent times, the newer version of Microsoft Word has become more user-friendly and thus it has become easier to perform so-called more complex tasks with the software, such as the creation of photo collages. With the addition of options and features to each newer version of Microsoft Word, it has become easier to work with graphics and arrange them or resize them or edit them in the desired way. More templates have been included in the newer versions to make it easy for the users to come to a decision when it comes to the shape of the collage and the number of pictures in it. Thus, it has various collage Microsoft Word options available now, which make the job much easier. There are a variety of options that are offered by the newer versions of Microsoft Word which will surely greatly help the user in creating photo collages as they open up the path to more features.

The difference has been in the quality and the quantity of the features that each of the new versions of Microsoft Word contains. For example, the older versions were predominantly used for text, and thus, there were not any viable options for pictures and arranging them, and creating a collage. The newer versions of Microsoft Word have sections and options entirely dedicated to the creation of collages and thus contain special Microsoft collage maker options which make it much easier to arrange pictures in certain ways and create collages. For example, the newer versions consist of features such as ‘SmartArt” which is a built-in feature to create collages in Microsoft Word. It is available in the newer versions of Word. ‘SmartArt” works as a Microsoft auto collage option.

The 2013 and 2016 versions of Microsoft Word also contain something called the ‘Developer” option, which can be accessed from the ‘Customizing the Ribbon” section. You can use it to specify the number of pictures and then insert pictures from a file. There is also the option of using Word Tables which can be used in any version of Microsoft Word to create a certain arrangement for your photo collage. Word Tables give the user complete control over the layout of the collage and this makes it easier for the user to arrange the pictures of the collage.


There is so something called the ‘Effect” option which can be found in the ‘Format Picture” option, and this can be efficiently used to add various artistic effects and modify the pictures in ways that the user wants.

The most commonly used version of the Microsoft Word software to create photo collages is expectedly the newest as it comes with the maximum features which enable the user to go beyond text and control designs, graphics, and everything else.
Part 2 How To Make A Photo Collage In Microsoft Word
The process to make a photo collage in Microsoft Word consists of several steps and each of them is equally important in this part of the article, we shall take a close look at each of these steps and how you can implement them, and how you can efficiently use the various features that Microsoft Word has to offer. Now, there are many ways in which one can create a collage in Microsoft Word using various Microsoft collage maker options. Read the options given below to understand them in proper details.
● Creating a photo collage by freestyle – This is the simplest method and is quite easy and thus, does not require much expertise to be followed.
● Firstly, go to the Ribbon. From there click on “Developer” option which can be found there. In case the option is not activated, the user can activate it by clicking on the “Customize The Ribbon” From there activate the ‘Developer” option.
● The second step follows the user clicking on the ‘Picture Content Control” button and this can be found easily in the ‘Controls” section of the Ribbon. This option is used to create placeholders for all the desired pictures.
● The cursor is placed on each placeholder and the ‘Picture” option is clicked upon. This gives you access to the pictures and following this, you will need to specify the source from where you shall obtain the pictures to paste them into the Word document.
● Now, the problem arises when each picture is pasted in the document in a random way and sizes and shapes. This can easily be solved by right-clicking on the picture and then clicking on “Wrap Text”, followed by ‘More Layout Options”, ‘In Front Of Text”, and this will enable you to arrange the pictures in whichever way you like.
● Now, the pictures can be organized in any way you want, and thus, the entire collage can be created in any you want. You can go ahead and shrink or stretch a photo without distorting it. You can use the various options of the “Picture Tools” tab to format the images which have borders and preset styles and shadows.

● Creating a collage using ‘SmartArt” – ‘SmartArt” is the easiest way to create a collage in Microsoft Word and in the shortest time possible. It is a pretty straightforward procedure. Let us take a look at the steps.
● Go to the ‘Insert” option and click on ‘SmartArt”, and then go and click on ‘Picture”, and out of the photo collages that appear in front of you, select one that is either photo-only or is photo-and-text and looks perfect for your purpose.
● By clicking on the picture icon on each photo placeholder, and then choosing ‘Insert”, you can choose to insert photos proportionally, as you please.
● Select a photo and click on the ‘Picture Tools” tab, while moving the photo into a placeholder. You can click on the ‘Crop” button to stretch or shrink a picture according to your wish. Thus, you can easily resize and reshape your pictures and photos in any way you like.
● The last and final step of the Microsoft auto collage option is repositioning the pictures by choosing ‘Move Up” or ‘Move Down”, which can be found under the double-arrow in the ‘SmartArt” frame’s the left side. Thus, you can easily change the entire arrangement of the entire photo collage, quite having to do much.

If you are trying to make a photo collage, you can also go with the **Wondershare Filmora **Video Editor, which has some amazing features, to make your job much easier. It has over 10 million stock media, a huge number of preset templates, and a feature called “Speed Ramping”, which you can use to adjust the speed of your video. It has various kinds of stock media such as “Pixabay”, “Giphy” and “Unsplash”.
For Win 7 or later (64-bit)
For macOS 10.12 or later
It works on a variety of operating systems, such as Windows 7, Windows 8.1, Windows 10, and also Windows 1It has a minimum RAM requirement of 4GB, though 8 GB is recommended for 4K and HD videos. It also requires a minimum of Intel HD Graphics 5000 or newer versions.
● Key Takeaways from This Episode →
●Thus, the entire article can be summarized by saying that there are quite a few ways in which you can create a photo collage in Microsoft Word, using collage Microsoft word and various other Microsoft auto collage options which can be used to make photo collages easily in Microsoft Word.
●With the release of newer versions with more and more features and options, it becomes easier to exercise control over graphical content in Microsoft Word.
●So, the processes are quite straightforward and simple and there should not be much problem in following them as mentioned so many times, there are many collage maker Microsoft options which you can use to make a photo collage with pictures and shapes that you desire.
●The immensity of options enables you to create collages in whichever you like.
Are you having trouble making a collage Microsoft Word? Well, at times it might prove tricky to make a photo collage using Microsoft Word as it is predominantly software that is used for text. Therefore, if one is trying to make a photo collage in Microsoft Word, one might need to know the purpose and use of Microsoft collage maker as the kit can greatly help to create a photo collage in Word.
There are also other things to know about the process such as the difference between making photo collages in different versions of Microsoft Word or which version of the Microsoft Word is most commonly used by all people.
In this article
01 [Any Differences in Making Collages in Different Versions of Microsoft Word?](#Part 1)
02 [How To Make A Photo Collage In Microsoft Word](#Part 2)
Part 1 Any Differences in Making Collages in Different Versions of Microsoft Word?
The usability of Microsoft Word does not end at simply writing text. It extends to the usage of photos and the creation of photo collages using these photos. Microsoft Word has the right features which you can easily use to organize pictures and photos in a certain way to make a photo collage. The collage maker Microsoft is not a hard operation to access if one knows the various options and operations of Microsoft Word well. There are different versions of Microsoft Word, all of which serve the same purposes but have different options and different icons representing various features. No matter which version you are using, the primary process of creating remains the same in all of those processes as it is simply the collection of the desired pictures, deciding on a particular shape and dimension of the page where you will arrange the pictures, inserting the pictures into the page, and then arranging them in a certain order.
Up until now, Microsoft has launched more than ten versions of Microsoft Word, with the preliminary ones being named “Microsoft Office”. In recent times, the newer version of Microsoft Word has become more user-friendly and thus it has become easier to perform so-called more complex tasks with the software, such as the creation of photo collages. With the addition of options and features to each newer version of Microsoft Word, it has become easier to work with graphics and arrange them or resize them or edit them in the desired way. More templates have been included in the newer versions to make it easy for the users to come to a decision when it comes to the shape of the collage and the number of pictures in it. Thus, it has various collage Microsoft Word options available now, which make the job much easier. There are a variety of options that are offered by the newer versions of Microsoft Word which will surely greatly help the user in creating photo collages as they open up the path to more features.

The difference has been in the quality and the quantity of the features that each of the new versions of Microsoft Word contains. For example, the older versions were predominantly used for text, and thus, there were not any viable options for pictures and arranging them, and creating a collage. The newer versions of Microsoft Word have sections and options entirely dedicated to the creation of collages and thus contain special Microsoft collage maker options which make it much easier to arrange pictures in certain ways and create collages. For example, the newer versions consist of features such as ‘SmartArt” which is a built-in feature to create collages in Microsoft Word. It is available in the newer versions of Word. ‘SmartArt” works as a Microsoft auto collage option.

The 2013 and 2016 versions of Microsoft Word also contain something called the ‘Developer” option, which can be accessed from the ‘Customizing the Ribbon” section. You can use it to specify the number of pictures and then insert pictures from a file. There is also the option of using Word Tables which can be used in any version of Microsoft Word to create a certain arrangement for your photo collage. Word Tables give the user complete control over the layout of the collage and this makes it easier for the user to arrange the pictures of the collage.


There is so something called the ‘Effect” option which can be found in the ‘Format Picture” option, and this can be efficiently used to add various artistic effects and modify the pictures in ways that the user wants.

The most commonly used version of the Microsoft Word software to create photo collages is expectedly the newest as it comes with the maximum features which enable the user to go beyond text and control designs, graphics, and everything else.
Part 2 How To Make A Photo Collage In Microsoft Word
The process to make a photo collage in Microsoft Word consists of several steps and each of them is equally important in this part of the article, we shall take a close look at each of these steps and how you can implement them, and how you can efficiently use the various features that Microsoft Word has to offer. Now, there are many ways in which one can create a collage in Microsoft Word using various Microsoft collage maker options. Read the options given below to understand them in proper details.
● Creating a photo collage by freestyle – This is the simplest method and is quite easy and thus, does not require much expertise to be followed.
● Firstly, go to the Ribbon. From there click on “Developer” option which can be found there. In case the option is not activated, the user can activate it by clicking on the “Customize The Ribbon” From there activate the ‘Developer” option.
● The second step follows the user clicking on the ‘Picture Content Control” button and this can be found easily in the ‘Controls” section of the Ribbon. This option is used to create placeholders for all the desired pictures.
● The cursor is placed on each placeholder and the ‘Picture” option is clicked upon. This gives you access to the pictures and following this, you will need to specify the source from where you shall obtain the pictures to paste them into the Word document.
● Now, the problem arises when each picture is pasted in the document in a random way and sizes and shapes. This can easily be solved by right-clicking on the picture and then clicking on “Wrap Text”, followed by ‘More Layout Options”, ‘In Front Of Text”, and this will enable you to arrange the pictures in whichever way you like.
● Now, the pictures can be organized in any way you want, and thus, the entire collage can be created in any you want. You can go ahead and shrink or stretch a photo without distorting it. You can use the various options of the “Picture Tools” tab to format the images which have borders and preset styles and shadows.

● Creating a collage using ‘SmartArt” – ‘SmartArt” is the easiest way to create a collage in Microsoft Word and in the shortest time possible. It is a pretty straightforward procedure. Let us take a look at the steps.
● Go to the ‘Insert” option and click on ‘SmartArt”, and then go and click on ‘Picture”, and out of the photo collages that appear in front of you, select one that is either photo-only or is photo-and-text and looks perfect for your purpose.
● By clicking on the picture icon on each photo placeholder, and then choosing ‘Insert”, you can choose to insert photos proportionally, as you please.
● Select a photo and click on the ‘Picture Tools” tab, while moving the photo into a placeholder. You can click on the ‘Crop” button to stretch or shrink a picture according to your wish. Thus, you can easily resize and reshape your pictures and photos in any way you like.
● The last and final step of the Microsoft auto collage option is repositioning the pictures by choosing ‘Move Up” or ‘Move Down”, which can be found under the double-arrow in the ‘SmartArt” frame’s the left side. Thus, you can easily change the entire arrangement of the entire photo collage, quite having to do much.

If you are trying to make a photo collage, you can also go with the **Wondershare Filmora **Video Editor, which has some amazing features, to make your job much easier. It has over 10 million stock media, a huge number of preset templates, and a feature called “Speed Ramping”, which you can use to adjust the speed of your video. It has various kinds of stock media such as “Pixabay”, “Giphy” and “Unsplash”.
For Win 7 or later (64-bit)
For macOS 10.12 or later
It works on a variety of operating systems, such as Windows 7, Windows 8.1, Windows 10, and also Windows 1It has a minimum RAM requirement of 4GB, though 8 GB is recommended for 4K and HD videos. It also requires a minimum of Intel HD Graphics 5000 or newer versions.
● Key Takeaways from This Episode →
●Thus, the entire article can be summarized by saying that there are quite a few ways in which you can create a photo collage in Microsoft Word, using collage Microsoft word and various other Microsoft auto collage options which can be used to make photo collages easily in Microsoft Word.
●With the release of newer versions with more and more features and options, it becomes easier to exercise control over graphical content in Microsoft Word.
●So, the processes are quite straightforward and simple and there should not be much problem in following them as mentioned so many times, there are many collage maker Microsoft options which you can use to make a photo collage with pictures and shapes that you desire.
●The immensity of options enables you to create collages in whichever you like.
Are you having trouble making a collage Microsoft Word? Well, at times it might prove tricky to make a photo collage using Microsoft Word as it is predominantly software that is used for text. Therefore, if one is trying to make a photo collage in Microsoft Word, one might need to know the purpose and use of Microsoft collage maker as the kit can greatly help to create a photo collage in Word.
There are also other things to know about the process such as the difference between making photo collages in different versions of Microsoft Word or which version of the Microsoft Word is most commonly used by all people.
In this article
01 [Any Differences in Making Collages in Different Versions of Microsoft Word?](#Part 1)
02 [How To Make A Photo Collage In Microsoft Word](#Part 2)
Part 1 Any Differences in Making Collages in Different Versions of Microsoft Word?
The usability of Microsoft Word does not end at simply writing text. It extends to the usage of photos and the creation of photo collages using these photos. Microsoft Word has the right features which you can easily use to organize pictures and photos in a certain way to make a photo collage. The collage maker Microsoft is not a hard operation to access if one knows the various options and operations of Microsoft Word well. There are different versions of Microsoft Word, all of which serve the same purposes but have different options and different icons representing various features. No matter which version you are using, the primary process of creating remains the same in all of those processes as it is simply the collection of the desired pictures, deciding on a particular shape and dimension of the page where you will arrange the pictures, inserting the pictures into the page, and then arranging them in a certain order.
Up until now, Microsoft has launched more than ten versions of Microsoft Word, with the preliminary ones being named “Microsoft Office”. In recent times, the newer version of Microsoft Word has become more user-friendly and thus it has become easier to perform so-called more complex tasks with the software, such as the creation of photo collages. With the addition of options and features to each newer version of Microsoft Word, it has become easier to work with graphics and arrange them or resize them or edit them in the desired way. More templates have been included in the newer versions to make it easy for the users to come to a decision when it comes to the shape of the collage and the number of pictures in it. Thus, it has various collage Microsoft Word options available now, which make the job much easier. There are a variety of options that are offered by the newer versions of Microsoft Word which will surely greatly help the user in creating photo collages as they open up the path to more features.

The difference has been in the quality and the quantity of the features that each of the new versions of Microsoft Word contains. For example, the older versions were predominantly used for text, and thus, there were not any viable options for pictures and arranging them, and creating a collage. The newer versions of Microsoft Word have sections and options entirely dedicated to the creation of collages and thus contain special Microsoft collage maker options which make it much easier to arrange pictures in certain ways and create collages. For example, the newer versions consist of features such as ‘SmartArt” which is a built-in feature to create collages in Microsoft Word. It is available in the newer versions of Word. ‘SmartArt” works as a Microsoft auto collage option.

The 2013 and 2016 versions of Microsoft Word also contain something called the ‘Developer” option, which can be accessed from the ‘Customizing the Ribbon” section. You can use it to specify the number of pictures and then insert pictures from a file. There is also the option of using Word Tables which can be used in any version of Microsoft Word to create a certain arrangement for your photo collage. Word Tables give the user complete control over the layout of the collage and this makes it easier for the user to arrange the pictures of the collage.


There is so something called the ‘Effect” option which can be found in the ‘Format Picture” option, and this can be efficiently used to add various artistic effects and modify the pictures in ways that the user wants.

The most commonly used version of the Microsoft Word software to create photo collages is expectedly the newest as it comes with the maximum features which enable the user to go beyond text and control designs, graphics, and everything else.
Part 2 How To Make A Photo Collage In Microsoft Word
The process to make a photo collage in Microsoft Word consists of several steps and each of them is equally important in this part of the article, we shall take a close look at each of these steps and how you can implement them, and how you can efficiently use the various features that Microsoft Word has to offer. Now, there are many ways in which one can create a collage in Microsoft Word using various Microsoft collage maker options. Read the options given below to understand them in proper details.
● Creating a photo collage by freestyle – This is the simplest method and is quite easy and thus, does not require much expertise to be followed.
● Firstly, go to the Ribbon. From there click on “Developer” option which can be found there. In case the option is not activated, the user can activate it by clicking on the “Customize The Ribbon” From there activate the ‘Developer” option.
● The second step follows the user clicking on the ‘Picture Content Control” button and this can be found easily in the ‘Controls” section of the Ribbon. This option is used to create placeholders for all the desired pictures.
● The cursor is placed on each placeholder and the ‘Picture” option is clicked upon. This gives you access to the pictures and following this, you will need to specify the source from where you shall obtain the pictures to paste them into the Word document.
● Now, the problem arises when each picture is pasted in the document in a random way and sizes and shapes. This can easily be solved by right-clicking on the picture and then clicking on “Wrap Text”, followed by ‘More Layout Options”, ‘In Front Of Text”, and this will enable you to arrange the pictures in whichever way you like.
● Now, the pictures can be organized in any way you want, and thus, the entire collage can be created in any you want. You can go ahead and shrink or stretch a photo without distorting it. You can use the various options of the “Picture Tools” tab to format the images which have borders and preset styles and shadows.

● Creating a collage using ‘SmartArt” – ‘SmartArt” is the easiest way to create a collage in Microsoft Word and in the shortest time possible. It is a pretty straightforward procedure. Let us take a look at the steps.
● Go to the ‘Insert” option and click on ‘SmartArt”, and then go and click on ‘Picture”, and out of the photo collages that appear in front of you, select one that is either photo-only or is photo-and-text and looks perfect for your purpose.
● By clicking on the picture icon on each photo placeholder, and then choosing ‘Insert”, you can choose to insert photos proportionally, as you please.
● Select a photo and click on the ‘Picture Tools” tab, while moving the photo into a placeholder. You can click on the ‘Crop” button to stretch or shrink a picture according to your wish. Thus, you can easily resize and reshape your pictures and photos in any way you like.
● The last and final step of the Microsoft auto collage option is repositioning the pictures by choosing ‘Move Up” or ‘Move Down”, which can be found under the double-arrow in the ‘SmartArt” frame’s the left side. Thus, you can easily change the entire arrangement of the entire photo collage, quite having to do much.

If you are trying to make a photo collage, you can also go with the **Wondershare Filmora **Video Editor, which has some amazing features, to make your job much easier. It has over 10 million stock media, a huge number of preset templates, and a feature called “Speed Ramping”, which you can use to adjust the speed of your video. It has various kinds of stock media such as “Pixabay”, “Giphy” and “Unsplash”.
For Win 7 or later (64-bit)
For macOS 10.12 or later
It works on a variety of operating systems, such as Windows 7, Windows 8.1, Windows 10, and also Windows 1It has a minimum RAM requirement of 4GB, though 8 GB is recommended for 4K and HD videos. It also requires a minimum of Intel HD Graphics 5000 or newer versions.
● Key Takeaways from This Episode →
●Thus, the entire article can be summarized by saying that there are quite a few ways in which you can create a photo collage in Microsoft Word, using collage Microsoft word and various other Microsoft auto collage options which can be used to make photo collages easily in Microsoft Word.
●With the release of newer versions with more and more features and options, it becomes easier to exercise control over graphical content in Microsoft Word.
●So, the processes are quite straightforward and simple and there should not be much problem in following them as mentioned so many times, there are many collage maker Microsoft options which you can use to make a photo collage with pictures and shapes that you desire.
●The immensity of options enables you to create collages in whichever you like.
Create Photoshop GIFs with Zero Hustle
How to Create Photoshop GIF The 100% Easy Way
An easy yet powerful editor
Numerous effects to choose from
Detailed tutorials provided by the official channel
Having trouble creating Photoshop GIFs? Stay tuned to set everything straight.
In this article
01 [Easy Ways to Create an Animated GIF in Photoshop](#Part 1)
02 [6 Ways To Make An Animated GIF Without Photoshop](#Part 2)
Part 1 Easy Ways to Create an Animated GIF in Photoshop
Animated GIFs are a naturally captivating means of information exchange and entertainment. When the talk is about creating these, you can visibly see a flood of creation tools and software solutions. However, standing out in the crowd, are those catchy Photoshop snippets that certainly have the potential to leave you jaw dropped.
A Photoshop GIF is bound to capture attention, owing to its high quality imaging and top rated professional editing outlook. If you possess the editing flare, do try creating one for an amazing editing experience.
Creating Animated Photoshop GIFs: Easiest Solutions
Let’s take a look into some easy and interesting ways of creating a GIF in Photoshop, to leave you with handy solutions, just in case you feel motivated to take up the creation idea.
Before you begin, make sure to install and launch a suitable version the Photoshop application in your device and keep a set of selected images at hand that you will require for GIF creation.
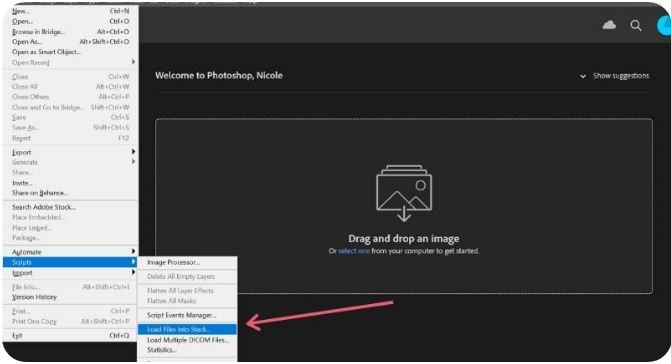
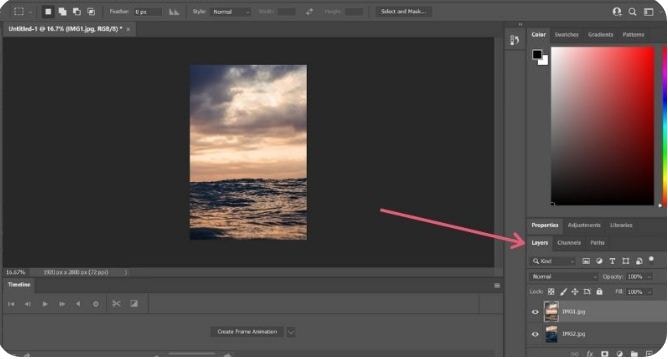
● Step 1: Load Image Files
Photoshop requires you to load your selected files into its creation stack. There is no limit on the image count, but make sure you choose images in a natural series so that the GIF doesn’t give an out of the box feel.
Reach the ‘File’ tab at the top and load your image files into the Photoshop stack using the following path:
File -> Scripts -> Load Files into Stack
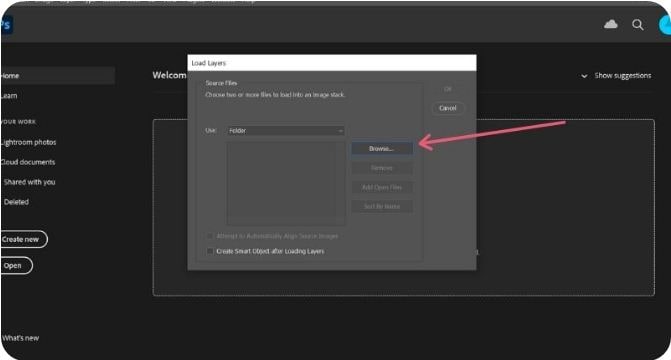
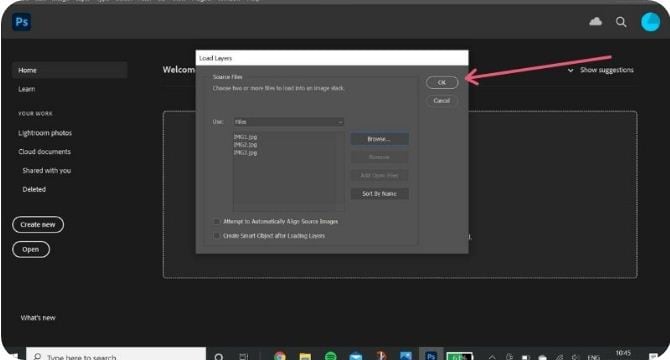
● Step 2: Image Selection
In the next pop-up window, click ‘Browse’ and choose the image file you wish to load into the Photoshop stack. In case the selected images seem tom lack proper alignment, click on the ‘Attempt to Automatically Align Source Images’ checkbox to set this straight and make your GIF frame stable.
Click on ‘OK’ when you are happy with your selections.
At this instant, Photoshop starts creating layers for the uploaded images, which you can see in the ‘Layers’ panel at the bottom-right. You are allowed to rearrange the image layers by selecting and dragging them or click on layer names to rename them.
If you notice distortion in Photoshop’s automatic alignment of your images, just crop the images frames to sort this out. Here’s how you can get this done:
● Tap the ‘Crop’ symbol.
● Adjust the crop frame to select the desired portion.
● Click on ‘Enter’ to confirm the action.
If you didn’t permit auto alignment previously, no worries, you can move ahead.
● Step 3: Make a Timeline Setup
Navigate to the ‘Window’ tab in the top menu and click the ’Timeline’ checkbox. You will see the ‘Timeline Window’ pop up below the Photoshop workspace, where you need to select the ‘Create Frame Animation’ tab. This will cause the options for frame animation to pop-up.
Select you topmost image layer, followed by clicking on the ‘Duplicate’ icon to generate a copy of the image frame.
● Step 4: Decide Time Frames
Select your topmost image frame to see a play duration of ‘0 sec’ below its thumbnail. Click to open the drop-down menu beside it and choose suitable time duration for the frame to run. Allot time durations to all successive frames in a similar manner.
● Step 5: Conceal Top Layers
You will see am combination of the first and second image layers in the image thumbnail. To set this right, navigate to ‘Layers’ to hide the top layer.
Continue to hide previous layers in successive frames so that each layer appears in its respective frame at the end of the process.
● Step 6: Preview Your Creation
Tap the ‘Play’ button to see your GIF preview. Ensure a smooth run with correct appearance order of images and precise frame durations.
● Step 7: Time to Share.
When you are satisfied, navigate to the ‘File’ tab and select ‘Save As’. From the menu that drops down, choose the GIF file format and click on ‘Save’.
In the ’GIF Save Options’ that follows, adjust file settings suited to your preference and tap ‘OK’.
As an alternative you can take the following path to open the ‘GIF Preview Window’:
File -> Export -> Save for Web
In the top-right comer, choose the GIF file format from the drop-down menu. There is also an option to resize your image at the bottom-right. It is advisable to keep the image size within 500 pixels for a convenient export across various media sharing platforms. When you finish, click on ‘Save’. Your creation is now ready for a media export.
Part 2 6 Ways to Make an Animated GIF Without Photoshop
The idea to create GIF in Photoshop is fun and exciting, no doubt on that, but you may often want to switch to a different platform. No issues with that, the web is there to sort out everything for you. All you need to do is open your favorite browser to land across a heap of welcoming solutions to create GIFs without Photoshop. Let’s have a look through the best ones:
01**Wondershare Filmora Video Editor **
Filmora by Wondershare is probably the best GIF maker tool you can rely on. This is packed with a diverse inventory of exciting design features that are ready to provide a creative boost to your editing skills. Loaded with a ton of classic audio visual effects, this software is certainly comprises of everything you need to create static and animated GIFs like a pro.

Wondershare Filmora - Best Video Editor for Mac/Windows
5,481,435 people have downloaded it.
Build unique custom animations without breaking a sweat.
Focus on creating epic stories and leave the details to Filmora’s auto features.
Start a creative adventure with drag & drop effects and endless possibilities.
Filmora simplifies advanced features to save you time and effort.
Filmora cuts out repetition so you can move on to your next creative breakthrough.
Key Features
● This is free software with possibly the most convenient interface.
● You get the freedom to play with hundreds of audio-visual effects to your heart’s content.
● You can create GIFs with static images and videos that are simply awesome to say the least.
● You need not worry about specific file formats. The software is compatible with almost all commonly known ones.
● Filmora allows you to expand and explore your editing talent to the fullest. You can play with tools like, cut, trim or combine image frames and make color and speed adjustments to get the perfect results for your artwork.
02Photoscape
This is another GIF maker tool you can choose to create catchy and interesting GIFs. Photoscape is a simple graphic editor that makes GIF creation exciting and fun. Available to you for free, this software allows you to design and edit animated GIFs with a series of image enhancements, like, resizing, color selection, image prints, etc. Photoscape is compatible with your Windows, Linux and Mac supported devices and has a clean interface. However, the program may sometimes take up a slow run.
Key Features
● You can improvise you GIF with image editing tools, like, color and size adjustments, clip arts, effects, overlays, etc.
● It has a unique ‘Photo Batch’ tool that you can use to process and rename multiple images simultaneously.
● Photoscape allows you to create interesting collages by merging a series of images into a single one.
● You can create captivating animated GIFs with multiple still images.
● The software is loaded with a bunch of utilities like, photo splitter, page merger, color picker, image viewer and others to give that perfect professional outlook to your creations.
03Gifted Motion
This is also among the commonly preferred GIF creator software. The best this about the tool is that it is platform independent and compatible with almost any Operating System. Another choice appeal of the software is its direct workability that is, you don’t require any program installations to create GIFs using this tool.
Key Features
● This is a simple graphic editor that runs on JAVA and is quite convenient to use.
● You can use this software to edit and create GIFs with images saved locally in your device.
● File formats supported by the software include PNG, JPEG, BMP and GIF.
● You don’t need to worry about licensing costs or in-app purchases; this tool is absolutely free to use.
● Loading big image files on this software may however, cost you some extra time.
01SSuite GIF Animator
This one is Windows compatible software that works well with both, 32 and 64-bit Operating System configurations. It lies among those ’Green Software Programs’ that cut down on your net energy cost. Apart from high quality animated GIFs, y6ou can also create movies and slides shows with this software.
Key Features
● This is a free of cost, clean and user-friendly graphic editor software.
● You don’t require Windows registration to use this software
● You can conveniently save the software into any USB or memory device; it is easily portable.
● It facilitates a speedy GIF creation and editing.
● You can explore a variety of editing features and add separate time frames to each image using this software.
● Picasion
This is a free, online GIF maker tool that gives you the liberty to import images and videos from different app galleries, like, Picasa, Flickr and others to create and edit motion GIFs. The tool, though having a simple interface and feature packed, is quite ad-stricken, but you can skip that by sticking to the right webpage.
Key Features
● The tool crosses language borders and is available to you in English, Spanish, Portuguese and Russian.
● You can make size adjustments to the GIF images, or add a completely new avatar of your own.
● The tool offers you a variety of editing effects and filters to enhance and improvise your created GIFs.
● You need not limit yourself to specific file formats with this tool; all common ones are conveniently supported.
● It is a quick and clean tool that rescues you from the glitch of a messy interface.
05GifPal
This one is also a free, online GIF creator with amazing editing features and tools. It comes with a diverse library of 20 frames and 30 effects to choose from, for creating normal and animated GIFs. It further has a variety of drawing and text editing tools you can use to add messages to your GIFs to make more impactful.
Key Features
● The tool is packed with a vast set of quality image editing tools that can create attractive motion and animated GIFs.
● The tool allows you to adjust and change the speed of image frames to give a natural flow to your GIF.
● An exclusive feature of the tool is that it allows you to edit frames in its timeline.
● Your creations with the tools are deprived of any default watermarks. You can either add one of your choice, or even create GIFs without a watermark.
● The tool site is free of unwanted and irrelevant ads.
● Key Takeaways from This Episode →
● Making a GIF in Photoshop is a great idea to design animation snippets, both for fun and a target purpose. Using the Photoshop GIF maker ensures quality and class in complete professional styles.
● However, if you are keen on browsing through other GIF creator alternatives, you can safely pick the Filmora GIF Maher software for creating excellent, next level animated GIFs.
Having trouble creating Photoshop GIFs? Stay tuned to set everything straight.
In this article
01 [Easy Ways to Create an Animated GIF in Photoshop](#Part 1)
02 [6 Ways To Make An Animated GIF Without Photoshop](#Part 2)
Part 1 Easy Ways to Create an Animated GIF in Photoshop
Animated GIFs are a naturally captivating means of information exchange and entertainment. When the talk is about creating these, you can visibly see a flood of creation tools and software solutions. However, standing out in the crowd, are those catchy Photoshop snippets that certainly have the potential to leave you jaw dropped.
A Photoshop GIF is bound to capture attention, owing to its high quality imaging and top rated professional editing outlook. If you possess the editing flare, do try creating one for an amazing editing experience.
Creating Animated Photoshop GIFs: Easiest Solutions
Let’s take a look into some easy and interesting ways of creating a GIF in Photoshop, to leave you with handy solutions, just in case you feel motivated to take up the creation idea.
Before you begin, make sure to install and launch a suitable version the Photoshop application in your device and keep a set of selected images at hand that you will require for GIF creation.
● Step 1: Load Image Files
Photoshop requires you to load your selected files into its creation stack. There is no limit on the image count, but make sure you choose images in a natural series so that the GIF doesn’t give an out of the box feel.
Reach the ‘File’ tab at the top and load your image files into the Photoshop stack using the following path:
File -> Scripts -> Load Files into Stack
● Step 2: Image Selection
In the next pop-up window, click ‘Browse’ and choose the image file you wish to load into the Photoshop stack. In case the selected images seem tom lack proper alignment, click on the ‘Attempt to Automatically Align Source Images’ checkbox to set this straight and make your GIF frame stable.
Click on ‘OK’ when you are happy with your selections.
At this instant, Photoshop starts creating layers for the uploaded images, which you can see in the ‘Layers’ panel at the bottom-right. You are allowed to rearrange the image layers by selecting and dragging them or click on layer names to rename them.
If you notice distortion in Photoshop’s automatic alignment of your images, just crop the images frames to sort this out. Here’s how you can get this done:
● Tap the ‘Crop’ symbol.
● Adjust the crop frame to select the desired portion.
● Click on ‘Enter’ to confirm the action.
If you didn’t permit auto alignment previously, no worries, you can move ahead.
● Step 3: Make a Timeline Setup
Navigate to the ‘Window’ tab in the top menu and click the ’Timeline’ checkbox. You will see the ‘Timeline Window’ pop up below the Photoshop workspace, where you need to select the ‘Create Frame Animation’ tab. This will cause the options for frame animation to pop-up.
Select you topmost image layer, followed by clicking on the ‘Duplicate’ icon to generate a copy of the image frame.
● Step 4: Decide Time Frames
Select your topmost image frame to see a play duration of ‘0 sec’ below its thumbnail. Click to open the drop-down menu beside it and choose suitable time duration for the frame to run. Allot time durations to all successive frames in a similar manner.
● Step 5: Conceal Top Layers
You will see am combination of the first and second image layers in the image thumbnail. To set this right, navigate to ‘Layers’ to hide the top layer.
Continue to hide previous layers in successive frames so that each layer appears in its respective frame at the end of the process.
● Step 6: Preview Your Creation
Tap the ‘Play’ button to see your GIF preview. Ensure a smooth run with correct appearance order of images and precise frame durations.
● Step 7: Time to Share.
When you are satisfied, navigate to the ‘File’ tab and select ‘Save As’. From the menu that drops down, choose the GIF file format and click on ‘Save’.
In the ’GIF Save Options’ that follows, adjust file settings suited to your preference and tap ‘OK’.
As an alternative you can take the following path to open the ‘GIF Preview Window’:
File -> Export -> Save for Web
In the top-right comer, choose the GIF file format from the drop-down menu. There is also an option to resize your image at the bottom-right. It is advisable to keep the image size within 500 pixels for a convenient export across various media sharing platforms. When you finish, click on ‘Save’. Your creation is now ready for a media export.
Part 2 6 Ways to Make an Animated GIF Without Photoshop
The idea to create GIF in Photoshop is fun and exciting, no doubt on that, but you may often want to switch to a different platform. No issues with that, the web is there to sort out everything for you. All you need to do is open your favorite browser to land across a heap of welcoming solutions to create GIFs without Photoshop. Let’s have a look through the best ones:
01**Wondershare Filmora Video Editor **
Filmora by Wondershare is probably the best GIF maker tool you can rely on. This is packed with a diverse inventory of exciting design features that are ready to provide a creative boost to your editing skills. Loaded with a ton of classic audio visual effects, this software is certainly comprises of everything you need to create static and animated GIFs like a pro.

Wondershare Filmora - Best Video Editor for Mac/Windows
5,481,435 people have downloaded it.
Build unique custom animations without breaking a sweat.
Focus on creating epic stories and leave the details to Filmora’s auto features.
Start a creative adventure with drag & drop effects and endless possibilities.
Filmora simplifies advanced features to save you time and effort.
Filmora cuts out repetition so you can move on to your next creative breakthrough.
Key Features
● This is free software with possibly the most convenient interface.
● You get the freedom to play with hundreds of audio-visual effects to your heart’s content.
● You can create GIFs with static images and videos that are simply awesome to say the least.
● You need not worry about specific file formats. The software is compatible with almost all commonly known ones.
● Filmora allows you to expand and explore your editing talent to the fullest. You can play with tools like, cut, trim or combine image frames and make color and speed adjustments to get the perfect results for your artwork.
02Photoscape
This is another GIF maker tool you can choose to create catchy and interesting GIFs. Photoscape is a simple graphic editor that makes GIF creation exciting and fun. Available to you for free, this software allows you to design and edit animated GIFs with a series of image enhancements, like, resizing, color selection, image prints, etc. Photoscape is compatible with your Windows, Linux and Mac supported devices and has a clean interface. However, the program may sometimes take up a slow run.
Key Features
● You can improvise you GIF with image editing tools, like, color and size adjustments, clip arts, effects, overlays, etc.
● It has a unique ‘Photo Batch’ tool that you can use to process and rename multiple images simultaneously.
● Photoscape allows you to create interesting collages by merging a series of images into a single one.
● You can create captivating animated GIFs with multiple still images.
● The software is loaded with a bunch of utilities like, photo splitter, page merger, color picker, image viewer and others to give that perfect professional outlook to your creations.
03Gifted Motion
This is also among the commonly preferred GIF creator software. The best this about the tool is that it is platform independent and compatible with almost any Operating System. Another choice appeal of the software is its direct workability that is, you don’t require any program installations to create GIFs using this tool.
Key Features
● This is a simple graphic editor that runs on JAVA and is quite convenient to use.
● You can use this software to edit and create GIFs with images saved locally in your device.
● File formats supported by the software include PNG, JPEG, BMP and GIF.
● You don’t need to worry about licensing costs or in-app purchases; this tool is absolutely free to use.
● Loading big image files on this software may however, cost you some extra time.
01SSuite GIF Animator
This one is Windows compatible software that works well with both, 32 and 64-bit Operating System configurations. It lies among those ’Green Software Programs’ that cut down on your net energy cost. Apart from high quality animated GIFs, y6ou can also create movies and slides shows with this software.
Key Features
● This is a free of cost, clean and user-friendly graphic editor software.
● You don’t require Windows registration to use this software
● You can conveniently save the software into any USB or memory device; it is easily portable.
● It facilitates a speedy GIF creation and editing.
● You can explore a variety of editing features and add separate time frames to each image using this software.
● Picasion
This is a free, online GIF maker tool that gives you the liberty to import images and videos from different app galleries, like, Picasa, Flickr and others to create and edit motion GIFs. The tool, though having a simple interface and feature packed, is quite ad-stricken, but you can skip that by sticking to the right webpage.
Key Features
● The tool crosses language borders and is available to you in English, Spanish, Portuguese and Russian.
● You can make size adjustments to the GIF images, or add a completely new avatar of your own.
● The tool offers you a variety of editing effects and filters to enhance and improvise your created GIFs.
● You need not limit yourself to specific file formats with this tool; all common ones are conveniently supported.
● It is a quick and clean tool that rescues you from the glitch of a messy interface.
05GifPal
This one is also a free, online GIF creator with amazing editing features and tools. It comes with a diverse library of 20 frames and 30 effects to choose from, for creating normal and animated GIFs. It further has a variety of drawing and text editing tools you can use to add messages to your GIFs to make more impactful.
Key Features
● The tool is packed with a vast set of quality image editing tools that can create attractive motion and animated GIFs.
● The tool allows you to adjust and change the speed of image frames to give a natural flow to your GIF.
● An exclusive feature of the tool is that it allows you to edit frames in its timeline.
● Your creations with the tools are deprived of any default watermarks. You can either add one of your choice, or even create GIFs without a watermark.
● The tool site is free of unwanted and irrelevant ads.
● Key Takeaways from This Episode →
● Making a GIF in Photoshop is a great idea to design animation snippets, both for fun and a target purpose. Using the Photoshop GIF maker ensures quality and class in complete professional styles.
● However, if you are keen on browsing through other GIF creator alternatives, you can safely pick the Filmora GIF Maher software for creating excellent, next level animated GIFs.
Having trouble creating Photoshop GIFs? Stay tuned to set everything straight.
In this article
01 [Easy Ways to Create an Animated GIF in Photoshop](#Part 1)
02 [6 Ways To Make An Animated GIF Without Photoshop](#Part 2)
Part 1 Easy Ways to Create an Animated GIF in Photoshop
Animated GIFs are a naturally captivating means of information exchange and entertainment. When the talk is about creating these, you can visibly see a flood of creation tools and software solutions. However, standing out in the crowd, are those catchy Photoshop snippets that certainly have the potential to leave you jaw dropped.
A Photoshop GIF is bound to capture attention, owing to its high quality imaging and top rated professional editing outlook. If you possess the editing flare, do try creating one for an amazing editing experience.
Creating Animated Photoshop GIFs: Easiest Solutions
Let’s take a look into some easy and interesting ways of creating a GIF in Photoshop, to leave you with handy solutions, just in case you feel motivated to take up the creation idea.
Before you begin, make sure to install and launch a suitable version the Photoshop application in your device and keep a set of selected images at hand that you will require for GIF creation.
● Step 1: Load Image Files
Photoshop requires you to load your selected files into its creation stack. There is no limit on the image count, but make sure you choose images in a natural series so that the GIF doesn’t give an out of the box feel.
Reach the ‘File’ tab at the top and load your image files into the Photoshop stack using the following path:
File -> Scripts -> Load Files into Stack
● Step 2: Image Selection
In the next pop-up window, click ‘Browse’ and choose the image file you wish to load into the Photoshop stack. In case the selected images seem tom lack proper alignment, click on the ‘Attempt to Automatically Align Source Images’ checkbox to set this straight and make your GIF frame stable.
Click on ‘OK’ when you are happy with your selections.
At this instant, Photoshop starts creating layers for the uploaded images, which you can see in the ‘Layers’ panel at the bottom-right. You are allowed to rearrange the image layers by selecting and dragging them or click on layer names to rename them.
If you notice distortion in Photoshop’s automatic alignment of your images, just crop the images frames to sort this out. Here’s how you can get this done:
● Tap the ‘Crop’ symbol.
● Adjust the crop frame to select the desired portion.
● Click on ‘Enter’ to confirm the action.
If you didn’t permit auto alignment previously, no worries, you can move ahead.
● Step 3: Make a Timeline Setup
Navigate to the ‘Window’ tab in the top menu and click the ’Timeline’ checkbox. You will see the ‘Timeline Window’ pop up below the Photoshop workspace, where you need to select the ‘Create Frame Animation’ tab. This will cause the options for frame animation to pop-up.
Select you topmost image layer, followed by clicking on the ‘Duplicate’ icon to generate a copy of the image frame.
● Step 4: Decide Time Frames
Select your topmost image frame to see a play duration of ‘0 sec’ below its thumbnail. Click to open the drop-down menu beside it and choose suitable time duration for the frame to run. Allot time durations to all successive frames in a similar manner.
● Step 5: Conceal Top Layers
You will see am combination of the first and second image layers in the image thumbnail. To set this right, navigate to ‘Layers’ to hide the top layer.
Continue to hide previous layers in successive frames so that each layer appears in its respective frame at the end of the process.
● Step 6: Preview Your Creation
Tap the ‘Play’ button to see your GIF preview. Ensure a smooth run with correct appearance order of images and precise frame durations.
● Step 7: Time to Share.
When you are satisfied, navigate to the ‘File’ tab and select ‘Save As’. From the menu that drops down, choose the GIF file format and click on ‘Save’.
In the ’GIF Save Options’ that follows, adjust file settings suited to your preference and tap ‘OK’.
As an alternative you can take the following path to open the ‘GIF Preview Window’:
File -> Export -> Save for Web
In the top-right comer, choose the GIF file format from the drop-down menu. There is also an option to resize your image at the bottom-right. It is advisable to keep the image size within 500 pixels for a convenient export across various media sharing platforms. When you finish, click on ‘Save’. Your creation is now ready for a media export.
Part 2 6 Ways to Make an Animated GIF Without Photoshop
The idea to create GIF in Photoshop is fun and exciting, no doubt on that, but you may often want to switch to a different platform. No issues with that, the web is there to sort out everything for you. All you need to do is open your favorite browser to land across a heap of welcoming solutions to create GIFs without Photoshop. Let’s have a look through the best ones:
01**Wondershare Filmora Video Editor **
Filmora by Wondershare is probably the best GIF maker tool you can rely on. This is packed with a diverse inventory of exciting design features that are ready to provide a creative boost to your editing skills. Loaded with a ton of classic audio visual effects, this software is certainly comprises of everything you need to create static and animated GIFs like a pro.

Wondershare Filmora - Best Video Editor for Mac/Windows
5,481,435 people have downloaded it.
Build unique custom animations without breaking a sweat.
Focus on creating epic stories and leave the details to Filmora’s auto features.
Start a creative adventure with drag & drop effects and endless possibilities.
Filmora simplifies advanced features to save you time and effort.
Filmora cuts out repetition so you can move on to your next creative breakthrough.
Key Features
● This is free software with possibly the most convenient interface.
● You get the freedom to play with hundreds of audio-visual effects to your heart’s content.
● You can create GIFs with static images and videos that are simply awesome to say the least.
● You need not worry about specific file formats. The software is compatible with almost all commonly known ones.
● Filmora allows you to expand and explore your editing talent to the fullest. You can play with tools like, cut, trim or combine image frames and make color and speed adjustments to get the perfect results for your artwork.
02Photoscape
This is another GIF maker tool you can choose to create catchy and interesting GIFs. Photoscape is a simple graphic editor that makes GIF creation exciting and fun. Available to you for free, this software allows you to design and edit animated GIFs with a series of image enhancements, like, resizing, color selection, image prints, etc. Photoscape is compatible with your Windows, Linux and Mac supported devices and has a clean interface. However, the program may sometimes take up a slow run.
Key Features
● You can improvise you GIF with image editing tools, like, color and size adjustments, clip arts, effects, overlays, etc.
● It has a unique ‘Photo Batch’ tool that you can use to process and rename multiple images simultaneously.
● Photoscape allows you to create interesting collages by merging a series of images into a single one.
● You can create captivating animated GIFs with multiple still images.
● The software is loaded with a bunch of utilities like, photo splitter, page merger, color picker, image viewer and others to give that perfect professional outlook to your creations.
03Gifted Motion
This is also among the commonly preferred GIF creator software. The best this about the tool is that it is platform independent and compatible with almost any Operating System. Another choice appeal of the software is its direct workability that is, you don’t require any program installations to create GIFs using this tool.
Key Features
● This is a simple graphic editor that runs on JAVA and is quite convenient to use.
● You can use this software to edit and create GIFs with images saved locally in your device.
● File formats supported by the software include PNG, JPEG, BMP and GIF.
● You don’t need to worry about licensing costs or in-app purchases; this tool is absolutely free to use.
● Loading big image files on this software may however, cost you some extra time.
01SSuite GIF Animator
This one is Windows compatible software that works well with both, 32 and 64-bit Operating System configurations. It lies among those ’Green Software Programs’ that cut down on your net energy cost. Apart from high quality animated GIFs, y6ou can also create movies and slides shows with this software.
Key Features
● This is a free of cost, clean and user-friendly graphic editor software.
● You don’t require Windows registration to use this software
● You can conveniently save the software into any USB or memory device; it is easily portable.
● It facilitates a speedy GIF creation and editing.
● You can explore a variety of editing features and add separate time frames to each image using this software.
● Picasion
This is a free, online GIF maker tool that gives you the liberty to import images and videos from different app galleries, like, Picasa, Flickr and others to create and edit motion GIFs. The tool, though having a simple interface and feature packed, is quite ad-stricken, but you can skip that by sticking to the right webpage.
Key Features
● The tool crosses language borders and is available to you in English, Spanish, Portuguese and Russian.
● You can make size adjustments to the GIF images, or add a completely new avatar of your own.
● The tool offers you a variety of editing effects and filters to enhance and improvise your created GIFs.
● You need not limit yourself to specific file formats with this tool; all common ones are conveniently supported.
● It is a quick and clean tool that rescues you from the glitch of a messy interface.
05GifPal
This one is also a free, online GIF creator with amazing editing features and tools. It comes with a diverse library of 20 frames and 30 effects to choose from, for creating normal and animated GIFs. It further has a variety of drawing and text editing tools you can use to add messages to your GIFs to make more impactful.
Key Features
● The tool is packed with a vast set of quality image editing tools that can create attractive motion and animated GIFs.
● The tool allows you to adjust and change the speed of image frames to give a natural flow to your GIF.
● An exclusive feature of the tool is that it allows you to edit frames in its timeline.
● Your creations with the tools are deprived of any default watermarks. You can either add one of your choice, or even create GIFs without a watermark.
● The tool site is free of unwanted and irrelevant ads.
● Key Takeaways from This Episode →
● Making a GIF in Photoshop is a great idea to design animation snippets, both for fun and a target purpose. Using the Photoshop GIF maker ensures quality and class in complete professional styles.
● However, if you are keen on browsing through other GIF creator alternatives, you can safely pick the Filmora GIF Maher software for creating excellent, next level animated GIFs.
Having trouble creating Photoshop GIFs? Stay tuned to set everything straight.
In this article
01 [Easy Ways to Create an Animated GIF in Photoshop](#Part 1)
02 [6 Ways To Make An Animated GIF Without Photoshop](#Part 2)
Part 1 Easy Ways to Create an Animated GIF in Photoshop
Animated GIFs are a naturally captivating means of information exchange and entertainment. When the talk is about creating these, you can visibly see a flood of creation tools and software solutions. However, standing out in the crowd, are those catchy Photoshop snippets that certainly have the potential to leave you jaw dropped.
A Photoshop GIF is bound to capture attention, owing to its high quality imaging and top rated professional editing outlook. If you possess the editing flare, do try creating one for an amazing editing experience.
Creating Animated Photoshop GIFs: Easiest Solutions
Let’s take a look into some easy and interesting ways of creating a GIF in Photoshop, to leave you with handy solutions, just in case you feel motivated to take up the creation idea.
Before you begin, make sure to install and launch a suitable version the Photoshop application in your device and keep a set of selected images at hand that you will require for GIF creation.
● Step 1: Load Image Files
Photoshop requires you to load your selected files into its creation stack. There is no limit on the image count, but make sure you choose images in a natural series so that the GIF doesn’t give an out of the box feel.
Reach the ‘File’ tab at the top and load your image files into the Photoshop stack using the following path:
File -> Scripts -> Load Files into Stack
● Step 2: Image Selection
In the next pop-up window, click ‘Browse’ and choose the image file you wish to load into the Photoshop stack. In case the selected images seem tom lack proper alignment, click on the ‘Attempt to Automatically Align Source Images’ checkbox to set this straight and make your GIF frame stable.
Click on ‘OK’ when you are happy with your selections.
At this instant, Photoshop starts creating layers for the uploaded images, which you can see in the ‘Layers’ panel at the bottom-right. You are allowed to rearrange the image layers by selecting and dragging them or click on layer names to rename them.
If you notice distortion in Photoshop’s automatic alignment of your images, just crop the images frames to sort this out. Here’s how you can get this done:
● Tap the ‘Crop’ symbol.
● Adjust the crop frame to select the desired portion.
● Click on ‘Enter’ to confirm the action.
If you didn’t permit auto alignment previously, no worries, you can move ahead.
● Step 3: Make a Timeline Setup
Navigate to the ‘Window’ tab in the top menu and click the ’Timeline’ checkbox. You will see the ‘Timeline Window’ pop up below the Photoshop workspace, where you need to select the ‘Create Frame Animation’ tab. This will cause the options for frame animation to pop-up.
Select you topmost image layer, followed by clicking on the ‘Duplicate’ icon to generate a copy of the image frame.
● Step 4: Decide Time Frames
Select your topmost image frame to see a play duration of ‘0 sec’ below its thumbnail. Click to open the drop-down menu beside it and choose suitable time duration for the frame to run. Allot time durations to all successive frames in a similar manner.
● Step 5: Conceal Top Layers
You will see am combination of the first and second image layers in the image thumbnail. To set this right, navigate to ‘Layers’ to hide the top layer.
Continue to hide previous layers in successive frames so that each layer appears in its respective frame at the end of the process.
● Step 6: Preview Your Creation
Tap the ‘Play’ button to see your GIF preview. Ensure a smooth run with correct appearance order of images and precise frame durations.
● Step 7: Time to Share.
When you are satisfied, navigate to the ‘File’ tab and select ‘Save As’. From the menu that drops down, choose the GIF file format and click on ‘Save’.
In the ’GIF Save Options’ that follows, adjust file settings suited to your preference and tap ‘OK’.
As an alternative you can take the following path to open the ‘GIF Preview Window’:
File -> Export -> Save for Web
In the top-right comer, choose the GIF file format from the drop-down menu. There is also an option to resize your image at the bottom-right. It is advisable to keep the image size within 500 pixels for a convenient export across various media sharing platforms. When you finish, click on ‘Save’. Your creation is now ready for a media export.
Part 2 6 Ways to Make an Animated GIF Without Photoshop
The idea to create GIF in Photoshop is fun and exciting, no doubt on that, but you may often want to switch to a different platform. No issues with that, the web is there to sort out everything for you. All you need to do is open your favorite browser to land across a heap of welcoming solutions to create GIFs without Photoshop. Let’s have a look through the best ones:
01**Wondershare Filmora Video Editor **
Filmora by Wondershare is probably the best GIF maker tool you can rely on. This is packed with a diverse inventory of exciting design features that are ready to provide a creative boost to your editing skills. Loaded with a ton of classic audio visual effects, this software is certainly comprises of everything you need to create static and animated GIFs like a pro.

Wondershare Filmora - Best Video Editor for Mac/Windows
5,481,435 people have downloaded it.
Build unique custom animations without breaking a sweat.
Focus on creating epic stories and leave the details to Filmora’s auto features.
Start a creative adventure with drag & drop effects and endless possibilities.
Filmora simplifies advanced features to save you time and effort.
Filmora cuts out repetition so you can move on to your next creative breakthrough.
Key Features
● This is free software with possibly the most convenient interface.
● You get the freedom to play with hundreds of audio-visual effects to your heart’s content.
● You can create GIFs with static images and videos that are simply awesome to say the least.
● You need not worry about specific file formats. The software is compatible with almost all commonly known ones.
● Filmora allows you to expand and explore your editing talent to the fullest. You can play with tools like, cut, trim or combine image frames and make color and speed adjustments to get the perfect results for your artwork.
02Photoscape
This is another GIF maker tool you can choose to create catchy and interesting GIFs. Photoscape is a simple graphic editor that makes GIF creation exciting and fun. Available to you for free, this software allows you to design and edit animated GIFs with a series of image enhancements, like, resizing, color selection, image prints, etc. Photoscape is compatible with your Windows, Linux and Mac supported devices and has a clean interface. However, the program may sometimes take up a slow run.
Key Features
● You can improvise you GIF with image editing tools, like, color and size adjustments, clip arts, effects, overlays, etc.
● It has a unique ‘Photo Batch’ tool that you can use to process and rename multiple images simultaneously.
● Photoscape allows you to create interesting collages by merging a series of images into a single one.
● You can create captivating animated GIFs with multiple still images.
● The software is loaded with a bunch of utilities like, photo splitter, page merger, color picker, image viewer and others to give that perfect professional outlook to your creations.
03Gifted Motion
This is also among the commonly preferred GIF creator software. The best this about the tool is that it is platform independent and compatible with almost any Operating System. Another choice appeal of the software is its direct workability that is, you don’t require any program installations to create GIFs using this tool.
Key Features
● This is a simple graphic editor that runs on JAVA and is quite convenient to use.
● You can use this software to edit and create GIFs with images saved locally in your device.
● File formats supported by the software include PNG, JPEG, BMP and GIF.
● You don’t need to worry about licensing costs or in-app purchases; this tool is absolutely free to use.
● Loading big image files on this software may however, cost you some extra time.
01SSuite GIF Animator
This one is Windows compatible software that works well with both, 32 and 64-bit Operating System configurations. It lies among those ’Green Software Programs’ that cut down on your net energy cost. Apart from high quality animated GIFs, y6ou can also create movies and slides shows with this software.
Key Features
● This is a free of cost, clean and user-friendly graphic editor software.
● You don’t require Windows registration to use this software
● You can conveniently save the software into any USB or memory device; it is easily portable.
● It facilitates a speedy GIF creation and editing.
● You can explore a variety of editing features and add separate time frames to each image using this software.
● Picasion
This is a free, online GIF maker tool that gives you the liberty to import images and videos from different app galleries, like, Picasa, Flickr and others to create and edit motion GIFs. The tool, though having a simple interface and feature packed, is quite ad-stricken, but you can skip that by sticking to the right webpage.
Key Features
● The tool crosses language borders and is available to you in English, Spanish, Portuguese and Russian.
● You can make size adjustments to the GIF images, or add a completely new avatar of your own.
● The tool offers you a variety of editing effects and filters to enhance and improvise your created GIFs.
● You need not limit yourself to specific file formats with this tool; all common ones are conveniently supported.
● It is a quick and clean tool that rescues you from the glitch of a messy interface.
05GifPal
This one is also a free, online GIF creator with amazing editing features and tools. It comes with a diverse library of 20 frames and 30 effects to choose from, for creating normal and animated GIFs. It further has a variety of drawing and text editing tools you can use to add messages to your GIFs to make more impactful.
Key Features
● The tool is packed with a vast set of quality image editing tools that can create attractive motion and animated GIFs.
● The tool allows you to adjust and change the speed of image frames to give a natural flow to your GIF.
● An exclusive feature of the tool is that it allows you to edit frames in its timeline.
● Your creations with the tools are deprived of any default watermarks. You can either add one of your choice, or even create GIFs without a watermark.
● The tool site is free of unwanted and irrelevant ads.
● Key Takeaways from This Episode →
● Making a GIF in Photoshop is a great idea to design animation snippets, both for fun and a target purpose. Using the Photoshop GIF maker ensures quality and class in complete professional styles.
● However, if you are keen on browsing through other GIF creator alternatives, you can safely pick the Filmora GIF Maher software for creating excellent, next level animated GIFs.
Also read:
- How to Remove Echo with Premiere Pro? Full Guide Here for 2024
- New How To Create A Green Screen Video In After Effects for 2024
- Updated Want to Speed up or Slow Down a Video to Make It Look Different? Here Are the Simple Steps to Change Video Speed in Lightworks Video Editor
- New 2024 Approved Top 5 Video Filter Software Improve Your Videos with Filters
- Updated How To Blur Background in Adobe Premiere Pro Detailed Guide for 2024
- Updated 2024 Approved 10 Catchy Pixel Art Wallpapers and How to Custom Your Own with Ease
- Updated 18 Video Editors Weve Tested Heres What We Learned
- Updated The Ultimate Guide for the 10 Leading Slow-Motion Cameras
- 2024 Approved How to Crop Videos in Windows Media Player
- Want to Immediately Know All About Discord GIF for 2024
- New 2024 Approved How to Fade in Text in Adobe Premiere Pro
- Updated In 2024, Best Audio Plug-Ins For Video Editors
- Updated 2024 Approved How to Add VHS Green Screen to Your Video
- Updated 2024 Approved How to Create and Use Adjustment Layers in After Effects
- New How to Create an Aesthetic Slideshow Presentation
- Logo Intro Videos Are the Hottest Trend in Town and Are Gaining Popularity Quickly. Keep Reading This Article to Learn Their Importance and How to Design One
- How To Change Your SIM PIN Code on Your Nokia C12 Pro Phone
- How To Bypass FRP on Honor Play 40C
- In 2024, 2 Ways to Transfer Text Messages from Nokia C22 to iPhone 15/14/13/12/11/X/8/ | Dr.fone
- In 2024, What Does Enter PUK Code Mean And Why Did The Sim Get PUK Blocked On Samsung Galaxy S23 Ultra Device
- New Best GIF Croppers How to Crop an Animated GIF for 2024
- In 2024, How to Unlock Xiaomi Redmi Note 13 Pro 5G PIN Code/Pattern Lock/Password
- Resolve Your Apple iPhone 13 Keeps Asking for Outlook Password
- In 2024, How to Bypass FRP on Vivo Y200?
- How to Screen Mirroring Honor Magic 5 Lite? | Dr.fone
- In 2024, How to Unlock Apple ID Activation Lock From iPhone 12 Pro Max?
- Repair Video Tool - Repair all your damaged video files of Infinix Zero 30 5G on Mac
- How To Fix Unresponsive Touch Screen on Vivo X Flip | Dr.fone
- All Must-Knows to Use Fake GPS GO Location Spoofer On Poco X5 Pro | Dr.fone
- How To Change Your iPhone 15 Apple ID on MacBook
- How to Unlock Apple iPhone 7 Passcode without Computer?
- How to Mirror Samsung Galaxy A15 4G to Mac? | Dr.fone
- Title: Free for 2024
- Author: Chloe
- Created at : 2024-04-24 07:08:19
- Updated at : 2024-04-25 07:08:19
- Link: https://ai-editing-video.techidaily.com/free-for-2024/
- License: This work is licensed under CC BY-NC-SA 4.0.

