:max_bytes(150000):strip_icc():format(webp)/GettyImages-971165690-1e0af1d9299f4fdba1225c2d20c739f2.jpg)
Free Titles For Final Cut Pro

Free Titles For Final Cut Pro
Final Cut Pro is one of the best ways to edit videos, especially for Mac users. One of the main reasons many video editors choose Final Cut Pro is that it works very well with third-party templates and plugins to allow the user to come up with highly unique productions.
In this article, we will look at some of the best free titles for Final Cut Pro. These are the title templates that you can use to create unique titles in your Final Cut Pro project.
- Trendy Final Cut Pro Title
- Kinetic Title Templates
- Abstract Fast Glitch Titles
- Free Gradient Shape Title Template
- Hand Drawn Brush Titles Pack
- Free Fullscreen Glitch Title Template
- Call-Out Titles and Elements
- Social Titles
- Motion Typography Template
- Quotes and Motivation Title Templates
Free Titles for Final Cut Pro
The following are some of the best title templates for Final Cut Pro;
Trendy Final Cut Pro Title
This is a template pack that comes with multiple designs to make the most stylish or bold titles for your video project. Most of the templates that you will find in this bundle are suitable for promo videos, social media videos, and YouTube videos. All the templates in the bundle are available in 4K resolution.
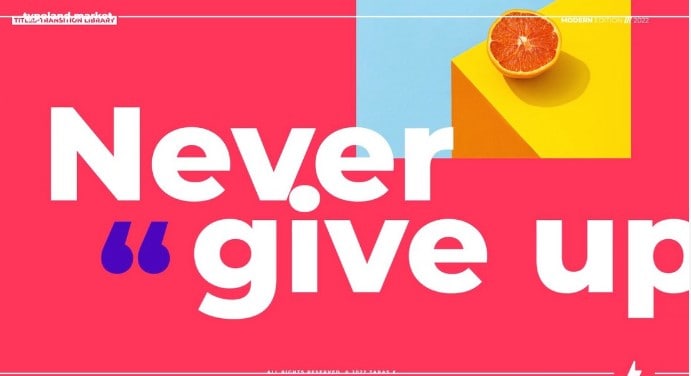
Kinetic Title Templates
This is the most ideal template package to choose for technology or futuristic video productions. But thanks to its numerous customizations, you can use it for other genres as well. All templates are compatible with both Apple Motion and Final Cut Pro.

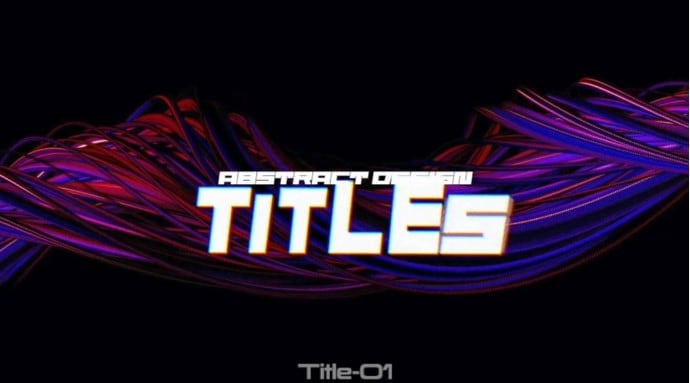
Abstract Fast Glitch Titles
This is one of the best templates if you want to create quick intros for your YouTube videos. There are 10 different title templates in the bundle and each one can be customized in various ways, including adding text animations.
Free Gradient Shape Title Template
As the name suggests, this is a bundle of templates that feature a gradient shape in very colorful backgrounds. Because of the spectacular colors, this is an ideal title design template for slideshows and event promo videos.

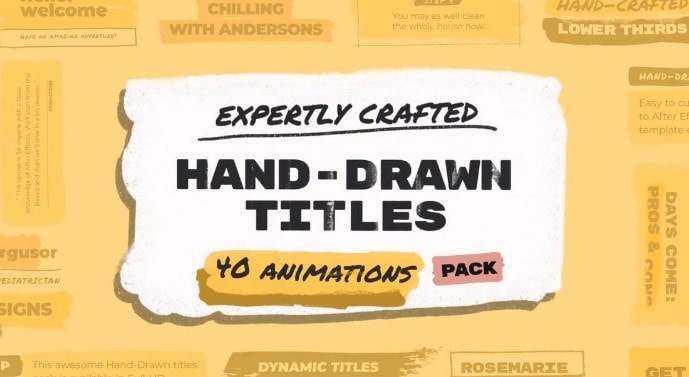
Hand Drawn Brush Titles Pack
This is the title template pack to choose from if you want your videos to stand out. It comes with unique brush-style titles that you can customize to fit into your video and they can make your video appear more playful and creative. There are more than 40 templates in this pack.
Free Fullscreen Glitch Title Template
This template contains a very bold title design that also comes with the glitching animation. It is one of the most popular titles for social media promos because when done right, the glitching animation can be very attention-grabbing. It is fully customizable.

Call-Out Titles and Elements
If you would like a title that will do more than just announce the video’s title and subject. The Call-Out Titles and Elements pack is one of the best. Since it allows you to add the title as well as additional elements like call-outs, it is the most ideal title template for promotional videos. This pack is made up of 78 different callout elements and titles to choose from.

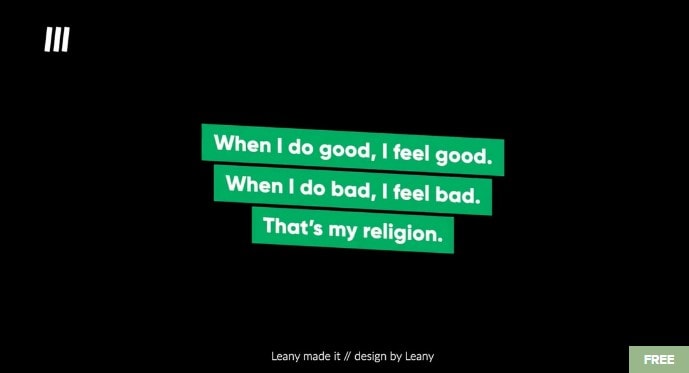
Social Titles
This is a collection of Final Cut Pro templates that also comes with text animations. The main appeal of the templates in this pack is that the styling is minimal, but creative typography still makes the title ideal for Instagram and certain YouTube genres.
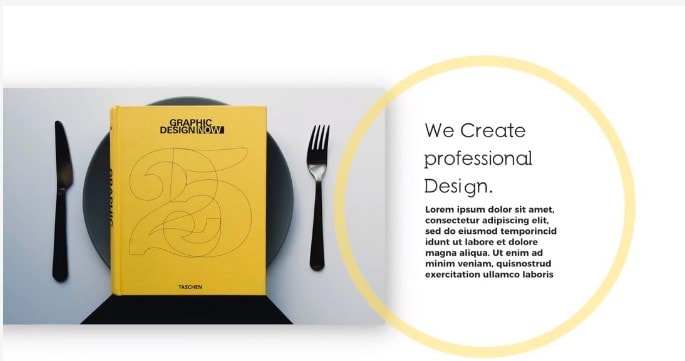
Motion Typography Template
This is a collection of templates that are suited to corporate and business-style videos. With more than 30 templates to choose from and unlimited customizations, you can create the ideal title for any presentation or promo video. They are suitable for both Final Cut Pro and Apple Motion.
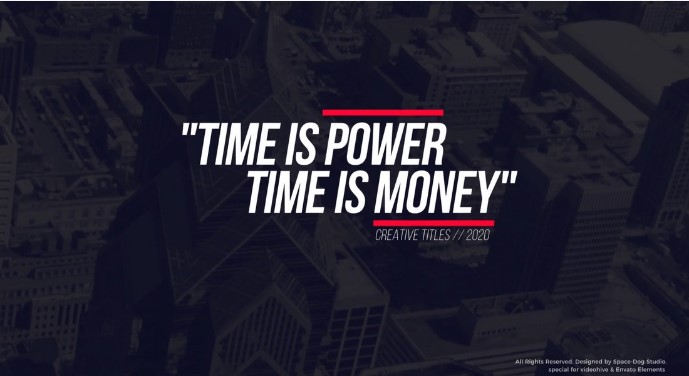
Quotes and Motivation Title Templates
This is a collection of templates that you can use to add quotes to any section of the video. Each of these templates also comes with text animations to make the quotes stand out even more. You can also customize all other aspects of the title including the size of the title.
How to Edit Titles in FCXP
Now that you have the perfect title for your video project, you may be wondering how you can add it to the video. Here’s how to add and edit titles to a video in Final Cut Pro;
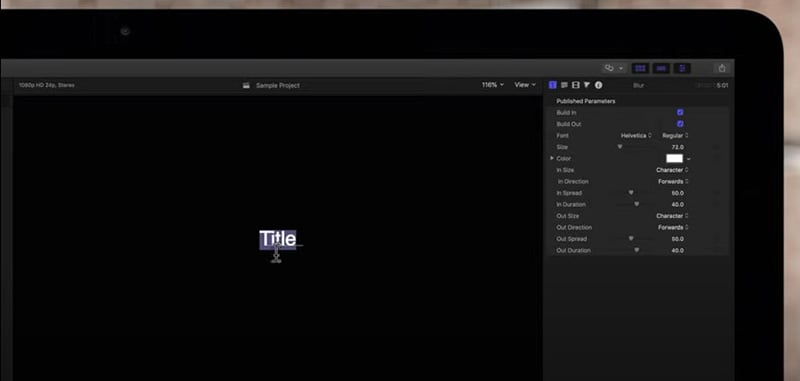
Step1 Once you have added the title clip to the timeline, select it and then move the playhead over the title.
Step2 Double click on the title and it will appear in the viewer. You can then double-click the text object in the viewer or select the text in the “Text Inspector.
Step3 Use the Command-Return keyboard shortcut to edit any existing text.
Alternative Way to Edit Titles
You can also very easily edit the title on any video using Wondershare Filmora . Filmora is one of the best video editing tools for both Windows and macOS that you can use to add and edit titles. It is very easy to use and provides a lot of customizations that are useful for the different genres of videos that you can create.
Here’s how to use Filmora to add and edit titles to your video;
Free Download For Win 7 or later(64-bit)
Free Download For macOS 10.14 or later
Step1 Download and install Wondershare Filmora onto your computer. Open the program and then click on the “Import” button to start. You can also just drag and drop the video to the main window to open it.
Step2 Once the video is open in Filmora, you will need to drag it to the timeline panel before you can start to edit it.

Step3 Click on the “Titles” tab at the top to open the text and title presets that you will need to add text to the document. Filmora offers more than 200 text effects to choose from. Just double-click on one of the presents to select it and then the preview window to see it in real-time.

Step4 If you like the preset that you have selected, place the cursor on the position in the timeline where you would like to add the text and then drag and drop the title track above the video in the timeline.

Step5 If you would like to change the duration of the text simply drag the edge of the timeline until you get the length that you desire. Filmora also allows you to edit and customize the text. To do that, double-click on the “Title” time frame to get some customization options.

Step6 Once you are happy with all the changes you have made, click on “Export” and choose an output format to save and export your video.
Takeaway
Titles are a vital part of any video as they can be used to provide a preview of the content the audience can expect. Now you have a huge selection of pre-made video templates to make your video unique and you can easily edit them in Final Cut Pro or Filmora .
The following are some of the best title templates for Final Cut Pro;Trendy Final Cut Pro Title
This is a template pack that comes with multiple designs to make the most stylish or bold titles for your video project. Most of the templates that you will find in this bundle are suitable for promo videos, social media videos, and YouTube videos. All the templates in the bundle are available in 4K resolution.

Kinetic Title Templates
This is the most ideal template package to choose for technology or futuristic video productions. But thanks to its numerous customizations, you can use it for other genres as well. All templates are compatible with both Apple Motion and Final Cut Pro.

Abstract Fast Glitch Titles
This is one of the best templates if you want to create quick intros for your YouTube videos. There are 10 different title templates in the bundle and each one can be customized in various ways, including adding text animations.

Free Gradient Shape Title Template
As the name suggests, this is a bundle of templates that feature a gradient shape in very colorful backgrounds. Because of the spectacular colors, this is an ideal title design template for slideshows and event promo videos.

Hand Drawn Brush Titles Pack
This is the title template pack to choose from if you want your videos to stand out. It comes with unique brush-style titles that you can customize to fit into your video and they can make your video appear more playful and creative. There are more than 40 templates in this pack.

Free Fullscreen Glitch Title Template
This template contains a very bold title design that also comes with the glitching animation. It is one of the most popular titles for social media promos because when done right, the glitching animation can be very attention-grabbing. It is fully customizable.

Call-Out Titles and Elements
If you would like a title that will do more than just announce the video’s title and subject. The Call-Out Titles and Elements pack is one of the best. Since it allows you to add the title as well as additional elements like call-outs, it is the most ideal title template for promotional videos. This pack is made up of 78 different callout elements and titles to choose from.

Social Titles
This is a collection of Final Cut Pro templates that also comes with text animations. The main appeal of the templates in this pack is that the styling is minimal, but creative typography still makes the title ideal for Instagram and certain YouTube genres.

Motion Typography Template
This is a collection of templates that are suited to corporate and business-style videos. With more than 30 templates to choose from and unlimited customizations, you can create the ideal title for any presentation or promo video. They are suitable for both Final Cut Pro and Apple Motion.

Quotes and Motivation Title Templates
This is a collection of templates that you can use to add quotes to any section of the video. Each of these templates also comes with text animations to make the quotes stand out even more. You can also customize all other aspects of the title including the size of the title.

How to Edit Titles in FCXP
Now that you have the perfect title for your video project, you may be wondering how you can add it to the video. Here’s how to add and edit titles to a video in Final Cut Pro;
Step1 Once you have added the title clip to the timeline, select it and then move the playhead over the title.
Step2 Double click on the title and it will appear in the viewer. You can then double-click the text object in the viewer or select the text in the “Text Inspector.
Step3 Use the Command-Return keyboard shortcut to edit any existing text.

Alternative Way to Edit Titles
You can also very easily edit the title on any video using Wondershare Filmora . Filmora is one of the best video editing tools for both Windows and macOS that you can use to add and edit titles. It is very easy to use and provides a lot of customizations that are useful for the different genres of videos that you can create.
Here’s how to use Filmora to add and edit titles to your video;
Free Download For Win 7 or later(64-bit)
Free Download For macOS 10.14 or later
Step1 Download and install Wondershare Filmora onto your computer. Open the program and then click on the “Import” button to start. You can also just drag and drop the video to the main window to open it.
Step2 Once the video is open in Filmora, you will need to drag it to the timeline panel before you can start to edit it.

Step3 Click on the “Titles” tab at the top to open the text and title presets that you will need to add text to the document. Filmora offers more than 200 text effects to choose from. Just double-click on one of the presents to select it and then the preview window to see it in real-time.

Step4 If you like the preset that you have selected, place the cursor on the position in the timeline where you would like to add the text and then drag and drop the title track above the video in the timeline.

Step5 If you would like to change the duration of the text simply drag the edge of the timeline until you get the length that you desire. Filmora also allows you to edit and customize the text. To do that, double-click on the “Title” time frame to get some customization options.

Step6 Once you are happy with all the changes you have made, click on “Export” and choose an output format to save and export your video.
Takeaway
Titles are a vital part of any video as they can be used to provide a preview of the content the audience can expect. Now you have a huge selection of pre-made video templates to make your video unique and you can easily edit them in Final Cut Pro or Filmora .
Learn How to Effectively Use Masking in After Effects with This Comprehensive Guide. Includes Step-by-Step Instructions and an Alternative Masking Technique
Masking is a powerful feature in After Effects that allows you to hide, reveal, or manipulate specific parts of a layer. Whether creating animations, visual effects, or enhancing your video content, masking can be a valuable tool in your arsenal. However, it can be intimidating for beginners, as it requires a good understanding of key concepts and techniques.
This article aims to demystify masking in After Effects and provide a comprehensive guide on getting started. Whether a beginner or an experienced user, you’ll find useful tips, tricks, and a creative alternative to masking that will take your skills to the next level. So let’s dive in and discover the art of masking in After Effects!
Overview of Masking in After Effects
Masking in After Effects hides or reveals certain layer parts, such as an image or video. This is achieved through masks, paths that determine the visibility of specific layer parts. Masks are an incredibly versatile tool in Adobe After Effects, allowing users to cut out and combine elements, create professional transitions, isolate objects in photos or videos, and build shapes, among other things.
Masks in After Effects are made up of two parts: the mask and the fill. The mask controls what is visible, while the fill determines the color or image used to fill the masked area.
By default, when a mask is created, it is set to “inverted,” meaning the masked area is visible, and the rest is hidden. However, this can easily be changed by pressing “M” to access the mask settings in the timeline and selecting the invert checkmark. Alternatively, the mode can be changed to subtract.
Overall, masks are an essential tool in After Effects, and it’s worth taking the time to learn as much as possible about them. The possibilities are endless, and mastering masks can greatly enhance your projects.
How To Do Masking in AE Using Shape Tools
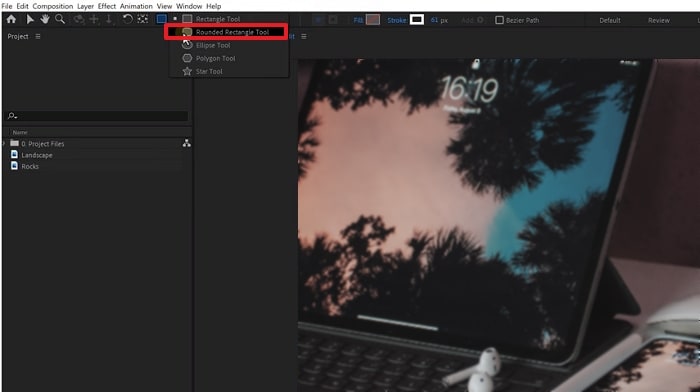
Shape tools provide a quick and easy way to create masks in AE and are a great starting point for beginners. With these tools, you can easily create masks in various shapes and sizes to hide, reveal, or manipulate parts of a layer. We’ll guide you through creating masks using different shape tools, including the rectangle, ellipse, and polygon tools. So let’s get started!
Step1 Choose the layer to which you want to apply the mask.
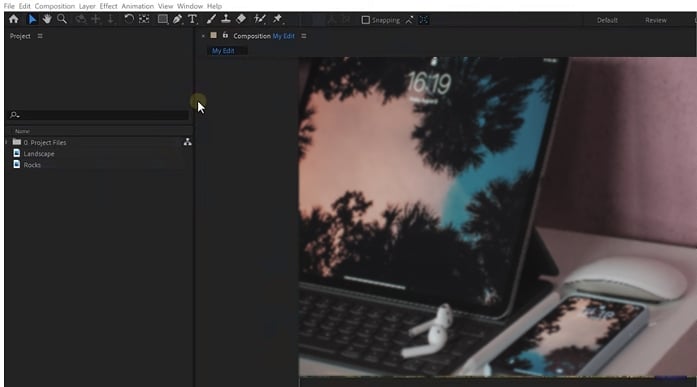
Step2 Choose one of the shape tools from the toolbar.
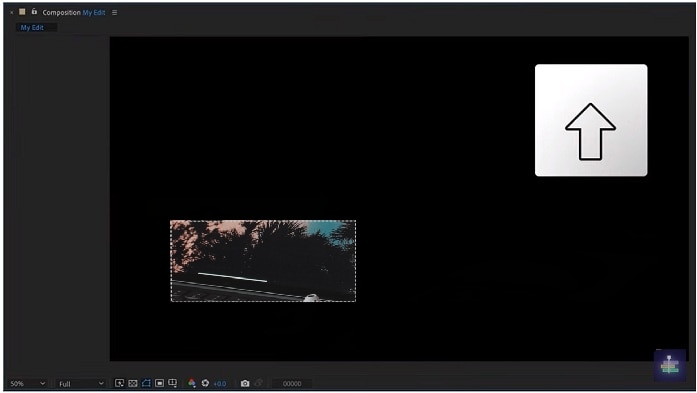
Step3 Drag the mouse and select the area you want to apply the shape tool mask.
![]()
Note:
- Holding down the “CTRL“ key for Windows or the “CMD“ key for Mac will draw the shape from the center.
- Holding down the “Shift“ key will maintain equal sides and create symmetrical shapes such as squares or circles.
How To Use Pen Tool for Masking in After Effects
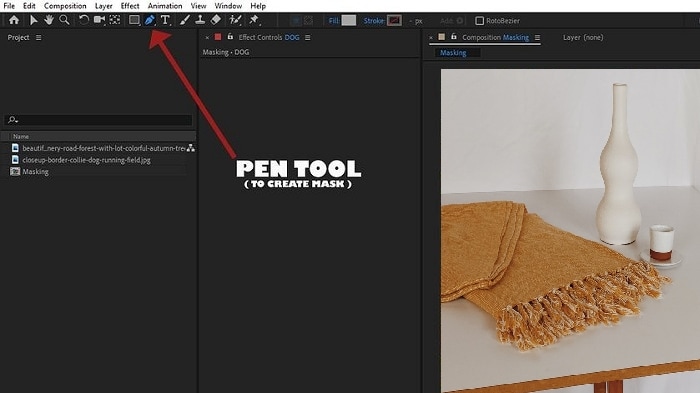
The Pen Tool in After Effects is a powerful, flexible option for creating masks. This section will explore using the Pen Tool to create masks in After Effects.
Whether you need to create a complex or a simple mask, the Pen Tool provides precise control over the mask shape and can create any shape you desire. From freehand masks to geometric shapes, the Pen Tool is the tool of choice for many After Effects users. Let’s take a closer look at how to use the Pen Tool for masking in After Effects.
Step1 Import image to project and add to timeline.

Step2 Click on the “Pen“ icon to activate Pen Tool, and use it to mask out the background.
Step3 Place a new image behind a masked image for a new background.
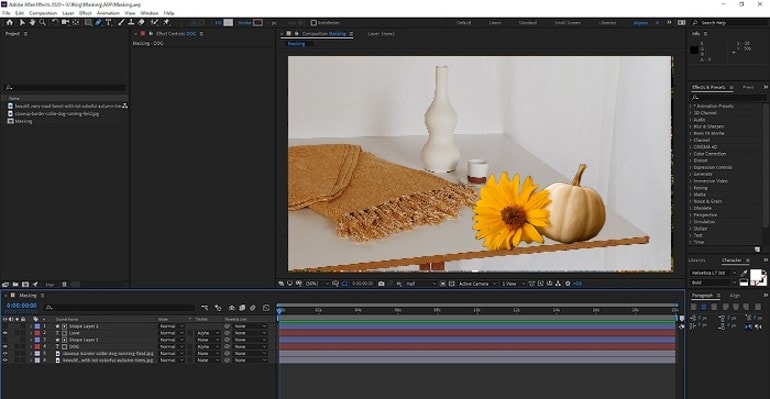
Step4 Add a masked image feather if needed.
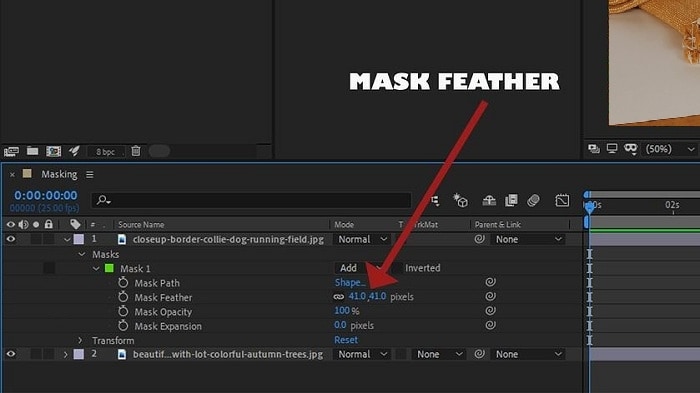
Step5 Add text, and create a “shape layer“ to place on the text.
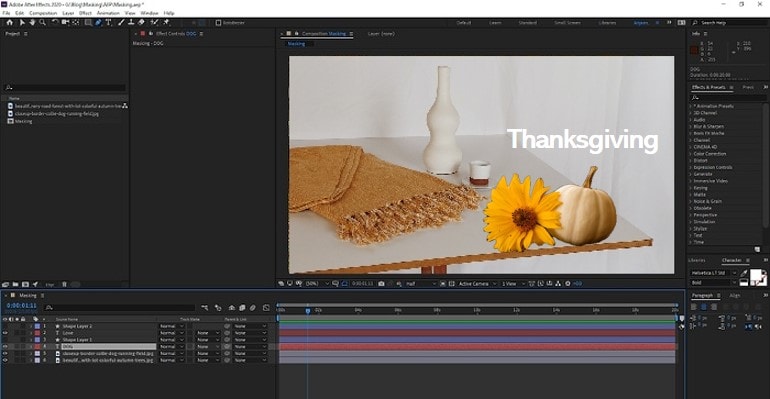
Step6 Use “Alpha Inverted Matte“ to mask the text.
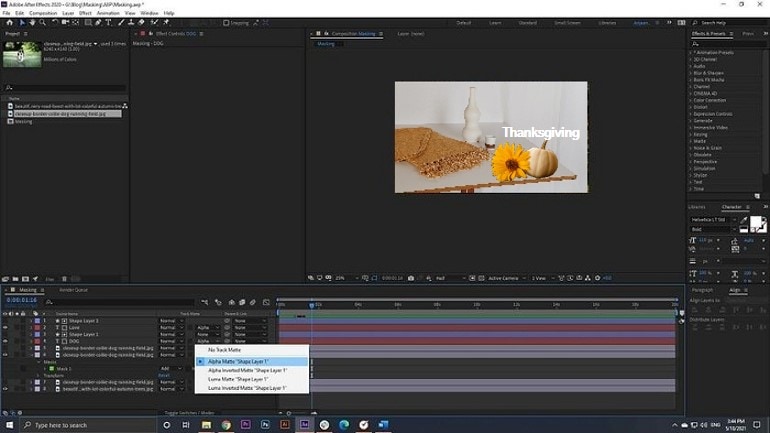
Wondershare Filmora - A Great Alternative to After Effects Masking
Wondershare Filmora is a popular video editing software that offers a range of features and tools for video editing. One of the most useful features is its masking capability, which provides a great alternative to the masking feature in Adobe After Effects.
Filmora’s masking feature is designed to be user-friendly, making it ideal for both beginner and advanced users. With its intuitive interface, users can easily create masks to hide, reveal, or manipulate parts of a video. The software offers a range of masking tools, including shape, freehand, and gradient masks, providing a wide range of options.
Free Download For Win 7 or later(64-bit)
Free Download For macOS 10.14 or later
In addition to its masking feature, Filmora offers various tools and features that make it a great choice for video editing. Its keyframe animation allows users to create smooth and professional transitions, and its audio editing features allow users to add music, sound effects, and voiceovers easily. The software also supports various file formats, making it easy to import and export videos for sharing and distribution.
Overall, Wondershare Filmora is a great alternative to After Effects, particularly for users looking for a more user-friendly and affordable video editing and masking option. With its comprehensive features, Filmora provides an excellent option for users who want to create professional-looking videos without needing advanced technical skills.
How To Use Shape Tool In Masking Using Filmora
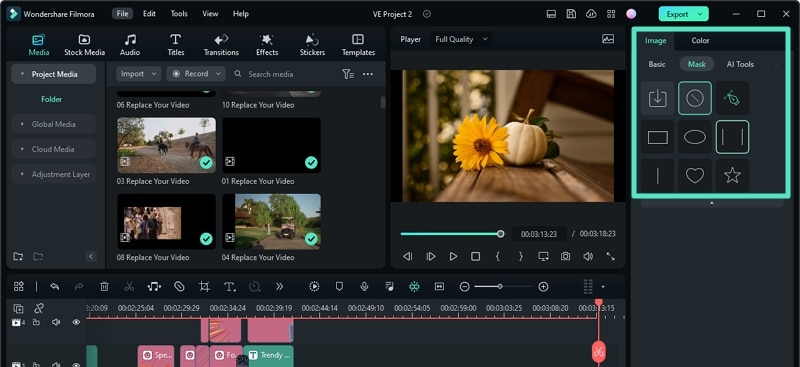
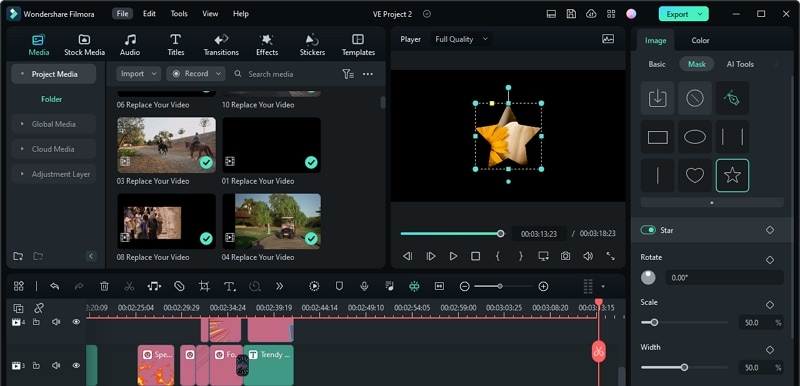
The Shape Tool in Filmora is a feature in the video editing software Wondershare Filmora, which allows users to create masks with various shapes such as rectangles, circles, double lines, single lines, love, and star, as well as custom shapes using the draw mask feature. Masks in Filmora can hide or reveal specific parts of a video clip, add animations, and create composite images and videos.
Discover how to use the Shape Tool in Wondershare Filmora for masking, a great alternative to After Effects masking. Easy to use for beginners and advanced users alike, Filmora’s Shape Tool provides options for creating masks to manipulate video content.
Step1 Enter the Video panel, and switch to the Mask tab in Wondershare Filmora. Choose from basic mask shapes or create your own.
Step2 Select a shape; see only the masked area in the Preview window.
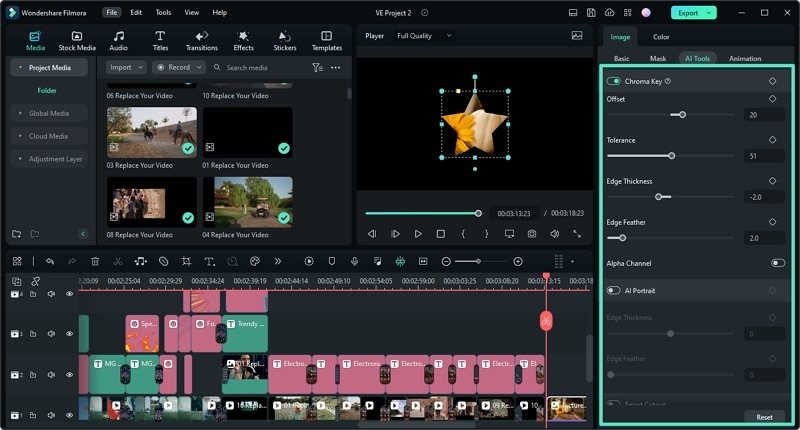
Step3 Add keyframes to animate the mask and adjust position, rotation, size, and blur strength.
How To Use Pen Tool In Masking Using Filmora
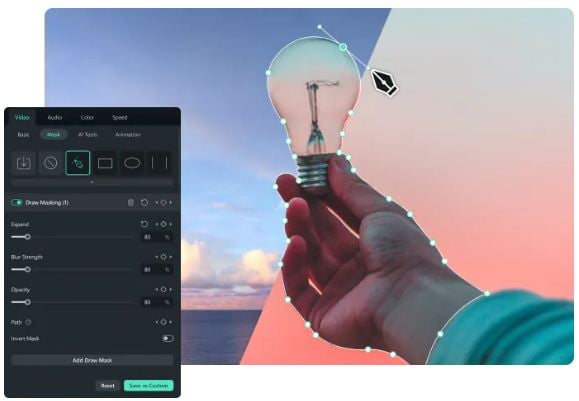
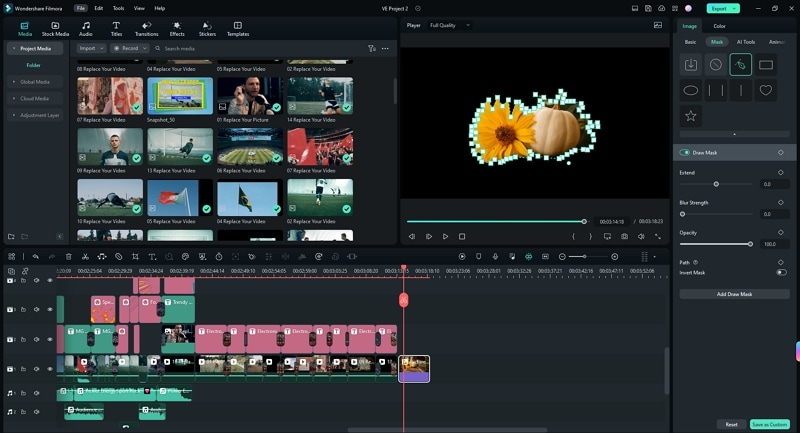
Pen Tool in Masking Using Filmora is a feature that enables users to create complex masks by dragging control points and modifying B-Splines. The tool allows users to draw the mask shape precisely by zooming in and out on the player screen and to create smooth curves by holding the Alt/Option key to adjust the Bessel curve for drawn masks.
The mask created using the Pen Tool can be edited, resized, repositioned, and adjusted using sliders and handles in the Preview window. The tool also enables users to invert the mask, making the original visible part invisible and the hidden part visible.
Learn how to use the Pen Tool in Wondershare Filmora for masking, a versatile alternative to After Effects masking. With the Pen Tool, you can easily outline and manipulate specific areas in your video to create unique and professional effects.
Step1 Create a project and add the media to the timeline**. Enter** the Mask tab.
Step2 Edit the mask by adjusting the sliders in the Mask tab to resize, reposition, and change orientation. Also, adjust the blur strength, width, height, and radius, or invert the mask.
Conclusion
Masking is an important aspect of video editing and opens up a new world of creative possibilities. After Effects provides a comprehensive set of tools for masking, and Filmora is a great alternative for those looking for a more user-friendly option.
Whether you’re using After Effects or Filmora, you can use masks to control the visibility of parts of your image, make shapes, build transitions, and much more. Following this article’s simple steps, you can start masking and bringing your creative vision to life.
- Holding down the “CTRL“ key for Windows or the “CMD“ key for Mac will draw the shape from the center.
- Holding down the “Shift“ key will maintain equal sides and create symmetrical shapes such as squares or circles.
How To Use Pen Tool for Masking in After Effects
The Pen Tool in After Effects is a powerful, flexible option for creating masks. This section will explore using the Pen Tool to create masks in After Effects.
Whether you need to create a complex or a simple mask, the Pen Tool provides precise control over the mask shape and can create any shape you desire. From freehand masks to geometric shapes, the Pen Tool is the tool of choice for many After Effects users. Let’s take a closer look at how to use the Pen Tool for masking in After Effects.
Step1 Import image to project and add to timeline.

Step2 Click on the “Pen“ icon to activate Pen Tool, and use it to mask out the background.

Step3 Place a new image behind a masked image for a new background.

Step4 Add a masked image feather if needed.

Step5 Add text, and create a “shape layer“ to place on the text.

Step6 Use “Alpha Inverted Matte“ to mask the text.

Wondershare Filmora - A Great Alternative to After Effects Masking
Wondershare Filmora is a popular video editing software that offers a range of features and tools for video editing. One of the most useful features is its masking capability, which provides a great alternative to the masking feature in Adobe After Effects.
Filmora’s masking feature is designed to be user-friendly, making it ideal for both beginner and advanced users. With its intuitive interface, users can easily create masks to hide, reveal, or manipulate parts of a video. The software offers a range of masking tools, including shape, freehand, and gradient masks, providing a wide range of options.
Free Download For Win 7 or later(64-bit)
Free Download For macOS 10.14 or later
In addition to its masking feature, Filmora offers various tools and features that make it a great choice for video editing. Its keyframe animation allows users to create smooth and professional transitions, and its audio editing features allow users to add music, sound effects, and voiceovers easily. The software also supports various file formats, making it easy to import and export videos for sharing and distribution.
Overall, Wondershare Filmora is a great alternative to After Effects, particularly for users looking for a more user-friendly and affordable video editing and masking option. With its comprehensive features, Filmora provides an excellent option for users who want to create professional-looking videos without needing advanced technical skills.
How To Use Shape Tool In Masking Using Filmora
The Shape Tool in Filmora is a feature in the video editing software Wondershare Filmora, which allows users to create masks with various shapes such as rectangles, circles, double lines, single lines, love, and star, as well as custom shapes using the draw mask feature. Masks in Filmora can hide or reveal specific parts of a video clip, add animations, and create composite images and videos.
Discover how to use the Shape Tool in Wondershare Filmora for masking, a great alternative to After Effects masking. Easy to use for beginners and advanced users alike, Filmora’s Shape Tool provides options for creating masks to manipulate video content.
Step1 Enter the Video panel, and switch to the Mask tab in Wondershare Filmora. Choose from basic mask shapes or create your own.

Step2 Select a shape; see only the masked area in the Preview window.

Step3 Add keyframes to animate the mask and adjust position, rotation, size, and blur strength.

How To Use Pen Tool In Masking Using Filmora
Pen Tool in Masking Using Filmora is a feature that enables users to create complex masks by dragging control points and modifying B-Splines. The tool allows users to draw the mask shape precisely by zooming in and out on the player screen and to create smooth curves by holding the Alt/Option key to adjust the Bessel curve for drawn masks.
The mask created using the Pen Tool can be edited, resized, repositioned, and adjusted using sliders and handles in the Preview window. The tool also enables users to invert the mask, making the original visible part invisible and the hidden part visible.
Learn how to use the Pen Tool in Wondershare Filmora for masking, a versatile alternative to After Effects masking. With the Pen Tool, you can easily outline and manipulate specific areas in your video to create unique and professional effects.
Step1 Create a project and add the media to the timeline**. Enter** the Mask tab.
Step2 Edit the mask by adjusting the sliders in the Mask tab to resize, reposition, and change orientation. Also, adjust the blur strength, width, height, and radius, or invert the mask.

Conclusion
Masking is an important aspect of video editing and opens up a new world of creative possibilities. After Effects provides a comprehensive set of tools for masking, and Filmora is a great alternative for those looking for a more user-friendly option.
Whether you’re using After Effects or Filmora, you can use masks to control the visibility of parts of your image, make shapes, build transitions, and much more. Following this article’s simple steps, you can start masking and bringing your creative vision to life.
Progressive Solutions to Adding VHS Effects to Video with Ease
Good videos with great edits and effects undoubtedly create a last impression. Videos are like windows to the past, allowing us to relive precious moments and memories. Similarly, good-looking videos have this remarkable ability to last forever. Even when it comes to content creation, videos are a great engagement tool. They engage audiences like no other medium can, conveying emotions and messages.
However, VHS effects have added more spice to the content creation and the creative work behind it. They give a normal video a distinct character and style, further improving it. By applying VHS filters, you can change the mood of your videos entirely. Applying these effects to your videos sometimes becomes difficult. However, there is always a simple solution to apply VHS to your videos.
Part 1: What is VHS Effect? An Overview
People from the 80s would remember the good old days when they used to watch movies on VHS tapes. In simple terms, the VHS effect is a style that tries to recreate the look of VHS recordings. It’s a nostalgic-style effect that has gained popularity in recent years. You can apply different filters and techniques to your videos to achieve this effect.
These techniques aim to replicate the features of VHS tapes. The key features of the VHS filters include distortion, noise, and tracking errors. Distortion and noise create flickering lines and static. Furthermore, the tracking errors give the impression of an unstable video signal. These elements make the video appear just like the old VHS tapes from the 80s.
Additionally, color grading plays an important role in creating this effect. VHS tapes had a unique color palette with saturated and slightly shifted colors. You can replicate this effect by adjusting and applying color grading effects.

Add VHS Effect to Video
Simply add video effects on Video with Filmora Video Effect Editor ! Experience the magic of cool yet outstanding video effects, where your videos come to life in beautiful visuals.
Apply VHS Effect Apply VHS Effect Learn More >

Part 2: How To Add VHS Effect to Video in Premiere Pro
If you want to add a VCR effect to your videos, you are at the right place. This part will discuss the steps to add VHS video effects using Premiere Pro. Although you can also try this on your Mac, you can surely look for other options. If you are a consistent user of FCPX instead of Premiere Pro, you can also apply VFH effects to your videos using FCPX .
Step 1: Open Adobe Premiere Pro and import the video to which you want to apply the effect. Click on the “Color” option in the main toolbar to open the “Lumetri Color” panel. In the panel, choose “Lumetri Scopes” from the top toolbar to open a graph window.

Step 2: Go to the “Basic Correction” option in the “Lumetri Color” box. Lower the “Whites” and increase the “Contrast.” Furthermore, set the “Blacks” to a value of 10 in the graph.

Step 3: Switch to the “Creative” tab in the “Lumetri Color” panel. Increase the “Faded Film” to your preference. Lower the “Sharpness,” “Saturation,” and “Vibrance” as desired. Adjust the color wheels in the “Color Wheels & Match” section of the “Lumetri Color” tab to achieve the desired VHS look. Find the “Vignette” option in the same tab and increase its value.

Step 4: Then, proceed to the editing mode by pressing the “Editing” button in the main toolbar. Choose “Edit” from the bottom half of the screen and search for the “Channel Blur” effect. After that, drag the effect and drop it onto your video clip. Then, select the video in the timeline and go to the “Video Control” section. Drag the “Channel Blur” effect above the previous adjustments and effects.

Step 5: In the “Channel Blur” effect tab, check the “Repeat Edge Pixel” option and increase the value of “Red Blurriness.” Change the “Blur Dimensions” option to “Horizontal.” Add another “Channel Blur” effect and repeat the process. Increase the value of “Blue Blurriness” to “30” and set “Red Blurriness” to “15.” Further, change the “Blur Dimensions” option to “Vertical.”

Step 6: After that, apply the “Unsharp Mask” and “Color Emboss” effects from the “Effect” panel. Adjust the “Amount” and “Radius” of the “Unsharp Mask” to “85” and “20,” respectively. Slightly increase the values of “Relief” for the “Color Emboss” effect.

Step 7: Apply the “Noise” effect from the “Noise & Grain” from the same section. Then, adjust the “Amount of Noise” according to your preference. Apply the “Wave Warp” effect and change the “Wave Height” to “2” and “Wave Width” to “1000.” Set the “Direction” to “0” and “Pinning” to “Horizontal Edges.”

Step 8: To crop your video to a 4:3 aspect ratio, create a “Color Matte” layer by clicking the “New Item” icon. Name the new layer and place it on the video clip. Repeat this step for another “Color Matte” layer. Search for the “Crop” effect in the “Effect” panel. Apply it to both color matte layers. Then, change the “Left” option to “86” for the first layer and the “Right” option to “86” for the second layer. Set the “Edge Feather” to “30” for both layers.

Step 9: Right-click and select “Save Preset” to save your VHS effect for future use. Finally, export your video to your system.

Part 3: How To Add VHS Effect to Video in Davinci Resolve
VHS tape filter is an awesome effect that brings you to the latter half of the 20th century. However, you can add this effect to your videos as well. You can learn how to apply this effect to your video in 3 simple steps:
Step 1: Open Davinci Resolve and import your video clip. Add an adjustment layer by selecting “Effects” from the main toolbar and searching for “Adjustment Layer.” Drag and drop it onto your video clip. Adjust the duration of the adjustment layer to match your video.

Step 2: Go to the bottom toolbar and select “Color.” Activate “Clips,” “Nodes,” and “Effects.” Ensure the adjustment layer is selected in the timeline. Click the “Library” button in the right corner. Search for the “Analog Damage” effect in the library search bar and drag and drop it onto the adjustment layer. Choose your desired VHS video filter from the “Preset” options in the “Analog Damage” tab. Select the “VHS Clean” effect for an almost similar VHS look.

Step 3: Adjust the settings by experimenting with different options like “Broadcast Signal” and “Scan Lines.” Preview your video by pressing the “Play” button and make further adjustments if needed. Finally, save the clip on your system.

Part 4: Some Online Solutions to Adding VHS Effect to Video Quickly
There are so many software and offline tools to apply old VHS effects. However, you don’t need to install software to add a VHS look to your videos. There are many online tools as well that you can use for this purpose.
1. Veed.io
Veed.io is a great online video editor loaded with tons of options. Other than editing and adjustment, this tool can even add subtitles to your videos. You can use this online video editor to add a VHS effect to the video. With simple and easy editing options, you can give your video an old VHS tape look. To apply this effect using this tool, follow the guided steps.
Step 1: Access the official website and click the “Video Editor Effects” option. Look for the “Choose Video” button and click on it. Further, upload your file by selecting “Upload a file.” You can also choose a stock video from the available options.

Step 2: Locate and select the “Filters” option in the sidebar after importing your video. Then, navigate to the “Effects” section and look for the VHS effects in the provided list. Choose the effect you like and apply the effect to your video by clicking it.

Step 3: Further, press the “Play” icon to preview the results. Once satisfied, press “Done,” located at the top right corner of the screen. Finally, press the “Export Video” button to save your file to your system.

2. Kapwing
Kapwing is an online video tool that is capable of doing more than you think. It is powered by AI technology to assist users in video editing, generation, and more. However, this tool is the best bet when it comes to adding a 90s VHS filter to a video. If you’re thinking of applying this effect to your video as well, simply follow the instructions.
Step 1: Access the Kapwing website and go to the “Tools” option. Then, press “Video Editor” in the new window to apply your desired VHS glitch effect.

Step 2: Then, upload your desired video by selecting the “Click to Upload” tab. Further, in the sidebar, select “Images” and search for the “VHS Effect GIF.” Choose from different overlays and drag your preferred one onto the video in the timeline. Adjust the overlay’s opacity as needed.

Step 3: Apply filters to your video for a more authentic VHS effect. To do so, select the video in the timeline and go to the “Effects” tab on the right panel. Choose a filter that gives your video an old and retro look. Once satisfied, click “Export Video” in the top right corner to save your video.

Part 5: Wondershare Filmora: An All-in-One Utility For Adding VHS Effect to Video
Wondershare Filmora is a tool packed with tons of options and features. In its latest update, the tool is now using AI to assist you in your editing work. There are so many effects and filters available that you can apply to your video footage. There is a comprehensive Filmora guide to adding VHS filters to videos on its website. However, these 5 steps will help you learn the process of applying a VHS screen effect.
Add VHS Effect For Win 7 or later(64-bit)
Add VHS Effect For macOS 10.14 or later
Step 1Install and Launch Wondershare Filmora
To begin, install and launch Wondershare Filmora on your computer. Once opened, select the “New Project” tab, which will take you to a new window. Import your video by either dragging and dropping it into the program or using the import media option. As you’ve added the video to the “Media” section, drag and drop it into the timeline.

Step 2Apply the VHS Effects
Access the “Effects” option in the top bar of the program. Search for “VHS” to explore the different VHS effects available. Choose the desired old VHS effect and drag it onto your video in the timeline. To adjust the intensity of the effect, modify the opacity settings in the “Effects” tab located on your screen. Continue adjusting until you are satisfied with the result.

Step 3Export and Save Your Video
Once you are happy with the applied VHS effect, it’s time to save your video. Access the “Export” button in the screen’s top left corner. Follow the instructions to select your desired settings and format for the exported video. Then, click “Export” again to begin the exporting process. Once completed, your video with the VHS effects will be saved and ready to be shared or enjoyed.

Conclusion
In conclusion, videos have a remarkable ability to leave a lasting impression. There are many ways to improve your content, and VHS is one such way. With VHS filters, you can transform your boring video into something appealing. In this scenario, Wondershare has provided tools to help you improve your videos. Filmora is a tool offered by Wondershare that will allow you to apply effects to your videos easily.
Apply VHS Effect Apply VHS Effect Learn More >

Part 2: How To Add VHS Effect to Video in Premiere Pro
If you want to add a VCR effect to your videos, you are at the right place. This part will discuss the steps to add VHS video effects using Premiere Pro. Although you can also try this on your Mac, you can surely look for other options. If you are a consistent user of FCPX instead of Premiere Pro, you can also apply VFH effects to your videos using FCPX .
Step 1: Open Adobe Premiere Pro and import the video to which you want to apply the effect. Click on the “Color” option in the main toolbar to open the “Lumetri Color” panel. In the panel, choose “Lumetri Scopes” from the top toolbar to open a graph window.

Step 2: Go to the “Basic Correction” option in the “Lumetri Color” box. Lower the “Whites” and increase the “Contrast.” Furthermore, set the “Blacks” to a value of 10 in the graph.

Step 3: Switch to the “Creative” tab in the “Lumetri Color” panel. Increase the “Faded Film” to your preference. Lower the “Sharpness,” “Saturation,” and “Vibrance” as desired. Adjust the color wheels in the “Color Wheels & Match” section of the “Lumetri Color” tab to achieve the desired VHS look. Find the “Vignette” option in the same tab and increase its value.

Step 4: Then, proceed to the editing mode by pressing the “Editing” button in the main toolbar. Choose “Edit” from the bottom half of the screen and search for the “Channel Blur” effect. After that, drag the effect and drop it onto your video clip. Then, select the video in the timeline and go to the “Video Control” section. Drag the “Channel Blur” effect above the previous adjustments and effects.

Step 5: In the “Channel Blur” effect tab, check the “Repeat Edge Pixel” option and increase the value of “Red Blurriness.” Change the “Blur Dimensions” option to “Horizontal.” Add another “Channel Blur” effect and repeat the process. Increase the value of “Blue Blurriness” to “30” and set “Red Blurriness” to “15.” Further, change the “Blur Dimensions” option to “Vertical.”

Step 6: After that, apply the “Unsharp Mask” and “Color Emboss” effects from the “Effect” panel. Adjust the “Amount” and “Radius” of the “Unsharp Mask” to “85” and “20,” respectively. Slightly increase the values of “Relief” for the “Color Emboss” effect.

Step 7: Apply the “Noise” effect from the “Noise & Grain” from the same section. Then, adjust the “Amount of Noise” according to your preference. Apply the “Wave Warp” effect and change the “Wave Height” to “2” and “Wave Width” to “1000.” Set the “Direction” to “0” and “Pinning” to “Horizontal Edges.”

Step 8: To crop your video to a 4:3 aspect ratio, create a “Color Matte” layer by clicking the “New Item” icon. Name the new layer and place it on the video clip. Repeat this step for another “Color Matte” layer. Search for the “Crop” effect in the “Effect” panel. Apply it to both color matte layers. Then, change the “Left” option to “86” for the first layer and the “Right” option to “86” for the second layer. Set the “Edge Feather” to “30” for both layers.

Step 9: Right-click and select “Save Preset” to save your VHS effect for future use. Finally, export your video to your system.

Part 3: How To Add VHS Effect to Video in Davinci Resolve
VHS tape filter is an awesome effect that brings you to the latter half of the 20th century. However, you can add this effect to your videos as well. You can learn how to apply this effect to your video in 3 simple steps:
Step 1: Open Davinci Resolve and import your video clip. Add an adjustment layer by selecting “Effects” from the main toolbar and searching for “Adjustment Layer.” Drag and drop it onto your video clip. Adjust the duration of the adjustment layer to match your video.

Step 2: Go to the bottom toolbar and select “Color.” Activate “Clips,” “Nodes,” and “Effects.” Ensure the adjustment layer is selected in the timeline. Click the “Library” button in the right corner. Search for the “Analog Damage” effect in the library search bar and drag and drop it onto the adjustment layer. Choose your desired VHS video filter from the “Preset” options in the “Analog Damage” tab. Select the “VHS Clean” effect for an almost similar VHS look.

Step 3: Adjust the settings by experimenting with different options like “Broadcast Signal” and “Scan Lines.” Preview your video by pressing the “Play” button and make further adjustments if needed. Finally, save the clip on your system.

Part 4: Some Online Solutions to Adding VHS Effect to Video Quickly
There are so many software and offline tools to apply old VHS effects. However, you don’t need to install software to add a VHS look to your videos. There are many online tools as well that you can use for this purpose.
1. Veed.io
Veed.io is a great online video editor loaded with tons of options. Other than editing and adjustment, this tool can even add subtitles to your videos. You can use this online video editor to add a VHS effect to the video. With simple and easy editing options, you can give your video an old VHS tape look. To apply this effect using this tool, follow the guided steps.
Step 1: Access the official website and click the “Video Editor Effects” option. Look for the “Choose Video” button and click on it. Further, upload your file by selecting “Upload a file.” You can also choose a stock video from the available options.

Step 2: Locate and select the “Filters” option in the sidebar after importing your video. Then, navigate to the “Effects” section and look for the VHS effects in the provided list. Choose the effect you like and apply the effect to your video by clicking it.

Step 3: Further, press the “Play” icon to preview the results. Once satisfied, press “Done,” located at the top right corner of the screen. Finally, press the “Export Video” button to save your file to your system.

2. Kapwing
Kapwing is an online video tool that is capable of doing more than you think. It is powered by AI technology to assist users in video editing, generation, and more. However, this tool is the best bet when it comes to adding a 90s VHS filter to a video. If you’re thinking of applying this effect to your video as well, simply follow the instructions.
Step 1: Access the Kapwing website and go to the “Tools” option. Then, press “Video Editor” in the new window to apply your desired VHS glitch effect.

Step 2: Then, upload your desired video by selecting the “Click to Upload” tab. Further, in the sidebar, select “Images” and search for the “VHS Effect GIF.” Choose from different overlays and drag your preferred one onto the video in the timeline. Adjust the overlay’s opacity as needed.

Step 3: Apply filters to your video for a more authentic VHS effect. To do so, select the video in the timeline and go to the “Effects” tab on the right panel. Choose a filter that gives your video an old and retro look. Once satisfied, click “Export Video” in the top right corner to save your video.

Part 5: Wondershare Filmora: An All-in-One Utility For Adding VHS Effect to Video
Wondershare Filmora is a tool packed with tons of options and features. In its latest update, the tool is now using AI to assist you in your editing work. There are so many effects and filters available that you can apply to your video footage. There is a comprehensive Filmora guide to adding VHS filters to videos on its website. However, these 5 steps will help you learn the process of applying a VHS screen effect.
Add VHS Effect For Win 7 or later(64-bit)
Add VHS Effect For macOS 10.14 or later
Step 1Install and Launch Wondershare Filmora
To begin, install and launch Wondershare Filmora on your computer. Once opened, select the “New Project” tab, which will take you to a new window. Import your video by either dragging and dropping it into the program or using the import media option. As you’ve added the video to the “Media” section, drag and drop it into the timeline.

Step 2Apply the VHS Effects
Access the “Effects” option in the top bar of the program. Search for “VHS” to explore the different VHS effects available. Choose the desired old VHS effect and drag it onto your video in the timeline. To adjust the intensity of the effect, modify the opacity settings in the “Effects” tab located on your screen. Continue adjusting until you are satisfied with the result.

Step 3Export and Save Your Video
Once you are happy with the applied VHS effect, it’s time to save your video. Access the “Export” button in the screen’s top left corner. Follow the instructions to select your desired settings and format for the exported video. Then, click “Export” again to begin the exporting process. Once completed, your video with the VHS effects will be saved and ready to be shared or enjoyed.

Conclusion
In conclusion, videos have a remarkable ability to leave a lasting impression. There are many ways to improve your content, and VHS is one such way. With VHS filters, you can transform your boring video into something appealing. In this scenario, Wondershare has provided tools to help you improve your videos. Filmora is a tool offered by Wondershare that will allow you to apply effects to your videos easily.
Do You Still Waste Time Making Transparent Background in Paint
Do You Still Waste Time Making Transparent Background in Paint
An easy yet powerful editor
Numerous effects to choose from
Detailed tutorials provided by the official channel
Transparent background can be made easily with paint. Make background transparent paint 3d in simple steps. Learn to make background of a picture transparent with paintbrush.
In this article
01 [What’s Paint and What Advantages Does It Have for Making Transparent Background](#Part 1)
02 [How to Save a Picture with a Transparent Background?](#Part 2)
03 [How to Make Background Transparent in Paint?](#Part 3)
Part 1 What’s Paint and What Advantages Does It Have for Making Transparent Background
MS paint is one of the widest programs of Microsoft used for creating and editing pictures at the computer. It is also used to add text to the images. It’s features like ease to use and simplicity has made it so popular among the people. It’s simple drawing tool help to draw pictures on the blank space or on existing image. The various editing tools such as cropping, resizing and rotating help in manipulating images. Wide range of colors, fonts and combinations option with color make it a great choice for the users to make and edit pictures. It also comes with various built in applications that are good for various versions of Windows.
Due to its various advantages, good painters can create beautiful pictures with special effects. One can easily add or edit pictures by adding attractive picture effects as it can be done with other applications. Some of the advantages of using paint to add transparent backgrounds are:
● Paint is pre-installed at every computer and thus a user who wish to do painting or edit in the images, they need not to deal with the installation process.
● It has basic drawing and editing tools such as shapes, cropping, sizing and coloring which support maximum file types such as JPG, GIF, BMP and PNG.
● Paint is a simple program and can be learned by anyone. Thus, it is user friendly, simple and one of the most cost effective programs.
● Eraser, magnifier, pencil, paintbrush, spray, fonts, shapes and color palette are some of the tools that can even be used to add some customized features to the pictures.
● The best thing with paint is that a user can start making a picture from scratch. The files can be easily used easily from various sources such as digital camera, scanner or any other source. A user is not required to download any other software or application to add creating and editing features in a picture.
● One can change the image’s dimensions, captions, and switch color images to black and white. Transparent Background Paint is also a feature in the MS paint which can make any picture more attractive.
● Paint has support system also that can help painter to master over the brush and paints.
Part 2 How to Save a Picture with a Transparent Background?
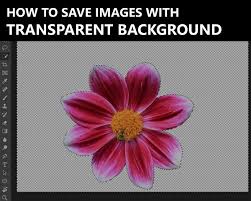
A picture made with paint splatter transparent background can be saved easily by following simple steps beginning from creating a picture with transparent background. The steps to be followed are:
● Open the image in paint which you require to add transparent background.
● Go to the image selection under select option. Click on “Transparent selection”.
● Pick the image area which is required to made transparent and press Delete.
● You will get the blank background and this need to be saved at the MS word file to make the background transparent.
● Insert the image into the word document, select ‘Format’ and click on ‘Remove background’.
● After having preview of the image, click on ‘Save changes’
● In the last step to save image, select ‘Save as Picture’. This will be the final image with a transparent background.
So, this way one can save image with transparent background paint.
Part 3 How to Make Background Transparent in Paint?
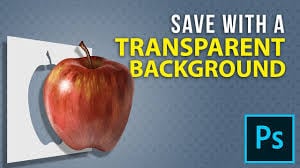
MS paint has plenty of features and tools to make a picture visually good. With high definition pictures coming into light now-a-days, 3D pictures are in trends. Giving a transparent background to a picture makes it very attractive. To paint 3d make background transparent, Ms Paint is a program that can be used by a new beginner and an experienced painter.
Let’s see how to make a picture background transparent in different styles.
01Make Background Transparent Using MS Paint
Learning to add transparent background to images? It can be done in simple steps:
● Click the Cortana, which is visual assistant and open Paint.
● Search paint in the search box and select it to open the Paint.
● To open the image in which background is to be added, move on to click on file and then open the image
● Press “Select button” and click the transparent selection option.
● Go to Select button’s menu and select the Free-form selection.
● Trace the area for background creation with the cursor and save the original picture. This can be done by holding the left mouse button.
● The rest of picture will be meant for having a transparent background.
● A rectangle will appear at the selected area. Right click on that. Then select cut that come in context menu. It will remove the selected foreground appearing the picture.
● Open a new image in Paint.
● Using Ctrl + V hotkey, you need to paste the traced foreground area from the first image.
● You can see the picture with transparent background.
● Left-click on the pasted foreground image and adjust it to a place on the background picture.
02Make Background Transparent Using Paint 3d
Transparent background can be made using Paint 3D. Let’s see how to do it:
● Search Paint 3D in Windows 10’s search box.
● It can also be done by adding the app to Windows 10
● Select to open the Paint 3D app.
● Go to Menu, select the image required and open it in Paint 3D
● Open the sidebar by pressing the Canvas button.
● Go to Transparent canvas setting.
● Through Select button drag the selection rectangle over an area of the image required to delete.
● Use Ctrl + X hotkey to cut out the area from the picture.
● You have a blank transparent area that can be filled with background layer.
● Go to Menu. Save it and select the 2D PNG option.
● Save by adding a title in the text box.
● Go to Menu and select, open the transparent image saved.
● You can find the transparent image on top of the background layer.
● The transparent area is filled by the background image layer.
● It can be resized also moving and dragging cursor.
A blank area remains in Paint leaves when picture is cut. It does not become transparent background. This blank region can be utilized for layers in the other image. This can be done through various images editing software. Thus, this way transparent background paint 3d can be made easily.
There are various applications and software to add transparent background to the images. One of the trendy applications to edit pictures and paint splash transparent background is Filmora. This application can be even used to paint brush transparent background and remove background in paint 3d. Let’s learn and know about Wondershare Filmora Video Editor .
For Win 7 or later (64-bit)
For macOS 10.12 or later
Filmora is one of the best picture and video editing software. It is trending and becoming popular due to its extraordinary features and editing tools. Colour tuning, editing support, advanced text editor, and its basic color grading features make it best for editing pictures. With filmora people can even add 3D effects on the pictures. It has Action camera tools which has camera shake, slow motion and reverse features. The professional color correction tool help in adjusting saturation, brightness and contrast. Faster editing with low resolution is also one of the features of the application. This software or application can add movement and new advance appearance to the picture that can make it more visually appealing.
This application is very useful for both the beginners as well as semi pros. They can turn their creativity into reality by using Filmora. Different versions of the application are available based on the suitability of the users. Filmora can be used to add transparent background to any images. With so many image editing and coloring tools and features, this becomes a must have application in any mobile device or Desktop.
● Ending Thoughts →
● MS paint from Microsoft is widely used program or software for creating and editing pictures. Due to its simple drawing tool and editing features, still it is first choice for the beginners and professional artists. Color, font, text and editing features in paint can be easily understood and therefore it has various advantages as compared to rest of the software or application.
● Ms Paint can be used for editing pictures and it is good when you need to add transparent background to any image. Paint 3d is one of the advanced version of the paint and it gives 3d effects to any image. It can be done by following simple steps. It can be learned easily through support provided by MS paint. The steps are simple and can be learned by anyone.
● Although there are various image editing software and applications for adding transparent background to an image. Filmora is one of the emerging application for editing pictures and videos. It is used to add some amazing effects to any picture or video. One can customize image as per their requirement through advanced settings. It can be easily installed and worked flow is good wit Filmora.
Transparent background can be made easily with paint. Make background transparent paint 3d in simple steps. Learn to make background of a picture transparent with paintbrush.
In this article
01 [What’s Paint and What Advantages Does It Have for Making Transparent Background](#Part 1)
02 [How to Save a Picture with a Transparent Background?](#Part 2)
03 [How to Make Background Transparent in Paint?](#Part 3)
Part 1 What’s Paint and What Advantages Does It Have for Making Transparent Background

MS paint is one of the widest programs of Microsoft used for creating and editing pictures at the computer. It is also used to add text to the images. It’s features like ease to use and simplicity has made it so popular among the people. It’s simple drawing tool help to draw pictures on the blank space or on existing image. The various editing tools such as cropping, resizing and rotating help in manipulating images. Wide range of colors, fonts and combinations option with color make it a great choice for the users to make and edit pictures. It also comes with various built in applications that are good for various versions of Windows.
Due to its various advantages, good painters can create beautiful pictures with special effects. One can easily add or edit pictures by adding attractive picture effects as it can be done with other applications. Some of the advantages of using paint to add transparent backgrounds are:
● Paint is pre-installed at every computer and thus a user who wish to do painting or edit in the images, they need not to deal with the installation process.
● It has basic drawing and editing tools such as shapes, cropping, sizing and coloring which support maximum file types such as JPG, GIF, BMP and PNG.
● Paint is a simple program and can be learned by anyone. Thus, it is user friendly, simple and one of the most cost effective programs.
● Eraser, magnifier, pencil, paintbrush, spray, fonts, shapes and color palette are some of the tools that can even be used to add some customized features to the pictures.
● The best thing with paint is that a user can start making a picture from scratch. The files can be easily used easily from various sources such as digital camera, scanner or any other source. A user is not required to download any other software or application to add creating and editing features in a picture.
● One can change the image’s dimensions, captions, and switch color images to black and white. Transparent Background Paint is also a feature in the MS paint which can make any picture more attractive.
● Paint has support system also that can help painter to master over the brush and paints.
Part 2 How to Save a Picture with a Transparent Background?

A picture made with paint splatter transparent background can be saved easily by following simple steps beginning from creating a picture with transparent background. The steps to be followed are:
● Open the image in paint which you require to add transparent background.
● Go to the image selection under select option. Click on “Transparent selection”.
● Pick the image area which is required to made transparent and press Delete.
● You will get the blank background and this need to be saved at the MS word file to make the background transparent.
● Insert the image into the word document, select ‘Format’ and click on ‘Remove background’.
● After having preview of the image, click on ‘Save changes’
● In the last step to save image, select ‘Save as Picture’. This will be the final image with a transparent background.
So, this way one can save image with transparent background paint.
Part 3 How to Make Background Transparent in Paint?

MS paint has plenty of features and tools to make a picture visually good. With high definition pictures coming into light now-a-days, 3D pictures are in trends. Giving a transparent background to a picture makes it very attractive. To paint 3d make background transparent, Ms Paint is a program that can be used by a new beginner and an experienced painter.
Let’s see how to make a picture background transparent in different styles.
01Make Background Transparent Using MS Paint
Learning to add transparent background to images? It can be done in simple steps:
● Click the Cortana, which is visual assistant and open Paint.
● Search paint in the search box and select it to open the Paint.
● To open the image in which background is to be added, move on to click on file and then open the image
● Press “Select button” and click the transparent selection option.
● Go to Select button’s menu and select the Free-form selection.
● Trace the area for background creation with the cursor and save the original picture. This can be done by holding the left mouse button.
● The rest of picture will be meant for having a transparent background.
● A rectangle will appear at the selected area. Right click on that. Then select cut that come in context menu. It will remove the selected foreground appearing the picture.
● Open a new image in Paint.
● Using Ctrl + V hotkey, you need to paste the traced foreground area from the first image.
● You can see the picture with transparent background.
● Left-click on the pasted foreground image and adjust it to a place on the background picture.
02Make Background Transparent Using Paint 3d
Transparent background can be made using Paint 3D. Let’s see how to do it:
● Search Paint 3D in Windows 10’s search box.
● It can also be done by adding the app to Windows 10
● Select to open the Paint 3D app.
● Go to Menu, select the image required and open it in Paint 3D
● Open the sidebar by pressing the Canvas button.
● Go to Transparent canvas setting.
● Through Select button drag the selection rectangle over an area of the image required to delete.
● Use Ctrl + X hotkey to cut out the area from the picture.
● You have a blank transparent area that can be filled with background layer.
● Go to Menu. Save it and select the 2D PNG option.
● Save by adding a title in the text box.
● Go to Menu and select, open the transparent image saved.
● You can find the transparent image on top of the background layer.
● The transparent area is filled by the background image layer.
● It can be resized also moving and dragging cursor.
A blank area remains in Paint leaves when picture is cut. It does not become transparent background. This blank region can be utilized for layers in the other image. This can be done through various images editing software. Thus, this way transparent background paint 3d can be made easily.
There are various applications and software to add transparent background to the images. One of the trendy applications to edit pictures and paint splash transparent background is Filmora. This application can be even used to paint brush transparent background and remove background in paint 3d. Let’s learn and know about Wondershare Filmora Video Editor .
For Win 7 or later (64-bit)
For macOS 10.12 or later
Filmora is one of the best picture and video editing software. It is trending and becoming popular due to its extraordinary features and editing tools. Colour tuning, editing support, advanced text editor, and its basic color grading features make it best for editing pictures. With filmora people can even add 3D effects on the pictures. It has Action camera tools which has camera shake, slow motion and reverse features. The professional color correction tool help in adjusting saturation, brightness and contrast. Faster editing with low resolution is also one of the features of the application. This software or application can add movement and new advance appearance to the picture that can make it more visually appealing.
This application is very useful for both the beginners as well as semi pros. They can turn their creativity into reality by using Filmora. Different versions of the application are available based on the suitability of the users. Filmora can be used to add transparent background to any images. With so many image editing and coloring tools and features, this becomes a must have application in any mobile device or Desktop.
● Ending Thoughts →
● MS paint from Microsoft is widely used program or software for creating and editing pictures. Due to its simple drawing tool and editing features, still it is first choice for the beginners and professional artists. Color, font, text and editing features in paint can be easily understood and therefore it has various advantages as compared to rest of the software or application.
● Ms Paint can be used for editing pictures and it is good when you need to add transparent background to any image. Paint 3d is one of the advanced version of the paint and it gives 3d effects to any image. It can be done by following simple steps. It can be learned easily through support provided by MS paint. The steps are simple and can be learned by anyone.
● Although there are various image editing software and applications for adding transparent background to an image. Filmora is one of the emerging application for editing pictures and videos. It is used to add some amazing effects to any picture or video. One can customize image as per their requirement through advanced settings. It can be easily installed and worked flow is good wit Filmora.
Transparent background can be made easily with paint. Make background transparent paint 3d in simple steps. Learn to make background of a picture transparent with paintbrush.
In this article
01 [What’s Paint and What Advantages Does It Have for Making Transparent Background](#Part 1)
02 [How to Save a Picture with a Transparent Background?](#Part 2)
03 [How to Make Background Transparent in Paint?](#Part 3)
Part 1 What’s Paint and What Advantages Does It Have for Making Transparent Background

MS paint is one of the widest programs of Microsoft used for creating and editing pictures at the computer. It is also used to add text to the images. It’s features like ease to use and simplicity has made it so popular among the people. It’s simple drawing tool help to draw pictures on the blank space or on existing image. The various editing tools such as cropping, resizing and rotating help in manipulating images. Wide range of colors, fonts and combinations option with color make it a great choice for the users to make and edit pictures. It also comes with various built in applications that are good for various versions of Windows.
Due to its various advantages, good painters can create beautiful pictures with special effects. One can easily add or edit pictures by adding attractive picture effects as it can be done with other applications. Some of the advantages of using paint to add transparent backgrounds are:
● Paint is pre-installed at every computer and thus a user who wish to do painting or edit in the images, they need not to deal with the installation process.
● It has basic drawing and editing tools such as shapes, cropping, sizing and coloring which support maximum file types such as JPG, GIF, BMP and PNG.
● Paint is a simple program and can be learned by anyone. Thus, it is user friendly, simple and one of the most cost effective programs.
● Eraser, magnifier, pencil, paintbrush, spray, fonts, shapes and color palette are some of the tools that can even be used to add some customized features to the pictures.
● The best thing with paint is that a user can start making a picture from scratch. The files can be easily used easily from various sources such as digital camera, scanner or any other source. A user is not required to download any other software or application to add creating and editing features in a picture.
● One can change the image’s dimensions, captions, and switch color images to black and white. Transparent Background Paint is also a feature in the MS paint which can make any picture more attractive.
● Paint has support system also that can help painter to master over the brush and paints.
Part 2 How to Save a Picture with a Transparent Background?

A picture made with paint splatter transparent background can be saved easily by following simple steps beginning from creating a picture with transparent background. The steps to be followed are:
● Open the image in paint which you require to add transparent background.
● Go to the image selection under select option. Click on “Transparent selection”.
● Pick the image area which is required to made transparent and press Delete.
● You will get the blank background and this need to be saved at the MS word file to make the background transparent.
● Insert the image into the word document, select ‘Format’ and click on ‘Remove background’.
● After having preview of the image, click on ‘Save changes’
● In the last step to save image, select ‘Save as Picture’. This will be the final image with a transparent background.
So, this way one can save image with transparent background paint.
Part 3 How to Make Background Transparent in Paint?

MS paint has plenty of features and tools to make a picture visually good. With high definition pictures coming into light now-a-days, 3D pictures are in trends. Giving a transparent background to a picture makes it very attractive. To paint 3d make background transparent, Ms Paint is a program that can be used by a new beginner and an experienced painter.
Let’s see how to make a picture background transparent in different styles.
01Make Background Transparent Using MS Paint
Learning to add transparent background to images? It can be done in simple steps:
● Click the Cortana, which is visual assistant and open Paint.
● Search paint in the search box and select it to open the Paint.
● To open the image in which background is to be added, move on to click on file and then open the image
● Press “Select button” and click the transparent selection option.
● Go to Select button’s menu and select the Free-form selection.
● Trace the area for background creation with the cursor and save the original picture. This can be done by holding the left mouse button.
● The rest of picture will be meant for having a transparent background.
● A rectangle will appear at the selected area. Right click on that. Then select cut that come in context menu. It will remove the selected foreground appearing the picture.
● Open a new image in Paint.
● Using Ctrl + V hotkey, you need to paste the traced foreground area from the first image.
● You can see the picture with transparent background.
● Left-click on the pasted foreground image and adjust it to a place on the background picture.
02Make Background Transparent Using Paint 3d
Transparent background can be made using Paint 3D. Let’s see how to do it:
● Search Paint 3D in Windows 10’s search box.
● It can also be done by adding the app to Windows 10
● Select to open the Paint 3D app.
● Go to Menu, select the image required and open it in Paint 3D
● Open the sidebar by pressing the Canvas button.
● Go to Transparent canvas setting.
● Through Select button drag the selection rectangle over an area of the image required to delete.
● Use Ctrl + X hotkey to cut out the area from the picture.
● You have a blank transparent area that can be filled with background layer.
● Go to Menu. Save it and select the 2D PNG option.
● Save by adding a title in the text box.
● Go to Menu and select, open the transparent image saved.
● You can find the transparent image on top of the background layer.
● The transparent area is filled by the background image layer.
● It can be resized also moving and dragging cursor.
A blank area remains in Paint leaves when picture is cut. It does not become transparent background. This blank region can be utilized for layers in the other image. This can be done through various images editing software. Thus, this way transparent background paint 3d can be made easily.
There are various applications and software to add transparent background to the images. One of the trendy applications to edit pictures and paint splash transparent background is Filmora. This application can be even used to paint brush transparent background and remove background in paint 3d. Let’s learn and know about Wondershare Filmora Video Editor .
For Win 7 or later (64-bit)
For macOS 10.12 or later
Filmora is one of the best picture and video editing software. It is trending and becoming popular due to its extraordinary features and editing tools. Colour tuning, editing support, advanced text editor, and its basic color grading features make it best for editing pictures. With filmora people can even add 3D effects on the pictures. It has Action camera tools which has camera shake, slow motion and reverse features. The professional color correction tool help in adjusting saturation, brightness and contrast. Faster editing with low resolution is also one of the features of the application. This software or application can add movement and new advance appearance to the picture that can make it more visually appealing.
This application is very useful for both the beginners as well as semi pros. They can turn their creativity into reality by using Filmora. Different versions of the application are available based on the suitability of the users. Filmora can be used to add transparent background to any images. With so many image editing and coloring tools and features, this becomes a must have application in any mobile device or Desktop.
● Ending Thoughts →
● MS paint from Microsoft is widely used program or software for creating and editing pictures. Due to its simple drawing tool and editing features, still it is first choice for the beginners and professional artists. Color, font, text and editing features in paint can be easily understood and therefore it has various advantages as compared to rest of the software or application.
● Ms Paint can be used for editing pictures and it is good when you need to add transparent background to any image. Paint 3d is one of the advanced version of the paint and it gives 3d effects to any image. It can be done by following simple steps. It can be learned easily through support provided by MS paint. The steps are simple and can be learned by anyone.
● Although there are various image editing software and applications for adding transparent background to an image. Filmora is one of the emerging application for editing pictures and videos. It is used to add some amazing effects to any picture or video. One can customize image as per their requirement through advanced settings. It can be easily installed and worked flow is good wit Filmora.
Transparent background can be made easily with paint. Make background transparent paint 3d in simple steps. Learn to make background of a picture transparent with paintbrush.
In this article
01 [What’s Paint and What Advantages Does It Have for Making Transparent Background](#Part 1)
02 [How to Save a Picture with a Transparent Background?](#Part 2)
03 [How to Make Background Transparent in Paint?](#Part 3)
Part 1 What’s Paint and What Advantages Does It Have for Making Transparent Background

MS paint is one of the widest programs of Microsoft used for creating and editing pictures at the computer. It is also used to add text to the images. It’s features like ease to use and simplicity has made it so popular among the people. It’s simple drawing tool help to draw pictures on the blank space or on existing image. The various editing tools such as cropping, resizing and rotating help in manipulating images. Wide range of colors, fonts and combinations option with color make it a great choice for the users to make and edit pictures. It also comes with various built in applications that are good for various versions of Windows.
Due to its various advantages, good painters can create beautiful pictures with special effects. One can easily add or edit pictures by adding attractive picture effects as it can be done with other applications. Some of the advantages of using paint to add transparent backgrounds are:
● Paint is pre-installed at every computer and thus a user who wish to do painting or edit in the images, they need not to deal with the installation process.
● It has basic drawing and editing tools such as shapes, cropping, sizing and coloring which support maximum file types such as JPG, GIF, BMP and PNG.
● Paint is a simple program and can be learned by anyone. Thus, it is user friendly, simple and one of the most cost effective programs.
● Eraser, magnifier, pencil, paintbrush, spray, fonts, shapes and color palette are some of the tools that can even be used to add some customized features to the pictures.
● The best thing with paint is that a user can start making a picture from scratch. The files can be easily used easily from various sources such as digital camera, scanner or any other source. A user is not required to download any other software or application to add creating and editing features in a picture.
● One can change the image’s dimensions, captions, and switch color images to black and white. Transparent Background Paint is also a feature in the MS paint which can make any picture more attractive.
● Paint has support system also that can help painter to master over the brush and paints.
Part 2 How to Save a Picture with a Transparent Background?

A picture made with paint splatter transparent background can be saved easily by following simple steps beginning from creating a picture with transparent background. The steps to be followed are:
● Open the image in paint which you require to add transparent background.
● Go to the image selection under select option. Click on “Transparent selection”.
● Pick the image area which is required to made transparent and press Delete.
● You will get the blank background and this need to be saved at the MS word file to make the background transparent.
● Insert the image into the word document, select ‘Format’ and click on ‘Remove background’.
● After having preview of the image, click on ‘Save changes’
● In the last step to save image, select ‘Save as Picture’. This will be the final image with a transparent background.
So, this way one can save image with transparent background paint.
Part 3 How to Make Background Transparent in Paint?

MS paint has plenty of features and tools to make a picture visually good. With high definition pictures coming into light now-a-days, 3D pictures are in trends. Giving a transparent background to a picture makes it very attractive. To paint 3d make background transparent, Ms Paint is a program that can be used by a new beginner and an experienced painter.
Let’s see how to make a picture background transparent in different styles.
01Make Background Transparent Using MS Paint
Learning to add transparent background to images? It can be done in simple steps:
● Click the Cortana, which is visual assistant and open Paint.
● Search paint in the search box and select it to open the Paint.
● To open the image in which background is to be added, move on to click on file and then open the image
● Press “Select button” and click the transparent selection option.
● Go to Select button’s menu and select the Free-form selection.
● Trace the area for background creation with the cursor and save the original picture. This can be done by holding the left mouse button.
● The rest of picture will be meant for having a transparent background.
● A rectangle will appear at the selected area. Right click on that. Then select cut that come in context menu. It will remove the selected foreground appearing the picture.
● Open a new image in Paint.
● Using Ctrl + V hotkey, you need to paste the traced foreground area from the first image.
● You can see the picture with transparent background.
● Left-click on the pasted foreground image and adjust it to a place on the background picture.
02Make Background Transparent Using Paint 3d
Transparent background can be made using Paint 3D. Let’s see how to do it:
● Search Paint 3D in Windows 10’s search box.
● It can also be done by adding the app to Windows 10
● Select to open the Paint 3D app.
● Go to Menu, select the image required and open it in Paint 3D
● Open the sidebar by pressing the Canvas button.
● Go to Transparent canvas setting.
● Through Select button drag the selection rectangle over an area of the image required to delete.
● Use Ctrl + X hotkey to cut out the area from the picture.
● You have a blank transparent area that can be filled with background layer.
● Go to Menu. Save it and select the 2D PNG option.
● Save by adding a title in the text box.
● Go to Menu and select, open the transparent image saved.
● You can find the transparent image on top of the background layer.
● The transparent area is filled by the background image layer.
● It can be resized also moving and dragging cursor.
A blank area remains in Paint leaves when picture is cut. It does not become transparent background. This blank region can be utilized for layers in the other image. This can be done through various images editing software. Thus, this way transparent background paint 3d can be made easily.
There are various applications and software to add transparent background to the images. One of the trendy applications to edit pictures and paint splash transparent background is Filmora. This application can be even used to paint brush transparent background and remove background in paint 3d. Let’s learn and know about Wondershare Filmora Video Editor .
For Win 7 or later (64-bit)
For macOS 10.12 or later
Filmora is one of the best picture and video editing software. It is trending and becoming popular due to its extraordinary features and editing tools. Colour tuning, editing support, advanced text editor, and its basic color grading features make it best for editing pictures. With filmora people can even add 3D effects on the pictures. It has Action camera tools which has camera shake, slow motion and reverse features. The professional color correction tool help in adjusting saturation, brightness and contrast. Faster editing with low resolution is also one of the features of the application. This software or application can add movement and new advance appearance to the picture that can make it more visually appealing.
This application is very useful for both the beginners as well as semi pros. They can turn their creativity into reality by using Filmora. Different versions of the application are available based on the suitability of the users. Filmora can be used to add transparent background to any images. With so many image editing and coloring tools and features, this becomes a must have application in any mobile device or Desktop.
● Ending Thoughts →
● MS paint from Microsoft is widely used program or software for creating and editing pictures. Due to its simple drawing tool and editing features, still it is first choice for the beginners and professional artists. Color, font, text and editing features in paint can be easily understood and therefore it has various advantages as compared to rest of the software or application.
● Ms Paint can be used for editing pictures and it is good when you need to add transparent background to any image. Paint 3d is one of the advanced version of the paint and it gives 3d effects to any image. It can be done by following simple steps. It can be learned easily through support provided by MS paint. The steps are simple and can be learned by anyone.
● Although there are various image editing software and applications for adding transparent background to an image. Filmora is one of the emerging application for editing pictures and videos. It is used to add some amazing effects to any picture or video. One can customize image as per their requirement through advanced settings. It can be easily installed and worked flow is good wit Filmora.
Also read:
- 2024 Approved Ll About GIF Keyboard That You Want to Know
- New 2024 Approved 10 Best Free GIF Background Remover for PC and Online
- New In 2024, Best 20 Slideshow Makers for Win/Mac/Online Review
- 2024 Approved In This Article, We Will Introduce You Our Top 5 Picks of Websites and Software Converter Online to Convert Powerpoint to Mp4
- New How to Calculate & Change Video Aspect Ratio Online
- Updated 2024 Approved Top Tricks for Learning Photo Slideshow
- Updated How to Make a Vacation Slideshow in 5 Minutes
- Updated In 2024, Best Ways to Merge FLV Files Windows, Mac,Android, iPhone & Online
- 2024 Approved How to Make Strobe Light Text Effect?
- What Is HDRI? Everything You Need to Know About HDRI
- 2024 Approved Your Powerpoint Slides Are Not Always Perfect and Sometimes Need a Little Editing Before Being Sent to the Client. Here Are some Ways You Can Make Sure Your Powerpoint Is Not Wrong
- In 2024, What Is the Best Frame Rate for 4K Videos?
- The Necessity of the Creation of Video Content for Social Media Has Urged Many Editing Software to Come Out on the Market. We Have Reviewed some, Free of Them in This Article for You for 2024
- New 2024 Approved A Guide to Understanding Efectum App and Some Top Alternatives
- Best Software or Website to Convert Video Format
- Updated How to Use Filmora Slideshow Maker for Making Slideshow? What Is Slideshow Filmora? Know the Steps to Make Filmora Slideshow. What Are Steps to Make Filmora Slideshow Template?
- Updated 2024 Approved 15 Best LUTS to Buy
- In 2024, Hard to Remove Black Background in After Effects?
- Updated Top 6 End Screen Makers
- Updated How To Remove Audio From Video
- How to Add Text Effects in Adobe Premiere Pro?
- Top Ways to Make Fast Motion Video on iPhone Solved for 2024
- Updated How To Make A Video Longer for 2024
- Updated WMV File Format Has Many Benefits over the Video Industry. If You Are Excited to Know More About the Format and Its Pros and Cons, Then Lets Start the Discussion
- New In 2024, Best 4 Love Video Maker with Music
- New 2024 Approved 8 Unexpected Ways to Add Emoji to Photo Online
- Remove the lock of Nokia C210
- In 2024, Ways to stop parent tracking your Samsung Galaxy S24+ | Dr.fone
- New Top 6 Mickey Mouse Voice Generators Providing Efficient Results
- Step-by-Step Tutorial How To Bypass Samsung Galaxy S23 Ultra FRP
- In 2024, How To Use Special Features - Virtual Location On Tecno Camon 20? | Dr.fone
- How To Transfer WhatsApp From Apple iPhone 12 to other iPhone 14 devices? | Dr.fone
- How To Unlock A Found Apple iPhone 7? | Dr.fone
- In 2024, Full Guide to Bypass Vivo V30 Pro FRP
- In 2024, How To Remove the Two Factor Authentication From iPhone 14 Plus
- In 2024, Unova Stone Pokémon Go Evolution List and How Catch Them For Honor X9a | Dr.fone
- How to Sign Out of Apple ID From Apple iPhone 8 without Password?
- How to Transfer Text Messages from Nokia C32 to New Phone | Dr.fone
- Title: Free Titles For Final Cut Pro
- Author: Chloe
- Created at : 2024-04-24 07:07:52
- Updated at : 2024-04-25 07:07:52
- Link: https://ai-editing-video.techidaily.com/free-titles-for-final-cut-pro/
- License: This work is licensed under CC BY-NC-SA 4.0.


