
:max_bytes(150000):strip_icc():format(webp)/zenbook-17-fold-oled-72de5601b7334834a2962b7a8c7b4e9b-16fb2ba97f414911a71ffd37c82c541e.png)
Guide to Create a Timelapse Video in After Effects for 2024
Guide to Create a Timelapse Video in After Effects
Time-Lapse movies are great for a variety of projects; you can use them as establishing shots in sitcoms, corporate marketing videos, and they can make lovely backgrounds for animated slideshows. A time-lapse video is essentially a series of photographs taken at regular intervals to depict how the environment changes gradually over a shorter period of time. In this article, we’ll demonstrate how you may quickly and easily build an After Effects time-lapse effect.
With that said, let’s start!
Step 1. Create a new composition
Calculating your composition length to accommodate the frame rate and number of images is the first step in generating a time-lapse video.
- Verify the number of images you have for your Sequence.
- New Composition Creation. Selecting a frame rate: A time lapse film produced at 30 frames per second will flow smoothly, but you can select any frame rate you like.
- To determine the duration of your composition, divide the number of photographs you have by the frame rate you’ve chosen. For instance, if you use 600 photos at 30 frames per second, your composition will last 20 seconds.
Step 2. Import your images
You are prepared to make a time-lapse sequence if all of your photographs are saved to the same folder and are in the same order. If you are working directly from your Camera, you will likely have Camera Raw files, although this procedure works with PNG and JPEG sequences.
- Press Command/Control I on your keyboard or select File > Import. Find the folder holding your image sequence.
- To begin, select the first picture in the sequence. If all of your images have accurate names, After Effects will be able to identify a sequence of images.
- Make sure the Force Alphabetical Order and Camera Raw Sequence checkboxes are selected. Your Time-Lapse Sequence will display in the Project Browser Panel after you click Import.
- Once you’ve watched how it plays, you can adjust the Frame Rate by right-clicking the Sequence in the Project Browser and selecting Interpret Footage > Main.
- To update your time-lapse, modify the Frame Rate setting and click OK.

Step 3. Create movements
- After Effects’ Time-Lapse Sequence can be used just like any other standalone clip. This implies that you may give your time-lapse clip movement by adding Keyframes and Effects.
- Place your Playhead at the beginning of the clip after choosing the Image Sequence. Make a keyframe for the scale or position.
- To generate a second Keyframe for the value of your choice, move to the end of the clip. Make any necessary Clip modifications.
- Right-click on the timeline, choose New > Adjustment Layer, then add your effects to the Adjustment Layer to add effects like noise and grain.
Step 4. Create slow motion from a video
You can import your video after you’ve shot it to prepare it for editing. The same steps, including naming your photos in order, must be taken for the Time Lapse sequence. It may be advantageous to entirely rename both your Image Sequence and Performer clip.
- Drag the finished Time Lapse sequence to your Timeline after completing it as previously explained.
- Over the Time Lapse, add the Performer Clip to the Timeline.
- Choose Time>Time Stretch by performing a right-click on the performer clip.
- You can alter the Stretch Factor or Duration in the dialogue box. When you alter one parameter, the other will reflect the new Stretch Factor or Duration for you.
Step 5. Make an overlay
You can alter the Stretch Factor or Duration in the dialogue box. When you alter one parameter, the other will reflect the new Stretch Factor or Duration for you.
- Find Luma Key in the Effect Control Panel and drag it to your clip.
- Change the Key Type setting in the Effect Control Panel to Key Out Brighter.
- The Threshold, Tolerance, and Edge settings should be adjusted until only the silhouette is visible.
- Use the Pen or Mask Tool to create a circle around the parts you want to delete if you discover any corners of your clip that are still visible.
- Add any Effects, such as Light Leaks, to your Adjustment Layer by choosing “Right-click > New > Adjustment layer.”

After Effects CC must be opened, a new project must be created, the Import File menu option must be selected, and the appropriate folder containing the altered still images must be located and selected before the time-lapse photos can be turned into a film. You need to make sure that the JPEG Series box is checked, as well as the Force Alphabetical Order box.
Once you have clicked on the first image in the sequence. The time-lapse video that you uploaded appears in the project library. After performing a right-click on the filename, select “New Comp from Selection” from the context menu.
Step 6. Exporting your video
After getting our sequence to perform some kind of slow, understated animation so that it appears as though the camera is moving dramatically, we will need to export a video file. Go to File > Export > Add to Render Queue, then open the Render Queue dialog box by going to Window > Render Queue. From there, you can choose the Output Module and change the settings in the options dialog box. Finally, choose the Output To option and select the location on your computer where you would like to save the video clip that we are currently rendering and exporting.

Conclusion
No matter how you make your time lapse videos, After Effects has a ton of features you can use to modify and enhance the way they look. Now that you are familiar with the fundamentals, you can play with the Frame Rates and Composition options. Check out this helpful manual for more information on Time Stretching and Remapping in After Effects.
Free Download For Win 7 or later(64-bit)
Free Download For macOS 10.14 or later
Free Download For macOS 10.14 or later
Customize PowerPoint Slideshow Icon in 8 Simple Ways
Customise Powerpoint Slideshow Icon in Simple Ways
An easy yet powerful editor
Numerous effects to choose from
Detailed tutorials provided by the official channel
We often need to make different PowerPoint presentations. Be it for school projects, office presentations, college work or corporate presentations, PowerPoint slides are the major and the most commonly used technique for presenting any study or work material.
There are many methods to make your PowerPoint presentation stand out among the rest. Among all the ways, one of the most effective ones is customizing slideshow icons in PowerPoint. If you do not yet know about customizing slideshow icons in a PowerPoint, follow the following discussion, as we will discuss all the necessary information about it.
In this article
01 [Where is the Slide Show Button in PowerPoint?](#Part 1)
02 [What Are the Icons of PowerPoint Presentation?](#Part 2)
03 [How to Get More Icons for PowerPoint?](#Part 3)
04 [How to Customize PowerPoint Slideshow Icon in 8 Simple Ways](#Part 4)
Part 1 Where is the Slide Show Button in PowerPoint?
To present the PowerPoint presentation you make, you will have to find and click on the slide show view icon. The slide show option helps you to present the PowerPoint presentation. You can present each of the slides, one after the other.
You can choose to change the slides manually, or there is also an option where the slides can change automatically. You can readily select either of the options according to your needs. Also, you can fix the time duration that would determine how long would each slide stay on the screen if you choose to present your PowerPoint presentation automatically.
But before accessing all of them, it is crucial, or rather necessary, for you to know the slide show button in PowerPoint. So, here are the different steps that will help you find the slide sorter view icon in PowerPoint.
● Step 1
Open Microsoft PowerPoint.
![]()
● Step 2
Reach out to the top Menu bar.
![]()
● Step 3
You will find the option of “Slide Show” there.
● Step 4
You can make the necessary customization about the slide show setting of your presentation there.
![]()
● Step 5
Select the option “From Beginning” to begin your PowerPoint slide show from the first slide. Or, you can select the option “From Current Slide” if you’re going to start the slide show from the slide you are currently present.
![]()
Part 2 What Are the Icons of PowerPoint Presentation?
Customizing your slides for your slide show with the help of the innumerable icons of the PowerPoint requires you to know about the various groups of available icons. So, we will now discuss the different groups of icons available in the PowerPoint.
The following are the different icons of PowerPoint that you can integrate into your PowerPoint presentation.
● Accessibility
The first groups of icons are about accessibility. It denotes the symbols or icons that depict the differently-abled or specially-abled people. It helps represent and include a large community of specially-abled people.
![]()
● Analytics
The following group represents the different symbols related to Mathematics, analysis, presentation, graphs and the like.
● Animals
This set of icons includes the symbols for various animals and birds that one can include in their presentation and make it look more attractive.
![]()
● Apparel
This group of icons include the different symbols of the outfits, clothes, dresses and the other accessories that we wear.
● Arrows
It includes the symbols for the arrows pointing in different directions. This group of icons can be one of the most useful ones among the rest.
● Art
It includes a group of icons that depict anything and everything artistic.
![]()
● Body Parts
You will get the symbols for all the body parts in this icon group.
![]()
● Bugs
Get the symbols of the bugs and insects under this category.
● Buildings
This set of symbols shows different types of buildings. It can be a house, a church, a bakery, etc.
There are many such groups of icons, which include the follows.
● Business
● Commerce
● Communication
● Celebration
● Education
● Faces
● Dinosaurs
● Food and Drinks
● Holidays
● Home
● Interface
● Landscape
● Location
● Medical
● Nature and Outdoors
● Occupation
● People
● Process
● Puzzles and Games
● Security and Justice
● Signs and Symbols
● Sports
● Technology and electronics
● Tools and Buildings
● Vehicles
● Weather and Seasons
Part 3 How to Get More Icons for PowerPoint?
PowerPoint has an endless variety of icons for your presentation. No matter what your need is or which type of presentation you are making. You will find any type of icon to ornament your presentation to the fullest.
But, how can you get more icons for your PowerPoint presentation? So, here are the steps for integrating as many icons as you want in your PowerPoint presentation.
Step 1
Go to PowerPoint and reach out to the top Menu bar.
![]()
Step 2
Select the option “Insert”.
Step 3
Select the option “Icons.”
Step 4
Search for as many and whatever type of icon you want to integrate into your PowerPoint presentation.
![]()
Step 5
Select “Insert” option.
![]()
Part 4 How to Customize PowerPoint Slideshow Icon in 8 Simple Ways
Here are the eight different ways in which you can customize the PowerPoint Slideshow Icon.
01Using sketchy lines
First thing, insert any icon of PowerPoint and then use the option “Convert to Shape”.
Go to the “Shape Format Tab” and go to the “Shape Outline.”
Select “Sketchpad”.
You can readily customize the icons in PowerPoint using this recently introduced option at PowerPoint.
![]()
02Adding Simple Shapes
Through this step, you can add some additional details and make the icons of PowerPoint even more enhanced and attractive. You have the option of including a simple and basic shape. Or you can also add some detailing to the icons. You have the freedom of letting your creativity flow to the fullest.
● Group your icon
● Make it effortless to copy and paste and move around all over the slide.
03Adding Animations
You can present your icons in the PowerPoint presentation in the form of animations. You can make them appear through different animation speeds and variations. You can resize them and add layers for animating the icons in PowerPoint.
04Changing the properties of the icons
You can also change the icons’ brightness, contrast, or colours to make them look more enhanced and engaging.
05Adding entrances and exists
You can make your icons enter and leave the presentation in many unique ways.
![]()
06Select the icon you prefer to customise
● Choose the “BrightSlide tab.”
● Go to “My Animations”
Choose your preferred way of making your icon enter or exit the slide
07Using mask
For this, here are the steps.
● Cover a part of the entire slide by selecting a rectangle.
● Match your design and change the fill colour.
● Use the “Align” tools to make circles.
● Animate the icons according to the way you prefer.
08Direction
Another exciting yet straightforward way of customising your icons in PowerPoint is by making them appear from a different direction. Although it sounds simple, it will make your presentation look more formal and intreating.
09Fading in and out
You can readily make your icons fade in or fade out and make them appear more exciting and engaging for your presentation.
Another way of making your presentation look entirely out of the box is with one of the best video editing tools: Filmora. Wondershare Filmora Video Editor has been the best tool for editing videos and enhancing them, and you can readily use it for presenting any slide show or presentation.
For Win 7 or later (64-bit)
For macOS 10.12 or later
It will make your presentation unique, as it has some of the most extraordinary and incredible features. Some of the features are as follows.
● Motion Tracking feature- This feature will make your videos look more fascinating. You can use your creativity to customise the motion of your videos and edit them according to your ideas and inspirations.
● Effects-There are as many as more than 800 effects in Filmora. So, if you want to make your presentation look absolutely different and more incredible from the crowd, use Fimlora and its numerous effects to make your presentation the best of the best.
● Text and Titles- Add texts and titles wherever necessary so that you do not miss out on any information about your topic at the presentation.
● Music Library- Add some more uniqueness and exciting feature to your PowerPoint presentation with the help of the various music and tunes present at the Music Library of Filmora.
There are several other features of Filmora that, if we start including them, will make a list unending. It is the ideal tool for editing videos and also using it for producing some of the most wonderful presentations.
● Ending Thoughts →
● So, now you can readily make some of the most exciting and engaging PowerPoint presentations as you are well aware of the different ways of searching for the icons in PowerPoint, searching for the slideshow icon at PowerPoint, and also slideshow icons in PowerPoint.
● Additionally, you can use the best video editing tool, Filmora, for making your presentation stand out among the crowd in the optimal way possible.
● If you enjoyed reading this article, don’t forget to drop a comment below. Also, share your views with us regarding the content or anything related to the topic.
How to Use Visual Effect for Zoom
Zoom, a video calling software, has been quite popular over the last several months and is still one of the most used videos calling applications by millions of people worldwide. The site is a favorite among working professionals, but it is also utilized by individuals to connect with their friends and loved ones. Additionally, despite the app’s abundance of practical built-in tools and functions, it lacks the fun filters and special effects that the majority of users are used to when using a camera. Zoom has ingrained itself in our vocabulary during the last year. It seemed almost inevitable given that everything, from meetings to parties, has moved online.
You don’t need to seek farther than Zoom visual effects to inject a little jazz into the routine Zoom meetings during these hard times. By making adjustments to your Video configuration either before or during a video call, you may add visual effects in Zoom. Zoom meetings may be tedious to conduct over extended periods of time. Additionally, it would be helpful if you recorded the condition of your room before any Zoom meetings. You wouldn’t want to reveal your disorganized space while in a meeting. In these situations, adding visual effects will keep your private area private while also making your Zoom meetings entertaining and exciting. It will also prevent others from seeing your filthy room. This tutorial will walk you through the process of adding visual effects to Zoom step-by-step. In addition, you will get acquainted with the numerous camera functions and visual effects that you may employ during a Zoom video conversation.
- 1. What apps can add visual effect on Zoom?
- 2. How do I add visual effects to Zoom in Mobile?
- 3. How do you download Zoom effects?
Part 1: Popular Visual Effects you can add to Zoom
You may apply one of four main graphic effects to your Zoom meetings. The visual effects that you may use in your next Zoom video chat are briefly summarized below.
1. Visual Backgrounds
Virtual backdrops may transform any plain wall into an artistic setting. Zoom provides you the choice to add photographs to your backdrop in addition to offering you a few pre-made backdrops. Zoom lets you add a movie to your backdrop in addition to simply photographs. With the help of this imaginative feature, gather your pals and enjoy your favorite meme or video. A presentation’s collection of photos, a video, or a single image may all serve as virtual backdrops. A green screen would often be used as your real backdrop and consistent lighting would be required.
To avoid having to reveal your real surroundings while in a conference, you may add any picture or video as a virtual backdrop in Zoom. You have the option of adding own photos and movies or selecting from the pre-existing backdrop films and images. The file type for video backgrounds should be MP4 or MOV, and the resolution should range from 360p to a maximum of 1080p. Ensure that the mirroring of your video is deselected in the Zoom’s Video settings if your backdrop picture has text that may be read. By using virtual backdrops, you may alter the background of your video as it appears to the audience member with whom you are speaking. During the video conference you’re in, the other participants will be able to view your face and body overlaid on the backdrop of your choice.
2. Filters
With these filters, you can have fun in all of your Zoom meetings! Filters are a fun way to spend time with loved ones who are far away, particularly at a period when maintaining social distance is crucial. Filters are the modifications you make to yourself during Zoom meetings (such as a mustache, beard, etc.). They enliven the proceedings and contribute to the fun and memorability of your Zoom meetings.
Your films’ colors may be changed, and video filters can also add new aspects. By selecting a filter appropriate for each event, like team meetings or game nights, you may create the right atmosphere. You may embellish your face in the video with flowers or animal traits by using Zoom’s various filters. Alternately, you might just convert your video’s color to black and white. The video filters from a different program, however, allow you to apply more vibrant filters and place a greater emphasis on special effects.
3. Lighting and Touch-ups
The Lighting function enhances lighting effects and makes adjustments for low light situations to make you seem more professional during a Zoom conference. Similar to this, Touch-up enhances your facial characteristics by making your skin shine, erasing wrinkles, and giving your face a radiant appearance.
On your Zoom videos, changing your lighting and applying touch-ups may improve how you seem. By adjusting your lighting, you can make even dim illumination look bright. By doing touch-ups, you may get a smoother skin texture and get rid of any obvious imperfections.
4. Studio Effects
Zoom has been developing on a new feature called Studio Effects that would give customers the option of using virtual cosmetics in their movies. They are still checking it out before formally releasing it since it is still in beta. However, it is still available to users under the Backgrounds & Filters area. You may adjust the opacity as you like. You have the option to choose a new color or one of the predefined colors. Additionally, you may decide to employ the face effects in all of your next meetings, albeit doing so might be problematic if you use Zoom for business. Don’t worry if you’re running late. Zoom can give your face a natural-looking cosmetic makeover in only one minute!
This function is intended for less formal settings, such as gatherings of friends or family. Anyone who wants to seem more professional during meetings has access to Studio Effects, which offers the choice of various eyebrow colors, beards, and lipsticks. These are a few recently added features. You may add mustaches, beards, and brows in a variety of designs, hues, and intensities. Additionally, you have the option of coloring your lips.
Part 2: How to Add Visual Effects to Zoom
Along with facilitating online meetings, the Zoom program also lets you play with its visual effects. You just need to make a few adjustments to the video settings or utilize another third-party program to be ready to go.
Step1Start a Zoom meeting
You can download Zoom, install it on your computer, and log into your account if you don’t already have it if you don’t already have it.
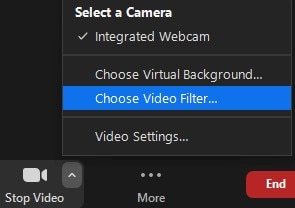
Step2Tap Background and Filters
After logging in to Zoom, use these settings. - Options > Camera > Video

Step3Faucet Filters
Here, you may play with a variety of visual effects and customize them to suit your tastes. Pick one of the numerous filters that are offered. To activate the filter, tap it.
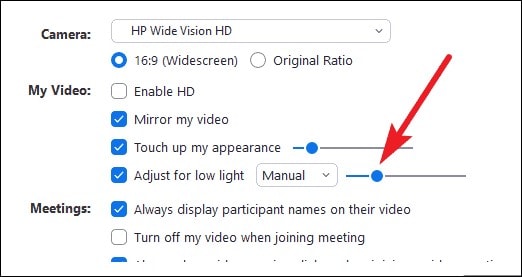
Step4Set Lighting Effects to on
Select “Adjust for low light” in the video options. For your lighting, you may choose between Auto and Manual effects. Zoom will automatically detect and adapt for the lighting in your room if you choose Auto.
Use Zoom’s noise reduction option to keep your conversation focused during your video conference in addition to adding visual elements. To do this, go to “Audio Settings” and choose “High” under “Suppress background noise.” Once you start speaking during the video conference, this essentially cancels out any background noise.
Part 3: Related FAQs
1. What apps can add visual effect on Zoom?
Following is the list of top three apps that you can use to utilize visual effects Zoom application:
Snap Camera is regarded as the most user-friendly. It is a software that you can download for Windows or Mac that works with live broadcasts and video chats. Because it was created by the people who founded Snapchat, it shares a broad variety of filters with that platform.
Link: Snap Camera
The Mac is the only platform on which CamTwist may be used. You may also use it to give your movies additional filters and unique effects. This program lets you pick from a variety of pre-made effects while also allowing you to create your own.
Link: CamTwist
Another desktop application that lets you change and even blur your backdrop is ManyCam. It enables you to apply digital effects, filters, and 3-D masks to your face. Using this tool, you can also build layers and presets.
Link: ManyCam
2. How do I add visual effects to Zoom in Mobile?
Zoom includes a function that might be useful if you don’t want to tidy up or want to add some entertainment to your calls. You may utilize Zoom virtual backdrops to alter your surroundings and take you to a more pleasant location on both the desktop and mobile apps. After joining one on a mobile device, pick Virtual backdrop by tapping the More icon in the bottom right corner. Choose a photo from the list of choices, or click the plus sign (+) to add a photo or video from your gallery.
3. How do you download Zoom effects?
Pressing the Studio Effects button after installing Zoom for the first time will prompt a pop-up asking you to download the Studio Effects package. Several filters, suited for both business meetings and conversations with friends, let you customize the video and audio during your video calls. To start downloading the Effects bundle, click the Download button. The “Studio Effects” window will appear on the right-hand side of the Background & Filter page after the download is finished. All the face components and choices are available in this Studio Effects window.
Conclusion
The most popular video meeting tool worldwide is Zoom. Family, friends, coworkers, and any two people who want to video chat utilize it. Zoom visual effects are the ideal tool for injecting some humor into otherwise dull Zoom sessions and meetings. A few simple steps will get you a striking backdrop, a humorous filter, and some interesting effects. Since the majority of formal work is now completed from home, Zoom has taken over as the standard video conferencing program. Try out as many of the effects as you like, and use this page as a companion and a map to help you along the way.
- 1. What apps can add visual effect on Zoom?
- 2. How do I add visual effects to Zoom in Mobile?
- 3. How do you download Zoom effects?
Part 1: Popular Visual Effects you can add to Zoom
You may apply one of four main graphic effects to your Zoom meetings. The visual effects that you may use in your next Zoom video chat are briefly summarized below.
1. Visual Backgrounds
Virtual backdrops may transform any plain wall into an artistic setting. Zoom provides you the choice to add photographs to your backdrop in addition to offering you a few pre-made backdrops. Zoom lets you add a movie to your backdrop in addition to simply photographs. With the help of this imaginative feature, gather your pals and enjoy your favorite meme or video. A presentation’s collection of photos, a video, or a single image may all serve as virtual backdrops. A green screen would often be used as your real backdrop and consistent lighting would be required.
To avoid having to reveal your real surroundings while in a conference, you may add any picture or video as a virtual backdrop in Zoom. You have the option of adding own photos and movies or selecting from the pre-existing backdrop films and images. The file type for video backgrounds should be MP4 or MOV, and the resolution should range from 360p to a maximum of 1080p. Ensure that the mirroring of your video is deselected in the Zoom’s Video settings if your backdrop picture has text that may be read. By using virtual backdrops, you may alter the background of your video as it appears to the audience member with whom you are speaking. During the video conference you’re in, the other participants will be able to view your face and body overlaid on the backdrop of your choice.
2. Filters
With these filters, you can have fun in all of your Zoom meetings! Filters are a fun way to spend time with loved ones who are far away, particularly at a period when maintaining social distance is crucial. Filters are the modifications you make to yourself during Zoom meetings (such as a mustache, beard, etc.). They enliven the proceedings and contribute to the fun and memorability of your Zoom meetings.
Your films’ colors may be changed, and video filters can also add new aspects. By selecting a filter appropriate for each event, like team meetings or game nights, you may create the right atmosphere. You may embellish your face in the video with flowers or animal traits by using Zoom’s various filters. Alternately, you might just convert your video’s color to black and white. The video filters from a different program, however, allow you to apply more vibrant filters and place a greater emphasis on special effects.
3. Lighting and Touch-ups
The Lighting function enhances lighting effects and makes adjustments for low light situations to make you seem more professional during a Zoom conference. Similar to this, Touch-up enhances your facial characteristics by making your skin shine, erasing wrinkles, and giving your face a radiant appearance.
On your Zoom videos, changing your lighting and applying touch-ups may improve how you seem. By adjusting your lighting, you can make even dim illumination look bright. By doing touch-ups, you may get a smoother skin texture and get rid of any obvious imperfections.
4. Studio Effects
Zoom has been developing on a new feature called Studio Effects that would give customers the option of using virtual cosmetics in their movies. They are still checking it out before formally releasing it since it is still in beta. However, it is still available to users under the Backgrounds & Filters area. You may adjust the opacity as you like. You have the option to choose a new color or one of the predefined colors. Additionally, you may decide to employ the face effects in all of your next meetings, albeit doing so might be problematic if you use Zoom for business. Don’t worry if you’re running late. Zoom can give your face a natural-looking cosmetic makeover in only one minute!
This function is intended for less formal settings, such as gatherings of friends or family. Anyone who wants to seem more professional during meetings has access to Studio Effects, which offers the choice of various eyebrow colors, beards, and lipsticks. These are a few recently added features. You may add mustaches, beards, and brows in a variety of designs, hues, and intensities. Additionally, you have the option of coloring your lips.
Part 2: How to Add Visual Effects to Zoom
Along with facilitating online meetings, the Zoom program also lets you play with its visual effects. You just need to make a few adjustments to the video settings or utilize another third-party program to be ready to go.
Step1Start a Zoom meeting
You can download Zoom, install it on your computer, and log into your account if you don’t already have it if you don’t already have it.
Step2Tap Background and Filters
After logging in to Zoom, use these settings. - Options > Camera > Video
Step3Faucet Filters
Here, you may play with a variety of visual effects and customize them to suit your tastes. Pick one of the numerous filters that are offered. To activate the filter, tap it.
Step4Set Lighting Effects to on
Select “Adjust for low light” in the video options. For your lighting, you may choose between Auto and Manual effects. Zoom will automatically detect and adapt for the lighting in your room if you choose Auto.
Use Zoom’s noise reduction option to keep your conversation focused during your video conference in addition to adding visual elements. To do this, go to “Audio Settings” and choose “High” under “Suppress background noise.” Once you start speaking during the video conference, this essentially cancels out any background noise.
Part 3: Related FAQs
1. What apps can add visual effect on Zoom?
Following is the list of top three apps that you can use to utilize visual effects Zoom application:
Snap Camera is regarded as the most user-friendly. It is a software that you can download for Windows or Mac that works with live broadcasts and video chats. Because it was created by the people who founded Snapchat, it shares a broad variety of filters with that platform.
Link: Snap Camera
The Mac is the only platform on which CamTwist may be used. You may also use it to give your movies additional filters and unique effects. This program lets you pick from a variety of pre-made effects while also allowing you to create your own.
Link: CamTwist
Another desktop application that lets you change and even blur your backdrop is ManyCam. It enables you to apply digital effects, filters, and 3-D masks to your face. Using this tool, you can also build layers and presets.
Link: ManyCam
2. How do I add visual effects to Zoom in Mobile?
Zoom includes a function that might be useful if you don’t want to tidy up or want to add some entertainment to your calls. You may utilize Zoom virtual backdrops to alter your surroundings and take you to a more pleasant location on both the desktop and mobile apps. After joining one on a mobile device, pick Virtual backdrop by tapping the More icon in the bottom right corner. Choose a photo from the list of choices, or click the plus sign (+) to add a photo or video from your gallery.
3. How do you download Zoom effects?
Pressing the Studio Effects button after installing Zoom for the first time will prompt a pop-up asking you to download the Studio Effects package. Several filters, suited for both business meetings and conversations with friends, let you customize the video and audio during your video calls. To start downloading the Effects bundle, click the Download button. The “Studio Effects” window will appear on the right-hand side of the Background & Filter page after the download is finished. All the face components and choices are available in this Studio Effects window.
Conclusion
The most popular video meeting tool worldwide is Zoom. Family, friends, coworkers, and any two people who want to video chat utilize it. Zoom visual effects are the ideal tool for injecting some humor into otherwise dull Zoom sessions and meetings. A few simple steps will get you a striking backdrop, a humorous filter, and some interesting effects. Since the majority of formal work is now completed from home, Zoom has taken over as the standard video conferencing program. Try out as many of the effects as you like, and use this page as a companion and a map to help you along the way.
Guide To Using Luts Perfectly in Final Cut Pro
Final Cut Pro is a powerful video editing software available for Mac OS. You can create professional-looking videos using this tool. To give your videos a more professional touch, you can use LUTs as well. It is a quick way to color grade and improve the feel of your media content. They are essentially a set of instructions that apply a particular color grading to your video.
Moreover, with so many options available, you can choose from any color grading style you want. From cinematic to retro, LUTs offer you a variety of color adjustment tones and overlays. All you have to do is to choose from free LUTs for Final Cut Pro and download your preferred one.
- Part 2: How to Apply LUTs on Final Cut Pro
- Part 3: Discussing Wondershare Filmora LUTs - The Best Video Editing Platform
Part 1: Discovering The Top Best LUTs for FCPX
You are at the right place if you’re having trouble finding the best LUTs for FCPX. This section will provide you with one of the best LUTs you can choose for your videos.
1.Free Cinematic LUTs Pack for Video Editing
This free LUT pack is a perfect choice to give your videos a cinematic look. It features a soft blue color grading with high contrast that can make your footage look like it was shot on film. This LUT is especially effective for outdoor scenes and action shots. Moreover, its color grading enhances the drama and feel of your video footage.

2.10 Free Vintage Color Presets for Final Cut Pro
10 Free Vintage Color Presets for Final Cut Pro is a great pack if you’re looking for a vintage or retro feel. It has a warm, yellowish color grading that can give your videos a nostalgic look. This pack is ideal for footage shot in the 70s, 80s, or 90s. It highlights the muddiness and brown shades in your video to add a touch of authenticity to it.

3. Perfect Green Video LUT
Perfect Green Video LUT is a pack of 3 cinematic-style LUTs. This pack is ideal for travel or nature videos as it increases the green tone in your videos. It has a lush, green color grading that can make your videos look vibrant and lively. Additionally, this pack is effective for outdoor scenes as it improves your video’s natural colors and makes it look more dynamic.

4. Cyberpunk Color Grades
Cyberpunk Color Grades is a pack of modern cyberpunk-style LUTs. It is a fantastic LUT pack if you’re working on a music video or a creative project. It has a bold, colorful grading with high saturation that can make your video stand out. This LUT pack is perfect for scenes with many neon lights or bright backgrounds. Moreover, it adds an extra pop of color and makes your videos look more energetic.

5. Pro Retouching Essentials Pack by Prince Meyson
Prince Meyson offers this skin tone enhancer LUT pack. It has a neutral, balanced color grading that can make your videos look more polished and professional. This LUT is ideal for interviews, documentaries, or corporate videos. Moreover, this pack is perfect for portraits and close-up shots. It can enhance the natural colors of your footage and make it look more refined.

Part 2: How to Apply LUTs on Final Cut Pro
Now that you’ve discovered there are many Final Cut Pro LUTs free to download. The most important thing is to learn how to use these free LUTs on your video using FCPX. Here are some methods to learn to apply LUTs using Final Cut Pro in simple steps.
Method 1 Using Custom Layer
Step1
Open Final Cut Pro and import your video. Once the video is imported, click on the clip you want to apply the LUT.

Step2
Go to the “Effect Browser” and search for the LUT option from the search menu. After selecting it, you will get a “Custom LUT” layer. Select the custom LUT layer and drag and drop it onto your video clip. Then, click on the video clip and go to the “Inspector” window.

Step3
Select the “Custom LUT” option in the inspector window and choose your desired LUT from the LUT drop-down menu. Final Cut Pro will apply your desired LUT to your video clip.

Method 2 Using Adjustment Layer
Step1
Click the plugin button once you’ve imported your video clip and choose RT Adjustment Layer. Furthermore, if you don’t have this plugin, you can download it for free.

Step2
An icon will appear once you’ve selected RT Adjustment Layer. Drag and drop this icon on top of your video clip.

Step3
Drag and drop the “Custom LUT” layer onto your RT Adjustment Layer from the Effect Browser. Click on the RT Adjustment Layer and choose your desired LUT from the “Inspector” menu.

Method 3 Change Settings To Enable LUTs
Step1
Import your video into Final Cut Pro and click on your video in the library and open the inspector window.

Step2
In the section of the “Inspector” menu, click the drop-down menu and select the “General” option. It will open up new options in the menu where you have to choose the “Camera LUT” option and select your preferred LUT. After selecting your LUT, save your video by choosing the option.

Part 3: Discussing Wondershare Filmora LUTs - The Best Video Editing Platform
If you’re looking for a great video editing tool, Wondershare Filmora might be just what you need. With many features embedded in it, it makes it easy to create professional-looking videos. Moreover, you can apply LUTs to add a cinematic touch to your footage. With over 200+ LUTs available, you can improve the color grading of your videos. Additionally, this tool allows you to adjust its intensity as well.
Furthermore, Wondershare Filmora offers options for color adjustments and enhancements. You can add transitions, templates, effects, and filters to your videos. In addition to this, it offers over 10 billion free media assets that you can use to enhance your videos. With Wondershare Filmora, you can play around with different features and options to make your content look fantastic.

Empower your videos with a new mood using different LUTs. Filmora now offers 100+ top-quality 3D LUTs cover a broad range of scenarios. Transform your videos with Filmora’s powerful 3D LUTs.
Apply LUT on Videos Apply LUT on Videos Learn More


Conclusion
In conclusion, Final Cut Pro is a powerful tool for video editing. This tool allows you to make color corrections and color adjustments to your videos. Furthermore, Final Cut Pro offers the option to use LUTs for color grading. You can find many best LUTs for FCPX available online to use in this tool. However, Wondershare Filmora is another amazing tool that you use to color-grade your videos professionally.
Part 1: Discovering The Top Best LUTs for FCPX
You are at the right place if you’re having trouble finding the best LUTs for FCPX. This section will provide you with one of the best LUTs you can choose for your videos.
1.Free Cinematic LUTs Pack for Video Editing
This free LUT pack is a perfect choice to give your videos a cinematic look. It features a soft blue color grading with high contrast that can make your footage look like it was shot on film. This LUT is especially effective for outdoor scenes and action shots. Moreover, its color grading enhances the drama and feel of your video footage.
2.10 Free Vintage Color Presets for Final Cut Pro
10 Free Vintage Color Presets for Final Cut Pro is a great pack if you’re looking for a vintage or retro feel. It has a warm, yellowish color grading that can give your videos a nostalgic look. This pack is ideal for footage shot in the 70s, 80s, or 90s. It highlights the muddiness and brown shades in your video to add a touch of authenticity to it.
3. Perfect Green Video LUT
Perfect Green Video LUT is a pack of 3 cinematic-style LUTs. This pack is ideal for travel or nature videos as it increases the green tone in your videos. It has a lush, green color grading that can make your videos look vibrant and lively. Additionally, this pack is effective for outdoor scenes as it improves your video’s natural colors and makes it look more dynamic.
4. Cyberpunk Color Grades
Cyberpunk Color Grades is a pack of modern cyberpunk-style LUTs. It is a fantastic LUT pack if you’re working on a music video or a creative project. It has a bold, colorful grading with high saturation that can make your video stand out. This LUT pack is perfect for scenes with many neon lights or bright backgrounds. Moreover, it adds an extra pop of color and makes your videos look more energetic.
5. Pro Retouching Essentials Pack by Prince Meyson
Prince Meyson offers this skin tone enhancer LUT pack. It has a neutral, balanced color grading that can make your videos look more polished and professional. This LUT is ideal for interviews, documentaries, or corporate videos. Moreover, this pack is perfect for portraits and close-up shots. It can enhance the natural colors of your footage and make it look more refined.
Part 2: How to Apply LUTs on Final Cut Pro
Now that you’ve discovered there are many Final Cut Pro LUTs free to download. The most important thing is to learn how to use these free LUTs on your video using FCPX. Here are some methods to learn to apply LUTs using Final Cut Pro in simple steps.
Method 1 Using Custom Layer
Step1
Open Final Cut Pro and import your video. Once the video is imported, click on the clip you want to apply the LUT.
Step2
Go to the “Effect Browser” and search for the LUT option from the search menu. After selecting it, you will get a “Custom LUT” layer. Select the custom LUT layer and drag and drop it onto your video clip. Then, click on the video clip and go to the “Inspector” window.
Step3
Select the “Custom LUT” option in the inspector window and choose your desired LUT from the LUT drop-down menu. Final Cut Pro will apply your desired LUT to your video clip.
Method 2 Using Adjustment Layer
Step1
Click the plugin button once you’ve imported your video clip and choose RT Adjustment Layer. Furthermore, if you don’t have this plugin, you can download it for free.
Step2
An icon will appear once you’ve selected RT Adjustment Layer. Drag and drop this icon on top of your video clip.
Step3
Drag and drop the “Custom LUT” layer onto your RT Adjustment Layer from the Effect Browser. Click on the RT Adjustment Layer and choose your desired LUT from the “Inspector” menu.
Method 3 Change Settings To Enable LUTs
Step1
Import your video into Final Cut Pro and click on your video in the library and open the inspector window.
Step2
In the section of the “Inspector” menu, click the drop-down menu and select the “General” option. It will open up new options in the menu where you have to choose the “Camera LUT” option and select your preferred LUT. After selecting your LUT, save your video by choosing the option.
Part 3: Discussing Wondershare Filmora LUTs - The Best Video Editing Platform
If you’re looking for a great video editing tool, Wondershare Filmora might be just what you need. With many features embedded in it, it makes it easy to create professional-looking videos. Moreover, you can apply LUTs to add a cinematic touch to your footage. With over 200+ LUTs available, you can improve the color grading of your videos. Additionally, this tool allows you to adjust its intensity as well.
Furthermore, Wondershare Filmora offers options for color adjustments and enhancements. You can add transitions, templates, effects, and filters to your videos. In addition to this, it offers over 10 billion free media assets that you can use to enhance your videos. With Wondershare Filmora, you can play around with different features and options to make your content look fantastic.
Empower your videos with a new mood using different LUTs. Filmora now offers 100+ top-quality 3D LUTs cover a broad range of scenarios. Transform your videos with Filmora’s powerful 3D LUTs.
Apply LUT on Videos Apply LUT on Videos Learn More
Conclusion
In conclusion, Final Cut Pro is a powerful tool for video editing. This tool allows you to make color corrections and color adjustments to your videos. Furthermore, Final Cut Pro offers the option to use LUTs for color grading. You can find many best LUTs for FCPX available online to use in this tool. However, Wondershare Filmora is another amazing tool that you use to color-grade your videos professionally.
Also read:
- New 2024 Approved Blender Green Screen Effects
- New Best 8 AR Apps for Android and iOS | Help You See the World of AR
- Updated How To Change Sky Background With Adobe Photoshop Best Ways for 2024
- Updated 2024 Approved How to Change Video Resolution in Filmora
- Timeline Template Is a Visual Representation Showing the Passage of Time. It Includes Text, Diagrams, Images and Icons. They Are Perfect for Telling Stories, Events Etc for 2024
- Best Video Grabbers for Chrome
- In 2024, Learn Topaz Video Enhance AI Review and Achieve Powerful Video Conversion
- Best Free Video Editing Software for Reddit for 2024
- Step by Step to Split a Clip in VLC for 2024
- New 2024 Approved Little Known Ways of Adding Emojis to Photos on iPhone & Android 2023
- Updated 7 Solutions to Cut Video on Mac without Using FFmpeg for 2024
- New Discover the Best Video Filter Software . Elevate Your Video Editing with Top Contenders Like Filmora, DaVinci Resolve, HitFilm Express, and More
- New In 2024, Best 10 Tools To Make Quiz Videos
- In 2024, Best Photo Video Maker Apps with Song PC, Mobile, Online
- Do You Have a Loved Ones Birthday Fast Approaching, and Youre Wondering What to Do? A Birthday Photo Slideshow Is One Good Way to Celebrate the Person and Make Them Feel that They Are Loved
- 2024 Approved Difference Between Time Lapse and Hyperlapse
- Updated Easily Cut Large Videos Faster on Mac 7 Solutions Included for 2024
- In 2024, Looking For a Cheap Camera to Make Slow Motion Video? Get It Now
- Updated 2024 Approved Looking Into The Top Free Slow Motion Apps (Android & iOS)
- 2024 Approved Having GoPro Accessories Is Easy, but Editing on GoPro Quik Is Challenging. Read This Guide and, Stepwise, Learn to Use GoPro Slow-Motion for Perfect Shots
- Want to Learn How to Trim Videos in Premiere Pro. Read on; Our Guide Will Help You Trim Videos with This Timeline-Based Video Editing Software Application to Make Them Engaging to Viewers for 2024
- New Easily Combine Videos and Audios with 5 Simple Online Tools
- Denoise Video in Adobe Premiere Pro – Audio and Video Noise Removal for 2024
- Unlock Your Video Editing Potential With Wondershare Filmora for 2024
- Updated YouTube Algorithm Hacks
- 2024 Approved If You Do Not Know How to QuickTime Trim Video Clips, You Are in the Right Place. We Have Provided Information that Will Help You Trim Videos with This Application and Make Them Engaging for Viewers
- New 2024 Approved 6 Instant Mp4 to GIF Online Tools
- How To Make a Video by Mouse in Filmora?
- Updated 2024 Approved How to Change the Speed of Video in DaVinci Resolve?
- 2024 Approved Lets Introduce the Top 5 Applications to Add a Song to a Video for Free with some Amazing Sound and Visual Effects
- Updated Discover the Top 5 Online Tools for Merging MP4 Files Easily and Quickly. Streamline Your Video Editing Process and Create Seamless Videos with These User-Friendly Tools
- New 2024 Approved 5 Tips for Aquasoft Slideshow
- Updated Easy Steps to Make Glitch Effect with Filmora
- New 2024 Approved 4 Methods How To Make a Recap Video
- Catch or Beat Sleeping Snorlax on Pokemon Go For Samsung Galaxy XCover 7 | Dr.fone
- The Best 8 VPN Hardware Devices Reviewed On Lava Blaze Pro 5G | Dr.fone
- In 2024, All About Apple iPhone 14 Pro Max Unlock Chip You Need to Know
- In 2024, Top 15 Augmented Reality Games Like Pokémon GO To Play On Oppo K11x | Dr.fone
- In 2024, The Top 5 Android Apps That Use Fingerprint Sensor to Lock Your Apps On Xiaomi Redmi Note 13 Pro 5G
- In 2024, iPogo will be the new iSpoofer On Apple iPhone 7? | Dr.fone
- How to Fix Pokemon Go Route Not Working On Realme V30? | Dr.fone
- In 2024, How to Use Google Assistant on Your Lock Screen Of Realme 11 Pro+ Phone
- 2024 Approved Translate Live Video Making It Possible With The Best Tool
- In 2024, Dose Life360 Notify Me When Someone Checks My Location On Honor V Purse? | Dr.fone
- Methods to Change GPS Location On Realme GT 3 | Dr.fone
- Title: Guide to Create a Timelapse Video in After Effects for 2024
- Author: Chloe
- Created at : 2024-05-20 03:38:31
- Updated at : 2024-05-21 03:38:31
- Link: https://ai-editing-video.techidaily.com/guide-to-create-a-timelapse-video-in-after-effects-for-2024/
- License: This work is licensed under CC BY-NC-SA 4.0.
