Guide to Create Intro Video with KineMaster

Guide to Create Intro Video with KineMaster
The intro is considered to be the most important part of a video. The intro comes first in a video and the first impression is crucial in retaining the viewers. If the intro is gripping and engaging, the viewers are likely to check the rest of the video. In order to create a stunning video, you need to have the best video editor. If you are a smartphone user, KineMaster intro maker should be your first choice.
You must have seen videos with stunning intro having KineMaster watermark on social media and video streaming platforms. Starting from beginners to professional video creators, KineMaster is an easy choice for them to make video intro. KineMaster is a powerful intro maker where you will find several templates, effects, and modes to create stunning intros for your videos. We will illustrate the steps to create intro video with KineMaster Intro Maker.
Part 1. Steps to Create Intro Video with KineMaster
KineMaster video editor is one of the most intuitive apps and that is why creating amazing intro videos is super easy. KineMaster app is available for both Android and iOS users. There are awesome assets, amazing templates, and useful blending modes available to design your desired intro video. You can create 4K intro videos at 60 FPS comfortably. Here are the steps to create intro KineMaster video.
Step 1: Go for KineMaster intro download as per your smartphone OS. Launch KineMaster app and tap on Create New icon on the home screen.
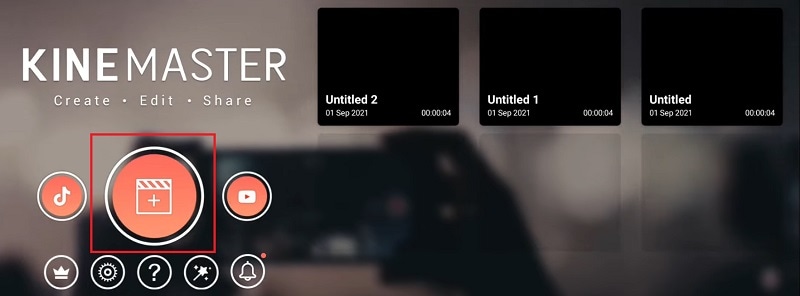
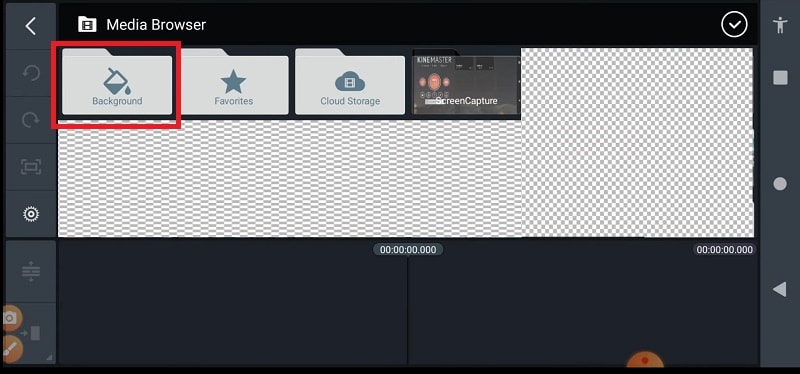
Step 2: Select an aspect ratio such as 16:9 or 9:16 or 1:1 as per your requirements. On the next screen, tap on Background and select a background as per your preference.
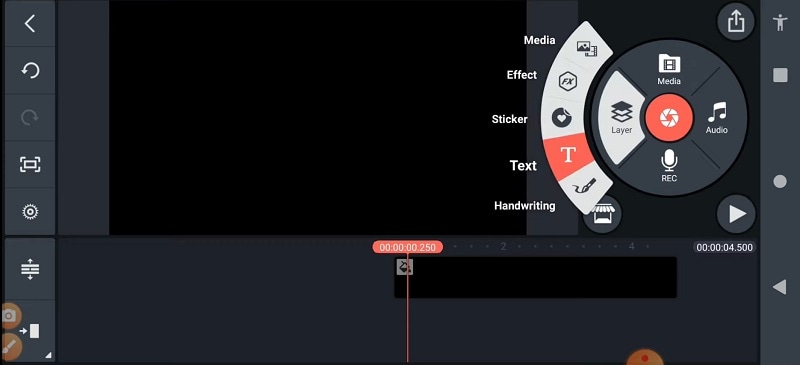
Step 3: On the layer at the bottom and select Text option. Type in your text that you want to show in the intro and tap on Ok button. You can change the font and style from the right panel.
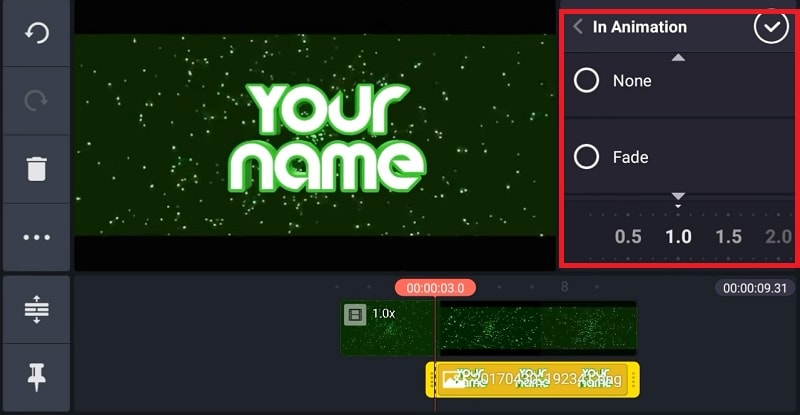
Step 4: Select the text layer and from the right panel, tap on In Animation option to animate the text. Select a desired animation template that you think is appropriate.
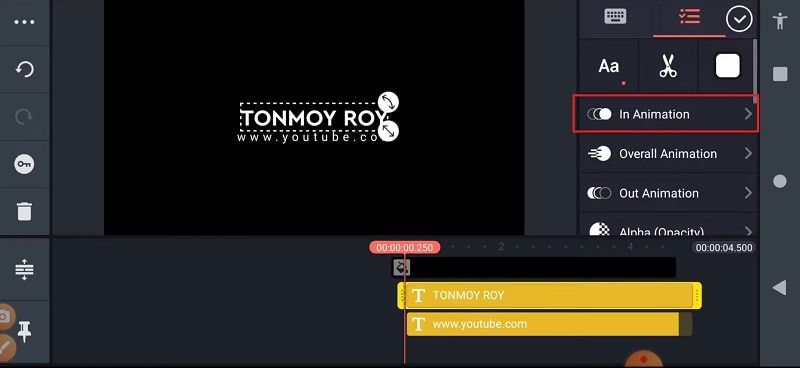
Step 5: Tap on the text layer again and tap on Effect option to add a text effect. Choose any desired Effect from the list. You can also tap on Get More to check out more effect templates.
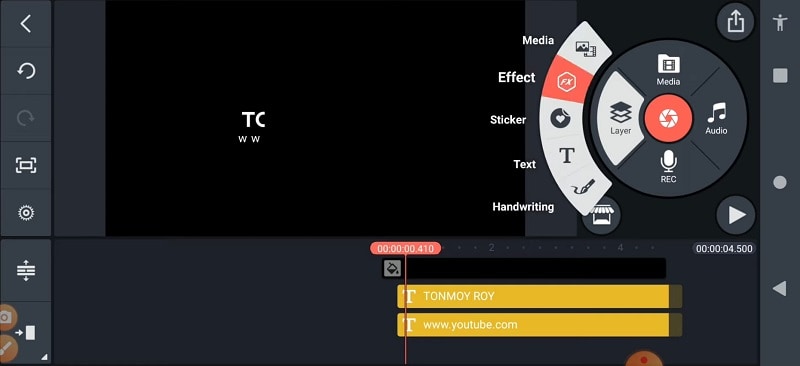
After you apply an effect, select the Effect layer from the timeline and go to Settings to make any adjustment. You can play and watch the intro video. Besides, you can add background photo or video and add graphical elements to enhance the intro animation.
Part 2. How to Create 3D Intro with KineMaster
We have illustrated how to create a text intro video and you can try out different animations and effects and come up with creative intro video. There is a viral trend in showing 3D intro to get more traction. You can use KineMaster to create amazing 3D intro videos easily that can go along with your video content. Here are the simple steps on how you can create 3D video with KineMaster.
Step 1: Install KineMaster from Play Store or App Store as per your smartphone OS. Launch KineMaster app after installation and tap on Create New icon.
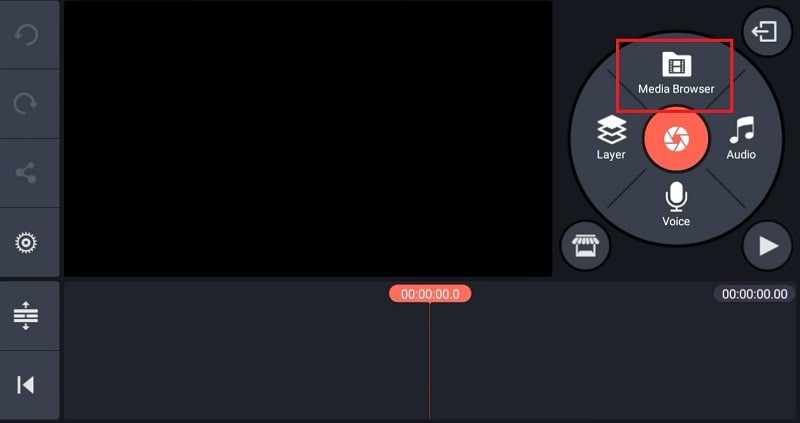
Step 2: Select an aspect ratio and tap on Background option. Select a background color as per your preference. Otherwise, you can tap on Media Browser if you want to add a pre-decided photo or video as a background. We recommend a background video to amplify the 3D effect.
Step 3: It is time to add a 3D title. You can tap on Layer icon and Text icon to type in any title that you can turn into 3D with text effect or style. You can also tap on Media icon to select a ready-made 3D text with a transparent background. After adding the text, you can stretch it to increase the size as per your preference.
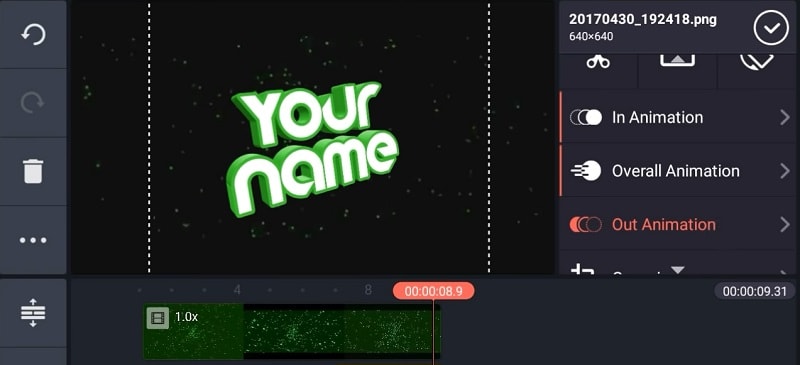
Step 4: From the right panel, tap on In Animation option and select a desired animation template. Similarly, tap on Out Animation option and select any animation whichever you think it is fit.
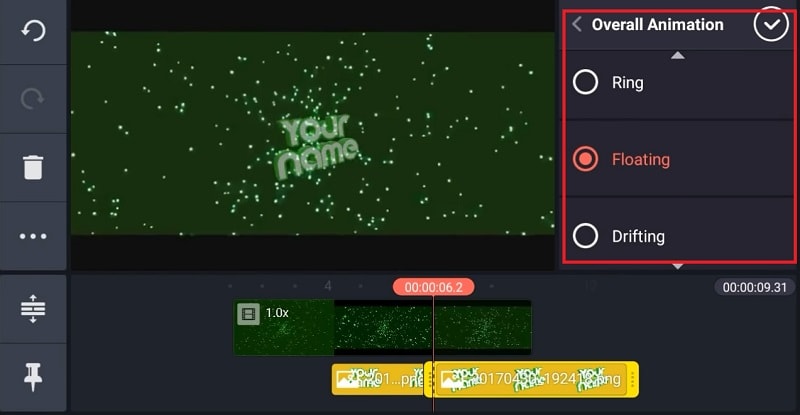
Step 5: From the right panel, tap on Overall Animation, select an animation template such as floating to enhance the 3D effect.
Part 3. Related FAQs of KineMaster Intro Video
What app most YouTubers use to make intros?
Apart from KineMaster, most YouTubers use Wondershare Filmora to make amazing videos. Filmora has a wider range of video effects, animations, and stock photos and videos. On top of that, the text animation and effect templates are tailor-made for intro videos.
Is KineMaster good for making YouTube videos?
Yes, KineMaster is good for creating engaging YouTube videos. You can create amazing intro and outro for your YouTube video on your smartphone. You can blend your photos and videos together and create amazing YouTube videos and stunning texts and titles. Besides, you can use chroma keys, transitions, reverse timing, and multi-layer features.
Can KineMaster handle 4K?
Yes, KineMaster is perfect for editing 4K video taken with high-end cameras. After editing the videos, you can export them in 4K resolution up to 60 FPS. However, you will need a high-end smartphone for KineMaster to handle 4K video editing smoothl
The intro is considered to be the most important part of a video. The intro comes first in a video and the first impression is crucial in retaining the viewers. If the intro is gripping and engaging, the viewers are likely to check the rest of the video. In order to create a stunning video, you need to have the best video editor. If you are a smartphone user, KineMaster intro maker should be your first choice.
You must have seen videos with stunning intro having KineMaster watermark on social media and video streaming platforms. Starting from beginners to professional video creators, KineMaster is an easy choice for them to make video intro. KineMaster is a powerful intro maker where you will find several templates, effects, and modes to create stunning intros for your videos. We will illustrate the steps to create intro video with KineMaster Intro Maker.
Part 1. Steps to Create Intro Video with KineMaster
KineMaster video editor is one of the most intuitive apps and that is why creating amazing intro videos is super easy. KineMaster app is available for both Android and iOS users. There are awesome assets, amazing templates, and useful blending modes available to design your desired intro video. You can create 4K intro videos at 60 FPS comfortably. Here are the steps to create intro KineMaster video.
Step 1: Go for KineMaster intro download as per your smartphone OS. Launch KineMaster app and tap on Create New icon on the home screen.

Step 2: Select an aspect ratio such as 16:9 or 9:16 or 1:1 as per your requirements. On the next screen, tap on Background and select a background as per your preference.

Step 3: On the layer at the bottom and select Text option. Type in your text that you want to show in the intro and tap on Ok button. You can change the font and style from the right panel.

Step 4: Select the text layer and from the right panel, tap on In Animation option to animate the text. Select a desired animation template that you think is appropriate.

Step 5: Tap on the text layer again and tap on Effect option to add a text effect. Choose any desired Effect from the list. You can also tap on Get More to check out more effect templates.

After you apply an effect, select the Effect layer from the timeline and go to Settings to make any adjustment. You can play and watch the intro video. Besides, you can add background photo or video and add graphical elements to enhance the intro animation.
Part 2. How to Create 3D Intro with KineMaster
We have illustrated how to create a text intro video and you can try out different animations and effects and come up with creative intro video. There is a viral trend in showing 3D intro to get more traction. You can use KineMaster to create amazing 3D intro videos easily that can go along with your video content. Here are the simple steps on how you can create 3D video with KineMaster.
Step 1: Install KineMaster from Play Store or App Store as per your smartphone OS. Launch KineMaster app after installation and tap on Create New icon.
Step 2: Select an aspect ratio and tap on Background option. Select a background color as per your preference. Otherwise, you can tap on Media Browser if you want to add a pre-decided photo or video as a background. We recommend a background video to amplify the 3D effect.

Step 3: It is time to add a 3D title. You can tap on Layer icon and Text icon to type in any title that you can turn into 3D with text effect or style. You can also tap on Media icon to select a ready-made 3D text with a transparent background. After adding the text, you can stretch it to increase the size as per your preference.

Step 4: From the right panel, tap on In Animation option and select a desired animation template. Similarly, tap on Out Animation option and select any animation whichever you think it is fit.

Step 5: From the right panel, tap on Overall Animation, select an animation template such as floating to enhance the 3D effect.

Part 3. Related FAQs of KineMaster Intro Video
What app most YouTubers use to make intros?
Apart from KineMaster, most YouTubers use Wondershare Filmora to make amazing videos. Filmora has a wider range of video effects, animations, and stock photos and videos. On top of that, the text animation and effect templates are tailor-made for intro videos.
Is KineMaster good for making YouTube videos?
Yes, KineMaster is good for creating engaging YouTube videos. You can create amazing intro and outro for your YouTube video on your smartphone. You can blend your photos and videos together and create amazing YouTube videos and stunning texts and titles. Besides, you can use chroma keys, transitions, reverse timing, and multi-layer features.
Can KineMaster handle 4K?
Yes, KineMaster is perfect for editing 4K video taken with high-end cameras. After editing the videos, you can export them in 4K resolution up to 60 FPS. However, you will need a high-end smartphone for KineMaster to handle 4K video editing smoothl
The intro is considered to be the most important part of a video. The intro comes first in a video and the first impression is crucial in retaining the viewers. If the intro is gripping and engaging, the viewers are likely to check the rest of the video. In order to create a stunning video, you need to have the best video editor. If you are a smartphone user, KineMaster intro maker should be your first choice.
You must have seen videos with stunning intro having KineMaster watermark on social media and video streaming platforms. Starting from beginners to professional video creators, KineMaster is an easy choice for them to make video intro. KineMaster is a powerful intro maker where you will find several templates, effects, and modes to create stunning intros for your videos. We will illustrate the steps to create intro video with KineMaster Intro Maker.
Part 1. Steps to Create Intro Video with KineMaster
KineMaster video editor is one of the most intuitive apps and that is why creating amazing intro videos is super easy. KineMaster app is available for both Android and iOS users. There are awesome assets, amazing templates, and useful blending modes available to design your desired intro video. You can create 4K intro videos at 60 FPS comfortably. Here are the steps to create intro KineMaster video.
Step 1: Go for KineMaster intro download as per your smartphone OS. Launch KineMaster app and tap on Create New icon on the home screen.

Step 2: Select an aspect ratio such as 16:9 or 9:16 or 1:1 as per your requirements. On the next screen, tap on Background and select a background as per your preference.

Step 3: On the layer at the bottom and select Text option. Type in your text that you want to show in the intro and tap on Ok button. You can change the font and style from the right panel.

Step 4: Select the text layer and from the right panel, tap on In Animation option to animate the text. Select a desired animation template that you think is appropriate.

Step 5: Tap on the text layer again and tap on Effect option to add a text effect. Choose any desired Effect from the list. You can also tap on Get More to check out more effect templates.

After you apply an effect, select the Effect layer from the timeline and go to Settings to make any adjustment. You can play and watch the intro video. Besides, you can add background photo or video and add graphical elements to enhance the intro animation.
Part 2. How to Create 3D Intro with KineMaster
We have illustrated how to create a text intro video and you can try out different animations and effects and come up with creative intro video. There is a viral trend in showing 3D intro to get more traction. You can use KineMaster to create amazing 3D intro videos easily that can go along with your video content. Here are the simple steps on how you can create 3D video with KineMaster.
Step 1: Install KineMaster from Play Store or App Store as per your smartphone OS. Launch KineMaster app after installation and tap on Create New icon.
Step 2: Select an aspect ratio and tap on Background option. Select a background color as per your preference. Otherwise, you can tap on Media Browser if you want to add a pre-decided photo or video as a background. We recommend a background video to amplify the 3D effect.

Step 3: It is time to add a 3D title. You can tap on Layer icon and Text icon to type in any title that you can turn into 3D with text effect or style. You can also tap on Media icon to select a ready-made 3D text with a transparent background. After adding the text, you can stretch it to increase the size as per your preference.

Step 4: From the right panel, tap on In Animation option and select a desired animation template. Similarly, tap on Out Animation option and select any animation whichever you think it is fit.

Step 5: From the right panel, tap on Overall Animation, select an animation template such as floating to enhance the 3D effect.

Part 3. Related FAQs of KineMaster Intro Video
What app most YouTubers use to make intros?
Apart from KineMaster, most YouTubers use Wondershare Filmora to make amazing videos. Filmora has a wider range of video effects, animations, and stock photos and videos. On top of that, the text animation and effect templates are tailor-made for intro videos.
Is KineMaster good for making YouTube videos?
Yes, KineMaster is good for creating engaging YouTube videos. You can create amazing intro and outro for your YouTube video on your smartphone. You can blend your photos and videos together and create amazing YouTube videos and stunning texts and titles. Besides, you can use chroma keys, transitions, reverse timing, and multi-layer features.
Can KineMaster handle 4K?
Yes, KineMaster is perfect for editing 4K video taken with high-end cameras. After editing the videos, you can export them in 4K resolution up to 60 FPS. However, you will need a high-end smartphone for KineMaster to handle 4K video editing smoothl
The intro is considered to be the most important part of a video. The intro comes first in a video and the first impression is crucial in retaining the viewers. If the intro is gripping and engaging, the viewers are likely to check the rest of the video. In order to create a stunning video, you need to have the best video editor. If you are a smartphone user, KineMaster intro maker should be your first choice.
You must have seen videos with stunning intro having KineMaster watermark on social media and video streaming platforms. Starting from beginners to professional video creators, KineMaster is an easy choice for them to make video intro. KineMaster is a powerful intro maker where you will find several templates, effects, and modes to create stunning intros for your videos. We will illustrate the steps to create intro video with KineMaster Intro Maker.
Part 1. Steps to Create Intro Video with KineMaster
KineMaster video editor is one of the most intuitive apps and that is why creating amazing intro videos is super easy. KineMaster app is available for both Android and iOS users. There are awesome assets, amazing templates, and useful blending modes available to design your desired intro video. You can create 4K intro videos at 60 FPS comfortably. Here are the steps to create intro KineMaster video.
Step 1: Go for KineMaster intro download as per your smartphone OS. Launch KineMaster app and tap on Create New icon on the home screen.

Step 2: Select an aspect ratio such as 16:9 or 9:16 or 1:1 as per your requirements. On the next screen, tap on Background and select a background as per your preference.

Step 3: On the layer at the bottom and select Text option. Type in your text that you want to show in the intro and tap on Ok button. You can change the font and style from the right panel.

Step 4: Select the text layer and from the right panel, tap on In Animation option to animate the text. Select a desired animation template that you think is appropriate.

Step 5: Tap on the text layer again and tap on Effect option to add a text effect. Choose any desired Effect from the list. You can also tap on Get More to check out more effect templates.

After you apply an effect, select the Effect layer from the timeline and go to Settings to make any adjustment. You can play and watch the intro video. Besides, you can add background photo or video and add graphical elements to enhance the intro animation.
Part 2. How to Create 3D Intro with KineMaster
We have illustrated how to create a text intro video and you can try out different animations and effects and come up with creative intro video. There is a viral trend in showing 3D intro to get more traction. You can use KineMaster to create amazing 3D intro videos easily that can go along with your video content. Here are the simple steps on how you can create 3D video with KineMaster.
Step 1: Install KineMaster from Play Store or App Store as per your smartphone OS. Launch KineMaster app after installation and tap on Create New icon.
Step 2: Select an aspect ratio and tap on Background option. Select a background color as per your preference. Otherwise, you can tap on Media Browser if you want to add a pre-decided photo or video as a background. We recommend a background video to amplify the 3D effect.

Step 3: It is time to add a 3D title. You can tap on Layer icon and Text icon to type in any title that you can turn into 3D with text effect or style. You can also tap on Media icon to select a ready-made 3D text with a transparent background. After adding the text, you can stretch it to increase the size as per your preference.

Step 4: From the right panel, tap on In Animation option and select a desired animation template. Similarly, tap on Out Animation option and select any animation whichever you think it is fit.

Step 5: From the right panel, tap on Overall Animation, select an animation template such as floating to enhance the 3D effect.

Part 3. Related FAQs of KineMaster Intro Video
What app most YouTubers use to make intros?
Apart from KineMaster, most YouTubers use Wondershare Filmora to make amazing videos. Filmora has a wider range of video effects, animations, and stock photos and videos. On top of that, the text animation and effect templates are tailor-made for intro videos.
Is KineMaster good for making YouTube videos?
Yes, KineMaster is good for creating engaging YouTube videos. You can create amazing intro and outro for your YouTube video on your smartphone. You can blend your photos and videos together and create amazing YouTube videos and stunning texts and titles. Besides, you can use chroma keys, transitions, reverse timing, and multi-layer features.
Can KineMaster handle 4K?
Yes, KineMaster is perfect for editing 4K video taken with high-end cameras. After editing the videos, you can export them in 4K resolution up to 60 FPS. However, you will need a high-end smartphone for KineMaster to handle 4K video editing smoothl
How to Make Discord GIF PFP? [Solved]
How to Make Discord GIF PFP? [Solved]
An easy yet powerful editor
Numerous effects to choose from
Detailed tutorials provided by the official channel
Recently, Discord has become quite popular among different communities, especially gamers. After all, it is a safe platform that delivers a convenient area to communicate with friends and family. Are you familiar with the forum? If yes, you understand some of its advantages and why many people settle for it. If not, here you will get complete information about discord gif PFP. Discord allows communication via text, video, audio, and files. It features a private chat section where you chat with your friends. Besides, it includes a free and paid version, depending on which suits you.
Despite its popularity, issues are still rising, especially on Discord GIF PFP. Besides, the idea of having a GIF as a PFP is unique and is rare among different platforms. Fortunately, this article has essential details about Discord animated PFP. Read through the content below to understand how to get an animated Discord PFP.
In this article
01 [How to Make Discord PFP a GIF? The Complete Guide](#Part 1)
02 [How to Fix GIF PFP not Working on Discord?](#Part 2)
03 [Discord GIF PFP: How to set GIF Profile Pic](#Part 3)
Part 1 How to Make Discord PFP a GIF? The Complete Guide
Let’s kick off with details on making a Discord PFP a GIF. The first thing you need to keep in mind is the requirements of a Discord PFP GIF. In other words, what are the things that Discord considers before agreeing to set up your profile? Note that the platform only allows file sizes of up-to 8Mbs. Anything above that is irrelevant. Its maximum resolution is 128 by 128 pixels. Consider these essential points to ensure that your PFP is accepted.
How do you save a GIF for Discord?
There are several ways to access Discord animated PFP. One is a Discord nitro, and the other is making one yourself. If you are a Nitro subscriber, the platform will prompt you with amazing Discord nitro PFP. However, regular users need to make the animated PFP for Discord. This section covers these individuals as we give simple steps to save a suitable GIF.
Step 1: Visit a GIF website with different options available such as Tenor and GIPHY, depending on your preference and taste
Step 2: Search for the ultimate GIF you need
Step 3: Click the animated GIF for Discord and open it on a new tab
Step 4: Right-click on the GIF and choose Save Image to name it and save it on your PC
How do you make a Discord GIF PFP?
Step 1: Visit powerful GIF websites such as the EZgif website
Step 2: Go to the editing option, Resize and upload your GIF by selecting the Upload icon
Step 3: For sizing, enter 128 as height and weight. Ensure that your Discord GIF PFP is 8Mbs and if it isn’t, go for the Gifsicle resize method.

Step 4: Select the resize option and save the necessary changes so that you can download your GIF on your PC.
After strictly following the steps above, you can easily make a Discord GIF PFP and upload it into your account. As a result, you will have an animated GIF PFP even without the Nitro subscription. Note that the Nitro option is bigger and better. After all, it has fewer requirement needs since the platform offers you the available choices. Try out Discord animated PFP today and experience powerful and eye-catching profiles.
Part 2 How to Fix GIF PFP not Working on Discord?
Discord is no secret a robust platform that makes communication among different communities more convenient for all. Are you new on Discord, or are you among the millions of users under the platform? Whatever your case is, you need the answers on dealing with an unresponsive Discord account. For instance, you can’t upload your Discord GIF PFP? GIF PFP is unresponsive in Discord? This section offers you some of the simplest ways to solve these problems.
01Ensure that you subscribe to Discord Nitro
Discord is the most sought-after platform for effective communication between different communities. It includes a free and paid option depending on your taste and preference. Of course, Discord Nitro is the paid version with many advantages that makes your experience bigger and better. Discord Nitro is the ultimate version when you wish to include GIF as your PFP since there are almost no restrictions. The platform prompts you with a conversation that assists you in setting up your PFP. Is it possible to get Discord animated GIF without Nitro? Yes. All you need is to get the GIF from other free websites. However, issues may arise, especially when meeting the requirements.
02Ensure you have a stable Internet connection
Like most networking applications, you need an internet connection to connect with your friends and family. Are you struggling with making the necessary changes for your animated Discord PFP? If yes, then ensure that you check your internet. After all, it is impossible to make the required changes without a stable network.
03Check the Discord PFP format and ensure it is GIF and not other formats such as WebM
From the information above, you can tell that Discord is quite a restrictive software when you wish to add a Discord GIF PFP without the Nitro subscription. Therefore, it is crucial to ensure that you get the correct format. Otherwise, your GIF upload will be unsuccessful. The only Discord format allowed is the GIF; hence ensure that yours meets this requirement.
04Suppose you are an IOS user, try to re-upload the GIF from your computer
Different operating systems tend to work differently. Are you an iOS user and having difficulty uploading your Discord GIF PFP from your mobile? If yes, try to re-upload it from your computer. It is a simple hack that can assist with an unresponsive Discord account.
05Reinstall or Update your Discord Application
Sometimes applications have issues because of pending updates. If you are trying to fix GIF PFP for an unresponsive Discord software, try reinstalling it or updating it. In most cases, upon making these updates, your app will automatically respond to the necessary changes.
Is your Discord having issues? Do you have a problem uploading animated GIFs for Discord? If yes, then follow the simple hacks above.
Part 3 Discord GIF PFP: How to set GIF Profile Pic?
Discord GIF PFP is a critical topic we often encounter in different online communities. After all, using GIFs as PFP is unique and makes your account gain the necessary attention. Why not when your PFP often reflects on your community. However, many questions often arise regarding animated PFP for Discord since few people are familiar with how to go about getting moving PFP discord. Luckily, several resourceful sources offer you the information you need. And this piece is one of them. This section explains the most straightforward steps to help you set a GIF Profile pic in Discord. Check it out!
You need to know that getting discord nitro is the most convenient way to get and set a GIF profile pic. Is it possible without the Nitro subscription? Yes. However, it has multiple limitations compared to Discord nitro.
Step 1: Discord Nitro
Get Discord Nitro. As mentioned above, Discord has a free and paid version. However, it is no secret that the latter version is more convenient. Discord Nitro requires you to pay a monthly fee of $4.99
Step 2: Discord GIF Picker
Use Discord GIF Picker to search for your ultimate GIF. You can access this feature from your app’s chat box right side. In this case, you need the desktop version.

Note: If you don’t get what you are looking for, consult external websites such as Tenor, Wondershare Filmora Video Editor and save the GIF of your choice. Of course, there are many free websites available hence you can settle for any of them.

Wondershare Filmora - Best Video Editor for Mac/Windows
5,481,435 people have downloaded it.
Build unique custom animations without breaking a sweat.
Focus on creating epic stories and leave the details to Filmora’s auto features.
Start a creative adventure with drag & drop effects and endless possibilities.
Filmora simplifies advanced features to save you time and effort.
Filmora cuts out repetition so you can move on to your next creative breakthrough.
Step 3: Settings
Change your PFP. For a successful process, you need to go to settings and User-Profile. Click on the available PFP and edit by selecting Change Avatar.

Step 4: Select GIF
Select your GIF from your PC and resize it to meet Discord’s requirements. Automatically, you will go to the editing page and apply the necessary changes. Select save changes and successfully change your PFP.
Step 5: Check Changes
View your Discord animated PFP to confirm the changes

Editing the animated GIF PFP is necessary, and you can use powerful editing software such as Filmora for the job. Filmora is a top editing platform that supports both video and GIF. Besides, it includes multiple features that assist in efficient editing. These features include noise removal, video stabilization, scene detection, 4k resolution support, image filters, etc. All these features blend to deliver a high-quality discord animated PFP.
● Ending Thoughts →
● Discord Nitro opens new possibilities for Discord users.
● Filmora is among the top editors you can use to get a great Discord moving PFP.
● It is possible to add GIF as PFP without Nitro. But the process is long and never delivers equally impressive results like those of Nitro.
● How to get animated Discord PFP is among the most popular topics about Discord. After all, almost everyone wants to have an exciting moving PFP Discord. Is it a straightforward process? Consider the details as above and learn more about Discord GIF PFP.
Recently, Discord has become quite popular among different communities, especially gamers. After all, it is a safe platform that delivers a convenient area to communicate with friends and family. Are you familiar with the forum? If yes, you understand some of its advantages and why many people settle for it. If not, here you will get complete information about discord gif PFP. Discord allows communication via text, video, audio, and files. It features a private chat section where you chat with your friends. Besides, it includes a free and paid version, depending on which suits you.
Despite its popularity, issues are still rising, especially on Discord GIF PFP. Besides, the idea of having a GIF as a PFP is unique and is rare among different platforms. Fortunately, this article has essential details about Discord animated PFP. Read through the content below to understand how to get an animated Discord PFP.
In this article
01 [How to Make Discord PFP a GIF? The Complete Guide](#Part 1)
02 [How to Fix GIF PFP not Working on Discord?](#Part 2)
03 [Discord GIF PFP: How to set GIF Profile Pic](#Part 3)
Part 1 How to Make Discord PFP a GIF? The Complete Guide
Let’s kick off with details on making a Discord PFP a GIF. The first thing you need to keep in mind is the requirements of a Discord PFP GIF. In other words, what are the things that Discord considers before agreeing to set up your profile? Note that the platform only allows file sizes of up-to 8Mbs. Anything above that is irrelevant. Its maximum resolution is 128 by 128 pixels. Consider these essential points to ensure that your PFP is accepted.
How do you save a GIF for Discord?
There are several ways to access Discord animated PFP. One is a Discord nitro, and the other is making one yourself. If you are a Nitro subscriber, the platform will prompt you with amazing Discord nitro PFP. However, regular users need to make the animated PFP for Discord. This section covers these individuals as we give simple steps to save a suitable GIF.
Step 1: Visit a GIF website with different options available such as Tenor and GIPHY, depending on your preference and taste
Step 2: Search for the ultimate GIF you need
Step 3: Click the animated GIF for Discord and open it on a new tab
Step 4: Right-click on the GIF and choose Save Image to name it and save it on your PC
How do you make a Discord GIF PFP?
Step 1: Visit powerful GIF websites such as the EZgif website
Step 2: Go to the editing option, Resize and upload your GIF by selecting the Upload icon
Step 3: For sizing, enter 128 as height and weight. Ensure that your Discord GIF PFP is 8Mbs and if it isn’t, go for the Gifsicle resize method.

Step 4: Select the resize option and save the necessary changes so that you can download your GIF on your PC.
After strictly following the steps above, you can easily make a Discord GIF PFP and upload it into your account. As a result, you will have an animated GIF PFP even without the Nitro subscription. Note that the Nitro option is bigger and better. After all, it has fewer requirement needs since the platform offers you the available choices. Try out Discord animated PFP today and experience powerful and eye-catching profiles.
Part 2 How to Fix GIF PFP not Working on Discord?
Discord is no secret a robust platform that makes communication among different communities more convenient for all. Are you new on Discord, or are you among the millions of users under the platform? Whatever your case is, you need the answers on dealing with an unresponsive Discord account. For instance, you can’t upload your Discord GIF PFP? GIF PFP is unresponsive in Discord? This section offers you some of the simplest ways to solve these problems.
01Ensure that you subscribe to Discord Nitro
Discord is the most sought-after platform for effective communication between different communities. It includes a free and paid option depending on your taste and preference. Of course, Discord Nitro is the paid version with many advantages that makes your experience bigger and better. Discord Nitro is the ultimate version when you wish to include GIF as your PFP since there are almost no restrictions. The platform prompts you with a conversation that assists you in setting up your PFP. Is it possible to get Discord animated GIF without Nitro? Yes. All you need is to get the GIF from other free websites. However, issues may arise, especially when meeting the requirements.
02Ensure you have a stable Internet connection
Like most networking applications, you need an internet connection to connect with your friends and family. Are you struggling with making the necessary changes for your animated Discord PFP? If yes, then ensure that you check your internet. After all, it is impossible to make the required changes without a stable network.
03Check the Discord PFP format and ensure it is GIF and not other formats such as WebM
From the information above, you can tell that Discord is quite a restrictive software when you wish to add a Discord GIF PFP without the Nitro subscription. Therefore, it is crucial to ensure that you get the correct format. Otherwise, your GIF upload will be unsuccessful. The only Discord format allowed is the GIF; hence ensure that yours meets this requirement.
04Suppose you are an IOS user, try to re-upload the GIF from your computer
Different operating systems tend to work differently. Are you an iOS user and having difficulty uploading your Discord GIF PFP from your mobile? If yes, try to re-upload it from your computer. It is a simple hack that can assist with an unresponsive Discord account.
05Reinstall or Update your Discord Application
Sometimes applications have issues because of pending updates. If you are trying to fix GIF PFP for an unresponsive Discord software, try reinstalling it or updating it. In most cases, upon making these updates, your app will automatically respond to the necessary changes.
Is your Discord having issues? Do you have a problem uploading animated GIFs for Discord? If yes, then follow the simple hacks above.
Part 3 Discord GIF PFP: How to set GIF Profile Pic?
Discord GIF PFP is a critical topic we often encounter in different online communities. After all, using GIFs as PFP is unique and makes your account gain the necessary attention. Why not when your PFP often reflects on your community. However, many questions often arise regarding animated PFP for Discord since few people are familiar with how to go about getting moving PFP discord. Luckily, several resourceful sources offer you the information you need. And this piece is one of them. This section explains the most straightforward steps to help you set a GIF Profile pic in Discord. Check it out!
You need to know that getting discord nitro is the most convenient way to get and set a GIF profile pic. Is it possible without the Nitro subscription? Yes. However, it has multiple limitations compared to Discord nitro.
Step 1: Discord Nitro
Get Discord Nitro. As mentioned above, Discord has a free and paid version. However, it is no secret that the latter version is more convenient. Discord Nitro requires you to pay a monthly fee of $4.99
Step 2: Discord GIF Picker
Use Discord GIF Picker to search for your ultimate GIF. You can access this feature from your app’s chat box right side. In this case, you need the desktop version.

Note: If you don’t get what you are looking for, consult external websites such as Tenor, Wondershare Filmora Video Editor and save the GIF of your choice. Of course, there are many free websites available hence you can settle for any of them.

Wondershare Filmora - Best Video Editor for Mac/Windows
5,481,435 people have downloaded it.
Build unique custom animations without breaking a sweat.
Focus on creating epic stories and leave the details to Filmora’s auto features.
Start a creative adventure with drag & drop effects and endless possibilities.
Filmora simplifies advanced features to save you time and effort.
Filmora cuts out repetition so you can move on to your next creative breakthrough.
Step 3: Settings
Change your PFP. For a successful process, you need to go to settings and User-Profile. Click on the available PFP and edit by selecting Change Avatar.

Step 4: Select GIF
Select your GIF from your PC and resize it to meet Discord’s requirements. Automatically, you will go to the editing page and apply the necessary changes. Select save changes and successfully change your PFP.
Step 5: Check Changes
View your Discord animated PFP to confirm the changes

Editing the animated GIF PFP is necessary, and you can use powerful editing software such as Filmora for the job. Filmora is a top editing platform that supports both video and GIF. Besides, it includes multiple features that assist in efficient editing. These features include noise removal, video stabilization, scene detection, 4k resolution support, image filters, etc. All these features blend to deliver a high-quality discord animated PFP.
● Ending Thoughts →
● Discord Nitro opens new possibilities for Discord users.
● Filmora is among the top editors you can use to get a great Discord moving PFP.
● It is possible to add GIF as PFP without Nitro. But the process is long and never delivers equally impressive results like those of Nitro.
● How to get animated Discord PFP is among the most popular topics about Discord. After all, almost everyone wants to have an exciting moving PFP Discord. Is it a straightforward process? Consider the details as above and learn more about Discord GIF PFP.
Recently, Discord has become quite popular among different communities, especially gamers. After all, it is a safe platform that delivers a convenient area to communicate with friends and family. Are you familiar with the forum? If yes, you understand some of its advantages and why many people settle for it. If not, here you will get complete information about discord gif PFP. Discord allows communication via text, video, audio, and files. It features a private chat section where you chat with your friends. Besides, it includes a free and paid version, depending on which suits you.
Despite its popularity, issues are still rising, especially on Discord GIF PFP. Besides, the idea of having a GIF as a PFP is unique and is rare among different platforms. Fortunately, this article has essential details about Discord animated PFP. Read through the content below to understand how to get an animated Discord PFP.
In this article
01 [How to Make Discord PFP a GIF? The Complete Guide](#Part 1)
02 [How to Fix GIF PFP not Working on Discord?](#Part 2)
03 [Discord GIF PFP: How to set GIF Profile Pic](#Part 3)
Part 1 How to Make Discord PFP a GIF? The Complete Guide
Let’s kick off with details on making a Discord PFP a GIF. The first thing you need to keep in mind is the requirements of a Discord PFP GIF. In other words, what are the things that Discord considers before agreeing to set up your profile? Note that the platform only allows file sizes of up-to 8Mbs. Anything above that is irrelevant. Its maximum resolution is 128 by 128 pixels. Consider these essential points to ensure that your PFP is accepted.
How do you save a GIF for Discord?
There are several ways to access Discord animated PFP. One is a Discord nitro, and the other is making one yourself. If you are a Nitro subscriber, the platform will prompt you with amazing Discord nitro PFP. However, regular users need to make the animated PFP for Discord. This section covers these individuals as we give simple steps to save a suitable GIF.
Step 1: Visit a GIF website with different options available such as Tenor and GIPHY, depending on your preference and taste
Step 2: Search for the ultimate GIF you need
Step 3: Click the animated GIF for Discord and open it on a new tab
Step 4: Right-click on the GIF and choose Save Image to name it and save it on your PC
How do you make a Discord GIF PFP?
Step 1: Visit powerful GIF websites such as the EZgif website
Step 2: Go to the editing option, Resize and upload your GIF by selecting the Upload icon
Step 3: For sizing, enter 128 as height and weight. Ensure that your Discord GIF PFP is 8Mbs and if it isn’t, go for the Gifsicle resize method.

Step 4: Select the resize option and save the necessary changes so that you can download your GIF on your PC.
After strictly following the steps above, you can easily make a Discord GIF PFP and upload it into your account. As a result, you will have an animated GIF PFP even without the Nitro subscription. Note that the Nitro option is bigger and better. After all, it has fewer requirement needs since the platform offers you the available choices. Try out Discord animated PFP today and experience powerful and eye-catching profiles.
Part 2 How to Fix GIF PFP not Working on Discord?
Discord is no secret a robust platform that makes communication among different communities more convenient for all. Are you new on Discord, or are you among the millions of users under the platform? Whatever your case is, you need the answers on dealing with an unresponsive Discord account. For instance, you can’t upload your Discord GIF PFP? GIF PFP is unresponsive in Discord? This section offers you some of the simplest ways to solve these problems.
01Ensure that you subscribe to Discord Nitro
Discord is the most sought-after platform for effective communication between different communities. It includes a free and paid option depending on your taste and preference. Of course, Discord Nitro is the paid version with many advantages that makes your experience bigger and better. Discord Nitro is the ultimate version when you wish to include GIF as your PFP since there are almost no restrictions. The platform prompts you with a conversation that assists you in setting up your PFP. Is it possible to get Discord animated GIF without Nitro? Yes. All you need is to get the GIF from other free websites. However, issues may arise, especially when meeting the requirements.
02Ensure you have a stable Internet connection
Like most networking applications, you need an internet connection to connect with your friends and family. Are you struggling with making the necessary changes for your animated Discord PFP? If yes, then ensure that you check your internet. After all, it is impossible to make the required changes without a stable network.
03Check the Discord PFP format and ensure it is GIF and not other formats such as WebM
From the information above, you can tell that Discord is quite a restrictive software when you wish to add a Discord GIF PFP without the Nitro subscription. Therefore, it is crucial to ensure that you get the correct format. Otherwise, your GIF upload will be unsuccessful. The only Discord format allowed is the GIF; hence ensure that yours meets this requirement.
04Suppose you are an IOS user, try to re-upload the GIF from your computer
Different operating systems tend to work differently. Are you an iOS user and having difficulty uploading your Discord GIF PFP from your mobile? If yes, try to re-upload it from your computer. It is a simple hack that can assist with an unresponsive Discord account.
05Reinstall or Update your Discord Application
Sometimes applications have issues because of pending updates. If you are trying to fix GIF PFP for an unresponsive Discord software, try reinstalling it or updating it. In most cases, upon making these updates, your app will automatically respond to the necessary changes.
Is your Discord having issues? Do you have a problem uploading animated GIFs for Discord? If yes, then follow the simple hacks above.
Part 3 Discord GIF PFP: How to set GIF Profile Pic?
Discord GIF PFP is a critical topic we often encounter in different online communities. After all, using GIFs as PFP is unique and makes your account gain the necessary attention. Why not when your PFP often reflects on your community. However, many questions often arise regarding animated PFP for Discord since few people are familiar with how to go about getting moving PFP discord. Luckily, several resourceful sources offer you the information you need. And this piece is one of them. This section explains the most straightforward steps to help you set a GIF Profile pic in Discord. Check it out!
You need to know that getting discord nitro is the most convenient way to get and set a GIF profile pic. Is it possible without the Nitro subscription? Yes. However, it has multiple limitations compared to Discord nitro.
Step 1: Discord Nitro
Get Discord Nitro. As mentioned above, Discord has a free and paid version. However, it is no secret that the latter version is more convenient. Discord Nitro requires you to pay a monthly fee of $4.99
Step 2: Discord GIF Picker
Use Discord GIF Picker to search for your ultimate GIF. You can access this feature from your app’s chat box right side. In this case, you need the desktop version.

Note: If you don’t get what you are looking for, consult external websites such as Tenor, Wondershare Filmora Video Editor and save the GIF of your choice. Of course, there are many free websites available hence you can settle for any of them.

Wondershare Filmora - Best Video Editor for Mac/Windows
5,481,435 people have downloaded it.
Build unique custom animations without breaking a sweat.
Focus on creating epic stories and leave the details to Filmora’s auto features.
Start a creative adventure with drag & drop effects and endless possibilities.
Filmora simplifies advanced features to save you time and effort.
Filmora cuts out repetition so you can move on to your next creative breakthrough.
Step 3: Settings
Change your PFP. For a successful process, you need to go to settings and User-Profile. Click on the available PFP and edit by selecting Change Avatar.

Step 4: Select GIF
Select your GIF from your PC and resize it to meet Discord’s requirements. Automatically, you will go to the editing page and apply the necessary changes. Select save changes and successfully change your PFP.
Step 5: Check Changes
View your Discord animated PFP to confirm the changes

Editing the animated GIF PFP is necessary, and you can use powerful editing software such as Filmora for the job. Filmora is a top editing platform that supports both video and GIF. Besides, it includes multiple features that assist in efficient editing. These features include noise removal, video stabilization, scene detection, 4k resolution support, image filters, etc. All these features blend to deliver a high-quality discord animated PFP.
● Ending Thoughts →
● Discord Nitro opens new possibilities for Discord users.
● Filmora is among the top editors you can use to get a great Discord moving PFP.
● It is possible to add GIF as PFP without Nitro. But the process is long and never delivers equally impressive results like those of Nitro.
● How to get animated Discord PFP is among the most popular topics about Discord. After all, almost everyone wants to have an exciting moving PFP Discord. Is it a straightforward process? Consider the details as above and learn more about Discord GIF PFP.
Recently, Discord has become quite popular among different communities, especially gamers. After all, it is a safe platform that delivers a convenient area to communicate with friends and family. Are you familiar with the forum? If yes, you understand some of its advantages and why many people settle for it. If not, here you will get complete information about discord gif PFP. Discord allows communication via text, video, audio, and files. It features a private chat section where you chat with your friends. Besides, it includes a free and paid version, depending on which suits you.
Despite its popularity, issues are still rising, especially on Discord GIF PFP. Besides, the idea of having a GIF as a PFP is unique and is rare among different platforms. Fortunately, this article has essential details about Discord animated PFP. Read through the content below to understand how to get an animated Discord PFP.
In this article
01 [How to Make Discord PFP a GIF? The Complete Guide](#Part 1)
02 [How to Fix GIF PFP not Working on Discord?](#Part 2)
03 [Discord GIF PFP: How to set GIF Profile Pic](#Part 3)
Part 1 How to Make Discord PFP a GIF? The Complete Guide
Let’s kick off with details on making a Discord PFP a GIF. The first thing you need to keep in mind is the requirements of a Discord PFP GIF. In other words, what are the things that Discord considers before agreeing to set up your profile? Note that the platform only allows file sizes of up-to 8Mbs. Anything above that is irrelevant. Its maximum resolution is 128 by 128 pixels. Consider these essential points to ensure that your PFP is accepted.
How do you save a GIF for Discord?
There are several ways to access Discord animated PFP. One is a Discord nitro, and the other is making one yourself. If you are a Nitro subscriber, the platform will prompt you with amazing Discord nitro PFP. However, regular users need to make the animated PFP for Discord. This section covers these individuals as we give simple steps to save a suitable GIF.
Step 1: Visit a GIF website with different options available such as Tenor and GIPHY, depending on your preference and taste
Step 2: Search for the ultimate GIF you need
Step 3: Click the animated GIF for Discord and open it on a new tab
Step 4: Right-click on the GIF and choose Save Image to name it and save it on your PC
How do you make a Discord GIF PFP?
Step 1: Visit powerful GIF websites such as the EZgif website
Step 2: Go to the editing option, Resize and upload your GIF by selecting the Upload icon
Step 3: For sizing, enter 128 as height and weight. Ensure that your Discord GIF PFP is 8Mbs and if it isn’t, go for the Gifsicle resize method.

Step 4: Select the resize option and save the necessary changes so that you can download your GIF on your PC.
After strictly following the steps above, you can easily make a Discord GIF PFP and upload it into your account. As a result, you will have an animated GIF PFP even without the Nitro subscription. Note that the Nitro option is bigger and better. After all, it has fewer requirement needs since the platform offers you the available choices. Try out Discord animated PFP today and experience powerful and eye-catching profiles.
Part 2 How to Fix GIF PFP not Working on Discord?
Discord is no secret a robust platform that makes communication among different communities more convenient for all. Are you new on Discord, or are you among the millions of users under the platform? Whatever your case is, you need the answers on dealing with an unresponsive Discord account. For instance, you can’t upload your Discord GIF PFP? GIF PFP is unresponsive in Discord? This section offers you some of the simplest ways to solve these problems.
01Ensure that you subscribe to Discord Nitro
Discord is the most sought-after platform for effective communication between different communities. It includes a free and paid option depending on your taste and preference. Of course, Discord Nitro is the paid version with many advantages that makes your experience bigger and better. Discord Nitro is the ultimate version when you wish to include GIF as your PFP since there are almost no restrictions. The platform prompts you with a conversation that assists you in setting up your PFP. Is it possible to get Discord animated GIF without Nitro? Yes. All you need is to get the GIF from other free websites. However, issues may arise, especially when meeting the requirements.
02Ensure you have a stable Internet connection
Like most networking applications, you need an internet connection to connect with your friends and family. Are you struggling with making the necessary changes for your animated Discord PFP? If yes, then ensure that you check your internet. After all, it is impossible to make the required changes without a stable network.
03Check the Discord PFP format and ensure it is GIF and not other formats such as WebM
From the information above, you can tell that Discord is quite a restrictive software when you wish to add a Discord GIF PFP without the Nitro subscription. Therefore, it is crucial to ensure that you get the correct format. Otherwise, your GIF upload will be unsuccessful. The only Discord format allowed is the GIF; hence ensure that yours meets this requirement.
04Suppose you are an IOS user, try to re-upload the GIF from your computer
Different operating systems tend to work differently. Are you an iOS user and having difficulty uploading your Discord GIF PFP from your mobile? If yes, try to re-upload it from your computer. It is a simple hack that can assist with an unresponsive Discord account.
05Reinstall or Update your Discord Application
Sometimes applications have issues because of pending updates. If you are trying to fix GIF PFP for an unresponsive Discord software, try reinstalling it or updating it. In most cases, upon making these updates, your app will automatically respond to the necessary changes.
Is your Discord having issues? Do you have a problem uploading animated GIFs for Discord? If yes, then follow the simple hacks above.
Part 3 Discord GIF PFP: How to set GIF Profile Pic?
Discord GIF PFP is a critical topic we often encounter in different online communities. After all, using GIFs as PFP is unique and makes your account gain the necessary attention. Why not when your PFP often reflects on your community. However, many questions often arise regarding animated PFP for Discord since few people are familiar with how to go about getting moving PFP discord. Luckily, several resourceful sources offer you the information you need. And this piece is one of them. This section explains the most straightforward steps to help you set a GIF Profile pic in Discord. Check it out!
You need to know that getting discord nitro is the most convenient way to get and set a GIF profile pic. Is it possible without the Nitro subscription? Yes. However, it has multiple limitations compared to Discord nitro.
Step 1: Discord Nitro
Get Discord Nitro. As mentioned above, Discord has a free and paid version. However, it is no secret that the latter version is more convenient. Discord Nitro requires you to pay a monthly fee of $4.99
Step 2: Discord GIF Picker
Use Discord GIF Picker to search for your ultimate GIF. You can access this feature from your app’s chat box right side. In this case, you need the desktop version.

Note: If you don’t get what you are looking for, consult external websites such as Tenor, Wondershare Filmora Video Editor and save the GIF of your choice. Of course, there are many free websites available hence you can settle for any of them.

Wondershare Filmora - Best Video Editor for Mac/Windows
5,481,435 people have downloaded it.
Build unique custom animations without breaking a sweat.
Focus on creating epic stories and leave the details to Filmora’s auto features.
Start a creative adventure with drag & drop effects and endless possibilities.
Filmora simplifies advanced features to save you time and effort.
Filmora cuts out repetition so you can move on to your next creative breakthrough.
Step 3: Settings
Change your PFP. For a successful process, you need to go to settings and User-Profile. Click on the available PFP and edit by selecting Change Avatar.

Step 4: Select GIF
Select your GIF from your PC and resize it to meet Discord’s requirements. Automatically, you will go to the editing page and apply the necessary changes. Select save changes and successfully change your PFP.
Step 5: Check Changes
View your Discord animated PFP to confirm the changes

Editing the animated GIF PFP is necessary, and you can use powerful editing software such as Filmora for the job. Filmora is a top editing platform that supports both video and GIF. Besides, it includes multiple features that assist in efficient editing. These features include noise removal, video stabilization, scene detection, 4k resolution support, image filters, etc. All these features blend to deliver a high-quality discord animated PFP.
● Ending Thoughts →
● Discord Nitro opens new possibilities for Discord users.
● Filmora is among the top editors you can use to get a great Discord moving PFP.
● It is possible to add GIF as PFP without Nitro. But the process is long and never delivers equally impressive results like those of Nitro.
● How to get animated Discord PFP is among the most popular topics about Discord. After all, almost everyone wants to have an exciting moving PFP Discord. Is it a straightforward process? Consider the details as above and learn more about Discord GIF PFP.
How to Add Effects on TikTok
In TikTok, users may develop and produce visually appealing videos to share with their viewers. The program enables users to apply effects to TikTok videos in order to facilitate this kind of production. TikTok offers a lot of features, making it simple to become lost inside the application. The utilization of TikTok’s built-in effects is one of the elements that contributes to their films’ engaging nature. To know how to add effects to TikTok videos, you must thus follow the instructions provided in the article below.
To know how to add effect to TikTok is a daunting task if you don’t know the steps. However, it’s time to get familiar with the most prevalent and coolest effects of the app if you want to build a sizable following on this platform and produce films that go viral. With this guide you can add effects to your video to make it more visually appealing; this is one of the best possibilities. These effects might include slow motion, stickers, or even special effects like visual effects.
Part 1. Using TikTok In-App Effects
If you use Tik Tok often, you undoubtedly already know that this app has several effects available as well. These consist of stickers, time effects, video coverings, and filter effects. As soon as you record or submit a video clip, these effects are readily triggered. Simply locate the “Effects” option to begin adding them to your movie. However, using text or caption effects is not possible in this manner. However, it is a useful method for improving your Tik Tok video before sharing it.
Steps to Add Effects to TikTok Using Built-in Effects:
Step1 Open the app after installation and add a video by touching the “+” button to start a new recording or by tapping the “Upload” button to upload media files from your picture library.
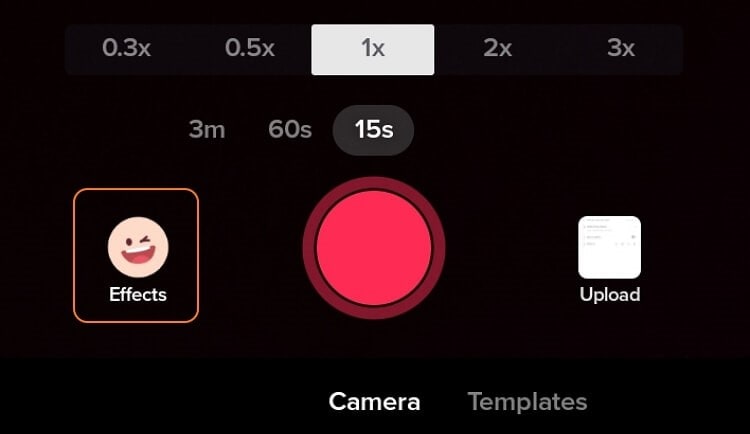
Step2 On the right side of the screen, tap “Filters.” You may now apply effects when a video file is available by touching the “Effects” button in the bottom left corner of the app.
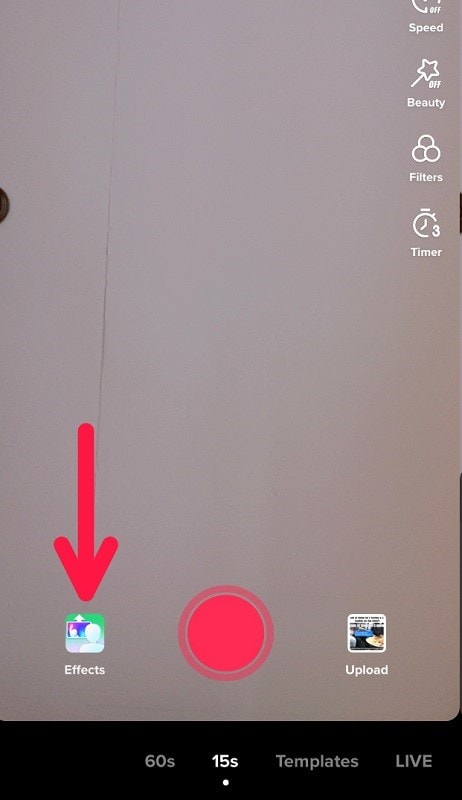
Step3 Choose the filter you want to use. To search, use the scroll, or choose a category to focus the sort of filter you want to apply.
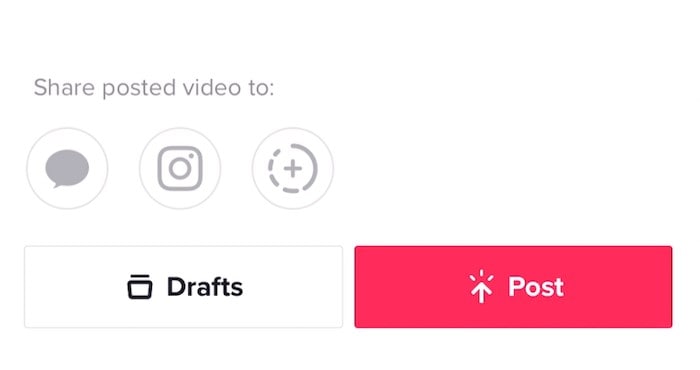
Step4 Click on “Effects.” Once again, scroll to search or choose an effect category to browse. Tap “Save” to save the changes you’ve made. Tap “Next” and then “Post” to continue.
Part 2. Adding Effects Before Recording
Many people are hesitant to record a TikTok video with more than one filter effect applied. You’ve probably seen that a lot of well-known makers create videos that combine many different effects. Actually, the procedure is rather easy. You may apply as many filters as you’d like on the TikTok app while recording time stamps one at a time only! It is not feasible or the option is not presently accessible on the app if you wish to apply many effects at once.
Steps to Add Effects to TikTok Videos Before Recording:
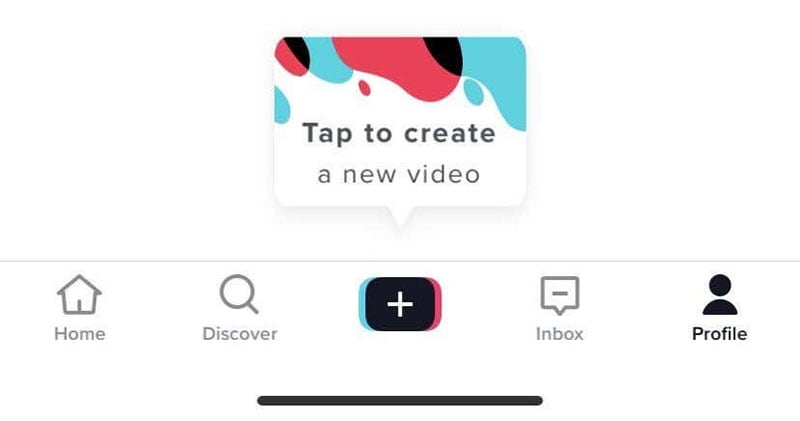
Step1 Open the TikTok app and click the Create button in the lower-middle of the screen.
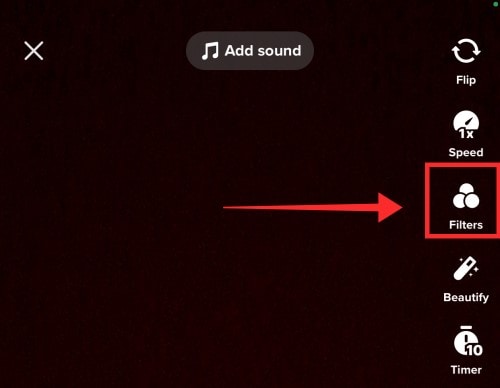
Step2 On the right side of the screen, tap Filters. The screen’s bottom will reveal a pop-up menu for filters.
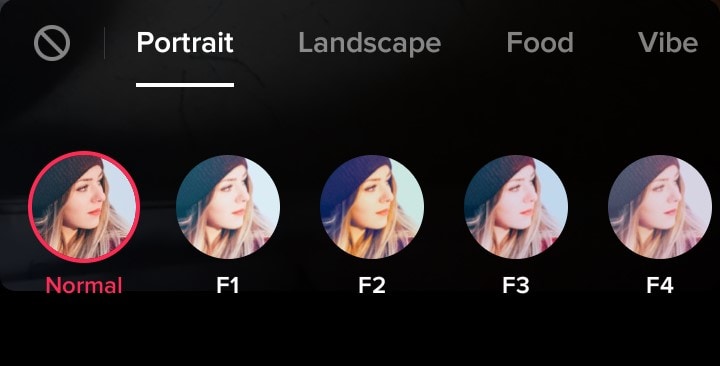
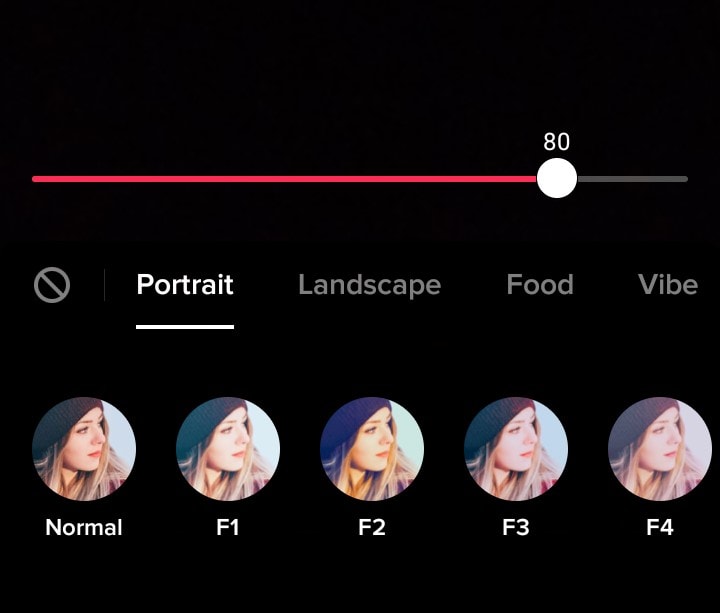
Step3 To see the choices, swipe. By tapping the tabs, you may quickly navigate to that particular set of filters. Alternatively, you may just swipe and browse through each choice. Select a filter by tapping it. To lessen or intensify the filter effect, move the slider to the left or right.
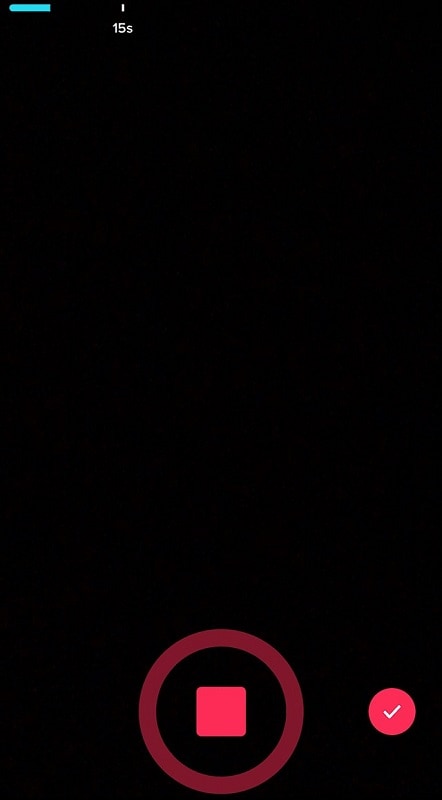
Step4 If you like the result, press the screen to start recording your video normally. Tap the Stop symbol at the very left to remove the filter.
Part 3. Adding Effects After Recording
Forgot to use a filter effect before to beginning your recording? Not to worry! On the Preview page, you may also apply a filter to your clips. By selecting Visual under Effects after recording or uploading your TikTok video, you may also add some lovely dynamic filter effects. You may achieve that by saving the films to your camera roll after applying each effect individually to the same clip. then launch the app’s video recorder, add the previously recorded video, and choose a new filter to apply to the video clip.
Steps to Add Effects to TikTok After Recording:
Step1 The first step is to launch the program on your phone and touch the “+” icon. Simply choose a filter effect for your movie by going right to the Filters section here.
![]()
Step2 The filters button, which is indicated by three circles, must be tapped in the second stage. You may choose the TikTok effect you wish to use once all of the effects are shown on the screen.
Step3 You have access to a wide variety of effects once you enter the effects gallery. Select the effect that best suits your video and that you prefer. After making your decision, leave the effects gallery and upload the recording.
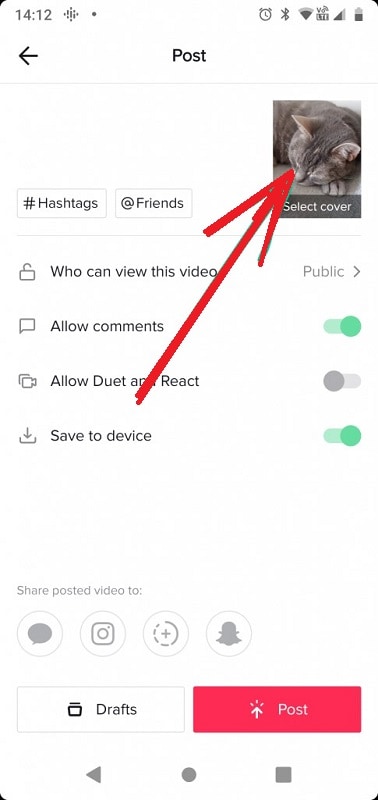
Step4 Click the review button to examine your video with the effect applied before publishing it. This will lead you to a preview screen. Before you actually publish it, you may also add music and other components.
Part 4. Add Filter on Video in TikTok
You may apply the filters after you film the movie, just as you do with the effects. You just need to visit visual. There is no way to identify the filter that your favorite TikToker used on his video on TikTok. Don’t worry, they often include the effect they employ in the hashtag or description, so you are still welcome to utilize it. To hunt for filter effects on TikTok, you might request a search function.
Steps to Add Filter on Videos in TikTok:
Step1 Click the “+” symbol in the bottom menu’s center after launching the TikTok app on your phone. Press the “+” button to start your camera before applying a specific filter.
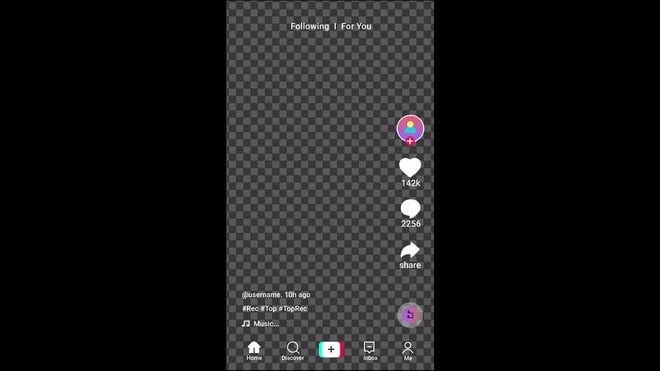
Step2 The “effects” symbol, which looks like a winking emoji, should be tapped. You will have access to a wide variety of TikTok filters once inside. On your screen, click the Filters symbol in the top right corner.
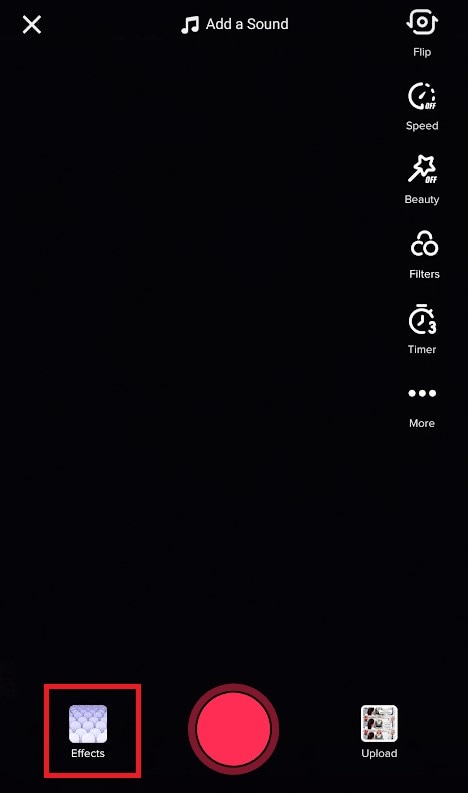
Step3 The options screen opens when you press the effect filter button. Your effect will appear in your video once you just hit the red button. When you are presented with all of these filters, choose the one that best fits your video and give it a try.
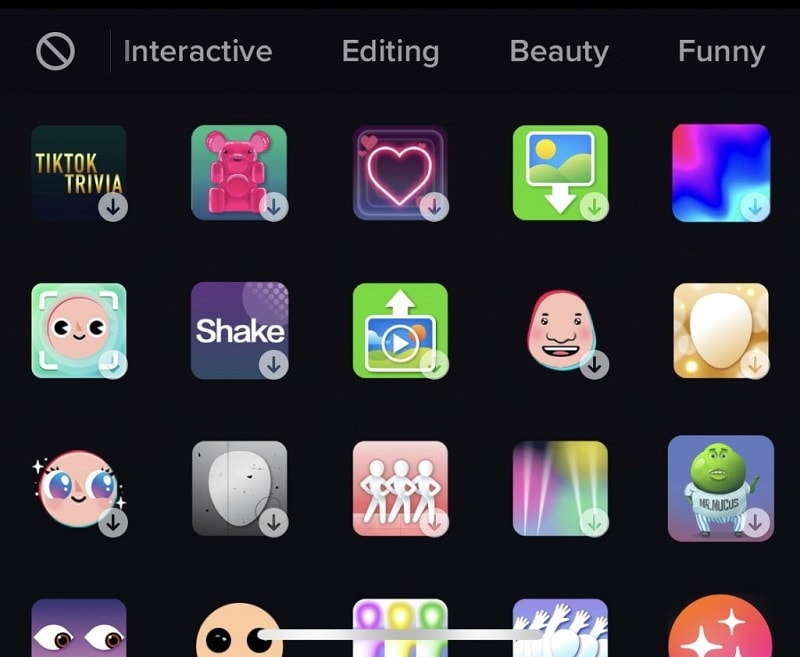
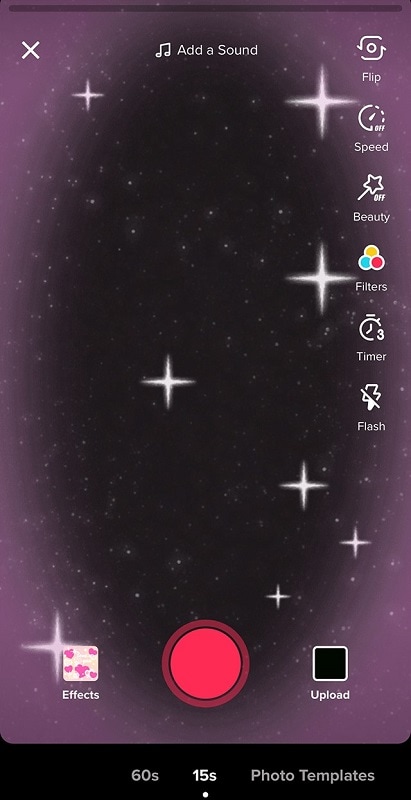
Step4 You may apply the filter to your video after you have officially made your decision. After doing this, leave the filter gallery and begin recording your video. Now that all of these procedures have been completed, you are able to capture your video with the effect on it.
The Bottom Line
Filters on TikTok work similarly to filters on other social media applications. However, there is no option or function in the TikTok app that allows you to look for a filter effect under the Filters or Effects tab. However, since most TikTok users constantly upload videos with any filter and strive to put the filter’s name and hashtags on the films, you may search for some videos with the identical filter. Your films will get flair and individuality thanks to this simple technique, which also gives certain filters a chance to catch on as trends.
Free Download For Win 7 or later(64-bit)
Free Download For macOS 10.14 or later
Free Download For macOS 10.14 or later
5 Excellent Tools To Convert Video to 60 FPS
Is the video you have too fast-paced? Does it show an action sequence or an intense basketball game? All the movement could make the video blurry. Changing the video to 60 FPS makes it better and crisper. So how can you do that? You can convert video to 60 FPS using these 5 excellent tools.
Why Convert Video to 60 FPS?
Perhaps you forgot to film your video in 60 FPS or 120 FPS. You can leave it at 30 FPS if you want to. But some videos look choppy when in that setting. By doubling the frames in the video, you make it a lot smoother. The motion will look so much more fluid. Consequently, that will let your viewers have a fantastic, immersive watching experience.
Do you plan to put the video in slow motion? That’s another great reason to convert the video to 60 FPS. Again, this makes the motion more fluid. So when you add the slow-motion effect, it just gets better. Not doing so will lead to terrible video quality, which your viewers would surely not like.
3 Methods To Convert Video to 60 FPS on Windows/Mac?
After reading those reasons, you may have thought of videos that you have that you can improve by converting to 60 FPS. So how can you do that? You can use these 3 effective methods. These are 3 different PC tools that allow for converting videos to 60 FPS.
1. Convert Video to 60 FPS With Wondershare Filmora
Free Download For Win 7 or later(64-bit)
Free Download For macOS 10.14 or later
Wondershare Filmora is one of the most amazing tools for converting videos to 60 FPS. This allows you to do that without complicated steps. It seems like the video just passed through the program with how fast and easy it is!

On top of that, Wondershare Filmora is a great video editor. It is complete with all the basic editing tools, plus some really great advanced features. So you can edit and enhance the video before or after converting it to 60 FPS. Because of that, Wondershare Filmora is a cost-effective tool.
Here are the steps to follow for turning a video to 60 FPS with Wondershare Filmora:
Step1 Open Wondershare Filmora. Click “New Project.”
Step2 Import the video that you want to convert to 60 FPS.
Step3 Drag the video to the timeline. Click “Export.”
Step4 Change the frame rate to 60 FPS. If you can’t find this, check if you are on the “Local” tab.

Step5 Click “Export.”
2. Use SmoothVideo Project to Make Video To 60 FPS
SmoothVideo Project (SVP) uses frame interpolation techniques - the same used by high-end TVs and projectors. This technique increases the frames by adding intermediate frames between existing ones. As a result, it produces smooth, fluid, and clear motion.
SmoothVideo Projects allow you to convert videos to 60 FPS and even to 120 or 144+ FPS. Also, it can convert the videos in real-time, on top of your video player.
Follow this guide to convert videos using this tool:
Step1 Install SVP and ensure to add SVPcode. If you already have the program installed, you can add SVPcode with the Maintain SVP 4 app.
Step2 Select “Browse for a video to transcode..”
Step3 Import the video/s that you want to convert to 60 FPS.
Step4 Pick 60 FPS when selecting a video profile for the video.

Step5 Choose between “Basic” and “Advanced” for the video compression setting.

Step6 Click “Start.”
3. Make Videos 60 FPS With Freemake Video Converter
Freemake is an all-in-one video converter tool. It supports over 500 video file formats and lets you turn photos and audio into video and process multiple videos at once. The best thing is that you don’t even need to download the video. Freemake Video Converter can convert online videos too.
While converting the files, you have the option to change their framerate. Therefore, it’s an excellent tool for turning videos to 60 FPS.
Follow these steps to change a video’s frame rate using this app:
Step1 Launch Freemake Video Converter. Click “+Video” to import the video that you want to convert.
Step2 Double-click the output format to open the window with the settings option.
Step3 Click the gear or “Settings” button.
Step4 On the new window, click the drop-down menu for “Frame Rate.” Select “60 fps.”

Step5 Click “Ok.”
Step6 Select the destination folder for the output file. Click “Convert.”
2 Fantastic 60 FPS Video Converter Online
What if you are not using a PC to edit your videos? For example, you shoot, edit, and upload your videos using your mobile phone. Or what if you use a PC, but you’re away from home? In these cases, you can use online tools. Here are the 2 best ones on the market.
1. VEED.IO 30 FPS to 60 FPS Online
Veed.io is a simple but ever-so-reliable online video tool. It lets you edit videos and change the frame rate for free. Also, it comes with an array of other tools that can help enhance the video. For instance, Veed.io can remove background noise from the video.
Veed.io also lets you change the video’s aspect ratio to optimize it for different video streaming platforms.
Here’s a guide on how to convert to 60 FPS using Veed.io:
Step1 Run your preferred web browser and go to the website of Veed.io.
Step2 Click “Get Started.”
Step3 Click “Upload a File” or drag the video file to the interface to upload it. Select the video that you want to convert to 60 FPS.

Step4 Click “Export” > “Advanced.”
Step5 Drag the slider for “Framerate Limit” to the right until the display text says “60.”

Step6 Click “Export Video.”
Step7 Please wait for Veed.io to finish processing your video. When the screen says, “Your video is ready.” Click the “Download” button.
![]()
Note: Sign in to your account to enable downloading.
2. 30 FPS to 60 FPS Online-Convert Tool
Online-Convert is a popular online file format converter. It supports north of 50 video source formats and allows you to convert files between them. Also, Online-Convert allows you to change the video’s frame rate. You can make it 60 FPS or even 120 FPS!
But please remember that, as the tool name suggests, Online-Convert is only a file converter. You can’t edit your videos using this online service. Thus, you need to either have a reliable video editor on your device or use another online tool with an editor function.
Anyway, here is a tutorial on how to convert videos to 60 FPS with this online tool:
Step1 Launch a web browser and go to the Online-Convert tool page.
Step2 Drag the video file to the green rectangle. Alternatively, click “Choose File”/ Enter URL” / “Dropbox” / “Google Drive” to import your file.

Step3 Scroll down to the “Change frame rate” option. Type “60” in the text box.

Step4 Click “Start.”
Step5 Wait for the conversion to finish. The download will start automatically.
Conclusion
Convert your videos to 60 FPS to make them smoother and give your audience a nicer viewing experience. You can use many tools to do that. We recommend trying Wondershare Filmora. Converting a video’s frame rate using this software is as easy as 1-2-3.
This video solution not only gives you the ability to change a video’s frame rate. Wondershare Filmora also provides you with many amazing video editing tools. Therefore, Filmora can help you turn your videos into art. It is worth it.
Free Download For macOS 10.14 or later
Wondershare Filmora is one of the most amazing tools for converting videos to 60 FPS. This allows you to do that without complicated steps. It seems like the video just passed through the program with how fast and easy it is!

On top of that, Wondershare Filmora is a great video editor. It is complete with all the basic editing tools, plus some really great advanced features. So you can edit and enhance the video before or after converting it to 60 FPS. Because of that, Wondershare Filmora is a cost-effective tool.
Here are the steps to follow for turning a video to 60 FPS with Wondershare Filmora:
Step1 Open Wondershare Filmora. Click “New Project.”
Step2 Import the video that you want to convert to 60 FPS.
Step3 Drag the video to the timeline. Click “Export.”
Step4 Change the frame rate to 60 FPS. If you can’t find this, check if you are on the “Local” tab.

Step5 Click “Export.”
2. Use SmoothVideo Project to Make Video To 60 FPS
SmoothVideo Project (SVP) uses frame interpolation techniques - the same used by high-end TVs and projectors. This technique increases the frames by adding intermediate frames between existing ones. As a result, it produces smooth, fluid, and clear motion.
SmoothVideo Projects allow you to convert videos to 60 FPS and even to 120 or 144+ FPS. Also, it can convert the videos in real-time, on top of your video player.
Follow this guide to convert videos using this tool:
Step1 Install SVP and ensure to add SVPcode. If you already have the program installed, you can add SVPcode with the Maintain SVP 4 app.
Step2 Select “Browse for a video to transcode..”
Step3 Import the video/s that you want to convert to 60 FPS.
Step4 Pick 60 FPS when selecting a video profile for the video.

Step5 Choose between “Basic” and “Advanced” for the video compression setting.

Step6 Click “Start.”
3. Make Videos 60 FPS With Freemake Video Converter
Freemake is an all-in-one video converter tool. It supports over 500 video file formats and lets you turn photos and audio into video and process multiple videos at once. The best thing is that you don’t even need to download the video. Freemake Video Converter can convert online videos too.
While converting the files, you have the option to change their framerate. Therefore, it’s an excellent tool for turning videos to 60 FPS.
Follow these steps to change a video’s frame rate using this app:
Step1 Launch Freemake Video Converter. Click “+Video” to import the video that you want to convert.
Step2 Double-click the output format to open the window with the settings option.
Step3 Click the gear or “Settings” button.
Step4 On the new window, click the drop-down menu for “Frame Rate.” Select “60 fps.”

Step5 Click “Ok.”
Step6 Select the destination folder for the output file. Click “Convert.”
2 Fantastic 60 FPS Video Converter Online
What if you are not using a PC to edit your videos? For example, you shoot, edit, and upload your videos using your mobile phone. Or what if you use a PC, but you’re away from home? In these cases, you can use online tools. Here are the 2 best ones on the market.
1. VEED.IO 30 FPS to 60 FPS Online
Veed.io is a simple but ever-so-reliable online video tool. It lets you edit videos and change the frame rate for free. Also, it comes with an array of other tools that can help enhance the video. For instance, Veed.io can remove background noise from the video.
Veed.io also lets you change the video’s aspect ratio to optimize it for different video streaming platforms.
Here’s a guide on how to convert to 60 FPS using Veed.io:
Step1 Run your preferred web browser and go to the website of Veed.io.
Step2 Click “Get Started.”
Step3 Click “Upload a File” or drag the video file to the interface to upload it. Select the video that you want to convert to 60 FPS.

Step4 Click “Export” > “Advanced.”
Step5 Drag the slider for “Framerate Limit” to the right until the display text says “60.”

Step6 Click “Export Video.”
Step7 Please wait for Veed.io to finish processing your video. When the screen says, “Your video is ready.” Click the “Download” button.
![]()
Note: Sign in to your account to enable downloading.
2. 30 FPS to 60 FPS Online-Convert Tool
Online-Convert is a popular online file format converter. It supports north of 50 video source formats and allows you to convert files between them. Also, Online-Convert allows you to change the video’s frame rate. You can make it 60 FPS or even 120 FPS!
But please remember that, as the tool name suggests, Online-Convert is only a file converter. You can’t edit your videos using this online service. Thus, you need to either have a reliable video editor on your device or use another online tool with an editor function.
Anyway, here is a tutorial on how to convert videos to 60 FPS with this online tool:
Step1 Launch a web browser and go to the Online-Convert tool page.
Step2 Drag the video file to the green rectangle. Alternatively, click “Choose File”/ Enter URL” / “Dropbox” / “Google Drive” to import your file.

Step3 Scroll down to the “Change frame rate” option. Type “60” in the text box.

Step4 Click “Start.”
Step5 Wait for the conversion to finish. The download will start automatically.
Conclusion
Convert your videos to 60 FPS to make them smoother and give your audience a nicer viewing experience. You can use many tools to do that. We recommend trying Wondershare Filmora. Converting a video’s frame rate using this software is as easy as 1-2-3.
This video solution not only gives you the ability to change a video’s frame rate. Wondershare Filmora also provides you with many amazing video editing tools. Therefore, Filmora can help you turn your videos into art. It is worth it.
Also read:
- Best GIF to Video Converters for 2024
- How to Make Canva Collages
- Ideas That Help You Out in Making Transparent Image
- 2024 Approved Best Ways to Add Meme Text to Videos
- New 2024 Approved How to Find a High-Quality Video Marketing Agency?
- Easy Way to Add Effects to Art Video for 2024
- Updated Understanding More About CapCut Lenta Template and Slow-Motion Videos
- New How to Use LUTs in Adobe Premiere Pro
- 2024 Approved Why You Should Master Slideshows In Lightroom?
- In 2024, 4 Simple Methods for Making a High-Quality Recap Video
- Updated 2024 Approved How to Add Motion Titles
- 2024 Approved Guide to Create Intro Video with KineMaster
- Ideas to Make A Perfect Café Vlog
- 2024 Approved How to Perfectly Use Canva Color Match?
- New Do You Want to Know All About Video Frame Rates and Speed? Wondershare Filmora Will Help You to Get More Information on This Matter
- Top-Search The Best Game Screen Recording Tools for PC for 2024
- Updated In 2024, How To Add Motion Blur Effect To Photos in GIMP
- Updated 2024 Approved Top 10 Fun Discord Bots You Need
- New How I Got Free After Effects Templates Slideshow with Simple Trick
- With an SRT Editor Online, You Can Synchronize the Subtitles with the Video, Change the Font, and Make Them More Readable. Read on to Know Your Options
- New 2024 Approved 8 Apps to Custom GIF Stickers
- New Motion Blur Photo With GIMP Step-By-Step Guide
- Updated In 2024, What Is Animated GIF | GIF Example & Advantages of GIF
- Updated 2024 Approved What Is the Best Filmora Slideshow Templates? Experts Choice
- 2024 Approved Detailed Steps to Rotate Videos in Windows Media Player
- In 2024, Split Videos in the Lightworks Step by Step
- New How to Perfect Quick and Efficient Video Editing | Keyboard Shortcuts in Filmora
- 2024 Approved How to Change Aspect Ratio in iMovie
- New Top 5 Apps To Add Song To Video
- New 2024 Approved How to Add a Slideshow in PowerPoint
- Apple ID Locked for Security Reasons On Apple iPhone 13 Pro? Find the Best Solution Here
- In 2024, Three Ways to Sim Unlock Motorola Edge 40
- What is Fake GPS Location Pro and Is It Good On Nokia C12 Plus? | Dr.fone
- Easy Guide to Tecno Pova 6 Pro 5G FRP Bypass With Best Methods
- New 2024 Approved How to Promote Your TikTok Videos Best 8 Strategies
- In 2024, Apple ID is Greyed Out From iPhone 6s Plus How to Bypass?
- How to Unlock iCloud Activation Lock and iCloud Account From iPhone 15 Pro Max?
- Does Galaxy XCover 6 Pro Tactical Edition has native MKV support?
- In 2024, Unlock iPhone SE (2022) With Forgotten Passcode Different Methods You Can Try | Dr.fone
- 9 Best Phone Monitoring Apps for Realme GT 5 | Dr.fone
- Samsung Galaxy S24+ Not Connecting to Wi-Fi? 12 Quick Ways to Fix | Dr.fone
- In 2024, How to Detect and Stop mSpy from Spying on Your Realme 12 5G | Dr.fone
- Still Using Pattern Locks with Vivo Y36i? Tips, Tricks and Helpful Advice
- In 2024, The Top 5 Android Apps That Use Fingerprint Sensor to Lock Your Apps On Oppo Find N3 Flip
- Fake the Location to Get Around the MLB Blackouts on Vivo Y100 5G | Dr.fone
- New 2024 Approved Best Toolbox to Translate YouTube Videos to English Subtitles
- 8 Workable Fixes to the SIM not provisioned MM#2 Error on Vivo Y200 | Dr.fone
- Title: Guide to Create Intro Video with KineMaster
- Author: Chloe
- Created at : 2024-06-09 16:15:20
- Updated at : 2024-06-10 16:15:20
- Link: https://ai-editing-video.techidaily.com/guide-to-create-intro-video-with-kinemaster/
- License: This work is licensed under CC BY-NC-SA 4.0.

