:max_bytes(150000):strip_icc():format(webp)/GettyImages-1437209125-b47ae60035f248e2b01b781f50f919c1.jpg)
Have You Ever Used an Adjustment Layer in Photoshop? Read This Article to Find Out How to Add, Resize, Change, and Use an Adjustment Layer in Photoshop Efficiently

Have You Ever Used an Adjustment Layer in Photoshop? Read This Article to Find Out How to Add, Resize, Change, and Use an Adjustment Layer in Photoshop Efficiently
Adobe Photoshop is a famous and powerful image editor through which you can draw captivating illustrations proficiently. Using this advanced software, you can also work on complex 3D artwork efficiently. You can change image backgrounds and eliminate the flaws in your pictures using Photoshop.
As Photoshop is a layer-based editing software, this article will focus on how to resize the layer in Photoshop effectively. Moreover, you can also discover how to create an adjustment layer in Photoshop within a few clicks.
Part 1: What is Layer in Photoshop?
Do you know how layers work in Photoshop? By using layers in Photoshop, you can execute flawless editing without modifying the composition of the whole image. Moreover, it does not alter the original image, so you can revert the changes anytime you want. You can easily adjust the saturation, brightness, contrast, and other elements on each layer in Photoshop. Moreover, you can add special effects to each layer according to your choice.
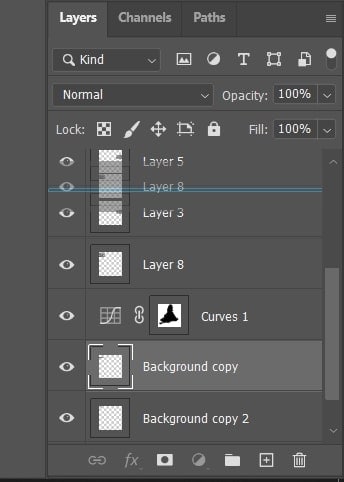
There are different sorts of layers in Photoshop. For example, fill layers consist of color patterns, and type layers allow you to create text and shapes. You can also move and change the position of layers to insert a specific element into the image. Thus, layers are the essential component of Photoshop, enabling you to add text, shapes, and special effects to the images effortlessly.
Part 2: How to Resize a Layer in Photoshop?
Do you want to learn how to change the size of a layer in Photoshop? Here are the simple steps that you can follow to resize a layer in Photoshop:
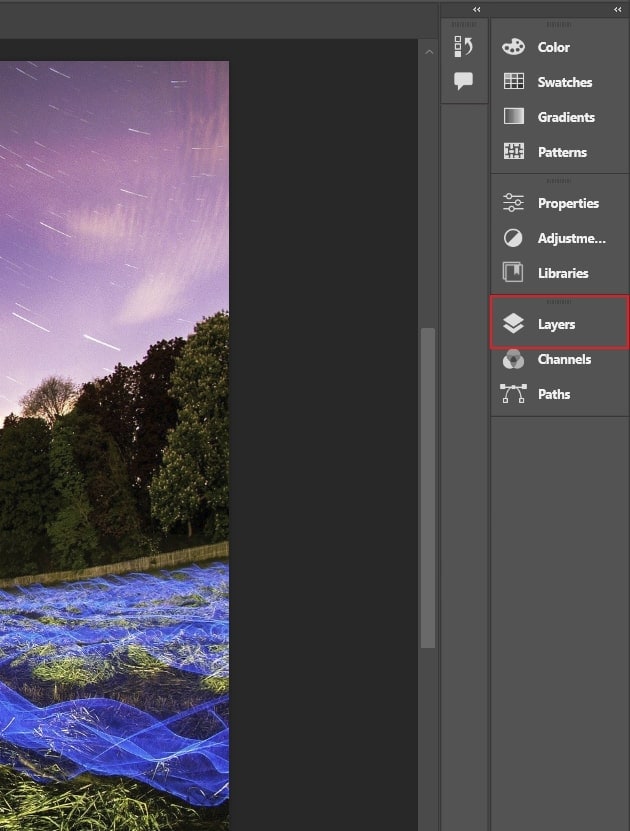
Step1 Go to the right panel of Photoshop and click on “Layers.” From there, choose the layer that you want to resize.
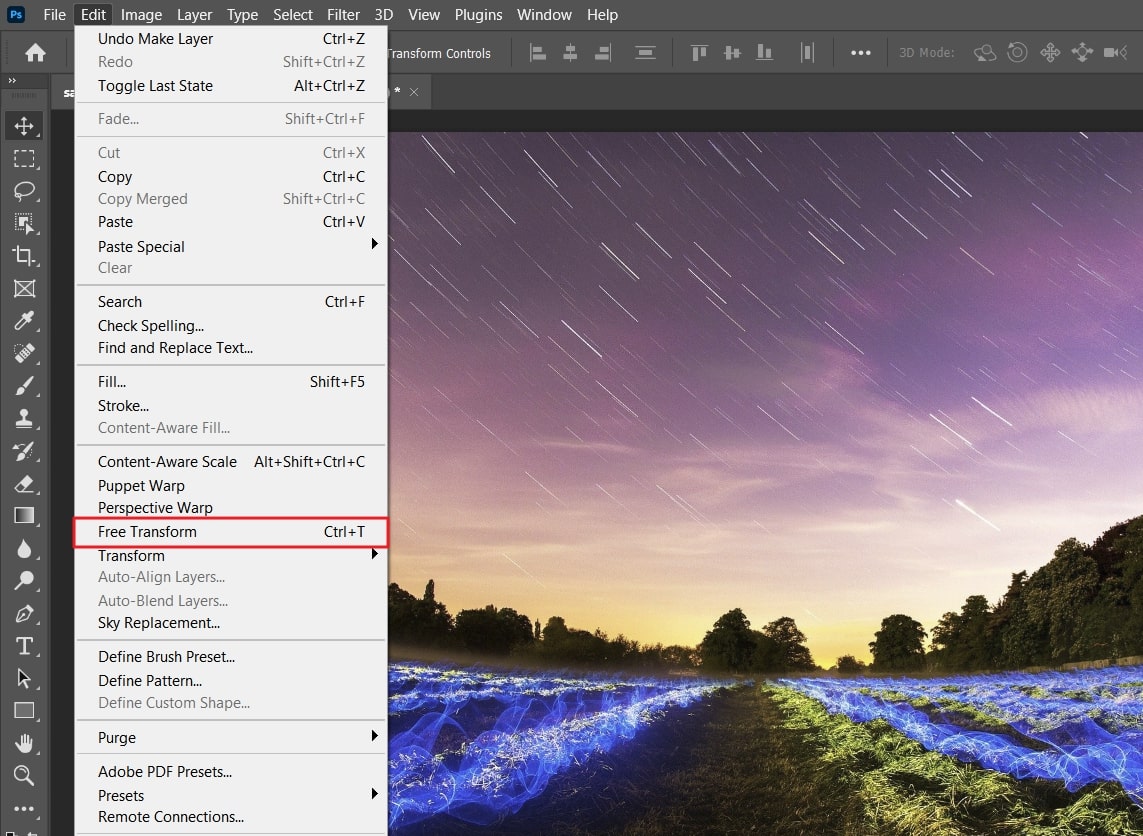
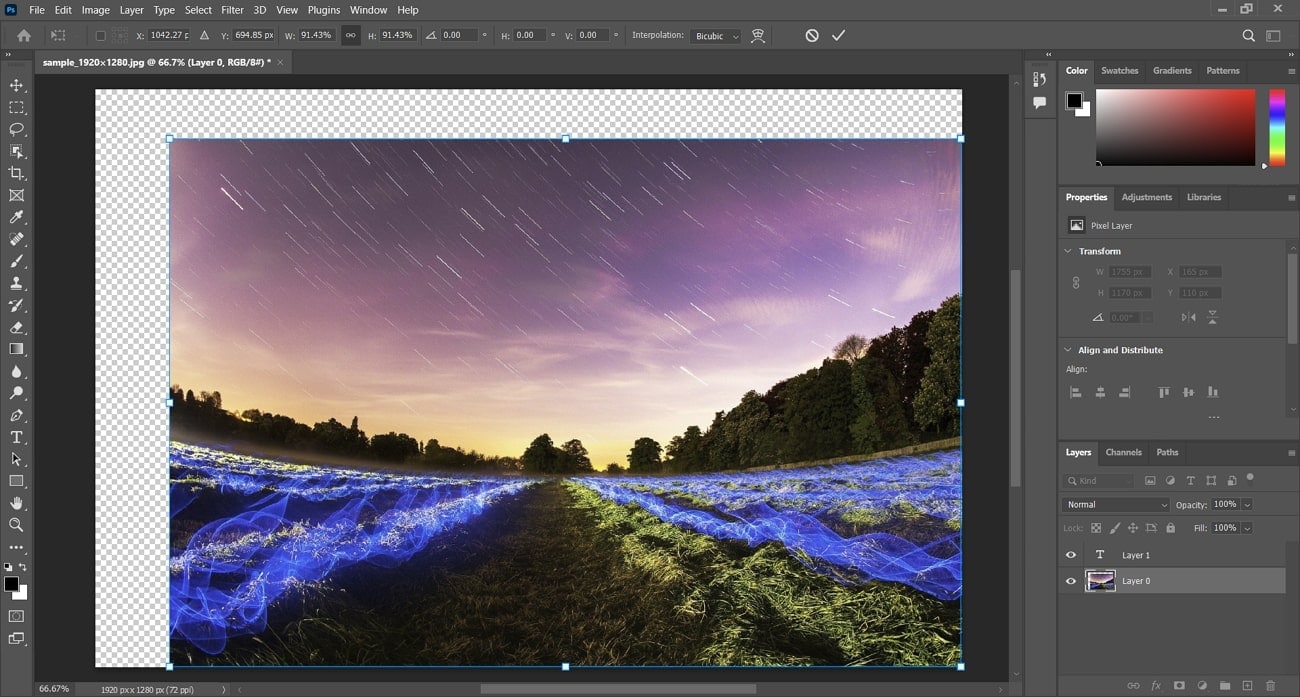
Step2 Once done with selecting the layer, go to the “Edit” tab given at the top. From there, tap on “Free Transform,” which will display the resize bars.
Step3 Now, you can drag and drop the layer according to your preferences. You can also change the height and width of the layer by holding the “Shift” key. Once done, fill in the checkmark at the top options bar. To finalize the resize of your layer, press “Enter” for Windows and “Return” for Mac.
Part 3: How to Change Layer Color in Photoshop?
Do you want to change the color of the layer in Photoshop? Here are the simple steps that you can follow:
Step1 To begin, create a new hue/saturation adjustment layer using the “Adjustments Panel.” Now, double-click on this newly created adjustment layer and select “Create Clipping Mask.” This will let you make color-changing adjustments.
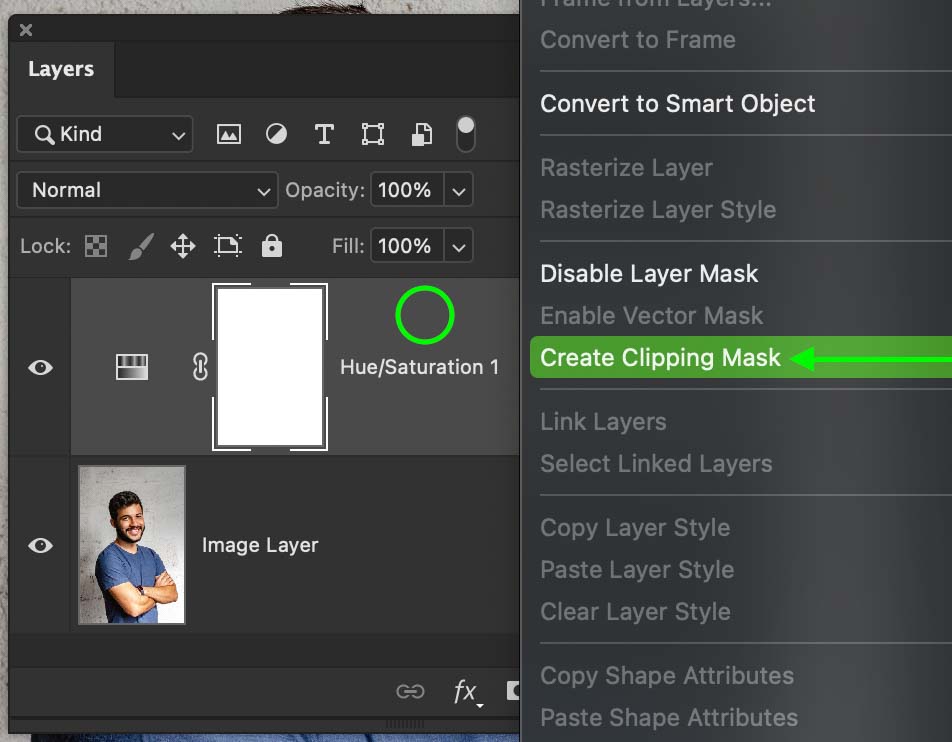
Step2 After creating the clipping mask, you will be able to see a right-angle arrow that is directed down to the image. Now make sure to select the colors of the color channel to make some changes. Afterward, double-click on the “Hue/Saturation” adjustment layer and choose the “Preset” option. Once done, choose the color of your choice.
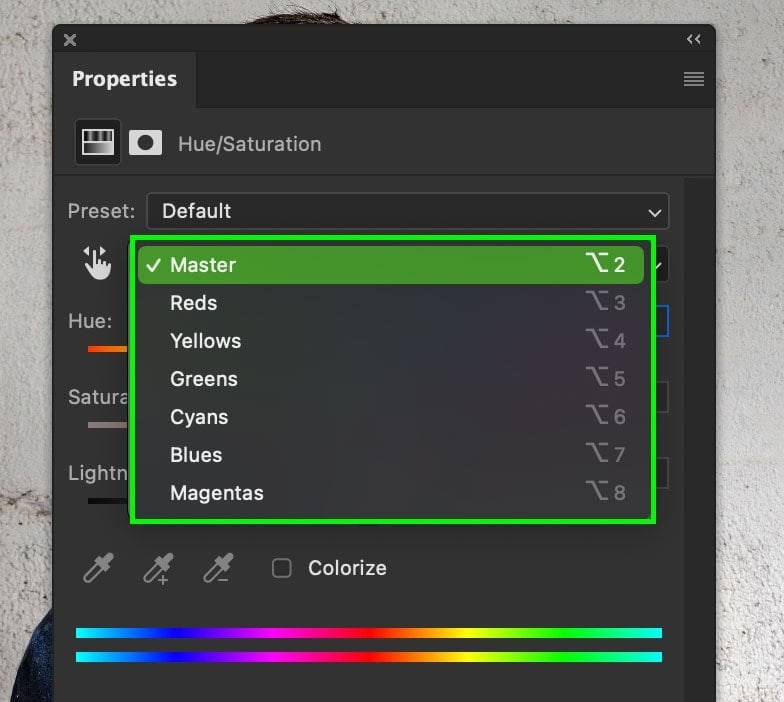
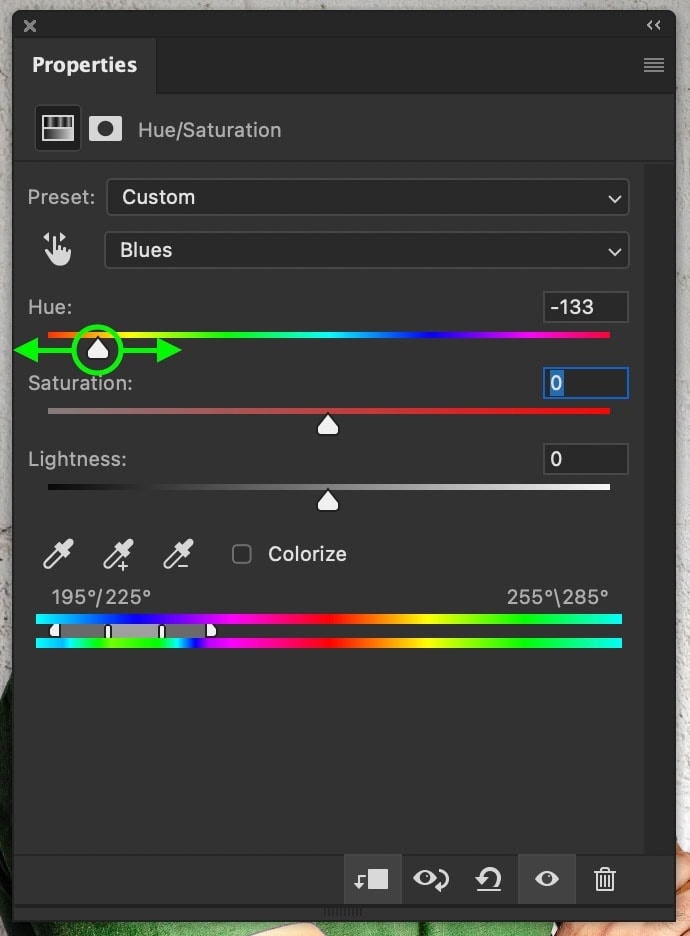
Step3 Once you have chosen the color, make sure to adjust the saturation accordingly. Afterward, manage the hue slider to your preferred color. Once done, you can adjust the sliders of saturation and lightness according to your choice.
Part 4: How to Use Adjustment Layers in Photoshop?
If you are unaware of how to use adjustment layers in Photoshop, this section will provide you with all the details. Thus, continue reading to find out the significance of adjustment layers in Photoshop.
4.1 Why Do You Need to Add an Adjustment Layer?
Raw images always come with lots of imperfections. If you want to edit and enhance them flawlessly, adjustment layers can help you. By adding the adjustment layer, you can manage the levels and curves of the images to make the shadows darker in the picture. Moreover, you can increase or decrease the contrast of the image in specific parts using the adjustment layers properly.
If your image has light problems, you can set the exposure by adding an adjustment layer. Furthermore, you can make the colors of the image pop out by adjusting the color balance. This is also possible with adjustment layers, as it makes the whole process of image editing efficient. Other components that you can modify using adjustment layers are brightness, curves, hue, photo filter, vibrance, etc.
4.2 What Kinds of Adjustment Layers Can You Try?
There are different kinds of adjustment layers that you can try in Photoshop. To discover about them, proceed to the following section.
1. Add a Color Lookup Adjustment Layer
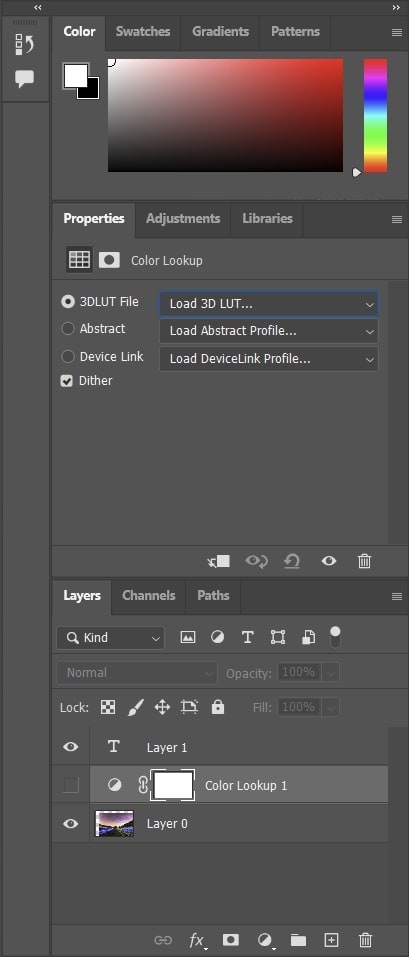
Once you have opened the image in Photoshop, add an adjustment layer and select the option of “Color Lookup” from the “Layers Panel.” From the properties, you can choose any of the color lookup tables. Here you can select any suitable preset to create a new look in your image. You can try different presets according to your image. Once done, you can use the “Blend Mode” option to make final adjustments.
2. Add a Blur Adjustment Layer in Photoshop
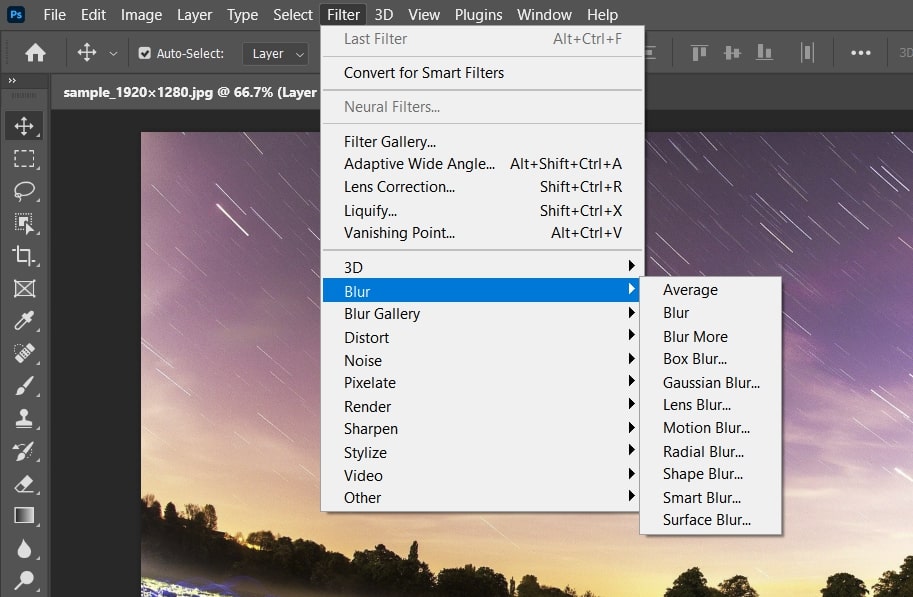
First, you have to create an adjustment layer in Photoshop. Once done, you can navigate to the “Filters” and choose any blur effects, such as Gaussian Blur. You can also apply the motion or radial blur effect from the “Filters” tab. Once you have selected the blur effect, apply it to the adjustment layer. Moreover, you can also try the “Layer Mask” to paint on the specific parts you want to make sharp.
3. Add a Curves Adjustment Layer in Photoshop
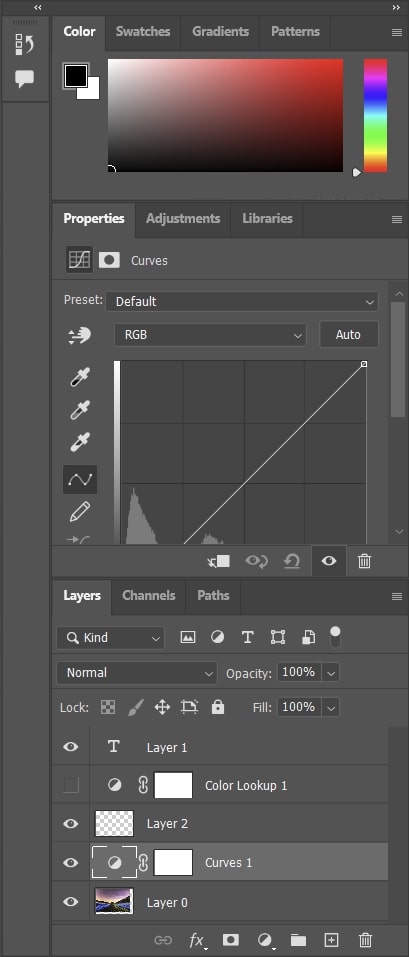
If you want to change the color of particular pixels in the image, you can add the curves adjustment in Photoshop. By doing so, you can execute minor changes in your image easily. To do so, go to the “Adjustments Panel” and click on the “Curves” icon.
Now, in the properties panel, you can move the curves to adjust the specific tonal area of the image. You can also add more points to the curve and apply any preset from the preset menu.
4. Make a Brightness and Contrast Layer in Photoshop
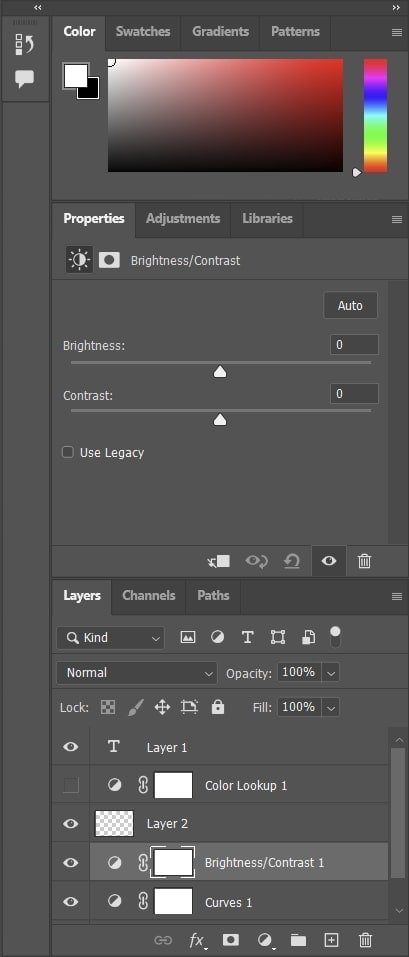
To make a brightness and contrast layer in Photoshop, go to the “Adjustments Panel” first. From there, tap on the “Brightness/Contrast” option that will instantly add a layer in the layers panel. Afterward, a properties panel will also open from which you can modify the settings. Here, you can drag the sliders of brightness and contrast to enhance them accordingly.
5. Adjust Layer Opacity in Photoshop
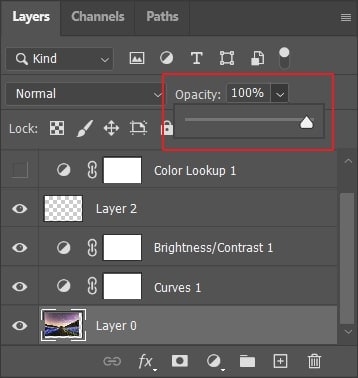
To learn how to adjust opacity in Photoshop, select the desired layer and click on the drop-down menu of “Opacity” in the layers panel. Next, move the slider to adjust the opacity accordingly. If you set the opacity value to 0%, the layer will become invisible.
Conclusion
Photoshop is widely used by professionals to perform high-end image editing. If you want to become an expert in using Photoshop, you must know how to add an adjustment layer in Photoshop. Through this article, you have learned about the importance of layers in image editing. Moreover, you have also discovered different kinds of adjustment layers that you can try to enhance your photos.
Adobe Photoshop is a famous and powerful image editor through which you can draw captivating illustrations proficiently. Using this advanced software, you can also work on complex 3D artwork efficiently. You can change image backgrounds and eliminate the flaws in your pictures using Photoshop.
As Photoshop is a layer-based editing software, this article will focus on how to resize the layer in Photoshop effectively. Moreover, you can also discover how to create an adjustment layer in Photoshop within a few clicks.

Part 1: What is Layer in Photoshop?
Do you know how layers work in Photoshop? By using layers in Photoshop, you can execute flawless editing without modifying the composition of the whole image. Moreover, it does not alter the original image, so you can revert the changes anytime you want. You can easily adjust the saturation, brightness, contrast, and other elements on each layer in Photoshop. Moreover, you can add special effects to each layer according to your choice.

There are different sorts of layers in Photoshop. For example, fill layers consist of color patterns, and type layers allow you to create text and shapes. You can also move and change the position of layers to insert a specific element into the image. Thus, layers are the essential component of Photoshop, enabling you to add text, shapes, and special effects to the images effortlessly.
Part 2: How to Resize a Layer in Photoshop?
Do you want to learn how to change the size of a layer in Photoshop? Here are the simple steps that you can follow to resize a layer in Photoshop:
Step1 Go to the right panel of Photoshop and click on “Layers.” From there, choose the layer that you want to resize.

Step2 Once done with selecting the layer, go to the “Edit” tab given at the top. From there, tap on “Free Transform,” which will display the resize bars.

Step3 Now, you can drag and drop the layer according to your preferences. You can also change the height and width of the layer by holding the “Shift” key. Once done, fill in the checkmark at the top options bar. To finalize the resize of your layer, press “Enter” for Windows and “Return” for Mac.

Part 3: How to Change Layer Color in Photoshop?
Do you want to change the color of the layer in Photoshop? Here are the simple steps that you can follow:
Step1 To begin, create a new hue/saturation adjustment layer using the “Adjustments Panel.” Now, double-click on this newly created adjustment layer and select “Create Clipping Mask.” This will let you make color-changing adjustments.

Step2 After creating the clipping mask, you will be able to see a right-angle arrow that is directed down to the image. Now make sure to select the colors of the color channel to make some changes. Afterward, double-click on the “Hue/Saturation” adjustment layer and choose the “Preset” option. Once done, choose the color of your choice.

Step3 Once you have chosen the color, make sure to adjust the saturation accordingly. Afterward, manage the hue slider to your preferred color. Once done, you can adjust the sliders of saturation and lightness according to your choice.

Part 4: How to Use Adjustment Layers in Photoshop?
If you are unaware of how to use adjustment layers in Photoshop, this section will provide you with all the details. Thus, continue reading to find out the significance of adjustment layers in Photoshop.
4.1 Why Do You Need to Add an Adjustment Layer?
Raw images always come with lots of imperfections. If you want to edit and enhance them flawlessly, adjustment layers can help you. By adding the adjustment layer, you can manage the levels and curves of the images to make the shadows darker in the picture. Moreover, you can increase or decrease the contrast of the image in specific parts using the adjustment layers properly.
If your image has light problems, you can set the exposure by adding an adjustment layer. Furthermore, you can make the colors of the image pop out by adjusting the color balance. This is also possible with adjustment layers, as it makes the whole process of image editing efficient. Other components that you can modify using adjustment layers are brightness, curves, hue, photo filter, vibrance, etc.
4.2 What Kinds of Adjustment Layers Can You Try?
There are different kinds of adjustment layers that you can try in Photoshop. To discover about them, proceed to the following section.
1. Add a Color Lookup Adjustment Layer
Once you have opened the image in Photoshop, add an adjustment layer and select the option of “Color Lookup” from the “Layers Panel.” From the properties, you can choose any of the color lookup tables. Here you can select any suitable preset to create a new look in your image. You can try different presets according to your image. Once done, you can use the “Blend Mode” option to make final adjustments.

2. Add a Blur Adjustment Layer in Photoshop
First, you have to create an adjustment layer in Photoshop. Once done, you can navigate to the “Filters” and choose any blur effects, such as Gaussian Blur. You can also apply the motion or radial blur effect from the “Filters” tab. Once you have selected the blur effect, apply it to the adjustment layer. Moreover, you can also try the “Layer Mask” to paint on the specific parts you want to make sharp.

3. Add a Curves Adjustment Layer in Photoshop
If you want to change the color of particular pixels in the image, you can add the curves adjustment in Photoshop. By doing so, you can execute minor changes in your image easily. To do so, go to the “Adjustments Panel” and click on the “Curves” icon.
Now, in the properties panel, you can move the curves to adjust the specific tonal area of the image. You can also add more points to the curve and apply any preset from the preset menu.

4. Make a Brightness and Contrast Layer in Photoshop
To make a brightness and contrast layer in Photoshop, go to the “Adjustments Panel” first. From there, tap on the “Brightness/Contrast” option that will instantly add a layer in the layers panel. Afterward, a properties panel will also open from which you can modify the settings. Here, you can drag the sliders of brightness and contrast to enhance them accordingly.

5. Adjust Layer Opacity in Photoshop
To learn how to adjust opacity in Photoshop, select the desired layer and click on the drop-down menu of “Opacity” in the layers panel. Next, move the slider to adjust the opacity accordingly. If you set the opacity value to 0%, the layer will become invisible.

Conclusion
Photoshop is widely used by professionals to perform high-end image editing. If you want to become an expert in using Photoshop, you must know how to add an adjustment layer in Photoshop. Through this article, you have learned about the importance of layers in image editing. Moreover, you have also discovered different kinds of adjustment layers that you can try to enhance your photos.
How to Make Stunning Glitch Effect in Photoshop?
Many of us are fascinated by glitch art. The aesthetic effect it adds to your content is unmatched. You can add color and class to your pictures with glitch picture effects. Someone who isn’t aware of the glitch effect is inspired by any technical mishap or digital error. The damage that the malfunctioning of a system causes is used as an art and an effect to beautify things.
You can add the glitch image effect to your photos easily. There are multiple cool templates available on the internet that could be used. You can also make your own stunning yet customized glitch effect Photoshop. If this has impressed you, then stay here because we will talk a lot about glitch photo editors.
In this article
01 Part 1. How Do You Do Photo Glitch Effect in Photoshop?
02 Part 2. 5 Awesome Glitch Effect Photoshop Actions.
Part 1. How Do You Do Photo Glitch Effect in Photoshop?
The jagged lines, the colorful pixels, frozen visuals, and also the distorted colors, everything perfectly blends to make a glitch effect. Usually, this is how all the glitch templates are, but if you get an opportunity to customize your image glitch effect and make your special effect, what will you do?
The best option to adopt in any such circumstances is Photoshop. With Photoshop, you can create a stunning and mind-blowing Photoshop VHS effect. If you want to learn about its steps, then continue reading.
Step 1: The process starts by importing the image to Photoshop on which you plan to add the photo glitch effect. Then you should always convert the image from colorful to black and white. This could be done quickly by going into the ‘Image’ menu from the menu bar. Next, go for the ‘Adjustments’ option and select ‘Desaturate.’

Step 2: Now duplicate the image by dragging it onto the New Layer icon in the Layers Panel. Then double click on the duplicated image. This will open a ‘Layer Style’ settings menu. Here, click on the icon for ‘R Channel’ and deselect it.

Step 3: Now, it’s time to add the first glitch element. For that, hold the ‘Shift’ key and move the image by using the left/right cursor keys on the keyboard. This will offset the image layer from the original.

Step 4: You can now select the ‘Mark’ tool from the left side. Make a rectangle anywhere on the image with the Mark tool and then switch back to the ‘Move’ tool. Then again, nudge the rectangular portion left or right to offset it. You can repeat this process multiple times on different areas of the image.

Step 5: At this point, make a New Layer and fill it with White. Now right-click on this white layer and select the option of ‘Convert to Smart Object.’

Step 6: Move to the menu bar at the top and go to the ‘Filter’ section. From there, select the option of ‘Filter Gallery.’ A new window will show up. Head to the ‘Sketch’ category, and there change the ‘Pattern Type’ to ‘Line.’ You can also play with the ‘Contrast’ and the ‘Size’ of the lines.

Step 7: Now, in the ‘Layers Panel,’ select the option of ‘Overlay’ from the dropdown menu so that the different layers can show through. You can adjust the visibility of the lines by adjusting the number on the scale.

Step 8: After setting everything for the glitch effect in your image, you can now add colors using the ‘Gradient Map.’ Or you can also import some graphic textures to Photoshop and add them to the image. Don’t forget to change the ‘Binding Mode’ to ‘Overlay.’ You can then play with the color and graphic settings.

Step 9: Once all the color adjustments have satisfied you, it’s time to add some text to your glitch image. For that, head to the ‘Text’ tool from the left menu and type in your text. Edit it as you did to your image so that you can make a cool glitch text effect Photoshop and with this, you are all done with making the most stunning glitch effect Photoshop.

Part 2. 5 Awesome Glitch Effect Photoshop Actions
With Photoshop, you can create your photo glitch effect as you prefer instead of using the available standard templates. What if you don’t have enough time to create the effect? Are you going to use the basic and standard templates?
If you are looking for some jaw-dropping glitch picture effects rather than using the basic effects, then this section of the article is perfect for you. We are going to talk about 5 fantastic glitch effects Photoshop action.
1. Distorted Glitch Photoshop Action
The first effect we will discuss is Distorted Glitch Photoshop Action. The effect is very easy to use. You can set it with just one click action. The effect allows you to do adjustment settings with very easy steps to edit it.
The effect has all the dark, distorted, and disturbance-related elements that make it an amazing effect to add glitch effect to image.

2. Geometric Glitch Photoshop Action
If glitch effect with lines is too mainstream for you, then this next effect will surely impress you. This effect is the Geometric Glitch Photoshop Action. You can edit this effect. All its colors, layers, and even elements are fully editable.
You can create a modern yet professional glitch image with this stunning effect. The effect lets you add shapes, abstract styles, and also glitch lines to make cool images.

3. Animated Glitch Photoshop Action
If you are looking for a glitch effect to add to animated content, then nothing is better than Animated Glitch Photoshop Action. The effect template is fully editable with 12 distinct color options. The animated effect has a very organized structure of layers, color coding, etc.
By using this effect, you can add a great vibe to your image. The template greatly shows the distortion, digital error, etc. You can play around with RGB to make it look crazy brilliant.

4. Futuristic Photoshop Action
The next effect in line to be discussed is Futuristic Photoshop Action. This effect has all the bright and neon colors. The effect could be added easily to your images regardless of the type of your content. Graphic designers and photographers use the Futuristic Effect to create stunning and professional glitch images.

5. Glitch Art Photoshop Action
The last effect template that we are going to shed light on is Glitch Art Photoshop Action. The effect is fully editable with 10 different abstract elements. The template has absolutely professional results. The effect delivers complete glitchy vibes.
The distortion, the abstract elements, the digital error, and everything else in effect represents all the glitchy vibes.

Final Words
This article is everything one person needs if they want to learn about glitch effect Photoshop. We have talked about creating a jaw-dropping glitch effect in Photoshop. The steps to create a stunning glitch effect have been mentioned above.
We then shared 5 incredible glitch effects that could be used in case you don’t want to create your own effect.
02 Part 2. 5 Awesome Glitch Effect Photoshop Actions.
Part 1. How Do You Do Photo Glitch Effect in Photoshop?
The jagged lines, the colorful pixels, frozen visuals, and also the distorted colors, everything perfectly blends to make a glitch effect. Usually, this is how all the glitch templates are, but if you get an opportunity to customize your image glitch effect and make your special effect, what will you do?
The best option to adopt in any such circumstances is Photoshop. With Photoshop, you can create a stunning and mind-blowing Photoshop VHS effect. If you want to learn about its steps, then continue reading.
Step 1: The process starts by importing the image to Photoshop on which you plan to add the photo glitch effect. Then you should always convert the image from colorful to black and white. This could be done quickly by going into the ‘Image’ menu from the menu bar. Next, go for the ‘Adjustments’ option and select ‘Desaturate.’

Step 2: Now duplicate the image by dragging it onto the New Layer icon in the Layers Panel. Then double click on the duplicated image. This will open a ‘Layer Style’ settings menu. Here, click on the icon for ‘R Channel’ and deselect it.

Step 3: Now, it’s time to add the first glitch element. For that, hold the ‘Shift’ key and move the image by using the left/right cursor keys on the keyboard. This will offset the image layer from the original.

Step 4: You can now select the ‘Mark’ tool from the left side. Make a rectangle anywhere on the image with the Mark tool and then switch back to the ‘Move’ tool. Then again, nudge the rectangular portion left or right to offset it. You can repeat this process multiple times on different areas of the image.

Step 5: At this point, make a New Layer and fill it with White. Now right-click on this white layer and select the option of ‘Convert to Smart Object.’

Step 6: Move to the menu bar at the top and go to the ‘Filter’ section. From there, select the option of ‘Filter Gallery.’ A new window will show up. Head to the ‘Sketch’ category, and there change the ‘Pattern Type’ to ‘Line.’ You can also play with the ‘Contrast’ and the ‘Size’ of the lines.

Step 7: Now, in the ‘Layers Panel,’ select the option of ‘Overlay’ from the dropdown menu so that the different layers can show through. You can adjust the visibility of the lines by adjusting the number on the scale.

Step 8: After setting everything for the glitch effect in your image, you can now add colors using the ‘Gradient Map.’ Or you can also import some graphic textures to Photoshop and add them to the image. Don’t forget to change the ‘Binding Mode’ to ‘Overlay.’ You can then play with the color and graphic settings.

Step 9: Once all the color adjustments have satisfied you, it’s time to add some text to your glitch image. For that, head to the ‘Text’ tool from the left menu and type in your text. Edit it as you did to your image so that you can make a cool glitch text effect Photoshop and with this, you are all done with making the most stunning glitch effect Photoshop.

Part 2. 5 Awesome Glitch Effect Photoshop Actions
With Photoshop, you can create your photo glitch effect as you prefer instead of using the available standard templates. What if you don’t have enough time to create the effect? Are you going to use the basic and standard templates?
If you are looking for some jaw-dropping glitch picture effects rather than using the basic effects, then this section of the article is perfect for you. We are going to talk about 5 fantastic glitch effects Photoshop action.
1. Distorted Glitch Photoshop Action
The first effect we will discuss is Distorted Glitch Photoshop Action. The effect is very easy to use. You can set it with just one click action. The effect allows you to do adjustment settings with very easy steps to edit it.
The effect has all the dark, distorted, and disturbance-related elements that make it an amazing effect to add glitch effect to image.

2. Geometric Glitch Photoshop Action
If glitch effect with lines is too mainstream for you, then this next effect will surely impress you. This effect is the Geometric Glitch Photoshop Action. You can edit this effect. All its colors, layers, and even elements are fully editable.
You can create a modern yet professional glitch image with this stunning effect. The effect lets you add shapes, abstract styles, and also glitch lines to make cool images.

3. Animated Glitch Photoshop Action
If you are looking for a glitch effect to add to animated content, then nothing is better than Animated Glitch Photoshop Action. The effect template is fully editable with 12 distinct color options. The animated effect has a very organized structure of layers, color coding, etc.
By using this effect, you can add a great vibe to your image. The template greatly shows the distortion, digital error, etc. You can play around with RGB to make it look crazy brilliant.

4. Futuristic Photoshop Action
The next effect in line to be discussed is Futuristic Photoshop Action. This effect has all the bright and neon colors. The effect could be added easily to your images regardless of the type of your content. Graphic designers and photographers use the Futuristic Effect to create stunning and professional glitch images.

5. Glitch Art Photoshop Action
The last effect template that we are going to shed light on is Glitch Art Photoshop Action. The effect is fully editable with 10 different abstract elements. The template has absolutely professional results. The effect delivers complete glitchy vibes.
The distortion, the abstract elements, the digital error, and everything else in effect represents all the glitchy vibes.

Final Words
This article is everything one person needs if they want to learn about glitch effect Photoshop. We have talked about creating a jaw-dropping glitch effect in Photoshop. The steps to create a stunning glitch effect have been mentioned above.
We then shared 5 incredible glitch effects that could be used in case you don’t want to create your own effect.
02 Part 2. 5 Awesome Glitch Effect Photoshop Actions.
Part 1. How Do You Do Photo Glitch Effect in Photoshop?
The jagged lines, the colorful pixels, frozen visuals, and also the distorted colors, everything perfectly blends to make a glitch effect. Usually, this is how all the glitch templates are, but if you get an opportunity to customize your image glitch effect and make your special effect, what will you do?
The best option to adopt in any such circumstances is Photoshop. With Photoshop, you can create a stunning and mind-blowing Photoshop VHS effect. If you want to learn about its steps, then continue reading.
Step 1: The process starts by importing the image to Photoshop on which you plan to add the photo glitch effect. Then you should always convert the image from colorful to black and white. This could be done quickly by going into the ‘Image’ menu from the menu bar. Next, go for the ‘Adjustments’ option and select ‘Desaturate.’

Step 2: Now duplicate the image by dragging it onto the New Layer icon in the Layers Panel. Then double click on the duplicated image. This will open a ‘Layer Style’ settings menu. Here, click on the icon for ‘R Channel’ and deselect it.

Step 3: Now, it’s time to add the first glitch element. For that, hold the ‘Shift’ key and move the image by using the left/right cursor keys on the keyboard. This will offset the image layer from the original.

Step 4: You can now select the ‘Mark’ tool from the left side. Make a rectangle anywhere on the image with the Mark tool and then switch back to the ‘Move’ tool. Then again, nudge the rectangular portion left or right to offset it. You can repeat this process multiple times on different areas of the image.

Step 5: At this point, make a New Layer and fill it with White. Now right-click on this white layer and select the option of ‘Convert to Smart Object.’

Step 6: Move to the menu bar at the top and go to the ‘Filter’ section. From there, select the option of ‘Filter Gallery.’ A new window will show up. Head to the ‘Sketch’ category, and there change the ‘Pattern Type’ to ‘Line.’ You can also play with the ‘Contrast’ and the ‘Size’ of the lines.

Step 7: Now, in the ‘Layers Panel,’ select the option of ‘Overlay’ from the dropdown menu so that the different layers can show through. You can adjust the visibility of the lines by adjusting the number on the scale.

Step 8: After setting everything for the glitch effect in your image, you can now add colors using the ‘Gradient Map.’ Or you can also import some graphic textures to Photoshop and add them to the image. Don’t forget to change the ‘Binding Mode’ to ‘Overlay.’ You can then play with the color and graphic settings.

Step 9: Once all the color adjustments have satisfied you, it’s time to add some text to your glitch image. For that, head to the ‘Text’ tool from the left menu and type in your text. Edit it as you did to your image so that you can make a cool glitch text effect Photoshop and with this, you are all done with making the most stunning glitch effect Photoshop.

Part 2. 5 Awesome Glitch Effect Photoshop Actions
With Photoshop, you can create your photo glitch effect as you prefer instead of using the available standard templates. What if you don’t have enough time to create the effect? Are you going to use the basic and standard templates?
If you are looking for some jaw-dropping glitch picture effects rather than using the basic effects, then this section of the article is perfect for you. We are going to talk about 5 fantastic glitch effects Photoshop action.
1. Distorted Glitch Photoshop Action
The first effect we will discuss is Distorted Glitch Photoshop Action. The effect is very easy to use. You can set it with just one click action. The effect allows you to do adjustment settings with very easy steps to edit it.
The effect has all the dark, distorted, and disturbance-related elements that make it an amazing effect to add glitch effect to image.

2. Geometric Glitch Photoshop Action
If glitch effect with lines is too mainstream for you, then this next effect will surely impress you. This effect is the Geometric Glitch Photoshop Action. You can edit this effect. All its colors, layers, and even elements are fully editable.
You can create a modern yet professional glitch image with this stunning effect. The effect lets you add shapes, abstract styles, and also glitch lines to make cool images.

3. Animated Glitch Photoshop Action
If you are looking for a glitch effect to add to animated content, then nothing is better than Animated Glitch Photoshop Action. The effect template is fully editable with 12 distinct color options. The animated effect has a very organized structure of layers, color coding, etc.
By using this effect, you can add a great vibe to your image. The template greatly shows the distortion, digital error, etc. You can play around with RGB to make it look crazy brilliant.

4. Futuristic Photoshop Action
The next effect in line to be discussed is Futuristic Photoshop Action. This effect has all the bright and neon colors. The effect could be added easily to your images regardless of the type of your content. Graphic designers and photographers use the Futuristic Effect to create stunning and professional glitch images.

5. Glitch Art Photoshop Action
The last effect template that we are going to shed light on is Glitch Art Photoshop Action. The effect is fully editable with 10 different abstract elements. The template has absolutely professional results. The effect delivers complete glitchy vibes.
The distortion, the abstract elements, the digital error, and everything else in effect represents all the glitchy vibes.

Final Words
This article is everything one person needs if they want to learn about glitch effect Photoshop. We have talked about creating a jaw-dropping glitch effect in Photoshop. The steps to create a stunning glitch effect have been mentioned above.
We then shared 5 incredible glitch effects that could be used in case you don’t want to create your own effect.
02 Part 2. 5 Awesome Glitch Effect Photoshop Actions.
Part 1. How Do You Do Photo Glitch Effect in Photoshop?
The jagged lines, the colorful pixels, frozen visuals, and also the distorted colors, everything perfectly blends to make a glitch effect. Usually, this is how all the glitch templates are, but if you get an opportunity to customize your image glitch effect and make your special effect, what will you do?
The best option to adopt in any such circumstances is Photoshop. With Photoshop, you can create a stunning and mind-blowing Photoshop VHS effect. If you want to learn about its steps, then continue reading.
Step 1: The process starts by importing the image to Photoshop on which you plan to add the photo glitch effect. Then you should always convert the image from colorful to black and white. This could be done quickly by going into the ‘Image’ menu from the menu bar. Next, go for the ‘Adjustments’ option and select ‘Desaturate.’

Step 2: Now duplicate the image by dragging it onto the New Layer icon in the Layers Panel. Then double click on the duplicated image. This will open a ‘Layer Style’ settings menu. Here, click on the icon for ‘R Channel’ and deselect it.

Step 3: Now, it’s time to add the first glitch element. For that, hold the ‘Shift’ key and move the image by using the left/right cursor keys on the keyboard. This will offset the image layer from the original.

Step 4: You can now select the ‘Mark’ tool from the left side. Make a rectangle anywhere on the image with the Mark tool and then switch back to the ‘Move’ tool. Then again, nudge the rectangular portion left or right to offset it. You can repeat this process multiple times on different areas of the image.

Step 5: At this point, make a New Layer and fill it with White. Now right-click on this white layer and select the option of ‘Convert to Smart Object.’

Step 6: Move to the menu bar at the top and go to the ‘Filter’ section. From there, select the option of ‘Filter Gallery.’ A new window will show up. Head to the ‘Sketch’ category, and there change the ‘Pattern Type’ to ‘Line.’ You can also play with the ‘Contrast’ and the ‘Size’ of the lines.

Step 7: Now, in the ‘Layers Panel,’ select the option of ‘Overlay’ from the dropdown menu so that the different layers can show through. You can adjust the visibility of the lines by adjusting the number on the scale.

Step 8: After setting everything for the glitch effect in your image, you can now add colors using the ‘Gradient Map.’ Or you can also import some graphic textures to Photoshop and add them to the image. Don’t forget to change the ‘Binding Mode’ to ‘Overlay.’ You can then play with the color and graphic settings.

Step 9: Once all the color adjustments have satisfied you, it’s time to add some text to your glitch image. For that, head to the ‘Text’ tool from the left menu and type in your text. Edit it as you did to your image so that you can make a cool glitch text effect Photoshop and with this, you are all done with making the most stunning glitch effect Photoshop.

Part 2. 5 Awesome Glitch Effect Photoshop Actions
With Photoshop, you can create your photo glitch effect as you prefer instead of using the available standard templates. What if you don’t have enough time to create the effect? Are you going to use the basic and standard templates?
If you are looking for some jaw-dropping glitch picture effects rather than using the basic effects, then this section of the article is perfect for you. We are going to talk about 5 fantastic glitch effects Photoshop action.
1. Distorted Glitch Photoshop Action
The first effect we will discuss is Distorted Glitch Photoshop Action. The effect is very easy to use. You can set it with just one click action. The effect allows you to do adjustment settings with very easy steps to edit it.
The effect has all the dark, distorted, and disturbance-related elements that make it an amazing effect to add glitch effect to image.

2. Geometric Glitch Photoshop Action
If glitch effect with lines is too mainstream for you, then this next effect will surely impress you. This effect is the Geometric Glitch Photoshop Action. You can edit this effect. All its colors, layers, and even elements are fully editable.
You can create a modern yet professional glitch image with this stunning effect. The effect lets you add shapes, abstract styles, and also glitch lines to make cool images.

3. Animated Glitch Photoshop Action
If you are looking for a glitch effect to add to animated content, then nothing is better than Animated Glitch Photoshop Action. The effect template is fully editable with 12 distinct color options. The animated effect has a very organized structure of layers, color coding, etc.
By using this effect, you can add a great vibe to your image. The template greatly shows the distortion, digital error, etc. You can play around with RGB to make it look crazy brilliant.

4. Futuristic Photoshop Action
The next effect in line to be discussed is Futuristic Photoshop Action. This effect has all the bright and neon colors. The effect could be added easily to your images regardless of the type of your content. Graphic designers and photographers use the Futuristic Effect to create stunning and professional glitch images.

5. Glitch Art Photoshop Action
The last effect template that we are going to shed light on is Glitch Art Photoshop Action. The effect is fully editable with 10 different abstract elements. The template has absolutely professional results. The effect delivers complete glitchy vibes.
The distortion, the abstract elements, the digital error, and everything else in effect represents all the glitchy vibes.

Final Words
This article is everything one person needs if they want to learn about glitch effect Photoshop. We have talked about creating a jaw-dropping glitch effect in Photoshop. The steps to create a stunning glitch effect have been mentioned above.
We then shared 5 incredible glitch effects that could be used in case you don’t want to create your own effect.
10 Apps to Make Videos with Pictures and Music
Versatile Video Editor - Wondershare Filmora
Almost all modern social media platforms allow you to upload videos on your profile, on your story, and even send them as a message. And if you want to create more personalized videos, then you might be looking for apps to put music over video, apps to make videos with pictures and music, and other types of video editor apps. But since everyone wants to edit videos right on their Android and iOS devices, many apps are available. And to help you pick the perfect app for music on video clips and make other edits, we are here with the 10 best apps to make videos with music and pictures. All of these video editor apps also have their important details below. You can easily pick the best app for making videos with pictures and music by going through the following options.
In this article
01 [Best 10 Apps for Making Videos on Android & iOS](#Part 1)
02 [Video Editor Software for Windows & Mac](#Part 2)
Part 1 Best 10 Apps for Making Videos on Android & iOS
#1) Kinemaster
Kinemaster is considered one of the most influential and feature-rich options when you talk about the best app for making videos with music right on your mobile device. While its user interface can be a little imitating initially, it offers almost all the features you will need in a picture video app with music support. You can easily edit 4K videos, apply video effects, work with multiple layers, use its inbuilt media library, and do much more for quickly editing videos with any music of your choice.

#2) Filmr
Filmr can be a great video-creating app with music support for all those who want something easy to use thanks to its user interface. Even though this app may not have all the high-end and versatile video editing features, it certainly offers all the basics making it a great app to make music videos with pictures. Despite being completely free to use, you still get various filters for both video and audio. You can also apply these effects on pictures for making videos with music. And the best part is that you get all of this in a completely free-to-use the app.
#3) Filmora
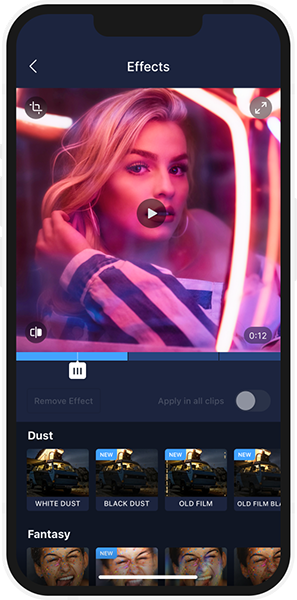
Filmora is most likely the best app to make a video with music and pictures on your smartphone. This is thanks to the wide range of features and effects that it includes while being one of the easiest to use apps out there. If you want to create videos with pictures and music, you will be glad to know that this is a video editor app with Spotify music support and offline music support so that you can apply any music of your choice. Filmora also allows you to use a wide range of video effects, apply text, add face filters, etc. And if you like Filmora, you can even try the Filmora video editor, which is its desktop version, as you will see below.
#4) Inshot
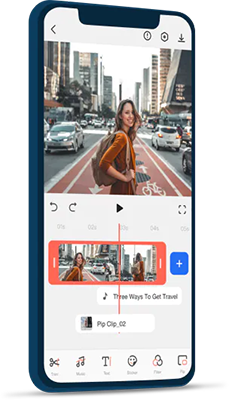
Inshot is one of the more basic and simpler video editor apps out there. It was primarily made to create square images and videos for posting on social media platforms like Instagram. But now, this app can also be used for trimming, applying effects, changing color filters, adding stickers, adding text, and much more. And most importantly, Inshot can also be used to create slideshows and videos using pictures and music. Unlike some other free video editors, this one does not even have any watermarks.
#5) CapCut
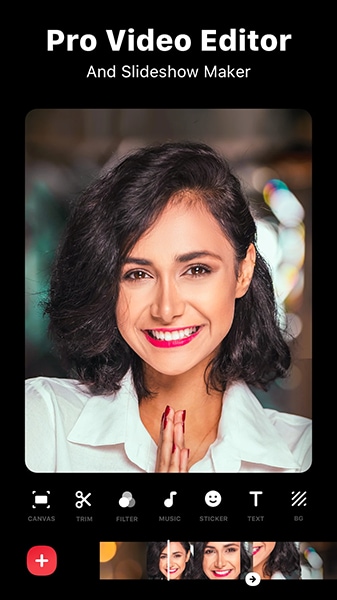
CapCut has been quite a popular option for creating music videos for social media platforms like Instagram Reels, YouTube Shorts, TikTok, and more. Thus, it is the perfect sync video to music beat app that you install on your smartphone. But most importantly, it comes with all the latest video effects, transitions, and much more for creating all the latest video trends on your phone. You can add music to both videos and photos using CapCut as you like.
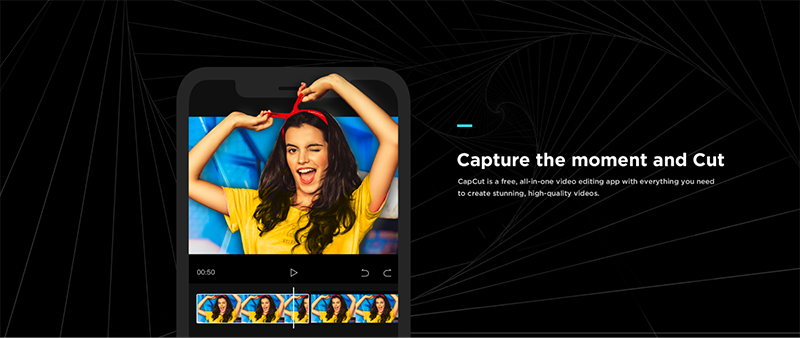
#6) Vimeo Create
Vimeo is a fairly popular video streaming platform which is almost similar to YouTube. Since a lot of users upload a large number of videos on Vimeo, Vimeo also offers its own editor. While it also has an online editor, you can also download Vimeo Create on your mobile device since it is available for both Android and iOS devices. It is the perfect option for beginners thanks to the large number of templates it offers for creating videos using pictures and music.

#7) Power Director
Power Director is quite a popular video editing app which is available on almost all platforms out there including mobile devices like Android & iOS. And even with the mobile version, you get almost all the functions of the desktop version making it perfect for creating videos using pictures and music. Even with the free version of Power Director, you also get a decent amount of video effects and support for editing 4K videos with ease. However, the free version does have a watermark on all the videos that you create.
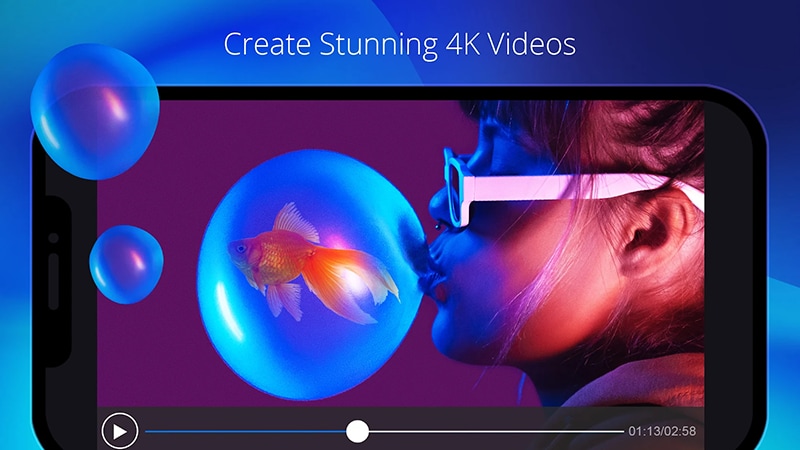
#8) Adobe Premiere Rush
If you are familiar with industry standards when you are talking about video editors, then you must know about Adobe Premiere Pro. And if you want a familiar experience on your mobile device, then you can go with the Adobe Premiere Rush. Even on your mobile device, it offers a very similar experience thanks to the wide range of features, effects, controls, and much more it offers. Unlike other video editor apps, it even allows you to record videos if you want more than just creating videos using pictures and music.
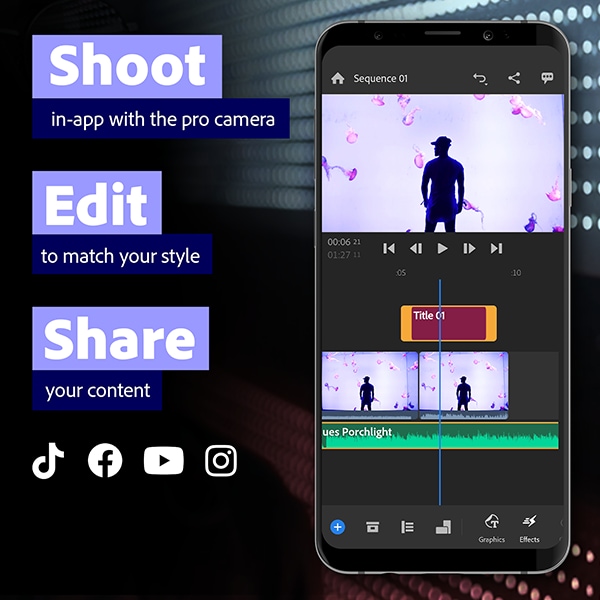
#9) GoPro Quik
As you can guess by the name, GoPro Quik is a video editing app primarily made for GoPro cameras. But with newer updates for this app, it can be used with any kind of video or picture files. And the best thing about the GoPro Quik app is that it supports automated music beat sync editing. You can simply add any music track in the app and it will automatically sync photos and videos with it. If you want, you can also use video effects like speed control, crop and trim, color filters, text, stickers, and much more.
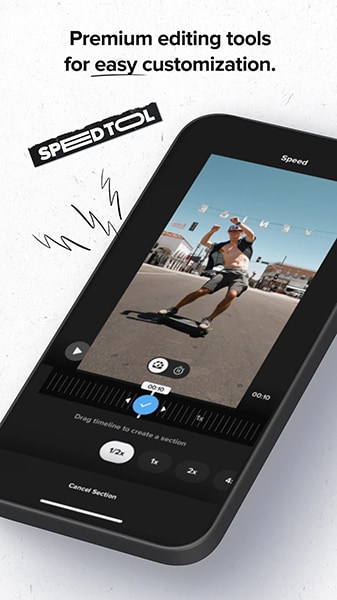
#10) Picsart
Even though Picsart was primarily a photo editing app, it also supports video editing in newer versions. And since Picsart is great for editing photos and pictures, creating videos using pictures and music is also quite easy. All of the features and effects supported by Picsart for photos, will also work for editing videos using Picsart. It includes color filters, face filters, makeup options, video effects, cropping, trimming, etc.
Part 2 Video Editor Software for Windows & Mac
With all the various apps given above, you can easily pick the right app to put videos together with music right on your smartphone. And while all of these apps work great for basic usage, any large projects are better to be done on a computer. Thankfully, even if you want an app to put videos and pictures together with music on your computer, you can still find multiple free to use options. Out of all such options,
is considered the best free app to make videos with music for Windows and Mac. Just per the name, Filmora is the desktop version of the previously mentioned Filmora.
Since this is the desktop version of Filmora, it offers even more features making it a great option for those who want the best app to make videos with music on Windows and Mac. Both the Windows and Mac versions of the Filmora video editing app are quite easy to use with easy-to-access options. As for its options, you get a wide range of video effects, color grading, audio settings, keyboard shortcuts, keyframing, motion tracking, and much more. And unlike other options, Filmora is the best perfect picture video app with music support for those who want an easy-to-run video editor since it can run even on entry-level computers with ease.
Wondershare Filmora
Get started quickly with Filmora’s powerful performance, intuitive interface, and countless effects!
Try It Free Try It Free Try It Free Learn More >

Conclusion
While there are music video creator app options available out there, not all of them offer the right features and options. Hence, to help you in picking the best app for music video made on your mobile device, we have already given the 10 best apps to make videos with music and pictures. Since all of these apps are quite different, you can certainly find the right option whether you want music over video app or a video collage with music app for your mobile device. You can also leave your thoughts and questions regarding the best app for making videos with pictures and music in the comments section below.
Almost all modern social media platforms allow you to upload videos on your profile, on your story, and even send them as a message. And if you want to create more personalized videos, then you might be looking for apps to put music over video, apps to make videos with pictures and music, and other types of video editor apps. But since everyone wants to edit videos right on their Android and iOS devices, many apps are available. And to help you pick the perfect app for music on video clips and make other edits, we are here with the 10 best apps to make videos with music and pictures. All of these video editor apps also have their important details below. You can easily pick the best app for making videos with pictures and music by going through the following options.
In this article
01 [Best 10 Apps for Making Videos on Android & iOS](#Part 1)
02 [Video Editor Software for Windows & Mac](#Part 2)
Part 1 Best 10 Apps for Making Videos on Android & iOS
#1) Kinemaster
Kinemaster is considered one of the most influential and feature-rich options when you talk about the best app for making videos with music right on your mobile device. While its user interface can be a little imitating initially, it offers almost all the features you will need in a picture video app with music support. You can easily edit 4K videos, apply video effects, work with multiple layers, use its inbuilt media library, and do much more for quickly editing videos with any music of your choice.

#2) Filmr
Filmr can be a great video-creating app with music support for all those who want something easy to use thanks to its user interface. Even though this app may not have all the high-end and versatile video editing features, it certainly offers all the basics making it a great app to make music videos with pictures. Despite being completely free to use, you still get various filters for both video and audio. You can also apply these effects on pictures for making videos with music. And the best part is that you get all of this in a completely free-to-use the app.

#3) Filmora
Filmora is most likely the best app to make a video with music and pictures on your smartphone. This is thanks to the wide range of features and effects that it includes while being one of the easiest to use apps out there. If you want to create videos with pictures and music, you will be glad to know that this is a video editor app with Spotify music support and offline music support so that you can apply any music of your choice. Filmora also allows you to use a wide range of video effects, apply text, add face filters, etc. And if you like Filmora, you can even try the Filmora video editor, which is its desktop version, as you will see below.

#4) Inshot
Inshot is one of the more basic and simpler video editor apps out there. It was primarily made to create square images and videos for posting on social media platforms like Instagram. But now, this app can also be used for trimming, applying effects, changing color filters, adding stickers, adding text, and much more. And most importantly, Inshot can also be used to create slideshows and videos using pictures and music. Unlike some other free video editors, this one does not even have any watermarks.

#5) CapCut
CapCut has been quite a popular option for creating music videos for social media platforms like Instagram Reels, YouTube Shorts, TikTok, and more. Thus, it is the perfect sync video to music beat app that you install on your smartphone. But most importantly, it comes with all the latest video effects, transitions, and much more for creating all the latest video trends on your phone. You can add music to both videos and photos using CapCut as you like.

#6) Vimeo Create
Vimeo is a fairly popular video streaming platform which is almost similar to YouTube. Since a lot of users upload a large number of videos on Vimeo, Vimeo also offers its own editor. While it also has an online editor, you can also download Vimeo Create on your mobile device since it is available for both Android and iOS devices. It is the perfect option for beginners thanks to the large number of templates it offers for creating videos using pictures and music.

#7) Power Director
Power Director is quite a popular video editing app which is available on almost all platforms out there including mobile devices like Android & iOS. And even with the mobile version, you get almost all the functions of the desktop version making it perfect for creating videos using pictures and music. Even with the free version of Power Director, you also get a decent amount of video effects and support for editing 4K videos with ease. However, the free version does have a watermark on all the videos that you create.

#8) Adobe Premiere Rush
If you are familiar with industry standards when you are talking about video editors, then you must know about Adobe Premiere Pro. And if you want a familiar experience on your mobile device, then you can go with the Adobe Premiere Rush. Even on your mobile device, it offers a very similar experience thanks to the wide range of features, effects, controls, and much more it offers. Unlike other video editor apps, it even allows you to record videos if you want more than just creating videos using pictures and music.

#9) GoPro Quik
As you can guess by the name, GoPro Quik is a video editing app primarily made for GoPro cameras. But with newer updates for this app, it can be used with any kind of video or picture files. And the best thing about the GoPro Quik app is that it supports automated music beat sync editing. You can simply add any music track in the app and it will automatically sync photos and videos with it. If you want, you can also use video effects like speed control, crop and trim, color filters, text, stickers, and much more.

#10) Picsart
Even though Picsart was primarily a photo editing app, it also supports video editing in newer versions. And since Picsart is great for editing photos and pictures, creating videos using pictures and music is also quite easy. All of the features and effects supported by Picsart for photos, will also work for editing videos using Picsart. It includes color filters, face filters, makeup options, video effects, cropping, trimming, etc.

Part 2 Video Editor Software for Windows & Mac
With all the various apps given above, you can easily pick the right app to put videos together with music right on your smartphone. And while all of these apps work great for basic usage, any large projects are better to be done on a computer. Thankfully, even if you want an app to put videos and pictures together with music on your computer, you can still find multiple free to use options. Out of all such options,
is considered the best free app to make videos with music for Windows and Mac. Just per the name, Filmora is the desktop version of the previously mentioned Filmora.
Since this is the desktop version of Filmora, it offers even more features making it a great option for those who want the best app to make videos with music on Windows and Mac. Both the Windows and Mac versions of the Filmora video editing app are quite easy to use with easy-to-access options. As for its options, you get a wide range of video effects, color grading, audio settings, keyboard shortcuts, keyframing, motion tracking, and much more. And unlike other options, Filmora is the best perfect picture video app with music support for those who want an easy-to-run video editor since it can run even on entry-level computers with ease.
Wondershare Filmora
Get started quickly with Filmora’s powerful performance, intuitive interface, and countless effects!
Try It Free Try It Free Try It Free Learn More >

Conclusion
While there are music video creator app options available out there, not all of them offer the right features and options. Hence, to help you in picking the best app for music video made on your mobile device, we have already given the 10 best apps to make videos with music and pictures. Since all of these apps are quite different, you can certainly find the right option whether you want music over video app or a video collage with music app for your mobile device. You can also leave your thoughts and questions regarding the best app for making videos with pictures and music in the comments section below.
Almost all modern social media platforms allow you to upload videos on your profile, on your story, and even send them as a message. And if you want to create more personalized videos, then you might be looking for apps to put music over video, apps to make videos with pictures and music, and other types of video editor apps. But since everyone wants to edit videos right on their Android and iOS devices, many apps are available. And to help you pick the perfect app for music on video clips and make other edits, we are here with the 10 best apps to make videos with music and pictures. All of these video editor apps also have their important details below. You can easily pick the best app for making videos with pictures and music by going through the following options.
In this article
01 [Best 10 Apps for Making Videos on Android & iOS](#Part 1)
02 [Video Editor Software for Windows & Mac](#Part 2)
Part 1 Best 10 Apps for Making Videos on Android & iOS
#1) Kinemaster
Kinemaster is considered one of the most influential and feature-rich options when you talk about the best app for making videos with music right on your mobile device. While its user interface can be a little imitating initially, it offers almost all the features you will need in a picture video app with music support. You can easily edit 4K videos, apply video effects, work with multiple layers, use its inbuilt media library, and do much more for quickly editing videos with any music of your choice.

#2) Filmr
Filmr can be a great video-creating app with music support for all those who want something easy to use thanks to its user interface. Even though this app may not have all the high-end and versatile video editing features, it certainly offers all the basics making it a great app to make music videos with pictures. Despite being completely free to use, you still get various filters for both video and audio. You can also apply these effects on pictures for making videos with music. And the best part is that you get all of this in a completely free-to-use the app.

#3) Filmora
Filmora is most likely the best app to make a video with music and pictures on your smartphone. This is thanks to the wide range of features and effects that it includes while being one of the easiest to use apps out there. If you want to create videos with pictures and music, you will be glad to know that this is a video editor app with Spotify music support and offline music support so that you can apply any music of your choice. Filmora also allows you to use a wide range of video effects, apply text, add face filters, etc. And if you like Filmora, you can even try the Filmora video editor, which is its desktop version, as you will see below.

#4) Inshot
Inshot is one of the more basic and simpler video editor apps out there. It was primarily made to create square images and videos for posting on social media platforms like Instagram. But now, this app can also be used for trimming, applying effects, changing color filters, adding stickers, adding text, and much more. And most importantly, Inshot can also be used to create slideshows and videos using pictures and music. Unlike some other free video editors, this one does not even have any watermarks.

#5) CapCut
CapCut has been quite a popular option for creating music videos for social media platforms like Instagram Reels, YouTube Shorts, TikTok, and more. Thus, it is the perfect sync video to music beat app that you install on your smartphone. But most importantly, it comes with all the latest video effects, transitions, and much more for creating all the latest video trends on your phone. You can add music to both videos and photos using CapCut as you like.

#6) Vimeo Create
Vimeo is a fairly popular video streaming platform which is almost similar to YouTube. Since a lot of users upload a large number of videos on Vimeo, Vimeo also offers its own editor. While it also has an online editor, you can also download Vimeo Create on your mobile device since it is available for both Android and iOS devices. It is the perfect option for beginners thanks to the large number of templates it offers for creating videos using pictures and music.

#7) Power Director
Power Director is quite a popular video editing app which is available on almost all platforms out there including mobile devices like Android & iOS. And even with the mobile version, you get almost all the functions of the desktop version making it perfect for creating videos using pictures and music. Even with the free version of Power Director, you also get a decent amount of video effects and support for editing 4K videos with ease. However, the free version does have a watermark on all the videos that you create.

#8) Adobe Premiere Rush
If you are familiar with industry standards when you are talking about video editors, then you must know about Adobe Premiere Pro. And if you want a familiar experience on your mobile device, then you can go with the Adobe Premiere Rush. Even on your mobile device, it offers a very similar experience thanks to the wide range of features, effects, controls, and much more it offers. Unlike other video editor apps, it even allows you to record videos if you want more than just creating videos using pictures and music.

#9) GoPro Quik
As you can guess by the name, GoPro Quik is a video editing app primarily made for GoPro cameras. But with newer updates for this app, it can be used with any kind of video or picture files. And the best thing about the GoPro Quik app is that it supports automated music beat sync editing. You can simply add any music track in the app and it will automatically sync photos and videos with it. If you want, you can also use video effects like speed control, crop and trim, color filters, text, stickers, and much more.

#10) Picsart
Even though Picsart was primarily a photo editing app, it also supports video editing in newer versions. And since Picsart is great for editing photos and pictures, creating videos using pictures and music is also quite easy. All of the features and effects supported by Picsart for photos, will also work for editing videos using Picsart. It includes color filters, face filters, makeup options, video effects, cropping, trimming, etc.

Part 2 Video Editor Software for Windows & Mac
With all the various apps given above, you can easily pick the right app to put videos together with music right on your smartphone. And while all of these apps work great for basic usage, any large projects are better to be done on a computer. Thankfully, even if you want an app to put videos and pictures together with music on your computer, you can still find multiple free to use options. Out of all such options,
is considered the best free app to make videos with music for Windows and Mac. Just per the name, Filmora is the desktop version of the previously mentioned Filmora.
Since this is the desktop version of Filmora, it offers even more features making it a great option for those who want the best app to make videos with music on Windows and Mac. Both the Windows and Mac versions of the Filmora video editing app are quite easy to use with easy-to-access options. As for its options, you get a wide range of video effects, color grading, audio settings, keyboard shortcuts, keyframing, motion tracking, and much more. And unlike other options, Filmora is the best perfect picture video app with music support for those who want an easy-to-run video editor since it can run even on entry-level computers with ease.
Wondershare Filmora
Get started quickly with Filmora’s powerful performance, intuitive interface, and countless effects!
Try It Free Try It Free Try It Free Learn More >

Conclusion
While there are music video creator app options available out there, not all of them offer the right features and options. Hence, to help you in picking the best app for music video made on your mobile device, we have already given the 10 best apps to make videos with music and pictures. Since all of these apps are quite different, you can certainly find the right option whether you want music over video app or a video collage with music app for your mobile device. You can also leave your thoughts and questions regarding the best app for making videos with pictures and music in the comments section below.
Almost all modern social media platforms allow you to upload videos on your profile, on your story, and even send them as a message. And if you want to create more personalized videos, then you might be looking for apps to put music over video, apps to make videos with pictures and music, and other types of video editor apps. But since everyone wants to edit videos right on their Android and iOS devices, many apps are available. And to help you pick the perfect app for music on video clips and make other edits, we are here with the 10 best apps to make videos with music and pictures. All of these video editor apps also have their important details below. You can easily pick the best app for making videos with pictures and music by going through the following options.
In this article
01 [Best 10 Apps for Making Videos on Android & iOS](#Part 1)
02 [Video Editor Software for Windows & Mac](#Part 2)
Part 1 Best 10 Apps for Making Videos on Android & iOS
#1) Kinemaster
Kinemaster is considered one of the most influential and feature-rich options when you talk about the best app for making videos with music right on your mobile device. While its user interface can be a little imitating initially, it offers almost all the features you will need in a picture video app with music support. You can easily edit 4K videos, apply video effects, work with multiple layers, use its inbuilt media library, and do much more for quickly editing videos with any music of your choice.

#2) Filmr
Filmr can be a great video-creating app with music support for all those who want something easy to use thanks to its user interface. Even though this app may not have all the high-end and versatile video editing features, it certainly offers all the basics making it a great app to make music videos with pictures. Despite being completely free to use, you still get various filters for both video and audio. You can also apply these effects on pictures for making videos with music. And the best part is that you get all of this in a completely free-to-use the app.

#3) Filmora
Filmora is most likely the best app to make a video with music and pictures on your smartphone. This is thanks to the wide range of features and effects that it includes while being one of the easiest to use apps out there. If you want to create videos with pictures and music, you will be glad to know that this is a video editor app with Spotify music support and offline music support so that you can apply any music of your choice. Filmora also allows you to use a wide range of video effects, apply text, add face filters, etc. And if you like Filmora, you can even try the Filmora video editor, which is its desktop version, as you will see below.

#4) Inshot
Inshot is one of the more basic and simpler video editor apps out there. It was primarily made to create square images and videos for posting on social media platforms like Instagram. But now, this app can also be used for trimming, applying effects, changing color filters, adding stickers, adding text, and much more. And most importantly, Inshot can also be used to create slideshows and videos using pictures and music. Unlike some other free video editors, this one does not even have any watermarks.

#5) CapCut
CapCut has been quite a popular option for creating music videos for social media platforms like Instagram Reels, YouTube Shorts, TikTok, and more. Thus, it is the perfect sync video to music beat app that you install on your smartphone. But most importantly, it comes with all the latest video effects, transitions, and much more for creating all the latest video trends on your phone. You can add music to both videos and photos using CapCut as you like.

#6) Vimeo Create
Vimeo is a fairly popular video streaming platform which is almost similar to YouTube. Since a lot of users upload a large number of videos on Vimeo, Vimeo also offers its own editor. While it also has an online editor, you can also download Vimeo Create on your mobile device since it is available for both Android and iOS devices. It is the perfect option for beginners thanks to the large number of templates it offers for creating videos using pictures and music.

#7) Power Director
Power Director is quite a popular video editing app which is available on almost all platforms out there including mobile devices like Android & iOS. And even with the mobile version, you get almost all the functions of the desktop version making it perfect for creating videos using pictures and music. Even with the free version of Power Director, you also get a decent amount of video effects and support for editing 4K videos with ease. However, the free version does have a watermark on all the videos that you create.

#8) Adobe Premiere Rush
If you are familiar with industry standards when you are talking about video editors, then you must know about Adobe Premiere Pro. And if you want a familiar experience on your mobile device, then you can go with the Adobe Premiere Rush. Even on your mobile device, it offers a very similar experience thanks to the wide range of features, effects, controls, and much more it offers. Unlike other video editor apps, it even allows you to record videos if you want more than just creating videos using pictures and music.

#9) GoPro Quik
As you can guess by the name, GoPro Quik is a video editing app primarily made for GoPro cameras. But with newer updates for this app, it can be used with any kind of video or picture files. And the best thing about the GoPro Quik app is that it supports automated music beat sync editing. You can simply add any music track in the app and it will automatically sync photos and videos with it. If you want, you can also use video effects like speed control, crop and trim, color filters, text, stickers, and much more.

#10) Picsart
Even though Picsart was primarily a photo editing app, it also supports video editing in newer versions. And since Picsart is great for editing photos and pictures, creating videos using pictures and music is also quite easy. All of the features and effects supported by Picsart for photos, will also work for editing videos using Picsart. It includes color filters, face filters, makeup options, video effects, cropping, trimming, etc.

Part 2 Video Editor Software for Windows & Mac
With all the various apps given above, you can easily pick the right app to put videos together with music right on your smartphone. And while all of these apps work great for basic usage, any large projects are better to be done on a computer. Thankfully, even if you want an app to put videos and pictures together with music on your computer, you can still find multiple free to use options. Out of all such options,
is considered the best free app to make videos with music for Windows and Mac. Just per the name, Filmora is the desktop version of the previously mentioned Filmora.
Since this is the desktop version of Filmora, it offers even more features making it a great option for those who want the best app to make videos with music on Windows and Mac. Both the Windows and Mac versions of the Filmora video editing app are quite easy to use with easy-to-access options. As for its options, you get a wide range of video effects, color grading, audio settings, keyboard shortcuts, keyframing, motion tracking, and much more. And unlike other options, Filmora is the best perfect picture video app with music support for those who want an easy-to-run video editor since it can run even on entry-level computers with ease.
Wondershare Filmora
Get started quickly with Filmora’s powerful performance, intuitive interface, and countless effects!
Try It Free Try It Free Try It Free Learn More >

Conclusion
While there are music video creator app options available out there, not all of them offer the right features and options. Hence, to help you in picking the best app for music video made on your mobile device, we have already given the 10 best apps to make videos with music and pictures. Since all of these apps are quite different, you can certainly find the right option whether you want music over video app or a video collage with music app for your mobile device. You can also leave your thoughts and questions regarding the best app for making videos with pictures and music in the comments section below.
3 In-Camera Transitions Tricks To Make Videos
You must have seen it in videos when a scene changes to another place or time. How is it possible? Video transitions are a post-production technique that connects two different shots together. And it makes the whole video goes smooth and fluent.
Hopping directly from one clip to the next looks pretty queer. It disturbs the whole dynamics and charm of the video. To avoid this, we use video transitions. This makes the video appear much smoother and more linked.
You may think it is not easy, but after reading this article, you will know how simple it is. All you need is a camera and a few skills. In this article, we will focus on different in-camera transitions and let you know how to edit in a powerful video editor Filmora .
Whip Your Camera
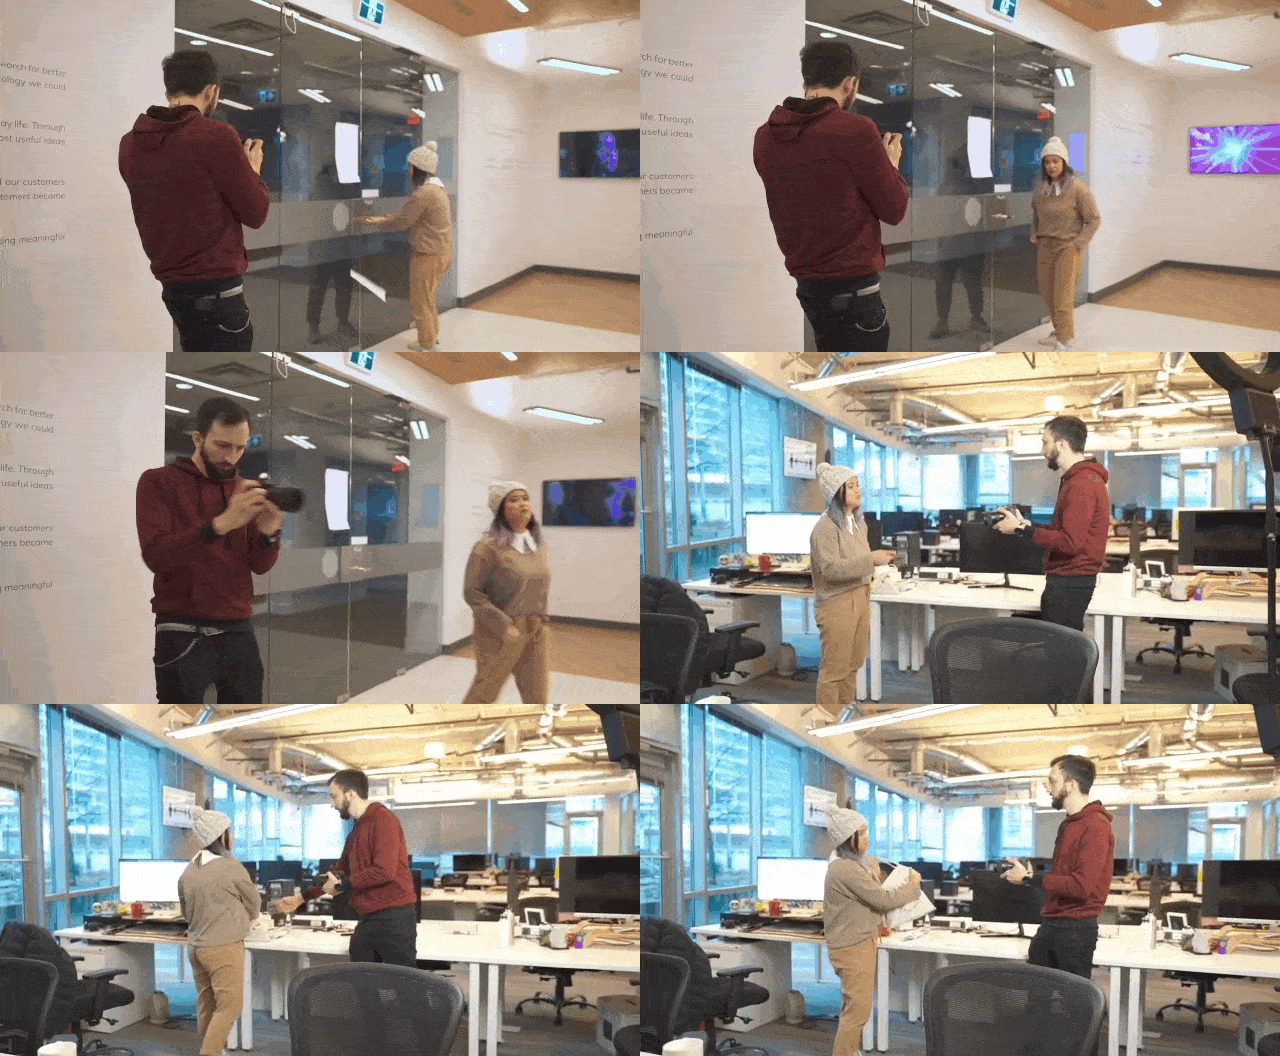
You may have noticed that when an object moves quickly, the camera creates a blurred image of the object. We call it motion blur. The idea with this transition is to cut and paste your shots together by whipping your camera at the end of your first shot and at the beginning of your second one. This effect depends on two aspects. The first is by the speedy motion of the object out of the frame, and the second is by the camera’s movement.
Here is a stepwise guide for you to try
- Plan your shots, where and in what direction you will make the whip.
- Then take the first shot and whip the camera at the end of the shot in the direction the object is moving.
- For the next shot, whip the camera into the action and complete the shot.
- Import both shots in your editing tool and find the point of blur in both.
- Cut and paste them to add a blurring effect to your video.
You can whip your camera in any direction you want. Make sure the movement is fast enough to create a motion blur.
The result would be a smooth transition from the first shot to the second, as in this clip:
Fill The Frame
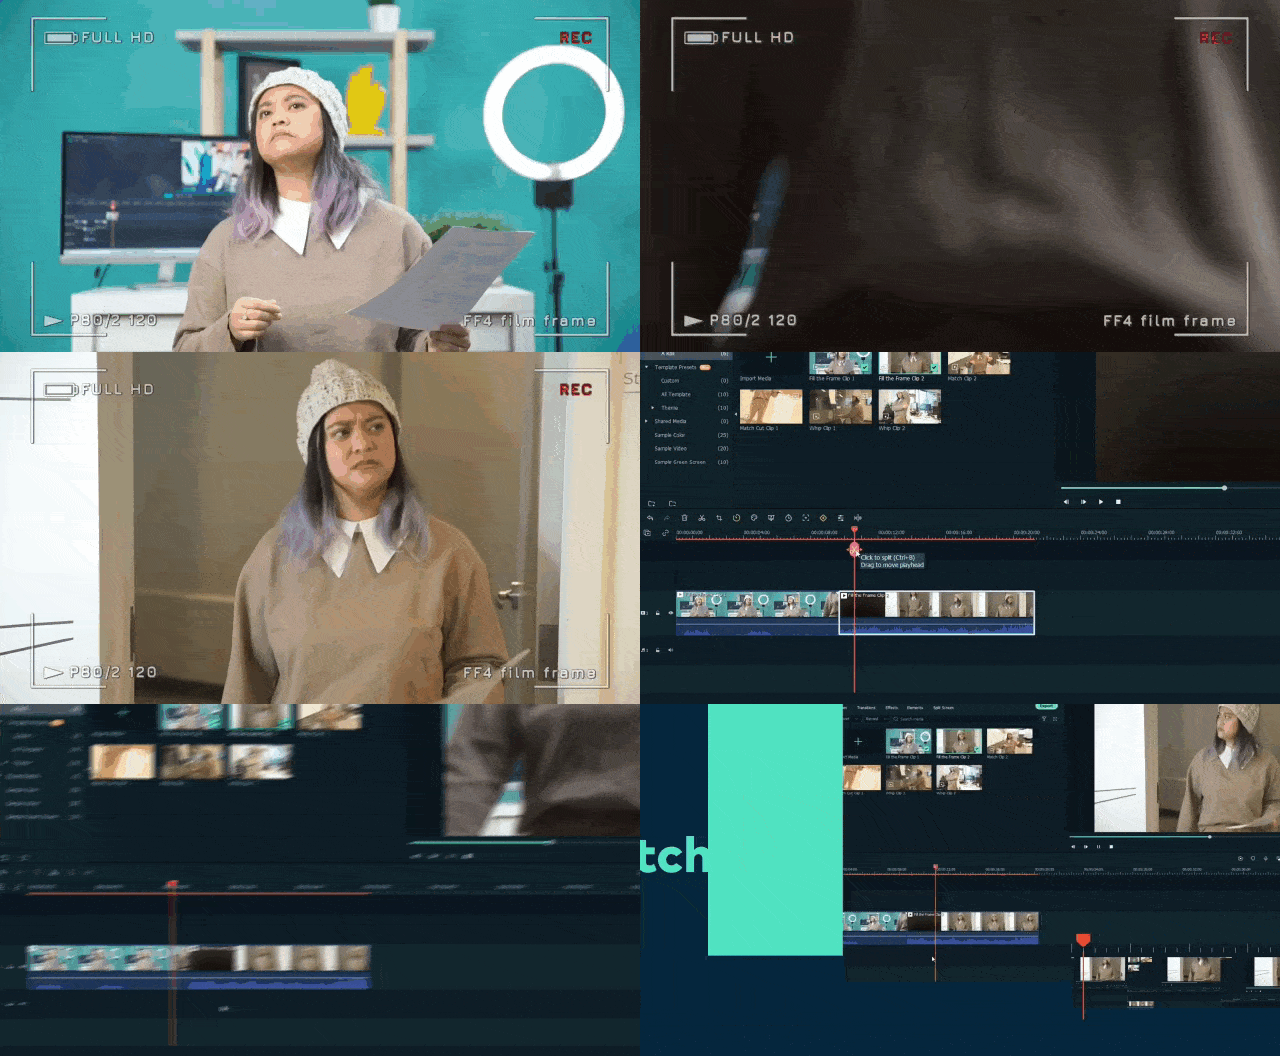
In this in-camera transition technique, you must fill the frame with an object or subject. Compose the shot with the main subject filling the frame from edge to edge. In this way, those who view the video immediately know what you want them to see.
Here is step-by-step guidance for this transition
- Plan the two shots you are going to take.
- Find a subject or an action that will fill the frame during recording.
- In the first shot, please make the subject move toward the frame so that it fills the frame.
- The second shot will take place at another time or place.
- To record the second shot, cover the frame with an object and then reveal the shot.
- Import both shots into Wondershare Filmora .
- Cut the two shots to the point where the frame is filled and paste these shots together.
Free Download For Win 7 or later(64-bit)
Free Download For macOS 10.14 or later
One important thing is to match the color and brightness of the object or subject. It will provide you with much better results. The video attached below explains all the steps of filling the frame.
Match Cut
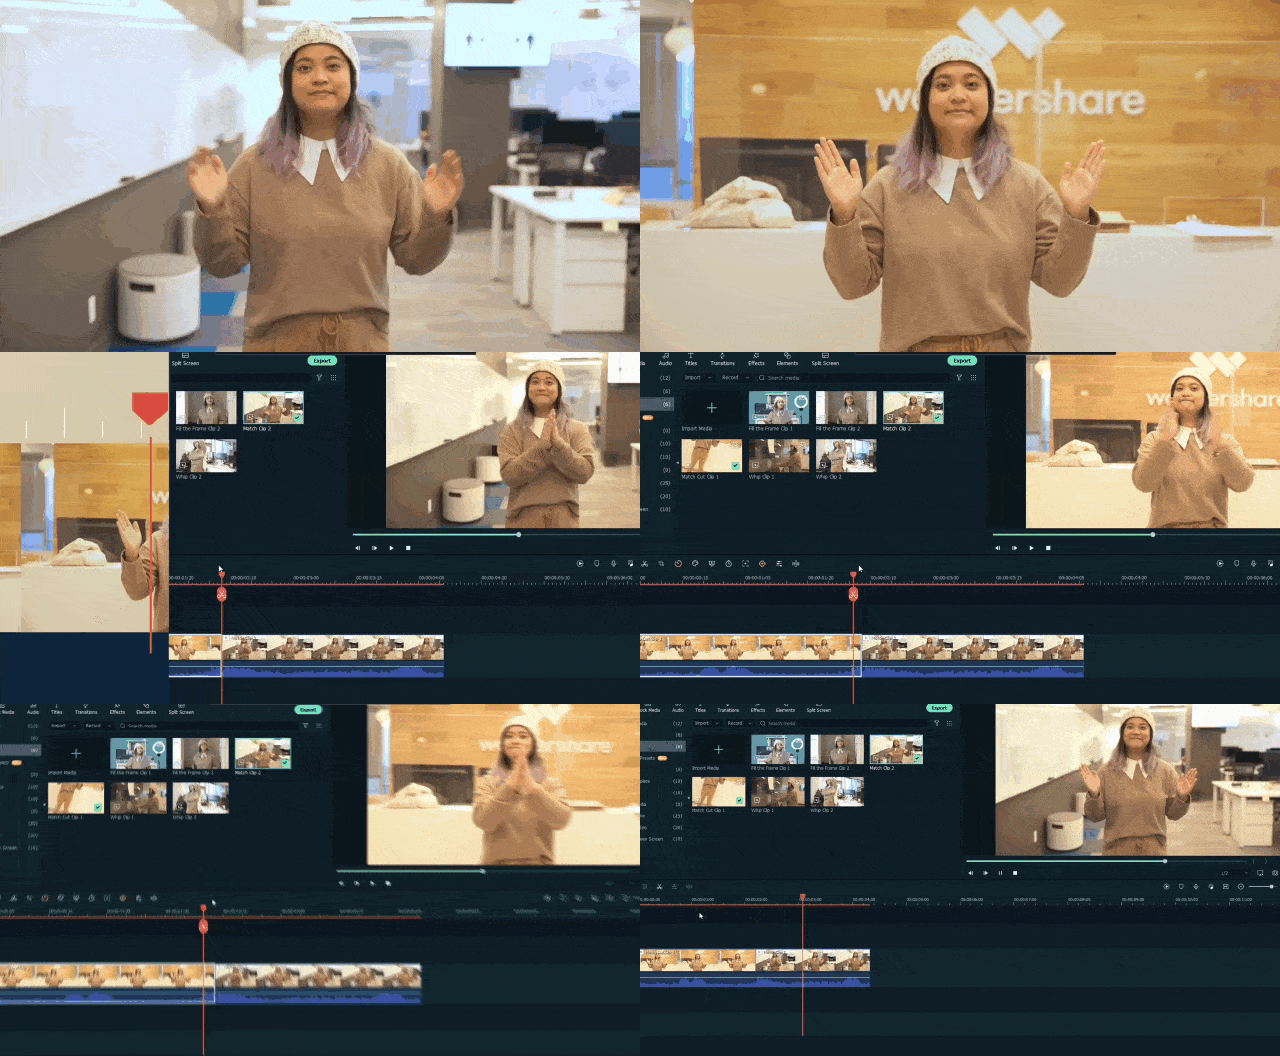
In a video, a match cut transitions from one shot to another. During this, the composition of the two shots is matched by action, subject, and subject matter. The goal is to make a visual match between two situations that don’t have a direct link. Here are the steps to creating a match-cut transition in your videos.
- Plan the shot you are going to take.
- Record the action in the first shot, for example, clapping your hands.
- Go to another place or scene to record the second shot.
- Repeat the same action in the second shot.
- Import both camera shots to Wondershare Filmora .
- Cut one shot to another when the action is at its peak.
This way, you can smoothly transition from one place or scene to another. There is a video attached below for a better understanding of the steps.
Final Words
You can use these techniques to create sublime in-camera transitions. Make sure to follow all the steps in the correct order. These transitions will make your videos look more creative and artistic. Plan your ideas, add these transitions to your videos, and create cool videos at home to post on social media.
If you find this article informative, remember to share it with your friends. Which of these transitions did you like the most, and are you going to try them?
Free Download For Win 7 or later(64-bit)
Free Download For macOS 10.14 or later
Free Download For macOS 10.14 or later
One important thing is to match the color and brightness of the object or subject. It will provide you with much better results. The video attached below explains all the steps of filling the frame.

Match Cut
In a video, a match cut transitions from one shot to another. During this, the composition of the two shots is matched by action, subject, and subject matter. The goal is to make a visual match between two situations that don’t have a direct link. Here are the steps to creating a match-cut transition in your videos.
- Plan the shot you are going to take.
- Record the action in the first shot, for example, clapping your hands.
- Go to another place or scene to record the second shot.
- Repeat the same action in the second shot.
- Import both camera shots to Wondershare Filmora .
- Cut one shot to another when the action is at its peak.
This way, you can smoothly transition from one place or scene to another. There is a video attached below for a better understanding of the steps.

Final Words
You can use these techniques to create sublime in-camera transitions. Make sure to follow all the steps in the correct order. These transitions will make your videos look more creative and artistic. Plan your ideas, add these transitions to your videos, and create cool videos at home to post on social media.
If you find this article informative, remember to share it with your friends. Which of these transitions did you like the most, and are you going to try them?
Free Download For Win 7 or later(64-bit)
Free Download For macOS 10.14 or later
Also read:
- 2024 Approved How to Add Font Effect
- In 2024, How to Shoot Cinematic Footage with Phone
- New Elevate Your Designs with Feather Shapes in After Effects
- Do You Want Your Photo and Video Edits to Look Like Peter McKinnons? Color-Grade Your Media Files with Peter McKinnon LUTs to Make Your Content Stand Out
- New Ultimate Guide on How to Plan and Storyboard a Music Video
- In 2024, A Guide to Color Grade Your Picture in LightRoom
- How to Use Color Grading in Final Cut Pro for 2024
- New Top 10 Transparent Image Online Tools That Give You an Advantage for 2024
- In 2024, Can You Enhance Your Drone Footage with Cinematic Drone LUTs? This Article Discusses Top Drone LUTs Recommendations to Simplify Video Editing
- New 2024 Approved How To Create a Polaroid Collage?
- Updated How Can You DIY VHS Overlay in After Effects?
- In 2024, Get The Perfect Drone Footage With Free Drone LUTs
- In 2024, Best Android Apps For Creating Slow Motion Videos
- Updated Figuring Out Proper Ways to Play a Video in Slow Motion on iPhone for 2024
- New 10 Crazy-Cool Examples of AR Video for 2024
- Brighten a Video in Windows 10 Easily When Video Clips You Recorded on Your Windows 10 Computer or Those Downloaded From YouTube Are Too Dark or Too Bright, You Can Easily Adjust the Color Levels in a Few Clicks
- New Dubbing Videos With Voiceovers | Using Wondershare Filmora for 2024
- How to Create Datamoshing Effect to Your Footage in After Effects, In 2024
- In 2024, How to Translate YouTube Videos to English Subtitles
- Looking For A Location Changer On OnePlus Nord N30 SE? Look No Further | Dr.fone
- In 2024, Will Pokémon Go Ban the Account if You Use PGSharp On Honor 100 Pro | Dr.fone
- How To Unlink Apple ID From iPhone 13 Pro
- 5 Solutions For Honor Magic 5 Lite Unlock Without Password
- Fixing Persistent Pandora Crashes on OnePlus Nord N30 5G | Dr.fone
- In 2024, How To Change Country on App Store for Apple iPhone 15 Plus With 7 Methods
- How to restore wiped call history on X7b?
- Complete guide for recovering photos files on Vivo S17.
- In 2024, Top 5 Lava Blaze 2 5G Bypass FRP Tools for PC That Actually Work
- In 2024, Top IMEI Unlokers for Your Oppo Reno 10 Pro 5G Phone
- How to get the dragon scale and evolution-enabled pokemon On Realme C53? | Dr.fone
- 3 Things You Must Know about Fake Snapchat Location On Xiaomi Redmi Note 12T Pro | Dr.fone
- Unlock Your Infinix Hot 40 Pro Phone with Ease The 3 Best Lock Screen Removal Tools
- Title: Have You Ever Used an Adjustment Layer in Photoshop? Read This Article to Find Out How to Add, Resize, Change, and Use an Adjustment Layer in Photoshop Efficiently
- Author: Chloe
- Created at : 2024-05-20 03:37:34
- Updated at : 2024-05-21 03:37:34
- Link: https://ai-editing-video.techidaily.com/have-you-ever-used-an-adjustment-layer-in-photoshop-read-this-article-to-find-out-how-to-add-resize-change-and-use-an-adjustment-layer-in-photoshop-efficien/
- License: This work is licensed under CC BY-NC-SA 4.0.

