
Here Is a Step-by-Step Guide to Color Correct and Color Grade a Video Professionally with Wondershare Filmora. Lets Get Going

Here Is a Step-by-Step Guide to Color Correct and Color Grade a Video Professionally with Wondershare Filmora. Let’s Get Going
As a post-production analysis of the filmed video, you might have noticed how the color contrast in a real VS reel. The colors do not appear bright and robust on a screen as in real life.
While there are numerous reasons for the dull, uninviting look- a basic edit could fix it quickly. One of the vital, if not the first, steps in the process is color grading and color correction. However, what exactly are color grading and color correction? And how can they help fix the color ratios and balance in a video?
This article covers everything you need to know about color grading and correction and a complete guide to adjusting cinematic colors with the best video editor, Wondershare Filmora. So, without much ado, let’s dig into it!
Part 1. Color Grading VS Color Correction
These terms have often been used interchangeably; people consider them synonymous. However, they are two different artistic phenomena to adjust the color scheme.
Since we will discuss them in detail later, here is a brief description. Put simply, color correcting is a corrective procedure, while color grading is a cinematic adjustment.
Color correction diverts the colors to a relatively neutral baseline achieving a unified look for all captured shots. On the other hand, color grading is inclined more toward a creative look aimed at balancing colors that reflect the emotion of the sequence.

These two work hand in hand to dramatically uplift the overall look of the sequence. Let’s delve deeper into these techniques and see how to use them.
Part 2. What Is Color Correction?
We will start with color correction- the first step in color editing. Even with a slight glance at the raw shots, you can notice how much the tones are messed up. The crude product is oversaturated with colors.
Color correction is about making the shots look as natural as possible. It brings the sequences to the neutral baseline to achieve a unified look.
For now, we need to ignore our creative and aesthetic preferences and focus entirely on exposure and white balance. The actual end goal is to keep the colors true to life.
However, color-correcting a video is challenging if you are a beginner. There needs to be more than just understanding the fundamentals; it requires cinematic and technical skills.
Here is the basic process for a clean, color-corrected shot, irrespective of the software you use.
Essential Steps for Color Correcting a Shot
1. Set the color profile
Different video formats (HDR, LOG, RAW, HLG, etc.) have different exposure content. Therefore, select a color profile that matches your video format for the best results before starting.
2. Adjust the saturation
It is the primary step of color correction. Often the exposure of raw content is high. Next, equalize the saturation for a natural look.
3. Fix the contrast
Contrast is the difference between the light and dark areas of the image. Pictures with a higher contrast are sharper and more detailed.
However, adjust the contrast during color correcting so that the dark areas are not crushed, and you preserve the details maximally.
4. Set the white balance
It is time to adjust the white balance with the saturation and contrast fixed. The colors will shift to orange and blue hues if it is maladjusted.
Use the color curves to ensure pure whites so all colors fall correctly in place.
5. Double-check individual color tones
The final step is a secondary checking of the individual colors. Double-check the skin tones so they match in each shot.
Make sure the skin tones match their natural hues for an authentic, unfiltered look.
It is a basic walkthrough for color-correcting. More steps can vary according to the professional demands of the video. However, as a beginner, this is the best process to follow.
Once we’ve corrected the color, it is time to move to the next and primary step- color grading.
ChatGPT is Now Available in Filmora! Filmora now offers a ChatGPT plug-in to provide a more inspirational copywriting experience.
Try It Free Try It Free Learn More

Part 3. What Is Color Grading?
After you set all the tones to the baseline, you can start with the creative process of color grading. In this case, you do not change the colors anymore. Instead, you make artistic choices to change the moods and emotions of that particular sequence. Color grading is about manipulating the colors and contrasts that intensify the visual tone and explain your story to the world.
Color correction can be enough if you want to keep the video realistic. However, color grading is essential if you want to imply emotions and feelings in your content. Following is an essential step-by-step guide to color grading.
Basic Steps of Color Grading
If you are a beginner, the color grading process can be tricky without expertise. Hence here are the basic steps of color grading a video.
1. Color correcting
Correcting the colors and balance will always be the first step before you can color-grade footage. Next, the video must be normalized and should seem natural before you intensify the overall look.
2. Match the colors
In the next step, we balance the contours between color-corrected footage and color grading. Then, you can use LUTs (Look Up Tables) to match the individual colors to the scheme.
3. Shot-to-shot matching
The next integral step is to match the colors between all the shots so we can achieve a unified look. The contrasting appearance of shots can make them look unprofessional and poorly cinematic.
4. Adjust the mood and emotions
A well-executed color grading can potentiate the emotions in a shot. Use your artistic choices and tools from editing software to imply the director’s feelings in the video.
5. Make the final adjustments
As the final opportunity, tweak hues and chroma to ensure the colors match your palette in each scene. But, again, do not overdo anything, and play with colors to nudge the moods in the shot.
If your footage is the cake, color grading is the cherry on top that enhances the final look. You can instantly evoke connotations and bring the audience to a different page with some professional color grading.
However, while color correcting and grading, there are a few things that you should take care of. Here is a list of some To-do’s and Not To-do’s in the post-production edit.
Part 4. Things To Consider About the Editing Environment
Before you begin color-grading or color-correcting, here are some essential things to consider that can dramatically improve the results.
1. Neutral editing environment
Funky neon lights or fluorescent lights in the background can dominate your vision. As compensation, you will be over-saturating your footage with colors.
Make sure to use only white, neutral light with a CRI (color rendering Index) of at least 90. It will decrease inconsistencies as much as possible.
2. Using might shifts/orange screen
People often activate night shifts or orange screens to protect their eyes from excessive strain. Resultantly, the screen appears dull and orange-y.
Since this alters the actual colors of the video, the results are undermined. So make sure to turn off all technologies that can sabotage the grading.
3. Control the light
It is necessary to control the amount of light that enters your working space area. Excessive light alters your color perception and hence obstructs achieving a balanced contour.
Ensure that the light does not directly falls on the screen or your eyes. You must maintain an adequate distance from the screen to see nuances as you grade.
After completing all the fundamentals of color correcting and color grading, let’s demonstrate how to do it in real-time.
Choosing good software can be chaos. There are plenty of options in the market with the best features, but we will be using Wondershare Filmora . Read on for a step-by-step guide on color correcting and grading.
Free Download For Win 7 or later(64-bit)
Free Download For macOS 10.14 or later
Part 5. How To Color Correct and Color Grade A Video With Wondershare Filmora?
To color-correct and color-grade a video, we recommend using Wondershare Filmora , one of the finest video editing apps on the market. Equipped with various tools, Filmora allows professional color correction with a few quick steps.
Free Download For Win 7 or later(64-bit)
Free Download For macOS 10.14 or later
With the super simple interface, the software is easy to use for beginners and professionals alike. In addition, Filmora offers extensive tools to manipulate colors and color grade your footage professionally. Here is how to color correct and color grade your video with Filmora post-production.
Step1Open Wondershare Filmora
Before we start, Install Wondersahare Filmora on your device. If you already have it downloaded, launch the software so we can begin.

Step2Color correcting the video
Drag and drop the video to the timeline from the Projects menu. Then, follow these steps to color-correct the video:
- Double-click on the video to open the editing panel. Four options are available: Video, Audio, Color, and Speed. Open the color tab.

- From the Basics menu, adjust the Exposure, Light Color, Contrast, White Balance, and Vibrance. Then, move the slider or add a LUT value to apply.

- Filmora offers a wide variety of 3D LUTs with mapped color spaces that project your preferences on the video with a single click. Select a pre-made LUT to apply to your video in the Preset tab. Or custom builds a Look Up Table and saves it for future use.

- Turn on the Color Match toggle and tap View Comparison to match your current video with a reference shot.

Step3Color grading the video
In the color editing panel, use the other two tabs, HSL and Curves, to create the aesthetics of your video.
- In the HSL panel, select a color from the seven colors of the rainbow. Then, set the hue, luminance, and saturation for each. Next, you can use the slider to nudge the colors or directly input a LUT value.

- The shadow areas are dark and crushed. To fix this, add the Curves effect to the video. Go to the Curves tab, choose a primary color, and move the curves to balance the color scheme.

Step4Save and export the file
Once you finish the final touches, save your footage to a local folder.
- Click the Export button. A pop-up screen will open.
- Select the File type. (MP4, WMV, GIF, etc.)
- Choose a local destination for the file.
- Click Export.

Conclusion
Hopefully, this post has given you a good understanding of the differences between color grading and color correction. But ultimately, it is all about your thought process and intuitions.
Filmora’s extensive collection of color editing tools makes color correction and grading a five-finger thing. You can also follow our guide to create some unique and professional-looking masterpieces. Turn on the artistic side and start creating mystical shots!
Try It Free Try It Free Learn More

Part 3. What Is Color Grading?
After you set all the tones to the baseline, you can start with the creative process of color grading. In this case, you do not change the colors anymore. Instead, you make artistic choices to change the moods and emotions of that particular sequence. Color grading is about manipulating the colors and contrasts that intensify the visual tone and explain your story to the world.
Color correction can be enough if you want to keep the video realistic. However, color grading is essential if you want to imply emotions and feelings in your content. Following is an essential step-by-step guide to color grading.
Basic Steps of Color Grading
If you are a beginner, the color grading process can be tricky without expertise. Hence here are the basic steps of color grading a video.
1. Color correcting
Correcting the colors and balance will always be the first step before you can color-grade footage. Next, the video must be normalized and should seem natural before you intensify the overall look.
2. Match the colors
In the next step, we balance the contours between color-corrected footage and color grading. Then, you can use LUTs (Look Up Tables) to match the individual colors to the scheme.
3. Shot-to-shot matching
The next integral step is to match the colors between all the shots so we can achieve a unified look. The contrasting appearance of shots can make them look unprofessional and poorly cinematic.
4. Adjust the mood and emotions
A well-executed color grading can potentiate the emotions in a shot. Use your artistic choices and tools from editing software to imply the director’s feelings in the video.
5. Make the final adjustments
As the final opportunity, tweak hues and chroma to ensure the colors match your palette in each scene. But, again, do not overdo anything, and play with colors to nudge the moods in the shot.
If your footage is the cake, color grading is the cherry on top that enhances the final look. You can instantly evoke connotations and bring the audience to a different page with some professional color grading.
However, while color correcting and grading, there are a few things that you should take care of. Here is a list of some To-do’s and Not To-do’s in the post-production edit.
Part 4. Things To Consider About the Editing Environment
Before you begin color-grading or color-correcting, here are some essential things to consider that can dramatically improve the results.
1. Neutral editing environment
Funky neon lights or fluorescent lights in the background can dominate your vision. As compensation, you will be over-saturating your footage with colors.
Make sure to use only white, neutral light with a CRI (color rendering Index) of at least 90. It will decrease inconsistencies as much as possible.
2. Using might shifts/orange screen
People often activate night shifts or orange screens to protect their eyes from excessive strain. Resultantly, the screen appears dull and orange-y.
Since this alters the actual colors of the video, the results are undermined. So make sure to turn off all technologies that can sabotage the grading.
3. Control the light
It is necessary to control the amount of light that enters your working space area. Excessive light alters your color perception and hence obstructs achieving a balanced contour.
Ensure that the light does not directly falls on the screen or your eyes. You must maintain an adequate distance from the screen to see nuances as you grade.
After completing all the fundamentals of color correcting and color grading, let’s demonstrate how to do it in real-time.
Choosing good software can be chaos. There are plenty of options in the market with the best features, but we will be using Wondershare Filmora . Read on for a step-by-step guide on color correcting and grading.
Free Download For Win 7 or later(64-bit)
Free Download For macOS 10.14 or later
Part 5. How To Color Correct and Color Grade A Video With Wondershare Filmora?
To color-correct and color-grade a video, we recommend using Wondershare Filmora , one of the finest video editing apps on the market. Equipped with various tools, Filmora allows professional color correction with a few quick steps.
Free Download For Win 7 or later(64-bit)
Free Download For macOS 10.14 or later
With the super simple interface, the software is easy to use for beginners and professionals alike. In addition, Filmora offers extensive tools to manipulate colors and color grade your footage professionally. Here is how to color correct and color grade your video with Filmora post-production.
Step1Open Wondershare Filmora
Before we start, Install Wondersahare Filmora on your device. If you already have it downloaded, launch the software so we can begin.

Step2Color correcting the video
Drag and drop the video to the timeline from the Projects menu. Then, follow these steps to color-correct the video:
- Double-click on the video to open the editing panel. Four options are available: Video, Audio, Color, and Speed. Open the color tab.

- From the Basics menu, adjust the Exposure, Light Color, Contrast, White Balance, and Vibrance. Then, move the slider or add a LUT value to apply.

- Filmora offers a wide variety of 3D LUTs with mapped color spaces that project your preferences on the video with a single click. Select a pre-made LUT to apply to your video in the Preset tab. Or custom builds a Look Up Table and saves it for future use.

- Turn on the Color Match toggle and tap View Comparison to match your current video with a reference shot.

Step3Color grading the video
In the color editing panel, use the other two tabs, HSL and Curves, to create the aesthetics of your video.
- In the HSL panel, select a color from the seven colors of the rainbow. Then, set the hue, luminance, and saturation for each. Next, you can use the slider to nudge the colors or directly input a LUT value.

- The shadow areas are dark and crushed. To fix this, add the Curves effect to the video. Go to the Curves tab, choose a primary color, and move the curves to balance the color scheme.

Step4Save and export the file
Once you finish the final touches, save your footage to a local folder.
- Click the Export button. A pop-up screen will open.
- Select the File type. (MP4, WMV, GIF, etc.)
- Choose a local destination for the file.
- Click Export.

Conclusion
Hopefully, this post has given you a good understanding of the differences between color grading and color correction. But ultimately, it is all about your thought process and intuitions.
Filmora’s extensive collection of color editing tools makes color correction and grading a five-finger thing. You can also follow our guide to create some unique and professional-looking masterpieces. Turn on the artistic side and start creating mystical shots!
A Vlog Has Many Elements to Answer. While Setting up Ideas for It, There Are Several Things Into Which You Should Look. This Article Presents a Picture of How a Vlog Video Is Made Perfectly
Are you new to vlogging? Have you gone through the basics of starting a vlog? If not, don’t worry, as we have the best guide for you to start vlogging. Initially, you will get to know about what is a vlog, along with several tips that should be kept in mind while making a vlog video.
In this article
01 How to Start Vlogging for Beginners?
02 Inspirations and Tips for Vlog Video Ideas
Part 1: How to Start Vlogging for Beginners?
A proper guide can be considered while starting your vlog video channel. Although there are hundreds and thousands of vloggers across the social media platform, there is still room for more. As you think of an intuitive idea for vlogging, there are some steps you need to reconsider before going into this system.

1. Finding the Niche and Audience of Choice
Looking into the variety of niches that can be tried for vlog videos, the selection can never be easy. You need to be sure which genre you are looking forward to picking, which then develops a target audience that you would be addressing. Your content heavily depends on the type of target audience you pick for yourselves. Be very appropriate and original while you add yourselves in the vlog video.
Finding the appropriate niche and working across it while understanding the answer to what is a vlog is quite essential. This guides the complete future of your channel across this section.
2. Look And Inspire From Competition
The second most important thing to be done before starting vlogs on your channel is an overview of the competitive market. Understanding the current video creator market dynamics is the next direction that you need to consider for starting vlogging. Competition lets you understand the loopholes that exist in the current system. This is a highly effective way of discovering innovation within any market.
Get inspired from the competition that exists within the current vlogging market. Find what they do best and consider the strong points within yourself.
3. Creating a Brand
The next step to starting your personal vlogs is setting up a brand that would become a highlight of yours across the platforms. People need something unifying to follow a certain party or personality; the same is true with vlogging. As many vloggers describe their community as a family, they set up a complete brand across this narrative and present a great idea of inclusivity.
While you prepare for your vlog video, you need to specify the name logo and create art that would set up the complete vlog channel. These should be extremely attractive and alluring for the community to watch and learn.
4. Familiarize and Invest
You should be sure about what you need to do across the platform. While you design the video for your vlog channel, it is important to understand what needs to be done to become a professional in this sector. Familiarizing yourselves about the platform is one crucial thing that helps you understand the requirements to fulfill for a video.
Make sure that you work with good gear and equipment. Video quality is one significant point that is considered by viewers in this community. To make yourselves heard out, you need to invest across the gear appropriately.
Part 2: Inspirations and Tips for Vlog Video Ideas
While you dissect the answer to the question of “what is vlogging,” this part indicates all the essential points and tips that need to be considered for vlog video ideas. These tips shall help you set up a platform for yourself to inspire and direct people to your content.

1. Be Innovative in Your First Vlog
The first vlog is essential for many reasons. Where you let people know about yourselves, this can be a great start to your impressive journey in vlogging. The only thing that you need to do is innovate users into setting up their first vlog. This can be done through a good idea or targeting your introduction under a particular niche. Innovate your method of interacting with people, and this would attract every person you may have thought of.
2. Make Yourselves Personal
To interact in a better way, it is always considered best to be personal with your viewers. Share things that you find especially important for the viewers to know. Where you think you’ll inspire people with your idea, you need to highlight it properly. This can include your personal goals, gains, routine, and other details that highlight your personal life in and out of work. Providing facts about your personality can be the perfect choice for a vlog about to make a start.
3. Include a Comedy Touch
People love comedy! They die for looking content that can make them laugh and make their day good. Your vlog video should be a distributed combination of different niches and types that can be targeted across different points as per the requirement of the audience. You will always understand the point where you wish to add a particular style of interaction. Adding a comedy touch will make your viewers laugh, which is a win-win for your vlog channel.
4. Add in Information
The community does not always like content that does not teach something well to the viewers. If you keep yourselves stagnant to a single point, it will never bring you a breakthrough in your vlogging history. Informative videos are realized as interactive, which many viewers usually promote at times. The topic or concept that has been presented needs to be addressed perfectly in vlogs to cater to the requirements.
5. Provide Utility Services
Vlogs that are a combination of fun, information, and utility are considered the best. Showing viewers a clear picture of your lifestyle can be used to inspire most of them. This can be one of the best tips that would be put into practice for inspiring people. Your vlog journey should be expressive and offer priority, which can be done by showcasing the world through traveling or providing fitness goals.
Closing Words
Wish to start your vlog channel? After hearing every important information and criteria, are you ready to make your first vlog? This article has provided a distinctive understanding of making the first vlog video with effective tips and tricks. Along with that, whenever it comes to editing these vlogs, you can consider using Wondershare Filmora for this purpose.
Wondershare Filmora provides a complete editorial collection of tools that can be used ideally for enhancing the quality of the video. Filmora allows you to change the videos and audios under essential tools to design the best video. You can also employ effective techniques such as using effects and transitions.
Such elements can provoke the user to perform systematically while presenting a cognitive solution to video editing. Multiple things can be done across the platform while designing the first vlog. Look into the provided tips and tricks to avoid all kinds of errors.
Wondershare Filmora
Get started easily with Filmora’s powerful performance, intuitive interface, and countless effects!
Try It Free Try It Free Try It Free Learn More >

02 Inspirations and Tips for Vlog Video Ideas
Part 1: How to Start Vlogging for Beginners?
A proper guide can be considered while starting your vlog video channel. Although there are hundreds and thousands of vloggers across the social media platform, there is still room for more. As you think of an intuitive idea for vlogging, there are some steps you need to reconsider before going into this system.

1. Finding the Niche and Audience of Choice
Looking into the variety of niches that can be tried for vlog videos, the selection can never be easy. You need to be sure which genre you are looking forward to picking, which then develops a target audience that you would be addressing. Your content heavily depends on the type of target audience you pick for yourselves. Be very appropriate and original while you add yourselves in the vlog video.
Finding the appropriate niche and working across it while understanding the answer to what is a vlog is quite essential. This guides the complete future of your channel across this section.
2. Look And Inspire From Competition
The second most important thing to be done before starting vlogs on your channel is an overview of the competitive market. Understanding the current video creator market dynamics is the next direction that you need to consider for starting vlogging. Competition lets you understand the loopholes that exist in the current system. This is a highly effective way of discovering innovation within any market.
Get inspired from the competition that exists within the current vlogging market. Find what they do best and consider the strong points within yourself.
3. Creating a Brand
The next step to starting your personal vlogs is setting up a brand that would become a highlight of yours across the platforms. People need something unifying to follow a certain party or personality; the same is true with vlogging. As many vloggers describe their community as a family, they set up a complete brand across this narrative and present a great idea of inclusivity.
While you prepare for your vlog video, you need to specify the name logo and create art that would set up the complete vlog channel. These should be extremely attractive and alluring for the community to watch and learn.
4. Familiarize and Invest
You should be sure about what you need to do across the platform. While you design the video for your vlog channel, it is important to understand what needs to be done to become a professional in this sector. Familiarizing yourselves about the platform is one crucial thing that helps you understand the requirements to fulfill for a video.
Make sure that you work with good gear and equipment. Video quality is one significant point that is considered by viewers in this community. To make yourselves heard out, you need to invest across the gear appropriately.
Part 2: Inspirations and Tips for Vlog Video Ideas
While you dissect the answer to the question of “what is vlogging,” this part indicates all the essential points and tips that need to be considered for vlog video ideas. These tips shall help you set up a platform for yourself to inspire and direct people to your content.

1. Be Innovative in Your First Vlog
The first vlog is essential for many reasons. Where you let people know about yourselves, this can be a great start to your impressive journey in vlogging. The only thing that you need to do is innovate users into setting up their first vlog. This can be done through a good idea or targeting your introduction under a particular niche. Innovate your method of interacting with people, and this would attract every person you may have thought of.
2. Make Yourselves Personal
To interact in a better way, it is always considered best to be personal with your viewers. Share things that you find especially important for the viewers to know. Where you think you’ll inspire people with your idea, you need to highlight it properly. This can include your personal goals, gains, routine, and other details that highlight your personal life in and out of work. Providing facts about your personality can be the perfect choice for a vlog about to make a start.
3. Include a Comedy Touch
People love comedy! They die for looking content that can make them laugh and make their day good. Your vlog video should be a distributed combination of different niches and types that can be targeted across different points as per the requirement of the audience. You will always understand the point where you wish to add a particular style of interaction. Adding a comedy touch will make your viewers laugh, which is a win-win for your vlog channel.
4. Add in Information
The community does not always like content that does not teach something well to the viewers. If you keep yourselves stagnant to a single point, it will never bring you a breakthrough in your vlogging history. Informative videos are realized as interactive, which many viewers usually promote at times. The topic or concept that has been presented needs to be addressed perfectly in vlogs to cater to the requirements.
5. Provide Utility Services
Vlogs that are a combination of fun, information, and utility are considered the best. Showing viewers a clear picture of your lifestyle can be used to inspire most of them. This can be one of the best tips that would be put into practice for inspiring people. Your vlog journey should be expressive and offer priority, which can be done by showcasing the world through traveling or providing fitness goals.
Closing Words
Wish to start your vlog channel? After hearing every important information and criteria, are you ready to make your first vlog? This article has provided a distinctive understanding of making the first vlog video with effective tips and tricks. Along with that, whenever it comes to editing these vlogs, you can consider using Wondershare Filmora for this purpose.
Wondershare Filmora provides a complete editorial collection of tools that can be used ideally for enhancing the quality of the video. Filmora allows you to change the videos and audios under essential tools to design the best video. You can also employ effective techniques such as using effects and transitions.
Such elements can provoke the user to perform systematically while presenting a cognitive solution to video editing. Multiple things can be done across the platform while designing the first vlog. Look into the provided tips and tricks to avoid all kinds of errors.
Wondershare Filmora
Get started easily with Filmora’s powerful performance, intuitive interface, and countless effects!
Try It Free Try It Free Try It Free Learn More >

02 Inspirations and Tips for Vlog Video Ideas
Part 1: How to Start Vlogging for Beginners?
A proper guide can be considered while starting your vlog video channel. Although there are hundreds and thousands of vloggers across the social media platform, there is still room for more. As you think of an intuitive idea for vlogging, there are some steps you need to reconsider before going into this system.

1. Finding the Niche and Audience of Choice
Looking into the variety of niches that can be tried for vlog videos, the selection can never be easy. You need to be sure which genre you are looking forward to picking, which then develops a target audience that you would be addressing. Your content heavily depends on the type of target audience you pick for yourselves. Be very appropriate and original while you add yourselves in the vlog video.
Finding the appropriate niche and working across it while understanding the answer to what is a vlog is quite essential. This guides the complete future of your channel across this section.
2. Look And Inspire From Competition
The second most important thing to be done before starting vlogs on your channel is an overview of the competitive market. Understanding the current video creator market dynamics is the next direction that you need to consider for starting vlogging. Competition lets you understand the loopholes that exist in the current system. This is a highly effective way of discovering innovation within any market.
Get inspired from the competition that exists within the current vlogging market. Find what they do best and consider the strong points within yourself.
3. Creating a Brand
The next step to starting your personal vlogs is setting up a brand that would become a highlight of yours across the platforms. People need something unifying to follow a certain party or personality; the same is true with vlogging. As many vloggers describe their community as a family, they set up a complete brand across this narrative and present a great idea of inclusivity.
While you prepare for your vlog video, you need to specify the name logo and create art that would set up the complete vlog channel. These should be extremely attractive and alluring for the community to watch and learn.
4. Familiarize and Invest
You should be sure about what you need to do across the platform. While you design the video for your vlog channel, it is important to understand what needs to be done to become a professional in this sector. Familiarizing yourselves about the platform is one crucial thing that helps you understand the requirements to fulfill for a video.
Make sure that you work with good gear and equipment. Video quality is one significant point that is considered by viewers in this community. To make yourselves heard out, you need to invest across the gear appropriately.
Part 2: Inspirations and Tips for Vlog Video Ideas
While you dissect the answer to the question of “what is vlogging,” this part indicates all the essential points and tips that need to be considered for vlog video ideas. These tips shall help you set up a platform for yourself to inspire and direct people to your content.

1. Be Innovative in Your First Vlog
The first vlog is essential for many reasons. Where you let people know about yourselves, this can be a great start to your impressive journey in vlogging. The only thing that you need to do is innovate users into setting up their first vlog. This can be done through a good idea or targeting your introduction under a particular niche. Innovate your method of interacting with people, and this would attract every person you may have thought of.
2. Make Yourselves Personal
To interact in a better way, it is always considered best to be personal with your viewers. Share things that you find especially important for the viewers to know. Where you think you’ll inspire people with your idea, you need to highlight it properly. This can include your personal goals, gains, routine, and other details that highlight your personal life in and out of work. Providing facts about your personality can be the perfect choice for a vlog about to make a start.
3. Include a Comedy Touch
People love comedy! They die for looking content that can make them laugh and make their day good. Your vlog video should be a distributed combination of different niches and types that can be targeted across different points as per the requirement of the audience. You will always understand the point where you wish to add a particular style of interaction. Adding a comedy touch will make your viewers laugh, which is a win-win for your vlog channel.
4. Add in Information
The community does not always like content that does not teach something well to the viewers. If you keep yourselves stagnant to a single point, it will never bring you a breakthrough in your vlogging history. Informative videos are realized as interactive, which many viewers usually promote at times. The topic or concept that has been presented needs to be addressed perfectly in vlogs to cater to the requirements.
5. Provide Utility Services
Vlogs that are a combination of fun, information, and utility are considered the best. Showing viewers a clear picture of your lifestyle can be used to inspire most of them. This can be one of the best tips that would be put into practice for inspiring people. Your vlog journey should be expressive and offer priority, which can be done by showcasing the world through traveling or providing fitness goals.
Closing Words
Wish to start your vlog channel? After hearing every important information and criteria, are you ready to make your first vlog? This article has provided a distinctive understanding of making the first vlog video with effective tips and tricks. Along with that, whenever it comes to editing these vlogs, you can consider using Wondershare Filmora for this purpose.
Wondershare Filmora provides a complete editorial collection of tools that can be used ideally for enhancing the quality of the video. Filmora allows you to change the videos and audios under essential tools to design the best video. You can also employ effective techniques such as using effects and transitions.
Such elements can provoke the user to perform systematically while presenting a cognitive solution to video editing. Multiple things can be done across the platform while designing the first vlog. Look into the provided tips and tricks to avoid all kinds of errors.
Wondershare Filmora
Get started easily with Filmora’s powerful performance, intuitive interface, and countless effects!
Try It Free Try It Free Try It Free Learn More >

02 Inspirations and Tips for Vlog Video Ideas
Part 1: How to Start Vlogging for Beginners?
A proper guide can be considered while starting your vlog video channel. Although there are hundreds and thousands of vloggers across the social media platform, there is still room for more. As you think of an intuitive idea for vlogging, there are some steps you need to reconsider before going into this system.

1. Finding the Niche and Audience of Choice
Looking into the variety of niches that can be tried for vlog videos, the selection can never be easy. You need to be sure which genre you are looking forward to picking, which then develops a target audience that you would be addressing. Your content heavily depends on the type of target audience you pick for yourselves. Be very appropriate and original while you add yourselves in the vlog video.
Finding the appropriate niche and working across it while understanding the answer to what is a vlog is quite essential. This guides the complete future of your channel across this section.
2. Look And Inspire From Competition
The second most important thing to be done before starting vlogs on your channel is an overview of the competitive market. Understanding the current video creator market dynamics is the next direction that you need to consider for starting vlogging. Competition lets you understand the loopholes that exist in the current system. This is a highly effective way of discovering innovation within any market.
Get inspired from the competition that exists within the current vlogging market. Find what they do best and consider the strong points within yourself.
3. Creating a Brand
The next step to starting your personal vlogs is setting up a brand that would become a highlight of yours across the platforms. People need something unifying to follow a certain party or personality; the same is true with vlogging. As many vloggers describe their community as a family, they set up a complete brand across this narrative and present a great idea of inclusivity.
While you prepare for your vlog video, you need to specify the name logo and create art that would set up the complete vlog channel. These should be extremely attractive and alluring for the community to watch and learn.
4. Familiarize and Invest
You should be sure about what you need to do across the platform. While you design the video for your vlog channel, it is important to understand what needs to be done to become a professional in this sector. Familiarizing yourselves about the platform is one crucial thing that helps you understand the requirements to fulfill for a video.
Make sure that you work with good gear and equipment. Video quality is one significant point that is considered by viewers in this community. To make yourselves heard out, you need to invest across the gear appropriately.
Part 2: Inspirations and Tips for Vlog Video Ideas
While you dissect the answer to the question of “what is vlogging,” this part indicates all the essential points and tips that need to be considered for vlog video ideas. These tips shall help you set up a platform for yourself to inspire and direct people to your content.

1. Be Innovative in Your First Vlog
The first vlog is essential for many reasons. Where you let people know about yourselves, this can be a great start to your impressive journey in vlogging. The only thing that you need to do is innovate users into setting up their first vlog. This can be done through a good idea or targeting your introduction under a particular niche. Innovate your method of interacting with people, and this would attract every person you may have thought of.
2. Make Yourselves Personal
To interact in a better way, it is always considered best to be personal with your viewers. Share things that you find especially important for the viewers to know. Where you think you’ll inspire people with your idea, you need to highlight it properly. This can include your personal goals, gains, routine, and other details that highlight your personal life in and out of work. Providing facts about your personality can be the perfect choice for a vlog about to make a start.
3. Include a Comedy Touch
People love comedy! They die for looking content that can make them laugh and make their day good. Your vlog video should be a distributed combination of different niches and types that can be targeted across different points as per the requirement of the audience. You will always understand the point where you wish to add a particular style of interaction. Adding a comedy touch will make your viewers laugh, which is a win-win for your vlog channel.
4. Add in Information
The community does not always like content that does not teach something well to the viewers. If you keep yourselves stagnant to a single point, it will never bring you a breakthrough in your vlogging history. Informative videos are realized as interactive, which many viewers usually promote at times. The topic or concept that has been presented needs to be addressed perfectly in vlogs to cater to the requirements.
5. Provide Utility Services
Vlogs that are a combination of fun, information, and utility are considered the best. Showing viewers a clear picture of your lifestyle can be used to inspire most of them. This can be one of the best tips that would be put into practice for inspiring people. Your vlog journey should be expressive and offer priority, which can be done by showcasing the world through traveling or providing fitness goals.
Closing Words
Wish to start your vlog channel? After hearing every important information and criteria, are you ready to make your first vlog? This article has provided a distinctive understanding of making the first vlog video with effective tips and tricks. Along with that, whenever it comes to editing these vlogs, you can consider using Wondershare Filmora for this purpose.
Wondershare Filmora provides a complete editorial collection of tools that can be used ideally for enhancing the quality of the video. Filmora allows you to change the videos and audios under essential tools to design the best video. You can also employ effective techniques such as using effects and transitions.
Such elements can provoke the user to perform systematically while presenting a cognitive solution to video editing. Multiple things can be done across the platform while designing the first vlog. Look into the provided tips and tricks to avoid all kinds of errors.
Wondershare Filmora
Get started easily with Filmora’s powerful performance, intuitive interface, and countless effects!
Try It Free Try It Free Try It Free Learn More >

Step by Step to Rotate Videos Using Kdenlive
Kdenlive is a free, open-source video editing software application. Kdenlive is a powerful video editor that can be used to create professional-quality videos. It supports all of the major video formats and has a wide range of features. Kdenlive is available for Linux, Mac OS X, and Windows. Kdenlive is a great choice for anyone looking for a powerful, yet easy-to-use video editor. It is perfect for creating professional-quality videos, and its wide range of features makes it suitable for a variety of different tasks. It is perfect for anyone who wants a versatile video editor that works on all major platforms.
Kdenlive’s user interface is divided into three main areas: the timeline, the clip monitor, and the effects stack. The timeline is where you add and arrange your clips. The clip monitor shows your video as it will appear in your final project. The effects stack allows you to apply a range of video effects to your clips.
Step-by-step on how to rotate videos using Kdenlive
There are two ways to rotate videos using Kdenlive: by using the rotate filter or by changing the project settings. The rotate filter is a video effect that allows you to rotate your video clip around its vertical and horizontal axes. To apply the rotate filter…
Step 1: Import your video clip to the timeline.
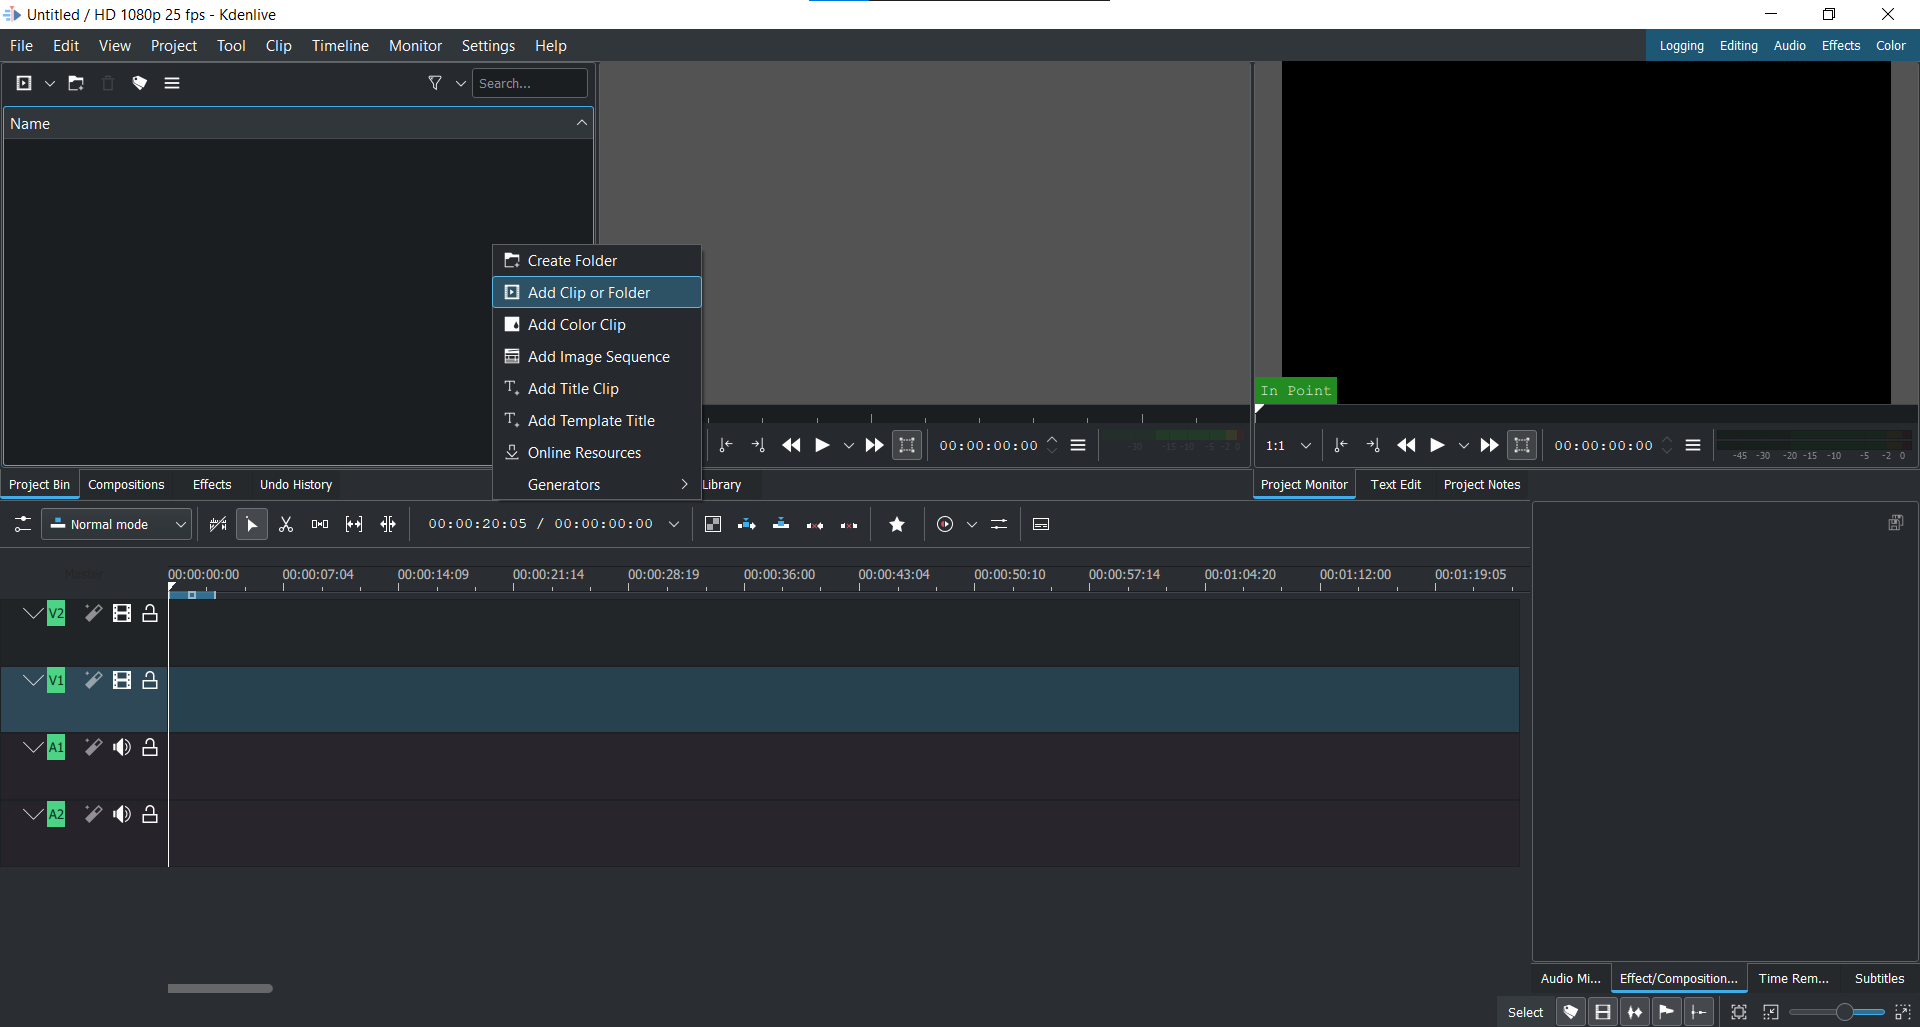
Step 2: Open the Effects tab and expand the Transform, Distort Perspective tab.
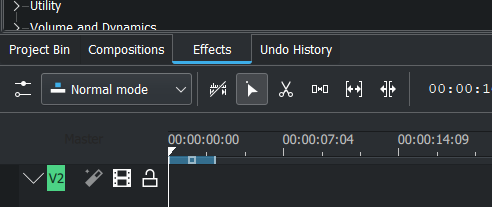
Step 3: Drag the Rotate filter onto your clip.
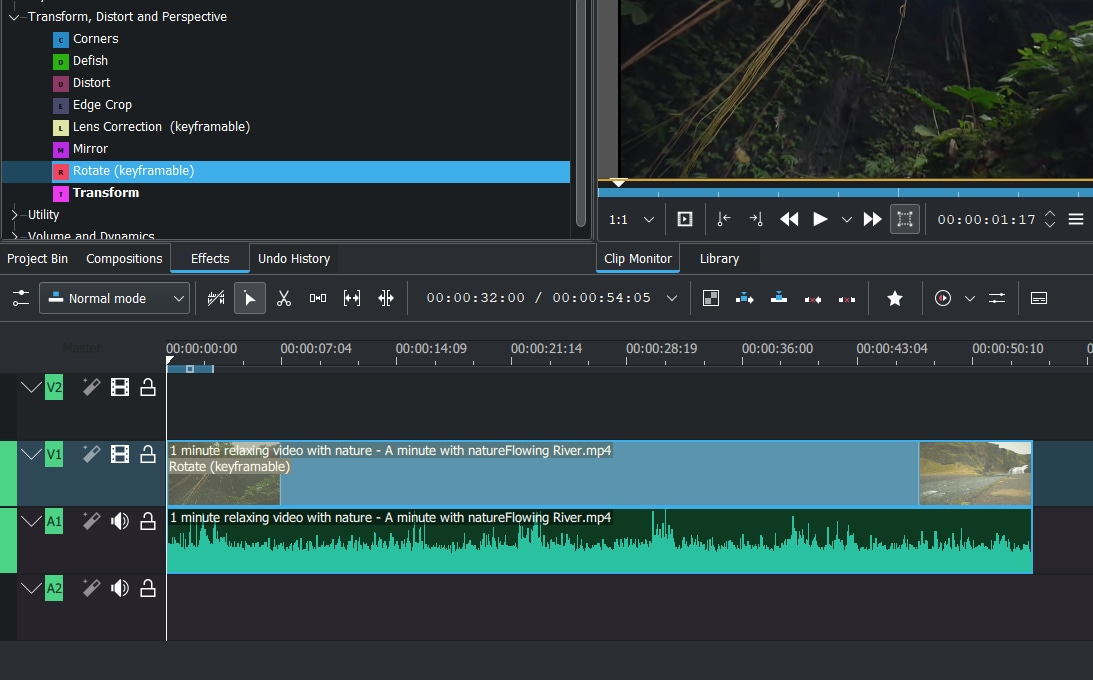
Step 4: The Rotate filter will open in the Effects Editor.
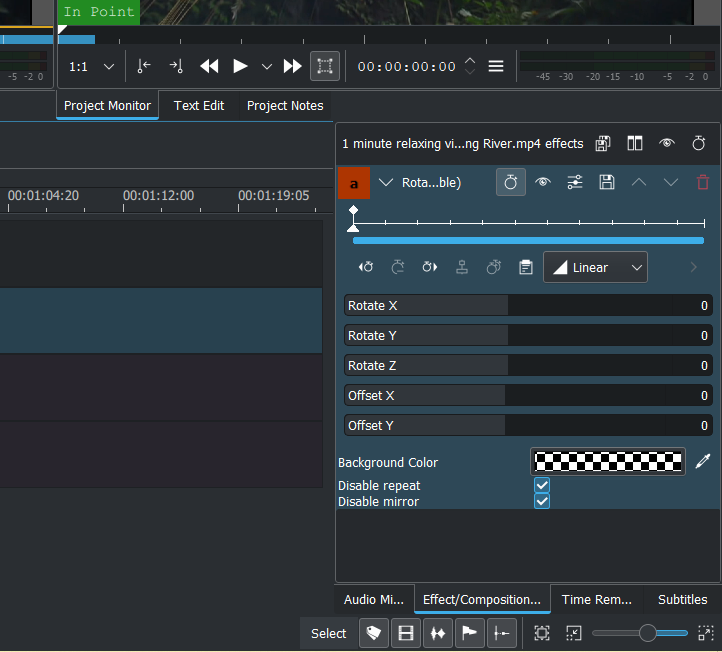
Step 5: Use the sliders to rotate your video clip.
Step 6: Click the ‘Save’ Icon to apply the filter.
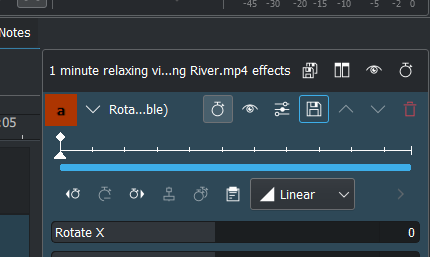
The rotate filter is a great way to quickly rotate your video clip. However, it does have some limitations. For example, you can’t…
- use the rotate filter on clips that are already rotated
- use the rotate filter to create a 360-degree rotation
- change the rotation orientation of your clip.
If you need to rotate your video clip in a different direction, or if you want to create a 360-degree rotation, you can change the project settings. The rotate filter can be used to rotate your video clip in 90-degree increments. If you need to rotate your video clip by a different amount, you can change the project settings. To change the project settings…
Step 1: Import your video clip to the timeline.
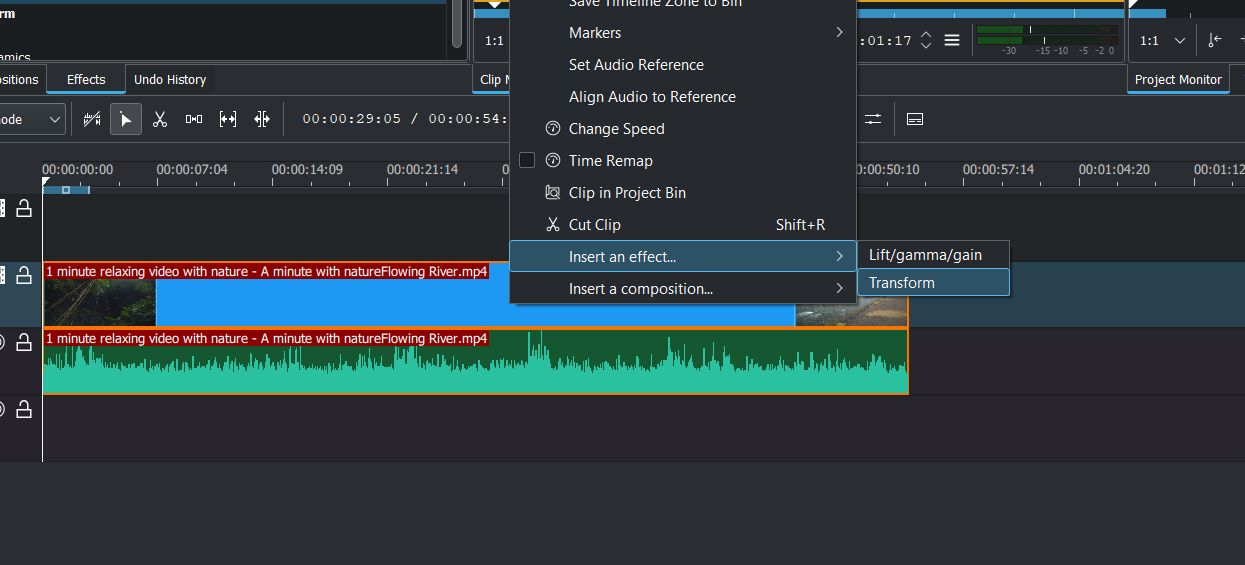
Step 2: Right-click on the clip and select Apply an Effect > Transform from the menu.
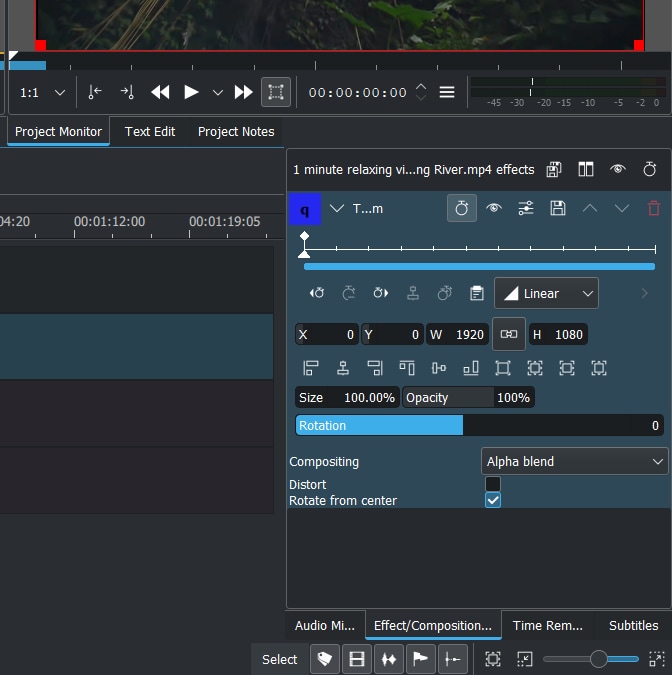
Step 3: The Properties window will open. Select the Rotate tab.

Step 4: Use the slider to set the amount of rotation you need.
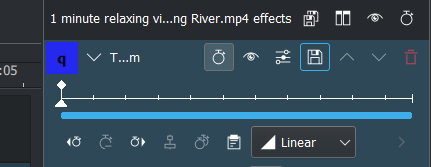
Step 5: Click the ‘Save’ Icon to apply the changes.
The project settings allow you to rotate your video clip in any direction you need.
How to rotate videos using Filmora?
Meanwhile, you can also use Filmora Video Editor to rotate your video. Filmora is a powerful video editor that can be used to create professional-quality videos. It supports all of the major video formats and has a wide range of features. Filmora is available for Windows and Mac OS X. Filmora’s user interface is divided into three main areas: the timeline, the preview window and the effects panel. The timeline is where you add and arrange your clips. The preview window shows your video as it will appear in your final project. The effects panel allows you to apply a range of video effects to your clips.
For Win 7 or later (64-bit)
For macOS 10.14 or later
Step-by-step on how to rotate videos using Filmora
Two ways to rotate your videos using Filmora: by using the rotate option when you right click it or changing the project settings. The rotate filter is a video effect that allows you to rotate your video clip around its vertical and horizontal axes.
To apply the rotate filter…
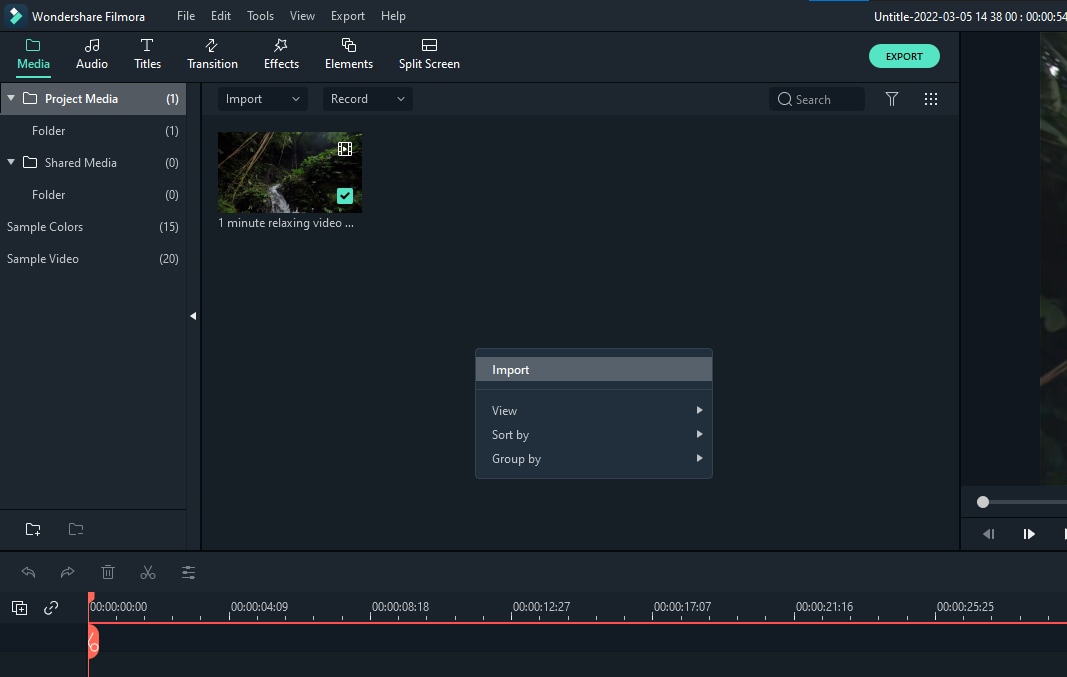
Step 1: Import your video clip into Filmora.
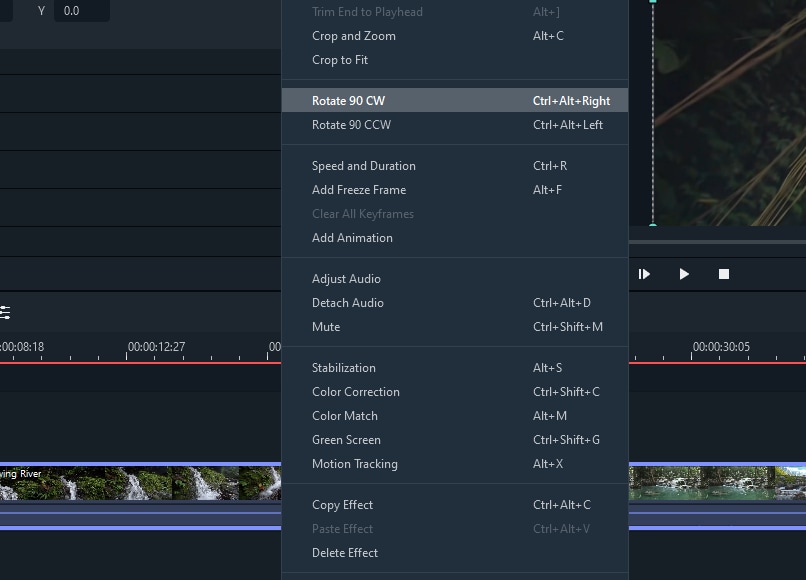
Step 2: Right-click on the video.
Step 3: Select ‘Rotate 90 CW’ or click Ctrl + Alt + Right to rotate the video 90 degrees clockwise.
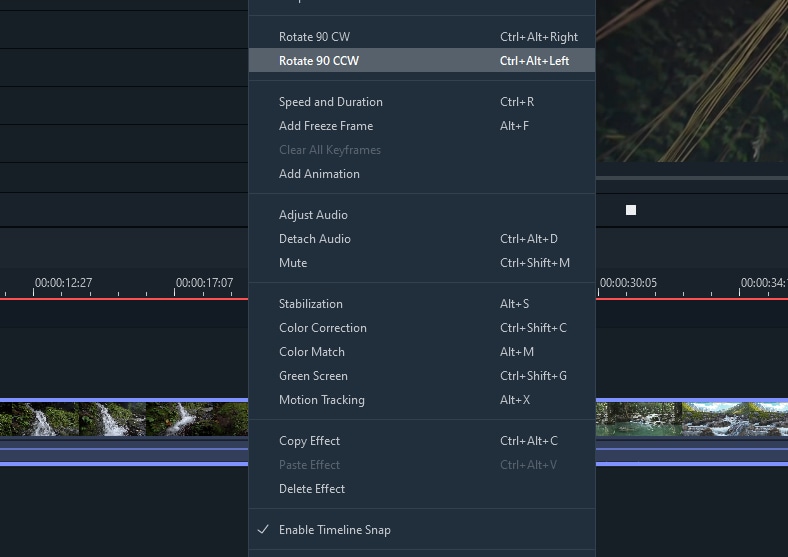
Step 4: Select ‘Rotate 90 CCW’ or click Ctrl + Alt + Left to rotate the video 90 degrees counterclockwise.
Step 5: Repeat the steps until you are satisfied. Note: It can only rotate the video in the degrees of multiples of 90.
Step 6: The video is now rotated.
Filmora’s rotate filter is very similar to Kdenlive’s. However, there are a few differences. For example…
- you can use the rotate filter on clips that are already rotated
- you can change the rotation orientation of your clip.
If you need to rotate your video clip in a different direction, or if you want to create a 360-degree rotation, follow the below steps:
Click on the ‘Edit’ option in the tool above the timeline.
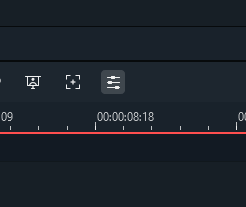
Select the ‘Transform’ option, then go to ‘Rotate’
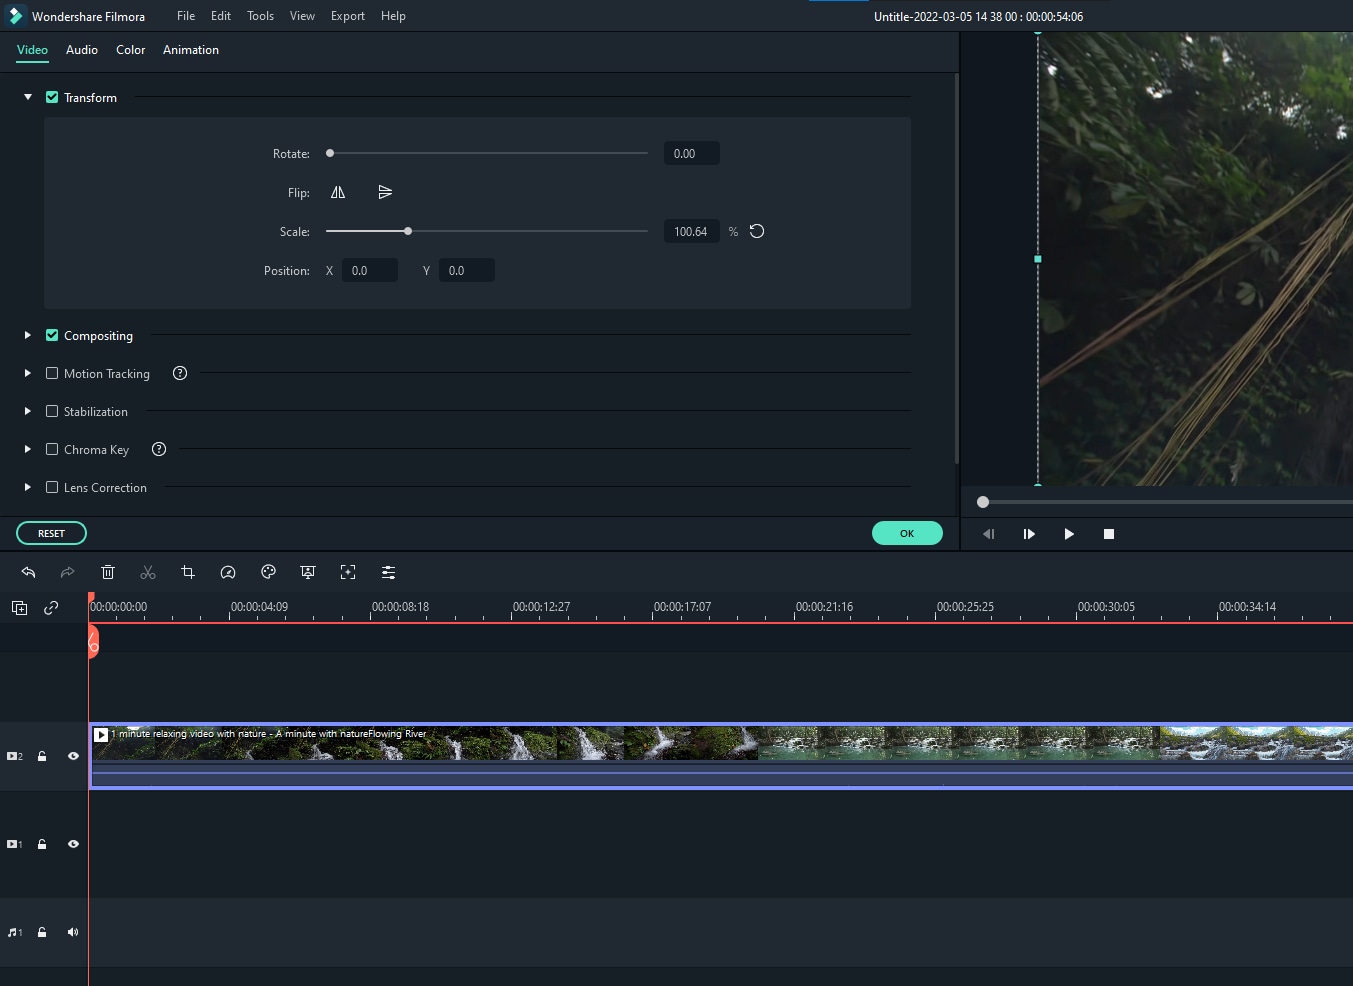
Use the slider to set the amount of rotation you need.

Click OK to apply the changes.
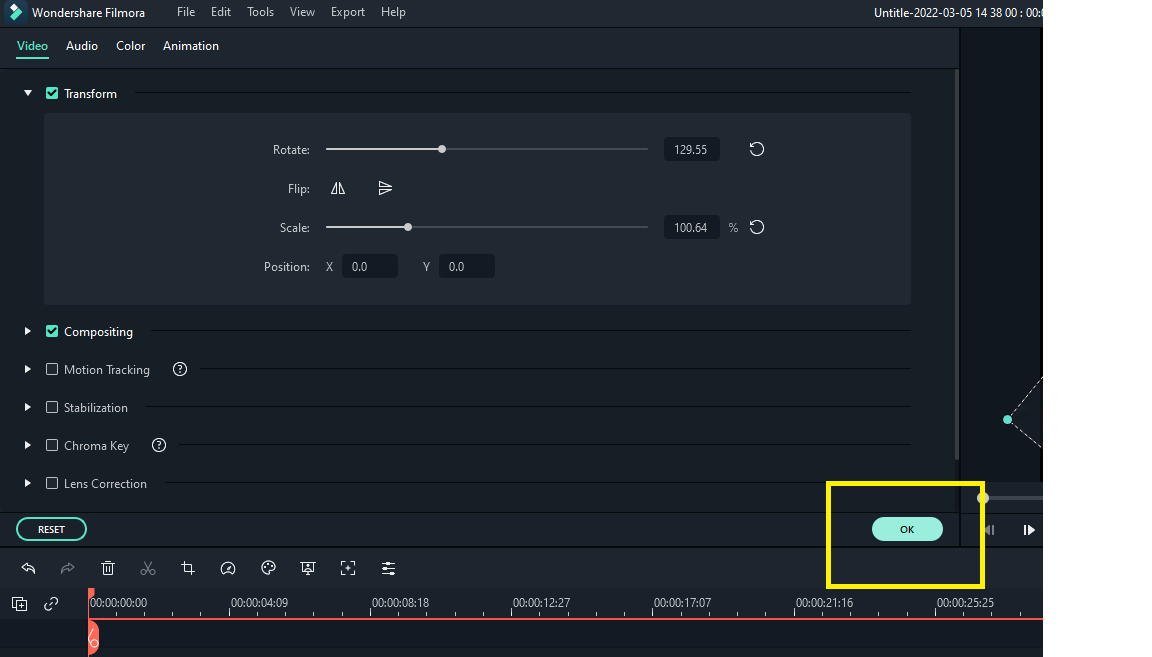
The project settings allow you to rotate your video clip in any direction you need.
Both Filmora and Kdenlive offer a rotate filter that allows you to rotate your video clip by a certain amount. However, only Filmora offers the ability to rotate your video clip in any direction you need. Additionally, Filmora offers a wide range of features that can be used to create professional-quality videos. If you need to rotate your video clip in a different direction, or if you want to create a 360-degree rotation, Filmora is the best option.
Step 2: Open the Effects tab and expand the Transform, Distort Perspective tab.

Step 3: Drag the Rotate filter onto your clip.

Step 4: The Rotate filter will open in the Effects Editor.

Step 5: Use the sliders to rotate your video clip.
Step 6: Click the ‘Save’ Icon to apply the filter.

The rotate filter is a great way to quickly rotate your video clip. However, it does have some limitations. For example, you can’t…
- use the rotate filter on clips that are already rotated
- use the rotate filter to create a 360-degree rotation
- change the rotation orientation of your clip.
If you need to rotate your video clip in a different direction, or if you want to create a 360-degree rotation, you can change the project settings. The rotate filter can be used to rotate your video clip in 90-degree increments. If you need to rotate your video clip by a different amount, you can change the project settings. To change the project settings…
Step 1: Import your video clip to the timeline.

Step 2: Right-click on the clip and select Apply an Effect > Transform from the menu.

Step 3: The Properties window will open. Select the Rotate tab.

Step 4: Use the slider to set the amount of rotation you need.

Step 5: Click the ‘Save’ Icon to apply the changes.

The project settings allow you to rotate your video clip in any direction you need.
How to rotate videos using Filmora?
Meanwhile, you can also use Filmora Video Editor to rotate your video. Filmora is a powerful video editor that can be used to create professional-quality videos. It supports all of the major video formats and has a wide range of features. Filmora is available for Windows and Mac OS X. Filmora’s user interface is divided into three main areas: the timeline, the preview window and the effects panel. The timeline is where you add and arrange your clips. The preview window shows your video as it will appear in your final project. The effects panel allows you to apply a range of video effects to your clips.
For Win 7 or later (64-bit)
For macOS 10.14 or later
Step-by-step on how to rotate videos using Filmora
Two ways to rotate your videos using Filmora: by using the rotate option when you right click it or changing the project settings. The rotate filter is a video effect that allows you to rotate your video clip around its vertical and horizontal axes.
To apply the rotate filter…
Step 1: Import your video clip into Filmora.

Step 2: Right-click on the video.
Step 3: Select ‘Rotate 90 CW’ or click Ctrl + Alt + Right to rotate the video 90 degrees clockwise.

Step 4: Select ‘Rotate 90 CCW’ or click Ctrl + Alt + Left to rotate the video 90 degrees counterclockwise.
Step 5: Repeat the steps until you are satisfied. Note: It can only rotate the video in the degrees of multiples of 90.
Step 6: The video is now rotated.
Filmora’s rotate filter is very similar to Kdenlive’s. However, there are a few differences. For example…
- you can use the rotate filter on clips that are already rotated
- you can change the rotation orientation of your clip.
If you need to rotate your video clip in a different direction, or if you want to create a 360-degree rotation, follow the below steps:
Click on the ‘Edit’ option in the tool above the timeline.

Select the ‘Transform’ option, then go to ‘Rotate’

Use the slider to set the amount of rotation you need.

Click OK to apply the changes.

The project settings allow you to rotate your video clip in any direction you need.
Both Filmora and Kdenlive offer a rotate filter that allows you to rotate your video clip by a certain amount. However, only Filmora offers the ability to rotate your video clip in any direction you need. Additionally, Filmora offers a wide range of features that can be used to create professional-quality videos. If you need to rotate your video clip in a different direction, or if you want to create a 360-degree rotation, Filmora is the best option.
Step 2: Open the Effects tab and expand the Transform, Distort Perspective tab.

Step 3: Drag the Rotate filter onto your clip.

Step 4: The Rotate filter will open in the Effects Editor.

Step 5: Use the sliders to rotate your video clip.
Step 6: Click the ‘Save’ Icon to apply the filter.

The rotate filter is a great way to quickly rotate your video clip. However, it does have some limitations. For example, you can’t…
- use the rotate filter on clips that are already rotated
- use the rotate filter to create a 360-degree rotation
- change the rotation orientation of your clip.
If you need to rotate your video clip in a different direction, or if you want to create a 360-degree rotation, you can change the project settings. The rotate filter can be used to rotate your video clip in 90-degree increments. If you need to rotate your video clip by a different amount, you can change the project settings. To change the project settings…
Step 1: Import your video clip to the timeline.

Step 2: Right-click on the clip and select Apply an Effect > Transform from the menu.

Step 3: The Properties window will open. Select the Rotate tab.

Step 4: Use the slider to set the amount of rotation you need.

Step 5: Click the ‘Save’ Icon to apply the changes.

The project settings allow you to rotate your video clip in any direction you need.
How to rotate videos using Filmora?
Meanwhile, you can also use Filmora Video Editor to rotate your video. Filmora is a powerful video editor that can be used to create professional-quality videos. It supports all of the major video formats and has a wide range of features. Filmora is available for Windows and Mac OS X. Filmora’s user interface is divided into three main areas: the timeline, the preview window and the effects panel. The timeline is where you add and arrange your clips. The preview window shows your video as it will appear in your final project. The effects panel allows you to apply a range of video effects to your clips.
For Win 7 or later (64-bit)
For macOS 10.14 or later
Step-by-step on how to rotate videos using Filmora
Two ways to rotate your videos using Filmora: by using the rotate option when you right click it or changing the project settings. The rotate filter is a video effect that allows you to rotate your video clip around its vertical and horizontal axes.
To apply the rotate filter…
Step 1: Import your video clip into Filmora.

Step 2: Right-click on the video.
Step 3: Select ‘Rotate 90 CW’ or click Ctrl + Alt + Right to rotate the video 90 degrees clockwise.

Step 4: Select ‘Rotate 90 CCW’ or click Ctrl + Alt + Left to rotate the video 90 degrees counterclockwise.
Step 5: Repeat the steps until you are satisfied. Note: It can only rotate the video in the degrees of multiples of 90.
Step 6: The video is now rotated.
Filmora’s rotate filter is very similar to Kdenlive’s. However, there are a few differences. For example…
- you can use the rotate filter on clips that are already rotated
- you can change the rotation orientation of your clip.
If you need to rotate your video clip in a different direction, or if you want to create a 360-degree rotation, follow the below steps:
Click on the ‘Edit’ option in the tool above the timeline.

Select the ‘Transform’ option, then go to ‘Rotate’

Use the slider to set the amount of rotation you need.

Click OK to apply the changes.

The project settings allow you to rotate your video clip in any direction you need.
Both Filmora and Kdenlive offer a rotate filter that allows you to rotate your video clip by a certain amount. However, only Filmora offers the ability to rotate your video clip in any direction you need. Additionally, Filmora offers a wide range of features that can be used to create professional-quality videos. If you need to rotate your video clip in a different direction, or if you want to create a 360-degree rotation, Filmora is the best option.
Step 2: Open the Effects tab and expand the Transform, Distort Perspective tab.

Step 3: Drag the Rotate filter onto your clip.

Step 4: The Rotate filter will open in the Effects Editor.

Step 5: Use the sliders to rotate your video clip.
Step 6: Click the ‘Save’ Icon to apply the filter.

The rotate filter is a great way to quickly rotate your video clip. However, it does have some limitations. For example, you can’t…
- use the rotate filter on clips that are already rotated
- use the rotate filter to create a 360-degree rotation
- change the rotation orientation of your clip.
If you need to rotate your video clip in a different direction, or if you want to create a 360-degree rotation, you can change the project settings. The rotate filter can be used to rotate your video clip in 90-degree increments. If you need to rotate your video clip by a different amount, you can change the project settings. To change the project settings…
Step 1: Import your video clip to the timeline.

Step 2: Right-click on the clip and select Apply an Effect > Transform from the menu.

Step 3: The Properties window will open. Select the Rotate tab.

Step 4: Use the slider to set the amount of rotation you need.

Step 5: Click the ‘Save’ Icon to apply the changes.

The project settings allow you to rotate your video clip in any direction you need.
How to rotate videos using Filmora?
Meanwhile, you can also use Filmora Video Editor to rotate your video. Filmora is a powerful video editor that can be used to create professional-quality videos. It supports all of the major video formats and has a wide range of features. Filmora is available for Windows and Mac OS X. Filmora’s user interface is divided into three main areas: the timeline, the preview window and the effects panel. The timeline is where you add and arrange your clips. The preview window shows your video as it will appear in your final project. The effects panel allows you to apply a range of video effects to your clips.
For Win 7 or later (64-bit)
For macOS 10.14 or later
Step-by-step on how to rotate videos using Filmora
Two ways to rotate your videos using Filmora: by using the rotate option when you right click it or changing the project settings. The rotate filter is a video effect that allows you to rotate your video clip around its vertical and horizontal axes.
To apply the rotate filter…
Step 1: Import your video clip into Filmora.

Step 2: Right-click on the video.
Step 3: Select ‘Rotate 90 CW’ or click Ctrl + Alt + Right to rotate the video 90 degrees clockwise.

Step 4: Select ‘Rotate 90 CCW’ or click Ctrl + Alt + Left to rotate the video 90 degrees counterclockwise.
Step 5: Repeat the steps until you are satisfied. Note: It can only rotate the video in the degrees of multiples of 90.
Step 6: The video is now rotated.
Filmora’s rotate filter is very similar to Kdenlive’s. However, there are a few differences. For example…
- you can use the rotate filter on clips that are already rotated
- you can change the rotation orientation of your clip.
If you need to rotate your video clip in a different direction, or if you want to create a 360-degree rotation, follow the below steps:
Click on the ‘Edit’ option in the tool above the timeline.

Select the ‘Transform’ option, then go to ‘Rotate’

Use the slider to set the amount of rotation you need.

Click OK to apply the changes.

The project settings allow you to rotate your video clip in any direction you need.
Both Filmora and Kdenlive offer a rotate filter that allows you to rotate your video clip by a certain amount. However, only Filmora offers the ability to rotate your video clip in any direction you need. Additionally, Filmora offers a wide range of features that can be used to create professional-quality videos. If you need to rotate your video clip in a different direction, or if you want to create a 360-degree rotation, Filmora is the best option.
Detailed Guide to Rotate Videos in Blender
Blender is a 3D animation software that can be used to create stunning 3D models and videos. It is free and open source, which means that it is available to anyone who wants to use it. Blender is also very versatile, and can be used to create anything from simple 3D models to full-blown 3D movies.
One of the biggest benefits of Blender is that it is easy to learn. The interface is intuitive and user-friendly, and there are plenty of tutorials available online that can help you get started. Blender also has a very active community, so if you ever get stuck, there is likely someone out there who can help you. It is a complex software, but there are many online tutorials like this article that can help you get started.
To download Blender, go to https://www.blender.org/download/ . Click on the link that says “Download Blender” and then select the version that you want to download. After you have downloaded Blender, install it on your computer.
Step-by-Step on how to rotate videos in Blender
The first way to rotate a video in Blender is by using the Strip option.
Step 1: To do this, open the video that you want to rotate in Blender.

Step 2: Then, click on the “Strip” menu and select “Transform.”

Step 3: In the Transform Properties window, you will see a list of different tools for the video. Scroll down until you see the “Rotation” property. This is where you can manually rotate the video.

Step 4: Click on Enter to save the rotation of the video.
The second way to rotate a video in Blender is by using the Transform Properties window. To do this…
Step 1: Open the video that you want to rotate in Blender.

Step 2: Next, go to ‘Transform’ in the Active Tool portion of the screen.
Figure 5
Step 3: Go to the ‘Transform’ option in the properties window and adjust based on the rotational angle that you want.

Step 4: Click on ‘Enter’ to apply it to the video.
In this tutorial, we have shown you two different ways to rotate a video in Blender. The first way is by using the Transform Properties window, and the second way is by using the 3D Viewport.
Which method you use is up to you. However, we recommend using the 3D Viewport method, as it is more accurate.
Rotating a video in Blender can be used for other purposes than just rotating it.
Here are some other things that you can do with a rotated video:
- Scale the video up or down
- Flip the video horizontally or vertically
- Change the position of the video in the 3D Viewport
How to rotate videos in Filmora
Meanwhile, you can also use Filmora Video Editor to rotate a video without any watermark. Filmora is a video editing software that lets you rotate videos easily. It is simple to use, and has many powerful features that let you edit your videos like a pro. It also has a built-in video converter that lets you convert your videos to different formats, so they can be played on any device. You can also export your videos in 4K resolution, so they look great no matter what device you are watching them on.
For Win 7 or later (64-bit)
For macOS 10.14 or later
There are two main ways to rotate video in Filmora: through the use of keyframes or by using the Transform Tool.
Step-by-step on how to rotate videos in Filmora
To rotate a video clip using keyframes…
Step 1: Import the video clip you want to rotate to your project.

Step 2: In the timeline, place the playhead at the beginning of the clip.

Step 3: With the playhead still at the beginning of the clip, drag the rotation handle in the preview window to rotate the video.

Step 4: Move the playhead to the end of the clip and drag the rotation handle again to rotate it further.

To rotate a video clip using the Transform Tool…
Select the “Edit” tool from the toolbar.

Go to the “Transform” selection, then select the rotate option.

Adjust the rotation angle using the tool.

Both methods are fairly straightforward and easy to use. Experiment with each to see which works best for your project.
Step 2: Then, click on the “Strip” menu and select “Transform.”

Step 3: In the Transform Properties window, you will see a list of different tools for the video. Scroll down until you see the “Rotation” property. This is where you can manually rotate the video.

Step 4: Click on Enter to save the rotation of the video.
The second way to rotate a video in Blender is by using the Transform Properties window. To do this…
Step 1: Open the video that you want to rotate in Blender.

Step 2: Next, go to ‘Transform’ in the Active Tool portion of the screen.
Figure 5
Step 3: Go to the ‘Transform’ option in the properties window and adjust based on the rotational angle that you want.

Step 4: Click on ‘Enter’ to apply it to the video.
In this tutorial, we have shown you two different ways to rotate a video in Blender. The first way is by using the Transform Properties window, and the second way is by using the 3D Viewport.
Which method you use is up to you. However, we recommend using the 3D Viewport method, as it is more accurate.
Rotating a video in Blender can be used for other purposes than just rotating it.
Here are some other things that you can do with a rotated video:
- Scale the video up or down
- Flip the video horizontally or vertically
- Change the position of the video in the 3D Viewport
How to rotate videos in Filmora
Meanwhile, you can also use Filmora Video Editor to rotate a video without any watermark. Filmora is a video editing software that lets you rotate videos easily. It is simple to use, and has many powerful features that let you edit your videos like a pro. It also has a built-in video converter that lets you convert your videos to different formats, so they can be played on any device. You can also export your videos in 4K resolution, so they look great no matter what device you are watching them on.
For Win 7 or later (64-bit)
For macOS 10.14 or later
There are two main ways to rotate video in Filmora: through the use of keyframes or by using the Transform Tool.
Step-by-step on how to rotate videos in Filmora
To rotate a video clip using keyframes…
Step 1: Import the video clip you want to rotate to your project.

Step 2: In the timeline, place the playhead at the beginning of the clip.

Step 3: With the playhead still at the beginning of the clip, drag the rotation handle in the preview window to rotate the video.

Step 4: Move the playhead to the end of the clip and drag the rotation handle again to rotate it further.

To rotate a video clip using the Transform Tool…
Select the “Edit” tool from the toolbar.

Go to the “Transform” selection, then select the rotate option.

Adjust the rotation angle using the tool.

Both methods are fairly straightforward and easy to use. Experiment with each to see which works best for your project.
Step 2: Then, click on the “Strip” menu and select “Transform.”

Step 3: In the Transform Properties window, you will see a list of different tools for the video. Scroll down until you see the “Rotation” property. This is where you can manually rotate the video.

Step 4: Click on Enter to save the rotation of the video.
The second way to rotate a video in Blender is by using the Transform Properties window. To do this…
Step 1: Open the video that you want to rotate in Blender.

Step 2: Next, go to ‘Transform’ in the Active Tool portion of the screen.
Figure 5
Step 3: Go to the ‘Transform’ option in the properties window and adjust based on the rotational angle that you want.

Step 4: Click on ‘Enter’ to apply it to the video.
In this tutorial, we have shown you two different ways to rotate a video in Blender. The first way is by using the Transform Properties window, and the second way is by using the 3D Viewport.
Which method you use is up to you. However, we recommend using the 3D Viewport method, as it is more accurate.
Rotating a video in Blender can be used for other purposes than just rotating it.
Here are some other things that you can do with a rotated video:
- Scale the video up or down
- Flip the video horizontally or vertically
- Change the position of the video in the 3D Viewport
How to rotate videos in Filmora
Meanwhile, you can also use Filmora Video Editor to rotate a video without any watermark. Filmora is a video editing software that lets you rotate videos easily. It is simple to use, and has many powerful features that let you edit your videos like a pro. It also has a built-in video converter that lets you convert your videos to different formats, so they can be played on any device. You can also export your videos in 4K resolution, so they look great no matter what device you are watching them on.
For Win 7 or later (64-bit)
For macOS 10.14 or later
There are two main ways to rotate video in Filmora: through the use of keyframes or by using the Transform Tool.
Step-by-step on how to rotate videos in Filmora
To rotate a video clip using keyframes…
Step 1: Import the video clip you want to rotate to your project.

Step 2: In the timeline, place the playhead at the beginning of the clip.

Step 3: With the playhead still at the beginning of the clip, drag the rotation handle in the preview window to rotate the video.

Step 4: Move the playhead to the end of the clip and drag the rotation handle again to rotate it further.

To rotate a video clip using the Transform Tool…
Select the “Edit” tool from the toolbar.

Go to the “Transform” selection, then select the rotate option.

Adjust the rotation angle using the tool.

Both methods are fairly straightforward and easy to use. Experiment with each to see which works best for your project.
Step 2: Then, click on the “Strip” menu and select “Transform.”

Step 3: In the Transform Properties window, you will see a list of different tools for the video. Scroll down until you see the “Rotation” property. This is where you can manually rotate the video.

Step 4: Click on Enter to save the rotation of the video.
The second way to rotate a video in Blender is by using the Transform Properties window. To do this…
Step 1: Open the video that you want to rotate in Blender.

Step 2: Next, go to ‘Transform’ in the Active Tool portion of the screen.
Figure 5
Step 3: Go to the ‘Transform’ option in the properties window and adjust based on the rotational angle that you want.

Step 4: Click on ‘Enter’ to apply it to the video.
In this tutorial, we have shown you two different ways to rotate a video in Blender. The first way is by using the Transform Properties window, and the second way is by using the 3D Viewport.
Which method you use is up to you. However, we recommend using the 3D Viewport method, as it is more accurate.
Rotating a video in Blender can be used for other purposes than just rotating it.
Here are some other things that you can do with a rotated video:
- Scale the video up or down
- Flip the video horizontally or vertically
- Change the position of the video in the 3D Viewport
How to rotate videos in Filmora
Meanwhile, you can also use Filmora Video Editor to rotate a video without any watermark. Filmora is a video editing software that lets you rotate videos easily. It is simple to use, and has many powerful features that let you edit your videos like a pro. It also has a built-in video converter that lets you convert your videos to different formats, so they can be played on any device. You can also export your videos in 4K resolution, so they look great no matter what device you are watching them on.
For Win 7 or later (64-bit)
For macOS 10.14 or later
There are two main ways to rotate video in Filmora: through the use of keyframes or by using the Transform Tool.
Step-by-step on how to rotate videos in Filmora
To rotate a video clip using keyframes…
Step 1: Import the video clip you want to rotate to your project.

Step 2: In the timeline, place the playhead at the beginning of the clip.

Step 3: With the playhead still at the beginning of the clip, drag the rotation handle in the preview window to rotate the video.

Step 4: Move the playhead to the end of the clip and drag the rotation handle again to rotate it further.

To rotate a video clip using the Transform Tool…
Select the “Edit” tool from the toolbar.

Go to the “Transform” selection, then select the rotate option.

Adjust the rotation angle using the tool.

Both methods are fairly straightforward and easy to use. Experiment with each to see which works best for your project.
Also read:
- What Is the Best MP4 Cutter for YouTuber on Mac for 2024
- Updated In 2024, How to Add Filters on iMovie
- 2024 Approved Lets Learn How to Convert a Normal Video Into a Film Shot in the 1920S with Wondershare Filmora
- Steps to Rotate Videos Using Handbrake for 2024
- New In 2024, Phone Aspect Ratio Vertical Definition, Types and Tips
- Updated How to Share YouTube Video on Zoom, In 2024
- New Best 20 Slideshow Makers for Win/Mac/Online Review
- Updated An Ultimate Guide to Flexclip Online Trimmer
- New How to Create Video in Text Intro?
- Updated How to Edit Facebook Video Ads for E-Commerce Business
- New 2024 Approved 2 Practical Ways to Combine Videos on TikTok
- Updated GIF to JPG Is as Simple as a Blink of an Eye for 2024
- New 2024 Approved How to Create a Light Sweep (Shine) Effect with Filmora
- This Article Will Explore in Detail How You Can Use the Features Available in Wondershare Filmora to Export the Video by Changing the Resolution of the Footage for 2024
- 18 Video Editors Weve Tested Heres What We Learned
- Updated Having Difficulty in Choosing the Most Affordable 3D Slideshow Software? Stay Here for the Best Application Choices of All Times to Create the Most Stunning Slideshows Ever
- In 2024, Recording Videos with Your Smartphones Is Fun and Fantastic. But Did You Know that Recording in Slo-Mo Has Become a Trend Nowadays? Read More to Learn About How to Convert Videos to Slow Motion Here
- Updated In 2024, Add Stylish Text to Videos
- 2024 Approved How To Make a Photo Collage in Microsoft Word
- Are You Facing Trouble in Playing a TS File? We Got You! Read the Article Below to Learn the Most About TS Format, Pros and Cons, and More for 2024
- 2024 Approved Best Photo Video Maker Apps with Song PC, Mobile, Online
- How to Spruce Up Your Telegram Profile
- LumaFusion – One of the Best Video Editors for iOS
- New In 2024, Guide Create The Perfect VHS Effect Look in Premiere Pro
- Updated Final Cut Pro for iPad for 2024
- New In 2024, A Guide to Find a High-Quality Video Marketing Agency
- New Ultimate Guide on Magic Effects Video Making for 2024
- Updated Learn to Splice Videos Together on iPhone
- New Logo Intro Videos Are the Hottest Trend in Town and Are Gaining Popularity Quickly. Keep Reading This Article to Learn Their Importance and How to Design One
- New 15 Free Cinematic LUTs for Your Film for 2024
- With Looping Videos, People Stay on Your Site Longer, Boosting Engagement. With Video Being Watched on Mobile over 3X More than Any Other Content, Its an Essential Part of Mobile Advertising
- Updated 2024 Approved 11 Best Video Editing Apps for iPhone
- Updated YouTube Lives Are Very Popular Nowadays and People Can Interact with the Anchor at Real Time. If You Want to Comment on a YouTube Live Chat, You Can Follow the Guide Below
- New In 2024, Top LUTs for Sony HLG to Download
- In 2024, Online Calculate and Change Video Aspect Ratio
- Updated How to Create Video in Text Intro?
- How to Use Lumetri Color in Adobe After Effects
- New Tips That Show Anybody How To Create Youtube Slideshow – Guaranteed
- 2024 Approved FLV Editors for Windows 11/10/8.1/8/7 Easily Edit FLV Videos on PC
- Your Complete Guide To Reset Samsung Galaxy M14 5G | Dr.fone
- The Most Useful Tips for Pokemon Go Ultra League On Xiaomi Redmi Note 12T Pro | Dr.fone
- Turning Off Two Factor Authentication From Apple iPhone 14 Plus? 5 Tips You Must Know
- Did Your iPhone 6s Plus Passcode Change Itself? Unlock It Now
- Hacks to do pokemon go trainer battles For Tecno Camon 20 Premier 5G | Dr.fone
- How to Bypass iPhone 13 Pro Max Passcode Easily Video Inside | Dr.fone
- All Must-Knows to Use Fake GPS GO Location Spoofer On Honor X9b | Dr.fone
- Vivo V27 Pro Screen Unresponsive? Heres How to Fix It | Dr.fone
- How to Change Spotify Location After Moving to Another Country On Vivo Y100i Power 5G | Dr.fone
- Solutions to Spy on Vivo V29e with and without jailbreak | Dr.fone
- In 2024, How to Transfer Contacts from Honor Play 40C To Phone | Dr.fone
- In 2024, Fake Android Location without Rooting For Your Honor Magic 6 Lite | Dr.fone
- How to Recover Apple iPhone 14 Pro Data From iOS iCloud? | Dr.fone
- How to Use Phone Clone to Migrate Your Lava Blaze 2 Pro Data? | Dr.fone
- Possible solutions to restore deleted pictures from ZTE Axon 40 Lite.
- Best Fixes For Nokia C12 Plus Hard Reset | Dr.fone
- In 2024, Why is iPogo not working On Honor X50 GT? Fixed | Dr.fone
- Home Button Not Working on Vivo S17 Pro? Here Are Real Fixes | Dr.fone
- How to Bypass FRP from Motorola Moto G84 5G?
- In 2024, The Most Effective Ways to Bypass iPhone 6 Plus Activation Lock
- In 2024, Things You Should Know When Unlocking Total Wireless Of Apple iPhone 14 Pro | Dr.fone
- 7 Solutions to Fix Error Code 963 on Google Play Of Honor 90 GT | Dr.fone
- How to fix iCloud lock from your iPhone 6s Plus and iPad
- How do you play HEVC/H.265 files on Sony ?
- In 2024, How To Bypass Oppo Reno 8T 5G FRP In 3 Different Ways
- How to get back lost photos from Oppo Find X6 Pro.
- How to Intercept Text Messages on Oppo Reno 8T 5G | Dr.fone
- How to Change/Fake Your Motorola Moto E13 Location on Viber | Dr.fone
- How to Unlock Xiaomi Redmi Note 13 5G PIN Code/Pattern Lock/Password
- In 2024, How to Hide/Fake Snapchat Location on Your Infinix Note 30 VIP Racing Edition | Dr.fone
- Title: Here Is a Step-by-Step Guide to Color Correct and Color Grade a Video Professionally with Wondershare Filmora. Lets Get Going
- Author: Chloe
- Created at : 2024-06-09 16:15:19
- Updated at : 2024-06-10 16:15:19
- Link: https://ai-editing-video.techidaily.com/here-is-a-step-by-step-guide-to-color-correct-and-color-grade-a-video-professionally-with-wondershare-filmora-lets-get-going/
- License: This work is licensed under CC BY-NC-SA 4.0.

