
:max_bytes(150000):strip_icc():format(webp)/0010_21-best-teen-movies-on-netflix-5104880-b0e9832746854cabb4f33cafef96214b.jpg)
How Did AI Video Games Act More Human Than Human for 2024
How Did AI Video Games Act More Human Than Human?
How Did AI Video Games Act More Human Than Human?
An easy yet powerful editor
Numerous effects to choose from
Detailed tutorials provided by the official channel
The gaming world is ever-changing, with developers looking to create innovative ways to immerse players into their digital worlds. One such technology that has begun to sweep is AI in the game industry.
AI is a powerful tool in many ways to improve the gaming experience. It can make artificial intelligence in computer games more believable and add replayability and immersion to games, and we can expect to see even more impressive applications in the future.
In this article
01 [What Is AI in Gaming?](#Part 1)
02 [Why Does AI in Gaming Matter?](#Part 2)
03 [How AI Will Completely Change Video Games](#Part 3)
04 [8 Games with Incredible Artificial Intelligence](#Part 4)
05 [What AI Video Games Assets Do Filmora Have?](#Part 5)
Part 1 What Is AI in Gaming?
In simple terms, AI is a set of algorithms that allow a computer to learn and improve from experience. Although you can apply it in many ways, artificial intelligence in video games is usually helpful to create more intelligent and more believable non-player characters (NPCs).
For example, an AI system might be helpful to determine how an NPC reacts to the player’s actions. If the player tries to steal from an NPC, the AI might make the NPC angry and more likely to attack the player. Alternatively, if the player is friendly to an NPC, the AI game playing might make the NPC more likely to help the player in future interactions.
Part 2 Why Does AI in Gaming Matter?
One of the most vital aspects of AI in video games is that it can make games more believable and immersive for players. When games can convincingly simulate human-like behavior, it can be a much more enjoyable experience for gamers. AI can make NPCs seem more lifelike and make the game world feel more believable.
AI is also becoming increasingly important for creating procedural content. This is where the game generates content on its own, rather than relying on pre-made assets. For example, a game might use procedural generation to create random dungeons or quests that the player can explore. This can add a lot of replayability to a game, as the player never knows what they will encounter next.
Part 3 How AI Will Completely Change Video Games
It is not a secret that AI is changing the world as we know it. With its ability to enable computers to learn and improve from experience, AI is paving the way for a future where machines can handle more complex tasks. And nowhere is this more apparent than in the world of video gaming.
In the past, developers brought in AI primarily for simple things like making certain NPCs (non-player characters) move and act realistically. But now, artificial intelligence in video games is being used for much more complex tasks like generating procedural content and creating believable human-like behavior. This results in a new generation of AI game playing that are more immersive and playable.
Part 4 Games with Incredible Artificial Intelligence
Now, we will look into eight video games that signify why we need the best ai in video games.
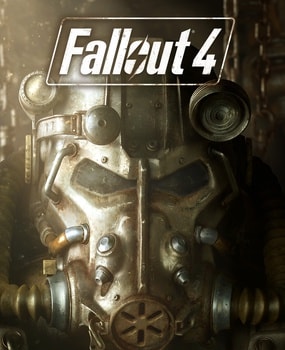
01Fallout 4
One of the most attractive examples of AI in video gaming is Fallout 4. This post-apocalyptic RPG features some of the most believable NPCs ever seen in a game. Each character is fully voiced, and they all have their unique personalities and backstories. The AI generates procedural content, meaning that the game world is always different each time you play.
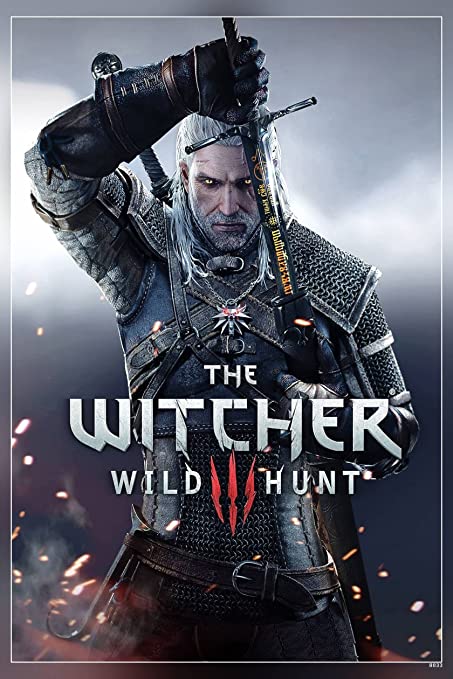
02The Witcher 3: Wild Hunt
The Witcher 3: Wild Hunt is one more great example of an AI video game. This open-world RPG features a vast array of believable NPCs, each with unique personality traits and motivations. The AI is also used to generate procedural content, resulting in a different game world every time you play.
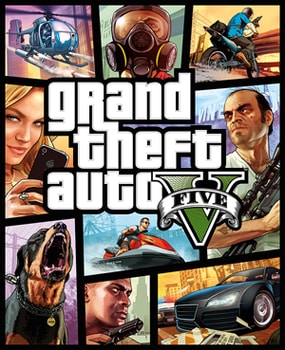
03Grand Theft Auto V
Grand Theft Auto V is yet another example of AI being used to create believable human-like behavior. The NPCs in this play are some of the most lifelike and realistic ever seen. They react to the player’s actions in believable ways, and the AI is used to generate procedural content, resulting in a game world that is always different.
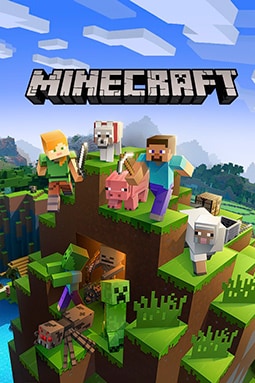
04Minecraft
Minecraft is a game that heavily uses procedural generation to create its content. The terrain and structures in the game are all generated on the fly by the AI, resulting in a different game world every time you play. What’s more, AI is also used to generate the behaviors of mobs (hostile creatures), making them more believable and lifelike.
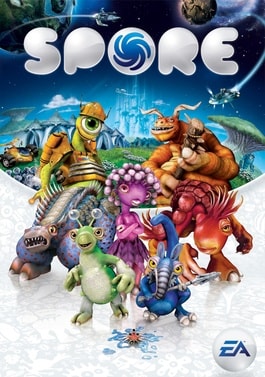
05Spore
Spore is an AI game play that is all about procedural generation. Every creature in the game is generated by AI, meaning that there are many possible creature designs. What’s more, AI is used to create creatures’ behaviors, making them more believable and lifelike.
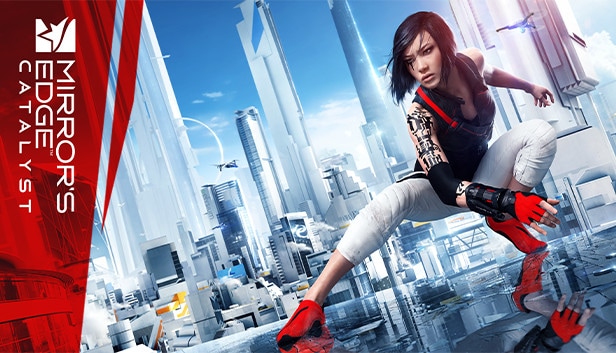
06Mirror’s Edge Catalyst
Mirror’s Edge Catalyst is a game that heavily uses AI to create its content. The levels in the game are all procedurally generated, meaning that they are different every time you play. This is made possible by the game’s AI, which produces the level layouts and obstacles on the fly.
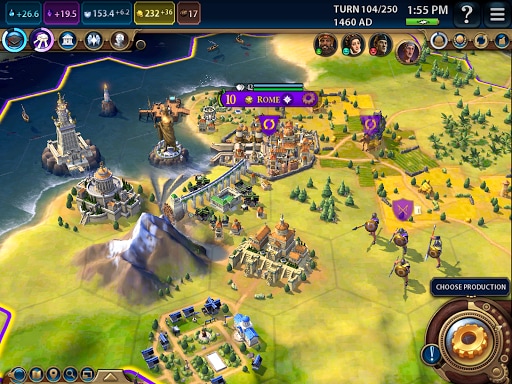
07Civilization VI
One of the most incredible examples of AI in video gaming is Civilization VI. This turn-based strategy game features some of the most believable NPCs ever seen in a game. Each character has its voice fully, and they all have unique personalities and backstories.
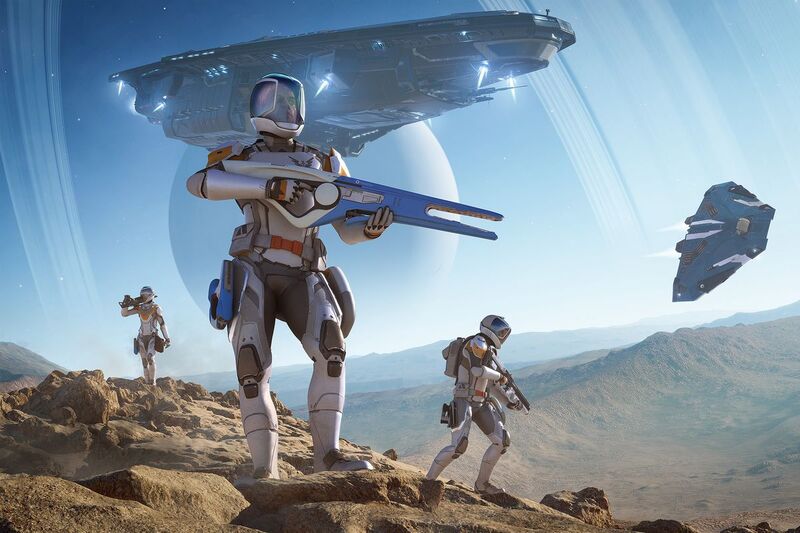
08Elite Dangerous
Elite Dangerous is a space simulation game that uses advanced AI to create believable and realistic human-like behavior. The NPCs in the game are some of the most lifelike and realistic ever seen. They react to the player’s actions in believable ways, and the AI is used to generate procedural content, resulting in a game world that is always different.
Part 5 What AI Video Games Assets Do Wondershare Filmora Video Editor Have?
With the increased use of AI in video games, most gamers have found gaming more enjoyable. However, an outstanding video editor has some assets that can significantly make AI video games better and more human. This video editor is one of the most sorted for and is called Filmora. Filmora is a great video editing software for creating stunning videos. It’s effortless to use and has various features to create professional-looking videos. It’s perfect for making videos for social media, YouTube, and other online platforms.
Its many features have a touch of artificial intelligence, making this program stand out from the other video editors and valuable for editing during ai video games creation.
Screen Recording
The Filmora screen recorder allows the user to concurrently record the screen and camera and the system and microphone audio. You can quickly record games, tutorials, YouTube videos, and other videos and then export them to YouTube, Vimeo, and other devices.
AI Portrait
The AI portrait function in Filmora video editor allows you to locate the human in your movie effortlessly and erase the background with a simple drag and click. There are also several portrait effects and AR stickers to add to your video editing enjoyment.
For Win 7 or later (64-bit)
For macOS 10.12 or later
Video Effects
Filmora customers can choose from various effects to utilize in their video editing software. It’s simple to create whatever effect you want with over 900 free effects, including drag-and-drop transitions, titles, filters, and motion components.
Do visit Wondershare Filmora exclusive website to know more about its latest upgrade and new features launch.
● Ending Thoughts →
● Thus, that was about what an ai video game is and why the characters act more like humans.
● So, as a video game lover, you can now explore the best of ai playing video games to have a personal experience of this new video gaming trend. Also, do try the Filmora software to see how you can change the looks and feel of your video game creation.
The gaming world is ever-changing, with developers looking to create innovative ways to immerse players into their digital worlds. One such technology that has begun to sweep is AI in the game industry.
AI is a powerful tool in many ways to improve the gaming experience. It can make artificial intelligence in computer games more believable and add replayability and immersion to games, and we can expect to see even more impressive applications in the future.
In this article
01 [What Is AI in Gaming?](#Part 1)
02 [Why Does AI in Gaming Matter?](#Part 2)
03 [How AI Will Completely Change Video Games](#Part 3)
04 [8 Games with Incredible Artificial Intelligence](#Part 4)
05 [What AI Video Games Assets Do Filmora Have?](#Part 5)
Part 1 What Is AI in Gaming?
In simple terms, AI is a set of algorithms that allow a computer to learn and improve from experience. Although you can apply it in many ways, artificial intelligence in video games is usually helpful to create more intelligent and more believable non-player characters (NPCs).
For example, an AI system might be helpful to determine how an NPC reacts to the player’s actions. If the player tries to steal from an NPC, the AI might make the NPC angry and more likely to attack the player. Alternatively, if the player is friendly to an NPC, the AI game playing might make the NPC more likely to help the player in future interactions.
Part 2 Why Does AI in Gaming Matter?
One of the most vital aspects of AI in video games is that it can make games more believable and immersive for players. When games can convincingly simulate human-like behavior, it can be a much more enjoyable experience for gamers. AI can make NPCs seem more lifelike and make the game world feel more believable.
AI is also becoming increasingly important for creating procedural content. This is where the game generates content on its own, rather than relying on pre-made assets. For example, a game might use procedural generation to create random dungeons or quests that the player can explore. This can add a lot of replayability to a game, as the player never knows what they will encounter next.
Part 3 How AI Will Completely Change Video Games
It is not a secret that AI is changing the world as we know it. With its ability to enable computers to learn and improve from experience, AI is paving the way for a future where machines can handle more complex tasks. And nowhere is this more apparent than in the world of video gaming.
In the past, developers brought in AI primarily for simple things like making certain NPCs (non-player characters) move and act realistically. But now, artificial intelligence in video games is being used for much more complex tasks like generating procedural content and creating believable human-like behavior. This results in a new generation of AI game playing that are more immersive and playable.
Part 4 Games with Incredible Artificial Intelligence
Now, we will look into eight video games that signify why we need the best ai in video games.
01Fallout 4
One of the most attractive examples of AI in video gaming is Fallout 4. This post-apocalyptic RPG features some of the most believable NPCs ever seen in a game. Each character is fully voiced, and they all have their unique personalities and backstories. The AI generates procedural content, meaning that the game world is always different each time you play.
02The Witcher 3: Wild Hunt
The Witcher 3: Wild Hunt is one more great example of an AI video game. This open-world RPG features a vast array of believable NPCs, each with unique personality traits and motivations. The AI is also used to generate procedural content, resulting in a different game world every time you play.
03Grand Theft Auto V
Grand Theft Auto V is yet another example of AI being used to create believable human-like behavior. The NPCs in this play are some of the most lifelike and realistic ever seen. They react to the player’s actions in believable ways, and the AI is used to generate procedural content, resulting in a game world that is always different.
04Minecraft
Minecraft is a game that heavily uses procedural generation to create its content. The terrain and structures in the game are all generated on the fly by the AI, resulting in a different game world every time you play. What’s more, AI is also used to generate the behaviors of mobs (hostile creatures), making them more believable and lifelike.
05Spore
Spore is an AI game play that is all about procedural generation. Every creature in the game is generated by AI, meaning that there are many possible creature designs. What’s more, AI is used to create creatures’ behaviors, making them more believable and lifelike.
06Mirror’s Edge Catalyst
Mirror’s Edge Catalyst is a game that heavily uses AI to create its content. The levels in the game are all procedurally generated, meaning that they are different every time you play. This is made possible by the game’s AI, which produces the level layouts and obstacles on the fly.
07Civilization VI
One of the most incredible examples of AI in video gaming is Civilization VI. This turn-based strategy game features some of the most believable NPCs ever seen in a game. Each character has its voice fully, and they all have unique personalities and backstories.
08Elite Dangerous
Elite Dangerous is a space simulation game that uses advanced AI to create believable and realistic human-like behavior. The NPCs in the game are some of the most lifelike and realistic ever seen. They react to the player’s actions in believable ways, and the AI is used to generate procedural content, resulting in a game world that is always different.
Part 5 What AI Video Games Assets Do Wondershare Filmora Video Editor Have?
With the increased use of AI in video games, most gamers have found gaming more enjoyable. However, an outstanding video editor has some assets that can significantly make AI video games better and more human. This video editor is one of the most sorted for and is called Filmora. Filmora is a great video editing software for creating stunning videos. It’s effortless to use and has various features to create professional-looking videos. It’s perfect for making videos for social media, YouTube, and other online platforms.
Its many features have a touch of artificial intelligence, making this program stand out from the other video editors and valuable for editing during ai video games creation.
Screen Recording
The Filmora screen recorder allows the user to concurrently record the screen and camera and the system and microphone audio. You can quickly record games, tutorials, YouTube videos, and other videos and then export them to YouTube, Vimeo, and other devices.
AI Portrait
The AI portrait function in Filmora video editor allows you to locate the human in your movie effortlessly and erase the background with a simple drag and click. There are also several portrait effects and AR stickers to add to your video editing enjoyment.
For Win 7 or later (64-bit)
For macOS 10.12 or later
Video Effects
Filmora customers can choose from various effects to utilize in their video editing software. It’s simple to create whatever effect you want with over 900 free effects, including drag-and-drop transitions, titles, filters, and motion components.
Do visit Wondershare Filmora exclusive website to know more about its latest upgrade and new features launch.
● Ending Thoughts →
● Thus, that was about what an ai video game is and why the characters act more like humans.
● So, as a video game lover, you can now explore the best of ai playing video games to have a personal experience of this new video gaming trend. Also, do try the Filmora software to see how you can change the looks and feel of your video game creation.
Simple Tricks Make 3D GIF Production of Inspiration Pop up Constantly
Simple Tricks Make 3d GIF Production of Inspiration Pop up Constantly
An easy yet powerful editor
Numerous effects to choose from
Detailed tutorials provided by the official channel
Making and sharing animated GIFs that practically pop out on your friend’s screen can be just the magic one needs to start their day.
3D animated GIFs are growing in popularity and surprisingly, because of a simple trick that even you can try out.
What separates 3D text GIFs or 3D animation GIFs from your regular GIFs is that they are bit more difficult but far more fun to make.
3D GIFs are where it feels like the picture is coming out of your screen. Of course, this is just a visual illusion which can be recreated over any video GIF that meets specific parameters.
In this article
01 [8 Examples of Inspiration for Fun 3D Gifs?](#Part 1)
02 [Top 5 Ways to Make 3D GIF](#Part 2)
03 [How to Make 3D Gifs in Videos More Textured](#Part 3)
Part 1 Examples of Inspiration for Fun 3D Gifs?
Remember that simple trick we mentioned earlier? This approach lets you create convincing 3D GIFs in an easy but deceptive way.
The actual magic behind this trick is the use of white lines that act as reference points separating 3 panels in the image.
Now, any animated elements of the GIF image will seem like they are popping out beyond the pre-set white lines and towards the viewer.
These white lines are used as referencing lines on the screen allowing our brains to bewilder at a passive 3D GIFs coming at us from the screen.
You can recreate this same affect with a few popular GIF makers.
Just to give you a taste of what it looks like, we have enlisted few trending pop culture 3D GIFs that are trending;
● We have all heard of Earth’s Mightiest Heroes, and Cap’ throwing his shield is certainly a fan favourite 3D GIF.

● Heard of Skull Island? Then you better call Skull Pest Control.

● Who wouldn’t love puppies? Well, here’s two.


● When you’re tangled up in things you don’t understand.

● You definitely don’t want to see this squirrel in your backyard.

● Make sure to get a good shot of caffeine when commuting through Elm Street.

● Ray Advertising is getting more innovative each year.

Part 2 Top 5 Ways to Make 3D GIF
The most instantaneous thing you can do to start making GIFs in your own free time is by using a GIF maker online. Online platforms like GIPHY and Imgflip (three more mentioned below) uses pre uploaded image and video content to create GIFs with the help of filters, texts, emoji’s and background effects.
You can simply create creative GIFs and share them directly to your social media pages. Of course if you are running your own business, you can choose to hire your own GIF animator for more personal banners and adverts.
On the other hand, if you are just sparking your creativity using a GIF creator to start out making simple animation GIFs. You can also use a GIF generator to create your GIFs from existing videos.
Now buckle up your imagination and let’s get GIFing.
01Wave.Video

This GIF creator earns its place among the best with sheer convenience. It is by far the easiest GIF maker to use on this list. You can get used to its editing interface in a shorter span of time and make amazing 3D GIFs using versatile features that are bound to impress your friends. Sharing your GIF is quite effortless with Wave.Video. You can take on small portions of your video and make a GIF out of it. It offers an amazing library of stock footage which you can use for a lot of other things too like creating intros for your videos.
02Make a GIF

If you have an image or a URL of a video and you wish to make an animated GIF out of it then Make a GIF is the GIF creator you need. Using this online free tool you can make GIFs out of any Facebook image or video URL. The Make a GIF interface also facilitates using your device’s webcam to click pictures and short clips for our GIFs and add them to the interface using drag and drop facility. You can select from pre uploaded stock samples from over a dozen different categories.
03Imgflip

When you not only need a GIF creator but an Editor as well, go for Imgflip. You can adjust and make changes in your GIF while creating it. It has tools designed into its interface that enables you to adjust the quality of the pictures you upload, their height and width as well. In terms of editing video GIFs you can tweak with the animation time and make adjustments in terms of placement of images using some of Imgflips amazing free tools.
04GIFMaker.me

Yet another animated GIF generator which simplifies your path to unlocking your GIF creativity skills a lot faster using images and videos. GIFMaker.me is compatible with all operating systems namely Windows, Mac and Linux. Although its arsenal of tools is quite basic and lets you only size/resize and reverse your GIFs. GIF maker has a very basic interface but can fulfil a fair average of your GIF creation needs.
05GIPHY

We kept the best for last and even if you type in making GIFs on Google, you might come across this search name quite often as pretty much lot of people are using it. Spark off your GIF creating drive with GIPHY which is an all-rounder in this arena. GIPHY has several awesome features that let you create GIFs by uploading images, videos and even URLs from YouTube or Vimeo or GIPHY itself. Its interface is simple and hassle free to use and lets you add filters, text, stickers and drawings to your GIFs.
Part 3 How to Make 3D Gifs in Videos More Textured
You can use GIF makers to create loops in videos you upload but the trick to making your 3D GIF stand out is about to be explained in the following.
● Step 1: Choosing an Image.
The first step in creating a 3D image is to carefully sort out which moment in your video you wish to convert into 3D. Pick an images or video clips that already have an element that pops out in a forward moving motion.
● Step 2: It should have a smart composition.
Becoming a creator means you need to know more about composition. This can be applicable to anything from making virtual designs to creating GIFs. 3D GIFs requires you to use a special Tumblr ‘frame’ that adds two breaks to the image which creates three horizontal panels. In exceptional cases, you could also use three break points and divide the image into four panels.
● Step 3: Become a content creator.
It’s okay to feel a bit off beat when trying out new skills but the prospects are rewarding. Try taking your own video footage, edit in Photoshop or any similar editing software. You can also opt for instant GIF creator apps that directly converts the footage or image you clicked into a GIF.
● Step 4: Making the split.
The next step would be splitting the image or frame into three panels as guideline for the 3D effects. In Photoshop you can import a GIF and choose ‘View’ from the navigation menu and then click on ‘New Guide’ from the drop down menu. Set the guide to 33% at first and 66% in the second.
● Step 5: Placingthe magical white lines over the guides.
From the shape menu on the sidebar, select the rectangle tool. Right click on this tool to get the shapes menu. Set ‘Fill Colour’ to white and set the weight to five pixels. Click and drag the lines over the guides.
● Step 6: For the final touch.
Merge these line layers and add a layer mask. The objective here is to only mask the panel where the main 3D element of the image which will be moving beyond the guides. How it is done is that you make copies of the frames where the animation goes beyond the guidelines and mask the layers where the element is over the visible layer.
● Step 7: Enjoy your GIF.
Once you are done masking every frame that you have copied. Replay your GIF to see if everything is in order.
Bonus Tip: Use Wondershare Filmora Video Editor to easily edit your videos using amazing tools, filters and affects. You can then make cool 3D GIFs from the videos you make.

Wondershare Filmora - Best Video Editor for Mac/Windows
5,481,435 people have downloaded it.
Build unique custom animations without breaking a sweat.
Focus on creating epic stories and leave the details to Filmora’s auto features.
Start a creative adventure with drag & drop effects and endless possibilities.
Filmora simplifies advanced features to save you time and effort.
Filmora cuts out repetition so you can move on to your next creative breakthrough.
● Key Takeaways from This Episode →
● Animated GIFs are interesting and fun to share with friends. They also make for effective advertising banners and conceptual promotions. So there are lot of applications for learning this skillset and is certainly is fun none the less.
● The easiest way to creating GIFs quick and easy would be by using a GIF creator. There are several amazing GIF creators online with fantastic features you can leverage to make amazing 3D GIFs.
● The basic trick which you should remember is using horizontal guidelines and an element which is moving towards the viewer. Keeping this in mind you can recreate amazing videos in fun GIF moments.
Making and sharing animated GIFs that practically pop out on your friend’s screen can be just the magic one needs to start their day.
3D animated GIFs are growing in popularity and surprisingly, because of a simple trick that even you can try out.
What separates 3D text GIFs or 3D animation GIFs from your regular GIFs is that they are bit more difficult but far more fun to make.
3D GIFs are where it feels like the picture is coming out of your screen. Of course, this is just a visual illusion which can be recreated over any video GIF that meets specific parameters.
In this article
01 [8 Examples of Inspiration for Fun 3D Gifs?](#Part 1)
02 [Top 5 Ways to Make 3D GIF](#Part 2)
03 [How to Make 3D Gifs in Videos More Textured](#Part 3)
Part 1 Examples of Inspiration for Fun 3D Gifs?
Remember that simple trick we mentioned earlier? This approach lets you create convincing 3D GIFs in an easy but deceptive way.
The actual magic behind this trick is the use of white lines that act as reference points separating 3 panels in the image.
Now, any animated elements of the GIF image will seem like they are popping out beyond the pre-set white lines and towards the viewer.
These white lines are used as referencing lines on the screen allowing our brains to bewilder at a passive 3D GIFs coming at us from the screen.
You can recreate this same affect with a few popular GIF makers.
Just to give you a taste of what it looks like, we have enlisted few trending pop culture 3D GIFs that are trending;
● We have all heard of Earth’s Mightiest Heroes, and Cap’ throwing his shield is certainly a fan favourite 3D GIF.
● Heard of Skull Island? Then you better call Skull Pest Control.
● Who wouldn’t love puppies? Well, here’s two.
● When you’re tangled up in things you don’t understand.
● You definitely don’t want to see this squirrel in your backyard.
● Make sure to get a good shot of caffeine when commuting through Elm Street.
● Ray Advertising is getting more innovative each year.
Part 2 Top 5 Ways to Make 3D GIF
The most instantaneous thing you can do to start making GIFs in your own free time is by using a GIF maker online. Online platforms like GIPHY and Imgflip (three more mentioned below) uses pre uploaded image and video content to create GIFs with the help of filters, texts, emoji’s and background effects.
You can simply create creative GIFs and share them directly to your social media pages. Of course if you are running your own business, you can choose to hire your own GIF animator for more personal banners and adverts.
On the other hand, if you are just sparking your creativity using a GIF creator to start out making simple animation GIFs. You can also use a GIF generator to create your GIFs from existing videos.
Now buckle up your imagination and let’s get GIFing.
01Wave.Video
This GIF creator earns its place among the best with sheer convenience. It is by far the easiest GIF maker to use on this list. You can get used to its editing interface in a shorter span of time and make amazing 3D GIFs using versatile features that are bound to impress your friends. Sharing your GIF is quite effortless with Wave.Video. You can take on small portions of your video and make a GIF out of it. It offers an amazing library of stock footage which you can use for a lot of other things too like creating intros for your videos.
02Make a GIF
If you have an image or a URL of a video and you wish to make an animated GIF out of it then Make a GIF is the GIF creator you need. Using this online free tool you can make GIFs out of any Facebook image or video URL. The Make a GIF interface also facilitates using your device’s webcam to click pictures and short clips for our GIFs and add them to the interface using drag and drop facility. You can select from pre uploaded stock samples from over a dozen different categories.
03Imgflip
When you not only need a GIF creator but an Editor as well, go for Imgflip. You can adjust and make changes in your GIF while creating it. It has tools designed into its interface that enables you to adjust the quality of the pictures you upload, their height and width as well. In terms of editing video GIFs you can tweak with the animation time and make adjustments in terms of placement of images using some of Imgflips amazing free tools.
04GIFMaker.me
Yet another animated GIF generator which simplifies your path to unlocking your GIF creativity skills a lot faster using images and videos. GIFMaker.me is compatible with all operating systems namely Windows, Mac and Linux. Although its arsenal of tools is quite basic and lets you only size/resize and reverse your GIFs. GIF maker has a very basic interface but can fulfil a fair average of your GIF creation needs.
05GIPHY
We kept the best for last and even if you type in making GIFs on Google, you might come across this search name quite often as pretty much lot of people are using it. Spark off your GIF creating drive with GIPHY which is an all-rounder in this arena. GIPHY has several awesome features that let you create GIFs by uploading images, videos and even URLs from YouTube or Vimeo or GIPHY itself. Its interface is simple and hassle free to use and lets you add filters, text, stickers and drawings to your GIFs.
Part 3 How to Make 3D Gifs in Videos More Textured
You can use GIF makers to create loops in videos you upload but the trick to making your 3D GIF stand out is about to be explained in the following.
● Step 1: Choosing an Image.
The first step in creating a 3D image is to carefully sort out which moment in your video you wish to convert into 3D. Pick an images or video clips that already have an element that pops out in a forward moving motion.
● Step 2: It should have a smart composition.
Becoming a creator means you need to know more about composition. This can be applicable to anything from making virtual designs to creating GIFs. 3D GIFs requires you to use a special Tumblr ‘frame’ that adds two breaks to the image which creates three horizontal panels. In exceptional cases, you could also use three break points and divide the image into four panels.
● Step 3: Become a content creator.
It’s okay to feel a bit off beat when trying out new skills but the prospects are rewarding. Try taking your own video footage, edit in Photoshop or any similar editing software. You can also opt for instant GIF creator apps that directly converts the footage or image you clicked into a GIF.
● Step 4: Making the split.
The next step would be splitting the image or frame into three panels as guideline for the 3D effects. In Photoshop you can import a GIF and choose ‘View’ from the navigation menu and then click on ‘New Guide’ from the drop down menu. Set the guide to 33% at first and 66% in the second.
● Step 5: Placingthe magical white lines over the guides.
From the shape menu on the sidebar, select the rectangle tool. Right click on this tool to get the shapes menu. Set ‘Fill Colour’ to white and set the weight to five pixels. Click and drag the lines over the guides.
● Step 6: For the final touch.
Merge these line layers and add a layer mask. The objective here is to only mask the panel where the main 3D element of the image which will be moving beyond the guides. How it is done is that you make copies of the frames where the animation goes beyond the guidelines and mask the layers where the element is over the visible layer.
● Step 7: Enjoy your GIF.
Once you are done masking every frame that you have copied. Replay your GIF to see if everything is in order.
Bonus Tip: Use Wondershare Filmora Video Editor to easily edit your videos using amazing tools, filters and affects. You can then make cool 3D GIFs from the videos you make.
Wondershare Filmora - Best Video Editor for Mac/Windows
5,481,435 people have downloaded it.
Build unique custom animations without breaking a sweat.
Focus on creating epic stories and leave the details to Filmora’s auto features.
Start a creative adventure with drag & drop effects and endless possibilities.
Filmora simplifies advanced features to save you time and effort.
Filmora cuts out repetition so you can move on to your next creative breakthrough.
● Key Takeaways from This Episode →
● Animated GIFs are interesting and fun to share with friends. They also make for effective advertising banners and conceptual promotions. So there are lot of applications for learning this skillset and is certainly is fun none the less.
● The easiest way to creating GIFs quick and easy would be by using a GIF creator. There are several amazing GIF creators online with fantastic features you can leverage to make amazing 3D GIFs.
● The basic trick which you should remember is using horizontal guidelines and an element which is moving towards the viewer. Keeping this in mind you can recreate amazing videos in fun GIF moments.
How to Trim/Crop Video in Microsoft Powerpoint
Create High-Quality Video - Wondershare Filmora
An easy and powerful YouTube video editor
Numerous video and audio effects to choose from
Detailed tutorials provided by the official channel
PowerPoint allows you to trim or crop the length of your video and save it as a separate media file. Trimming/cropping video is a great way to remove distracting or unnecessary parts of your video or change its dimensions so that it fits within a certain area. Doing this will make your videos captivating, and more people will want to watch them. Keeping that in mind, we’ll explain how you can crop or trim video in PowerPoint. You will also learn some helpful tips that you can use when editing videos on this presentation program.
In this article
01 How to Trim Videos in PowerPoint
02 Bonus! Tips on Editing Videos in Powerpoint
How to Trim Videos in PowerPoint
Many people use Microsoft PowerPoint to prepare basic animated explainers and presentations, but you can learn how to trip or crop videos in this program with the tools that it provides. With that in mind, here is how to trim, reset, or edit videos in PowerPoint.
How to Trim a Video in PowerPoint
You can trip unnecessary content at the start or end of your video clip. However, you can only trim videos you have inserted from your PC, as this feature is not yet available for videos on the web. Follow the steps below to learn how to trim video in PowerPoint.
- If you are in a slide containing a media placeholder, click on Insert Video from File. A window will open; select the From a File option.
- Find the video file on your PC and select it. Then, click the arrow that’s right next to the Insert button. Choose either the Link to File or Insert option and your video will appear on the slide.
- If you are not using a slide that has a media placeholder, find the Insert tab and click Video on My PC. You will be able to locate the video file on your PC.
- You are now ready to trim video PowerPoint.
- Select your video, and the Playback tab will appear. Navigate to the Editing area of the ribbon and hit the Trim Video button.

- You’ll see a small editing window that allows you to trim video in PowerPoint.
- Enter the end and start times for the sections of the video you would like to keep. Alternatively, you can use the markers to choose the start and endpoints.

- To adjust the start and end times in smaller increments, you can use the arrows you see on the sides of those boxes. If you know the exact times, enter them into the corresponding boxes.
- You can also select the portion you would like to keep using the end and start time markers. In this case, sliding the red marker allows you to the end time while the green one lets you set the start time.

- If you want to use a combination of the tools above to pinpoint where to start and end the video, hit the Play button, then click the Pause button when you reach the time you want.

- Enter this time into the End Time or Start Time box, depending on the portion you would like to keep. Or you can move any of the markers to this spot.
- Hit the OK button once the portion of the video clip you want is all set. The video will appear on your slide update, and it will only play the section that you kept when trimming the video.
How to Reset or Edit a Trimmed Video in PowerPoint
If you trim video in PowerPoint and change your mind, you can always edit where you have trimmed it or reset the trimmed video back to its original state. Follow the steps below to learn how to edit to reset a trimmed video in PowerPoint.
- Select your video, and then find the Playback tab.

- Hit the Trim Video button, and the Trim Video Settings will be as they were when you were trimming the video. That means you can make the necessary adjustments.
- To reset a trimmed video back to its original length, slide the red end marker to the right and the green start maker to the left. The OK button allows you to play the whole video in your presentation.

How to Save a Trimmed Video
Now that you have trimmed your video in Microsoft PowerPoint, you might want to save it to use it outside this program. You can only save the video file after compressing it, then you can use the trimmed video as you want.
After compressing your trimmed video, only the trimmed section will show up on your slide. That said, follow the steps below to save your trimmed video:
- From the PowerPoint menu, select File > Info
- Next, select the Compress Media option.
- Next to Compress Media, you will see all media that are in your slideshow, including your trimmed video. If you’ve got other video files here, the compression process will apply to these files.
- Choose the suitable level of compression. A dialog box will pop up as the compression process takes place. Hit the Close button when this process completes.
- Go back to the slide that contains your trimmed video, which has now been compressed.
- Right-click the compressed video, and select the Save Media As option.

- Choose the location where you want to save your video. You can change its name if you want and click the Save button.
You have now successfully saved your trimmed video.
Bonus! Tips on Editing Videos in Powerpoint
Now that you know how to trim video PowerPoint, here are some helpful tips on editing videos on this application.
How to Crop Videos in PowerPoint
Once you have inserted your video in the slide, you have the option of cropping it. Follow these steps below to learn how to crop video PowerPoint.
- Open your presentation and then go to the slide where you have inserted your video clip.
- Double-click or select the video, and the two Video Tools tabs will appear in the ribbon: Playback and Format. Hit the Format tab option to activate it.

- Your slide may show a black rectangle after you insert your video.
- Add a Poster Frame to the video clip to get rid of the black rectangle.
- Click Crop in the Video Tools Format tab.

- On the edges of your video clip, you’ll see dark crop handles. If you use the Video Shape option, the crop handles will appear on the edge of that shape.
- Pressing the Ctrl key on your keyboard while you drag allows you to alter how you crop. Pressing Ctrl plus dragging the side cropping handles resizes two opposite sides, while Ctrl plus dragging the corner cropping handles resizes all the four sides.
- Pressing the Shift key on your keyboard while dragging will give you different results. You can also use the Shift and Ctrl keys simultaneously to combine both capabilities.
- You can reposition the crop by either moving the video itself or the crop area.
- Crop the unwanted portion by hitting the Crop button again or pressing the Enter key. You can also click on the Slide Area to apply the cropping changes.
- You can access more crop options by right-clicking the video, where a contextual menu will appear. Select the Format Video option.
- You’ll see the Format Video Task Pane; select the Crop option.

- You can crop sections of the video by specifying the Picture or Crop Position. You can also change other crop parameters, such as Top, Left, Offset Y, Offset X, Height, and Width.

How to Play Video Inside a Shape
If you want to edit your video and enhance its appearance, you can have it play inside a unique shape instead of the usual rectangle format that videos play in. In turn, you’ll draw attention to your video.
To play your video in an unusual shape, select your video and navigate to the Format tab. Then, go to the Video Shape menu, where you’ll see multiple shapes to choose from.

How to Apply Preset Video Styles
You can also liven up your video by applying one of the pre-designed styles that PowerPoints provides. These styles combine various effects, including bevels, reflections, shadows, tilts, and frames.
Applying preset video styles is a simple process. Select the video, then navigate to the Format tab. Click More under the Video Style section. You’ll see a gallery of preset styles; roll your mouse over it and hold the cursor over any style type. The program will apply a live preview of this style to your video.

Conclusion
● You can use PowerPoint to crop, trim, and add video styles to your videos to make them more attractive to your audience by following the steps above. In turn, they will get more views and attract more attention.
PowerPoint allows you to trim or crop the length of your video and save it as a separate media file. Trimming/cropping video is a great way to remove distracting or unnecessary parts of your video or change its dimensions so that it fits within a certain area. Doing this will make your videos captivating, and more people will want to watch them. Keeping that in mind, we’ll explain how you can crop or trim video in PowerPoint. You will also learn some helpful tips that you can use when editing videos on this presentation program.
In this article
01 How to Trim Videos in PowerPoint
02 Bonus! Tips on Editing Videos in Powerpoint
How to Trim Videos in PowerPoint
Many people use Microsoft PowerPoint to prepare basic animated explainers and presentations, but you can learn how to trip or crop videos in this program with the tools that it provides. With that in mind, here is how to trim, reset, or edit videos in PowerPoint.
How to Trim a Video in PowerPoint
You can trip unnecessary content at the start or end of your video clip. However, you can only trim videos you have inserted from your PC, as this feature is not yet available for videos on the web. Follow the steps below to learn how to trim video in PowerPoint.
- If you are in a slide containing a media placeholder, click on Insert Video from File. A window will open; select the From a File option.
- Find the video file on your PC and select it. Then, click the arrow that’s right next to the Insert button. Choose either the Link to File or Insert option and your video will appear on the slide.
- If you are not using a slide that has a media placeholder, find the Insert tab and click Video on My PC. You will be able to locate the video file on your PC.
- You are now ready to trim video PowerPoint.
- Select your video, and the Playback tab will appear. Navigate to the Editing area of the ribbon and hit the Trim Video button.
- You’ll see a small editing window that allows you to trim video in PowerPoint.
- Enter the end and start times for the sections of the video you would like to keep. Alternatively, you can use the markers to choose the start and endpoints.
- To adjust the start and end times in smaller increments, you can use the arrows you see on the sides of those boxes. If you know the exact times, enter them into the corresponding boxes.
- You can also select the portion you would like to keep using the end and start time markers. In this case, sliding the red marker allows you to the end time while the green one lets you set the start time.
- If you want to use a combination of the tools above to pinpoint where to start and end the video, hit the Play button, then click the Pause button when you reach the time you want.
- Enter this time into the End Time or Start Time box, depending on the portion you would like to keep. Or you can move any of the markers to this spot.
- Hit the OK button once the portion of the video clip you want is all set. The video will appear on your slide update, and it will only play the section that you kept when trimming the video.
How to Reset or Edit a Trimmed Video in PowerPoint
If you trim video in PowerPoint and change your mind, you can always edit where you have trimmed it or reset the trimmed video back to its original state. Follow the steps below to learn how to edit to reset a trimmed video in PowerPoint.
- Select your video, and then find the Playback tab.
- Hit the Trim Video button, and the Trim Video Settings will be as they were when you were trimming the video. That means you can make the necessary adjustments.
- To reset a trimmed video back to its original length, slide the red end marker to the right and the green start maker to the left. The OK button allows you to play the whole video in your presentation.
How to Save a Trimmed Video
Now that you have trimmed your video in Microsoft PowerPoint, you might want to save it to use it outside this program. You can only save the video file after compressing it, then you can use the trimmed video as you want.
After compressing your trimmed video, only the trimmed section will show up on your slide. That said, follow the steps below to save your trimmed video:
- From the PowerPoint menu, select File > Info
- Next, select the Compress Media option.
- Next to Compress Media, you will see all media that are in your slideshow, including your trimmed video. If you’ve got other video files here, the compression process will apply to these files.
- Choose the suitable level of compression. A dialog box will pop up as the compression process takes place. Hit the Close button when this process completes.
- Go back to the slide that contains your trimmed video, which has now been compressed.
- Right-click the compressed video, and select the Save Media As option.
- Choose the location where you want to save your video. You can change its name if you want and click the Save button.
You have now successfully saved your trimmed video.
Bonus! Tips on Editing Videos in Powerpoint
Now that you know how to trim video PowerPoint, here are some helpful tips on editing videos on this application.
How to Crop Videos in PowerPoint
Once you have inserted your video in the slide, you have the option of cropping it. Follow these steps below to learn how to crop video PowerPoint.
- Open your presentation and then go to the slide where you have inserted your video clip.
- Double-click or select the video, and the two Video Tools tabs will appear in the ribbon: Playback and Format. Hit the Format tab option to activate it.
- Your slide may show a black rectangle after you insert your video.
- Add a Poster Frame to the video clip to get rid of the black rectangle.
- Click Crop in the Video Tools Format tab.
- On the edges of your video clip, you’ll see dark crop handles. If you use the Video Shape option, the crop handles will appear on the edge of that shape.
- Pressing the Ctrl key on your keyboard while you drag allows you to alter how you crop. Pressing Ctrl plus dragging the side cropping handles resizes two opposite sides, while Ctrl plus dragging the corner cropping handles resizes all the four sides.
- Pressing the Shift key on your keyboard while dragging will give you different results. You can also use the Shift and Ctrl keys simultaneously to combine both capabilities.
- You can reposition the crop by either moving the video itself or the crop area.
- Crop the unwanted portion by hitting the Crop button again or pressing the Enter key. You can also click on the Slide Area to apply the cropping changes.
- You can access more crop options by right-clicking the video, where a contextual menu will appear. Select the Format Video option.
- You’ll see the Format Video Task Pane; select the Crop option.
- You can crop sections of the video by specifying the Picture or Crop Position. You can also change other crop parameters, such as Top, Left, Offset Y, Offset X, Height, and Width.
How to Play Video Inside a Shape
If you want to edit your video and enhance its appearance, you can have it play inside a unique shape instead of the usual rectangle format that videos play in. In turn, you’ll draw attention to your video.
To play your video in an unusual shape, select your video and navigate to the Format tab. Then, go to the Video Shape menu, where you’ll see multiple shapes to choose from.
How to Apply Preset Video Styles
You can also liven up your video by applying one of the pre-designed styles that PowerPoints provides. These styles combine various effects, including bevels, reflections, shadows, tilts, and frames.
Applying preset video styles is a simple process. Select the video, then navigate to the Format tab. Click More under the Video Style section. You’ll see a gallery of preset styles; roll your mouse over it and hold the cursor over any style type. The program will apply a live preview of this style to your video.
Conclusion
● You can use PowerPoint to crop, trim, and add video styles to your videos to make them more attractive to your audience by following the steps above. In turn, they will get more views and attract more attention.
How to Create Photoshop GIF The 100% Easy Way
How to Create Photoshop GIF The 100% Easy Way
An easy yet powerful editor
Numerous effects to choose from
Detailed tutorials provided by the official channel
Having trouble creating Photoshop GIFs? Stay tuned to set everything straight.
In this article
01 [Easy Ways to Create an Animated GIF in Photoshop](#Part 1)
02 [6 Ways To Make An Animated GIF Without Photoshop](#Part 2)
Part 1 Easy Ways to Create an Animated GIF in Photoshop
Animated GIFs are a naturally captivating means of information exchange and entertainment. When the talk is about creating these, you can visibly see a flood of creation tools and software solutions. However, standing out in the crowd, are those catchy Photoshop snippets that certainly have the potential to leave you jaw dropped.
A Photoshop GIF is bound to capture attention, owing to its high quality imaging and top rated professional editing outlook. If you possess the editing flare, do try creating one for an amazing editing experience.
Creating Animated Photoshop GIFs: Easiest Solutions
Let’s take a look into some easy and interesting ways of creating a GIF in Photoshop, to leave you with handy solutions, just in case you feel motivated to take up the creation idea.
Before you begin, make sure to install and launch a suitable version the Photoshop application in your device and keep a set of selected images at hand that you will require for GIF creation.
● Step 1: Load Image Files
Photoshop requires you to load your selected files into its creation stack. There is no limit on the image count, but make sure you choose images in a natural series so that the GIF doesn’t give an out of the box feel.

Reach the ‘File’ tab at the top and load your image files into the Photoshop stack using the following path:
File -> Scripts -> Load Files into Stack

● Step 2: Image Selection
In the next pop-up window, click ‘Browse’ and choose the image file you wish to load into the Photoshop stack. In case the selected images seem tom lack proper alignment, click on the ‘Attempt to Automatically Align Source Images’ checkbox to set this straight and make your GIF frame stable.

Click on ‘OK’ when you are happy with your selections.

At this instant, Photoshop starts creating layers for the uploaded images, which you can see in the ‘Layers’ panel at the bottom-right. You are allowed to rearrange the image layers by selecting and dragging them or click on layer names to rename them.

If you notice distortion in Photoshop’s automatic alignment of your images, just crop the images frames to sort this out. Here’s how you can get this done:
● Tap the ‘Crop’ symbol.
● Adjust the crop frame to select the desired portion.
● Click on ‘Enter’ to confirm the action.
If you didn’t permit auto alignment previously, no worries, you can move ahead.
● Step 3: Make a Timeline Setup
Navigate to the ‘Window’ tab in the top menu and click the ’Timeline’ checkbox. You will see the ‘Timeline Window’ pop up below the Photoshop workspace, where you need to select the ‘Create Frame Animation’ tab. This will cause the options for frame animation to pop-up.

Select you topmost image layer, followed by clicking on the ‘Duplicate’ icon to generate a copy of the image frame.

● Step 4: Decide Time Frames
Select your topmost image frame to see a play duration of ‘0 sec’ below its thumbnail. Click to open the drop-down menu beside it and choose suitable time duration for the frame to run. Allot time durations to all successive frames in a similar manner.

● Step 5: Conceal Top Layers
You will see am combination of the first and second image layers in the image thumbnail. To set this right, navigate to ‘Layers’ to hide the top layer.

Continue to hide previous layers in successive frames so that each layer appears in its respective frame at the end of the process.

● Step 6: Preview Your Creation
Tap the ‘Play’ button to see your GIF preview. Ensure a smooth run with correct appearance order of images and precise frame durations.

● Step 7: Time to Share.
When you are satisfied, navigate to the ‘File’ tab and select ‘Save As’. From the menu that drops down, choose the GIF file format and click on ‘Save’.

In the ’GIF Save Options’ that follows, adjust file settings suited to your preference and tap ‘OK’.

As an alternative you can take the following path to open the ‘GIF Preview Window’:
File -> Export -> Save for Web

In the top-right comer, choose the GIF file format from the drop-down menu. There is also an option to resize your image at the bottom-right. It is advisable to keep the image size within 500 pixels for a convenient export across various media sharing platforms. When you finish, click on ‘Save’. Your creation is now ready for a media export.

Part 2 6 Ways to Make an Animated GIF Without Photoshop
The idea to create GIF in Photoshop is fun and exciting, no doubt on that, but you may often want to switch to a different platform. No issues with that, the web is there to sort out everything for you. All you need to do is open your favorite browser to land across a heap of welcoming solutions to create GIFs without Photoshop. Let’s have a look through the best ones:
01**Wondershare Filmora Video Editor **
Filmora by Wondershare is probably the best GIF maker tool you can rely on. This is packed with a diverse inventory of exciting design features that are ready to provide a creative boost to your editing skills. Loaded with a ton of classic audio visual effects, this software is certainly comprises of everything you need to create static and animated GIFs like a pro.
Wondershare Filmora - Best Video Editor for Mac/Windows
5,481,435 people have downloaded it.
Build unique custom animations without breaking a sweat.
Focus on creating epic stories and leave the details to Filmora’s auto features.
Start a creative adventure with drag & drop effects and endless possibilities.
Filmora simplifies advanced features to save you time and effort.
Filmora cuts out repetition so you can move on to your next creative breakthrough.
Key Features
● This is free software with possibly the most convenient interface.
● You get the freedom to play with hundreds of audio-visual effects to your heart’s content.
● You can create GIFs with static images and videos that are simply awesome to say the least.
● You need not worry about specific file formats. The software is compatible with almost all commonly known ones.
● Filmora allows you to expand and explore your editing talent to the fullest. You can play with tools like, cut, trim or combine image frames and make color and speed adjustments to get the perfect results for your artwork.
02Photoscape
This is another GIF maker tool you can choose to create catchy and interesting GIFs. Photoscape is a simple graphic editor that makes GIF creation exciting and fun. Available to you for free, this software allows you to design and edit animated GIFs with a series of image enhancements, like, resizing, color selection, image prints, etc. Photoscape is compatible with your Windows, Linux and Mac supported devices and has a clean interface. However, the program may sometimes take up a slow run.

Key Features
● You can improvise you GIF with image editing tools, like, color and size adjustments, clip arts, effects, overlays, etc.
● It has a unique ‘Photo Batch’ tool that you can use to process and rename multiple images simultaneously.
● Photoscape allows you to create interesting collages by merging a series of images into a single one.
● You can create captivating animated GIFs with multiple still images.
● The software is loaded with a bunch of utilities like, photo splitter, page merger, color picker, image viewer and others to give that perfect professional outlook to your creations.
03Gifted Motion
This is also among the commonly preferred GIF creator software. The best this about the tool is that it is platform independent and compatible with almost any Operating System. Another choice appeal of the software is its direct workability that is, you don’t require any program installations to create GIFs using this tool.

Key Features
● This is a simple graphic editor that runs on JAVA and is quite convenient to use.
● You can use this software to edit and create GIFs with images saved locally in your device.
● File formats supported by the software include PNG, JPEG, BMP and GIF.
● You don’t need to worry about licensing costs or in-app purchases; this tool is absolutely free to use.
● Loading big image files on this software may however, cost you some extra time.
01SSuite GIF Animator
This one is Windows compatible software that works well with both, 32 and 64-bit Operating System configurations. It lies among those ’Green Software Programs’ that cut down on your net energy cost. Apart from high quality animated GIFs, y6ou can also create movies and slides shows with this software.

Key Features
● This is a free of cost, clean and user-friendly graphic editor software.
● You don’t require Windows registration to use this software
● You can conveniently save the software into any USB or memory device; it is easily portable.
● It facilitates a speedy GIF creation and editing.
● You can explore a variety of editing features and add separate time frames to each image using this software.
● Picasion
This is a free, online GIF maker tool that gives you the liberty to import images and videos from different app galleries, like, Picasa, Flickr and others to create and edit motion GIFs. The tool, though having a simple interface and feature packed, is quite ad-stricken, but you can skip that by sticking to the right webpage.

Key Features
● The tool crosses language borders and is available to you in English, Spanish, Portuguese and Russian.
● You can make size adjustments to the GIF images, or add a completely new avatar of your own.
● The tool offers you a variety of editing effects and filters to enhance and improvise your created GIFs.
● You need not limit yourself to specific file formats with this tool; all common ones are conveniently supported.
● It is a quick and clean tool that rescues you from the glitch of a messy interface.
05GifPal
This one is also a free, online GIF creator with amazing editing features and tools. It comes with a diverse library of 20 frames and 30 effects to choose from, for creating normal and animated GIFs. It further has a variety of drawing and text editing tools you can use to add messages to your GIFs to make more impactful.

Key Features
● The tool is packed with a vast set of quality image editing tools that can create attractive motion and animated GIFs.
● The tool allows you to adjust and change the speed of image frames to give a natural flow to your GIF.
● An exclusive feature of the tool is that it allows you to edit frames in its timeline.
● Your creations with the tools are deprived of any default watermarks. You can either add one of your choice, or even create GIFs without a watermark.
● The tool site is free of unwanted and irrelevant ads.
● Key Takeaways from This Episode →
● Making a GIF in Photoshop is a great idea to design animation snippets, both for fun and a target purpose. Using the Photoshop GIF maker ensures quality and class in complete professional styles.
● However, if you are keen on browsing through other GIF creator alternatives, you can safely pick the Filmora GIF Maher software for creating excellent, next level animated GIFs.
Having trouble creating Photoshop GIFs? Stay tuned to set everything straight.
In this article
01 [Easy Ways to Create an Animated GIF in Photoshop](#Part 1)
02 [6 Ways To Make An Animated GIF Without Photoshop](#Part 2)
Part 1 Easy Ways to Create an Animated GIF in Photoshop
Animated GIFs are a naturally captivating means of information exchange and entertainment. When the talk is about creating these, you can visibly see a flood of creation tools and software solutions. However, standing out in the crowd, are those catchy Photoshop snippets that certainly have the potential to leave you jaw dropped.
A Photoshop GIF is bound to capture attention, owing to its high quality imaging and top rated professional editing outlook. If you possess the editing flare, do try creating one for an amazing editing experience.
Creating Animated Photoshop GIFs: Easiest Solutions
Let’s take a look into some easy and interesting ways of creating a GIF in Photoshop, to leave you with handy solutions, just in case you feel motivated to take up the creation idea.
Before you begin, make sure to install and launch a suitable version the Photoshop application in your device and keep a set of selected images at hand that you will require for GIF creation.
● Step 1: Load Image Files
Photoshop requires you to load your selected files into its creation stack. There is no limit on the image count, but make sure you choose images in a natural series so that the GIF doesn’t give an out of the box feel.
Reach the ‘File’ tab at the top and load your image files into the Photoshop stack using the following path:
File -> Scripts -> Load Files into Stack
● Step 2: Image Selection
In the next pop-up window, click ‘Browse’ and choose the image file you wish to load into the Photoshop stack. In case the selected images seem tom lack proper alignment, click on the ‘Attempt to Automatically Align Source Images’ checkbox to set this straight and make your GIF frame stable.
Click on ‘OK’ when you are happy with your selections.
At this instant, Photoshop starts creating layers for the uploaded images, which you can see in the ‘Layers’ panel at the bottom-right. You are allowed to rearrange the image layers by selecting and dragging them or click on layer names to rename them.
If you notice distortion in Photoshop’s automatic alignment of your images, just crop the images frames to sort this out. Here’s how you can get this done:
● Tap the ‘Crop’ symbol.
● Adjust the crop frame to select the desired portion.
● Click on ‘Enter’ to confirm the action.
If you didn’t permit auto alignment previously, no worries, you can move ahead.
● Step 3: Make a Timeline Setup
Navigate to the ‘Window’ tab in the top menu and click the ’Timeline’ checkbox. You will see the ‘Timeline Window’ pop up below the Photoshop workspace, where you need to select the ‘Create Frame Animation’ tab. This will cause the options for frame animation to pop-up.
Select you topmost image layer, followed by clicking on the ‘Duplicate’ icon to generate a copy of the image frame.
● Step 4: Decide Time Frames
Select your topmost image frame to see a play duration of ‘0 sec’ below its thumbnail. Click to open the drop-down menu beside it and choose suitable time duration for the frame to run. Allot time durations to all successive frames in a similar manner.
● Step 5: Conceal Top Layers
You will see am combination of the first and second image layers in the image thumbnail. To set this right, navigate to ‘Layers’ to hide the top layer.
Continue to hide previous layers in successive frames so that each layer appears in its respective frame at the end of the process.
● Step 6: Preview Your Creation
Tap the ‘Play’ button to see your GIF preview. Ensure a smooth run with correct appearance order of images and precise frame durations.
● Step 7: Time to Share.
When you are satisfied, navigate to the ‘File’ tab and select ‘Save As’. From the menu that drops down, choose the GIF file format and click on ‘Save’.
In the ’GIF Save Options’ that follows, adjust file settings suited to your preference and tap ‘OK’.
As an alternative you can take the following path to open the ‘GIF Preview Window’:
File -> Export -> Save for Web
In the top-right comer, choose the GIF file format from the drop-down menu. There is also an option to resize your image at the bottom-right. It is advisable to keep the image size within 500 pixels for a convenient export across various media sharing platforms. When you finish, click on ‘Save’. Your creation is now ready for a media export.
Part 2 6 Ways to Make an Animated GIF Without Photoshop
The idea to create GIF in Photoshop is fun and exciting, no doubt on that, but you may often want to switch to a different platform. No issues with that, the web is there to sort out everything for you. All you need to do is open your favorite browser to land across a heap of welcoming solutions to create GIFs without Photoshop. Let’s have a look through the best ones:
01**Wondershare Filmora Video Editor **
Filmora by Wondershare is probably the best GIF maker tool you can rely on. This is packed with a diverse inventory of exciting design features that are ready to provide a creative boost to your editing skills. Loaded with a ton of classic audio visual effects, this software is certainly comprises of everything you need to create static and animated GIFs like a pro.
Wondershare Filmora - Best Video Editor for Mac/Windows
5,481,435 people have downloaded it.
Build unique custom animations without breaking a sweat.
Focus on creating epic stories and leave the details to Filmora’s auto features.
Start a creative adventure with drag & drop effects and endless possibilities.
Filmora simplifies advanced features to save you time and effort.
Filmora cuts out repetition so you can move on to your next creative breakthrough.
Key Features
● This is free software with possibly the most convenient interface.
● You get the freedom to play with hundreds of audio-visual effects to your heart’s content.
● You can create GIFs with static images and videos that are simply awesome to say the least.
● You need not worry about specific file formats. The software is compatible with almost all commonly known ones.
● Filmora allows you to expand and explore your editing talent to the fullest. You can play with tools like, cut, trim or combine image frames and make color and speed adjustments to get the perfect results for your artwork.
02Photoscape
This is another GIF maker tool you can choose to create catchy and interesting GIFs. Photoscape is a simple graphic editor that makes GIF creation exciting and fun. Available to you for free, this software allows you to design and edit animated GIFs with a series of image enhancements, like, resizing, color selection, image prints, etc. Photoscape is compatible with your Windows, Linux and Mac supported devices and has a clean interface. However, the program may sometimes take up a slow run.
Key Features
● You can improvise you GIF with image editing tools, like, color and size adjustments, clip arts, effects, overlays, etc.
● It has a unique ‘Photo Batch’ tool that you can use to process and rename multiple images simultaneously.
● Photoscape allows you to create interesting collages by merging a series of images into a single one.
● You can create captivating animated GIFs with multiple still images.
● The software is loaded with a bunch of utilities like, photo splitter, page merger, color picker, image viewer and others to give that perfect professional outlook to your creations.
03Gifted Motion
This is also among the commonly preferred GIF creator software. The best this about the tool is that it is platform independent and compatible with almost any Operating System. Another choice appeal of the software is its direct workability that is, you don’t require any program installations to create GIFs using this tool.
Key Features
● This is a simple graphic editor that runs on JAVA and is quite convenient to use.
● You can use this software to edit and create GIFs with images saved locally in your device.
● File formats supported by the software include PNG, JPEG, BMP and GIF.
● You don’t need to worry about licensing costs or in-app purchases; this tool is absolutely free to use.
● Loading big image files on this software may however, cost you some extra time.
01SSuite GIF Animator
This one is Windows compatible software that works well with both, 32 and 64-bit Operating System configurations. It lies among those ’Green Software Programs’ that cut down on your net energy cost. Apart from high quality animated GIFs, y6ou can also create movies and slides shows with this software.
Key Features
● This is a free of cost, clean and user-friendly graphic editor software.
● You don’t require Windows registration to use this software
● You can conveniently save the software into any USB or memory device; it is easily portable.
● It facilitates a speedy GIF creation and editing.
● You can explore a variety of editing features and add separate time frames to each image using this software.
● Picasion
This is a free, online GIF maker tool that gives you the liberty to import images and videos from different app galleries, like, Picasa, Flickr and others to create and edit motion GIFs. The tool, though having a simple interface and feature packed, is quite ad-stricken, but you can skip that by sticking to the right webpage.
Key Features
● The tool crosses language borders and is available to you in English, Spanish, Portuguese and Russian.
● You can make size adjustments to the GIF images, or add a completely new avatar of your own.
● The tool offers you a variety of editing effects and filters to enhance and improvise your created GIFs.
● You need not limit yourself to specific file formats with this tool; all common ones are conveniently supported.
● It is a quick and clean tool that rescues you from the glitch of a messy interface.
05GifPal
This one is also a free, online GIF creator with amazing editing features and tools. It comes with a diverse library of 20 frames and 30 effects to choose from, for creating normal and animated GIFs. It further has a variety of drawing and text editing tools you can use to add messages to your GIFs to make more impactful.
Key Features
● The tool is packed with a vast set of quality image editing tools that can create attractive motion and animated GIFs.
● The tool allows you to adjust and change the speed of image frames to give a natural flow to your GIF.
● An exclusive feature of the tool is that it allows you to edit frames in its timeline.
● Your creations with the tools are deprived of any default watermarks. You can either add one of your choice, or even create GIFs without a watermark.
● The tool site is free of unwanted and irrelevant ads.
● Key Takeaways from This Episode →
● Making a GIF in Photoshop is a great idea to design animation snippets, both for fun and a target purpose. Using the Photoshop GIF maker ensures quality and class in complete professional styles.
● However, if you are keen on browsing through other GIF creator alternatives, you can safely pick the Filmora GIF Maher software for creating excellent, next level animated GIFs.
Also read:
- Discover Vintage LUTs Premiere Pro Free and Paid Options Available
- New 11 Tools To Create Radial Blur Photo Mobile And Desktop
- Updated 2024 Approved Best 5 Tips to Freeze-Frame in After Effects
- New In 2024, How to Use a Stabilization Tool in Filmora
- In 2024, Do You Want Your Video Footage to Resemble Kodak Films? You Can Get the Old Kodak Film Look by Searching for Kodak 2383 LUT Free Download on the Internet
- How to Change Aspect Ratio in iMovie
- Updated YouTube Algorithm Hacks 2024
- In 2024, Do You Often Feel Fascinated to Try Hands at Anime Character Design to Spark up Your Editing Skills, or Just for a Fun-Filled Activity? Stay Here for the Best Inspirations You Can Ever Get
- How to Create a Smooth Cut Transition Effect?
- 2024 Approved Camtasia Video Editor Review
- 2024 Approved This Article Will Address Your Questions About the Easiest Way to Turn a Blog Into a Podcast. Lets Begin with the Reasons Why You Should Do a Podcast
- Updated This Article Is Actually the Guide Regarding Editing the Videos Through VEED. As a Substitute, Wondershare Filmora Is Also Under Discussion that Is Also Available for the Same Purpose
- Updated 3 Actionable Ways to Create Countdown Animation for Videos for 2024
- Using This Article as a Reference, the Users Would Create a Café Meal Intro and YouTube End Screen While Knowing Multiple Ways to Download Cooking Background Music for 2024
- New 2024 Approved Separate Audio From Video in DaVinci Resolve Step by Step
- Voice Changer for Discord | Use Voicemod on Discord
- Updated Add Background to Video With/Without a Green Screen
- In 2024, Powerpoint Slideshow Icon, Slide Sorter View Icon, Slideshow Icon Powerpoint, Slide Show View Icon
- How to Remove Audio From Videos with FFmpeg for 2024
- Updated Ways to Learn Discord Game Bots – Even if Youre Just Starting Out for 2024
- Updated How to Speed Up and Slow Down a Video
- Updated Detailed Guide to Rotate Videos in Blender
- 2024 Approved Explore a Variety of Inexpensive Camera Models Suitable for Making Slow-Motion Footage without Compromising Quality
- Updated How to Add Text Effects in Adobe Premiere Pro for 2024
- What Is Animated GIF for 2024
- Adjust Background to Black for Your Product Review Video
- Updated In 2024, How to Speed Up Pictures on TikTok Slideshow
- New Experience Time Differently with The Top Slow-Motion Applications
- Updated In 2024, How To Create 3D Text In Video
- Updated EasyHDR Review Is This a Good Choice to Create HDR
- In 2024, How to Create the Night-to-Day Effect Video
- In 2024, Best Ways to Blur Zoom Background for Free
- Updated How to Find a High-Quality Video Marketing Agency?
- How to Make Discord Emoji GIF for 2024
- In 2024, Detailed Guide to Resize Your Video in VLC
- In 2024, Are You Looking to Make Transparent Background in Canva Then You Can Learn About It in This Article
- 2024 Approved How To Add Text In After Effects
- Updated Looking for the Different Ar Video Effects to Include in Your Film? Check Out This Article for the Best 10 Augmented Reality Effects and the Fun Ar Effects in Filmora
- Learn How to Create a Unique Repeated Text Animation in the Filmora Video Editor. Follow the Simple Step-by-Step Instructions for 2024
- How To Make a Timelapse in After Effects
- Updated In 2024, Discover Vintage LUTs Premiere Pro Free and Paid Options Available
- Updated What If YouTube Zoom to Fill Not Working, In 2024
- New How to Convert Videos to Slow Motion, In 2024
- New Learn How to Blur Faces in Your Video on iPhone
- New How to Create Marketing Videos for 2024
- Full Guide to Hard Reset Your Vivo X Fold 2 | Dr.fone
- New Top 10 Cartoon Canvas Painting Ideas for Total Beginners
- In 2024, Top Apps and Online Tools To Track Vivo V29 Phone With/Without IMEI Number
- How To Bypass Honor Magic5 Ultimate FRP In 3 Different Ways
- Fixing Foneazy MockGo Not Working On Realme 11X 5G | Dr.fone
- In 2024, How to Remove and Reset Face ID on iPhone 13
- Top 10 Fingerprint Lock Apps to Lock Your Itel A05s Phone
- In 2024, 8 Safe and Effective Methods to Unlock Your Apple iPhone 13 mini Without a Passcode
- Easy Steps To Create Talking Memoji on iPhone Free for 2024
- In 2024, 5 Ways to Track Apple iPhone 6 without App | Dr.fone
- In 2024, How to Bypass Android Lock Screen Using Emergency Call On Vivo V27 Pro?
- In 2024, How Can Infinix Smart 8 PlusMirror Share to PC? | Dr.fone
- In 2024, How to Remove Forgotten PIN Of Your Infinix Hot 30 5G
- Complete Tutorial to Use VPNa to Fake GPS Location On Honor Magic V2 | Dr.fone
- How to get back lost contacts from Infinix Note 30 VIP Racing Edition.
- How to Transfer Data from Tecno Spark 10 Pro to Any iOS Devices | Dr.fone
- 11 Best Location Changers for HTC U23 Pro | Dr.fone
- In 2024, Complete Tutorial to Use GPS Joystick to Fake GPS Location On Vivo Y100A | Dr.fone
- How To Simulate GPS Movement With Location Spoofer On Vivo Y78 5G? | Dr.fone
- Updated Breakthrough How to Make A Picture Speak for 2024
- In 2024, How Many Attempts To Unlock iPhone SE (2020) | Dr.fone
- How to Factory Reset Oppo F23 5G in 5 Easy Ways | Dr.fone
- In 2024, 4 Feasible Ways to Fake Location on Facebook For your Oppo F25 Pro 5G | Dr.fone
- In 2024, How to Migrate Android Data From Samsung Galaxy S23 Tactical Edition to New Android Phone? | Dr.fone
- In 2024, How to Unlock iPhone XS Passcode without Computer?
- In 2024, Techniques for Making After Effects 2D Animation
- How To Fix Apple iPhone 11 Pro Max Could Not Be Activated/Reached Issue
- Title: How Did AI Video Games Act More Human Than Human for 2024
- Author: Chloe
- Created at : 2024-05-20 03:38:04
- Updated at : 2024-05-21 03:38:04
- Link: https://ai-editing-video.techidaily.com/how-did-ai-video-games-act-more-human-than-human-for-2024/
- License: This work is licensed under CC BY-NC-SA 4.0.
