
:max_bytes(150000):strip_icc():format(webp)/kids-ipad-580f65635f9b58564cc0fc91-5c5cbb6ac9e77c0001d92aa4.jpg)
How to Achieve GoPro Slow Motion With Quality for 2024
How to Achieve GoPro Slow Motion With Quality
Slow-motion videos are a new phenomenon in engaging audiences. In this decade, such effects add a dramatic feel to empathize movie clips. Slow motion is an effective way to keep viewers hooked to the content. Now, the question arises of which could be the best way to make a perfect GoPro slow-mo. To find an answer, read this guide and achieve high-quality slow-mo videos with GoPro.
Let us tell you first that GoPro is primarily a company for camera accessories. Besides, there is GoPro Quik, which is responsible for dedicated video editing. Many professionals rely on GoPro slow-motion to change video speed with a single tap. Thus, without wasting time, delve into the details given and learn to make GoPro 11 slow motion with the best available accessories.
Slow Motion Video Maker Slow your video’s speed with better control of your keyframes to create unique cinematic effects!
Make A Slow Motion Video Make A Slow Motion Video More Features

Part 1: Slowing Down Videos on Your GoPro: A Guide
GoPro offers Sony Vegas Pro Slow Motion to record videos in slow motion. Does using such technical equipment seem challenging for you as a new user? Follow this step-by-step guide and set the camera before recording to make a perfect slow-mo shot.
Step 1
Set the resolution to 2.7k for a slow-motion video and a frame rate of 240fps. Afterward, keep the “Color” natural if you don’t want to color grade it. Moreover, adjust the “Sharping” low by using its respective options.

Step 2
Reset the “Hyper Smooth” to high and later turn ISO to a minimum of 100 and a maximum of 800. Then, head to set the “Shutter Speed” and “White Balance” to auto.

Step 3
Moving ahead, choose Lens to “Linear” and keep the “Bitrate” high. Finally, select the “Exposure Value Compensation” to -0.5 using its slider. Your camera is ready to capture your desired and captivating slow-motion shots.

Part 2: Slow Down Videos on GoPro Quik After Recording
After recording the required clip, post-editing is important to polish the digital content. GoPro also offers GoPro Quik to edit slow-motion videos to your desired extent. Unfortunately, not everyone can quickly discover Go Pro slow motion in their first use. That’s why it’s necessary to follow the given steps so you can easily discover and edit slow motion.
Step 1
Access the GoPro Quick on your device and launch it. Choose the “Media” icon in the bottom bar and select the video you want to edit. After importing the required media files, start working on a project.

Step 2
Select the “Pen” icon in the bottom bar and scroll the menu to the left side. Here, choose the “Speed” option and tap the “+” icon to drag the slider to the point where you want to apply the slow motion. Hit the end mark and get a preview of smooth speed ramping in slow motion.

Part 3: Make Better Slow-Motion Videos with Wondershare Filmora
Making a slow motion means spending cognitive effort and time on a project. Thus, video editors seek a reliable platform like GoPro Hero 11, which is slow motion. Unfortunately, this editing app is outdated, and other better platforms are being developed. In search of the latest and easy-to-use video editor, use Wondershare Filmora .
It is a video editing software with various powerful editing features compared with GoPro Quik. This platform can perform more tasks than trimming, merging, and splitting clips. Filmora is equipped with AI technology to provide maximum ease to users. You can use this tool to ensure a smooth workflow and boost your productivity.
Why Filmora is Better Than GoPro Quik?
Filmora provides many features that GoPro Quik does not offer. Everyone needs solid arguments and valid reasons to reconsider their choices. Thus, here we have highlighted some proven and logical reasons to use Filmora instead of GoPro:
- The first and foremost thing you can see is Filmora’s intuitive interface. Anyone without any video editing background can use this tool effectively for their projects.
- Video editors need assistance while editing perfect shots. Filmora offers an AI Copilot Editing system as your editing assistant, which GoPro does not provide. It directs users to create high-quality videos.
Free Download For Win 7 or later(64-bit)
Free Download For macOS 10.14 or later
- GoPro Quik allows you to edit up to 1-minute videos. In contrast, Filmora doesn’t restrict you from editing videos of a certain length.
- With Filmora AI, you can generate a customized script and turn it into a video. AI integration for unique content makes this tool better than GoPro Quik.
- Unlike GoPro Quik, getting personalized music tracks is possible with Filmora. It can create soundtracks that align with your project’s needs.
- Slow-motion GoPro can assist in speed-ramping videos for a smooth transition. Conversely, Filmora also offers an optical flow option to automate the speed ramping .
- Even GoPro Quik cannot remove vocals from the audio files. Using Filmora, this option is just a click away. It can automatically separate vocals from music tracks so you can dub high-quality videos.
- Using GoPro, users can share their videos on social media or export them anywhere. In comparison, Filmora allows you to adjust resolution, quality, project name, and destination.
- AI in Filmora can generate images with your prompts that will not claim legal rights. This service is unavailable in GoPro; it is just limited to video editing.
- Last but not least, Filmora can transform your text into engaging videos. By doing so, you can save the budget for actors, video editors, and other crew.
Step-by-Step Guide to Slow Down Video With Filmora
After learning the exceptional functionalities of Filmora, you might be considering using it. To put you at ease, we have explained stepwise usage of achieving slow motion with Filmora. It’s quite easier and more automatic than GoPro slow motion:
Free Download For Win 7 or later(64-bit)
Free Download For macOS 10.14 or later
Step 1: Install Filmora V13 and Import Your Media
Go to the official site of Wondershare Filmora and download its latest version, V13. Launch it in your system and access its intuitive main interface. Choose “New Project” from its home screen and enter in the editing screen. Press your keyboard’s “Ctrl + I” keys and import your desired file in Filmora.

Step 2: Use the Optical Flow Option and Slow Down the Video Speed
Drag and drop the imported video in the timeline section. Place your cursor on that video and right-click on it. Hit the “Uniform Speed” option from the displayed list and direct toward the right-side editing panel. There, use the “Speed” slider and slow down the video as required. Move downward and extend the “AI Frame Interpolation” menu to pick the “Optical Flow.”

Step 3: Preview the Results to Export or Continue to Edit
Finally, get a preview of a slower but high-quality video by pressing the “Space” key. Afterward, if you are satisfied with the results, move to the “Export” option at the top right. Now, set the output settings based on how you want to save the video. Finally, press the “Export” button to save the results on your system.

Conclusion
To summarize, the GoPro camera is available in the market to capture slow-motion shots. On the other hand, GoPro Quik is an editing tool that has been popular for a decade. Many users are unaware of the latest video editing software, Wondershare Filmora. It is an AI-powered platform that has proven to be better than GoPro slow-motion, as discussed above.
Make A Slow Motion Video Make A Slow Motion Video More Features
Part 1: Slowing Down Videos on Your GoPro: A Guide
GoPro offers Sony Vegas Pro Slow Motion to record videos in slow motion. Does using such technical equipment seem challenging for you as a new user? Follow this step-by-step guide and set the camera before recording to make a perfect slow-mo shot.
Step 1
Set the resolution to 2.7k for a slow-motion video and a frame rate of 240fps. Afterward, keep the “Color” natural if you don’t want to color grade it. Moreover, adjust the “Sharping” low by using its respective options.
Step 2
Reset the “Hyper Smooth” to high and later turn ISO to a minimum of 100 and a maximum of 800. Then, head to set the “Shutter Speed” and “White Balance” to auto.
Step 3
Moving ahead, choose Lens to “Linear” and keep the “Bitrate” high. Finally, select the “Exposure Value Compensation” to -0.5 using its slider. Your camera is ready to capture your desired and captivating slow-motion shots.
Part 2: Slow Down Videos on GoPro Quik After Recording
After recording the required clip, post-editing is important to polish the digital content. GoPro also offers GoPro Quik to edit slow-motion videos to your desired extent. Unfortunately, not everyone can quickly discover Go Pro slow motion in their first use. That’s why it’s necessary to follow the given steps so you can easily discover and edit slow motion.
Step 1
Access the GoPro Quick on your device and launch it. Choose the “Media” icon in the bottom bar and select the video you want to edit. After importing the required media files, start working on a project.
Step 2
Select the “Pen” icon in the bottom bar and scroll the menu to the left side. Here, choose the “Speed” option and tap the “+” icon to drag the slider to the point where you want to apply the slow motion. Hit the end mark and get a preview of smooth speed ramping in slow motion.
Part 3: Make Better Slow-Motion Videos with Wondershare Filmora
Making a slow motion means spending cognitive effort and time on a project. Thus, video editors seek a reliable platform like GoPro Hero 11, which is slow motion. Unfortunately, this editing app is outdated, and other better platforms are being developed. In search of the latest and easy-to-use video editor, use Wondershare Filmora .
It is a video editing software with various powerful editing features compared with GoPro Quik. This platform can perform more tasks than trimming, merging, and splitting clips. Filmora is equipped with AI technology to provide maximum ease to users. You can use this tool to ensure a smooth workflow and boost your productivity.
Why Filmora is Better Than GoPro Quik?
Filmora provides many features that GoPro Quik does not offer. Everyone needs solid arguments and valid reasons to reconsider their choices. Thus, here we have highlighted some proven and logical reasons to use Filmora instead of GoPro:
- The first and foremost thing you can see is Filmora’s intuitive interface. Anyone without any video editing background can use this tool effectively for their projects.
- Video editors need assistance while editing perfect shots. Filmora offers an AI Copilot Editing system as your editing assistant, which GoPro does not provide. It directs users to create high-quality videos.
Free Download For Win 7 or later(64-bit)
Free Download For macOS 10.14 or later
- GoPro Quik allows you to edit up to 1-minute videos. In contrast, Filmora doesn’t restrict you from editing videos of a certain length.
- With Filmora AI, you can generate a customized script and turn it into a video. AI integration for unique content makes this tool better than GoPro Quik.
- Unlike GoPro Quik, getting personalized music tracks is possible with Filmora. It can create soundtracks that align with your project’s needs.
- Slow-motion GoPro can assist in speed-ramping videos for a smooth transition. Conversely, Filmora also offers an optical flow option to automate the speed ramping .
- Even GoPro Quik cannot remove vocals from the audio files. Using Filmora, this option is just a click away. It can automatically separate vocals from music tracks so you can dub high-quality videos.
- Using GoPro, users can share their videos on social media or export them anywhere. In comparison, Filmora allows you to adjust resolution, quality, project name, and destination.
- AI in Filmora can generate images with your prompts that will not claim legal rights. This service is unavailable in GoPro; it is just limited to video editing.
- Last but not least, Filmora can transform your text into engaging videos. By doing so, you can save the budget for actors, video editors, and other crew.
Step-by-Step Guide to Slow Down Video With Filmora
After learning the exceptional functionalities of Filmora, you might be considering using it. To put you at ease, we have explained stepwise usage of achieving slow motion with Filmora. It’s quite easier and more automatic than GoPro slow motion:
Free Download For Win 7 or later(64-bit)
Free Download For macOS 10.14 or later
Step 1: Install Filmora V13 and Import Your Media
Go to the official site of Wondershare Filmora and download its latest version, V13. Launch it in your system and access its intuitive main interface. Choose “New Project” from its home screen and enter in the editing screen. Press your keyboard’s “Ctrl + I” keys and import your desired file in Filmora.
Step 2: Use the Optical Flow Option and Slow Down the Video Speed
Drag and drop the imported video in the timeline section. Place your cursor on that video and right-click on it. Hit the “Uniform Speed” option from the displayed list and direct toward the right-side editing panel. There, use the “Speed” slider and slow down the video as required. Move downward and extend the “AI Frame Interpolation” menu to pick the “Optical Flow.”
Step 3: Preview the Results to Export or Continue to Edit
Finally, get a preview of a slower but high-quality video by pressing the “Space” key. Afterward, if you are satisfied with the results, move to the “Export” option at the top right. Now, set the output settings based on how you want to save the video. Finally, press the “Export” button to save the results on your system.
Conclusion
To summarize, the GoPro camera is available in the market to capture slow-motion shots. On the other hand, GoPro Quik is an editing tool that has been popular for a decade. Many users are unaware of the latest video editing software, Wondershare Filmora. It is an AI-powered platform that has proven to be better than GoPro slow-motion, as discussed above.
Efficient Ways to Manage Your Timeline
Do you still have a lot of editing to do after spending hours creating a video for your client? Though you already have a lot on your plate, you can’t continue to devote all of your working hours to only video editing. What if we told you there is a way to make this video editing process much quicker and easier? Keep reading this article to learn how to make the video editing process simpler and more effective.
Part 1: Best Way to Manage your Timeline
We all know that keeping good habits while editing could be helpful, whether you are a professional or a newbie. It could make editing so much more efficient. Today, we will show you some easy tips to organize your media browser and timeline while editing videos. But before we begin, download Filmora from their official website so you can follow all the steps easily.
Free Download For Win 7 or later(64-bit)
Free Download For macOS 10.14 or later
1. Create folders in Filmora
If you have footage from multiple cameras, it is best to create some folders first.
Step1 Create a Folder for Camera 1
If you have video footage from three cameras, you can create one folder for each camera.
Go to the default folder on the top left and rename it Cam_A.

Step2 Create a Folder for Camera 2
Then go to the bottom left of the media browser and click on this icon to add a new folder. Rename it to Cam_B.

Step3 Create a Folder for Camera 3
Repeat the steps to create another folder called Cam_C. Now you can import footage from your different cameras into each folder.

Step4 Create a Folder for Production Sound
After that, add three new folders and rename them to Production Sound, SFX, and Music. Production sound is usually the sound that is recorded on set. If you have recorded all dialects from the subjects on the location, you can put them into this folder.

Step5 Create a Folder for SFX
SFX stands for sound effects. You can add push clapping, laughing and other Folly sounds into this folder.

Step6 Create a Folder for Music
Next, import all music files into the music folder. You can create folders for your graphics, B-roll, and stock footage if needed.

2. Organize your Timeline and Video Tracks
Step1 Create Tracks for Picture Editing
Keep the first three tracks for picture editing. These tracks are usually for picture editing that includes footage with no effects or some simple effects—for example resizing, keyframing, transitions, or Green Screen.

Step2 Create Tracks for Temporary Footage
Set up the fourth track for the temporary footage or placeholders so you can quickly switch the temporary footage without spending extra time looking for them.

Step3 Create Tracks for Effects
Set the fifth video track as the effect track. It will include all effects from firmware that do not apply to the footage directly.

Step4 Create Tracks for On and Off Content
Next, on the sixth video track, you can add the content that you would want to turn on and off from time to time. In this example, you can put the subtitles here.

3. Organize your Audio Tracks
Step1 Create Tracks for Dialects
The first two tracks are usually for dialects. You can include all the dialects of characters in these tracks. Keep one track for each character. If you have more characters, feel free to assign more tracks to them.

Step2 Create Tracks for Additional Audio
The third audio track could be for any additional audio, such as voiceover. If you don’t have a voiceover in your video, you can leave it empty.

Step3 Create Tracks for Sound Effects
The fourth track could usually be the sound effects track. You can add all the clapping sounds, laughing, and all kinds of other foley sound here.

Step4 Create Tracks for Ambient Sound
Keep the fifth track for Ambient sound and room tone. You can use it to keep a very subtle environment sound in specific scenes. For example, you can use the room tone recorded on sets.

Step5 Create Tracks for Background Music
Finally, the sixth track is usually for background music. But, of course, you could also keep it empty if your project has no background music.

4. Color Code Your Clips
Suppose you want to make the timeline even easier to view. In that case, you can select all clips from a camera or a subject and color code them into a specific color. For example, you can color code the footage from camera A in red, camera B in yellow, and Camera C in blue. Now, when you look at the Timeline, you can quickly distinguish footage from different cameras.

Part 2: Pro Tips about Improving Video Editing Efficiency
1. Rename Individual Clips
It would be much simpler to organize the timeline if you could quickly rename individual clips. Cut a clip into smaller segments and give each clip a different name. Make sure these clips have a name other than the source video to avoid confusion.
2. Remove Empty Timeline
For quick video editing, timeline organization is essential. Organize your materials and footage at all times to prevent delays. Put everything in the correct folders with the proper labels. To keep your timeline organized, select “Delete Empty Tracks” from the context menu when right-clicking on the track window on the left.
3. Use Keyboard Shortcuts
Knowing keyboard shortcuts allows you to carry out the editing process quickly and precisely.
4. Select Good Music
Don’t only concentrate on the images; the music also affects how well your video comes out. For example, suppose you’re making a drama movie. In that case, you should pick the right music track to evoke particular emotions in your viewers.
5. Add Text and Graphics
Depending on the style of the video, adding text, graphics, or stock video to your project could be helpful. You should provide more text than just the title for some videos.
Summary
You don’t need to be an expert in video editing to produce high-quality videos. In reality, you can complete the task without any expensive, high-end professional training. So how? Well, with the proper video editing tools like Wondershare Filmora, anything is possible. Follow the above guide, organize your timeline and keep the tracks consistent while video editing on Filmora so it’s easier to come back and edit a project or share with other editors.
Free Download For macOS 10.14 or later
1. Create folders in Filmora
If you have footage from multiple cameras, it is best to create some folders first.
Step1 Create a Folder for Camera 1
If you have video footage from three cameras, you can create one folder for each camera.
Go to the default folder on the top left and rename it Cam_A.
Step2 Create a Folder for Camera 2
Then go to the bottom left of the media browser and click on this icon to add a new folder. Rename it to Cam_B.
Step3 Create a Folder for Camera 3
Repeat the steps to create another folder called Cam_C. Now you can import footage from your different cameras into each folder.
Step4 Create a Folder for Production Sound
After that, add three new folders and rename them to Production Sound, SFX, and Music. Production sound is usually the sound that is recorded on set. If you have recorded all dialects from the subjects on the location, you can put them into this folder.
Step5 Create a Folder for SFX
SFX stands for sound effects. You can add push clapping, laughing and other Folly sounds into this folder.
Step6 Create a Folder for Music
Next, import all music files into the music folder. You can create folders for your graphics, B-roll, and stock footage if needed.
2. Organize your Timeline and Video Tracks
Step1 Create Tracks for Picture Editing
Keep the first three tracks for picture editing. These tracks are usually for picture editing that includes footage with no effects or some simple effects—for example resizing, keyframing, transitions, or Green Screen.
Step2 Create Tracks for Temporary Footage
Set up the fourth track for the temporary footage or placeholders so you can quickly switch the temporary footage without spending extra time looking for them.
Step3 Create Tracks for Effects
Set the fifth video track as the effect track. It will include all effects from firmware that do not apply to the footage directly.
Step4 Create Tracks for On and Off Content
Next, on the sixth video track, you can add the content that you would want to turn on and off from time to time. In this example, you can put the subtitles here.
3. Organize your Audio Tracks
Step1 Create Tracks for Dialects
The first two tracks are usually for dialects. You can include all the dialects of characters in these tracks. Keep one track for each character. If you have more characters, feel free to assign more tracks to them.
Step2 Create Tracks for Additional Audio
The third audio track could be for any additional audio, such as voiceover. If you don’t have a voiceover in your video, you can leave it empty.
Step3 Create Tracks for Sound Effects
The fourth track could usually be the sound effects track. You can add all the clapping sounds, laughing, and all kinds of other foley sound here.
Step4 Create Tracks for Ambient Sound
Keep the fifth track for Ambient sound and room tone. You can use it to keep a very subtle environment sound in specific scenes. For example, you can use the room tone recorded on sets.
Step5 Create Tracks for Background Music
Finally, the sixth track is usually for background music. But, of course, you could also keep it empty if your project has no background music.
4. Color Code Your Clips
Suppose you want to make the timeline even easier to view. In that case, you can select all clips from a camera or a subject and color code them into a specific color. For example, you can color code the footage from camera A in red, camera B in yellow, and Camera C in blue. Now, when you look at the Timeline, you can quickly distinguish footage from different cameras.
Part 2: Pro Tips about Improving Video Editing Efficiency
1. Rename Individual Clips
It would be much simpler to organize the timeline if you could quickly rename individual clips. Cut a clip into smaller segments and give each clip a different name. Make sure these clips have a name other than the source video to avoid confusion.
2. Remove Empty Timeline
For quick video editing, timeline organization is essential. Organize your materials and footage at all times to prevent delays. Put everything in the correct folders with the proper labels. To keep your timeline organized, select “Delete Empty Tracks” from the context menu when right-clicking on the track window on the left.
3. Use Keyboard Shortcuts
Knowing keyboard shortcuts allows you to carry out the editing process quickly and precisely.
4. Select Good Music
Don’t only concentrate on the images; the music also affects how well your video comes out. For example, suppose you’re making a drama movie. In that case, you should pick the right music track to evoke particular emotions in your viewers.
5. Add Text and Graphics
Depending on the style of the video, adding text, graphics, or stock video to your project could be helpful. You should provide more text than just the title for some videos.
Summary
You don’t need to be an expert in video editing to produce high-quality videos. In reality, you can complete the task without any expensive, high-end professional training. So how? Well, with the proper video editing tools like Wondershare Filmora, anything is possible. Follow the above guide, organize your timeline and keep the tracks consistent while video editing on Filmora so it’s easier to come back and edit a project or share with other editors.
How to Get Zoom on TV [Easy Solutions]
The modern workforce needs adaptable alternatives to the conventional room-to-room conferencing. The latest integrated online collaboration platform is called Zoom. What’s more, now you can get Zoom on TV. Being one of the most well-known conferencing programs, it offers reliable and efficient hosting of online meetings. In a same vein, you may set up conference rooms, do video seminars, and use instant messaging to receive real-time communications. Moreover, can you get zoom on your tv? Then the answer is Yes! The ideal technique to expand a small conference is to mirror it on TV using Zoom meetings. Additionally, sharing across all platforms and devices is possible. Sharing HD video, audio, and material from your desktop and mobile devices to conference rooms and phone systems is simple, dependable, and safe with Zoom Meetings.
Zoom is one of the top videos calling applications available, however, in terms of functionality, dependability, and stability. Special features include screen sharing for multi-user annotation and local and cloud recording with transcription. With just a single click, you may share any file with supported and encrypted settings for increased security and communicate across all platforms. Zoom has now come to represent meetings for those who do their business remotely. For almost all platforms, including Android, iOS, macOS, Windows, Smart TVs, etc., the Zoom app is officially accessible. For the query how to get zoom on portal tv? you may activate Zoom screen casting whether you’re using a Windows 10 or a Mac laptop with the Chrome browser. This section will be useful to you if you want to benefit from Zoom on a TV. You may thus do so. Continue reading the article to learn more about how to get zoom on tv.
Part 1: Get Zoom on TV with HDMI Cable
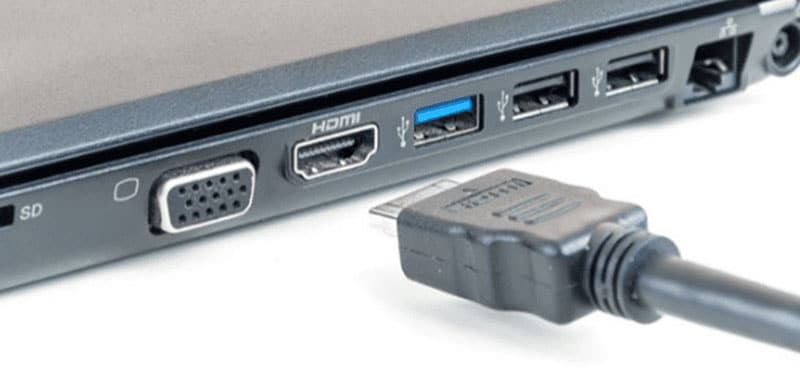
Although Zoom provides companies and bigger organizations with a professional solution like Zoom Rooms, if you’re at home, you don’t need to put anything on your TV to use Zoom. You may start using Zoom right away by simply connecting your Zoom device to your TV. Connect your TV to your laptop’s HDMI port if it has one. Simple as that, however if the laptop doesn’t figure it out on its own you may need to explain what is going on with the second display. Although more reliable, connecting via cable means your source device is linked to the TV and you can’t go for a stroll. It also means you don’t have to worry about the wireless connection fading.
Steps to Get Zoom on TV with HDMI
Step1Connect the HDMI End to the TV and the Other End to Your Device
You may use this in its place if you don’t have an HDMI but do have a USB-C port. To connect to the HDMI cable coming into your TV, you’ll need a dongle, but you’ll need to make sure it’s compatible.
Step2Turn On your TV
Turn on your TV, then switch the video source to the HDMI port you just connected in your device to using the TV remote.
Step3Launch Zoom Meeting
Start or join a meeting by using the Zoom app on your smartphone (available for Android, iOS, Windows, and macOS).
Part 2: Use AirPlay to Connect Zoom to TV
Using AirPlay mirroring, MacOS or iOS devices may share content with Zoom rooms. On MacOS and iOS, Airplay is used to communicate between the Zoom client and the Zoom room. There may be a great potential for your own business requirements if you can figure out how to utilize Airplay to Zoom mirror your screen to your Apple TV. By default, AirPlay sends audio to the Apple TV. Depending on how loud your speakers are set to play and where your input device’s microphone is located, this may cause echoing and ever-louder feedback loops. Without further ado, let’s look at some of the important strategies you may use to maximize live screen streaming on your Apple TV device.
Steps to Use AirPlay to Connect Zoom to TV
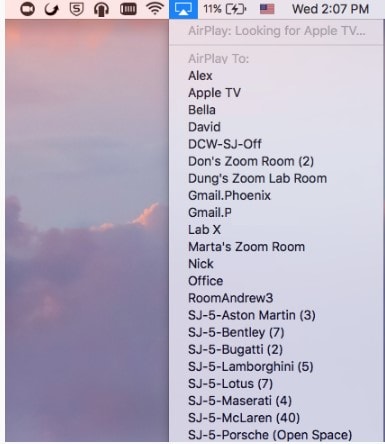
Step1Navigate to the Airplay Display in the Apple menu’s top right corner. Choose your Apple TV from the list of AirPlay Display options in the Displays preference pane. The “Show mirroring option in the menu bar when available” checkbox makes it easier to reach the AirPlay menu.

Step2Select Room Management > Zoom Rooms after logging into the Zoom online interface to manage your current Zoom Rooms. Then, modify the account settings and turn on Apple screen mirroring using the location hierarchy system.
Step3Turn on Apple Screen Mirroring by going to the Meetings tab. If this happens, you may need to activate it from the verification dialog box; otherwise, screen mirroring ought to start immediately on your device and let you see Zoom on your Apple TV. A shared password will be required of you.
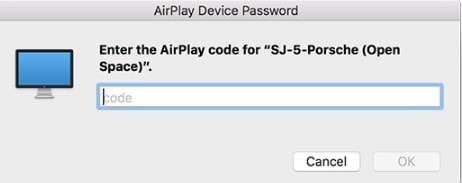
Step4Enter the passcode that is shown on the Zoom room’s screen. You may start using Airplay on your smartphone after enabling Apple screen mirroring.

Step5After that, turn off AirPlay Display by using the option in the preference pane or the system menu bar. To stop sharing, click Disconnect Airplay.
Part 3: Mirror Screen with Chromecast
The Chromecast gadgets from Google are well constructed. They should be able to cast more than just standard streaming services to your TV, logically speaking. Using a Chromecast device is one of the simplest methods to cast a Zoom conference to your TV. They are affordable, and any Google browser and the Google Home app for your Android or iOS smartphone both contain the cast capability. Between a device, such as your phone or computer, and the television, Chromecast offers the perfect connection. Chromecast makes it easy to cast Zoom meetings, particularly conferences with many of participants, since it can virtually reflect everything on your phone, tablet, or computer screen to your TV. For meetings with bigger attendance, it is advantageous to be able to cast Zoom meetings to almost any device, even a smart TV, using Chromecast.
Steps to Mirror Screen with Chromecast
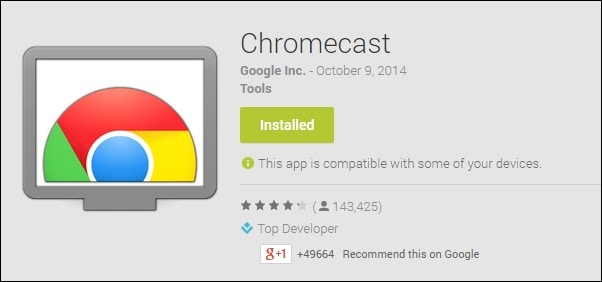
Step1Install the Chromecast
Connect your Google Chromecast to the same internet source as your casting device by plugging it in.
Step2Manage Cast Settings
Locate the casting option on your device and search for recipients. Get the Zoom Cloud Meetings app for iOS or Android. You’ll also need to download the third-party software if you use an iPad or iPhone. After that, sign up for a Zoom account and log in to get started.
Step3Start Mirroring Zoom
The screen of your phone will show up on your TV when you tap your Chromecast. The best view is obtained by turning your phone into landscape after opening Zoom as usual. Once you place a call from here, the video will cast to your TV. Go to the next screen and click Start Broadcasting. You may now start casting to your Chromecast device by opening the Zoom Cloud Meeting app.

You must download the third-party app if you use an iPhone or iPad. The Chromecast Streamer software will let you cast a Zoom meeting on your Chromecast device as Zoom doesn’t provide a casting option.
Conclusion
Zoom’s popularity has skyrocketed as a result of the Pandemic. Zoom has emerged as the preferred video conferencing solution as the bulk of the global workforce shifts to a “work from home” environment. Now that more individuals than ever before work from home, video conferencing has emerged as a vital tool for marketing and corporate communication. Mirroring Zoom meetings to TV has never been this simple. In light of this, we hope that this guide has helped you come up with some of the greatest ideas and approaches for your personal zoom sharing needs. We really hope that this information has been helpful to you if you’ve been interested in learning more about screen sharing your Zoom to TV. Thanks to these methods, you can now mirror any device platform on TV.
The modern workforce needs adaptable alternatives to the conventional room-to-room conferencing. The latest integrated online collaboration platform is called Zoom. What’s more, now you can get Zoom on TV. Being one of the most well-known conferencing programs, it offers reliable and efficient hosting of online meetings. In a same vein, you may set up conference rooms, do video seminars, and use instant messaging to receive real-time communications. Moreover, can you get zoom on your tv? Then the answer is Yes! The ideal technique to expand a small conference is to mirror it on TV using Zoom meetings. Additionally, sharing across all platforms and devices is possible. Sharing HD video, audio, and material from your desktop and mobile devices to conference rooms and phone systems is simple, dependable, and safe with Zoom Meetings.
Zoom is one of the top videos calling applications available, however, in terms of functionality, dependability, and stability. Special features include screen sharing for multi-user annotation and local and cloud recording with transcription. With just a single click, you may share any file with supported and encrypted settings for increased security and communicate across all platforms. Zoom has now come to represent meetings for those who do their business remotely. For almost all platforms, including Android, iOS, macOS, Windows, Smart TVs, etc., the Zoom app is officially accessible. For the query how to get zoom on portal tv? you may activate Zoom screen casting whether you’re using a Windows 10 or a Mac laptop with the Chrome browser. This section will be useful to you if you want to benefit from Zoom on a TV. You may thus do so. Continue reading the article to learn more about how to get zoom on tv.
Part 1: Get Zoom on TV with HDMI Cable
Although Zoom provides companies and bigger organizations with a professional solution like Zoom Rooms, if you’re at home, you don’t need to put anything on your TV to use Zoom. You may start using Zoom right away by simply connecting your Zoom device to your TV. Connect your TV to your laptop’s HDMI port if it has one. Simple as that, however if the laptop doesn’t figure it out on its own you may need to explain what is going on with the second display. Although more reliable, connecting via cable means your source device is linked to the TV and you can’t go for a stroll. It also means you don’t have to worry about the wireless connection fading.
Steps to Get Zoom on TV with HDMI
Step1Connect the HDMI End to the TV and the Other End to Your Device
You may use this in its place if you don’t have an HDMI but do have a USB-C port. To connect to the HDMI cable coming into your TV, you’ll need a dongle, but you’ll need to make sure it’s compatible.
Step2Turn On your TV
Turn on your TV, then switch the video source to the HDMI port you just connected in your device to using the TV remote.
Step3Launch Zoom Meeting
Start or join a meeting by using the Zoom app on your smartphone (available for Android, iOS, Windows, and macOS).
Part 2: Use AirPlay to Connect Zoom to TV
Using AirPlay mirroring, MacOS or iOS devices may share content with Zoom rooms. On MacOS and iOS, Airplay is used to communicate between the Zoom client and the Zoom room. There may be a great potential for your own business requirements if you can figure out how to utilize Airplay to Zoom mirror your screen to your Apple TV. By default, AirPlay sends audio to the Apple TV. Depending on how loud your speakers are set to play and where your input device’s microphone is located, this may cause echoing and ever-louder feedback loops. Without further ado, let’s look at some of the important strategies you may use to maximize live screen streaming on your Apple TV device.
Steps to Use AirPlay to Connect Zoom to TV
Step1Navigate to the Airplay Display in the Apple menu’s top right corner. Choose your Apple TV from the list of AirPlay Display options in the Displays preference pane. The “Show mirroring option in the menu bar when available” checkbox makes it easier to reach the AirPlay menu.
Step2Select Room Management > Zoom Rooms after logging into the Zoom online interface to manage your current Zoom Rooms. Then, modify the account settings and turn on Apple screen mirroring using the location hierarchy system.
Step3Turn on Apple Screen Mirroring by going to the Meetings tab. If this happens, you may need to activate it from the verification dialog box; otherwise, screen mirroring ought to start immediately on your device and let you see Zoom on your Apple TV. A shared password will be required of you.
Step4Enter the passcode that is shown on the Zoom room’s screen. You may start using Airplay on your smartphone after enabling Apple screen mirroring.
Step5After that, turn off AirPlay Display by using the option in the preference pane or the system menu bar. To stop sharing, click Disconnect Airplay.
Part 3: Mirror Screen with Chromecast
The Chromecast gadgets from Google are well constructed. They should be able to cast more than just standard streaming services to your TV, logically speaking. Using a Chromecast device is one of the simplest methods to cast a Zoom conference to your TV. They are affordable, and any Google browser and the Google Home app for your Android or iOS smartphone both contain the cast capability. Between a device, such as your phone or computer, and the television, Chromecast offers the perfect connection. Chromecast makes it easy to cast Zoom meetings, particularly conferences with many of participants, since it can virtually reflect everything on your phone, tablet, or computer screen to your TV. For meetings with bigger attendance, it is advantageous to be able to cast Zoom meetings to almost any device, even a smart TV, using Chromecast.
Steps to Mirror Screen with Chromecast
Step1Install the Chromecast
Connect your Google Chromecast to the same internet source as your casting device by plugging it in.
Step2Manage Cast Settings
Locate the casting option on your device and search for recipients. Get the Zoom Cloud Meetings app for iOS or Android. You’ll also need to download the third-party software if you use an iPad or iPhone. After that, sign up for a Zoom account and log in to get started.
Step3Start Mirroring Zoom
The screen of your phone will show up on your TV when you tap your Chromecast. The best view is obtained by turning your phone into landscape after opening Zoom as usual. Once you place a call from here, the video will cast to your TV. Go to the next screen and click Start Broadcasting. You may now start casting to your Chromecast device by opening the Zoom Cloud Meeting app.
You must download the third-party app if you use an iPhone or iPad. The Chromecast Streamer software will let you cast a Zoom meeting on your Chromecast device as Zoom doesn’t provide a casting option.
Conclusion
Zoom’s popularity has skyrocketed as a result of the Pandemic. Zoom has emerged as the preferred video conferencing solution as the bulk of the global workforce shifts to a “work from home” environment. Now that more individuals than ever before work from home, video conferencing has emerged as a vital tool for marketing and corporate communication. Mirroring Zoom meetings to TV has never been this simple. In light of this, we hope that this guide has helped you come up with some of the greatest ideas and approaches for your personal zoom sharing needs. We really hope that this information has been helpful to you if you’ve been interested in learning more about screen sharing your Zoom to TV. Thanks to these methods, you can now mirror any device platform on TV.
The Way to Quick and Efficient Editing | Keyboard Shortcuts in Filmora
To get rid of mistakes in the videos and to make them more visually appealing, people prefer to edit videos. You can also shape the video in a storytelling way to express and present the cohesive story to the world. Nowadays, video editing is a demanded skill, and every person wishes to master it. In these scenarios, the built-in keyboard shortcuts will help you a lot.
The best tool that provides built-in keyboard shortcuts and can help you experience the best video editing experience is Wondershare Filmora. By the end of this article, you will be aware of the checkpoints along with the keyboard shortcuts of Filmora. We will also provide keyboard shortcuts in this article to encourage shortcut video editing.
Wondershare Filmora12 A cross-platform helping you make quick and efficient video editing!
Free Download Free Download Learn More
Part 1: Major Checkpoints in Quick Video Editing
While doing video editing, it is very important to focus on efficiency and speed. It is essential to focus on the speed and efficiency of a video editing tool. Moreover, there are some checkpoints that you have to consider before getting into video editing. Some of them are:
01of 05Preparing Footage
Before anything else, you have to arrange and prepare your footage. It helps optimize the editing procedure, and you can label the files properly. Besides this, it also saves you time searching for specific files and footage.
02of 05Timeline Setting
You have to set up your timelines in the desired and recognizable resolutions. Moreover, adjusting frame rates and duration of videos and creating customized templates before anything else.
03of 05Selection of moments
Make sure you watch your video in a proper manner so you don’t have to waste time finding a specific moment. By this, you will be able to select a moment without wasting additional time.
04of 05Transitions and Adjustments
While editing the videos, you need to add the basic transitions to add consistency. Furthermore, you can adjust the audio metrics of videos and sync them with the length of videos.
05of 05Preview and Export
After editing the videos, you also have to preview them to check and fix the mistakes. Above all, always select the tool through which you can preview the videos and export them in the desired output format.
Part 2: An Introduction to Wondershare Filmora and Its Video Editing Intuition
Wondershare Filmora can be referred to as a feature-packed, cost-effective, all-in-one, easy-to-use video editing software. This tool has the capability to create professional-grade videos. You can also take assistance from this tool for creating advanced-level content for your social media platforms. It is also known to be the best choice when it comes to editing videos.
In Filmora, you can find diversified video editing tools as it comprehends timeline-based editing, so you can also use it to edit your memories. Several video formats are compatible with Filmora, so you will not face restrictions in this part.
Free Download For Win 7 or later(64-bit)
Free Download For macOS 10.14 or later
Key Features of Wondershare Filmora
- The AI Smart Cutout feature of Filmora lets you highlight and edit diversified unrequired objects, persons, or pets from the background.
- One of the best things about Filmora is it supports the AI Image feature through which you can turn descriptive text into illustrative images.
- It also shows the integrations with ChatGPT, through which you can generate AI text during video editing. This is perfect for YouTube descriptions and titles.
- You can also adjust the speed of the video while controlling the keyframes to make cinematic-grade edits in simple videos.
- The title editing feature lets you create artistic features with modernized word art, illustrations, and animations.

Part 3: Learning All Keyboard Shorts for Quick and Efficient Video Editing
To maximize productivity and workflow efficiency, you can take assistance from the keyboard shortcuts. Luckily, the industry-standard tool named Filmora offers effective keyboard shortcuts. Do you wish to know the keyboard shortcuts integrated with Wondershare Filmora? There is nothing to worry about because in this part, you will find the effective and implementable easy edit video shortcuts:
| Function | Shortcut |
|---|---|
| Preference | Ctrl+Shift+, |
| Keyboard Shortcut | Ctrl+Alt+K |
| Exit | Alt+F |
| New Project | Ctrl+N |
| Open Project | Ctrl+O |
| Save Project | Ctrl+S |
| Save Project As | Ctrl+Shift+S |
| Archive Project | Ctrl+Shift+A |
| Import Media Files | Ctrl+I |
| Record Voice-Over | Alt+R |
| Add a New Folder | +Alt+N |
| Undo | Ctrl+Z |
| Redo | Ctrl+Y |
| Cut | Ctrl+X |
| Copy | Ctrl+C |
| Paste | Ctrl+V |
| Duplicate | Ctrl+D |
| Delete | Del |
| Ripple Delete | Shift+Del |
| Close Gap | Alt+Del |
| Select All | +A |
| Copy Effects | Ctrl+Alt+C |
| Paste Effects | Ctrl+Alt+V |
| Select Clip Range | X |
| Cancel the Selected Range | Shift+X |
| Nudge Left | Alt+Left |
| Nudge Right | Alt+Right |
| Nudge Up | Alt+Up |
| Edit Properties | Alt+E |
| Split | Ctrl+B |
| Trim Start to Playhead | Alt+[ |
| Trim End to Playhead | Alt+] |
| Crop to Fit | Ctrl+F |
| Crop and Zoom | Alt+C |
| Rotate 90CW | Ctrl+Alt+Right |
| Rotate CCW | Ctrl+Alt+Left |
| Group | Ctrl+G |
| UnGroup | Ctrl+Alt+G |
| Uniform Speed | Ctrl+R |
| Add Freeze Frame | Alt+F |
| Detach Audio | Ctrl+Alt+D |
| Mute | Ctrl+Shift+M |
| Stabilization | Alt+S |
| Chroma Key | Ctrl+Shift+G |
| Red Marker | Alt+1 |
| Orange Marker | Alt+2 |
| Yellow Marker | Alt+3 |
| Green Marker | Alt+4 |
| Cyan Marker | Alt+5 |
| Blue Marker | Alt+6 |
| Purple Marker | Alt+7 |
| Grey Marker | Alt+8 |
| Select All Clips With the Same Color Mark | Alt+Shift+ |
| Render Preview | Enter |
| Add Audio/Video Keyframes | Alt+Left Click |
| Previous Keyframes | [ |
| Next Keyframes | ] |
| Motion Tracking | Alt+X |
| Color Match | Alt+M |
| Insert | Shift+QI |
| Overwrite | Shift_+O |
| Replace | Alt+Mouse Drag |
| Rename | F2 |
| Reveal in Explorer | Ctrl+Shift+R |
| Apply | Alt+A |
| Quick Split Mode | C |
| Select | V |
| Open Audio Stretch | S |
| Exit Audio Stretch | Shift+S |
| Add to Favorites | Shift+F |
| Adjust the Bezier Curve | Alt+Mouse Drag |
| Split 9 Edited State0 | Shift+Enter |
| Merge Up (Cursor at the beginning of the sentence0 | Backspace |
| Merge down subtitles 9radio or edited state) | Alt+Q |
| Merge selected subtitles (multi-select state | Alt+Q |
| Play/Pause | Space |
| Stop | Ctrl +/ |
| Full Screen/Restore Snapshot | Ctrl+Alt+S |
| Previous Frame /Move Left | Left |
| Next Frame/ More Right | Right |
| Previous Edit Point / Move Up | Up |
| Next Edit Point/ Move Down | Down |
| Go To Next Second | Shift+Right |
| Go to Previous Marker | Shift+Up |
| Go to Next Marker | Shift+Down |
| Go to Project Beginning | Home |
| Go to Project End | End |
| Go to Selected Clip Start | Shift+Home |
| Go to Selected Clip End | Shift+End |
| Zoom In | Ctrl+= |
| Zoom Out | Ctrl+_ |
| Zoom to Fit Timeline | Shift+Z |
| Select Previous | Ctrl+Left |
| Select Next | Ctrl+Right |
| Horizontal Scroll (Timeline) | Alt+Scroll Up/Down |
| Vertical Scroll (Timeline) | Scroll Up/Down |
| Mark In | I |
| Mark Out | O |
| Clear In And Out | Ctrl+Shift+X |
| Add Marker | M |
| Edit Marker | Shift+M |
| Help | F |
| Export | Ctrl+ E |
Conclusion
In the article, you have discovered crucial information about video editing in Filmora. There are some checkpoints that you need to keep in mind before getting into editing. Integrating these checkpoints, there is a consistent need to understand keyboard shortcuts in video editing. This procedure, in particular, helps much in effective video editing.
With the help of the Filmora shortcut video editor, you can make cinematic-level edits to the video. It also integrates several features such as AI Smart Cutout, AI Copywriting, and more. To know more about these useful keyboard shortcuts, this article has surely been of great help.
Free Download Free Download Learn More
Part 1: Major Checkpoints in Quick Video Editing
While doing video editing, it is very important to focus on efficiency and speed. It is essential to focus on the speed and efficiency of a video editing tool. Moreover, there are some checkpoints that you have to consider before getting into video editing. Some of them are:
01of 05Preparing Footage
Before anything else, you have to arrange and prepare your footage. It helps optimize the editing procedure, and you can label the files properly. Besides this, it also saves you time searching for specific files and footage.
02of 05Timeline Setting
You have to set up your timelines in the desired and recognizable resolutions. Moreover, adjusting frame rates and duration of videos and creating customized templates before anything else.
03of 05Selection of moments
Make sure you watch your video in a proper manner so you don’t have to waste time finding a specific moment. By this, you will be able to select a moment without wasting additional time.
04of 05Transitions and Adjustments
While editing the videos, you need to add the basic transitions to add consistency. Furthermore, you can adjust the audio metrics of videos and sync them with the length of videos.
05of 05Preview and Export
After editing the videos, you also have to preview them to check and fix the mistakes. Above all, always select the tool through which you can preview the videos and export them in the desired output format.
Part 2: An Introduction to Wondershare Filmora and Its Video Editing Intuition
Wondershare Filmora can be referred to as a feature-packed, cost-effective, all-in-one, easy-to-use video editing software. This tool has the capability to create professional-grade videos. You can also take assistance from this tool for creating advanced-level content for your social media platforms. It is also known to be the best choice when it comes to editing videos.
In Filmora, you can find diversified video editing tools as it comprehends timeline-based editing, so you can also use it to edit your memories. Several video formats are compatible with Filmora, so you will not face restrictions in this part.
Free Download For Win 7 or later(64-bit)
Free Download For macOS 10.14 or later
Key Features of Wondershare Filmora
- The AI Smart Cutout feature of Filmora lets you highlight and edit diversified unrequired objects, persons, or pets from the background.
- One of the best things about Filmora is it supports the AI Image feature through which you can turn descriptive text into illustrative images.
- It also shows the integrations with ChatGPT, through which you can generate AI text during video editing. This is perfect for YouTube descriptions and titles.
- You can also adjust the speed of the video while controlling the keyframes to make cinematic-grade edits in simple videos.
- The title editing feature lets you create artistic features with modernized word art, illustrations, and animations.
Part 3: Learning All Keyboard Shorts for Quick and Efficient Video Editing
To maximize productivity and workflow efficiency, you can take assistance from the keyboard shortcuts. Luckily, the industry-standard tool named Filmora offers effective keyboard shortcuts. Do you wish to know the keyboard shortcuts integrated with Wondershare Filmora? There is nothing to worry about because in this part, you will find the effective and implementable easy edit video shortcuts:
| Function | Shortcut |
|---|---|
| Preference | Ctrl+Shift+, |
| Keyboard Shortcut | Ctrl+Alt+K |
| Exit | Alt+F |
| New Project | Ctrl+N |
| Open Project | Ctrl+O |
| Save Project | Ctrl+S |
| Save Project As | Ctrl+Shift+S |
| Archive Project | Ctrl+Shift+A |
| Import Media Files | Ctrl+I |
| Record Voice-Over | Alt+R |
| Add a New Folder | +Alt+N |
| Undo | Ctrl+Z |
| Redo | Ctrl+Y |
| Cut | Ctrl+X |
| Copy | Ctrl+C |
| Paste | Ctrl+V |
| Duplicate | Ctrl+D |
| Delete | Del |
| Ripple Delete | Shift+Del |
| Close Gap | Alt+Del |
| Select All | +A |
| Copy Effects | Ctrl+Alt+C |
| Paste Effects | Ctrl+Alt+V |
| Select Clip Range | X |
| Cancel the Selected Range | Shift+X |
| Nudge Left | Alt+Left |
| Nudge Right | Alt+Right |
| Nudge Up | Alt+Up |
| Edit Properties | Alt+E |
| Split | Ctrl+B |
| Trim Start to Playhead | Alt+[ |
| Trim End to Playhead | Alt+] |
| Crop to Fit | Ctrl+F |
| Crop and Zoom | Alt+C |
| Rotate 90CW | Ctrl+Alt+Right |
| Rotate CCW | Ctrl+Alt+Left |
| Group | Ctrl+G |
| UnGroup | Ctrl+Alt+G |
| Uniform Speed | Ctrl+R |
| Add Freeze Frame | Alt+F |
| Detach Audio | Ctrl+Alt+D |
| Mute | Ctrl+Shift+M |
| Stabilization | Alt+S |
| Chroma Key | Ctrl+Shift+G |
| Red Marker | Alt+1 |
| Orange Marker | Alt+2 |
| Yellow Marker | Alt+3 |
| Green Marker | Alt+4 |
| Cyan Marker | Alt+5 |
| Blue Marker | Alt+6 |
| Purple Marker | Alt+7 |
| Grey Marker | Alt+8 |
| Select All Clips With the Same Color Mark | Alt+Shift+ |
| Render Preview | Enter |
| Add Audio/Video Keyframes | Alt+Left Click |
| Previous Keyframes | [ |
| Next Keyframes | ] |
| Motion Tracking | Alt+X |
| Color Match | Alt+M |
| Insert | Shift+QI |
| Overwrite | Shift_+O |
| Replace | Alt+Mouse Drag |
| Rename | F2 |
| Reveal in Explorer | Ctrl+Shift+R |
| Apply | Alt+A |
| Quick Split Mode | C |
| Select | V |
| Open Audio Stretch | S |
| Exit Audio Stretch | Shift+S |
| Add to Favorites | Shift+F |
| Adjust the Bezier Curve | Alt+Mouse Drag |
| Split 9 Edited State0 | Shift+Enter |
| Merge Up (Cursor at the beginning of the sentence0 | Backspace |
| Merge down subtitles 9radio or edited state) | Alt+Q |
| Merge selected subtitles (multi-select state | Alt+Q |
| Play/Pause | Space |
| Stop | Ctrl +/ |
| Full Screen/Restore Snapshot | Ctrl+Alt+S |
| Previous Frame /Move Left | Left |
| Next Frame/ More Right | Right |
| Previous Edit Point / Move Up | Up |
| Next Edit Point/ Move Down | Down |
| Go To Next Second | Shift+Right |
| Go to Previous Marker | Shift+Up |
| Go to Next Marker | Shift+Down |
| Go to Project Beginning | Home |
| Go to Project End | End |
| Go to Selected Clip Start | Shift+Home |
| Go to Selected Clip End | Shift+End |
| Zoom In | Ctrl+= |
| Zoom Out | Ctrl+_ |
| Zoom to Fit Timeline | Shift+Z |
| Select Previous | Ctrl+Left |
| Select Next | Ctrl+Right |
| Horizontal Scroll (Timeline) | Alt+Scroll Up/Down |
| Vertical Scroll (Timeline) | Scroll Up/Down |
| Mark In | I |
| Mark Out | O |
| Clear In And Out | Ctrl+Shift+X |
| Add Marker | M |
| Edit Marker | Shift+M |
| Help | F |
| Export | Ctrl+ E |
Conclusion
In the article, you have discovered crucial information about video editing in Filmora. There are some checkpoints that you need to keep in mind before getting into editing. Integrating these checkpoints, there is a consistent need to understand keyboard shortcuts in video editing. This procedure, in particular, helps much in effective video editing.
With the help of the Filmora shortcut video editor, you can make cinematic-level edits to the video. It also integrates several features such as AI Smart Cutout, AI Copywriting, and more. To know more about these useful keyboard shortcuts, this article has surely been of great help.
Also read:
- 2024 Approved Have You Ever Tried DaVinci Resolve for Creating a Motion Blur Effect? Read This Article to Discover How to Use DaVinci Resolve Motion Blur with the Help of Detailed Instructions
- Easy Ways to Remove Motion Blur In Photoshop
- Updated How to Use LUTs Perfectly in Final Cut Pro
- 2024 Approved Color Lut in Video - Color Grade Your Video
- In 2024, Control Playback Speed in Premiere Pro
- Updated In 2024, Best Free Slow Motion Apps For Android and iPhone
- Do You Want to Remove the Unnecessary Scene From Your TikTok Video? This Article Will Help You to Adjust the Length of TikTok Clip by Providing Easy Methods for 2024
- New Dubbing Videos With Voiceovers | Using Wondershare Filmora
- In 2024, Want to Make Your Canva Slideshow More Attractive? Follow the Given Discussion to Know Everything About Making the Best Slideshows with Canva
- How to Add Photos to Tik Tok Video for 2024
- Want to Add the Radial Blur Image Effect to Your Photos to Make Them Stand Out? Read on to Find the 11 Best Tools for Creating Stunning Image Editing Projects for 2024
- Updated The Best Laptops For Video Editing
- Updated 2024 Approved Best Free LUTs to Use
- Take Your Video Editing to the Next Level with Video Scopes for 2024
- New Top Applications That Can Help Apply The Best VHS Camera Effect
- Spooky Halloween with the Best 15+ Halloween Countdown Video Clips
- 2024 Approved Here We Are Going to Show You the Best Effects to Appear on Camera Made with Filmora
- Want to Apply a Filter on Your Video Using Your iPhone or Mac? Here Are the Simple Steps to Put Add Filters on iMovie. Find Out a Better iMovie Alternative with More Filters
- In 2024, Create Slow Motion Videos Using Final Cut Pro with Ease
- New How to Build A Video Editing Career for 2024
- How to Cut Videos on Mac without Using FFmpeg, In 2024
- Boost the Pace of Your Instagram Reels Videos with These Simple Tricks
- 2024 Approved How to Customize Your Loading Text Effect?
- 2024 Approved Getting To Know More About the Video Editing Interface of Wondershare Filmora
- Updated 2024 Approved Funny Content Ideas for YouTube Videos and Funny Music Background
- Updated Splice App for Android - Guide to Download & Use
- New 2024 Approved Blender - A Video Editor for Every Professional
- In 2024, Understanding the Dynamics Underlying in AI Slow Motion Editing
- How to Create Intro Video with Filmora
- New Easily Combine Videos and Audios with 5 Simple Online Tools for 2024
- Updated In 2024, Everything That You Need to Know About Video Montages- Ideas, Techniques, and Software
- In 2024, Catch or Beat Sleeping Snorlax on Pokemon Go For Google Pixel 7a | Dr.fone
- How to Reset Tecno Spark 10 Pro Without the Home Button | Dr.fone
- Unlocking an iCloud Locked iPad and iPhone 11 Pro Max
- The way to recover deleted photos on Gionee F3 Pro without backup.
- In 2024, 3 Ways to Unlock Your Apple iPhone 14 Pro for Free
- How to Fix Unfortunately, Contacts Has Stopped Error on Honor Magic 6 Pro | Dr.fone
- Top IMEI Unlokers for Apple iPhone 7 Plus and Android Phones
- In 2024, How to Watch Hulu Outside US On Oppo Find X7 Ultra | Dr.fone
- In 2024, Guide to Mirror Your Tecno Pova 5 Pro to Other Android devices | Dr.fone
- Everything You Need to Know about Lock Screen Settings on your Vivo Y02T
- In 2024, How Do I SIM Unlock My Apple iPhone 7?
- Fixing Foneazy MockGo Not Working On Apple iPhone 15 Plus | Dr.fone
- Title: How to Achieve GoPro Slow Motion With Quality for 2024
- Author: Chloe
- Created at : 2024-05-20 03:38:32
- Updated at : 2024-05-21 03:38:32
- Link: https://ai-editing-video.techidaily.com/how-to-achieve-gopro-slow-motion-with-quality-for-2024/
- License: This work is licensed under CC BY-NC-SA 4.0.
