:max_bytes(150000):strip_icc():format(webp)/GettyImages-944229088-5bd1f61e46e0fb0026fdf2f0.jpg)
How to Add a Green Screen to Zoom for 2024

How to Add a Green Screen to Zoom
If you are a regular user of Zoom app because you have to attend meetings and video conferences every now and then, you should know how to create a green screen for Zoom calls. There are going to be times when you would not want to show what is in your background because it might look distracting. Besides, changing the background from time to time breaks the monotony of your Zoom calls.
Zoom app allows you to change your background and set any available virtual background. However, the effect of virtual background may not be accurate and smooth unless you have a uniform background color. If you use green screen background for Zoom, you can replace it with any virtual background that will look very realistic to your audiences. We will illustrate how to create a green screen background for Zoom.
Part 1. How to add green screen to Zoom on computer?
Regular Zoom users prefer arranging and attending video conferences from their computers. Zoom desktop app makes it more convenient to attend Zoom conference with a wider screen and better visibility. Make sure you have a uniform green screen in your background before attending Zoom call so that you can replace it with any available virtual background on Zoom. Here are the steps on how to create a green screen for Zoom app on your computer.
Step1Open Zoom app and make sure you are logged into your account. Adjust the webcam so that only you and your green screen should be visible in the frame.
Step2Click on Settings (gear icon) located in the top-right corner.
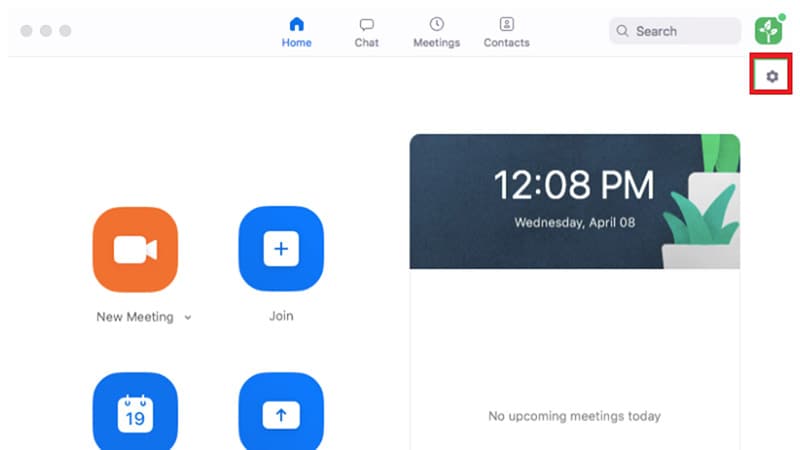
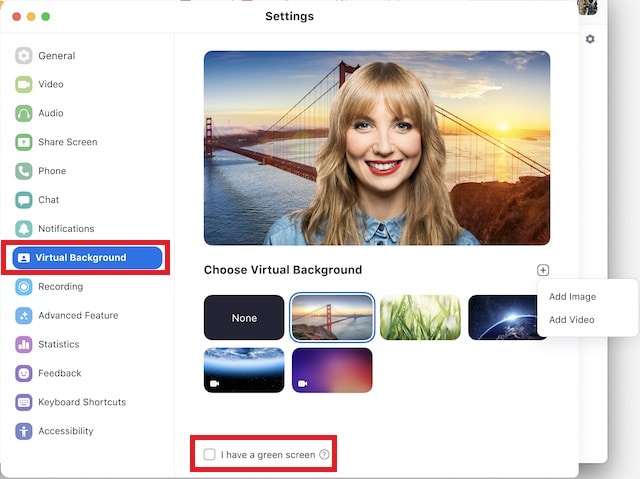
Step3Once Settings window opens, click on Virtual background option on the left panel.
Step4Turn on the option “I have a green screen” located at the bottom. Thereafter, choose a virtual background with which you want to replace the green screen in your video.
Step5Apart from the present virtual background, you can add photo or video to replace green screen background.
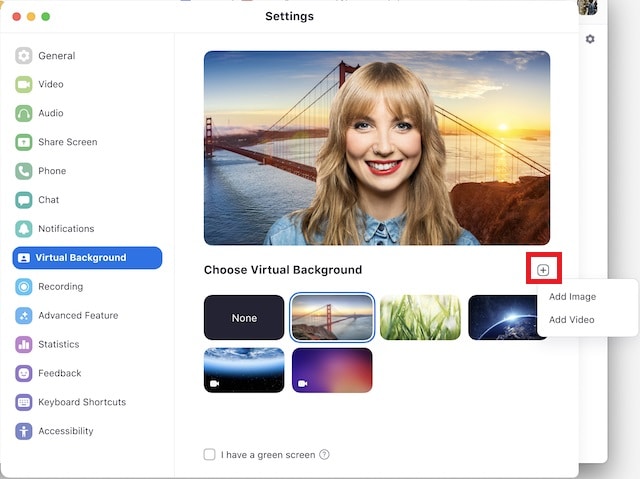
Step6Close Settings window and you will see that your green screen is replaced by your selected virtual background.
Part 2. How to add green screen to Zoom on mobile?
If you are an occasional Zoom user, you are more likely to use your smartphone to attend Zoom conferences. If you want green screen effect on your Zoom call, make sure you have a sizeable green screen in your background. This is because even if you happen to move your phone during the meeting, green screen background should come in the video frame all the time.
It is recommended to use a tripod to keep your smartphone fixed in one spot for better and consistent green screen effect. Here are the steps to answer your question how do you add a green screen to Zoom app on your mobile phone. The steps are the same for Android and iOS users.
Step1Open Zoom app on your smartphone and make sure you are signed into your account.
Step2Start a Zoom meeting and tap on More option located in the bottom-right corner.

Step3Tap on Virtual background and you can select any preset virtual background.
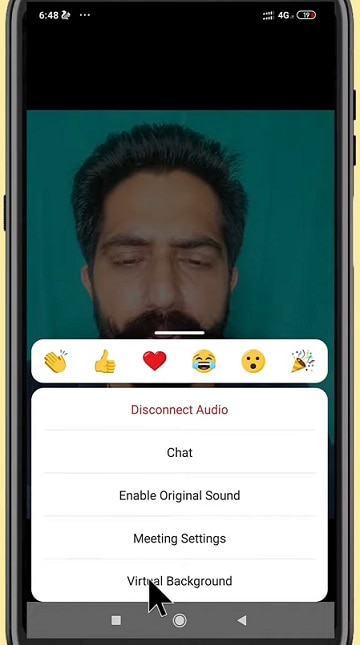
Step4If you want to replace green screen with a customized background, tap on “+” icon and select any photo or video from your phone.
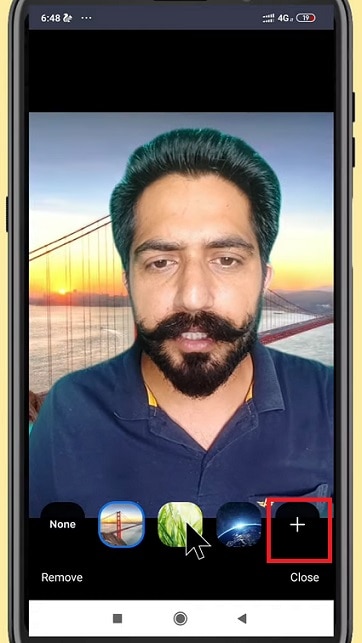
Step5Tap on Close option and the selected virtual background will be applied to your Zoom video.
Part 3. Tips to use green screen on Zoom video
Here are some important tips to use green screen on Zoom video for a better outcome.
Buy Large Green Screen - Since you are going to invest in buying green screen, you should buy a large green screen instead of buying two. Firstly, when you have one large green screen, you can set it up without any wrinkles or overlaps.
Secondly, a large green screen means greater surface area, and even when you slightly change the angle of your camera, your background will still have green screen instead of the exterior wall showing up and ruining virtual background effect.
Buy Green Screen Stand - Along with green screen, you should buy a sizeable green screen stand. A regular green screen stand contains two vertical supports at both ends and one horizontal support where you hand the green screen.
You can buy it according to the size of green screen you have bought. And you need to buy stand because you cannot fix the green screen on the wall properly. If you use any other means, there are going to be wrinkles and uneven virtual background effect.
Green Screen Quality - You can purchase any shade of green screen, but we recommend you opt for vibrant green color for a better outcome. Most importantly, the color should be even across the surface, and there should not be light and dark patches to dampen the virtual background effect and make it look unrealistic. That is why you should not compromise with quality.
Avoid Green Objects - You should not wear anything green. If your green screen has a lighter shade, you can wear deep color dresses and vice versa. Most importantly, you should not keep anything that is green while attending Zoom attending as it will disturb the green screen effect and it will look embarrassing. If you need to keep any green objects in your Zoom meetings, you should have blue screen instead of green screen.
Focus On Lighting - Lighting is extremely important when you want to use green screen. You should place the light so that it spreads evenly across the green screen. Otherwise, there are going to be light and dark patches, and the effect can get disturbed. Make sure you do not cast any shadow on the green screen by positioning the green screen accordingly.
Select A Proper Background - Last but not least, when you change your green screen to any virtual background photo or video, make sure you keep your audiences in mind. If you are attending a meeting, you should keep a professional-looking background. The background should not be distracting and match the theme of your meeting.
Conclusion
We have answered your question, “How do you add a green screen to zoom?” You can use green screen on your Zoom desktop app as well as smartphone app. This will help you to make your usual background cover up with green screen and replace green screen with any virtual background. Keep in mind all the tips we have provided you so that the green screen effect is perfect.
Free Download For Win 7 or later(64-bit)
Free Download For macOS 10.14 or later
Top 12 Sony Vegas Slideshow Templates for Free Download
Top 12 Sony Vegas Slideshow Templates for Free Download
An easy yet powerful editor
Numerous effects to choose from
Detailed tutorials provided by the official channel
Sometimes you need a quick and reliable way to add the contents to your favourite social media websites where you have your accounts created for multiple activities, whether it is personal or professional. No matter how much and in what manner you are using them, you always required a full flow of the contents to attract the intended audience. You can make some content right from the scratch in the form of videos, audio, textual, or mostly a mix of them, but at the same time, it needs a lot of time and effort to do so. There is another option for you to make use of professionally demanding and powerful tools to complete your journey of creating the desired level of content in no time. With an option to use pictures, videos, or texts, for your presentations these Sony Vegas template slideshow options can let you ease your creation process.

In this article
01 [What is Sony Vegas & What are Its Advantages?](#Part 1)
02 [Best 12 Sony Vegas Slideshow Templates for Free Download](#Part 2)
03 [FAQ of Sony Vegas Slideshow Templates](#Part 3)
Part 1 What is Sony Vegas & What are Its Advantages?
The Sony Vegas is one of the most interesting and professional video editing tools that can be utilized for a wide range of activities like the creation of an amazing video on YouTube and making use of the same for uploading desired content to relevant social media accounts with preformatted information.
Sometimes creators need a quick and reliable tool to easily get away with the desired level of content sharing on different social media accounts in just a few clicks. This is where templates play a vital role. Whether it is about your need of creating or adding content for YouTube or just want to post something new and relevant for your audience on the Facebook wall, you will find Sony Vegas Template Slideshow ever amazing.
Here is the list of 12 amazing Sony Vegas Slideshow templates for free to download & use with only a few demands subscription for full access.
Part 2 Best 12 Sony Vegas Slideshow Templates for Free Download

01Title Slides
In case you are searching for the best possible and premium level of Sony-Vegas title templates then you are at the right place. Title Slides is the most amazing template with duration of around 40 seconds but you will never be going to use all of those. The title slides give title animations in the form of an intro for creating attractive videos. At the same time, you can make use of various seconds to give a detailed overview of the main titles to get mentioned inside the intended video. To get full-access, you need to buy this template from the creator’s website.
02Swift Slideshow
The 2nd template on the list of Sony-Vegas templates is also among the paid ones but worth every single penny because this can give you totally different yet professional look. In terms of slideshow and text overlay, one can make use of this in terms of a header for the website or your social media account to post an ad for the desired product/service you are offering or want to offer. It is also very simple to edit this template in terms of changing images, text or videos.
03Glitch Intro
Among the list of Sony Vegas Slideshow Templates, Glitch Intro is the free template and also the coolest one which can be utilized for creating videos on the YouTube or various other platforms. In the Glitch formation of template, you will see a text appears &disappears in quick succession with the background keeps on flickering just behind. You are just required to change the text as per your convenience to write name of your channel, program, episode, or anything else as per your needs. There is also an option to change the colour. For the light & casual videos you can make use of Glitch Intro template.

04Minimal-Motion Graphic Logo Revealing Template
You are going to love this intro template from the list of Sony Vegas Premium Templates because of its swiftness and gives you professional looks in no time. You just need to download it & then it is ready to use it without any over colouring or disturbance. With lots of features this must be in your Sony Vegas Slideshow Templates to Free Download.
05Sony Vegas Pro-Intro Template
This is a top-level Sony Vegas Template but you need slightly more time to come-up nicely with this template but the result will be completely awesome. This template contains two colors and with its USP of elementary motion you will surely put this in your top 5 list of templates for strange features.
06SVP11 +
When it comes to professionalism, then SVP11+ is the pro one. With bold & authentic features, you can make use of it for different varieties of purposes. Also, using it in between the segments will add to the credibility of your video. In just 3-4 seconds you will be able to put text information in an animated form.
07Modern-Juicy Outro Template
Versatile in nature, the Modern Juicy is an Outro template for any purpose, although it is made entirely for the You Tubers, but in case you have a profile of a channel on other platforms also, you can easily use it
08SVFX Outro Template
SVFX is basically a channel on a YouTube platform that creates many amazing Sony Vegas templates and SVFX outro template is one of those. Simply add this template at the end of your YouTube, or Facebook video, then it’s done you are ready to experience the change in appearance. One can easily change text, audio, and graphics for your videos in different social media accounts.
09The Sony Vegas Outro Template
This one is yet another outro template on the list of Sony Vegas Slideshow Template Free. You can easily download it at no cost and you will also get a description about how to use this template in terms of preview. Without changing anything, just add credentials of yours and then you are good to go with publishing.
10Lower Thirds Pack
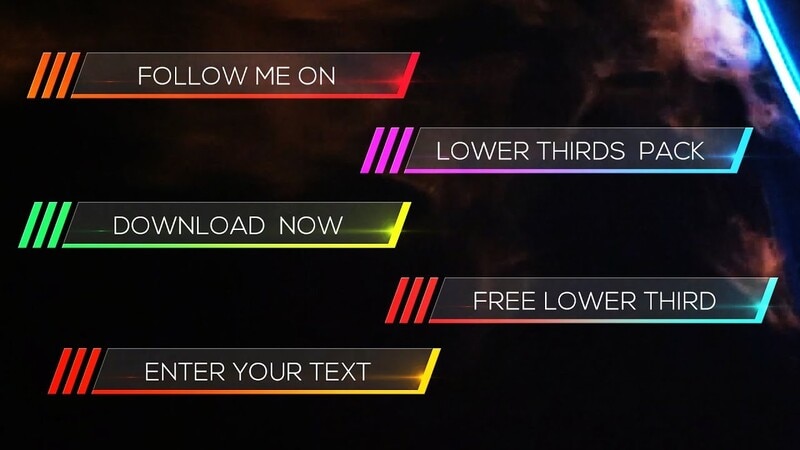
When it comes to the task of creating lower-thirds then among the creators this is very hectic task to face. In terms of professionalism they take so much time to give a unique look together with an animation to come-in & out of any video. But don’t worry; this lower third template pack by Sony Vegas is easy on its mission. With great combination of colours and other textual information, this is just amazing to use.
11Text Promo
In case you want to impress the audience in a quick manner then just choose this reliable and dynamic template. Text Promo is very fast and comes with unique designing features to perfectly suit lifestyle &travel videos. Although paid, but it comes with an ability to easily customize as per the needs & comfort. You will get option to change colors, text, and images with addition of newer effects to give it a professional look.
12Modern Slideshow Template
Yet another slideshow template from Sony Vegas that is free to download and mainly utilized for videos & pictures. Just add the videos in the box provided and get all your dimensions easily fit inside the given boxes. When it comes to creating a unique presentation for your product or service then has it to save time and efforts.
Is There Any Alternative to Sony Vegas Templates?
If you are finding a great alternative option to Sony Vegas then Filmora should be on your list. With exact same features to the Sony Vegas is it easy to use and comes with user-friendly interface. If you don’t have any experience in terms of video editing then Wondershare Filmora Video Editor is a good option to consider.
For Win 7 or later (64-bit)
For macOS 10.12 or later
The template mode can provide you pre-created format to help you easily build professional videos in no time without any experience. This usually comes with wide range of explanation videos in order to showcase how to use any particular template.
No Doubt Filmora is an ideal choice for the creation of pro-videos in few minutes and in its library, you can easily find varieties of intros, outros, promos, slideshows, and animation with endless effects.
Part 3 FAQ of Sony Vegas Slideshow Templates

Is Sony Vegas Is Available To Use Without A Watermark?
In case of free version of the Sony Vegas, you will get a watermark attached to your videos, just after exporting them. If you want to remove the watermark, then you can purchase a pro version to just remove it easily or get watermark-free videos.
How to Edit Text in Any Sony Vegas Template?
The editing text feature to use at any template is very easy. You just required to move ahead at Media Generator tab & here just click on the text, you will see a ‘pop-up’ window will appear in front for editing desired text. With the same steps you can change color, size, font etc. as and when required.
● Ending Thoughts →
● The Sony Vegas templates are quite useful and give a handy solution for addition of intro, outro, and other relevant elements in just a few minutes.
● Even if you are not a professional video editing expert, the templates can do their job easily with its end results are just astonishing.
● It is sometimes recommended for you to go for the Filmora App to edit the contents much faster over the other apps for the templates making. With Filmora, there is no need to feel disappointed as you are getting some wonderful end results in the form of amazing videos.
Sometimes you need a quick and reliable way to add the contents to your favourite social media websites where you have your accounts created for multiple activities, whether it is personal or professional. No matter how much and in what manner you are using them, you always required a full flow of the contents to attract the intended audience. You can make some content right from the scratch in the form of videos, audio, textual, or mostly a mix of them, but at the same time, it needs a lot of time and effort to do so. There is another option for you to make use of professionally demanding and powerful tools to complete your journey of creating the desired level of content in no time. With an option to use pictures, videos, or texts, for your presentations these Sony Vegas template slideshow options can let you ease your creation process.

In this article
01 [What is Sony Vegas & What are Its Advantages?](#Part 1)
02 [Best 12 Sony Vegas Slideshow Templates for Free Download](#Part 2)
03 [FAQ of Sony Vegas Slideshow Templates](#Part 3)
Part 1 What is Sony Vegas & What are Its Advantages?

The Sony Vegas is one of the most interesting and professional video editing tools that can be utilized for a wide range of activities like the creation of an amazing video on YouTube and making use of the same for uploading desired content to relevant social media accounts with preformatted information.
Sometimes creators need a quick and reliable tool to easily get away with the desired level of content sharing on different social media accounts in just a few clicks. This is where templates play a vital role. Whether it is about your need of creating or adding content for YouTube or just want to post something new and relevant for your audience on the Facebook wall, you will find Sony Vegas Template Slideshow ever amazing.
Here is the list of 12 amazing Sony Vegas Slideshow templates for free to download & use with only a few demands subscription for full access.
Part 2 Best 12 Sony Vegas Slideshow Templates for Free Download

01Title Slides
In case you are searching for the best possible and premium level of Sony-Vegas title templates then you are at the right place. Title Slides is the most amazing template with duration of around 40 seconds but you will never be going to use all of those. The title slides give title animations in the form of an intro for creating attractive videos. At the same time, you can make use of various seconds to give a detailed overview of the main titles to get mentioned inside the intended video. To get full-access, you need to buy this template from the creator’s website.
02Swift Slideshow
The 2nd template on the list of Sony-Vegas templates is also among the paid ones but worth every single penny because this can give you totally different yet professional look. In terms of slideshow and text overlay, one can make use of this in terms of a header for the website or your social media account to post an ad for the desired product/service you are offering or want to offer. It is also very simple to edit this template in terms of changing images, text or videos.
03Glitch Intro
Among the list of Sony Vegas Slideshow Templates, Glitch Intro is the free template and also the coolest one which can be utilized for creating videos on the YouTube or various other platforms. In the Glitch formation of template, you will see a text appears &disappears in quick succession with the background keeps on flickering just behind. You are just required to change the text as per your convenience to write name of your channel, program, episode, or anything else as per your needs. There is also an option to change the colour. For the light & casual videos you can make use of Glitch Intro template.

04Minimal-Motion Graphic Logo Revealing Template
You are going to love this intro template from the list of Sony Vegas Premium Templates because of its swiftness and gives you professional looks in no time. You just need to download it & then it is ready to use it without any over colouring or disturbance. With lots of features this must be in your Sony Vegas Slideshow Templates to Free Download.
05Sony Vegas Pro-Intro Template
This is a top-level Sony Vegas Template but you need slightly more time to come-up nicely with this template but the result will be completely awesome. This template contains two colors and with its USP of elementary motion you will surely put this in your top 5 list of templates for strange features.
06SVP11 +
When it comes to professionalism, then SVP11+ is the pro one. With bold & authentic features, you can make use of it for different varieties of purposes. Also, using it in between the segments will add to the credibility of your video. In just 3-4 seconds you will be able to put text information in an animated form.
07Modern-Juicy Outro Template
Versatile in nature, the Modern Juicy is an Outro template for any purpose, although it is made entirely for the You Tubers, but in case you have a profile of a channel on other platforms also, you can easily use it
08SVFX Outro Template
SVFX is basically a channel on a YouTube platform that creates many amazing Sony Vegas templates and SVFX outro template is one of those. Simply add this template at the end of your YouTube, or Facebook video, then it’s done you are ready to experience the change in appearance. One can easily change text, audio, and graphics for your videos in different social media accounts.
09The Sony Vegas Outro Template
This one is yet another outro template on the list of Sony Vegas Slideshow Template Free. You can easily download it at no cost and you will also get a description about how to use this template in terms of preview. Without changing anything, just add credentials of yours and then you are good to go with publishing.
10Lower Thirds Pack
When it comes to the task of creating lower-thirds then among the creators this is very hectic task to face. In terms of professionalism they take so much time to give a unique look together with an animation to come-in & out of any video. But don’t worry; this lower third template pack by Sony Vegas is easy on its mission. With great combination of colours and other textual information, this is just amazing to use.
11Text Promo
In case you want to impress the audience in a quick manner then just choose this reliable and dynamic template. Text Promo is very fast and comes with unique designing features to perfectly suit lifestyle &travel videos. Although paid, but it comes with an ability to easily customize as per the needs & comfort. You will get option to change colors, text, and images with addition of newer effects to give it a professional look.
12Modern Slideshow Template
Yet another slideshow template from Sony Vegas that is free to download and mainly utilized for videos & pictures. Just add the videos in the box provided and get all your dimensions easily fit inside the given boxes. When it comes to creating a unique presentation for your product or service then has it to save time and efforts.

Is There Any Alternative to Sony Vegas Templates?
If you are finding a great alternative option to Sony Vegas then Filmora should be on your list. With exact same features to the Sony Vegas is it easy to use and comes with user-friendly interface. If you don’t have any experience in terms of video editing then Wondershare Filmora Video Editor is a good option to consider.
For Win 7 or later (64-bit)
For macOS 10.12 or later
The template mode can provide you pre-created format to help you easily build professional videos in no time without any experience. This usually comes with wide range of explanation videos in order to showcase how to use any particular template.
No Doubt Filmora is an ideal choice for the creation of pro-videos in few minutes and in its library, you can easily find varieties of intros, outros, promos, slideshows, and animation with endless effects.
Part 3 FAQ of Sony Vegas Slideshow Templates

Is Sony Vegas Is Available To Use Without A Watermark?
In case of free version of the Sony Vegas, you will get a watermark attached to your videos, just after exporting them. If you want to remove the watermark, then you can purchase a pro version to just remove it easily or get watermark-free videos.
How to Edit Text in Any Sony Vegas Template?
The editing text feature to use at any template is very easy. You just required to move ahead at Media Generator tab & here just click on the text, you will see a ‘pop-up’ window will appear in front for editing desired text. With the same steps you can change color, size, font etc. as and when required.
● Ending Thoughts →
● The Sony Vegas templates are quite useful and give a handy solution for addition of intro, outro, and other relevant elements in just a few minutes.
● Even if you are not a professional video editing expert, the templates can do their job easily with its end results are just astonishing.
● It is sometimes recommended for you to go for the Filmora App to edit the contents much faster over the other apps for the templates making. With Filmora, there is no need to feel disappointed as you are getting some wonderful end results in the form of amazing videos.
Sometimes you need a quick and reliable way to add the contents to your favourite social media websites where you have your accounts created for multiple activities, whether it is personal or professional. No matter how much and in what manner you are using them, you always required a full flow of the contents to attract the intended audience. You can make some content right from the scratch in the form of videos, audio, textual, or mostly a mix of them, but at the same time, it needs a lot of time and effort to do so. There is another option for you to make use of professionally demanding and powerful tools to complete your journey of creating the desired level of content in no time. With an option to use pictures, videos, or texts, for your presentations these Sony Vegas template slideshow options can let you ease your creation process.

In this article
01 [What is Sony Vegas & What are Its Advantages?](#Part 1)
02 [Best 12 Sony Vegas Slideshow Templates for Free Download](#Part 2)
03 [FAQ of Sony Vegas Slideshow Templates](#Part 3)
Part 1 What is Sony Vegas & What are Its Advantages?

The Sony Vegas is one of the most interesting and professional video editing tools that can be utilized for a wide range of activities like the creation of an amazing video on YouTube and making use of the same for uploading desired content to relevant social media accounts with preformatted information.
Sometimes creators need a quick and reliable tool to easily get away with the desired level of content sharing on different social media accounts in just a few clicks. This is where templates play a vital role. Whether it is about your need of creating or adding content for YouTube or just want to post something new and relevant for your audience on the Facebook wall, you will find Sony Vegas Template Slideshow ever amazing.
Here is the list of 12 amazing Sony Vegas Slideshow templates for free to download & use with only a few demands subscription for full access.
Part 2 Best 12 Sony Vegas Slideshow Templates for Free Download

01Title Slides
In case you are searching for the best possible and premium level of Sony-Vegas title templates then you are at the right place. Title Slides is the most amazing template with duration of around 40 seconds but you will never be going to use all of those. The title slides give title animations in the form of an intro for creating attractive videos. At the same time, you can make use of various seconds to give a detailed overview of the main titles to get mentioned inside the intended video. To get full-access, you need to buy this template from the creator’s website.
02Swift Slideshow
The 2nd template on the list of Sony-Vegas templates is also among the paid ones but worth every single penny because this can give you totally different yet professional look. In terms of slideshow and text overlay, one can make use of this in terms of a header for the website or your social media account to post an ad for the desired product/service you are offering or want to offer. It is also very simple to edit this template in terms of changing images, text or videos.
03Glitch Intro
Among the list of Sony Vegas Slideshow Templates, Glitch Intro is the free template and also the coolest one which can be utilized for creating videos on the YouTube or various other platforms. In the Glitch formation of template, you will see a text appears &disappears in quick succession with the background keeps on flickering just behind. You are just required to change the text as per your convenience to write name of your channel, program, episode, or anything else as per your needs. There is also an option to change the colour. For the light & casual videos you can make use of Glitch Intro template.

04Minimal-Motion Graphic Logo Revealing Template
You are going to love this intro template from the list of Sony Vegas Premium Templates because of its swiftness and gives you professional looks in no time. You just need to download it & then it is ready to use it without any over colouring or disturbance. With lots of features this must be in your Sony Vegas Slideshow Templates to Free Download.
05Sony Vegas Pro-Intro Template
This is a top-level Sony Vegas Template but you need slightly more time to come-up nicely with this template but the result will be completely awesome. This template contains two colors and with its USP of elementary motion you will surely put this in your top 5 list of templates for strange features.
06SVP11 +
When it comes to professionalism, then SVP11+ is the pro one. With bold & authentic features, you can make use of it for different varieties of purposes. Also, using it in between the segments will add to the credibility of your video. In just 3-4 seconds you will be able to put text information in an animated form.
07Modern-Juicy Outro Template
Versatile in nature, the Modern Juicy is an Outro template for any purpose, although it is made entirely for the You Tubers, but in case you have a profile of a channel on other platforms also, you can easily use it
08SVFX Outro Template
SVFX is basically a channel on a YouTube platform that creates many amazing Sony Vegas templates and SVFX outro template is one of those. Simply add this template at the end of your YouTube, or Facebook video, then it’s done you are ready to experience the change in appearance. One can easily change text, audio, and graphics for your videos in different social media accounts.
09The Sony Vegas Outro Template
This one is yet another outro template on the list of Sony Vegas Slideshow Template Free. You can easily download it at no cost and you will also get a description about how to use this template in terms of preview. Without changing anything, just add credentials of yours and then you are good to go with publishing.
10Lower Thirds Pack
When it comes to the task of creating lower-thirds then among the creators this is very hectic task to face. In terms of professionalism they take so much time to give a unique look together with an animation to come-in & out of any video. But don’t worry; this lower third template pack by Sony Vegas is easy on its mission. With great combination of colours and other textual information, this is just amazing to use.
11Text Promo
In case you want to impress the audience in a quick manner then just choose this reliable and dynamic template. Text Promo is very fast and comes with unique designing features to perfectly suit lifestyle &travel videos. Although paid, but it comes with an ability to easily customize as per the needs & comfort. You will get option to change colors, text, and images with addition of newer effects to give it a professional look.
12Modern Slideshow Template
Yet another slideshow template from Sony Vegas that is free to download and mainly utilized for videos & pictures. Just add the videos in the box provided and get all your dimensions easily fit inside the given boxes. When it comes to creating a unique presentation for your product or service then has it to save time and efforts.

Is There Any Alternative to Sony Vegas Templates?
If you are finding a great alternative option to Sony Vegas then Filmora should be on your list. With exact same features to the Sony Vegas is it easy to use and comes with user-friendly interface. If you don’t have any experience in terms of video editing then Wondershare Filmora Video Editor is a good option to consider.
For Win 7 or later (64-bit)
For macOS 10.12 or later
The template mode can provide you pre-created format to help you easily build professional videos in no time without any experience. This usually comes with wide range of explanation videos in order to showcase how to use any particular template.
No Doubt Filmora is an ideal choice for the creation of pro-videos in few minutes and in its library, you can easily find varieties of intros, outros, promos, slideshows, and animation with endless effects.
Part 3 FAQ of Sony Vegas Slideshow Templates

Is Sony Vegas Is Available To Use Without A Watermark?
In case of free version of the Sony Vegas, you will get a watermark attached to your videos, just after exporting them. If you want to remove the watermark, then you can purchase a pro version to just remove it easily or get watermark-free videos.
How to Edit Text in Any Sony Vegas Template?
The editing text feature to use at any template is very easy. You just required to move ahead at Media Generator tab & here just click on the text, you will see a ‘pop-up’ window will appear in front for editing desired text. With the same steps you can change color, size, font etc. as and when required.
● Ending Thoughts →
● The Sony Vegas templates are quite useful and give a handy solution for addition of intro, outro, and other relevant elements in just a few minutes.
● Even if you are not a professional video editing expert, the templates can do their job easily with its end results are just astonishing.
● It is sometimes recommended for you to go for the Filmora App to edit the contents much faster over the other apps for the templates making. With Filmora, there is no need to feel disappointed as you are getting some wonderful end results in the form of amazing videos.
Sometimes you need a quick and reliable way to add the contents to your favourite social media websites where you have your accounts created for multiple activities, whether it is personal or professional. No matter how much and in what manner you are using them, you always required a full flow of the contents to attract the intended audience. You can make some content right from the scratch in the form of videos, audio, textual, or mostly a mix of them, but at the same time, it needs a lot of time and effort to do so. There is another option for you to make use of professionally demanding and powerful tools to complete your journey of creating the desired level of content in no time. With an option to use pictures, videos, or texts, for your presentations these Sony Vegas template slideshow options can let you ease your creation process.

In this article
01 [What is Sony Vegas & What are Its Advantages?](#Part 1)
02 [Best 12 Sony Vegas Slideshow Templates for Free Download](#Part 2)
03 [FAQ of Sony Vegas Slideshow Templates](#Part 3)
Part 1 What is Sony Vegas & What are Its Advantages?

The Sony Vegas is one of the most interesting and professional video editing tools that can be utilized for a wide range of activities like the creation of an amazing video on YouTube and making use of the same for uploading desired content to relevant social media accounts with preformatted information.
Sometimes creators need a quick and reliable tool to easily get away with the desired level of content sharing on different social media accounts in just a few clicks. This is where templates play a vital role. Whether it is about your need of creating or adding content for YouTube or just want to post something new and relevant for your audience on the Facebook wall, you will find Sony Vegas Template Slideshow ever amazing.
Here is the list of 12 amazing Sony Vegas Slideshow templates for free to download & use with only a few demands subscription for full access.
Part 2 Best 12 Sony Vegas Slideshow Templates for Free Download

01Title Slides
In case you are searching for the best possible and premium level of Sony-Vegas title templates then you are at the right place. Title Slides is the most amazing template with duration of around 40 seconds but you will never be going to use all of those. The title slides give title animations in the form of an intro for creating attractive videos. At the same time, you can make use of various seconds to give a detailed overview of the main titles to get mentioned inside the intended video. To get full-access, you need to buy this template from the creator’s website.
02Swift Slideshow
The 2nd template on the list of Sony-Vegas templates is also among the paid ones but worth every single penny because this can give you totally different yet professional look. In terms of slideshow and text overlay, one can make use of this in terms of a header for the website or your social media account to post an ad for the desired product/service you are offering or want to offer. It is also very simple to edit this template in terms of changing images, text or videos.
03Glitch Intro
Among the list of Sony Vegas Slideshow Templates, Glitch Intro is the free template and also the coolest one which can be utilized for creating videos on the YouTube or various other platforms. In the Glitch formation of template, you will see a text appears &disappears in quick succession with the background keeps on flickering just behind. You are just required to change the text as per your convenience to write name of your channel, program, episode, or anything else as per your needs. There is also an option to change the colour. For the light & casual videos you can make use of Glitch Intro template.

04Minimal-Motion Graphic Logo Revealing Template
You are going to love this intro template from the list of Sony Vegas Premium Templates because of its swiftness and gives you professional looks in no time. You just need to download it & then it is ready to use it without any over colouring or disturbance. With lots of features this must be in your Sony Vegas Slideshow Templates to Free Download.
05Sony Vegas Pro-Intro Template
This is a top-level Sony Vegas Template but you need slightly more time to come-up nicely with this template but the result will be completely awesome. This template contains two colors and with its USP of elementary motion you will surely put this in your top 5 list of templates for strange features.
06SVP11 +
When it comes to professionalism, then SVP11+ is the pro one. With bold & authentic features, you can make use of it for different varieties of purposes. Also, using it in between the segments will add to the credibility of your video. In just 3-4 seconds you will be able to put text information in an animated form.
07Modern-Juicy Outro Template
Versatile in nature, the Modern Juicy is an Outro template for any purpose, although it is made entirely for the You Tubers, but in case you have a profile of a channel on other platforms also, you can easily use it
08SVFX Outro Template
SVFX is basically a channel on a YouTube platform that creates many amazing Sony Vegas templates and SVFX outro template is one of those. Simply add this template at the end of your YouTube, or Facebook video, then it’s done you are ready to experience the change in appearance. One can easily change text, audio, and graphics for your videos in different social media accounts.
09The Sony Vegas Outro Template
This one is yet another outro template on the list of Sony Vegas Slideshow Template Free. You can easily download it at no cost and you will also get a description about how to use this template in terms of preview. Without changing anything, just add credentials of yours and then you are good to go with publishing.
10Lower Thirds Pack
When it comes to the task of creating lower-thirds then among the creators this is very hectic task to face. In terms of professionalism they take so much time to give a unique look together with an animation to come-in & out of any video. But don’t worry; this lower third template pack by Sony Vegas is easy on its mission. With great combination of colours and other textual information, this is just amazing to use.
11Text Promo
In case you want to impress the audience in a quick manner then just choose this reliable and dynamic template. Text Promo is very fast and comes with unique designing features to perfectly suit lifestyle &travel videos. Although paid, but it comes with an ability to easily customize as per the needs & comfort. You will get option to change colors, text, and images with addition of newer effects to give it a professional look.
12Modern Slideshow Template
Yet another slideshow template from Sony Vegas that is free to download and mainly utilized for videos & pictures. Just add the videos in the box provided and get all your dimensions easily fit inside the given boxes. When it comes to creating a unique presentation for your product or service then has it to save time and efforts.

Is There Any Alternative to Sony Vegas Templates?
If you are finding a great alternative option to Sony Vegas then Filmora should be on your list. With exact same features to the Sony Vegas is it easy to use and comes with user-friendly interface. If you don’t have any experience in terms of video editing then Wondershare Filmora Video Editor is a good option to consider.
For Win 7 or later (64-bit)
For macOS 10.12 or later
The template mode can provide you pre-created format to help you easily build professional videos in no time without any experience. This usually comes with wide range of explanation videos in order to showcase how to use any particular template.
No Doubt Filmora is an ideal choice for the creation of pro-videos in few minutes and in its library, you can easily find varieties of intros, outros, promos, slideshows, and animation with endless effects.
Part 3 FAQ of Sony Vegas Slideshow Templates

Is Sony Vegas Is Available To Use Without A Watermark?
In case of free version of the Sony Vegas, you will get a watermark attached to your videos, just after exporting them. If you want to remove the watermark, then you can purchase a pro version to just remove it easily or get watermark-free videos.
How to Edit Text in Any Sony Vegas Template?
The editing text feature to use at any template is very easy. You just required to move ahead at Media Generator tab & here just click on the text, you will see a ‘pop-up’ window will appear in front for editing desired text. With the same steps you can change color, size, font etc. as and when required.
● Ending Thoughts →
● The Sony Vegas templates are quite useful and give a handy solution for addition of intro, outro, and other relevant elements in just a few minutes.
● Even if you are not a professional video editing expert, the templates can do their job easily with its end results are just astonishing.
● It is sometimes recommended for you to go for the Filmora App to edit the contents much faster over the other apps for the templates making. With Filmora, there is no need to feel disappointed as you are getting some wonderful end results in the form of amazing videos.
Step by Step to Cut Videos in Adobe Premiere Pro
Video editing is an essential skill in a world that has a growing focus on creative fields. And if you work with videos, knowing which clips to use and where to cut is essential in conveying your story and increasing its impact. So, if you are a beginner and want to familiarise yourself with steps and terms used in video editing, in this article, we will go through the steps you will need to cut your video file in Adobe Premiere Pro and Wondershare Filmora.
This guide uses Adobe Premiere Pro 2022 and Wondershare Filmora X.
How to cut video in Adobe Premiere Pro?
Once you have Adobe Premiere Pro open on your computer, follow the steps listed below.
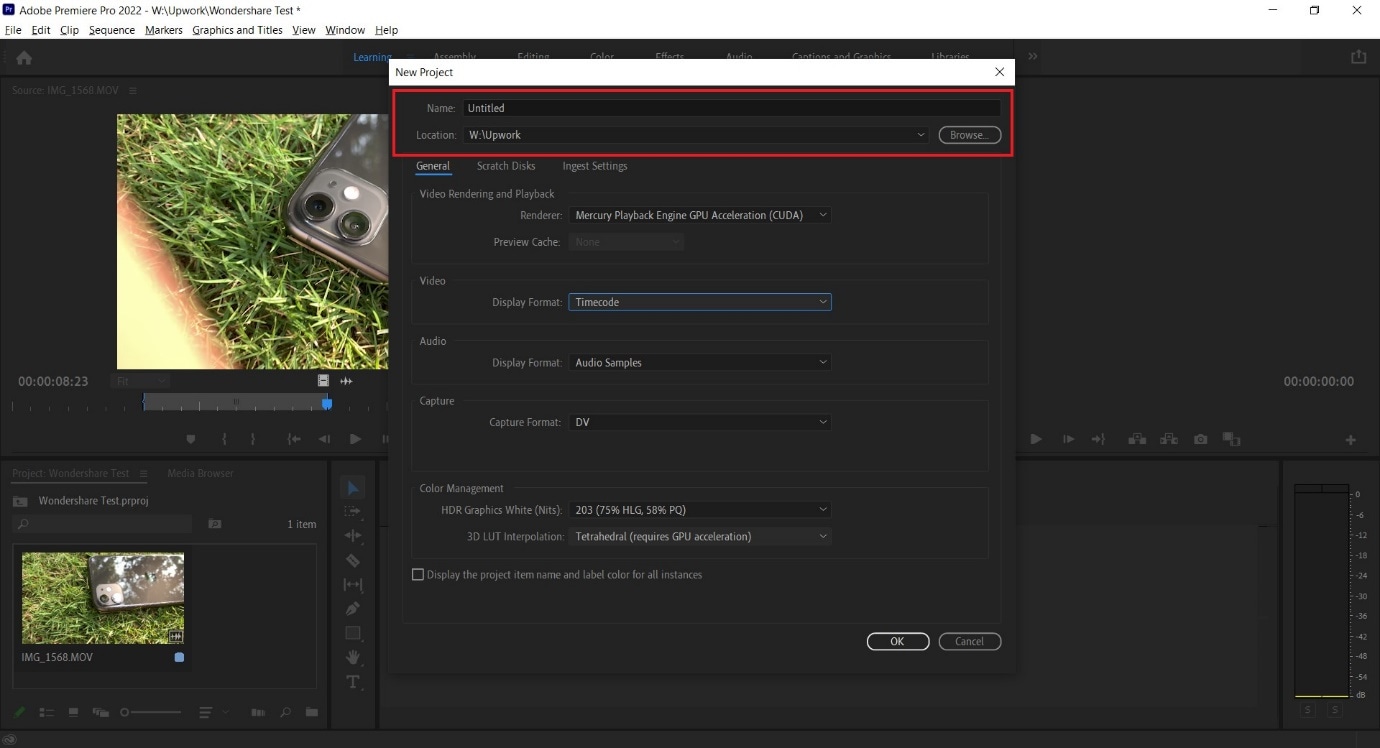
Step 1: Create a new project in Premiere Pro.
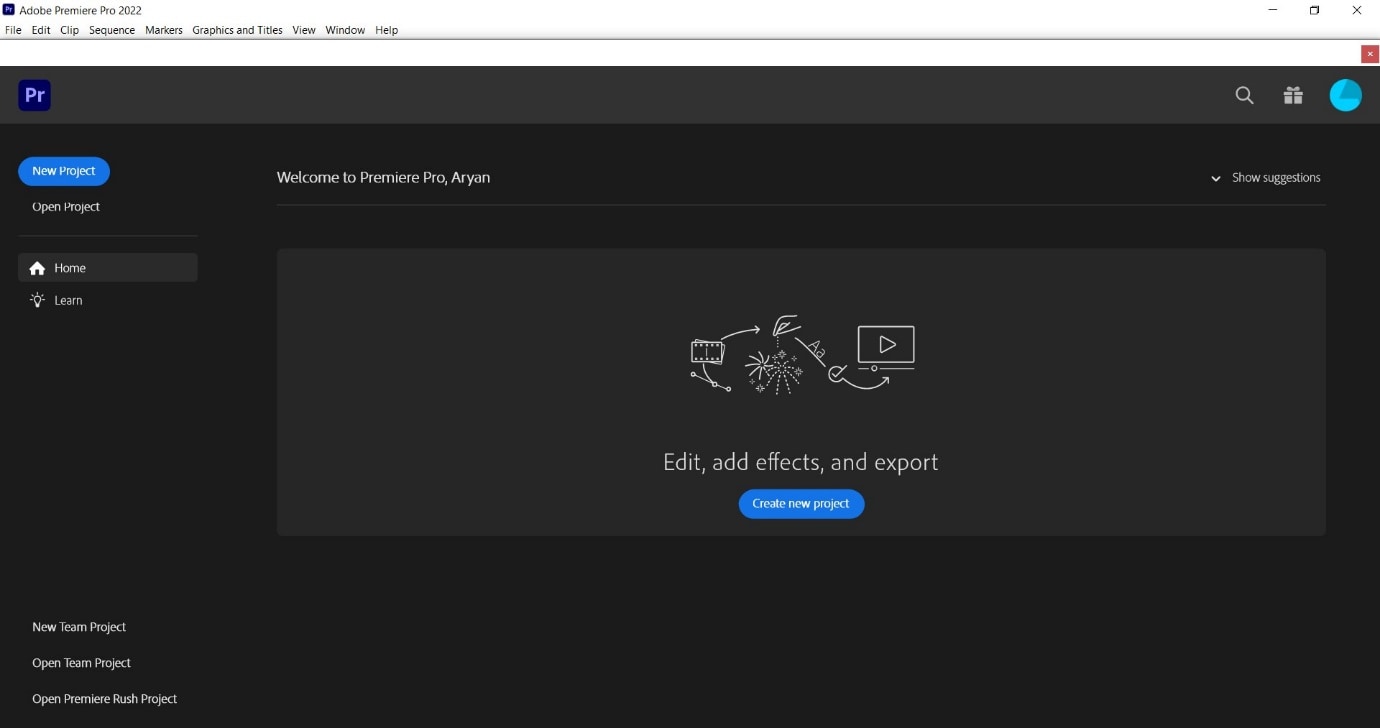
During project creation, we recommend keeping an eye on the file name set and the storage location; this can help reduce the time spent in locating the Premiere Project.
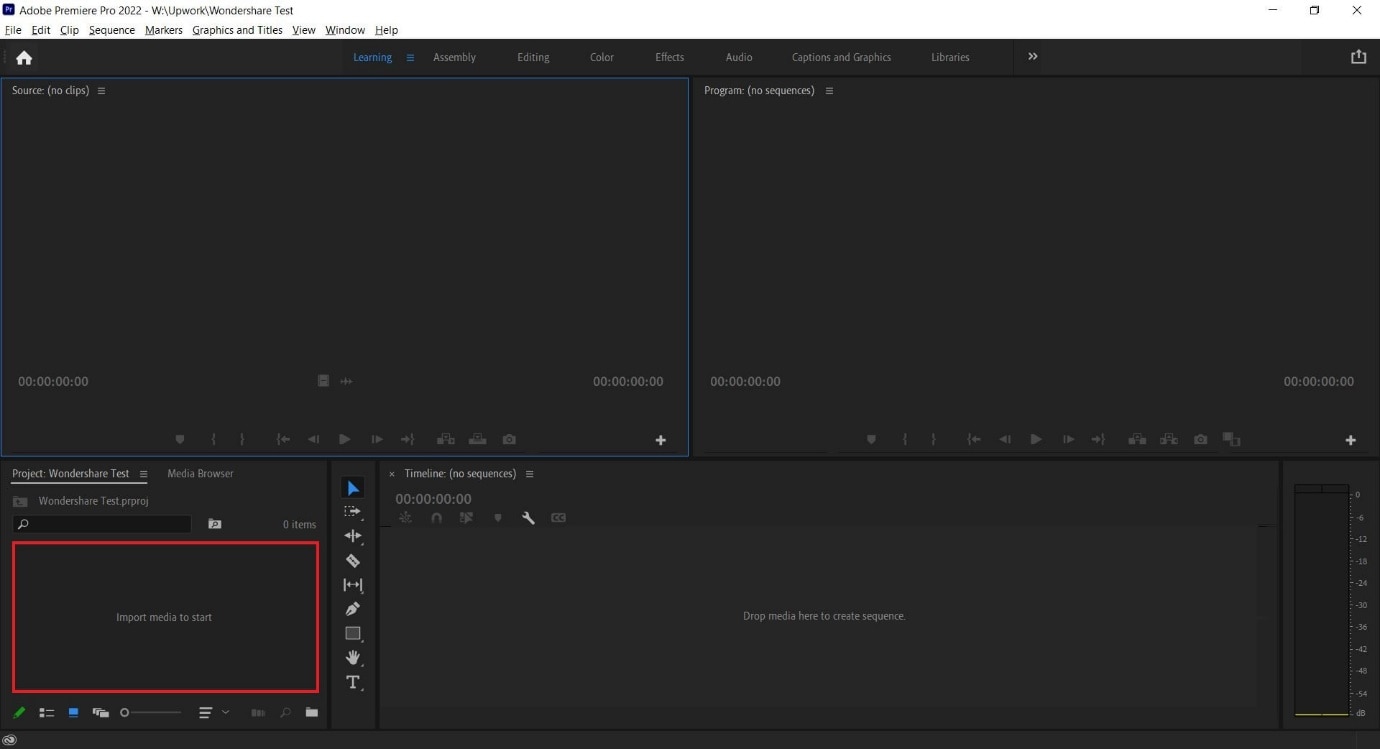
Step 2: Import a video file into Premiere Pro with a double click in the marked area and choose the file from its stored location.
Step 3: Double click on any imported media to activate it and send it to the Source Window.
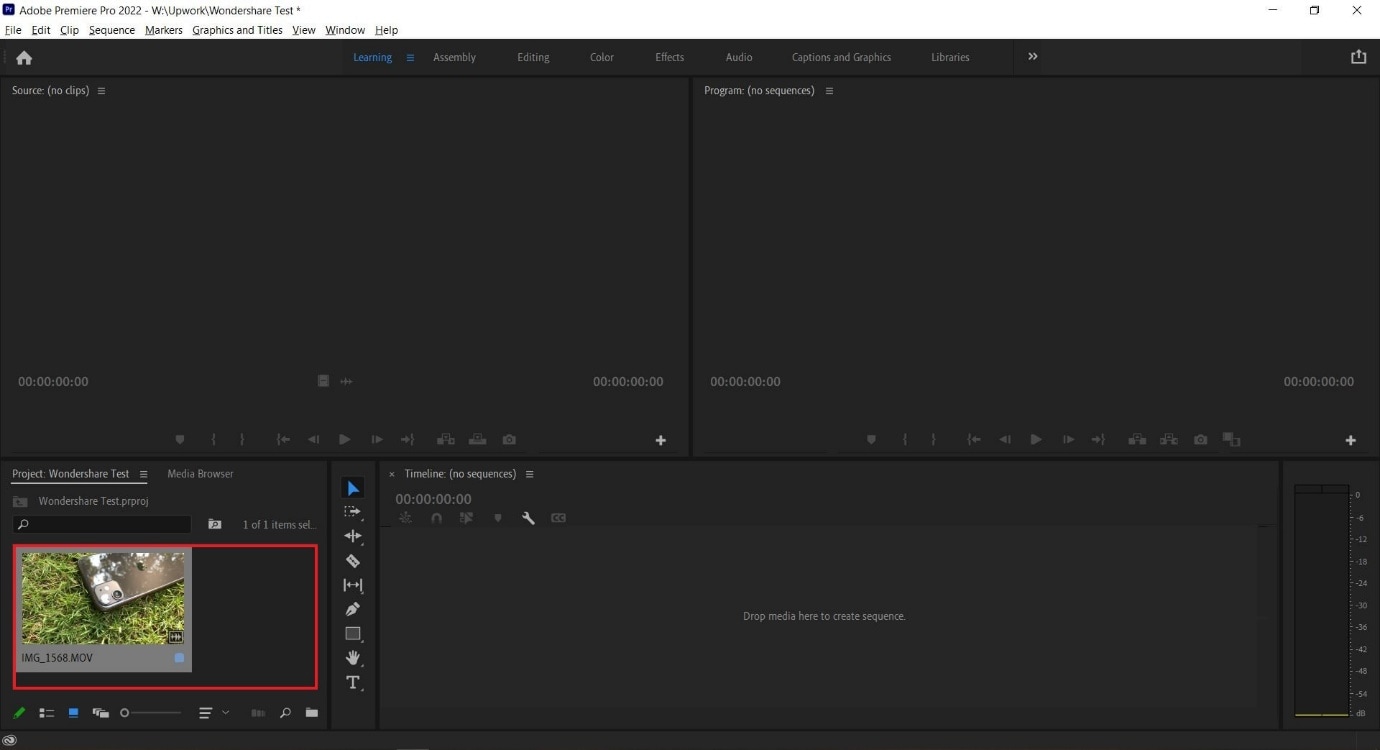
You can continue to import more media by double-clicking within the marked area. For better organization, users can also create Bins, which are folders within a Premiere Pro File that are often in use to sort out imported media.
Users can create Bins with a right-click in the red box marked area (refer to image above).
Step 4: Select either the whole clip or a part of it from the Source Window and drag it onto the Timeline.
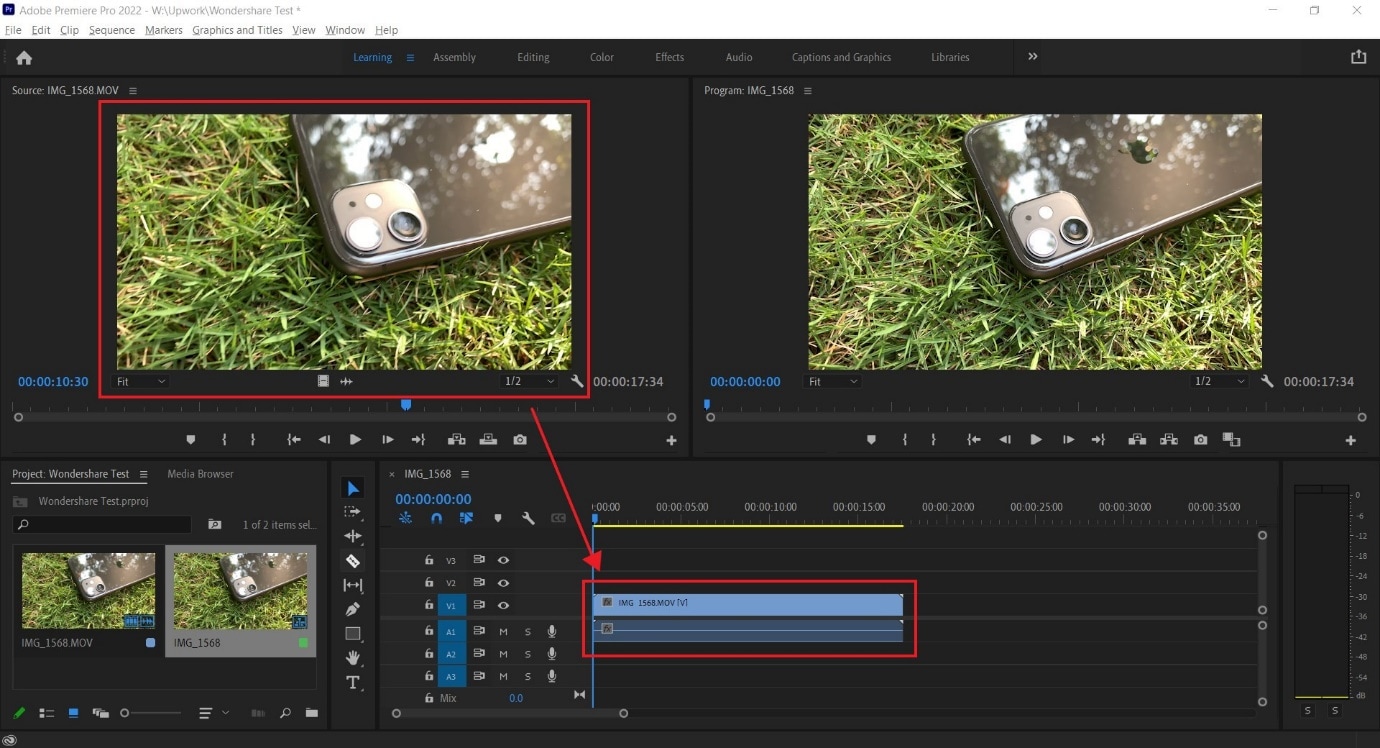
Step 5: Select the Razor Tool from the Tools Window. Now, pick the point where you want to introduce a cut and confirm with your left mouse button; this will split your video track into two parts.
Make a second cut where desired, following which you can move around the newly generated clip or delete it.
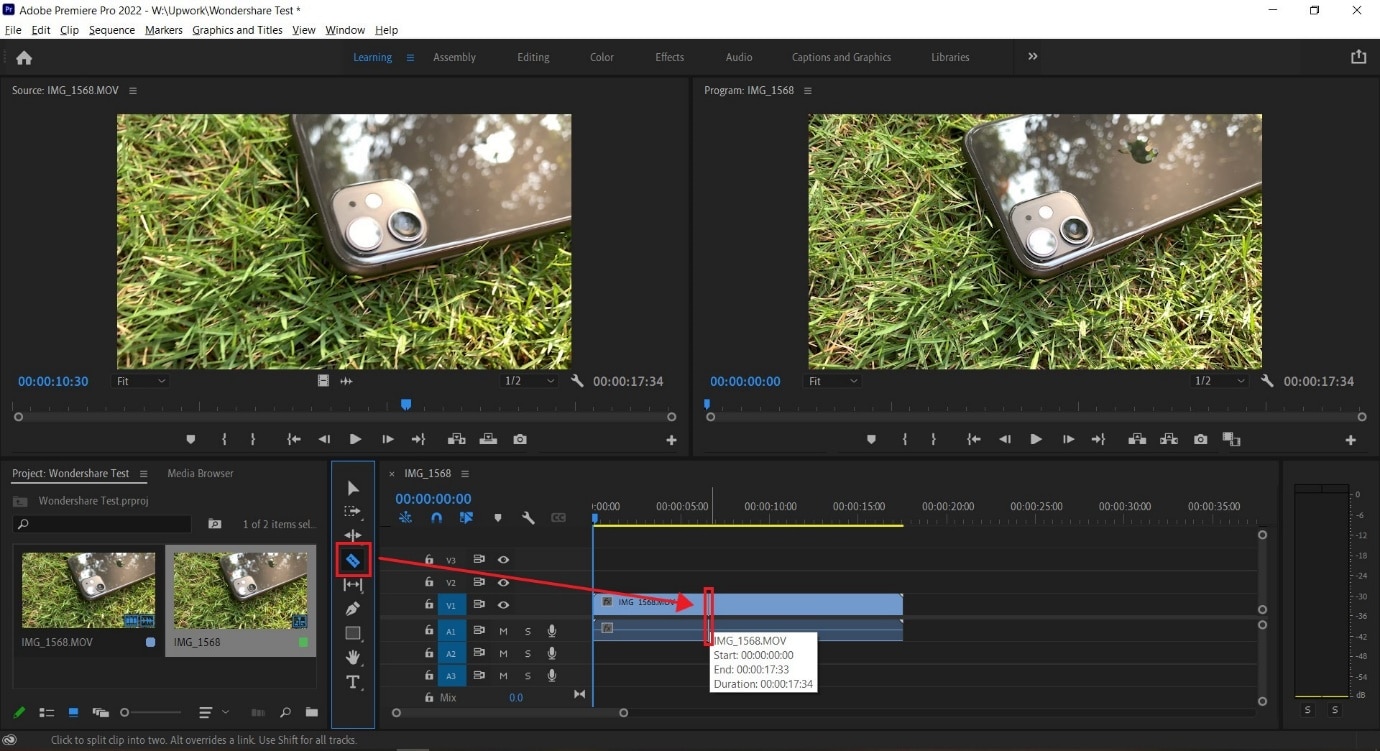
**Tip:**You can also select the Razor Tool by pressing C on the keyboard_._
We also recommend using the Snap in Timeline feature (activated with (S) on your keyboard or by choosing the magnet option), which will match your mouse pointer with the Playhead to ensure your cut will match the exact frame shown on your screen.
-—————————————————————————————————————————————-
Some more tips for Adobe Premiere Pro:
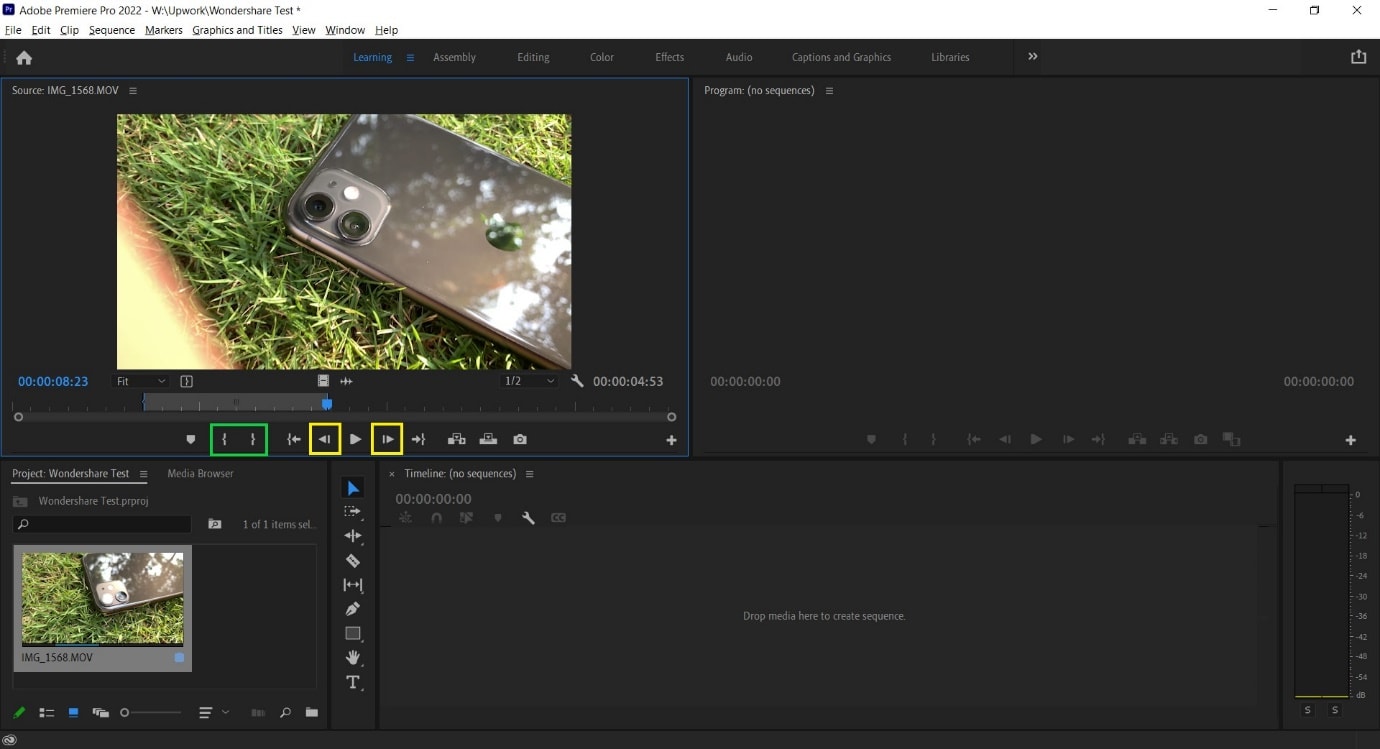
- Using the I and O keys on your keyboard while playing a video in the Source Window will allow you to set an In Pointand an Out Point. These markers will allow you to move a specific part of your video file into the Timeline, thus, reducing the amount of time spent making the right cut.
We have tagged the Mark In and Mark Out buttons with a Green Box in the image below.
- Clicking on the Step Frame Buttons [marked in Yellow] will also help increase the accuracy of your cut by allowing you to select the exact moment you desire.
- You can also mark a Point of Interest in your video file with the help of Markers in Premiere Pro. These afford you the ability to come back to the moment at a later time and see why it interested you in the first place, as editing sessions can often take hours at an end.
An alternative way to cut video with Wondershare Filmora
In Wondershare Filmora Video Editor , the steps to cut a video are simplified and don’t require as many steps as seen earlier. Opening the application throws you straight into a project, and following this, you can import a video file and begin editing. From the process you will learn below, it is easy to assume that Wondershare Filmora is more convenient for beginners and provides software features that match paid professional software.
For Win 7 or later (64-bit)
For macOS 10.14 or later
Note: If you don’t have Wondershare Filmora installed, you can get the video editor by visiting its official website . Once the setup program download completes, execute it and begin the installation process.
Once you have the editing software open, follow the steps listed below.
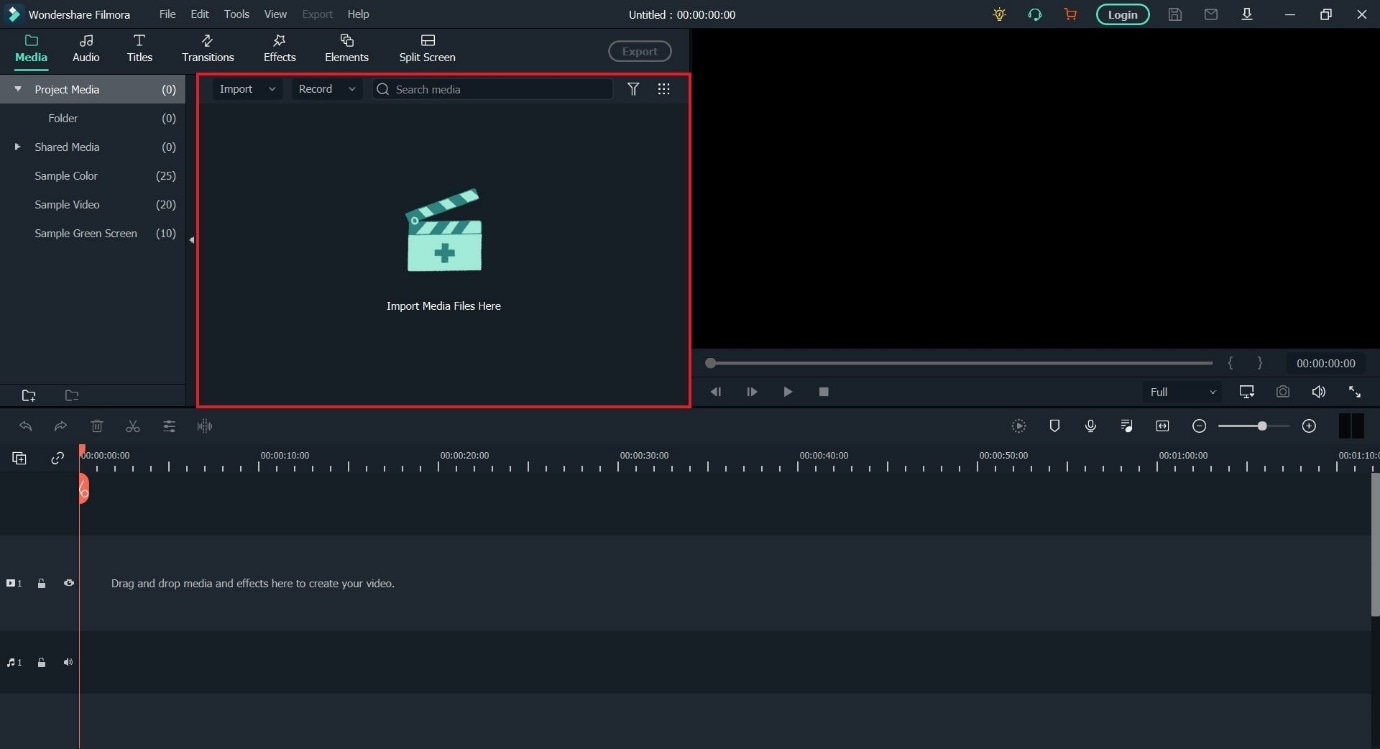
Step 1: Import a video file by clicking on the import window.
The default project setting for Filmora X is 1920x1080 at 25 frames per second. Users can change this to match their video file by going into Project Settings under the File tab or by accepting the automatic prompt that appears when dragging the video file onto the Timeline.
Note: If you have a PC with weak hardware, Wondershare Filmora gives you the option to create Video Proxies that will reduce the load on your computer by creating smaller clips that are lower in size, resulting in a smoother and faster experience. You can also do this in Premiere Pro, but Filmora does it for you automatically once given permission.
Step 2: Drag the video file onto the Timeline to begin previewing it in the Playback Window and commence editing operations.
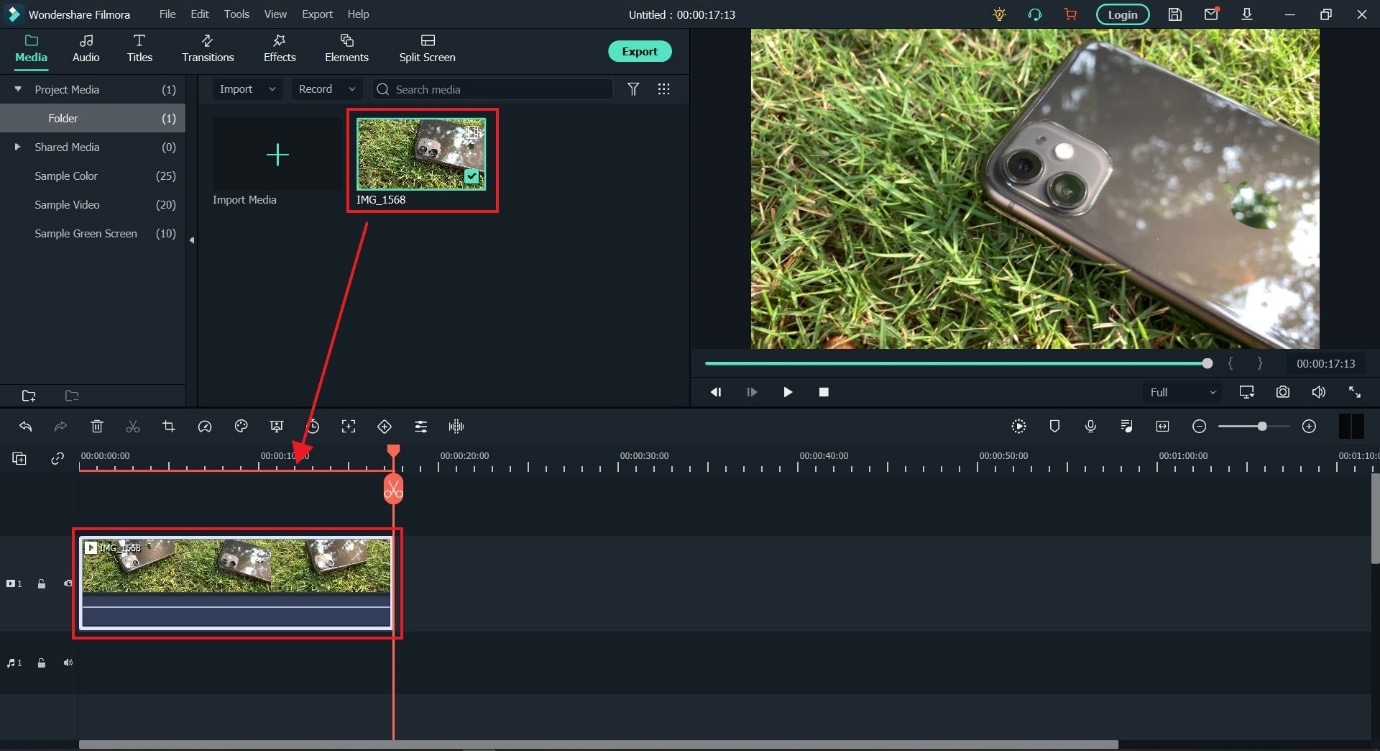
Step 3: Locate where you want to cut in the video file and click on the orange scissors option to split the video file.
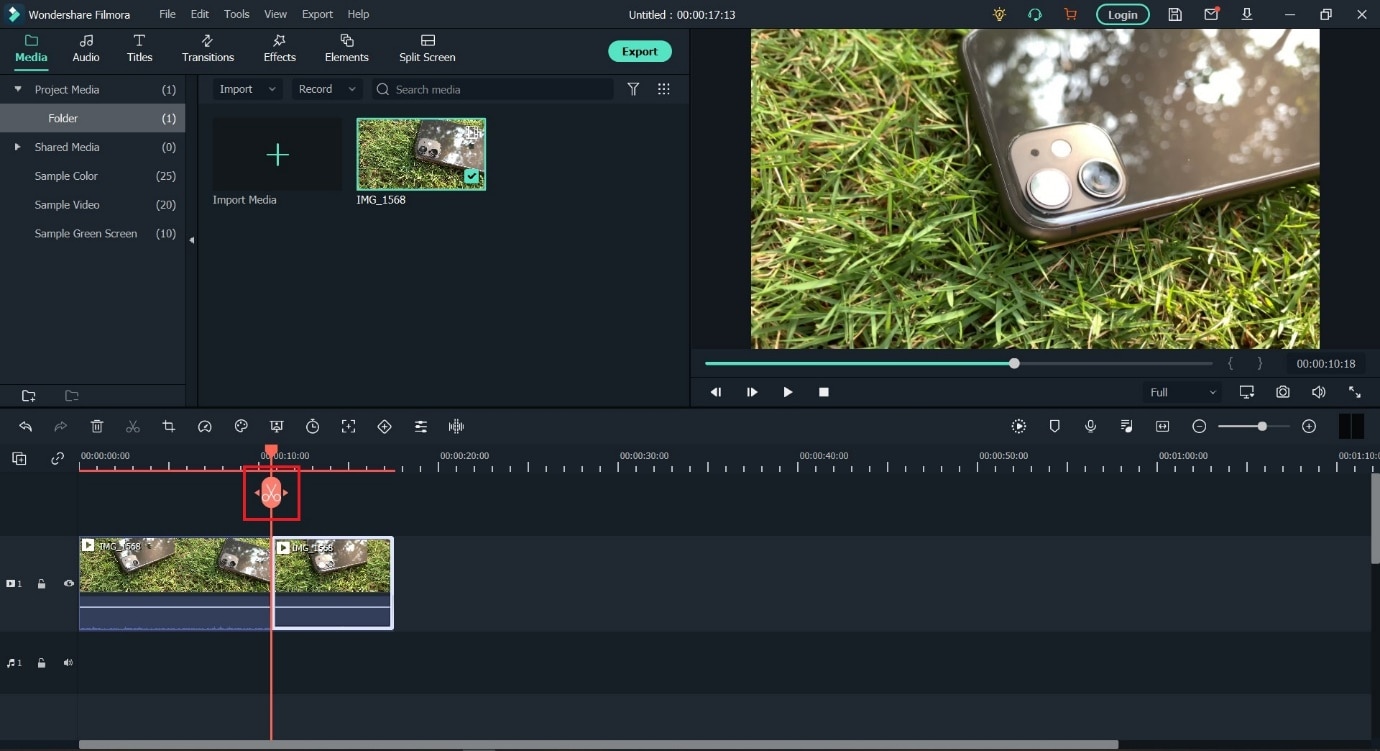
Tip: You can also use the keyboard shortcut (CTRL+B) to cut without using a mouse click, in case you make use of a trackpad while editing.
The Bottom Line
As said earlier, knowing where to cut is essential in improving the feel of your video, and we hope this guide showed you exactly how to perform the actions to create your best project. If you are a beginner, the simplistic approach of Wondershare Filmora will be more welcoming and easier to navigate. In addition, the software is also free to download, with added features that you can activate by paying a monthly, yearly, or one-time fee. Adobe Premiere Pro is an option worth considering if you plan on using third-party plugins and other applications from the Creative Cloud Suite.
During project creation, we recommend keeping an eye on the file name set and the storage location; this can help reduce the time spent in locating the Premiere Project.

Step 2: Import a video file into Premiere Pro with a double click in the marked area and choose the file from its stored location.

Step 3: Double click on any imported media to activate it and send it to the Source Window.

You can continue to import more media by double-clicking within the marked area. For better organization, users can also create Bins, which are folders within a Premiere Pro File that are often in use to sort out imported media.
Users can create Bins with a right-click in the red box marked area (refer to image above).
Step 4: Select either the whole clip or a part of it from the Source Window and drag it onto the Timeline.

Step 5: Select the Razor Tool from the Tools Window. Now, pick the point where you want to introduce a cut and confirm with your left mouse button; this will split your video track into two parts.
Make a second cut where desired, following which you can move around the newly generated clip or delete it.

**Tip:**You can also select the Razor Tool by pressing C on the keyboard_._
We also recommend using the Snap in Timeline feature (activated with (S) on your keyboard or by choosing the magnet option), which will match your mouse pointer with the Playhead to ensure your cut will match the exact frame shown on your screen.
-—————————————————————————————————————————————-
Some more tips for Adobe Premiere Pro:
- Using the I and O keys on your keyboard while playing a video in the Source Window will allow you to set an In Pointand an Out Point. These markers will allow you to move a specific part of your video file into the Timeline, thus, reducing the amount of time spent making the right cut.
We have tagged the Mark In and Mark Out buttons with a Green Box in the image below.
- Clicking on the Step Frame Buttons [marked in Yellow] will also help increase the accuracy of your cut by allowing you to select the exact moment you desire.
- You can also mark a Point of Interest in your video file with the help of Markers in Premiere Pro. These afford you the ability to come back to the moment at a later time and see why it interested you in the first place, as editing sessions can often take hours at an end.

An alternative way to cut video with Wondershare Filmora
In Wondershare Filmora Video Editor , the steps to cut a video are simplified and don’t require as many steps as seen earlier. Opening the application throws you straight into a project, and following this, you can import a video file and begin editing. From the process you will learn below, it is easy to assume that Wondershare Filmora is more convenient for beginners and provides software features that match paid professional software.
For Win 7 or later (64-bit)
For macOS 10.14 or later
Note: If you don’t have Wondershare Filmora installed, you can get the video editor by visiting its official website . Once the setup program download completes, execute it and begin the installation process.
Once you have the editing software open, follow the steps listed below.
Step 1: Import a video file by clicking on the import window.
The default project setting for Filmora X is 1920x1080 at 25 frames per second. Users can change this to match their video file by going into Project Settings under the File tab or by accepting the automatic prompt that appears when dragging the video file onto the Timeline.

Note: If you have a PC with weak hardware, Wondershare Filmora gives you the option to create Video Proxies that will reduce the load on your computer by creating smaller clips that are lower in size, resulting in a smoother and faster experience. You can also do this in Premiere Pro, but Filmora does it for you automatically once given permission.
Step 2: Drag the video file onto the Timeline to begin previewing it in the Playback Window and commence editing operations.

Step 3: Locate where you want to cut in the video file and click on the orange scissors option to split the video file.

Tip: You can also use the keyboard shortcut (CTRL+B) to cut without using a mouse click, in case you make use of a trackpad while editing.
The Bottom Line
As said earlier, knowing where to cut is essential in improving the feel of your video, and we hope this guide showed you exactly how to perform the actions to create your best project. If you are a beginner, the simplistic approach of Wondershare Filmora will be more welcoming and easier to navigate. In addition, the software is also free to download, with added features that you can activate by paying a monthly, yearly, or one-time fee. Adobe Premiere Pro is an option worth considering if you plan on using third-party plugins and other applications from the Creative Cloud Suite.
During project creation, we recommend keeping an eye on the file name set and the storage location; this can help reduce the time spent in locating the Premiere Project.

Step 2: Import a video file into Premiere Pro with a double click in the marked area and choose the file from its stored location.

Step 3: Double click on any imported media to activate it and send it to the Source Window.

You can continue to import more media by double-clicking within the marked area. For better organization, users can also create Bins, which are folders within a Premiere Pro File that are often in use to sort out imported media.
Users can create Bins with a right-click in the red box marked area (refer to image above).
Step 4: Select either the whole clip or a part of it from the Source Window and drag it onto the Timeline.

Step 5: Select the Razor Tool from the Tools Window. Now, pick the point where you want to introduce a cut and confirm with your left mouse button; this will split your video track into two parts.
Make a second cut where desired, following which you can move around the newly generated clip or delete it.

**Tip:**You can also select the Razor Tool by pressing C on the keyboard_._
We also recommend using the Snap in Timeline feature (activated with (S) on your keyboard or by choosing the magnet option), which will match your mouse pointer with the Playhead to ensure your cut will match the exact frame shown on your screen.
-—————————————————————————————————————————————-
Some more tips for Adobe Premiere Pro:
- Using the I and O keys on your keyboard while playing a video in the Source Window will allow you to set an In Pointand an Out Point. These markers will allow you to move a specific part of your video file into the Timeline, thus, reducing the amount of time spent making the right cut.
We have tagged the Mark In and Mark Out buttons with a Green Box in the image below.
- Clicking on the Step Frame Buttons [marked in Yellow] will also help increase the accuracy of your cut by allowing you to select the exact moment you desire.
- You can also mark a Point of Interest in your video file with the help of Markers in Premiere Pro. These afford you the ability to come back to the moment at a later time and see why it interested you in the first place, as editing sessions can often take hours at an end.

An alternative way to cut video with Wondershare Filmora
In Wondershare Filmora Video Editor , the steps to cut a video are simplified and don’t require as many steps as seen earlier. Opening the application throws you straight into a project, and following this, you can import a video file and begin editing. From the process you will learn below, it is easy to assume that Wondershare Filmora is more convenient for beginners and provides software features that match paid professional software.
For Win 7 or later (64-bit)
For macOS 10.14 or later
Note: If you don’t have Wondershare Filmora installed, you can get the video editor by visiting its official website . Once the setup program download completes, execute it and begin the installation process.
Once you have the editing software open, follow the steps listed below.
Step 1: Import a video file by clicking on the import window.
The default project setting for Filmora X is 1920x1080 at 25 frames per second. Users can change this to match their video file by going into Project Settings under the File tab or by accepting the automatic prompt that appears when dragging the video file onto the Timeline.

Note: If you have a PC with weak hardware, Wondershare Filmora gives you the option to create Video Proxies that will reduce the load on your computer by creating smaller clips that are lower in size, resulting in a smoother and faster experience. You can also do this in Premiere Pro, but Filmora does it for you automatically once given permission.
Step 2: Drag the video file onto the Timeline to begin previewing it in the Playback Window and commence editing operations.

Step 3: Locate where you want to cut in the video file and click on the orange scissors option to split the video file.

Tip: You can also use the keyboard shortcut (CTRL+B) to cut without using a mouse click, in case you make use of a trackpad while editing.
The Bottom Line
As said earlier, knowing where to cut is essential in improving the feel of your video, and we hope this guide showed you exactly how to perform the actions to create your best project. If you are a beginner, the simplistic approach of Wondershare Filmora will be more welcoming and easier to navigate. In addition, the software is also free to download, with added features that you can activate by paying a monthly, yearly, or one-time fee. Adobe Premiere Pro is an option worth considering if you plan on using third-party plugins and other applications from the Creative Cloud Suite.
During project creation, we recommend keeping an eye on the file name set and the storage location; this can help reduce the time spent in locating the Premiere Project.

Step 2: Import a video file into Premiere Pro with a double click in the marked area and choose the file from its stored location.

Step 3: Double click on any imported media to activate it and send it to the Source Window.

You can continue to import more media by double-clicking within the marked area. For better organization, users can also create Bins, which are folders within a Premiere Pro File that are often in use to sort out imported media.
Users can create Bins with a right-click in the red box marked area (refer to image above).
Step 4: Select either the whole clip or a part of it from the Source Window and drag it onto the Timeline.

Step 5: Select the Razor Tool from the Tools Window. Now, pick the point where you want to introduce a cut and confirm with your left mouse button; this will split your video track into two parts.
Make a second cut where desired, following which you can move around the newly generated clip or delete it.

**Tip:**You can also select the Razor Tool by pressing C on the keyboard_._
We also recommend using the Snap in Timeline feature (activated with (S) on your keyboard or by choosing the magnet option), which will match your mouse pointer with the Playhead to ensure your cut will match the exact frame shown on your screen.
-—————————————————————————————————————————————-
Some more tips for Adobe Premiere Pro:
- Using the I and O keys on your keyboard while playing a video in the Source Window will allow you to set an In Pointand an Out Point. These markers will allow you to move a specific part of your video file into the Timeline, thus, reducing the amount of time spent making the right cut.
We have tagged the Mark In and Mark Out buttons with a Green Box in the image below.
- Clicking on the Step Frame Buttons [marked in Yellow] will also help increase the accuracy of your cut by allowing you to select the exact moment you desire.
- You can also mark a Point of Interest in your video file with the help of Markers in Premiere Pro. These afford you the ability to come back to the moment at a later time and see why it interested you in the first place, as editing sessions can often take hours at an end.

An alternative way to cut video with Wondershare Filmora
In Wondershare Filmora Video Editor , the steps to cut a video are simplified and don’t require as many steps as seen earlier. Opening the application throws you straight into a project, and following this, you can import a video file and begin editing. From the process you will learn below, it is easy to assume that Wondershare Filmora is more convenient for beginners and provides software features that match paid professional software.
For Win 7 or later (64-bit)
For macOS 10.14 or later
Note: If you don’t have Wondershare Filmora installed, you can get the video editor by visiting its official website . Once the setup program download completes, execute it and begin the installation process.
Once you have the editing software open, follow the steps listed below.
Step 1: Import a video file by clicking on the import window.
The default project setting for Filmora X is 1920x1080 at 25 frames per second. Users can change this to match their video file by going into Project Settings under the File tab or by accepting the automatic prompt that appears when dragging the video file onto the Timeline.

Note: If you have a PC with weak hardware, Wondershare Filmora gives you the option to create Video Proxies that will reduce the load on your computer by creating smaller clips that are lower in size, resulting in a smoother and faster experience. You can also do this in Premiere Pro, but Filmora does it for you automatically once given permission.
Step 2: Drag the video file onto the Timeline to begin previewing it in the Playback Window and commence editing operations.

Step 3: Locate where you want to cut in the video file and click on the orange scissors option to split the video file.

Tip: You can also use the keyboard shortcut (CTRL+B) to cut without using a mouse click, in case you make use of a trackpad while editing.
The Bottom Line
As said earlier, knowing where to cut is essential in improving the feel of your video, and we hope this guide showed you exactly how to perform the actions to create your best project. If you are a beginner, the simplistic approach of Wondershare Filmora will be more welcoming and easier to navigate. In addition, the software is also free to download, with added features that you can activate by paying a monthly, yearly, or one-time fee. Adobe Premiere Pro is an option worth considering if you plan on using third-party plugins and other applications from the Creative Cloud Suite.
How to Slow Down Time-Lapse Videos on iPhone
There are moments that need highlighting and there are moments that need a flashing speed. You can control both moments if you are just wondering can slow down a time lapse. There are video editing softwares like Filmora if you want to know how to slow down time lapse on iPhone. Let’s discuss some of the best time lapse editing tools and also learn about how to slow down a time lapse
Part1 What Is Time-Lapse?
Time-lapse is a cinematography and photography technique that captures a series of images or frames at specific intervals over a prolonged period of time and then plays them back at a much faster rate. This creates a visually captivating effect where time appears to be moving faster than in real life.
In a time-lapse video, moments typically occur slowly or over an extended period, such as the movement of clouds, the growth of plants, or construction of buildings are compressed into a short video clip. Time-lapse is a powerful storytelling tool and if you are tempted to learn how to slow down a time lapse video because sometimes they can be faster than we intend them to be. Let’s discuss how you can slow down time lapse video.
Part2 Method 1: Using Filmora To Change Time Lapse Speed
Filmora is one of the best video editing software whose user-friendly interface allows both beginners and professionals to create compelling videos effortlessly. With Filmora, you can cut, trim, slow down time lapse video, and edit videos. You can also apply built-in effects and transitions, and adjust the playback speed to create stunning time-lapse or slow-motion effects.
Filmora also offers advanced color grading tools so that you can correct and enhance the color in your videos to make them visually appealing. Additionally, Filmora supports a wide range of video formats and allows easy exporting of edited videos to various platforms, making the sharing process convenient and straightforward. With its rich library of royalty-free music and sound effects. Let’s discuss how to change time lapse speed on iPhone.
AI Time-Lapse For Win 7 or later(64-bit)
AI Time-Lapse For macOS 10.14 or later
- Open Filmora and start a new project.
- Import your time-lapse video by either clicking on “Import” or dragging and dropping the file into the media library.
- Drag the imported video from the media library to the timeline at the bottom of the screen.
- Click on the video in the timeline to select it. You should see editing options appear.
- Look for a speed option, often represented as a speedometer icon. Click on it to open the speed settings.
- In the speed settings, you can slow down time lapse video. You can make it slower according to your preference.
- After adjusting the speed, play the video in the preview window to see if it’s at the desired speed.
- Once done with performing time lapse slower, save and export your edited time-lapse video by choosing the “Export” option.
- Choose the desired output format and save location, then click “Export” to save the edited video.
Part3 Method 2: Using Imovie To Change Time Lapse Speed
- Open iMovie on your iOS device.
- Import the time-lapse video you want to edit.
- Drag and drop the video onto the timeline.
- Select the video clip on the timeline.
- Look for the speed adjustment settings; it is usually represented by a turtle or hare icon.
- Click on the speed adjustment icon, and a slider or option to change the speed will appear.
- Adjust the speed according to your preference by dragging the slider or entering a value.
- Play the video to preview the new speed.
- Once you are done with the slow down time lapse video, you can save or export the edited video.
Summary
Learning how to slow down time lapse videos on iPhone enhances the storytelling power of your cinematography, allowing viewers to engage more deeply with your content. There are video editing tools like Filmora and iMovie which have revolutionized the editing process, making it feasible to slow down time lapse video directly on your iPhone. These tools are user-friendly and equipped with intuitive features that guide you through the process of modifying the speed of your time-lapse creations.
It is easier to master how to slow down a time lapse, so as a filmmaker, content creator and photographer, you can showcase events or phenomena that unfold over a long period of time in a brief span of time. The techniques and tools such as Filmora , available today, make the task simpler and more accessible, even for beginners. Using Filmora, you can effectively slow down time lapse sequences so that your narratives are conveyed compellingly and that every critical detail is highlighted for your audience’s appreciation and understanding.
Also read:
- 2024 Approved How to Make Double Exposure Effect in Filmora
- New 2024 Approved How to Create a PowerPoint Looping Slideshow
- In 2024, How to Use Twixtor Effect to Add Slow-Motion Effect to Video?
- New 2024 Approved How to Create Your Own Subscribe Channel Graphics
- New How to Loop a Video in Canva Editor
- Updated Add Background to Video With/Without a Green Screen
- In 2024, Overview of Best LUTs for Vlog
- Updated 10 BEST TEXT TO SPEECH VIDEO MAKERS
- In 2024, 10 Best Free Text to Speech Software Windows, Mac,Android, iPhone & Online
- 2024 Approved How to Create a Special Animated Transition in Filmora in Just 2 Minutes. This Simple Step-by-Step Guide Will Show You the Easy Way
- Updated Camtasia Review – Is It The Best Video Editor?
- Updated Guide To Selecting and Using the Best Braw Luts
- In 2024, This Guide Is to Help You Select the Ways that Meet Your Needs, and It Is Easy for You to Combine 2 or More Videos Into One Video
- How To Make a Photo Collage in Microsoft Word — Step by Step Guide for 2024
- In 2024, Add Some Shake to Videos with Alight Motion
- In 2024, How to Unlock Samsung Galaxy S23 Tactical Edition Bootloader Easily
- AddROM Bypass An Android Tool to Unlock FRP Lock Screen For your Oppo Find N3 Flip
- Hacks to do pokemon go trainer battles For Oppo A78 5G | Dr.fone
- In 2024, Bypass iCloud Activation Lock with IMEI Code From your iPhone 15
- In 2024, The Best Methods to Unlock the iPhone Locked to Owner for Apple iPhone 7 Plus | Dr.fone
- How to recover data from dead iPhone 15 | Stellar
- How to Mirror Apple iPhone 7 Plus to Mac? | Dr.fone
- Planning to Use a Pokemon Go Joystick on Vivo X90S? | Dr.fone
- In 2024, How To Reset the Security Questions of Your Apple ID On Your Apple iPhone 14
- In 2024, 9 Best Phone Monitoring Apps for OnePlus Ace 2 | Dr.fone
- In 2024, Full Guide to Unlock Your Vivo X100
- How To Simulate GPS Movement With Location Spoofer On Apple iPhone 13 Pro Max? | Dr.fone
- A Step-by-Step Guide on Using ADB and Fastboot to Remove FRP Lock on your Samsung Galaxy A14 4G
- How To Do Lava Blaze Pro 5G Screen Sharing | Dr.fone
- Title: How to Add a Green Screen to Zoom for 2024
- Author: Chloe
- Created at : 2024-05-20 03:37:46
- Updated at : 2024-05-21 03:37:46
- Link: https://ai-editing-video.techidaily.com/how-to-add-a-green-screen-to-zoom-for-2024/
- License: This work is licensed under CC BY-NC-SA 4.0.

