
:max_bytes(150000):strip_icc():format(webp)/the-11-best-whatsapp-tricks-and-tips-in-2020-4782877-fd12628437f34b85ac38f1a9ac95637e.jpg)
How to Add Custom Subtitles to Netflix
How to Add Custom Subtitles to Netflix
Netflix is the most popular streaming service in the world. It offers loads of movies and series that you can watch on smartphones, tablets, and computers. Over the years, Netflix has become a one-stop destination for watching movies and TV shows in different languages.
While the user base of Netflix is quite diverse, the platform offers subtitles in limited languages for most movies and series. Suppose you want to view a Korean Drama on Netflix with French subtitles. However, you found that French subtitles are unavailable for that Korean Drama. In such a case, you might wonder if adding custom subtitles to Netflix is possible.
Well, you can add subtitles to Netflix, and there are two different methods to do the same. This guide will help you learn both methods available for adding custom subtitles to Netflix. So, let’s get started!
Method 1. Upload Your Custom Subtitle to Netflix
Before proceeding with this method, you must remember that it only works if you are a Netflix Premium user. Now, let’s discuss how to add subtitles to Netflix with this method.
Key Steps to Follow
Below are the steps for adding custom subtitles to Netflix.
Step 1 First of all, you need to install and add Language Learning with Netflix & YouTube™ extension to your web browser (Chrome or Edge).
Step 2 Make sure the extension is activated.
Step 3 Download the .srt file that contains the subtitles in your preferred language for a particular movie or TV show.
Step 4 Open Netflix on a Chrome or Edge browser and sign into your account.
Step 5 Play the movie or TV show for which you have downloaded the subtitles.
Step 6 Within the Netflix player, you will see a settings icon left to the Subtitles icon. Click on it.
Step 7 Among the various setting options, you need to choose the screen and find the one with the label “Lower Subtitles (Mother Language)”. You need to click on its field and select the “Upload Subtitle” option.
Step 8 You will see a pop-up window at the top of the screen where you need to click the “Choose File” button.
Step 9 You then need to navigate to the directory on your computer where you have downloaded the subtitles file, select it, and click the “Open” button.
Step 10 Click the “Okay” button to upload the subtitles to Netflix.
Step 11 Close the settings window and play the video. You can view the uploaded subtitles at the bottom of the player.
Method 2. Add Custom Subtitles to Netflix with Extensions
If you’re not a Netflix Premium user, you can still add subtitles to Netflix with the help of certain browser extensions. We’ll list them down and discuss the steps for using one of them; the basic steps for using all such extensions are pretty much the same.
1. Substital
Supported web browsers: C hrome | Firefox | Edge
Substital is among the most popular extensions that allow you to add subtitles to several online on-demand video streaming platforms, including Netflix. It has more than 100K users on the Chome Web Store.
Key Features
- Offers a built-in subtitles search feature.
- Supports .srt files and .zip files containing subtitles in the .srt format.
- You can manually sync the subtitles with the video.
- It allows you to customize the appearance of subtitles.
Steps to Add Custom Subtitles to Netflix with Substital
Following are the key steps to add custom subtitles to Netflix using the Substital extension:
Step 1 The first thing you need to do is to download and install the Substital extension on your browser.
Step 2 Open Netflix on the same browser and log in to your account.
Step 3 Play the movie or episode from a TV series for which you want to add custom subtitles.
Step 4 Download the subtitles file for the same movie or episode in your preferred language from the web.
Step 5 Now open the extensions menu in your browser and click on the Substital icon.
Step 6 You will see the name of the movie or TV show that you are watching on Netflix. Click on it.
Step 7 In this step, you need to drag and drop the subtitle file from your system (that you downloaded earlier) to the browser window.
Step 8 Finally, you can notice that the subtitles are loaded in the Netflix player.
2. Super Netflix
Web browsers: Chrome
Super Netflix is yet another reliable extension to add subtitles to Netflix. Apart from adding custom subtitles, this extension allows you to change the video playback speed. Like Substital, the Super Netflix extension on Chrome Web Store also has 100K+ users.
Key Features
- It can help you avoid spoilers by blurring images and episode descriptions.
- You can use the extension to skip intros automatically.
- Offers 5 different video modes.
- You get the option to change the Netflix streaming server.
3. Netflix SubStyler: customize subtitles
Web browsers: Chrome
Unlike the other two extensions mentioned above, Netflix SubStyler only allows you to change the styling of subtitles on Netflix. However, the thing that makes this extension worthy of your attention is that it comes loaded with several customization options.
Key Features
- You can choose a custom text color for the subtitles either with the help of an in-built color picker or by entering the RGB value of the color.
- The extension lets you add text outlines and change the size of the text.
- You can even add a text background and change its color and opacity.
Bonus Tip: How to Edit and Add Subtitles to Videos Available Offline
In certain cases, you may want to edit the subtitles of videos probably because either the subtitles are not available for a certain part of the video, or they are not correct. So, if you want to edit subtitles of videos that you have downloaded with ease, you can consider using Wondershare Filmora .
Free Download For Win 7 or later(64-bit)
Free Download For macOS 10.14 or later

Filmora is one of the most popular and powerful video editors out there. Developed by Wondershare, it allows you to import subtitle files in various formats, including .srt, and edit them directly. Some noteworthy features of Filmora for subtitles and video editing include the manual addition of subtitles, speech-to-text conversion, green screen, video stabilization, and color correction.
Wondershare Filmora also offers several advanced text editing tools that make it possible to customize the appearance of subtitles that you add to a video. You can change the color and size of the fonts and add a gradient effect to the text. Additionally, you can animate text to make it stand out.
Add Custom Subtitles with Filmora: A Step-by-Step Guide
If you want to add subtitles to any video using Filmora, you simply need to follow the steps mentioned below. Please note that for this tutorial, we’ll be using Filmora 11.
Step 1 Launch the Filmora app on your computer and create a new project.
Step 2 You can simply click the “Import media” button and load the video onto it.
Step 3 Hover over the video’s thumbnail and click on the (+) button to add it to the timeline.
Step 4 Now, you need to play the video and find the section of the video where you need to add subtitles. Pause the video and add a mark by pressing the M key on your keyboard. You can also do the same by clicking the marker button, which is located beside the microphone icon in the top right of the timeline tab.
Step 5 To add the subtitle, you need to click on the “Titles” button that you can see at the top of the Filmora window. You can see several subtitle templates available there.
Step 6 Download, preview, and choose a subtitle template that seems most appropriate.
Step 7 You can then drag and drop the subtitle to the timeline above the video timeline. You can also trim the subtitle length from any side of the subtitle timeline box.
Step 8 You need to double-click on the subtitle timeline box to add custom text, change font size, color, and alignment, and add animations.
Step 9 Once done, you can click on the “Ok” button to save the changes.
Step 10 Similarly, you can add subtitles for different sections of the video.
Conclusion
If you want to add custom subtitles to Netflix movies and TV shows, you can achieve the same with the two different methods mentioned above. For the first method to work, you must be a Netflix Premium user. On the other hand, the second method will work fine even if you aren’t a Netflix Premium user. Also, you can add custom subtitles to any offline videos using the Wondershare Filmora video editor.
Free Download For macOS 10.14 or later
Filmora is one of the most popular and powerful video editors out there. Developed by Wondershare, it allows you to import subtitle files in various formats, including .srt, and edit them directly. Some noteworthy features of Filmora for subtitles and video editing include the manual addition of subtitles, speech-to-text conversion, green screen, video stabilization, and color correction.
Wondershare Filmora also offers several advanced text editing tools that make it possible to customize the appearance of subtitles that you add to a video. You can change the color and size of the fonts and add a gradient effect to the text. Additionally, you can animate text to make it stand out.
Add Custom Subtitles with Filmora: A Step-by-Step Guide
If you want to add subtitles to any video using Filmora, you simply need to follow the steps mentioned below. Please note that for this tutorial, we’ll be using Filmora 11.
Step 1 Launch the Filmora app on your computer and create a new project.
Step 2 You can simply click the “Import media” button and load the video onto it.
Step 3 Hover over the video’s thumbnail and click on the (+) button to add it to the timeline.
Step 4 Now, you need to play the video and find the section of the video where you need to add subtitles. Pause the video and add a mark by pressing the M key on your keyboard. You can also do the same by clicking the marker button, which is located beside the microphone icon in the top right of the timeline tab.
Step 5 To add the subtitle, you need to click on the “Titles” button that you can see at the top of the Filmora window. You can see several subtitle templates available there.
Step 6 Download, preview, and choose a subtitle template that seems most appropriate.
Step 7 You can then drag and drop the subtitle to the timeline above the video timeline. You can also trim the subtitle length from any side of the subtitle timeline box.
Step 8 You need to double-click on the subtitle timeline box to add custom text, change font size, color, and alignment, and add animations.
Step 9 Once done, you can click on the “Ok” button to save the changes.
Step 10 Similarly, you can add subtitles for different sections of the video.
Conclusion
If you want to add custom subtitles to Netflix movies and TV shows, you can achieve the same with the two different methods mentioned above. For the first method to work, you must be a Netflix Premium user. On the other hand, the second method will work fine even if you aren’t a Netflix Premium user. Also, you can add custom subtitles to any offline videos using the Wondershare Filmora video editor.
How to Use Visual Effect for Zoom
Zoom, a video calling software, has been quite popular over the last several months and is still one of the most used videos calling applications by millions of people worldwide. The site is a favorite among working professionals, but it is also utilized by individuals to connect with their friends and loved ones. Additionally, despite the app’s abundance of practical built-in tools and functions, it lacks the fun filters and special effects that the majority of users are used to when using a camera. Zoom has ingrained itself in our vocabulary during the last year. It seemed almost inevitable given that everything, from meetings to parties, has moved online.
You don’t need to seek farther than Zoom visual effects to inject a little jazz into the routine Zoom meetings during these hard times. By making adjustments to your Video configuration either before or during a video call, you may add visual effects in Zoom. Zoom meetings may be tedious to conduct over extended periods of time. Additionally, it would be helpful if you recorded the condition of your room before any Zoom meetings. You wouldn’t want to reveal your disorganized space while in a meeting. In these situations, adding visual effects will keep your private area private while also making your Zoom meetings entertaining and exciting. It will also prevent others from seeing your filthy room. This tutorial will walk you through the process of adding visual effects to Zoom step-by-step. In addition, you will get acquainted with the numerous camera functions and visual effects that you may employ during a Zoom video conversation.
- 1. What apps can add visual effect on Zoom?
- 2. How do I add visual effects to Zoom in Mobile?
- 3. How do you download Zoom effects?
Part 1: Popular Visual Effects you can add to Zoom
You may apply one of four main graphic effects to your Zoom meetings. The visual effects that you may use in your next Zoom video chat are briefly summarized below.
1. Visual Backgrounds
Virtual backdrops may transform any plain wall into an artistic setting. Zoom provides you the choice to add photographs to your backdrop in addition to offering you a few pre-made backdrops. Zoom lets you add a movie to your backdrop in addition to simply photographs. With the help of this imaginative feature, gather your pals and enjoy your favorite meme or video. A presentation’s collection of photos, a video, or a single image may all serve as virtual backdrops. A green screen would often be used as your real backdrop and consistent lighting would be required.
To avoid having to reveal your real surroundings while in a conference, you may add any picture or video as a virtual backdrop in Zoom. You have the option of adding own photos and movies or selecting from the pre-existing backdrop films and images. The file type for video backgrounds should be MP4 or MOV, and the resolution should range from 360p to a maximum of 1080p. Ensure that the mirroring of your video is deselected in the Zoom’s Video settings if your backdrop picture has text that may be read. By using virtual backdrops, you may alter the background of your video as it appears to the audience member with whom you are speaking. During the video conference you’re in, the other participants will be able to view your face and body overlaid on the backdrop of your choice.
2. Filters
With these filters, you can have fun in all of your Zoom meetings! Filters are a fun way to spend time with loved ones who are far away, particularly at a period when maintaining social distance is crucial. Filters are the modifications you make to yourself during Zoom meetings (such as a mustache, beard, etc.). They enliven the proceedings and contribute to the fun and memorability of your Zoom meetings.
Your films’ colors may be changed, and video filters can also add new aspects. By selecting a filter appropriate for each event, like team meetings or game nights, you may create the right atmosphere. You may embellish your face in the video with flowers or animal traits by using Zoom’s various filters. Alternately, you might just convert your video’s color to black and white. The video filters from a different program, however, allow you to apply more vibrant filters and place a greater emphasis on special effects.
3. Lighting and Touch-ups
The Lighting function enhances lighting effects and makes adjustments for low light situations to make you seem more professional during a Zoom conference. Similar to this, Touch-up enhances your facial characteristics by making your skin shine, erasing wrinkles, and giving your face a radiant appearance.
On your Zoom videos, changing your lighting and applying touch-ups may improve how you seem. By adjusting your lighting, you can make even dim illumination look bright. By doing touch-ups, you may get a smoother skin texture and get rid of any obvious imperfections.
4. Studio Effects
Zoom has been developing on a new feature called Studio Effects that would give customers the option of using virtual cosmetics in their movies. They are still checking it out before formally releasing it since it is still in beta. However, it is still available to users under the Backgrounds & Filters area. You may adjust the opacity as you like. You have the option to choose a new color or one of the predefined colors. Additionally, you may decide to employ the face effects in all of your next meetings, albeit doing so might be problematic if you use Zoom for business. Don’t worry if you’re running late. Zoom can give your face a natural-looking cosmetic makeover in only one minute!
This function is intended for less formal settings, such as gatherings of friends or family. Anyone who wants to seem more professional during meetings has access to Studio Effects, which offers the choice of various eyebrow colors, beards, and lipsticks. These are a few recently added features. You may add mustaches, beards, and brows in a variety of designs, hues, and intensities. Additionally, you have the option of coloring your lips.
Part 2: How to Add Visual Effects to Zoom
Along with facilitating online meetings, the Zoom program also lets you play with its visual effects. You just need to make a few adjustments to the video settings or utilize another third-party program to be ready to go.
Step1Start a Zoom meeting
You can download Zoom, install it on your computer, and log into your account if you don’t already have it if you don’t already have it.
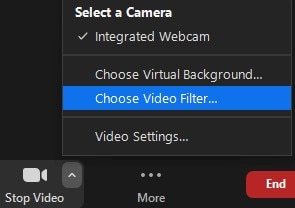
Step2Tap Background and Filters
After logging in to Zoom, use these settings. - Options > Camera > Video

Step3Faucet Filters
Here, you may play with a variety of visual effects and customize them to suit your tastes. Pick one of the numerous filters that are offered. To activate the filter, tap it.
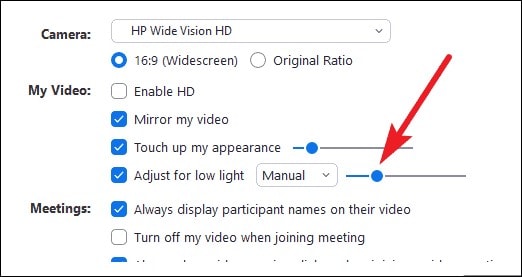
Step4Set Lighting Effects to on
Select “Adjust for low light” in the video options. For your lighting, you may choose between Auto and Manual effects. Zoom will automatically detect and adapt for the lighting in your room if you choose Auto.
Use Zoom’s noise reduction option to keep your conversation focused during your video conference in addition to adding visual elements. To do this, go to “Audio Settings” and choose “High” under “Suppress background noise.” Once you start speaking during the video conference, this essentially cancels out any background noise.
Part 3: Related FAQs
1. What apps can add visual effect on Zoom?
Following is the list of top three apps that you can use to utilize visual effects Zoom application:
Snap Camera is regarded as the most user-friendly. It is a software that you can download for Windows or Mac that works with live broadcasts and video chats. Because it was created by the people who founded Snapchat, it shares a broad variety of filters with that platform.
Link: Snap Camera
The Mac is the only platform on which CamTwist may be used. You may also use it to give your movies additional filters and unique effects. This program lets you pick from a variety of pre-made effects while also allowing you to create your own.
Link: CamTwist
Another desktop application that lets you change and even blur your backdrop is ManyCam. It enables you to apply digital effects, filters, and 3-D masks to your face. Using this tool, you can also build layers and presets.
Link: ManyCam
2. How do I add visual effects to Zoom in Mobile?
Zoom includes a function that might be useful if you don’t want to tidy up or want to add some entertainment to your calls. You may utilize Zoom virtual backdrops to alter your surroundings and take you to a more pleasant location on both the desktop and mobile apps. After joining one on a mobile device, pick Virtual backdrop by tapping the More icon in the bottom right corner. Choose a photo from the list of choices, or click the plus sign (+) to add a photo or video from your gallery.
3. How do you download Zoom effects?
Pressing the Studio Effects button after installing Zoom for the first time will prompt a pop-up asking you to download the Studio Effects package. Several filters, suited for both business meetings and conversations with friends, let you customize the video and audio during your video calls. To start downloading the Effects bundle, click the Download button. The “Studio Effects” window will appear on the right-hand side of the Background & Filter page after the download is finished. All the face components and choices are available in this Studio Effects window.
Conclusion
The most popular video meeting tool worldwide is Zoom. Family, friends, coworkers, and any two people who want to video chat utilize it. Zoom visual effects are the ideal tool for injecting some humor into otherwise dull Zoom sessions and meetings. A few simple steps will get you a striking backdrop, a humorous filter, and some interesting effects. Since the majority of formal work is now completed from home, Zoom has taken over as the standard video conferencing program. Try out as many of the effects as you like, and use this page as a companion and a map to help you along the way.
- 1. What apps can add visual effect on Zoom?
- 2. How do I add visual effects to Zoom in Mobile?
- 3. How do you download Zoom effects?
Part 1: Popular Visual Effects you can add to Zoom
You may apply one of four main graphic effects to your Zoom meetings. The visual effects that you may use in your next Zoom video chat are briefly summarized below.
1. Visual Backgrounds
Virtual backdrops may transform any plain wall into an artistic setting. Zoom provides you the choice to add photographs to your backdrop in addition to offering you a few pre-made backdrops. Zoom lets you add a movie to your backdrop in addition to simply photographs. With the help of this imaginative feature, gather your pals and enjoy your favorite meme or video. A presentation’s collection of photos, a video, or a single image may all serve as virtual backdrops. A green screen would often be used as your real backdrop and consistent lighting would be required.
To avoid having to reveal your real surroundings while in a conference, you may add any picture or video as a virtual backdrop in Zoom. You have the option of adding own photos and movies or selecting from the pre-existing backdrop films and images. The file type for video backgrounds should be MP4 or MOV, and the resolution should range from 360p to a maximum of 1080p. Ensure that the mirroring of your video is deselected in the Zoom’s Video settings if your backdrop picture has text that may be read. By using virtual backdrops, you may alter the background of your video as it appears to the audience member with whom you are speaking. During the video conference you’re in, the other participants will be able to view your face and body overlaid on the backdrop of your choice.
2. Filters
With these filters, you can have fun in all of your Zoom meetings! Filters are a fun way to spend time with loved ones who are far away, particularly at a period when maintaining social distance is crucial. Filters are the modifications you make to yourself during Zoom meetings (such as a mustache, beard, etc.). They enliven the proceedings and contribute to the fun and memorability of your Zoom meetings.
Your films’ colors may be changed, and video filters can also add new aspects. By selecting a filter appropriate for each event, like team meetings or game nights, you may create the right atmosphere. You may embellish your face in the video with flowers or animal traits by using Zoom’s various filters. Alternately, you might just convert your video’s color to black and white. The video filters from a different program, however, allow you to apply more vibrant filters and place a greater emphasis on special effects.
3. Lighting and Touch-ups
The Lighting function enhances lighting effects and makes adjustments for low light situations to make you seem more professional during a Zoom conference. Similar to this, Touch-up enhances your facial characteristics by making your skin shine, erasing wrinkles, and giving your face a radiant appearance.
On your Zoom videos, changing your lighting and applying touch-ups may improve how you seem. By adjusting your lighting, you can make even dim illumination look bright. By doing touch-ups, you may get a smoother skin texture and get rid of any obvious imperfections.
4. Studio Effects
Zoom has been developing on a new feature called Studio Effects that would give customers the option of using virtual cosmetics in their movies. They are still checking it out before formally releasing it since it is still in beta. However, it is still available to users under the Backgrounds & Filters area. You may adjust the opacity as you like. You have the option to choose a new color or one of the predefined colors. Additionally, you may decide to employ the face effects in all of your next meetings, albeit doing so might be problematic if you use Zoom for business. Don’t worry if you’re running late. Zoom can give your face a natural-looking cosmetic makeover in only one minute!
This function is intended for less formal settings, such as gatherings of friends or family. Anyone who wants to seem more professional during meetings has access to Studio Effects, which offers the choice of various eyebrow colors, beards, and lipsticks. These are a few recently added features. You may add mustaches, beards, and brows in a variety of designs, hues, and intensities. Additionally, you have the option of coloring your lips.
Part 2: How to Add Visual Effects to Zoom
Along with facilitating online meetings, the Zoom program also lets you play with its visual effects. You just need to make a few adjustments to the video settings or utilize another third-party program to be ready to go.
Step1Start a Zoom meeting
You can download Zoom, install it on your computer, and log into your account if you don’t already have it if you don’t already have it.
Step2Tap Background and Filters
After logging in to Zoom, use these settings. - Options > Camera > Video
Step3Faucet Filters
Here, you may play with a variety of visual effects and customize them to suit your tastes. Pick one of the numerous filters that are offered. To activate the filter, tap it.
Step4Set Lighting Effects to on
Select “Adjust for low light” in the video options. For your lighting, you may choose between Auto and Manual effects. Zoom will automatically detect and adapt for the lighting in your room if you choose Auto.
Use Zoom’s noise reduction option to keep your conversation focused during your video conference in addition to adding visual elements. To do this, go to “Audio Settings” and choose “High” under “Suppress background noise.” Once you start speaking during the video conference, this essentially cancels out any background noise.
Part 3: Related FAQs
1. What apps can add visual effect on Zoom?
Following is the list of top three apps that you can use to utilize visual effects Zoom application:
Snap Camera is regarded as the most user-friendly. It is a software that you can download for Windows or Mac that works with live broadcasts and video chats. Because it was created by the people who founded Snapchat, it shares a broad variety of filters with that platform.
Link: Snap Camera
The Mac is the only platform on which CamTwist may be used. You may also use it to give your movies additional filters and unique effects. This program lets you pick from a variety of pre-made effects while also allowing you to create your own.
Link: CamTwist
Another desktop application that lets you change and even blur your backdrop is ManyCam. It enables you to apply digital effects, filters, and 3-D masks to your face. Using this tool, you can also build layers and presets.
Link: ManyCam
2. How do I add visual effects to Zoom in Mobile?
Zoom includes a function that might be useful if you don’t want to tidy up or want to add some entertainment to your calls. You may utilize Zoom virtual backdrops to alter your surroundings and take you to a more pleasant location on both the desktop and mobile apps. After joining one on a mobile device, pick Virtual backdrop by tapping the More icon in the bottom right corner. Choose a photo from the list of choices, or click the plus sign (+) to add a photo or video from your gallery.
3. How do you download Zoom effects?
Pressing the Studio Effects button after installing Zoom for the first time will prompt a pop-up asking you to download the Studio Effects package. Several filters, suited for both business meetings and conversations with friends, let you customize the video and audio during your video calls. To start downloading the Effects bundle, click the Download button. The “Studio Effects” window will appear on the right-hand side of the Background & Filter page after the download is finished. All the face components and choices are available in this Studio Effects window.
Conclusion
The most popular video meeting tool worldwide is Zoom. Family, friends, coworkers, and any two people who want to video chat utilize it. Zoom visual effects are the ideal tool for injecting some humor into otherwise dull Zoom sessions and meetings. A few simple steps will get you a striking backdrop, a humorous filter, and some interesting effects. Since the majority of formal work is now completed from home, Zoom has taken over as the standard video conferencing program. Try out as many of the effects as you like, and use this page as a companion and a map to help you along the way.
How to Overlay Video in Premiere Pro
In order to make it simple to combine the shot’s components into a sequence, video overlays are pieces of film that are often recorded in a dark studio. Using image overlays on a video production is fairly frequent. However, adding pictures to every video you export might be tiresome and time-consuming if you have several films to send. For instance, an overlay video in Premiere Pro might be preferred by you rather than a manual addition of the overlay media.
There is a quick and easy method to know how to overlay a video on a video in Premiere Pro and we’ve got it covered. However, depending on the kind of element, there may be some color blending that affects the components themselves. Overlays may be filmed on either a green screen or a blue screen. Snow components photographed against a green screen may have a green hue shift, necessitating further color grading before the footage might be used.
Part 1. How to Overlay Video in Premiere Pro
Videos sometimes need a splash of color to elevate them. With the built-in color effects in Adobe Premiere Pro, you can apply overlays to any video, whether you want to add a little drama to a clip or a splash of color to a social media post. We’ll demonstrate how to overlay videos in this article. To liven up your intros, make your outros stand out, and spruce up your summer social media posts, add a gradient video overlay effect. Adobe Premiere Pro and gorgeous video clips are all you need.
Steps to Overlay Video in Premiere Pro
Step1Activate Premiere Pro
To build a new sequence, start a new project in Premiere, import your footage, then drag your clip onto the timeline. The clip’s parameters will be reflected in the sequence.

Step2Select Overlay Effect
Secondly, choose the Effects workspace (located near the top of your window). This will guarantee that the tools we need are accessible. Alternately, you may go to Window > Workspaces > Effects.

Step3Create a layer of adjustments
Go to File > New > Adjustment Layer to begin. Make sure your Project panel is chosen if the option is not accessible. Your clip and sequence will show up in your Project panel with the adjustment layer. Add the timeline with the adjustment layer selected.

Step4Create the Video Overlay
Transitions, generators, audio effects, and video effects are all included under the Effects panel. We’ll begin by selecting the 4-Color Gradient from the “Generate” folder, which contains generators for patterns and gradients, to produce the video overlay effect. Right-click on the adjustment layer in the timeline and drag the appropriate effect there.

Step5Change the Effect Control
In the Effect Controls panel, you may manage and adjust effects. You may change the default effect settings for each element in your timeline, such as size and opacity, under the Effect Controls panel along with any additional effects you’ve added. To access an item’s effect controls, click on it in the timeline.

By selecting the ‘Show all properties’ next to the adjustment layer in your timeline, you can get a before-and-after comparison. Increase the value by selecting “blend with original.” To change the effect’s strength, move this up and down.
Step6Save the Project
Try switching the linear mode to radial. You can make a color transition for circles by doing this. You will be able to highlight various things with color after this transition. The circle’s starting point may be animated to follow a certain item in the scene.

To the right of the Presets drop-down menu, choose the Auto Save button. Check the Save Effects Settings box when the Choose a Name dialog box appears. Future exports made with this preset will automatically take into account any Image Overlay settings you’ve configured.
Part 2. Premiere Pro Easy Alternative to Overlay Video [Filmora ]
Any professional video editor may be interested in it since it offers the strength, complexity, and adaptability they need. Users need to be well-versed in a variety of editing techniques in order to use the tools properly. Therefore, it’s not really the best option for a novice or someone who hasn’t mastered video editing. We advise using Filmora as a substitute because of this. It is user-friendly for all users and is crammed with numerous theme effects shops to spruce up your video effects, such as transitions, filters, overlays, titles, etc.
Filmora is a powerful and creative video editing program that is really simple to use. With a wide variety of sophisticated video editing tools, Filmora boasts a highly user-friendly interface. Both novice and experienced video editors may utilize the many creative features that Filmora offers. Filmora is the best option if you’re looking for a video editing program that’s not only inexpensive but also offers a variety of features and functions. The program not only has a fantastic user interface, but it also offers strong capabilities that let video editors create precisely the films they desire.
Free Download For Win 7 or later(64-bit)
Free Download For macOS 10.14 or later
Steps to Use Filmora to Overlay Videos:
Step1Launch Filmora
Run the software and switch to Video editor mode. Next, add the image or movie to the media library. Now drag and drop the primary video into the video track or click the “Import Media” button to add it.
Step2Import Media to Overlay
Find the image or video in the media library that you want to overlay over the backdrop video and right-click on it. The image or video overlay may be resized and positioned here as desired.

Step3Spice up with Effects
There are several choices available for adding extra effects to the video. By selecting the effect tab, you may look for more effects as well. The decision to switch to a green screen or include other components into the film is entirely up to you.

Step4Customize Effects and Save
Inside the Effects window, press Ok and once you have applied the required effects to see the modifications appear on the screen. You may also add element movements to make the video seem more entertaining. Once the editing and effect adding are complete, you may export the video on the go.
Conclusion
An image or animation that you contribute to your movies as a video overlay will display below the video and cover the video. Overlay editing is the kind of editing that is most often utilized. It just covers over whatever is in the timeline at the location where you wish to add that clip. If necessary, you may also review the comprehensive instructions for adding images or movies as an overlay to a video, which helps in improving the video quality. With Filmora , video overlays allow for the sharing of additional information without interfering with the viewing of the video.
Free Download For macOS 10.14 or later
Steps to Use Filmora to Overlay Videos:
Step1Launch Filmora
Run the software and switch to Video editor mode. Next, add the image or movie to the media library. Now drag and drop the primary video into the video track or click the “Import Media” button to add it.
Step2Import Media to Overlay
Find the image or video in the media library that you want to overlay over the backdrop video and right-click on it. The image or video overlay may be resized and positioned here as desired.
Step3Spice up with Effects
There are several choices available for adding extra effects to the video. By selecting the effect tab, you may look for more effects as well. The decision to switch to a green screen or include other components into the film is entirely up to you.
Step4Customize Effects and Save
Inside the Effects window, press Ok and once you have applied the required effects to see the modifications appear on the screen. You may also add element movements to make the video seem more entertaining. Once the editing and effect adding are complete, you may export the video on the go.
Conclusion
An image or animation that you contribute to your movies as a video overlay will display below the video and cover the video. Overlay editing is the kind of editing that is most often utilized. It just covers over whatever is in the timeline at the location where you wish to add that clip. If necessary, you may also review the comprehensive instructions for adding images or movies as an overlay to a video, which helps in improving the video quality. With Filmora , video overlays allow for the sharing of additional information without interfering with the viewing of the video.
Basic Introduction of LumaFusion Color Grading
Create High-Quality Video - Wondershare Filmora
An easy and powerful YouTube video editor
Numerous video and audio effects to choose from
Detailed tutorials provided by the official channel
There are many reasons why video editing is essential for content creators. Regardless of your reasons for putting up video content, you’ll achieve little progress without manipulating and structuring your shots. Video editing is what helps to create an emotional connection to your content. That, in turn, is what spurs your viewers to take the action you desire.
Maybe you already know a thing or two about video editing? Good for you! However, there’s always more to learn. For example, only a few people understand the intricacies of luma fusion color grading. Meanwhile, that’s one of the significant differentiating factors between a regular video editor and a pro.
Are you tired of video editing at a basic level? Then this article is for you. It will introduce you to the basics of LumaFusion color grading. Are you ready?
In this article
02 Essential Things You Should Know About Color Grading in LumaFusion
03 Does LumaFusion Have a Desktop Version?
What Is LumaFusion?
Are you a filmmaker, video producer, or editor? Then you’ll need LumaFusion at some point in your editing journey. Whether you are a professional or not, you can use LumaFusion to tell exciting stories through your videos. It has numerous essential features to produce the precise effects you wish to achieve. What’s more, you can use this effective multitrack video editor on iPads and iPhones.
One thing you will love about LumaFusion is its user-friendliness. Even as an aspiring videographer with little experience, you can understand how to use this video editing powerhouse in an instant and with minimal supervision.

LumaFusion is affordable, especially non-linear editors (NLEs) with similar details. When it comes to robust features, LumaFusion retakes the spotlight. This video editor will become your favorite tool in no time.
Here are some exciting things you can do using LumaFusion:
● Enjoy a Simplified SSD and Cloud Storage Importing Process
One of the best things about LumaFusion is your ability to import from SSD and cloud storage seamlessly. If you’re using an external SSD for playback media, this feature will excite you. LumaFusion automatically imports media from your SSD whenever you add video clips to the timeline. There’s no need to waste time importing media by yourself.
● Switch Between Six Workspace Layouts
LumaFusion features six workspace layouts. So you can choose whatever one works best for the project you are working on. With the layout button, you can scramble the source viewer, browser, and timeline to your preference. LumaFusion also gives you the option of viewing the content in portrait or landscape modes. It’s a truly customizable and advanced multitrack video editing app for everyone who loves ease.
● Access Seamless Final Cut Pro Exporting
Do you work with Final Cut Pro X? Then there’s exciting news for you. Lumafusion allows you to export specific project files so that you can work on the NLE. Even though this feature is only available for a fee, it offers excellent value for its $20 price. You can hardly have it cheaper with other NLEs.
● Leverage Its Intuitive UI/UX
This is no hoax—LumaFusion’s intuitive design will blow your mind. If you’ve got prior knowledge or experience using other editing platforms (especially NLEs), you find LumaFusion easy to use. If not, their comprehensive reference guide can help you get acquainted with the app quickly. LumaFusion’s design gives you absolute control.
● Explore Flexibility and Amazing Effects
LumaFusion has numerous fantastic effects to appreciate. These features offer you top-notch flexibility and functionality. The clip editor’s preview window comprises four different editors—the frame and fit editor, audio editors, speed editors, and the color and effects editor. From the timeline navigator to the audio mixer and clip editor, there’s a lot to explore on LumaFusion.
● Enjoy the Automated Audio Ducking Feature
Audio ducking involves temporarily lowering a specified audio signal’s volume when another one comes up. Having to do this manually can be tiring. Fortunately, with LumaFusion’s automatic audio ducking feature, you don’t have to worry about that anymore. All you need to do is assign speakers and music tracks as master and auto track. The audio ducking feature takes it up from there.

● Easy and Direct Exportation to Youtube and Vimeo
LumaFusion comes with an option that allows you to export your edited videos directly to YouTube or Vimeo. When exporting directly to YouTube, the app will enable you to write titles and descriptions or set categories and tags. If you choose to upload your videos to YouTube directly, you can transfer it to your file folder first.
Essential Things You Should Know About Color Grading in LumaFusion
Color grading is an essential post-production process that gives your footage’s color scheme a distinctive appearance and character. This technique gives your videos some cinematic impression by painting over them.
With color grading, you can adjust your video’s color balance, saturation, contrast, luminance, black level, etc. It helps to evoke the particular emotions or moods that you want your videos to exude.
These are the essential things to note about color grading in LumaFusion:
1. Does LumaFusion Have Color Grading?
In answering this question, it’s essential to understand the difference between color correction and color grading. Both editing techniques have vital differentiating characteristics, so it’s wrong to use them interchangeably.
Color correction ensures that videos look as natural to the human eye as possible. If there’s a technical color error, for example, due to bad lighting, color correction helps fix that.
However, the aim of color grading isn’t fixing color mistakes but using colors to convey a mood, atmosphere, or style. Some videographers classify color correction as the first phase in the color grading process.
Generally, you can use LumaFusion to color correct your footage. However, you can’t color grade with the app except you decide to tamper with the color presets tab’s color sliders. Even at that, you wouldn’t get the perfect results you want.
Fortunately, LumaFusion allows you to import and apply LUT (look-up tables). With LumaFusion LUTs, you can color grade your footage to your satisfaction.
2. How To Color Grade in LumaFusion
This is how to color grade your videos:
○ First, Color Correct
When attempting to color grade your footage, it’s essential that you color correct it first. Color correction ensures that your video doesn’t remain flat or unexciting.
○ Create Your LUTs
LUT allows you to save specific color grades to use anytime you need them. This helps to save time by ensuring that you don’t develop color spaces all over again when working on various footage. You can also download as many free LUTs as you like.
○ Bring In a LUT
After creating LUTs, import and apply them to your LumaFusion. Next, blend or adjust your LUt by shifting the slider to get your desired effects. It’s that simple!
3. Can I Use Multiple LUTs in LumaFusion?
The short answer is a big YES. You can apply multiple LUTs in LumaFusion.
Here’s how t go o about it:
- Apply your first LUT
- Export the LUT
- Access rendered movies
- Apply the second LUT
There is numerous manipulation you can do with LUT. For example, you can merge two or more LUTs into one.
Does LumaFusion Have a Desktop Version?
Do you own a PC or desktop[, and you’re wondering how to access LumaFusion’s unique features on it? Unfortunately, LumaFusion is only available for iOS users and not Android or Windows PC.
However, all hope is not lost as Filmora has come to the rescue. Filmora’s video editor provides you with color matching/grading options to create the cinematic effects you want for your footage. You can use the features on your computer.
Let’s talk about Filmora’s Video Editor for Windows features in some detail:
For Win 7 or later (64-bit)
For macOS 10.12 or later
● Color Match
Do you want to achieve a similar color or consistent look for multiple clips? Then Filmora’s video editor is your best bet. The color match feature ensures color consistency throughout your video. It’s easy to use, aids efficiency, and saves your time.
● Color Correction
Color correction is one of the easiest ways to make your footage look extraordinary. With over 40 fantastic drag-and-color presets available to you, your color correction game is about to get lit. Filmora’s color correction feature also allows you to make 3D LUTs conveniently.
Filmora offers free online tools for videographers and unique products for computer software and mobile apps. You can check here to get more information about the Lumafusion alternatives on Mac .
Conclusion
● What’s worth doing is worth doing well? That’s why, as a videographer, you shouldn’t be comfortable with uploading flat, ordinary videos. It’ll help if you take your craft a notch higher by considering color grading for your footage.
● Did you fall in love with LumaFusion’s video editing app? That’s great. With your iPhone or iPad, you can get the best out of the video editor.
● Filmora offers you cool video editing features for color correcting and grading if you’re working on a desktop. There are also amazing Filmora apps for iOS and Android devices. Visit their website for more information on how these video editing features can improve your project’s quality.
There are many reasons why video editing is essential for content creators. Regardless of your reasons for putting up video content, you’ll achieve little progress without manipulating and structuring your shots. Video editing is what helps to create an emotional connection to your content. That, in turn, is what spurs your viewers to take the action you desire.
Maybe you already know a thing or two about video editing? Good for you! However, there’s always more to learn. For example, only a few people understand the intricacies of luma fusion color grading. Meanwhile, that’s one of the significant differentiating factors between a regular video editor and a pro.
Are you tired of video editing at a basic level? Then this article is for you. It will introduce you to the basics of LumaFusion color grading. Are you ready?
In this article
02 Essential Things You Should Know About Color Grading in LumaFusion
03 Does LumaFusion Have a Desktop Version?
What Is LumaFusion?
Are you a filmmaker, video producer, or editor? Then you’ll need LumaFusion at some point in your editing journey. Whether you are a professional or not, you can use LumaFusion to tell exciting stories through your videos. It has numerous essential features to produce the precise effects you wish to achieve. What’s more, you can use this effective multitrack video editor on iPads and iPhones.
One thing you will love about LumaFusion is its user-friendliness. Even as an aspiring videographer with little experience, you can understand how to use this video editing powerhouse in an instant and with minimal supervision.
LumaFusion is affordable, especially non-linear editors (NLEs) with similar details. When it comes to robust features, LumaFusion retakes the spotlight. This video editor will become your favorite tool in no time.
Here are some exciting things you can do using LumaFusion:
● Enjoy a Simplified SSD and Cloud Storage Importing Process
One of the best things about LumaFusion is your ability to import from SSD and cloud storage seamlessly. If you’re using an external SSD for playback media, this feature will excite you. LumaFusion automatically imports media from your SSD whenever you add video clips to the timeline. There’s no need to waste time importing media by yourself.
● Switch Between Six Workspace Layouts
LumaFusion features six workspace layouts. So you can choose whatever one works best for the project you are working on. With the layout button, you can scramble the source viewer, browser, and timeline to your preference. LumaFusion also gives you the option of viewing the content in portrait or landscape modes. It’s a truly customizable and advanced multitrack video editing app for everyone who loves ease.
● Access Seamless Final Cut Pro Exporting
Do you work with Final Cut Pro X? Then there’s exciting news for you. Lumafusion allows you to export specific project files so that you can work on the NLE. Even though this feature is only available for a fee, it offers excellent value for its $20 price. You can hardly have it cheaper with other NLEs.
● Leverage Its Intuitive UI/UX
This is no hoax—LumaFusion’s intuitive design will blow your mind. If you’ve got prior knowledge or experience using other editing platforms (especially NLEs), you find LumaFusion easy to use. If not, their comprehensive reference guide can help you get acquainted with the app quickly. LumaFusion’s design gives you absolute control.
● Explore Flexibility and Amazing Effects
LumaFusion has numerous fantastic effects to appreciate. These features offer you top-notch flexibility and functionality. The clip editor’s preview window comprises four different editors—the frame and fit editor, audio editors, speed editors, and the color and effects editor. From the timeline navigator to the audio mixer and clip editor, there’s a lot to explore on LumaFusion.
● Enjoy the Automated Audio Ducking Feature
Audio ducking involves temporarily lowering a specified audio signal’s volume when another one comes up. Having to do this manually can be tiring. Fortunately, with LumaFusion’s automatic audio ducking feature, you don’t have to worry about that anymore. All you need to do is assign speakers and music tracks as master and auto track. The audio ducking feature takes it up from there.
● Easy and Direct Exportation to Youtube and Vimeo
LumaFusion comes with an option that allows you to export your edited videos directly to YouTube or Vimeo. When exporting directly to YouTube, the app will enable you to write titles and descriptions or set categories and tags. If you choose to upload your videos to YouTube directly, you can transfer it to your file folder first.
Essential Things You Should Know About Color Grading in LumaFusion
Color grading is an essential post-production process that gives your footage’s color scheme a distinctive appearance and character. This technique gives your videos some cinematic impression by painting over them.
With color grading, you can adjust your video’s color balance, saturation, contrast, luminance, black level, etc. It helps to evoke the particular emotions or moods that you want your videos to exude.
These are the essential things to note about color grading in LumaFusion:
1. Does LumaFusion Have Color Grading?
In answering this question, it’s essential to understand the difference between color correction and color grading. Both editing techniques have vital differentiating characteristics, so it’s wrong to use them interchangeably.
Color correction ensures that videos look as natural to the human eye as possible. If there’s a technical color error, for example, due to bad lighting, color correction helps fix that.
However, the aim of color grading isn’t fixing color mistakes but using colors to convey a mood, atmosphere, or style. Some videographers classify color correction as the first phase in the color grading process.
Generally, you can use LumaFusion to color correct your footage. However, you can’t color grade with the app except you decide to tamper with the color presets tab’s color sliders. Even at that, you wouldn’t get the perfect results you want.
Fortunately, LumaFusion allows you to import and apply LUT (look-up tables). With LumaFusion LUTs, you can color grade your footage to your satisfaction.
2. How To Color Grade in LumaFusion
This is how to color grade your videos:
○ First, Color Correct
When attempting to color grade your footage, it’s essential that you color correct it first. Color correction ensures that your video doesn’t remain flat or unexciting.
○ Create Your LUTs
LUT allows you to save specific color grades to use anytime you need them. This helps to save time by ensuring that you don’t develop color spaces all over again when working on various footage. You can also download as many free LUTs as you like.
○ Bring In a LUT
After creating LUTs, import and apply them to your LumaFusion. Next, blend or adjust your LUt by shifting the slider to get your desired effects. It’s that simple!
3. Can I Use Multiple LUTs in LumaFusion?
The short answer is a big YES. You can apply multiple LUTs in LumaFusion.
Here’s how t go o about it:
- Apply your first LUT
- Export the LUT
- Access rendered movies
- Apply the second LUT
There is numerous manipulation you can do with LUT. For example, you can merge two or more LUTs into one.
Does LumaFusion Have a Desktop Version?
Do you own a PC or desktop[, and you’re wondering how to access LumaFusion’s unique features on it? Unfortunately, LumaFusion is only available for iOS users and not Android or Windows PC.
However, all hope is not lost as Filmora has come to the rescue. Filmora’s video editor provides you with color matching/grading options to create the cinematic effects you want for your footage. You can use the features on your computer.
Let’s talk about Filmora’s Video Editor for Windows features in some detail:
For Win 7 or later (64-bit)
For macOS 10.12 or later
● Color Match
Do you want to achieve a similar color or consistent look for multiple clips? Then Filmora’s video editor is your best bet. The color match feature ensures color consistency throughout your video. It’s easy to use, aids efficiency, and saves your time.
● Color Correction
Color correction is one of the easiest ways to make your footage look extraordinary. With over 40 fantastic drag-and-color presets available to you, your color correction game is about to get lit. Filmora’s color correction feature also allows you to make 3D LUTs conveniently.
Filmora offers free online tools for videographers and unique products for computer software and mobile apps. You can check here to get more information about the Lumafusion alternatives on Mac .
Conclusion
● What’s worth doing is worth doing well? That’s why, as a videographer, you shouldn’t be comfortable with uploading flat, ordinary videos. It’ll help if you take your craft a notch higher by considering color grading for your footage.
● Did you fall in love with LumaFusion’s video editing app? That’s great. With your iPhone or iPad, you can get the best out of the video editor.
● Filmora offers you cool video editing features for color correcting and grading if you’re working on a desktop. There are also amazing Filmora apps for iOS and Android devices. Visit their website for more information on how these video editing features can improve your project’s quality.
Also read:
- Updated In 2024, Best 8 Educational Video Websites for Teachers
- Find Out What Track Mattes Are in After Effects and Learn How to Find and Use It with Simple and Easy-to-Follow Instructions for 2024
- In 2024, Do You Want to Make TikTok Videos More Elemental by Using Countdown but Dont Know How to Do This? Here We Will Thoroughly Guide You About This
- New How Does Sonys S&Q Feature Help Recording Slow-Motion Video for 2024
- New 10 Best Free Spanish Text To Speech Converter Websites for 2024
- Using VN Editor To Add Luts for Video Editing
- How to Use a Stabilization Tool in Filmora
- In 2024, Ultimate Guide on Converting Word to SRT
- Updated A Comprehensive Guide on VHS Technology and Its Influence on Video Editing for 2024
- In 2024, A Guide To Motion Tracking Using The Best Video Editors
- 2024 Approved Several Tips Can Facilitate How You Edit Videos Faster and Easier. All You Need to Do Is to Read This Article to Find Out What They Are
- Bandicut Video Editor Download and Review
- New How to Get VHS Filter and Glitch Filter to Your Images or Videos for 2024
- 2024 Approved How To Export Video in Filmora
- New In 2024, How To Add Text In After Effects
- New Dollar-Store DIY Hacks to Use for Filmmaking
- Updated A Complete Overview of VSCO Video Editor for 2024
- Updated How to Got Free After Effects Templates Slideshow with Simple Trick
- 2024 Approved 10 Best Movie Trailer Voice Generators Windows, Mac, Android, iPhone & Online
- Updated 2024 Approved Boost the Pace of Your Instagram Reels Videos with These Simple Tricks
- Logo Intro Videos Are the Hottest Trend in Town and Are Gaining Popularity Quickly. Keep Reading This Article to Learn Their Importance and How to Design One
- New How I Got Free After Effects Templates Slideshow with Simple Trick
- In 2024, Do You Want to Know About the Best Filmic Pro LUTs for Video Editing? This Article Provides Details on the Best Recommendations
- In 2024, The Power of Music in Videos
- AVI Editor for Windows 11/10/8.1/8/7 Easily Edit AVI Files on PC
- Updated MP3 Cutter Download
- Updated In 2024, The Best Way to Remove Audio From Your Videos
- New How to Color Grade Your Picture in LightRoom for 2024
- 2024 Approved Learn How to Create a Kinetic Typography Text Effect in Filmora, One of the Best Video Editors for All Skill Levels. Check Out This Simple Step-by-Step Guide
- 2024 Approved Learning Some Perfect Ways to Convert a Slow-Motion Video to Normal
- Use Your Social Media App and Make Slow-Motion Videos by Reading This Guide. Besides Learning Slow-Motion Snapchat, Get Useful Apps Serving the Same Purposes
- New Every Compositor Should Know The Trick of Color Match in After Effects
- How To Speed Up Video With Lightworks Video Editor
- Updated In 2024, 15 Camera Shake Preset for Adobe Premiere Pro
- Updated Hitfilm Express - A Guide to Download, Install, Key Features
- In 2024, Deleting White Background in Photoshop Is Hard?
- Updated This Article Will Show You How to Clone Yourslef in Videos with Filmora
- Updated Secret Tips & Tricks to Use in Filmora for 2024
- How to Make Vintage Film Effect 1980S
- In 2024, How to Create A Freeze Frame Sequence in Video
- Updated Full Guide to Funcall Voice Changer and Its Alternatives
- Top 20 Slideshow Makers for Win/Mac/Online Review
- New How Can You Deny These Top 10 Free Speech to Text Software
- This Article Aim to Teach You How to Make a Night to Day Effect Video with Filmora. Follow the Steps to Figure It Out for 2024
- New What Are the Best Video Background Changers Online, In 2024
- Reliable User Guide to Fix Motorola Moto G13 Running Slow and Freezing | Dr.fone
- Here are Some of the Best Pokemon Discord Servers to Join On Honor 80 Pro Straight Screen Edition | Dr.fone
- How to Detect and Remove Spyware on Oppo Find N3 Flip? | Dr.fone
- Ultimate Guide to Catch the Regional-Located Pokemon For Apple iPhone 11 Pro | Dr.fone
- In 2024, How Do You Get Sun Stone Evolutions in Pokémon For Vivo T2x 5G? | Dr.fone
- How to Intercept Text Messages on Motorola Moto G24 | Dr.fone
- How to Easily Hard reset my Oppo A1x 5G | Dr.fone
- 5 Ways to Reset Xiaomi Redmi Note 13 Pro 5G Without Volume Buttons | Dr.fone
- In 2024, 9 Best Free Android Monitoring Apps to Monitor Phone Remotely For your Samsung Galaxy F04 | Dr.fone
- Easy Ways to Translate TikTok Videos
- In 2024, 8 Ways to Transfer Photos from Lava Yuva 2 to iPhone Easily | Dr.fone
- In 2024, How Do You Unlock your iPhone XS Max? Learn All 4 Methods | Dr.fone
- How to Share Location in Messenger On Oppo A59 5G? | Dr.fone
- Samsung Galaxy S24 Camera Not Working Unexpected Error? Fix It Now | Dr.fone
- The Magnificent Art of Pokemon Go Streaming On Poco M6 Pro 5G? | Dr.fone
- How to retrieve erased videos from Samsung Galaxy XCover 7
- Unlock android phone if you forget the Huawei password or pattern lock
- What is the best Pokemon for pokemon pvp ranking On Realme 12 Pro+ 5G? | Dr.fone
- In 2024, How to Change Location On Facebook Dating for your Apple iPhone 12 | Dr.fone
- In 2024, How to Unlock Apple ID Activation Lock On Apple iPhone 6?
- AddROM Bypass An Android Tool to Unlock FRP Lock Screen For your Xiaomi Redmi K70 Pro
- Updated In 2024, What Are AI Tools? | Wondershare Virbo Glossary
- In 2024, Detailed guide of ispoofer for pogo installation On Honor V Purse | Dr.fone
- Can Life360 Track Or See Text Messages? What Can You Do with Life360 On Apple iPhone 11 Pro Max? | Dr.fone
- In 2024, How to Transfer Data After Switching From Itel A05s to Latest Samsung | Dr.fone
- How to Use Google Assistant on Your Lock Screen Of Vivo Y17s Phone
- In 2024, How Do I SIM Unlock My iPhone 15?
- New Top 4 Morgan Freeman Voice Generator Tools for Voice Cloning for 2024
- Can I Bypass a Forgotten Phone Password Of Lava Blaze 2?
- In 2024, Unlocking Apple iPhone 13 mini Lock Screen 3 Foolproof Methods that Actually Work | Dr.fone
- Top 4 SIM Location Trackers To Easily Find Your Lost ZTE Axon 40 Lite Device
- Solved Warning Camera Failed on Samsung Galaxy A24 | Dr.fone
- In 2024, Best 3 Vivo V30 Pro Emulator for Mac to Run Your Wanted Android Apps | Dr.fone
- How To Transfer WhatsApp From iPhone 6s Plus to other iPhone 14 Pro devices? | Dr.fone
- How to Fix Apple iPhone SE (2020) Passcode not Working?
- In 2024, What Is a SIM Network Unlock PIN? Get Your HTC U23 Pro Phone Network-Ready
- How To Transfer WhatsApp From Apple iPhone XS Max to other iPhone? | Dr.fone
- In 2024, Here are Some of the Best Pokemon Discord Servers to Join On Poco M6 Pro 4G | Dr.fone
- New In 2024, The Art of Comics - Learn How to Do Funny Cartoon Drawings
- A Complete Guide To OEM Unlocking on Vivo Y100i Power 5G
- What is Geo-Blocking and How to Bypass it On Tecno Spark 10C? | Dr.fone
- Fixing Foneazy MockGo Not Working On Meizu 21 | Dr.fone
- Complete Tutorial to Use GPS Joystick to Fake GPS Location On Samsung Galaxy A05s | Dr.fone
- Can I Bypass a Forgotten Phone Password Of Poco X6?
- 5 Ways to Send Ringtones from Apple iPhone 6s Plus to iPhone Including iPhone 15 | Dr.fone
- Title: How to Add Custom Subtitles to Netflix
- Author: Chloe
- Created at : 2024-05-20 03:37:21
- Updated at : 2024-05-21 03:37:21
- Link: https://ai-editing-video.techidaily.com/how-to-add-custom-subtitles-to-netflix/
- License: This work is licensed under CC BY-NC-SA 4.0.
