:max_bytes(150000):strip_icc():format(webp)/relaxing-while-getting-his-studies-done-495857099-5a1ed8c5ec2f640037e369f4.jpg)
How to Add Echo Effect to Video

How to Add Echo Effect to Video
If you are alone in a large empty room and you speak something, your words get echoed across the room. It will seem as if you are speaking the same words multiple times but with less volume every single time. When you have a video where you are reading out poems or giving an important message, adding an echo effect to the video makes the audio impactful and engaging.
You will need a video editor where you can add echo effect to video in simple steps. Not many video editors are available where you can add the echo effect instantly from the available sound effects and presets. That is why we have handpicked the best video editors for Windows PC and Mac users. You can also add echo effect to video online from any device directly from your web browser.
Part 1. How to Add Echo Effect to Video Online
If you want to add echo effect to your video one time only, there is no need to download any video editor uselessly. You can use an online audio editor to add echo effect and combine the modified audio and video files together. TwistedWave is one of the few online video editors that allow you to add echo effect to your video. Here are the steps how to add echo effect in video online.
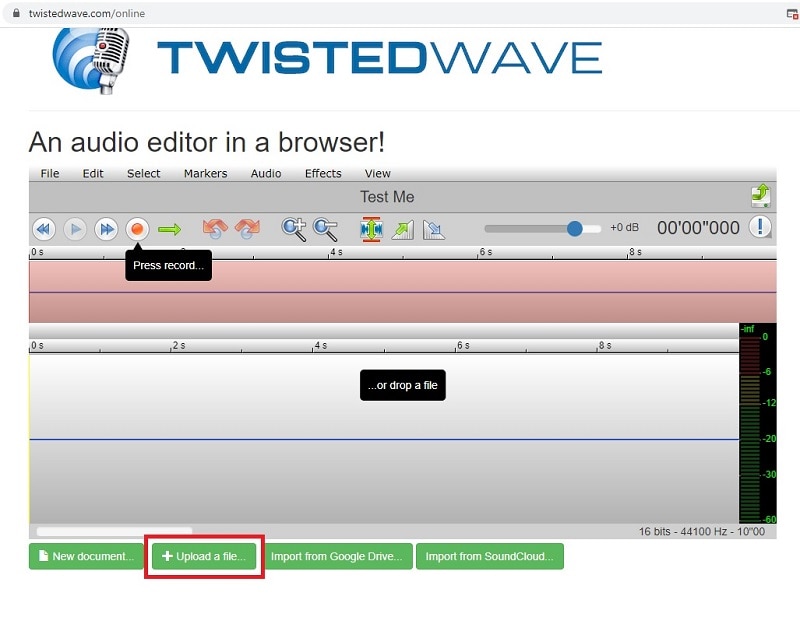
Step 1Open your web browser and visit “twistedwave.com/online”. Click on Upload a file button to upload your video file.
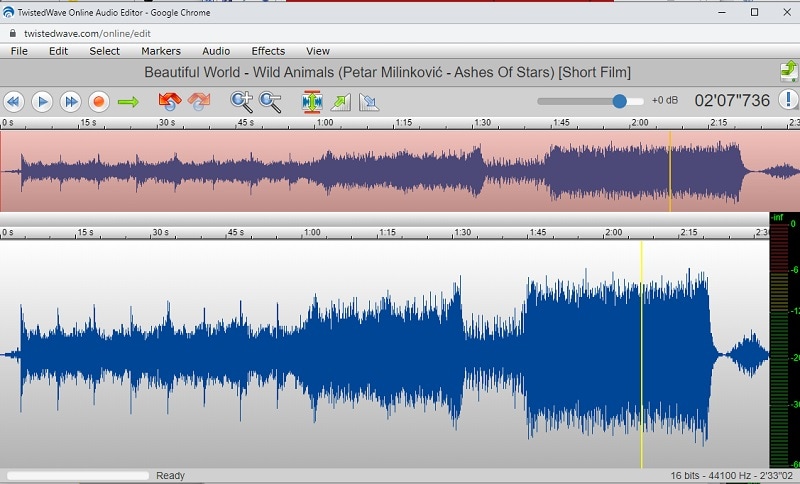
Step 2After successful uploading, TwistedWave will separate the audio portion from the uploaded video file and open it on its editor to add sound effects.
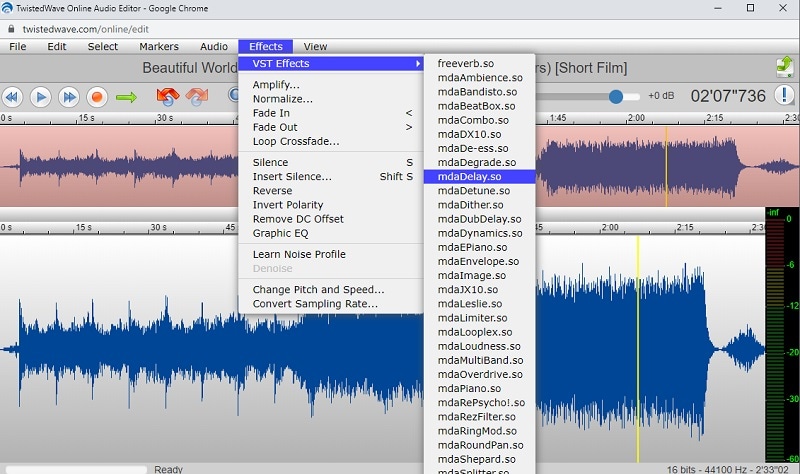
Step 3On the new editor window, go to Effects> VST Effects and click on mdaDelay.so.
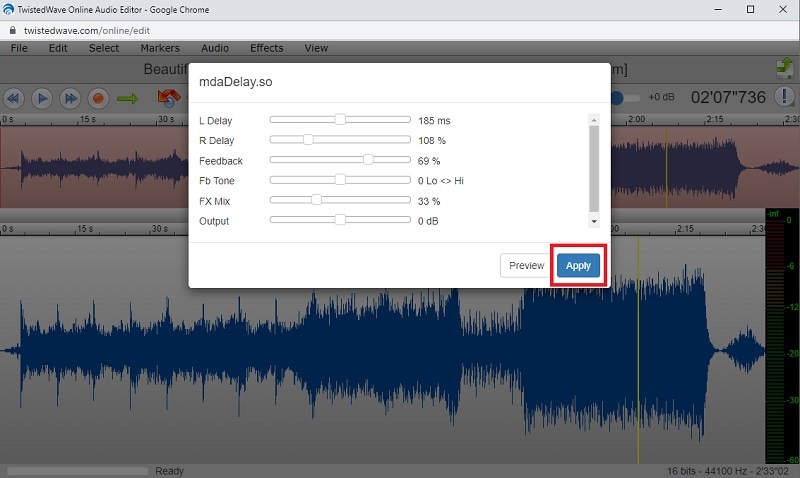
Step 4From the pop-up window, you can adjust different parameters as per your preference for the enhanced echo effect. Click on Apply button.
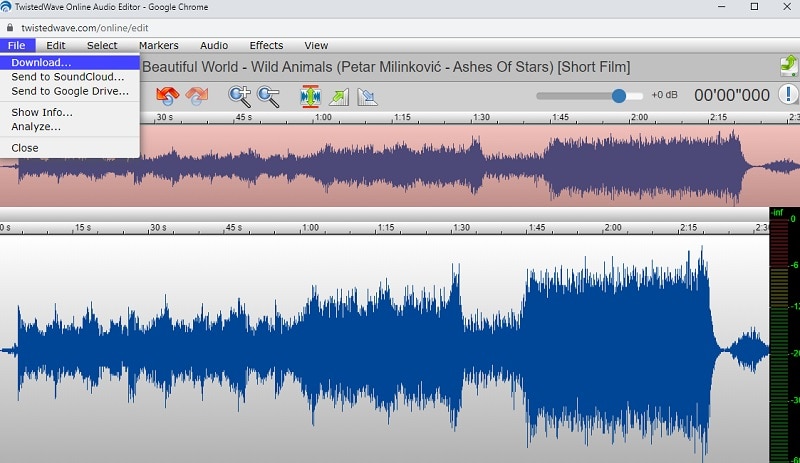
Step 5Play the audio to check the echo effect and go to File and click on Download option. You can save the modified audio file on your device.
Part 2. How to Add Echo to Video on Windows PC
If you are a Windows PC user, there are only a few video editors available where you can add echo effect instant from the built-in option. Even the most popular video editors do not have the echo effect preset in the audio effects. We recommend Wondershare Filmora where you can add echo effect in a few steps instantly from the built-in echo effect.
Filmora Video Editor is a powerful application that simplifies adding echo effects to your videos. It has a comprehensive range of features that make it easy for even beginners to create stunning results in no time at all. To start adding a echo effect with Filmora, follow these few simple steps:
Free Download For Win 7 or later(64-bit)
Free Download For macOS 10.14 or later
Step 1Download and install Filmora. Launch the application and click on New Project option. You can go to File menu and click on New Project option.

Step 2Go to File> Import Media and click on Import Media Files option. Select your video file from your storage device. Otherwise, you can drag and drop the video on Project Media and drop the video on Timeline.

Step 3Click on Effects option located at the top and search for “echo”. Drag and drop the Echo effect on your video located on Timeline.
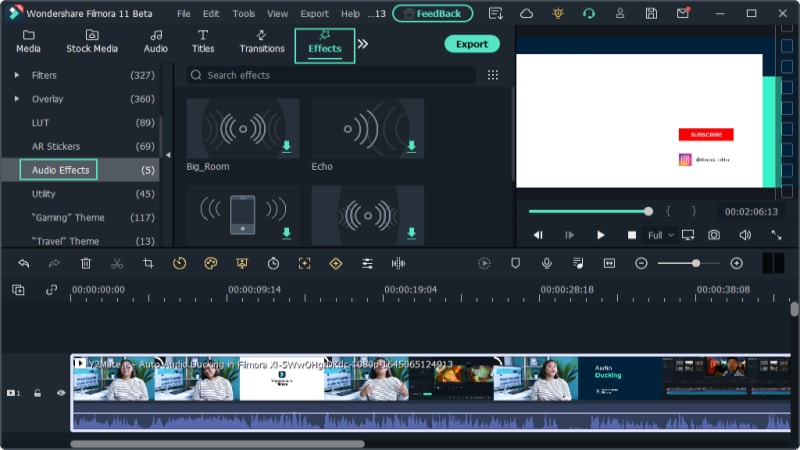
Step 4Double-click on the video file and click on Audio option at the top. Scroll down and go to Echo section. You can adjust the parameters to get the echo effect as per your preference. Click on Ok button.

Step 5Play the video and if you are satisfied, click on Export button to save the video in your desired file format.
Part 3. How to Add Echo to Video on Mac
If you are a Mac user and you are looking for a free video editor to add echo effect, you can use iMovie app. iMovie is a video editor by Apple and most Mac users know and might have used it. iMovie comes with a built-in echo delay effect that can get the job done for you. However, the effect is not customizable as it is in Filmora. Here are the steps on how to put echo on video using iMovie.
Step 1Launch iMovie from Applications folder as it comes pre-installed on Mac.
Step 2Go to File> Import Media to bring in your video file. Thereafter, drag and drop the file on the Timeline.

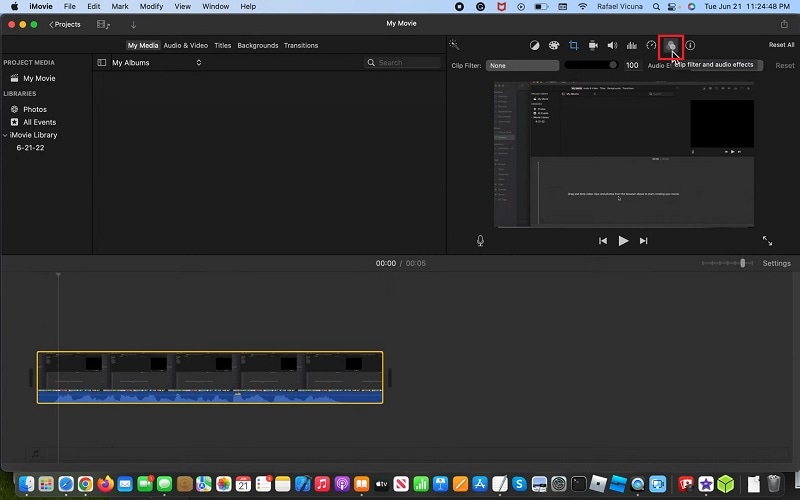
Step 3Click on the video clip on the Timeline and click on “Clip Filter and Audio Effects” icon in the top-right corner.
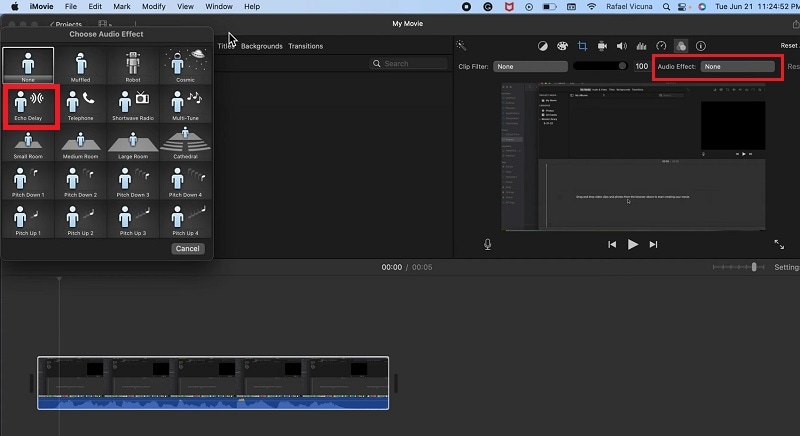
Step 4Click on Audio Effect – None option and “Choose Audio Effect” pop-up window will open. Click on Echo Delay option.
Step 5Play the video and go to File> Share> File option to export the edited video.

The Bottom Line
Adding echo effect to video is a common trend when you want to emphasize what you are speaking. The echo effect sounds different and hence, it grabs the attention of the audience instantly. We have illustrated how you can add echo effect to your video online as well as on your computer. We highly recommend Wondershare Filmora to instant put echo effect to your video on Windows PC and Mac.
Free Download For Win 7 or later(64-bit)
Free Download For macOS 10.14 or later
Free Download For macOS 10.14 or later
Step 1Download and install Filmora. Launch the application and click on New Project option. You can go to File menu and click on New Project option.

Step 2Go to File> Import Media and click on Import Media Files option. Select your video file from your storage device. Otherwise, you can drag and drop the video on Project Media and drop the video on Timeline.

Step 3Click on Effects option located at the top and search for “echo”. Drag and drop the Echo effect on your video located on Timeline.

Step 4Double-click on the video file and click on Audio option at the top. Scroll down and go to Echo section. You can adjust the parameters to get the echo effect as per your preference. Click on Ok button.

Step 5Play the video and if you are satisfied, click on Export button to save the video in your desired file format.
Part 3. How to Add Echo to Video on Mac
If you are a Mac user and you are looking for a free video editor to add echo effect, you can use iMovie app. iMovie is a video editor by Apple and most Mac users know and might have used it. iMovie comes with a built-in echo delay effect that can get the job done for you. However, the effect is not customizable as it is in Filmora. Here are the steps on how to put echo on video using iMovie.
Step 1Launch iMovie from Applications folder as it comes pre-installed on Mac.
Step 2Go to File> Import Media to bring in your video file. Thereafter, drag and drop the file on the Timeline.

Step 3Click on the video clip on the Timeline and click on “Clip Filter and Audio Effects” icon in the top-right corner.

Step 4Click on Audio Effect – None option and “Choose Audio Effect” pop-up window will open. Click on Echo Delay option.

Step 5Play the video and go to File> Share> File option to export the edited video.

The Bottom Line
Adding echo effect to video is a common trend when you want to emphasize what you are speaking. The echo effect sounds different and hence, it grabs the attention of the audience instantly. We have illustrated how you can add echo effect to your video online as well as on your computer. We highly recommend Wondershare Filmora to instant put echo effect to your video on Windows PC and Mac.
Free Download For Win 7 or later(64-bit)
Free Download For macOS 10.14 or later
Dollar-Store DIY Hacks to Use for Filmmaking on a Budget
Filmmaking is usually an expensive hobby, but slowly over time, it’s become more affordable. Regular gear like cameras and lights are slightly cheaper, but there are plenty of ways to DIY regular items to use as film gear.
Making DIY film gear may not give you the same look as professional gear, but it could be a fun project and give you similar looks on a budget. In this article, let’s look at some dollar-store DIY hacks that you can use for filmmaking on a budget.
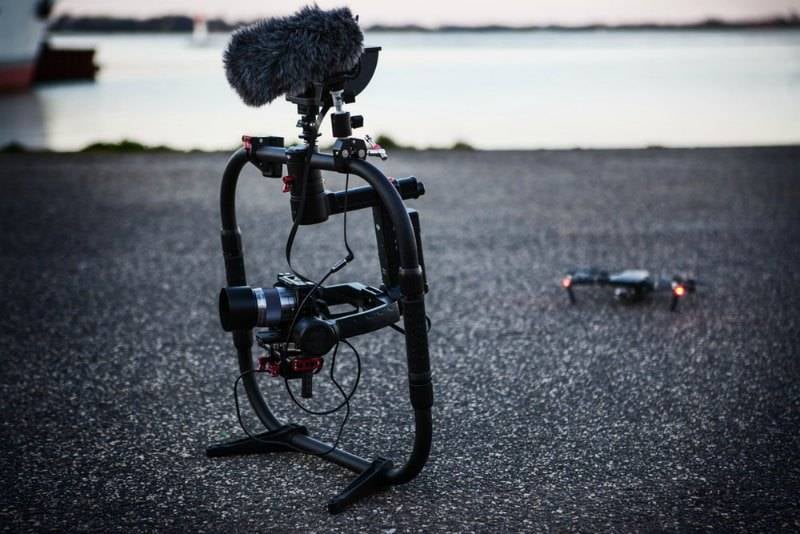
Tip 1. Add foreground elements to improve the frame of videos
Let’s start with something we can do to enhance your framing. Sometimes we want to direct our audience’s attention to a specific part of the frame. In this case, it’s the talent of placing an object in the shot’s foreground that can help us do that. While also making a more attractive frame. At the dollar store, try using something like these fake plants.
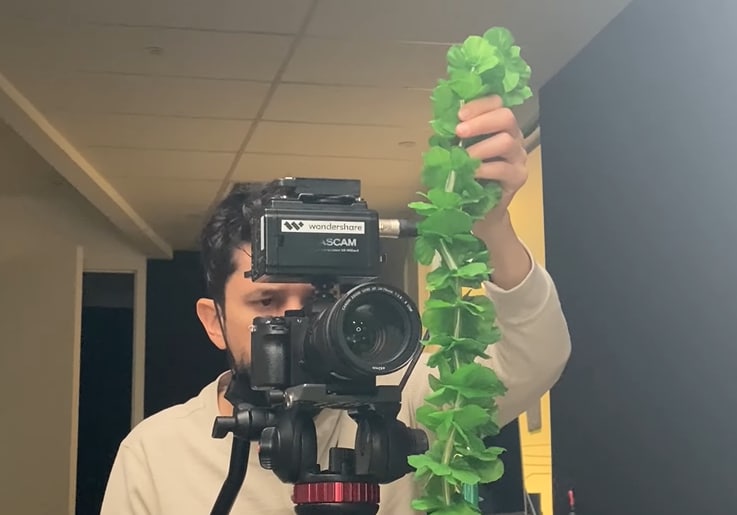
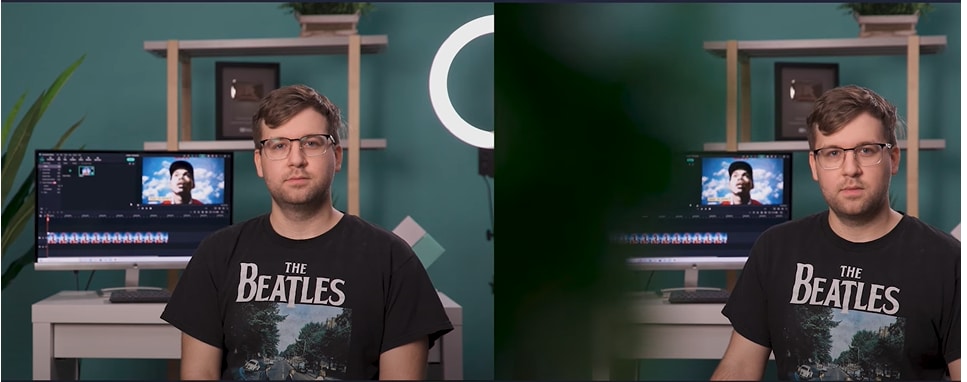
You can place it in front of your lens. Then focus on the talent behind it, giving a blurry foreground that perfectly frames the talent. Here’s how the shot looks with and without foreground elements.
![]()
Note: Remember, you can also use a different angle than simply approaching the object from the front. You can try and use different perspectives until you find the shot or footage you are looking for.
Tip 2. Adjust lights with poster boards
The shot below looks dark and boring because the background has no light. Here’s the shot with and without the lights.

A practical light is a light that shows up on screen rather than lighting talent from off-screen. For example, some dollar stores have small LED accent lights for around three dollars.
Others even have lights with adhesive backings that allow you to place them all over the room—creating great lighting accents with small eye-catching pockets of light.

On film sets, crews use a bounce to reflect light from one light source in another direction. At the dollar store, we can find something like this poster board to get a similar effect.

By reflecting the light onto the bounce, we get softer, more spread-out light when it’s reflected. Then you will get the result in a nicer look. Using poster boards, you can do multiple things with light.
- Use white to bounce light.
- Use black as a flag to shape or block light.

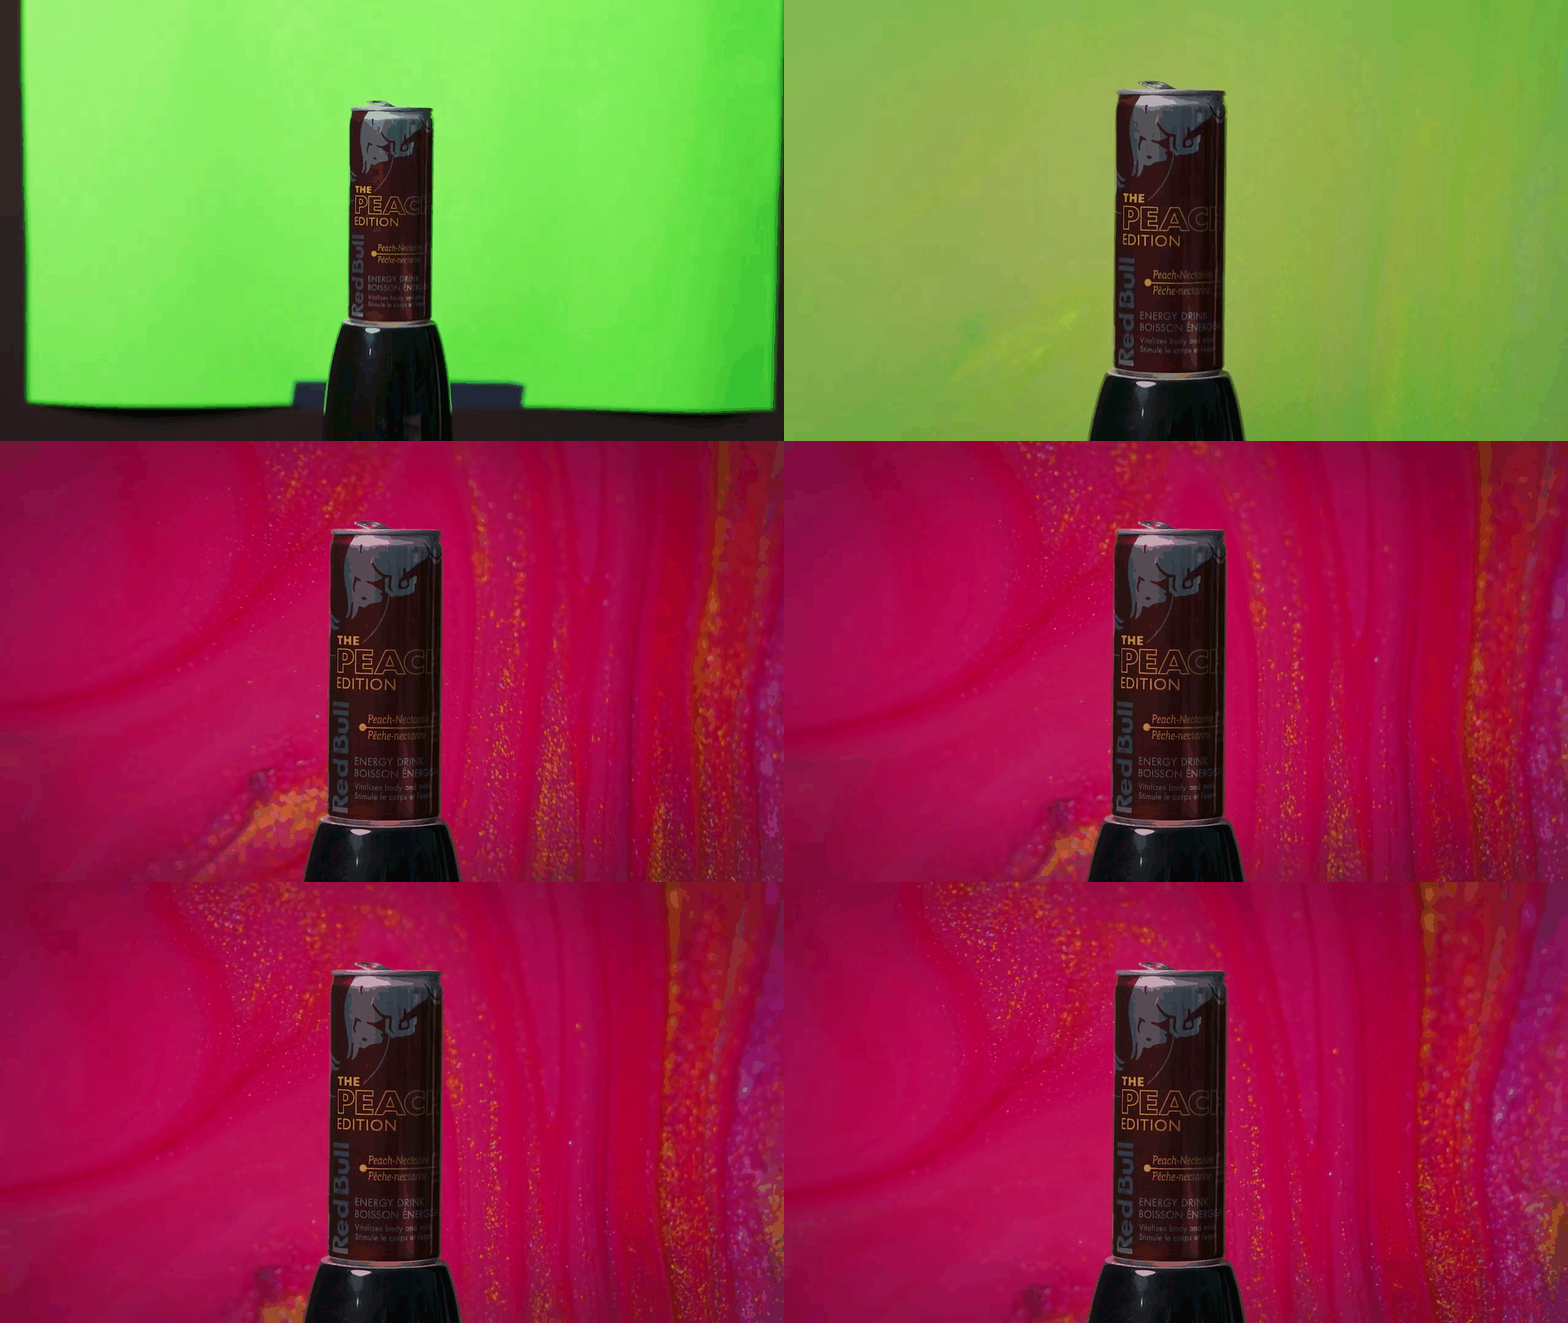
- You can also use green for a small green screen when filming a product video
You might have seen how big production companies create those alienated landscapes, such as in the movie Avatar and many more.
The concept is recording your object in front of a green screen behind it. Then, it’s much easier to add a separately filmed background to the final footage with a video editor like Filmora.
Tip 3. Smooth audio with felt pads or socks
Do you ever have audio pop while you are recording? It can get annoying. So, to fix the issues, we are now teaching you three practical ways.
1. Felt pads
Felt pads with adhesive backs can be stuck onto noisy props like a coffee mug. This way, we won’t hear the mug hitting the table when we’re recording sound.

2. Socks as pop filters
Professionals use what they call a pop filter because a pop filter can reduce the loud pops from their mouths. But what is pop? Pops usually occur when people say words that start with the letter P or B.
Then what is a pop filter? You might have seen in some YouTube videos, especially live streamers, where they use a microphone with a plate on its head; that’s called a pop filter. You can purchase pricey gear like a pop filter, or we can get a pack of cheap socks at the dollar store and place them over the mic.
It will make your voiceover slightly quieter, but it should also get rid of the popping. So keep adding socks until you hear no more pops in your voiceover.

Conclusion
See how easy it was! Keep in mind these dollar store hacks in your next video. And you can edit your footage like a pro with an easy-to-use video editor like Wondershare Filmora . Keep exploring different ideas and perspectives to record.
Free Download For Win 7 or later(64-bit)
Free Download For macOS 10.14 or later
Tip 2. Adjust lights with poster boards
The shot below looks dark and boring because the background has no light. Here’s the shot with and without the lights.

A practical light is a light that shows up on screen rather than lighting talent from off-screen. For example, some dollar stores have small LED accent lights for around three dollars.
Others even have lights with adhesive backings that allow you to place them all over the room—creating great lighting accents with small eye-catching pockets of light.

On film sets, crews use a bounce to reflect light from one light source in another direction. At the dollar store, we can find something like this poster board to get a similar effect.

By reflecting the light onto the bounce, we get softer, more spread-out light when it’s reflected. Then you will get the result in a nicer look. Using poster boards, you can do multiple things with light.
- Use white to bounce light.
- Use black as a flag to shape or block light.

- You can also use green for a small green screen when filming a product video
You might have seen how big production companies create those alienated landscapes, such as in the movie Avatar and many more.
The concept is recording your object in front of a green screen behind it. Then, it’s much easier to add a separately filmed background to the final footage with a video editor like Filmora.

Tip 3. Smooth audio with felt pads or socks
Do you ever have audio pop while you are recording? It can get annoying. So, to fix the issues, we are now teaching you three practical ways.
1. Felt pads
Felt pads with adhesive backs can be stuck onto noisy props like a coffee mug. This way, we won’t hear the mug hitting the table when we’re recording sound.

2. Socks as pop filters
Professionals use what they call a pop filter because a pop filter can reduce the loud pops from their mouths. But what is pop? Pops usually occur when people say words that start with the letter P or B.
Then what is a pop filter? You might have seen in some YouTube videos, especially live streamers, where they use a microphone with a plate on its head; that’s called a pop filter. You can purchase pricey gear like a pop filter, or we can get a pack of cheap socks at the dollar store and place them over the mic.
It will make your voiceover slightly quieter, but it should also get rid of the popping. So keep adding socks until you hear no more pops in your voiceover.

Conclusion
See how easy it was! Keep in mind these dollar store hacks in your next video. And you can edit your footage like a pro with an easy-to-use video editor like Wondershare Filmora . Keep exploring different ideas and perspectives to record.
Free Download For Win 7 or later(64-bit)
Free Download For macOS 10.14 or later
IMovie Review – Is It The Best Video Editor for Mac Users
If you are a Mac user and you are getting started in video editing, it is better if you start with a free video editing software. There is no need to download any external free video editor when you are a Mac user. This is because Mac comes with a pre-installed free video editor called iMovie editor. iMovie is a video editing app from Apple where you will get all the standard and some advanced features.
iMovie is extremely popular among Mac users for video editing because it is completely free and easy to use. In fact, iMovie is also available for iPhone and iPad users. You can start your video editing on your iPhone and transfer the same work to Mac to continue editing on your Mac. But the most important question is if iMovie editor is the best video editor for Mac users. Read our iMovie review and find out a better alternative.
Part 1. Key Features of iMovie
Even iMovie is completely free to use, it competes with several premium video editors in terms of features. There are only a handful of free video editors available that lets you edit 4K videos, and iMovie is one of them. Similarly, there are only a few premium video editors available that support editing the same video project on different devices like iMovie. Here are all the key features of iMovie that you should know.
Templates and Themes – iMovie comes with different templates and themes for creating different types of videos including cinematic videos. There are classy and trending themes available to create trailers and short films. These themes and templates have limited customization options so that you can adjust as per your requirements.
Basic Editing – iMovie lets you combine video clips, split a large video file, trim video parts, crop and rotate video. Besides, you get to zoom videos as well as resize them as you need. You can add texts and titles as well as apply different transitions wherever you want to.
Advanced Editing – You can change speed and turn your video clips into slow-motion videos. You can correct the color as well as stabilize them. Besides, you can apply green screen effect and split screen effect. Moreover, you can reverse video as well as put overlays on videos. iMovie is also capable of recording video and audio if you want to record your screen or webcam video.
Audio Editing – iMovie lets you edit audio as well which is an essential requirement in video editing. You can increase and decrease volume, change speed and add beat markers to a video if required. Coming to audio effects, you can apply fade-in and fade-out effects. You can mute the audio in your recorded video and add a background music instead. Moreover, you can add voiceover and choose royalty-free audio clips.
Transitions and Effects – Even though there are limited visual effects, there are unique and eye-catchy. iMovie keeps on adding new and trending effects with every update so that the users have enough options to make their videos stand out. iMovie also provides different backgrounds that you can use on your video to enhance its quality. Apart from visual effects, there are several standard audio effects available.
User Interface – iMovie comes with a simple and intuitive user interface that lets everyone edit videos instantly without prior experience. This is exactly why some users never go for premium video editors. The user interface is clean, and all options are readily available. You can upload media files on Media Library, and they are automatically categorized from where you can access them instantly.
Part 2. How to Edit Videos with iMovie?
iMovie comes pre-installed on Mac, and hence, there is no need to download and install the application. Coming to how to use iMovie, there are three types of projects you can choose on iMovie. They are Media, Projects, and Theater. Media is where your footages reside, Projects represent the main workspace, and Theater is where your finished projects reside. Here are the steps regarding iMovie edit video.
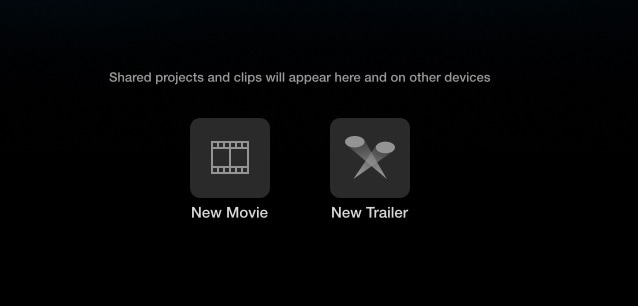
Step 1: Open iMovie and click on Projects. You will see two options Movie and Trailer. Click on Movie to edit your videos.
Step 2: Click on My Movie under Project Media and go to My Media. Import your video clips and audio files under My Media.
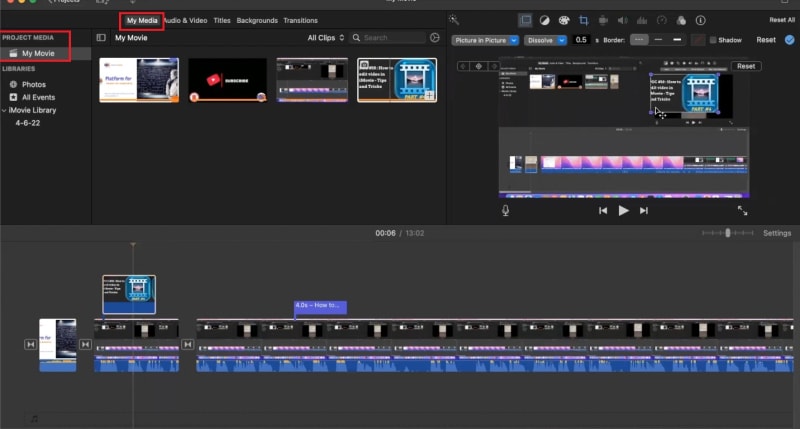
Step 3: Drag and drop the video clips and audio clips on the timeline in proper order. You can go for iMovie edit audio and video such as trimming as required.
Step 4: Go to Transitions located at the top bar beside My Media and place the desired transitions in between the video clips.
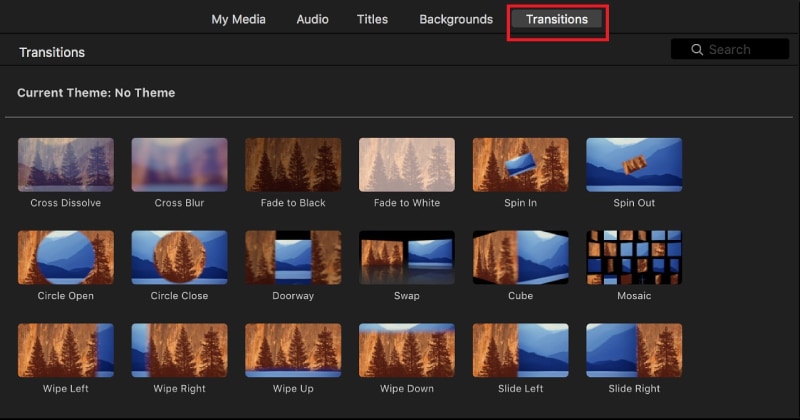
Step 5: Similarly, go to Titles located at the top bar beside Transitions and place them on the timeline wherever appropriate.
Step 6: Finally, check your edited video on the canvas and then go to the top-right corner and click on Export. You will have to option to save it in Theater and share on social media as well as through email and iTunes.

Part 3. Alternative to Edit Videos - Filmora
In spite of iMovie being a good video editor, Mac users search for a better alternative. This is because there are limited transitions and effects available. You can have two video tracks only on the timeline and there is lack of customization. Besides, the advanced features of video editing such as motion tracking are not available. Moreover, there are limited file formats supported for importing and exporting.
Wondershare Filmora is the best alternative to iMovie for Mac users. Filmora is a premium video editor where all the shortcomings of iMovie are taken care of. Filmora supports almost all file formats for media files. There is a wide range of transitions, effects, elements as well as animations available. Besides, there are different styles of texts and titles available along with stock media library. Here are the steps to edit videos with iMovie.
For Win 7 or later (64-bit)
For macOS 10.12 or later
Step 1: Download and install Filmora on your Mac. Launch Filmora and click on New Project.
Step 2: Drag and drop your video clips and audio files Project Media folder. Drag and place the video clips on the timeline and arrange per perfectly. Place audio files on the timeline on a different track.

Step 3: If you want to apply transitions, go to Transitions at the top bar and drag any transition in between video clips on the timeline. You can also insert texts from Titles and objects from Elements from the top bar.

Step 4: Play the video to see the changes you have made, and click on Export button to save the video when you are satisfied.

Part 4. FAQs about iMovie
Is iMovie good for video editing?
Yes, iMovie is good for basic video editing. You can edit 4K videos, and iMovie is available on macOS and iOS. If you are a beginner, iMovie is perfect for you. If you want advanced editing features, we recommend Wondershare Filmora.
What’s better Premiere Pro or iMovie?
In terms of features and functionalities, Premiere Pro is far better than iMovie. However, Premiere Pro is more for advanced video editing while iMovie is more for beginners. iMovie is simpler to use than Premiere Pro, and hence, beginners will love it.
Can I make YouTube videos with iMovie?
Yes, you can make YouTube videos with iMovie as it has all the required tools and options. Import your video clips and audio files on the timeline, go for iMovie edit clip like trim and crop as required, add transitions, texts, and effects as applicable and publish your finished video on YouTube.
For macOS 10.12 or later
Step 1: Download and install Filmora on your Mac. Launch Filmora and click on New Project.
Step 2: Drag and drop your video clips and audio files Project Media folder. Drag and place the video clips on the timeline and arrange per perfectly. Place audio files on the timeline on a different track.

Step 3: If you want to apply transitions, go to Transitions at the top bar and drag any transition in between video clips on the timeline. You can also insert texts from Titles and objects from Elements from the top bar.

Step 4: Play the video to see the changes you have made, and click on Export button to save the video when you are satisfied.

Part 4. FAQs about iMovie
Is iMovie good for video editing?
Yes, iMovie is good for basic video editing. You can edit 4K videos, and iMovie is available on macOS and iOS. If you are a beginner, iMovie is perfect for you. If you want advanced editing features, we recommend Wondershare Filmora.
What’s better Premiere Pro or iMovie?
In terms of features and functionalities, Premiere Pro is far better than iMovie. However, Premiere Pro is more for advanced video editing while iMovie is more for beginners. iMovie is simpler to use than Premiere Pro, and hence, beginners will love it.
Can I make YouTube videos with iMovie?
Yes, you can make YouTube videos with iMovie as it has all the required tools and options. Import your video clips and audio files on the timeline, go for iMovie edit clip like trim and crop as required, add transitions, texts, and effects as applicable and publish your finished video on YouTube.
For macOS 10.12 or later
Step 1: Download and install Filmora on your Mac. Launch Filmora and click on New Project.
Step 2: Drag and drop your video clips and audio files Project Media folder. Drag and place the video clips on the timeline and arrange per perfectly. Place audio files on the timeline on a different track.

Step 3: If you want to apply transitions, go to Transitions at the top bar and drag any transition in between video clips on the timeline. You can also insert texts from Titles and objects from Elements from the top bar.

Step 4: Play the video to see the changes you have made, and click on Export button to save the video when you are satisfied.

Part 4. FAQs about iMovie
Is iMovie good for video editing?
Yes, iMovie is good for basic video editing. You can edit 4K videos, and iMovie is available on macOS and iOS. If you are a beginner, iMovie is perfect for you. If you want advanced editing features, we recommend Wondershare Filmora.
What’s better Premiere Pro or iMovie?
In terms of features and functionalities, Premiere Pro is far better than iMovie. However, Premiere Pro is more for advanced video editing while iMovie is more for beginners. iMovie is simpler to use than Premiere Pro, and hence, beginners will love it.
Can I make YouTube videos with iMovie?
Yes, you can make YouTube videos with iMovie as it has all the required tools and options. Import your video clips and audio files on the timeline, go for iMovie edit clip like trim and crop as required, add transitions, texts, and effects as applicable and publish your finished video on YouTube.
For macOS 10.12 or later
Step 1: Download and install Filmora on your Mac. Launch Filmora and click on New Project.
Step 2: Drag and drop your video clips and audio files Project Media folder. Drag and place the video clips on the timeline and arrange per perfectly. Place audio files on the timeline on a different track.

Step 3: If you want to apply transitions, go to Transitions at the top bar and drag any transition in between video clips on the timeline. You can also insert texts from Titles and objects from Elements from the top bar.

Step 4: Play the video to see the changes you have made, and click on Export button to save the video when you are satisfied.

Part 4. FAQs about iMovie
Is iMovie good for video editing?
Yes, iMovie is good for basic video editing. You can edit 4K videos, and iMovie is available on macOS and iOS. If you are a beginner, iMovie is perfect for you. If you want advanced editing features, we recommend Wondershare Filmora.
What’s better Premiere Pro or iMovie?
In terms of features and functionalities, Premiere Pro is far better than iMovie. However, Premiere Pro is more for advanced video editing while iMovie is more for beginners. iMovie is simpler to use than Premiere Pro, and hence, beginners will love it.
Can I make YouTube videos with iMovie?
Yes, you can make YouTube videos with iMovie as it has all the required tools and options. Import your video clips and audio files on the timeline, go for iMovie edit clip like trim and crop as required, add transitions, texts, and effects as applicable and publish your finished video on YouTube.
How to Rotate AVI in Vertical/Portrait Orientation [Windows, Mac,Android, iPhone & Online]

Video editing is the process of cutting and rearranging multiple clips or segments of video to create a new and more improved video. This involves adding titles, animations, sound effects, music and more. Video editing has not ceased to follow the trend of technology as it keeps thriving tirelessly through the ages. With advancement springing forth from many sides, video editing followed every pace to ensure it’s not left behind. This largely involves gadgets, computers and smartphones.
Before the advent of smartphones, computers have been the only video editing tools, and that culture is preserved even till date as its use has spread round the world. It is therefore evident that film making cannot bypass this process. Improvements have been made over the years on video editing softwares for computers to stay up to date as regards features and usability. There are other video editors which were introduced, and are still being updated such as Adobe Premiere Pro, Final Cut, Filmora and so on. As the case is today, smartphones have proven to be relevant in the process; they have also come up with video editing applications such as Power Video Director, InShot, Filmora for Android, Kinemaster and many more for Android, iPhone and iPads.
This article aims at giving guides and steps on how to rotate AVI videos using different softwares on different PCs (Windows and Mac) and smartphones (Android and iPhone). This does not leave online video editing softwares behind also.
WHAT IS AVI?

AVI means Audio Video Interleave. It’s a multimedia container format introduced by Microsoft in November 1992 as part of its video for Windows technology. AVI files can contain both audio and video data in a file container that allows synchronous audio-with-video playback.
KDENLIVE – FREE FOR WINDOWS

Introduced in 2002, Kdenlive has a good quality and design. The design is straightforward, user-friendly which makes you know what you are getting into, as well as the actual quality of the effects that you might want to apply to your video while editing. Overall, it looks really professional, neat and organized.
HOW TO ROTATE AVI VIDEO IN KDENLIVE
- STEP 1 - Launch Kdenlive on your Windows and import the video from where you have saved it locally. Drag and drop video on timeline

- STEP 2 - Select video effects and in the search box, type ‘rotate’ and click on it. Click on effects, then select video effects
- STEP 3 - Drag the video to the timeline and go to effects, then drag and drop the ‘rotate’ effect on the clip.

ALTERNATIVE WAY TO ROTATE AVI VIDEO ON KDENLIVE
- STEP 1 - Create a vertical project: create profile, select size, 1080 x 1920 and select aspect ratio: 9:16. Afterwards, there will be a vertical outline on your program window. Import your video to the project bin and drag it to the timeline
- STEP 2 - Go to effects, then click on ‘transform’ and double-click on it
- STEP 3 - Go to the down-right part of your screen and click on ‘rotation’ and highlight to change the number to whichever is ideal for your screen; you can change it to 270. This will make it rotate but will not fill the screen yet. Highlight the size and change it to 180 an hit the ‘enter’ key.
OPENSHOT – FREE FOR WINDOWS
OpenShot Video Editor is a free and open-source video editor for Windows, macOS, Linux, and Chrome OS. The project started in August 2008 by Jonathan Thomas, with the objective of providing a stable, free, and friendly to use video editor.

HOW TO ROTATE AVI VIDEO ON OPENSHOT
- STEP 1 - Launch OpenShot on your Windows and import your clip form where you’ve saved it locally

- STEP 2 - Drag and drop footage on your timeline and click on the ‘play’ button to check your footage. Right click on the footage and an option box will appear

- STEP 3 - Click on rotate; you can choose to rotate either left or right. Rotate till it ideally fits the screen

ALTERNATIVE WAY TO ROTATE AVI VIDEO ON OPEN SHOT
- STEP 1 - Launch OpenShot on your Windows and drag your footage to the timeline.
- STEP 2 - Right click on your video and select properties.
- STEP 3 - Go to rotation and change the value, and your video will rotate
ADOBE PREMIERE PRO – PAID FOR WINDOWS

Introduced in 2003, Adobe Premiere Pro is known to be a video editing software. It has a lot of features that can be used in the process of editing. It’s capable of editing feature movies such as Hollywood and the likes.
HOW TO ROTATE AVI VIDEO ON ADOBE PREMIERE PRO – FIXING A LANDSCAPE SHOT
- STEP 1 - Go to sequence and click on sequence settings

- STEP 2 - Click on frame size and type in 3840; for the horizontal, type in 2160 and then proceed to click ok
FIXING A PORTRAIT SHOT
- Put your play-head (the thin line that moves over the clips on your timeline) on the clip on the timeline
- Go to the top and click on ‘Editing’, then you go to effects control

- Go to ‘scale’, and type in the number according to the degree you desire to effect
your rotation. However, your video will be just perfect if you type in -90

ALTERNATIVE WAY TO ROTATE AVI VIDEO ON ADOBE PREMIERE PRO
- STEP 1 - Go to the effects window and search for ‘flip’
- STEP 2 - Click on ‘Transform’. You can then decide to do a horizontal flip or a vertical flip
- STEP 3 - All you need to do is click and drag it on to your clip and it will flip, whether horizontal or vertical
- STEP 4 - It is easy to remedy when you click and drag the other to place on your footage, whether horizontal or vertical.
TO ROTATE YOUR CLIP
- STEP 1 - Highlight your footage on the timeline and go to your effects controls window. Underneath ‘motion’, there is the perimeter of rotation. If you click and drag the mouse on the number, it will rotate either clockwise or counter-clockwise. Also, you can type in whatever rotation amount you want

- STEP 2 - It’s also worth mentioning that when you rotate a clip, you’re always rotating around the inker point (the little blue cross in a circle). You can click and drag this through the program monitor to any point on the clip and start rotating it around the inker point. In fact, it doesn’t have to be on the clip; you can make the inker point up further and rotate, and will still rotate around the inker point. If you don’t see this on your program monitor, that’s because you haven’t highlighted the motion.

- STEP 3 - A good tip is using guides to help you level and horizontal or whether you are working with on-screen. To get a slant perfectly leveled, there’s an easy way to reference a straight line on your program monitor. On the bottom right of your program monitor is the button [a plus (+) button] editor. Click on it and a box full of tools will pop up which you can work with. Click ‘add show rulers’, ‘show guides’ and ‘safe margins’


- STEP 4 - In the ruler section, take your mouse, click and drag it down to the little crosses of your safe margins. The same goes for the vertical ruler; click and drag over. That will create a new guide. For your footage, what you might need to do is get your horizontal guide down to your horizon view. You can go to your rotation and rotate your footage to get straight with your guide. If you are left with black bars at the corners, take off your safe margin rulers and guides and then zoom in on your footage and take off the black bars. To do this, go back to your effect controls

- STEP 5 - Instead of doing rotation, you scale by clicking and sliding the mouse on the number to the right


iMOVIE – FREE FOR MAC

iMovie is a preinstalled video editing application developed by Apple Inc. for macOS, Ios, and iPadOS devices. It was originally released in 1999 as a Mac OS 8 application bundle with the first FireWire-enabled consumer Mac model, the iMac DV. With iMovie, you can create professional-looking videos without an editing degree.
HOW TO ROTATE AVI VIDEO IN iMOVIE
- STEP 1 - Run iMovie on your PC and create a new project by clicking ‘create new’ and selecting ‘movie’. Import your footage: Click on the arrow pointing downwards just below your menu bar, and select the video from wherever it is saved locally.

- STEP 2 - Click on the video once it’s imported; make sure it has the yellow boundary on it. Click and drag it onto the timeline
- STEP 3 - Leave your play-head on the footage and go just above your program window and click on the crop icon, the third from the left. Afterwards, a rotate ion will show just by the right above the program monitor. There are actually two buttons to rotate in either direction. You can save time by clicking the correct direction for whichever way your videos need to be rotated


- STEP 4 - Your videos is rotated; you can go ahead and save

FILMORA – PAID FOR MAC

Formerly known as Wondershare Video Editor as at when it first launched in 2015, Filmora Video Editor is a video editing software that helps businesses create and distribute white-labeled marketing videos. Filmora is an easy-to-use video editing software for a beginner. It supports 50 above formats, 4k editing, Filmstock effects store, all basic and advanced editing tools in the most easily accessible and used manner.
For Win 7 or later (64-bit)
For macOS 10.14 or later
HOW TO ROTATE AVI VIDEO IN FILMORA
- STEP 1 - Run Filmora on your PC, import your video from where it has been locally saved and drag to the timeline
- STEP 2 - Go to file, and select ‘project settings’. By default, the video is recorded on portrait – 9:11, so change the aspect ratio to 16:9


- STEP 3 - Go to your timeline and double-click your footage. A box of options will pop up beside the program monitor. Simply go to rotate and click and slide to rotate. It may be difficult to line it up even and straight. Just go to the program monitor and click on the little line and drag; it makes it easier to align


- STEP 4 - Go to ‘scale’ and slide it to the right to make it fill the screen. Your video is rotated and ready to be previewed
VIDEOLEAP – PAID FOR ANDROID AND iPHONE

Videoleap includes the usual basic cutting and pasting tools, plus greenscreen aspect ratios, slow-mo and fast motion, audio editing, and unlimited undo and redo actions. Access to the app and premium features is available with a subscription for $7.99/month, or with additional discounts if bought as a one-time purchase or multiple month bundles.
HOW TO ROTATE AVI VIDEO IN VIDEOLEAP
- STEP 1 - Launch Videoleap on your android and Import your footage from where you have saved it locally. Tap on ‘transform’, and then tap on rotate, then tap on rotate as many times as it takes so that it can be ideally fit


- STEP 2 - Change the format from 16:9 (YouTube format) to 9:16 (for TikTok). To do that, deselect the clip, tap on canvas, and then choose 9:16. Play the clip to preview and save.

INSHOT – FREE FOR ANDROID

InShot app is an all-in-one visual content editing app. It allows you to create videos, edit photos, and create image collages. The app has plenty of features too. You can trim clips, change the speed of your footage, and add filters, music and text. InShot is a free mobile application that you can download on your Windows to create or edit videos and photos.
HOW TO ROTATE AVI VIDEO ON INSHOT
- STEP 1 - Import your video from where you have locally saved it
- STEP 2 - Tap on the clip, and swipe the toolbar to the left to find the ‘rotate’ icon. When you tap on ‘rotate’, it will rotate your video to your left; you can keep rotating till it’s ideally fit


QUICKTIME VIDEO EDITOR – FREE FOR MAC

- Open your video on your PC using the Quicktime program. Go to ‘edit’ and click on ‘rotate left’; keep clicking until your video ideally fits the screen. Your video is rotated successfully. Preview, save and export your video.


VLLO – PAID FOR ANDROID

VLLO is a super easy video editor. Beginner and casual users will enjoy editing video with its intuitive but precise control abled split, txt, BGM and transition. For the pro editors, premium paid features are also ready with Chroma-Key, PIP, mosaic and keyframe animations.
HOW TO ROTATE AVI VIDEO IN VLLO – LANDSCAPE TO PORTRAIT
- STEP 1 - Import your footage from where you have saved it locally and change aspect ratio to 16:9 and select the ‘fill’ icon.

- STEP 2 - On your timeline, click on the footage and select the curved arrow icon to rotate as you click and drag. You can choose to rotate either ways, and your video is rotated, and ready to be previewed and saved

VEED – ONLINE/CLOUD-BASED VIDEO EDITOR

VEED.IO is an online video editing platform that makes creating videos easy and accessible to everyone. Millions of creators around the world use our products to tell stories, create content, grow their audience and more.
HOW TO ROTATE AVI VIDEO ONLINE USING VEED – PORTRAIT TO LANDSCAPE
- STEP 1 - Create an account online on Veed – Visit <www.veed.io>

- STEP 2 - Click the ‘view project’ button and import/upload footage form where it has been saved locally

- STEP 3 - Go to ‘edit video’ and select ‘adjust’. Go to rotation and click and drag to the right and to the left for your video to fit ideally

- STEP 4 - You can export your video once it is rotated
ALTRNATIVE WAY TO ROTATE AVI VIDEO ONLINE USING VEED
- STEP 1 - Import your footage and drag it to the timeline
- STEP 2 - Click on ‘try sample’ or ‘upload video’

- STEP 3 - Click on ‘rotate’. Click to rotate either ways, 90 degrees
- STEP 4 - Go to crop and choose whether ‘vertical’ or ‘landscape’ to get rid of the bars

WEVIDEO – ONLINE/CLOUD-BASED VIDEO EDITOR
WeVideo is an online, cloud-based video editing platform that works in web browsers and on mobile devices. The company was originally founded in 2011 in Europe. Their main headquarters is in Mountain View, California with a team based in Romania.
HOW TO ROTATE AVI VIDEO ON WEVIDEO ONLINE
- STEP 1 - Import your footage and drag it to the timeline

- STEP 2 - Click on the little pencil icon right above the timeline

- STEP 3 - That will open up your editor, popping up a box full of option. Select the ‘transform’ tab, then two arrows right in front of ‘rotation’ till it fits: two clicks for 180, and one click for 90. Adjust it as needed, and save changes to preview.

Video editing is the process of cutting and rearranging multiple clips or segments of video to create a new and more improved video. This involves adding titles, animations, sound effects, music and more. Video editing has not ceased to follow the trend of technology as it keeps thriving tirelessly through the ages. With advancement springing forth from many sides, video editing followed every pace to ensure it’s not left behind. This largely involves gadgets, computers and smartphones.
Before the advent of smartphones, computers have been the only video editing tools, and that culture is preserved even till date as its use has spread round the world. It is therefore evident that film making cannot bypass this process. Improvements have been made over the years on video editing softwares for computers to stay up to date as regards features and usability. There are other video editors which were introduced, and are still being updated such as Adobe Premiere Pro, Final Cut, Filmora and so on. As the case is today, smartphones have proven to be relevant in the process; they have also come up with video editing applications such as Power Video Director, InShot, Filmora for Android, Kinemaster and many more for Android, iPhone and iPads.
This article aims at giving guides and steps on how to rotate AVI videos using different softwares on different PCs (Windows and Mac) and smartphones (Android and iPhone). This does not leave online video editing softwares behind also.
WHAT IS AVI?

AVI means Audio Video Interleave. It’s a multimedia container format introduced by Microsoft in November 1992 as part of its video for Windows technology. AVI files can contain both audio and video data in a file container that allows synchronous audio-with-video playback.
KDENLIVE – FREE FOR WINDOWS

Introduced in 2002, Kdenlive has a good quality and design. The design is straightforward, user-friendly which makes you know what you are getting into, as well as the actual quality of the effects that you might want to apply to your video while editing. Overall, it looks really professional, neat and organized.
HOW TO ROTATE AVI VIDEO IN KDENLIVE
- STEP 1 - Launch Kdenlive on your Windows and import the video from where you have saved it locally. Drag and drop video on timeline

- STEP 2 - Select video effects and in the search box, type ‘rotate’ and click on it. Click on effects, then select video effects
- STEP 3 - Drag the video to the timeline and go to effects, then drag and drop the ‘rotate’ effect on the clip.

ALTERNATIVE WAY TO ROTATE AVI VIDEO ON KDENLIVE
- STEP 1 - Create a vertical project: create profile, select size, 1080 x 1920 and select aspect ratio: 9:16. Afterwards, there will be a vertical outline on your program window. Import your video to the project bin and drag it to the timeline
- STEP 2 - Go to effects, then click on ‘transform’ and double-click on it
- STEP 3 - Go to the down-right part of your screen and click on ‘rotation’ and highlight to change the number to whichever is ideal for your screen; you can change it to 270. This will make it rotate but will not fill the screen yet. Highlight the size and change it to 180 an hit the ‘enter’ key.
OPENSHOT – FREE FOR WINDOWS
OpenShot Video Editor is a free and open-source video editor for Windows, macOS, Linux, and Chrome OS. The project started in August 2008 by Jonathan Thomas, with the objective of providing a stable, free, and friendly to use video editor.

HOW TO ROTATE AVI VIDEO ON OPENSHOT
- STEP 1 - Launch OpenShot on your Windows and import your clip form where you’ve saved it locally

- STEP 2 - Drag and drop footage on your timeline and click on the ‘play’ button to check your footage. Right click on the footage and an option box will appear

- STEP 3 - Click on rotate; you can choose to rotate either left or right. Rotate till it ideally fits the screen

ALTERNATIVE WAY TO ROTATE AVI VIDEO ON OPEN SHOT
- STEP 1 - Launch OpenShot on your Windows and drag your footage to the timeline.
- STEP 2 - Right click on your video and select properties.
- STEP 3 - Go to rotation and change the value, and your video will rotate
ADOBE PREMIERE PRO – PAID FOR WINDOWS

Introduced in 2003, Adobe Premiere Pro is known to be a video editing software. It has a lot of features that can be used in the process of editing. It’s capable of editing feature movies such as Hollywood and the likes.
HOW TO ROTATE AVI VIDEO ON ADOBE PREMIERE PRO – FIXING A LANDSCAPE SHOT
- STEP 1 - Go to sequence and click on sequence settings

- STEP 2 - Click on frame size and type in 3840; for the horizontal, type in 2160 and then proceed to click ok
FIXING A PORTRAIT SHOT
- Put your play-head (the thin line that moves over the clips on your timeline) on the clip on the timeline
- Go to the top and click on ‘Editing’, then you go to effects control

- Go to ‘scale’, and type in the number according to the degree you desire to effect
your rotation. However, your video will be just perfect if you type in -90

ALTERNATIVE WAY TO ROTATE AVI VIDEO ON ADOBE PREMIERE PRO
- STEP 1 - Go to the effects window and search for ‘flip’
- STEP 2 - Click on ‘Transform’. You can then decide to do a horizontal flip or a vertical flip
- STEP 3 - All you need to do is click and drag it on to your clip and it will flip, whether horizontal or vertical
- STEP 4 - It is easy to remedy when you click and drag the other to place on your footage, whether horizontal or vertical.
TO ROTATE YOUR CLIP
- STEP 1 - Highlight your footage on the timeline and go to your effects controls window. Underneath ‘motion’, there is the perimeter of rotation. If you click and drag the mouse on the number, it will rotate either clockwise or counter-clockwise. Also, you can type in whatever rotation amount you want

- STEP 2 - It’s also worth mentioning that when you rotate a clip, you’re always rotating around the inker point (the little blue cross in a circle). You can click and drag this through the program monitor to any point on the clip and start rotating it around the inker point. In fact, it doesn’t have to be on the clip; you can make the inker point up further and rotate, and will still rotate around the inker point. If you don’t see this on your program monitor, that’s because you haven’t highlighted the motion.

- STEP 3 - A good tip is using guides to help you level and horizontal or whether you are working with on-screen. To get a slant perfectly leveled, there’s an easy way to reference a straight line on your program monitor. On the bottom right of your program monitor is the button [a plus (+) button] editor. Click on it and a box full of tools will pop up which you can work with. Click ‘add show rulers’, ‘show guides’ and ‘safe margins’


- STEP 4 - In the ruler section, take your mouse, click and drag it down to the little crosses of your safe margins. The same goes for the vertical ruler; click and drag over. That will create a new guide. For your footage, what you might need to do is get your horizontal guide down to your horizon view. You can go to your rotation and rotate your footage to get straight with your guide. If you are left with black bars at the corners, take off your safe margin rulers and guides and then zoom in on your footage and take off the black bars. To do this, go back to your effect controls

- STEP 5 - Instead of doing rotation, you scale by clicking and sliding the mouse on the number to the right


iMOVIE – FREE FOR MAC

iMovie is a preinstalled video editing application developed by Apple Inc. for macOS, Ios, and iPadOS devices. It was originally released in 1999 as a Mac OS 8 application bundle with the first FireWire-enabled consumer Mac model, the iMac DV. With iMovie, you can create professional-looking videos without an editing degree.
HOW TO ROTATE AVI VIDEO IN iMOVIE
- STEP 1 - Run iMovie on your PC and create a new project by clicking ‘create new’ and selecting ‘movie’. Import your footage: Click on the arrow pointing downwards just below your menu bar, and select the video from wherever it is saved locally.

- STEP 2 - Click on the video once it’s imported; make sure it has the yellow boundary on it. Click and drag it onto the timeline
- STEP 3 - Leave your play-head on the footage and go just above your program window and click on the crop icon, the third from the left. Afterwards, a rotate ion will show just by the right above the program monitor. There are actually two buttons to rotate in either direction. You can save time by clicking the correct direction for whichever way your videos need to be rotated


- STEP 4 - Your videos is rotated; you can go ahead and save

FILMORA – PAID FOR MAC

Formerly known as Wondershare Video Editor as at when it first launched in 2015, Filmora Video Editor is a video editing software that helps businesses create and distribute white-labeled marketing videos. Filmora is an easy-to-use video editing software for a beginner. It supports 50 above formats, 4k editing, Filmstock effects store, all basic and advanced editing tools in the most easily accessible and used manner.
For Win 7 or later (64-bit)
For macOS 10.14 or later
HOW TO ROTATE AVI VIDEO IN FILMORA
- STEP 1 - Run Filmora on your PC, import your video from where it has been locally saved and drag to the timeline
- STEP 2 - Go to file, and select ‘project settings’. By default, the video is recorded on portrait – 9:11, so change the aspect ratio to 16:9


- STEP 3 - Go to your timeline and double-click your footage. A box of options will pop up beside the program monitor. Simply go to rotate and click and slide to rotate. It may be difficult to line it up even and straight. Just go to the program monitor and click on the little line and drag; it makes it easier to align


- STEP 4 - Go to ‘scale’ and slide it to the right to make it fill the screen. Your video is rotated and ready to be previewed
VIDEOLEAP – PAID FOR ANDROID AND iPHONE

Videoleap includes the usual basic cutting and pasting tools, plus greenscreen aspect ratios, slow-mo and fast motion, audio editing, and unlimited undo and redo actions. Access to the app and premium features is available with a subscription for $7.99/month, or with additional discounts if bought as a one-time purchase or multiple month bundles.
HOW TO ROTATE AVI VIDEO IN VIDEOLEAP
- STEP 1 - Launch Videoleap on your android and Import your footage from where you have saved it locally. Tap on ‘transform’, and then tap on rotate, then tap on rotate as many times as it takes so that it can be ideally fit


- STEP 2 - Change the format from 16:9 (YouTube format) to 9:16 (for TikTok). To do that, deselect the clip, tap on canvas, and then choose 9:16. Play the clip to preview and save.

INSHOT – FREE FOR ANDROID

InShot app is an all-in-one visual content editing app. It allows you to create videos, edit photos, and create image collages. The app has plenty of features too. You can trim clips, change the speed of your footage, and add filters, music and text. InShot is a free mobile application that you can download on your Windows to create or edit videos and photos.
HOW TO ROTATE AVI VIDEO ON INSHOT
- STEP 1 - Import your video from where you have locally saved it
- STEP 2 - Tap on the clip, and swipe the toolbar to the left to find the ‘rotate’ icon. When you tap on ‘rotate’, it will rotate your video to your left; you can keep rotating till it’s ideally fit


QUICKTIME VIDEO EDITOR – FREE FOR MAC

- Open your video on your PC using the Quicktime program. Go to ‘edit’ and click on ‘rotate left’; keep clicking until your video ideally fits the screen. Your video is rotated successfully. Preview, save and export your video.


VLLO – PAID FOR ANDROID

VLLO is a super easy video editor. Beginner and casual users will enjoy editing video with its intuitive but precise control abled split, txt, BGM and transition. For the pro editors, premium paid features are also ready with Chroma-Key, PIP, mosaic and keyframe animations.
HOW TO ROTATE AVI VIDEO IN VLLO – LANDSCAPE TO PORTRAIT
- STEP 1 - Import your footage from where you have saved it locally and change aspect ratio to 16:9 and select the ‘fill’ icon.

- STEP 2 - On your timeline, click on the footage and select the curved arrow icon to rotate as you click and drag. You can choose to rotate either ways, and your video is rotated, and ready to be previewed and saved

VEED – ONLINE/CLOUD-BASED VIDEO EDITOR

VEED.IO is an online video editing platform that makes creating videos easy and accessible to everyone. Millions of creators around the world use our products to tell stories, create content, grow their audience and more.
HOW TO ROTATE AVI VIDEO ONLINE USING VEED – PORTRAIT TO LANDSCAPE
- STEP 1 - Create an account online on Veed – Visit <www.veed.io>

- STEP 2 - Click the ‘view project’ button and import/upload footage form where it has been saved locally

- STEP 3 - Go to ‘edit video’ and select ‘adjust’. Go to rotation and click and drag to the right and to the left for your video to fit ideally

- STEP 4 - You can export your video once it is rotated
ALTRNATIVE WAY TO ROTATE AVI VIDEO ONLINE USING VEED
- STEP 1 - Import your footage and drag it to the timeline
- STEP 2 - Click on ‘try sample’ or ‘upload video’

- STEP 3 - Click on ‘rotate’. Click to rotate either ways, 90 degrees
- STEP 4 - Go to crop and choose whether ‘vertical’ or ‘landscape’ to get rid of the bars

WEVIDEO – ONLINE/CLOUD-BASED VIDEO EDITOR
WeVideo is an online, cloud-based video editing platform that works in web browsers and on mobile devices. The company was originally founded in 2011 in Europe. Their main headquarters is in Mountain View, California with a team based in Romania.
HOW TO ROTATE AVI VIDEO ON WEVIDEO ONLINE
- STEP 1 - Import your footage and drag it to the timeline

- STEP 2 - Click on the little pencil icon right above the timeline

- STEP 3 - That will open up your editor, popping up a box full of option. Select the ‘transform’ tab, then two arrows right in front of ‘rotation’ till it fits: two clicks for 180, and one click for 90. Adjust it as needed, and save changes to preview.

Video editing is the process of cutting and rearranging multiple clips or segments of video to create a new and more improved video. This involves adding titles, animations, sound effects, music and more. Video editing has not ceased to follow the trend of technology as it keeps thriving tirelessly through the ages. With advancement springing forth from many sides, video editing followed every pace to ensure it’s not left behind. This largely involves gadgets, computers and smartphones.
Before the advent of smartphones, computers have been the only video editing tools, and that culture is preserved even till date as its use has spread round the world. It is therefore evident that film making cannot bypass this process. Improvements have been made over the years on video editing softwares for computers to stay up to date as regards features and usability. There are other video editors which were introduced, and are still being updated such as Adobe Premiere Pro, Final Cut, Filmora and so on. As the case is today, smartphones have proven to be relevant in the process; they have also come up with video editing applications such as Power Video Director, InShot, Filmora for Android, Kinemaster and many more for Android, iPhone and iPads.
This article aims at giving guides and steps on how to rotate AVI videos using different softwares on different PCs (Windows and Mac) and smartphones (Android and iPhone). This does not leave online video editing softwares behind also.
WHAT IS AVI?

AVI means Audio Video Interleave. It’s a multimedia container format introduced by Microsoft in November 1992 as part of its video for Windows technology. AVI files can contain both audio and video data in a file container that allows synchronous audio-with-video playback.
KDENLIVE – FREE FOR WINDOWS

Introduced in 2002, Kdenlive has a good quality and design. The design is straightforward, user-friendly which makes you know what you are getting into, as well as the actual quality of the effects that you might want to apply to your video while editing. Overall, it looks really professional, neat and organized.
HOW TO ROTATE AVI VIDEO IN KDENLIVE
- STEP 1 - Launch Kdenlive on your Windows and import the video from where you have saved it locally. Drag and drop video on timeline

- STEP 2 - Select video effects and in the search box, type ‘rotate’ and click on it. Click on effects, then select video effects
- STEP 3 - Drag the video to the timeline and go to effects, then drag and drop the ‘rotate’ effect on the clip.

ALTERNATIVE WAY TO ROTATE AVI VIDEO ON KDENLIVE
- STEP 1 - Create a vertical project: create profile, select size, 1080 x 1920 and select aspect ratio: 9:16. Afterwards, there will be a vertical outline on your program window. Import your video to the project bin and drag it to the timeline
- STEP 2 - Go to effects, then click on ‘transform’ and double-click on it
- STEP 3 - Go to the down-right part of your screen and click on ‘rotation’ and highlight to change the number to whichever is ideal for your screen; you can change it to 270. This will make it rotate but will not fill the screen yet. Highlight the size and change it to 180 an hit the ‘enter’ key.
OPENSHOT – FREE FOR WINDOWS
OpenShot Video Editor is a free and open-source video editor for Windows, macOS, Linux, and Chrome OS. The project started in August 2008 by Jonathan Thomas, with the objective of providing a stable, free, and friendly to use video editor.

HOW TO ROTATE AVI VIDEO ON OPENSHOT
- STEP 1 - Launch OpenShot on your Windows and import your clip form where you’ve saved it locally

- STEP 2 - Drag and drop footage on your timeline and click on the ‘play’ button to check your footage. Right click on the footage and an option box will appear

- STEP 3 - Click on rotate; you can choose to rotate either left or right. Rotate till it ideally fits the screen

ALTERNATIVE WAY TO ROTATE AVI VIDEO ON OPEN SHOT
- STEP 1 - Launch OpenShot on your Windows and drag your footage to the timeline.
- STEP 2 - Right click on your video and select properties.
- STEP 3 - Go to rotation and change the value, and your video will rotate
ADOBE PREMIERE PRO – PAID FOR WINDOWS

Introduced in 2003, Adobe Premiere Pro is known to be a video editing software. It has a lot of features that can be used in the process of editing. It’s capable of editing feature movies such as Hollywood and the likes.
HOW TO ROTATE AVI VIDEO ON ADOBE PREMIERE PRO – FIXING A LANDSCAPE SHOT
- STEP 1 - Go to sequence and click on sequence settings

- STEP 2 - Click on frame size and type in 3840; for the horizontal, type in 2160 and then proceed to click ok
FIXING A PORTRAIT SHOT
- Put your play-head (the thin line that moves over the clips on your timeline) on the clip on the timeline
- Go to the top and click on ‘Editing’, then you go to effects control

- Go to ‘scale’, and type in the number according to the degree you desire to effect
your rotation. However, your video will be just perfect if you type in -90

ALTERNATIVE WAY TO ROTATE AVI VIDEO ON ADOBE PREMIERE PRO
- STEP 1 - Go to the effects window and search for ‘flip’
- STEP 2 - Click on ‘Transform’. You can then decide to do a horizontal flip or a vertical flip
- STEP 3 - All you need to do is click and drag it on to your clip and it will flip, whether horizontal or vertical
- STEP 4 - It is easy to remedy when you click and drag the other to place on your footage, whether horizontal or vertical.
TO ROTATE YOUR CLIP
- STEP 1 - Highlight your footage on the timeline and go to your effects controls window. Underneath ‘motion’, there is the perimeter of rotation. If you click and drag the mouse on the number, it will rotate either clockwise or counter-clockwise. Also, you can type in whatever rotation amount you want

- STEP 2 - It’s also worth mentioning that when you rotate a clip, you’re always rotating around the inker point (the little blue cross in a circle). You can click and drag this through the program monitor to any point on the clip and start rotating it around the inker point. In fact, it doesn’t have to be on the clip; you can make the inker point up further and rotate, and will still rotate around the inker point. If you don’t see this on your program monitor, that’s because you haven’t highlighted the motion.

- STEP 3 - A good tip is using guides to help you level and horizontal or whether you are working with on-screen. To get a slant perfectly leveled, there’s an easy way to reference a straight line on your program monitor. On the bottom right of your program monitor is the button [a plus (+) button] editor. Click on it and a box full of tools will pop up which you can work with. Click ‘add show rulers’, ‘show guides’ and ‘safe margins’


- STEP 4 - In the ruler section, take your mouse, click and drag it down to the little crosses of your safe margins. The same goes for the vertical ruler; click and drag over. That will create a new guide. For your footage, what you might need to do is get your horizontal guide down to your horizon view. You can go to your rotation and rotate your footage to get straight with your guide. If you are left with black bars at the corners, take off your safe margin rulers and guides and then zoom in on your footage and take off the black bars. To do this, go back to your effect controls

- STEP 5 - Instead of doing rotation, you scale by clicking and sliding the mouse on the number to the right


iMOVIE – FREE FOR MAC

iMovie is a preinstalled video editing application developed by Apple Inc. for macOS, Ios, and iPadOS devices. It was originally released in 1999 as a Mac OS 8 application bundle with the first FireWire-enabled consumer Mac model, the iMac DV. With iMovie, you can create professional-looking videos without an editing degree.
HOW TO ROTATE AVI VIDEO IN iMOVIE
- STEP 1 - Run iMovie on your PC and create a new project by clicking ‘create new’ and selecting ‘movie’. Import your footage: Click on the arrow pointing downwards just below your menu bar, and select the video from wherever it is saved locally.

- STEP 2 - Click on the video once it’s imported; make sure it has the yellow boundary on it. Click and drag it onto the timeline
- STEP 3 - Leave your play-head on the footage and go just above your program window and click on the crop icon, the third from the left. Afterwards, a rotate ion will show just by the right above the program monitor. There are actually two buttons to rotate in either direction. You can save time by clicking the correct direction for whichever way your videos need to be rotated


- STEP 4 - Your videos is rotated; you can go ahead and save

FILMORA – PAID FOR MAC

Formerly known as Wondershare Video Editor as at when it first launched in 2015, Filmora Video Editor is a video editing software that helps businesses create and distribute white-labeled marketing videos. Filmora is an easy-to-use video editing software for a beginner. It supports 50 above formats, 4k editing, Filmstock effects store, all basic and advanced editing tools in the most easily accessible and used manner.
For Win 7 or later (64-bit)
For macOS 10.14 or later
HOW TO ROTATE AVI VIDEO IN FILMORA
- STEP 1 - Run Filmora on your PC, import your video from where it has been locally saved and drag to the timeline
- STEP 2 - Go to file, and select ‘project settings’. By default, the video is recorded on portrait – 9:11, so change the aspect ratio to 16:9


- STEP 3 - Go to your timeline and double-click your footage. A box of options will pop up beside the program monitor. Simply go to rotate and click and slide to rotate. It may be difficult to line it up even and straight. Just go to the program monitor and click on the little line and drag; it makes it easier to align


- STEP 4 - Go to ‘scale’ and slide it to the right to make it fill the screen. Your video is rotated and ready to be previewed
VIDEOLEAP – PAID FOR ANDROID AND iPHONE

Videoleap includes the usual basic cutting and pasting tools, plus greenscreen aspect ratios, slow-mo and fast motion, audio editing, and unlimited undo and redo actions. Access to the app and premium features is available with a subscription for $7.99/month, or with additional discounts if bought as a one-time purchase or multiple month bundles.
HOW TO ROTATE AVI VIDEO IN VIDEOLEAP
- STEP 1 - Launch Videoleap on your android and Import your footage from where you have saved it locally. Tap on ‘transform’, and then tap on rotate, then tap on rotate as many times as it takes so that it can be ideally fit


- STEP 2 - Change the format from 16:9 (YouTube format) to 9:16 (for TikTok). To do that, deselect the clip, tap on canvas, and then choose 9:16. Play the clip to preview and save.

INSHOT – FREE FOR ANDROID

InShot app is an all-in-one visual content editing app. It allows you to create videos, edit photos, and create image collages. The app has plenty of features too. You can trim clips, change the speed of your footage, and add filters, music and text. InShot is a free mobile application that you can download on your Windows to create or edit videos and photos.
HOW TO ROTATE AVI VIDEO ON INSHOT
- STEP 1 - Import your video from where you have locally saved it
- STEP 2 - Tap on the clip, and swipe the toolbar to the left to find the ‘rotate’ icon. When you tap on ‘rotate’, it will rotate your video to your left; you can keep rotating till it’s ideally fit


QUICKTIME VIDEO EDITOR – FREE FOR MAC

- Open your video on your PC using the Quicktime program. Go to ‘edit’ and click on ‘rotate left’; keep clicking until your video ideally fits the screen. Your video is rotated successfully. Preview, save and export your video.


VLLO – PAID FOR ANDROID

VLLO is a super easy video editor. Beginner and casual users will enjoy editing video with its intuitive but precise control abled split, txt, BGM and transition. For the pro editors, premium paid features are also ready with Chroma-Key, PIP, mosaic and keyframe animations.
HOW TO ROTATE AVI VIDEO IN VLLO – LANDSCAPE TO PORTRAIT
- STEP 1 - Import your footage from where you have saved it locally and change aspect ratio to 16:9 and select the ‘fill’ icon.

- STEP 2 - On your timeline, click on the footage and select the curved arrow icon to rotate as you click and drag. You can choose to rotate either ways, and your video is rotated, and ready to be previewed and saved

VEED – ONLINE/CLOUD-BASED VIDEO EDITOR

VEED.IO is an online video editing platform that makes creating videos easy and accessible to everyone. Millions of creators around the world use our products to tell stories, create content, grow their audience and more.
HOW TO ROTATE AVI VIDEO ONLINE USING VEED – PORTRAIT TO LANDSCAPE
- STEP 1 - Create an account online on Veed – Visit <www.veed.io>

- STEP 2 - Click the ‘view project’ button and import/upload footage form where it has been saved locally

- STEP 3 - Go to ‘edit video’ and select ‘adjust’. Go to rotation and click and drag to the right and to the left for your video to fit ideally

- STEP 4 - You can export your video once it is rotated
ALTRNATIVE WAY TO ROTATE AVI VIDEO ONLINE USING VEED
- STEP 1 - Import your footage and drag it to the timeline
- STEP 2 - Click on ‘try sample’ or ‘upload video’

- STEP 3 - Click on ‘rotate’. Click to rotate either ways, 90 degrees
- STEP 4 - Go to crop and choose whether ‘vertical’ or ‘landscape’ to get rid of the bars

WEVIDEO – ONLINE/CLOUD-BASED VIDEO EDITOR
WeVideo is an online, cloud-based video editing platform that works in web browsers and on mobile devices. The company was originally founded in 2011 in Europe. Their main headquarters is in Mountain View, California with a team based in Romania.
HOW TO ROTATE AVI VIDEO ON WEVIDEO ONLINE
- STEP 1 - Import your footage and drag it to the timeline

- STEP 2 - Click on the little pencil icon right above the timeline

- STEP 3 - That will open up your editor, popping up a box full of option. Select the ‘transform’ tab, then two arrows right in front of ‘rotation’ till it fits: two clicks for 180, and one click for 90. Adjust it as needed, and save changes to preview.

Video editing is the process of cutting and rearranging multiple clips or segments of video to create a new and more improved video. This involves adding titles, animations, sound effects, music and more. Video editing has not ceased to follow the trend of technology as it keeps thriving tirelessly through the ages. With advancement springing forth from many sides, video editing followed every pace to ensure it’s not left behind. This largely involves gadgets, computers and smartphones.
Before the advent of smartphones, computers have been the only video editing tools, and that culture is preserved even till date as its use has spread round the world. It is therefore evident that film making cannot bypass this process. Improvements have been made over the years on video editing softwares for computers to stay up to date as regards features and usability. There are other video editors which were introduced, and are still being updated such as Adobe Premiere Pro, Final Cut, Filmora and so on. As the case is today, smartphones have proven to be relevant in the process; they have also come up with video editing applications such as Power Video Director, InShot, Filmora for Android, Kinemaster and many more for Android, iPhone and iPads.
This article aims at giving guides and steps on how to rotate AVI videos using different softwares on different PCs (Windows and Mac) and smartphones (Android and iPhone). This does not leave online video editing softwares behind also.
WHAT IS AVI?

AVI means Audio Video Interleave. It’s a multimedia container format introduced by Microsoft in November 1992 as part of its video for Windows technology. AVI files can contain both audio and video data in a file container that allows synchronous audio-with-video playback.
KDENLIVE – FREE FOR WINDOWS

Introduced in 2002, Kdenlive has a good quality and design. The design is straightforward, user-friendly which makes you know what you are getting into, as well as the actual quality of the effects that you might want to apply to your video while editing. Overall, it looks really professional, neat and organized.
HOW TO ROTATE AVI VIDEO IN KDENLIVE
- STEP 1 - Launch Kdenlive on your Windows and import the video from where you have saved it locally. Drag and drop video on timeline

- STEP 2 - Select video effects and in the search box, type ‘rotate’ and click on it. Click on effects, then select video effects
- STEP 3 - Drag the video to the timeline and go to effects, then drag and drop the ‘rotate’ effect on the clip.

ALTERNATIVE WAY TO ROTATE AVI VIDEO ON KDENLIVE
- STEP 1 - Create a vertical project: create profile, select size, 1080 x 1920 and select aspect ratio: 9:16. Afterwards, there will be a vertical outline on your program window. Import your video to the project bin and drag it to the timeline
- STEP 2 - Go to effects, then click on ‘transform’ and double-click on it
- STEP 3 - Go to the down-right part of your screen and click on ‘rotation’ and highlight to change the number to whichever is ideal for your screen; you can change it to 270. This will make it rotate but will not fill the screen yet. Highlight the size and change it to 180 an hit the ‘enter’ key.
OPENSHOT – FREE FOR WINDOWS
OpenShot Video Editor is a free and open-source video editor for Windows, macOS, Linux, and Chrome OS. The project started in August 2008 by Jonathan Thomas, with the objective of providing a stable, free, and friendly to use video editor.

HOW TO ROTATE AVI VIDEO ON OPENSHOT
- STEP 1 - Launch OpenShot on your Windows and import your clip form where you’ve saved it locally

- STEP 2 - Drag and drop footage on your timeline and click on the ‘play’ button to check your footage. Right click on the footage and an option box will appear

- STEP 3 - Click on rotate; you can choose to rotate either left or right. Rotate till it ideally fits the screen

ALTERNATIVE WAY TO ROTATE AVI VIDEO ON OPEN SHOT
- STEP 1 - Launch OpenShot on your Windows and drag your footage to the timeline.
- STEP 2 - Right click on your video and select properties.
- STEP 3 - Go to rotation and change the value, and your video will rotate
ADOBE PREMIERE PRO – PAID FOR WINDOWS

Introduced in 2003, Adobe Premiere Pro is known to be a video editing software. It has a lot of features that can be used in the process of editing. It’s capable of editing feature movies such as Hollywood and the likes.
HOW TO ROTATE AVI VIDEO ON ADOBE PREMIERE PRO – FIXING A LANDSCAPE SHOT
- STEP 1 - Go to sequence and click on sequence settings

- STEP 2 - Click on frame size and type in 3840; for the horizontal, type in 2160 and then proceed to click ok
FIXING A PORTRAIT SHOT
- Put your play-head (the thin line that moves over the clips on your timeline) on the clip on the timeline
- Go to the top and click on ‘Editing’, then you go to effects control

- Go to ‘scale’, and type in the number according to the degree you desire to effect
your rotation. However, your video will be just perfect if you type in -90

ALTERNATIVE WAY TO ROTATE AVI VIDEO ON ADOBE PREMIERE PRO
- STEP 1 - Go to the effects window and search for ‘flip’
- STEP 2 - Click on ‘Transform’. You can then decide to do a horizontal flip or a vertical flip
- STEP 3 - All you need to do is click and drag it on to your clip and it will flip, whether horizontal or vertical
- STEP 4 - It is easy to remedy when you click and drag the other to place on your footage, whether horizontal or vertical.
TO ROTATE YOUR CLIP
- STEP 1 - Highlight your footage on the timeline and go to your effects controls window. Underneath ‘motion’, there is the perimeter of rotation. If you click and drag the mouse on the number, it will rotate either clockwise or counter-clockwise. Also, you can type in whatever rotation amount you want

- STEP 2 - It’s also worth mentioning that when you rotate a clip, you’re always rotating around the inker point (the little blue cross in a circle). You can click and drag this through the program monitor to any point on the clip and start rotating it around the inker point. In fact, it doesn’t have to be on the clip; you can make the inker point up further and rotate, and will still rotate around the inker point. If you don’t see this on your program monitor, that’s because you haven’t highlighted the motion.

- STEP 3 - A good tip is using guides to help you level and horizontal or whether you are working with on-screen. To get a slant perfectly leveled, there’s an easy way to reference a straight line on your program monitor. On the bottom right of your program monitor is the button [a plus (+) button] editor. Click on it and a box full of tools will pop up which you can work with. Click ‘add show rulers’, ‘show guides’ and ‘safe margins’


- STEP 4 - In the ruler section, take your mouse, click and drag it down to the little crosses of your safe margins. The same goes for the vertical ruler; click and drag over. That will create a new guide. For your footage, what you might need to do is get your horizontal guide down to your horizon view. You can go to your rotation and rotate your footage to get straight with your guide. If you are left with black bars at the corners, take off your safe margin rulers and guides and then zoom in on your footage and take off the black bars. To do this, go back to your effect controls

- STEP 5 - Instead of doing rotation, you scale by clicking and sliding the mouse on the number to the right


iMOVIE – FREE FOR MAC

iMovie is a preinstalled video editing application developed by Apple Inc. for macOS, Ios, and iPadOS devices. It was originally released in 1999 as a Mac OS 8 application bundle with the first FireWire-enabled consumer Mac model, the iMac DV. With iMovie, you can create professional-looking videos without an editing degree.
HOW TO ROTATE AVI VIDEO IN iMOVIE
- STEP 1 - Run iMovie on your PC and create a new project by clicking ‘create new’ and selecting ‘movie’. Import your footage: Click on the arrow pointing downwards just below your menu bar, and select the video from wherever it is saved locally.

- STEP 2 - Click on the video once it’s imported; make sure it has the yellow boundary on it. Click and drag it onto the timeline
- STEP 3 - Leave your play-head on the footage and go just above your program window and click on the crop icon, the third from the left. Afterwards, a rotate ion will show just by the right above the program monitor. There are actually two buttons to rotate in either direction. You can save time by clicking the correct direction for whichever way your videos need to be rotated


- STEP 4 - Your videos is rotated; you can go ahead and save

FILMORA – PAID FOR MAC

Formerly known as Wondershare Video Editor as at when it first launched in 2015, Filmora Video Editor is a video editing software that helps businesses create and distribute white-labeled marketing videos. Filmora is an easy-to-use video editing software for a beginner. It supports 50 above formats, 4k editing, Filmstock effects store, all basic and advanced editing tools in the most easily accessible and used manner.
For Win 7 or later (64-bit)
For macOS 10.14 or later
HOW TO ROTATE AVI VIDEO IN FILMORA
- STEP 1 - Run Filmora on your PC, import your video from where it has been locally saved and drag to the timeline
- STEP 2 - Go to file, and select ‘project settings’. By default, the video is recorded on portrait – 9:11, so change the aspect ratio to 16:9


- STEP 3 - Go to your timeline and double-click your footage. A box of options will pop up beside the program monitor. Simply go to rotate and click and slide to rotate. It may be difficult to line it up even and straight. Just go to the program monitor and click on the little line and drag; it makes it easier to align


- STEP 4 - Go to ‘scale’ and slide it to the right to make it fill the screen. Your video is rotated and ready to be previewed
VIDEOLEAP – PAID FOR ANDROID AND iPHONE

Videoleap includes the usual basic cutting and pasting tools, plus greenscreen aspect ratios, slow-mo and fast motion, audio editing, and unlimited undo and redo actions. Access to the app and premium features is available with a subscription for $7.99/month, or with additional discounts if bought as a one-time purchase or multiple month bundles.
HOW TO ROTATE AVI VIDEO IN VIDEOLEAP
- STEP 1 - Launch Videoleap on your android and Import your footage from where you have saved it locally. Tap on ‘transform’, and then tap on rotate, then tap on rotate as many times as it takes so that it can be ideally fit


- STEP 2 - Change the format from 16:9 (YouTube format) to 9:16 (for TikTok). To do that, deselect the clip, tap on canvas, and then choose 9:16. Play the clip to preview and save.

INSHOT – FREE FOR ANDROID

InShot app is an all-in-one visual content editing app. It allows you to create videos, edit photos, and create image collages. The app has plenty of features too. You can trim clips, change the speed of your footage, and add filters, music and text. InShot is a free mobile application that you can download on your Windows to create or edit videos and photos.
HOW TO ROTATE AVI VIDEO ON INSHOT
- STEP 1 - Import your video from where you have locally saved it
- STEP 2 - Tap on the clip, and swipe the toolbar to the left to find the ‘rotate’ icon. When you tap on ‘rotate’, it will rotate your video to your left; you can keep rotating till it’s ideally fit


QUICKTIME VIDEO EDITOR – FREE FOR MAC

- Open your video on your PC using the Quicktime program. Go to ‘edit’ and click on ‘rotate left’; keep clicking until your video ideally fits the screen. Your video is rotated successfully. Preview, save and export your video.


VLLO – PAID FOR ANDROID

VLLO is a super easy video editor. Beginner and casual users will enjoy editing video with its intuitive but precise control abled split, txt, BGM and transition. For the pro editors, premium paid features are also ready with Chroma-Key, PIP, mosaic and keyframe animations.
HOW TO ROTATE AVI VIDEO IN VLLO – LANDSCAPE TO PORTRAIT
- STEP 1 - Import your footage from where you have saved it locally and change aspect ratio to 16:9 and select the ‘fill’ icon.

- STEP 2 - On your timeline, click on the footage and select the curved arrow icon to rotate as you click and drag. You can choose to rotate either ways, and your video is rotated, and ready to be previewed and saved

VEED – ONLINE/CLOUD-BASED VIDEO EDITOR

VEED.IO is an online video editing platform that makes creating videos easy and accessible to everyone. Millions of creators around the world use our products to tell stories, create content, grow their audience and more.
HOW TO ROTATE AVI VIDEO ONLINE USING VEED – PORTRAIT TO LANDSCAPE
- STEP 1 - Create an account online on Veed – Visit <www.veed.io>

- STEP 2 - Click the ‘view project’ button and import/upload footage form where it has been saved locally

- STEP 3 - Go to ‘edit video’ and select ‘adjust’. Go to rotation and click and drag to the right and to the left for your video to fit ideally

- STEP 4 - You can export your video once it is rotated
ALTRNATIVE WAY TO ROTATE AVI VIDEO ONLINE USING VEED
- STEP 1 - Import your footage and drag it to the timeline
- STEP 2 - Click on ‘try sample’ or ‘upload video’

- STEP 3 - Click on ‘rotate’. Click to rotate either ways, 90 degrees
- STEP 4 - Go to crop and choose whether ‘vertical’ or ‘landscape’ to get rid of the bars

WEVIDEO – ONLINE/CLOUD-BASED VIDEO EDITOR
WeVideo is an online, cloud-based video editing platform that works in web browsers and on mobile devices. The company was originally founded in 2011 in Europe. Their main headquarters is in Mountain View, California with a team based in Romania.
HOW TO ROTATE AVI VIDEO ON WEVIDEO ONLINE
- STEP 1 - Import your footage and drag it to the timeline

- STEP 2 - Click on the little pencil icon right above the timeline

- STEP 3 - That will open up your editor, popping up a box full of option. Select the ‘transform’ tab, then two arrows right in front of ‘rotation’ till it fits: two clicks for 180, and one click for 90. Adjust it as needed, and save changes to preview.

Also read:
- Using Montage In Movies | Learn to Use Montage With Movies for 2024
- In 2024, Do You Want to Slow Down Your TikTok Video and Zoom on a Specific Part? This Is No Longer a Difficult Task as This Video Comes up with the Right Set of Methods that Can Be Used to Implement the Slow Zoom Effect TikTok
- Updated 3 Effective Methods to Correct Color Distortion in Videos for 2024
- New Best Tools To Create Blend Image Collage
- In 2024, How Can You Get VHS Filter and Glitch Filter to Your Images or Videos?
- New In 2024, Discover the Process of Slowing Down Time-Lapse Videos on Your iPhone
- New Best Text Animations In After Effects
- 2024 Approved Looking for the Steps to Add Transitions Effects in Premiere Pro? Here Are the Steps to Add and Edit Transitions in Premiere Pro and an Alternative Way to Video Transitions
- Updated How to Make a Smooth Speed Ramping in Premiere Pro, In 2024
- 3 In-Camera Transitions Tricks To Make Videos Like a Pro
- How to Apply Video Filters
- 2024 Approved You Can Easily Film Rotating Video Illusions From Your Smartphone and Edit Them on Wondershare Filmora in Just a Few Clicks
- New In 2024, 100+ Best TikTok Captions Enhance Your Content
- New What Is Color Finale
- New Create Your Slow Zoom TikTok in Minutes
- 2024 Approved Step by Step to Crop Videos Using Lightworks
- In 2024, How To Add Text In After Effects
- New 2024 Approved How to Create and Add an Adjustment Layer in Final Cut Pro
- New 2024 Approved Top List Best VHS Sound Effect That You Can Use in Video Making
- Updated 2024 Approved End This Problem! Make Transparent Background Video Today
- New Slow Down or Speed Up Videos Easily on PC, Online, and Phone
- New How to Create Loop Videos Using Filmora
- Updated Adobe Lightroom Color Grading Tutorial for 2024
- New In 2024, How to Combine Multiple Videos Into One on Instagram
- 2024 Approved There Are a Few Ways to Remove or Mute Audio in a Video, but How? Read This Article and Learn How to Do It Using Recommended Android Apps
- Are You Looking to Make Transparent Background in Canva Then You Can Learn About It in This Article for 2024
- Updated How to Correct Lens Distortion in Videos for 2024
- Add Stylish Text to Videos for 2024
- Add Some Shake to Videos with Alight Motion for 2024
- Updated Best Video Title Generators
- New How to Create Your Own LUTs for Your Video with Filmora for 2024
- Updated Here We Are Going to Show You the Best Effects to Appear on Camera Made with Filmora
- New In 2024, 2 Effective Ways to Add Text Behind Objects
- How to Factory Reset Vivo Y02T without Losing Data | Dr.fone
- Top 10 AirPlay Apps in Vivo S18 for Streaming | Dr.fone
- Proven Ways to Fix There Was A Problem Parsing the Package on Realme C53 | Dr.fone
- How to Transfer Data from Samsung Galaxy A54 5G to Any iOS Devices | Dr.fone
- Updated How To Learn Cartoon Sketch Drawing for 2024
- In 2024, Easy Guide to Itel A70 FRP Bypass With Best Methods
- New Multiple Ways How To Remove iCloud Activation Lock On your iPhone 8
- Still Using Pattern Locks with Infinix Hot 40 Pro? Tips, Tricks and Helpful Advice
- In 2024, Easily Unlock Your OnePlus Ace 2 Pro Device SIM
- In 2024, 5 Ways To Teach You To Transfer Files from Itel P55 5G to Other Android Devices Easily | Dr.fone
- Fake Android Location without Rooting For Your Motorola G54 5G | Dr.fone
- In 2024, Apple ID Locked for Security Reasons On Apple iPhone 6s? Find the Best Solution Here
- Full Guide on Mirroring Your OnePlus Open to Your PC/Mac | Dr.fone
- Android Screen Stuck General Asus ROG Phone 8 Partly Screen Unresponsive | Dr.fone
- In 2024, How To Fix Auto Lock Greyed Out on Apple iPhone 11 Pro | Dr.fone
- How to Spy on Text Messages from Computer & Motorola Moto G14 | Dr.fone
- 6 Ways to Change Spotify Location On Your Samsung Galaxy XCover 7 | Dr.fone
- Full Solutions to Fix Error Code 920 In Google Play on Sony Xperia 5 V | Dr.fone
- Simple and Effective Ways to Change Your Country on YouTube App Of your Nokia G22 | Dr.fone
- In 2024, iPhone Is Disabled? Here Is The Way To Unlock Disabled Apple iPhone 13 Pro Max | Dr.fone
- 9 Quick Fixes to Unfortunately TouchWiz has stopped Of Vivo S18e | Dr.fone
- In 2024, Overview of the Best Xiaomi Redmi Note 13 5G Screen Mirroring App | Dr.fone
- Title: How to Add Echo Effect to Video
- Author: Chloe
- Created at : 2024-05-20 03:37:18
- Updated at : 2024-05-21 03:37:18
- Link: https://ai-editing-video.techidaily.com/how-to-add-echo-effect-to-video/
- License: This work is licensed under CC BY-NC-SA 4.0.

