How To Add Motion Blur In Davinci Resolve?

How To Add Motion Blur In Davinci Resolve?
Do you want to give extra details to your object’s movements in a video? Motion blur effect can instantly add a natural effect to your videos by smoothening the lines and edges. It also adds a sense of action in a video quite dramatically.
Many professionals also say that motion blur creates a passage of time by crafting vibrant streaks of colors. So, if you want to add this dynamic effect, this article will help you. By reading this article, you can learn how to add motion blur in DaVinci Resolve using efficient ways.
Part 1: What is DaVinci Resolve?
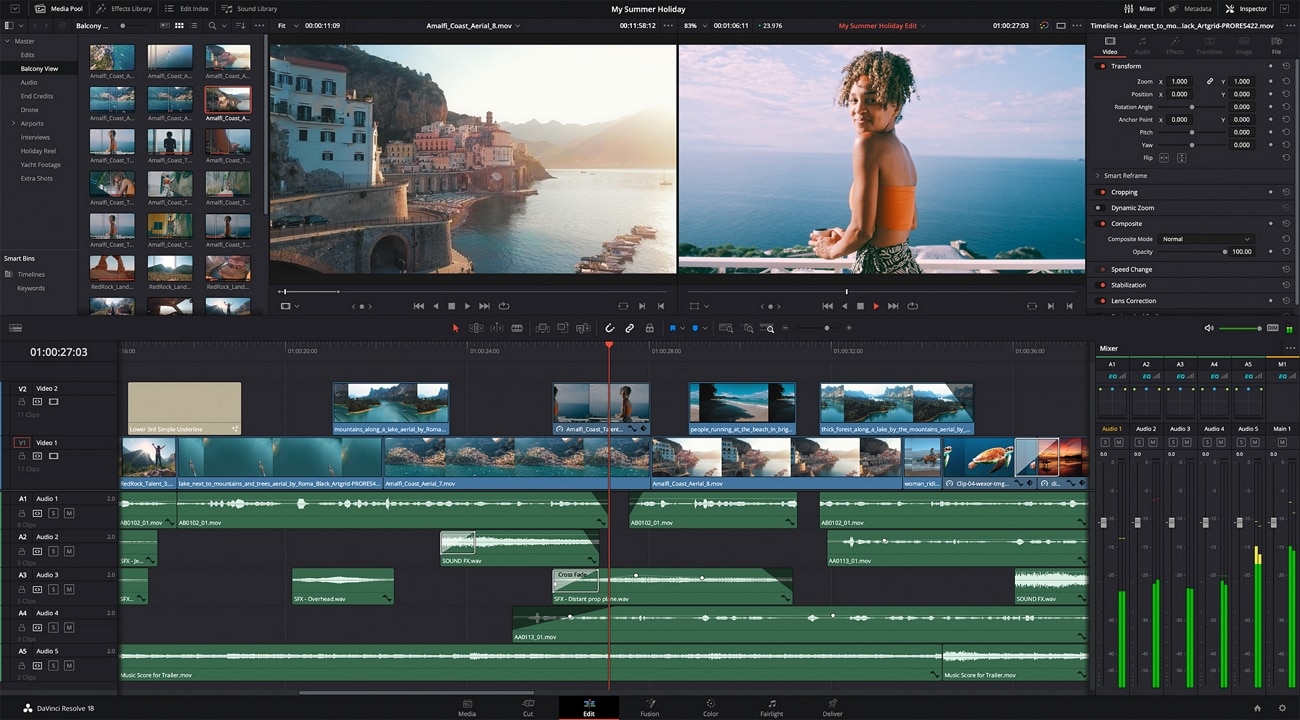
DaVinci Resolve is an all-in-one software that includes various capabilities. Using this tool, you can effortlessly add effects, filters, visual graphics, and other elements. You can also use this professional software to color-correct your video by altering saturation, hue, contrast, and brightness. With new upgrades, DaVinci provides remote collaboration using Blackmagic Cloud. This will allow you to collaborate with multiple users efficiently.
You can find different tools on different pages of DaVinci. This flexibility and wide space will help you to execute video editing effortlessly. Furthermore, you can also create customizable keyboard shortcuts to increase your overall work efficiency. Thus, its highly professional software contains a wide range of media management, organization, and editing tools.
Part 2: How to Add Motion Blur to Videos in DaVinci Resolve?
DaVinci Resolve can professionally add a motion blur effect to your videos to smoothen the look. To use the DaVinci motion blur effect, there are two efficient ways. To learn about them in detail, read this part of the section carefully.
1. On the Fusion Page
DaVinci has separate pages, like the Fusion page, for different uses. If you want to learn how to add a motion blur effect on the fusion page, check the following instructions carefully.
What is the Fusion Page in DaVinci?
On the Fusion page, you can use captivating visual effects to add a new perspective to your videos. This page consists of a diverse range of motion graphics and visual effects. You can use retouching and repairing tools from the fusion page to generate a cinematic effect quickly.
So, by merging images, effects, and animations together, you can create a vibrant effect of your own efficiently. To add DaVinci Resolve motion blur on the fusion page, here are the simple steps:
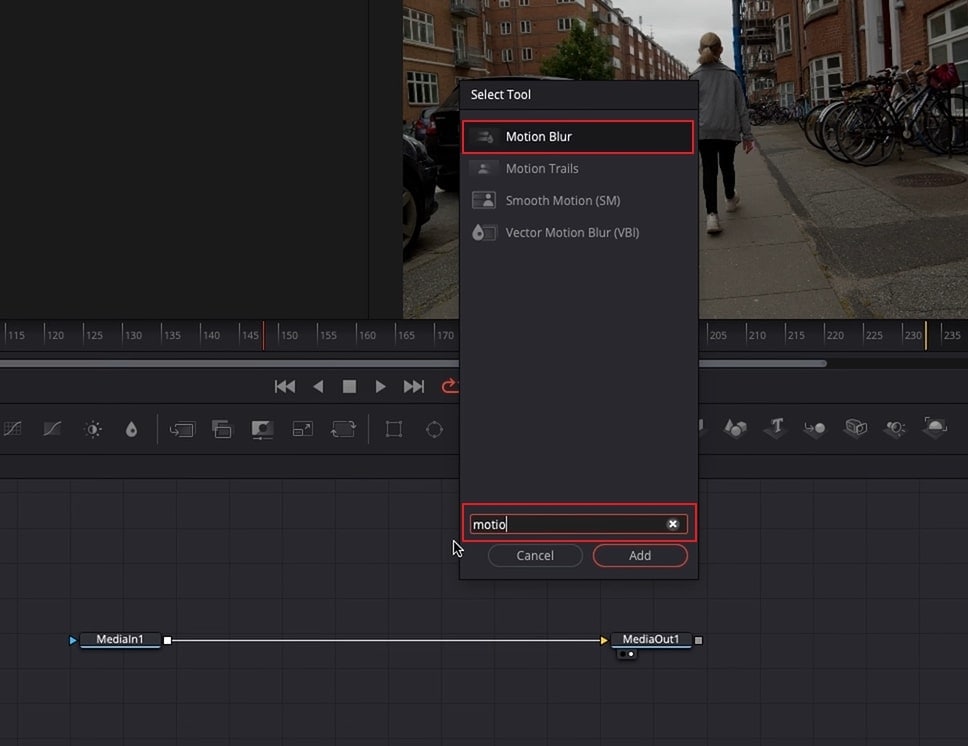
Step1 Navigate to the DaVinci Resolve tool and upload your video. Now open the fusion page and press “Shift” and “Spacebar.” On the search box, type “Motion” and select “Motion Blur” from the results. After selecting it, tap on the “Add” button.
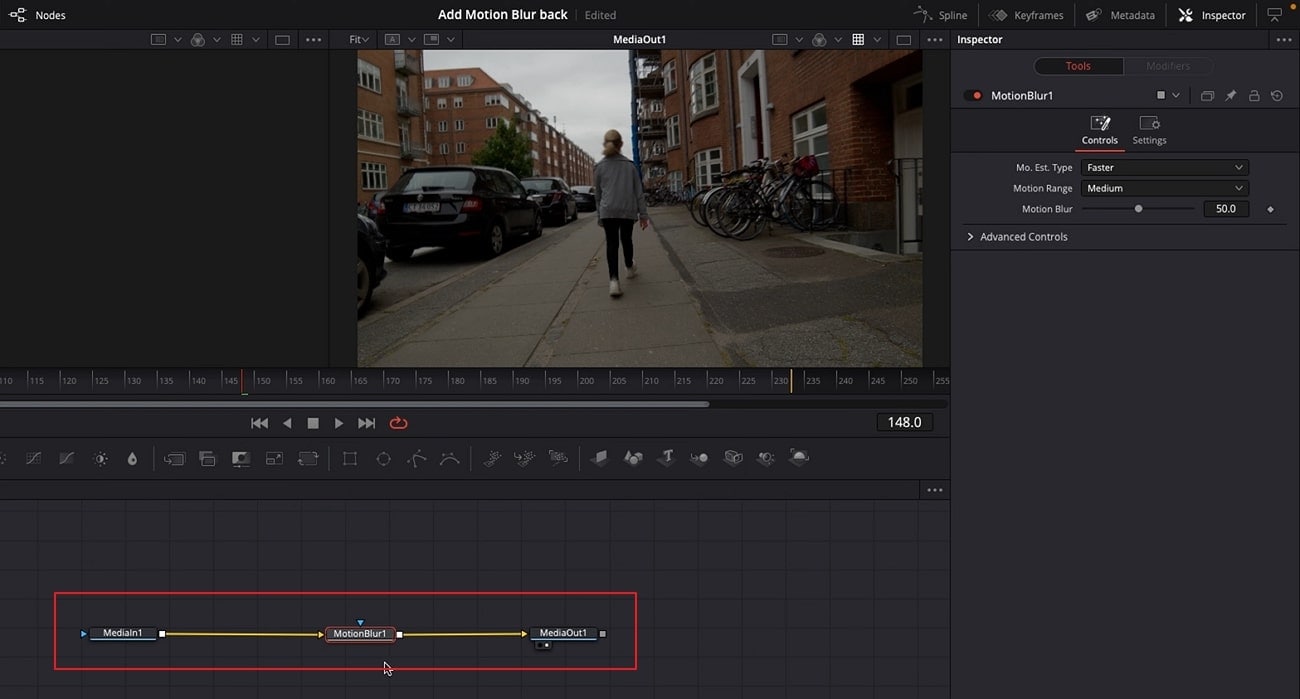
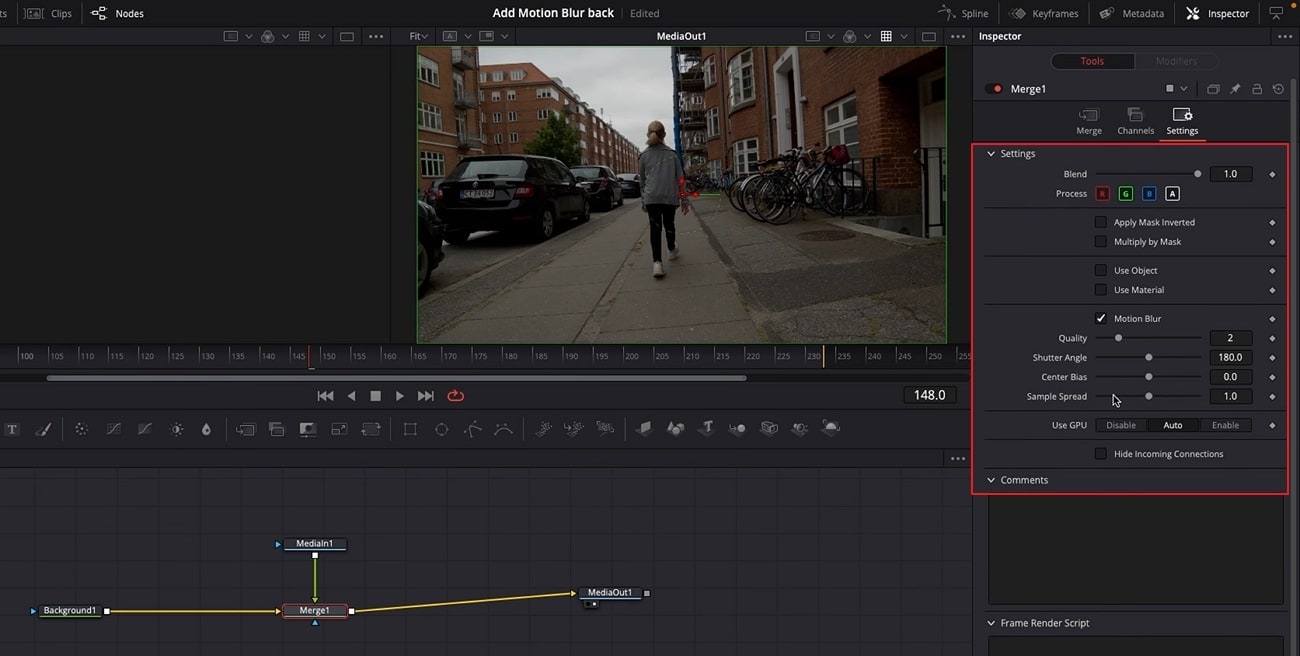
Step2 Now, you will be able to see a nod of Motion Blur on the interface. Drag this node to the center of “Media in” and “Media Out.” By selecting the motion blur node, you can adjust the settings from the right direction.
Step3 You can also remove the Motion Blur node to create more enhancements. After removing it, you have to add a “Background” and connect it to Media in and Media out nodes. Now merge the nodes and navigate to “Settings.” From the settings, you can check the box of motion blur and change its elements like quality, shutter angle, etc.
2. In the Edit Page
The Edit page in DaVinci Resolve provides you with complete freedom to add transitions, titles, and effects to the videos. On this page, you can replace, insert, overwrite and trim the clip effectively. Moreover, you can also add 2D and 3D titles to your videos on the edit page.
If you want to add a motion blur effect on DaVinci Resolve 17, you can instantly increase your work efficiency. The reason is that on DaVinci, you would be able to directly drag the motion blur effect on the editing area. Thus, it can increase your editing speed drastically. To add DaVinci motion blur on the editing page, read the below steps:
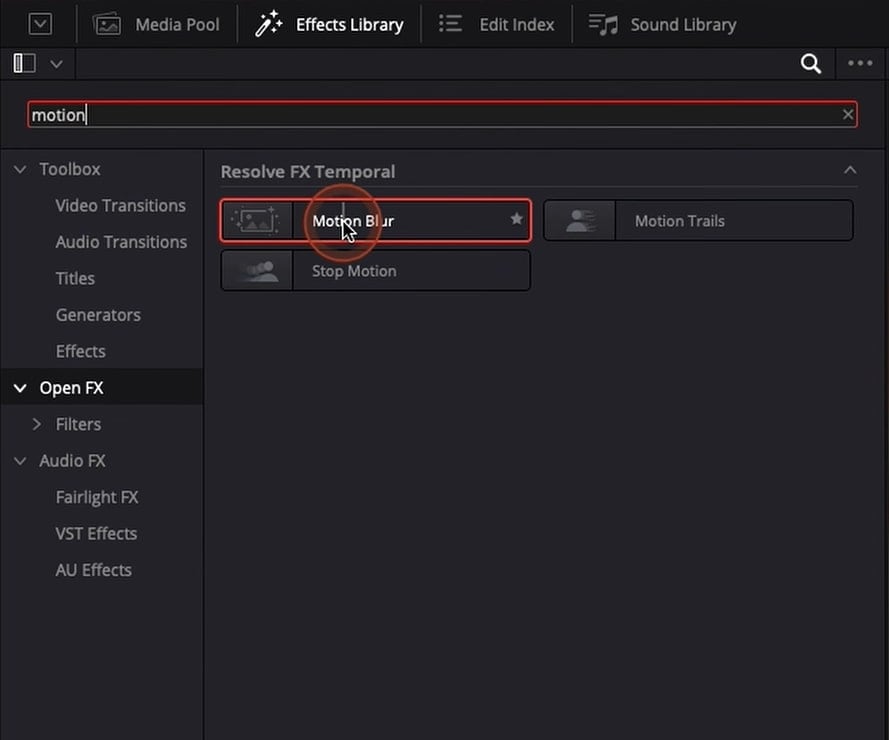
Step1 After accessing the DaVinci Resolve, open its edit page and upload the video. Once done, go to “Effects Library” and select “Open FX.” Now from the search bar, type “Motion Blur.” Select motion blur from the results and apply it to the timeline.
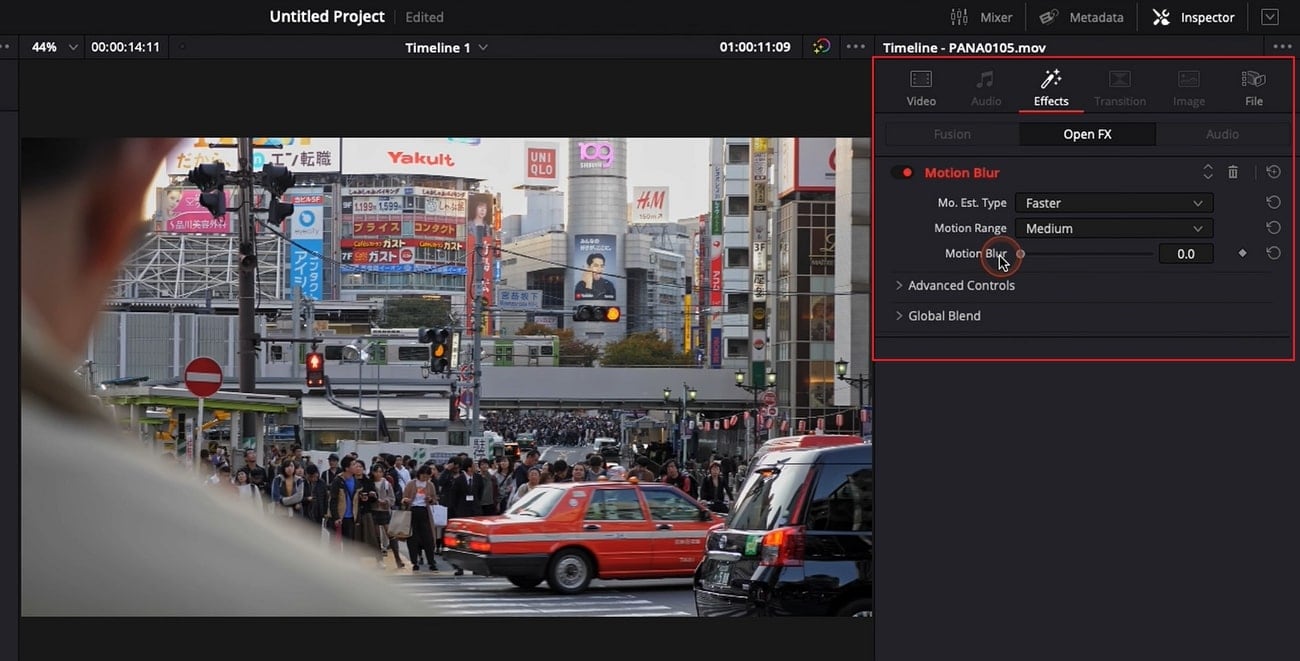
Step2 On the right side, select the “Effects” tab, and then you will be able to modify the motion range, motion blur value, and other elements.
Bonus Tips – Add Motion Blur with an Alternative to DaVinci Resolve
Do you want a better tool than DaVinci Resolve motion blur? Filmora is an easy-to-use tool that has a delightful and well-designed interface. Using this tool, you can effortlessly perform flawless editing on your videos without interruption. You can transitions and effects to your video to improve their visual appeal. You can also add audio clips to the video on this platform with great ease.
Free Download For Win 7 or later(64-bit)
Free Download For macOS 10.14 or later
Apart from advanced functioning, you can also use Filmora to execute basic functions. For instance, you can cut, trim, split, merge, and crop your videos with high precision. Moreover, you can use its stock footage to create a dynamic video from scratch. Hence, it’s a complete professional software that can change the outlook of your video efficiently.
Steps to Add Motion Blur in Wondershare Filmora
Follow the steps described below to add the motion blur to your videos if you are a beginner in the video industry:
Step1 Create a New Filmora Project
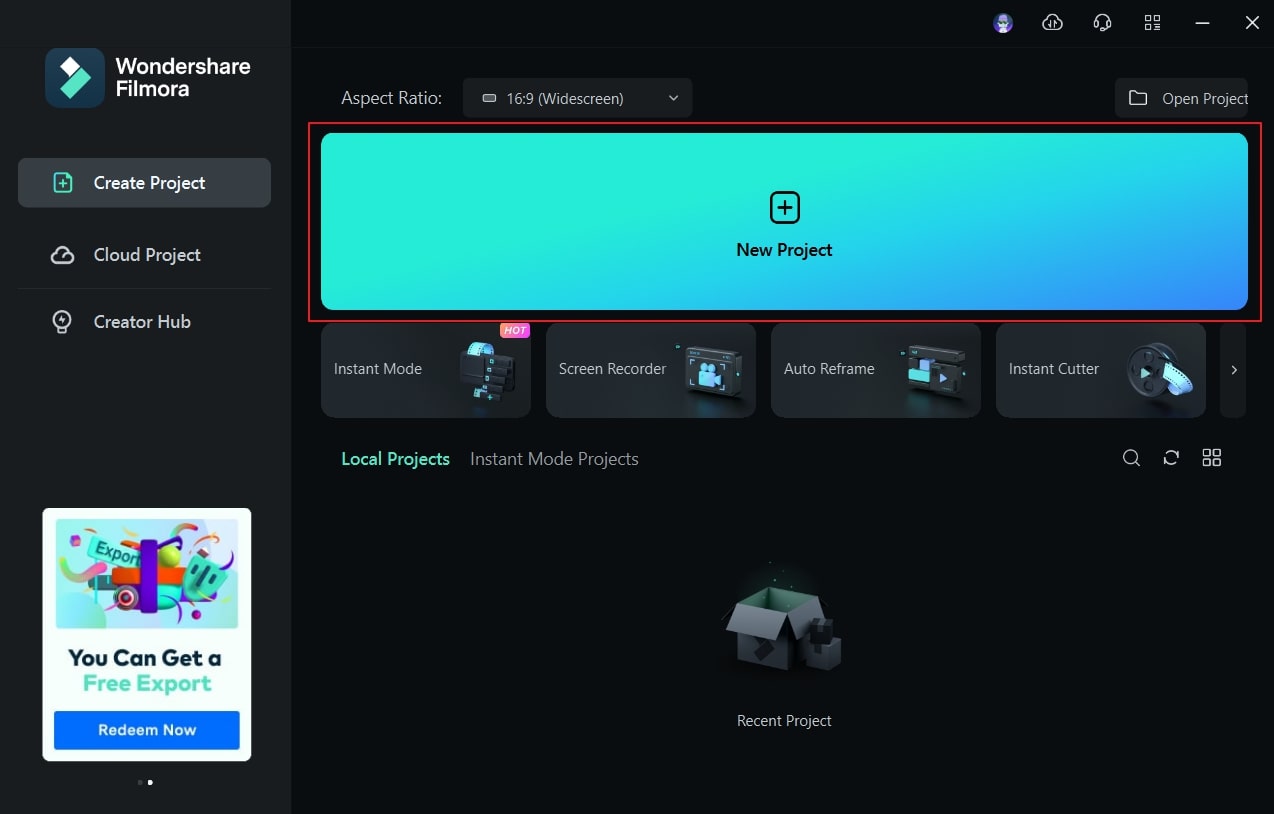
After launching Filmora, hit the “Create New Project” button to open a new interface. On the project media, upload your desired media file and then drag it to the timeline.
Step2 Choose the Motion Blur Effect
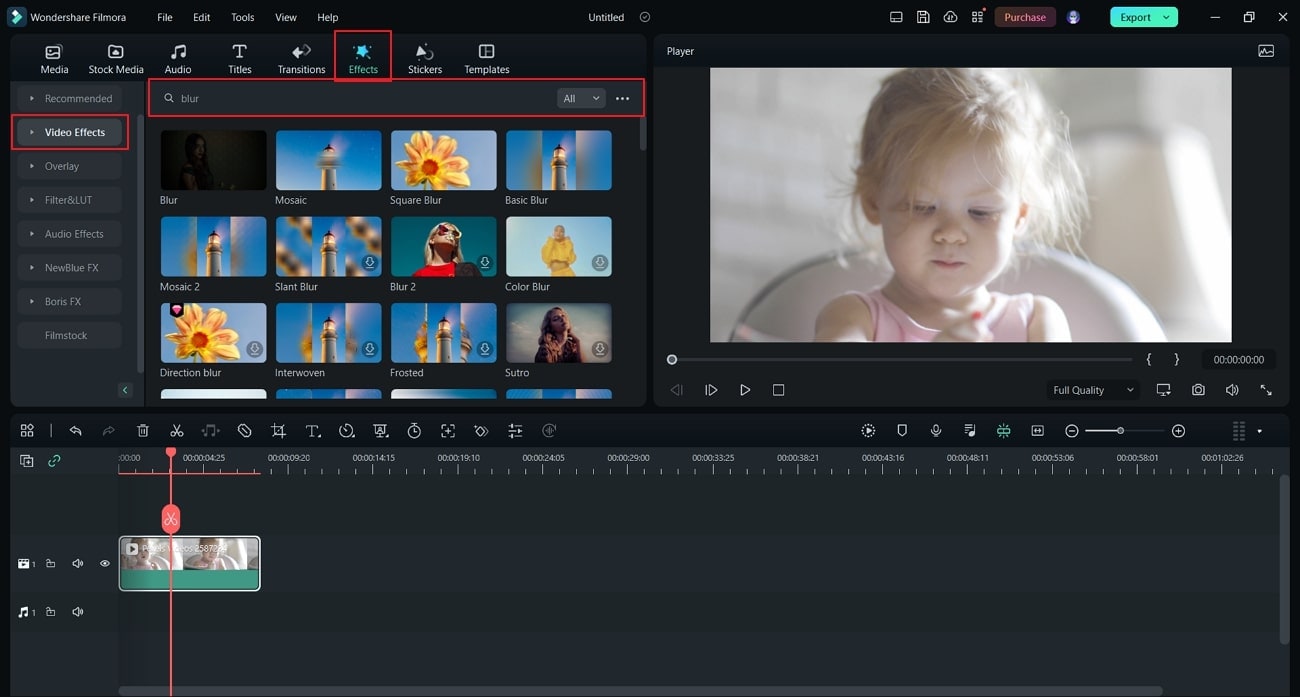
Now go to the “Effects” tab and select the “Video Effects” category from the left panel. Now you will have to type “Blur” in the search bar to get all the blur effects of Filmora. Select your option and apply the effect to the timeline.
Step3 Add the Dissolve Transition
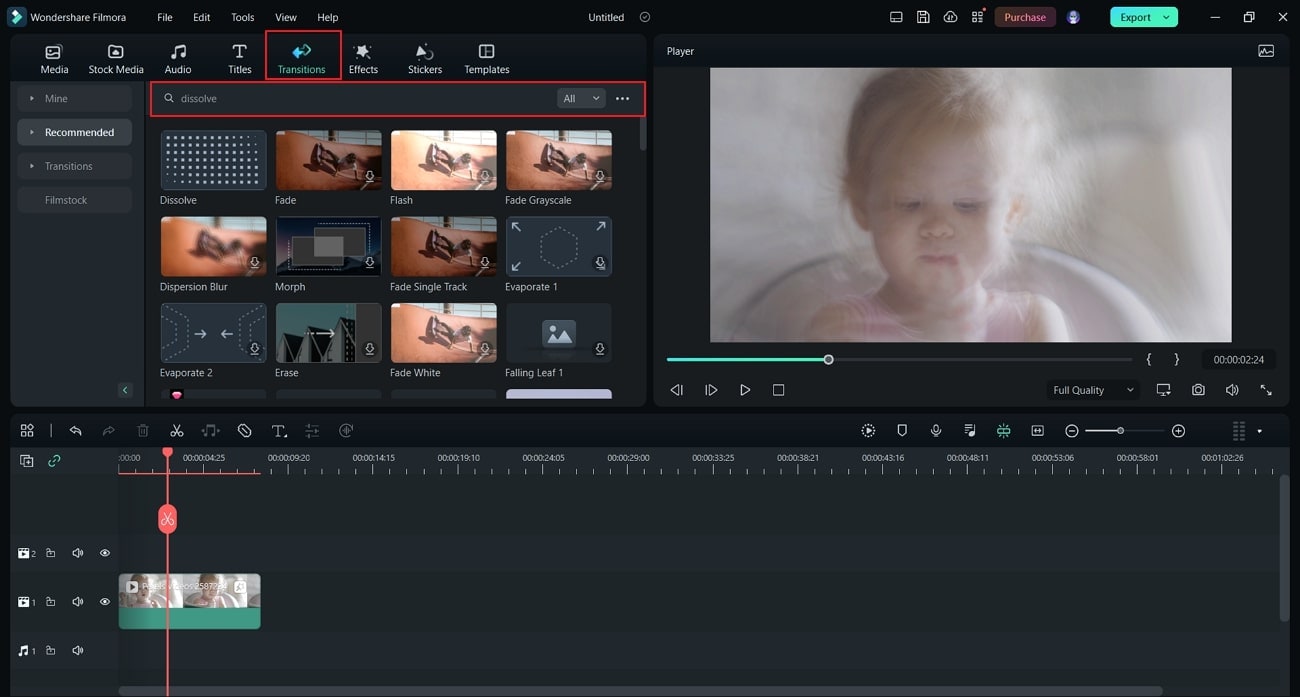
You can also add a transition known as “Dissolve” by searching for it in the “Transitions” tab to smoothen your video. You can see the final results in the preview window.
Conclusion
Have you ever added a motion blur effect to your videos? If you are unaware of how to create a professional motion blur effect, this article can provide you with complete guidance. In this article, we have used DaVinci Resolve to flawlessly add a motion blur effect. However, if you find the interface of DaVinci Resolve motion blur complicated, you can try its best alternative, Wondershare Filmora.
Free Download For macOS 10.14 or later
Apart from advanced functioning, you can also use Filmora to execute basic functions. For instance, you can cut, trim, split, merge, and crop your videos with high precision. Moreover, you can use its stock footage to create a dynamic video from scratch. Hence, it’s a complete professional software that can change the outlook of your video efficiently.
Steps to Add Motion Blur in Wondershare Filmora
Follow the steps described below to add the motion blur to your videos if you are a beginner in the video industry:
Step1 Create a New Filmora Project
After launching Filmora, hit the “Create New Project” button to open a new interface. On the project media, upload your desired media file and then drag it to the timeline.

Step2 Choose the Motion Blur Effect
Now go to the “Effects” tab and select the “Video Effects” category from the left panel. Now you will have to type “Blur” in the search bar to get all the blur effects of Filmora. Select your option and apply the effect to the timeline.

Step3 Add the Dissolve Transition
You can also add a transition known as “Dissolve” by searching for it in the “Transitions” tab to smoothen your video. You can see the final results in the preview window.

Conclusion
Have you ever added a motion blur effect to your videos? If you are unaware of how to create a professional motion blur effect, this article can provide you with complete guidance. In this article, we have used DaVinci Resolve to flawlessly add a motion blur effect. However, if you find the interface of DaVinci Resolve motion blur complicated, you can try its best alternative, Wondershare Filmora.
Easy Guide to Zoom Video in VLC
Even though VLC Media Player is not the default video player in any operating system, most users install VLC Player separately on their computers. This is because VLC Media Player offers several useful and advanced features that the default media player like Windows Media Player lacks. There are situations when users need to zoom into certain parts of a video, and that is where VLC zoom in video feature comes in handy.
You may need to zoom into videos to pay attention to details and focus on parts around the subject that others are missing out. For example, you have recorded a video, and you have played it on VLC to zoom in and ensure that there is nothing distracting before you publish the video. Now, we will illustrate all the different ways on how to zoom in VLC Media Player. We will also suggest a better alternative to zoom into videos easily.
Part 1: Zoom VLC Video Using Interactive Zoom
VLC Media Player comes with Interactive Zoom feature that lets you zoom into a section of a video irrespective of its resolution. You can use Interactive Zoom feature to zoom nearly eight times the original size of the video. While you zoom your video with Interactive Zoom option, VLC Media Player zooms the video digitally, and if the video resolution is not high, you can see some deterioration in video quality as you zoom in. Here are the steps on how to VLC zoom with Interactive Zoom.
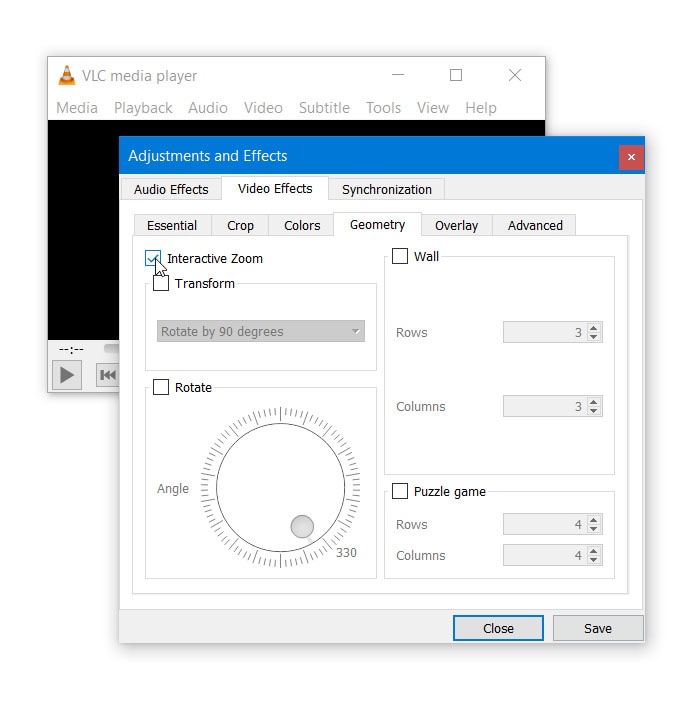
Step1First, you have to enable Interactive Zoom feature. Launch VLC Player and go to Tools menu option.
Step2Select Effects and Filters and you will see Adjustments and Effects window open.
Step3Go to Video Effects tab and then go to Geometry tab.
Step4Turn on Interactive Zoom option. Click on Save and Close buttons.
Step5Play a video and you will see a Picture in Picture window in the top-left corner where you can see live preview of the video. You will notice a rectangular box that you can drag around the PiP window to zoom that section of the video.
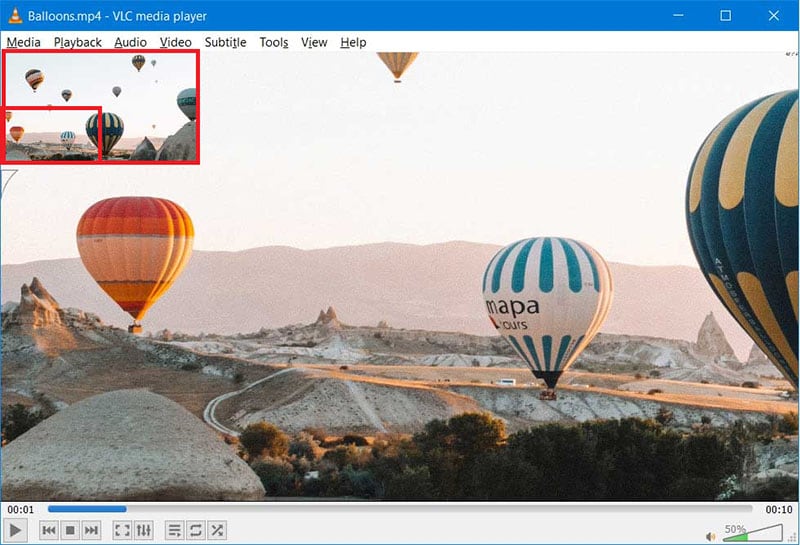
Step6Wherever you place the rectangular box in PiP window, that part will be zoomed and shown outside the PiP window. You can increase or decrease the level of magnification from the vertical slider present below PiP window.
Part 2: Zoom Video Using VLC Video Menu
Apart from Interactive Zoom, there is also an inbuilt Zoom option available under Video Menu. While Interactive Zoom is for detailed zooming, Zoom through Video menu on VLC is for instant zooming. Moreover, Zoom through Video menu is effective only when you view the video on VLC Player. If you are watching the video on full screen, the zooming effect will not be easily noticeable. Here are the steps on how to zoom in VLC player using VLC Video menu.
Step1Open VLC Media player in windowed mode and play the desired video.
Step2Go to Video menu and select Zoom option.
Step3You will come across several options such as 1:4 quarter, 1:2 half, 1:1 original, and 2:1 double. You can select from one of them as per your requirements.
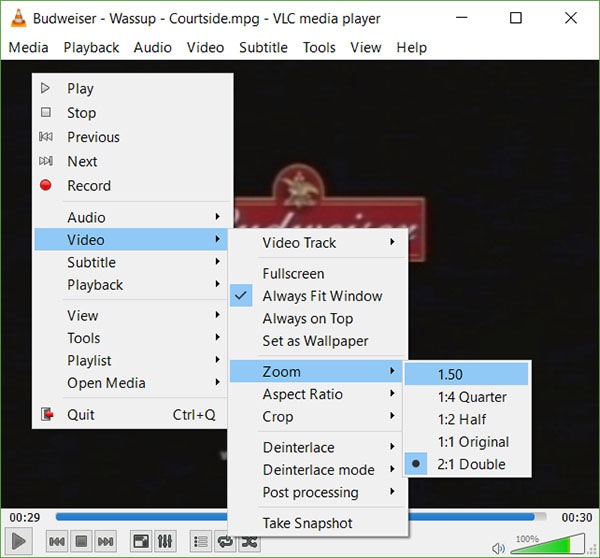
Otherwise, you can press Shift + Z keys together to try out different zoom options.
Part 3: Zoom VLC Video Using Magnifier
If you are using VLC Media Player on your Windows desktop computer, you can use the inbuilt Magnifier tool to zoom into a video that you are playing on VLC. You can zoom into videos to read any text in the background but this leads to low resolution and distortion. You can zoom in by 16 times which is the highest among all the three methods. Here are the steps on how to VLC zoom video using Magnifier tool.
Step1Open VLC Player and play the desired video.
Step2Go to Start menu on Windows and search for “Magnifier”.
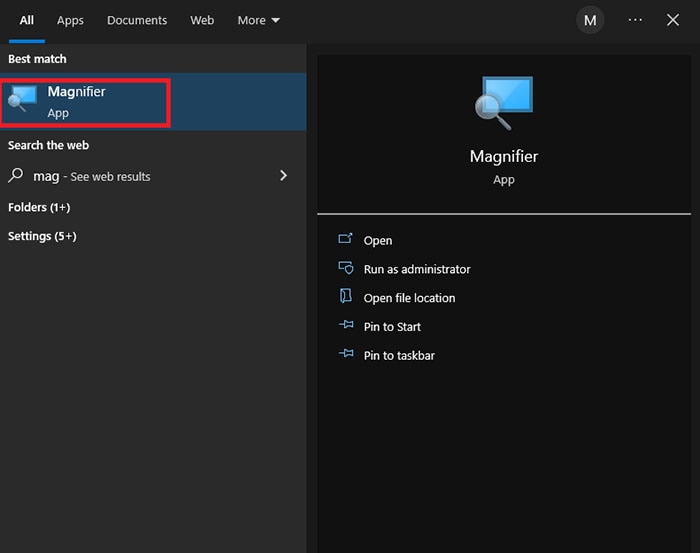
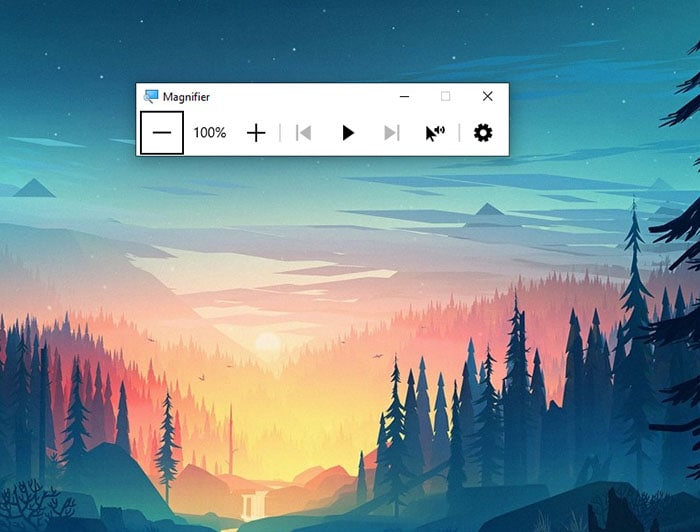
Step3Click on Magnifier App. Once it opens, place the mouse pointer on the video and you will see its magnified version.
Step4Press Windows and “+” keys to zoom in while press Windows and “-“ keys to zoom out.
Part 4: VLC Alternative to Zoom in Videos
If you are not satisfied with VLC Player zoom feature, you can use a video editor to zoom into your video conveniently so that you can check any focused section on your video. You can also read any text on the video comfortably. We recommend Wondershare Filmora as an alternative to VLC Media Player for zooming into videos. Filmora is a professional video editor and here is the list of the steps on how to zoom into videos with Filmora.
Step 1: Download and install Wondershare Filmora and it is available for Windows and Mac users.
Free Download For Win 7 or later(64-bit)
Free Download For macOS 10.14 or later
Step 2: Launch Wondershare and click on New Project option.
Step 3: Import your video on Filmora into Project Media folder by drag and drop option.

Step 4: Drag and drop the video file into Timeline. Click on Crop icon on the top bar of Timeline.
Step 5: Go to Pan & Zoom tab and move the rectangular box and play the video to watch its magnified video. You can also export the video after cropping in your desired file format.

Conclusion
There are several scenarios when you need to zoom into a video to focus on the details. VLC Media Player comes with instant zoom as well as detailed zoom options to satisfy your requirements. You can even use Magnifier App on Windows to zoom into videos. But for the best result, we recommend Wondershare Filmora as the best VLC Player alternative for zooming videos.
Free Download For macOS 10.14 or later
Step 2: Launch Wondershare and click on New Project option.
Step 3: Import your video on Filmora into Project Media folder by drag and drop option.

Step 4: Drag and drop the video file into Timeline. Click on Crop icon on the top bar of Timeline.
Step 5: Go to Pan & Zoom tab and move the rectangular box and play the video to watch its magnified video. You can also export the video after cropping in your desired file format.

Conclusion
There are several scenarios when you need to zoom into a video to focus on the details. VLC Media Player comes with instant zoom as well as detailed zoom options to satisfy your requirements. You can even use Magnifier App on Windows to zoom into videos. But for the best result, we recommend Wondershare Filmora as the best VLC Player alternative for zooming videos.
How to Make Text Reveal Effect Easily
Have you ever seen the text reveal led by a subject when moving across the frame? It’s one of the most common text-revealing effects in video editing. This technique is often used to add titles or credits to a scene for cinematic vibes and creative effects.
While it may look complicated, it’s actually quite easy to create with a video editing program like Filmora. Filmora’s masking feature allows users to create impressive and eye-catching text reveals in their videos. For those looking for a tutorial on how to make text reveal, here’s a step-by-step guide to help you out.
How to add text reveal effect using Filmora’s masking tool
Free Download For Win 7 or later(64-bit)
Free Download For macOS 10.14 or later
First, make sure the video clips you are using are clear, with the subject moving across the frame. It will help the text to stand out and be more easily seen. Now, follow the step-by-step guides below:
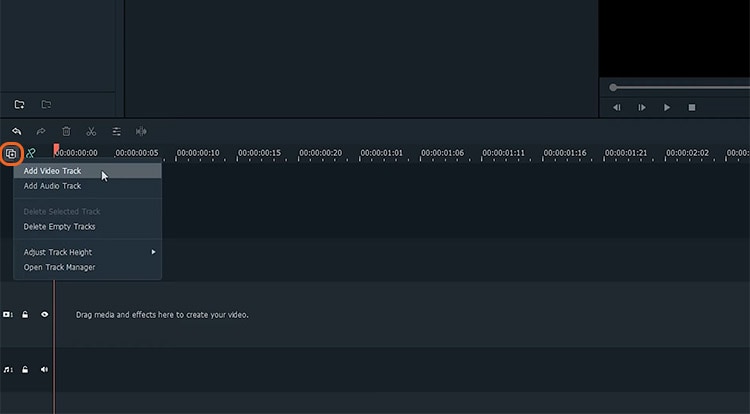
Step 1 Add video tracks
You will need three video tracks in order to create this effect, so click the (+) icon above the timeline > Add Video Track and add two more video tracks.
Step 2 Import the clip to the timeline
Drag and drop your clip onto the first and third video tracks of the timeline. Then, align them with each other.
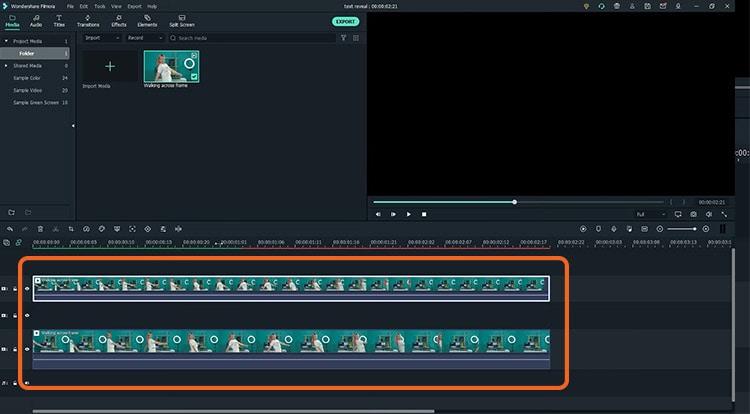
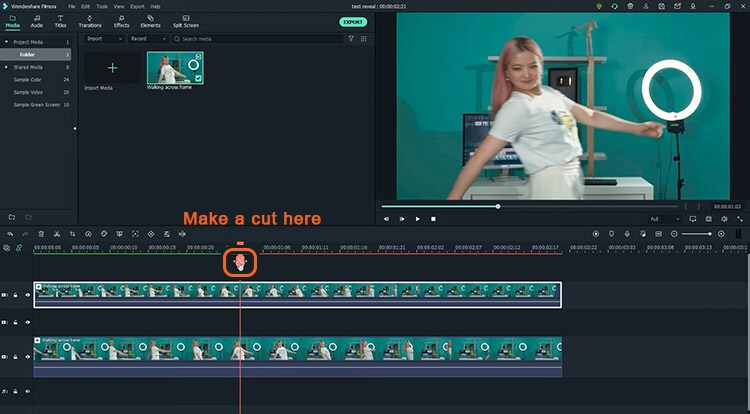
Step 3 Make a cut at the beginning of the text
Find the spot where you want the text reveals to start, then click the scissor icon to make a cut on the clip from the first video track.
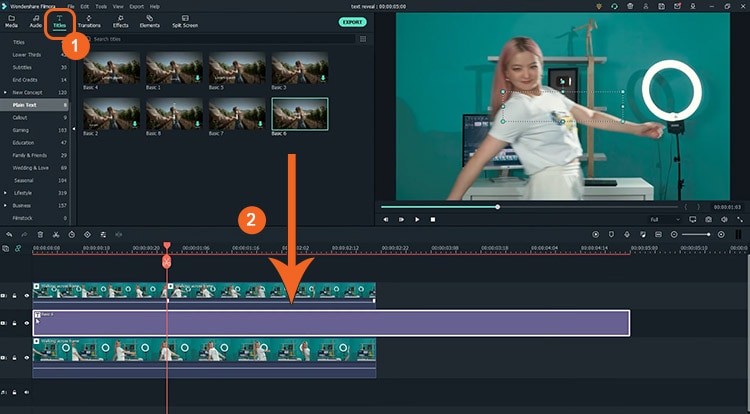
Step 4 Add and adjust the text
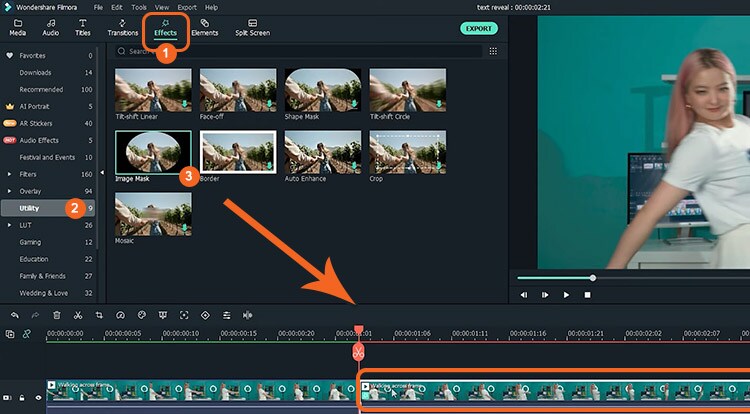
Go to Title > Plain Text > select which text styles suit you best. Then, drag the title to the second video track.
Double-click on the title clip and type out your text. Then, adjust the text position and align it to the cut you have made.
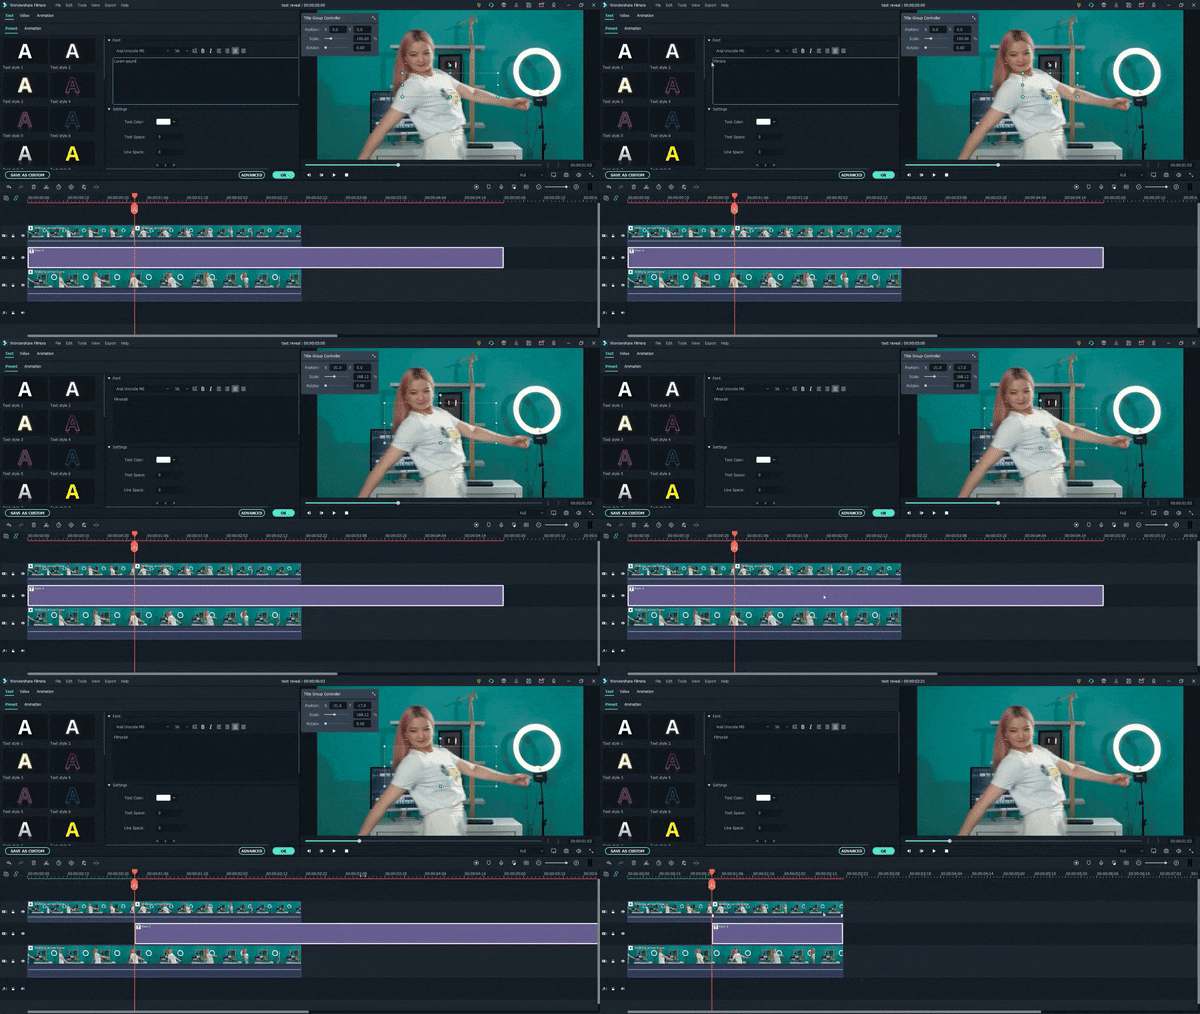
Step 5 Use the masking tool
Go to Effects > Utility > Image Mask, then drag and drop it onto the latter half of the top video clip.
Make more cuts on the top latter clip, frame by frame, starting from the first cut you have made.
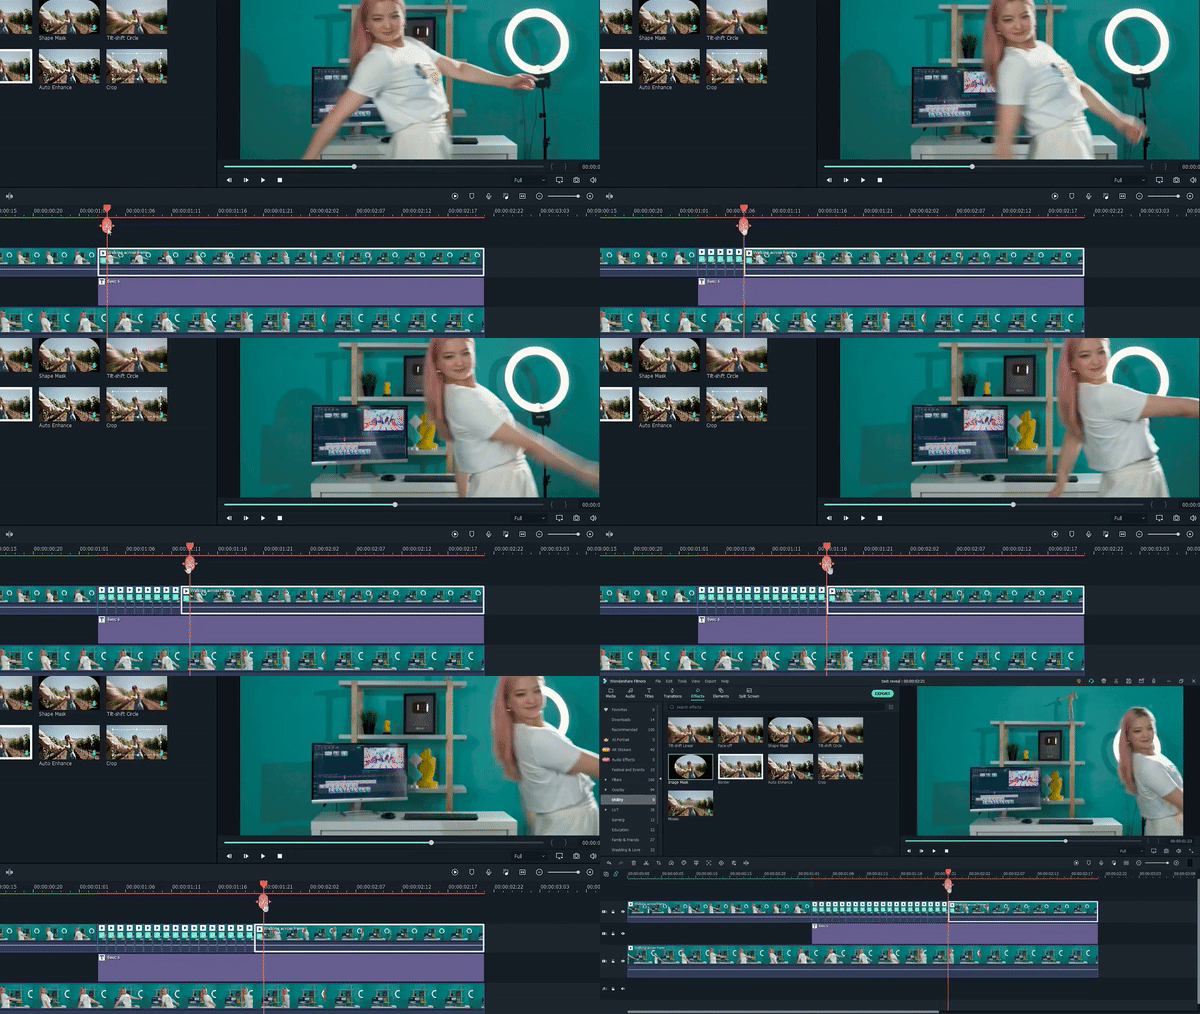
Double-click on each of the smaller clips and find the mask settings.
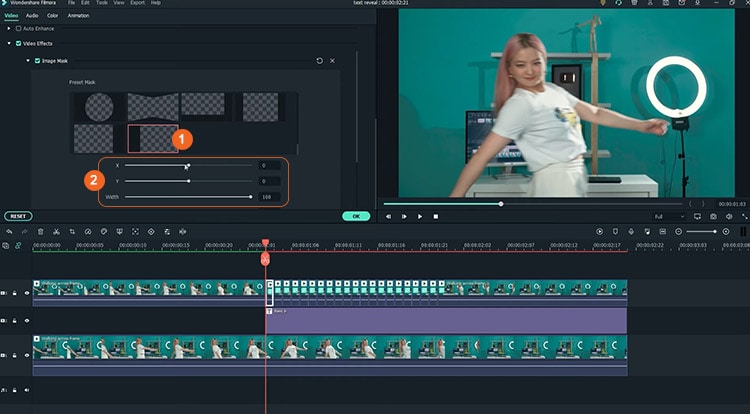
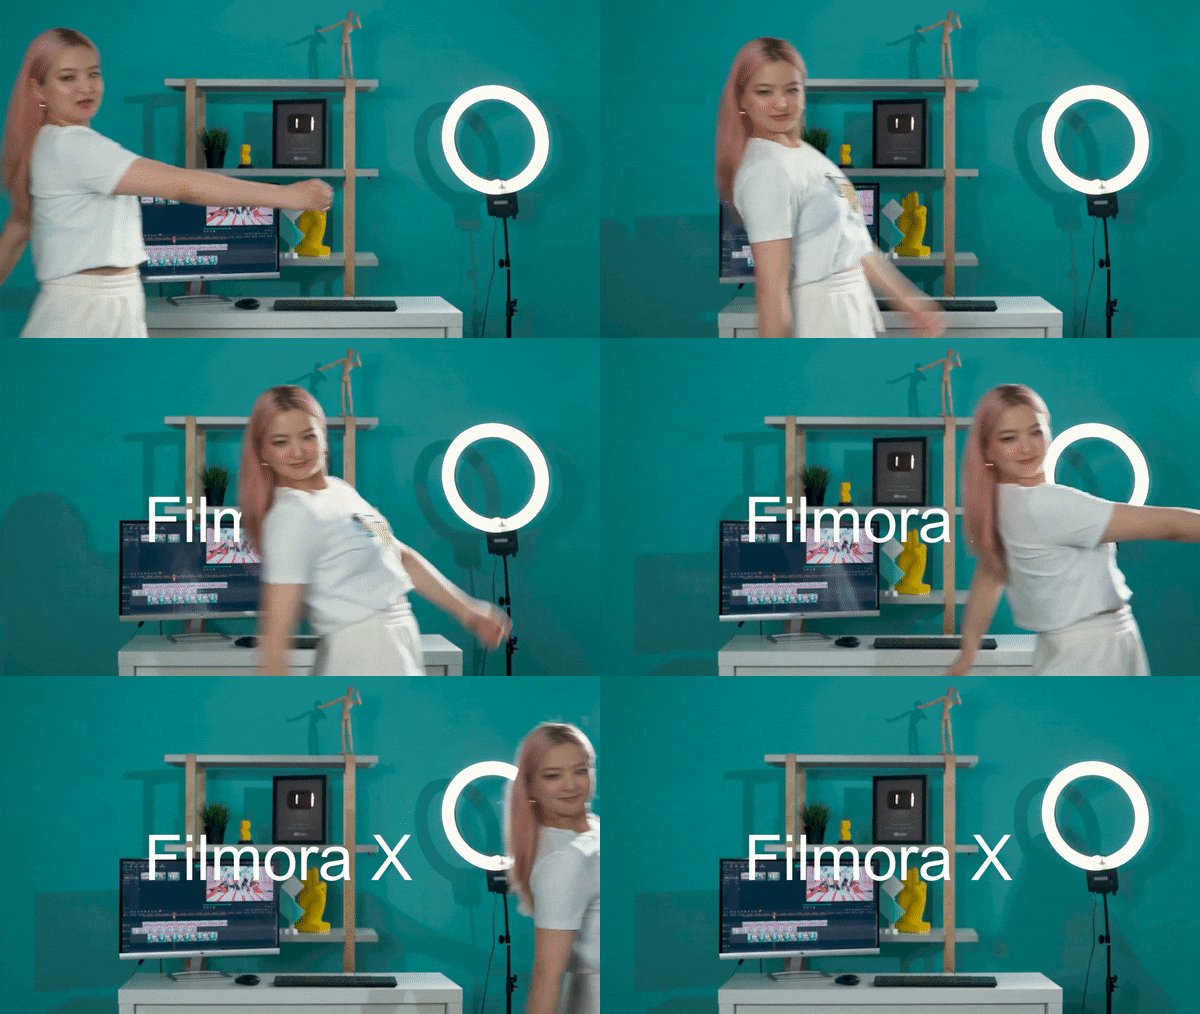
Since the subject in this tutorial is moving from side to side, we are going to match the mask’s y-axis setting, which is also the revealed text portion, with the subject’s movement. Starting from the first clip, adjust the y-axis number to a smaller/bigger number.
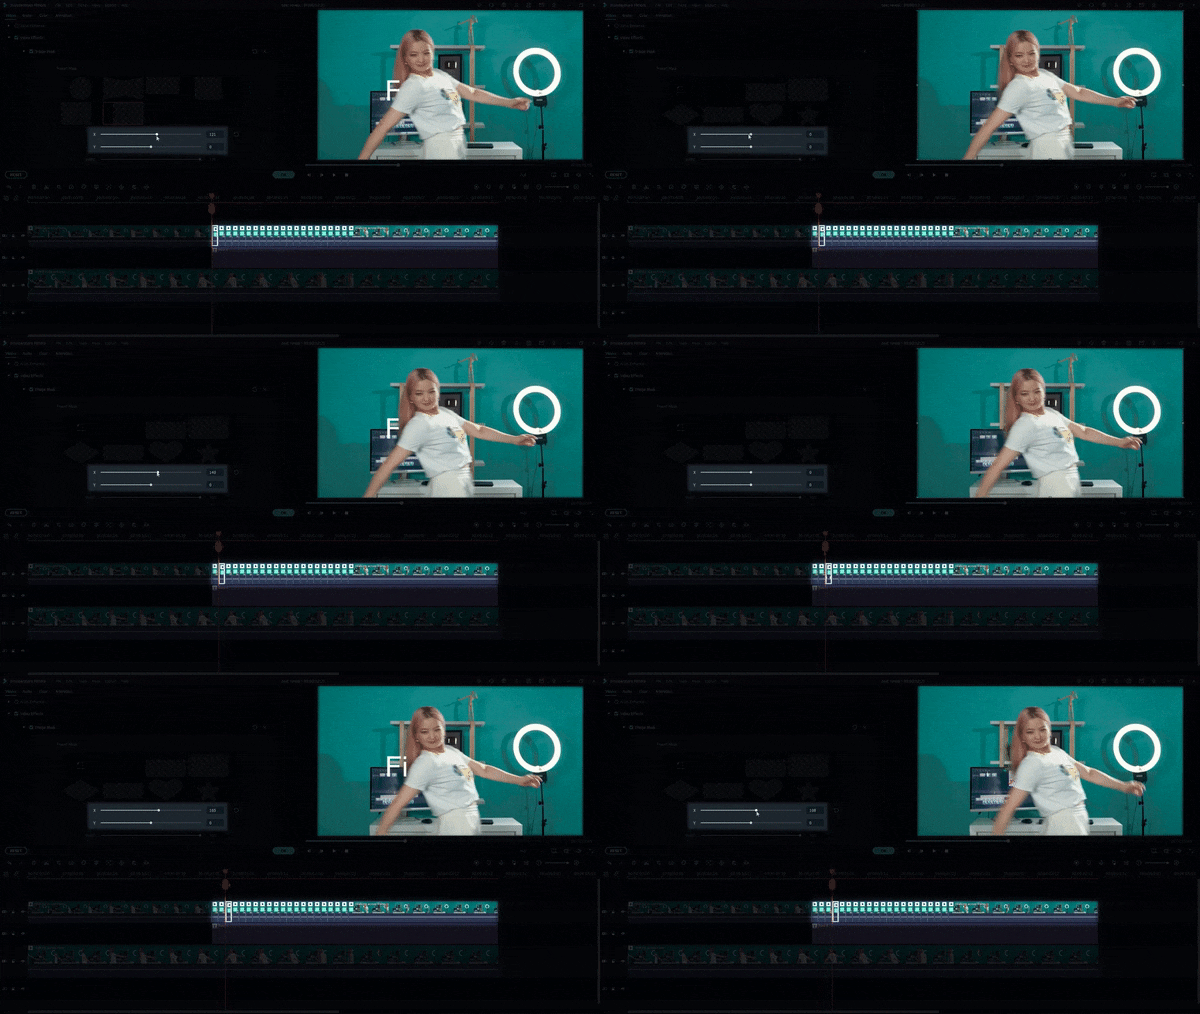
There we go! The final look should look like this:
Summary
That is how we can create the text reveal effect using Wondershare Filmora. Using Filmora’s masking tool, it’s easy to create a text reveal the effect that can add flair and interest to your videos. Just follow the simple steps, and you’ll be able to get the desired result with a few clicks of your mouse. Give it a try, and share your thoughts with us.
Free Download For macOS 10.14 or later
First, make sure the video clips you are using are clear, with the subject moving across the frame. It will help the text to stand out and be more easily seen. Now, follow the step-by-step guides below:
Step 1 Add video tracks
You will need three video tracks in order to create this effect, so click the (+) icon above the timeline > Add Video Track and add two more video tracks.

Step 2 Import the clip to the timeline
Drag and drop your clip onto the first and third video tracks of the timeline. Then, align them with each other.

Step 3 Make a cut at the beginning of the text
Find the spot where you want the text reveals to start, then click the scissor icon to make a cut on the clip from the first video track.

Step 4 Add and adjust the text
Go to Title > Plain Text > select which text styles suit you best. Then, drag the title to the second video track.

Double-click on the title clip and type out your text. Then, adjust the text position and align it to the cut you have made.

Step 5 Use the masking tool
Go to Effects > Utility > Image Mask, then drag and drop it onto the latter half of the top video clip.

Make more cuts on the top latter clip, frame by frame, starting from the first cut you have made.

Double-click on each of the smaller clips and find the mask settings.

Since the subject in this tutorial is moving from side to side, we are going to match the mask’s y-axis setting, which is also the revealed text portion, with the subject’s movement. Starting from the first clip, adjust the y-axis number to a smaller/bigger number.

There we go! The final look should look like this:

Summary
That is how we can create the text reveal effect using Wondershare Filmora. Using Filmora’s masking tool, it’s easy to create a text reveal the effect that can add flair and interest to your videos. Just follow the simple steps, and you’ll be able to get the desired result with a few clicks of your mouse. Give it a try, and share your thoughts with us.
Free Download For macOS 10.14 or later
First, make sure the video clips you are using are clear, with the subject moving across the frame. It will help the text to stand out and be more easily seen. Now, follow the step-by-step guides below:
Step 1 Add video tracks
You will need three video tracks in order to create this effect, so click the (+) icon above the timeline > Add Video Track and add two more video tracks.

Step 2 Import the clip to the timeline
Drag and drop your clip onto the first and third video tracks of the timeline. Then, align them with each other.

Step 3 Make a cut at the beginning of the text
Find the spot where you want the text reveals to start, then click the scissor icon to make a cut on the clip from the first video track.

Step 4 Add and adjust the text
Go to Title > Plain Text > select which text styles suit you best. Then, drag the title to the second video track.

Double-click on the title clip and type out your text. Then, adjust the text position and align it to the cut you have made.

Step 5 Use the masking tool
Go to Effects > Utility > Image Mask, then drag and drop it onto the latter half of the top video clip.

Make more cuts on the top latter clip, frame by frame, starting from the first cut you have made.

Double-click on each of the smaller clips and find the mask settings.

Since the subject in this tutorial is moving from side to side, we are going to match the mask’s y-axis setting, which is also the revealed text portion, with the subject’s movement. Starting from the first clip, adjust the y-axis number to a smaller/bigger number.

There we go! The final look should look like this:

Summary
That is how we can create the text reveal effect using Wondershare Filmora. Using Filmora’s masking tool, it’s easy to create a text reveal the effect that can add flair and interest to your videos. Just follow the simple steps, and you’ll be able to get the desired result with a few clicks of your mouse. Give it a try, and share your thoughts with us.
Free Download For macOS 10.14 or later
First, make sure the video clips you are using are clear, with the subject moving across the frame. It will help the text to stand out and be more easily seen. Now, follow the step-by-step guides below:
Step 1 Add video tracks
You will need three video tracks in order to create this effect, so click the (+) icon above the timeline > Add Video Track and add two more video tracks.

Step 2 Import the clip to the timeline
Drag and drop your clip onto the first and third video tracks of the timeline. Then, align them with each other.

Step 3 Make a cut at the beginning of the text
Find the spot where you want the text reveals to start, then click the scissor icon to make a cut on the clip from the first video track.

Step 4 Add and adjust the text
Go to Title > Plain Text > select which text styles suit you best. Then, drag the title to the second video track.

Double-click on the title clip and type out your text. Then, adjust the text position and align it to the cut you have made.

Step 5 Use the masking tool
Go to Effects > Utility > Image Mask, then drag and drop it onto the latter half of the top video clip.

Make more cuts on the top latter clip, frame by frame, starting from the first cut you have made.

Double-click on each of the smaller clips and find the mask settings.

Since the subject in this tutorial is moving from side to side, we are going to match the mask’s y-axis setting, which is also the revealed text portion, with the subject’s movement. Starting from the first clip, adjust the y-axis number to a smaller/bigger number.

There we go! The final look should look like this:

Summary
That is how we can create the text reveal effect using Wondershare Filmora. Using Filmora’s masking tool, it’s easy to create a text reveal the effect that can add flair and interest to your videos. Just follow the simple steps, and you’ll be able to get the desired result with a few clicks of your mouse. Give it a try, and share your thoughts with us.
Ultimate Guide on How to Film Better in Public
Filming in public and different locations can add a new dimension to any video. The possibilities are limitless, from the hustle and bustle of a busy city street to the tranquil beauty of a remote beach.
Suppose you’re a new vlogger and want to capture the perfect scene in public. Then this blog is for you. It will explain various tips and tricks to help you create the best videos, regardless of location. So let’s start and learn more about how to film better in public!
Part 1. What Gear Will You Need to Record a Better Video in Public?
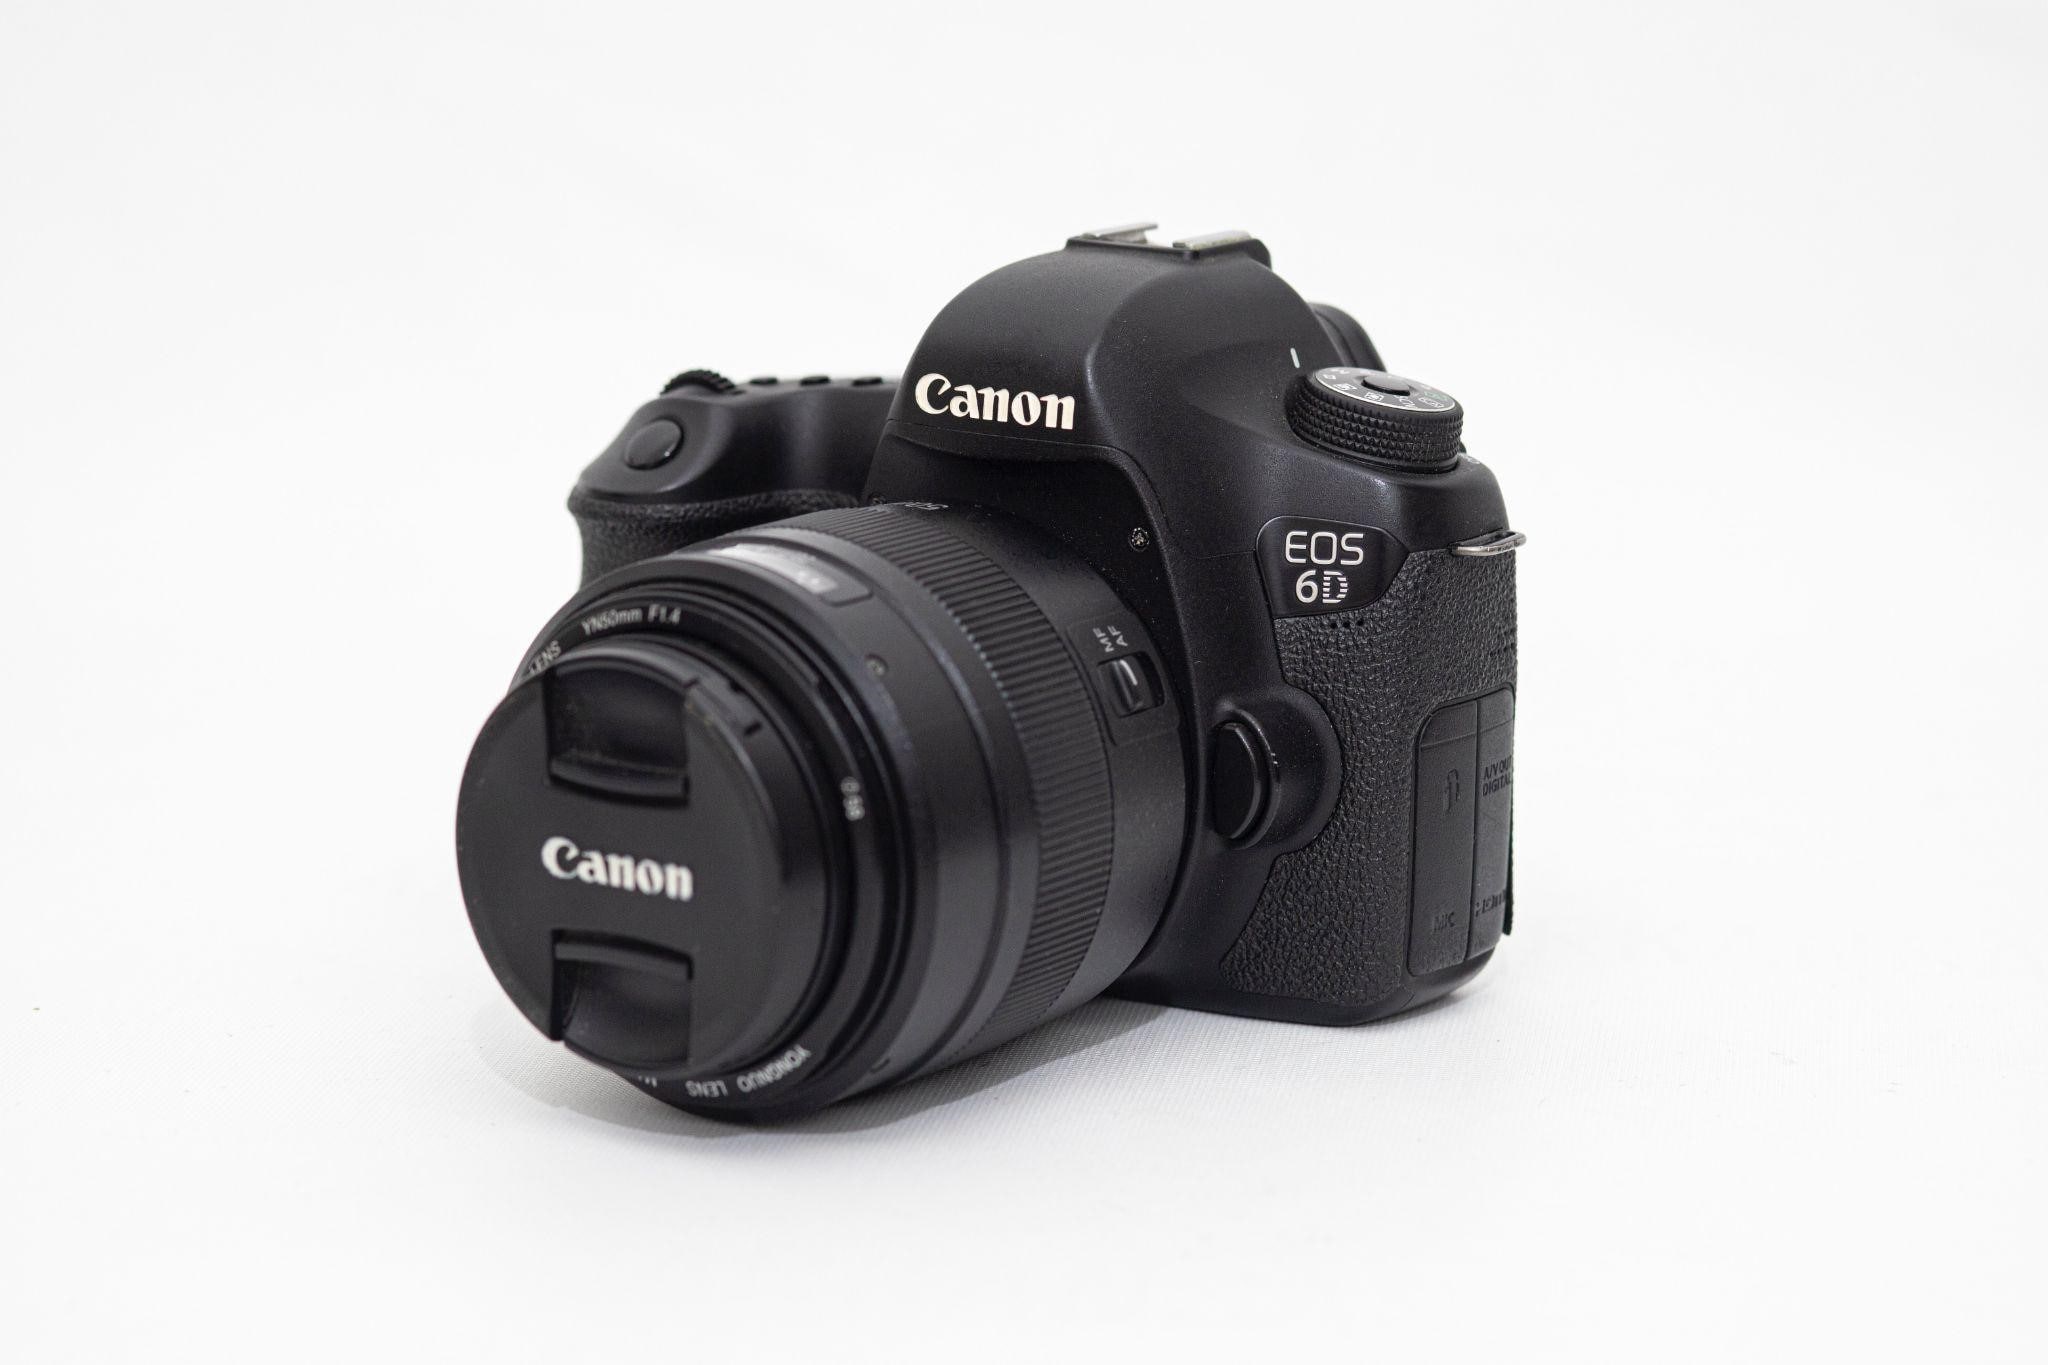
While recording in public, you want to avoid setting and holding unnecessary camera gear. That’s why you should keep your gear as low-key as possible. The essential shooting gears that you are going to need are as follows:
A Good Camera
A good camera is essential to record a video in public because it will provide quality footage. It will also allow you to capture more detail and create more engaging videos. But if you use a phone instead, make sure it is the latest iPhone or other with high pixels camera.
A Tripod
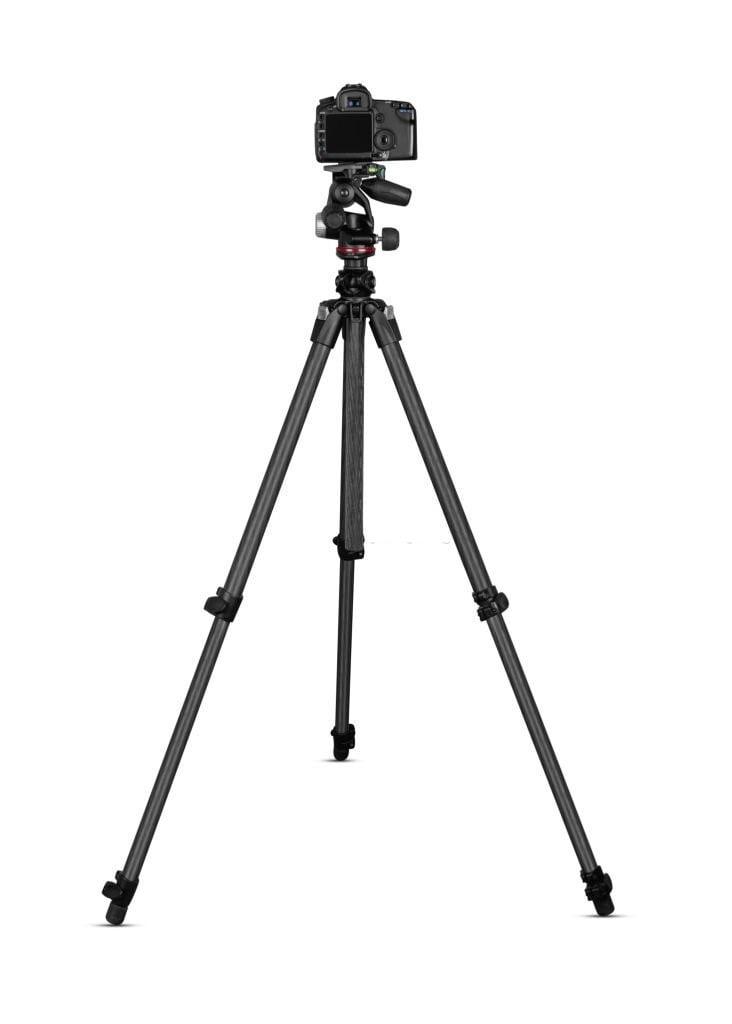
A tripod is essential when recording video in public to ensure that your shots are stable and steady. Without a tripod, your camera can shake and create a distorted, blurry image that can ruin a shot. So having a secure tripod will help you capture professional-looking footage.
A Microphone
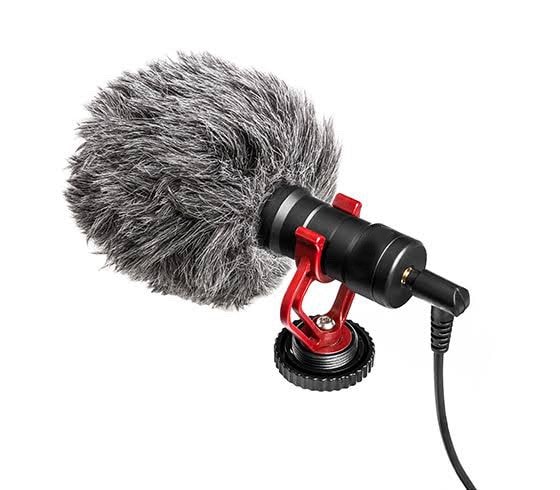
A microphone is essential for recording a video in public because it captures the sound in the environment, allowing the video to be recorded with better-quality audio. Without a microphone, the video would be recorded with distorted sound and would likely be challenging to understand.
Apart from the gear mentioned above, you can also bring an ND filter, extra batteries, and SD cards. Because If the battery runs out or the SD card becomes full, the video recording could be lost. The spare batteries and SD cards help to ensure that the video can be captured uninterrupted. Let’s see what we need further.
Part 2. What Do You Need to Accomplish With Your Video?
While recording a video in a busy location, you need to accomplish three things with your video to record it better. Which are as follows:
1. Clean Shots
When recording in a busy location, it is essential to try and capture clean shots. It can be done by using a wide-angle lens to get the full shot or zooming in to focus on a particular element.
2. Clean Audio
Getting a clean and clear sound when recording audio in a busy location is essential. A good quality microphone, an audio recorder, or external noise reduction can help minimize background noise and capture the desired audio.
3. Decent Lighting
In a busy location, decent lighting is as important as the other two factors. Look for natural light sources that can provide good light, even illumination. If these are unavailable, consider using portable lighting equipment or lamps to create a more flattering environment.
Now that we know what we need let’s see how to make a video.
Part 3. How to Get the Best Shot While Filming Outdoor?
Whether you are a vlogger, a YouTuber, or a student filmmaker, shooting a video in a busy area is always a challenge. You must be able to plan and execute your production in a way that minimizes disruption and produces quality footage. By following these instructions, we hope you can make a difference in a shot you record:
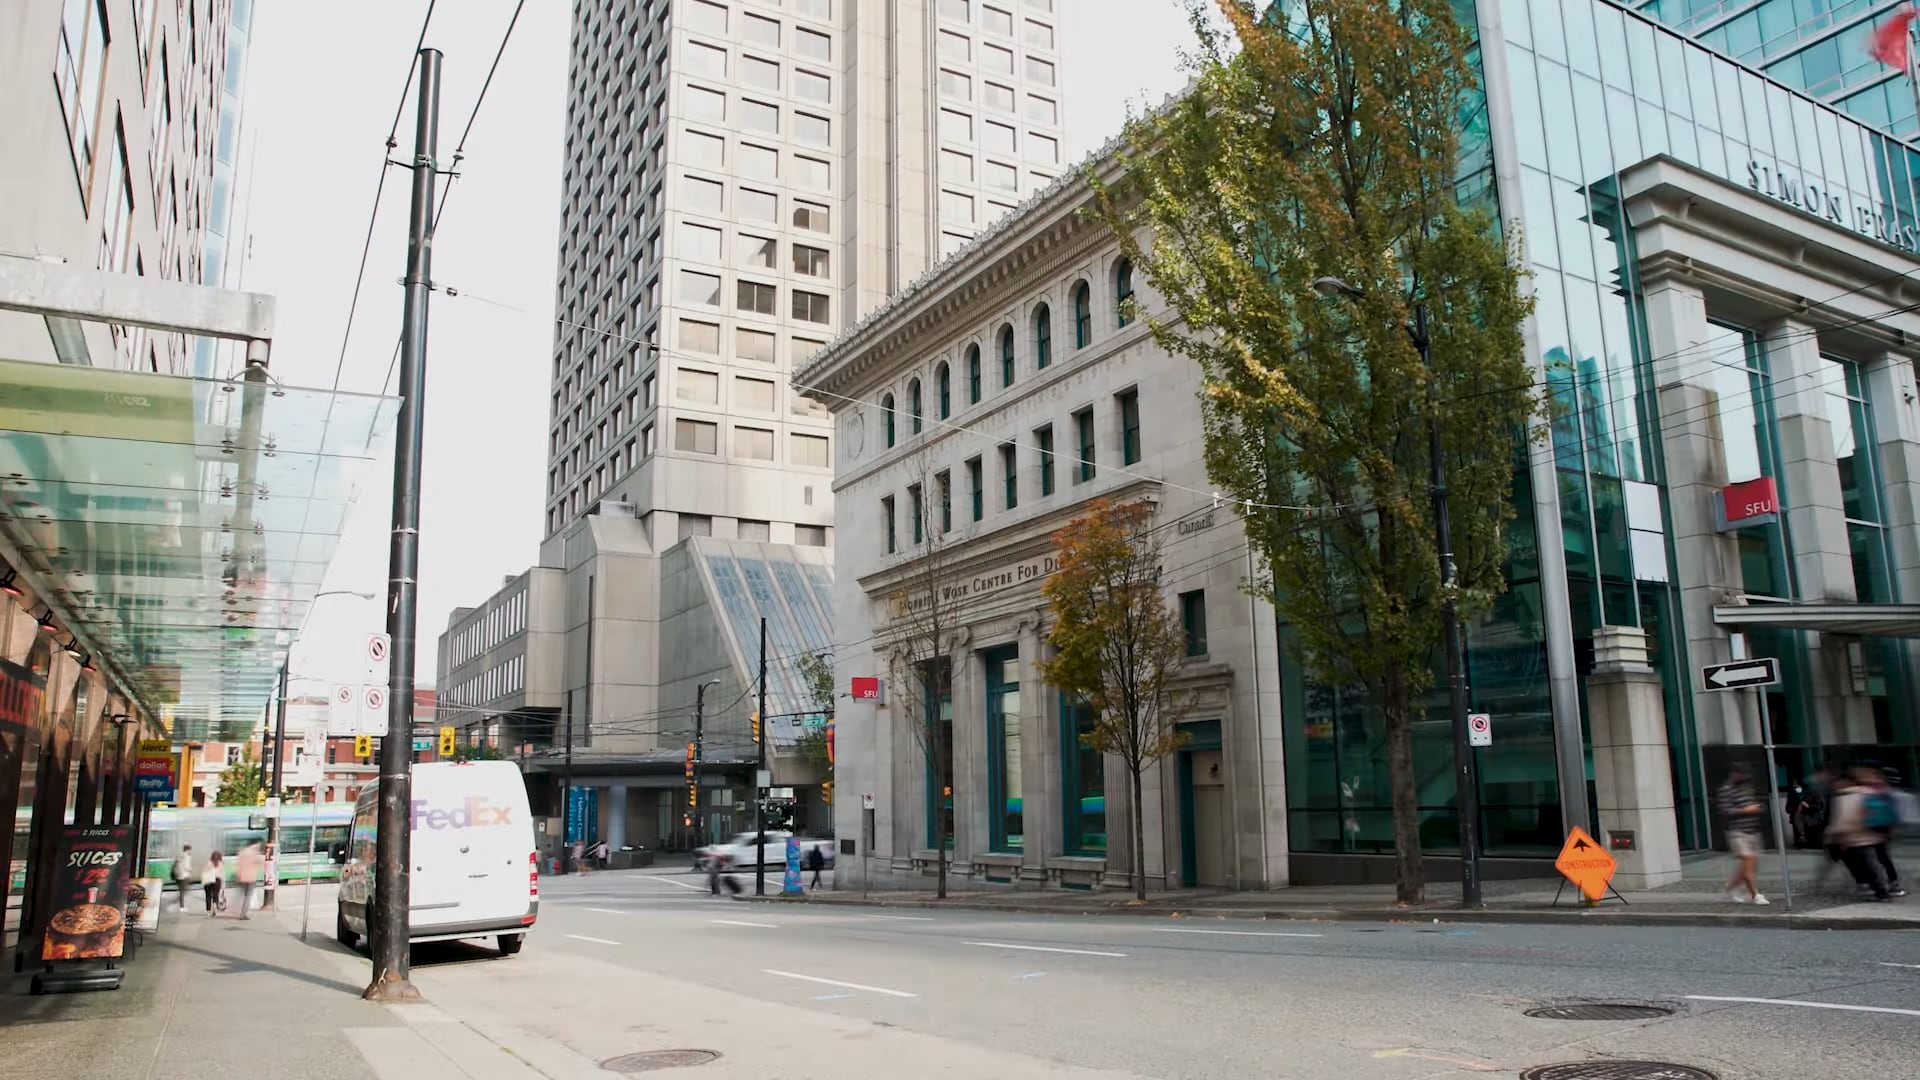
Step1 Scout the Location
Before recording, visit the location in advance to plan your shots. Take note of potential distractions or noise sources and plan your angles accordingly.
Step2 Choose the correct shooting time
The best time to record a video in a busy location is when the area is less crowded, such as early in the morning or late at night. Avoiding peak times and holidays is also a good idea.
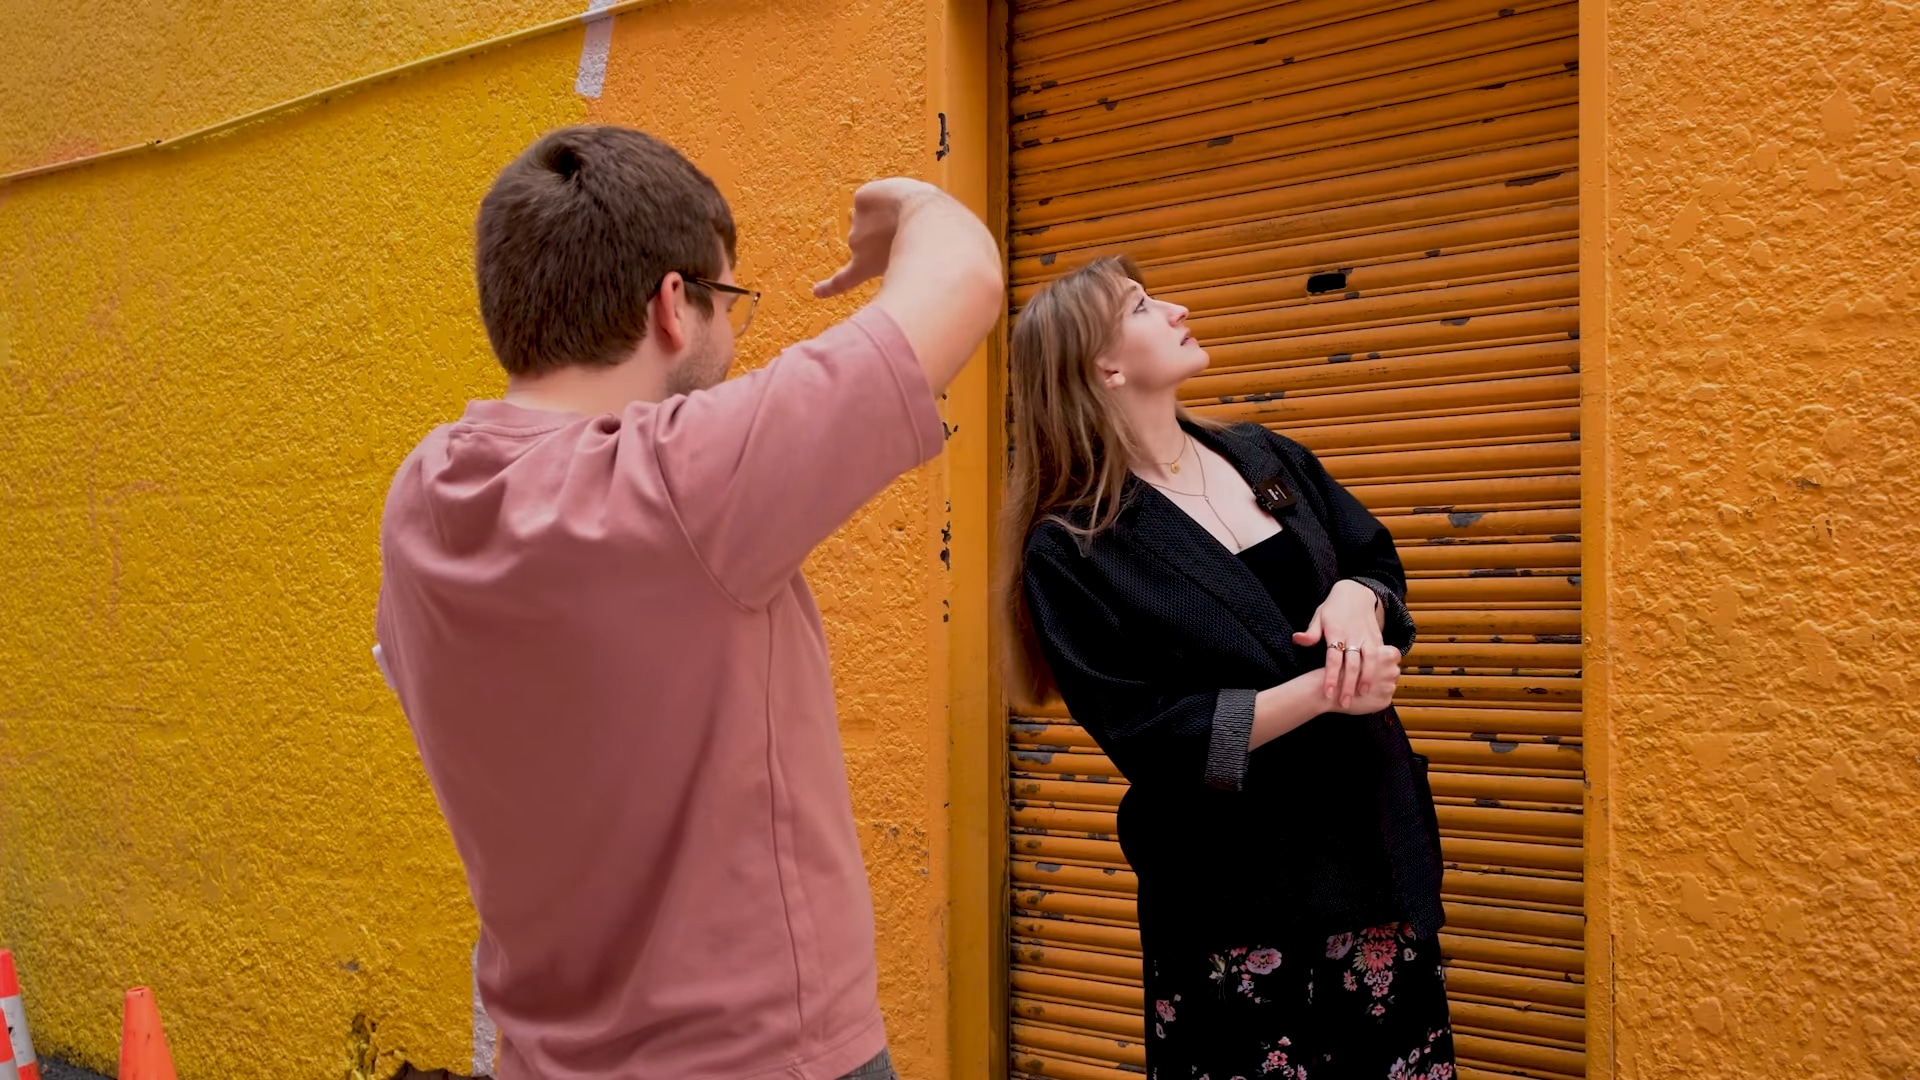
Step3 Choose the right angle
Once you get to the location, you must find the right angle.
Select Background
Try to find a background that will best capture the atmosphere of the area and minimize any background noise.
Set the frame
If your frame is too broad, you will face potential distractions that could interfere with your video, such as people walking in and out of the frame.
Set your position
Instead of getting closer to your talent, get further away and zoom in this way, you leave space for other people in the location, and you can still get your shot!
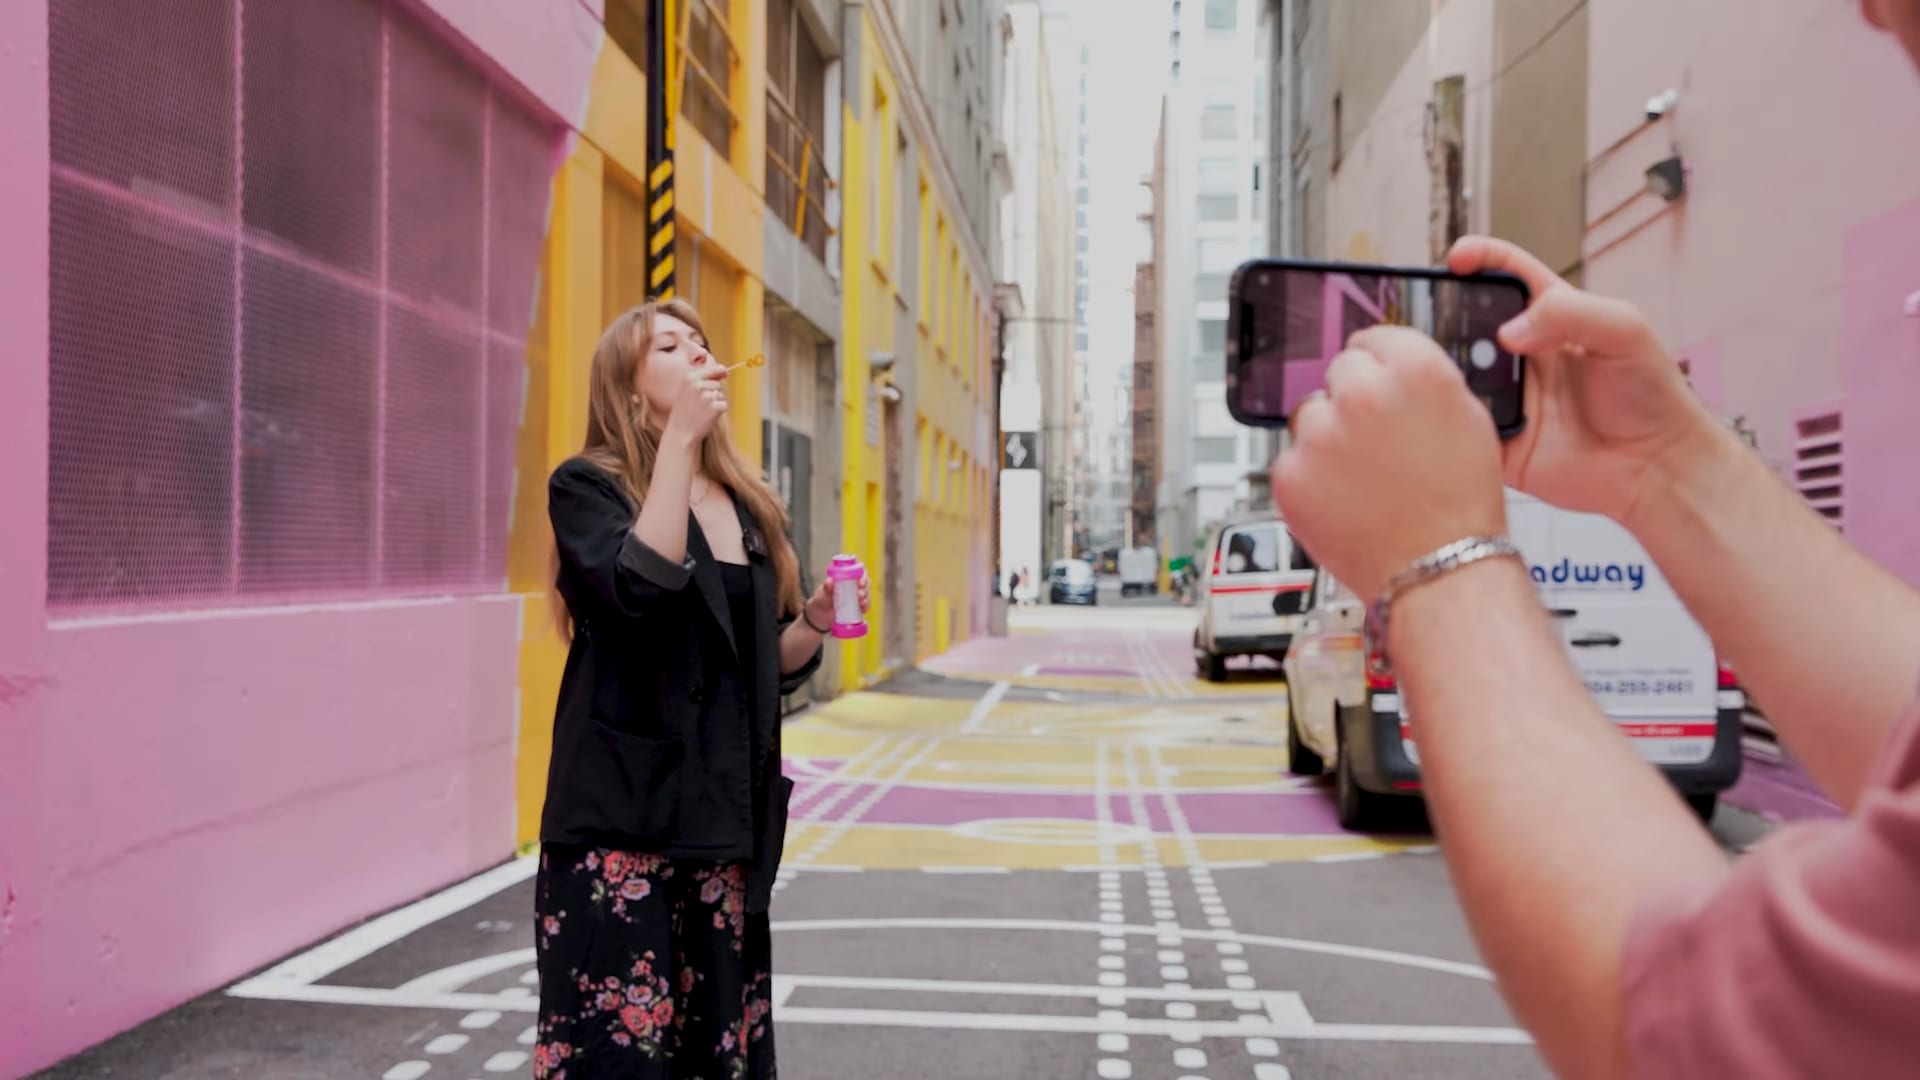
Try to get your shot and then get out quickly so you don’t bother other people trying to get their photos.
Part 4. Best Way to Record Audio While Filming Outdoor
Audio is essential to any video production, and recording audio while filming outdoor scenes can be challenging.
Outdoor environments come with more variables to consider, such as wind, traffic noise, and other background noise, that can make capturing clear audio more difficult. Even if you use a high-quality mic, you still have chances of interruption.
If you get any such variable in the video you recorded, you can re-record the audio with the help of Wondershare Filmora . Let’s see how you can do it:
Free Download For Win 7 or later(64-bit)
Free Download For macOS 10.14 or later
Step1 First, select the clip you want to re-record and then drag it onto the timeline.
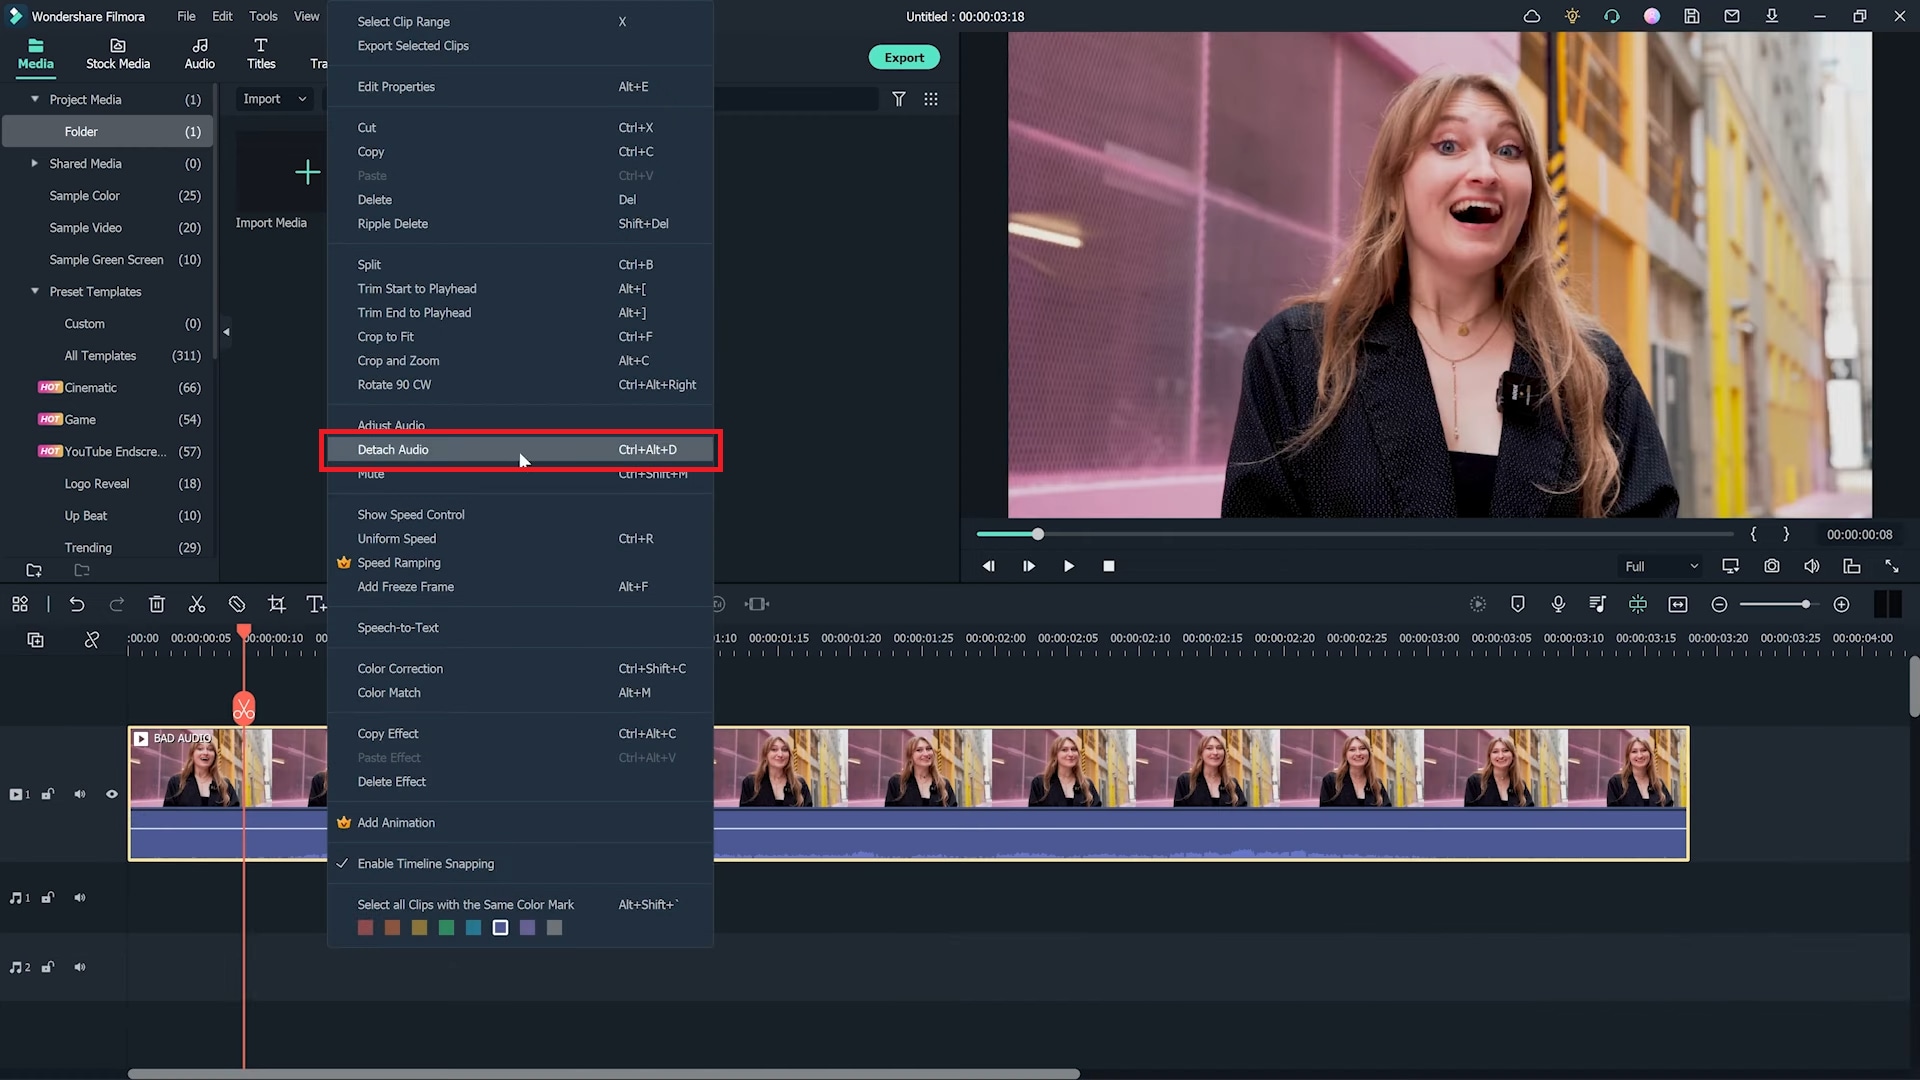
Step2 Right-click on the video you dragged and then click on the Detach Audio. After doing that, mute the lousy audio from the audio timeline.
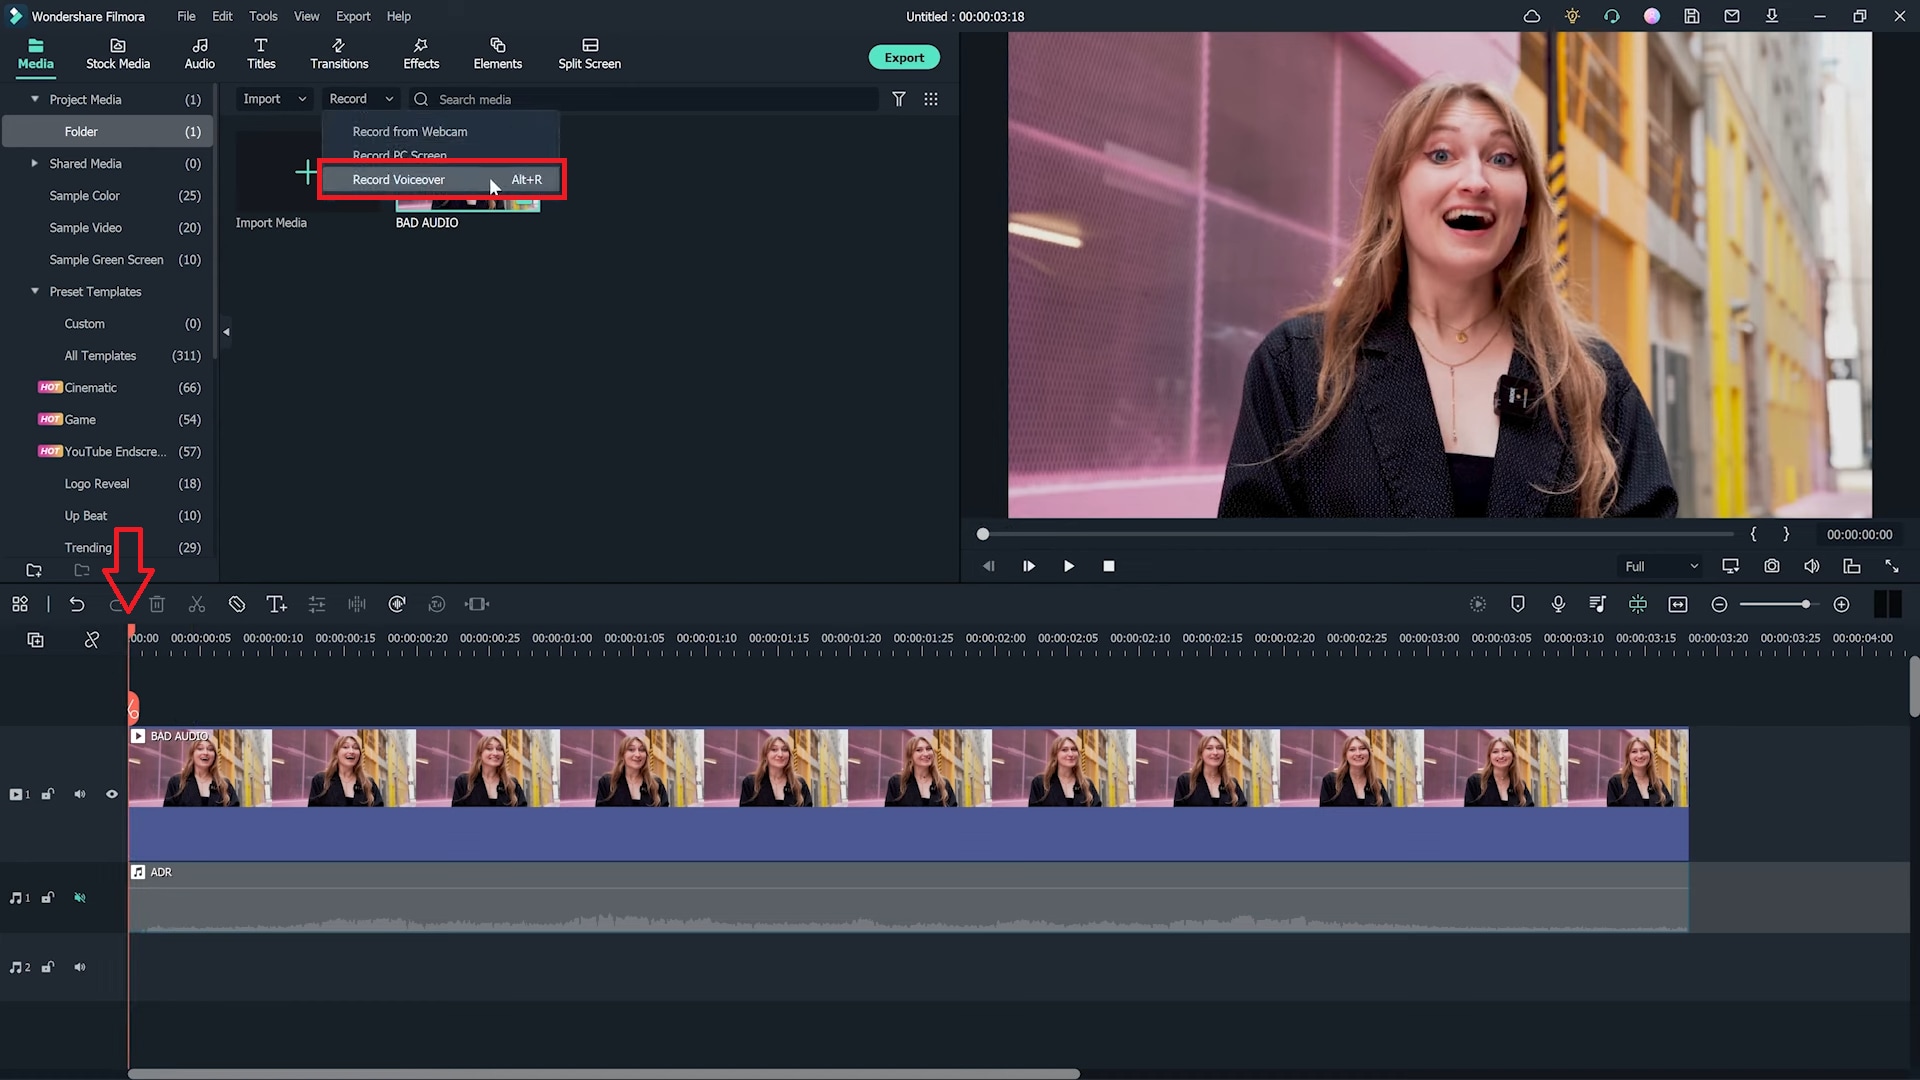
Step3 Place the playhead at the clip’s start, click Record just above the import media section, and then click Record Voiceover.
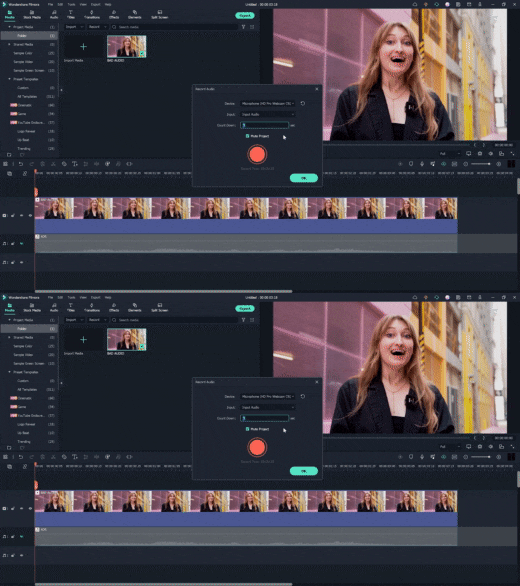
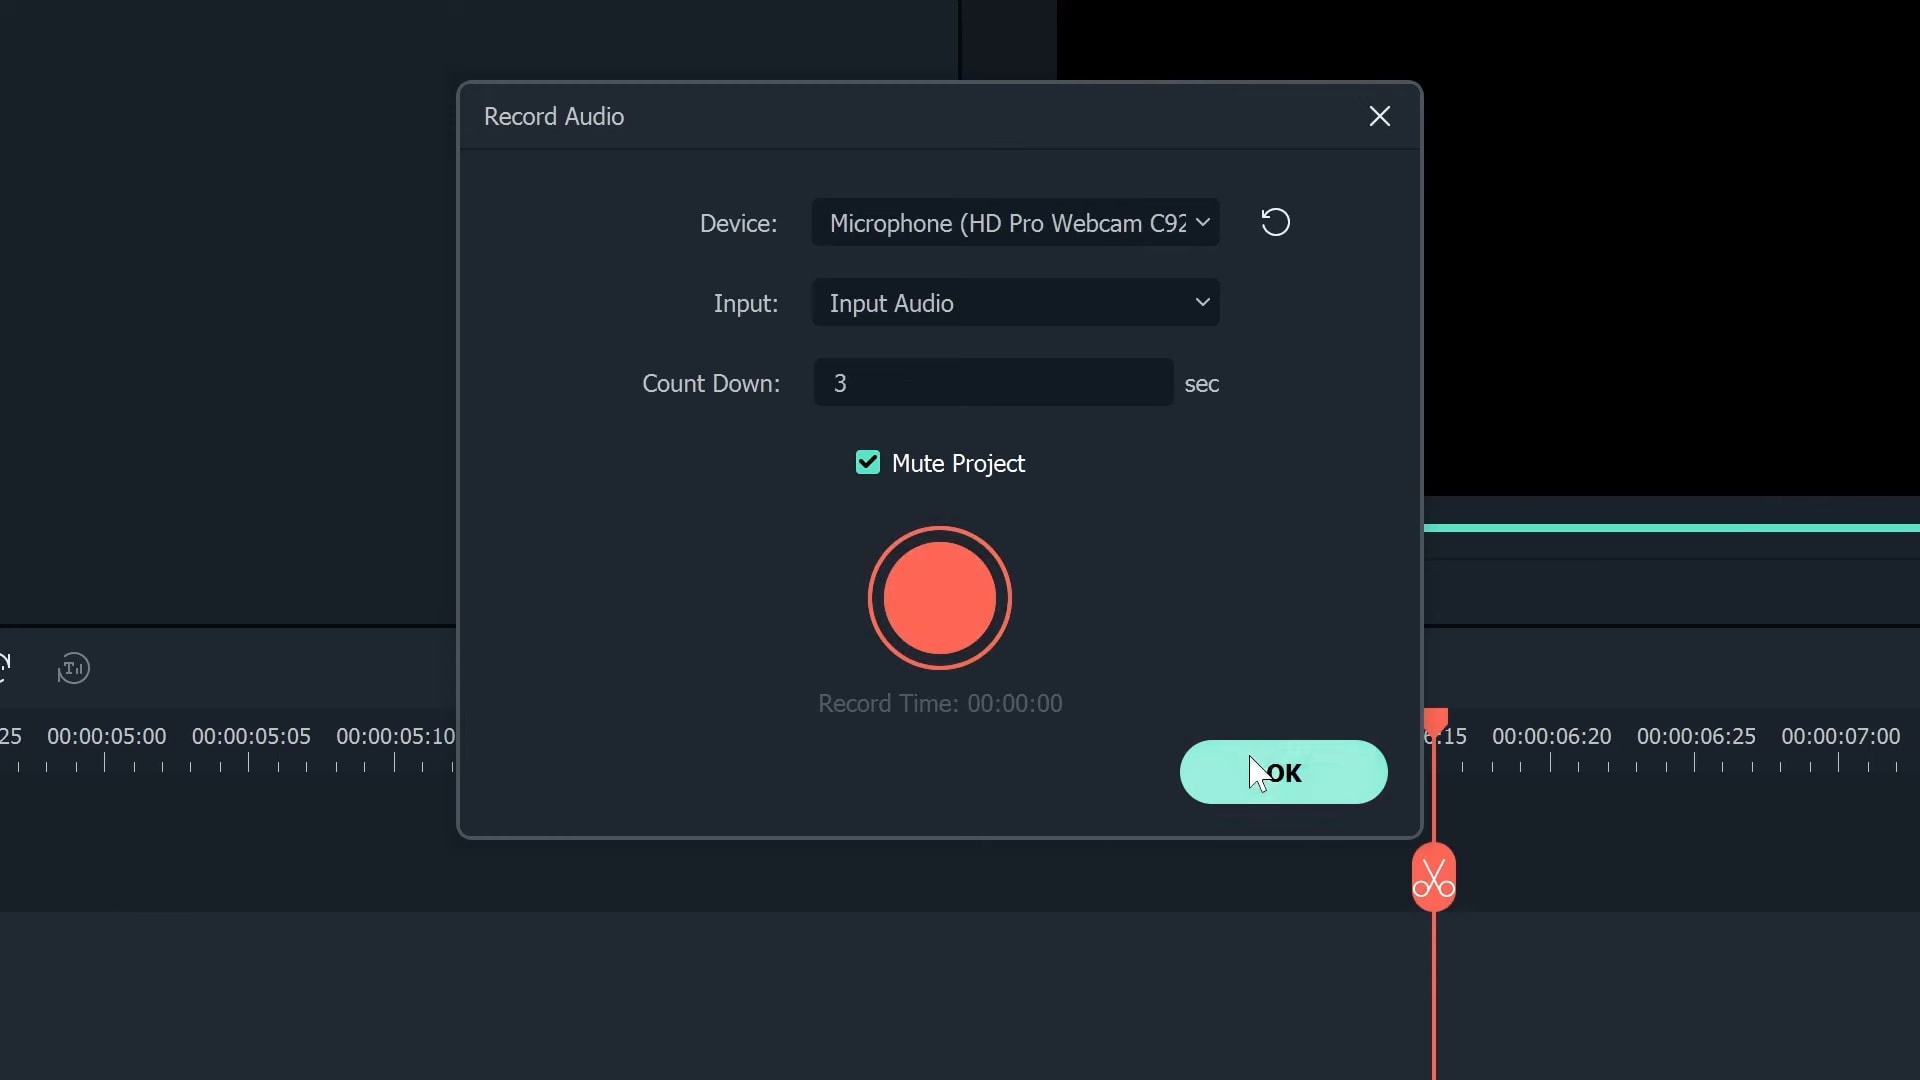
Step4 Now select a recording device and then select the time for the countdown. For example, a 3-minute timer would be perfect.
Step5 Click record and try to re-record your line and match it up the best you can. To get the sound and sync right, you might need to attempt a few times, but in the end, it will improve the quality of your video.
This technique is used in almost every film you see, especially action sequences that also have dialogue. You can also use this technique with the help of Filmora and enhance your video with better audio quality.
Conclusion
We hope this blog has given you some tips for how to film better in public. Filming in public can be intimidating, but you can shoot professional footage with the proper techniques.
From understanding the legalities of filming in public to learning to be discreet and respectful of your environment, you can ensure your filming experience is positive and successful.
With these tips and some practice, you’ll be on your way to shooting great videos in public!
Let us know your favorite film location in the comments below.
Free Download For macOS 10.14 or later
Step1 First, select the clip you want to re-record and then drag it onto the timeline.
Step2 Right-click on the video you dragged and then click on the Detach Audio. After doing that, mute the lousy audio from the audio timeline.

Step3 Place the playhead at the clip’s start, click Record just above the import media section, and then click Record Voiceover.

Step4 Now select a recording device and then select the time for the countdown. For example, a 3-minute timer would be perfect.

Step5 Click record and try to re-record your line and match it up the best you can. To get the sound and sync right, you might need to attempt a few times, but in the end, it will improve the quality of your video.

This technique is used in almost every film you see, especially action sequences that also have dialogue. You can also use this technique with the help of Filmora and enhance your video with better audio quality.
Conclusion
We hope this blog has given you some tips for how to film better in public. Filming in public can be intimidating, but you can shoot professional footage with the proper techniques.
From understanding the legalities of filming in public to learning to be discreet and respectful of your environment, you can ensure your filming experience is positive and successful.
With these tips and some practice, you’ll be on your way to shooting great videos in public!
Let us know your favorite film location in the comments below.
Also read:
- [New] Essential Video Editing Apps for YouTube Creators for 2024
- [New] Infuse Your TikTok with Popular Anime Themes & Styles
- [Updated] Innovative Approaches to Sims 4 Video for 2024
- 2024 Approved 100+ Best TikTok Captions Enhance Your Content
- 2024 Approved Unveiling the Secrets of iPhone Podcast Integration
- Fiscal Footprint of Mr. Beast for 2024
- New 2024 Approved Learning How to Create LUTs with LUTs Generator
- New How To Record Your Computer Audio in Audacity
- Overcoming Audio Issues with the Onikuma Headset - A Comprehensive Guide to Solutions
- Updated 2024 Approved Create a Kickass COD Warzone Thumbnail for Free
- Updated Is Windows Movie Maker Still Available?
- Title: How To Add Motion Blur In Davinci Resolve?
- Author: Chloe
- Created at : 2024-09-30 06:50:59
- Updated at : 2024-10-02 23:05:43
- Link: https://ai-editing-video.techidaily.com/how-to-add-motion-blur-in-davinci-resolve/
- License: This work is licensed under CC BY-NC-SA 4.0.