:max_bytes(150000):strip_icc():format(webp)/GettyImages-642250032-010d3026f565420eac9ac098bced6278.jpg)
How To Add Motion Blur On CapCut? (IPhone & Android)

How To Add Motion Blur On CapCut? (IPhone & Android)
Do you know what adds a realistic effect to videos? Professionals add various types of effects to the videos to create artistic perspective flawlessly. Usually, the process of adding effects to the videos happens in the post-production phase, where professionals utilize various software. One of the commonly added effects is the motion blur effect which creates a subtle motion in the video.
In this article, we will address how to do motion blur on CapCut with simple steps. So, continue reading this guide to learn an easy and simple way of creating motion blur in your videos.
Part 1: Why Should You Add Motion Blur to Videos?
The motion blur effect changes the perspective of moving objects in a film or video. If you have created an animated video, you must add a motion blur effect to make the movement of objects or characters natural. Moreover, it gives a realistic touch to your videos by describing a particular movement in the video. That’s why adding a motion blur effect in videos is necessary, as, without this effect, the video would look choppy.
To introduce a motion blur effect, you can find multiple tools and video editors. However, if you want to try professional software, CapCut is a trustworthy option. This tool has a pre-made motion blur effect that you can instantly add within seconds. So, if you have already downloaded CapCut, upgrade to its latest version to try its built-in motion blur effect. Continue reading this article to find out about motion blur CapCut.
Part 2: How to Add Motion Blur to Videos on CapCut?
Are you excited to add a motion blur effect using CapCut? CapCut is a popular video editor, especially for TikTok, through which you can execute professional video editing easily. In this section, we will guide you on how to add motion blur on CapCut using your iPhone and Android.
1. On iPhone
CapCut is available on App Store , through which you can easily download it on your iPhone. To add a motion blur effect to your video on iPhone, check the below steps:
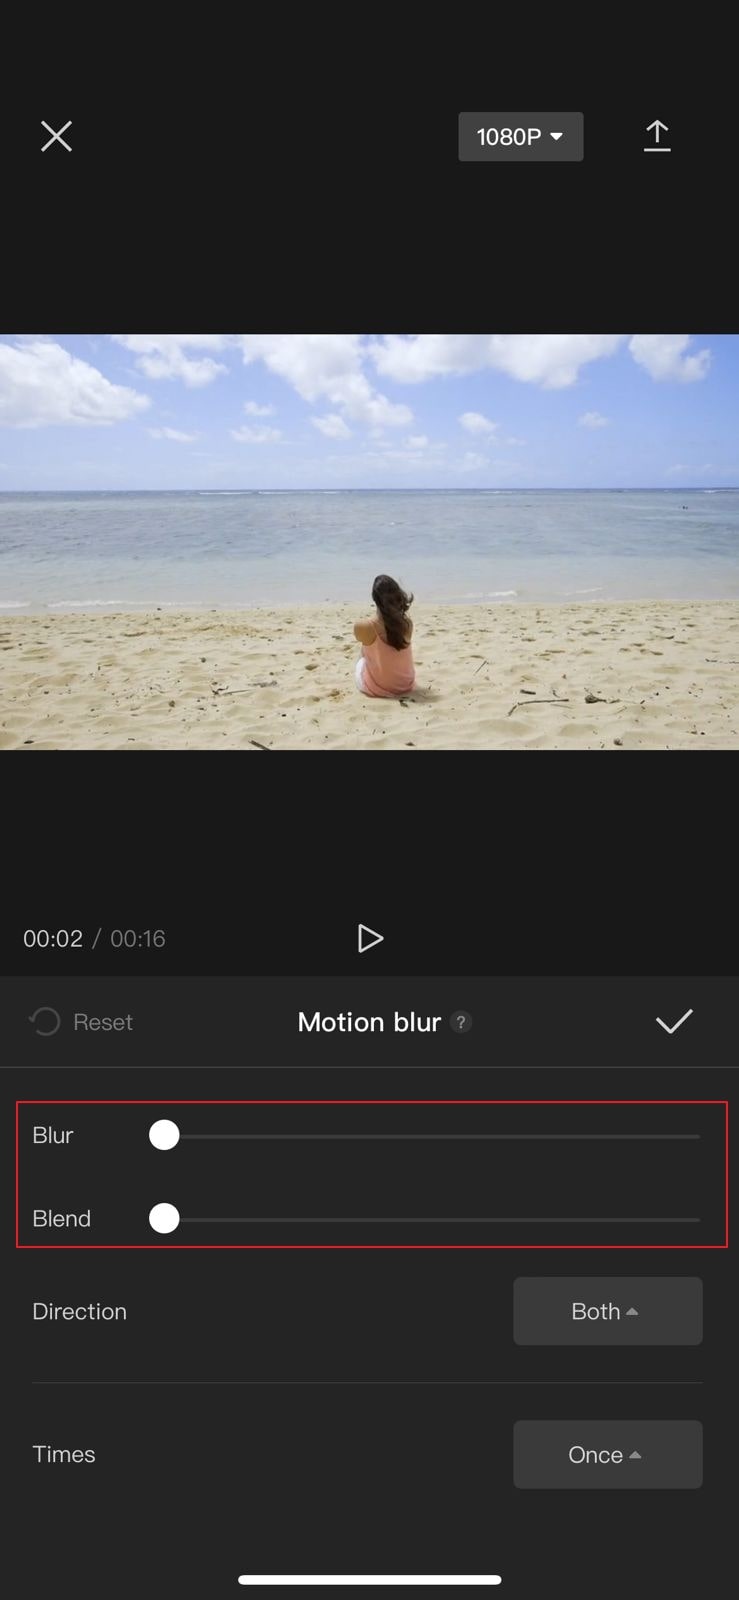
Step1 After adding the desired video clip in CapCut, select it and scroll in the right direction until you can locate the “Motion Blur” option. Now tap on “Motion Blur” and increase its “Blur” and “Blend” strength according to your choice. You can also increase the Blend value accordingly.
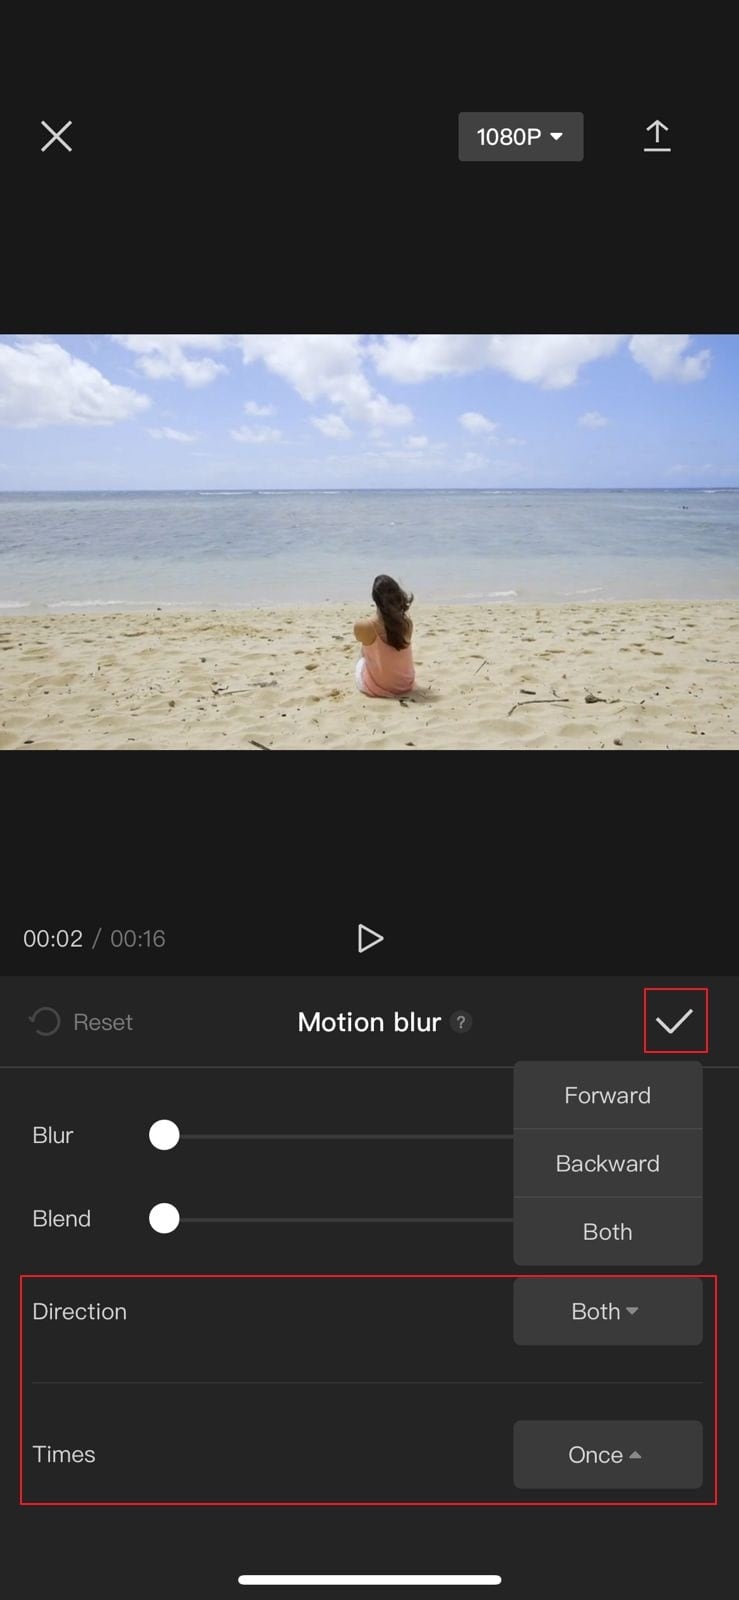
Step2 Moreover, you can choose the direction and times of the motion blur effect. Once you are done, tap on the “Tick” icon. After some seconds, the motion blur effect will be applied to your video.
2. On Android
Android users can also take benefit from the CapCut app. Once you have successfully downloaded the CapCut app on your Android phone from Play Store , follow the below instructions:
Step1 Open the CapCut app and tap on the “New Project” option. By doing so, upload the video from your phone on its interface.

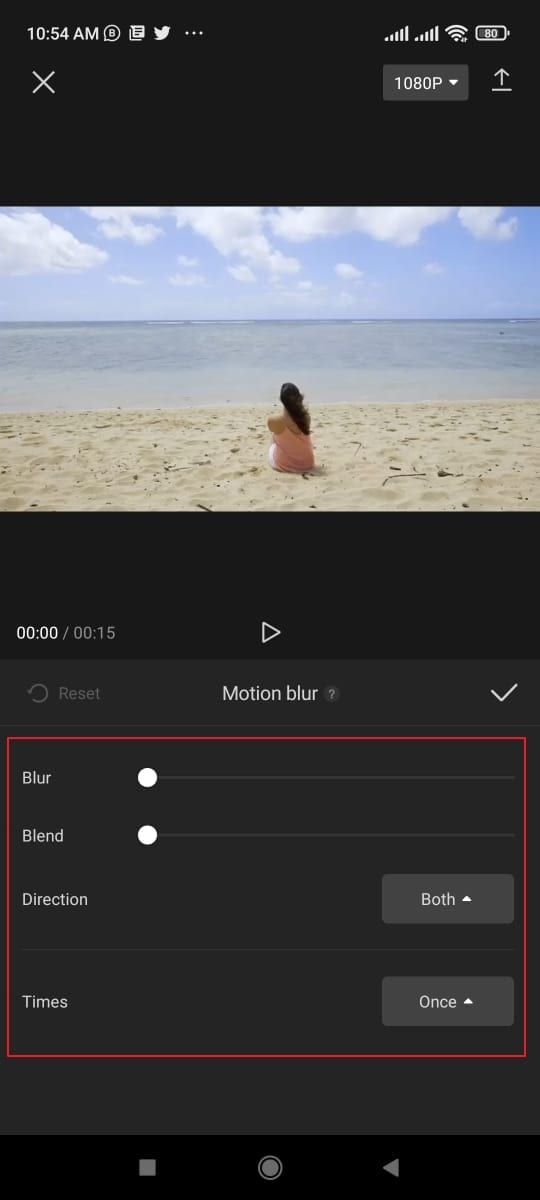
Step2 After uploading, select the clip and scroll in the right direction. From there, select the “Motion Blur” option and choose “Blur” strength and “Blend” value. You can also select the “Direction” and “Times” values from the options. Once done, tap on the “Tick” option to add a motion blur effect to your video successfully.
Part 3: The Best Alternative to CapCut to Add Motion Blur On Mobile
If you want alternatives to CapCut for creating a motion blur effect flawlessly, this part of the article can help you. You can find the best 3 apps in this section that are capable of generating a motion blur effect easily.
1. Videoleap
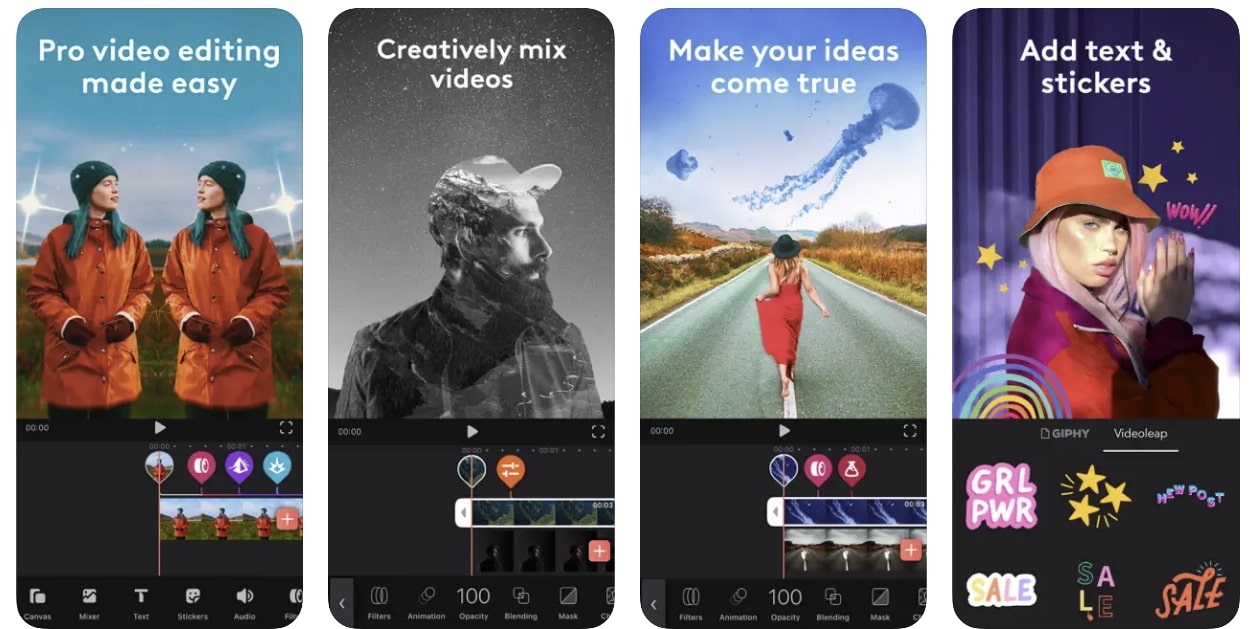
Videoleap is a popular editing app that is available for both iOS and Android users. Using this app, you can add text to your videos by selecting the font, color, opacity, and other elements. Moreover, you can add an audio clip to your video effectively using this app. Furthermore, you can also adjust the brightness, saturation, and other components of the video.
Besides being a powerful video editor, you can also use this tool to add a motion blur to your video. You can use its different filters and effects to create a motion blur effect. This tool offers complete customization freedom so that you can generate your preferred effect easily.
Key Features
- This tool offers over 100 different sound effects that you can add to your video for more engagement.
- You can check your final video in full screen comfortably on this tool.
- This video editor also provides multiple creator video templates through which you can create professional videos.
Pros
- This tool offers small tutorials with every feature to provide you with complete guidance.
- You can execute layer-based editing through this app to add effects, videos, images, and other elements efficiently.
Cons
- This tool does not include a built-in motion effect. Thus, you have to create a motion blur effect on this app through customization.
Tutorial: To see and learn how to use Videoleap effectively, you can see a quick tutorial following this link: https://www.youtube.com/watch?v=e7twWHCVT8U .
2. NSMB – Motion Blur Video
NSMB is a special app that can also work offline to add a motion blur effect to your videos. It has a simple interface that allows you to add a motion blur effect to your video instantly. Once you have uploaded the video on this app, you can easily apply the motion blur effect with a single tap.
Moreover, this app does not distort the quality of your video after adding the motion blur effect. Thus, it’s an efficient app that enables you to add a motion blur to your videos without manual effort.

Download: Android
Key Features
- This app easily supports Android 5.0 OS and above.
- It’s a simple and lightweight app that won’t take up storage space on your phone.
- This app has more than 1M downloads which tell its reliability.
Pros
- This app will add the function of ‘Preview,” through which you will be able to see your final results easily.
- You can adjust the strength of the added motion blur using the slider in this app.
Cons
- This app has limited options and does not offer vast features for video editing.
Tutorial: Do you want to learn how to use this app? Here is a simple and easy video tutorial that you can watch to learn how to use this tool: https://www.youtube.com/shorts/Nm%5FxEMQc6zg .
3. Node Video – Pro Video Editor
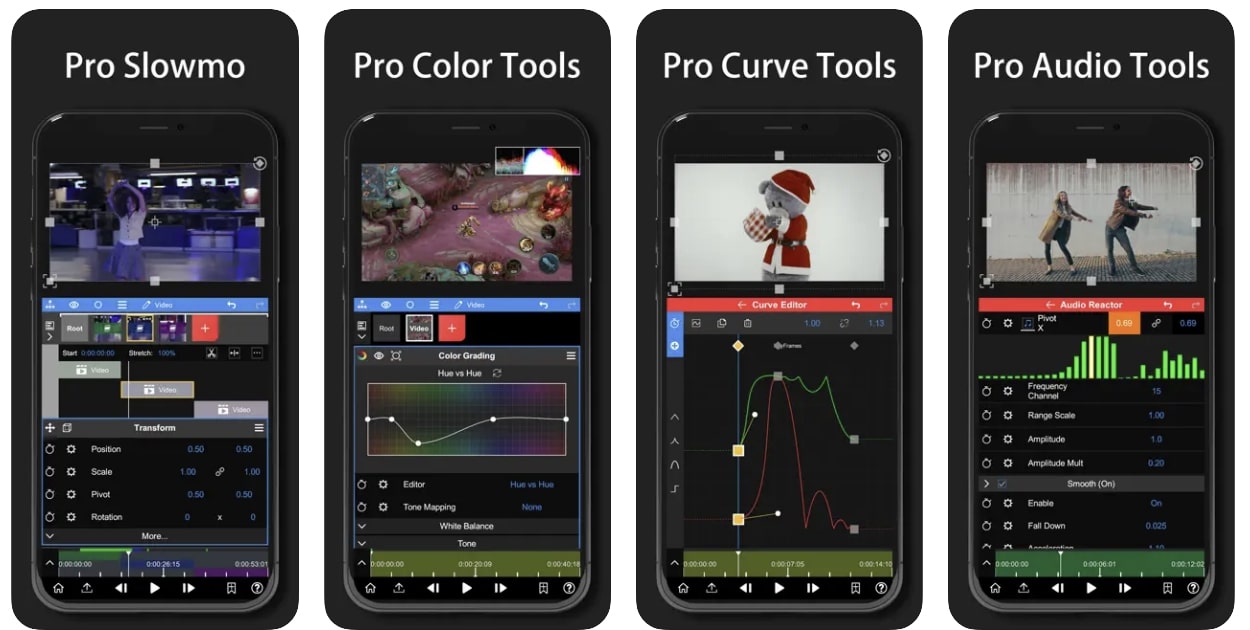
Node Video is a complete professional tool as it offers various editing features that can help you. You can discover tons of advanced editing tools on this app, such as keyframe animation, pen tool, motion tracker, puppet pin, etc. It also provides 3D renders that can assist you in mapping your videos to 3D models.
It also offers various types of effects and filters that can transform your video effectively. Moreover, you can also add a motion blur effect from this tool to your video within seconds. It has a built-in motion blur effect that can be added instantly without complications.
Key Features
- Apart from the motion blur effect, this tool contains various sorts of other effects such as gaussian blur, radial blur, cross blur, directional blur, etc.
- The rendering speed of this app is extremely fast to provide you with fast results.
- Its advanced features can automatically separate backgrounds and human faces instantly.
Pros
- Using this tool, you can edit the audio in the video clip by changing properties and effects.
- You can modify the color grading of your video by modifying lift, gamma, and gain elements.
Cons
- To continuously use this app, you have to buy its subscription plans.
Tutorial: In this video tutorial, you can find authentic instructions to use Node Video without any hassle. Thus, visit this video link to check the tutorial: https://www.youtube.com/watch?v=z9lq8XXCmss .
Comparison
Apps like NSMB and Node Video work efficiently as they contain built-in motion blur effects. They work similarly to CapCut, as you can easily add a motion blur effect to your videos automatically. However, these apps provide limited options to choose the area and amount of effect. So, if you want to add customization to your videos proficiently, you can try Videoleap.
Conclusion
Motion blur effect can immensely change the dynamic of your professional videos. If you want to instruct about specific movements in your video, the motion blur effect can enhance it easily. In this article, we have shed light on how to do motion blur on CapCut. For more options, we have also provided three alternatives to CapCut for your additional help.
Tutorial: To see and learn how to use Videoleap effectively, you can see a quick tutorial following this link: https://www.youtube.com/watch?v=e7twWHCVT8U .
2. NSMB – Motion Blur Video
NSMB is a special app that can also work offline to add a motion blur effect to your videos. It has a simple interface that allows you to add a motion blur effect to your video instantly. Once you have uploaded the video on this app, you can easily apply the motion blur effect with a single tap.
Moreover, this app does not distort the quality of your video after adding the motion blur effect. Thus, it’s an efficient app that enables you to add a motion blur to your videos without manual effort.

Download: Android
Key Features
- This app easily supports Android 5.0 OS and above.
- It’s a simple and lightweight app that won’t take up storage space on your phone.
- This app has more than 1M downloads which tell its reliability.
Pros
- This app will add the function of ‘Preview,” through which you will be able to see your final results easily.
- You can adjust the strength of the added motion blur using the slider in this app.
Cons
- This app has limited options and does not offer vast features for video editing.
Tutorial: Do you want to learn how to use this app? Here is a simple and easy video tutorial that you can watch to learn how to use this tool: https://www.youtube.com/shorts/Nm%5FxEMQc6zg .
3. Node Video – Pro Video Editor
Node Video is a complete professional tool as it offers various editing features that can help you. You can discover tons of advanced editing tools on this app, such as keyframe animation, pen tool, motion tracker, puppet pin, etc. It also provides 3D renders that can assist you in mapping your videos to 3D models.
It also offers various types of effects and filters that can transform your video effectively. Moreover, you can also add a motion blur effect from this tool to your video within seconds. It has a built-in motion blur effect that can be added instantly without complications.

Key Features
- Apart from the motion blur effect, this tool contains various sorts of other effects such as gaussian blur, radial blur, cross blur, directional blur, etc.
- The rendering speed of this app is extremely fast to provide you with fast results.
- Its advanced features can automatically separate backgrounds and human faces instantly.
Pros
- Using this tool, you can edit the audio in the video clip by changing properties and effects.
- You can modify the color grading of your video by modifying lift, gamma, and gain elements.
Cons
- To continuously use this app, you have to buy its subscription plans.
Tutorial: In this video tutorial, you can find authentic instructions to use Node Video without any hassle. Thus, visit this video link to check the tutorial: https://www.youtube.com/watch?v=z9lq8XXCmss .
Comparison
Apps like NSMB and Node Video work efficiently as they contain built-in motion blur effects. They work similarly to CapCut, as you can easily add a motion blur effect to your videos automatically. However, these apps provide limited options to choose the area and amount of effect. So, if you want to add customization to your videos proficiently, you can try Videoleap.
Conclusion
Motion blur effect can immensely change the dynamic of your professional videos. If you want to instruct about specific movements in your video, the motion blur effect can enhance it easily. In this article, we have shed light on how to do motion blur on CapCut. For more options, we have also provided three alternatives to CapCut for your additional help.
This Article Talks About if the Windows Movie Maker Available and if Yes, Then How You Can Download It and so On. It Further Comprises an Alternative to the Same to Create Videos
During the early days of our childhood, when Microsoft decided to release its Windows essential software package from there, a tool emerged. It soon became one of the top destinations and choices for people looking to edit their images and videos. The windows movie maker available in that suite gave the most beginner-friendly experience to all the editors who didn’t have a lot of ideas regarding how to edit and improve their photos or videos.
But nowadays, the situation and market have changed drastically. Due to enormous market competition, other editing applications started to take up the territory of Windows movie maker and soon became a distant memory. That is to say, if you are still looking for the answer that is Windows movie maker still available so that you can still enjoy its various features. Then, you shall not look for the solution anymore because we have put together this article to answer all your questions.
Part 1. How to Download Microsoft Windows Movie Maker
You probably already know that Microsoft has ceased all its operations regarding updating and developing any Windows Movie Maker. Then, suppose you are still looking to download and run it on your personal computer. In that case, it is possible to download it from the internet and follow some essential steps for its seamless installation.
Here we will cover all the necessary steps from its downloading, installation, and proper running on the windows device you want to enjoy as per your requirements: -
- The first and foremost step would be downloading the windows live essential setup file from any website where it’s available.
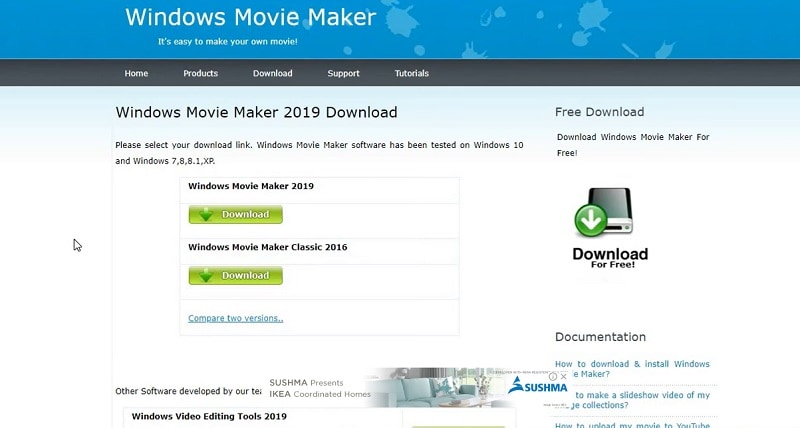
- Next, you need to open the setup file by double clicking on the wlsetup-all from where it is located on your computer.
- Click yes on the windows installation window whenever it gets opened without hesitation.
- After that, click on the install all windows essentials package. Although most apps won’t be available, you can still download windows movie maker as you wish.
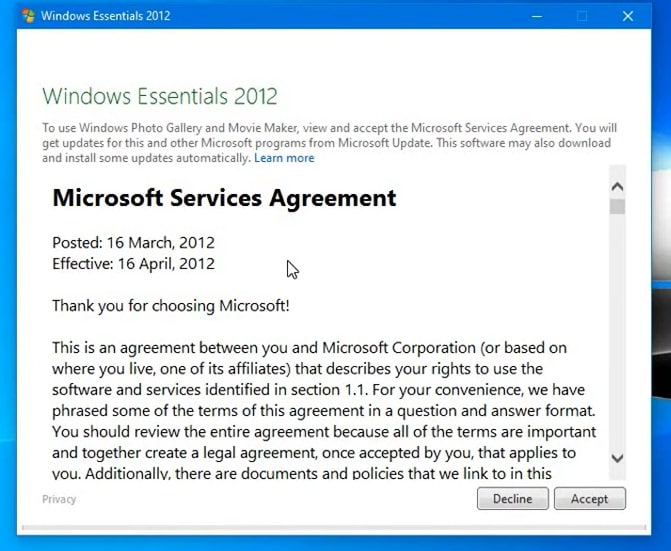
- A show details bar is available at the windows tab’s bottom left corner. By clicking on that, you will be able to see the percentage of how much time till installation. Now, please wait for the windows movie maker to install.
- After all the apps in the essentials package get installed, the windows movie maker will be installed along with them. After this, click on the start menu, which is available at the bottom left corner of the tab.
- Please type the name windows movie maker; it will show the windows movie maker app installed on your personal computer.
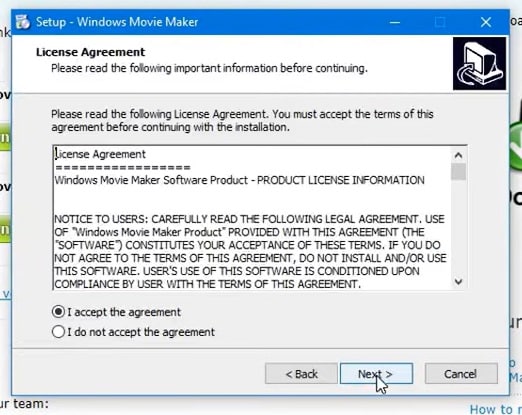
- Click on the movie maker’s name, probably stationed at the start menu’s top. After which, a terms and conditions page will open up.
- Without looking at any other option, choose the accept option at the bottom right corner, and boom, windows movie maker, would officially launch on your PC for use.
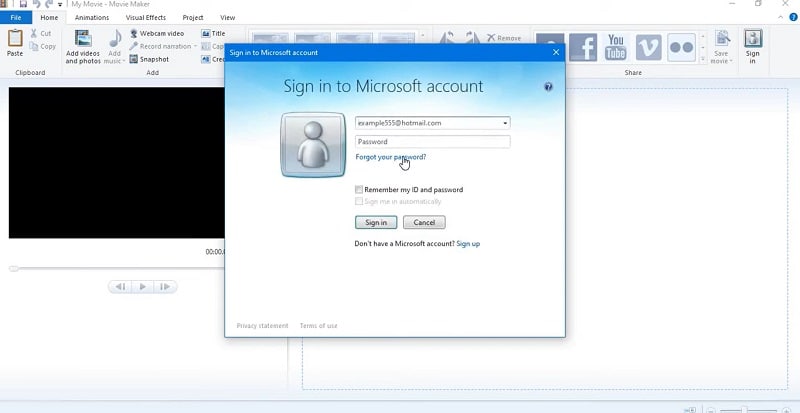
- Lastly, when the windows essentials installation message gets popped up on your screen, close that window and enjoy your windows movie maker efficiently.
Part 2. Windows Movie Maker Alternative to Create Videos
For instance, if the windows movie maker is no longer available to download even after searching it throughout the internet. Then, there is nothing to be tensed about because there are more than enough alternatives that are much better than what Windows movie maker could offer.
Filmora is that new aged video editing software that has turned out to be a popular alternative and ideal choice for people looking to edit their photos or videos and wondering is movie makers still available. Filmora is an exciting choice for allowing users to edit videos using some of the best new, wide-ranging categories of powerful editing tools.
Free Download For Win 7 or later(64-bit)
Free Download For macOS 10.14 or later
Even if you are new to the editing field, you can easily use Filmora due to its user-friendly and uniquely designed interface. Some of the features which you can enjoy upon using Filmora as your editing software comprises: -
- Export and edit all your videos at the premium category of 4k resolution.
- Easily remove all the unnecessary background noises effectively.
- Options to add zoom and panning movement to the still footage present in your video.
- Smoothly change the background space and add some special effects for enhancement.
Now, after getting a brief idea about Filmora and its features. Let us know to look at four steps that will help your edit your videos seamlessly through Filmora: -
Start the application of Filmora
The first step towards using Filmora would involve you to double click the Filmora icon on your desktop screen. This will help in launching the application.

A new window would appear, asking if you want to opt for creating altogether a new project or continue your previous one. You can only choose the exact aspect ratio you want for your videos from this window.
Choose the new project option
Click on the ‘create a new project’ option. Now, allow the editor window some time to load.

Now, after the Filmora video editor opens, opt for registering your product that is using “register button”. Filmora is famous for allowing all types of videos for editing with the use of their tools and clicking “import” button in the upper left corner. From here, you can easily select and import the videos from your gallery into the Filmora app efficiently.
Organize all your items in one place by creating separate folders
Create a separate folder for all your videos and organize your editing project for accessing it seamlessly. Not choosing to do so could create many problems and confusion. It’s regarding the ones you were editing and had already been edited.
Remove all the irrelevant parts from your videos
The raw videos you chose to shoot could contain many parts where irrelevant content takes up lots of space. It unnecessarily increases the length of the footage.
![]()
So, if you want to remove and trim those things from your videos, then drag those videos from the media tab and drop those on the timeline would do the work.
Windows movie maker introduced to the world through the package of windows essentials tab in 2012 was not able to achieve the success it was predicted to. One of the most common reasons behind it was the ever-increasing competition in the editing field. New companies or businesses kept on entering the same space, and slowly, they effectively captured all the territory, which was windows movie maker.
Soon, we were asking ourselves, like, is windows movie maker available for windows 10? If not, then how to download it? To sum it up, hopefully, after reading the above article, you have gained the knowledge and learned how to download the windows movie maker and other alternatives available on the market.
Part 3. Related FAQs of Windows Movie Maker
1. Why is the Windows movie maker no longer available?
The windows movie maker, an elusive part of windows essentials introduced in 2012, is no longer available to download. Various websites on the internet which used to offer a free download option of windows movie makers have stopped providing their services.
But those websites that still offer the download option could contain malware, viruses, and hidden costs.
2. How do I get Windows movie maker 2022?
The first step for getting Windows movie maker 2022 would be installing it from the internet. It can be through desktops, laptops, or PCs that support the windows software. If you hold a mac, then windows movie maker won’t be able to run on that device.
As windows movie maker was included in the windows essentials package of 2012, a single installation would efficiently open all the apps available on the bundle.
3. Can I get a Windows movie maker for Windows 10?
You can still get a windows movie maker for your Windows 10 supporting device. As you already know, Microsoft has stopped developing and updating the features of windows movie maker supported for windows 10.
But it can still be downloaded separately from the internet and conveniently run on your device.
Free Download For macOS 10.14 or later
Even if you are new to the editing field, you can easily use Filmora due to its user-friendly and uniquely designed interface. Some of the features which you can enjoy upon using Filmora as your editing software comprises: -
- Export and edit all your videos at the premium category of 4k resolution.
- Easily remove all the unnecessary background noises effectively.
- Options to add zoom and panning movement to the still footage present in your video.
- Smoothly change the background space and add some special effects for enhancement.
Now, after getting a brief idea about Filmora and its features. Let us know to look at four steps that will help your edit your videos seamlessly through Filmora: -
Start the application of Filmora
The first step towards using Filmora would involve you to double click the Filmora icon on your desktop screen. This will help in launching the application.

A new window would appear, asking if you want to opt for creating altogether a new project or continue your previous one. You can only choose the exact aspect ratio you want for your videos from this window.
Choose the new project option
Click on the ‘create a new project’ option. Now, allow the editor window some time to load.

Now, after the Filmora video editor opens, opt for registering your product that is using “register button”. Filmora is famous for allowing all types of videos for editing with the use of their tools and clicking “import” button in the upper left corner. From here, you can easily select and import the videos from your gallery into the Filmora app efficiently.
Organize all your items in one place by creating separate folders
Create a separate folder for all your videos and organize your editing project for accessing it seamlessly. Not choosing to do so could create many problems and confusion. It’s regarding the ones you were editing and had already been edited.
Remove all the irrelevant parts from your videos
The raw videos you chose to shoot could contain many parts where irrelevant content takes up lots of space. It unnecessarily increases the length of the footage.
![]()
So, if you want to remove and trim those things from your videos, then drag those videos from the media tab and drop those on the timeline would do the work.
Windows movie maker introduced to the world through the package of windows essentials tab in 2012 was not able to achieve the success it was predicted to. One of the most common reasons behind it was the ever-increasing competition in the editing field. New companies or businesses kept on entering the same space, and slowly, they effectively captured all the territory, which was windows movie maker.
Soon, we were asking ourselves, like, is windows movie maker available for windows 10? If not, then how to download it? To sum it up, hopefully, after reading the above article, you have gained the knowledge and learned how to download the windows movie maker and other alternatives available on the market.
Part 3. Related FAQs of Windows Movie Maker
1. Why is the Windows movie maker no longer available?
The windows movie maker, an elusive part of windows essentials introduced in 2012, is no longer available to download. Various websites on the internet which used to offer a free download option of windows movie makers have stopped providing their services.
But those websites that still offer the download option could contain malware, viruses, and hidden costs.
2. How do I get Windows movie maker 2022?
The first step for getting Windows movie maker 2022 would be installing it from the internet. It can be through desktops, laptops, or PCs that support the windows software. If you hold a mac, then windows movie maker won’t be able to run on that device.
As windows movie maker was included in the windows essentials package of 2012, a single installation would efficiently open all the apps available on the bundle.
3. Can I get a Windows movie maker for Windows 10?
You can still get a windows movie maker for your Windows 10 supporting device. As you already know, Microsoft has stopped developing and updating the features of windows movie maker supported for windows 10.
But it can still be downloaded separately from the internet and conveniently run on your device.
AI Features of Filmora - Silence Detection in Videos
Sometimes awkward silent moments can make a video look cringe and boring. Silence in videos can often be a major drawback, making the content dull and unengaging. However, fear not because there are ways to eliminate them and keep your viewers hooked. One effective solution is to utilize certain features that help in removing silence from videos.
Silence detection is a feature that lets you detect silence and awkward pauses in your content. It can detect those instances where there is no audio or any significant sound present. By utilizing this feature, you can easily identify and remove these silent parts from your videos. Wondershare Filmora is a tool that offers this AI-powered feature to remove silence from videos.
Part 1: How Can Silencing in Videos Damage It?
Silence can negatively affect videos, making them less engaging and captivating. Many video silence removers are available, but first, learn how silence affects video content. Let’s explore some of how silence can damage the quality of video content:
1. Loss of Interest
When viewers encounter long silent moments in a video, they lose interest. Silence fails to hold their attention and leaves them craving for something more stimulating. As a result, they may lose interest in the content and look for other videos. This is somewhat discouraging for a content creator. That’s why short and meaningful content is what the audience demand.
2. Lack of Emotional Connection
Sound and audio play an essential role in creating an emotional connection with the audience. Silence, on the other hand, fails to start any emotional response. Without appropriate sound effects or dialogue, videos can feel empty and emotionless. The absence of audio elements also fails to establish a connection with the viewer.
3. Breaks the Flow
Silent moments in videos can disrupt the natural flow and rhythm of the content. Viewers expect a seamless progression from one scene to another. However, sudden silences in a video may create frustration for some individuals. It may also lead to a disjointed viewing experience for the viewer. Meanwhile, the audience sometimes couldn’t understand the intended message.
4. Awkwardness and Uncomfortable Silence
Silence can create awkward moments in videos, especially when it’s unexpected or prolonged. These silent gaps can make viewers feel uncomfortable. The viewer becomes unsure of what to expect or how to interpret the situation. Moreover, awkward silences can detract from the overall viewing experience. It also leaves a negative impression and makes the content less enjoyable.
5. Reduced Engagement and Sharing
Videos that contain excessive silence are less likely to be shared or discussed among viewers. Silent moments fail to generate excitement or spark conversations. In contrast, videos with dynamic audio elements are more likely to capture attention. If your video has long pauses or awkward silent moments, it may not get the expected response.
Video Slience Detector
Easily and precisely detect slience in video with Filmora Video Editor ! Experience the magic of cool to make great videos.
Detect Slience in Video Detect Slience in Video Learn More >

Part 2: Silence Detection Feature of Wondershare Filmora - An Understanding
Wondershare Filmora Video Editor always surprises you with its unique editing options and features. Its many features make it easy and pretty straightforward for you like. With another excellent feature, you can detect silence in audio files and videos. This unique feature will automatically detect awkward silence or long pauses.
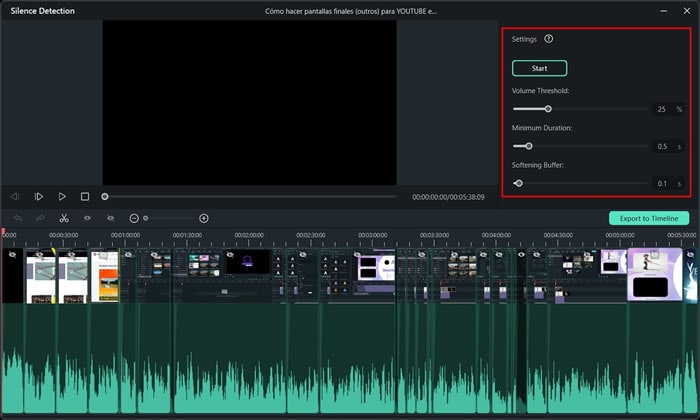
Furthermore, you can remove those moments from your project to create a seamless experience. This video silence remover uses AI to find silent intervals in your video. You can also change the volume threshold by helping the tool find more such moments in your project. Additionally, you can change the minimum duration of such silent intervals of your video.
Part 3: Gathering Details About the Other AI Features of Filmora
Wondershare Filmora can auto remove silence in videos, but it has other AI features too. Learn more about Filmora’s AI features in this section.
Edit Video with AI For Win 7 or later(64-bit)
Edit Video with AI For macOS 10.14 or later
AI Image
This feature of the Wondershare Filmora employs AI to improve the appearance of images in videos. It automatically fixes imperfections like noise and color asymmetry. Furthermore, it also corrects brightness, giving your videos a better, more polished appearance. You can fast and easily enhance the quality of your video with the help of this feature.
Auto Reframe
If you want to change the aspect ratio of your video automatically, then this is the feature for you. The Auto Reframe function in Filmora automatically modifies aspect ratios for your video .
Motion Tracking
Filmora’s motion tracking feature tracks and follows moving objects in videos . It allows you to add effects, text, or graphics that move along with the object. Furthermore, this feature makes it easy to highlight and enhance specific elements in a video. You can even create engaging and professional-looking effects using the motion tracking feature. This feature makes it simple to add dynamic elements to videos.
Instant Mode
Wondershare Filmora has an Instant Mode feature that lets users create videos easily and quickly. You can choose a template, import your video, and let the software will edit it automatically. This feature can automatically apply transitions, effects, and music to your videos. It’s a simple and convenient way to make polished videos without needing advanced editing skills.
Auto Beat Sync
It is a feature that synchronizes video clips and effects with the beats of background music. This feature can automatically detect the rhythm and aligns the visuals accordingly. Moreover, it can save you time and make your videos more engaging. You can edit and synchronize audio with video without having expertise by using this AI feature of Filmora.
Part 4: Tutorial: Using The Silence Detection Feature in Filmora
Wondershare Filmora can automatically remove silence from videos in no time. With its silent detection feature, you can easily remove awkward silence from your videos. Follow these guided steps to remove such moments from your videos.
Detect Slience in Video For Win 7 or later(64-bit)
Detect Slience in Video For macOS 10.14 or later
Step 1Open Wondershare Filmora
To auto remove silence in videos, start by opening Wondershare Filmora on your system. Look for the “Silence Detection” button located just beneath the “New Project” option.
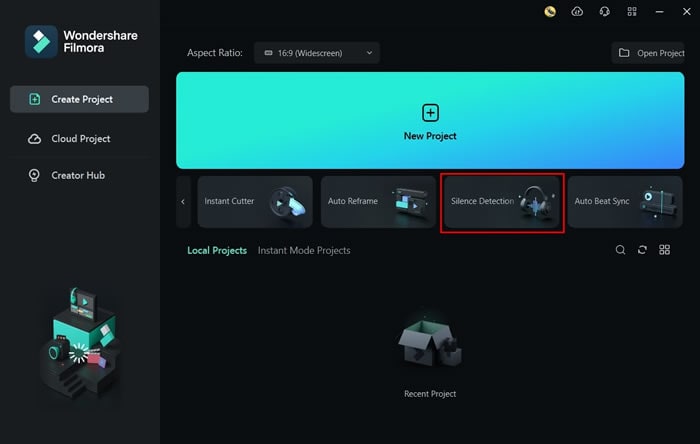
Step 2Import and Detect Silence
Click on the “Silence Detection“ button, and then import your video file into the tool. If needed, you can adjust the parameters in the “Settings” menu according to your requirements. Continue to select the “Start” button, and Filmora will automatically detect any silent intervals in your video or audio file.
Step 3Delete Silence and Merge Clips
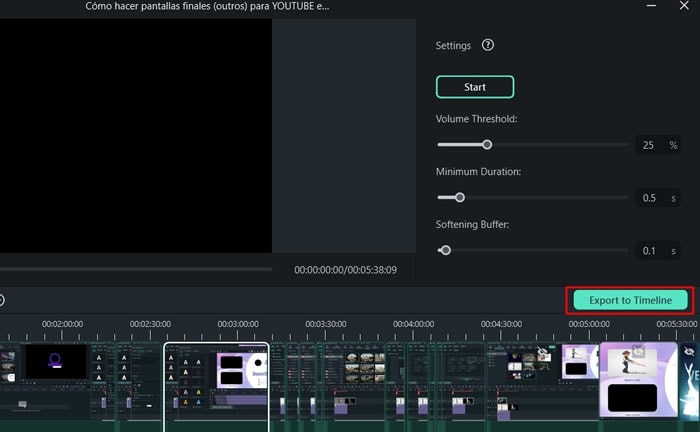
Continue to remove the silent portions from the timeline by merging the clips together. To merge the remaining clips together, drag and place each clip right next to each other. Once done, click the “Export to Timeline” button to lead into the main interface.
Conclusion
To conclude, silence detection eliminates boring stretches of silence from a video. Additionally, it allows you to enhance the overall flow of your video. By removing such intervals, you can maintain a consistent pace throughout your video. Wondershare Filmora is a fantastic tool that automatically removes silence from video and audio files.
Detect Slience in Video Detect Slience in Video Learn More >

Part 2: Silence Detection Feature of Wondershare Filmora - An Understanding
Wondershare Filmora Video Editor always surprises you with its unique editing options and features. Its many features make it easy and pretty straightforward for you like. With another excellent feature, you can detect silence in audio files and videos. This unique feature will automatically detect awkward silence or long pauses.
Furthermore, you can remove those moments from your project to create a seamless experience. This video silence remover uses AI to find silent intervals in your video. You can also change the volume threshold by helping the tool find more such moments in your project. Additionally, you can change the minimum duration of such silent intervals of your video.
Part 3: Gathering Details About the Other AI Features of Filmora
Wondershare Filmora can auto remove silence in videos, but it has other AI features too. Learn more about Filmora’s AI features in this section.
Edit Video with AI For Win 7 or later(64-bit)
Edit Video with AI For macOS 10.14 or later
AI Image
This feature of the Wondershare Filmora employs AI to improve the appearance of images in videos. It automatically fixes imperfections like noise and color asymmetry. Furthermore, it also corrects brightness, giving your videos a better, more polished appearance. You can fast and easily enhance the quality of your video with the help of this feature.
Auto Reframe
If you want to change the aspect ratio of your video automatically, then this is the feature for you. The Auto Reframe function in Filmora automatically modifies aspect ratios for your video .
Motion Tracking
Filmora’s motion tracking feature tracks and follows moving objects in videos . It allows you to add effects, text, or graphics that move along with the object. Furthermore, this feature makes it easy to highlight and enhance specific elements in a video. You can even create engaging and professional-looking effects using the motion tracking feature. This feature makes it simple to add dynamic elements to videos.
Instant Mode
Wondershare Filmora has an Instant Mode feature that lets users create videos easily and quickly. You can choose a template, import your video, and let the software will edit it automatically. This feature can automatically apply transitions, effects, and music to your videos. It’s a simple and convenient way to make polished videos without needing advanced editing skills.
Auto Beat Sync
It is a feature that synchronizes video clips and effects with the beats of background music. This feature can automatically detect the rhythm and aligns the visuals accordingly. Moreover, it can save you time and make your videos more engaging. You can edit and synchronize audio with video without having expertise by using this AI feature of Filmora.
Part 4: Tutorial: Using The Silence Detection Feature in Filmora
Wondershare Filmora can automatically remove silence from videos in no time. With its silent detection feature, you can easily remove awkward silence from your videos. Follow these guided steps to remove such moments from your videos.
Detect Slience in Video For Win 7 or later(64-bit)
Detect Slience in Video For macOS 10.14 or later
Step 1Open Wondershare Filmora
To auto remove silence in videos, start by opening Wondershare Filmora on your system. Look for the “Silence Detection” button located just beneath the “New Project” option.

Step 2Import and Detect Silence
Click on the “Silence Detection“ button, and then import your video file into the tool. If needed, you can adjust the parameters in the “Settings” menu according to your requirements. Continue to select the “Start” button, and Filmora will automatically detect any silent intervals in your video or audio file.

Step 3Delete Silence and Merge Clips
Continue to remove the silent portions from the timeline by merging the clips together. To merge the remaining clips together, drag and place each clip right next to each other. Once done, click the “Export to Timeline” button to lead into the main interface.

Conclusion
To conclude, silence detection eliminates boring stretches of silence from a video. Additionally, it allows you to enhance the overall flow of your video. By removing such intervals, you can maintain a consistent pace throughout your video. Wondershare Filmora is a fantastic tool that automatically removes silence from video and audio files.
Create Your Face Zoom TikTok Now
Abundant Video Effects - Wondershare Filmora
Provide abundant video effects - A creative video editor
Powerful color correction and grading
Detailed tutorials are provided by the official channel
TikTok videos are very popular across the youth of the world. With millions of users in support of the platform, there are many content creators that gained popularity through making small videos on TikTok. These videos are, however, incomplete without the existence of a proper effect on them. To emphasize something across a video, the zoom effect is always preferred in the market.
This article discusses the face zoom effect of TikTok and provides users with the appropriate methods that can be adapted to utilize this function to perfection. With this feature, you can make your perfect videos with an emphasis on the important elements to view on the screen.
In this article
Part 1: What is TikTok Face Zoom?
Part 2: Create A Face Zoom TikTok Video in Minutes
Part 3: Bonus | Create Face Zoom Video in Wondershare Filmora
Part 1: What is TikTok Face Zoom?
The face zoom TikTok effect is referred to the zooming effect that is covered by putting the focus on the facial presence within the video. The use of the face zoom effect on TikTok has a significant utility in highlighting the importance of the person within the video and creating an illusion that would make people watch the video all along.
Many TikTokers like using this effect in scenes where they wish to highlight something new about their face, e.g., new makeup.
Part 2: Create A Face Zoom TikTok Video in Minutes
There are some direct approaches to zooming the face across a TikTok video. To understand these methods, you should go through the provided details and understand the face zoom effect on TikTok.
Method 1: Create A Face Zoom TikTok Video in Minutes
Step 1: Before coming onto adding effects across your TikTok video, you need to record it across the social platform or have it recorded before on your smartphone under the requirements of TikTok.
Step 2: For uploading a video on TikTok, you need to continue by clicking the “+” icon and locating the “Upload” button for adding a pre-recorded video across TikTok.

Step 3: Once you have added the video for editing, navigate into the “Effects” section and find yourselves in the “Visuals” section. Let the cursor of the video be at the point where the facial features are prominent, and you wish to face zoom the video from there. With the cursor across the required place, find the “Zoom” effect in the list and hold the button until you’ve successfully added the effect across the required length of the video.

Step 4: After editing the video and adding the face zoom effect successfully, you need to click on “Save” to preview the video before you click “Next” to share it across the necessary platforms. TikTok provides you with the ability to share your videos across Instagram, Facebook, or WhatsApp.

Method 2: Do Face Zoom Easily by Finding a Face Zoom Video
Step 1: To use the TikTok face zoom effect on your video, you need to launch the platform and click on “Discover” present on the bottom of the screen. In the search bar, you need to type “Face Zoom” to locate the effect across TikTok.

Step 2: Once you have found the effect, open it on another screen. Locate the “Try this effect” button to use a similar effect across your video.

Step 3: Record the video on TikTok by clicking on the red recording button. Make changes to the recorded video and save the video on your device or share it across the social media platforms as desired.

Part 3: Bonus | Create Face Zoom Video in Wondershare Filmora
TikTok produces impressive content that can be commended for many reasons. This, however, does not make the professional video that you might be looking for. What to do if you cannot create such a professional video that would help you get the right reach you are looking for? Wondershare Filmora includes an exceptional experience of using the TikTok face zoom effect across its easy-to-use platform with the right set of tools.
To understand how you can successfully execute the procedure without putting yourselves in any difficulty, go through the steps as shown below:
Step 1: Download and Install Wondershare Filmora
For starters, you need to have Wondershare Filmora installed on your computer. Proceed to launch it and click on the “New Project” button to start a new project.

Step 2: Upload Media
As a new window opens up on the front, you need to click on the arrowhead icon against the “Media” tab to import the video that is to be edited across Wondershare Filmora. On adding it, drag it across the timeline successfully.

Step 3: Track the Face using Motion Tracking
To track the facial features across the video, you need to double-click the video on the timeline and proceed to open the “Motion Tracking” menu that you can find across the pane. Enable the option if necessary and set the position of the box across the “Preview” window that would track the face. Click on “Start Tracking” to successfully motion track the face.

Step 4: Add Magnify Effect to the Face
Proceed into the “Effects” tab and write “Magnify” in the search bar. Select the effect and place it across the video in the timeline. To align the effect with the face, you need to double-click the video and move into the “Motion Tracking” section again. Select the specific magnify effect in the drop-down menu and select “Start Tracking.”

Step 5: Preview and Export the Face Zoom Video
Once you are done editing the video, preview it across the window to check if any edits are required. Once confirmed, click on the “Export” button to save the video across the computer.

Conclusion
The TikTok face zoom effect can be quite impressive if used perfectly. However, since the intent is to highlight the facial parts in the video, the appropriate use of the effect can give an exceptional result. For this, the article has discussed the best methods that can be applied to understanding how to use face zoom in TikTok with ease.
TikTok videos are very popular across the youth of the world. With millions of users in support of the platform, there are many content creators that gained popularity through making small videos on TikTok. These videos are, however, incomplete without the existence of a proper effect on them. To emphasize something across a video, the zoom effect is always preferred in the market.
This article discusses the face zoom effect of TikTok and provides users with the appropriate methods that can be adapted to utilize this function to perfection. With this feature, you can make your perfect videos with an emphasis on the important elements to view on the screen.
In this article
Part 1: What is TikTok Face Zoom?
Part 2: Create A Face Zoom TikTok Video in Minutes
Part 3: Bonus | Create Face Zoom Video in Wondershare Filmora
Part 1: What is TikTok Face Zoom?
The face zoom TikTok effect is referred to the zooming effect that is covered by putting the focus on the facial presence within the video. The use of the face zoom effect on TikTok has a significant utility in highlighting the importance of the person within the video and creating an illusion that would make people watch the video all along.
Many TikTokers like using this effect in scenes where they wish to highlight something new about their face, e.g., new makeup.
Part 2: Create A Face Zoom TikTok Video in Minutes
There are some direct approaches to zooming the face across a TikTok video. To understand these methods, you should go through the provided details and understand the face zoom effect on TikTok.
Method 1: Create A Face Zoom TikTok Video in Minutes
Step 1: Before coming onto adding effects across your TikTok video, you need to record it across the social platform or have it recorded before on your smartphone under the requirements of TikTok.
Step 2: For uploading a video on TikTok, you need to continue by clicking the “+” icon and locating the “Upload” button for adding a pre-recorded video across TikTok.

Step 3: Once you have added the video for editing, navigate into the “Effects” section and find yourselves in the “Visuals” section. Let the cursor of the video be at the point where the facial features are prominent, and you wish to face zoom the video from there. With the cursor across the required place, find the “Zoom” effect in the list and hold the button until you’ve successfully added the effect across the required length of the video.

Step 4: After editing the video and adding the face zoom effect successfully, you need to click on “Save” to preview the video before you click “Next” to share it across the necessary platforms. TikTok provides you with the ability to share your videos across Instagram, Facebook, or WhatsApp.

Method 2: Do Face Zoom Easily by Finding a Face Zoom Video
Step 1: To use the TikTok face zoom effect on your video, you need to launch the platform and click on “Discover” present on the bottom of the screen. In the search bar, you need to type “Face Zoom” to locate the effect across TikTok.

Step 2: Once you have found the effect, open it on another screen. Locate the “Try this effect” button to use a similar effect across your video.

Step 3: Record the video on TikTok by clicking on the red recording button. Make changes to the recorded video and save the video on your device or share it across the social media platforms as desired.

Part 3: Bonus | Create Face Zoom Video in Wondershare Filmora
TikTok produces impressive content that can be commended for many reasons. This, however, does not make the professional video that you might be looking for. What to do if you cannot create such a professional video that would help you get the right reach you are looking for? Wondershare Filmora includes an exceptional experience of using the TikTok face zoom effect across its easy-to-use platform with the right set of tools.
To understand how you can successfully execute the procedure without putting yourselves in any difficulty, go through the steps as shown below:
Step 1: Download and Install Wondershare Filmora
For starters, you need to have Wondershare Filmora installed on your computer. Proceed to launch it and click on the “New Project” button to start a new project.

Step 2: Upload Media
As a new window opens up on the front, you need to click on the arrowhead icon against the “Media” tab to import the video that is to be edited across Wondershare Filmora. On adding it, drag it across the timeline successfully.

Step 3: Track the Face using Motion Tracking
To track the facial features across the video, you need to double-click the video on the timeline and proceed to open the “Motion Tracking” menu that you can find across the pane. Enable the option if necessary and set the position of the box across the “Preview” window that would track the face. Click on “Start Tracking” to successfully motion track the face.

Step 4: Add Magnify Effect to the Face
Proceed into the “Effects” tab and write “Magnify” in the search bar. Select the effect and place it across the video in the timeline. To align the effect with the face, you need to double-click the video and move into the “Motion Tracking” section again. Select the specific magnify effect in the drop-down menu and select “Start Tracking.”

Step 5: Preview and Export the Face Zoom Video
Once you are done editing the video, preview it across the window to check if any edits are required. Once confirmed, click on the “Export” button to save the video across the computer.

Conclusion
The TikTok face zoom effect can be quite impressive if used perfectly. However, since the intent is to highlight the facial parts in the video, the appropriate use of the effect can give an exceptional result. For this, the article has discussed the best methods that can be applied to understanding how to use face zoom in TikTok with ease.
TikTok videos are very popular across the youth of the world. With millions of users in support of the platform, there are many content creators that gained popularity through making small videos on TikTok. These videos are, however, incomplete without the existence of a proper effect on them. To emphasize something across a video, the zoom effect is always preferred in the market.
This article discusses the face zoom effect of TikTok and provides users with the appropriate methods that can be adapted to utilize this function to perfection. With this feature, you can make your perfect videos with an emphasis on the important elements to view on the screen.
In this article
Part 1: What is TikTok Face Zoom?
Part 2: Create A Face Zoom TikTok Video in Minutes
Part 3: Bonus | Create Face Zoom Video in Wondershare Filmora
Part 1: What is TikTok Face Zoom?
The face zoom TikTok effect is referred to the zooming effect that is covered by putting the focus on the facial presence within the video. The use of the face zoom effect on TikTok has a significant utility in highlighting the importance of the person within the video and creating an illusion that would make people watch the video all along.
Many TikTokers like using this effect in scenes where they wish to highlight something new about their face, e.g., new makeup.
Part 2: Create A Face Zoom TikTok Video in Minutes
There are some direct approaches to zooming the face across a TikTok video. To understand these methods, you should go through the provided details and understand the face zoom effect on TikTok.
Method 1: Create A Face Zoom TikTok Video in Minutes
Step 1: Before coming onto adding effects across your TikTok video, you need to record it across the social platform or have it recorded before on your smartphone under the requirements of TikTok.
Step 2: For uploading a video on TikTok, you need to continue by clicking the “+” icon and locating the “Upload” button for adding a pre-recorded video across TikTok.

Step 3: Once you have added the video for editing, navigate into the “Effects” section and find yourselves in the “Visuals” section. Let the cursor of the video be at the point where the facial features are prominent, and you wish to face zoom the video from there. With the cursor across the required place, find the “Zoom” effect in the list and hold the button until you’ve successfully added the effect across the required length of the video.

Step 4: After editing the video and adding the face zoom effect successfully, you need to click on “Save” to preview the video before you click “Next” to share it across the necessary platforms. TikTok provides you with the ability to share your videos across Instagram, Facebook, or WhatsApp.

Method 2: Do Face Zoom Easily by Finding a Face Zoom Video
Step 1: To use the TikTok face zoom effect on your video, you need to launch the platform and click on “Discover” present on the bottom of the screen. In the search bar, you need to type “Face Zoom” to locate the effect across TikTok.

Step 2: Once you have found the effect, open it on another screen. Locate the “Try this effect” button to use a similar effect across your video.

Step 3: Record the video on TikTok by clicking on the red recording button. Make changes to the recorded video and save the video on your device or share it across the social media platforms as desired.

Part 3: Bonus | Create Face Zoom Video in Wondershare Filmora
TikTok produces impressive content that can be commended for many reasons. This, however, does not make the professional video that you might be looking for. What to do if you cannot create such a professional video that would help you get the right reach you are looking for? Wondershare Filmora includes an exceptional experience of using the TikTok face zoom effect across its easy-to-use platform with the right set of tools.
To understand how you can successfully execute the procedure without putting yourselves in any difficulty, go through the steps as shown below:
Step 1: Download and Install Wondershare Filmora
For starters, you need to have Wondershare Filmora installed on your computer. Proceed to launch it and click on the “New Project” button to start a new project.

Step 2: Upload Media
As a new window opens up on the front, you need to click on the arrowhead icon against the “Media” tab to import the video that is to be edited across Wondershare Filmora. On adding it, drag it across the timeline successfully.

Step 3: Track the Face using Motion Tracking
To track the facial features across the video, you need to double-click the video on the timeline and proceed to open the “Motion Tracking” menu that you can find across the pane. Enable the option if necessary and set the position of the box across the “Preview” window that would track the face. Click on “Start Tracking” to successfully motion track the face.

Step 4: Add Magnify Effect to the Face
Proceed into the “Effects” tab and write “Magnify” in the search bar. Select the effect and place it across the video in the timeline. To align the effect with the face, you need to double-click the video and move into the “Motion Tracking” section again. Select the specific magnify effect in the drop-down menu and select “Start Tracking.”

Step 5: Preview and Export the Face Zoom Video
Once you are done editing the video, preview it across the window to check if any edits are required. Once confirmed, click on the “Export” button to save the video across the computer.

Conclusion
The TikTok face zoom effect can be quite impressive if used perfectly. However, since the intent is to highlight the facial parts in the video, the appropriate use of the effect can give an exceptional result. For this, the article has discussed the best methods that can be applied to understanding how to use face zoom in TikTok with ease.
TikTok videos are very popular across the youth of the world. With millions of users in support of the platform, there are many content creators that gained popularity through making small videos on TikTok. These videos are, however, incomplete without the existence of a proper effect on them. To emphasize something across a video, the zoom effect is always preferred in the market.
This article discusses the face zoom effect of TikTok and provides users with the appropriate methods that can be adapted to utilize this function to perfection. With this feature, you can make your perfect videos with an emphasis on the important elements to view on the screen.
In this article
Part 1: What is TikTok Face Zoom?
Part 2: Create A Face Zoom TikTok Video in Minutes
Part 3: Bonus | Create Face Zoom Video in Wondershare Filmora
Part 1: What is TikTok Face Zoom?
The face zoom TikTok effect is referred to the zooming effect that is covered by putting the focus on the facial presence within the video. The use of the face zoom effect on TikTok has a significant utility in highlighting the importance of the person within the video and creating an illusion that would make people watch the video all along.
Many TikTokers like using this effect in scenes where they wish to highlight something new about their face, e.g., new makeup.
Part 2: Create A Face Zoom TikTok Video in Minutes
There are some direct approaches to zooming the face across a TikTok video. To understand these methods, you should go through the provided details and understand the face zoom effect on TikTok.
Method 1: Create A Face Zoom TikTok Video in Minutes
Step 1: Before coming onto adding effects across your TikTok video, you need to record it across the social platform or have it recorded before on your smartphone under the requirements of TikTok.
Step 2: For uploading a video on TikTok, you need to continue by clicking the “+” icon and locating the “Upload” button for adding a pre-recorded video across TikTok.

Step 3: Once you have added the video for editing, navigate into the “Effects” section and find yourselves in the “Visuals” section. Let the cursor of the video be at the point where the facial features are prominent, and you wish to face zoom the video from there. With the cursor across the required place, find the “Zoom” effect in the list and hold the button until you’ve successfully added the effect across the required length of the video.

Step 4: After editing the video and adding the face zoom effect successfully, you need to click on “Save” to preview the video before you click “Next” to share it across the necessary platforms. TikTok provides you with the ability to share your videos across Instagram, Facebook, or WhatsApp.

Method 2: Do Face Zoom Easily by Finding a Face Zoom Video
Step 1: To use the TikTok face zoom effect on your video, you need to launch the platform and click on “Discover” present on the bottom of the screen. In the search bar, you need to type “Face Zoom” to locate the effect across TikTok.

Step 2: Once you have found the effect, open it on another screen. Locate the “Try this effect” button to use a similar effect across your video.

Step 3: Record the video on TikTok by clicking on the red recording button. Make changes to the recorded video and save the video on your device or share it across the social media platforms as desired.

Part 3: Bonus | Create Face Zoom Video in Wondershare Filmora
TikTok produces impressive content that can be commended for many reasons. This, however, does not make the professional video that you might be looking for. What to do if you cannot create such a professional video that would help you get the right reach you are looking for? Wondershare Filmora includes an exceptional experience of using the TikTok face zoom effect across its easy-to-use platform with the right set of tools.
To understand how you can successfully execute the procedure without putting yourselves in any difficulty, go through the steps as shown below:
Step 1: Download and Install Wondershare Filmora
For starters, you need to have Wondershare Filmora installed on your computer. Proceed to launch it and click on the “New Project” button to start a new project.

Step 2: Upload Media
As a new window opens up on the front, you need to click on the arrowhead icon against the “Media” tab to import the video that is to be edited across Wondershare Filmora. On adding it, drag it across the timeline successfully.

Step 3: Track the Face using Motion Tracking
To track the facial features across the video, you need to double-click the video on the timeline and proceed to open the “Motion Tracking” menu that you can find across the pane. Enable the option if necessary and set the position of the box across the “Preview” window that would track the face. Click on “Start Tracking” to successfully motion track the face.

Step 4: Add Magnify Effect to the Face
Proceed into the “Effects” tab and write “Magnify” in the search bar. Select the effect and place it across the video in the timeline. To align the effect with the face, you need to double-click the video and move into the “Motion Tracking” section again. Select the specific magnify effect in the drop-down menu and select “Start Tracking.”

Step 5: Preview and Export the Face Zoom Video
Once you are done editing the video, preview it across the window to check if any edits are required. Once confirmed, click on the “Export” button to save the video across the computer.

Conclusion
The TikTok face zoom effect can be quite impressive if used perfectly. However, since the intent is to highlight the facial parts in the video, the appropriate use of the effect can give an exceptional result. For this, the article has discussed the best methods that can be applied to understanding how to use face zoom in TikTok with ease.
Also read:
- 2024 Approved What Is the Best MP4 Cutter for YouTuber on Mac?
- Updated 2024 Approved Splice Video Editor Online - Get Your Videos Splice Easily
- How to Edit GoPro Videos on Mac for 2024
- New Whatever the Reason You Want to Convert an Mp4 to GIF Online, There Are a Number of Ways to Do It. Use This Guide to Learn the Best Methods. Read More Here
- Some Top Methods to Create AI Slow Motion Videos for 2024
- In 2024, Best Free LUTs to Use
- Updated In 2024, Finding LUTs Made by Danny Gevirtz
- Quickest Guide | Zoom In and Out on Snapchat
- Create a Stunning Light Sweep Effect in Filmora. Use Simple and Easy Steps to Export a High-Quality Video that Will Impress Even Pro Video Editors for 2024
- Updated How to Color Grading in Final Cut Pro for 2024
- New In 2024, How to Loop Video in Canva
- New In 2024, Easy Steps to Make Glitch Effect with Filmora
- How to Create Vintage Film Effect 1990S for 2024
- Updated 15 Best LUTS to Buy
- New How to Loop a Video on Android
- Updated Zoom In and Out on Snapchat for 2024
- What Is the Best FPS for YouTube Videos for 2024
- Updated Looking For The Best Slow Motion Effect in Premiere Pro for 2024
- Updated Why Your Transparent GIF Is Hard to Remove
- How to Make a TikTok Loop Video
- How to Merge FLV Files Windows, Mac,Android, iPhone & Online for 2024
- 6 Best Text to Speech Generators for YouTube Videos Windows, Mac, Android, iPhone & Online for 2024
- How To Unlock SIM Cards Of Nokia C12 Pro Without PUK Codes
- How to Unlock Nokia 150 (2023) Without Password?
- In 2024, How to Fake GPS on Android without Mock Location For your Vivo V29 Pro | Dr.fone
- How to Fix It Vivo Y27 5G Wont Turn On | Dr.fone
- What Legendaries Are In Pokemon Platinum On Nokia C110? | Dr.fone
- How to Fix Unfortunately, Contacts Has Stopped Error on Honor 100 Pro | Dr.fone
- What is Geo-Blocking and How to Bypass it On Realme Narzo N55? | Dr.fone
- Hassle-Free Ways to Remove FRP Lock from Samsung Galaxy M14 4G Phones with/without a PC
- All Things You Need to Know about Wipe Data/Factory Reset For Oppo A59 5G | Dr.fone
- In 2024, Is Fake GPS Location Spoofer a Good Choice On Lenovo ThinkPhone? | Dr.fone
- Gmail Not Working on Itel P40 7 Common Problems & Fixes | Dr.fone
- How To Install the Latest iOS/iPadOS Beta Version on Apple iPhone 12 Pro Max? | Dr.fone
- Rootjunky APK To Bypass Google FRP Lock For Samsung Galaxy S24+
- In 2024, Tips and Tricks for Setting Up your Poco C50 Phone Pattern Lock
- In 2024, Pattern Locks Are Unsafe Secure Your Xiaomi Redmi Note 12 Pro+ 5G Phone Now with These Tips
- 5 Ways to Reset Itel A70 Without Volume Buttons | Dr.fone
- The Best iSpoofer Alternative to Try On Realme Narzo N53 | Dr.fone
- In 2024, How to Change Lock Screen Wallpaper on Poco X5
- In 2024, Full Guide to Catch 100 IV Pokémon Using a Map On Realme 12+ 5G | Dr.fone
- Top Apps and Online Tools To Track Vivo S17 Phone With/Without IMEI Number
- How to Change Motorola Moto G23 Location on Skout | Dr.fone
- Title: How To Add Motion Blur On CapCut? (IPhone & Android)
- Author: Chloe
- Created at : 2024-05-20 03:37:27
- Updated at : 2024-05-21 03:37:27
- Link: https://ai-editing-video.techidaily.com/how-to-add-motion-blur-on-capcut-iphone-and-android/
- License: This work is licensed under CC BY-NC-SA 4.0.


