:max_bytes(150000):strip_icc():format(webp)/podcasts-safeforkids-5b2f3dd4eb97de0036d9f87b.jpg)
How to Add Selective Color Effect to Your Videos

How to Add Selective Color Effect to Your Videos
Selective color is an effect that lets you desaturate all the colors in a photo or video while preserving one or more colors of your choice. It is done by isolating a specific color of your choice in the frame while all other colors turn into black and white, just like this.
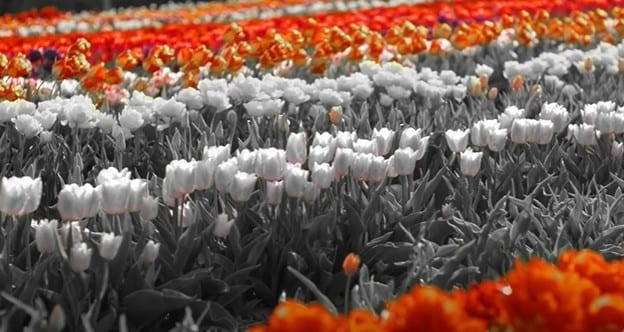
By using this effect, we can draw viewers’ attention to a specific point in the clip. If you want your video do the same, Filmora can be a good helper. Alright, we’ll be creating selective color effects in two examples. Let’s get started.
Tutorial 1 on making color isolation by selective color effect
In this first example, we are going to use stock footage showing a subject on a bike.
To add a selective color effect, download Wondershare Filmora on your PC or Mac. Now follow the steps as explained below to add this effect and isolate the color of your choice.
Free Download For Win 7 or later(64-bit)
Free Download For macOS 10.14 or later
Step1 Launch Wondershare Filmora and drag and drop your clip to the timeline.
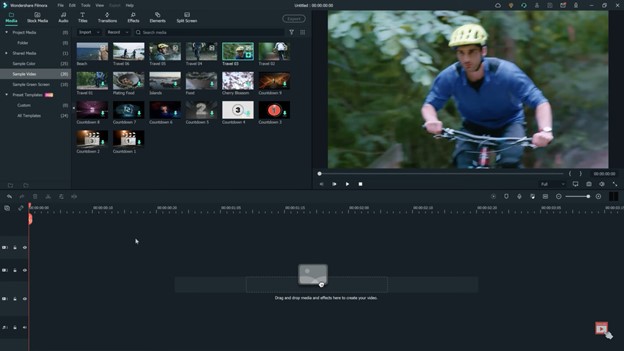
Step2 Go to effects and then click “NewBlue FX” option and select Newblue filters.
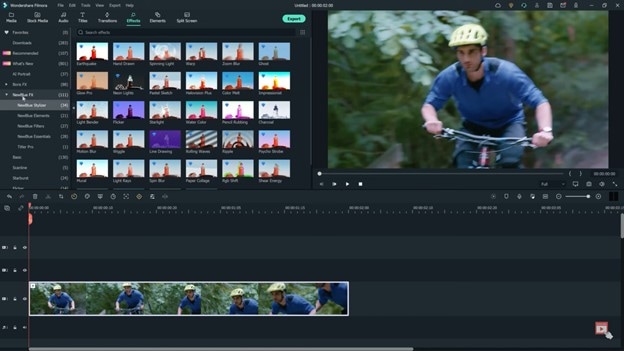
Step3 Find the Selective Color Effect and drag it onto the clip. The effect will be instantly applied.
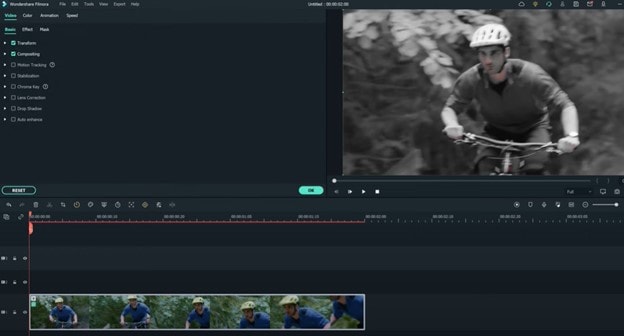
Step4 Next, double-click on the clip and check out the effects menu at the top of the screen.
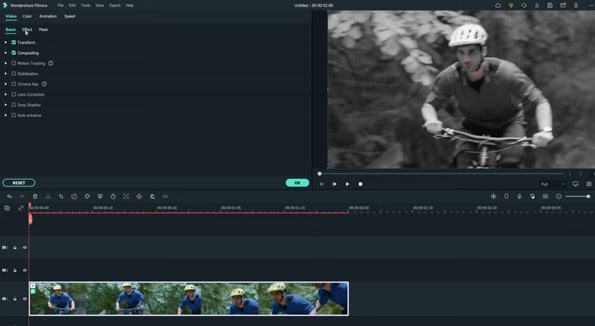
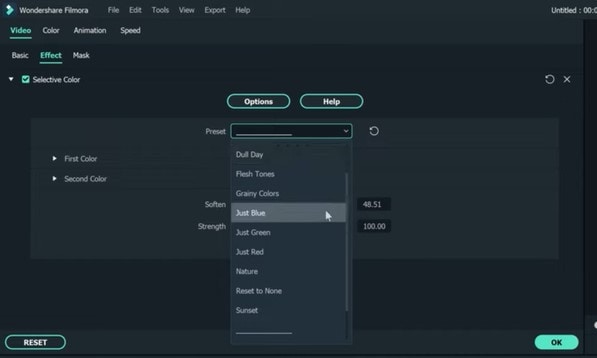
Step5 Open the preset drop-down menu. There will be a lot of presets with different colors. Select the preset you want to use. In this scenario, let us select Just Blue.
Step6 If you see a blue tint at a place or object which you want to be white and black, click on the first color.
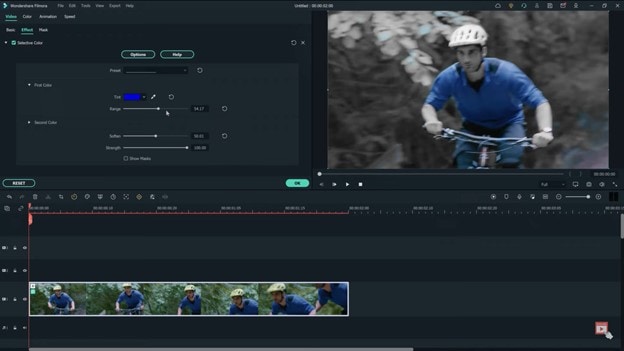
Step7 Now adjust the range slider to decrease the number of unwanted tints.
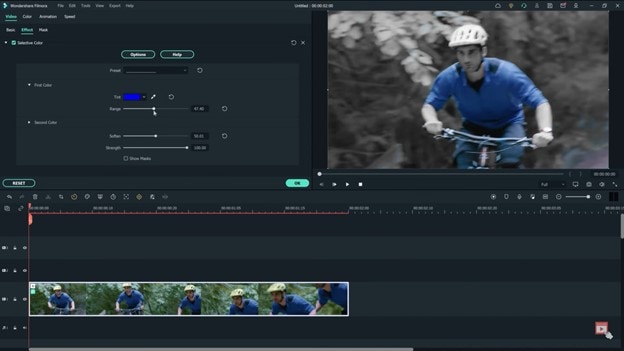
Step8 To blur the edges of the effects, turn up the softened slider and remove any unwanted tint previously remaining.
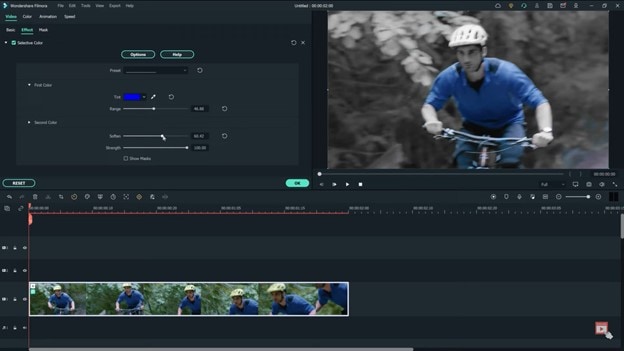
In this way, you can add a selective color effect to your video clips and isolate the color of your choice.
Tutorial 2 on make color isolation using eyedropper tool
You might ask how do we use the eyedropper tool here. It can sample colors from anywhere in a video or an image and add them to your swatch panel. The steps to use the eyedropper tool to add a selective color to your video are below.
Step1 As same as the first one, launching Wondershare Filmora is the first priority. And drag your clip to the timeline.
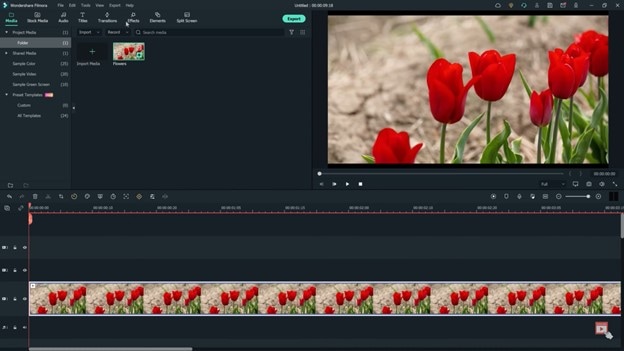
Step2 Go to effects at the top, and find Newblue effects, and click on the Newblue filters.
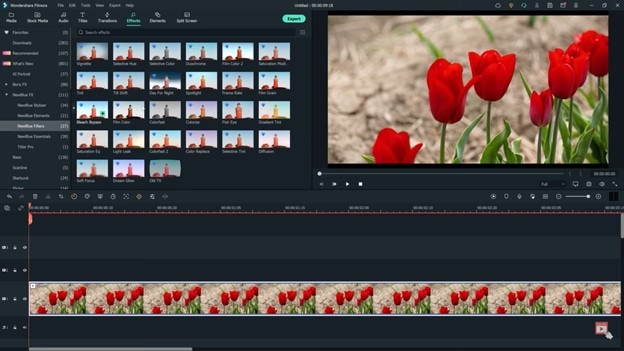
Step3 Find the selective color effect and drag it to the clip.
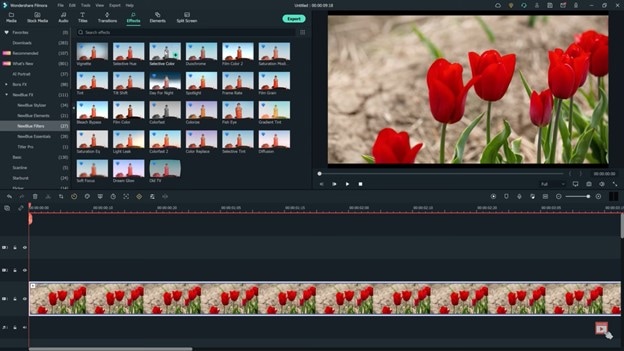
Step4 Double-click on the clip and visit the effects menu at the top of the screen.
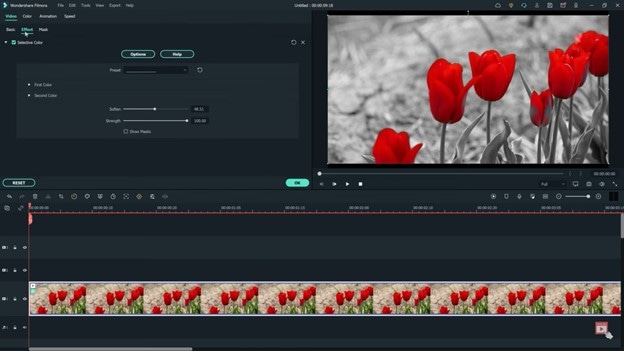
Step5 Click on the ‘first color’ and select the eye dropper tool. This will allow us to select the red flower in the preview window. You can also click different parts of the image to get the color that we want.
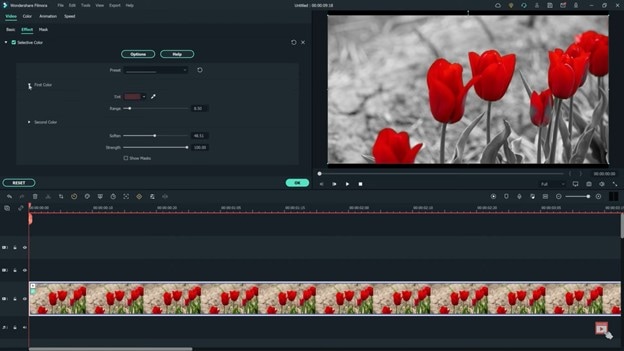
Step6 Next, try selecting a second color to isolate within our shot. In this example, we are going to make the stems on the flowers stand out as well. Select second color and go to the tint section. And find a color that is close to the second color, which will be green in this case.
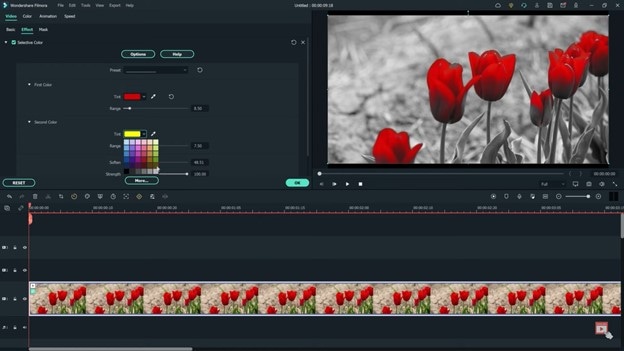
Step7 Pick the eyedropper tool and click it on the green part of the clip. Then adjust the range slider as needed.
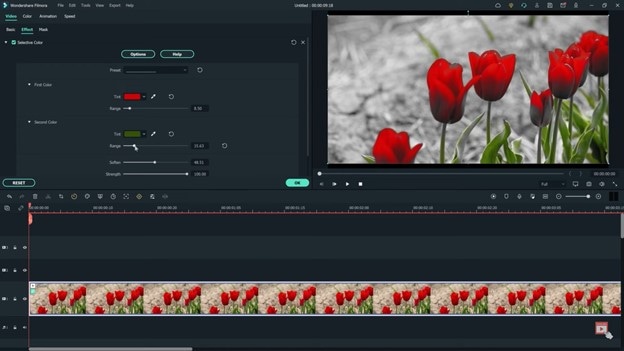
Alright, let’s watch back the video to see how both colors are now isolated.

Follow all the steps in the correct order. This is how you can use NewBlue effects for color isolation using Wondershare Filmora. The color isolation using the selective color effect defines the point of interest in the clip for the viewers.
Free Download For macOS 10.14 or later
Step1 Launch Wondershare Filmora and drag and drop your clip to the timeline.

Step2 Go to effects and then click “NewBlue FX” option and select Newblue filters.

Step3 Find the Selective Color Effect and drag it onto the clip. The effect will be instantly applied.

Step4 Next, double-click on the clip and check out the effects menu at the top of the screen.

Step5 Open the preset drop-down menu. There will be a lot of presets with different colors. Select the preset you want to use. In this scenario, let us select Just Blue.

Step6 If you see a blue tint at a place or object which you want to be white and black, click on the first color.

Step7 Now adjust the range slider to decrease the number of unwanted tints.

Step8 To blur the edges of the effects, turn up the softened slider and remove any unwanted tint previously remaining.

In this way, you can add a selective color effect to your video clips and isolate the color of your choice.
Tutorial 2 on make color isolation using eyedropper tool
You might ask how do we use the eyedropper tool here. It can sample colors from anywhere in a video or an image and add them to your swatch panel. The steps to use the eyedropper tool to add a selective color to your video are below.
Step1 As same as the first one, launching Wondershare Filmora is the first priority. And drag your clip to the timeline.

Step2 Go to effects at the top, and find Newblue effects, and click on the Newblue filters.

Step3 Find the selective color effect and drag it to the clip.

Step4 Double-click on the clip and visit the effects menu at the top of the screen.

Step5 Click on the ‘first color’ and select the eye dropper tool. This will allow us to select the red flower in the preview window. You can also click different parts of the image to get the color that we want.

Step6 Next, try selecting a second color to isolate within our shot. In this example, we are going to make the stems on the flowers stand out as well. Select second color and go to the tint section. And find a color that is close to the second color, which will be green in this case.

Step7 Pick the eyedropper tool and click it on the green part of the clip. Then adjust the range slider as needed.

Alright, let’s watch back the video to see how both colors are now isolated.

Follow all the steps in the correct order. This is how you can use NewBlue effects for color isolation using Wondershare Filmora. The color isolation using the selective color effect defines the point of interest in the clip for the viewers.
Top Way to Freeze-Frame in Final Cut Pro
Best Way to Freeze Frame in Final Cut Pro
An easy yet powerful editor
Numerous effects to choose from
Detailed tutorials provided by the official channel
The primary purpose of freezing frames is to hold a particular frame in clips in one place, temporarily to stop the action onscreen. You can create the Freeze-Frame clip from any video clip in the browser or the timeline. If a Freeze-Frame clip is created from the browser, it gets affixed to the major storyline at the Playhead location as a connecting clip.

Now, Final Cut Pro is a fantastic video editor available for macOS. It is an entire video editing tool perfect for basic video editing. In addition, it can be valuable to Freeze-Frames in a video. This article will explain why to Freeze-Frame in FCP and its alternatives. We will also introduce how to add a Freeze-Frame Final Cut Pro video editor that can make your videos more appealing.
In this article
01 [Why Do You Need to Freeze-Frame](#Part 1)
02 [How to Freeze-Frames in Final Cut Pro?](#Part 2)
03 [3 Alternative to Freeze-Frames and Why](#Part 3)
Part 1 Why Do You Need to Freeze-Frame
Freeze-Frames is an effective and quick way to begin a drama session when you want to edit a movie. Besides, users of any age, ranging from children to adults, can easily handle it. Participants can use it to create an image using their bodies with no movement, and Freeze-Frames can also be made by individuals, a whole group, or a small group.
Another perfect way to describe a Freeze-Frame is a “still image.” It is a way of pressing the pause button on the remote control and making a statue or taking a photo. The image creation can be quick without discussion, planned, or rehearsed.
Here are some reasons you need a Freeze-Frame app:
● They are beneficial as a quick way of communicating ideas or telling a story.
● In addition, Freeze-Frame can represent objects or people and even abstract concepts like atmosphere or emotions.
● Freeze-Frames can help shyer performers to gain confidence, as there are no lines to learn.

Part 2 How to Freeze-Frames in Final Cut Pro?
FCPX Freeze-Frame clips can temporarily hold a particular frame in place and stop the action onscreen. The Freeze-Frame, as its phrase, freezes or contains the specific frame you want to feature or focus on in a video.
You have to pick or select the frame you want to freeze and follow the steps in the article to freeze the frame of your choice.
In addition, if you do not want to create a separate freeze-frame clip, make a hold segment to stop the action for part of a clip temporarily. This action offers more precise control, especially when a variable speed effect is created.
You can Freeze-Frame on the fly by navigating to a specific frame in a clip or during playback. Thus, A Freeze-Frame clip will preserve any attributes applied to the source clip, such as settings and effects.
Here is how to Freeze-Frame in Final Cut Pro effectively.
Step 1: In the browser or in the timeline in Final Cut Pro, do any one of the following:
● Begin playback of the clip and pause
● Move the Skimmer or Playhead to the portion you wish to freeze.

Step 2: Choose Edit > Add Freeze-Frame (or press Option-F).
Note: How Freeze-Frame gets added to the project depends on whether it got created from the browser or the timeline:
● If the Freeze-Frame was from a browser clip, a new freeze-frame clip gets attached as a connected clip at the Playhead site in the timeline.
● Alternatively, if the freeze-frame was from the timeline, a new freeze-frame clip gets inserted at the Playhead location or the Skimmer in the timeline.

Part 3 Alternative to Freeze-Frames and Why
There are a lot of alternatives to Freeze-Frame in Final-Cut Pro all over the Internet. However, you must be careful while choosing when you want to add customization to your videos.
Additionally, if you are looking for the best editor to add a Freeze-Frame effect to your video, we recommend trying Filmora. Wondershare Filmora Video Editor for Mac and Windows devices comes with tons of Freeze-Frame impacts that you can use to spice-up your video.
For Win 7 or later (64-bit)
For macOS 10.12 or later
Some of the alternatives to adding a Freeze-Frame on Final Cut Pro include:
01AZ Screen Recorder
This is a free android APK alternative to Freeze-Frames in FCP. It is a great application available for anyone who needs to have the ability to record what is happening on their Android device’s screen. One great benefit of using this application is that your Android device does need to be rooted to experience the best the app has to offer.
A blinking red dot will be noticed in the screen’s right bottom corner when users begin to record with this application. This is an indicator that the recording is in progress. In addition, users can pause the recording as per their requirements by just tapping the screen. If you are not comfortable with the location of the blinking red dot, hold and move it to anywhere on the screen that can better suit your needs. Thus, this is an excellent alternative to Final Cut Pro X Freeze-Frame with the exceptional video quality.
Features
● Simple, clean, and easy to use interface
● The application settings options allow users to adjust things like the video output quality and how the clip recording interacts with the screen while the application is running.
● The four icons located in the middle of the application’s home screen clearly outline their options when the application is first open. The four options include adjusting the application’s settings, accessing previously recorded video files, starting recording, and the option to exit.
Pros:
● It has options to increase video quality.
● No watermark
● No time limits
● No frame loss
Cons:
● No option to live stream.

02AndroVid
This Android application allows the creation of new videos by cutting and combining two or more video effects on your phone. Additionally, this application is typically different from the others that let you watch videos or share them with other sites. Bits and pieces can be cut from two or more videos and combined to make a new video. In addition, it is fun to use if you want to create a new music video that features the same song but different steps made when various people are being used.
Users can easily cut and paste with simple instructions, and the application also lets you work with any video stored on your phone.
Features
● Add subtitles to the videos that you create
● Create titles in any color or font that is available with the application
● making the videos from the clips a little more personal and customized before sharing.
Pros
● Allows multiple videos editing
● Allows the addition of a subtitle
● Users can reverse video content
Cons
● You cannot save a lot of work automatically
● It takes time to get the video adjusted

03Action Director
This Android editor also serves as an alternative to Final Cut Pro X Freeze-Frame. This video editing tool allows users to create quality compositions in no time at all. Additionally, you can change the image’s color, cut video clips, add a soundtrack, or insert text with this Video Editor using effortless control. With just a few finger taps on the screen, you can customize any video. This excellent video editing tool lets you create and share your videos quickly and easily.
Features
● Record videos with this Android app.
● Edit video and apply effects from its exclusive list.
● Get more than 12 transitions for your videos
● The useful movie editing guide helps you create videos with action effects and edits.
● Share your videos with your friends.
Pros
● It is fast and easy to use
● It is elementary to control
● Has video sharing option to share videos on another website
Cons
● Requires premium version to export video in high quality
● Ending Thoughts →
● About Final Cut Pro X Freeze-Frame and explained to the user how to use Freeze-Frame in FCP.
● Additionally, the article listed and presented three alternatives to Freeze-Frame and
● Recommended Filmora as the best editing software to use Freeze-Frame effects due to its many editing options.
The primary purpose of freezing frames is to hold a particular frame in clips in one place, temporarily to stop the action onscreen. You can create the Freeze-Frame clip from any video clip in the browser or the timeline. If a Freeze-Frame clip is created from the browser, it gets affixed to the major storyline at the Playhead location as a connecting clip.

Now, Final Cut Pro is a fantastic video editor available for macOS. It is an entire video editing tool perfect for basic video editing. In addition, it can be valuable to Freeze-Frames in a video. This article will explain why to Freeze-Frame in FCP and its alternatives. We will also introduce how to add a Freeze-Frame Final Cut Pro video editor that can make your videos more appealing.
In this article
01 [Why Do You Need to Freeze-Frame](#Part 1)
02 [How to Freeze-Frames in Final Cut Pro?](#Part 2)
03 [3 Alternative to Freeze-Frames and Why](#Part 3)
Part 1 Why Do You Need to Freeze-Frame
Freeze-Frames is an effective and quick way to begin a drama session when you want to edit a movie. Besides, users of any age, ranging from children to adults, can easily handle it. Participants can use it to create an image using their bodies with no movement, and Freeze-Frames can also be made by individuals, a whole group, or a small group.
Another perfect way to describe a Freeze-Frame is a “still image.” It is a way of pressing the pause button on the remote control and making a statue or taking a photo. The image creation can be quick without discussion, planned, or rehearsed.
Here are some reasons you need a Freeze-Frame app:
● They are beneficial as a quick way of communicating ideas or telling a story.
● In addition, Freeze-Frame can represent objects or people and even abstract concepts like atmosphere or emotions.
● Freeze-Frames can help shyer performers to gain confidence, as there are no lines to learn.

Part 2 How to Freeze-Frames in Final Cut Pro?
FCPX Freeze-Frame clips can temporarily hold a particular frame in place and stop the action onscreen. The Freeze-Frame, as its phrase, freezes or contains the specific frame you want to feature or focus on in a video.
You have to pick or select the frame you want to freeze and follow the steps in the article to freeze the frame of your choice.
In addition, if you do not want to create a separate freeze-frame clip, make a hold segment to stop the action for part of a clip temporarily. This action offers more precise control, especially when a variable speed effect is created.
You can Freeze-Frame on the fly by navigating to a specific frame in a clip or during playback. Thus, A Freeze-Frame clip will preserve any attributes applied to the source clip, such as settings and effects.
Here is how to Freeze-Frame in Final Cut Pro effectively.
Step 1: In the browser or in the timeline in Final Cut Pro, do any one of the following:
● Begin playback of the clip and pause
● Move the Skimmer or Playhead to the portion you wish to freeze.

Step 2: Choose Edit > Add Freeze-Frame (or press Option-F).
Note: How Freeze-Frame gets added to the project depends on whether it got created from the browser or the timeline:
● If the Freeze-Frame was from a browser clip, a new freeze-frame clip gets attached as a connected clip at the Playhead site in the timeline.
● Alternatively, if the freeze-frame was from the timeline, a new freeze-frame clip gets inserted at the Playhead location or the Skimmer in the timeline.

Part 3 Alternative to Freeze-Frames and Why
There are a lot of alternatives to Freeze-Frame in Final-Cut Pro all over the Internet. However, you must be careful while choosing when you want to add customization to your videos.
Additionally, if you are looking for the best editor to add a Freeze-Frame effect to your video, we recommend trying Filmora. Wondershare Filmora Video Editor for Mac and Windows devices comes with tons of Freeze-Frame impacts that you can use to spice-up your video.
For Win 7 or later (64-bit)
For macOS 10.12 or later
Some of the alternatives to adding a Freeze-Frame on Final Cut Pro include:
01AZ Screen Recorder
This is a free android APK alternative to Freeze-Frames in FCP. It is a great application available for anyone who needs to have the ability to record what is happening on their Android device’s screen. One great benefit of using this application is that your Android device does need to be rooted to experience the best the app has to offer.
A blinking red dot will be noticed in the screen’s right bottom corner when users begin to record with this application. This is an indicator that the recording is in progress. In addition, users can pause the recording as per their requirements by just tapping the screen. If you are not comfortable with the location of the blinking red dot, hold and move it to anywhere on the screen that can better suit your needs. Thus, this is an excellent alternative to Final Cut Pro X Freeze-Frame with the exceptional video quality.
Features
● Simple, clean, and easy to use interface
● The application settings options allow users to adjust things like the video output quality and how the clip recording interacts with the screen while the application is running.
● The four icons located in the middle of the application’s home screen clearly outline their options when the application is first open. The four options include adjusting the application’s settings, accessing previously recorded video files, starting recording, and the option to exit.
Pros:
● It has options to increase video quality.
● No watermark
● No time limits
● No frame loss
Cons:
● No option to live stream.

02AndroVid
This Android application allows the creation of new videos by cutting and combining two or more video effects on your phone. Additionally, this application is typically different from the others that let you watch videos or share them with other sites. Bits and pieces can be cut from two or more videos and combined to make a new video. In addition, it is fun to use if you want to create a new music video that features the same song but different steps made when various people are being used.
Users can easily cut and paste with simple instructions, and the application also lets you work with any video stored on your phone.
Features
● Add subtitles to the videos that you create
● Create titles in any color or font that is available with the application
● making the videos from the clips a little more personal and customized before sharing.
Pros
● Allows multiple videos editing
● Allows the addition of a subtitle
● Users can reverse video content
Cons
● You cannot save a lot of work automatically
● It takes time to get the video adjusted

03Action Director
This Android editor also serves as an alternative to Final Cut Pro X Freeze-Frame. This video editing tool allows users to create quality compositions in no time at all. Additionally, you can change the image’s color, cut video clips, add a soundtrack, or insert text with this Video Editor using effortless control. With just a few finger taps on the screen, you can customize any video. This excellent video editing tool lets you create and share your videos quickly and easily.
Features
● Record videos with this Android app.
● Edit video and apply effects from its exclusive list.
● Get more than 12 transitions for your videos
● The useful movie editing guide helps you create videos with action effects and edits.
● Share your videos with your friends.
Pros
● It is fast and easy to use
● It is elementary to control
● Has video sharing option to share videos on another website
Cons
● Requires premium version to export video in high quality
● Ending Thoughts →
● About Final Cut Pro X Freeze-Frame and explained to the user how to use Freeze-Frame in FCP.
● Additionally, the article listed and presented three alternatives to Freeze-Frame and
● Recommended Filmora as the best editing software to use Freeze-Frame effects due to its many editing options.
The primary purpose of freezing frames is to hold a particular frame in clips in one place, temporarily to stop the action onscreen. You can create the Freeze-Frame clip from any video clip in the browser or the timeline. If a Freeze-Frame clip is created from the browser, it gets affixed to the major storyline at the Playhead location as a connecting clip.

Now, Final Cut Pro is a fantastic video editor available for macOS. It is an entire video editing tool perfect for basic video editing. In addition, it can be valuable to Freeze-Frames in a video. This article will explain why to Freeze-Frame in FCP and its alternatives. We will also introduce how to add a Freeze-Frame Final Cut Pro video editor that can make your videos more appealing.
In this article
01 [Why Do You Need to Freeze-Frame](#Part 1)
02 [How to Freeze-Frames in Final Cut Pro?](#Part 2)
03 [3 Alternative to Freeze-Frames and Why](#Part 3)
Part 1 Why Do You Need to Freeze-Frame
Freeze-Frames is an effective and quick way to begin a drama session when you want to edit a movie. Besides, users of any age, ranging from children to adults, can easily handle it. Participants can use it to create an image using their bodies with no movement, and Freeze-Frames can also be made by individuals, a whole group, or a small group.
Another perfect way to describe a Freeze-Frame is a “still image.” It is a way of pressing the pause button on the remote control and making a statue or taking a photo. The image creation can be quick without discussion, planned, or rehearsed.
Here are some reasons you need a Freeze-Frame app:
● They are beneficial as a quick way of communicating ideas or telling a story.
● In addition, Freeze-Frame can represent objects or people and even abstract concepts like atmosphere or emotions.
● Freeze-Frames can help shyer performers to gain confidence, as there are no lines to learn.

Part 2 How to Freeze-Frames in Final Cut Pro?
FCPX Freeze-Frame clips can temporarily hold a particular frame in place and stop the action onscreen. The Freeze-Frame, as its phrase, freezes or contains the specific frame you want to feature or focus on in a video.
You have to pick or select the frame you want to freeze and follow the steps in the article to freeze the frame of your choice.
In addition, if you do not want to create a separate freeze-frame clip, make a hold segment to stop the action for part of a clip temporarily. This action offers more precise control, especially when a variable speed effect is created.
You can Freeze-Frame on the fly by navigating to a specific frame in a clip or during playback. Thus, A Freeze-Frame clip will preserve any attributes applied to the source clip, such as settings and effects.
Here is how to Freeze-Frame in Final Cut Pro effectively.
Step 1: In the browser or in the timeline in Final Cut Pro, do any one of the following:
● Begin playback of the clip and pause
● Move the Skimmer or Playhead to the portion you wish to freeze.

Step 2: Choose Edit > Add Freeze-Frame (or press Option-F).
Note: How Freeze-Frame gets added to the project depends on whether it got created from the browser or the timeline:
● If the Freeze-Frame was from a browser clip, a new freeze-frame clip gets attached as a connected clip at the Playhead site in the timeline.
● Alternatively, if the freeze-frame was from the timeline, a new freeze-frame clip gets inserted at the Playhead location or the Skimmer in the timeline.

Part 3 Alternative to Freeze-Frames and Why
There are a lot of alternatives to Freeze-Frame in Final-Cut Pro all over the Internet. However, you must be careful while choosing when you want to add customization to your videos.
Additionally, if you are looking for the best editor to add a Freeze-Frame effect to your video, we recommend trying Filmora. Wondershare Filmora Video Editor for Mac and Windows devices comes with tons of Freeze-Frame impacts that you can use to spice-up your video.
For Win 7 or later (64-bit)
For macOS 10.12 or later
Some of the alternatives to adding a Freeze-Frame on Final Cut Pro include:
01AZ Screen Recorder
This is a free android APK alternative to Freeze-Frames in FCP. It is a great application available for anyone who needs to have the ability to record what is happening on their Android device’s screen. One great benefit of using this application is that your Android device does need to be rooted to experience the best the app has to offer.
A blinking red dot will be noticed in the screen’s right bottom corner when users begin to record with this application. This is an indicator that the recording is in progress. In addition, users can pause the recording as per their requirements by just tapping the screen. If you are not comfortable with the location of the blinking red dot, hold and move it to anywhere on the screen that can better suit your needs. Thus, this is an excellent alternative to Final Cut Pro X Freeze-Frame with the exceptional video quality.
Features
● Simple, clean, and easy to use interface
● The application settings options allow users to adjust things like the video output quality and how the clip recording interacts with the screen while the application is running.
● The four icons located in the middle of the application’s home screen clearly outline their options when the application is first open. The four options include adjusting the application’s settings, accessing previously recorded video files, starting recording, and the option to exit.
Pros:
● It has options to increase video quality.
● No watermark
● No time limits
● No frame loss
Cons:
● No option to live stream.

02AndroVid
This Android application allows the creation of new videos by cutting and combining two or more video effects on your phone. Additionally, this application is typically different from the others that let you watch videos or share them with other sites. Bits and pieces can be cut from two or more videos and combined to make a new video. In addition, it is fun to use if you want to create a new music video that features the same song but different steps made when various people are being used.
Users can easily cut and paste with simple instructions, and the application also lets you work with any video stored on your phone.
Features
● Add subtitles to the videos that you create
● Create titles in any color or font that is available with the application
● making the videos from the clips a little more personal and customized before sharing.
Pros
● Allows multiple videos editing
● Allows the addition of a subtitle
● Users can reverse video content
Cons
● You cannot save a lot of work automatically
● It takes time to get the video adjusted

03Action Director
This Android editor also serves as an alternative to Final Cut Pro X Freeze-Frame. This video editing tool allows users to create quality compositions in no time at all. Additionally, you can change the image’s color, cut video clips, add a soundtrack, or insert text with this Video Editor using effortless control. With just a few finger taps on the screen, you can customize any video. This excellent video editing tool lets you create and share your videos quickly and easily.
Features
● Record videos with this Android app.
● Edit video and apply effects from its exclusive list.
● Get more than 12 transitions for your videos
● The useful movie editing guide helps you create videos with action effects and edits.
● Share your videos with your friends.
Pros
● It is fast and easy to use
● It is elementary to control
● Has video sharing option to share videos on another website
Cons
● Requires premium version to export video in high quality
● Ending Thoughts →
● About Final Cut Pro X Freeze-Frame and explained to the user how to use Freeze-Frame in FCP.
● Additionally, the article listed and presented three alternatives to Freeze-Frame and
● Recommended Filmora as the best editing software to use Freeze-Frame effects due to its many editing options.
The primary purpose of freezing frames is to hold a particular frame in clips in one place, temporarily to stop the action onscreen. You can create the Freeze-Frame clip from any video clip in the browser or the timeline. If a Freeze-Frame clip is created from the browser, it gets affixed to the major storyline at the Playhead location as a connecting clip.

Now, Final Cut Pro is a fantastic video editor available for macOS. It is an entire video editing tool perfect for basic video editing. In addition, it can be valuable to Freeze-Frames in a video. This article will explain why to Freeze-Frame in FCP and its alternatives. We will also introduce how to add a Freeze-Frame Final Cut Pro video editor that can make your videos more appealing.
In this article
01 [Why Do You Need to Freeze-Frame](#Part 1)
02 [How to Freeze-Frames in Final Cut Pro?](#Part 2)
03 [3 Alternative to Freeze-Frames and Why](#Part 3)
Part 1 Why Do You Need to Freeze-Frame
Freeze-Frames is an effective and quick way to begin a drama session when you want to edit a movie. Besides, users of any age, ranging from children to adults, can easily handle it. Participants can use it to create an image using their bodies with no movement, and Freeze-Frames can also be made by individuals, a whole group, or a small group.
Another perfect way to describe a Freeze-Frame is a “still image.” It is a way of pressing the pause button on the remote control and making a statue or taking a photo. The image creation can be quick without discussion, planned, or rehearsed.
Here are some reasons you need a Freeze-Frame app:
● They are beneficial as a quick way of communicating ideas or telling a story.
● In addition, Freeze-Frame can represent objects or people and even abstract concepts like atmosphere or emotions.
● Freeze-Frames can help shyer performers to gain confidence, as there are no lines to learn.

Part 2 How to Freeze-Frames in Final Cut Pro?
FCPX Freeze-Frame clips can temporarily hold a particular frame in place and stop the action onscreen. The Freeze-Frame, as its phrase, freezes or contains the specific frame you want to feature or focus on in a video.
You have to pick or select the frame you want to freeze and follow the steps in the article to freeze the frame of your choice.
In addition, if you do not want to create a separate freeze-frame clip, make a hold segment to stop the action for part of a clip temporarily. This action offers more precise control, especially when a variable speed effect is created.
You can Freeze-Frame on the fly by navigating to a specific frame in a clip or during playback. Thus, A Freeze-Frame clip will preserve any attributes applied to the source clip, such as settings and effects.
Here is how to Freeze-Frame in Final Cut Pro effectively.
Step 1: In the browser or in the timeline in Final Cut Pro, do any one of the following:
● Begin playback of the clip and pause
● Move the Skimmer or Playhead to the portion you wish to freeze.

Step 2: Choose Edit > Add Freeze-Frame (or press Option-F).
Note: How Freeze-Frame gets added to the project depends on whether it got created from the browser or the timeline:
● If the Freeze-Frame was from a browser clip, a new freeze-frame clip gets attached as a connected clip at the Playhead site in the timeline.
● Alternatively, if the freeze-frame was from the timeline, a new freeze-frame clip gets inserted at the Playhead location or the Skimmer in the timeline.

Part 3 Alternative to Freeze-Frames and Why
There are a lot of alternatives to Freeze-Frame in Final-Cut Pro all over the Internet. However, you must be careful while choosing when you want to add customization to your videos.
Additionally, if you are looking for the best editor to add a Freeze-Frame effect to your video, we recommend trying Filmora. Wondershare Filmora Video Editor for Mac and Windows devices comes with tons of Freeze-Frame impacts that you can use to spice-up your video.
For Win 7 or later (64-bit)
For macOS 10.12 or later
Some of the alternatives to adding a Freeze-Frame on Final Cut Pro include:
01AZ Screen Recorder
This is a free android APK alternative to Freeze-Frames in FCP. It is a great application available for anyone who needs to have the ability to record what is happening on their Android device’s screen. One great benefit of using this application is that your Android device does need to be rooted to experience the best the app has to offer.
A blinking red dot will be noticed in the screen’s right bottom corner when users begin to record with this application. This is an indicator that the recording is in progress. In addition, users can pause the recording as per their requirements by just tapping the screen. If you are not comfortable with the location of the blinking red dot, hold and move it to anywhere on the screen that can better suit your needs. Thus, this is an excellent alternative to Final Cut Pro X Freeze-Frame with the exceptional video quality.
Features
● Simple, clean, and easy to use interface
● The application settings options allow users to adjust things like the video output quality and how the clip recording interacts with the screen while the application is running.
● The four icons located in the middle of the application’s home screen clearly outline their options when the application is first open. The four options include adjusting the application’s settings, accessing previously recorded video files, starting recording, and the option to exit.
Pros:
● It has options to increase video quality.
● No watermark
● No time limits
● No frame loss
Cons:
● No option to live stream.

02AndroVid
This Android application allows the creation of new videos by cutting and combining two or more video effects on your phone. Additionally, this application is typically different from the others that let you watch videos or share them with other sites. Bits and pieces can be cut from two or more videos and combined to make a new video. In addition, it is fun to use if you want to create a new music video that features the same song but different steps made when various people are being used.
Users can easily cut and paste with simple instructions, and the application also lets you work with any video stored on your phone.
Features
● Add subtitles to the videos that you create
● Create titles in any color or font that is available with the application
● making the videos from the clips a little more personal and customized before sharing.
Pros
● Allows multiple videos editing
● Allows the addition of a subtitle
● Users can reverse video content
Cons
● You cannot save a lot of work automatically
● It takes time to get the video adjusted

03Action Director
This Android editor also serves as an alternative to Final Cut Pro X Freeze-Frame. This video editing tool allows users to create quality compositions in no time at all. Additionally, you can change the image’s color, cut video clips, add a soundtrack, or insert text with this Video Editor using effortless control. With just a few finger taps on the screen, you can customize any video. This excellent video editing tool lets you create and share your videos quickly and easily.
Features
● Record videos with this Android app.
● Edit video and apply effects from its exclusive list.
● Get more than 12 transitions for your videos
● The useful movie editing guide helps you create videos with action effects and edits.
● Share your videos with your friends.
Pros
● It is fast and easy to use
● It is elementary to control
● Has video sharing option to share videos on another website
Cons
● Requires premium version to export video in high quality
● Ending Thoughts →
● About Final Cut Pro X Freeze-Frame and explained to the user how to use Freeze-Frame in FCP.
● Additionally, the article listed and presented three alternatives to Freeze-Frame and
● Recommended Filmora as the best editing software to use Freeze-Frame effects due to its many editing options.
The Ultimate Guide to Make a Text Collage
The Ultimate Guide to Make a Text Collage
An easy yet powerful editor
Numerous effects to choose from
Detailed tutorials provided by the official channel
Collages are everywhere, be it online sites, social media platforms, magazines, birthday wishes, newspapers, and much tools, more. Organizing your images in some random or specific shapes to offer a visually enhanced experience is the major purpose of the collage. Besides adding images, there are several other elements and factors that combine to make up an eye-catchy collage and a key one is the “text”.
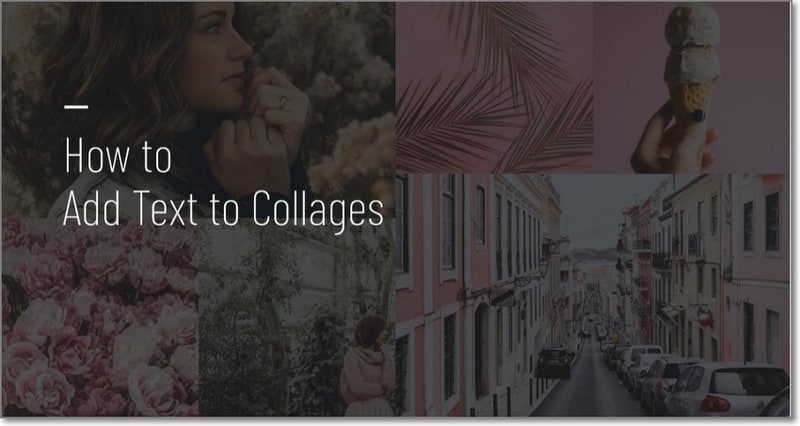
So, if you too are considering to create a photo collage with text, just stick to us and keep reading.
In this article
01 [Why Create a Text Collage?](#Part 1)
02 [When to Use Text Collage?](#Part 2)
03 [Factors to Be Considered While Creating a Text Collage](#Part 3)
04 [Top 5 Tools to Create a Text Collage](#Part 4)
05 [Use Stock Images to Pep Up Your Text Collage](#Part 5)
Part 1 Why Create a Text Collage?
Adding a text to your collage is beneficial in ways more than one. The text brings versatility to your collage, and also helps in conveying the message along with the theme. Moreover, a little interesting text line along with animations added to your collage enhances its overall visual communication and looks.
Part 2 When to Use Text Collage?
Though text can be added to all types of collages there are some specific occasions when the purpose of adding the text becomes more meaningful. For instance, adding text while creating a birthday collage, mood board collage, anniversary collage, scrapbook collage, holiday collage, or other similar ones helps in expressing the feelings, theme, and emotions in a better manner.
Part 3 Factors to Be Considered While Creating a Text Collage
There are several text-adding ways and methods by which you can make your collage look interesting. Considering a few important ones will let you create an impressive collage in no time. Check out some useful tips and tricks to use text within the photo collage.
● Identify if you wish to add the text as the focal point or not. If you are using the text as the first striking thing in the collage then ensure that it is eye-catchy and interesting.
● Keep a good balance between the text and the images so that it does not look weird.
● The color and the font of the text are among the most important factors to be considered. Make sure that both the text color as well as the font match and blend well with the theme and the images in the collage.
● Keeping the background of the text simple, less detailed, and also clutter-free is important so that the text content comes out nicely.
● Make sure only to add a few words or lines in your collage to make it look sophisticated. It’s majorly a photo collage with a dash of the text so keep it that way only and not vice-versa.
Part 4 Top 5 Tools to Create a Text Collage
There are several desktop, online, and app based text collage maker tools available. Some of the popular ones are enlisted below.
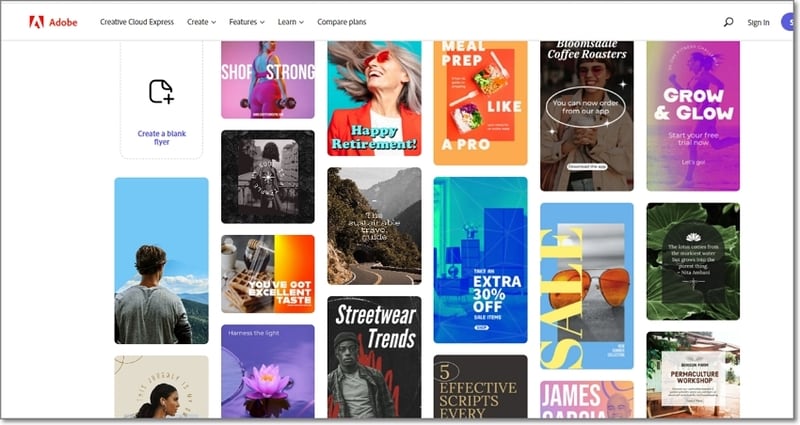
01Adobe Creative Cloud Express
Adobe is known for its advanced image editing options and its online version called creative cloud is no less. Using this browser-based tool you can create some amazing collage and also add text easily. The site offers an array of templates to choose the design as per your theme and the interface is also user-friendly. You need to free sign-up to use the program.
02Befunky
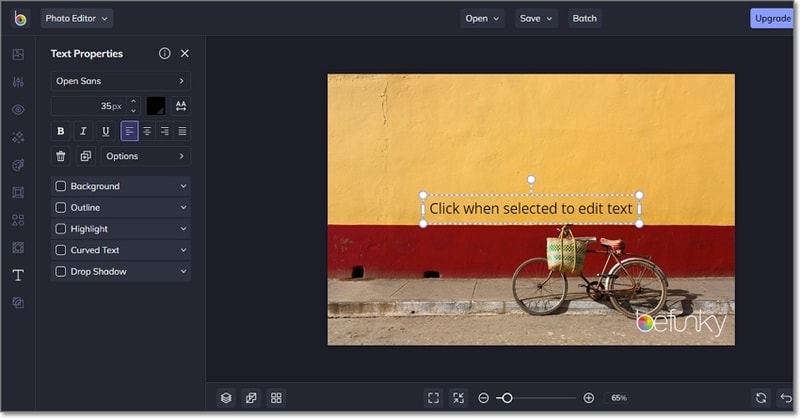
This is another interesting online tool that can be used to add text to your collages, photo projects, and designs. Free to use, the tool has multiple options for text customization like selecting the body text, headline, outline, shadow drop options, and more. Pre-set designs for adding the text to your collages are also available here.
03Fotor
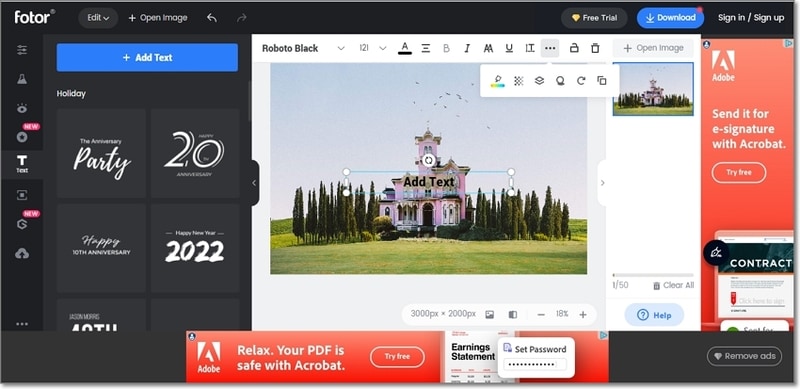
When it comes to creating collages and customizing them, Fotor is one of the most widely used tools. This free online program will let you add text to your created collages for enhancing their overall looks. Several text-based templates are also available to choose from and you can even customize the text parameters like font, size, spacing, highlight color, shadow, and more.
04Canva
Canva is a popular image editing online tool that supports several other functions as well including collage creation. Using this versatile program, you can add texts to your photos as well as collages easily. Several templates in an array of categories for collage creation are available and you can even personalize the text by changing its font, color, background, and other parameters.

05PhotoCollage
This is a simple to use online collage maker with text tool that helps you create a decent collage with a text in no time. You can either use the blank space to add images and set them in the desired format for a collage or choose from the pre-set templates. Using the tool you can change the position of the text, flip it, rotate it, select the font, color, size, shadow, stroke and customize it in several other ways.
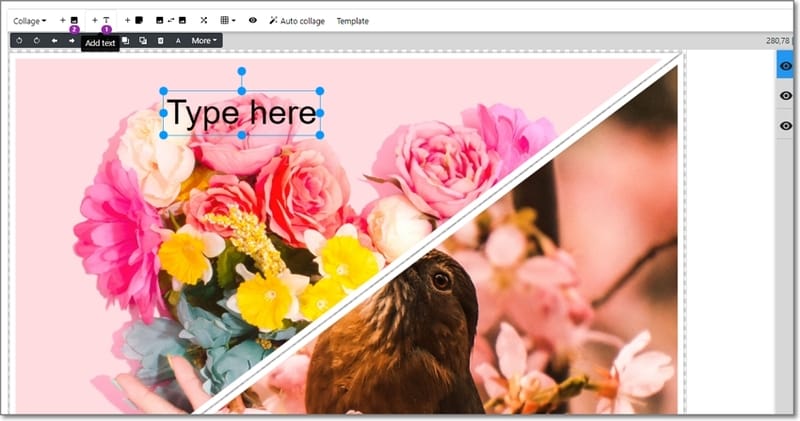
Part 5 Use stock images to pep up your text collage
The text is the additional elements of the collage to make them look more interesting while the images and photos remain as the main content. So, no matter how interesting your text and its design are, if the images in the collages are not interesting, the collage will be of no good.
So, if you do not have interesting pictures matching your theme in high quality, no need to worry as there are several tools that can help you use their stock images for creating a collage or other purposes. One such superb tool we suggest here is Wondershare Filmora Video Editor which is a complete video editing tool that also has an impressive collection of pictures and other stick media in high quality.
Search for the pictures from several categories matching your theme at Filmora and use them without any worries. Moreover, you can even create a video collage using the software’s split-screen feature.
For Win 7 or later (64-bit)
For macOS 10.12 or later
● Ending Thoughts →
● Text collage are the ones where text is added to the photo collage to convey a message or make it look more interesting.
● While creating a text collage there are several factors to be considered like the text color, font, background, and more.
● A number of text collage maker online, desktop, and app-based tools available.
● To get stock images in high quality for your collages, Wondershare Filmora is an excellent tool.
Collages are everywhere, be it online sites, social media platforms, magazines, birthday wishes, newspapers, and much tools, more. Organizing your images in some random or specific shapes to offer a visually enhanced experience is the major purpose of the collage. Besides adding images, there are several other elements and factors that combine to make up an eye-catchy collage and a key one is the “text”.

So, if you too are considering to create a photo collage with text, just stick to us and keep reading.
In this article
01 [Why Create a Text Collage?](#Part 1)
02 [When to Use Text Collage?](#Part 2)
03 [Factors to Be Considered While Creating a Text Collage](#Part 3)
04 [Top 5 Tools to Create a Text Collage](#Part 4)
05 [Use Stock Images to Pep Up Your Text Collage](#Part 5)
Part 1 Why Create a Text Collage?
Adding a text to your collage is beneficial in ways more than one. The text brings versatility to your collage, and also helps in conveying the message along with the theme. Moreover, a little interesting text line along with animations added to your collage enhances its overall visual communication and looks.
Part 2 When to Use Text Collage?
Though text can be added to all types of collages there are some specific occasions when the purpose of adding the text becomes more meaningful. For instance, adding text while creating a birthday collage, mood board collage, anniversary collage, scrapbook collage, holiday collage, or other similar ones helps in expressing the feelings, theme, and emotions in a better manner.
Part 3 Factors to Be Considered While Creating a Text Collage
There are several text-adding ways and methods by which you can make your collage look interesting. Considering a few important ones will let you create an impressive collage in no time. Check out some useful tips and tricks to use text within the photo collage.
● Identify if you wish to add the text as the focal point or not. If you are using the text as the first striking thing in the collage then ensure that it is eye-catchy and interesting.
● Keep a good balance between the text and the images so that it does not look weird.
● The color and the font of the text are among the most important factors to be considered. Make sure that both the text color as well as the font match and blend well with the theme and the images in the collage.
● Keeping the background of the text simple, less detailed, and also clutter-free is important so that the text content comes out nicely.
● Make sure only to add a few words or lines in your collage to make it look sophisticated. It’s majorly a photo collage with a dash of the text so keep it that way only and not vice-versa.
Part 4 Top 5 Tools to Create a Text Collage
There are several desktop, online, and app based text collage maker tools available. Some of the popular ones are enlisted below.
01Adobe Creative Cloud Express
Adobe is known for its advanced image editing options and its online version called creative cloud is no less. Using this browser-based tool you can create some amazing collage and also add text easily. The site offers an array of templates to choose the design as per your theme and the interface is also user-friendly. You need to free sign-up to use the program.

02Befunky
This is another interesting online tool that can be used to add text to your collages, photo projects, and designs. Free to use, the tool has multiple options for text customization like selecting the body text, headline, outline, shadow drop options, and more. Pre-set designs for adding the text to your collages are also available here.

03Fotor
When it comes to creating collages and customizing them, Fotor is one of the most widely used tools. This free online program will let you add text to your created collages for enhancing their overall looks. Several text-based templates are also available to choose from and you can even customize the text parameters like font, size, spacing, highlight color, shadow, and more.

04Canva
Canva is a popular image editing online tool that supports several other functions as well including collage creation. Using this versatile program, you can add texts to your photos as well as collages easily. Several templates in an array of categories for collage creation are available and you can even personalize the text by changing its font, color, background, and other parameters.

05PhotoCollage
This is a simple to use online collage maker with text tool that helps you create a decent collage with a text in no time. You can either use the blank space to add images and set them in the desired format for a collage or choose from the pre-set templates. Using the tool you can change the position of the text, flip it, rotate it, select the font, color, size, shadow, stroke and customize it in several other ways.

Part 5 Use stock images to pep up your text collage
The text is the additional elements of the collage to make them look more interesting while the images and photos remain as the main content. So, no matter how interesting your text and its design are, if the images in the collages are not interesting, the collage will be of no good.
So, if you do not have interesting pictures matching your theme in high quality, no need to worry as there are several tools that can help you use their stock images for creating a collage or other purposes. One such superb tool we suggest here is Wondershare Filmora Video Editor which is a complete video editing tool that also has an impressive collection of pictures and other stick media in high quality.
Search for the pictures from several categories matching your theme at Filmora and use them without any worries. Moreover, you can even create a video collage using the software’s split-screen feature.
For Win 7 or later (64-bit)
For macOS 10.12 or later
● Ending Thoughts →
● Text collage are the ones where text is added to the photo collage to convey a message or make it look more interesting.
● While creating a text collage there are several factors to be considered like the text color, font, background, and more.
● A number of text collage maker online, desktop, and app-based tools available.
● To get stock images in high quality for your collages, Wondershare Filmora is an excellent tool.
Collages are everywhere, be it online sites, social media platforms, magazines, birthday wishes, newspapers, and much tools, more. Organizing your images in some random or specific shapes to offer a visually enhanced experience is the major purpose of the collage. Besides adding images, there are several other elements and factors that combine to make up an eye-catchy collage and a key one is the “text”.

So, if you too are considering to create a photo collage with text, just stick to us and keep reading.
In this article
01 [Why Create a Text Collage?](#Part 1)
02 [When to Use Text Collage?](#Part 2)
03 [Factors to Be Considered While Creating a Text Collage](#Part 3)
04 [Top 5 Tools to Create a Text Collage](#Part 4)
05 [Use Stock Images to Pep Up Your Text Collage](#Part 5)
Part 1 Why Create a Text Collage?
Adding a text to your collage is beneficial in ways more than one. The text brings versatility to your collage, and also helps in conveying the message along with the theme. Moreover, a little interesting text line along with animations added to your collage enhances its overall visual communication and looks.
Part 2 When to Use Text Collage?
Though text can be added to all types of collages there are some specific occasions when the purpose of adding the text becomes more meaningful. For instance, adding text while creating a birthday collage, mood board collage, anniversary collage, scrapbook collage, holiday collage, or other similar ones helps in expressing the feelings, theme, and emotions in a better manner.
Part 3 Factors to Be Considered While Creating a Text Collage
There are several text-adding ways and methods by which you can make your collage look interesting. Considering a few important ones will let you create an impressive collage in no time. Check out some useful tips and tricks to use text within the photo collage.
● Identify if you wish to add the text as the focal point or not. If you are using the text as the first striking thing in the collage then ensure that it is eye-catchy and interesting.
● Keep a good balance between the text and the images so that it does not look weird.
● The color and the font of the text are among the most important factors to be considered. Make sure that both the text color as well as the font match and blend well with the theme and the images in the collage.
● Keeping the background of the text simple, less detailed, and also clutter-free is important so that the text content comes out nicely.
● Make sure only to add a few words or lines in your collage to make it look sophisticated. It’s majorly a photo collage with a dash of the text so keep it that way only and not vice-versa.
Part 4 Top 5 Tools to Create a Text Collage
There are several desktop, online, and app based text collage maker tools available. Some of the popular ones are enlisted below.
01Adobe Creative Cloud Express
Adobe is known for its advanced image editing options and its online version called creative cloud is no less. Using this browser-based tool you can create some amazing collage and also add text easily. The site offers an array of templates to choose the design as per your theme and the interface is also user-friendly. You need to free sign-up to use the program.

02Befunky
This is another interesting online tool that can be used to add text to your collages, photo projects, and designs. Free to use, the tool has multiple options for text customization like selecting the body text, headline, outline, shadow drop options, and more. Pre-set designs for adding the text to your collages are also available here.

03Fotor
When it comes to creating collages and customizing them, Fotor is one of the most widely used tools. This free online program will let you add text to your created collages for enhancing their overall looks. Several text-based templates are also available to choose from and you can even customize the text parameters like font, size, spacing, highlight color, shadow, and more.

04Canva
Canva is a popular image editing online tool that supports several other functions as well including collage creation. Using this versatile program, you can add texts to your photos as well as collages easily. Several templates in an array of categories for collage creation are available and you can even personalize the text by changing its font, color, background, and other parameters.

05PhotoCollage
This is a simple to use online collage maker with text tool that helps you create a decent collage with a text in no time. You can either use the blank space to add images and set them in the desired format for a collage or choose from the pre-set templates. Using the tool you can change the position of the text, flip it, rotate it, select the font, color, size, shadow, stroke and customize it in several other ways.

Part 5 Use stock images to pep up your text collage
The text is the additional elements of the collage to make them look more interesting while the images and photos remain as the main content. So, no matter how interesting your text and its design are, if the images in the collages are not interesting, the collage will be of no good.
So, if you do not have interesting pictures matching your theme in high quality, no need to worry as there are several tools that can help you use their stock images for creating a collage or other purposes. One such superb tool we suggest here is Wondershare Filmora Video Editor which is a complete video editing tool that also has an impressive collection of pictures and other stick media in high quality.
Search for the pictures from several categories matching your theme at Filmora and use them without any worries. Moreover, you can even create a video collage using the software’s split-screen feature.
For Win 7 or later (64-bit)
For macOS 10.12 or later
● Ending Thoughts →
● Text collage are the ones where text is added to the photo collage to convey a message or make it look more interesting.
● While creating a text collage there are several factors to be considered like the text color, font, background, and more.
● A number of text collage maker online, desktop, and app-based tools available.
● To get stock images in high quality for your collages, Wondershare Filmora is an excellent tool.
Collages are everywhere, be it online sites, social media platforms, magazines, birthday wishes, newspapers, and much tools, more. Organizing your images in some random or specific shapes to offer a visually enhanced experience is the major purpose of the collage. Besides adding images, there are several other elements and factors that combine to make up an eye-catchy collage and a key one is the “text”.

So, if you too are considering to create a photo collage with text, just stick to us and keep reading.
In this article
01 [Why Create a Text Collage?](#Part 1)
02 [When to Use Text Collage?](#Part 2)
03 [Factors to Be Considered While Creating a Text Collage](#Part 3)
04 [Top 5 Tools to Create a Text Collage](#Part 4)
05 [Use Stock Images to Pep Up Your Text Collage](#Part 5)
Part 1 Why Create a Text Collage?
Adding a text to your collage is beneficial in ways more than one. The text brings versatility to your collage, and also helps in conveying the message along with the theme. Moreover, a little interesting text line along with animations added to your collage enhances its overall visual communication and looks.
Part 2 When to Use Text Collage?
Though text can be added to all types of collages there are some specific occasions when the purpose of adding the text becomes more meaningful. For instance, adding text while creating a birthday collage, mood board collage, anniversary collage, scrapbook collage, holiday collage, or other similar ones helps in expressing the feelings, theme, and emotions in a better manner.
Part 3 Factors to Be Considered While Creating a Text Collage
There are several text-adding ways and methods by which you can make your collage look interesting. Considering a few important ones will let you create an impressive collage in no time. Check out some useful tips and tricks to use text within the photo collage.
● Identify if you wish to add the text as the focal point or not. If you are using the text as the first striking thing in the collage then ensure that it is eye-catchy and interesting.
● Keep a good balance between the text and the images so that it does not look weird.
● The color and the font of the text are among the most important factors to be considered. Make sure that both the text color as well as the font match and blend well with the theme and the images in the collage.
● Keeping the background of the text simple, less detailed, and also clutter-free is important so that the text content comes out nicely.
● Make sure only to add a few words or lines in your collage to make it look sophisticated. It’s majorly a photo collage with a dash of the text so keep it that way only and not vice-versa.
Part 4 Top 5 Tools to Create a Text Collage
There are several desktop, online, and app based text collage maker tools available. Some of the popular ones are enlisted below.
01Adobe Creative Cloud Express
Adobe is known for its advanced image editing options and its online version called creative cloud is no less. Using this browser-based tool you can create some amazing collage and also add text easily. The site offers an array of templates to choose the design as per your theme and the interface is also user-friendly. You need to free sign-up to use the program.

02Befunky
This is another interesting online tool that can be used to add text to your collages, photo projects, and designs. Free to use, the tool has multiple options for text customization like selecting the body text, headline, outline, shadow drop options, and more. Pre-set designs for adding the text to your collages are also available here.

03Fotor
When it comes to creating collages and customizing them, Fotor is one of the most widely used tools. This free online program will let you add text to your created collages for enhancing their overall looks. Several text-based templates are also available to choose from and you can even customize the text parameters like font, size, spacing, highlight color, shadow, and more.

04Canva
Canva is a popular image editing online tool that supports several other functions as well including collage creation. Using this versatile program, you can add texts to your photos as well as collages easily. Several templates in an array of categories for collage creation are available and you can even personalize the text by changing its font, color, background, and other parameters.

05PhotoCollage
This is a simple to use online collage maker with text tool that helps you create a decent collage with a text in no time. You can either use the blank space to add images and set them in the desired format for a collage or choose from the pre-set templates. Using the tool you can change the position of the text, flip it, rotate it, select the font, color, size, shadow, stroke and customize it in several other ways.

Part 5 Use stock images to pep up your text collage
The text is the additional elements of the collage to make them look more interesting while the images and photos remain as the main content. So, no matter how interesting your text and its design are, if the images in the collages are not interesting, the collage will be of no good.
So, if you do not have interesting pictures matching your theme in high quality, no need to worry as there are several tools that can help you use their stock images for creating a collage or other purposes. One such superb tool we suggest here is Wondershare Filmora Video Editor which is a complete video editing tool that also has an impressive collection of pictures and other stick media in high quality.
Search for the pictures from several categories matching your theme at Filmora and use them without any worries. Moreover, you can even create a video collage using the software’s split-screen feature.
For Win 7 or later (64-bit)
For macOS 10.12 or later
● Ending Thoughts →
● Text collage are the ones where text is added to the photo collage to convey a message or make it look more interesting.
● While creating a text collage there are several factors to be considered like the text color, font, background, and more.
● A number of text collage maker online, desktop, and app-based tools available.
● To get stock images in high quality for your collages, Wondershare Filmora is an excellent tool.
How to Color Grading in Final Cut Pro
Have you ever questioned the purpose of those odd video scopes or how to build super grades from the start in Final Cut Pro? In contrast to editing talents, color grading is a technical and difficult ability that takes practice.
In order to help, we decided to compile a thorough beginner’s article to color grading in Final Cut Pro.
With that said, let’s begin!
1. Discover how you color grade in Final Cut Pro
Color grading may be a tedious and time-consuming operation, therefore it’s a skill set that calls for a lot of patience. Some editors won’t conduct any color grading or correction beyond the bare minimum. But even mundane-looking film may look remarkable if you know how to give it a dramatic touch.
A more cinematic grade requires a number of procedures, and there is no one method that works for all situations. We’ll therefore walk you through the process of creating a cinematic color grade in Final Cut Pro, but depending on your material, you might need to add or omit some phases.
Step1Filming
Since the raw video is essential for producing a cinematic image, an outstanding grade begins with the camera.
Use the greatest quality settings your camera offers while recording your video; the more information in your picture, the more you can manipulate it during grading.
While it may seem preferable to shoot with as much color as you can, using a duller color profile is very necessary. Your camera will have color settings, and although the washed-out, drab appearance may not inspire confidence in you, it will offer you a lot more editing possibility.
Step2Create a color profile
After importing your film, you may be concerned about the general dull look of your recordings. The reason for that is because you have not yet matched the color profile of your sequence to the one of your camera. To start on this process, it goes as follows.
- Drag your clip onto your timeline and make sure it is selected. Click on the Inspector icon.
- Then click on the Information tab of the clip.
- Navigate all the way down through the options to find the Color LUT option.
- Then choose the Color profile that matches your clip based on the camera it is filmed with.
- You’re done!
Step3Checking the scopes
The Scopes in Final Cut Pro are panels that display the color information of your shots. They are quite complicated and can be difficult to comprehend if you did not use them ever before. You can activate Video Scopes by clicking View > Show in Viewer > Video Scopes from the View menu. The three components of grading are the highlights, mid-tones, and shadows. Your highlights are shown at the top and your shadows are at the bottom in all grading tools and scopes.
2. Include Color Wheels
Now that your setup is complete, you can begin grading your footage. Grading is done in multiple layers stacked on top of each other. It may take multiple levels to create the desired look. Follow the instructions below to modify your settings to match your clip if you want to give your footage a cinematic look.
You may access a wider range of color manipulation tools with the built-in color wheels, exposure adjustments, including isolation of color selection, RGB modifications across tone ranges, and simple masking.
3. Color board
A vertical color spectrum is shown on the Color Board, and it is intersected by a horizontal line that features four nodes. These are the ranges of the footage that are designated as the Highlights, Midtones, and Shadows, respectively.
Adjusting a node to a new color space has an immediate and noticeable impact on the corresponding section of the image. If you move above the horizontal line, it will increase, and if you go below the line, it will decrease.
You also have control over the Saturation and Exposure settings. These are wonderful to have if you want to increase the contrast in your photographs and make particular colors more vivid or muted.
4. Masks
Using the Shape Masks feature, each of these individual effects can be perfect for particular regions of your footage. In addition, by utilizing a Color Mask, you can alter the appearance of a specific color. It is possible to apply multiple iterations of each color adjustment to a clip and find it listed under the Effect heading.
The order can be changed by dragging and dropping, and either method can be disabled or enabled. Utilizing keyframes allows for the effects of color grading to be specifically timed as well. Last but not least, keep in mind that the quality and color sample depth of the clips determine how much of an overall adjustment you are capable of making to a color.
5. Color Curves
If you are experienced with more advanced picture editing software, such as Adobe Photoshop, you will benefit greatly from using color curves. Adjustments can be made independently to both the Luma (the brightest areas) and the primary composite colors (red, blue, and green).
6. Match Colors
Match Color is an additional choice that may be made from the improvement’s menu. This function will try to replicate the visual style of one video clip in another. First, choose the clip whose color you want to change, click on that clip that has the desired appearance, and last, choose Match Color.
You will still be able to utilize these settings as shortcuts even after you have gained more experience with manual grading and are comfortable making finer adjustments manually. It is important to keep in mind that while using Final Cut Pro X for color grading, effects can be layered on top of one another.
It’s not likely that a single tool or adjustment will solve an issue or produce the desired result; rather, it’s more likely that a number of different impacts will be required. In the same way that different visual effects in Final Cut Pro X may be toggled on and off, any layers that you add to a clip can have their visibility controlled from the Inspector window.
Conclusion
In Final Cut Pro X, you may choose from a wide variety of grading plugins, ranging from more affordable solutions like FCPeffects to more expensive ones like Magic Bullet Looks, which are designed specifically for feature film-style grades.
Additionally, there is a variety of stand-alone applications for color grading, such as DaVinci Resolve and FilmConvert. You might be comfortable with their gear, but you should also know that their professional-grade color package includes some rather complex editing options.
Beginning to experiment with all of Final Cut Pro X’s functions and determining which ones are most useful to you is the best method to gain an understanding of the program’s color grading capabilities. If you don’t currently have a project that requires your attention, you can download stock footage and experiment with it.
Free Download For Win 7 or later(64-bit)
Free Download For macOS 10.14 or later
Free Download For macOS 10.14 or later
Also read:
- Edit FLV Video Files with FLV Editor Windows, Mac,Android, iPhone for 2024
- How to Make an Instant Slideshow on Mac
- How D AI Video Games Act More Human Than Human?
- Updated Premiere Pro Text Effects Beginner Guide
- New In 2024, Tips for Choosing Location and Scheduling Music Video
- Updated 2024 Approved How to Do Velocity Edits on PC
- New Stunning Glitch Effect and Its Creation Steps for Premiere Pro
- 2024 Approved Make A Tattoo Disappear Like A Magic
- In 2024, This Article Will Show You the Steps to Make Coin Magic in Videos with Filmora
- New In 2024, How to Add Text Animation Online
- Want to Take Your Editing Creativity to the Next Level by Designing Top-Class, Professional-Quality Slideshows in Aquasoft? Rest Assured, You Have Landed at the Right Place for 2024
- 2024 Approved Wondering How to Edit a Video to Slow Motion on iPhone and Android Devices? Find Out How to Use Wondershare Filmora to Create and Edit Slo Mo Videos in a Few Clicks
- Updated In 2024, How to Create an Adobe Slideshow the Easy Way
- Updated 2024 Approved Thousands Already Know Ezgif and So Can You
- New 2024 Approved How to Edit Facebook Video Ads for E-Commerce Business
- In 2024, The Best Jump Cut Editing Tricks Make Your Videos Snappy!
- How to Create a DIY Green Screen Video Effect, In 2024
- Updated In 2024, Useful Tips for Tiktok Video Aspect Ratio Included
- New Updated 8 Ways to Merge SRT with MP4
- 2024 Approved How to Create a Slideshow on iPhone
- Updated 2024 Approved Detailed Guide to Crop Videos in Sony Vegas Pro
- New 2024 Approved How Can I Control Speed of a Video
- Best 12 AI Video Generators to Pick
- Apple iPhone 6 Mirror to PC? Top Apps You Must Know | Dr.fone
- Play Store Not Working On Tecno Spark 10 5G? 8 Solutions Inside | Dr.fone
- How To Transfer Data From iPhone 7 To Other iPhone 14 devices? | Dr.fone
- 3 Easy Ways to Factory Reset a Locked Apple iPhone 12 Pro Without iTunes
- 7 Fixes for Unfortunately, Phone Has Stopped on Honor Play 7T | Dr.fone
- How To Unlock Any Xiaomi 14 Phone Password Using Emergency Call
- Everything You Need To Know About Unlocked iPhone SE
- Solved Warning Camera Failed on Xiaomi 13 Ultra | Dr.fone
- 8 Solutions to Fix Find My Friends Location Not Available On Apple iPhone XR | Dr.fone
- How to Change Google Play Location On Poco C51 | Dr.fone
- Full Tutorial to Bypass Your Samsung Galaxy A14 4G Face Lock?
- Updated In 2024, Best 4 Eminem Voice Generator Apps for PC, Mac, Mobile, and Online
- Best 10 iMessage Recovery Software | Stellar
- The Updated Method to Bypass Samsung Galaxy A54 5G FRP
- Device unlock Vivo
- In 2024, The Ultimate Guide to Unlocking Apple Watch Or iPhone 11 from iCloud
- How To Unlock Apple iPhone 15 Plus Official Method to Unlock Your Apple iPhone 15 Plus
- In 2024, Why does the pokemon go battle league not available On Tecno Spark 10 5G | Dr.fone
- Title: How to Add Selective Color Effect to Your Videos
- Author: Chloe
- Created at : 2024-05-20 03:37:19
- Updated at : 2024-05-21 03:37:19
- Link: https://ai-editing-video.techidaily.com/how-to-add-selective-color-effect-to-your-videos/
- License: This work is licensed under CC BY-NC-SA 4.0.

