
:max_bytes(150000):strip_icc():format(webp)/windows11contextmenu-f4d6ebb14db4444d851b4338aa553e21.png)
How to Add Video Effects with Movavi Slideshow Maker
How to Add Video Effects with Movavi Slideshow Maker
Many video editors won’t be late in their artwork. They tend to use different effects to light up their crafts. For them, editing videos with effects applications gives more life to the story. In this composition, you will learn more about Effects, and if you are just about to do your video editing right now, these details are definitely for you.
What are Video Effects?
According to the dictionary, an effect is brought about by a cause or an agency.
In video editing, there are a few video effects you must know to apply them to your video project. Video effects can alter the speed and produce distortions, reflections, aesthetic filters, stylistic color grading, animation transitions, and more. They can also contain 3D features like CGI. When used well, these effects improve the narrative, the atmosphere, and the images’ overall impact.
Let’s dissect a few of the major effects, which will be most helpful to you.
Pans and Tilts
Your first thought upon hearing these two words may be tripod motions. Pans and tilts are a quick way to add additional movement and sensation to your video, making it more dynamic.
Change the Speed/Duration
One feature that virtually every NLE or Non-Linear Editing software gives us is the option to modify the playback speed of your video while reducing or increasing the actual duration and tempo of your segments. Slowing down your footage to match the frame rate at which the video was initially captured is one of the critical explanations for doing this.
To incorporate some frantic or chaotic moments into your production, you can use this to generate slow-motion shots and fast-forward effects. This effect can also quickly pan through footage for humorous effect. Find the “Speed/Duration” option under Effects controls to accomplish this.
Light Leaks and Flares
Nothing gives your video a more ethereal vibe than gentle, warm light emerging from the scene. A direct source visible in the photo may be the source of this light, or it may enter the frame from the edge. You’ve probably seen these flares and leaks countless times in movies, whether they were added in post-production or resulted from the cinematographer’s lens choice. You can select where the light comes from if it doesn’t distract from the task. Remember that these spills and flares must contribute to the narrative while remaining barely perceptible to the viewer.
Retro/VHS Effects
While light leaks and lens flares give your movie or film a timeless feel, nothing gives it a dated or, one would say, “scrappy” vibe. The grunge appearance of the ‘90s is in right now, and one of the most popular effects is the VHS look.
There are several ways to get this effect. Applying a preset, essentially a LUT (look-up table or filter), to your color grade will make the image appear fuzzier, desaturated, and blurrier (using the different alpha and gamma channels). This will cause “chroma errors,” which result from poor recordings and a lack of a flying erase head (a function that enables you to record over previously filmed video; imagine formatting your SD card while the video is still present on the card and you are simply recording over it), giving your images an outline of distorted blues and reds.
Color Grading and Color Correction
Besides actual editing, color grading and correction are arguably the most significant post-production steps. With the help of these tools, you may alter skin tones, highlight, and shadow levels, add vignettes, experiment with contrast, and much more. We’ll briefly go through one aspect of color grading—the ability to adjust particular colors in your image—even though this subject needs its ebook.
Adding Overlays
Although we’ve talked about adding overlays, such as VHS effects or light leaks, you may use many other editing overlays to add particular components to your shot, including weather particles!
Using Titles and Motion Graphics
Motion graphics and clean titles are essential for any video that wishes to appear professional. These could be subtitles, and the animation logo reveals post-credits, lower thirds, or even major titles. There are various free typefaces available that you may use to make your project stand out, regardless of the program you’re working in.
Once you’ve selected the appropriate font, color, and weight, it’s time to move on to motion graphics. These are crucial because they may transform a clear, ageless title or text into a lively, entertaining illustration of the product or concept your movie is attempting to market.
The abundance of tutorials nowadays makes learning the fundamentals of motion graphics a piece of cake. As I previously stated, you can access all the various effects and movements you might need, regardless of the editing program, you use.
These various methods and approaches need the practice to perfect, just like any other component of filmmaking. As you add these video editing effects to your editing toolkit, there will undoubtedly be a lot of trial and error. Still, eventually, they will become second nature to your workflow.
Importance of Applying Effects to your Video
Almost from the first motion film, cinematic storytelling and video effects have gone hand in hand. They can improve a scene, create something that doesn’t exist, hide an error, and do much more. In essence, they assist a filmmaker in telling a tale in the manner they desire.
Applying Effects using Movavi Slideshow Maker
Making picture collages is less appealing than slide show presentations. This method is ideal for presenting a gallery of images or creating a polished photo-video presentation for your brand and goods. You’ll need a creative slideshow program with loads of capabilities to create a polished slideshow that will enhance your production. The Movavi Slideshow Maker now comes into play.
In this composition, I will show you how to apply “Effects” on your video using Movavi Slideshow Maker video editing software. A professional slideshow program called Movavi slideshow creator is made for usage by both professional and amateur picture editors. It is a Mac and Windows PC freemium program with many options to give your slideshow presentation a polished and distinctive appearance.
Features of Movavi Slideshow Maker
- It offers an easy-to-use UI
- Includes a complete toolbox for altering photos
- Advanced features for improving slideshows
- Internal media tools
- Native recording capability
- Features scalable video adjustment.
Take note that this software is not just for editing pictures but also for videos.
Step1 Click the Import tab.

Step2 Click “Add Files” and locate your desired video to edit.

Step3 Drag the imported video that you want to edit onto the video track.

Applying Filter effects
A video filter is software that modifies a multimedia stream somehow. A filter graph is a series of filters that each accept input from an upstream filter, process the information, and then output the edited video to their downstream counterparts.
Step1 Click the Filter tab.

Step2 Choose your desired Filter effects depending on your preferred category.

Step3 You can see the preview of a Filter effect by clicking it before applying it to your desired video to be edited.

Step4 If you finally chose a Filter effect, drag it onto the imported video.
Step5 And now you will see the changes. The “star” symbol on the imported video means you have already applied a Filter effect on it.

Raw Footage vs With Applied Filter Effect
Raw Footage

Brush – Sketch Filter effect

Adding Transition Effect
Transitions guide your audience.
From the opening to the very end, they structure the movie. There are numerous typical forms, including the wipe, dissolve, split-cut, and many others. Film editors use transitions to transfer a scene from one video clip to another practice. Transitions don’t need to be visible.
Step1 Click the Transition tab.

Step2 Choose your desired Transition effect depending on your preferred category.

Step3 You can see the preview of a Transition effect by clicking it before applying it to your desired video to be edited.
Step4 If you finally chose a Transition effect, drag it between each imported video.

Step5 Now you will see this kind of symbol, which means you have already put a Transition effect between the imported videos.
![]()
Note: Transition effects can also be applied even if you have only one video. You can put transitions effects either at the start of the video, which could make your video introduction more appealing. Also, you can set the Transition effect at the end of the video, which could give you a pleasant closing.
Transition Effect at the start
Transition Effect at the end
Also, you can make your Transition effect longer or shorter simply by clicking this symbol then it will turn yellow. Point your cursor either on the left side of the symbol; the cursor will become a horizontal double-arrow to change the span of your Transition effect on the left video or on the right end side of the symbol to change the span of the Transition effect on the right video.
Applying Titling Motion Effect
Most video editing applications come with built-in titling choices, and many of them vary from basic letters to a collection of motion graphics that have already been pre-programmed. Enter your text into a template to insert them.
The majority of video projects have crucial titles. You can use them to build a mood, label key elements of the film, and convey information.
Step1 Click the Title tab.

Step2 Choose your desired Titling motion effect depending on your preferred category. You can also see the preview of a title effect by clicking it before applying it to your selected video to be edited.

Step3 To apply the Title Motion effect, drag the effect onto the title track, just above the video track.

Step4 You can place your Title Motion effect on your desired time where you want it to appear.

Step5 To edit your Title texts, you can double-click the applied title on the title track or right-click on it and click the “edit” option. You can also edit the text by double-clicking the title portion on the current video editing.

Step6 In this step, you can edit the Title text in the “clip editing” section, as seen in the red color box. You can change the color, text style, and font size on the yellow color box. And in the green color box, you can change the alignment of the text; you can Bold it, Italizing, and make it an Underlined text.

Step7 You can also adjust the time duration of the Titling Motion effect in two ways. First, by clicking the Title effect from the title track and placing your cursor on either side (the cursor will become a double-headed arrow), you have to shorten or lengthen the Title effect. The second step is to click the “Clip” section and adjust the duration.

These are some ways to apply effects on Movavi Slideshow Maker video editing software. You can choose your desired effects that can make an excellent contribution to your video project. You can download other effects not included in this software by simply going to their store. Click the Help tab to find “Movavi Store” or “Movavi Effects Store.”

You know many video editing software you can find on the internet, and most of them need your subscription to unlock all their features. But of course, there are also several video editing software that is free to use, which could be very helpful for you, especially when you are just a beginner in this field. Choosing the best video editing software is recommended to develop your skills gradually. You can start with a basic one before working on a professional type of video editing software.
Overall, I hope you learn more about applying effects to video editing. I hope this article helps you decide what video effects you will be using when you start editing videos. Remember that too many effects can ruin your work, so sometimes you need to keep it simple. Just be sure that you will guide the audience very well and lead them to your beautiful story.
Free Download For Win 7 or later(64-bit)
Free Download For macOS 10.14 or later
Transition Effect at the start
Transition Effect at the end
Also, you can make your Transition effect longer or shorter simply by clicking this symbol then it will turn yellow. Point your cursor either on the left side of the symbol; the cursor will become a horizontal double-arrow to change the span of your Transition effect on the left video or on the right end side of the symbol to change the span of the Transition effect on the right video.
Applying Titling Motion Effect
Most video editing applications come with built-in titling choices, and many of them vary from basic letters to a collection of motion graphics that have already been pre-programmed. Enter your text into a template to insert them.
The majority of video projects have crucial titles. You can use them to build a mood, label key elements of the film, and convey information.
Step1 Click the Title tab.
Step2 Choose your desired Titling motion effect depending on your preferred category. You can also see the preview of a title effect by clicking it before applying it to your selected video to be edited.
Step3 To apply the Title Motion effect, drag the effect onto the title track, just above the video track.
Step4 You can place your Title Motion effect on your desired time where you want it to appear.
Step5 To edit your Title texts, you can double-click the applied title on the title track or right-click on it and click the “edit” option. You can also edit the text by double-clicking the title portion on the current video editing.
Step6 In this step, you can edit the Title text in the “clip editing” section, as seen in the red color box. You can change the color, text style, and font size on the yellow color box. And in the green color box, you can change the alignment of the text; you can Bold it, Italizing, and make it an Underlined text.
Step7 You can also adjust the time duration of the Titling Motion effect in two ways. First, by clicking the Title effect from the title track and placing your cursor on either side (the cursor will become a double-headed arrow), you have to shorten or lengthen the Title effect. The second step is to click the “Clip” section and adjust the duration.
These are some ways to apply effects on Movavi Slideshow Maker video editing software. You can choose your desired effects that can make an excellent contribution to your video project. You can download other effects not included in this software by simply going to their store. Click the Help tab to find “Movavi Store” or “Movavi Effects Store.”
You know many video editing software you can find on the internet, and most of them need your subscription to unlock all their features. But of course, there are also several video editing software that is free to use, which could be very helpful for you, especially when you are just a beginner in this field. Choosing the best video editing software is recommended to develop your skills gradually. You can start with a basic one before working on a professional type of video editing software.
Overall, I hope you learn more about applying effects to video editing. I hope this article helps you decide what video effects you will be using when you start editing videos. Remember that too many effects can ruin your work, so sometimes you need to keep it simple. Just be sure that you will guide the audience very well and lead them to your beautiful story.
Free Download For Win 7 or later(64-bit)
Free Download For macOS 10.14 or later
Do You Want to Add an Adjustment Layer to Your Video for Easier Editing? Read This Article to Find Out How to Efficiently Add an Adjustment Layer in After Effects
Have you ever used After Effects for professional video editing? Adobe After Effects is a significant video editing software that is used to add animating effects, transitions, intros, outros, and visual effects. You can launch this software on Windows and Mac effectively. Using this high-end software allows you to work on team projects as it consists of auto-saving features.
Moreover, you can add adjustment layers on After Effects to make your video editing more efficient. If you don’t know what the adjustment layer in After Effects is, this article will help you. By reading this article, you can easily learn how to create adjustment layers in your video clips using After Effects.

Part 1: What is the Adjustment Layer in After Effects?
The adjustment layer can save you time and energy from adding effects to multiple clips individually. It does not alter the composition of your video clip until you start applying the effects. Once you add the effect in the adjustment layer, it will replace the effect on all the layers under it.
You can add the adjustment layers in your timeline for creating visual effects such as film grain or color grading. Using the adjustment layer, you can produce transition effects by adding effects to shorter compositions. However, if you want to use the adjustment layer properly, you should select its position carefully in the layer’s stack.

Moreover, always keep in mind that anything placed under the adjustment layer will have a direct effect. In contrast, anything above the adjustment layer won’t get affected. Hence, you can use adjustment layers in After Effects for your convenience to apply all kinds of effects from color to distortion.
Part 2: How to Add Adjustment Layers in After Effects?
Do you want to learn how to add an adjustment layer in After Effects? In this section, we will shed light on two ways through which you can add an adjustment layer to your video clips in After Effects:
Way 1: After opening After Effects and uploading your project, go to the “Layers” tab. Tap on the “New” button and choose “Adjustment Layer.”

Way 2: Once done with uploading the project on After Effects, go to the blank space in the timeline section on the left side. Right-click using your mouse and select the option “New.” Afterward, click on “Adjustment Layer” to proceed. This will add the adjustment layer on the top of your layers stack.

Tips – Keyboard Shortcuts of Adjustment Layers in After Effects
Do you want to save time while creating an adjustment layer in After Effects? Through the following table, you can learn the shortcuts that you can utilize to generate adjustment layers quickly.
| For Windows | For MacBook |
|---|---|
| Ctrl+Alt+Y | Command+Option+Y |
Part 3: Popular Effects You Can Try With Adjustment Layers in After Effects
In this section, you can find out different effects that you can try with the adjustment layer in After Effects. By applying these effects with an adjustment layer, you can transform your video drastically.
1. Animated Ink Text
Do you want to give a unique sense of style to your added text in the video? This particular effect can add animation to your text to produce engaging and distinctive visuals for your text. To make animated ink text illustrations efficiently, you can check the following steps:
Step1 Once you have uploaded the project on After Effects, you can begin with the process. First, open the composition settings and modify the width, height, frame rate, resolution, and background color according to your choice.
Step2 Make sure to select a suitable text font and color to craft a vibrant output. Afterward, head to the “Effect” tab and select tap on “Transition.” From there, select “Linear Wipe.” Now adjust the settings of the “Linear Wipe” effect from the left panel.

Step3 Now add an adjustment layer to your timeline and select “Distort” from the “Effect” tab. From the “Distort” drop-down menu, choose “Turbulent Displace.” After making its settings, such as adjusting the evolution time, head back to the “Effects” tab and select “Blur and Sharpen.” From there, click on “Fast Box Blur.”
Step4 Manage the threshold value properly and then add a new effect called “Stylize.” From its drop-down menu, click on “Roughen Edges.” Afterward, you can add some elements, such as ink droplets, to create a more vibrant look. To ensure a flawless illustration, make sure to match the color of ink droplets with your text color.
Step5 If you want to give a highlight effect to your animated text, you can add 2nd adjustment layer. Afterward, you can select a bold color for your text, such as black, and add a “Perspective” effect. You can adjust the light color and intensity to create compelling results.
Moreover, you can also add blur and matte effects for more modifications. You can use the blending mode to adjust all the colors. Also, you can apply noise and grain effects to eliminate all the harsh edges from the text.

2. Add Blur Effect
There are various blur effects, such as Gaussian blur, motion blur, radial blur, etc. You can add any of the blur effects in your video clip to craft a smoother look. In After Effects, you can find a variety of blur effects that can help you change your video’s perspective. To use an adjustment layer for adding the blur effect, here are the accurate steps:
Step1 Once you have imported the video clip to the timeline of After Effects, add an adjustment layer. Afterward, go to the “Effects” tab and locate any of your preferred effects, such as Gaussian blur. After locating this effect, apply it to the adjustment layer.

Step2 After applying the effect to the adjustment layer, you can change its settings from the left side. From the left panel, you can change the blurriness value and blur dimensions according to your choice.
3. Color Correction
Color correction effects can add and manage the colors in your videos effortlessly. You can change the basic corrections of your video by adjusting the brightness, contrast, hue, exposure, highlight, and other elements. Here are the simple steps to use the adjustment layer for color correction:
Step1 After uploading the video on After Effects, go to the “Layer” tab and add an adjustment layer from there. Once done, you can search for the color correction effect on this tool.
Step2 Once you have found the suitable color correction effect, apply it to the adjustment layer. You can always change the settings of the applied effect from the left panel.

Conclusion
Many beginners are unaware of the term called adjustment layer in video editing. By reading this article, you can find out brief and authentic details about the adjustment layer. Moreover, we have also addressed how to add an adjustment layer in After Effects in simple and easy steps. You can also check about the common effects that people use in Adobe After Effects, using adjustment layers to enhance their videos.
Part 3: Popular Effects You Can Try With Adjustment Layers in After Effects
In this section, you can find out different effects that you can try with the adjustment layer in After Effects. By applying these effects with an adjustment layer, you can transform your video drastically.
1. Animated Ink Text
Do you want to give a unique sense of style to your added text in the video? This particular effect can add animation to your text to produce engaging and distinctive visuals for your text. To make animated ink text illustrations efficiently, you can check the following steps:
Step1 Once you have uploaded the project on After Effects, you can begin with the process. First, open the composition settings and modify the width, height, frame rate, resolution, and background color according to your choice.
Step2 Make sure to select a suitable text font and color to craft a vibrant output. Afterward, head to the “Effect” tab and select tap on “Transition.” From there, select “Linear Wipe.” Now adjust the settings of the “Linear Wipe” effect from the left panel.
Step3 Now add an adjustment layer to your timeline and select “Distort” from the “Effect” tab. From the “Distort” drop-down menu, choose “Turbulent Displace.” After making its settings, such as adjusting the evolution time, head back to the “Effects” tab and select “Blur and Sharpen.” From there, click on “Fast Box Blur.”
Step4 Manage the threshold value properly and then add a new effect called “Stylize.” From its drop-down menu, click on “Roughen Edges.” Afterward, you can add some elements, such as ink droplets, to create a more vibrant look. To ensure a flawless illustration, make sure to match the color of ink droplets with your text color.
Step5 If you want to give a highlight effect to your animated text, you can add 2nd adjustment layer. Afterward, you can select a bold color for your text, such as black, and add a “Perspective” effect. You can adjust the light color and intensity to create compelling results.
Moreover, you can also add blur and matte effects for more modifications. You can use the blending mode to adjust all the colors. Also, you can apply noise and grain effects to eliminate all the harsh edges from the text.
2. Add Blur Effect
There are various blur effects, such as Gaussian blur, motion blur, radial blur, etc. You can add any of the blur effects in your video clip to craft a smoother look. In After Effects, you can find a variety of blur effects that can help you change your video’s perspective. To use an adjustment layer for adding the blur effect, here are the accurate steps:
Step1 Once you have imported the video clip to the timeline of After Effects, add an adjustment layer. Afterward, go to the “Effects” tab and locate any of your preferred effects, such as Gaussian blur. After locating this effect, apply it to the adjustment layer.
Step2 After applying the effect to the adjustment layer, you can change its settings from the left side. From the left panel, you can change the blurriness value and blur dimensions according to your choice.
3. Color Correction
Color correction effects can add and manage the colors in your videos effortlessly. You can change the basic corrections of your video by adjusting the brightness, contrast, hue, exposure, highlight, and other elements. Here are the simple steps to use the adjustment layer for color correction:
Step1 After uploading the video on After Effects, go to the “Layer” tab and add an adjustment layer from there. Once done, you can search for the color correction effect on this tool.
Step2 Once you have found the suitable color correction effect, apply it to the adjustment layer. You can always change the settings of the applied effect from the left panel.
Conclusion
Many beginners are unaware of the term called adjustment layer in video editing. By reading this article, you can find out brief and authentic details about the adjustment layer. Moreover, we have also addressed how to add an adjustment layer in After Effects in simple and easy steps. You can also check about the common effects that people use in Adobe After Effects, using adjustment layers to enhance their videos.
Tips to Make Cinematic Color Grading
New modern color grading software allows you to do point-and-click color grading right in your browser. Color changes are as easy and intuitive as painting or sketching.
You can choose from many different look presets and movie emulations based on Hollywood movies plus real-time previews of your favorite LUTs with this software.
Part 1. What is Cinematic Color Grading?
The cinematic look is all the rage these days and aims to mimic images captured on real film rather than digitally created. To achieve this effect, film directors use various means from lighting to cinematic color gradation. The latter is a powerful tool for bringing a cool or warm tone to a video and providing smooth color transitions to fall on an image that doesn’t look too real but feels emotional.
This kind of post-production processing, which produces beautiful results when used by color magicians, requires a deep understanding of colors and their effect on our psyche and even physiology. It’s not enough to watch a color grading video and use a LUT to get where you want. You should at the very least have an understanding of:
- Color wheel
- Color quality
- Color harmony and discord
- Warm and cool colors
- Color context
Part 2. Tips to make cinematic color grading
Here are three helpful tips to create cinematic-looking images in DaVinci Resolve.
In my 10-year career as a colorist, I’ve worked on every type of content imaginable: short, long, commercial, educational, episodic—you name it. And while each of these formats requires its approach, the one constant that spans them all is the client’s desire for a cinematic look.
Virtually all of us aspire to more cinematic color, but we often come up short—in part because the term itself has become too broad to effectively target. To focus on the goal, I like to think of “cinematic” as “an image whose key visual properties are consistent with those of printed film.”
The print film was the primary medium through which we consumed cinematic images for the first century of filmmaking and is therefore at the very heart of cinematic aesthetics. In this video, I’ll show you my top three secrets to achieving this aesthetic quickly and consistently in Davinci Resolve.
Tips1: Create Color Density
The first secret to film color is to create color density. Another key aesthetic property of film images is that colors can be either highly saturated or highly luminescent but cannot be both.
We can mimic this visual characteristic by identifying strongly saturated colors in our image and using the Hue vs. Lum to reduce their brightness. This simple technique is especially effective on pure primary colors (red, green, and blue).
Tips2: Separation Beats Saturation
The second secret to film color is prioritizing separation over saturation. When you feel like an image lacks overall color or pop, it’s all too easy to reach for the saturation knob, but that’s not a very cinematic solution.
Instead, try using split toning—pushing cool colors into shadows and warm colors into highlights—to increase tonal separation and add depth to an image. This characteristic is present in virtually every film print and is deeply evocative when applied correctly.
Tips3: Strong Contrast is Your Friend
The third secret of film colors is a strong contrast. This is not always easy, as a higher contrast look inherently requires more precision with exposure placement. Too often we pump up some contrast, end up with an image that looks blown out or too crisp, and then immediately back away from editing.
However, if you stick with high contrast long enough to improve your exposure, you’ll get a very different result and be well on your way to a more cinematic image.
Part 3. How to add color cinematic grading by using Filmora?
New modern color grading software allows you to do point-and-click color grading right in your browser. Color changes are as easy and intuitive as painting or sketching.
You can choose from many different look presets and movie emulations based on Hollywood movies plus real-time previews of your favorite LUTs with this software.
Wondershare Filmora is an option if you want to easily change the colors of your projects. You may just double-click the media after dragging it onto the editing timeline to change the contrast, saturation, brightness, and hue.
Despite its speed, it also allows you to merge, edit audio, divide, rotate, and apply as many cool video effects as you like.
Step1Add the media
After installing Wondershare Filmora, click the New Project and Import button to easily find and load your videos.
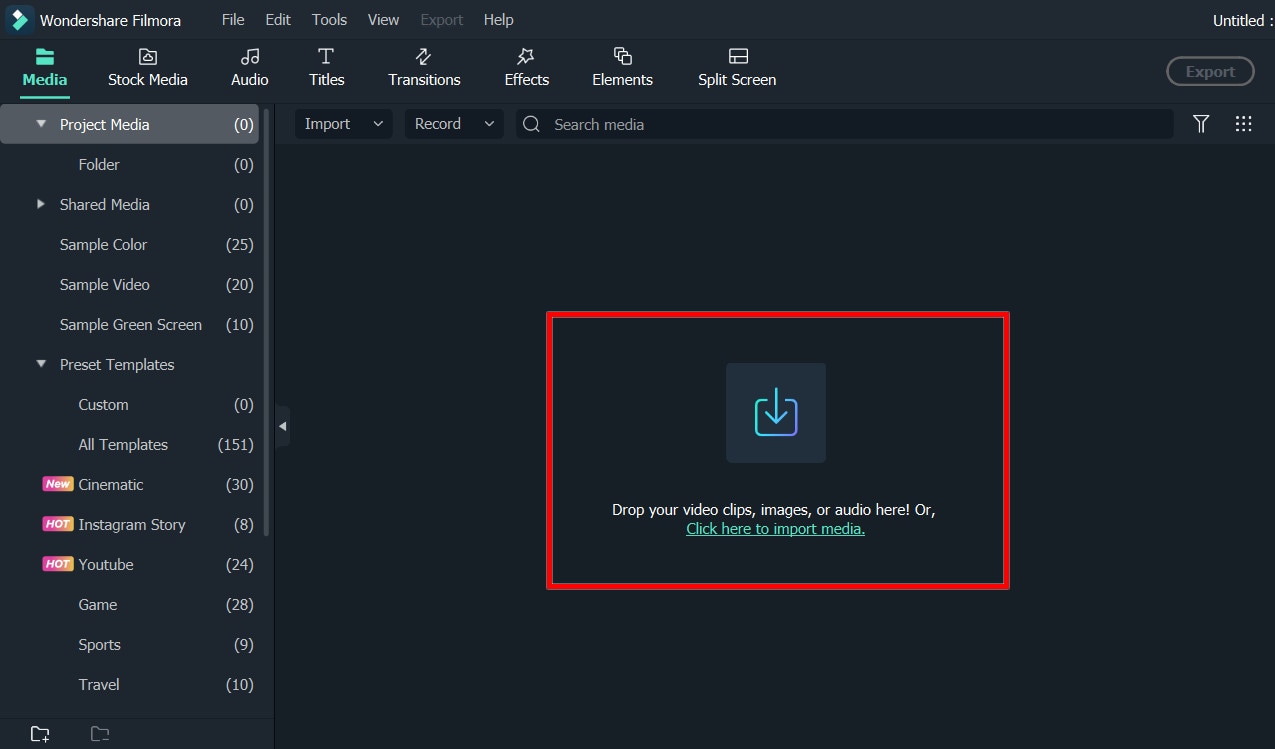
Step2Correct the color [Basic and Advanced]
In the timeline, double-click the video editing window. Select the “Color” panel and make adjustments.
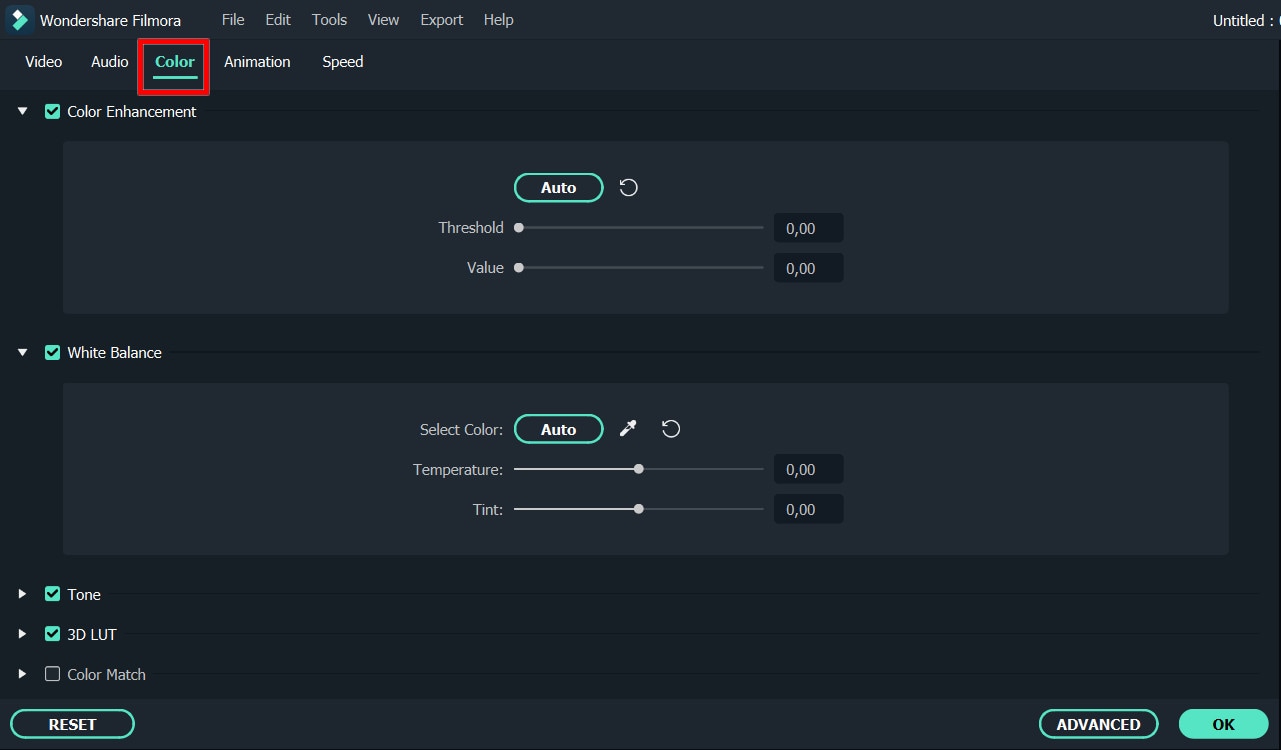
- Contrast: By adjusting this setting, you can control the brightness and color in different parts of the image.
- Saturation: This setting highlights the gray part of the video to a shade. You can adjust it to make the colors of the entire video image appear more saturated or more subdued.
- Brightness: You can change this setting to adjust the overall darkness and lightness of your project.
- Hue: Hue is generally the lightness of a color. Let’s say that when red is saturated with white, it creates a shade of pink.
- 3D LUT: 3D lookup tables provide your media with Hollywood movie color sets like the 007 series, Batman, Harry Porter, etc.
Hover over the indicator to adjust the color correction settings. Then left click on it and move the slider. The corresponding value stabilizes after releasing the mouse button.
With Filmora, you also have access to advanced color correction. Click the Advanced Color Tuning icon to enter the appropriate window where you can fine-tune the color or use preset templates.
The Preferences tab has a variety of templates, including Movie, Normal, 3D LUT, and Vignette. In the Edit tab, you can adjust color temperature, white balance, hue, 3D LUT, color, HSL, light, vignette, etc.
Step3Preview and save the new video
When you are satisfied with your creation, click “Export”. Then click the Settings button and save the new videos in different formats in the Format tab. You can also export the video directly to Vimeo or YouTube or burn it to DVD for better preservation.
Filmora’s color correction tools will make your videos look natural, more attractive, more vibrant, consistent, and professional.
Color Correction Presets
Color correction presets help your video achieve an enhanced cinematic look. Adjust gives you control over fine-tuning the colors in your shots. You can make various adjustments such as color temperature and exposure.
In the “Effects > LUT” tab, you’ll see an extensive selection of preset color settings. These include Vignettes, Movie Looks Like Old Movies, and Cinematic 3D LUT effects such as Harry Potter, Game of Thrones, House of Cards, and Mission Impossible.
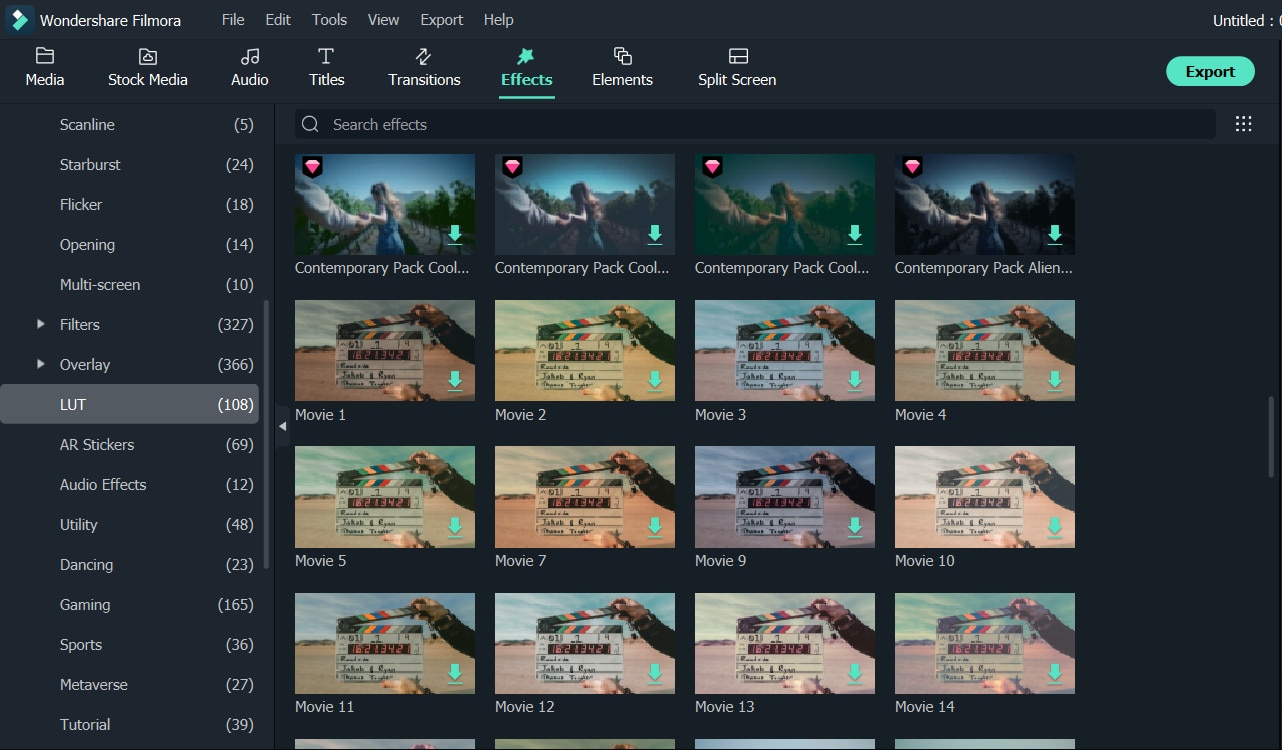
Filmora’s Color Correction Advanced Tool also categorizes your presets. Click on All Presents to see six categories: Favorites, Custom, 3D Lut, Common, Film, and Vignette.
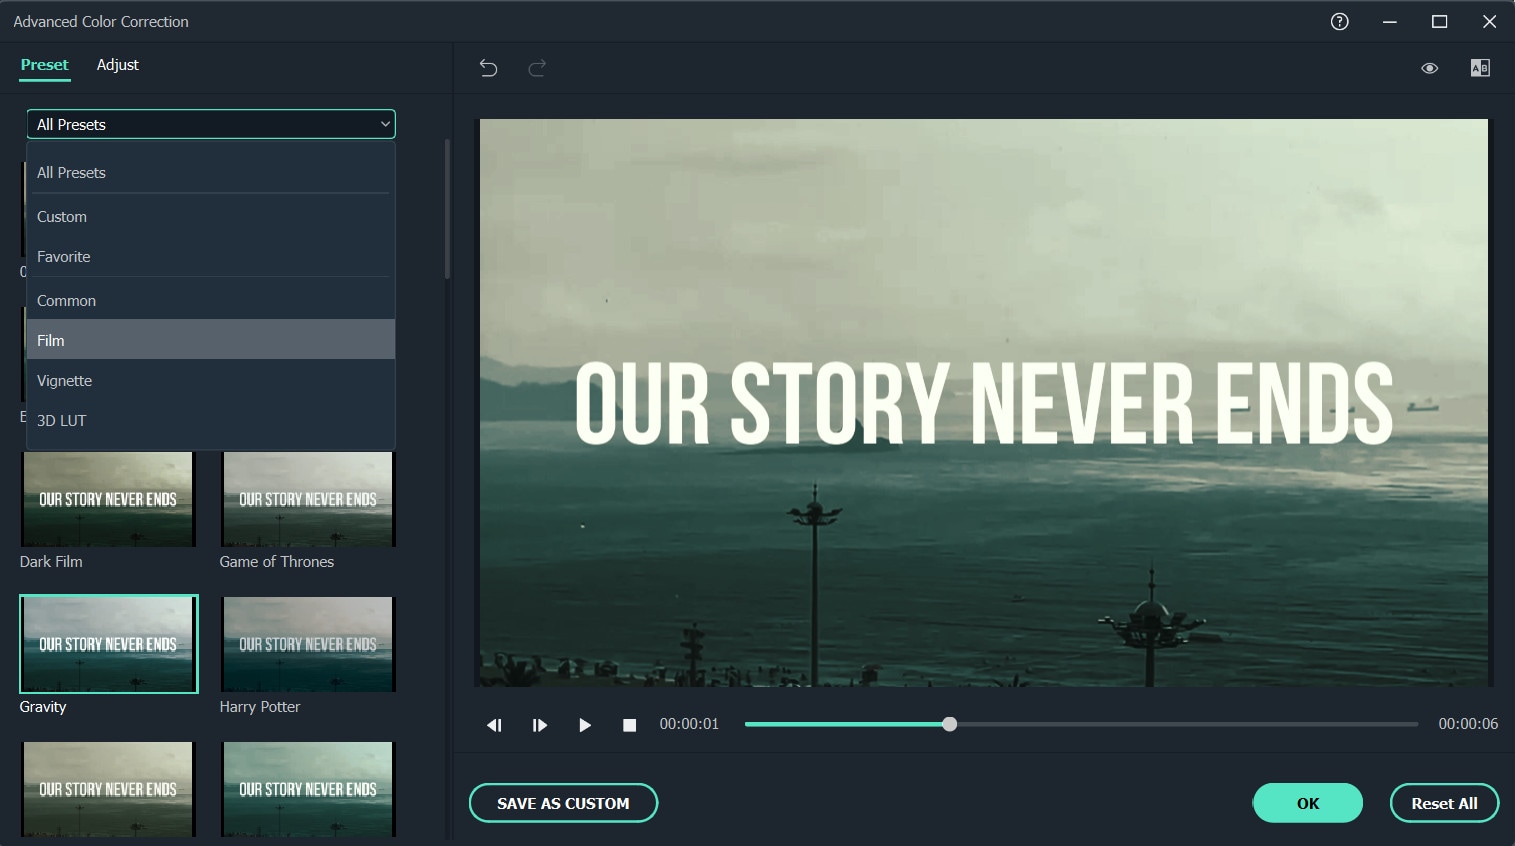
Double-click a preset to apply it to your video. You can see how it looks in the Advanced Color Correction preview window. If you are satisfied with the results, click OK.
Conclusion
Above are the steps to give your video a cinematic look using Wondershare Filmora, hope this helps if you are wondering how to do it. As we can see above, using Filmora video editor will make you more creative in making videos with a suitable emotional tone.
Free Download For Win 7 or later(64-bit)
Free Download For macOS 10.14 or later
Camtasia Video Editor Review
If you are planning to record your screen and create a tutorial video, you will need a screen recording application. After capturing your video, you need to edit your videos so that you can remove unnecessary parts and add texts and titles wherever necessary. You will need a video editor with screen recorder, and Camtasia video editor is a suitable choice.
Camtasia lets you capture your gameplay as well as create software demo videos. You can choose from video templates and themes to create professional-quality videos as per your requirements. You can add transitions, effects, and annotations to make the videos attractive and engaging. But is Camtasia editor really the best one or is there a better alternative available? Find out from our Camtasia review.
Part 1. How to Download and Install Camtasia?
TechSmith Camtasia is compatible with both Windows 10 or above and Mac 10.14 or above. Camtasia is not a lightweight video editor as it demands 8GB of RAM. As far as the processor goes, it requires at least a 6th Gen Core i3 processor or M1 Apple processor. Therefore, if you have a low-end computer, you may experience lag and crash.
Camtasia is a premium video editor, and you can download its free trial version before opting for its premium version. The price plans differ for individuals, businesses, education, and government organizations. Here are the steps to download and install Camtasia free trial version.
Step 1: Open the web browser on your computer and visit “www.techsmith.com/download/camtasia” .
Step 2: Click on Windows Download or Mac Download as per your operating system.

Step 3: Wait for some time for the installer software to get downloaded. Thereafter, click on the installer file to install Camtasia following the on-screen instructions.
Step 4: After installation, launch Camtasia and click on New Recording option to capture your screen. If you want to edit an existing video, you need to click on New Project option.

Step 5: If you have clicked on New Recording option, you will get a widget where you need to select your screen to start capturing. You can also select external webcam and microphone. Once you are ready to recording, Click on Rec red button.

Part 2. Key Features of Camtasia
Camtasia is a versatile video editor that competes with all the premium video editors in the market. Hence, there is no dearth of features and functionalities in Camtasia editor, and we are going to highlight the key features that you should be aware of.
Recording – Camtasia lets you capture your screen as well as webcam video easily. You can also record system audio as well as external mic audio. This is useful in recording gameplay with live reaction, tutorial, and training videos as well as presentation videos. You can capture any specific region of the screen as well as use greenscreen effect for webcam videos.
Templates – Camtasia is tailor-made for creating video tutorials, how-to videos, software demo videos, presentation and instructional videos, and training videos. This is why it comes with video templates that users can use immediately to create any specific type of video instantly. In fact, you can customize these templates and create your own theme so that the videos get personalized branding.
Presets and Transitions – There are loads of presents and transitions that you can include in your video to uplift the video content and quality. You can also create custom styles and configure them for regular use in your videos. Transitions are extremely useful to avoid pauses and put them in between slides.
PowerPoint Integration – You can turn your slides on PowerPoint into video instantly with Camtasia. Camtasia comes with PowerPoint integration through which you can import slides in Camtasia and create a video out of it with transitions and other effects. Alternatively, you can record your presentation in PowerPoint in video format.
Annotations and Interactivity – Camtasia lets you create videos where the viewers can interact and take actions. There are options for callouts, quizzes, textboxes, and much more so that the viewers can engage themselves in the video. Besides, you can use arrows, shapes, and other objects to highlight parts in your video for better explanation.
Audio and Cursor Effects – Camtasia has a wide range of audio effects that you apply to your audio recordings or import audio files. Besides, there are options for background noise removal, adjusting gain and pitch, compression, and emphasize. Similarly, you can highlight your cursor movement, spotlight the area as well as magnify when required.
Part 3. How to Edit Videos with Camtasia?
Camtasia is essentially a video editor where you can all types of videos as per your requirements. Camtasia has a robust timeline where you can import different types of video and audio files and arrange them sequentially. You can have multiple layers on top of another such as texts, shapes, photos, voiceover, and other media files as required. Camtasia has a powerful canvas where you can preview your edited video as well as resize and rotate the edited video. Here are the steps to edit videos with Camtasia.
Step 1: Open Camtasia and click on New Project. Sign into your Camtasia account to start editing your recorded video.
Step 2: Go to Media and click on Import Media. Import all the media files starting from video clips to audio clips and even photos.

Step 3: From Media Bin, drag and drop the media files to the timeline. Keep the video files in one track, audio files in another track, and likewise. Arrange them properly so that they are placed sequentially. You can trim them directly from the timeline and stretch the music file to cover the entire video as required.

Step 4: Go to Annotation to add shapes, texts, arrows, and callouts. Go to Transitions and drag and drop transitions of your choice in between video clips on the timeline as you think perfect.

Step 5: Go to Audio Effects to enhance the audio of the video. Moreover, you can check and apply animations, behaviors(text effects), cursor effects, visual effects as well as interactivity as you think relevant.
Step 6: On the canvas, check out how your edited video looks like. Once you are satisfied, click on Export button to save the video on your hard drive.

Part 4. Camtasia Alternative to Edit Videos
There are various reasons why people look for a better alternative to Camtasia after trying out its free trial. First of all, you need a high-end computer for Camtasia to run smoothly. Second, there are limited effects and animations available for a premium video editor. Users have also reported crashes and bugs while editing high-resolution videos. We recommend Wondershare Filmora as the best alternative to Camtasia edit video.
Filmora is a premium video editor with video capturing option just like Camtasia. Filmora scores over Camtasia as it has minimum system requirements, and there are loads of visual and audio effects including the trending ones. Besides, there are stock media files that you can include in your video. Moreover, Filmora supports more file formats for importing and exporting. Here are the steps to edit videos on Filmora.
For Win 7 or later (64-bit)
For macOS 10.12 or later
Step 1: Download and install Filmora on your computer. Filmora is available for Windows and Mac.
Step 2: Launch Filmora and click on New Project. Drag and drop all your media files into Project Media folder.
Step 3: Drag and place the video files one by one on the timeline as per your requirements. Place audio files in the same way on a different track.

Step 4: Go to Transitions located at the top bar and drag and drop any transition in between video clips and photos wherever required. You can also insert Titles, Effects, and Elements from the top bar.

Step 5: Go to Audio located at the top bar, and drag and drop audio effects on the audio files on the timeline. You can also check the Stock Media and use them in your video as required.
Step 6: Play the video once everything is done, and click on Export button to save the video file on your hard drive.

Part 5. FAQs about Camtasia
1. Can I use Camtasia for free?
You can download the free trial version of Camtasia and use it for a limited number of days. The free version has all the features unlocked, but the output video will have Camtasia watermark.
2. Is Camtasia good for video editing?
Camtasia is good for video editing if your video belongs to training and tutorial videos. There are templates and annotations available that are tailor-made to edit how-to videos and add interactivity for the viewers. However, for an all-rounder video editor, we recommend Filmora over Camtasia.
3. How do I trim a video in Camtasia?
Once your import the video and place it on the timeline, use green and red to select the part that you want to trim. Once the selection is done, click on Cut(scissor) icon. The portion will be cut, and you can paste it anywhere if required. Lastly, join the parts of the video on the timeline after trimming any part out.
4. Can I record my screen with Camtasia?
Yes, Camtasia allows you to record your screen, webcam, or both simultaneously. You can also capture system audio or record your own voiceover. This feature is useful for creating tutorials, demos, or presentations.
5. How do I export my videos from Camtasia?
Once you have finished editing your videos, you can export them in various formats, such as MP4, WMV, MOV, and AVI. Camtasia also allows you to customize the video settings, such as resolution, frame rate, and bitrate. You can also upload your videos directly to YouTube, Vimeo, or Screencast.com from Camtasia.
For macOS 10.12 or later
Step 1: Download and install Filmora on your computer. Filmora is available for Windows and Mac.
Step 2: Launch Filmora and click on New Project. Drag and drop all your media files into Project Media folder.
Step 3: Drag and place the video files one by one on the timeline as per your requirements. Place audio files in the same way on a different track.
Step 4: Go to Transitions located at the top bar and drag and drop any transition in between video clips and photos wherever required. You can also insert Titles, Effects, and Elements from the top bar.
Step 5: Go to Audio located at the top bar, and drag and drop audio effects on the audio files on the timeline. You can also check the Stock Media and use them in your video as required.
Step 6: Play the video once everything is done, and click on Export button to save the video file on your hard drive.
Part 5. FAQs about Camtasia
1. Can I use Camtasia for free?
You can download the free trial version of Camtasia and use it for a limited number of days. The free version has all the features unlocked, but the output video will have Camtasia watermark.
2. Is Camtasia good for video editing?
Camtasia is good for video editing if your video belongs to training and tutorial videos. There are templates and annotations available that are tailor-made to edit how-to videos and add interactivity for the viewers. However, for an all-rounder video editor, we recommend Filmora over Camtasia.
3. How do I trim a video in Camtasia?
Once your import the video and place it on the timeline, use green and red to select the part that you want to trim. Once the selection is done, click on Cut(scissor) icon. The portion will be cut, and you can paste it anywhere if required. Lastly, join the parts of the video on the timeline after trimming any part out.
4. Can I record my screen with Camtasia?
Yes, Camtasia allows you to record your screen, webcam, or both simultaneously. You can also capture system audio or record your own voiceover. This feature is useful for creating tutorials, demos, or presentations.
5. How do I export my videos from Camtasia?
Once you have finished editing your videos, you can export them in various formats, such as MP4, WMV, MOV, and AVI. Camtasia also allows you to customize the video settings, such as resolution, frame rate, and bitrate. You can also upload your videos directly to YouTube, Vimeo, or Screencast.com from Camtasia.
Also read:
- New 2024 Approved 5 Ways to Denoise a Video
- New A Guide to Adding Audio in Wondershare Filmora
- In 2024, A Complete Guide to the Best Brand Story Videos
- In 2024, Making Slow Motion Videos in Premiere Pro A Review on The Best Methods
- Unleash the Power of Video Slow Motion with Wondershare Filmora. Find Out How to Create Slow Motion Video with the Effective Speed Ramping Feature on Filmora
- 2024 Approved Polish and Enshrine Your Music Videos with the Best Editing Software, Filmora. Add Cuts to Your Beat, Light Leaks, and Much More
- 2024 Approved Top Tips on How to Design Travel Slideshow
- Hyperlapse VS Timelapse Videos for 2024
- New 2024 Approved Progressive Solutions to Add VHS Effects to Video with Ease
- Updated How to Record Shots and Edit Them Using Wonderware Filmora to Create the Super Jump Effect? A Complete Guide for Beginners
- 2024 Approved Learn to Merge Clips in DaVinci Resolve with Simple Steps
- New A Guide to Speed up a Video on Splice for 2024
- New 2024 Approved How to Create Text Animation for Videos
- Step by Step to Cut a Video in QuickTime
- New How to Create Datamoshing Effect to Your Footage in After Effects, In 2024
- Best Android Apps For Creating Slow Motion Videos
- Updated The Best Peter McKinnon LUTs for Perfect Video Editing
- New Do You Want to Be Aware of VHSs Meaning? There Is Nothing to Be Worried About because We Will Guide You in This Article
- 2024 Approved Best Way to Freeze-Frame in Final Cut Pro
- Updated How to Loop Videos on Android Phones for 2024
- 2024 Approved Can You Get Free After Effects Templates Slideshow? Yes, You Definitely Can! Follow the Given Discussion to Learn About a Simple Trick and More About Getting Free Effects Template for Slideshows
- New Ways to Make Sure Your Video Editing Course Is Worthing to Watch for 2024
- Updated How to Create A Freeze Frame Sequence in Video for 2024
- Are You a Teacher? Are You Looking for Educational Background Music? This Article Has Everything You Will Need to Know for Creating Outstanding Educational Teaching Videos
- New AI Features of Wondershare Filmora - Silence Detection in Videos
- Updated How to Do Perfect Match Paint 100 the Simple Way
- Updated In 2024, Complete How-To Tutorials of Kapwing Collage Maker
- 2024 Approved How to Create an Adobe Slideshow the Easy Way
- New General Information That You Need To Know About MKV Format
- Hitfilm Express - A Guide to Download, Install, Key Features for 2024
- Updated 2024 Approved How to Apply Video Filters Mobile and Desktop
- The Quicktime Software with Its Latest Version Gives You an Option to Change the Speed of an Audio or Video File. It Makes It Easy to Watch the Slow-Motion Video or Fast-Forward the Audio for 2024
- How to Find iSpoofer Pro Activation Key On Motorola Edge 2023? | Dr.fone
- In 2024, How To Fix Apple iPhone 11 Could Not Be Activated/Reached Issue
- In 2024, How to Access Your iPhone 15 Pro When You Forget the Passcode?
- How To Fix Part of the Touch Screen Not Working on Nubia Red Magic 8S Pro+ | Dr.fone
- Easily Unlock Your Infinix Smart 7 Device SIM
- In 2024, Apple ID is Greyed Out On Apple iPhone 6 How to Bypass?
- How to Remove a Previously Synced Google Account from Your Poco M6 Pro 4G
- How to Change/Add Location Filters on Snapchat For your Apple iPhone 13 mini | Dr.fone
- Does Oppo Find N3 Flip Have Find My Friends? | Dr.fone
- Apple iPhone 15 Backup Password Never Set But Still Asking? Heres the Fix | Dr.fone
- In 2024, The Best Methods to Unlock the iPhone Locked to Owner for iPhone 12 mini | Dr.fone
- Prank Your Friends! Easy Ways to Fake and Share Google Maps Location On ZTE Blade A73 5G | Dr.fone
- How to Unlock Apple iPhone 14 Pro Passcode without Computer?
- 5 Ways to Transfer Music from Apple iPhone 6 Plus to Android | Dr.fone
- How to Xiaomi Civi 3 Disney 100th Anniversary Edition Get Deleted Pictures Back with Ease and Safety?
- The Ultimate Guide to Get the Rare Candy on Pokemon Go Fire Red On Samsung Galaxy S23 Tactical Edition | Dr.fone
- Here are Some of the Best Pokemon Discord Servers to Join On Vivo Y200e 5G | Dr.fone
- Title: How to Add Video Effects with Movavi Slideshow Maker
- Author: Chloe
- Created at : 2024-05-20 03:37:21
- Updated at : 2024-05-21 03:37:21
- Link: https://ai-editing-video.techidaily.com/how-to-add-video-effects-with-movavi-slideshow-maker/
- License: This work is licensed under CC BY-NC-SA 4.0.
