:max_bytes(150000):strip_icc():format(webp)/safari-photo--canon-and-nikon-digital-cameras-and-lenses--masai-mara-game-reserve--kenya--769713645-5bde071546e0fb0026a2c012.jpg)
How to Change Frame Rate in Premiere Pro

How to Change Frame Rate in Premiere Pro
The video’s frame rate is an important aspect of it. Too high of a frame rate makes the video seem unnatural. On the other hand, too low can make some videos choppy. You can fix that by changing the frame rate using a video editor. And we are here to help you learn how to do that. Here’s how to change the frame rate in Premiere Pro.
The frame rate sometimes makes or breaks the video. So it is important to get this setting right. Suppose you made a mistake and recorded your video in the wrong setting. You can follow this guide to solve your problem.
How To Check Video Frame Rate in Premiere Pro
Before we teach you how to change a video’s frame rate in Premiere Pro, let’s first make sure you know how to check. Maybe you don’t need to modify the video because it is already in the correct setting.
So how do you do that in Premiere Pro?
- Import the video to Adobe Premiere Pro.
- Check the “Media” window. Next to the video file name is its frame rate. It is written in the format x.00 fps. FPS stands for “frames per second,” which is used interchangeably with the term frame rate.
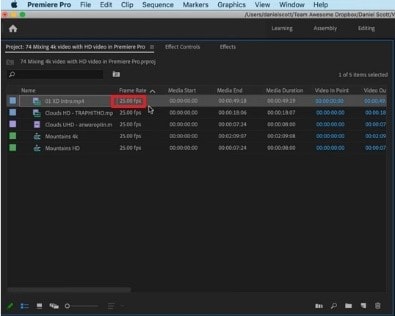
Reasons for Changing Frame Rate
Suppose you have an action-packed video. It would not look great at 30 fps - it will look too choppy. That will give your audience a rotten viewing experience. By increasing the frames, you can make the motion more fluid and smoother.
Increasing the frames per second also results in better slow-motion videos. A 30 fps one would not look good with this effect because it does not show smooth motion. Thus, we recommend making the video at least 60 fps.
However, a higher frame rate does not always mean better videos. It can result in what they call the “soap opera effect.” It means the video shows too many details. That makes the videos seem “unnatural” or less cinematic.
High frame rates make videos look more realistic since there is less stuttering and motion blur between frames. That’s great. But for older audiences - the ones used to watching videos at 24 fps, it can be off-putting. So it’s also important to consider your target audience when deciding the right frame rate for your video.
With these reasons in mind, you may want to change your video’s frame rate.
How To Change FPS in Premiere Pro
Let’s dilly-dally no more. Here’s a quick guide on how to change fps in Adobe Premiere Pro. This program gives you two different ways to change fps. One is changing the frame rate of a sequence; the other is changing the frame rate of the video clip. We will teach you how to do both.
l Change the Frame Rate of a Sequence
Suppose you want to keep the frame rate of most of the video the same. Only some parts need adjusting. You can change the frame rate of the sequences that need changing instead. Here are the steps to follow to achieve this:
- Open your project in Adobe Premiere Pro.
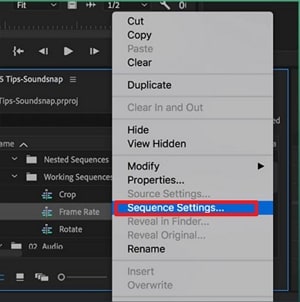
- In the Project panel, select the sequence whose frame rate you want to change. Right-click on that sequence.
- Choose “Sequence Settings” from the menu that appears.
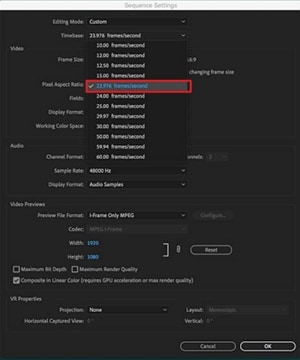
- Click the drop-down menu for “Timebase.”
- Select the frame rate you want the sequence to be in.
- Click “OK.”
l Change the Frame Rate of a Video Clip
Here are the steps you should follow if you want to change the frame rate of an entire video clip.
- Import your video clip to Premiere Pro and drag it to the timeline.
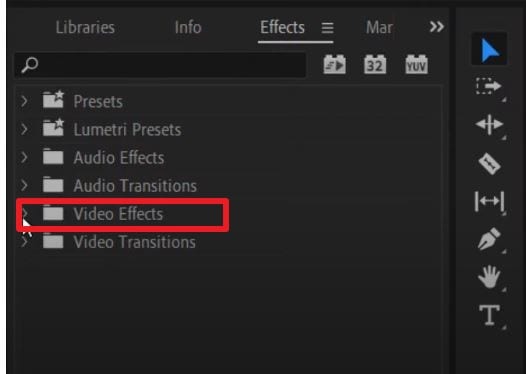
- Go to the “Effects” tab. It’s in the options at the bottom left of the screen.
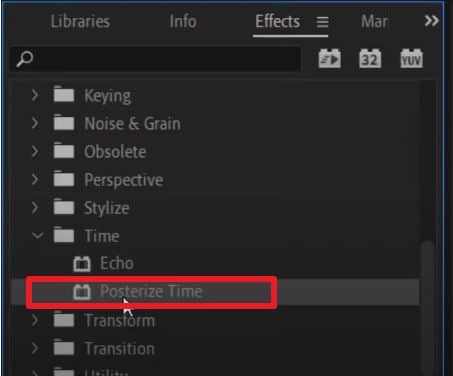
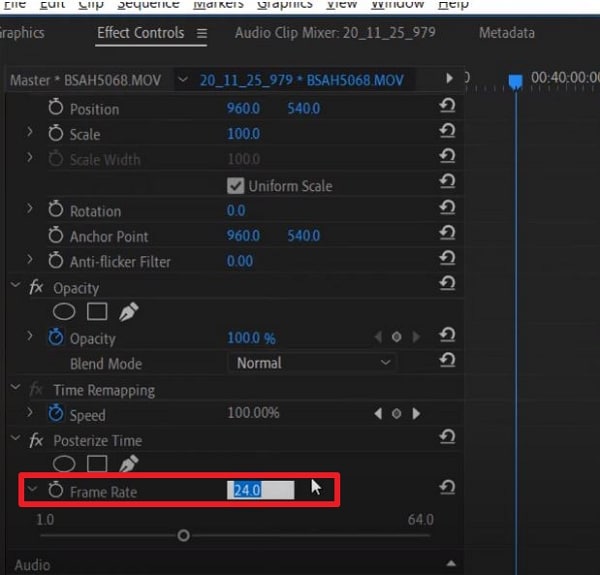
- Select “Video Effects” > “Time” > “Posterize Time.”
- Drag and drop the Posterize Time effect to the clip whose frame rate you want to change.
- Click “Effect Controls” at the top left of the screen.
- Select the small “arrow” button next to the “Frame Rate” text under “Posterize Time.”
- Change the frame rate to your preferred setting. For example, type “60” to make the video 60 fps.
- Click “Sequence” > “Render Selection.”
And that’s it! That is how you change a video clip’s frame rate in Adobe Premiere Pro.
How To Make 120 FPS Videos With Premiere Pro
Videos that are 120 fps are very popular now. If you are a gaming content creator on YouTube, you probably record videos at this frame rate. You’d want to edit that footage and export it at the same frame rate.
Adobe Premiere Pro allows you to do that. But it’s a little bit of a hidden feature. When creating a sequence, you may notice that the highest the frame rate can go is 60 frames per second. That’s obviously not the number that we want. Don’t worry. There is a workaround. The best thing is that it’s super easy.
Follow these steps to change your video to 120 fps:
- Import your 120 fps video to Adobe Premiere Pro.
- Select your footage. Drag it to your timeline or the tab where the text says, “Drop media here to create sequence.”
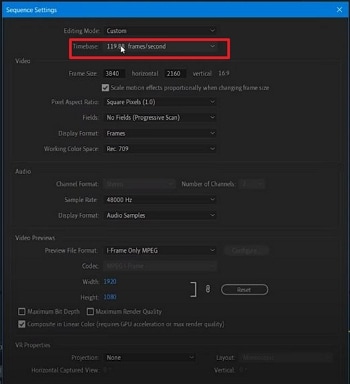
- Select the timeline panel. Click “Sequence” > “Sequence Settings.”
- Check the “Timebase” section. It should say “119.88 frames/second,” 120 fps when rounded off.
- Edit the video as needed and render it. The output should stay at 120 fps.
How To Change Video From 30 FPS to 60 FPS in Premiere Pro
Do you have a video recorded at 30 frames per second, and do you want it at 60? Here’s a simple solution to that. Follow these steps in Adobe Premiere Pro to double the video’s frame rate.
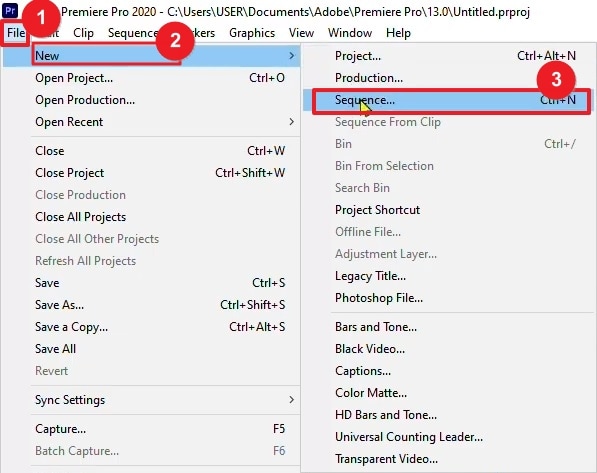
- Open Adobe Premiere Pro. Click “File” > “New” > “Sequence.”
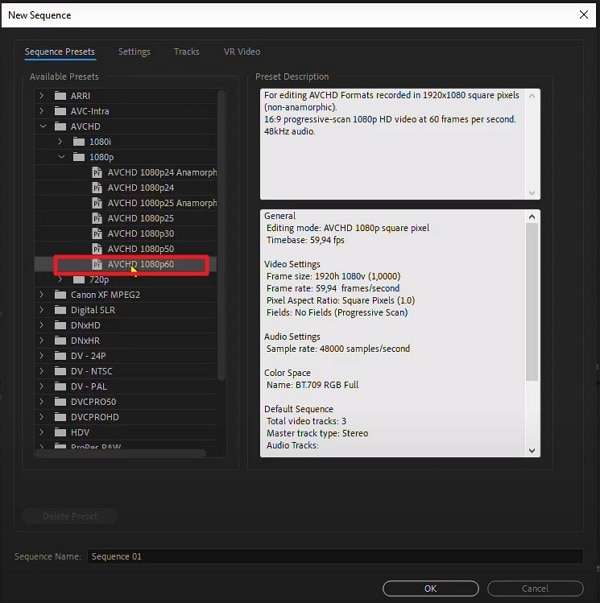
- Click “AVCHD” > “1080p” > “AVCHD 1080p60” > “OK.”
- Import your 30 fps video into Adobe Premiere Pro.
- Drag the video into the timeline.
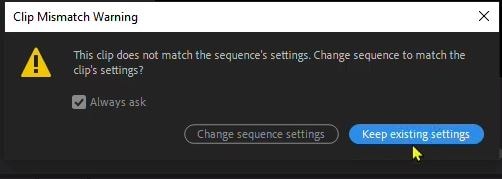
- Click “Keep existing settings.”
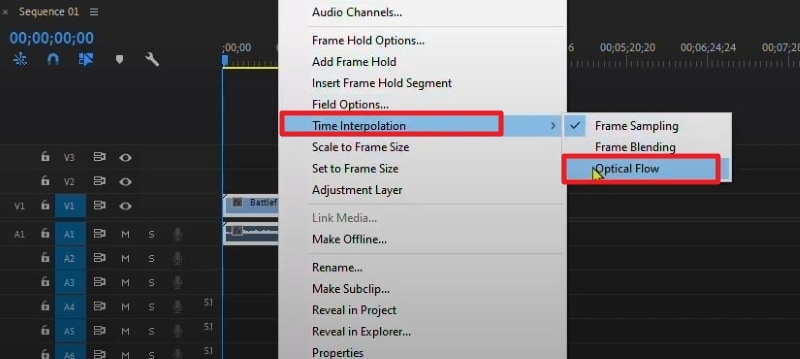
- Right-click the video in the timeline. Select “Time interpolation” > “Optical Flow.”
- Press the “Enter” key. Wait for the processing to finish. This can take hours.
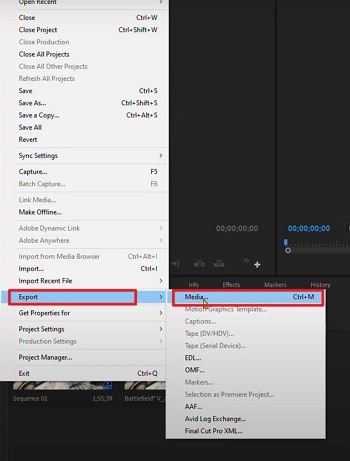
- Click “File” > “Export” > “Media.”
- Select a preset.
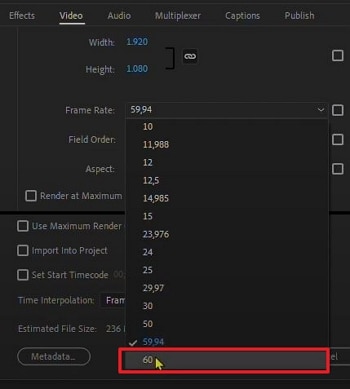
- Scroll down to the “Effects” section to check if the frame rate is at 60 fps. If not, change it to 60 fps.
- Click “Export.”
[Bonus] Wondershare Filmora - Premiere Pro’s Alternative
Free Download For Win 7 or later(64-bit)
Free Download For macOS 10.14 or later
What if you don’t have Adobe Premiere Pro or don’t like this tool? What’s a good alternative? That would be Wondershare Filmora.

Why use Filmora as a substitute for Premiere Pro? This video editor offers lots of great features, basic or advanced. With these at your fingertips, you can bring your videos to the next level and wow your audiences.
Among Filmora’s handy features is the ability to quickly change a video’s frame rate. You don’t even need to be a video editing expert to do it with this software! That’s how straightforward the process is.
How To Change the Frame Rate in Wondershare Filmora
Changing a video’s frame rate in Wondershare Filmora is super easy. Even a child can do it due to how simple the steps are. Here, read this 5-step guide to change a video’s frame rate using this amazing video editor.
- Launch Wondershare Filmora and create a new project.

- Import the video whose frame rate you want to change.
- Drag the video into the timeline.
![]()
- Click “Export.”
- Select the format you want the output file to be in. Find the “Frame Rate” in the options, click the drop-down menu, and select the frame rate that you want. Click “Export.”

Conclusion
Getting the frame rate of a video right is important, so you should not neglect it. It greatly affects your audience’s viewing experience. Thankfully, if you make mistakes, you can correct them with video editors like Premiere Pro. If it’s not to your liking, you can use Wondershare Filmora instead - it’s the best alternative.
Filmora lets you change a video’s frame rate very easily. Also, it gives you a bunch of other features you might enjoy using. And here’s some good news: this software app is affordable! You can also download the free trial to give it a shot.
Free Download For macOS 10.14 or later
What if you don’t have Adobe Premiere Pro or don’t like this tool? What’s a good alternative? That would be Wondershare Filmora.

Why use Filmora as a substitute for Premiere Pro? This video editor offers lots of great features, basic or advanced. With these at your fingertips, you can bring your videos to the next level and wow your audiences.
Among Filmora’s handy features is the ability to quickly change a video’s frame rate. You don’t even need to be a video editing expert to do it with this software! That’s how straightforward the process is.
How To Change the Frame Rate in Wondershare Filmora
Changing a video’s frame rate in Wondershare Filmora is super easy. Even a child can do it due to how simple the steps are. Here, read this 5-step guide to change a video’s frame rate using this amazing video editor.
- Launch Wondershare Filmora and create a new project.

- Import the video whose frame rate you want to change.
- Drag the video into the timeline.
![]()
- Click “Export.”
- Select the format you want the output file to be in. Find the “Frame Rate” in the options, click the drop-down menu, and select the frame rate that you want. Click “Export.”

Conclusion
Getting the frame rate of a video right is important, so you should not neglect it. It greatly affects your audience’s viewing experience. Thankfully, if you make mistakes, you can correct them with video editors like Premiere Pro. If it’s not to your liking, you can use Wondershare Filmora instead - it’s the best alternative.
Filmora lets you change a video’s frame rate very easily. Also, it gives you a bunch of other features you might enjoy using. And here’s some good news: this software app is affordable! You can also download the free trial to give it a shot.
4 Solutions to Crop a Video on Android Easily
Nowadays, we can use our mobile phones to create almost anything – they have become an indivisible part of our lives. Most of the people check their mobile phones every 2 minutes – did they receive a new message?
What about different kinds of notifications – reactions on social network, or the ones which inform us about breaking news, or, to-do lists? People are well-connected to Facebook, Instagram, TikTok, and sometimes, we just want to update our accounts with just photos or new videos we took on the go. Sometimes, we have a perfect footage we took with our Android, but we have no idea, or just no time to edit our stunning video clips on the computer.
Yes, changing or adjusting a video shouldn’t be that hard – you shouldn’t be obligated to turn to Adobe Premiere Pro or other “heavy” software in order to have a video to your whole liking. Therefore, we have mobile applications just for editing our videos, in a simple, and fast way (thank you, mobile developers!).
In this article, we will be discussing how to crop a video on Android, but since most android devices don’t have this option, you will need to do it externally, by downloading and using different apps. So, more concretely, we will touch upon how to crop our video clips using following apps: Google Photos, Clideo, and Filmora.
Using Google Photos
In case you have Android, the Google Photos app will be there – it’s free and in most cases, already installed and ready to serve you. If you can’t find Google Photos, just find it and download it from the Google Play Store.

First off, you just open the application and allow it to access photos and media on your device. Tap the video you would like to crop. Then, click on Edit: it will launch the in-app video editor.
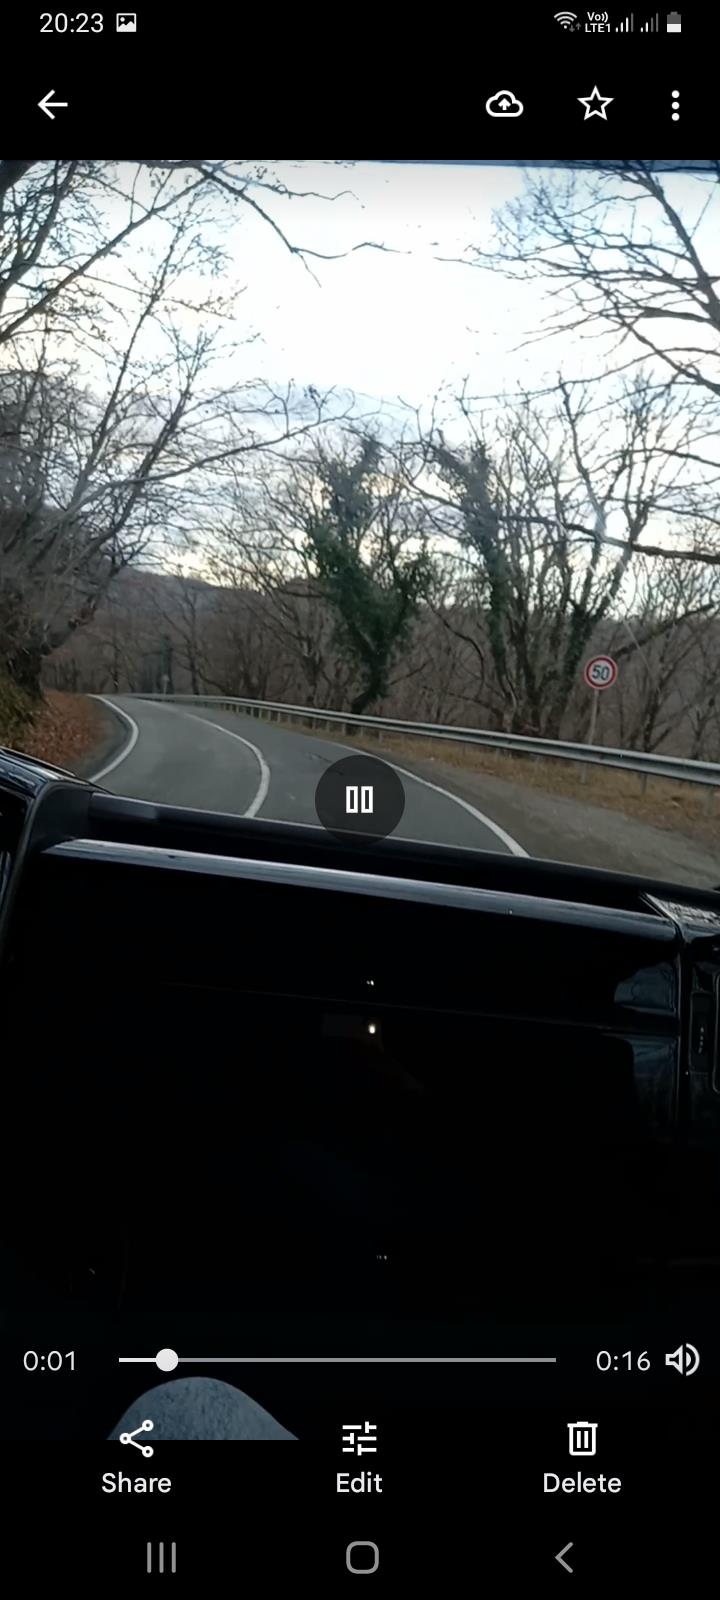
At the bottom, you will see the Crop option and hit on it, which will result in appearing a cropping box around your video clip.
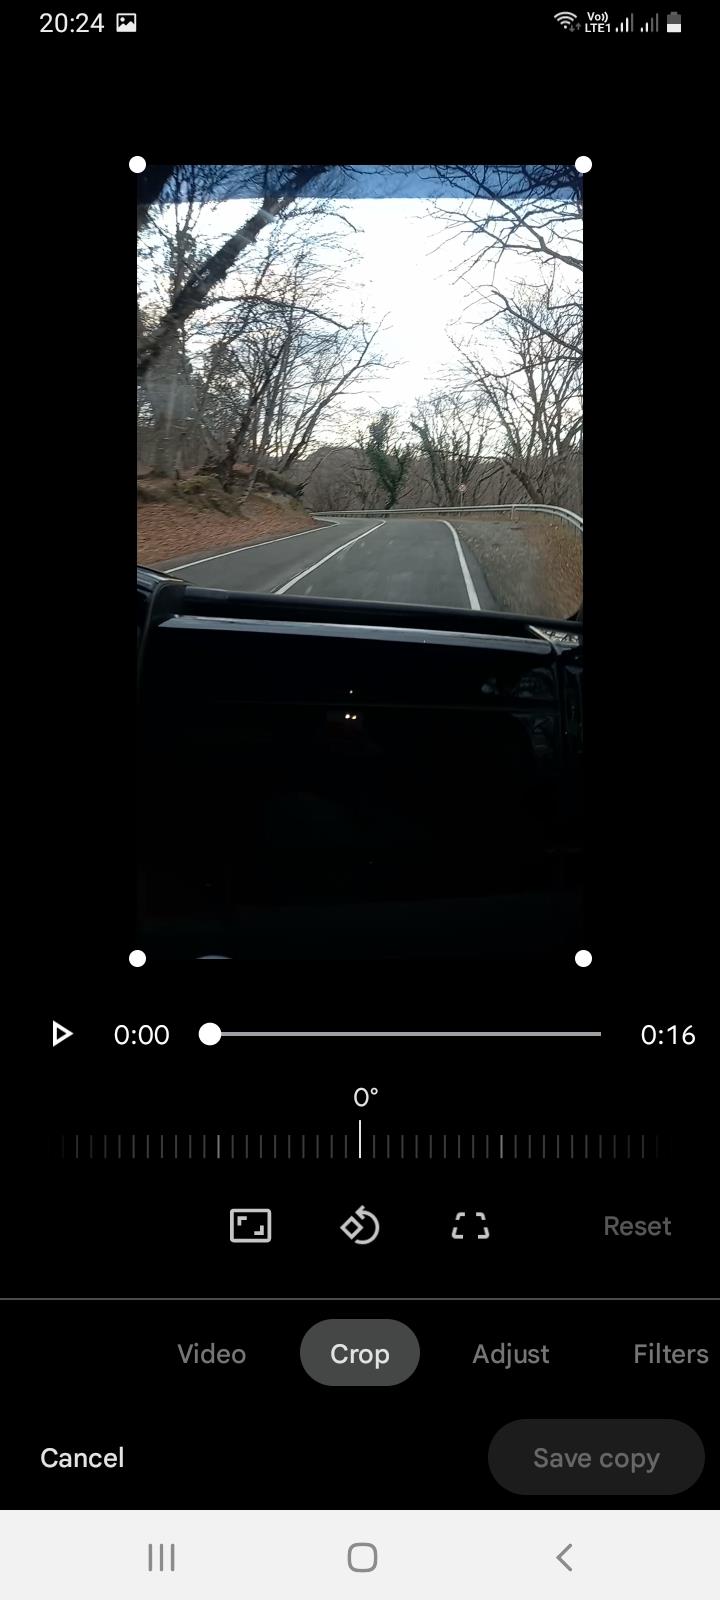
Once you see little icons at the bottom, you need to choose the first one – it’s the Ratio button, through which you can choose the aspect you would like to apply. Your choice is between these several aspect ratios: Free, Original, Square, 5:4, 16:9, 4:3, and 3:2.
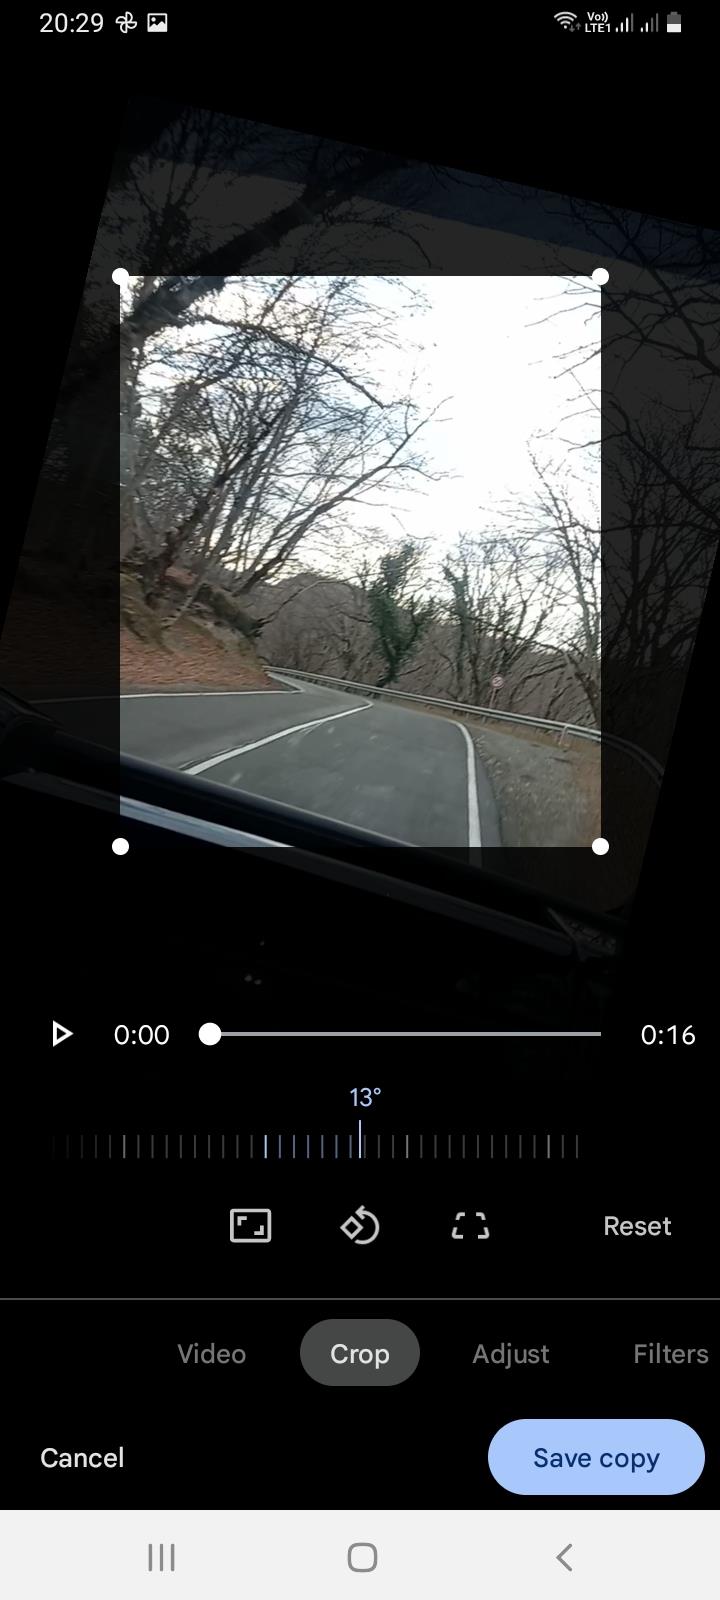
Choosing Free ratio option gives you the freedom to adjust the cropping sliders manually, in order to resize the video to any aspect ratio; it is even possible to rotate the clip, pinch, and zoom in/out.
After you are done with adjusting your video, you need to click on the Save Copy button, which will save a new edited version of your footage. And, meanwhile, don’t worry! – this will not be overwritten on the original one, which will still stand intact.
Using Clideo
Clideo is an interesting one… it doesn’t require you to download anything, because there is a way to crop your video online, through the web browser on Android.
First off, you need to click on Clideo’s Android crop video tool from the browser on the smartphone. You will see a Choose File button and hit on it – this will take you to your gallery and let you find the clip you are about to crop.
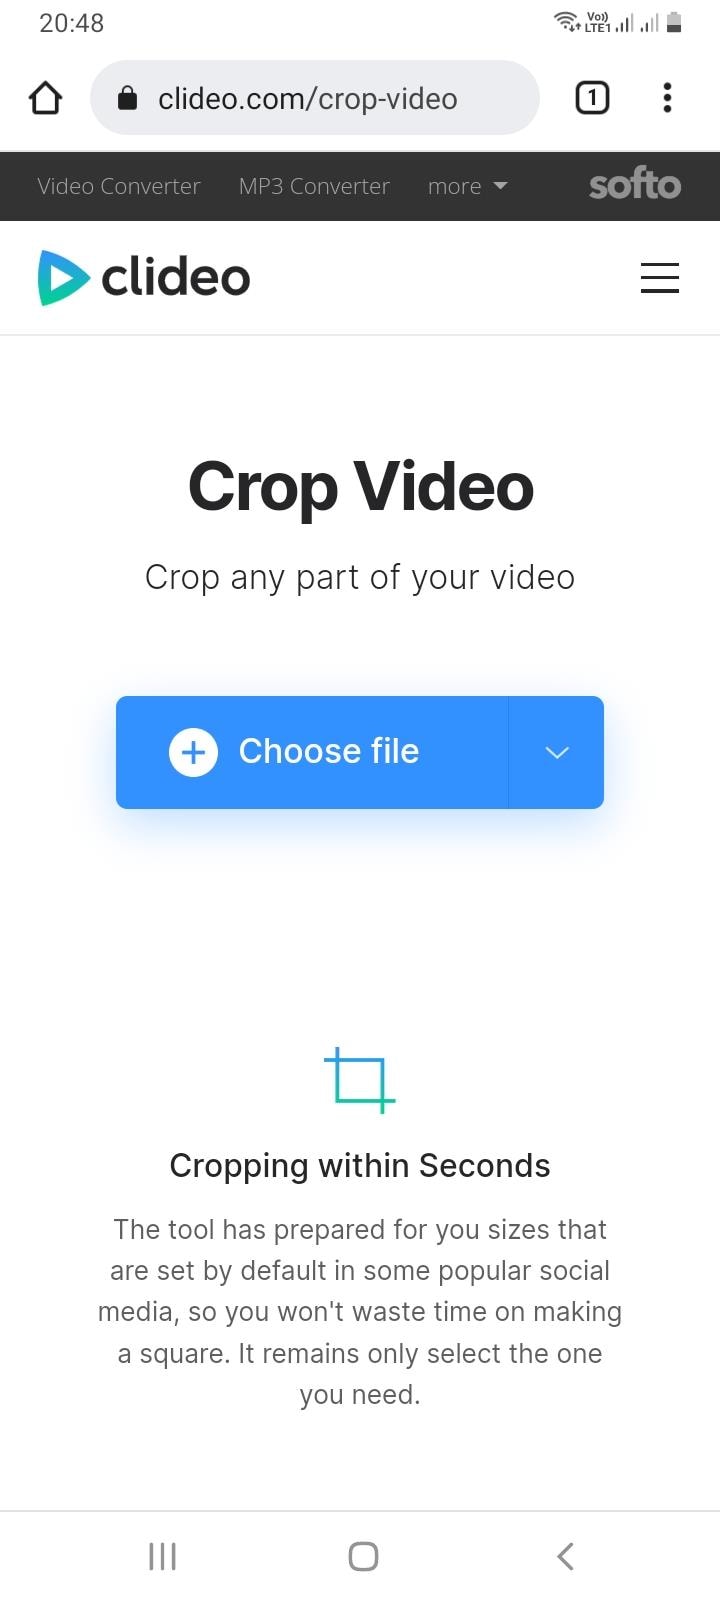
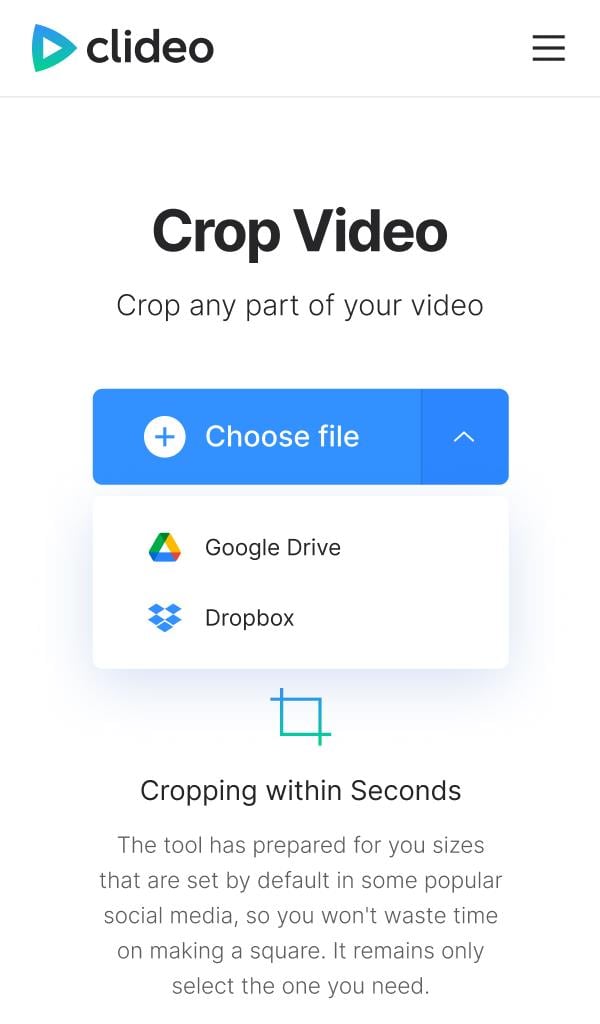
You can also upload your file from Cloud Storage. You need to click on the down-arrow on the right-hand side of the button and you’ll find the option to add a clip from your Dropbox or Google Drive account.
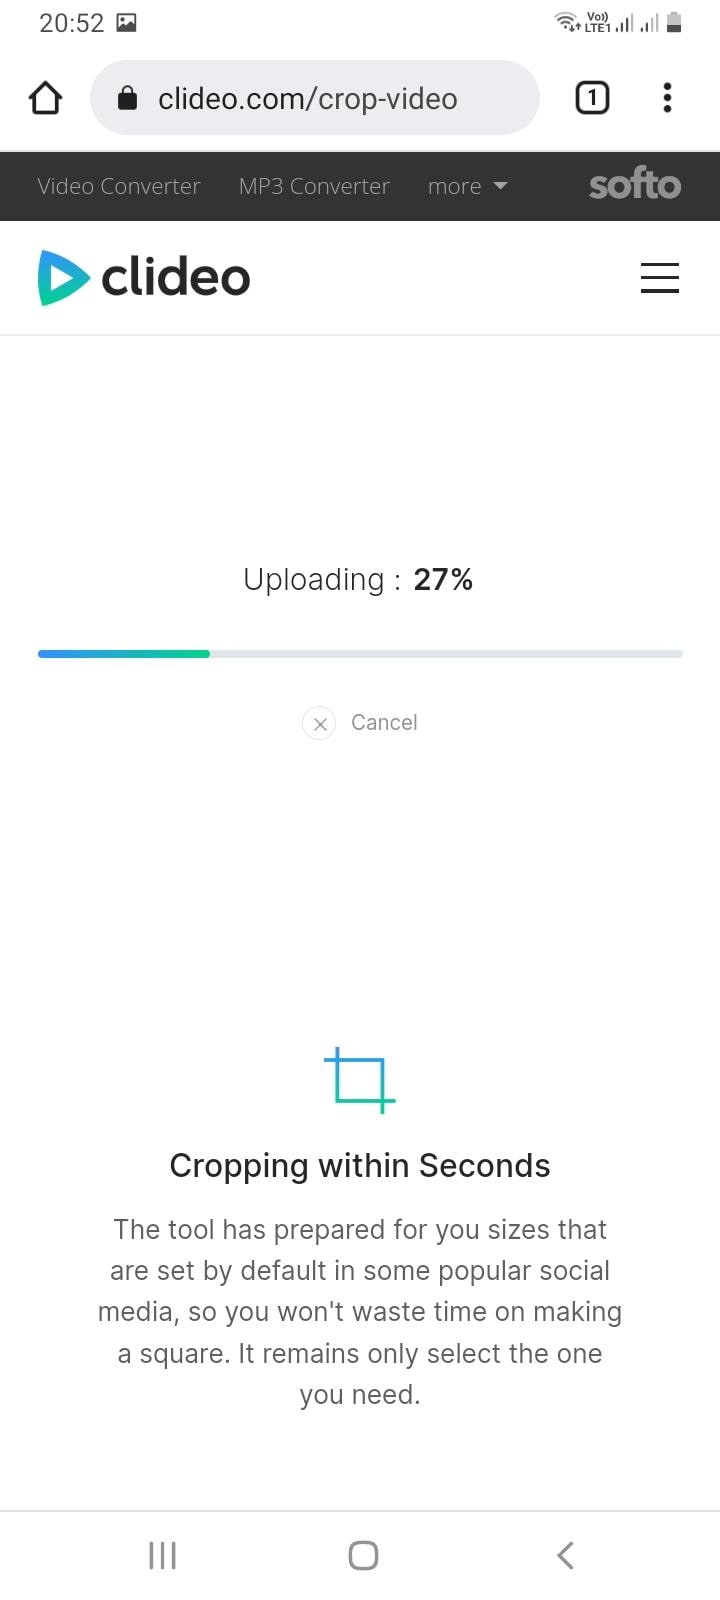
After your file is uploaded, Clideo will take you to the editing page, where you can select the area you would like to be in the edited version, and crop the video. Here, you will be able to choose the aspect ratio, exact size of the video and the format.

Once you have finished with the cropping and settings, you need to click on Export which will process your edited video clip.

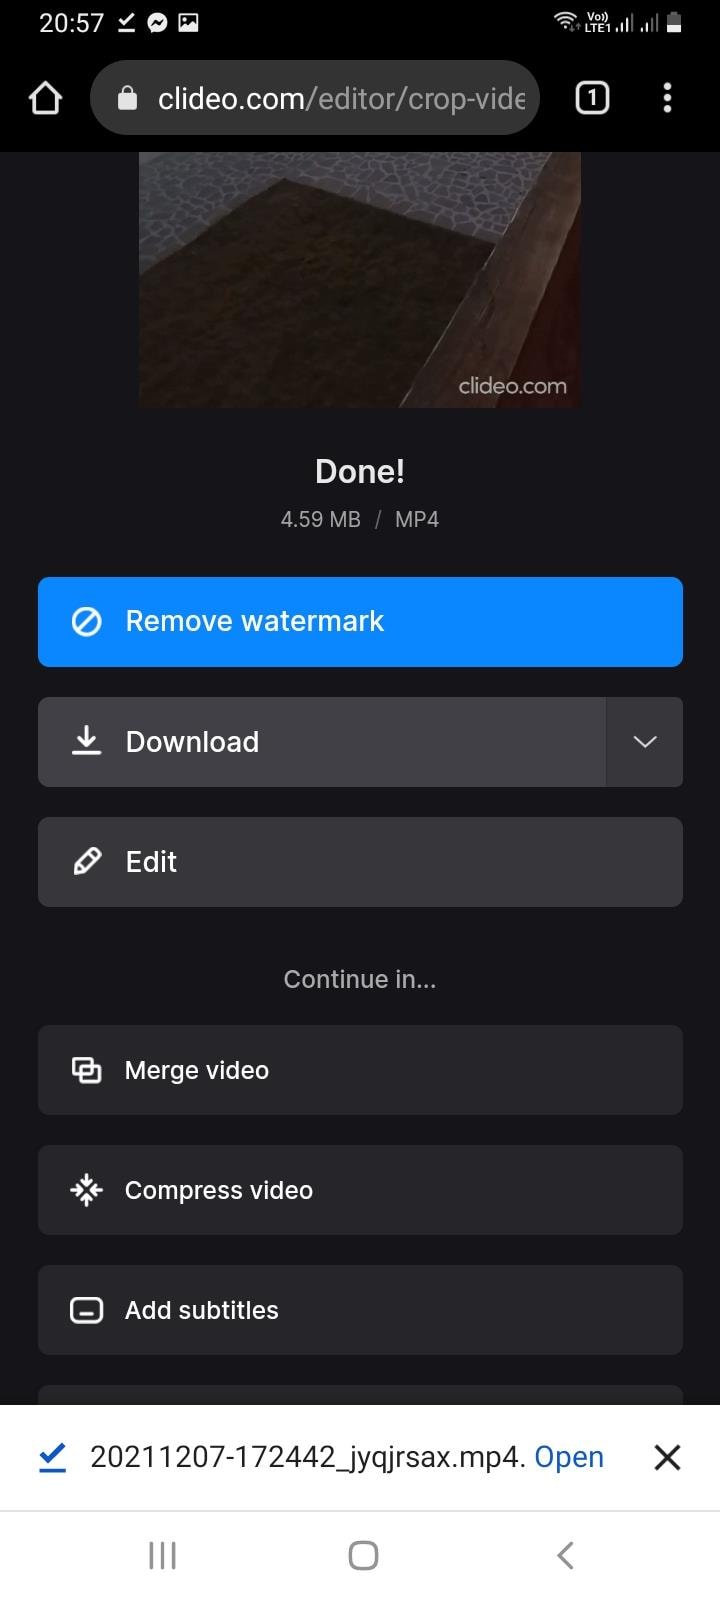
Once it is done, you proceed on the page which lets you do 3 things: Remove watermark (for it, though, you will have to sign in), Edit again, or/and Download!
Using Filmora
Filmora is an android version of software Filmora and it also gives you the opportunity to crop videos and photos with no problem. First, of course, you have to download the application from Google Play Store, and open it;

then, after opening it, you’ll click on New Project. You can choose any photo/video from your albums or stock, you might even select multiple clips.
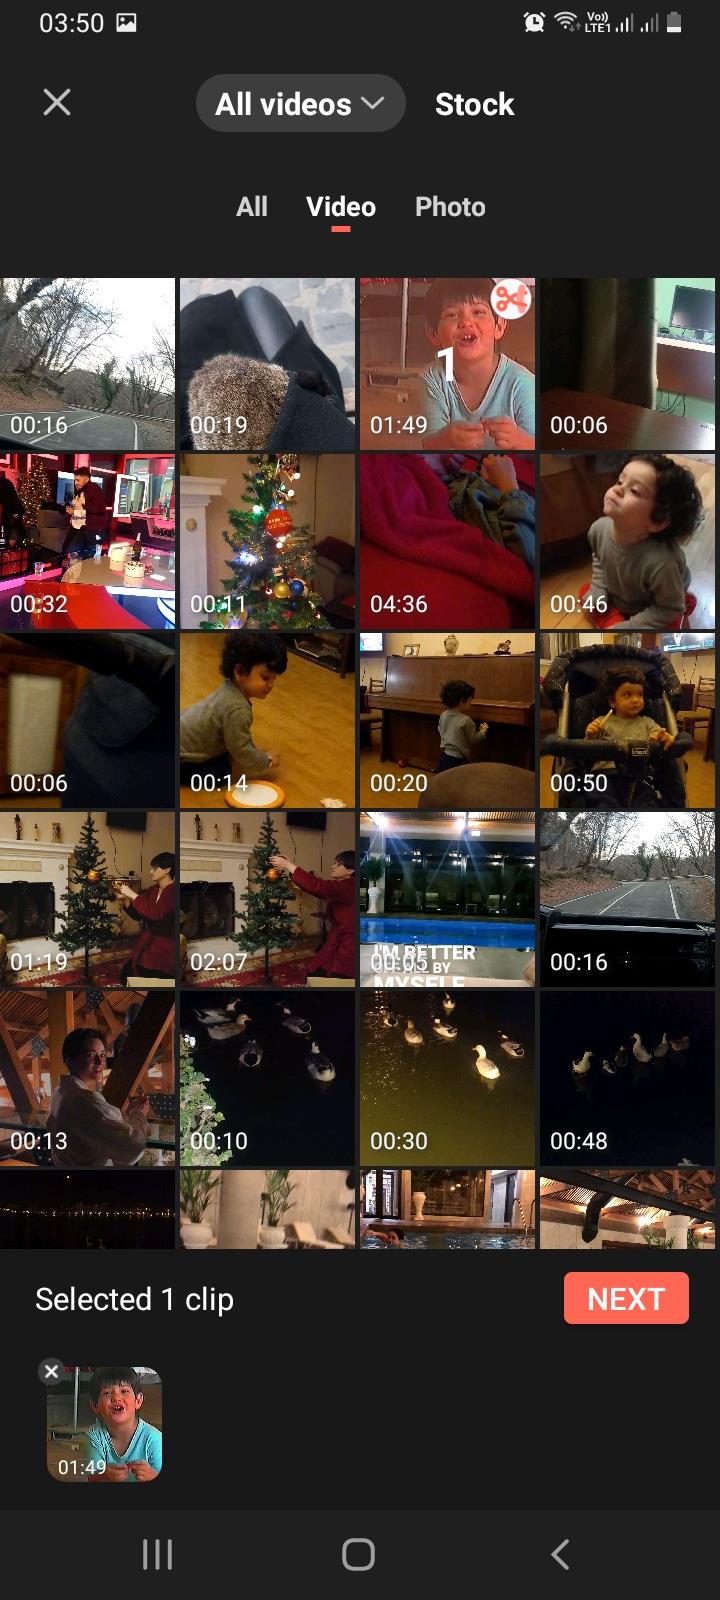
Once you have chosen your file, you click on Next button and you proceed to the editor itself.
There, you will see different options at the bottom of your phone, such as Trim, Music, Text, Sticker, Effect, etc.
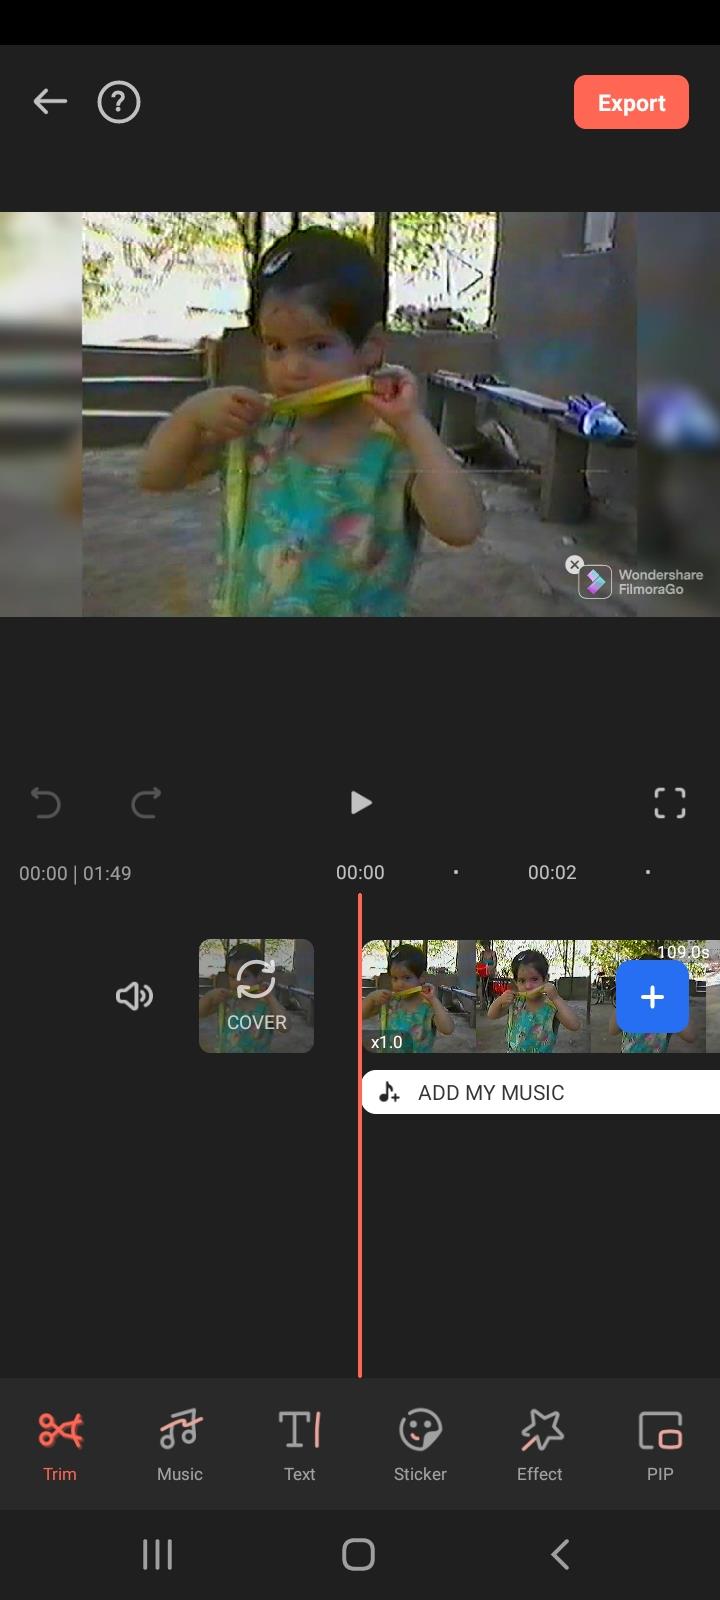
It doesn’t show you the option Crop right away, but Crop is “hidden” behind the Trim button!
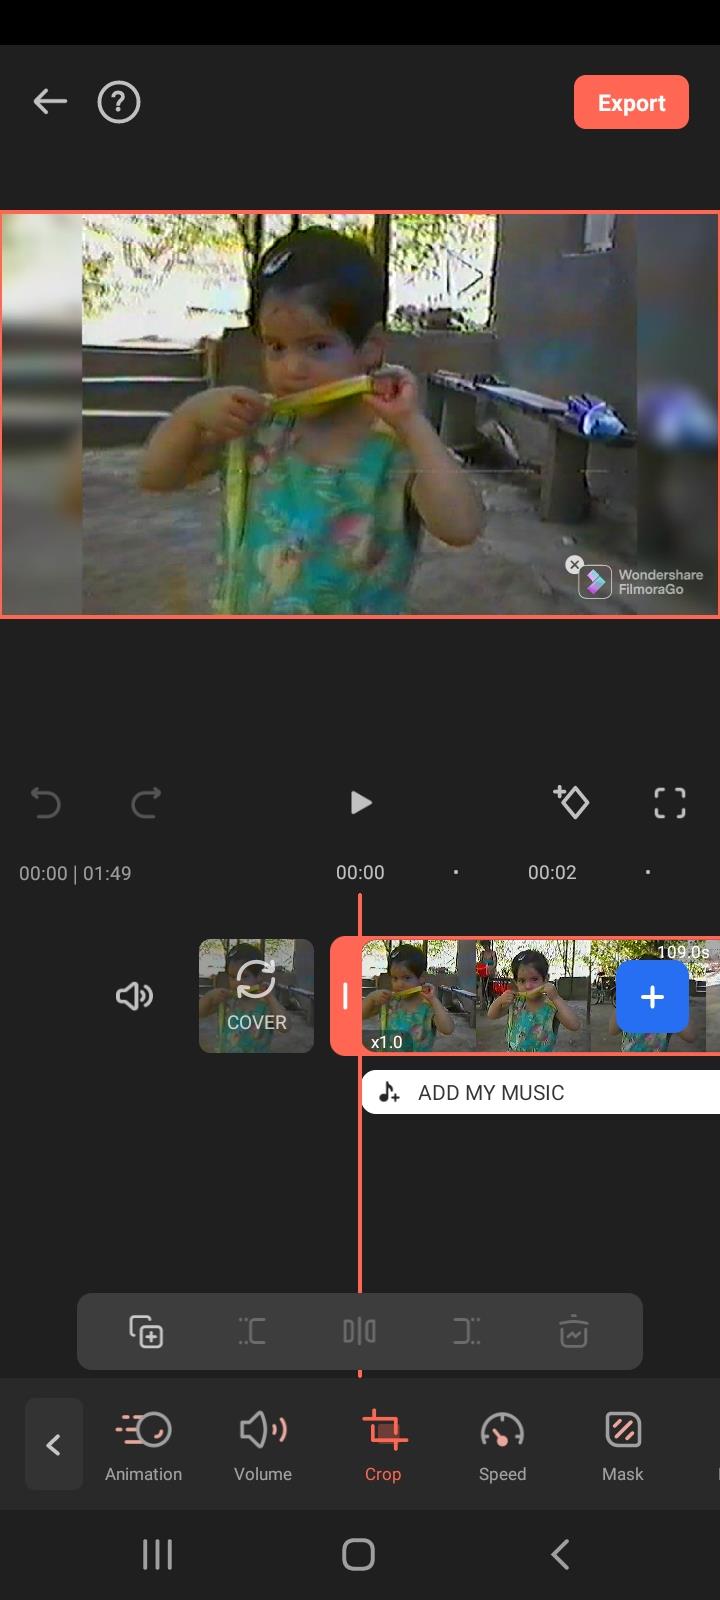
So, you choose Trim, then find Crop and hit that, and then you are free to choose any aspect ratio: 1:1; 4:5; 16:9; 9:16; and 5:4. You can crop the video manually, too, and you are able to adjust where your new “screen” might be wanted most.
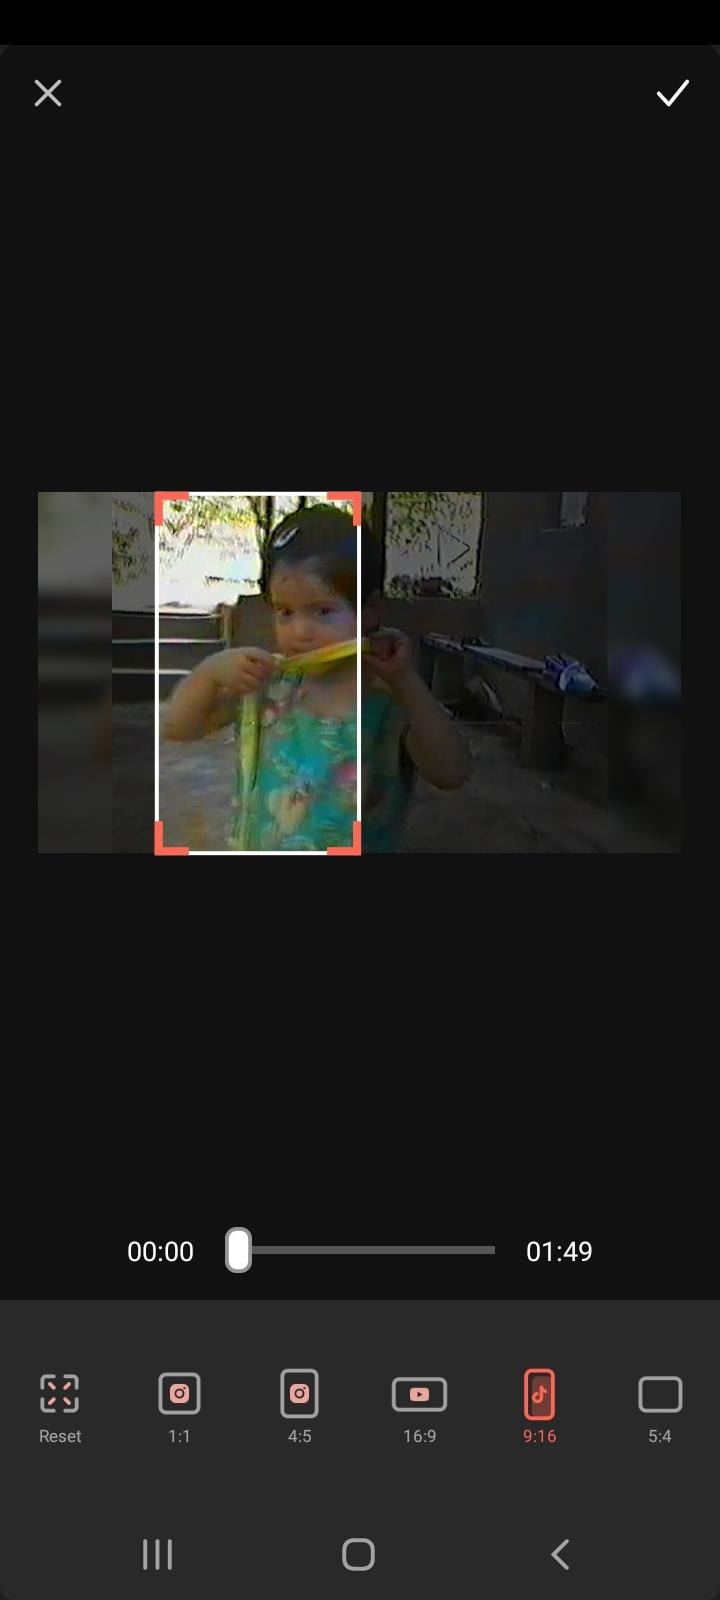
After you have finished with cropping and are satisfied, you can click on Export, which will take a few seconds.
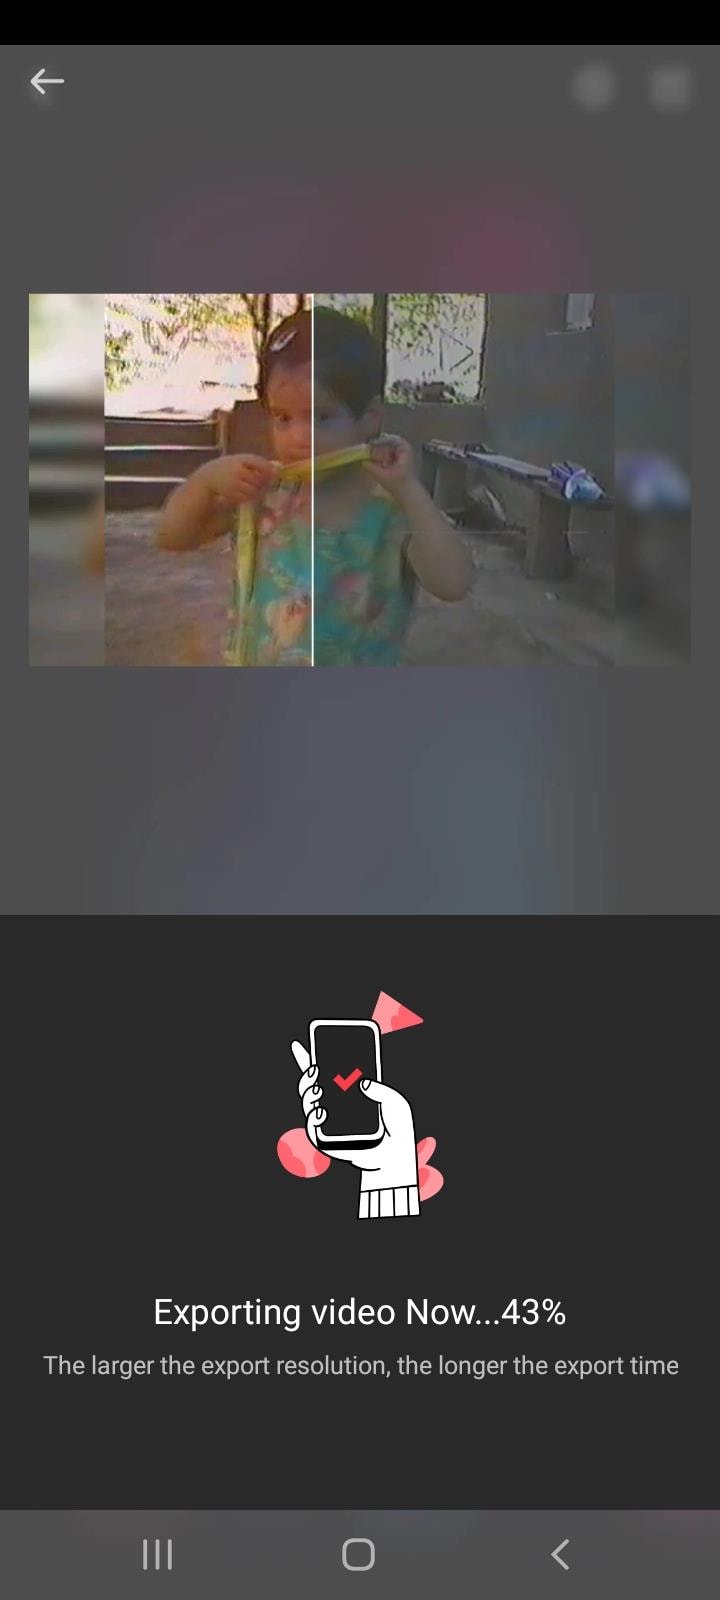
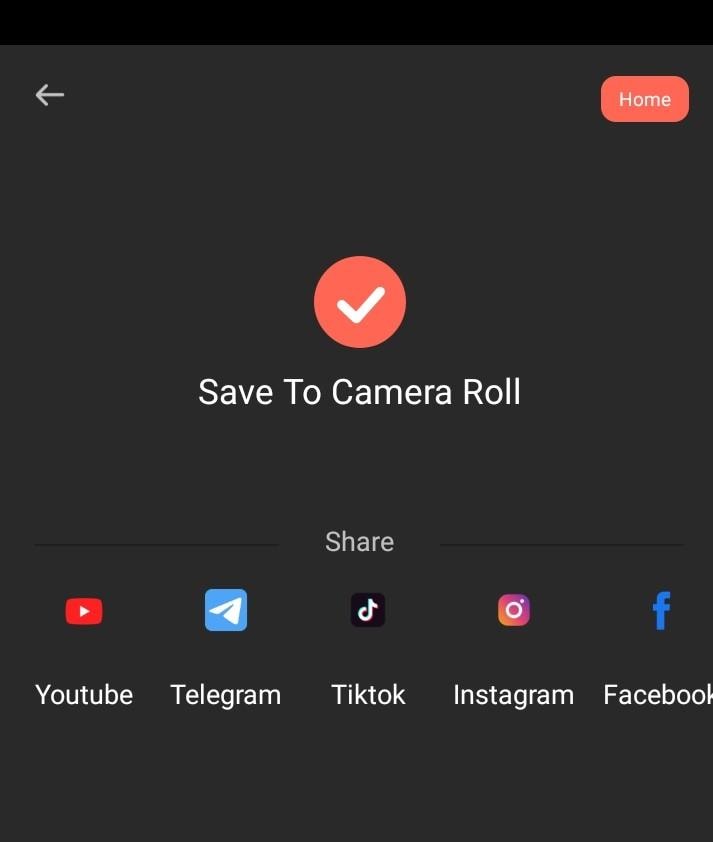
After it is done, you can find your newly-cropped video in your Camera Roll.
Using Wondershare Filmora
As mentioned, Filmora is a mobile version of its desktop edition – Wondershare Filmora Video Editor . So, you can also try your hand at this very handy software which also has a nice interface.
For Win 7 or later (64-bit)
For macOS 10.14 or later
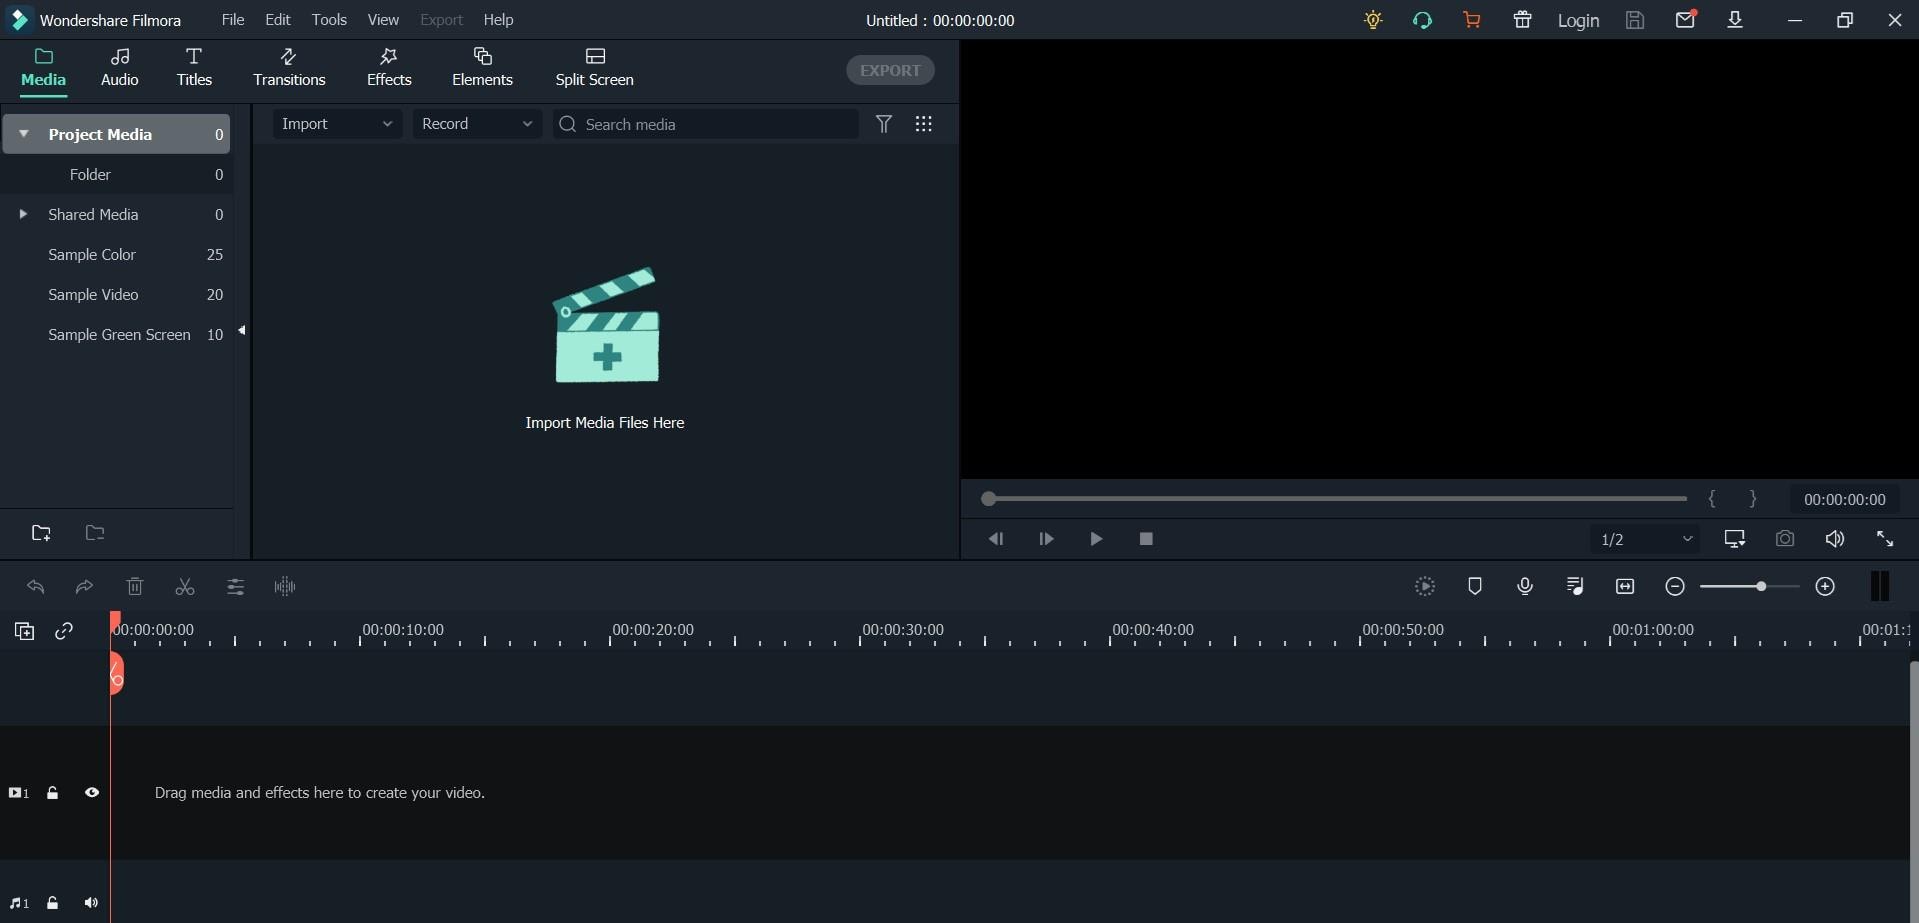
If you download Wondershare Filmora X, you will need to click on Import Media Files Here.
You will choose your clip(s) you would like to crop and then drag and drop it in the sequence.
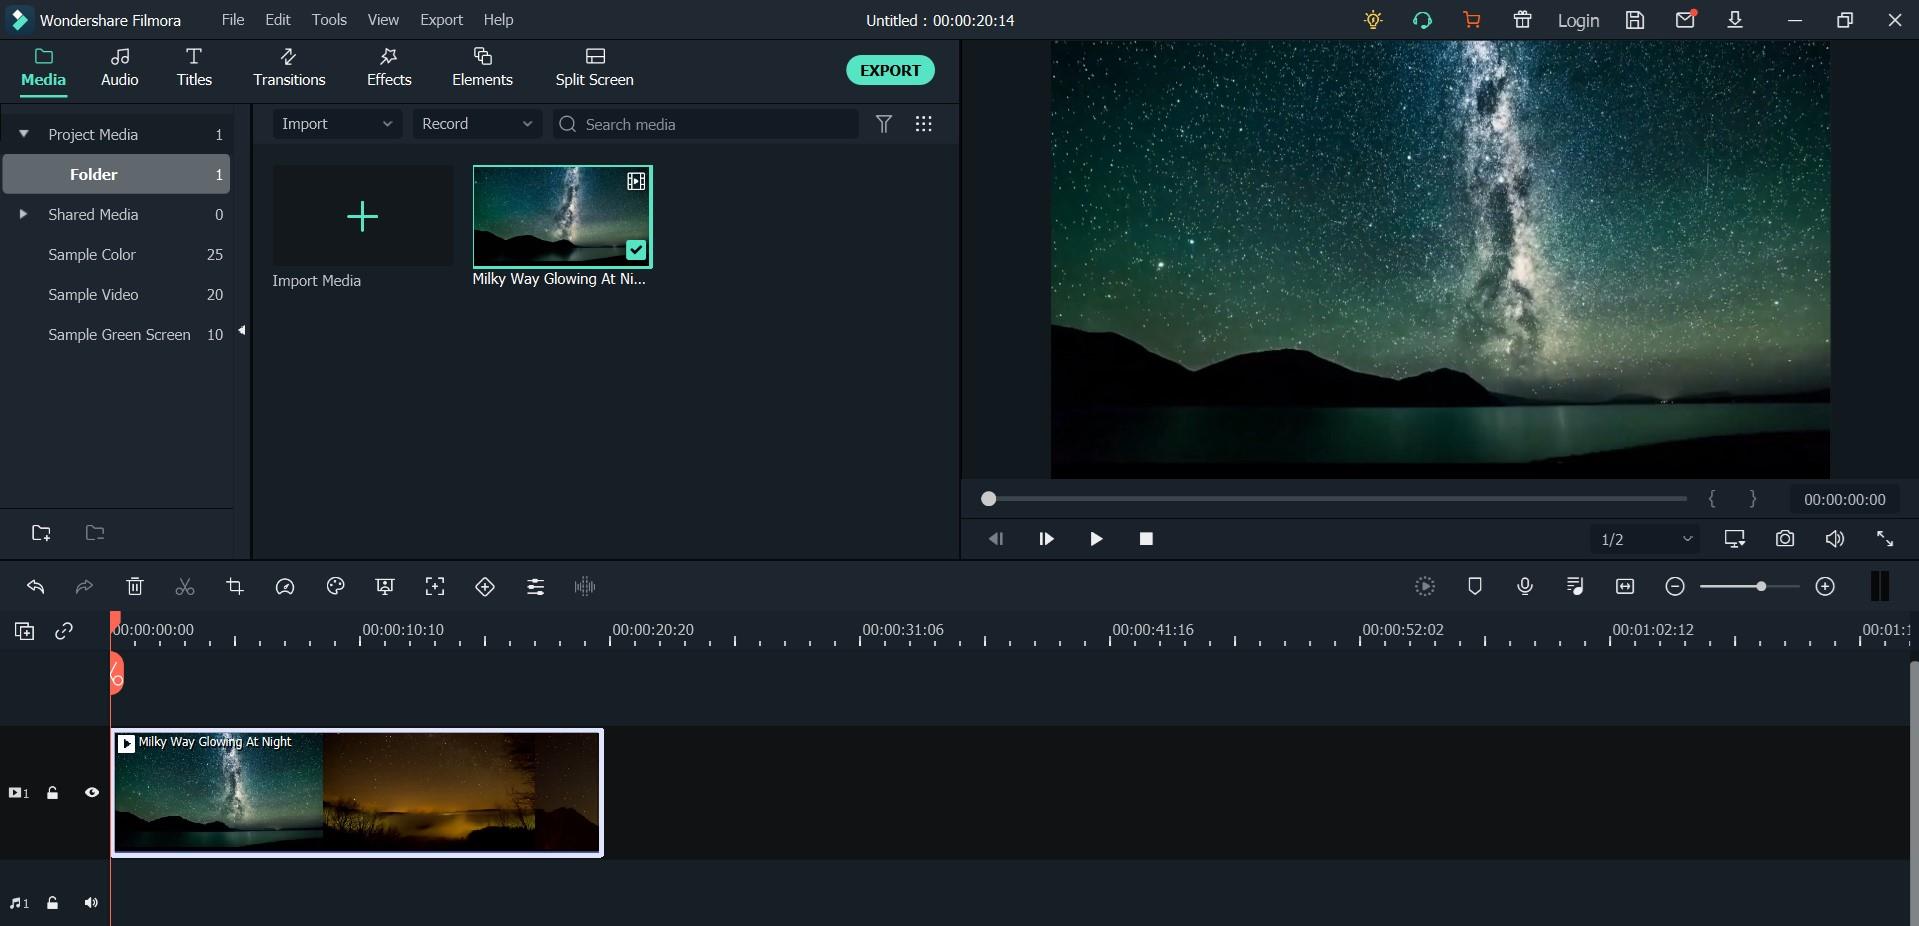
Above your video in the sequence you will see little icons and find a Crop one.
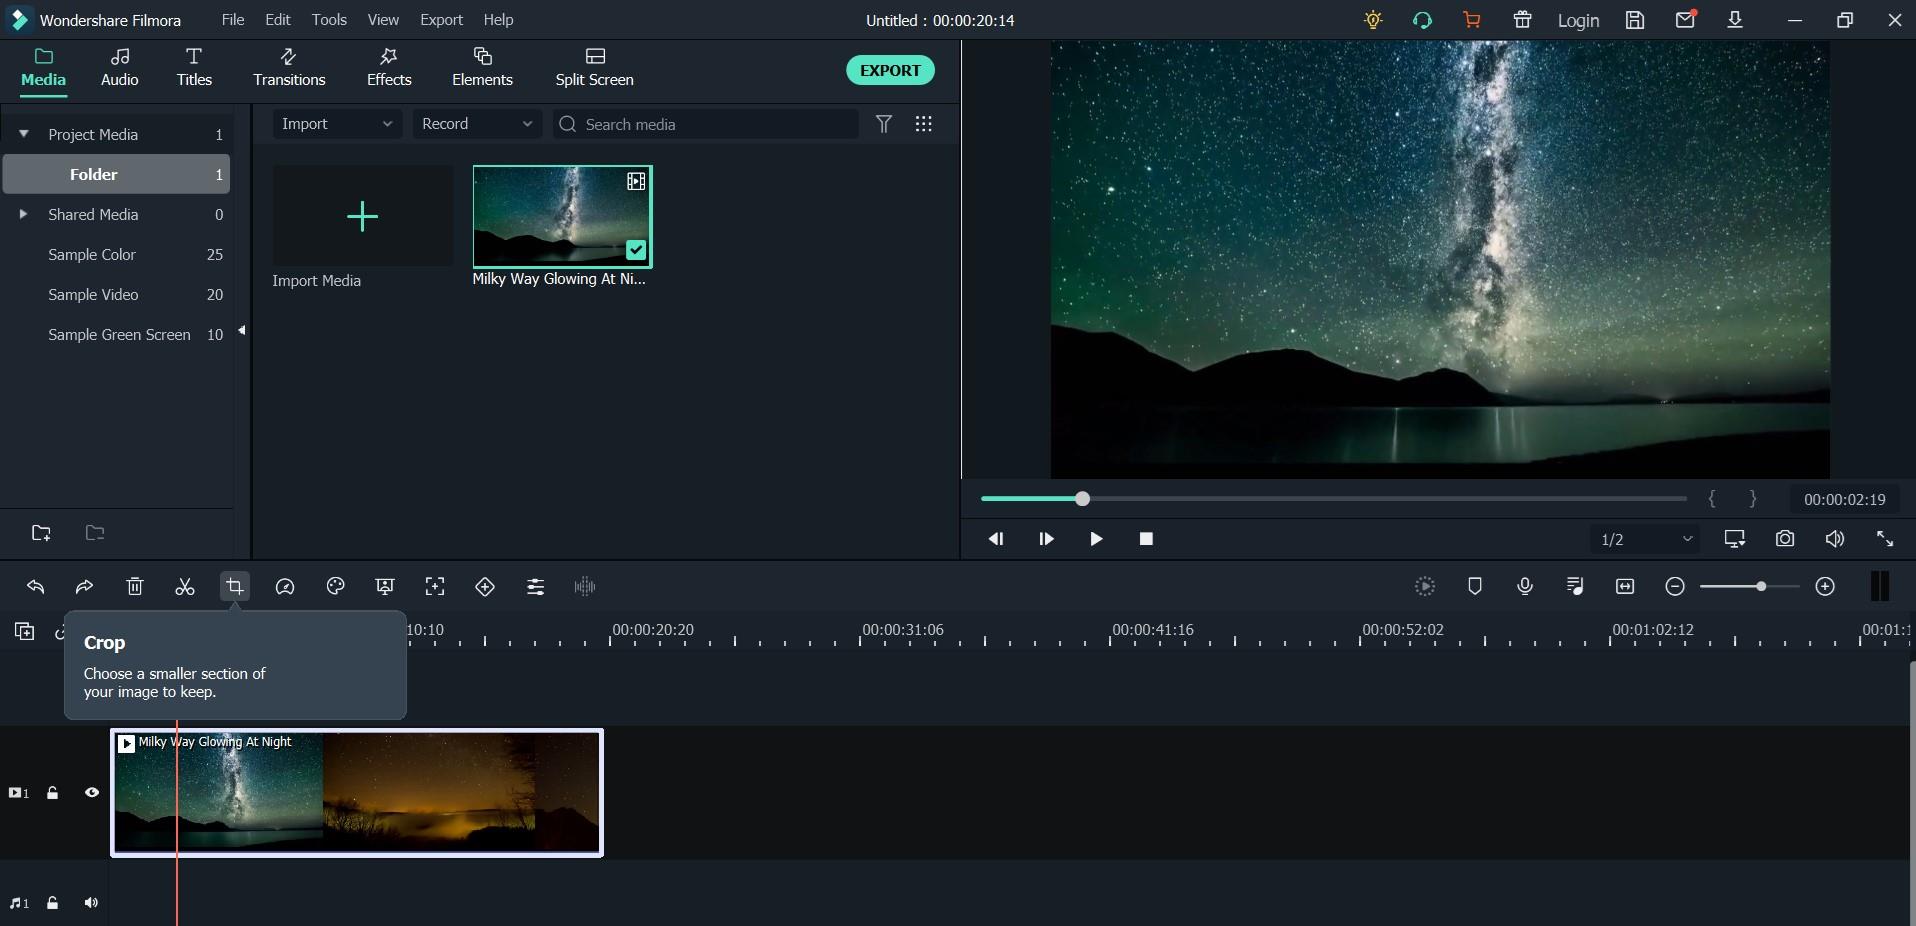
After clicking on it, a new window will open – it’s for Crop and Zoom, where you can choose a needed ratio or do it manually (for it, you have to select Custom first).
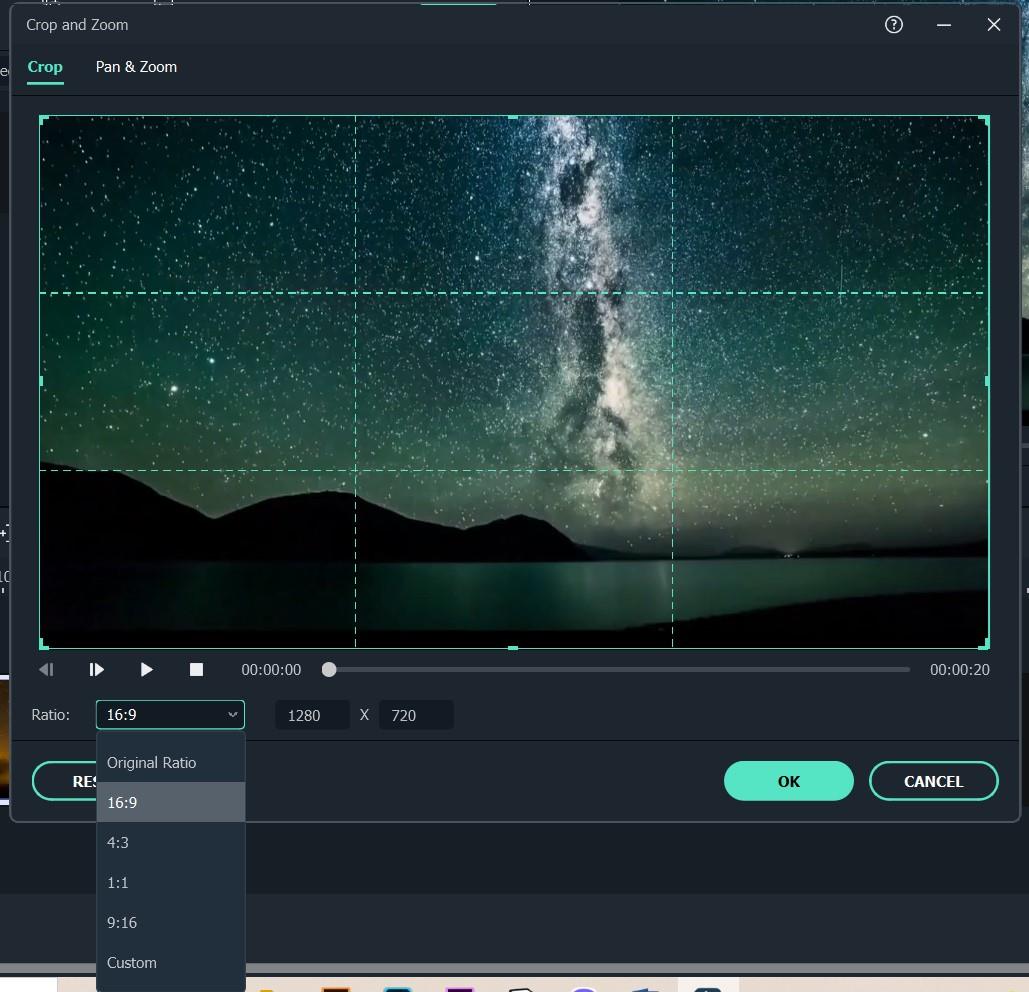
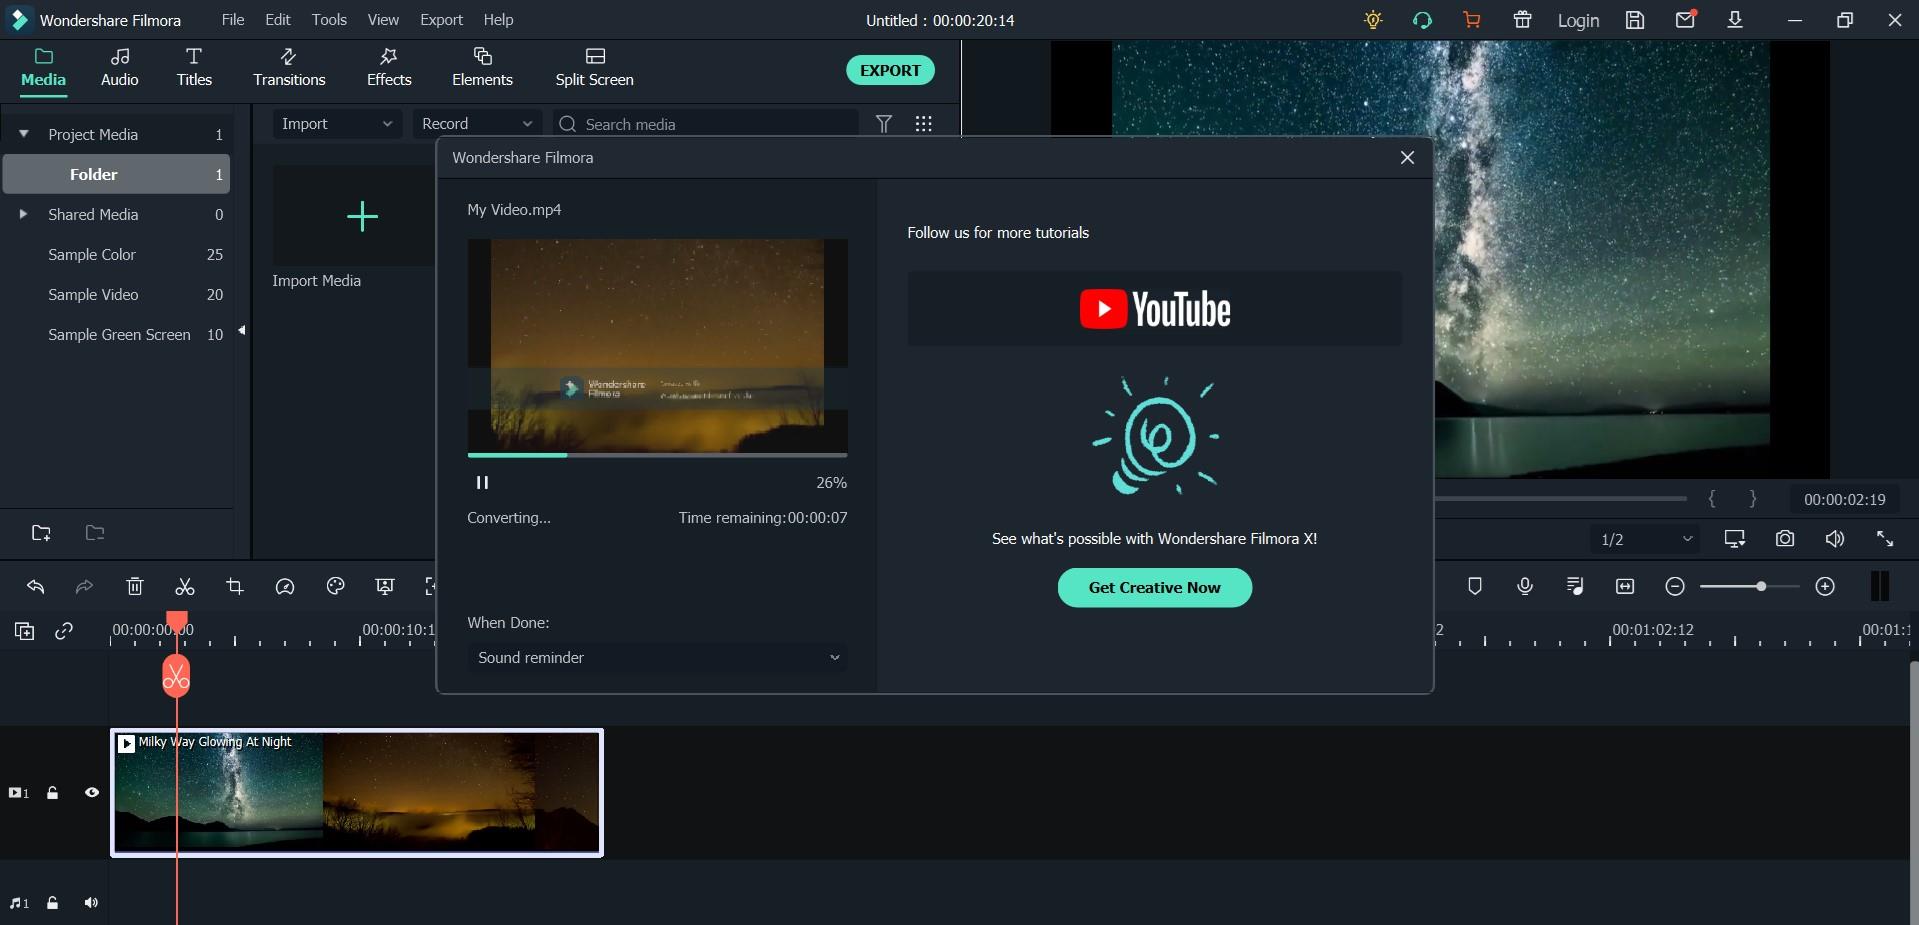
After clicking OK, your video will be cropped as you like. Then, you can proceed with Exporting it – click on Export, choose your preferred settings, and save the video at last.
So, that’s all for this article – you have learned how to crop a video on Android, using Google Photos, Clideo, Filmora; lastly, you have learned about how to crop a video using a desktop version of Filmora, namely, Wondershare Filmora. Hopefully, this is the information which will help you make your videos more “on spot” and be satisfied with the results, as well as satisfy your viewers!
First off, you just open the application and allow it to access photos and media on your device. Tap the video you would like to crop. Then, click on Edit: it will launch the in-app video editor.

At the bottom, you will see the Crop option and hit on it, which will result in appearing a cropping box around your video clip.

Once you see little icons at the bottom, you need to choose the first one – it’s the Ratio button, through which you can choose the aspect you would like to apply. Your choice is between these several aspect ratios: Free, Original, Square, 5:4, 16:9, 4:3, and 3:2.

Choosing Free ratio option gives you the freedom to adjust the cropping sliders manually, in order to resize the video to any aspect ratio; it is even possible to rotate the clip, pinch, and zoom in/out.
After you are done with adjusting your video, you need to click on the Save Copy button, which will save a new edited version of your footage. And, meanwhile, don’t worry! – this will not be overwritten on the original one, which will still stand intact.
Using Clideo
Clideo is an interesting one… it doesn’t require you to download anything, because there is a way to crop your video online, through the web browser on Android.
First off, you need to click on Clideo’s Android crop video tool from the browser on the smartphone. You will see a Choose File button and hit on it – this will take you to your gallery and let you find the clip you are about to crop.

You can also upload your file from Cloud Storage. You need to click on the down-arrow on the right-hand side of the button and you’ll find the option to add a clip from your Dropbox or Google Drive account.


After your file is uploaded, Clideo will take you to the editing page, where you can select the area you would like to be in the edited version, and crop the video. Here, you will be able to choose the aspect ratio, exact size of the video and the format.

Once you have finished with the cropping and settings, you need to click on Export which will process your edited video clip.

Once it is done, you proceed on the page which lets you do 3 things: Remove watermark (for it, though, you will have to sign in), Edit again, or/and Download!

Using Filmora
Filmora is an android version of software Filmora and it also gives you the opportunity to crop videos and photos with no problem. First, of course, you have to download the application from Google Play Store, and open it;

then, after opening it, you’ll click on New Project. You can choose any photo/video from your albums or stock, you might even select multiple clips.

Once you have chosen your file, you click on Next button and you proceed to the editor itself.
There, you will see different options at the bottom of your phone, such as Trim, Music, Text, Sticker, Effect, etc.

It doesn’t show you the option Crop right away, but Crop is “hidden” behind the Trim button!

So, you choose Trim, then find Crop and hit that, and then you are free to choose any aspect ratio: 1:1; 4:5; 16:9; 9:16; and 5:4. You can crop the video manually, too, and you are able to adjust where your new “screen” might be wanted most.

After you have finished with cropping and are satisfied, you can click on Export, which will take a few seconds.

After it is done, you can find your newly-cropped video in your Camera Roll.

Using Wondershare Filmora
As mentioned, Filmora is a mobile version of its desktop edition – Wondershare Filmora Video Editor . So, you can also try your hand at this very handy software which also has a nice interface.
For Win 7 or later (64-bit)
For macOS 10.14 or later
If you download Wondershare Filmora X, you will need to click on Import Media Files Here.

You will choose your clip(s) you would like to crop and then drag and drop it in the sequence.

Above your video in the sequence you will see little icons and find a Crop one.

After clicking on it, a new window will open – it’s for Crop and Zoom, where you can choose a needed ratio or do it manually (for it, you have to select Custom first).

After clicking OK, your video will be cropped as you like. Then, you can proceed with Exporting it – click on Export, choose your preferred settings, and save the video at last.

So, that’s all for this article – you have learned how to crop a video on Android, using Google Photos, Clideo, Filmora; lastly, you have learned about how to crop a video using a desktop version of Filmora, namely, Wondershare Filmora. Hopefully, this is the information which will help you make your videos more “on spot” and be satisfied with the results, as well as satisfy your viewers!
First off, you just open the application and allow it to access photos and media on your device. Tap the video you would like to crop. Then, click on Edit: it will launch the in-app video editor.

At the bottom, you will see the Crop option and hit on it, which will result in appearing a cropping box around your video clip.

Once you see little icons at the bottom, you need to choose the first one – it’s the Ratio button, through which you can choose the aspect you would like to apply. Your choice is between these several aspect ratios: Free, Original, Square, 5:4, 16:9, 4:3, and 3:2.

Choosing Free ratio option gives you the freedom to adjust the cropping sliders manually, in order to resize the video to any aspect ratio; it is even possible to rotate the clip, pinch, and zoom in/out.
After you are done with adjusting your video, you need to click on the Save Copy button, which will save a new edited version of your footage. And, meanwhile, don’t worry! – this will not be overwritten on the original one, which will still stand intact.
Using Clideo
Clideo is an interesting one… it doesn’t require you to download anything, because there is a way to crop your video online, through the web browser on Android.
First off, you need to click on Clideo’s Android crop video tool from the browser on the smartphone. You will see a Choose File button and hit on it – this will take you to your gallery and let you find the clip you are about to crop.

You can also upload your file from Cloud Storage. You need to click on the down-arrow on the right-hand side of the button and you’ll find the option to add a clip from your Dropbox or Google Drive account.


After your file is uploaded, Clideo will take you to the editing page, where you can select the area you would like to be in the edited version, and crop the video. Here, you will be able to choose the aspect ratio, exact size of the video and the format.

Once you have finished with the cropping and settings, you need to click on Export which will process your edited video clip.

Once it is done, you proceed on the page which lets you do 3 things: Remove watermark (for it, though, you will have to sign in), Edit again, or/and Download!

Using Filmora
Filmora is an android version of software Filmora and it also gives you the opportunity to crop videos and photos with no problem. First, of course, you have to download the application from Google Play Store, and open it;

then, after opening it, you’ll click on New Project. You can choose any photo/video from your albums or stock, you might even select multiple clips.

Once you have chosen your file, you click on Next button and you proceed to the editor itself.
There, you will see different options at the bottom of your phone, such as Trim, Music, Text, Sticker, Effect, etc.

It doesn’t show you the option Crop right away, but Crop is “hidden” behind the Trim button!

So, you choose Trim, then find Crop and hit that, and then you are free to choose any aspect ratio: 1:1; 4:5; 16:9; 9:16; and 5:4. You can crop the video manually, too, and you are able to adjust where your new “screen” might be wanted most.

After you have finished with cropping and are satisfied, you can click on Export, which will take a few seconds.

After it is done, you can find your newly-cropped video in your Camera Roll.

Using Wondershare Filmora
As mentioned, Filmora is a mobile version of its desktop edition – Wondershare Filmora Video Editor . So, you can also try your hand at this very handy software which also has a nice interface.
For Win 7 or later (64-bit)
For macOS 10.14 or later
If you download Wondershare Filmora X, you will need to click on Import Media Files Here.

You will choose your clip(s) you would like to crop and then drag and drop it in the sequence.

Above your video in the sequence you will see little icons and find a Crop one.

After clicking on it, a new window will open – it’s for Crop and Zoom, where you can choose a needed ratio or do it manually (for it, you have to select Custom first).

After clicking OK, your video will be cropped as you like. Then, you can proceed with Exporting it – click on Export, choose your preferred settings, and save the video at last.

So, that’s all for this article – you have learned how to crop a video on Android, using Google Photos, Clideo, Filmora; lastly, you have learned about how to crop a video using a desktop version of Filmora, namely, Wondershare Filmora. Hopefully, this is the information which will help you make your videos more “on spot” and be satisfied with the results, as well as satisfy your viewers!
First off, you just open the application and allow it to access photos and media on your device. Tap the video you would like to crop. Then, click on Edit: it will launch the in-app video editor.

At the bottom, you will see the Crop option and hit on it, which will result in appearing a cropping box around your video clip.

Once you see little icons at the bottom, you need to choose the first one – it’s the Ratio button, through which you can choose the aspect you would like to apply. Your choice is between these several aspect ratios: Free, Original, Square, 5:4, 16:9, 4:3, and 3:2.

Choosing Free ratio option gives you the freedom to adjust the cropping sliders manually, in order to resize the video to any aspect ratio; it is even possible to rotate the clip, pinch, and zoom in/out.
After you are done with adjusting your video, you need to click on the Save Copy button, which will save a new edited version of your footage. And, meanwhile, don’t worry! – this will not be overwritten on the original one, which will still stand intact.
Using Clideo
Clideo is an interesting one… it doesn’t require you to download anything, because there is a way to crop your video online, through the web browser on Android.
First off, you need to click on Clideo’s Android crop video tool from the browser on the smartphone. You will see a Choose File button and hit on it – this will take you to your gallery and let you find the clip you are about to crop.

You can also upload your file from Cloud Storage. You need to click on the down-arrow on the right-hand side of the button and you’ll find the option to add a clip from your Dropbox or Google Drive account.


After your file is uploaded, Clideo will take you to the editing page, where you can select the area you would like to be in the edited version, and crop the video. Here, you will be able to choose the aspect ratio, exact size of the video and the format.

Once you have finished with the cropping and settings, you need to click on Export which will process your edited video clip.

Once it is done, you proceed on the page which lets you do 3 things: Remove watermark (for it, though, you will have to sign in), Edit again, or/and Download!

Using Filmora
Filmora is an android version of software Filmora and it also gives you the opportunity to crop videos and photos with no problem. First, of course, you have to download the application from Google Play Store, and open it;

then, after opening it, you’ll click on New Project. You can choose any photo/video from your albums or stock, you might even select multiple clips.

Once you have chosen your file, you click on Next button and you proceed to the editor itself.
There, you will see different options at the bottom of your phone, such as Trim, Music, Text, Sticker, Effect, etc.

It doesn’t show you the option Crop right away, but Crop is “hidden” behind the Trim button!

So, you choose Trim, then find Crop and hit that, and then you are free to choose any aspect ratio: 1:1; 4:5; 16:9; 9:16; and 5:4. You can crop the video manually, too, and you are able to adjust where your new “screen” might be wanted most.

After you have finished with cropping and are satisfied, you can click on Export, which will take a few seconds.

After it is done, you can find your newly-cropped video in your Camera Roll.

Using Wondershare Filmora
As mentioned, Filmora is a mobile version of its desktop edition – Wondershare Filmora Video Editor . So, you can also try your hand at this very handy software which also has a nice interface.
For Win 7 or later (64-bit)
For macOS 10.14 or later
If you download Wondershare Filmora X, you will need to click on Import Media Files Here.

You will choose your clip(s) you would like to crop and then drag and drop it in the sequence.

Above your video in the sequence you will see little icons and find a Crop one.

After clicking on it, a new window will open – it’s for Crop and Zoom, where you can choose a needed ratio or do it manually (for it, you have to select Custom first).

After clicking OK, your video will be cropped as you like. Then, you can proceed with Exporting it – click on Export, choose your preferred settings, and save the video at last.

So, that’s all for this article – you have learned how to crop a video on Android, using Google Photos, Clideo, Filmora; lastly, you have learned about how to crop a video using a desktop version of Filmora, namely, Wondershare Filmora. Hopefully, this is the information which will help you make your videos more “on spot” and be satisfied with the results, as well as satisfy your viewers!
Change Video Speed with FFmpeg
Have you ever wanted to speed up or slow down a video? Maybe it was too long, or you wanted to draw out an exciting part of the video without having to watch the boring parts.
In this article, we will be showing you how to use FFmpeg to speed up and slow down your videos using CLI. You’ll also find some other useful FFmpeg commands that you can use on your videos.
Finally, we will explain how to automate these commands so that you can run them on all your videos with ease.
Part 1. What is FFmpeg?
FFmpeg is a free and open-source cross-platform software project that can record, convert, and stream audio and video. It was developed by Fabrice Bellard in 2000. It has since become one of the most popular tools for transcoding media content on Linux, Unix, Mac OS X, Windows NT, and more.
One of its lesser-known capabilities is to speed up or slow down videos in just about any design you can think of — with either the audio or the video synced to the other if desired.
Uses of FFmpeg
FFMPEG is a command-line tool that can manipulate and transcode video files. Its uses are as follows:
- FFmpeg can create, trim, join or separate video clips on the fly and encode them into formats including MPEG, VOB, M2TS, TS, RMVB, or AVI.
- It can be used for Video processing, Video packaging support, Video compression, Audio, and Video container support, FFplay, and FFprobe.
- It also has extensive options for altering the look of an image in just about any way imaginable. Whether you want to change the brightness, hue, saturation, or perform multiple operations like subsampling (resizing) without reducing quality—the list goes on!
You could think of it as the Swiss army knife for video manipulation tasks. The interface might seem intimidating at first, but once you get the hang of it, all commands are broken down into simple English phrases.
The most important thing to know before getting started with this is how to use FFmpeg’s -i and -v flags for input and output, respectively. To apply effects like slow motion playback or fast motion playback, use these flags in tandem with one another when specifying which file should be edited.
Benefits and Disadvantages of FFmpeg
FFmpeg has many benefits over other video editing software because it is free and open source, meaning that you have access to the code so that you can modify it if needed. Thus, it’s a better option when compared to other video editing software such as Avidemux, QuickTime Pro 7, and Adobe Premiere Elements 12. Some of these benefits include:
- Being able to edit videos on multiple platforms (Windows, Mac OS X);
- FFmpeg has features to speed up and slow down video;
- Being able to convert from one format into another seamlessly;
- An extensive amount of features are at your disposal.
Some of the drawbacks are that some settings are not configurable, like with YouTube’s built-in editor. The main disadvantage, though, would be the lengthiness of the program’s installation process: not only do you need to download FFmpeg itself but also three external libraries like libx264, libmp3lame, and libfaac; then you must compile all six packages before the installation completes. Luckily this process doesn’t take very long.
Another possible disadvantage is the time required for downloading the various resources since they may not be readily available on standard file hosting sites such as Mediafire or Dropbox (though they can be found through third-party websites). If you’re looking for something more robust than Windows Movie Maker or iMovie, we recommend checking out FFmpeg.
Part 2. How to Speed Up a Video in FFmpeg?
FFmpeg can be used to speed up videos. It’s not the only option, but it’s one of the most common ways to make your videos faster. If you want your video to be faster, then FFmpeg is the right tool for the job. Some speed-up features include: FFmpeg speed up video and audio, ffmpeg speed up video mp4, ffmpeg change video speed, and so on.
The Ultimate Step-by-Step Guide to speed up a video in FFmpeg
The presentation timestamp (PTS) of each video frame can be modified to alter the pace of a video stream.
Step1 Open a terminal and type in FFmpeg. This will open the program.
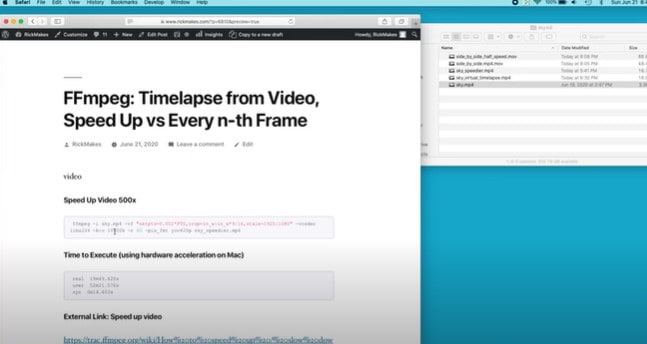
Step2 Drag and drop the video file onto the window.
Step3 This is accomplished with the command -filter:v “setpts=.”
Step4 According to the documentation, fast motion requires: -filter:v setpts=0.5*PTS.
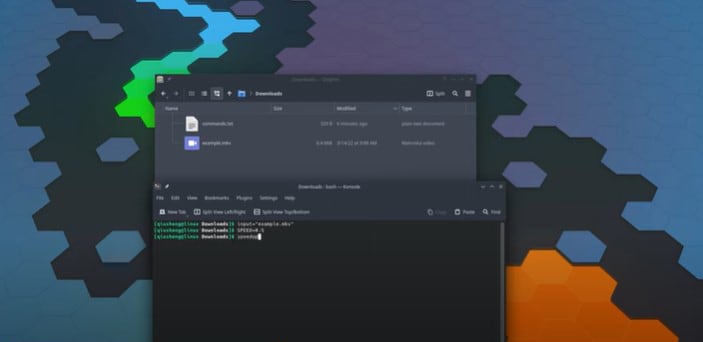
Step5 Click Enter.
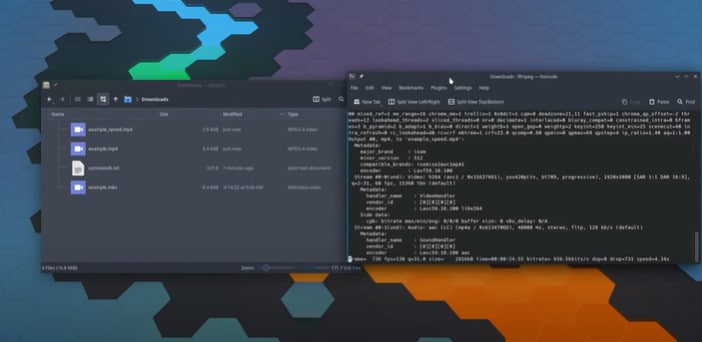
Step6 The result would be a sped-up version of your video.
Part 3. An Alternative to FFmpeg: Wondershare Filmora
FFmpeg is the best video editor in this e-market, and it’s totally free! The only problem with this software, however, is that it isn’t very easy to use for some newbies. If you’re looking for an alternative to FFmpeg but want one with amazing editing capabilities, Wondershare Filmora should be on top of your list! Here are some key features that make Filmora stand out among other video editors.
Wondershare Filmora has all the features you need in a video editor and is also easy enough for beginners to use. It is also compatible with Windows and Mac OS, which means there are no issues with compatibility.
One of the best features of this software, compared to FFmpeg, is its simplicity. With just a few clicks and by following the on-screen instructions, it can be used to create videos that are visually appealing and fun.
Free Download For Win 7 or later(64-bit)
Free Download For macOS 10.14 or later
The supported formats of Filmora are Video formats (AVI, MPEG-2, MPEG-4, MKV, WMV), Video codecs (AVC1, MPEG-4 AVC, VC1/WMV3), Audio formats (AC3/DTS), Picture formats (JPG/JPEG). Supports up to 4K resolution.
Filmora also offers extensive editing features, including:
- Speed Ramping: To produce distinctive dramatic effects, change the speed of your film while having more control over your keyframes.
- Preset Templates: Making a creative film is straightforward using the built-in Filmora Preset template
- Mask and Blend: The masking and blending features in Filmora are user-friendly and packed with valuable capabilities.
- AI Portrait: Easily identify people in your film and increase the fun factor when editing it.
Major approaches to speed up a video in Filmora
As we know that Filmora has the option to change the speed of a video, so let’s find out step-by-step how to do that; you can also watch this Tutorial on Youtube :
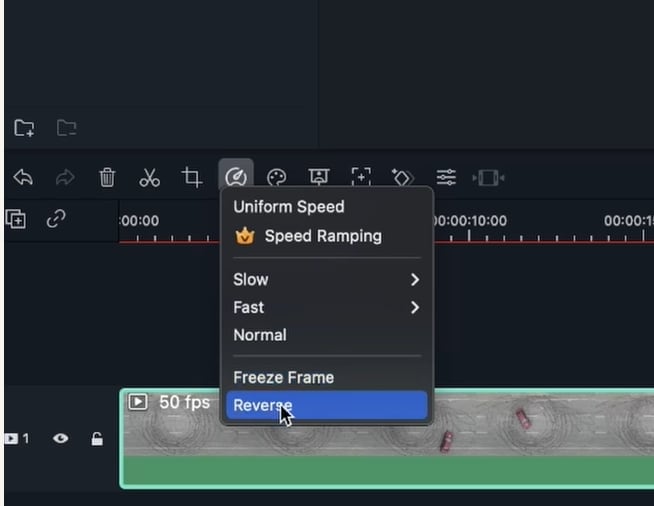
Method 1: Use the ‘Fast’ or ‘Slow’ option to change the speed
Just as simple as the heading is, this option is pretty straightforward, but you cannot decide how much speed you want to add to your video or how slow you want it to be.
Method 2: Changing Uniform Speed in Wondershare Filmora
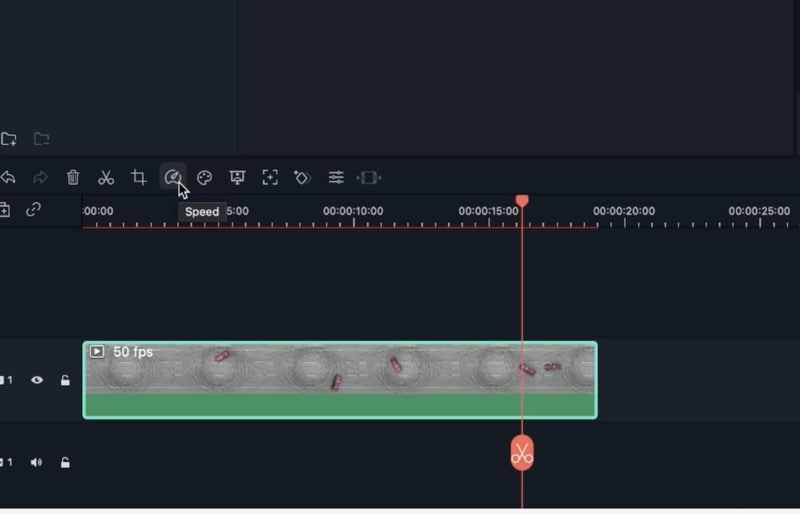
You need to check your video’s FPS and import your clip first.
Pick your preferred video. Go to the menu and select “Download.” After hitting the “Plus” button, you may maintain the video’s quality by choosing “Match to Media.”
After the movie has loaded, you have two options: double-clicking the clip or selecting the speed option provided below the screen.
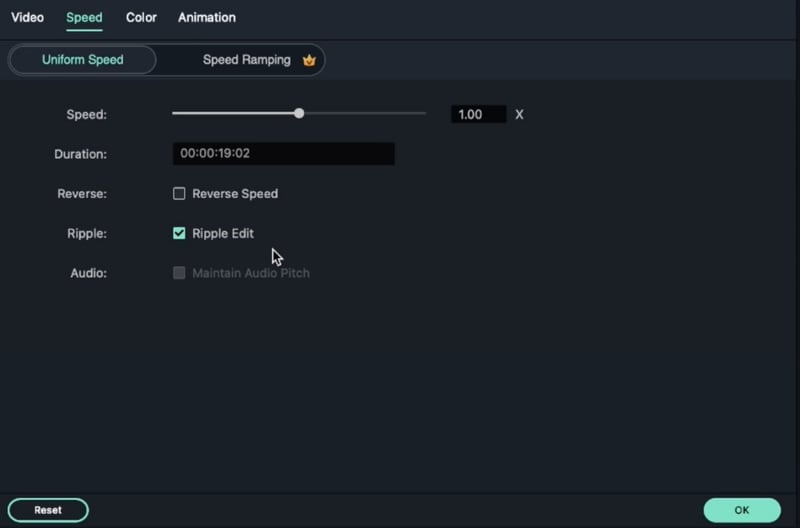
A window appears when we double-click the chosen video. We shall navigate to the “SPEED” section beneath this window. Additional “Uniform Speed” and “Speed Ramping” panels may be found on this speed panel. We shall operate within the uniform speed panel to alter the video’s tempo consistently. A slider is provided for us to adjust the movie’s pacing.
The general speed of the film is continually increased or decreased when we choose the option for constant pace. If we choose the speed option on the screen, it gives us a built-in range of numbers that we can use to change the video’s pace in addition to presets like rapid and regular slow.
Once we click “OK,” the video’s tempo adjusts automatically.
Method 3: Adjusting the Fast/Slow motion to fit your movie using the Speed Ramping option
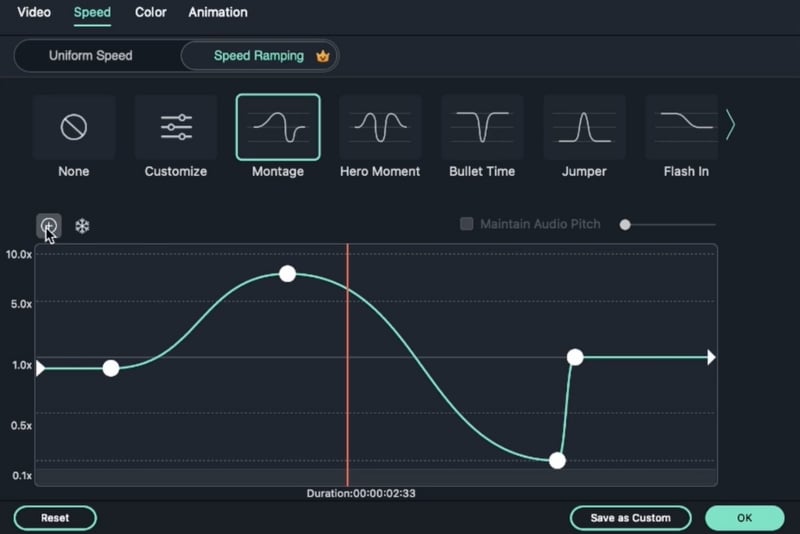
To set up the speed ramping feature for your video, double-clicking the video will give us access to the “SPEED RAMPING” option in the speed panel. When we select the speed ramping option, we see a range of graphs. Each graph shows a number of tempo variations that we may use in our movie.
For Instance, when we select the “MONTAGE” preset, the video’s tempo changes based on how many keyframes we choose and at what rate. As previously stated, as the graph rises above one and falls below one, the movie’s tempo will slow down, increasing its regular speed.
Moving these keyframes higher will make the video go more quickly, while moving them downward will make the movie move more slowly. We may also add more keyframes by using the add button up top, as seen in the image. When satisfied with our results, we will produce the video after pressing the “OK” button.
Watch this video and know more about speed ramping.
Conclusion
In conclusion, the first thing you can do to speed up your video is to use FFmpeg. The FFmpeg project is a community-driven, non-profit collaborative project to develop and maintain an open-source code library for handling multimedia files, including video. It has many features including ffmpeg speed-up video, ffmpeg slow-down video, etc. FFmpeg is free software and supports many platforms, including Linux, macOS, iOS, and Android.
Filmora is another great alternative that allows users to speed up their videos much more easily than using FFmpeg alone. Moreover, it has built-in tools that allow users to automatically detect if there are any issues with their videos. Filmora also offers a wide range of features that you may not find in FFmpeg.
How to Make Strobe Light Text Effect?
In video editing, professionals put in different types of effects to create a unique feel to the visuals. In fact, there are different styles available that you can use in videos to create a specific feel in the viewers—case in point, strobe lights.
This technique involves a series of intense short flashes of light in sections of the clip that create a suspenseful or thrilling ambiance, amping up the horror feel in viewers and more. You might have seen many examples of this in horror movies, thrillers, suspense or action-filled movies, sci-fi films, etc. Similarly, adding the effect to the titles gives a cinematic feel to them.
As a film or video editor, are you interested in adding this effect to your own project as well? Luckily, you do not need significant technical know-how or invest in different types of high-grade equipment to manage it - Wondershare Filmora allows users to add the effect easily in the titles. Want to know how? Read ahead.
Launch the software first
Of course, before you can begin adding the effect to your video, you must have the software. The downloading process for Wondershare Filmora 11 is very straightforward as long as you have a Mac or Windows PC.
Free Download For Win 7 or later(64-bit)
Free Download For macOS 10.14 or later
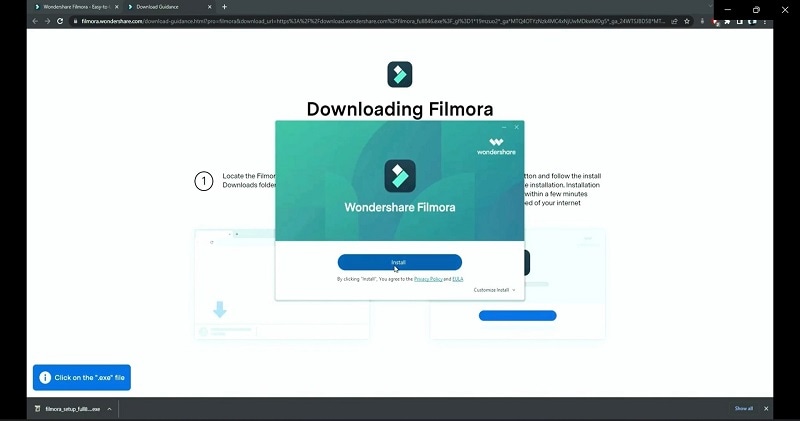
First, visit the official website to download the software. The Download button at the top of the screen or the description box is available to click on. That will instantly allow the Filmora installer to download into your device.
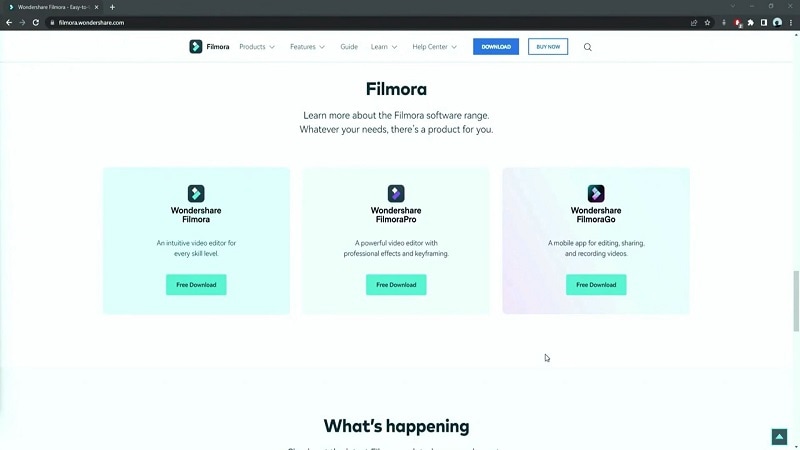
Double-click on the installer from your notifications or browser downloads section, then click Install. Allow the prompt for permission approval when it comes up, and the installation process will begin. This would take a little bit of time, and you can tap on the Start Now button at the last window that opens.
Add the title
The editor will open automatically next. You have to tap on the Create New Project button to access the editing screen, tap on the Titles tab, and choose the Default Title. If you prefer another version, browse through the different title presets available as options and download the one you prefer.
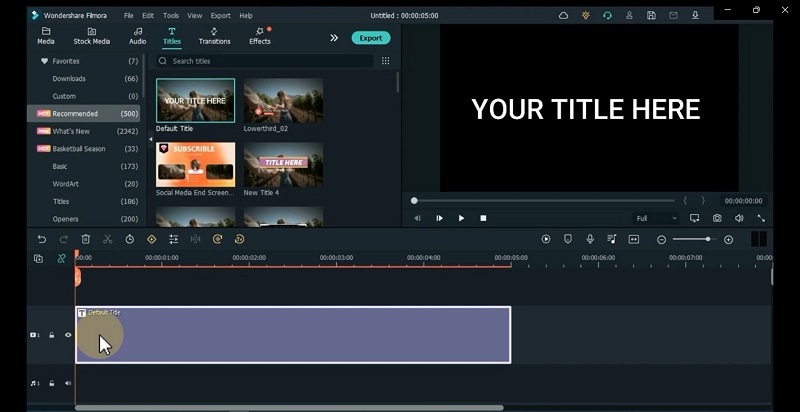
Then, drag the title from this section and drop it into the editing timeline. Double-click on the title in the timeline to open the title editing window. Insert the text you want to add as the title in the text field and adjust the size, font, and other font modifications here.
Edit the title and click snapshots
Then, you should drag the title clip you added to the timeline to an upper section and click on the Media tab following that. Then, choose the Sample Color option from the listed menu and tap on the Black color choice. After doing so, drag it down to the timeline onto the track under the Default Title clip you added and moved up.
Consequently, click on the Snapshot icon at the right side of the toolbar just above the timeline. This will take a screenshot of the black color picture you added second.
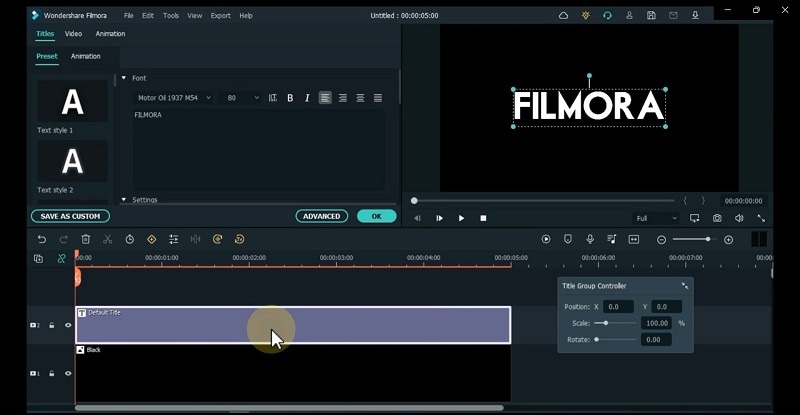
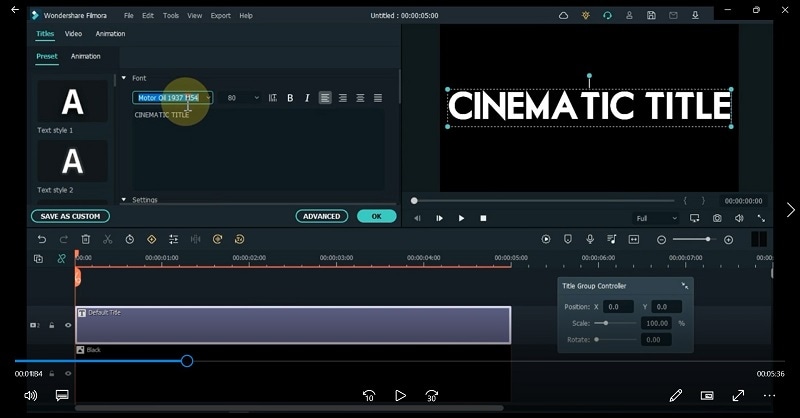
Then you should double-click on the original Default Title you added and start editing your title text once more. This time, add the term you want to appear under your original title here. Adjust the font for it as something other than the original one. For example, if you put Motor Oil 1937 M54 as the first title font, set the second as Montserrat SemBold. Make more adjustments, if necessary, to the font. Then, retake a snapshot of it.
Insert the snapshots
Remove the two title clips you added to the timeline. You have to work with the Snapshots you took now.
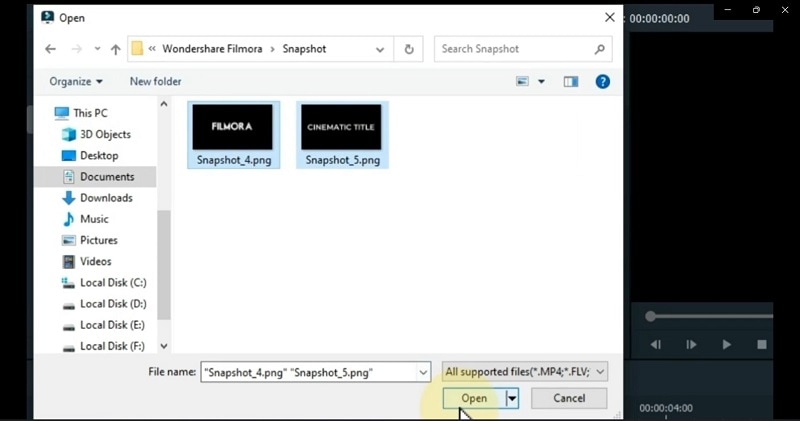
It is possible that you will not see the Snapshots saved in your media folder. In this case, tap on the “Click here to insert media” section and go to the device library. It will open in the Wondershare Filmora folder; if not, search for it and access it.
In the folder, double-click on the Snapshot folder. Choose both of the Snapshots you saved right now from here and tap on Open to import them into Filmora.
Import additional music and background visuals
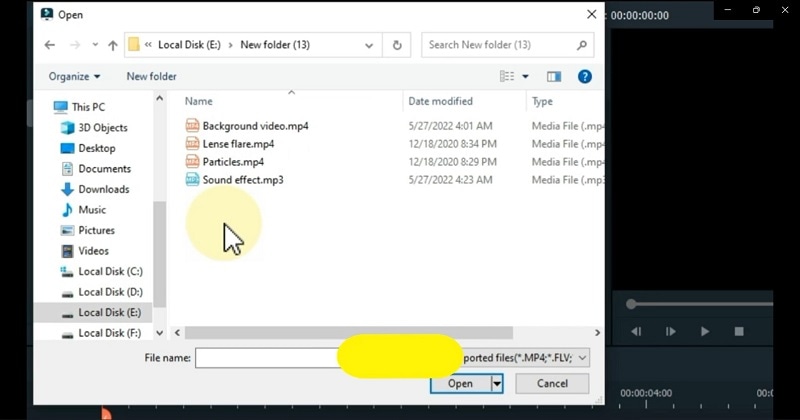
After you have imported the snapshots to Filmora, you have to tap on the Import File option again. Go to the folder where you saved specific files like Lens flare, background video, particles, and sound effect clips. If you have these previously saved in other folders, make sure to keep them all in one folder ahead of time and open that one here.
Choose all files and click on Open to add them to the Filmora software. Now starts the process of merging them all into one cohesive effect.
Drag the files into the timeline
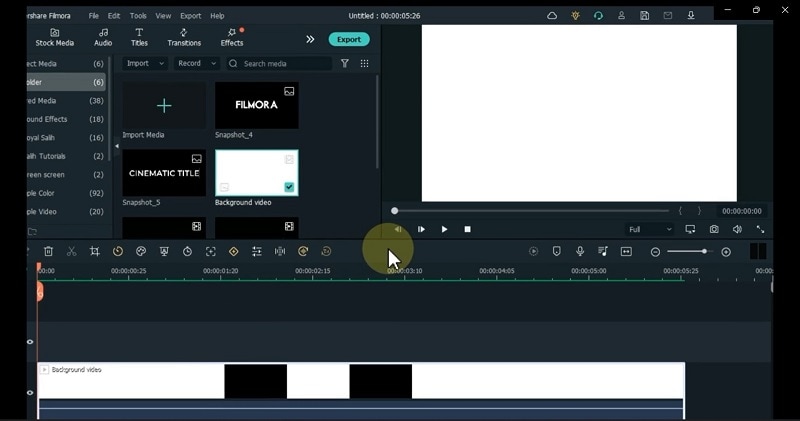
The background video is the first file you will drag and drop to the timeline. For the best effect, choose a flashing light background video. Next, drag the first title you edited into Track 2, right above the first one. Make sure to adjust the length of the clip to match the background video length. Repeat the same for the second snapshot, adding it above the first snapshot in the timeline.
Edit the snapshots via Chroma Key and Composting
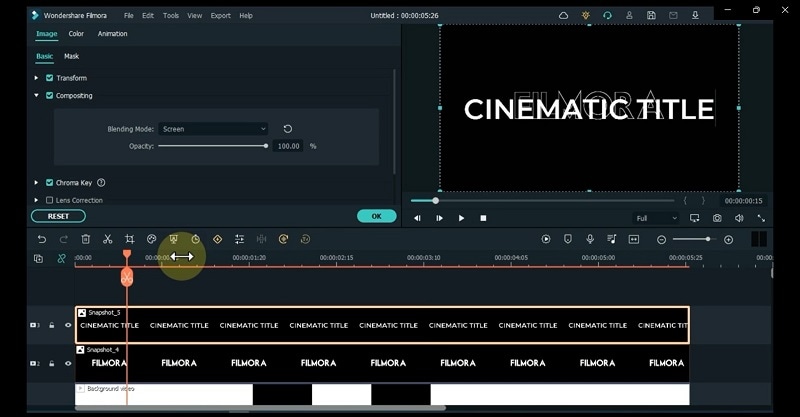
You must hide the second snapshot you added, i.e., the one in the 3rd Track on the timeline. After that, click on snapshot 1 and tap on the Chroma Key icon in the toolbar right above the timeline.
When the Chroma Key window opens, tap on the Select Color option and go to the “More…” option. Tap on the basic white color and click on OK.
Following it, move the slider for Edge Thickness to extend it and see the preview to know if you are satisfied with the amount. Then, click on the unhide icon for the second snapshot. Right-click on it and tap on the Composting option. Under the Blending Mode parameter, change the option to Screen. The title background will remove automatically.
Press OK.
Add the sound effect
Again, you must hide the second snapshot in the timeline with the same step as before. Then, drag the sound effect to the audio track timeline next. Tap on the Play button under the Preview to see how the effect looks with the sound. Cut out the extra second of the sound effect clip to align it with the ending section of all of the other clips.
Add the initial keyframes
Choose the first snapshot in the timeline, below the second snapshot, and above the background video clip. Then, double-click on it to open the editor window and choose the Animation tab this time instead of Image.
Add the keyframe here and change the value of the Scale parameter to 400 or something high like that. In the preview, you will see that most of the font in this title is out of frame. After this, click on Rotate and turn the font to 45 degrees.
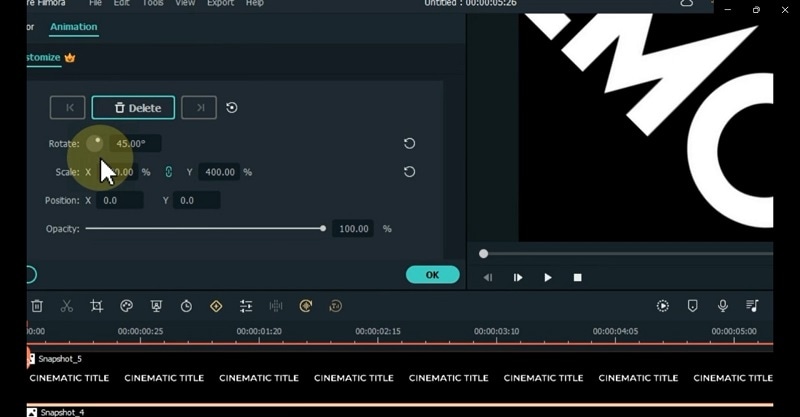
Move your playhead on this snapshot clip in the timeline by at least 1 second. Then, add another keyframe in this location by tapping the Add button. Here, reset the Scale and Rotate parameters and press the OK button to end.
Add the lens flare and particle video
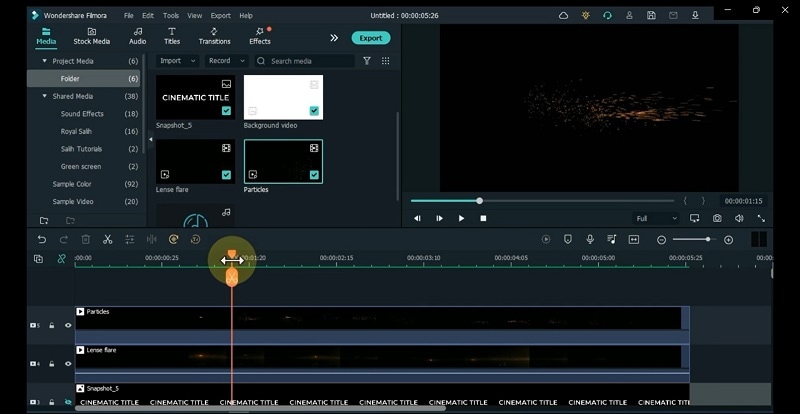
Next, go back to the media section where all the files you added are present and drag your lens flare clip to the timeline, right on the track above the last one you added. Drop it here and adjust the length of it to match others if it does not show that automatically.
Above it, drag and drop the Particles video from the media files you added previously onto the track above the lens flare one. Do the same to delete the spare part by moving the play head to that point, clicking on the scissor icon, and removing the extra part.
Then, double-click on this Particles video clip on the timeline and go to the Compositing section. Tap on the Blending Mode drop-down choice and choose the Screen option. Press OK. Next, repeat the same for the lens flare video and tap the OK button.
Now, play the preview again.
Adjust the second title, again
Remember how you clicked on the hide button for the second snapshot for title 2? Now, you have to click on the unhide icon beside it.
Move the play head to the 3-second mark from the beginning. If you need clarification on this, check if the lens flare effect is beginning to start below the first title at this point. Move your playhead to that point for the second snapshot.
Here, tap on the Split icon and remove the clip’s first half. Then, double-click on the second half and go to Animation. Press the Add button to insert a keyframe here and change the scale and position of the title at this point. Move it to the placement you want, right above the lens flare. Also, drag the slider for the Opacity parameter to zero at this point.
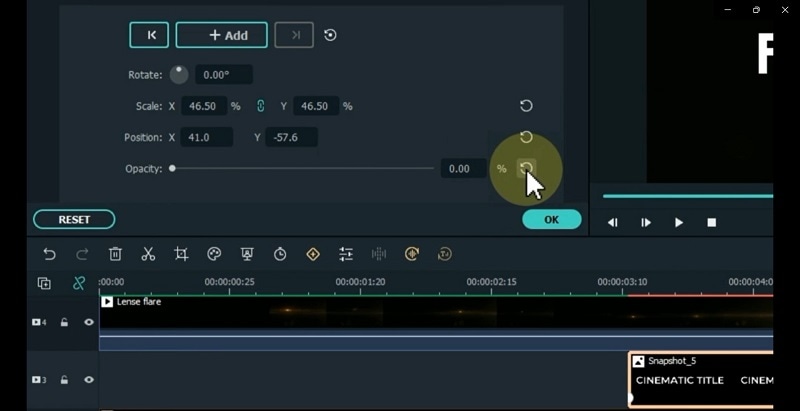
Subsequently, move the play head to the point when the lens flare effect stop, which is around 2 seconds more. At this point, you have to add another keyframe and change the Opacity to 100.
Play the preview of the whole thing to see how the effect looks in completion.
Conclusion
Indeed, the strobe light effect in the title of movies or videos of different lengths can effectively create a heart-stopping moment on the screen. Moreover, it can work to incite a feeling of anticipation in viewers, especially with the right music beat in the backdrop.
Using Filmora will allow you to add the cinematic effect quickly and efficiently with simple, quick steps. Follow the phases mentioned in this post while trying out different variations before settling on your final shot choice.
Free Download For macOS 10.14 or later
First, visit the official website to download the software. The Download button at the top of the screen or the description box is available to click on. That will instantly allow the Filmora installer to download into your device.

Double-click on the installer from your notifications or browser downloads section, then click Install. Allow the prompt for permission approval when it comes up, and the installation process will begin. This would take a little bit of time, and you can tap on the Start Now button at the last window that opens.

Add the title
The editor will open automatically next. You have to tap on the Create New Project button to access the editing screen, tap on the Titles tab, and choose the Default Title. If you prefer another version, browse through the different title presets available as options and download the one you prefer.

Then, drag the title from this section and drop it into the editing timeline. Double-click on the title in the timeline to open the title editing window. Insert the text you want to add as the title in the text field and adjust the size, font, and other font modifications here.
Edit the title and click snapshots
Then, you should drag the title clip you added to the timeline to an upper section and click on the Media tab following that. Then, choose the Sample Color option from the listed menu and tap on the Black color choice. After doing so, drag it down to the timeline onto the track under the Default Title clip you added and moved up.
Consequently, click on the Snapshot icon at the right side of the toolbar just above the timeline. This will take a screenshot of the black color picture you added second.

Then you should double-click on the original Default Title you added and start editing your title text once more. This time, add the term you want to appear under your original title here. Adjust the font for it as something other than the original one. For example, if you put Motor Oil 1937 M54 as the first title font, set the second as Montserrat SemBold. Make more adjustments, if necessary, to the font. Then, retake a snapshot of it.

Insert the snapshots
Remove the two title clips you added to the timeline. You have to work with the Snapshots you took now.
It is possible that you will not see the Snapshots saved in your media folder. In this case, tap on the “Click here to insert media” section and go to the device library. It will open in the Wondershare Filmora folder; if not, search for it and access it.
In the folder, double-click on the Snapshot folder. Choose both of the Snapshots you saved right now from here and tap on Open to import them into Filmora.

Import additional music and background visuals
After you have imported the snapshots to Filmora, you have to tap on the Import File option again. Go to the folder where you saved specific files like Lens flare, background video, particles, and sound effect clips. If you have these previously saved in other folders, make sure to keep them all in one folder ahead of time and open that one here.
Choose all files and click on Open to add them to the Filmora software. Now starts the process of merging them all into one cohesive effect.

Drag the files into the timeline
The background video is the first file you will drag and drop to the timeline. For the best effect, choose a flashing light background video. Next, drag the first title you edited into Track 2, right above the first one. Make sure to adjust the length of the clip to match the background video length. Repeat the same for the second snapshot, adding it above the first snapshot in the timeline.

Edit the snapshots via Chroma Key and Composting
You must hide the second snapshot you added, i.e., the one in the 3rd Track on the timeline. After that, click on snapshot 1 and tap on the Chroma Key icon in the toolbar right above the timeline.
When the Chroma Key window opens, tap on the Select Color option and go to the “More…” option. Tap on the basic white color and click on OK.
Following it, move the slider for Edge Thickness to extend it and see the preview to know if you are satisfied with the amount. Then, click on the unhide icon for the second snapshot. Right-click on it and tap on the Composting option. Under the Blending Mode parameter, change the option to Screen. The title background will remove automatically.
Press OK.

Add the sound effect
Again, you must hide the second snapshot in the timeline with the same step as before. Then, drag the sound effect to the audio track timeline next. Tap on the Play button under the Preview to see how the effect looks with the sound. Cut out the extra second of the sound effect clip to align it with the ending section of all of the other clips.
Add the initial keyframes
Choose the first snapshot in the timeline, below the second snapshot, and above the background video clip. Then, double-click on it to open the editor window and choose the Animation tab this time instead of Image.
Add the keyframe here and change the value of the Scale parameter to 400 or something high like that. In the preview, you will see that most of the font in this title is out of frame. After this, click on Rotate and turn the font to 45 degrees.

Move your playhead on this snapshot clip in the timeline by at least 1 second. Then, add another keyframe in this location by tapping the Add button. Here, reset the Scale and Rotate parameters and press the OK button to end.
Add the lens flare and particle video
Next, go back to the media section where all the files you added are present and drag your lens flare clip to the timeline, right on the track above the last one you added. Drop it here and adjust the length of it to match others if it does not show that automatically.
Above it, drag and drop the Particles video from the media files you added previously onto the track above the lens flare one. Do the same to delete the spare part by moving the play head to that point, clicking on the scissor icon, and removing the extra part.
Then, double-click on this Particles video clip on the timeline and go to the Compositing section. Tap on the Blending Mode drop-down choice and choose the Screen option. Press OK. Next, repeat the same for the lens flare video and tap the OK button.
Now, play the preview again.

Adjust the second title, again
Remember how you clicked on the hide button for the second snapshot for title 2? Now, you have to click on the unhide icon beside it.
Move the play head to the 3-second mark from the beginning. If you need clarification on this, check if the lens flare effect is beginning to start below the first title at this point. Move your playhead to that point for the second snapshot.
Here, tap on the Split icon and remove the clip’s first half. Then, double-click on the second half and go to Animation. Press the Add button to insert a keyframe here and change the scale and position of the title at this point. Move it to the placement you want, right above the lens flare. Also, drag the slider for the Opacity parameter to zero at this point.

Subsequently, move the play head to the point when the lens flare effect stop, which is around 2 seconds more. At this point, you have to add another keyframe and change the Opacity to 100.
Play the preview of the whole thing to see how the effect looks in completion.
Conclusion
Indeed, the strobe light effect in the title of movies or videos of different lengths can effectively create a heart-stopping moment on the screen. Moreover, it can work to incite a feeling of anticipation in viewers, especially with the right music beat in the backdrop.
Using Filmora will allow you to add the cinematic effect quickly and efficiently with simple, quick steps. Follow the phases mentioned in this post while trying out different variations before settling on your final shot choice.
Also read:
- Updated Replacing Sky in Your Pictures Using Online and Offline Tools for 2024
- Updated Do You Know How AI Is Helping Video Editors and Enthusiasts? Many Video Editing Software Allows an Auto Reframe Option to Use that Can Help Manage Videos
- Adding a Spooky Shadow Effect with Filmora for 2024
- Dollar-Store DIY Hacks to Use for Filmmaking on a Budget for 2024
- New Learn Top Best Free LUTs For Premiere Pro
- Updated 2024 Approved Creating Testimonial Videos For Health And Wellness Business Industry
- 2024 Approved Ultimate Guidelines to Help You Better Use VLC Media Player
- Discover the Process of Slowing Down Time-Lapse Videos on Your iPhone for 2024
- New In 2024, Splice App for Android - Guide to Download & Use
- Updated What Anime Character Are You Look Like?
- Detailed Steps to Cut a Video in QuickTime
- New 15 Must-Use Gifs Editors for 2024
- In 2024, Detailed Steps to Rotate Videos in Windows Media Player
- Updated 10 Catchy Pixel Art Wallpapers and How to Custom Your Own with Ease
- Updated In 2024, 6 Best Methods to Make a Video Longer
- In 2024, How to Record Video Streams With FFmpeg on Windows and Mac?
- Updated How to Color-Correct an S-Log Footage for 2024
- Updated In 2024, 3 Ways to Combine 2 or 3 Videos Into 1
- Updated In 2024, How to Add Text Animation Online
- Are You Searching for Professional Subtitle Apps? Read This Article to Explore Various Compatible Subtitle Apps that You Can Run on Multiple Platforms for 2024
- In 2024, How to Create Cinematic Style Videos?
- New Are You Looking to Store Your Videos Securely and Efficiently? Look No Further than Our Top Pick for the Best Cloud Storage Service for Videos
- New In 2024, 15 Free Cinematic LUTs for Your Film
- New 2024 Approved How to Make Discord Logo GIF
- New Easy Guide to Use a Stabilization Tool in Filmora for 2024
- New 2024 Approved Best Ways to Add Photos to Tik Tok Video
- Updated In 2024, How to Make a Video Slideshow in iMovie
- Updated Detailed Tutorial to Crop a Video Using Openshot?
- New 2024 Approved Best Free LUTs to Use
- In 2024, 2 Effective Ways to Add Text Behind Objects
- Updated Easy Ways to Edit Recorded Video for 2024
- 2024 Approved How to Make Video Fade to Black in Movie Maker Easily
- New 2024 Approved 7 Tips to Create Teaching Videos
- Updated Detailed Steps to Rotate Videos in Davinci Resolve
- How to Add VHS Effects to Videos for Free 2024
- New 2024 Approved 22 Free Video Editing Software to Save Your Money and Time
- 2024 Approved Want to Learn How to Make a Fortnite Montage? This Guide Will Give You the Low-Down on Creating Epic Montage Fortnite Videos that You Can Share with Other Players on Social Media Platforms
- Full Guide How To Fix Connection Is Not Private on Lava Agni 2 5G | Dr.fone
- In 2024, The Complete Guide to Google Pixel 8 FRP Bypass Everything You Need to Know
- In 2024, Mastering Lock Screen Settings How to Enable and Disable on Xiaomi Redmi 12
- In 2024, Getting the Pokemon Go GPS Signal Not Found 11 Error in Motorola Moto G Stylus 5G (2023) | Dr.fone
- How to share/fake gps on Uber for Apple iPhone 14 Plus | Dr.fone
- 10 Easy-to-Use FRP Bypass Tools for Unlocking Google Accounts On Xiaomi Redmi Note 12 Pro 5G
- How to Transfer Data from Vivo Y17s to Samsung Phone | Dr.fone
- In 2024, How to Sign Out of Apple ID From iPhone 12 without Password?
- In 2024, How To Activate and Use Life360 Ghost Mode On Gionee F3 Pro | Dr.fone
- In 2024, How to Change your Oppo Reno 10 Pro+ 5G Location on Twitter | Dr.fone
- Title: How to Change Frame Rate in Premiere Pro
- Author: Chloe
- Created at : 2024-05-20 03:37:21
- Updated at : 2024-05-21 03:37:21
- Link: https://ai-editing-video.techidaily.com/how-to-change-frame-rate-in-premiere-pro/
- License: This work is licensed under CC BY-NC-SA 4.0.


