:max_bytes(150000):strip_icc():format(webp)/apps-like-tiktok-the-best-alternatives-in-2020-9f3611f635da4198956585133eaf01cb.jpg)
How to Clone Yourself in Videos with Filmora for 2024

How to Clone Yourself in Videos with Filmora?
With the help of video editing programs like Filmora , you can create clones of yourself. Whether you’re looking to create a funny skit or a serious video, cloning yourself can add much production value to your project.
In this article, we’ll walk you through the process of how to clone yourself in videos using Filmora.
Part 1: How to Film Clips for Cloning Effects?
To make cloning effects, you will need to take two different shots and use a tripod to place the camera, so the frame doesn’t change.
Shooting the first clip
For the first shot, stay on one side of the frame and do the first action. For example, you can pretend to yank and take off your jacket. Then, drop the jacket to the other side of the frame.

To make it more realistic, make an interaction by reacting to the “clone” while facing the other direction.

Shooting the second clip
Then, shoot for the second clip without changing the frame. You will have to go to the place where you dropped the jacket from the first shot.

Act as if you have just appeared there and give a reaction to the other side as well.
Part 2: How to Do the Clone Effect with Filmora?
After you have shot the necessary film clips, bring the clips into Filmora 11. If you haven’t installed Filmora yet, you can go to their website and download it here:
Free Download For Win 7 or later(64-bit)
Free Download For macOS 10.14 or later
Once you have opened Filmora 11, follow the steps below:
Step1 Bring the first clip to the timeline and cut the clip where you pretend to yank and take off the jacket. Select and delete the unnecessary clip.
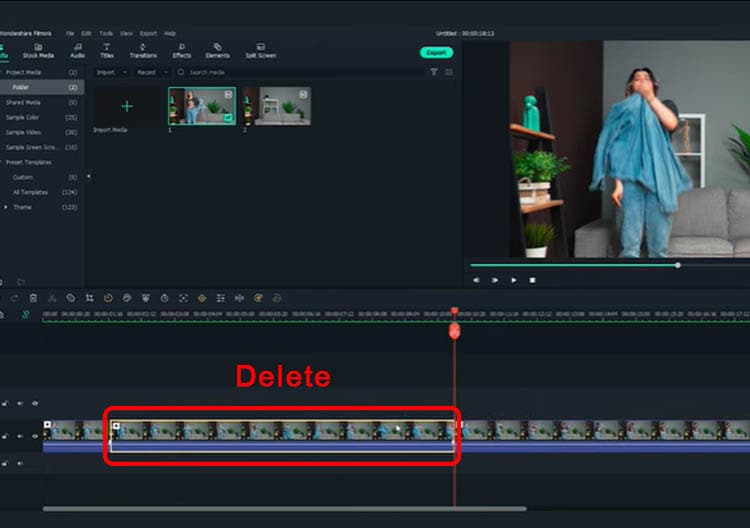
Step2 After you have the first part of the effect ready, let’s start working on the clone part using masking.
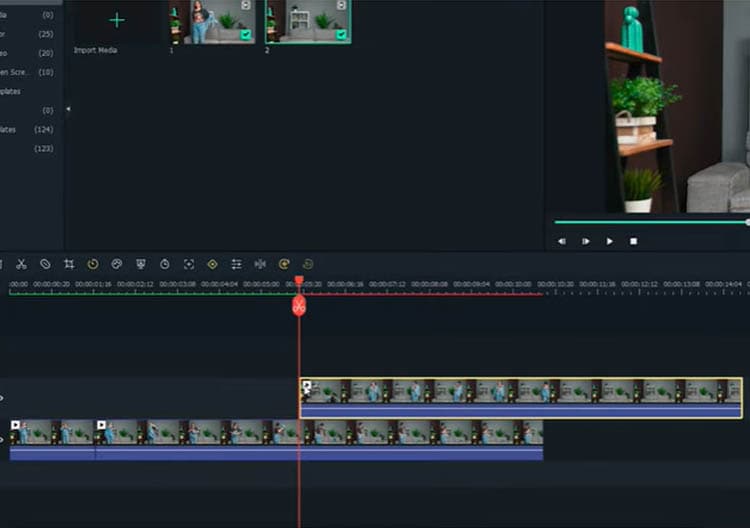
First, place the second clip on a different window track, and the starting point is where you react to the “clone.”
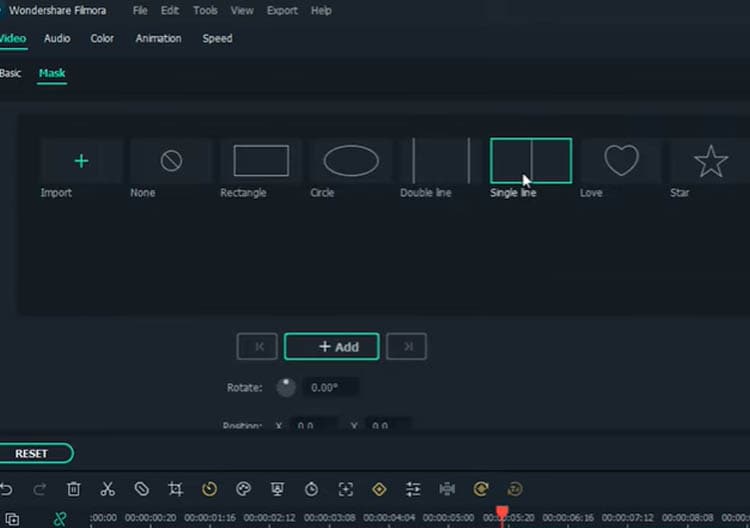
Then, double-click the second clip and go to the Filmora setting window. Tap on the Mask section > Single line.
On the preview screen, adjust the position of the mask to only show “the clone.”
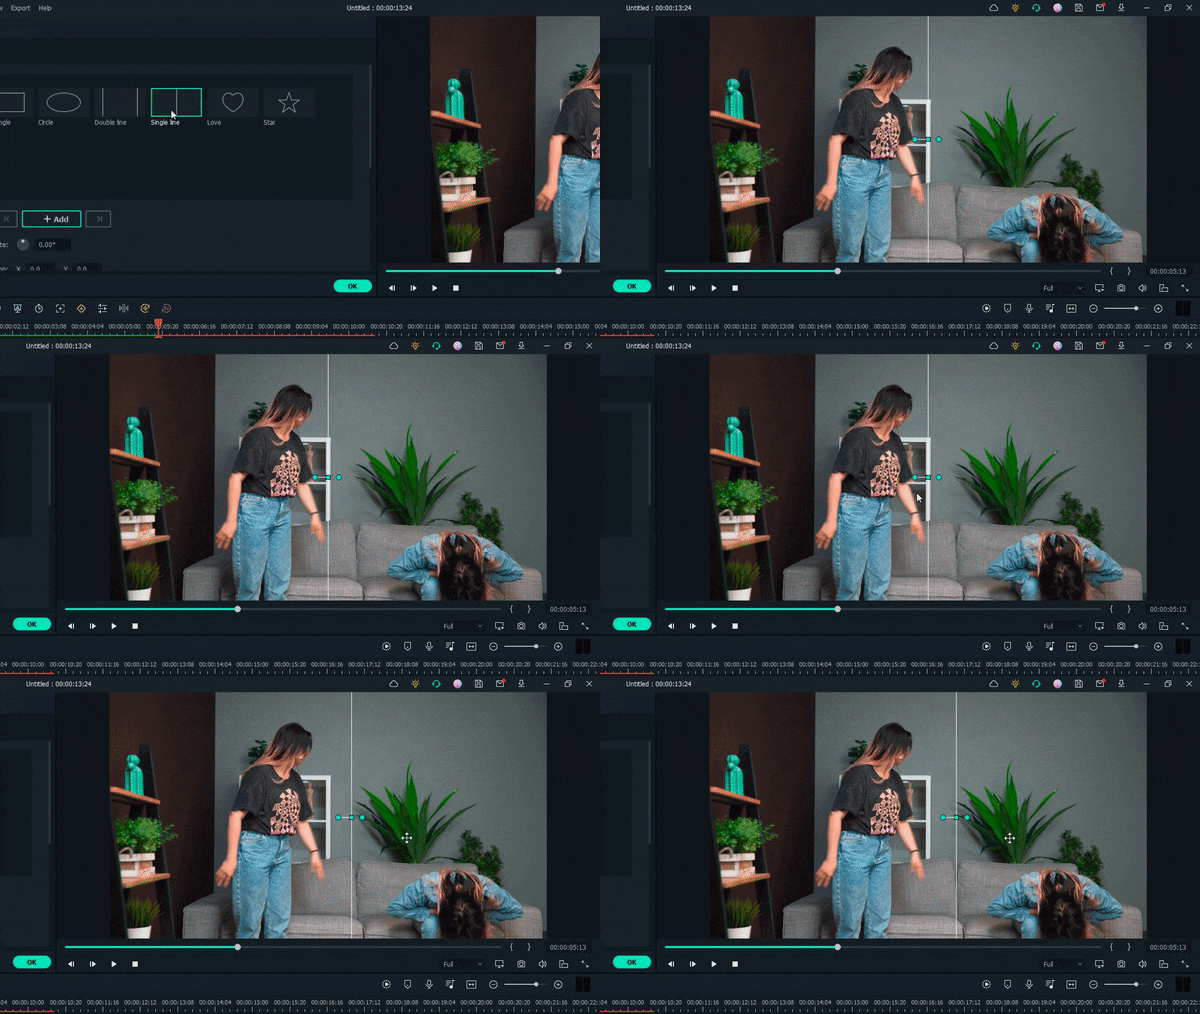
Set the blur strength on the setting to make a smoother edge transition.
Step3 If the timing of the two clips doesn’t match, you can fix it using the speed ramping feature on Filmora 11. To use it, double-click the second clip and select Speed > Speed Ramping > Customize.
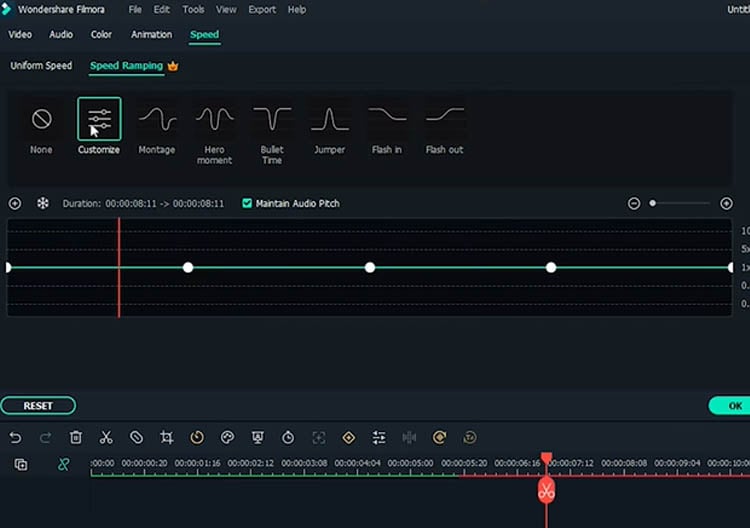
Move the keyframe up to increase the speed. You can adjust it according to your needs.
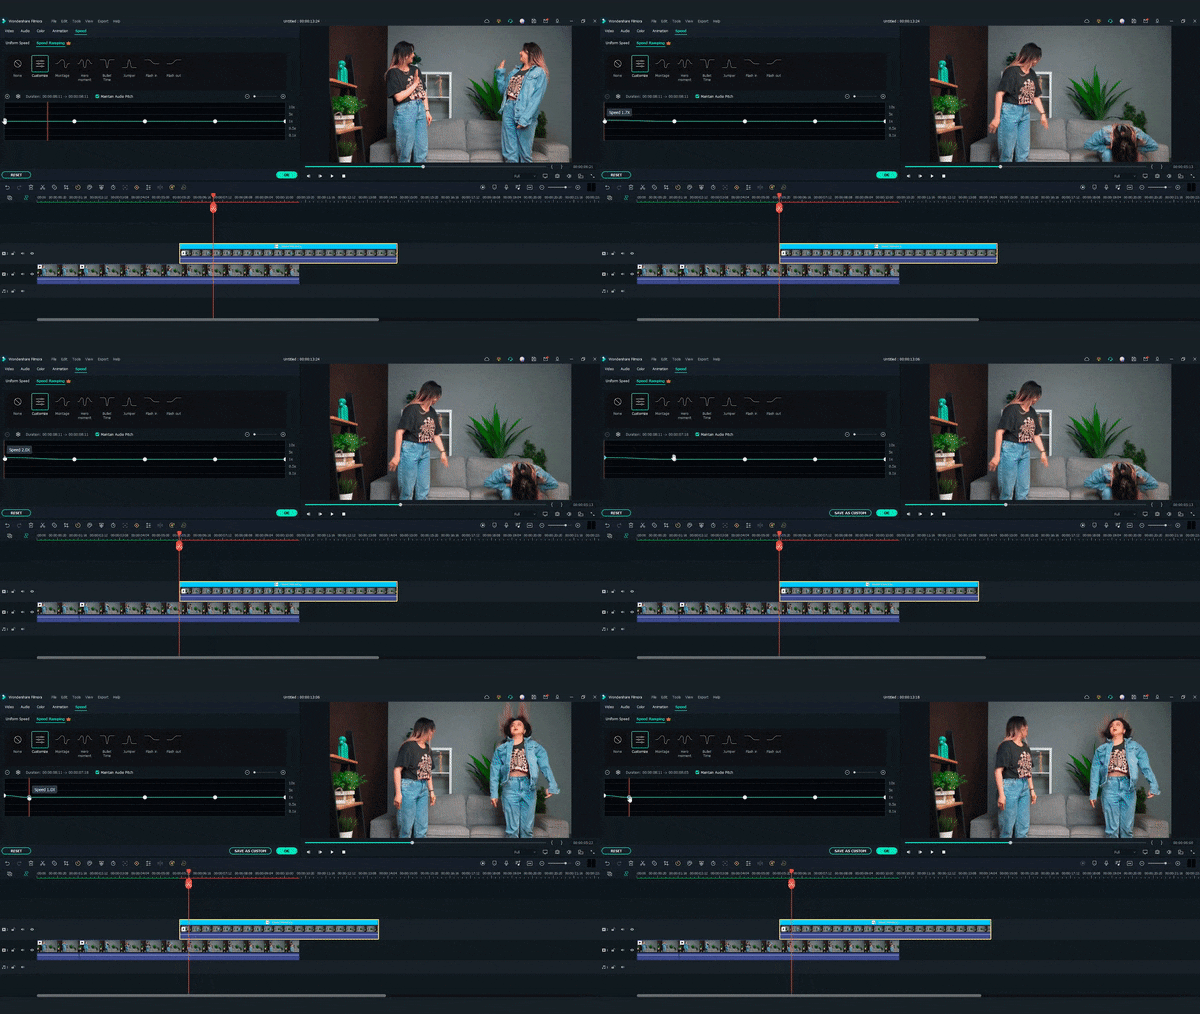
Step4 Once you are satisfied, adjust the clip length on the timeline and make sure that both clips finish at the same time.
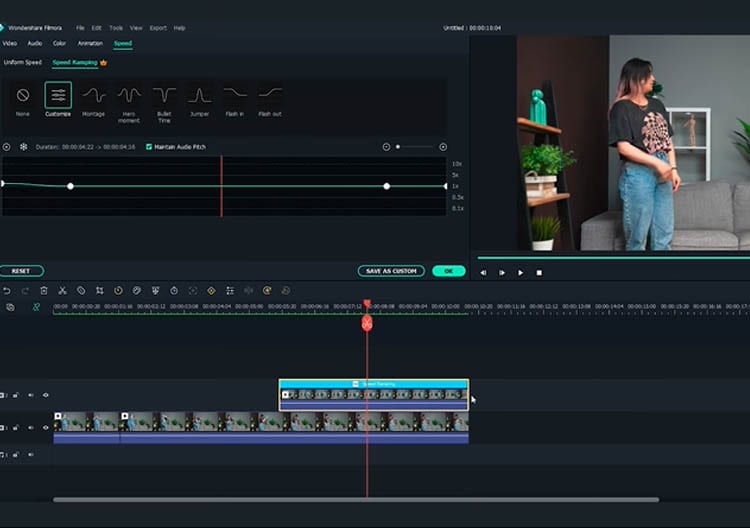
Extra tip: Add one more effect to make it more magical.
Step1 Open the Effects window and search for “up down 1.”
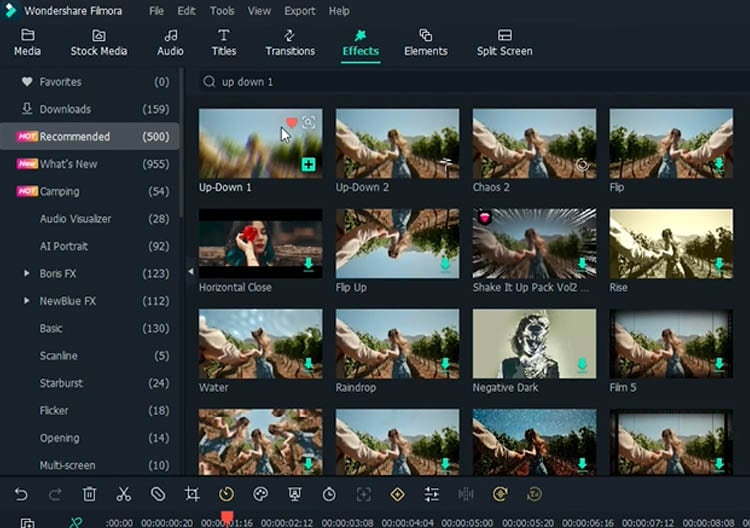
Step2 Drag and drop the effect onto the timeline where the first cut is set. Adjust the effect length to match the action.
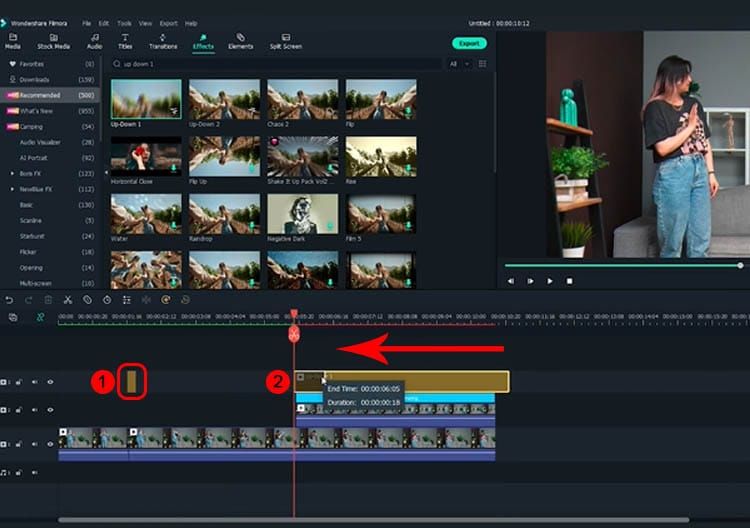
Then, drag and drop the effect again in the transition between the first and the second clip. Adjust it to the appropriate length, then it will give a more dramatic effect.
Step3 You can playback and see how it looks on the preview screen.
Summary
Making a clone effect on video is easy using Filmora. You can use the same trick to create a fashion lookbook video or other creative content to make them more engaging. Let us know if you want to see more tutorials.
Free Download For Win 7 or later(64-bit)
Free Download For macOS 10.14 or later
Free Download For macOS 10.14 or later
Once you have opened Filmora 11, follow the steps below:
Step1 Bring the first clip to the timeline and cut the clip where you pretend to yank and take off the jacket. Select and delete the unnecessary clip.

Step2 After you have the first part of the effect ready, let’s start working on the clone part using masking.
First, place the second clip on a different window track, and the starting point is where you react to the “clone.”

Then, double-click the second clip and go to the Filmora setting window. Tap on the Mask section > Single line.

On the preview screen, adjust the position of the mask to only show “the clone.”

Set the blur strength on the setting to make a smoother edge transition.
Step3 If the timing of the two clips doesn’t match, you can fix it using the speed ramping feature on Filmora 11. To use it, double-click the second clip and select Speed > Speed Ramping > Customize.

Move the keyframe up to increase the speed. You can adjust it according to your needs.

Step4 Once you are satisfied, adjust the clip length on the timeline and make sure that both clips finish at the same time.

Extra tip: Add one more effect to make it more magical.
Step1 Open the Effects window and search for “up down 1.”

Step2 Drag and drop the effect onto the timeline where the first cut is set. Adjust the effect length to match the action.

Then, drag and drop the effect again in the transition between the first and the second clip. Adjust it to the appropriate length, then it will give a more dramatic effect.
Step3 You can playback and see how it looks on the preview screen.
Summary
Making a clone effect on video is easy using Filmora. You can use the same trick to create a fashion lookbook video or other creative content to make them more engaging. Let us know if you want to see more tutorials.
Free Download For Win 7 or later(64-bit)
Free Download For macOS 10.14 or later
How to Add Text in Adobe Rush
Adobe Premiere Rush is a tool designed to make it easier to make simple video edits on desktop and mobile devices. But most users who are used to video editing using Adobe Premiere may find Adobe Rush a little complicated. This includes simple tasks like adding text to your video , which can be difficult unless you know how to do it.
In this article, we will share with you how you can add text to a video using Adobe Rush. We will also share with you an Adobe Rush alternative solution that is much simpler to use.
How to Add Text in Adobe Rush
To easily add text to your Adobe Premiere Rush project, follow these very simple steps. These steps apply to both desktop and mobile versions of Adobe Rush.
Step 1Open Adobe Premiere Rush on your computer and then open the video project you are working on.
Step 2With the project open, click on the blue “Plus” icon under the main menu. On mobile devices, the icon would be at the bottom of the main page.
![]()
Step 3Select “Graphics” from the options that appear
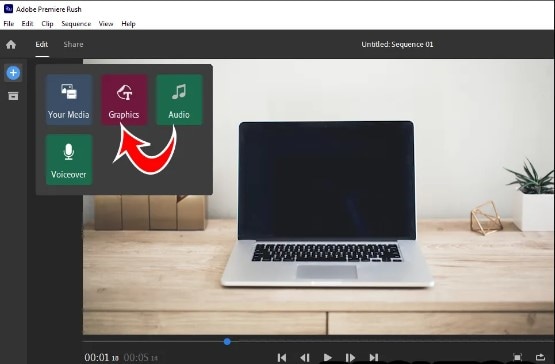
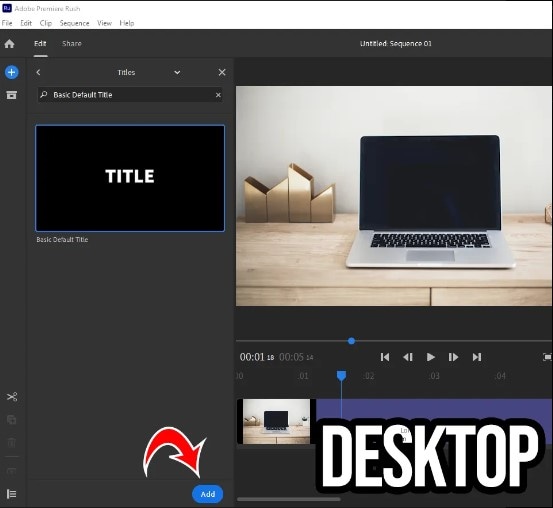
Step 4Click on “More” under “Titles” and then search for “Basic Default Title.” Tap “Add” to add a title to the video’s sequence.
Step 5Once the title is in the sequence, you will be able to make changes to it any way you want. To do that, just drag the title in the preview and tap on it. You should then be able to see options to change the color, size, font, and more in the submenu.
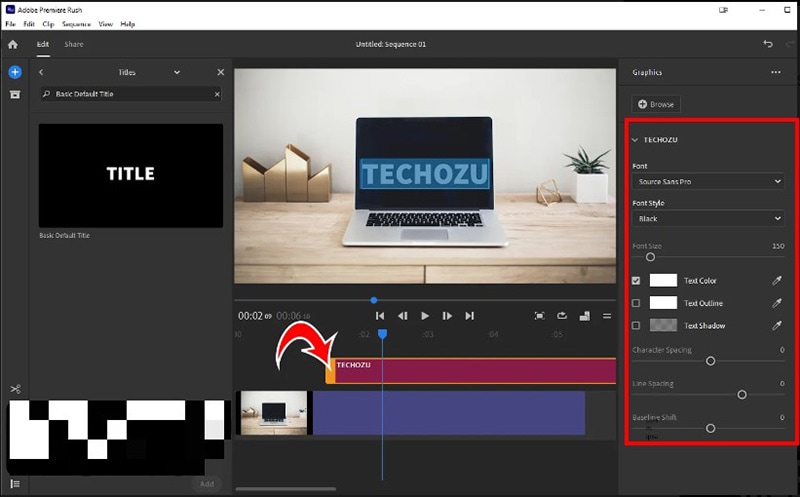
For the purpose of this tutorial, we chose to use the basic title, but Adobe Premiere Rush allows you to choose from a wide range of titles and styling effects to suit your project’s requirements. You also have the choice to add numerous graphics and effects to the title.
You can also very easily duplicate the formatted text as many times as you need to. Just right-click on the formatted text and select “duplicate” to create a copy.
Alternative Way to Add Text Effects to a Video
If Adobe Rush is not a viable solution for you, perhaps because of the cost of the program or even its complexity, we have a video editing platform that is easy to use and has all the features you would find on Adobe Rush and so much more.
This video editing suite is Wondershare Filmora , an easy-to-use and highly effective solution that offers numerous ways to edit videos. The following simple steps show you how you can use Filmora to add text effects to your video project;
Free Download For Win 7 or later(64-bit)
Free Download For macOS 10.14 or later
Step 1Install Wondershare Filmora
Start by installing Wondershare Filmora on your computer. You can download the setup file from the main website and then follow the instructions on the installation Wizard to install the program on your computer.
When the installation is complete, open Filmora on your computer.
Step 2Import the Video Files
On the main screen, click on “New Project” to start editing your video.
At this point, you may want to adjust several settings such as the aspect ratio and frame rates. You can do that in the “Project Settings” window.
Once you have all the settings as needed depending on your project, click “Import” to select the video that you would like to edit.
You can also just drag and drop the video into the main window to open it.

Step 3Add the Video/Videos to the Timeline
To edit the video and any of its components, you will need to add the video to the timeline. You can do that by simply dragging and dropping the video clips from the media library to the timeline below.
This will allow you to see the locations within the video that you can add and effects to.
Step 4Select Text Presets and Add Your Text
With the video in the timeline, you are now ready to add your text. To do that, click on the “Titles” tab and then open the “Text & Title” presets.
Filmora offers more than 200+ text effects that apply to various types of videos. Find the title preset that you would like to use and double-click on it and you should be able to see the effect in the “Preview” window.

If you like what you see, place your Playhead icon where you want the add the text and title in the timeline, and then drag and drop the track above the video.
Step 5Select the Duration of the Text
The default duration of any text overlay that you add to the project is 5 seconds. But you can extend this timeline to fit your needs.
To change the duration of the text overlay, select the text in the timeline and click on the “Timer” icon.

Step 6Edit and Customize Your Text
You also have the option to customize your text in various ways including changing the text font, color, and size.
To edit the text, double-click on the “Title” frame in the timeline, and in the window that appears, make as many changes as you want. There are more than 20 text effects to choose from. Just select one and then double-click on any style to apply it to the text.

You can also use the “Animation” icon if you want to change the animation of the text overlay.
You can also click on the “Advanced” tab to get more advanced editing options for the text that you add to the video. In the advanced options window, you can apply a preset and animation or even customize the Text Fill, Border, and Shadow elements of your text.
Step 7Export Your Video
Once you’ve made all the changes you wanted to make to the video, you can click on the “Play” icon to see a preview of the video to make sure it is just the way you want it to be.
If you are happy with everything and you don’t need to make any more changes, click on the “Export” button. In the window that appears, select the output format for the video and if you need to, you can also select other parameters including the Bit Rate, Encoder, Resolution, and more.
Once all your settings are just how you want them to be, click on “Export” to name the video and save all the changes that you just made.
Filmora also gives you the option to upload the video directly to YouTube and you can also choose to burn the video to DVD. If you will be playing the video on mobile devices, click on the “Devices” tab and select the device you will be using from the options listed here including iPhone, iPad, Samsung Galaxy, and more.
Related FAQs
1. Can I Add Captions in Adobe Rush?
Yes. Adobe Premiere Rush does allow you to add captions and subtitles to any video project. The process is very easy, just open the video in Adobe Rush and add an unformatted “Title” as we did in part 1 above. You can then move the title to any section of the screen and format it any way you want. Ensure that you extend the text to cover the full length of the video. Then simply copy and paste the subtitles from the video’s SRT file to the Title. Set the timing of the text to correspond to the video’s duration and you’re all set.
2. Can You Move Text in Adobe Rush?
Yes, you can easily move text in Adobe Rush. Add the text to the video as described in the first part of this article and once it is on the timeline, you can simply drag the text clip to any desired area on the timeline to change its location.
3. How Do I Add a Title in Adobe Rush Mobile?
One of the greatest advantages of choosing Adobe Rush over other video editors is that it can be very easy to use on mobile devices. The steps to add a title using Adobe Rush for mobile are just as simple as the steps to do it on a desktop. Just open Adobe Rush on your mobile device and then open the video you want to edit, tap on the blue “+” icon at the bottom and select “Graphics > More > Basic Default Title” and then tap “Add” to add your title. You also get the same options to edit the text in various ways including the font size, color, and effects.
Free Download For Win 7 or later(64-bit)
Free Download For macOS 10.14 or later
Free Download For macOS 10.14 or later
Step 1Install Wondershare Filmora
Start by installing Wondershare Filmora on your computer. You can download the setup file from the main website and then follow the instructions on the installation Wizard to install the program on your computer.
When the installation is complete, open Filmora on your computer.
Step 2Import the Video Files
On the main screen, click on “New Project” to start editing your video.
At this point, you may want to adjust several settings such as the aspect ratio and frame rates. You can do that in the “Project Settings” window.
Once you have all the settings as needed depending on your project, click “Import” to select the video that you would like to edit.
You can also just drag and drop the video into the main window to open it.

Step 3Add the Video/Videos to the Timeline
To edit the video and any of its components, you will need to add the video to the timeline. You can do that by simply dragging and dropping the video clips from the media library to the timeline below.
This will allow you to see the locations within the video that you can add and effects to.
Step 4Select Text Presets and Add Your Text
With the video in the timeline, you are now ready to add your text. To do that, click on the “Titles” tab and then open the “Text & Title” presets.
Filmora offers more than 200+ text effects that apply to various types of videos. Find the title preset that you would like to use and double-click on it and you should be able to see the effect in the “Preview” window.

If you like what you see, place your Playhead icon where you want the add the text and title in the timeline, and then drag and drop the track above the video.
Step 5Select the Duration of the Text
The default duration of any text overlay that you add to the project is 5 seconds. But you can extend this timeline to fit your needs.
To change the duration of the text overlay, select the text in the timeline and click on the “Timer” icon.

Step 6Edit and Customize Your Text
You also have the option to customize your text in various ways including changing the text font, color, and size.
To edit the text, double-click on the “Title” frame in the timeline, and in the window that appears, make as many changes as you want. There are more than 20 text effects to choose from. Just select one and then double-click on any style to apply it to the text.

You can also use the “Animation” icon if you want to change the animation of the text overlay.
You can also click on the “Advanced” tab to get more advanced editing options for the text that you add to the video. In the advanced options window, you can apply a preset and animation or even customize the Text Fill, Border, and Shadow elements of your text.
Step 7Export Your Video
Once you’ve made all the changes you wanted to make to the video, you can click on the “Play” icon to see a preview of the video to make sure it is just the way you want it to be.
If you are happy with everything and you don’t need to make any more changes, click on the “Export” button. In the window that appears, select the output format for the video and if you need to, you can also select other parameters including the Bit Rate, Encoder, Resolution, and more.
Once all your settings are just how you want them to be, click on “Export” to name the video and save all the changes that you just made.
Filmora also gives you the option to upload the video directly to YouTube and you can also choose to burn the video to DVD. If you will be playing the video on mobile devices, click on the “Devices” tab and select the device you will be using from the options listed here including iPhone, iPad, Samsung Galaxy, and more.
Related FAQs
1. Can I Add Captions in Adobe Rush?
Yes. Adobe Premiere Rush does allow you to add captions and subtitles to any video project. The process is very easy, just open the video in Adobe Rush and add an unformatted “Title” as we did in part 1 above. You can then move the title to any section of the screen and format it any way you want. Ensure that you extend the text to cover the full length of the video. Then simply copy and paste the subtitles from the video’s SRT file to the Title. Set the timing of the text to correspond to the video’s duration and you’re all set.
2. Can You Move Text in Adobe Rush?
Yes, you can easily move text in Adobe Rush. Add the text to the video as described in the first part of this article and once it is on the timeline, you can simply drag the text clip to any desired area on the timeline to change its location.
3. How Do I Add a Title in Adobe Rush Mobile?
One of the greatest advantages of choosing Adobe Rush over other video editors is that it can be very easy to use on mobile devices. The steps to add a title using Adobe Rush for mobile are just as simple as the steps to do it on a desktop. Just open Adobe Rush on your mobile device and then open the video you want to edit, tap on the blue “+” icon at the bottom and select “Graphics > More > Basic Default Title” and then tap “Add” to add your title. You also get the same options to edit the text in various ways including the font size, color, and effects.
Free Download For Win 7 or later(64-bit)
Free Download For macOS 10.14 or later
Guide: Cropping and Combining Content in Wondershare Filmora [Latest]
Video editing is one of the most essential tasks in a video project. It plays a role in creating videos that leave a lasting impression on your audience. From the initial raw footage to the final product, a video goes through several processes. One vital aspect of video editing is trimming and merging, which holds great importance for any video project.
The editing process changes the whole narrative of a video by adding more depth and feel to it. Through editing, you can remove unwanted segments, rearrange clips, and much more. Capturing and recording video is one thing, but bringing the best out of the raw files is another. To make your raw footage somewhat stunning, you have to sit in the editing room.
Part 1: How Does Trimming or Merging Videos Help Users?
Merging and trimming videos is an editing technique that offers many benefits. Here’s how these actions can help you in so many ways. Find out how it helps the users when they merge or trim a video:
Trimming Videos
- Trimming allows users to remove unwanted portions of a video. You can eliminate mistakes, irrelevant footage, or unnecessary pauses in the video. It also helps streamline the content and improve its overall quality.
- It can help adjust the pacing of a video by removing or shortening sections that may be too slow or lengthy. This ensures a more engaging and dynamic viewing experience.
- By trimming, you can select the best moments from a longer video. You can also create highlight reels that showcase the most important or exciting parts.
- Many social media platforms have specific time limitations for videos. It allows you to meet these requirements and share their content without compromising its essence.
Merging Videos
- The merging of videos enables you to combine multiple clips or segments into a single video. This technique is useful when users want to compile footage from different sources. It also creates a uniform narrative from separate scenes.
- Merging allows you to create montages or collages that showcase various moments or perspectives. This is often used in music videos, compilations, or video presentations.
- Doing this can make seamless transitions between different shots or scenes. This further creates a visually fluid experience for the viewer.
- It also helps you create a coherent storyline by combining different clips. You can use this technique to communicate ideas, emotions, or messages effectively.
Part 2: Wondershare Filmora: An Introduction to A Great Video Editor
Wondershare Filmora is a video editing tool that is created for almost everyone. This tool has it all, from simple edit options to more complicated ones. You can apply various kinds of filters and effects to your video. Additionally, you can change the color tone of your video project by making a few adjustments. However, this is not it, as you can even do trimming and merging in your project.
Trimming or Merging Videos Editor A cross-platform for making videos anywhere for all creators, providing trimming and merging videos functions.
Free Download Free Download Learn More

Besides all this, the tool offers more than you’re expectations. It exists for professionals, enthusiasts, and even those who have started learning how to edit. Moreover, you can import and export videos up to 4K resolution using Wondershare Filmora. Choose a suitable template, import your media files, and start editing your videos with this tool.
Key Features
- Almost all tools provide effects and filters, but Wondershare Filmora offers more. The tool provides free media assets, overlays, transitions, stickers, and more.
- Filmora enables you to add keyframes to your video. This feature will allow you to make changes and add effects to the particular frame.
- Moreover, you can add a virtual green screen in Wondershare Filmora. By using this feature, you can add VFX and other motion effects to your video.
Part 3: Guide to Cropping and Trimming Videos on Wondershare Filmora
You’re in luck if you want to learn about trimming and cropping videos using Wondershare Filmora. This portion will let you know how to crop a video and trim parts of it using this tool.
Filmora Tutorial - Basic Editing in Filmora
Free Download For Win 7 or later(64-bit)
Free Download For macOS 10.14 or later
Step 1Guide to Cropping Videos
To start cropping your video, open Wondershare Filmora and select “New Project” to create a new editing project. Import your video file by dragging and dropping it into the tool. Further, locate your video file in the tool and drag it into the timeline.

Step 2Proceed To Crop and Zoom Window
In the timeline window, look for the “Crop” button and select it, which is located right next to the “Split” option. However, you can press “Alt + C” as a shortcut to access the next screen. This will help you lead into the “Crop and Zoom” window.

Step 3Adjust the Crop
Crop the video by moving the edges accordingly using your mouse. Click and drag the edges inward or outward to define the new frame of your video. If desired, you can also change the “Ratio” by entering the dimensions in the given boxes. This allows you to set specific dimensions for your cropped video.

Step 4Apply the Crop and Save
When done with the cropping adjustments, click “Apply.” This will save the changes, and your video will be cropped based on your preferences. Lastly, make sure to save your file by selecting the “Export” option.

Trimming Methods and Guide
Free Download For Win 7 or later(64-bit)
Free Download For macOS 10.14 or later
01of 05Method 1: Trim Using Video Layer Edges
Step 1: First, import your video into Wondershare Filmora. Then, drag and drop the video onto the timeline and locate the edge of your video layer.

Step 2: Slide the left or right edge to trim the video according to your requirement. Release the edge when you are satisfied with the trimmed portion. Moreover, save your file by pressing the “Export” button.

02of 05Method 2: Trim Using Playhead Slider
Step 1: After importing your media file into the timeline, place the Playhead slider on your video layer at the desired trimming point. Click the “Scissor” icon displayed on the Playhead. The video will be trimmed at the Playhead position.

Step 2: Delete the unwanted portion of the video by selecting it and pressing the “Delete” key on your keyboard. Don’t forget to save your file by exporting it to your system.

03of 05Method 3: Trim Using Option Menu
Step 1: Once your video is in the timeline, move the Playhead slider to the point where you want to trim the video. Right-click on the video layer in the timeline to open a menu.
Step 2: Select “Trim Start to Playhead” to trim the video from the start to the Playback slider.
Step 3: Alternatively, you can select “Trim End to Playhead” to trim the video from the Playhead slider to the end.

04of 05Method 4: Trim Using Shortcut Keys
Step 1: Move the Playhead slider to the desired trimming point after bringing your video into the timeline.
Step 2: Press “Alt + [“ to trim the video from the beginning to the Playhead position.
Step 3: Contrary, you can press the shortcut keys “Alt + ]“ to trim the video from the Playhead position to the end.
05of 05Method 5: Trim Using Instant Cutter Tool
Step 1: Open Wondershare Filmora and select the “Media” button. Go to the “Import” drop-down menu and choose “Import with Instant Cutter Tool.” A new window will appear.

Step 2: Select “Open File” to import your media file into the new window. Once imported, use the sliders at the edges of the video to trim it. Adjust the sliders as needed to define the trimmed portion. Lastly, press “Export” to add a trimmed video to your project.

Part 4: Manual and Automated Techniques of Merging Content on Wondershare Filmora
Wondershare Filmora is an editing platform that makes editing simple for everyone. If you’re an enthusiast looking to learn basics like merging videos and cropping YouTube videos, you’re at the right place. In the part below, you will learn two methods to merge video in Filmora.
Free Download For Win 7 or later(64-bit)
Free Download For macOS 10.14 or later
Methods to merge video in Filmora
Manual Method To Merge Video Clips in Wondershare Filmora
Step 1Launch Wondershare Filmora
To merge two or more video clips using Wondershare Filmora, start by launching the software on your computer. In the editing window of Filmora, locate the “Click here to import” option and import the video clips you want to merge. This will bring the video to the preview window.

Step 2Arrange Clips in Timeline
Proceed to drag and drop each video clip, one by one, onto the timeline. Ensure that you place each clip layer right next to each other in the desired merging order.

Step 3Adjust and Export
Adjust the timeframe of your videos, if needed, by trimming or extending them on the timeline. Once you are satisfied with the arrangement, proceed to export the project. By exporting, your multiple video clips will be merged into a single video file.

Automated Method for Merging Videos in Wondershare Filmora
Step 1Importing Videos
Start by going to the import section and clicking the “Import” drop-down menu. As this opens a menu, select the option of “Import with Instant Cutter Tool.”

Step 2Merging Videos
Within the new window, locate the “Merge” option and click on it. Select the video clips you want to merge by accessing “Open.” Filmora will now import your video clips and merge them.

Step 3Exporting the Merged File
After your video clips have been successfully merged, it’s time to export the final result. In the same window, find the “Export” option and click on it. This will export the merged file directly to the editing window of Wondershare Filmora.

Conclusion
To conclude, video editing and post-production are tasks that polish your project. Editing fine-tunes your project, and the result is always better than the raw footage. Wondershare Filmora is a tool that makes it easy to edit your raw footage into an exceptional video. This tool has everything from trimming and merging to more advanced, like an AI-powered edit option.
For those who are in search to crop YouTube videos, they can surely stop by Filmora. They will get their required results in no time in a highly professional environment.
Free Download Free Download Learn More

Besides all this, the tool offers more than you’re expectations. It exists for professionals, enthusiasts, and even those who have started learning how to edit. Moreover, you can import and export videos up to 4K resolution using Wondershare Filmora. Choose a suitable template, import your media files, and start editing your videos with this tool.
Key Features
- Almost all tools provide effects and filters, but Wondershare Filmora offers more. The tool provides free media assets, overlays, transitions, stickers, and more.
- Filmora enables you to add keyframes to your video. This feature will allow you to make changes and add effects to the particular frame.
- Moreover, you can add a virtual green screen in Wondershare Filmora. By using this feature, you can add VFX and other motion effects to your video.
Part 3: Guide to Cropping and Trimming Videos on Wondershare Filmora
You’re in luck if you want to learn about trimming and cropping videos using Wondershare Filmora. This portion will let you know how to crop a video and trim parts of it using this tool.
Filmora Tutorial - Basic Editing in Filmora
Free Download For Win 7 or later(64-bit)
Free Download For macOS 10.14 or later
Step 1Guide to Cropping Videos
To start cropping your video, open Wondershare Filmora and select “New Project” to create a new editing project. Import your video file by dragging and dropping it into the tool. Further, locate your video file in the tool and drag it into the timeline.

Step 2Proceed To Crop and Zoom Window
In the timeline window, look for the “Crop” button and select it, which is located right next to the “Split” option. However, you can press “Alt + C” as a shortcut to access the next screen. This will help you lead into the “Crop and Zoom” window.

Step 3Adjust the Crop
Crop the video by moving the edges accordingly using your mouse. Click and drag the edges inward or outward to define the new frame of your video. If desired, you can also change the “Ratio” by entering the dimensions in the given boxes. This allows you to set specific dimensions for your cropped video.

Step 4Apply the Crop and Save
When done with the cropping adjustments, click “Apply.” This will save the changes, and your video will be cropped based on your preferences. Lastly, make sure to save your file by selecting the “Export” option.

Trimming Methods and Guide
Free Download For Win 7 or later(64-bit)
Free Download For macOS 10.14 or later
01of 05Method 1: Trim Using Video Layer Edges
Step 1: First, import your video into Wondershare Filmora. Then, drag and drop the video onto the timeline and locate the edge of your video layer.

Step 2: Slide the left or right edge to trim the video according to your requirement. Release the edge when you are satisfied with the trimmed portion. Moreover, save your file by pressing the “Export” button.

02of 05Method 2: Trim Using Playhead Slider
Step 1: After importing your media file into the timeline, place the Playhead slider on your video layer at the desired trimming point. Click the “Scissor” icon displayed on the Playhead. The video will be trimmed at the Playhead position.

Step 2: Delete the unwanted portion of the video by selecting it and pressing the “Delete” key on your keyboard. Don’t forget to save your file by exporting it to your system.

03of 05Method 3: Trim Using Option Menu
Step 1: Once your video is in the timeline, move the Playhead slider to the point where you want to trim the video. Right-click on the video layer in the timeline to open a menu.
Step 2: Select “Trim Start to Playhead” to trim the video from the start to the Playback slider.
Step 3: Alternatively, you can select “Trim End to Playhead” to trim the video from the Playhead slider to the end.

04of 05Method 4: Trim Using Shortcut Keys
Step 1: Move the Playhead slider to the desired trimming point after bringing your video into the timeline.
Step 2: Press “Alt + [“ to trim the video from the beginning to the Playhead position.
Step 3: Contrary, you can press the shortcut keys “Alt + ]“ to trim the video from the Playhead position to the end.
05of 05Method 5: Trim Using Instant Cutter Tool
Step 1: Open Wondershare Filmora and select the “Media” button. Go to the “Import” drop-down menu and choose “Import with Instant Cutter Tool.” A new window will appear.

Step 2: Select “Open File” to import your media file into the new window. Once imported, use the sliders at the edges of the video to trim it. Adjust the sliders as needed to define the trimmed portion. Lastly, press “Export” to add a trimmed video to your project.

Part 4: Manual and Automated Techniques of Merging Content on Wondershare Filmora
Wondershare Filmora is an editing platform that makes editing simple for everyone. If you’re an enthusiast looking to learn basics like merging videos and cropping YouTube videos, you’re at the right place. In the part below, you will learn two methods to merge video in Filmora.
Free Download For Win 7 or later(64-bit)
Free Download For macOS 10.14 or later
Methods to merge video in Filmora
Manual Method To Merge Video Clips in Wondershare Filmora
Step 1Launch Wondershare Filmora
To merge two or more video clips using Wondershare Filmora, start by launching the software on your computer. In the editing window of Filmora, locate the “Click here to import” option and import the video clips you want to merge. This will bring the video to the preview window.

Step 2Arrange Clips in Timeline
Proceed to drag and drop each video clip, one by one, onto the timeline. Ensure that you place each clip layer right next to each other in the desired merging order.

Step 3Adjust and Export
Adjust the timeframe of your videos, if needed, by trimming or extending them on the timeline. Once you are satisfied with the arrangement, proceed to export the project. By exporting, your multiple video clips will be merged into a single video file.

Automated Method for Merging Videos in Wondershare Filmora
Step 1Importing Videos
Start by going to the import section and clicking the “Import” drop-down menu. As this opens a menu, select the option of “Import with Instant Cutter Tool.”

Step 2Merging Videos
Within the new window, locate the “Merge” option and click on it. Select the video clips you want to merge by accessing “Open.” Filmora will now import your video clips and merge them.

Step 3Exporting the Merged File
After your video clips have been successfully merged, it’s time to export the final result. In the same window, find the “Export” option and click on it. This will export the merged file directly to the editing window of Wondershare Filmora.

Conclusion
To conclude, video editing and post-production are tasks that polish your project. Editing fine-tunes your project, and the result is always better than the raw footage. Wondershare Filmora is a tool that makes it easy to edit your raw footage into an exceptional video. This tool has everything from trimming and merging to more advanced, like an AI-powered edit option.
For those who are in search to crop YouTube videos, they can surely stop by Filmora. They will get their required results in no time in a highly professional environment.
Do You Wish to Make Changes Across Your Video? Are You Looking to Record Your Desktop Screen on Mac? Worry Not, as This Article Provides Details About QuickTime Player that Caters to All User Requirements
While designing the iOS and macOS for its dedicated devices, Apple created multiple supporting software that competes for the best in the market. An example is the QuickTime Player, a state-of-the-art, built-in video player available across Mac. This article shall introduce a detailed analysis and overview of QuickTime Player along with major QuickTime formats and features.
Come along as we explore more about QuickTime Player! You surely will get to know much about the tool before using it.
In this article
01 Key Features of QuickTime Player
02 List of QuickTime File Format
03 How to Play Videos with QuickTime
04 How to Do Screen Recording with QuickTime?
05 How to Convert Video File to MOV Format in QuickTime?
06 Top Recommended Video Editor in 2022 – Filmora Video Editor
Part 1: Key Features of QuickTime Player
Multiple highlighting features can be discovered across QuickTime Player. While a basic built-in video player, the tool outshines other video players for the following features, making it a special choice for users working across Mac. Let us look into these features to know more about QuickTime.
Record Across the Player
QuickTime Player offers users a variety of options in recording across the tool. With the basic screen recording where the user potentially sets up the area for recording and other settings, users can also record audio and movies across QuickTime. Doesn’t it sound awesome?
Editing with QuickTime
This video player is much more than a simple video player. Users can effectively use this tool for editing their videos in numerous ways. From trimming video or audio to splitting videos across the player, there are multiple options available that can be accessed easily. The user can also merge and rotate their clips according to their convenience. Sounds convenient, doesn’t it?
Change Resolution of Video
Want to change the resolution of a video? QuickTime Player allows you to potentially change the resolution of the video according to your requirement. If you have a 4K video of huge size, QuickTime Player can easily change its resolution to 1080p, 720p, or 480p, as per the requirement of the user.
Sharing Videos Directly
One of the most impressive options available across QuickTime Player is to share the video directly across different platforms. Users can share their video through Mail, Messages, AirDrop, Vimeo, Facebook, Flickr, YouTube, and several other options supported by QuickTime. Get it shared anywhere!
Part 2: List of QuickTime File Format
QuickTime offers a tangible list of file formats that can be operated across the video player. The following list shows all the QuickTime file format that can run across it:
Video File Formats
- QuickTime Movie (.mov)
- MPEG-4 (.mp4, .m4v)
- MPEG-1
- 3GPP
- 3GPP2
- AVI
- DV
Audio File Formats
- iTunes Audio (.m4a, .m4b, .m4p)
- MP3
- Core Audio (.caf)
- AIFF
- AU
- SD2
- WAV
- SND
- AMR
Part 3: How to Play Videos with QuickTime
Once you know how QuickTime Player makes it easy for Mac users to play their video, it is time to understand the steps associated with the procedure. Two basic techniques can be implemented to play videos with QuickTime. The first method to play videos with QuickTime are featured as follows:
Step 1: You need to open QuickTime Player across your Mac. For that, proceed across Launchpad to access the application.

Step 2: Once the player is launched, you can simply select any video across the window that opens up. Once selected, tap “Open” to play it across QuickTime.

Sounds easy, right? However, if you have multiple videos to open or have other video players installed in your Mac, you should consider following this second approach. If QuickTime Player is not your default video player, it is important to follow the steps below for opening any video across QuickTime.
Step 1: Open Finder on your device and proceed to locate the video that you wish to open across QuickTime. On finding the video, click on the video while holding the “Control” button on the keyboard. This opens a drop-down menu.

Step 2: In the “Open With” section across the menu, you will find the option of QuickTime Player. Tap on the option to open the video across QuickTime.

Part 4: How to Do Screen Recording with QuickTime?
Several functions can be performed across QuickTime. While the QuickTime video format allows you to play different videos across the platform, it also helps users record screens of their choice. To understand the step-by-step procedure, you need to follow the steps displayed below. Come along and learn more about it.
Step 1: Open QuickTime Player on your device and tap on the “File” tab on the top of the screen. Select the option of “New Screen Recording” from the available options to initiate screen recording.

Step 2: The next window opens up, which involves managing the screen recording settings. You need to set up the screen area recorded in the process initially.

Step 3: After setting the screen area, tap on “Options” to specify the microphone settings, the location where the recording will be saved, the timer, and other significant options that are important for screen recording. Click on the “Record” button to start.

Step 4: Once you have recorded the appropriate screen, click on the “Stop” sign appearing on the top of the window to conclude recording and save it across the decided location.

Part 5: How to Convert Video File to MOV Format in QuickTime?
QuickTime Player is not quite extensive when it comes to converting video files. Although there are several QuickTime format files that you may come across and play across the platform, it only converts any video file into MOV format, which is the dedicated file format potentially designed by Apple. To understand the method to convert any QuickTime video format to MOV format, follow the steps shown below:
Step 1: You need to open the appropriate video across QuickTime to convert it accordingly. Once opened, tap on the “File” tab, and select “Export as” across the available options.

Step 2: You need to select an appropriate resolution from the available options according to the video quality that you want the video to be saved in on the preceding menu. QuickTime player will show low-quality resolutions for the high-quality video but not vice versa.

Step 3: A new window opens that requires you to set up the name and location for the video. Add the file extension “.mov” at the end of the name of the video to convert it into MOV format.

Extra Tips: Top Recommended Video Editor in 2022 – Filmora Video Editor
Video players are important for running videos across your devices. However, the significance of a video editor is as primary as a video player in the market. When selecting the best video editor for making changes in your video before posting and viewing it across devices, there are multiple factors that a user looks into.
Wondershare Filmora offers unique and extensive features to its users at a price that is unmatched by the other players in the market. When it comes to basic video editing, the platform features the simplest set of tools that helps users enhance their video to perfection. Along with that, Filmora even allows you to add in music, effects, and transitions as desired. Isn’t it the dream?

For Win 7 or later (64-bit)
For macOS 10.12 or later
With such tools available, Filmora is recognized for its ability to make editing simple for users. There is no need for the user to be a professional in editing for making changes across Filmora. Any individual who is new to video editing can efficiently use the platform for their needs. Along with that, Filmora even allows users to make changes across the audios, both within the videos and separately. It surely is perfect!
Closing Words
Got to know much about QuickTime Player? This effective video player is the best available in the market for Mac users. While supporting different QuickTime file format, users can make significant changes across their videos with the tool. QuickTime allows them to make edits, convert, and record screens easily. This is what makes it a special choice in the market.
02 List of QuickTime File Format
03 How to Play Videos with QuickTime
04 How to Do Screen Recording with QuickTime?
05 How to Convert Video File to MOV Format in QuickTime?
06 Top Recommended Video Editor in 2022 – Filmora Video Editor
Part 1: Key Features of QuickTime Player
Multiple highlighting features can be discovered across QuickTime Player. While a basic built-in video player, the tool outshines other video players for the following features, making it a special choice for users working across Mac. Let us look into these features to know more about QuickTime.
Record Across the Player
QuickTime Player offers users a variety of options in recording across the tool. With the basic screen recording where the user potentially sets up the area for recording and other settings, users can also record audio and movies across QuickTime. Doesn’t it sound awesome?
Editing with QuickTime
This video player is much more than a simple video player. Users can effectively use this tool for editing their videos in numerous ways. From trimming video or audio to splitting videos across the player, there are multiple options available that can be accessed easily. The user can also merge and rotate their clips according to their convenience. Sounds convenient, doesn’t it?
Change Resolution of Video
Want to change the resolution of a video? QuickTime Player allows you to potentially change the resolution of the video according to your requirement. If you have a 4K video of huge size, QuickTime Player can easily change its resolution to 1080p, 720p, or 480p, as per the requirement of the user.
Sharing Videos Directly
One of the most impressive options available across QuickTime Player is to share the video directly across different platforms. Users can share their video through Mail, Messages, AirDrop, Vimeo, Facebook, Flickr, YouTube, and several other options supported by QuickTime. Get it shared anywhere!
Part 2: List of QuickTime File Format
QuickTime offers a tangible list of file formats that can be operated across the video player. The following list shows all the QuickTime file format that can run across it:
Video File Formats
- QuickTime Movie (.mov)
- MPEG-4 (.mp4, .m4v)
- MPEG-1
- 3GPP
- 3GPP2
- AVI
- DV
Audio File Formats
- iTunes Audio (.m4a, .m4b, .m4p)
- MP3
- Core Audio (.caf)
- AIFF
- AU
- SD2
- WAV
- SND
- AMR
Part 3: How to Play Videos with QuickTime
Once you know how QuickTime Player makes it easy for Mac users to play their video, it is time to understand the steps associated with the procedure. Two basic techniques can be implemented to play videos with QuickTime. The first method to play videos with QuickTime are featured as follows:
Step 1: You need to open QuickTime Player across your Mac. For that, proceed across Launchpad to access the application.

Step 2: Once the player is launched, you can simply select any video across the window that opens up. Once selected, tap “Open” to play it across QuickTime.

Sounds easy, right? However, if you have multiple videos to open or have other video players installed in your Mac, you should consider following this second approach. If QuickTime Player is not your default video player, it is important to follow the steps below for opening any video across QuickTime.
Step 1: Open Finder on your device and proceed to locate the video that you wish to open across QuickTime. On finding the video, click on the video while holding the “Control” button on the keyboard. This opens a drop-down menu.

Step 2: In the “Open With” section across the menu, you will find the option of QuickTime Player. Tap on the option to open the video across QuickTime.

Part 4: How to Do Screen Recording with QuickTime?
Several functions can be performed across QuickTime. While the QuickTime video format allows you to play different videos across the platform, it also helps users record screens of their choice. To understand the step-by-step procedure, you need to follow the steps displayed below. Come along and learn more about it.
Step 1: Open QuickTime Player on your device and tap on the “File” tab on the top of the screen. Select the option of “New Screen Recording” from the available options to initiate screen recording.

Step 2: The next window opens up, which involves managing the screen recording settings. You need to set up the screen area recorded in the process initially.

Step 3: After setting the screen area, tap on “Options” to specify the microphone settings, the location where the recording will be saved, the timer, and other significant options that are important for screen recording. Click on the “Record” button to start.

Step 4: Once you have recorded the appropriate screen, click on the “Stop” sign appearing on the top of the window to conclude recording and save it across the decided location.

Part 5: How to Convert Video File to MOV Format in QuickTime?
QuickTime Player is not quite extensive when it comes to converting video files. Although there are several QuickTime format files that you may come across and play across the platform, it only converts any video file into MOV format, which is the dedicated file format potentially designed by Apple. To understand the method to convert any QuickTime video format to MOV format, follow the steps shown below:
Step 1: You need to open the appropriate video across QuickTime to convert it accordingly. Once opened, tap on the “File” tab, and select “Export as” across the available options.

Step 2: You need to select an appropriate resolution from the available options according to the video quality that you want the video to be saved in on the preceding menu. QuickTime player will show low-quality resolutions for the high-quality video but not vice versa.

Step 3: A new window opens that requires you to set up the name and location for the video. Add the file extension “.mov” at the end of the name of the video to convert it into MOV format.

Extra Tips: Top Recommended Video Editor in 2022 – Filmora Video Editor
Video players are important for running videos across your devices. However, the significance of a video editor is as primary as a video player in the market. When selecting the best video editor for making changes in your video before posting and viewing it across devices, there are multiple factors that a user looks into.
Wondershare Filmora offers unique and extensive features to its users at a price that is unmatched by the other players in the market. When it comes to basic video editing, the platform features the simplest set of tools that helps users enhance their video to perfection. Along with that, Filmora even allows you to add in music, effects, and transitions as desired. Isn’t it the dream?

For Win 7 or later (64-bit)
For macOS 10.12 or later
With such tools available, Filmora is recognized for its ability to make editing simple for users. There is no need for the user to be a professional in editing for making changes across Filmora. Any individual who is new to video editing can efficiently use the platform for their needs. Along with that, Filmora even allows users to make changes across the audios, both within the videos and separately. It surely is perfect!
Closing Words
Got to know much about QuickTime Player? This effective video player is the best available in the market for Mac users. While supporting different QuickTime file format, users can make significant changes across their videos with the tool. QuickTime allows them to make edits, convert, and record screens easily. This is what makes it a special choice in the market.
02 List of QuickTime File Format
03 How to Play Videos with QuickTime
04 How to Do Screen Recording with QuickTime?
05 How to Convert Video File to MOV Format in QuickTime?
06 Top Recommended Video Editor in 2022 – Filmora Video Editor
Part 1: Key Features of QuickTime Player
Multiple highlighting features can be discovered across QuickTime Player. While a basic built-in video player, the tool outshines other video players for the following features, making it a special choice for users working across Mac. Let us look into these features to know more about QuickTime.
Record Across the Player
QuickTime Player offers users a variety of options in recording across the tool. With the basic screen recording where the user potentially sets up the area for recording and other settings, users can also record audio and movies across QuickTime. Doesn’t it sound awesome?
Editing with QuickTime
This video player is much more than a simple video player. Users can effectively use this tool for editing their videos in numerous ways. From trimming video or audio to splitting videos across the player, there are multiple options available that can be accessed easily. The user can also merge and rotate their clips according to their convenience. Sounds convenient, doesn’t it?
Change Resolution of Video
Want to change the resolution of a video? QuickTime Player allows you to potentially change the resolution of the video according to your requirement. If you have a 4K video of huge size, QuickTime Player can easily change its resolution to 1080p, 720p, or 480p, as per the requirement of the user.
Sharing Videos Directly
One of the most impressive options available across QuickTime Player is to share the video directly across different platforms. Users can share their video through Mail, Messages, AirDrop, Vimeo, Facebook, Flickr, YouTube, and several other options supported by QuickTime. Get it shared anywhere!
Part 2: List of QuickTime File Format
QuickTime offers a tangible list of file formats that can be operated across the video player. The following list shows all the QuickTime file format that can run across it:
Video File Formats
- QuickTime Movie (.mov)
- MPEG-4 (.mp4, .m4v)
- MPEG-1
- 3GPP
- 3GPP2
- AVI
- DV
Audio File Formats
- iTunes Audio (.m4a, .m4b, .m4p)
- MP3
- Core Audio (.caf)
- AIFF
- AU
- SD2
- WAV
- SND
- AMR
Part 3: How to Play Videos with QuickTime
Once you know how QuickTime Player makes it easy for Mac users to play their video, it is time to understand the steps associated with the procedure. Two basic techniques can be implemented to play videos with QuickTime. The first method to play videos with QuickTime are featured as follows:
Step 1: You need to open QuickTime Player across your Mac. For that, proceed across Launchpad to access the application.

Step 2: Once the player is launched, you can simply select any video across the window that opens up. Once selected, tap “Open” to play it across QuickTime.

Sounds easy, right? However, if you have multiple videos to open or have other video players installed in your Mac, you should consider following this second approach. If QuickTime Player is not your default video player, it is important to follow the steps below for opening any video across QuickTime.
Step 1: Open Finder on your device and proceed to locate the video that you wish to open across QuickTime. On finding the video, click on the video while holding the “Control” button on the keyboard. This opens a drop-down menu.

Step 2: In the “Open With” section across the menu, you will find the option of QuickTime Player. Tap on the option to open the video across QuickTime.

Part 4: How to Do Screen Recording with QuickTime?
Several functions can be performed across QuickTime. While the QuickTime video format allows you to play different videos across the platform, it also helps users record screens of their choice. To understand the step-by-step procedure, you need to follow the steps displayed below. Come along and learn more about it.
Step 1: Open QuickTime Player on your device and tap on the “File” tab on the top of the screen. Select the option of “New Screen Recording” from the available options to initiate screen recording.

Step 2: The next window opens up, which involves managing the screen recording settings. You need to set up the screen area recorded in the process initially.

Step 3: After setting the screen area, tap on “Options” to specify the microphone settings, the location where the recording will be saved, the timer, and other significant options that are important for screen recording. Click on the “Record” button to start.

Step 4: Once you have recorded the appropriate screen, click on the “Stop” sign appearing on the top of the window to conclude recording and save it across the decided location.

Part 5: How to Convert Video File to MOV Format in QuickTime?
QuickTime Player is not quite extensive when it comes to converting video files. Although there are several QuickTime format files that you may come across and play across the platform, it only converts any video file into MOV format, which is the dedicated file format potentially designed by Apple. To understand the method to convert any QuickTime video format to MOV format, follow the steps shown below:
Step 1: You need to open the appropriate video across QuickTime to convert it accordingly. Once opened, tap on the “File” tab, and select “Export as” across the available options.

Step 2: You need to select an appropriate resolution from the available options according to the video quality that you want the video to be saved in on the preceding menu. QuickTime player will show low-quality resolutions for the high-quality video but not vice versa.

Step 3: A new window opens that requires you to set up the name and location for the video. Add the file extension “.mov” at the end of the name of the video to convert it into MOV format.

Extra Tips: Top Recommended Video Editor in 2022 – Filmora Video Editor
Video players are important for running videos across your devices. However, the significance of a video editor is as primary as a video player in the market. When selecting the best video editor for making changes in your video before posting and viewing it across devices, there are multiple factors that a user looks into.
Wondershare Filmora offers unique and extensive features to its users at a price that is unmatched by the other players in the market. When it comes to basic video editing, the platform features the simplest set of tools that helps users enhance their video to perfection. Along with that, Filmora even allows you to add in music, effects, and transitions as desired. Isn’t it the dream?

For Win 7 or later (64-bit)
For macOS 10.12 or later
With such tools available, Filmora is recognized for its ability to make editing simple for users. There is no need for the user to be a professional in editing for making changes across Filmora. Any individual who is new to video editing can efficiently use the platform for their needs. Along with that, Filmora even allows users to make changes across the audios, both within the videos and separately. It surely is perfect!
Closing Words
Got to know much about QuickTime Player? This effective video player is the best available in the market for Mac users. While supporting different QuickTime file format, users can make significant changes across their videos with the tool. QuickTime allows them to make edits, convert, and record screens easily. This is what makes it a special choice in the market.
02 List of QuickTime File Format
03 How to Play Videos with QuickTime
04 How to Do Screen Recording with QuickTime?
05 How to Convert Video File to MOV Format in QuickTime?
06 Top Recommended Video Editor in 2022 – Filmora Video Editor
Part 1: Key Features of QuickTime Player
Multiple highlighting features can be discovered across QuickTime Player. While a basic built-in video player, the tool outshines other video players for the following features, making it a special choice for users working across Mac. Let us look into these features to know more about QuickTime.
Record Across the Player
QuickTime Player offers users a variety of options in recording across the tool. With the basic screen recording where the user potentially sets up the area for recording and other settings, users can also record audio and movies across QuickTime. Doesn’t it sound awesome?
Editing with QuickTime
This video player is much more than a simple video player. Users can effectively use this tool for editing their videos in numerous ways. From trimming video or audio to splitting videos across the player, there are multiple options available that can be accessed easily. The user can also merge and rotate their clips according to their convenience. Sounds convenient, doesn’t it?
Change Resolution of Video
Want to change the resolution of a video? QuickTime Player allows you to potentially change the resolution of the video according to your requirement. If you have a 4K video of huge size, QuickTime Player can easily change its resolution to 1080p, 720p, or 480p, as per the requirement of the user.
Sharing Videos Directly
One of the most impressive options available across QuickTime Player is to share the video directly across different platforms. Users can share their video through Mail, Messages, AirDrop, Vimeo, Facebook, Flickr, YouTube, and several other options supported by QuickTime. Get it shared anywhere!
Part 2: List of QuickTime File Format
QuickTime offers a tangible list of file formats that can be operated across the video player. The following list shows all the QuickTime file format that can run across it:
Video File Formats
- QuickTime Movie (.mov)
- MPEG-4 (.mp4, .m4v)
- MPEG-1
- 3GPP
- 3GPP2
- AVI
- DV
Audio File Formats
- iTunes Audio (.m4a, .m4b, .m4p)
- MP3
- Core Audio (.caf)
- AIFF
- AU
- SD2
- WAV
- SND
- AMR
Part 3: How to Play Videos with QuickTime
Once you know how QuickTime Player makes it easy for Mac users to play their video, it is time to understand the steps associated with the procedure. Two basic techniques can be implemented to play videos with QuickTime. The first method to play videos with QuickTime are featured as follows:
Step 1: You need to open QuickTime Player across your Mac. For that, proceed across Launchpad to access the application.

Step 2: Once the player is launched, you can simply select any video across the window that opens up. Once selected, tap “Open” to play it across QuickTime.

Sounds easy, right? However, if you have multiple videos to open or have other video players installed in your Mac, you should consider following this second approach. If QuickTime Player is not your default video player, it is important to follow the steps below for opening any video across QuickTime.
Step 1: Open Finder on your device and proceed to locate the video that you wish to open across QuickTime. On finding the video, click on the video while holding the “Control” button on the keyboard. This opens a drop-down menu.

Step 2: In the “Open With” section across the menu, you will find the option of QuickTime Player. Tap on the option to open the video across QuickTime.

Part 4: How to Do Screen Recording with QuickTime?
Several functions can be performed across QuickTime. While the QuickTime video format allows you to play different videos across the platform, it also helps users record screens of their choice. To understand the step-by-step procedure, you need to follow the steps displayed below. Come along and learn more about it.
Step 1: Open QuickTime Player on your device and tap on the “File” tab on the top of the screen. Select the option of “New Screen Recording” from the available options to initiate screen recording.

Step 2: The next window opens up, which involves managing the screen recording settings. You need to set up the screen area recorded in the process initially.

Step 3: After setting the screen area, tap on “Options” to specify the microphone settings, the location where the recording will be saved, the timer, and other significant options that are important for screen recording. Click on the “Record” button to start.

Step 4: Once you have recorded the appropriate screen, click on the “Stop” sign appearing on the top of the window to conclude recording and save it across the decided location.

Part 5: How to Convert Video File to MOV Format in QuickTime?
QuickTime Player is not quite extensive when it comes to converting video files. Although there are several QuickTime format files that you may come across and play across the platform, it only converts any video file into MOV format, which is the dedicated file format potentially designed by Apple. To understand the method to convert any QuickTime video format to MOV format, follow the steps shown below:
Step 1: You need to open the appropriate video across QuickTime to convert it accordingly. Once opened, tap on the “File” tab, and select “Export as” across the available options.

Step 2: You need to select an appropriate resolution from the available options according to the video quality that you want the video to be saved in on the preceding menu. QuickTime player will show low-quality resolutions for the high-quality video but not vice versa.

Step 3: A new window opens that requires you to set up the name and location for the video. Add the file extension “.mov” at the end of the name of the video to convert it into MOV format.

Extra Tips: Top Recommended Video Editor in 2022 – Filmora Video Editor
Video players are important for running videos across your devices. However, the significance of a video editor is as primary as a video player in the market. When selecting the best video editor for making changes in your video before posting and viewing it across devices, there are multiple factors that a user looks into.
Wondershare Filmora offers unique and extensive features to its users at a price that is unmatched by the other players in the market. When it comes to basic video editing, the platform features the simplest set of tools that helps users enhance their video to perfection. Along with that, Filmora even allows you to add in music, effects, and transitions as desired. Isn’t it the dream?

For Win 7 or later (64-bit)
For macOS 10.12 or later
With such tools available, Filmora is recognized for its ability to make editing simple for users. There is no need for the user to be a professional in editing for making changes across Filmora. Any individual who is new to video editing can efficiently use the platform for their needs. Along with that, Filmora even allows users to make changes across the audios, both within the videos and separately. It surely is perfect!
Closing Words
Got to know much about QuickTime Player? This effective video player is the best available in the market for Mac users. While supporting different QuickTime file format, users can make significant changes across their videos with the tool. QuickTime allows them to make edits, convert, and record screens easily. This is what makes it a special choice in the market.
Also read:
- New 3 Actionable Ways to Create Countdown Animation for Videos
- Updated Learn About Open Broadcaster Software and How to Perform Obs Color Correction. Also, Explore the Various Aspects of Color Correction Like Contrast, Brightness, Saturation, Among Others
- In 2024, Adobe Premiere Pro Guide to Slow-Down Video
- New The Best Way to Remove Audio From Your Videos
- Want to Make Professional-Looking Videos? Keep Reading to Give Your Videos a Cinematic Feel with the Audio Mixer of Filmora
- What Is Animated GIF for 2024
- Speed Control Is Frequently Used in Video Editing. By Speed up or Slow Down the Video Speed, You Can Achieve Different Visual Results. This Article Will Show You How to Control the Speed of a Video
- New In 2024, 8 Apps to Custom GIF Stickers
- Tactics To Make Keynote Slideshow for 2024
- Updated In 2024, Easy Ways to Remove Motion Blur In Photoshop
- 2024 Approved Have You Ever Used Premiere Pro to Create Slow-Motion Effects? This Article Will Provide a Guide on Producing Slow-Motion Effects by Using Adobe Premiere Pro
- New How To Add Fade In Windows Video Editor
- New How to Make Boring Videos Look Cool By B Rolls
- Updated Best iOS Slow Motion Apps To Work With for 2024
- New In 2024, How to Add Subtitles in VLC Media Play
- Updated 2024 Approved KineMaster Templates 101 How to Get the Most Out of Video Templates
- Updated In 2024, Easily Combine Videos and Audios with 5 Simple Online Tools
- New The Top 10 AI Video Analytics Companies at a Glance
- 2024 Approved How To Change Text Color In Premiere Pro
- Start Making Procreate GIFs and Take Your Editing Creativity to the Next Level
- Updated In 2024, Discover the Top Slow Motion Camera App to Use
- In 2024, Ultimate Guidelines to Help You Use VLC Media Player Better
- Efficient Ways to Change Slow Motion Video to Normal on iPhone
- Updated Vegas Pro - How to Download, Install and Use It?
- Best Image (JPG/PNG) to GIF Converters for 2024
- New In 2024, Top GIF to MP4 Converters
- Updated 2024 Approved Quickly Turn Any Video Into a Paper Rip Effect
- In 2024, Locked Out of Apple iPhone 14? 5 Ways to get into a Locked Apple iPhone 14 | Dr.fone
- Still Using Pattern Locks with Samsung Galaxy M14 5G? Tips, Tricks and Helpful Advice
- How to retrieve erased call logs from Nokia XR21?
- Full Guide How To Fix Connection Is Not Private on Realme GT Neo 5 | Dr.fone
- In 2024, The Complete Guide to Tecno Pop 7 Pro FRP Bypass Everything You Need to Know
- In 2024, Guide to Mirror Your Vivo S18 Pro to Other Android devices | Dr.fone
- In 2024, Top 15 Apps To Hack WiFi Password On Xiaomi Redmi Note 12T Pro
- Here are Some Pro Tips for Pokemon Go PvP Battles On Nokia C12 Pro | Dr.fone
- Top 4 SIM Location Trackers To Easily Find Your Lost Samsung Galaxy XCover 7 Device
- Top-Notch Solutions for Disabled Apple ID From iPhone 15 Plus Making It Possible
- Which is the Best Fake GPS Joystick App On Motorola Moto G34 5G? | Dr.fone
- Ultimate Guide to Catch the Regional-Located Pokemon For Nubia Red Magic 9 Pro | Dr.fone
- Easy Steps on How To Create a New Apple ID Account On iPhone 13 Pro Max | Dr.fone
- The Best Android SIM Unlock Code Generators Unlock Your Motorola Edge+ (2023) Phone Hassle-Free
- In 2024, Bypass iCloud Activation Lock with IMEI Code From your Apple iPhone SE
- How To Deal With the Realme 11 Pro Screen Black But Still Works? | Dr.fone
- In 2024, How To Check if Your HTC Is Unlocked
- Title: How to Clone Yourself in Videos with Filmora for 2024
- Author: Chloe
- Created at : 2024-05-20 03:38:06
- Updated at : 2024-05-21 03:38:06
- Link: https://ai-editing-video.techidaily.com/how-to-clone-yourself-in-videos-with-filmora-for-2024/
- License: This work is licensed under CC BY-NC-SA 4.0.

