
How to Color Grade Your Picture in LightRoom

How to Color Grade Your Picture in LightRoom
Create High-Quality Video - Wondershare Filmora
An easy and powerful YouTube video editor
Numerous video and audio effects to choose from
Detailed tutorials are provided by the official channel
Every budding photographer knows what Photoshop is Adobe Lightroom (officially Adobe Photoshop Lightroom) is the newer and more advanced version of Photoshop. Compared with other alternatives of Lightroom , Lightroom helps photographers import, modify, manipulate, find, organize, and manage their images as an image editing software. Lightroom combines photo management and photo editing in one.
One of the most amazing things about Lightroom is its autosave or nondestructive feature. Once you edit your photos, Lightroom instantly saves and stores them in your Lightroom catalog. With its inbuilt-presets, Lightroom makes working on your project so much easy and fun.
You can leverage Lightroom’s unique features to perform different types of tasks. However, in this article, you’ll learn color grading in Lightroom and how to make it work.
In this article
03 How To Color Grade Your Picture in LightRoom
What Is Color Grading?
Color grading is one of the essential processes for creating the perfect video and image content. Like with color correction, color grading helps enhance the appearance of your image or video and makes it appealing to viewers. However, unlike color correction, it focuses on creating stylistic or cinematic effects rather than rectifying mistakes in the image.
Color grading enhances an already edited or otherwise perfect image or video. So, in color grading, you are not trying to balance out colors or make your pictures look natural to the human eyes. Color correction does all that. Instead, with color grading, you aim to “paint over” a color-corrected content to evoke specific emotions or moods in the viewers.
Colors carry different emotions or visual tones. So, they’re essential in the post-production process to manipulate viewers into specific moods that tell your story best. In other words, color grading aligns your viewer’s emotions to the central theme in your story.

For example, if your image or video’s theme is passion, power, violence, or danger, red portrays them perfectly. Meanwhile, blue does it when you wish to evoke calmness and melancholy in your viewers.
Other examples include:
- pink for beauty, innocence, and femininity,
- Green for nature, darkness, and corruption
- Purple for fantasies, and the mystical
- Yellow for obsession, sickness, and naivety
- Orange for warmth, friendliness, youth, and happiness
Have you noticed that turning your pictures black and white makes them look timeless? That’s color grading in action.
Color Grading in LightRoom
Are you amazed by the thrilling power of color grading to manipulate viewers’ emotions? Are you wondering how you can achieve that effect seamlessly? Then, you don’t need to worry about it. With Adobe Photoshop Lightroom, you too can make magic.
Since Lightroom is an advanced photo editor, it has a lot to offer in features. Unfortunately, this may also mean that it can be complex to understand, especially if you’re new to photo editing. So, first things first, you must understand the color grading panel in Lightroom to appreciate it better.
Lightroom’s color grading panel is right beneath the HSL panel in the Develop Panel. It serves as a replacement for the Split Toning Panel from earlier versions, so it’s pretty easy to find.
The color grading panel comprises five small icons, three color wheels, and a blending/balance slider:
● The Five Small Icons
Lightroom’s small icons are a 3-way default layout, shadows, mid-tones, highlights, and global. With 3-way, you can manipulate the highlights, shadows, and mid-tones. Mid-tones, highlights, and shadows hide all color wheels, excluding the necessary ones that adjust them.
Meanwhile, Global combines and blends the highlights, mid-tones, and shadow adjustments no matter the luminosity. Global ensures that the color wheels work harmoniously.
When adjusting icons, it’s best to use each color wheel one after another one. You’ll get better and more precise outcomes that way compared to using them together.
● Lightroom’s Color Wheels
You can view Lightroom’s three-color wheels through the 3-way default layout. The color wheels help to enhance distinct image parts by providing various color hues. It also allows you to introduce saturation through an adjustable knob.
Each lightroom’s color wheels feature a luminance slide beneath them that adjusts color brightness. Between the luminance slide and the wheel is a visible eye icon that you can use to turn the effects on or off.
● The Blending and Balance Slider
The blending and balance sliders offer you advanced control over how your colors look after introducing them. With the blending slider, you can control the color distinctiveness between highlights and shadows. In other words, this feature helps to merge colors to produce a much more balanced and beautiful result.
The balance slider adjusts altered mid-tones, highlights, and shadows to balance the effects. By default, the slider is set at 0 in the middle and allows you to move it in opposite directions for distinct effects. For example, you can use this tool to balance shadows with over-concentrated colors.
While the above features are visible to everyone in the 3-way view, there are two more hidden sliders. You may only view them when editing highlights, shadows, mid-tones, or the global color wheels. They’re the hue and saturation sliders that you can only uncover by clicking on the arrow below the eye icon.
There’s no idea why the hue and saturation sliders aren’t visible in the 3-way view. That’s especially when you discover that they do the all-important job of making minor but precise changes to final adjustments. This produces an excellent fine-tuned outcome and gives your image a professional finish.

How To Color Grade Your Picture in LightRoom
If you wish to use the color grading Lightroom tool to enhance photos, here’s a comprehensive guide for you. You’ll learn the best practices to apply when using the specific Lightroom features to produce your desired effects:
● Pick Your Color Scheme
What’s color grading without the right colors? Choosing an appropriate color scheme is one of the essential steps in Lightroom color grading. That’s because it sets the tone for the next steps. If you choose the wrong colors, you won’t get the excellent result you desire no matter how hard you try.
First, take a good look at your picture and its visible colors. Then think of the colors that compliment or contrast with them. For example, you should base images with red highlights around red. You can also try colors close to red in the color wheel, like orange.
Once you’ve found the colors that suit your image, you’re ready for the next steps in your color grading process. However, more than just adding colors, you must also pay attention to contrasting colors during processing. If you find such unwanted colors, use the HSL panel to pale them out.
● Prioritize Precision
In earlier paragraphs, you learned that working with the highlights, shadows, and mid-tones individually is best. That’s because individual adjustments are a painstaking process that guarantees the most accurate results. This makes a lot of difference in the final product compared to when you work with the wheel.
Working on the shadows, highlights, and mid-tones individually also connects to the hue and saturation sliders. So you remember how vital these hidden sliders are? You wouldn’t be able to access them by working on the tools one after another. Take that as your reward for being detail-oriented.
● Increase Saturation Values
Sometimes, the effect of one tool tells on another. For example, leaving your saturation values below may render your hue slider ineffective. To avoid that confusion, it’s best to increase your saturation levels to some values higher than your preferred one.
Yes, it wouldn’t look nice initially as you adjust the hue. However, it will ensure that you get the perfect color for your image. You can always go back to adjust the saturation to your choice values later on.
● Use Color Wheels To Find Color, Use Shadows to Refine
When discussing how to choose your color scheme, you must have understood how vital the color wheel is in finding harmonious hues. However, picking your preferred color isn’t the complete process. You must learn to fine-tune your chosen color by using the hue slider. Do this after adjusting the saturation to your preferred level as in the previous step. The result is always mind-blowing.

● Learn the Short Cuts
There are some shortcuts to learn when color grading in Lightroom to enhance accuracy and convenience. For example, option (Mac)/Alt (Windows) gives you better control over your image’s outcomes. Option/Alt + Up will increase saturation by one while the shift key adjusts it. You can use Command (Mac)/Ctrl (Windows) to adjust the hue. Also, the reset button on the right side of your panel takes you back to your initial image.
● Extra Tips
These best practices will help you to achieve excellent results:
- Don’t color grade without understanding the psychology of colors. Know what colors convey different moods or emotions.
- Be sure to work with high-quality pictures. Color grading isn’t magic; it wouldn’t correct an already lousy image.
- Shooting your pictures in RAW gives you more color control.
Conclusion
● Now that you’ve learned how to color grade using Lightroom, there’s no limit to what you can achieve. You can now explore your creative side with so much fun. However, know that you will likely not get it right the first time. Perfection comes with consistent practice or trial and error.
Every budding photographer knows what Photoshop is Adobe Lightroom (officially Adobe Photoshop Lightroom) is the newer and more advanced version of Photoshop. Compared with other alternatives of Lightroom , Lightroom helps photographers import, modify, manipulate, find, organize, and manage their images as an image editing software. Lightroom combines photo management and photo editing in one.
One of the most amazing things about Lightroom is its autosave or nondestructive feature. Once you edit your photos, Lightroom instantly saves and stores them in your Lightroom catalog. With its inbuilt-presets, Lightroom makes working on your project so much easy and fun.
You can leverage Lightroom’s unique features to perform different types of tasks. However, in this article, you’ll learn color grading in Lightroom and how to make it work.
In this article
03 How To Color Grade Your Picture in LightRoom
What Is Color Grading?
Color grading is one of the essential processes for creating the perfect video and image content. Like with color correction, color grading helps enhance the appearance of your image or video and makes it appealing to viewers. However, unlike color correction, it focuses on creating stylistic or cinematic effects rather than rectifying mistakes in the image.
Color grading enhances an already edited or otherwise perfect image or video. So, in color grading, you are not trying to balance out colors or make your pictures look natural to the human eyes. Color correction does all that. Instead, with color grading, you aim to “paint over” a color-corrected content to evoke specific emotions or moods in the viewers.
Colors carry different emotions or visual tones. So, they’re essential in the post-production process to manipulate viewers into specific moods that tell your story best. In other words, color grading aligns your viewer’s emotions to the central theme in your story.

For example, if your image or video’s theme is passion, power, violence, or danger, red portrays them perfectly. Meanwhile, blue does it when you wish to evoke calmness and melancholy in your viewers.
Other examples include:
- pink for beauty, innocence, and femininity,
- Green for nature, darkness, and corruption
- Purple for fantasies, and the mystical
- Yellow for obsession, sickness, and naivety
- Orange for warmth, friendliness, youth, and happiness
Have you noticed that turning your pictures black and white makes them look timeless? That’s color grading in action.
Color Grading in LightRoom
Are you amazed by the thrilling power of color grading to manipulate viewers’ emotions? Are you wondering how you can achieve that effect seamlessly? Then, you don’t need to worry about it. With Adobe Photoshop Lightroom, you too can make magic.
Since Lightroom is an advanced photo editor, it has a lot to offer in features. Unfortunately, this may also mean that it can be complex to understand, especially if you’re new to photo editing. So, first things first, you must understand the color grading panel in Lightroom to appreciate it better.
Lightroom’s color grading panel is right beneath the HSL panel in the Develop Panel. It serves as a replacement for the Split Toning Panel from earlier versions, so it’s pretty easy to find.
The color grading panel comprises five small icons, three color wheels, and a blending/balance slider:
● The Five Small Icons
Lightroom’s small icons are a 3-way default layout, shadows, mid-tones, highlights, and global. With 3-way, you can manipulate the highlights, shadows, and mid-tones. Mid-tones, highlights, and shadows hide all color wheels, excluding the necessary ones that adjust them.
Meanwhile, Global combines and blends the highlights, mid-tones, and shadow adjustments no matter the luminosity. Global ensures that the color wheels work harmoniously.
When adjusting icons, it’s best to use each color wheel one after another one. You’ll get better and more precise outcomes that way compared to using them together.
● Lightroom’s Color Wheels
You can view Lightroom’s three-color wheels through the 3-way default layout. The color wheels help to enhance distinct image parts by providing various color hues. It also allows you to introduce saturation through an adjustable knob.
Each lightroom’s color wheels feature a luminance slide beneath them that adjusts color brightness. Between the luminance slide and the wheel is a visible eye icon that you can use to turn the effects on or off.
● The Blending and Balance Slider
The blending and balance sliders offer you advanced control over how your colors look after introducing them. With the blending slider, you can control the color distinctiveness between highlights and shadows. In other words, this feature helps to merge colors to produce a much more balanced and beautiful result.
The balance slider adjusts altered mid-tones, highlights, and shadows to balance the effects. By default, the slider is set at 0 in the middle and allows you to move it in opposite directions for distinct effects. For example, you can use this tool to balance shadows with over-concentrated colors.
While the above features are visible to everyone in the 3-way view, there are two more hidden sliders. You may only view them when editing highlights, shadows, mid-tones, or the global color wheels. They’re the hue and saturation sliders that you can only uncover by clicking on the arrow below the eye icon.
There’s no idea why the hue and saturation sliders aren’t visible in the 3-way view. That’s especially when you discover that they do the all-important job of making minor but precise changes to final adjustments. This produces an excellent fine-tuned outcome and gives your image a professional finish.

How To Color Grade Your Picture in LightRoom
If you wish to use the color grading Lightroom tool to enhance photos, here’s a comprehensive guide for you. You’ll learn the best practices to apply when using the specific Lightroom features to produce your desired effects:
● Pick Your Color Scheme
What’s color grading without the right colors? Choosing an appropriate color scheme is one of the essential steps in Lightroom color grading. That’s because it sets the tone for the next steps. If you choose the wrong colors, you won’t get the excellent result you desire no matter how hard you try.
First, take a good look at your picture and its visible colors. Then think of the colors that compliment or contrast with them. For example, you should base images with red highlights around red. You can also try colors close to red in the color wheel, like orange.
Once you’ve found the colors that suit your image, you’re ready for the next steps in your color grading process. However, more than just adding colors, you must also pay attention to contrasting colors during processing. If you find such unwanted colors, use the HSL panel to pale them out.
● Prioritize Precision
In earlier paragraphs, you learned that working with the highlights, shadows, and mid-tones individually is best. That’s because individual adjustments are a painstaking process that guarantees the most accurate results. This makes a lot of difference in the final product compared to when you work with the wheel.
Working on the shadows, highlights, and mid-tones individually also connects to the hue and saturation sliders. So you remember how vital these hidden sliders are? You wouldn’t be able to access them by working on the tools one after another. Take that as your reward for being detail-oriented.
● Increase Saturation Values
Sometimes, the effect of one tool tells on another. For example, leaving your saturation values below may render your hue slider ineffective. To avoid that confusion, it’s best to increase your saturation levels to some values higher than your preferred one.
Yes, it wouldn’t look nice initially as you adjust the hue. However, it will ensure that you get the perfect color for your image. You can always go back to adjust the saturation to your choice values later on.
● Use Color Wheels To Find Color, Use Shadows to Refine
When discussing how to choose your color scheme, you must have understood how vital the color wheel is in finding harmonious hues. However, picking your preferred color isn’t the complete process. You must learn to fine-tune your chosen color by using the hue slider. Do this after adjusting the saturation to your preferred level as in the previous step. The result is always mind-blowing.

● Learn the Short Cuts
There are some shortcuts to learn when color grading in Lightroom to enhance accuracy and convenience. For example, option (Mac)/Alt (Windows) gives you better control over your image’s outcomes. Option/Alt + Up will increase saturation by one while the shift key adjusts it. You can use Command (Mac)/Ctrl (Windows) to adjust the hue. Also, the reset button on the right side of your panel takes you back to your initial image.
● Extra Tips
These best practices will help you to achieve excellent results:
- Don’t color grade without understanding the psychology of colors. Know what colors convey different moods or emotions.
- Be sure to work with high-quality pictures. Color grading isn’t magic; it wouldn’t correct an already lousy image.
- Shooting your pictures in RAW gives you more color control.
Conclusion
● Now that you’ve learned how to color grade using Lightroom, there’s no limit to what you can achieve. You can now explore your creative side with so much fun. However, know that you will likely not get it right the first time. Perfection comes with consistent practice or trial and error.
Every budding photographer knows what Photoshop is Adobe Lightroom (officially Adobe Photoshop Lightroom) is the newer and more advanced version of Photoshop. Compared with other alternatives of Lightroom , Lightroom helps photographers import, modify, manipulate, find, organize, and manage their images as an image editing software. Lightroom combines photo management and photo editing in one.
One of the most amazing things about Lightroom is its autosave or nondestructive feature. Once you edit your photos, Lightroom instantly saves and stores them in your Lightroom catalog. With its inbuilt-presets, Lightroom makes working on your project so much easy and fun.
You can leverage Lightroom’s unique features to perform different types of tasks. However, in this article, you’ll learn color grading in Lightroom and how to make it work.
In this article
03 How To Color Grade Your Picture in LightRoom
What Is Color Grading?
Color grading is one of the essential processes for creating the perfect video and image content. Like with color correction, color grading helps enhance the appearance of your image or video and makes it appealing to viewers. However, unlike color correction, it focuses on creating stylistic or cinematic effects rather than rectifying mistakes in the image.
Color grading enhances an already edited or otherwise perfect image or video. So, in color grading, you are not trying to balance out colors or make your pictures look natural to the human eyes. Color correction does all that. Instead, with color grading, you aim to “paint over” a color-corrected content to evoke specific emotions or moods in the viewers.
Colors carry different emotions or visual tones. So, they’re essential in the post-production process to manipulate viewers into specific moods that tell your story best. In other words, color grading aligns your viewer’s emotions to the central theme in your story.

For example, if your image or video’s theme is passion, power, violence, or danger, red portrays them perfectly. Meanwhile, blue does it when you wish to evoke calmness and melancholy in your viewers.
Other examples include:
- pink for beauty, innocence, and femininity,
- Green for nature, darkness, and corruption
- Purple for fantasies, and the mystical
- Yellow for obsession, sickness, and naivety
- Orange for warmth, friendliness, youth, and happiness
Have you noticed that turning your pictures black and white makes them look timeless? That’s color grading in action.
Color Grading in LightRoom
Are you amazed by the thrilling power of color grading to manipulate viewers’ emotions? Are you wondering how you can achieve that effect seamlessly? Then, you don’t need to worry about it. With Adobe Photoshop Lightroom, you too can make magic.
Since Lightroom is an advanced photo editor, it has a lot to offer in features. Unfortunately, this may also mean that it can be complex to understand, especially if you’re new to photo editing. So, first things first, you must understand the color grading panel in Lightroom to appreciate it better.
Lightroom’s color grading panel is right beneath the HSL panel in the Develop Panel. It serves as a replacement for the Split Toning Panel from earlier versions, so it’s pretty easy to find.
The color grading panel comprises five small icons, three color wheels, and a blending/balance slider:
● The Five Small Icons
Lightroom’s small icons are a 3-way default layout, shadows, mid-tones, highlights, and global. With 3-way, you can manipulate the highlights, shadows, and mid-tones. Mid-tones, highlights, and shadows hide all color wheels, excluding the necessary ones that adjust them.
Meanwhile, Global combines and blends the highlights, mid-tones, and shadow adjustments no matter the luminosity. Global ensures that the color wheels work harmoniously.
When adjusting icons, it’s best to use each color wheel one after another one. You’ll get better and more precise outcomes that way compared to using them together.
● Lightroom’s Color Wheels
You can view Lightroom’s three-color wheels through the 3-way default layout. The color wheels help to enhance distinct image parts by providing various color hues. It also allows you to introduce saturation through an adjustable knob.
Each lightroom’s color wheels feature a luminance slide beneath them that adjusts color brightness. Between the luminance slide and the wheel is a visible eye icon that you can use to turn the effects on or off.
● The Blending and Balance Slider
The blending and balance sliders offer you advanced control over how your colors look after introducing them. With the blending slider, you can control the color distinctiveness between highlights and shadows. In other words, this feature helps to merge colors to produce a much more balanced and beautiful result.
The balance slider adjusts altered mid-tones, highlights, and shadows to balance the effects. By default, the slider is set at 0 in the middle and allows you to move it in opposite directions for distinct effects. For example, you can use this tool to balance shadows with over-concentrated colors.
While the above features are visible to everyone in the 3-way view, there are two more hidden sliders. You may only view them when editing highlights, shadows, mid-tones, or the global color wheels. They’re the hue and saturation sliders that you can only uncover by clicking on the arrow below the eye icon.
There’s no idea why the hue and saturation sliders aren’t visible in the 3-way view. That’s especially when you discover that they do the all-important job of making minor but precise changes to final adjustments. This produces an excellent fine-tuned outcome and gives your image a professional finish.

How To Color Grade Your Picture in LightRoom
If you wish to use the color grading Lightroom tool to enhance photos, here’s a comprehensive guide for you. You’ll learn the best practices to apply when using the specific Lightroom features to produce your desired effects:
● Pick Your Color Scheme
What’s color grading without the right colors? Choosing an appropriate color scheme is one of the essential steps in Lightroom color grading. That’s because it sets the tone for the next steps. If you choose the wrong colors, you won’t get the excellent result you desire no matter how hard you try.
First, take a good look at your picture and its visible colors. Then think of the colors that compliment or contrast with them. For example, you should base images with red highlights around red. You can also try colors close to red in the color wheel, like orange.
Once you’ve found the colors that suit your image, you’re ready for the next steps in your color grading process. However, more than just adding colors, you must also pay attention to contrasting colors during processing. If you find such unwanted colors, use the HSL panel to pale them out.
● Prioritize Precision
In earlier paragraphs, you learned that working with the highlights, shadows, and mid-tones individually is best. That’s because individual adjustments are a painstaking process that guarantees the most accurate results. This makes a lot of difference in the final product compared to when you work with the wheel.
Working on the shadows, highlights, and mid-tones individually also connects to the hue and saturation sliders. So you remember how vital these hidden sliders are? You wouldn’t be able to access them by working on the tools one after another. Take that as your reward for being detail-oriented.
● Increase Saturation Values
Sometimes, the effect of one tool tells on another. For example, leaving your saturation values below may render your hue slider ineffective. To avoid that confusion, it’s best to increase your saturation levels to some values higher than your preferred one.
Yes, it wouldn’t look nice initially as you adjust the hue. However, it will ensure that you get the perfect color for your image. You can always go back to adjust the saturation to your choice values later on.
● Use Color Wheels To Find Color, Use Shadows to Refine
When discussing how to choose your color scheme, you must have understood how vital the color wheel is in finding harmonious hues. However, picking your preferred color isn’t the complete process. You must learn to fine-tune your chosen color by using the hue slider. Do this after adjusting the saturation to your preferred level as in the previous step. The result is always mind-blowing.

● Learn the Short Cuts
There are some shortcuts to learn when color grading in Lightroom to enhance accuracy and convenience. For example, option (Mac)/Alt (Windows) gives you better control over your image’s outcomes. Option/Alt + Up will increase saturation by one while the shift key adjusts it. You can use Command (Mac)/Ctrl (Windows) to adjust the hue. Also, the reset button on the right side of your panel takes you back to your initial image.
● Extra Tips
These best practices will help you to achieve excellent results:
- Don’t color grade without understanding the psychology of colors. Know what colors convey different moods or emotions.
- Be sure to work with high-quality pictures. Color grading isn’t magic; it wouldn’t correct an already lousy image.
- Shooting your pictures in RAW gives you more color control.
Conclusion
● Now that you’ve learned how to color grade using Lightroom, there’s no limit to what you can achieve. You can now explore your creative side with so much fun. However, know that you will likely not get it right the first time. Perfection comes with consistent practice or trial and error.
Every budding photographer knows what Photoshop is Adobe Lightroom (officially Adobe Photoshop Lightroom) is the newer and more advanced version of Photoshop. Compared with other alternatives of Lightroom , Lightroom helps photographers import, modify, manipulate, find, organize, and manage their images as an image editing software. Lightroom combines photo management and photo editing in one.
One of the most amazing things about Lightroom is its autosave or nondestructive feature. Once you edit your photos, Lightroom instantly saves and stores them in your Lightroom catalog. With its inbuilt-presets, Lightroom makes working on your project so much easy and fun.
You can leverage Lightroom’s unique features to perform different types of tasks. However, in this article, you’ll learn color grading in Lightroom and how to make it work.
In this article
03 How To Color Grade Your Picture in LightRoom
What Is Color Grading?
Color grading is one of the essential processes for creating the perfect video and image content. Like with color correction, color grading helps enhance the appearance of your image or video and makes it appealing to viewers. However, unlike color correction, it focuses on creating stylistic or cinematic effects rather than rectifying mistakes in the image.
Color grading enhances an already edited or otherwise perfect image or video. So, in color grading, you are not trying to balance out colors or make your pictures look natural to the human eyes. Color correction does all that. Instead, with color grading, you aim to “paint over” a color-corrected content to evoke specific emotions or moods in the viewers.
Colors carry different emotions or visual tones. So, they’re essential in the post-production process to manipulate viewers into specific moods that tell your story best. In other words, color grading aligns your viewer’s emotions to the central theme in your story.

For example, if your image or video’s theme is passion, power, violence, or danger, red portrays them perfectly. Meanwhile, blue does it when you wish to evoke calmness and melancholy in your viewers.
Other examples include:
- pink for beauty, innocence, and femininity,
- Green for nature, darkness, and corruption
- Purple for fantasies, and the mystical
- Yellow for obsession, sickness, and naivety
- Orange for warmth, friendliness, youth, and happiness
Have you noticed that turning your pictures black and white makes them look timeless? That’s color grading in action.
Color Grading in LightRoom
Are you amazed by the thrilling power of color grading to manipulate viewers’ emotions? Are you wondering how you can achieve that effect seamlessly? Then, you don’t need to worry about it. With Adobe Photoshop Lightroom, you too can make magic.
Since Lightroom is an advanced photo editor, it has a lot to offer in features. Unfortunately, this may also mean that it can be complex to understand, especially if you’re new to photo editing. So, first things first, you must understand the color grading panel in Lightroom to appreciate it better.
Lightroom’s color grading panel is right beneath the HSL panel in the Develop Panel. It serves as a replacement for the Split Toning Panel from earlier versions, so it’s pretty easy to find.
The color grading panel comprises five small icons, three color wheels, and a blending/balance slider:
● The Five Small Icons
Lightroom’s small icons are a 3-way default layout, shadows, mid-tones, highlights, and global. With 3-way, you can manipulate the highlights, shadows, and mid-tones. Mid-tones, highlights, and shadows hide all color wheels, excluding the necessary ones that adjust them.
Meanwhile, Global combines and blends the highlights, mid-tones, and shadow adjustments no matter the luminosity. Global ensures that the color wheels work harmoniously.
When adjusting icons, it’s best to use each color wheel one after another one. You’ll get better and more precise outcomes that way compared to using them together.
● Lightroom’s Color Wheels
You can view Lightroom’s three-color wheels through the 3-way default layout. The color wheels help to enhance distinct image parts by providing various color hues. It also allows you to introduce saturation through an adjustable knob.
Each lightroom’s color wheels feature a luminance slide beneath them that adjusts color brightness. Between the luminance slide and the wheel is a visible eye icon that you can use to turn the effects on or off.
● The Blending and Balance Slider
The blending and balance sliders offer you advanced control over how your colors look after introducing them. With the blending slider, you can control the color distinctiveness between highlights and shadows. In other words, this feature helps to merge colors to produce a much more balanced and beautiful result.
The balance slider adjusts altered mid-tones, highlights, and shadows to balance the effects. By default, the slider is set at 0 in the middle and allows you to move it in opposite directions for distinct effects. For example, you can use this tool to balance shadows with over-concentrated colors.
While the above features are visible to everyone in the 3-way view, there are two more hidden sliders. You may only view them when editing highlights, shadows, mid-tones, or the global color wheels. They’re the hue and saturation sliders that you can only uncover by clicking on the arrow below the eye icon.
There’s no idea why the hue and saturation sliders aren’t visible in the 3-way view. That’s especially when you discover that they do the all-important job of making minor but precise changes to final adjustments. This produces an excellent fine-tuned outcome and gives your image a professional finish.

How To Color Grade Your Picture in LightRoom
If you wish to use the color grading Lightroom tool to enhance photos, here’s a comprehensive guide for you. You’ll learn the best practices to apply when using the specific Lightroom features to produce your desired effects:
● Pick Your Color Scheme
What’s color grading without the right colors? Choosing an appropriate color scheme is one of the essential steps in Lightroom color grading. That’s because it sets the tone for the next steps. If you choose the wrong colors, you won’t get the excellent result you desire no matter how hard you try.
First, take a good look at your picture and its visible colors. Then think of the colors that compliment or contrast with them. For example, you should base images with red highlights around red. You can also try colors close to red in the color wheel, like orange.
Once you’ve found the colors that suit your image, you’re ready for the next steps in your color grading process. However, more than just adding colors, you must also pay attention to contrasting colors during processing. If you find such unwanted colors, use the HSL panel to pale them out.
● Prioritize Precision
In earlier paragraphs, you learned that working with the highlights, shadows, and mid-tones individually is best. That’s because individual adjustments are a painstaking process that guarantees the most accurate results. This makes a lot of difference in the final product compared to when you work with the wheel.
Working on the shadows, highlights, and mid-tones individually also connects to the hue and saturation sliders. So you remember how vital these hidden sliders are? You wouldn’t be able to access them by working on the tools one after another. Take that as your reward for being detail-oriented.
● Increase Saturation Values
Sometimes, the effect of one tool tells on another. For example, leaving your saturation values below may render your hue slider ineffective. To avoid that confusion, it’s best to increase your saturation levels to some values higher than your preferred one.
Yes, it wouldn’t look nice initially as you adjust the hue. However, it will ensure that you get the perfect color for your image. You can always go back to adjust the saturation to your choice values later on.
● Use Color Wheels To Find Color, Use Shadows to Refine
When discussing how to choose your color scheme, you must have understood how vital the color wheel is in finding harmonious hues. However, picking your preferred color isn’t the complete process. You must learn to fine-tune your chosen color by using the hue slider. Do this after adjusting the saturation to your preferred level as in the previous step. The result is always mind-blowing.

● Learn the Short Cuts
There are some shortcuts to learn when color grading in Lightroom to enhance accuracy and convenience. For example, option (Mac)/Alt (Windows) gives you better control over your image’s outcomes. Option/Alt + Up will increase saturation by one while the shift key adjusts it. You can use Command (Mac)/Ctrl (Windows) to adjust the hue. Also, the reset button on the right side of your panel takes you back to your initial image.
● Extra Tips
These best practices will help you to achieve excellent results:
- Don’t color grade without understanding the psychology of colors. Know what colors convey different moods or emotions.
- Be sure to work with high-quality pictures. Color grading isn’t magic; it wouldn’t correct an already lousy image.
- Shooting your pictures in RAW gives you more color control.
Conclusion
● Now that you’ve learned how to color grade using Lightroom, there’s no limit to what you can achieve. You can now explore your creative side with so much fun. However, know that you will likely not get it right the first time. Perfection comes with consistent practice or trial and error.
How to Perform Mask Tracking: Discovering the Best Methods
Mask tracking refers to editing a specific part of a video without overlapping. Masking helps with creative transitions and background removal with ease. The integration of AI technology in masking tools has made masking more accessible. They help with masking an object or landscape with precision.
In addition, you can correct the colors of a specific part through a motion tracking mask. In this article, we’ll discuss masker tracking using three different software. Two of those software are renowned for their professionalism and precision. We’ll discuss masking in Adobe After Effects , Adobe Premiere Pro , and an alternative.
AI Smart Masking Spice up your video content with the endless possibilities of AI masking functions

Part 1: Working Out the Comprehensive Methods to Perform Mask Tracking on Adobe After Effects
Adobe After Effects is a powerful tool for mask tracking and other functions. The interface of this tool tailors your content to your needs with precision. The process of masking is convenient and accessible and provides accurate results. Its advanced masking options, like filling up the mask, add a realistic touch. Before learning about masking in After Effects, let’s discuss some of its features:
- Text Animations: Animating your text in Adobe After Effects is a comprehensive experience. It is because the software has amazing text fonts and animation options. You can also set the appearance settings like opacity, color, and more text. In addition, the software has pre-installed effects and presets to ease the process.
- VFX/Visual Effects: Elevate your images and videos using Adobe’s amazing visual elements. It can eliminate mistakes, and results are so promising that they become invisible. You can use the mask tracking effect to hide and fill objects. In addition, you can turn your transitions into high-resolution 3D or 4D videos.
- Motion Graphics: It moves anything with its motion graphics functionality and advanced keyframing. Along with animating text, the feature allows you to move the logos. You can move a logo on any background from top to bottom or left to right. With its flickering and wiggling effects, make animations without keyframing.
- Rotoscoping: This After Effects function eliminates using green screens in your videos. Using the pen tool, you can merge a different object in a different footage. Afterward, you can polish the mask by resizing and adjusting opacity values.
- Motion Tracking: Elevate the graphics of your videos using the motion tracking feature. This function connects any image with an object’s motion. Therefore, your images become animated and add a creative element to the content. Its cloud collaboration with other software allows users to download assets.
Step-by-Step Procedure for Masking in Adobe After Effects
Now that you know the After Effects masker line tracking feature, let’s move forward. Read the following guide to learn more about masking:
Step 1
After importing your clip into the timeline, select it in the timeline panel. Navigate towards the upper toolbar and select the “Pen Tool” option. Afterward, create a mask around the object that you want to remove.
![]()
Step 2
You’ll see a mask around the object, and the rest of the screen will disappear. Navigate to the timeline panel, expand the video track options, and select “Mask.” Click the “Mask” navigation arrow and select “None.”
![]()
Step 3
Click the “Mask” button and select the “Track Mask” option. A mask tracker window will appear on the right side; expand the “Method” option. Following that, select the type of masking you want, like “Position.” Play the video from beginning to end for motion detection. Afterward, change the “Mask” mode to “Add” to apply masking.
![]()
Step 4
Afterward, change the Mask mode to “Subtract” from the timeline. Now, navigate towards the topmost toolbar and expand the “Window” tab. From the expansion menu, click the “Content-Aware Fill” option.
![]()
Step 5
Move towards the “Mask” option, expand “Mask Path,” and change the values below. Now, go to the right side, increase “Alpha Expansion,” and click “Generate Fill Layer.” Once the mask tracking completes, download your video.
![]()
Part 2: Providing a Detailed Guide on How to Do Mask Tracking with Adobe Premiere Pro
Adobe Premiere Pro is one of the industry’s leading tools for editing videos. It offers a wide range of features and built-in effects to elevate content. The software offers precise editing capabilities for mask tracking and other enhancements. In addition, it has many visual, video, and audio effects and presets to apply. Let’s discuss some key features of this tool that make it worthy of being top:
- Motion Graphics Templates: With its seamless After Effect collaboration, it offers built-in templates. These templates include multiple text, shapes, and graphics. You can also customize these templates as per content relevancy and taste.
- Edit Audio: Premiere Pro has multiple audio editing options to maintain audio quality. The tool allows you to decrease the volume of one track while increasing others. In addition, you can make audio adjustments that fit a sound.
- Color Correction: Enhance the graphical element in your videos using this feature. It offers both color correction and enhancing capabilities. You can employ this color correction if you have overexposed or underexposed videos.
- Movie and Film Editing: A professional editor offers applications in the media industry. The Premiere Pro offers seamless collaboration with all video and audio formats. In addition, it can import files from all sources like DSLRs and more.
- Speech to Text: It doesn’t just limit you to video editing but also offers transcript creation. The software analyzes your footage’s audio and creates transcripts. Afterward, you can use them as subtitles and captions.
Step-by-Step Procedure for Masking in Premiere Pro
After introducing mask tracking in Adobe Premiere Pro, let’s progress further. Continue reading the following guide to gain a deeper understanding of masking:
Step 1
After importing your video in the timeline, select it and navigate towards the toolbar. In the “Edit > Effect” section, select “Lumetri Color” under “Video Effects.” Then, select the mask option under Lumetri colors and set it on the screen.
![]()
Step 2
Then, apply the color correction options on the masked areas.
![]()
Step 3
Select “Mask Path” under the Mask section and play it upon color correcting. This will start the mask tracking throughout the clip. The color corrections will be applied to the masked area throughout the video.
![]()
Part 3: Make Mask Tracking Easy with Wondershare Filmora: Working Out the Details
The above-mentioned mask tracking software is professional but is difficult to comprehend. This software is not compatible in terms of convenience. This was when users needed software with easy access and an editing interface. Wondershare Filmora performs diverse creation and editing tasks with expertise. The software assists in diverse audio, video, and text-editing tasks.
The AI-backed algorithms have made achieving perfection in your editing task seamless. In Filmora’s new V13 upgrade, it has introduced an AI masking feature. This feature offers to mask character or subject and auto-analyzes the selected area. In addition, for manual motion tracking masks, users can also resize the mask brush.
Step-by-Step Guide to AI Masking in Filmora
To understand this mask tracking feature better, we have assembled the steps of it. In the following guide, you will learn about accessing and applying this tool:
Step 1Place Media to the Timeline
Upon entering Filmora, click the “New Project” button and access its editing interface. Go to the Project Media section and click the “Import” button. Afterward, import your file and bring it to the timeline using your cursor.
![]()
Step 2Access and Employ AI Masking
Select the video in the timeline and navigate towards the right-side settings panel. In the “Video” tab, you’ll find the “Mask” section. Under this section, select the “AI Mask” option and scroll down to adjust its settings. Expand the “AI Mask” section, and choose the options you want masking for. Once you see the masked results on the preview screen, adjust the other settings below.
![]()
Step 3Save the Settings and Export
Afterward, click the “Save as custom” button to save these settings as a preset for later use. Further, make other adjustments and click on the “Export” button to finalize.
![]()
Free Download For Win 7 or later(64-bit)
Free Download For macOS 10.14 or later
Additional Editing Features of Wondershare Filmora
Along with masker line tracking, there are other video editing and AI features of Filmora. Keep reading the below section to know more about them:
1. AI Text-to-Video
Turn your words into graphics using this generative AI of Filmora. It transforms your textual directions into videos, along with images and voices. Using this AI will save you the effort of creating or hiring a professional.
2. AI Copilot Editing
Why spend hours exploring Filmora’s interface when you can have your guide? The AI Copilot acts like your personal chatbot assistant. You can converse with it like regular people, and it will show you directions on the feature. In addition, it features buttons to employ a specific effect or function.
3. Screen Recorder
Are you a creator who uploads video tutorials and educational videos? You can use Filmora’s screen recorder to create content in a seamless manner. It offers microphone recording and webcam recording for maximum interactivity. In addition, you can adjust custom screen resolution settings and more.
4. Video Background Remover
Leave the effort of adding a green screen in your background during video creation. Filmora’s AI technology can remove video backgrounds without any flaws. Users can replace the background with solid colors, gradients, and more afterward.
5. Silence Detection
Those long or short pauses during video recording are annoying for your audience. They decline the quality of the video and ultimately decline audience engagement. To remove such pauses, use Filmora silence detection AI to auto-eliminate them.
Free Download For Win 7 or later(64-bit)
Free Download For macOS 10.14 or later
Conclusion
In this article, users have gained insights into top mask tracking software. Along with their applications, the article discussed how to access and apply masking. However, masking in the first two tools can be difficult for some people. Hence, we introduced Wondershare Filmora as an easy desktop alternative. If you want to employ an easy motion tracking mask, use this versatile software.
Free Download Free Download Learn More

Part 1: Working Out the Comprehensive Methods to Perform Mask Tracking on Adobe After Effects
Adobe After Effects is a powerful tool for mask tracking and other functions. The interface of this tool tailors your content to your needs with precision. The process of masking is convenient and accessible and provides accurate results. Its advanced masking options, like filling up the mask, add a realistic touch. Before learning about masking in After Effects, let’s discuss some of its features:
- Text Animations: Animating your text in Adobe After Effects is a comprehensive experience. It is because the software has amazing text fonts and animation options. You can also set the appearance settings like opacity, color, and more text. In addition, the software has pre-installed effects and presets to ease the process.
- VFX/Visual Effects: Elevate your images and videos using Adobe’s amazing visual elements. It can eliminate mistakes, and results are so promising that they become invisible. You can use the mask tracking effect to hide and fill objects. In addition, you can turn your transitions into high-resolution 3D or 4D videos.
- Motion Graphics: It moves anything with its motion graphics functionality and advanced keyframing. Along with animating text, the feature allows you to move the logos. You can move a logo on any background from top to bottom or left to right. With its flickering and wiggling effects, make animations without keyframing.
- Rotoscoping: This After Effects function eliminates using green screens in your videos. Using the pen tool, you can merge a different object in a different footage. Afterward, you can polish the mask by resizing and adjusting opacity values.
- Motion Tracking: Elevate the graphics of your videos using the motion tracking feature. This function connects any image with an object’s motion. Therefore, your images become animated and add a creative element to the content. Its cloud collaboration with other software allows users to download assets.
Step-by-Step Procedure for Masking in Adobe After Effects
Now that you know the After Effects masker line tracking feature, let’s move forward. Read the following guide to learn more about masking:
Step 1
After importing your clip into the timeline, select it in the timeline panel. Navigate towards the upper toolbar and select the “Pen Tool” option. Afterward, create a mask around the object that you want to remove.
![]()
Step 2
You’ll see a mask around the object, and the rest of the screen will disappear. Navigate to the timeline panel, expand the video track options, and select “Mask.” Click the “Mask” navigation arrow and select “None.”
![]()
Step 3
Click the “Mask” button and select the “Track Mask” option. A mask tracker window will appear on the right side; expand the “Method” option. Following that, select the type of masking you want, like “Position.” Play the video from beginning to end for motion detection. Afterward, change the “Mask” mode to “Add” to apply masking.
![]()
Step 4
Afterward, change the Mask mode to “Subtract” from the timeline. Now, navigate towards the topmost toolbar and expand the “Window” tab. From the expansion menu, click the “Content-Aware Fill” option.
![]()
Step 5
Move towards the “Mask” option, expand “Mask Path,” and change the values below. Now, go to the right side, increase “Alpha Expansion,” and click “Generate Fill Layer.” Once the mask tracking completes, download your video.
![]()
Part 2: Providing a Detailed Guide on How to Do Mask Tracking with Adobe Premiere Pro
Adobe Premiere Pro is one of the industry’s leading tools for editing videos. It offers a wide range of features and built-in effects to elevate content. The software offers precise editing capabilities for mask tracking and other enhancements. In addition, it has many visual, video, and audio effects and presets to apply. Let’s discuss some key features of this tool that make it worthy of being top:
- Motion Graphics Templates: With its seamless After Effect collaboration, it offers built-in templates. These templates include multiple text, shapes, and graphics. You can also customize these templates as per content relevancy and taste.
- Edit Audio: Premiere Pro has multiple audio editing options to maintain audio quality. The tool allows you to decrease the volume of one track while increasing others. In addition, you can make audio adjustments that fit a sound.
- Color Correction: Enhance the graphical element in your videos using this feature. It offers both color correction and enhancing capabilities. You can employ this color correction if you have overexposed or underexposed videos.
- Movie and Film Editing: A professional editor offers applications in the media industry. The Premiere Pro offers seamless collaboration with all video and audio formats. In addition, it can import files from all sources like DSLRs and more.
- Speech to Text: It doesn’t just limit you to video editing but also offers transcript creation. The software analyzes your footage’s audio and creates transcripts. Afterward, you can use them as subtitles and captions.
Step-by-Step Procedure for Masking in Premiere Pro
After introducing mask tracking in Adobe Premiere Pro, let’s progress further. Continue reading the following guide to gain a deeper understanding of masking:
Step 1
After importing your video in the timeline, select it and navigate towards the toolbar. In the “Edit > Effect” section, select “Lumetri Color” under “Video Effects.” Then, select the mask option under Lumetri colors and set it on the screen.
![]()
Step 2
Then, apply the color correction options on the masked areas.
![]()
Step 3
Select “Mask Path” under the Mask section and play it upon color correcting. This will start the mask tracking throughout the clip. The color corrections will be applied to the masked area throughout the video.
![]()
Part 3: Make Mask Tracking Easy with Wondershare Filmora: Working Out the Details
The above-mentioned mask tracking software is professional but is difficult to comprehend. This software is not compatible in terms of convenience. This was when users needed software with easy access and an editing interface. Wondershare Filmora performs diverse creation and editing tasks with expertise. The software assists in diverse audio, video, and text-editing tasks.
The AI-backed algorithms have made achieving perfection in your editing task seamless. In Filmora’s new V13 upgrade, it has introduced an AI masking feature. This feature offers to mask character or subject and auto-analyzes the selected area. In addition, for manual motion tracking masks, users can also resize the mask brush.
Step-by-Step Guide to AI Masking in Filmora
To understand this mask tracking feature better, we have assembled the steps of it. In the following guide, you will learn about accessing and applying this tool:
Step 1Place Media to the Timeline
Upon entering Filmora, click the “New Project” button and access its editing interface. Go to the Project Media section and click the “Import” button. Afterward, import your file and bring it to the timeline using your cursor.
![]()
Step 2Access and Employ AI Masking
Select the video in the timeline and navigate towards the right-side settings panel. In the “Video” tab, you’ll find the “Mask” section. Under this section, select the “AI Mask” option and scroll down to adjust its settings. Expand the “AI Mask” section, and choose the options you want masking for. Once you see the masked results on the preview screen, adjust the other settings below.
![]()
Step 3Save the Settings and Export
Afterward, click the “Save as custom” button to save these settings as a preset for later use. Further, make other adjustments and click on the “Export” button to finalize.
![]()
Free Download For Win 7 or later(64-bit)
Free Download For macOS 10.14 or later
Additional Editing Features of Wondershare Filmora
Along with masker line tracking, there are other video editing and AI features of Filmora. Keep reading the below section to know more about them:
1. AI Text-to-Video
Turn your words into graphics using this generative AI of Filmora. It transforms your textual directions into videos, along with images and voices. Using this AI will save you the effort of creating or hiring a professional.
2. AI Copilot Editing
Why spend hours exploring Filmora’s interface when you can have your guide? The AI Copilot acts like your personal chatbot assistant. You can converse with it like regular people, and it will show you directions on the feature. In addition, it features buttons to employ a specific effect or function.
3. Screen Recorder
Are you a creator who uploads video tutorials and educational videos? You can use Filmora’s screen recorder to create content in a seamless manner. It offers microphone recording and webcam recording for maximum interactivity. In addition, you can adjust custom screen resolution settings and more.
4. Video Background Remover
Leave the effort of adding a green screen in your background during video creation. Filmora’s AI technology can remove video backgrounds without any flaws. Users can replace the background with solid colors, gradients, and more afterward.
5. Silence Detection
Those long or short pauses during video recording are annoying for your audience. They decline the quality of the video and ultimately decline audience engagement. To remove such pauses, use Filmora silence detection AI to auto-eliminate them.
Free Download For Win 7 or later(64-bit)
Free Download For macOS 10.14 or later
Conclusion
In this article, users have gained insights into top mask tracking software. Along with their applications, the article discussed how to access and apply masking. However, masking in the first two tools can be difficult for some people. Hence, we introduced Wondershare Filmora as an easy desktop alternative. If you want to employ an easy motion tracking mask, use this versatile software.
Easy Ways to Add Text Overlay to Video
Text overlay refers to adding a text element over a video scene. The viewers will see your text elements appear on the screen while watching the video. Adding text overlay is quite common in videos and movies. Starting from showing credits in intro and outro of video to showing topics and important points to emphasize on them, text overlay is highly useful.
If you want to add text overlay video, you will need a video editor on your device. Every video editor has text overlay option, but you need to choose that video editor which offers a wide range of text overlay options. We will illustrate how to add text overlay to your video on your computer, smartphone, as well as online from your web browser.
Part 1. Add Text Overlay to Video on PC
If you are a Windows user and you are looking for an all-around video editor, we recommend Wondershare Filmora . It is a professional video editor, and it is quite popular among regular video creators. Filmora has a diverse collection of video, audio, and text effects. You can also use transitions and elements as per your requirements. Here are the steps to add video overlay video in Filmora.
Free Download For Win 7 or later(64-bit)
Free Download For macOS 10.14 or later
Step1 Download and install Wondershare Filmora for Windows. Launch the application and click on New Project.

Step2 Import your video file into Project Media folder and drop it on Timeline.

Step3 Go to Titles option at the top and you will find different categories of text styles to apply to your video.

Step4 Select any category and any desired text style and drop it on Timeline. Place the text to that position on Timeline where you want the text to appear on the video.

Step5 Double-click on Text layer present on Timeline and customize the text label and other parameters as per your requirements.
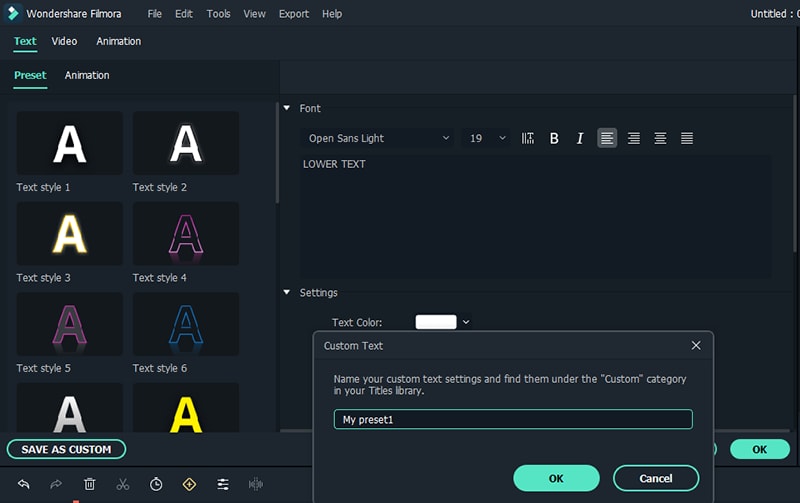
Step6 Finally, play the video and click on Export button to save the video on your hard drive.
Part 2. Add Text Overlay to Video on Mac
When it comes to editing videos on Mac, iMovie is a popular choice. This is because iMovie is an Apple product and it comes pre-installed on Mac. Adding text to your video is super easy on iMovie. There are different types of text styles available and here are the steps to add video overlay using iMovie.
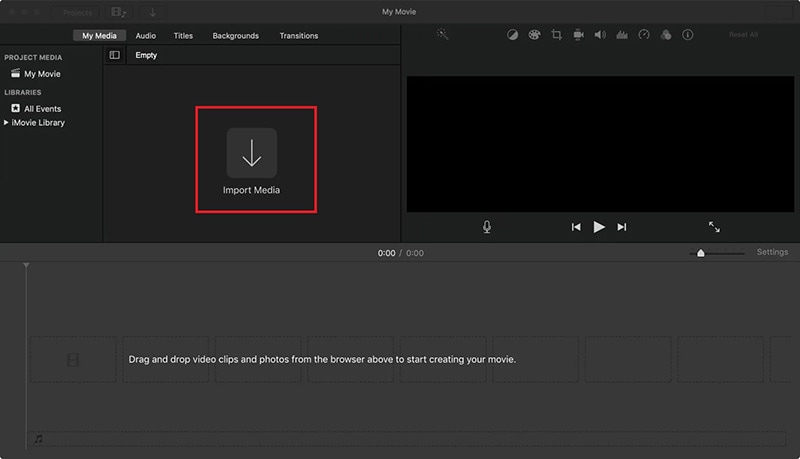
Step1 Open iMovie from Applications folder. Click on Create New button and thereafter, click on Import Media button to bring in your video clip.
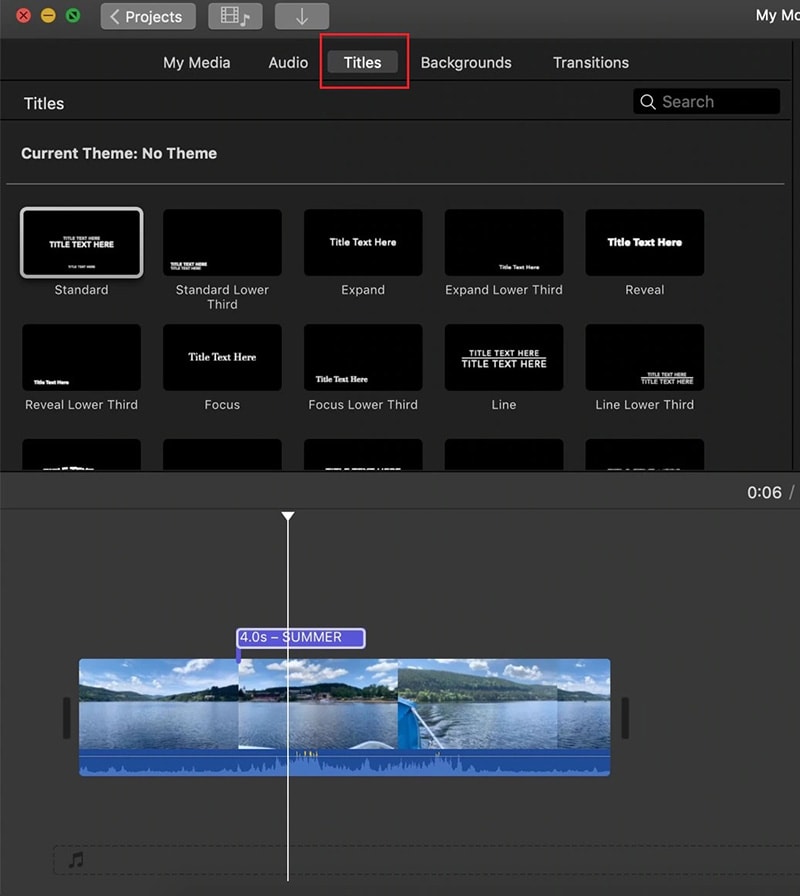
Step2 Drag and drop the video file from Media folder to Timeline. Select Titles at the top and you will see different text styles. Place your mouse pointer over them to preview them. Drag and drop any desired text style on Timeline and place it where you want it to appear in the video.
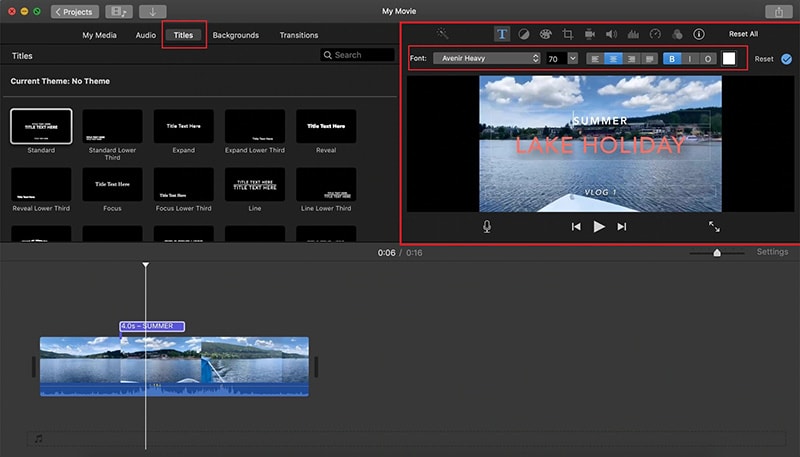
Step3 Edit the text from Preview Screen instantly. You can also change font, size, and other text elements.
Step4 If you are satisfied with the text overlay, go to File> Share> File to export the video file.
Part 3. Add Text Overlay to Video on iPhone
If you have captured a video on your iPhone and you want to add some texts over the video, you can do it instantly with iMovie app. Yes, iMovie app from Apple is available for iPhone as well. There is no need to transfer the video file to your PC or Mac for text overlay video. Here are the steps to follow.
Step1 Open iMovie app and tap on Plus icon to import your video clip to iMovie.
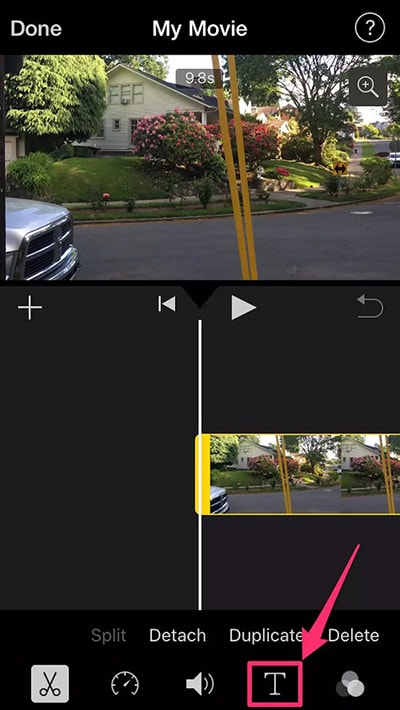
Step2 Tap on the video clip and tap on “T” icon located at the bottom.
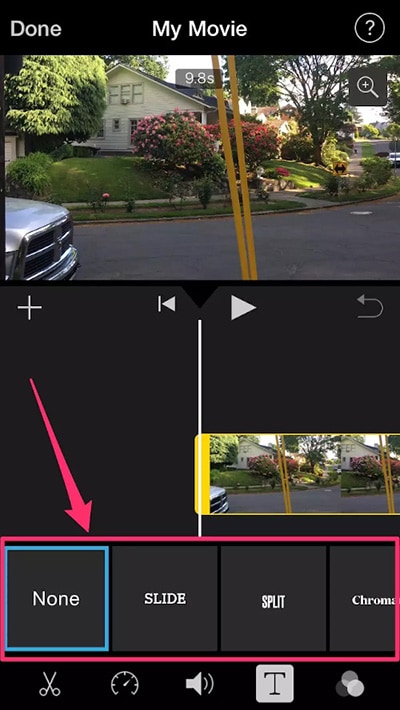
Step3 You need to choose the text style as per your preference from the bottom.
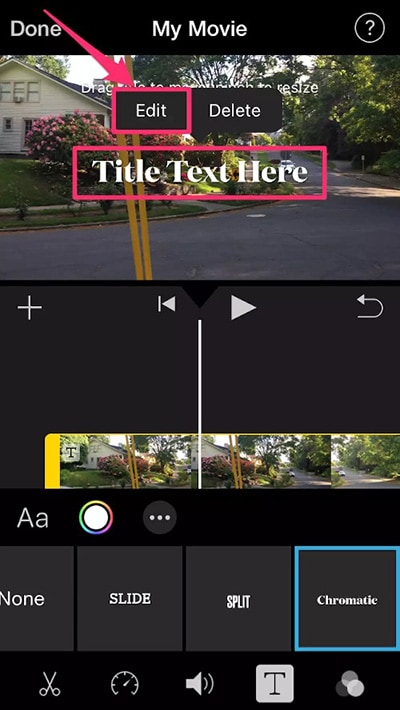
Step4 Tap on the Viewer to place the default text and tap on Edit option to change the text as per your requirements.
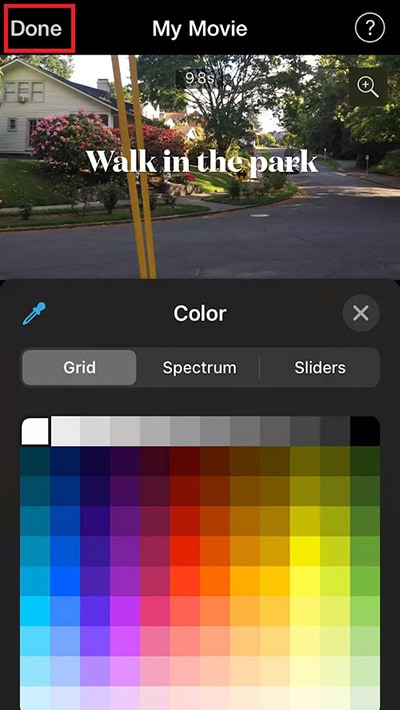
Step5 You can also reposition the text as well as adjust the size, font, as well as color. When you are satisfied, tap on Done.
Part 5. Add Text Overlay to Video Online
If you are not a regular video creator and you edit video rarely, installing an app on your phone or computer is going to be useless. You can use an online video editor to add text overlay to your video. This can be done on any device starting from smartphones to computers. Here are the steps to add overlay video online.
Step1 Open your web browser and visit “online-video-cutter.com/add-text-to-video”. Click on Open File button and select your video file from your storage device.
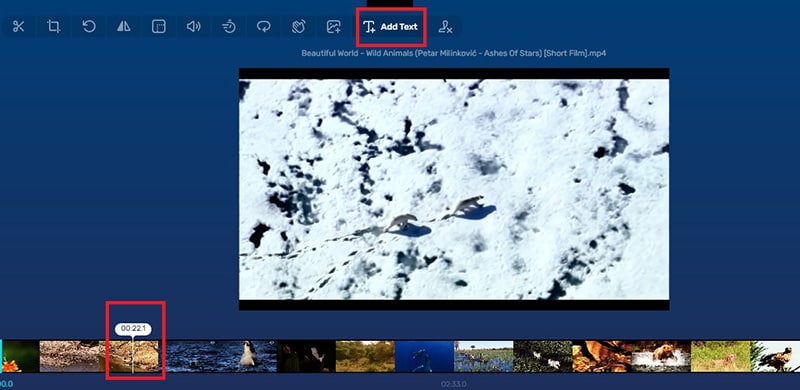
Step2 Wait for the video to get uploaded. Move the playhead on video navigation panel to where you want to add the text overlay. Click on Add Text button from the top.
Step3 Click on the video where you want to place the text and type in the required text.
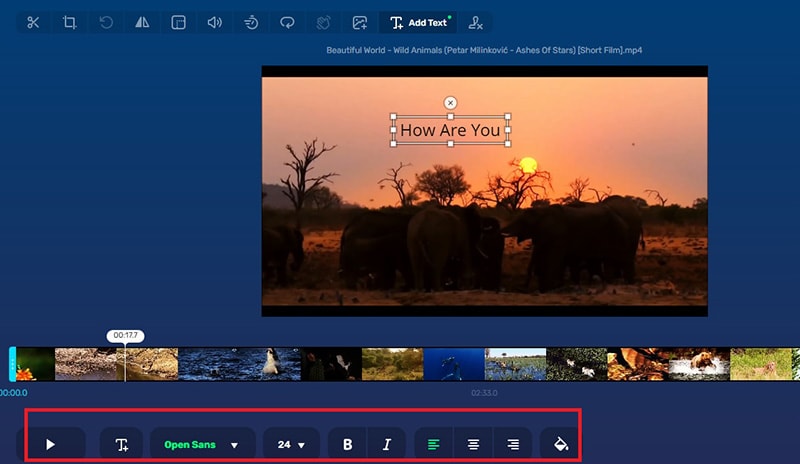
Step4 Select the text and below the navigation panel, you will find all the tools to customize the text as per your preference.
Step5 Once done and you are satisfied, click on Save button.
Conclusion
Adding text overlay to video is a basic operation in video editing. We have illustrated how you can use iMovie for Mac as well as iPhone to add text overlay video. For Windows users, Filmora is the perfect video editor with different categories of tile and text styles to add text to any video. Furthermore, you can use the online video editor for text overlay video on the go.
Free Download For macOS 10.14 or later
Step1 Download and install Wondershare Filmora for Windows. Launch the application and click on New Project.

Step2 Import your video file into Project Media folder and drop it on Timeline.

Step3 Go to Titles option at the top and you will find different categories of text styles to apply to your video.

Step4 Select any category and any desired text style and drop it on Timeline. Place the text to that position on Timeline where you want the text to appear on the video.

Step5 Double-click on Text layer present on Timeline and customize the text label and other parameters as per your requirements.

Step6 Finally, play the video and click on Export button to save the video on your hard drive.
Part 2. Add Text Overlay to Video on Mac
When it comes to editing videos on Mac, iMovie is a popular choice. This is because iMovie is an Apple product and it comes pre-installed on Mac. Adding text to your video is super easy on iMovie. There are different types of text styles available and here are the steps to add video overlay using iMovie.
Step1 Open iMovie from Applications folder. Click on Create New button and thereafter, click on Import Media button to bring in your video clip.

Step2 Drag and drop the video file from Media folder to Timeline. Select Titles at the top and you will see different text styles. Place your mouse pointer over them to preview them. Drag and drop any desired text style on Timeline and place it where you want it to appear in the video.

Step3 Edit the text from Preview Screen instantly. You can also change font, size, and other text elements.

Step4 If you are satisfied with the text overlay, go to File> Share> File to export the video file.
Part 3. Add Text Overlay to Video on iPhone
If you have captured a video on your iPhone and you want to add some texts over the video, you can do it instantly with iMovie app. Yes, iMovie app from Apple is available for iPhone as well. There is no need to transfer the video file to your PC or Mac for text overlay video. Here are the steps to follow.
Step1 Open iMovie app and tap on Plus icon to import your video clip to iMovie.
Step2 Tap on the video clip and tap on “T” icon located at the bottom.

Step3 You need to choose the text style as per your preference from the bottom.

Step4 Tap on the Viewer to place the default text and tap on Edit option to change the text as per your requirements.

Step5 You can also reposition the text as well as adjust the size, font, as well as color. When you are satisfied, tap on Done.

Part 5. Add Text Overlay to Video Online
If you are not a regular video creator and you edit video rarely, installing an app on your phone or computer is going to be useless. You can use an online video editor to add text overlay to your video. This can be done on any device starting from smartphones to computers. Here are the steps to add overlay video online.
Step1 Open your web browser and visit “online-video-cutter.com/add-text-to-video”. Click on Open File button and select your video file from your storage device.
Step2 Wait for the video to get uploaded. Move the playhead on video navigation panel to where you want to add the text overlay. Click on Add Text button from the top.

Step3 Click on the video where you want to place the text and type in the required text.
Step4 Select the text and below the navigation panel, you will find all the tools to customize the text as per your preference.

Step5 Once done and you are satisfied, click on Save button.
Conclusion
Adding text overlay to video is a basic operation in video editing. We have illustrated how you can use iMovie for Mac as well as iPhone to add text overlay video. For Windows users, Filmora is the perfect video editor with different categories of tile and text styles to add text to any video. Furthermore, you can use the online video editor for text overlay video on the go.
AI Features of Wondershare Filmora - Silence Detection in Videos
Sometimes awkward silent moments can make a video look cringe and boring. Silence in videos can often be a major drawback, making the content dull and unengaging. However, fear not because there are ways to eliminate them and keep your viewers hooked. One effective solution is to utilize certain features that help in removing silence from videos.
Silence detection is a feature that lets you detect silence and awkward pauses in your content. It can detect those instances where there is no audio or any significant sound present. By utilizing this feature, you can easily identify and remove these silent parts from your videos. Wondershare Filmora is a tool that offers this AI-powered feature to remove silence from videos.
Part 1: How Can Silencing in Videos Damage It?
Silence can negatively affect videos, making them less engaging and captivating. Many video silence removers are available, but first, learn how silence affects video content. Let’s explore some of how silence can damage the quality of video content:
1. Loss of Interest
When viewers encounter long silent moments in a video, they lose interest. Silence fails to hold their attention and leaves them craving for something more stimulating. As a result, they may lose interest in the content and look for other videos. This is somewhat discouraging for a content creator. That’s why short and meaningful content is what the audience demand.
2. Lack of Emotional Connection
Sound and audio play an essential role in creating an emotional connection with the audience. Silence, on the other hand, fails to start any emotional response. Without appropriate sound effects or dialogue, videos can feel empty and emotionless. The absence of audio elements also fails to establish a connection with the viewer.
3. Breaks the Flow
Silent moments in videos can disrupt the natural flow and rhythm of the content. Viewers expect a seamless progression from one scene to another. However, sudden silences in a video may create frustration for some individuals. It may also lead to a disjointed viewing experience for the viewer. Meanwhile, the audience sometimes couldn’t understand the intended message.
4. Awkwardness and Uncomfortable Silence
Silence can create awkward moments in videos, especially when it’s unexpected or prolonged. These silent gaps can make viewers feel uncomfortable. The viewer becomes unsure of what to expect or how to interpret the situation. Moreover, awkward silences can detract from the overall viewing experience. It also leaves a negative impression and makes the content less enjoyable.
5. Reduced Engagement and Sharing
Videos that contain excessive silence are less likely to be shared or discussed among viewers. Silent moments fail to generate excitement or spark conversations. In contrast, videos with dynamic audio elements are more likely to capture attention. If your video has long pauses or awkward silent moments, it may not get the expected response.
Video Slience Detector
Easily and precisely detect slience in video with Filmora Video Editor ! Experience the magic of cool to make great videos.
Detect Slience in Video Detect Slience in Video Learn More >

Part 2: Silence Detection Feature of Wondershare Filmora - An Understanding
Wondershare Filmora Video Editor always surprises you with its unique editing options and features. Its many features make it easy and pretty straightforward for you like. With another excellent feature, you can detect silence in audio files and videos. This unique feature will automatically detect awkward silence or long pauses.
Furthermore, you can remove those moments from your project to create a seamless experience. This video silence remover uses AI to find silent intervals in your video. You can also change the volume threshold by helping the tool find more such moments in your project. Additionally, you can change the minimum duration of such silent intervals of your video.
Part 3: Gathering Details About the Other AI Features of Filmora
Wondershare Filmora can auto remove silence in videos, but it has other AI features too. Learn more about Filmora’s AI features in this section.
Edit Video with AI For Win 7 or later(64-bit)
Edit Video with AI For macOS 10.14 or later
AI Image
This feature of the Wondershare Filmora employs AI to improve the appearance of images in videos. It automatically fixes imperfections like noise and color asymmetry. Furthermore, it also corrects brightness, giving your videos a better, more polished appearance. You can fast and easily enhance the quality of your video with the help of this feature.
Auto Reframe
If you want to change the aspect ratio of your video automatically, then this is the feature for you. The Auto Reframe function in Filmora automatically modifies aspect ratios for your video .
Motion Tracking
Filmora’s motion tracking feature tracks and follows moving objects in videos . It allows you to add effects, text, or graphics that move along with the object. Furthermore, this feature makes it easy to highlight and enhance specific elements in a video. You can even create engaging and professional-looking effects using the motion tracking feature. This feature makes it simple to add dynamic elements to videos.
Instant Mode
Wondershare Filmora has an Instant Mode feature that lets users create videos easily and quickly. You can choose a template, import your video, and let the software will edit it automatically. This feature can automatically apply transitions, effects, and music to your videos. It’s a simple and convenient way to make polished videos without needing advanced editing skills.
Auto Beat Sync
It is a feature that synchronizes video clips and effects with the beats of background music. This feature can automatically detect the rhythm and aligns the visuals accordingly. Moreover, it can save you time and make your videos more engaging. You can edit and synchronize audio with video without having expertise by using this AI feature of Filmora.
Part 4: Tutorial: Using The Silence Detection Feature in Filmora
Wondershare Filmora can automatically remove silence from videos in no time. With its silent detection feature, you can easily remove awkward silence from your videos. Follow these guided steps to remove such moments from your videos.
Detect Slience in Video For Win 7 or later(64-bit)
Detect Slience in Video For macOS 10.14 or later
Step 1Open Wondershare Filmora
To auto remove silence in videos, start by opening Wondershare Filmora on your system. Look for the “Silence Detection” button located just beneath the “New Project” option.

Step 2Import and Detect Silence
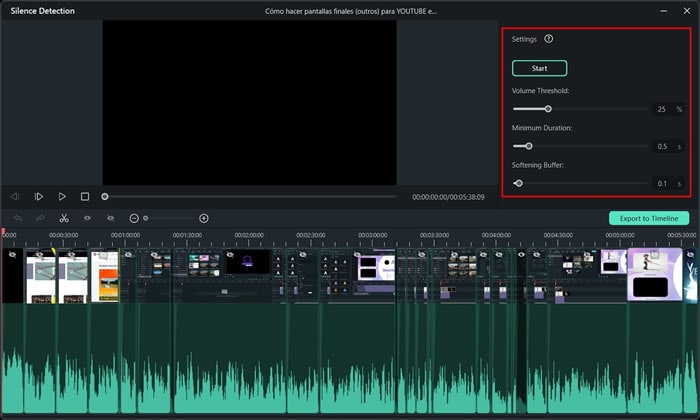
Click on the “Silence Detection“ button, and then import your video file into the tool. If needed, you can adjust the parameters in the “Settings” menu according to your requirements. Continue to select the “Start” button, and Filmora will automatically detect any silent intervals in your video or audio file.
Step 3Delete Silence and Merge Clips
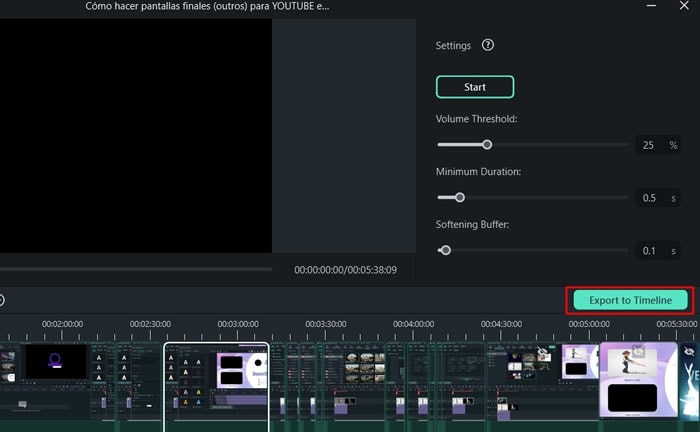
Continue to remove the silent portions from the timeline by merging the clips together. To merge the remaining clips together, drag and place each clip right next to each other. Once done, click the “Export to Timeline” button to lead into the main interface.
Conclusion
To conclude, silence detection eliminates boring stretches of silence from a video. Additionally, it allows you to enhance the overall flow of your video. By removing such intervals, you can maintain a consistent pace throughout your video. Wondershare Filmora is a fantastic tool that automatically removes silence from video and audio files.
Detect Slience in Video Detect Slience in Video Learn More >

Part 2: Silence Detection Feature of Wondershare Filmora - An Understanding
Wondershare Filmora Video Editor always surprises you with its unique editing options and features. Its many features make it easy and pretty straightforward for you like. With another excellent feature, you can detect silence in audio files and videos. This unique feature will automatically detect awkward silence or long pauses.
Furthermore, you can remove those moments from your project to create a seamless experience. This video silence remover uses AI to find silent intervals in your video. You can also change the volume threshold by helping the tool find more such moments in your project. Additionally, you can change the minimum duration of such silent intervals of your video.
Part 3: Gathering Details About the Other AI Features of Filmora
Wondershare Filmora can auto remove silence in videos, but it has other AI features too. Learn more about Filmora’s AI features in this section.
Edit Video with AI For Win 7 or later(64-bit)
Edit Video with AI For macOS 10.14 or later
AI Image
This feature of the Wondershare Filmora employs AI to improve the appearance of images in videos. It automatically fixes imperfections like noise and color asymmetry. Furthermore, it also corrects brightness, giving your videos a better, more polished appearance. You can fast and easily enhance the quality of your video with the help of this feature.
Auto Reframe
If you want to change the aspect ratio of your video automatically, then this is the feature for you. The Auto Reframe function in Filmora automatically modifies aspect ratios for your video .
Motion Tracking
Filmora’s motion tracking feature tracks and follows moving objects in videos . It allows you to add effects, text, or graphics that move along with the object. Furthermore, this feature makes it easy to highlight and enhance specific elements in a video. You can even create engaging and professional-looking effects using the motion tracking feature. This feature makes it simple to add dynamic elements to videos.
Instant Mode
Wondershare Filmora has an Instant Mode feature that lets users create videos easily and quickly. You can choose a template, import your video, and let the software will edit it automatically. This feature can automatically apply transitions, effects, and music to your videos. It’s a simple and convenient way to make polished videos without needing advanced editing skills.
Auto Beat Sync
It is a feature that synchronizes video clips and effects with the beats of background music. This feature can automatically detect the rhythm and aligns the visuals accordingly. Moreover, it can save you time and make your videos more engaging. You can edit and synchronize audio with video without having expertise by using this AI feature of Filmora.
Part 4: Tutorial: Using The Silence Detection Feature in Filmora
Wondershare Filmora can automatically remove silence from videos in no time. With its silent detection feature, you can easily remove awkward silence from your videos. Follow these guided steps to remove such moments from your videos.
Detect Slience in Video For Win 7 or later(64-bit)
Detect Slience in Video For macOS 10.14 or later
Step 1Open Wondershare Filmora
To auto remove silence in videos, start by opening Wondershare Filmora on your system. Look for the “Silence Detection” button located just beneath the “New Project” option.

Step 2Import and Detect Silence
Click on the “Silence Detection“ button, and then import your video file into the tool. If needed, you can adjust the parameters in the “Settings” menu according to your requirements. Continue to select the “Start” button, and Filmora will automatically detect any silent intervals in your video or audio file.

Step 3Delete Silence and Merge Clips
Continue to remove the silent portions from the timeline by merging the clips together. To merge the remaining clips together, drag and place each clip right next to each other. Once done, click the “Export to Timeline” button to lead into the main interface.

Conclusion
To conclude, silence detection eliminates boring stretches of silence from a video. Additionally, it allows you to enhance the overall flow of your video. By removing such intervals, you can maintain a consistent pace throughout your video. Wondershare Filmora is a fantastic tool that automatically removes silence from video and audio files.
Also read:
- New 2024 Approved Learn Color Correction in After Effects with These Videos
- 2024 Approved Guaranteed 10 Storyboard Creators To Make Animation Easier
- Updated In 2024, Dubbing Videos With Voiceovers | Wondershare Filmora Tutorial
- In 2024, Best Ideas for Time Lapse Video
- New GIF to JPG Is as Simple as a Blink of an Eye
- In 2024, How to Create a Slideshow with Icecream Slideshow Maker
- 2024 Approved How to Make a Slideshow GIF?
- Updated Despite the Aforementioned Restrictions, Cartoon Video Makers Still Offer a Sea of Possibilities to Their Users, so Lets Dive Into the Magical World of Animated Videos
- Updated If You Are Looking Forward to Make Attractive and Customized Slideshows, Lightroom Is One of the Best Options that You Can Consider
- New Working Out All Important Details of Slowing Down Video in After Effects for 2024
- Do You Also Use Android to Create and Edit Videos? Read About the Efectum Video Effects Editor, Which Is Available in Your App Stores for Seamless Editing
- 2024 Approved Want to Know the Full Process of Adding the Falling Text Effect as a Video Introduction? Detailed Guidelines on All the Steps Are Mentioned Here for Filmora Users
- New How to Create a Custom Slide Show in PowerPoint
- Change Video Speed with FFmpeg for 2024
- Updated In 2024, Best Method to Split Video Into Parts Online
- What Is TS Format and How To Play TS Files? Basic Tips
- 2024 Approved Despite the Aforementioned Restrictions, Cartoon Video Makers Still Offer a Sea of Possibilities to Their Users, so Lets Dive Into the Magical World of Animated Videos
- Using AI to Replace Skies Finding the Right Methods for 2024
- New In 2024, 4 Ways to Merge MP4 and MP3
- Updated Adobe Premiere Pro Guide to Slow-Down Video
- New 6 Instant Ways to Make Windows 10 Slideshow
- New 2024 Approved Detailed Tutorial to Crop a Video Using Openshot?
- New In the Realm of Creating Graphic Presentation, People Also Ask About Designing Professionally Sound Slideshow Word Presentations. Heres How You Can Go About the Process
- Updated 8 Websites to Find 3D Text PNG
- Updated 2024 Approved The Best Way To Color Grading & Color Correction in Filmora
- Beginners Guide About WMV Format and Best WMV Video Editor for 2024
- New Everything That You Need to Know About Video Montages- Ideas, Techniques, and Software
- New How to Create a DIY Green Screen Video Effect?
- New In 2024, How to Combine Videos Into One on Instagram
- 2024 Approved DVD Slideshow Builder Review and Tutorial
- Updated In 2024, How to Create Freeze Frame Clone Effect
- Updated End Screen Makers for 2024
- Updated 10 Matching Color Combination That Works Together Greatly
- Updated Video Maker with Song
- New 2024 Approved 6 Websites to Free Download Motivational Video Footage
- Updated In 2024, 4 Ways to Rotate Videos on Windows PC
- Best 6 WMV to GIF Converters for 2024
- 2024 Approved Step by Step to Crop a Video with CyberLink PowerDirector
- Updated In 2024, Boost Your Spirit Creating Motivational Status Videos
- In 2024, 15 Stunning GIF Splitter Examples You Need to Bookmark
- Updated In 2024, 5 Methods to Make a Fake Facetime Call Video
- New In 2024, Best 10 3D Slideshow Software Review
- New A Review of 3D LUT Mobile App - A Composite Application for Editing Media
- In 2024, Add Stylish Text to Videos
- Updated 2024 Approved Unlock Your Video Editing Potential With Wondershare Filmora
- 8 Free Title Makers to Use for 2024
- Updated This Article Discusses What Is Blender Video Editor, How to Download, Install and Use It, and Its Key Features. It Further Discusses Its Alternative for Editing Your Videos and More. Check Out Now
- How To Repair iOS of Apple iPhone 11? | Dr.fone
- 7 Solutions to Fix Chrome Crashes or Wont Open on Realme C55 | Dr.fone
- 8 Workable Fixes to the SIM not provisioned MM#2 Error on Nokia C12 Pro | Dr.fone
- What to Do if Google Play Services Keeps Stopping on Motorola Moto G14 | Dr.fone
- How to use Snapchat Location Spoofer to Protect Your Privacy On Samsung Galaxy M34? | Dr.fone
- Tecno Spark Go (2024) ADB Format Tool for PC vs. Other Unlocking Tools Which One is the Best?
- How to Transfer Music from Samsung Galaxy F54 5G to iPod | Dr.fone
- How to remove Google FRP Lock on Tecno Camon 30 Pro 5G
- In 2024, How to Change/Fake Your Motorola Moto G13 Location on Viber | Dr.fone
- In 2024, How To Remove Screen Lock PIN On Vivo Y100 Like A Pro 5 Easy Ways
- In 2024, 4 Ways to Transfer Music from Oppo A1 5G to iPhone | Dr.fone
- Update 6 Best Voice Changers You Cant Miss
- 8 Ultimate Fixes for Google Play Your Vivo Y55s 5G (2023) Isnt Compatible | Dr.fone
- How to Transfer Data from Itel P40+ to Samsung Phone | Dr.fone
- In 2024, Detailed guide of ispoofer for pogo installation On Lava Blaze 2 | Dr.fone
- Sim Unlock Xiaomi Redmi Note 12 5G Phones without Code 2 Ways to Remove Android Sim Lock
- Hard Resetting an Samsung Galaxy A15 4G Device Made Easy | Dr.fone
- In 2024, Top 7 Phone Number Locators To Track OnePlus Ace 2 Pro Location | Dr.fone
- Calls on Samsung Galaxy A54 5G Go Straight to Voicemail? 12 Fixes | Dr.fone
- Fix the Error of Unfortunately the Process.com.android.phone Has Stopped on Tecno Spark 10C | Dr.fone
- 9 Best Free Android Monitoring Apps to Monitor Phone Remotely For your Honor Magic5 Ultimate | Dr.fone
- In 2024, Trouble with iPhone 14 Plus Swipe-Up? Try These 11 Solutions | Dr.fone
- 3 Ways to Fake GPS Without Root On Samsung Galaxy M14 4G | Dr.fone
- How To Simulate GPS Movement With Location Spoofer On Vivo Y27s? | Dr.fone
- In 2024, How to Fix the Apple iPhone 6s Plus GPS not Working Issue | Dr.fone
- In 2024, How to Migrate Android Data From Motorola Defy 2 to New Android Phone? | Dr.fone
- Downloading SamFw FRP Tool 3.0 for Infinix Zero 5G 2023 Turbo
- In 2024, CatchEmAll Celebrate National Pokémon Day with Virtual Location On Samsung Galaxy S23 | Dr.fone
- 10 Free Location Spoofers to Fake GPS Location on your Realme GT 5 Pro | Dr.fone
- How to Unlock locked iPhone 15 Plus by restoring it to factory settings
- List of Pokémon Go Joysticks On Tecno Spark 10C | Dr.fone
- A Detailed Guide on Faking Your Location in Mozilla Firefox On Xiaomi Redmi A2 | Dr.fone
- How to Fix the Soft Bricked Vivo Y56 5G? | Dr.fone
- How to Factory Reset Nokia 130 Music in 5 Easy Ways | Dr.fone
- How To Erase Private Data From iPhone 8 Plus | Dr.fone
- In 2024, 8 Best Apps for Screen Mirroring Samsung Galaxy F14 5G PC | Dr.fone
- In 2024, A Working Guide For Pachirisu Pokemon Go Map On Vivo Y77t | Dr.fone
- In 2024, 5 Ways to Track Realme GT 3 without App | Dr.fone
- In 2024, 4 Feasible Ways to Fake Location on Facebook For your Apple iPhone 12 Pro | Dr.fone
- In 2024, Troubleshooting Error Connecting to the Apple ID Server From iPhone 15 Pro Max
- Title: How to Color Grade Your Picture in LightRoom
- Author: Chloe
- Created at : 2024-06-18 14:31:06
- Updated at : 2024-06-19 14:31:06
- Link: https://ai-editing-video.techidaily.com/how-to-color-grade-your-picture-in-lightroom/
- License: This work is licensed under CC BY-NC-SA 4.0.


