:max_bytes(150000):strip_icc():format(webp)/GettyImages-1437209125-b47ae60035f248e2b01b781f50f919c1.jpg)
How To Combine Videos On TikTok

How To Combine Videos On TikTok
Meta Description: If you have several videos you would like to combine into one video, follow the steps in this article to combine videos on TikTok.
Many people continue to ask how to combine videos on TikTok. If you saw a video that grabbed your attention but consisted of several recordings, you might be wondering how you can combine the videos for TikTok. In this article, we’ll provide all the solutions you need. We’ll explore the best ways to combine videos on TikTok without surpassing the time limit the platform specified. On that note, let’s begin.
2 Practical Ways to Combine Videos on TikTok
This section will explore two practical ways to help you combine videos on TikTok. First, follow the steps outlined to complete the process.
Using the TikTok Camera
You can first combine videos on TikTok by using its official camera. To achieve this, follow the steps outlined below to combine your videos seamlessly.
- First, visit TikTok and click the ‘+’ icon at the bottom of the screen.

- Once you do this, you can advance to recording the clips you want.
- Click the timer button at the top of the screen to choose how long you would like to shoot your video; you can select 5 seconds, 10 seconds, etc.
- Before starting the countdown, drag the red bar by the audio track to where you want the clip to end.
- You can repeat the recording many times to have many clips recorded.
- Once you’re done recording, click the ‘adjust clip’ icon to adjust your video clips.
- After adjusting, hit the ‘done’ button and have your combined video.
You can go ahead and share with your followers and the general public.
Use the Combining Function
The second practical way you can combine TikTok videos into a single video is by using the app’s built-in combining function. To find out how you can use this technique for your videos, follow the steps outlined below.
- Once you have the TikTok app on your device, open it and go to the menu bar. Select the ‘+’ button; it should be at the end of the screen.
- Instead of recording through the TikTok camera, choose the ‘upload’ button, and it will take you to your device storage, where you can select the videos you would like to upload on TikTok.
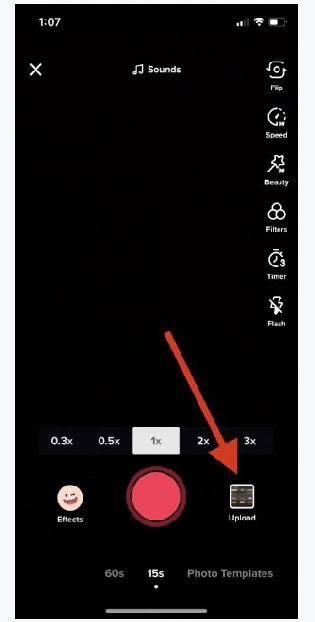
- Now, choose the ‘select multiple’ option at the left corner of your screen. Once you select this option, you can select different videos you would like to join together. Once you are satisfied with your choice, hit the ‘next’ button.
- TikTok will allow you to combine the videos for up to 60 seconds. You can customize the video arrangement according to your preference.
- If you’re satisfied with the final video result, click the next option, and you can share it on your TikTok account.

How to Combine Draft Videos on TikTok
Now that you know how to combine videos on TikTok, you’re probably wondering about the best way to combine the drafts you saved on your TikTok account. Maybe when you made the videos, you were unmotivated to upload them. However, now you want to combine the videos into a single video and don’t know how to proceed. So, follow the steps outlined in this article to get it done.
Step 1: Go to Your Drafts
To begin, you have to launch the TikTok app and click on the ‘me’ option at the end of the screen. Then, it will redirect you to your profile, choose the ‘drafts’ category, and take you to the videos you saved on the app and never published.
Step 2: Update Privacy Settings
Now you want to change the privacy setting in the ‘who can watch this video’ category to ‘just me.’ After updating, tap on ‘post.’ After posting your video, you can change the setting by clicking on ‘change cut.’ You can reduce the video length and add new videos to combine TikTok drafts.
Step 3: Add Filters and More Effects
You can also add music to your newly combined video and texts, stickers, filters, and many more effects to enhance your video.
Step 4: Save Draft
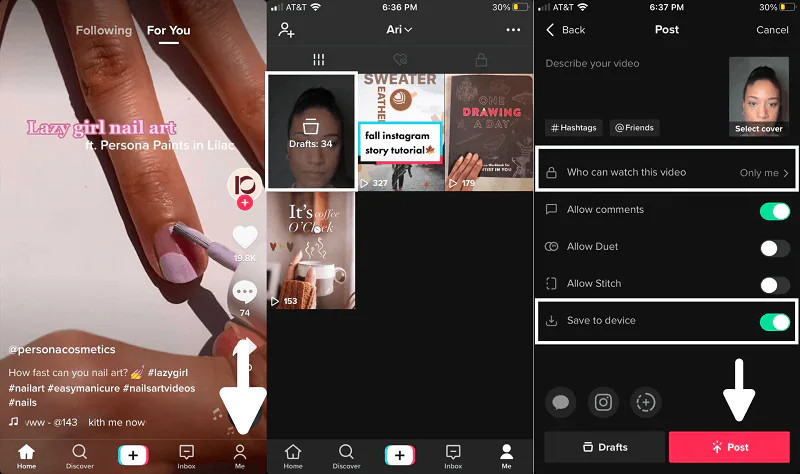
Once again, save the video as a draft, but you’ll have to choose a thumbnail for your video. You can choose any part of the video to become the thumbnail. Then, post your video by navigating to the home screen again and clicking the plus icon to post; select your video and post.
Use Third-Party Tools to Combine Videos for TikTok Before Uploading
There are several tools you can use to combine TikTok videos. While there is software, some are available online. Since TikTok gives limited editing functions, most TikTokers want a rich editing tool that they can use to edit and combine videos for TikTok. Below are three user-friendly software you can use to successfully edit and combine your videos.
Wondershare filmora
This is the best editing software you can find; it makes it relatively easy to combine your TikTok videos into a single video. Not only does Filmora allow you to combine videos before you upload them, but you can also use its host of editing tools to enhance your video. You can use this software for any type of video like slideshows, documentaries, photomontages, and many more. It is quite easy to use, irrespective of your editing skills, because of its user-friendly interface.
It is a strong contender in the editing world because it offers different effects, overlays, titles, transitions, etc. You can also upload your video directly to TikTok and other social media platforms. With many themes available on the platform, you can create a slideshow right on the platform. Follow the steps outlined below to combine multiple videos on Wondershare Filmora.
- First, you have to download the app on your device; you can do this from the official website. Install the app afterward, and the launch to begin.
- Next, select ‘create new project,’ It will take you to the media screen. Click the ‘add’ button and choose ‘import media file.’
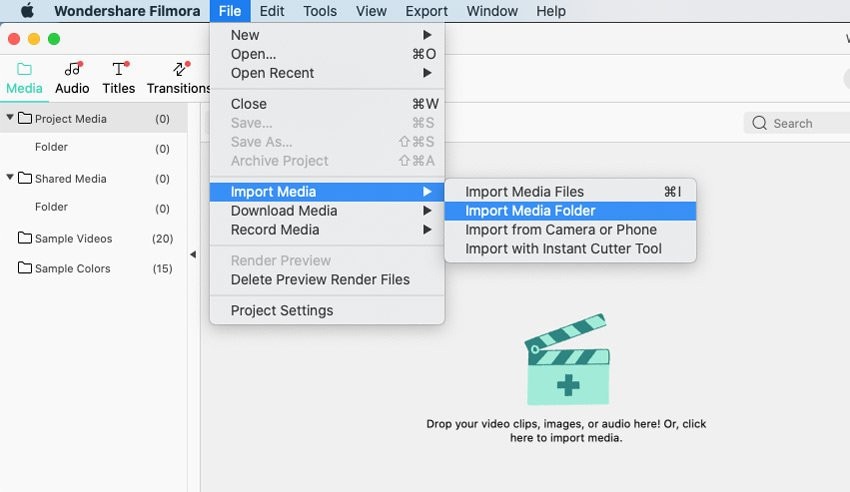
- You can then navigate to the folder with the videos you want to combine and choose.
- Afterward, drag the videos to the timeline. Filmora will ask you if you want to match the project to the resolution of your media; choose to ‘match to media’
- This will make the videos into one. You can rearrange the video clips to your preference; simply click and drag the videos to reposition them.
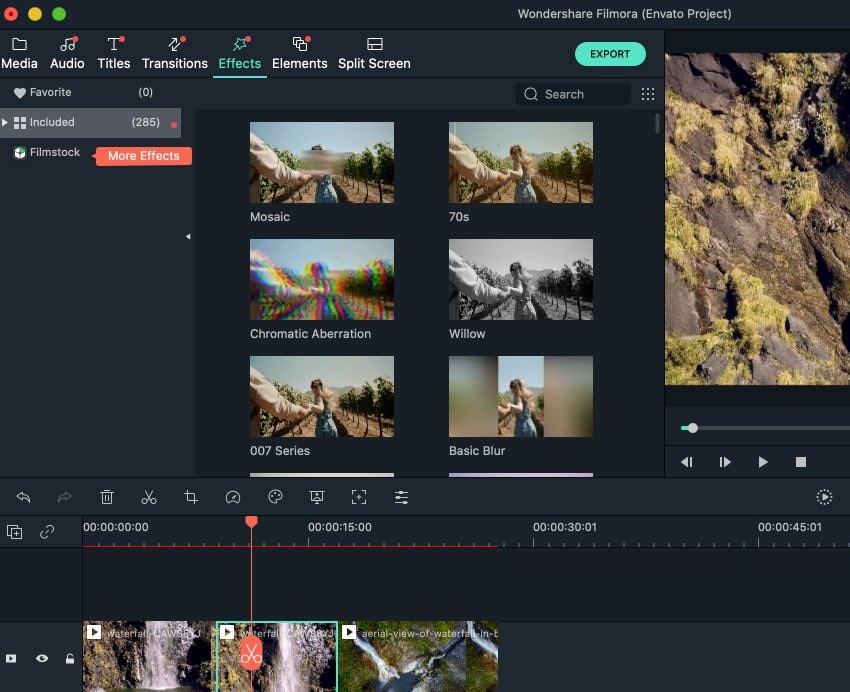
- You can also use the effects, filters, transitions, and overlays on Filmora to enhance your TikTok video.
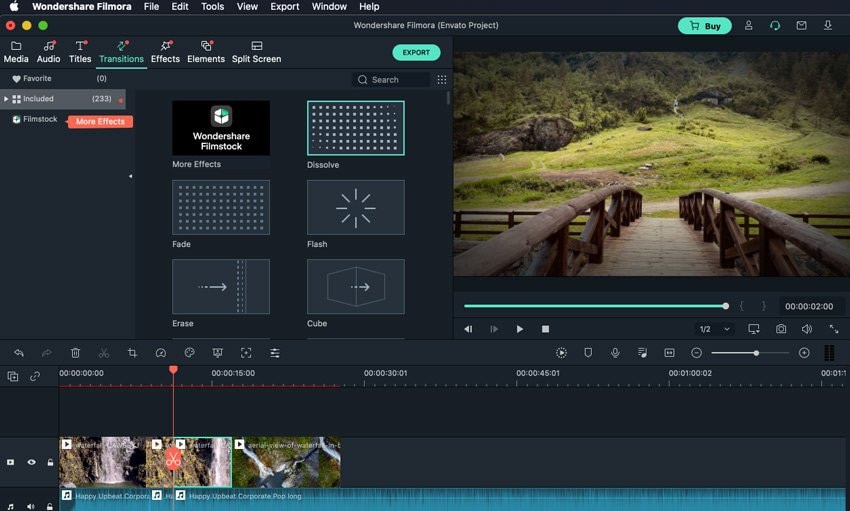
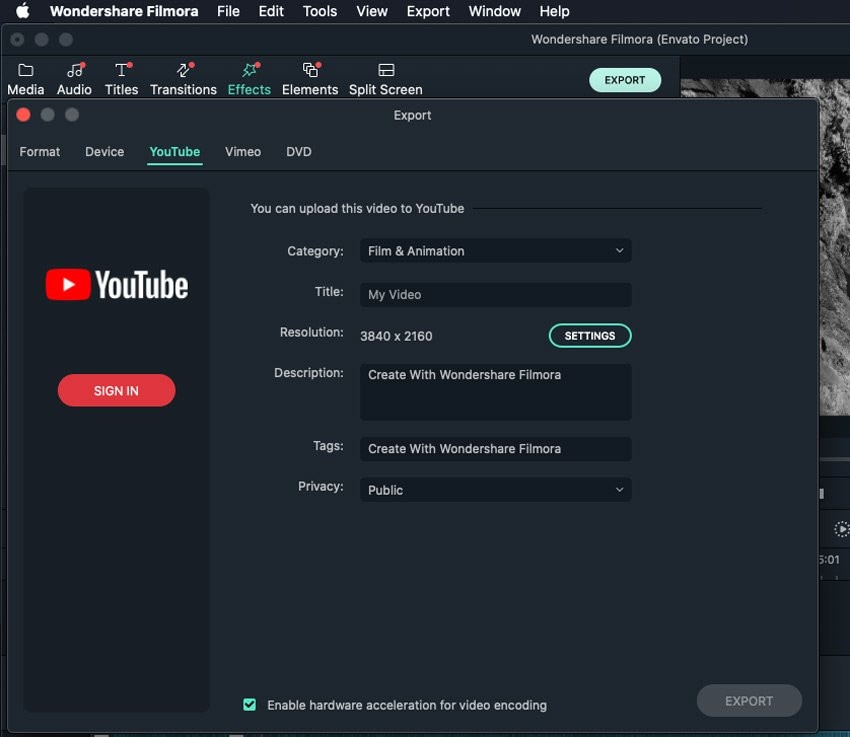
- Once everything looks good, click on the ‘export’ button at the top of the screen.
- You can then rename your video and choose where you would like to save the video. Filmora also allows you to adjust your video’s resolution and bitrate before clicking the ‘export’ option.
VideoProc Converter

Another third-party app you can use to edit your video and combine videos for TikTok is VideooProc Converter. It allows you to merge several videos in a lossless manner, and you can also cut, trim, rotate and resize your videos to your preference. You could also change the format and any other requirements you would like to tweak. Some beginners might find this video editor hard to navigate. However, the steps below should make the process easier for you.
- Firstly, download VideoProc Converter and launch the software.
- Import your TikTok videos and select and output format for your video; there are many options to choose from.
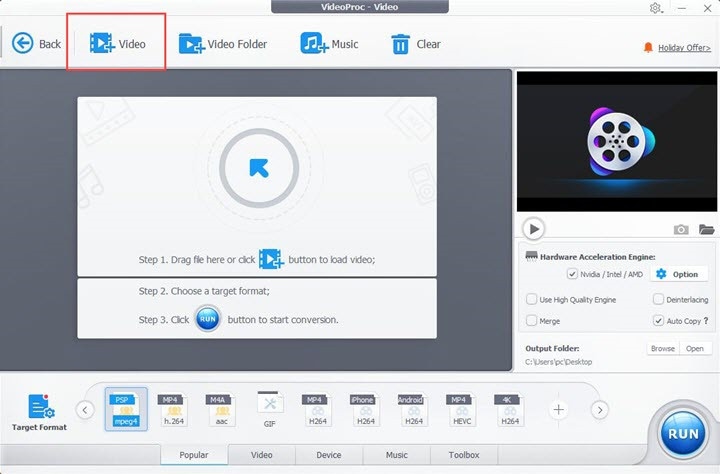
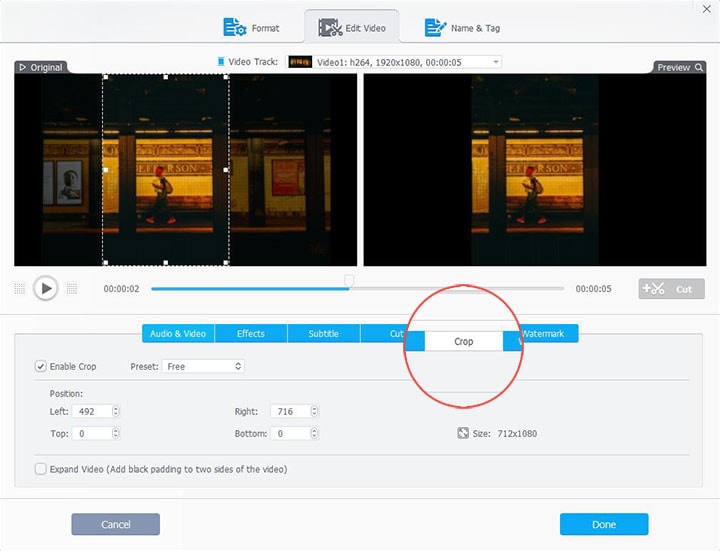
- You can then start editing each video clip separately. You can resize, trim and crop your videos. You can also apply effects, rotate the videos, and add subtitles.
- Next, go to the end of the screen and click the ‘toolbox’ option, select ‘merge,’ and you can choose the videos you would like to combine.
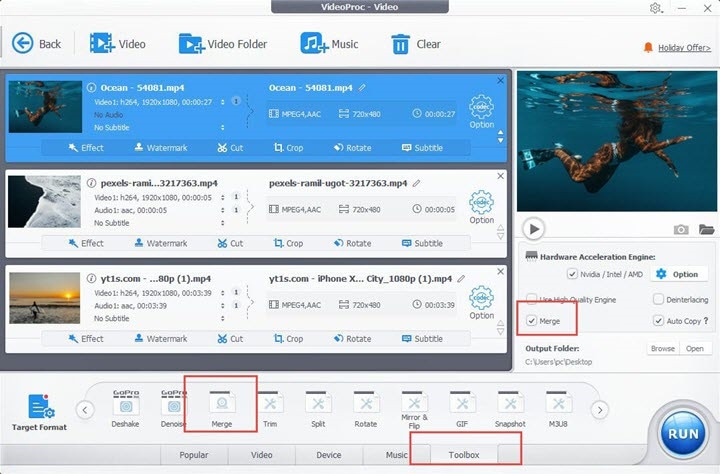
- After combining the videos, you can save the video and export it to your preferred storage device.
Adobe Spark
This is another top video-combining tool you can use for your TikTok videos. It allows you to make quick edits on your TikTok videos. Of course, you have to own a TikTok account to use this video editor. However, using it is quite simple, and the steps outlined below show just that.
- Go to the Adobe Spark website and sign-in; you can create an account if you don’t have one.

- Navigate to the ‘project’ tab on the homepage and select ‘create a project.’

- Click the ‘videos’ tab and choose a template you prefer. You would also have to give your video a title. Once you’re done, choose ‘start from scratch’ to begin.

- It would take you to the video editor; hover over an empty slide and click ‘video’ to choose the video you would like to upload.

- Adobe Spark allows you to trim the length of the video if you think it’s too long. Repeat the previous step to add another video again.
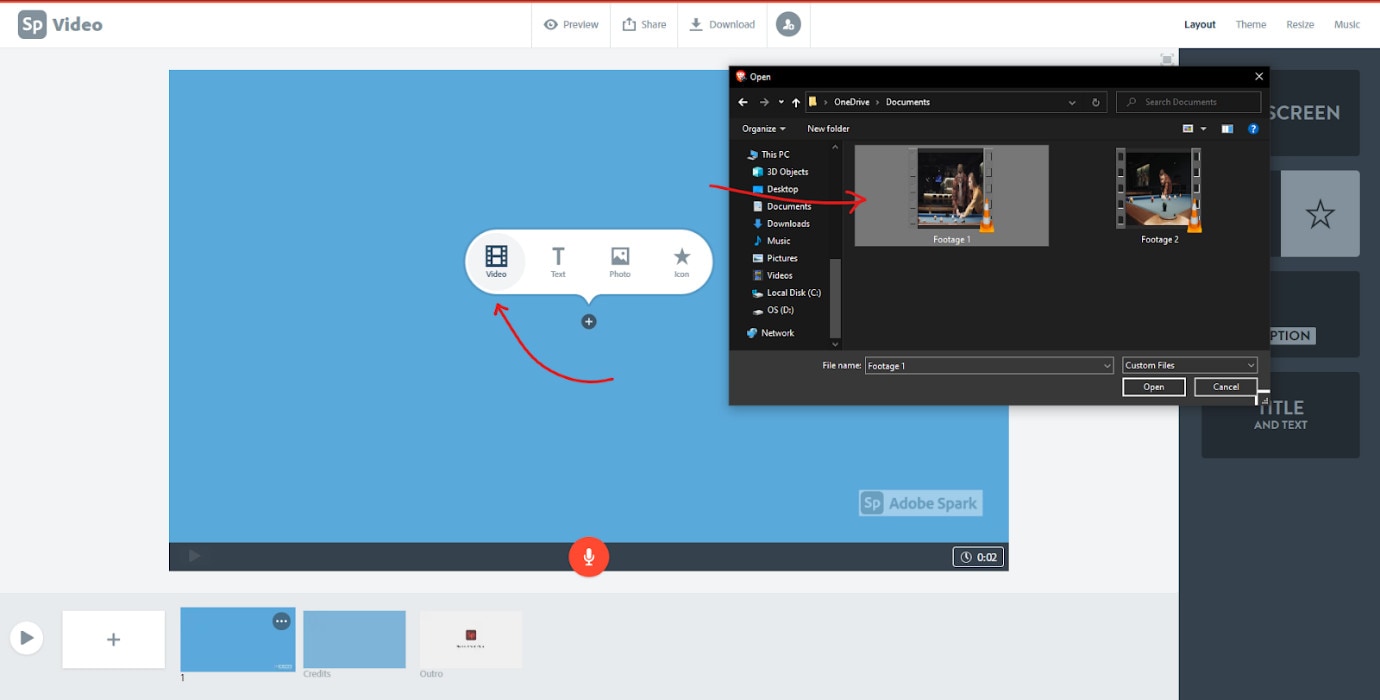
- Once you’ve added all the videos you want, you can rearrange them in the proper sequence.
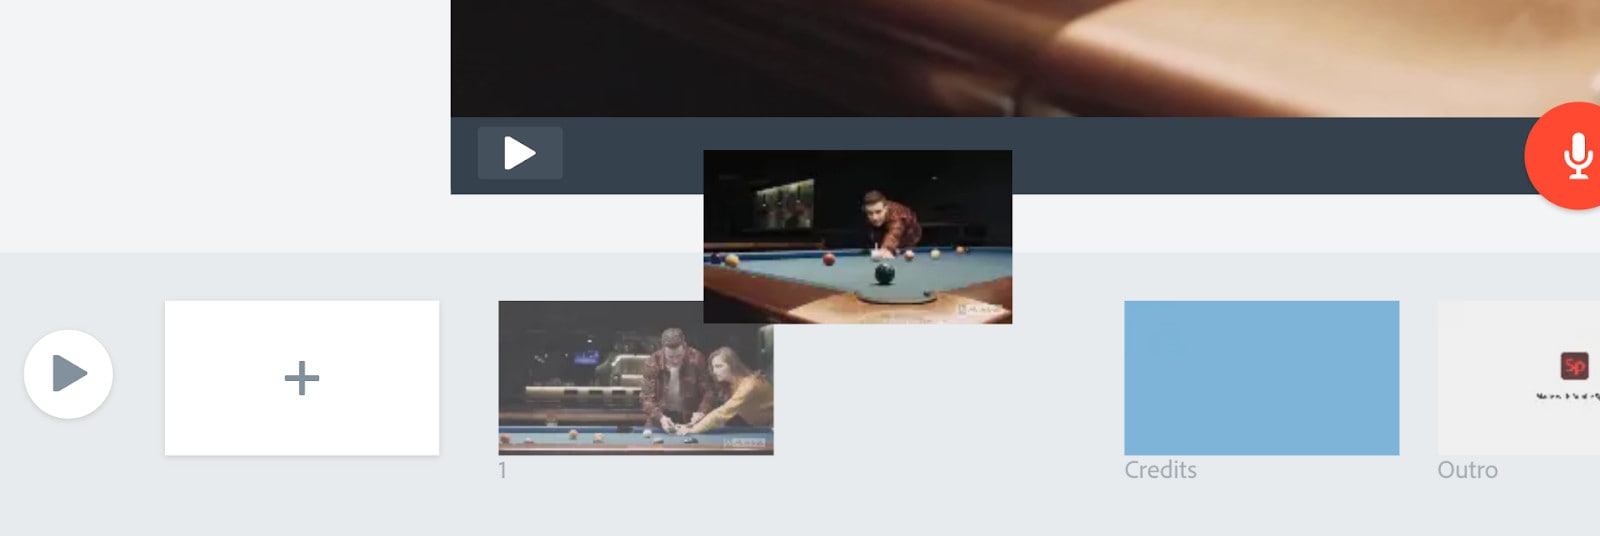
- Now you can save your video; click the ‘download’ button, and Adobe Spark will automatically download the newly combined video to your device.
7 Tips and Tricks You Should Know for TikTok Videos Creation
Although most tips focus on how you can redo your video to focus on the video-sharing platform, we have some tips and tricks you should know for TikTok video creation that focuses on combining videos. If you’re always having drafts or would like to enhance your videos, these cool tips will serve as a quick method for you.
- Combine Photos and Videos
TikTok allows you to combine videos and images. This comes in handy when trying to make a point on your video. For example, you’re probably wondering how you can add a foundation picture to your video. It is quite simple if you follow the steps below.
- Launch the TikTok app and click the ‘+’ button at the end of the screen.
- Record your video and select the ‘impacts’ screen at the end of the screen after a few moments.’
- Choose ‘transfer your picture to change foundation from the options that pop up.’
- Continue recording your video, and the chosen picture will become your video foundation.
- Add Overlay to TikTok Videos
Another tip we have is how to add overlay videos on TikTok without third-party editing apps; follow the steps below.

- After chronicling your videos, you can choose to add a melodic overlay, channels, and many more enhancements like stickers and text overlays.
- Once you add this to your video, choose next, and it will take you to the next page, where you can add subtitles, hashtags, and many more before you post.
- How to Add Videos to TikTok After Posting
Apart from making videos, you can also make two-part duets on TikTok. Additionally, TikTok allows you to record with different formats; follow the steps below.
- Firstly, go to the video you would like to edit and click the three-dot icon to edit your video.
- Once you edit the video by changing the format or adding another part, save your video, and TikTok allows you to post your video again.
- Place Videos Side by Side
Another tip we have in store for you is how you can place videos side by side on TikTok; the steps below help you achieve this.

- First, click the ‘star’ button at the side of your screen and select ‘add to favorite.’
- Now, record a second video on your TikTok or simply import it if you have already recorded the video.
- Download the first video, and you can use the combining feature on TikTok to make the video run next to each other
- Once you’re satisfied, you can now proceed to post your video.
- Learn to Perform Duets on TikTok
Another thing you can do on TikTok is to duet with other TikTok users
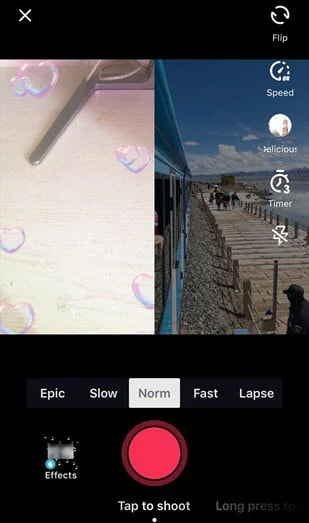
- To do this, go to TikTok and find the video you would like to duet
- At the end of the screen, click on the ‘share’ option and choose ‘duet’ from the option available
- Tap the red icon at the middle of the screen to start recording your video; your video usually appears on the left while the other video shows up in the right corner.
- Once you’re done recording, click the checkmark icon at the top of the screen to save your recording.
- Replay the duet to ensure you like the result; you can add effects, stickers, and other editing features you want to the video before you post.
- Set a Timer for Recording Videos
One of the ways you can record multiple scenes for a video is by using the recording tool; the steps below show you how to do that.
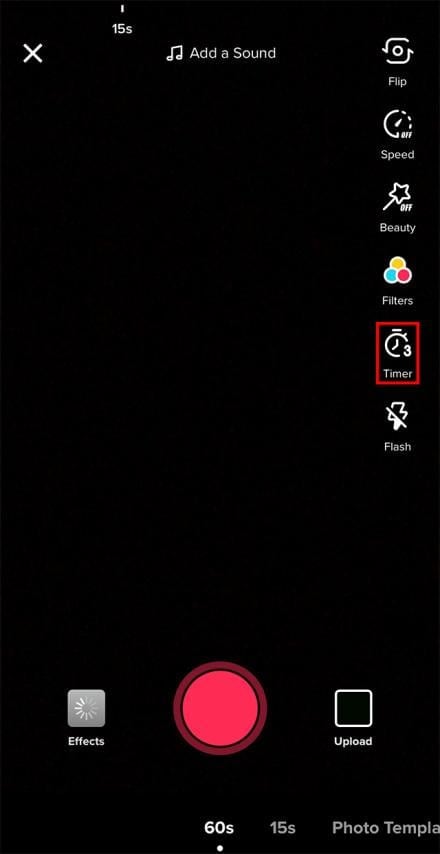
- Once you launch TikTok and click on the camera icon
- Tap the ‘clock’ icon at the side of the screen; you can choose between 3-10 seconds
- Click the red circle to start recording
- A countdown on the screen gives you time to get ready to record. Once the countdown gets to zero, TikTok starts recording your video.
- Use the Stitch Feature
Stitched videos allow you to add the first maker’s details in the new video; these details connect TikTok users to the first video. It is quite easy to stitch one video to another. Simply navigate to the ‘privacy and settings’ tab, and you can enable or disable stitching for your TikTok videos; you can also turn this on and off for your videos. Follow the steps below to stitch your TikTok videos.
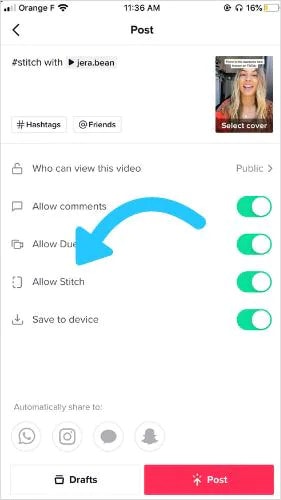
- Open the TikTok app and choose the video you would like to stitch
- Now choose the three-dot icon and select the ‘advanced’ option
- You can stitch up to five seconds from the video you would like to stick to add to the current video.
- You can add recordings to the stitched option and then stitch them together to post.
Final Thoughts
Whether you’re a stranger to the TikTok scene or a professional, TikTok is quite popular as a video-sharing platform. However, you don’t always get it right the first time, and you might want to combine various videos into one perfect option to upload. Apart from the two practical ways you can do this on TikTok, we also share three third-party apps you can use to achieve this. You can also explore the seven tips shared in this article to maximize your potential on the TikTok app.

- Once you do this, you can advance to recording the clips you want.
- Click the timer button at the top of the screen to choose how long you would like to shoot your video; you can select 5 seconds, 10 seconds, etc.
- Before starting the countdown, drag the red bar by the audio track to where you want the clip to end.
- You can repeat the recording many times to have many clips recorded.
- Once you’re done recording, click the ‘adjust clip’ icon to adjust your video clips.
- After adjusting, hit the ‘done’ button and have your combined video.
You can go ahead and share with your followers and the general public.
Use the Combining Function
The second practical way you can combine TikTok videos into a single video is by using the app’s built-in combining function. To find out how you can use this technique for your videos, follow the steps outlined below.
- Once you have the TikTok app on your device, open it and go to the menu bar. Select the ‘+’ button; it should be at the end of the screen.
- Instead of recording through the TikTok camera, choose the ‘upload’ button, and it will take you to your device storage, where you can select the videos you would like to upload on TikTok.

- Now, choose the ‘select multiple’ option at the left corner of your screen. Once you select this option, you can select different videos you would like to join together. Once you are satisfied with your choice, hit the ‘next’ button.
- TikTok will allow you to combine the videos for up to 60 seconds. You can customize the video arrangement according to your preference.
- If you’re satisfied with the final video result, click the next option, and you can share it on your TikTok account.

How to Combine Draft Videos on TikTok
Now that you know how to combine videos on TikTok, you’re probably wondering about the best way to combine the drafts you saved on your TikTok account. Maybe when you made the videos, you were unmotivated to upload them. However, now you want to combine the videos into a single video and don’t know how to proceed. So, follow the steps outlined in this article to get it done.
Step 1: Go to Your Drafts
To begin, you have to launch the TikTok app and click on the ‘me’ option at the end of the screen. Then, it will redirect you to your profile, choose the ‘drafts’ category, and take you to the videos you saved on the app and never published.
Step 2: Update Privacy Settings
Now you want to change the privacy setting in the ‘who can watch this video’ category to ‘just me.’ After updating, tap on ‘post.’ After posting your video, you can change the setting by clicking on ‘change cut.’ You can reduce the video length and add new videos to combine TikTok drafts.
Step 3: Add Filters and More Effects
You can also add music to your newly combined video and texts, stickers, filters, and many more effects to enhance your video.
Step 4: Save Draft

Once again, save the video as a draft, but you’ll have to choose a thumbnail for your video. You can choose any part of the video to become the thumbnail. Then, post your video by navigating to the home screen again and clicking the plus icon to post; select your video and post.
Use Third-Party Tools to Combine Videos for TikTok Before Uploading
There are several tools you can use to combine TikTok videos. While there is software, some are available online. Since TikTok gives limited editing functions, most TikTokers want a rich editing tool that they can use to edit and combine videos for TikTok. Below are three user-friendly software you can use to successfully edit and combine your videos.
Wondershare filmora
This is the best editing software you can find; it makes it relatively easy to combine your TikTok videos into a single video. Not only does Filmora allow you to combine videos before you upload them, but you can also use its host of editing tools to enhance your video. You can use this software for any type of video like slideshows, documentaries, photomontages, and many more. It is quite easy to use, irrespective of your editing skills, because of its user-friendly interface.
It is a strong contender in the editing world because it offers different effects, overlays, titles, transitions, etc. You can also upload your video directly to TikTok and other social media platforms. With many themes available on the platform, you can create a slideshow right on the platform. Follow the steps outlined below to combine multiple videos on Wondershare Filmora.
- First, you have to download the app on your device; you can do this from the official website. Install the app afterward, and the launch to begin.
- Next, select ‘create new project,’ It will take you to the media screen. Click the ‘add’ button and choose ‘import media file.’

- You can then navigate to the folder with the videos you want to combine and choose.
- Afterward, drag the videos to the timeline. Filmora will ask you if you want to match the project to the resolution of your media; choose to ‘match to media’
- This will make the videos into one. You can rearrange the video clips to your preference; simply click and drag the videos to reposition them.

- You can also use the effects, filters, transitions, and overlays on Filmora to enhance your TikTok video.

- Once everything looks good, click on the ‘export’ button at the top of the screen.
- You can then rename your video and choose where you would like to save the video. Filmora also allows you to adjust your video’s resolution and bitrate before clicking the ‘export’ option.

VideoProc Converter

Another third-party app you can use to edit your video and combine videos for TikTok is VideooProc Converter. It allows you to merge several videos in a lossless manner, and you can also cut, trim, rotate and resize your videos to your preference. You could also change the format and any other requirements you would like to tweak. Some beginners might find this video editor hard to navigate. However, the steps below should make the process easier for you.
- Firstly, download VideoProc Converter and launch the software.
- Import your TikTok videos and select and output format for your video; there are many options to choose from.

- You can then start editing each video clip separately. You can resize, trim and crop your videos. You can also apply effects, rotate the videos, and add subtitles.

- Next, go to the end of the screen and click the ‘toolbox’ option, select ‘merge,’ and you can choose the videos you would like to combine.

- After combining the videos, you can save the video and export it to your preferred storage device.
Adobe Spark
This is another top video-combining tool you can use for your TikTok videos. It allows you to make quick edits on your TikTok videos. Of course, you have to own a TikTok account to use this video editor. However, using it is quite simple, and the steps outlined below show just that.
- Go to the Adobe Spark website and sign-in; you can create an account if you don’t have one.

- Navigate to the ‘project’ tab on the homepage and select ‘create a project.’

- Click the ‘videos’ tab and choose a template you prefer. You would also have to give your video a title. Once you’re done, choose ‘start from scratch’ to begin.

- It would take you to the video editor; hover over an empty slide and click ‘video’ to choose the video you would like to upload.

- Adobe Spark allows you to trim the length of the video if you think it’s too long. Repeat the previous step to add another video again.

- Once you’ve added all the videos you want, you can rearrange them in the proper sequence.

- Now you can save your video; click the ‘download’ button, and Adobe Spark will automatically download the newly combined video to your device.
7 Tips and Tricks You Should Know for TikTok Videos Creation
Although most tips focus on how you can redo your video to focus on the video-sharing platform, we have some tips and tricks you should know for TikTok video creation that focuses on combining videos. If you’re always having drafts or would like to enhance your videos, these cool tips will serve as a quick method for you.
- Combine Photos and Videos
TikTok allows you to combine videos and images. This comes in handy when trying to make a point on your video. For example, you’re probably wondering how you can add a foundation picture to your video. It is quite simple if you follow the steps below.
- Launch the TikTok app and click the ‘+’ button at the end of the screen.
- Record your video and select the ‘impacts’ screen at the end of the screen after a few moments.’
- Choose ‘transfer your picture to change foundation from the options that pop up.’
- Continue recording your video, and the chosen picture will become your video foundation.
- Add Overlay to TikTok Videos
Another tip we have is how to add overlay videos on TikTok without third-party editing apps; follow the steps below.

- After chronicling your videos, you can choose to add a melodic overlay, channels, and many more enhancements like stickers and text overlays.
- Once you add this to your video, choose next, and it will take you to the next page, where you can add subtitles, hashtags, and many more before you post.
- How to Add Videos to TikTok After Posting
Apart from making videos, you can also make two-part duets on TikTok. Additionally, TikTok allows you to record with different formats; follow the steps below.
- Firstly, go to the video you would like to edit and click the three-dot icon to edit your video.
- Once you edit the video by changing the format or adding another part, save your video, and TikTok allows you to post your video again.
- Place Videos Side by Side
Another tip we have in store for you is how you can place videos side by side on TikTok; the steps below help you achieve this.

- First, click the ‘star’ button at the side of your screen and select ‘add to favorite.’
- Now, record a second video on your TikTok or simply import it if you have already recorded the video.
- Download the first video, and you can use the combining feature on TikTok to make the video run next to each other
- Once you’re satisfied, you can now proceed to post your video.
- Learn to Perform Duets on TikTok
Another thing you can do on TikTok is to duet with other TikTok users

- To do this, go to TikTok and find the video you would like to duet
- At the end of the screen, click on the ‘share’ option and choose ‘duet’ from the option available
- Tap the red icon at the middle of the screen to start recording your video; your video usually appears on the left while the other video shows up in the right corner.
- Once you’re done recording, click the checkmark icon at the top of the screen to save your recording.
- Replay the duet to ensure you like the result; you can add effects, stickers, and other editing features you want to the video before you post.
- Set a Timer for Recording Videos
One of the ways you can record multiple scenes for a video is by using the recording tool; the steps below show you how to do that.

- Once you launch TikTok and click on the camera icon
- Tap the ‘clock’ icon at the side of the screen; you can choose between 3-10 seconds
- Click the red circle to start recording
- A countdown on the screen gives you time to get ready to record. Once the countdown gets to zero, TikTok starts recording your video.
- Use the Stitch Feature
Stitched videos allow you to add the first maker’s details in the new video; these details connect TikTok users to the first video. It is quite easy to stitch one video to another. Simply navigate to the ‘privacy and settings’ tab, and you can enable or disable stitching for your TikTok videos; you can also turn this on and off for your videos. Follow the steps below to stitch your TikTok videos.

- Open the TikTok app and choose the video you would like to stitch
- Now choose the three-dot icon and select the ‘advanced’ option
- You can stitch up to five seconds from the video you would like to stick to add to the current video.
- You can add recordings to the stitched option and then stitch them together to post.
Final Thoughts
Whether you’re a stranger to the TikTok scene or a professional, TikTok is quite popular as a video-sharing platform. However, you don’t always get it right the first time, and you might want to combine various videos into one perfect option to upload. Apart from the two practical ways you can do this on TikTok, we also share three third-party apps you can use to achieve this. You can also explore the seven tips shared in this article to maximize your potential on the TikTok app.

- Once you do this, you can advance to recording the clips you want.
- Click the timer button at the top of the screen to choose how long you would like to shoot your video; you can select 5 seconds, 10 seconds, etc.
- Before starting the countdown, drag the red bar by the audio track to where you want the clip to end.
- You can repeat the recording many times to have many clips recorded.
- Once you’re done recording, click the ‘adjust clip’ icon to adjust your video clips.
- After adjusting, hit the ‘done’ button and have your combined video.
You can go ahead and share with your followers and the general public.
Use the Combining Function
The second practical way you can combine TikTok videos into a single video is by using the app’s built-in combining function. To find out how you can use this technique for your videos, follow the steps outlined below.
- Once you have the TikTok app on your device, open it and go to the menu bar. Select the ‘+’ button; it should be at the end of the screen.
- Instead of recording through the TikTok camera, choose the ‘upload’ button, and it will take you to your device storage, where you can select the videos you would like to upload on TikTok.

- Now, choose the ‘select multiple’ option at the left corner of your screen. Once you select this option, you can select different videos you would like to join together. Once you are satisfied with your choice, hit the ‘next’ button.
- TikTok will allow you to combine the videos for up to 60 seconds. You can customize the video arrangement according to your preference.
- If you’re satisfied with the final video result, click the next option, and you can share it on your TikTok account.

How to Combine Draft Videos on TikTok
Now that you know how to combine videos on TikTok, you’re probably wondering about the best way to combine the drafts you saved on your TikTok account. Maybe when you made the videos, you were unmotivated to upload them. However, now you want to combine the videos into a single video and don’t know how to proceed. So, follow the steps outlined in this article to get it done.
Step 1: Go to Your Drafts
To begin, you have to launch the TikTok app and click on the ‘me’ option at the end of the screen. Then, it will redirect you to your profile, choose the ‘drafts’ category, and take you to the videos you saved on the app and never published.
Step 2: Update Privacy Settings
Now you want to change the privacy setting in the ‘who can watch this video’ category to ‘just me.’ After updating, tap on ‘post.’ After posting your video, you can change the setting by clicking on ‘change cut.’ You can reduce the video length and add new videos to combine TikTok drafts.
Step 3: Add Filters and More Effects
You can also add music to your newly combined video and texts, stickers, filters, and many more effects to enhance your video.
Step 4: Save Draft

Once again, save the video as a draft, but you’ll have to choose a thumbnail for your video. You can choose any part of the video to become the thumbnail. Then, post your video by navigating to the home screen again and clicking the plus icon to post; select your video and post.
Use Third-Party Tools to Combine Videos for TikTok Before Uploading
There are several tools you can use to combine TikTok videos. While there is software, some are available online. Since TikTok gives limited editing functions, most TikTokers want a rich editing tool that they can use to edit and combine videos for TikTok. Below are three user-friendly software you can use to successfully edit and combine your videos.
Wondershare filmora
This is the best editing software you can find; it makes it relatively easy to combine your TikTok videos into a single video. Not only does Filmora allow you to combine videos before you upload them, but you can also use its host of editing tools to enhance your video. You can use this software for any type of video like slideshows, documentaries, photomontages, and many more. It is quite easy to use, irrespective of your editing skills, because of its user-friendly interface.
It is a strong contender in the editing world because it offers different effects, overlays, titles, transitions, etc. You can also upload your video directly to TikTok and other social media platforms. With many themes available on the platform, you can create a slideshow right on the platform. Follow the steps outlined below to combine multiple videos on Wondershare Filmora.
- First, you have to download the app on your device; you can do this from the official website. Install the app afterward, and the launch to begin.
- Next, select ‘create new project,’ It will take you to the media screen. Click the ‘add’ button and choose ‘import media file.’

- You can then navigate to the folder with the videos you want to combine and choose.
- Afterward, drag the videos to the timeline. Filmora will ask you if you want to match the project to the resolution of your media; choose to ‘match to media’
- This will make the videos into one. You can rearrange the video clips to your preference; simply click and drag the videos to reposition them.

- You can also use the effects, filters, transitions, and overlays on Filmora to enhance your TikTok video.

- Once everything looks good, click on the ‘export’ button at the top of the screen.
- You can then rename your video and choose where you would like to save the video. Filmora also allows you to adjust your video’s resolution and bitrate before clicking the ‘export’ option.

VideoProc Converter

Another third-party app you can use to edit your video and combine videos for TikTok is VideooProc Converter. It allows you to merge several videos in a lossless manner, and you can also cut, trim, rotate and resize your videos to your preference. You could also change the format and any other requirements you would like to tweak. Some beginners might find this video editor hard to navigate. However, the steps below should make the process easier for you.
- Firstly, download VideoProc Converter and launch the software.
- Import your TikTok videos and select and output format for your video; there are many options to choose from.

- You can then start editing each video clip separately. You can resize, trim and crop your videos. You can also apply effects, rotate the videos, and add subtitles.

- Next, go to the end of the screen and click the ‘toolbox’ option, select ‘merge,’ and you can choose the videos you would like to combine.

- After combining the videos, you can save the video and export it to your preferred storage device.
Adobe Spark
This is another top video-combining tool you can use for your TikTok videos. It allows you to make quick edits on your TikTok videos. Of course, you have to own a TikTok account to use this video editor. However, using it is quite simple, and the steps outlined below show just that.
- Go to the Adobe Spark website and sign-in; you can create an account if you don’t have one.

- Navigate to the ‘project’ tab on the homepage and select ‘create a project.’

- Click the ‘videos’ tab and choose a template you prefer. You would also have to give your video a title. Once you’re done, choose ‘start from scratch’ to begin.

- It would take you to the video editor; hover over an empty slide and click ‘video’ to choose the video you would like to upload.

- Adobe Spark allows you to trim the length of the video if you think it’s too long. Repeat the previous step to add another video again.

- Once you’ve added all the videos you want, you can rearrange them in the proper sequence.

- Now you can save your video; click the ‘download’ button, and Adobe Spark will automatically download the newly combined video to your device.
7 Tips and Tricks You Should Know for TikTok Videos Creation
Although most tips focus on how you can redo your video to focus on the video-sharing platform, we have some tips and tricks you should know for TikTok video creation that focuses on combining videos. If you’re always having drafts or would like to enhance your videos, these cool tips will serve as a quick method for you.
- Combine Photos and Videos
TikTok allows you to combine videos and images. This comes in handy when trying to make a point on your video. For example, you’re probably wondering how you can add a foundation picture to your video. It is quite simple if you follow the steps below.
- Launch the TikTok app and click the ‘+’ button at the end of the screen.
- Record your video and select the ‘impacts’ screen at the end of the screen after a few moments.’
- Choose ‘transfer your picture to change foundation from the options that pop up.’
- Continue recording your video, and the chosen picture will become your video foundation.
- Add Overlay to TikTok Videos
Another tip we have is how to add overlay videos on TikTok without third-party editing apps; follow the steps below.

- After chronicling your videos, you can choose to add a melodic overlay, channels, and many more enhancements like stickers and text overlays.
- Once you add this to your video, choose next, and it will take you to the next page, where you can add subtitles, hashtags, and many more before you post.
- How to Add Videos to TikTok After Posting
Apart from making videos, you can also make two-part duets on TikTok. Additionally, TikTok allows you to record with different formats; follow the steps below.
- Firstly, go to the video you would like to edit and click the three-dot icon to edit your video.
- Once you edit the video by changing the format or adding another part, save your video, and TikTok allows you to post your video again.
- Place Videos Side by Side
Another tip we have in store for you is how you can place videos side by side on TikTok; the steps below help you achieve this.

- First, click the ‘star’ button at the side of your screen and select ‘add to favorite.’
- Now, record a second video on your TikTok or simply import it if you have already recorded the video.
- Download the first video, and you can use the combining feature on TikTok to make the video run next to each other
- Once you’re satisfied, you can now proceed to post your video.
- Learn to Perform Duets on TikTok
Another thing you can do on TikTok is to duet with other TikTok users

- To do this, go to TikTok and find the video you would like to duet
- At the end of the screen, click on the ‘share’ option and choose ‘duet’ from the option available
- Tap the red icon at the middle of the screen to start recording your video; your video usually appears on the left while the other video shows up in the right corner.
- Once you’re done recording, click the checkmark icon at the top of the screen to save your recording.
- Replay the duet to ensure you like the result; you can add effects, stickers, and other editing features you want to the video before you post.
- Set a Timer for Recording Videos
One of the ways you can record multiple scenes for a video is by using the recording tool; the steps below show you how to do that.

- Once you launch TikTok and click on the camera icon
- Tap the ‘clock’ icon at the side of the screen; you can choose between 3-10 seconds
- Click the red circle to start recording
- A countdown on the screen gives you time to get ready to record. Once the countdown gets to zero, TikTok starts recording your video.
- Use the Stitch Feature
Stitched videos allow you to add the first maker’s details in the new video; these details connect TikTok users to the first video. It is quite easy to stitch one video to another. Simply navigate to the ‘privacy and settings’ tab, and you can enable or disable stitching for your TikTok videos; you can also turn this on and off for your videos. Follow the steps below to stitch your TikTok videos.

- Open the TikTok app and choose the video you would like to stitch
- Now choose the three-dot icon and select the ‘advanced’ option
- You can stitch up to five seconds from the video you would like to stick to add to the current video.
- You can add recordings to the stitched option and then stitch them together to post.
Final Thoughts
Whether you’re a stranger to the TikTok scene or a professional, TikTok is quite popular as a video-sharing platform. However, you don’t always get it right the first time, and you might want to combine various videos into one perfect option to upload. Apart from the two practical ways you can do this on TikTok, we also share three third-party apps you can use to achieve this. You can also explore the seven tips shared in this article to maximize your potential on the TikTok app.

- Once you do this, you can advance to recording the clips you want.
- Click the timer button at the top of the screen to choose how long you would like to shoot your video; you can select 5 seconds, 10 seconds, etc.
- Before starting the countdown, drag the red bar by the audio track to where you want the clip to end.
- You can repeat the recording many times to have many clips recorded.
- Once you’re done recording, click the ‘adjust clip’ icon to adjust your video clips.
- After adjusting, hit the ‘done’ button and have your combined video.
You can go ahead and share with your followers and the general public.
Use the Combining Function
The second practical way you can combine TikTok videos into a single video is by using the app’s built-in combining function. To find out how you can use this technique for your videos, follow the steps outlined below.
- Once you have the TikTok app on your device, open it and go to the menu bar. Select the ‘+’ button; it should be at the end of the screen.
- Instead of recording through the TikTok camera, choose the ‘upload’ button, and it will take you to your device storage, where you can select the videos you would like to upload on TikTok.

- Now, choose the ‘select multiple’ option at the left corner of your screen. Once you select this option, you can select different videos you would like to join together. Once you are satisfied with your choice, hit the ‘next’ button.
- TikTok will allow you to combine the videos for up to 60 seconds. You can customize the video arrangement according to your preference.
- If you’re satisfied with the final video result, click the next option, and you can share it on your TikTok account.

How to Combine Draft Videos on TikTok
Now that you know how to combine videos on TikTok, you’re probably wondering about the best way to combine the drafts you saved on your TikTok account. Maybe when you made the videos, you were unmotivated to upload them. However, now you want to combine the videos into a single video and don’t know how to proceed. So, follow the steps outlined in this article to get it done.
Step 1: Go to Your Drafts
To begin, you have to launch the TikTok app and click on the ‘me’ option at the end of the screen. Then, it will redirect you to your profile, choose the ‘drafts’ category, and take you to the videos you saved on the app and never published.
Step 2: Update Privacy Settings
Now you want to change the privacy setting in the ‘who can watch this video’ category to ‘just me.’ After updating, tap on ‘post.’ After posting your video, you can change the setting by clicking on ‘change cut.’ You can reduce the video length and add new videos to combine TikTok drafts.
Step 3: Add Filters and More Effects
You can also add music to your newly combined video and texts, stickers, filters, and many more effects to enhance your video.
Step 4: Save Draft

Once again, save the video as a draft, but you’ll have to choose a thumbnail for your video. You can choose any part of the video to become the thumbnail. Then, post your video by navigating to the home screen again and clicking the plus icon to post; select your video and post.
Use Third-Party Tools to Combine Videos for TikTok Before Uploading
There are several tools you can use to combine TikTok videos. While there is software, some are available online. Since TikTok gives limited editing functions, most TikTokers want a rich editing tool that they can use to edit and combine videos for TikTok. Below are three user-friendly software you can use to successfully edit and combine your videos.
Wondershare filmora
This is the best editing software you can find; it makes it relatively easy to combine your TikTok videos into a single video. Not only does Filmora allow you to combine videos before you upload them, but you can also use its host of editing tools to enhance your video. You can use this software for any type of video like slideshows, documentaries, photomontages, and many more. It is quite easy to use, irrespective of your editing skills, because of its user-friendly interface.
It is a strong contender in the editing world because it offers different effects, overlays, titles, transitions, etc. You can also upload your video directly to TikTok and other social media platforms. With many themes available on the platform, you can create a slideshow right on the platform. Follow the steps outlined below to combine multiple videos on Wondershare Filmora.
- First, you have to download the app on your device; you can do this from the official website. Install the app afterward, and the launch to begin.
- Next, select ‘create new project,’ It will take you to the media screen. Click the ‘add’ button and choose ‘import media file.’

- You can then navigate to the folder with the videos you want to combine and choose.
- Afterward, drag the videos to the timeline. Filmora will ask you if you want to match the project to the resolution of your media; choose to ‘match to media’
- This will make the videos into one. You can rearrange the video clips to your preference; simply click and drag the videos to reposition them.

- You can also use the effects, filters, transitions, and overlays on Filmora to enhance your TikTok video.

- Once everything looks good, click on the ‘export’ button at the top of the screen.
- You can then rename your video and choose where you would like to save the video. Filmora also allows you to adjust your video’s resolution and bitrate before clicking the ‘export’ option.

VideoProc Converter

Another third-party app you can use to edit your video and combine videos for TikTok is VideooProc Converter. It allows you to merge several videos in a lossless manner, and you can also cut, trim, rotate and resize your videos to your preference. You could also change the format and any other requirements you would like to tweak. Some beginners might find this video editor hard to navigate. However, the steps below should make the process easier for you.
- Firstly, download VideoProc Converter and launch the software.
- Import your TikTok videos and select and output format for your video; there are many options to choose from.

- You can then start editing each video clip separately. You can resize, trim and crop your videos. You can also apply effects, rotate the videos, and add subtitles.

- Next, go to the end of the screen and click the ‘toolbox’ option, select ‘merge,’ and you can choose the videos you would like to combine.

- After combining the videos, you can save the video and export it to your preferred storage device.
Adobe Spark
This is another top video-combining tool you can use for your TikTok videos. It allows you to make quick edits on your TikTok videos. Of course, you have to own a TikTok account to use this video editor. However, using it is quite simple, and the steps outlined below show just that.
- Go to the Adobe Spark website and sign-in; you can create an account if you don’t have one.

- Navigate to the ‘project’ tab on the homepage and select ‘create a project.’

- Click the ‘videos’ tab and choose a template you prefer. You would also have to give your video a title. Once you’re done, choose ‘start from scratch’ to begin.

- It would take you to the video editor; hover over an empty slide and click ‘video’ to choose the video you would like to upload.

- Adobe Spark allows you to trim the length of the video if you think it’s too long. Repeat the previous step to add another video again.

- Once you’ve added all the videos you want, you can rearrange them in the proper sequence.

- Now you can save your video; click the ‘download’ button, and Adobe Spark will automatically download the newly combined video to your device.
7 Tips and Tricks You Should Know for TikTok Videos Creation
Although most tips focus on how you can redo your video to focus on the video-sharing platform, we have some tips and tricks you should know for TikTok video creation that focuses on combining videos. If you’re always having drafts or would like to enhance your videos, these cool tips will serve as a quick method for you.
- Combine Photos and Videos
TikTok allows you to combine videos and images. This comes in handy when trying to make a point on your video. For example, you’re probably wondering how you can add a foundation picture to your video. It is quite simple if you follow the steps below.
- Launch the TikTok app and click the ‘+’ button at the end of the screen.
- Record your video and select the ‘impacts’ screen at the end of the screen after a few moments.’
- Choose ‘transfer your picture to change foundation from the options that pop up.’
- Continue recording your video, and the chosen picture will become your video foundation.
- Add Overlay to TikTok Videos
Another tip we have is how to add overlay videos on TikTok without third-party editing apps; follow the steps below.

- After chronicling your videos, you can choose to add a melodic overlay, channels, and many more enhancements like stickers and text overlays.
- Once you add this to your video, choose next, and it will take you to the next page, where you can add subtitles, hashtags, and many more before you post.
- How to Add Videos to TikTok After Posting
Apart from making videos, you can also make two-part duets on TikTok. Additionally, TikTok allows you to record with different formats; follow the steps below.
- Firstly, go to the video you would like to edit and click the three-dot icon to edit your video.
- Once you edit the video by changing the format or adding another part, save your video, and TikTok allows you to post your video again.
- Place Videos Side by Side
Another tip we have in store for you is how you can place videos side by side on TikTok; the steps below help you achieve this.

- First, click the ‘star’ button at the side of your screen and select ‘add to favorite.’
- Now, record a second video on your TikTok or simply import it if you have already recorded the video.
- Download the first video, and you can use the combining feature on TikTok to make the video run next to each other
- Once you’re satisfied, you can now proceed to post your video.
- Learn to Perform Duets on TikTok
Another thing you can do on TikTok is to duet with other TikTok users

- To do this, go to TikTok and find the video you would like to duet
- At the end of the screen, click on the ‘share’ option and choose ‘duet’ from the option available
- Tap the red icon at the middle of the screen to start recording your video; your video usually appears on the left while the other video shows up in the right corner.
- Once you’re done recording, click the checkmark icon at the top of the screen to save your recording.
- Replay the duet to ensure you like the result; you can add effects, stickers, and other editing features you want to the video before you post.
- Set a Timer for Recording Videos
One of the ways you can record multiple scenes for a video is by using the recording tool; the steps below show you how to do that.

- Once you launch TikTok and click on the camera icon
- Tap the ‘clock’ icon at the side of the screen; you can choose between 3-10 seconds
- Click the red circle to start recording
- A countdown on the screen gives you time to get ready to record. Once the countdown gets to zero, TikTok starts recording your video.
- Use the Stitch Feature
Stitched videos allow you to add the first maker’s details in the new video; these details connect TikTok users to the first video. It is quite easy to stitch one video to another. Simply navigate to the ‘privacy and settings’ tab, and you can enable or disable stitching for your TikTok videos; you can also turn this on and off for your videos. Follow the steps below to stitch your TikTok videos.

- Open the TikTok app and choose the video you would like to stitch
- Now choose the three-dot icon and select the ‘advanced’ option
- You can stitch up to five seconds from the video you would like to stick to add to the current video.
- You can add recordings to the stitched option and then stitch them together to post.
Final Thoughts
Whether you’re a stranger to the TikTok scene or a professional, TikTok is quite popular as a video-sharing platform. However, you don’t always get it right the first time, and you might want to combine various videos into one perfect option to upload. Apart from the two practical ways you can do this on TikTok, we also share three third-party apps you can use to achieve this. You can also explore the seven tips shared in this article to maximize your potential on the TikTok app.
TEXT REVEAL Animation | Easy Masking Filmora
Preparation
What you need to prepare:
- A computer (Windows or macOS)
- Your video materials.
- Filmora video editor
Step 1
Download the Filmora video editor and install it. Once it loads, click on “New Project”.
Step 2
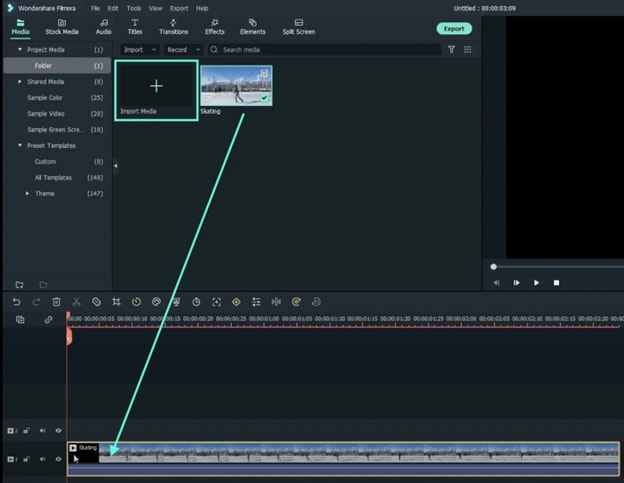
Import your footage by clicking on “Import Media”. Then, drag your clip to the Timeline to start editing it.
Step 3
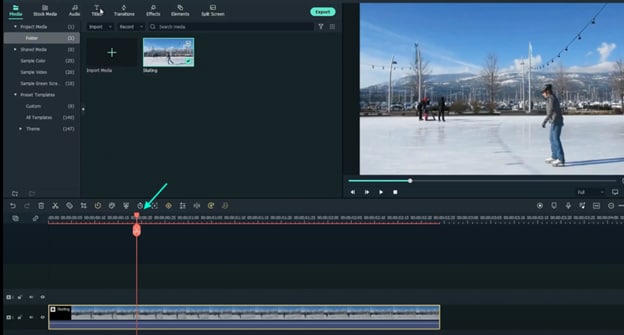
Review your video and place the Playhead at the point where you want the text reveal to begin.
Step 4
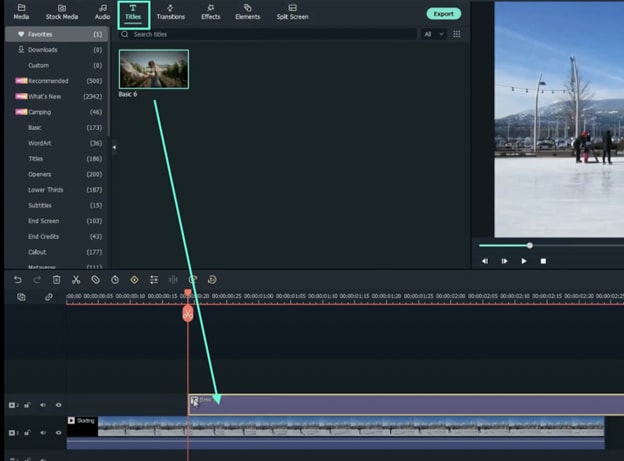
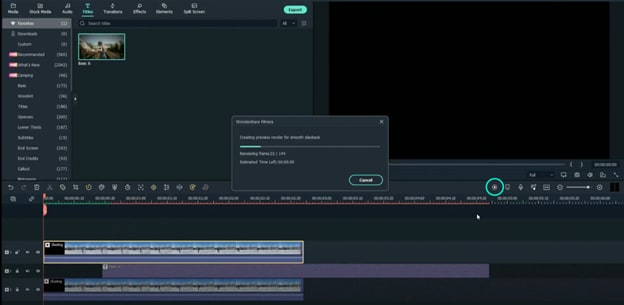
Go to the Titles tab and drag the Basic title to Track 2 on the Timeline. Then, right-click on the Title clip and go to Edit Properties. Here, type in your text and change the font to any bold one. You can also go to the WordArt tab to further customize your text. Click OK.
Step 5
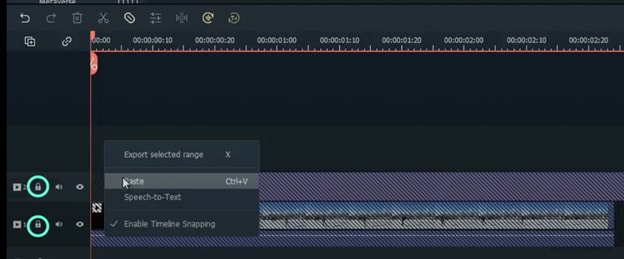
Now, move the text to fit the objects or people on your video perfectly. Copy the video clip on Track 1. Then, lock both Track 1 and Track 2 by pressing the key-lock button. Right-click anywhere above Track 2 and select Paste.
Step 6
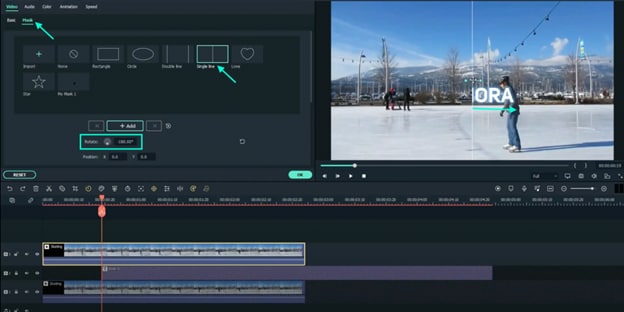
Move the Playhead to where the clip on Track 2 starts. Right-click on the clip in Track 3 → go to Edit Properties → select the Mask tab → click on Single Line. Then, adjust the Rotate value to “-180°”. Drag the slider on the screen to the right side until the text totally disappears next to your moving object. Now, scroll down from the panel on the left and change Blur Strength to 1%.
Step 7
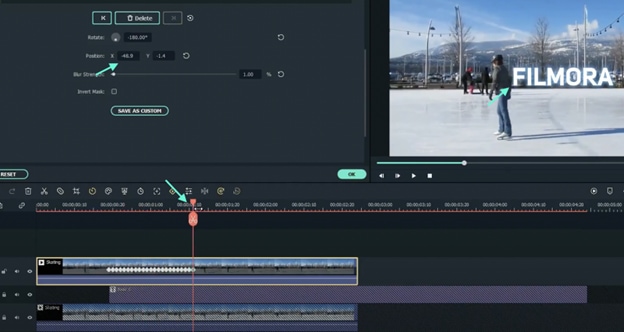
Next, add a keyframe by clicking on the “**+Add**” button. Move the Playhead one frame forward. Drag the X-axis to the left slowly to reveal a tiny portion of the text on the screen. Then, repeat this as many times as it takes until the full text is revealed, going one frame at a time.
Step 8
Finally, Render the video and watch the final preview. Congratulations, you’ve just successfully created a text reveal animation in FIlmora.
Summary
What you’ve learned:
- Animate text frame by frame in Filmora
- Edit the properties of clips in the video editor
- Add titles and manipulate clips on the Timeline
What you need to prepare:
- A computer (Windows or macOS)
- Your video materials.
- Filmora video editor
Step 1
Download the Filmora video editor and install it. Once it loads, click on “New Project”.
Step 2
Import your footage by clicking on “Import Media”. Then, drag your clip to the Timeline to start editing it.

Step 3
Review your video and place the Playhead at the point where you want the text reveal to begin.

Step 4
Go to the Titles tab and drag the Basic title to Track 2 on the Timeline. Then, right-click on the Title clip and go to Edit Properties. Here, type in your text and change the font to any bold one. You can also go to the WordArt tab to further customize your text. Click OK.

Step 5
Now, move the text to fit the objects or people on your video perfectly. Copy the video clip on Track 1. Then, lock both Track 1 and Track 2 by pressing the key-lock button. Right-click anywhere above Track 2 and select Paste.

Step 6
Move the Playhead to where the clip on Track 2 starts. Right-click on the clip in Track 3 → go to Edit Properties → select the Mask tab → click on Single Line. Then, adjust the Rotate value to “-180°”. Drag the slider on the screen to the right side until the text totally disappears next to your moving object. Now, scroll down from the panel on the left and change Blur Strength to 1%.

Step 7
Next, add a keyframe by clicking on the “**+Add**” button. Move the Playhead one frame forward. Drag the X-axis to the left slowly to reveal a tiny portion of the text on the screen. Then, repeat this as many times as it takes until the full text is revealed, going one frame at a time.

Step 8
Finally, Render the video and watch the final preview. Congratulations, you’ve just successfully created a text reveal animation in FIlmora.

Summary
What you’ve learned:
- Animate text frame by frame in Filmora
- Edit the properties of clips in the video editor
- Add titles and manipulate clips on the Timeline
What you need to prepare:
- A computer (Windows or macOS)
- Your video materials.
- Filmora video editor
Step 1
Download the Filmora video editor and install it. Once it loads, click on “New Project”.
Step 2
Import your footage by clicking on “Import Media”. Then, drag your clip to the Timeline to start editing it.

Step 3
Review your video and place the Playhead at the point where you want the text reveal to begin.

Step 4
Go to the Titles tab and drag the Basic title to Track 2 on the Timeline. Then, right-click on the Title clip and go to Edit Properties. Here, type in your text and change the font to any bold one. You can also go to the WordArt tab to further customize your text. Click OK.

Step 5
Now, move the text to fit the objects or people on your video perfectly. Copy the video clip on Track 1. Then, lock both Track 1 and Track 2 by pressing the key-lock button. Right-click anywhere above Track 2 and select Paste.

Step 6
Move the Playhead to where the clip on Track 2 starts. Right-click on the clip in Track 3 → go to Edit Properties → select the Mask tab → click on Single Line. Then, adjust the Rotate value to “-180°”. Drag the slider on the screen to the right side until the text totally disappears next to your moving object. Now, scroll down from the panel on the left and change Blur Strength to 1%.

Step 7
Next, add a keyframe by clicking on the “**+Add**” button. Move the Playhead one frame forward. Drag the X-axis to the left slowly to reveal a tiny portion of the text on the screen. Then, repeat this as many times as it takes until the full text is revealed, going one frame at a time.

Step 8
Finally, Render the video and watch the final preview. Congratulations, you’ve just successfully created a text reveal animation in FIlmora.

Summary
What you’ve learned:
- Animate text frame by frame in Filmora
- Edit the properties of clips in the video editor
- Add titles and manipulate clips on the Timeline
What you need to prepare:
- A computer (Windows or macOS)
- Your video materials.
- Filmora video editor
Step 1
Download the Filmora video editor and install it. Once it loads, click on “New Project”.
Step 2
Import your footage by clicking on “Import Media”. Then, drag your clip to the Timeline to start editing it.

Step 3
Review your video and place the Playhead at the point where you want the text reveal to begin.

Step 4
Go to the Titles tab and drag the Basic title to Track 2 on the Timeline. Then, right-click on the Title clip and go to Edit Properties. Here, type in your text and change the font to any bold one. You can also go to the WordArt tab to further customize your text. Click OK.

Step 5
Now, move the text to fit the objects or people on your video perfectly. Copy the video clip on Track 1. Then, lock both Track 1 and Track 2 by pressing the key-lock button. Right-click anywhere above Track 2 and select Paste.

Step 6
Move the Playhead to where the clip on Track 2 starts. Right-click on the clip in Track 3 → go to Edit Properties → select the Mask tab → click on Single Line. Then, adjust the Rotate value to “-180°”. Drag the slider on the screen to the right side until the text totally disappears next to your moving object. Now, scroll down from the panel on the left and change Blur Strength to 1%.

Step 7
Next, add a keyframe by clicking on the “**+Add**” button. Move the Playhead one frame forward. Drag the X-axis to the left slowly to reveal a tiny portion of the text on the screen. Then, repeat this as many times as it takes until the full text is revealed, going one frame at a time.

Step 8
Finally, Render the video and watch the final preview. Congratulations, you’ve just successfully created a text reveal animation in FIlmora.

Summary
What you’ve learned:
- Animate text frame by frame in Filmora
- Edit the properties of clips in the video editor
- Add titles and manipulate clips on the Timeline
Color Lut in Video - Color Grade Your Video
Create High-Quality Video - Wondershare Filmora
An easy and powerful YouTube video editor
Numerous video and audio effects to choose from
Detailed tutorials provided by the official channel
Do you want to improve the quality of your videos? With so many people providing online video content. Other than the subject of your video, its quality is also important. One way to make your content pop is to create a lut video. Below is information on how to color grade your video using lut resources. Keep reading to discover why lut video editing is important and where to get the best resources.

In this article
01 What is LUT?
02 Why do we need to use LUTs?
03 How to add luts to your video using Filmora
So, what is LUT?
LUT refers to Look Up Tables, which a custom color templates you use when creating videos. These help you create content for different devices, including television and mobile devices. For example, you can create custom LUTs for easy conversion from standard definition to more modern cinematic formats such as 4K and UHD.
What are the different types of LUTs?
Here are the colour lut categories for filmmakers:
- Transform
- Calibration
- Viewing
- 1D: 1D lut offers customization on one value of your colors. These are available as .lut file types.
- 3D: These award you more control over your luts video editing since they offer saturation, hues, and brightness levels on different axis. You will find these as .cube file types.

These allow you to make your content vibrant and mimic the color schemes of famous filmmakers such as David Fincher. He is famous for using greens and blues in his films to arrest your attention. He does this by employing a darker than usual color scheme, which leaves you staring at the screen for the entire film. You can see this color lut in the movie Fight Club or The Social Network.
Keep reading to discover the effects of each in luts video editing.
Why do we need to use LUTs?
You use LUTs for different reasons, as you can see from David Fincher’s example. However, here are a few more:
• To add emphasis to a particular scene
Sometimes, it can be challenging to communicate the importance of your message using standard color schemes. As such, filmmakers use dramatic color schemes in their content. For example, the colour scheme in the above photo emphasizes the tranquillity of the sea between contrasting landscapes.

• To ensure uniformity across different devices
You will use a calibration color lut to ensure a similar video quality across different TV monitors whether it is HD, UHD, or 4K. Similarly, you can use a transformation colour lut to add a cinematic effect to your film to make it appear as if your audience is viewing it in a theatre.
Camera manufacturers use different color luts to diversify their products according to their target markets. For example, you get a different lut color grading from a Sony camera as you would in a Canon.

How to add luts to your video using Filmora
Filmora is a great video editing tool for all filmmaker experience levels. It includes tons of features and a user-friendly interface to ensure professional results each time. It is available for both macOS and Windows devices. Filmora allows you to install custom Luts and apply it to your videos.
Guide to use Filmora
1. Launch the video editor
Once you complete the download, launch it to start making magical videos for your audience.
2. Import Your Film
The lut editing video software allows you to import your videos directly from your device.
3. Select Advanced Color Tuning
You will find this on the Tools drop-down menu. It is located on the top menu options of Filmora. Then, drag and drop your video to the timeline. The tool also offers an A/B comparison, allowing you to check the result of your lut video editing before you apply the effect.
You can use the preset luts Filmora offers or upload your custom luts from any of the sites in the next section.
4. Save & Export
Click OK to finalize the correction and export the video to your preferred device. You will see the available options from the software’s export menu.
A few things to consider before using Filmora’s Advanced Color correction tool include:
- Your film white balance needs to be correct to get better results.
- Your camera’s exposure during filming also needs to be optimal to get ideal results when using Filmora for lut video editing. However, the Advanced Color Correction tool will tell you if everything is optimal.
- Finally, the original video needs to be of ideal quality for optimal color lut results. Different shooting conditions may not work with certain color luts. Therefore, opt for luts that match your filmmaking style to get the best results.
For Win 7 or later (64-bit)
For macOS 10.12 or later
Bonus! Free Lut Resources
Do you want more diversity in your lut video editing? Here are some free lut resources to check out.
1. Vision color luts
Vision color luts is another lut video editing software that you can use to hone your skills. They also offer free luts you can upload on their favorite software. Additionally, they have luts for even the latest display resolutions such as 2K and 3D. Check out the full list here.
2. Sam Kolder
Sam Kolder is a Vlogger who is famous for his stunning creations that feature his travels. His work also inspires many creators thanks to his editing and use of color luts. He also shares free lut packs and his creative process across his official channels, including YouTube and Instagram.
He mainly works on Adobe Premiere pro. However, his luts still work with other video editing software.
3. Shutterstock.com
Shutterstock also offers tons of free stuff relating to lut video editing. You will also find free luts that are compatible with Filmora on the website. Here are a few of them you can sample. Please check before you download other packs, as some of the stuff may not match your current versions.
4. Giggster.com
Giggster.com is an LA-based company that caters to aspiring filmmakers. They too offer the occasional lut files you can use to make your videos more stunning. However, they mostly feature those that work with Photoshop CC. So, you may wanna check your software’s compatibility beforehand. Here is one of the freebies you can download.
5. Premiumbeat.com
You may also want to check out some of Premiumbeat’s free offerings if you are an AfterEffects user. They offer stylistic luts and other free tools you can use to edit your films. Additionally, they do this regularly. Therefore, they are worth a look to see what is new.
Conclusion
● Color luts are incredible tools to add flair to your videos. Additionally, you can use them with incredible ease on software like Filmora. Here are some of the creations you can sample from some of the free ones that come with the tool.
Do you want to improve the quality of your videos? With so many people providing online video content. Other than the subject of your video, its quality is also important. One way to make your content pop is to create a lut video. Below is information on how to color grade your video using lut resources. Keep reading to discover why lut video editing is important and where to get the best resources.

In this article
01 What is LUT?
02 Why do we need to use LUTs?
03 How to add luts to your video using Filmora
So, what is LUT?
LUT refers to Look Up Tables, which a custom color templates you use when creating videos. These help you create content for different devices, including television and mobile devices. For example, you can create custom LUTs for easy conversion from standard definition to more modern cinematic formats such as 4K and UHD.
What are the different types of LUTs?
Here are the colour lut categories for filmmakers:
- Transform
- Calibration
- Viewing
- 1D: 1D lut offers customization on one value of your colors. These are available as .lut file types.
- 3D: These award you more control over your luts video editing since they offer saturation, hues, and brightness levels on different axis. You will find these as .cube file types.

These allow you to make your content vibrant and mimic the color schemes of famous filmmakers such as David Fincher. He is famous for using greens and blues in his films to arrest your attention. He does this by employing a darker than usual color scheme, which leaves you staring at the screen for the entire film. You can see this color lut in the movie Fight Club or The Social Network.
Keep reading to discover the effects of each in luts video editing.
Why do we need to use LUTs?
You use LUTs for different reasons, as you can see from David Fincher’s example. However, here are a few more:
• To add emphasis to a particular scene
Sometimes, it can be challenging to communicate the importance of your message using standard color schemes. As such, filmmakers use dramatic color schemes in their content. For example, the colour scheme in the above photo emphasizes the tranquillity of the sea between contrasting landscapes.

• To ensure uniformity across different devices
You will use a calibration color lut to ensure a similar video quality across different TV monitors whether it is HD, UHD, or 4K. Similarly, you can use a transformation colour lut to add a cinematic effect to your film to make it appear as if your audience is viewing it in a theatre.
Camera manufacturers use different color luts to diversify their products according to their target markets. For example, you get a different lut color grading from a Sony camera as you would in a Canon.

How to add luts to your video using Filmora
Filmora is a great video editing tool for all filmmaker experience levels. It includes tons of features and a user-friendly interface to ensure professional results each time. It is available for both macOS and Windows devices. Filmora allows you to install custom Luts and apply it to your videos.
Guide to use Filmora
1. Launch the video editor
Once you complete the download, launch it to start making magical videos for your audience.
2. Import Your Film
The lut editing video software allows you to import your videos directly from your device.
3. Select Advanced Color Tuning
You will find this on the Tools drop-down menu. It is located on the top menu options of Filmora. Then, drag and drop your video to the timeline. The tool also offers an A/B comparison, allowing you to check the result of your lut video editing before you apply the effect.
You can use the preset luts Filmora offers or upload your custom luts from any of the sites in the next section.
4. Save & Export
Click OK to finalize the correction and export the video to your preferred device. You will see the available options from the software’s export menu.
A few things to consider before using Filmora’s Advanced Color correction tool include:
- Your film white balance needs to be correct to get better results.
- Your camera’s exposure during filming also needs to be optimal to get ideal results when using Filmora for lut video editing. However, the Advanced Color Correction tool will tell you if everything is optimal.
- Finally, the original video needs to be of ideal quality for optimal color lut results. Different shooting conditions may not work with certain color luts. Therefore, opt for luts that match your filmmaking style to get the best results.
For Win 7 or later (64-bit)
For macOS 10.12 or later
Bonus! Free Lut Resources
Do you want more diversity in your lut video editing? Here are some free lut resources to check out.
1. Vision color luts
Vision color luts is another lut video editing software that you can use to hone your skills. They also offer free luts you can upload on their favorite software. Additionally, they have luts for even the latest display resolutions such as 2K and 3D. Check out the full list here.
2. Sam Kolder
Sam Kolder is a Vlogger who is famous for his stunning creations that feature his travels. His work also inspires many creators thanks to his editing and use of color luts. He also shares free lut packs and his creative process across his official channels, including YouTube and Instagram.
He mainly works on Adobe Premiere pro. However, his luts still work with other video editing software.
3. Shutterstock.com
Shutterstock also offers tons of free stuff relating to lut video editing. You will also find free luts that are compatible with Filmora on the website. Here are a few of them you can sample. Please check before you download other packs, as some of the stuff may not match your current versions.
4. Giggster.com
Giggster.com is an LA-based company that caters to aspiring filmmakers. They too offer the occasional lut files you can use to make your videos more stunning. However, they mostly feature those that work with Photoshop CC. So, you may wanna check your software’s compatibility beforehand. Here is one of the freebies you can download.
5. Premiumbeat.com
You may also want to check out some of Premiumbeat’s free offerings if you are an AfterEffects user. They offer stylistic luts and other free tools you can use to edit your films. Additionally, they do this regularly. Therefore, they are worth a look to see what is new.
Conclusion
● Color luts are incredible tools to add flair to your videos. Additionally, you can use them with incredible ease on software like Filmora. Here are some of the creations you can sample from some of the free ones that come with the tool.
Do you want to improve the quality of your videos? With so many people providing online video content. Other than the subject of your video, its quality is also important. One way to make your content pop is to create a lut video. Below is information on how to color grade your video using lut resources. Keep reading to discover why lut video editing is important and where to get the best resources.

In this article
01 What is LUT?
02 Why do we need to use LUTs?
03 How to add luts to your video using Filmora
So, what is LUT?
LUT refers to Look Up Tables, which a custom color templates you use when creating videos. These help you create content for different devices, including television and mobile devices. For example, you can create custom LUTs for easy conversion from standard definition to more modern cinematic formats such as 4K and UHD.
What are the different types of LUTs?
Here are the colour lut categories for filmmakers:
- Transform
- Calibration
- Viewing
- 1D: 1D lut offers customization on one value of your colors. These are available as .lut file types.
- 3D: These award you more control over your luts video editing since they offer saturation, hues, and brightness levels on different axis. You will find these as .cube file types.

These allow you to make your content vibrant and mimic the color schemes of famous filmmakers such as David Fincher. He is famous for using greens and blues in his films to arrest your attention. He does this by employing a darker than usual color scheme, which leaves you staring at the screen for the entire film. You can see this color lut in the movie Fight Club or The Social Network.
Keep reading to discover the effects of each in luts video editing.
Why do we need to use LUTs?
You use LUTs for different reasons, as you can see from David Fincher’s example. However, here are a few more:
• To add emphasis to a particular scene
Sometimes, it can be challenging to communicate the importance of your message using standard color schemes. As such, filmmakers use dramatic color schemes in their content. For example, the colour scheme in the above photo emphasizes the tranquillity of the sea between contrasting landscapes.

• To ensure uniformity across different devices
You will use a calibration color lut to ensure a similar video quality across different TV monitors whether it is HD, UHD, or 4K. Similarly, you can use a transformation colour lut to add a cinematic effect to your film to make it appear as if your audience is viewing it in a theatre.
Camera manufacturers use different color luts to diversify their products according to their target markets. For example, you get a different lut color grading from a Sony camera as you would in a Canon.

How to add luts to your video using Filmora
Filmora is a great video editing tool for all filmmaker experience levels. It includes tons of features and a user-friendly interface to ensure professional results each time. It is available for both macOS and Windows devices. Filmora allows you to install custom Luts and apply it to your videos.
Guide to use Filmora
1. Launch the video editor
Once you complete the download, launch it to start making magical videos for your audience.
2. Import Your Film
The lut editing video software allows you to import your videos directly from your device.
3. Select Advanced Color Tuning
You will find this on the Tools drop-down menu. It is located on the top menu options of Filmora. Then, drag and drop your video to the timeline. The tool also offers an A/B comparison, allowing you to check the result of your lut video editing before you apply the effect.
You can use the preset luts Filmora offers or upload your custom luts from any of the sites in the next section.
4. Save & Export
Click OK to finalize the correction and export the video to your preferred device. You will see the available options from the software’s export menu.
A few things to consider before using Filmora’s Advanced Color correction tool include:
- Your film white balance needs to be correct to get better results.
- Your camera’s exposure during filming also needs to be optimal to get ideal results when using Filmora for lut video editing. However, the Advanced Color Correction tool will tell you if everything is optimal.
- Finally, the original video needs to be of ideal quality for optimal color lut results. Different shooting conditions may not work with certain color luts. Therefore, opt for luts that match your filmmaking style to get the best results.
For Win 7 or later (64-bit)
For macOS 10.12 or later
Bonus! Free Lut Resources
Do you want more diversity in your lut video editing? Here are some free lut resources to check out.
1. Vision color luts
Vision color luts is another lut video editing software that you can use to hone your skills. They also offer free luts you can upload on their favorite software. Additionally, they have luts for even the latest display resolutions such as 2K and 3D. Check out the full list here.
2. Sam Kolder
Sam Kolder is a Vlogger who is famous for his stunning creations that feature his travels. His work also inspires many creators thanks to his editing and use of color luts. He also shares free lut packs and his creative process across his official channels, including YouTube and Instagram.
He mainly works on Adobe Premiere pro. However, his luts still work with other video editing software.
3. Shutterstock.com
Shutterstock also offers tons of free stuff relating to lut video editing. You will also find free luts that are compatible with Filmora on the website. Here are a few of them you can sample. Please check before you download other packs, as some of the stuff may not match your current versions.
4. Giggster.com
Giggster.com is an LA-based company that caters to aspiring filmmakers. They too offer the occasional lut files you can use to make your videos more stunning. However, they mostly feature those that work with Photoshop CC. So, you may wanna check your software’s compatibility beforehand. Here is one of the freebies you can download.
5. Premiumbeat.com
You may also want to check out some of Premiumbeat’s free offerings if you are an AfterEffects user. They offer stylistic luts and other free tools you can use to edit your films. Additionally, they do this regularly. Therefore, they are worth a look to see what is new.
Conclusion
● Color luts are incredible tools to add flair to your videos. Additionally, you can use them with incredible ease on software like Filmora. Here are some of the creations you can sample from some of the free ones that come with the tool.
Do you want to improve the quality of your videos? With so many people providing online video content. Other than the subject of your video, its quality is also important. One way to make your content pop is to create a lut video. Below is information on how to color grade your video using lut resources. Keep reading to discover why lut video editing is important and where to get the best resources.

In this article
01 What is LUT?
02 Why do we need to use LUTs?
03 How to add luts to your video using Filmora
So, what is LUT?
LUT refers to Look Up Tables, which a custom color templates you use when creating videos. These help you create content for different devices, including television and mobile devices. For example, you can create custom LUTs for easy conversion from standard definition to more modern cinematic formats such as 4K and UHD.
What are the different types of LUTs?
Here are the colour lut categories for filmmakers:
- Transform
- Calibration
- Viewing
- 1D: 1D lut offers customization on one value of your colors. These are available as .lut file types.
- 3D: These award you more control over your luts video editing since they offer saturation, hues, and brightness levels on different axis. You will find these as .cube file types.

These allow you to make your content vibrant and mimic the color schemes of famous filmmakers such as David Fincher. He is famous for using greens and blues in his films to arrest your attention. He does this by employing a darker than usual color scheme, which leaves you staring at the screen for the entire film. You can see this color lut in the movie Fight Club or The Social Network.
Keep reading to discover the effects of each in luts video editing.
Why do we need to use LUTs?
You use LUTs for different reasons, as you can see from David Fincher’s example. However, here are a few more:
• To add emphasis to a particular scene
Sometimes, it can be challenging to communicate the importance of your message using standard color schemes. As such, filmmakers use dramatic color schemes in their content. For example, the colour scheme in the above photo emphasizes the tranquillity of the sea between contrasting landscapes.

• To ensure uniformity across different devices
You will use a calibration color lut to ensure a similar video quality across different TV monitors whether it is HD, UHD, or 4K. Similarly, you can use a transformation colour lut to add a cinematic effect to your film to make it appear as if your audience is viewing it in a theatre.
Camera manufacturers use different color luts to diversify their products according to their target markets. For example, you get a different lut color grading from a Sony camera as you would in a Canon.

How to add luts to your video using Filmora
Filmora is a great video editing tool for all filmmaker experience levels. It includes tons of features and a user-friendly interface to ensure professional results each time. It is available for both macOS and Windows devices. Filmora allows you to install custom Luts and apply it to your videos.
Guide to use Filmora
1. Launch the video editor
Once you complete the download, launch it to start making magical videos for your audience.
2. Import Your Film
The lut editing video software allows you to import your videos directly from your device.
3. Select Advanced Color Tuning
You will find this on the Tools drop-down menu. It is located on the top menu options of Filmora. Then, drag and drop your video to the timeline. The tool also offers an A/B comparison, allowing you to check the result of your lut video editing before you apply the effect.
You can use the preset luts Filmora offers or upload your custom luts from any of the sites in the next section.
4. Save & Export
Click OK to finalize the correction and export the video to your preferred device. You will see the available options from the software’s export menu.
A few things to consider before using Filmora’s Advanced Color correction tool include:
- Your film white balance needs to be correct to get better results.
- Your camera’s exposure during filming also needs to be optimal to get ideal results when using Filmora for lut video editing. However, the Advanced Color Correction tool will tell you if everything is optimal.
- Finally, the original video needs to be of ideal quality for optimal color lut results. Different shooting conditions may not work with certain color luts. Therefore, opt for luts that match your filmmaking style to get the best results.
For Win 7 or later (64-bit)
For macOS 10.12 or later
Bonus! Free Lut Resources
Do you want more diversity in your lut video editing? Here are some free lut resources to check out.
1. Vision color luts
Vision color luts is another lut video editing software that you can use to hone your skills. They also offer free luts you can upload on their favorite software. Additionally, they have luts for even the latest display resolutions such as 2K and 3D. Check out the full list here.
2. Sam Kolder
Sam Kolder is a Vlogger who is famous for his stunning creations that feature his travels. His work also inspires many creators thanks to his editing and use of color luts. He also shares free lut packs and his creative process across his official channels, including YouTube and Instagram.
He mainly works on Adobe Premiere pro. However, his luts still work with other video editing software.
3. Shutterstock.com
Shutterstock also offers tons of free stuff relating to lut video editing. You will also find free luts that are compatible with Filmora on the website. Here are a few of them you can sample. Please check before you download other packs, as some of the stuff may not match your current versions.
4. Giggster.com
Giggster.com is an LA-based company that caters to aspiring filmmakers. They too offer the occasional lut files you can use to make your videos more stunning. However, they mostly feature those that work with Photoshop CC. So, you may wanna check your software’s compatibility beforehand. Here is one of the freebies you can download.
5. Premiumbeat.com
You may also want to check out some of Premiumbeat’s free offerings if you are an AfterEffects user. They offer stylistic luts and other free tools you can use to edit your films. Additionally, they do this regularly. Therefore, they are worth a look to see what is new.
Conclusion
● Color luts are incredible tools to add flair to your videos. Additionally, you can use them with incredible ease on software like Filmora. Here are some of the creations you can sample from some of the free ones that come with the tool.
Do You Want to Know About Efficient Motion Blur Plugins for Adobe Effects? Read This Article to Find Out How to Use Motion Blur Plugins for Enhanced Results
Adobe Effects is popularly used to add visual effects to video. Using this software, you can craft titles, intros, and outros for your videos and can also use this tool to add motion blur to your videos. If you want a more captivating and enhanced result, you can try the After Effects motion blur plugin, as discussed in this article. So, keep reading this guide to find out about the best motion blur plugins for Adobe After Effects.
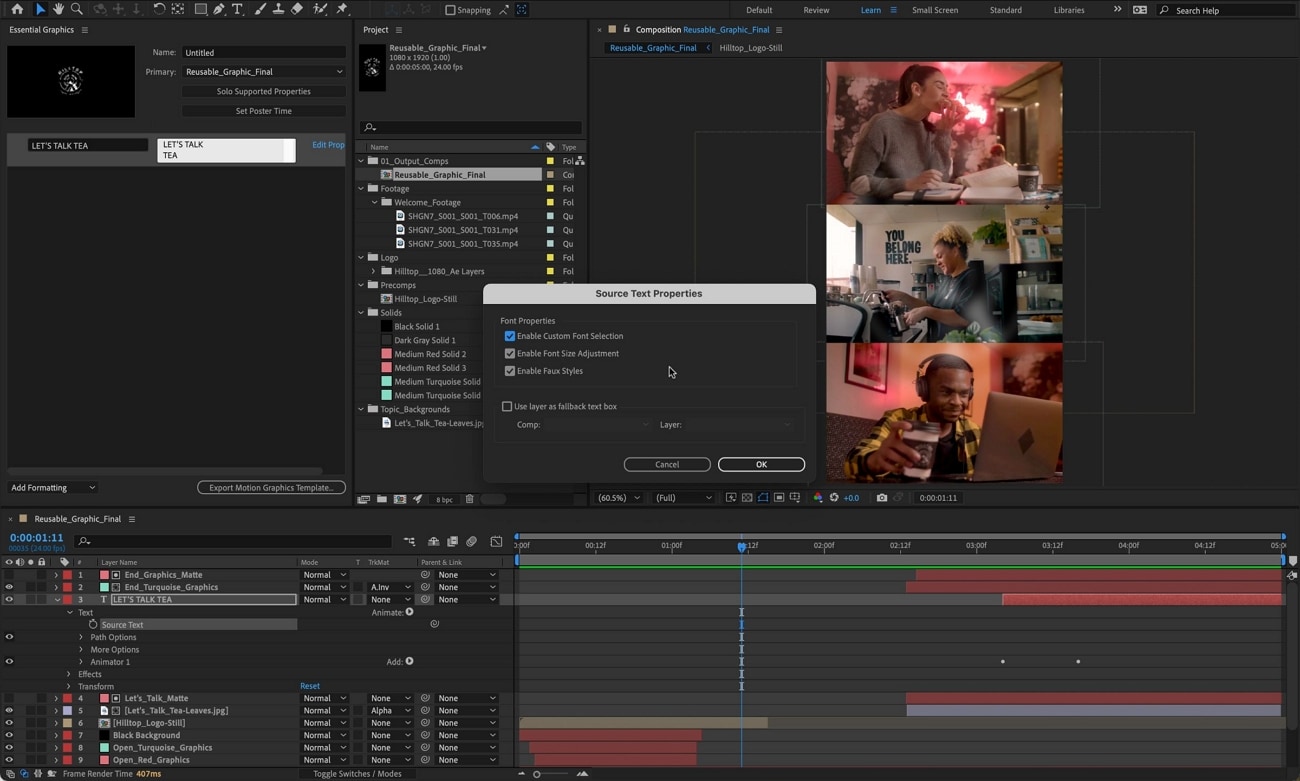
Part 1: What is Motion Blur?
If you have captured a video where you want to show the movement of a certain train, car, or any object, motion blur can smooth it naturally. If you want to show the rapid movement of fast-moving objects, the motion blur effect can enhance this motion flawlessly.
Through this effect, you can smoothen your video by adding a realistic touch to it. By doing so, you can effectively put an emphasis on any particular area in the video. Many people add this effect to racing games to add a sense of speed realistically. Hence, the motion blur effect is commonly used by video creators and editors to prevent their videos from having a choppy or unprofessional look.

Part 2: 3 Motion Blur Plugins for Adobe Effects
Are you ready to use the best motion blur plugin of After Effects? In this section, we will discuss the top 3 motion blur plugins that can help you to create a motion blur effect in After Effects.
1. RE: Vision Effects ReelSmart Motion Blur
RSMB is a powerful motion blur plugin that contains various advanced features. By adding this motion blur plugin, you can instantly add a motion blur effect to your videos without any manual effort. Moreover, within this tool, you can also adjust the amount of blur that you want to apply to your video. You can also generate compelling effects using RSMB by blurring a sequence of motion, preferably.
Price: For After Effects, the regular version costs about $109.95. Whereas for the Pro version, the cost is $169.95.
Download: ReelSmart shows great compatibility with popular software such as Premiere Pro, After Effects, and many more. However, the subscription and download plans for each software are different. So, if you want to learn more about this plugin, you can navigate to its official website .
Key Features
- RSMB uses automatic tracking for each pixel so that the motion blur effect can be applied with great precision.
- You can adjust the amount and strength of motion blur through this plugin.
- With the help of advanced technology, RSMB can use the technique of object separation. Through this capability, the plugin can easily separate background and foreground efficiently.
- You can also use RSMB to track 360 footages for adding motion blur. Due to its advanced algorithms, it easily adds a motion blur effect to 360 videos by considering the sides, bottoms, tops, and edges.
What We Like
- RSMB can use spline guidance that can help you to animate shapes to display the movement of the objects. Thus, even if this plugin encounters tracking problems, you can always guide the object’s movement.
- Apart from adding a motion blur effect, you can also use RSMB to remove this blur effect without compromising the quality of your video.
What We Don’t Like
- A wide range of advanced features is only available in the pro version of RSMB. Thus, it can be expensive for beginner users.
2. CC Force Motion Blur
You can find the CC Force Motion Blur plugin under the time category of the Effects tab. By using this effect, you can add a natural sense of motion to your video easily. Once you have chosen the CC Force Motion Blur effect, you can add various keyframes to adjust the position and movement accordingly. Moreover, if you want to add this effect flawlessly, you should add an adjustment layer first. This will help you to add and adjust the CC Force Motion Blur effect in a perfect way.
Download: It’s a built-in option in After Effects that you can find easily. So, it’s free to use and does not require downloading anything.
Tutorial: To check how to use this After Effects motion blur plugin, you can see the instructions present in this video:
3. Pixel Motion Blur
Pixel Motion Blur can also help you in creating a dynamic blur effect in your video. After adding this effect, you can set different elements such as shutter control, shutter samples, and vector detail. If you decrease the shutter samples, the rendering speed will comparatively become faster. You can also set the shutter control to automatic, which will allow you to change the composition settings.
Download: You can find the Pixel Motion Blur plugin in the interface of After Effects. Thus, you can access it without any installation.
Tutorial: Do you want to try Pixel Motion Blur? Check the steps present in this video to discover how to use this special plugin without any hassle:
Part 3: RSMB vs. CC Force vs. Pixel: Which is the Best Motion Blur Plugin?
Do you want to learn the difference between all the discussed motion blur plugins for Adobe Effects? Read this section to find out the comparison between the top 3 best motion blur plugins.
1. Render time
ReelSmart Motion Blur vs. CC Force Motion Blur
The rendering speed of RSMB is way faster than CC Force Motion Blur. Especially if you are applying a motion blur effect to the animated or 3D video, CC Force Motion Blur can take excessive time to render. Thus, RSMB is a better choice as it provides fast rendering speed along with additional features.
CC Force Motion Blur vs. Pixel Motion Blur
As compared to Pixel Motion Blur, CC Force Motion Blur has a faster rendering speed. If you have a smaller number of samples while applying the CC Force Motion Blur, the rendering speed will become faster.
2. Price
RSMB is a paid plugin for Adobe After Effects and provides different subscription plans. On the other hand, CC Force Motion Blur and Pixel Motion Blur are the built-in features of After Effects. Thus, you can access them without any cost.
Conclusion
In this article, we have shed light on the top three motion blur plugins you can easily use on After Effects. Using any motion blur plugins, you can efficiently make the movement of your objects realistic and dynamic. These After Effects motion blur plugins will help you generate more professional results.
Part 1: What is Motion Blur?
If you have captured a video where you want to show the movement of a certain train, car, or any object, motion blur can smooth it naturally. If you want to show the rapid movement of fast-moving objects, the motion blur effect can enhance this motion flawlessly.
Through this effect, you can smoothen your video by adding a realistic touch to it. By doing so, you can effectively put an emphasis on any particular area in the video. Many people add this effect to racing games to add a sense of speed realistically. Hence, the motion blur effect is commonly used by video creators and editors to prevent their videos from having a choppy or unprofessional look.

Part 2: 3 Motion Blur Plugins for Adobe Effects
Are you ready to use the best motion blur plugin of After Effects? In this section, we will discuss the top 3 motion blur plugins that can help you to create a motion blur effect in After Effects.
1. RE: Vision Effects ReelSmart Motion Blur
RSMB is a powerful motion blur plugin that contains various advanced features. By adding this motion blur plugin, you can instantly add a motion blur effect to your videos without any manual effort. Moreover, within this tool, you can also adjust the amount of blur that you want to apply to your video. You can also generate compelling effects using RSMB by blurring a sequence of motion, preferably.
Price: For After Effects, the regular version costs about $109.95. Whereas for the Pro version, the cost is $169.95.
Download: ReelSmart shows great compatibility with popular software such as Premiere Pro, After Effects, and many more. However, the subscription and download plans for each software are different. So, if you want to learn more about this plugin, you can navigate to its official website .
Key Features
- RSMB uses automatic tracking for each pixel so that the motion blur effect can be applied with great precision.
- You can adjust the amount and strength of motion blur through this plugin.
- With the help of advanced technology, RSMB can use the technique of object separation. Through this capability, the plugin can easily separate background and foreground efficiently.
- You can also use RSMB to track 360 footages for adding motion blur. Due to its advanced algorithms, it easily adds a motion blur effect to 360 videos by considering the sides, bottoms, tops, and edges.
What We Like
- RSMB can use spline guidance that can help you to animate shapes to display the movement of the objects. Thus, even if this plugin encounters tracking problems, you can always guide the object’s movement.
- Apart from adding a motion blur effect, you can also use RSMB to remove this blur effect without compromising the quality of your video.
What We Don’t Like
- A wide range of advanced features is only available in the pro version of RSMB. Thus, it can be expensive for beginner users.
2. CC Force Motion Blur
You can find the CC Force Motion Blur plugin under the time category of the Effects tab. By using this effect, you can add a natural sense of motion to your video easily. Once you have chosen the CC Force Motion Blur effect, you can add various keyframes to adjust the position and movement accordingly. Moreover, if you want to add this effect flawlessly, you should add an adjustment layer first. This will help you to add and adjust the CC Force Motion Blur effect in a perfect way.
Download: It’s a built-in option in After Effects that you can find easily. So, it’s free to use and does not require downloading anything.
Tutorial: To check how to use this After Effects motion blur plugin, you can see the instructions present in this video:
3. Pixel Motion Blur
Pixel Motion Blur can also help you in creating a dynamic blur effect in your video. After adding this effect, you can set different elements such as shutter control, shutter samples, and vector detail. If you decrease the shutter samples, the rendering speed will comparatively become faster. You can also set the shutter control to automatic, which will allow you to change the composition settings.
Download: You can find the Pixel Motion Blur plugin in the interface of After Effects. Thus, you can access it without any installation.
Tutorial: Do you want to try Pixel Motion Blur? Check the steps present in this video to discover how to use this special plugin without any hassle:
Part 3: RSMB vs. CC Force vs. Pixel: Which is the Best Motion Blur Plugin?
Do you want to learn the difference between all the discussed motion blur plugins for Adobe Effects? Read this section to find out the comparison between the top 3 best motion blur plugins.
1. Render time
ReelSmart Motion Blur vs. CC Force Motion Blur
The rendering speed of RSMB is way faster than CC Force Motion Blur. Especially if you are applying a motion blur effect to the animated or 3D video, CC Force Motion Blur can take excessive time to render. Thus, RSMB is a better choice as it provides fast rendering speed along with additional features.
CC Force Motion Blur vs. Pixel Motion Blur
As compared to Pixel Motion Blur, CC Force Motion Blur has a faster rendering speed. If you have a smaller number of samples while applying the CC Force Motion Blur, the rendering speed will become faster.
2. Price
RSMB is a paid plugin for Adobe After Effects and provides different subscription plans. On the other hand, CC Force Motion Blur and Pixel Motion Blur are the built-in features of After Effects. Thus, you can access them without any cost.
Conclusion
In this article, we have shed light on the top three motion blur plugins you can easily use on After Effects. Using any motion blur plugins, you can efficiently make the movement of your objects realistic and dynamic. These After Effects motion blur plugins will help you generate more professional results.
Also read:
- 2024 Approved Top 5 Video Filter Software Improve Your Videos with Filters
- Updated 2024 Approved How to Create Cinematic Style Videos?
- New In 2024, 10 Best Vloggers on YouTube
- Updated Read on to Learn About OpenCV Object Tracking, What It Is, and How to Implement It in Python, and OpenCV
- In 2024, 10 Matching Color Combination That Works Together Greatly
- New 4 Ways to Merge MP4 and MP3
- Updated How to Create Photoshop GIF The 100 Easy Way
- New Top 15 Slow Motion CapCut Templates to Work With
- 2024 Approved Every Compositor Should Know The Trick of Color Match in After Effects
- New 12 Top Picks of Video Enhancer Software for 2024
- 2024 Approved How to Use Adjustment Layer in Final Cut Pro
- Find Out The Best Dark Moody LUTs During Editing for 2024
- New In 2024, 10 Best Movie Trailer Voice Generators Windows, Mac, Android, iPhone & Online
- In 2024, Detailed Tutorial to Crop Video in KineMaster
- Got No Luck with MP4 Video Joining Software? Try These 6 Best MP4 Mergers to Combine Videos on Your MAC and Windows
- Create Intro Video with Flixpress
- Top 9 Sparkle Effects Photo and Video Editors You Should Know for 2024
- How to Add Subtitles in QuickTime Player, In 2024
- In 2024, Top 10 Movie Trailer Voice Generators Windows, Mac, Android, iPhone
- Updated In 2024, How to Make a Vacation Slideshow in 5 Minutes
- How to Speed Up and Slow Down a Video
- Updated 2024 Approved Zoom In and Out on Discord
- Video Marketing Is Adopted by Most Companies in This Digital Era. In This Post, We Are Going to Share some Useful Tips to Create a Better Product Video Ads to Help Prompt Business
- In 2024, How-To Tutorials of Kapwing Collage Maker
- 2024 Approved Easy Step by Step Tutorial on Creating a Lightroom Collage
- Updated How to Convert Time-Lapse to Normal Video
- New In 2024, Find The Best LUTs for Lightroom
- How to Change Lock Screen Wallpaper on Vivo V27 Pro
- Full Guide to Bypass Nokia 130 Music FRP
- Remove Google FRP Lock on Motorola Moto G Stylus 5G (2023)
- In 2024, How to Track Vivo Y100 5G by Phone Number | Dr.fone
- How to unlock iPhone 6 without passcode
- In 2024, Can You Unlock iPhone SE (2020) After Forgetting the Passcode? | Dr.fone
- In 2024, The Ultimate Guide How to Bypass Swipe Screen to Unlock on Samsung Galaxy A05 Device
- Stuck at Android System Recovery Of Honor Play 8T ? Fix It Easily | Dr.fone
- In 2024, How to Change GPS Location on Nubia Red Magic 8S Pro Easily & Safely | Dr.fone
- How to Transfer Data from Honor 90 to BlackBerry | Dr.fone
- Title: How To Combine Videos On TikTok
- Author: Chloe
- Created at : 2024-05-20 03:37:21
- Updated at : 2024-05-21 03:37:21
- Link: https://ai-editing-video.techidaily.com/how-to-combine-videos-on-tiktok/
- License: This work is licensed under CC BY-NC-SA 4.0.

