

How to Create a DIY Green Screen Video Effect for 2024
How to Create a DIY Green Screen Video Effect?
No matter how big the budget of a Hollywood movie is, at the end of the day, it has to rely on the humble green screens for special video effects. The stunning studios from where your favorite YouTubers and gamers stream their videos are graphical video effects created through green screens. Even the studios that you see on TV channels are a graphical creation of green screens. You must be wondering how they could achieve such awesome graphics with a simple green screen.
All you need is a good-quality green fabric, a professional video editing software, and a camera. You may not believe it, but that is all you need for creating DIY green screen video effect. You do not have to be a professional video editor to edit the green screen on your videos and add any special video effect. In this article, you will learn how to create your own DIY green backdrop.
What Is Green Screen Technique?
A green screen is nothing but a green fabric. In a video, a green screen is placed in the background behind the subject. In the editing phase of the video, the green screen is replaced with any background image or video effect that stays intact in the video as long as possible. In short, the green screen technique involves superimposing photos and videos on the green screen in a video.
Starting from the video game industry, movie industry to video streaming and TV channels, the green screen technique is used everywhere. The stunning graphical component of these industries is totally dependent on the green screen technique. In fact, DIY green screen for zoom meetings and video conferencing is widely used. Along with that, YouTubers and Twitch streamers use DIY green screen for streaming live.
Technically speaking, instead of a green screen, you can use any other color of screen. However, green screens are widely used, and it has become a norm. The main point to remember when using a green screen is that nothing else should have green color such as the dresses the subject is wearing. Therefore, in technical terms, the green screen is referred to as Chroma Key, and you will find Chroma Key option instead of green screen in most video editors.
Why Use Green Screen Technique?
The main reason why the green screen technique is used in movie and video making is that the video editor can replace the entire background at once instead of replacing the background frame by frame. Once you replace a green screen with an image or video effect, it stays the same throughout the video as long as required.
Therefore, the video editor can save a lot of time in editing and the editing stays uniform throughout which gives a realistic effect. If the green screen technique is not used and editing is done frame by frame of a video, there could be a manual error, inconsistent, and graphical glitches.
You can replace green screens with anything you want. It could be a still image of a beautiful studio with 3D effect like you see in case of YouTubers and gamers. It could be a moving, real-life landscape on any place in the world instead of a beautiful background picture. Similarly, it could be replaced by video effects such as explosions, stadiums full of people, battlefields, and likewise. At times, it could be live animations as you see on TV channels.
How To Create DIY Green Screen Stand Setup and Add Green Screen Effect?
If you want to have a green screen setup for your video, you need to have the following things ready.
- A green cloth that is large enough to cover the entire background.
- A video editing software to replace green screen in your video with anything.
- External light for more video clarity and a good camera with mic.
Step 1: Setup DIY Green Backdrop
Your green fabric should be soft and bright. If you are going to be the subject of the video, make sure you are not wearing anything green. Moreover, do not keep any object within the video frame that is green in color. If there are too many green objects, you can use a blue screen.
When it comes to hanging the green cloth in the background, people find it very difficult. If your video frame is going to be a close-up to the subject, you can use a green screen panel to hang green cloth. A green screen panel generally has a collapsible structure for easy storage and transportation.
Otherwise, you need to install hooks in the wall if you are planning to replace the green screen with a studio-like scene so that the entire background of the video frame stays covered with green screen. You should opt for multiple green screens and stitch them together to cover the background completely.
Step 2: Setup Camera and Light
Whether you are shooting with a DSLR camera or smartphone camera or webcam, make sure you are shooting at least HD video quality so that the editing could be great. Lights are important when you are using green screen though they are not a necessity. The video quality and brightness get enhanced with lights. Diffused lights work the best and the background should be well-lit.
Most importantly, you have to place the lights in such a way that your body arms should not be casting any shadow on the green screen. You can either stand very close to the green screen or away from the green screen so that your shadow does not go till the green screen. Instead of starting to shoot the video from the very beginning, you should capture for a few seconds and make sure everything is perfect including the camera angle.
Step 3: Get The Best Video Editor For Green Screen Effect
There are various video editors available, but not all of them are suitable for green screen effect. We recommend Wondershare Filmora as the best video editor to apply green screen effects on your video while editing. The reason behind the recommendation is that the steps to replace the green screen with any image or video are super simple and anyone can do it. There is no need to be a professional video editor.
Wondershare Filmora also lets you capture video through webcam and you can also capture your screen. It is perfect for recording gameplay as well as your reaction and commentary. Similarly, you can record demonstrations, tutorial videos, as well as video conferences. You can apply green screen effects to your recorded video instantly and publish on different platforms. In fact, you can adjust all the parameters such as color scheme, audio ducking, keyframing, motion tracking and much more to enhance the video output quality.
Conclusion
Making videos with DIY green screen stand is no more an esoteric concept. You can set it up anywhere and start shooting video. The magic begins in the post-production stage where you can use Wondershare Filmora to replace the green screen with video effects that will blow the mind of your viewers and followers. Filmora has intuitive options and controls through which you can apply green screen effect in simple steps.
How to Create Intro with Renderforest
When individuals hear about free online items, they frequently associate them with being of poor quality, ineffective, or unreliable. Renderforest, on the other hand, is an exception. This can be precisely what you need if you’re seeking a cheap—or even free—high-quality online video editing platform. The service offers both freemium and premium solutions. The more expensive solutions provide the most flexibility.
What is Renderforest?
A free online tool for making animated videos and slideshows is Renderforest. The web platform makes it simple, quick, and affordable for organizations and individuals to produce slideshows, explainer and promotional business movies, logo animations, and much more.
The online video creation platform Renderforest enables people and companies to produce “broadcast grade” videos for personal or professional usage. Anyone may register as a user in just a few easy steps, and using it is free.
Users can produce an infinite number of high-quality videos, export them, and then share them online or on social media.
The web platform already provides various tailor-made options for blog animations, wedding and photo slideshows, instructional films, and video invites for personal use.
Additionally, the platform offers simple-to-use alternatives for company presentations, invites to events, promotional films, kinetic typography, explainer videos, testimonials, and more.
Renderforest’s Primary Attributes include:
- Videos of high quality
- A sizable collection of animation templates and storylines
- Access to more than 195,000 Royalty-free stock footage clips with an intuitive online movie editor
- One-click video publishing to YouTube channels or Facebook pages
- A music library with commercial licenses for use in making videos
Added characteristics:
- A voiceover generator for text
- Create an infinite number of color schemes
- Countless font uploads
- Obtainable 1,000,000+ premium video templates
- Including a custom watermark
- A reseller’s permit
- Working in teams
How it Works
Choose a video template from their selection by browsing. Once you register, you can utilize any of the hundreds of editable templates that they have available.
You will be presented with various categories when you choose video templates, from promotional templates to logo animation templates to slide displays and everything in between.
You may freely post high-quality photographs, audio, and voice-over, an incredibly fantastic feature. The ability to share their tales in a way that customers can relate to is given to business owners by this.
After you’ve finished editing, the video must render for a while before it’s prepared for publishing. Click the edit button if you want to make some changes to the video or are unsatisfied with it. The video can be edited as many times as you like.
Users can directly post their videos on social media platforms, including Facebook, Twitter, Google+, Pinterest, and Instagram, through the website.
Renderforest maintains all your projects on your dashboard for as long as you use the service, so you don’t have to fear that you’ll lose your work..
Pricing
Regarding costs, Renderforest provides four different kinds of subscription options. The Free, Amateur, Pro, and Business plans are among them. The Free program makes a fantastic study aid. It’s possible to take your time with it, hone your talents, and upgrade to the paid plans after becoming familiar with the platform.
Regarding the free plan, you may watch and share your films on social media but not download them. You must utilize one of the paying subscriptions to download your videos. Choose the Business package if you don’t want Renderforest’s watermark to appear on your video. If you select monthly billing, it will cost you $149.99 per month or $49.99 per year.
If you want to take your company to the next level with distinctive videos, think about selecting one of the expertly produced video production packages. The starting package, which starts at $699, is the least priced.
Tutorial on How to Create an Intro Using Renderforest
Professional video creators are likely aware that starting a video without a suitable introduction is equivalent to sneaking into someone’s house without permission. A good intro is a doorbell to let people know you’ve arrived.
A strong introduction ensures that more people will view your film. Adults have an attention span of about 12 seconds, according to studies from 2000. It is now only 8 seconds. You have 8 seconds to entice viewers to watch your video, so don’t waste it. A captivating introduction will give your content a professional touch and pique your audience’s interest. This task is worthwhile if you want to advertise your videos successfully.
These days, you don’t necessarily need to hire a pro to make a film if you need one. The majority of the available tools are free. We’ll demonstrate in this lesson how to use Renderforest to create a polished video intro. Our intro maker will let you start strong, whether for a fun birthday video or commercial use.
When you’re prepared to begin producing your videos, go to Renderforest, register for an account, or sign in if you already have one.
Check out the vast selection of templates under “Intros and logos“ in the “Create Video“ section of the navigation menu. Here, you can select the intro you like most and begin altering it, or use our advanced search filters to locate the specific content you require.

We’ll use the “Swift Glitch Logo“ template for this tutorial, enabling you to present your logo with glitch effects. This template may produce intro and outro movies for presentations, your YouTube channel, lobby backgrounds, and other uses.
Select your preferred template and click the “Create now“ button to start.
![]()
Your logo should now be uploaded with a transparent background (PNG). You can upload it in one of three ways: using an image URL directly from your device or selecting an existing file from your “Media library.” If you don’t already have one, you may make one right away using our logo maker tool, which is also accessible in the editor.

Write your company’s name, tagline, or other brief words in the text field once you’ve added your logo. To save the changes, don’t forget to click “Save and close.”
You can select the overall design of your logo and the preferred font style in the “Style” section.

Select your preferred color scheme in the “Color“ section now. You can choose between two color schemes made by our design team and manually selectable custom colors in this section.
Go to the “Music“ area to select a song for your intro. You can add one or pick from our “Music collection.” You can record a voice-over in the editor or upload one for your introduction.
Well done! Let’s check out your introduction in the “Preview“ area now. Click “Free preview“ to check your video and ensure you like the outcome. Click back and tweak the introduction if you need to make any adjustments.
Instantly create professional introduction videos in your browser! Utilize our intro maker, and let its unique touch set your videos apart from the competition.
Enjoy making videos with Renderforest, where your imagination is the only restriction.
Renderforest Pros & Cons
This section is for you if you need to learn quickly about Renderforest’s advantages and disadvantages and are short on time. We’ve studied all the relevant reviews available and created a list of advantages and disadvantages for you to consider.
To determine if this is the best product for your company’s needs, look over these Renderforest advantages and disadvantages.
Pros
- Many lovely and contemporary templates
- a 4K video export feature
- 5-in-1 solution
- use is limitless for all services
- Quick and friendly client support
Cons
- With free version, watermark
- Only paying customers have access to font modification
- Costly single-project packages
- Free high-quality video preview unavailable
- a few templates allow for limited customisation
Competition to Renderforest
Animoto and PowToon are a couple of the site’s main rivals. These are excellent online video editing tools, but Renderforest stands out because it is simple to use and enables even novice users to create, share quickly, and download “broadcast grade videos.”
Renderforest vs PowToon
One of the most popular Renderforest Video alternatives available is PowToon. It’s challenging to decide which of these two platforms is superior because they are the best on the market. What you want as a business owner ultimately determines everything.
PowToon is a similar business that focuses on corporate videos but doesn’t provide the extra things Renderforest delivers (logo maker, graphic design, mockups, website builder). Pro customers pay $89 per month ($20 if invoiced annually), which is significantly more expensive than the alternative. Fortunately, they offer a complimentary bundle so you can sample the goods.
PowToon offers many more customizing choices than Renderforest because it is a video-based platform, but it will cost you.
Renderforest is a more cost-effective option if you need a range of services for your small business. PowToon is a better option for more prominent firms seeking a professional video creation platform.
Currently, some internet video services might be pricey and time-consuming to use. Renderforest will be welcomed by many small businesses looking for an economical and user-friendly online video editing platform.
Renderforest combines the top tools under a single subscription bundle in terms of features. In the end, you can manage your website, branding, and marketing visual production for less than $25 per month.
Fortunately, you don’t have to believe us. You may experience all the main advantages of Renderforest yourself by giving it a try. Check out the pros and drawbacks list in our Renderforest review if you need more assistance.
Free Download For Win 7 or later(64-bit)
Free Download For macOS 10.14 or later
How to Create a Freeze Frame Sequence Effect
One can add different effects to videos to create a more appealing movie style. One of the most well-liked and widely used effects is the freeze frame effect, which creates a short frozen frame effect on clips.
You can use different video editing software to create this effect in videos. But not all of them come close to the easy-to-use functionality of Wondershare Filmora . On a video, you can utilize this feature to freeze a specific reaction of the character on screen or add a dramatic effect for a pivotal moment, like scoring a touchdown.
Upon enabling this effect, the video clip automatically splits at the frozen moments. Users insert another image file for that duration and activate the background audio and effects. If you are wondering how to carry out this feature on Filmora, read all the steps involved here.
Launching the Software
The first step is downloading the software on your computer, whether it is macOS-powered or Windows. Go to the software’s official website and click on the blue Download button at the top of the home page.
You do not have to do a lot of steps to complete this process since an installer of the app will automatically download into your device at this step. Make sure you are downloading the Wondershare Filmora 11 version since it is the latest version of the software with advanced upgrades, like the Freeze Frame support.
Free Download For Win 7 or later(64-bit)
Free Download For macOS 10.14 or later
To install the software, you have to double-click on the app installer that got downloaded and agree to the permissions that it prompts. Then, the installation process will continue. The software will launch automatically after the process ends and you press Start Now.

Adding the footage
Next, your main step is to add the video you will edit into the Filmora software. First, you must click the Create New Project tab on the homepage. When the editor opens, tap on the “Click here to import media” button and insert the video you will edit from your device. Next, drag it down to the editing timeline for making further changes. Choose the Keep project settings option when the prompt comes up to ensure the same quality of the video.

Still, it would help if you tapped the play button on the screen to see a Preview of the video clip to check its stability and quality. Also, ensure that your main subject is darker than the backdrop in the video clip.
Adjust the playhead location
On the video clip, you added to the editing timeline, click on the playhead. Then, drag it to move it to the specific point in the video where you will freeze the frame. Click on the Snapshot icon at the right end of the preview window to capture the frame. Press the Lock Track icon after that.

Move the image in place
After the previously mentioned step, you should drag the snapshot you just captured to the second layer on the timeline above the clip. Make sure to place the image where the playhead is, marking the point of the freeze frame. Then, drag the slider at the end of the image clip you added to the timeline to match its length with the video clip.
Afterward, you should click on the playhead and move it a little ahead by a few frames. Again, tap the “Lock Track” icon beside the image file to keep it in place. Following that, take another snapshot of the image via the Snapshot icon.

Unlock the layers
Repeat this step for a few more layers, like dragging the snapshot image to the timeline > moving the playhead by some frames > Snapshot > Lock Track. Then, after you are done with the number of stages possible with your video clip, unlock all of the locked track layers sequentially from top to bottom.
Editing the layers
After this, click on the second clip in the layers. Right-click on the top of the clip in the timeline and choose “Edit Properties” from the drop-down menu. Next, click on the Compositing option and tap the tickmark beside it. Then, select the drop-down menu for the Blending Mode option and change Normal to Darken. Press the OK button after you are done.

Following that, repeat the same for all of the layers of the snapshots to choose the blending mode parameter for them to Darken. After you are done, click on the Preview play button to see how the process worked for creating the freeze frame effect in your video clip.
Exporting the effect the first time
After completing all the editing steps, you should select the Export button at the top of the screen. Then, choose the Local tab and click on the MP4 as the video file format. Make settings-based changes if needed and press the Export button.

After that, however, import the edited file to Filmora from your device again.
Edit the freeze frame video clip
Choose all of the video clip sections you edited on Filmora from the timeline after adding the recently edited video clip to the editor. Then, drag this clip to the primary editing timeline layer on the timeline and drop it.
Then, drag the playhead on the clip to the frame at which the third freeze frame occurs. For this, you can play the Preview of the clip to verify. After placing the playhead at that exact moment, click on the Split icon from the toolbar above the editor timeline or the Scissor icon. Then, remove the second half of the clip.

Create the freeze frame to reverse the speed effect
After this, right-click on the top of the remaining video clip on your timeline. From the drop-down menu that appears, tap on the Copy option. Then, paste the second half beside the first half on the same layer.
After that, right-click on the second copied clip and choose the Speed option > Click on Reverse. After that, play the Preview to see how the effect appears in your video. Finally, export the video from Filmora.

Conclusion
The process of creating a freeze-frame effect can typically get complex. But it is relatively simple to achieve on Filmora if you follow the steps diligently. Furthermore, on this software, whether you are using a Windows or Mac device, there are various video editing features, including the freeze-frame effect. They all assure quick and advanced optimization of video projects, so you should try the platform.
Free Download For macOS 10.14 or later
To install the software, you have to double-click on the app installer that got downloaded and agree to the permissions that it prompts. Then, the installation process will continue. The software will launch automatically after the process ends and you press Start Now.
Adding the footage
Next, your main step is to add the video you will edit into the Filmora software. First, you must click the Create New Project tab on the homepage. When the editor opens, tap on the “Click here to import media” button and insert the video you will edit from your device. Next, drag it down to the editing timeline for making further changes. Choose the Keep project settings option when the prompt comes up to ensure the same quality of the video.
Still, it would help if you tapped the play button on the screen to see a Preview of the video clip to check its stability and quality. Also, ensure that your main subject is darker than the backdrop in the video clip.
Adjust the playhead location
On the video clip, you added to the editing timeline, click on the playhead. Then, drag it to move it to the specific point in the video where you will freeze the frame. Click on the Snapshot icon at the right end of the preview window to capture the frame. Press the Lock Track icon after that.
Move the image in place
After the previously mentioned step, you should drag the snapshot you just captured to the second layer on the timeline above the clip. Make sure to place the image where the playhead is, marking the point of the freeze frame. Then, drag the slider at the end of the image clip you added to the timeline to match its length with the video clip.
Afterward, you should click on the playhead and move it a little ahead by a few frames. Again, tap the “Lock Track” icon beside the image file to keep it in place. Following that, take another snapshot of the image via the Snapshot icon.
Unlock the layers
Repeat this step for a few more layers, like dragging the snapshot image to the timeline > moving the playhead by some frames > Snapshot > Lock Track. Then, after you are done with the number of stages possible with your video clip, unlock all of the locked track layers sequentially from top to bottom.
Editing the layers
After this, click on the second clip in the layers. Right-click on the top of the clip in the timeline and choose “Edit Properties” from the drop-down menu. Next, click on the Compositing option and tap the tickmark beside it. Then, select the drop-down menu for the Blending Mode option and change Normal to Darken. Press the OK button after you are done.
Following that, repeat the same for all of the layers of the snapshots to choose the blending mode parameter for them to Darken. After you are done, click on the Preview play button to see how the process worked for creating the freeze frame effect in your video clip.
Exporting the effect the first time
After completing all the editing steps, you should select the Export button at the top of the screen. Then, choose the Local tab and click on the MP4 as the video file format. Make settings-based changes if needed and press the Export button.
After that, however, import the edited file to Filmora from your device again.
Edit the freeze frame video clip
Choose all of the video clip sections you edited on Filmora from the timeline after adding the recently edited video clip to the editor. Then, drag this clip to the primary editing timeline layer on the timeline and drop it.
Then, drag the playhead on the clip to the frame at which the third freeze frame occurs. For this, you can play the Preview of the clip to verify. After placing the playhead at that exact moment, click on the Split icon from the toolbar above the editor timeline or the Scissor icon. Then, remove the second half of the clip.
Create the freeze frame to reverse the speed effect
After this, right-click on the top of the remaining video clip on your timeline. From the drop-down menu that appears, tap on the Copy option. Then, paste the second half beside the first half on the same layer.
After that, right-click on the second copied clip and choose the Speed option > Click on Reverse. After that, play the Preview to see how the effect appears in your video. Finally, export the video from Filmora.
Conclusion
The process of creating a freeze-frame effect can typically get complex. But it is relatively simple to achieve on Filmora if you follow the steps diligently. Furthermore, on this software, whether you are using a Windows or Mac device, there are various video editing features, including the freeze-frame effect. They all assure quick and advanced optimization of video projects, so you should try the platform.
What Are the 10 Best GIF Creator?
What are the 10 Best GIF Creator?
An easy yet powerful editor
Numerous effects to choose from
Detailed tutorials provided by the official channel
Stay tuned to find the most affordable GIF creator solutions.
In this article
01 [Why Gifs Are Essential for Every Marketer?](#Part 1)
02 [How to Make Your Own GIF?](#Part 2)
03 [What Are 10 Best GIF Creator to Find Brilliant Pre-made Gifs?](#Part 3)
Part 1 Why Gifs Are Essential for Every Marketer?
Everyone around you today is accustomed with the fact that GIFs are an interesting and impactful means of content sharing. These 3-5 second snippets are highly preferred and convenient ways to deliver information that is precise, clear and to the point. When it comes to time frames, short and quick GIFs are obvious choices over lengthy videos. Additionally, GIFs are eye-catchy and keep you captivated to see though the entire content within seconds, contradictory to those monotonous and often dull videos that sound more like a long, boring lecture.
These are an effective media tool that is not limited to sharing information that is chiefly entertainment based or fun centered. You can use them to deliver important content that addresses a specific purpose or audience. Owing to this, GIFs have become an essential marketing utility, here’s why:
● Improve Product Branding:
GIFs can serve as impressive branding tools for your products in the market. Markets today are considerably impacted by the ‘What You See is What You Buy’ concept, which puts forward the need to lay added stress on effective branding.
GIFs are ready to sort this out with their exciting range of features. From video editing choices to sound and color customization, GIFs are loaded with everything you need to improvise your product branding. All you have to do is explore your creativity to make the most of the GIF branding choices.
● Explain it Better
On a preference poll, most of us would shift to ‘watch’ over ‘read’ for a comprehensive understanding. An attractive motion visual is an even better treat. GIFs are pivotal in making viewers relate to the concept and message behind your product in a more enhanced manner.
Additionally, these are a continent means to introduce emotional mobility among your target audience with depictive emojis. You can use GIFs to develop effective content approaches to make the audience connect with your product viability, both practically band emotionally.
● Increase Visitor Attraction
Today’s changing times have brought about a rapid outlook towards everything. All of us are bounded by time constraints and when browsing the web, the prime need is to look for quick and accurate solutions to everything concerned.
Short and exact information delivery of GIFs is something that would keep visitors glued to your site because they will be assured of getting exactly what they search for and that too in an interesting and entertaining way.
Part 2 How to Make Your Own GIF?
Now that you are familiar with the creative marketing credibility of GIFs, you might naturally feel motivated towards creating a GIF of your own. In case you are, see through the following section of this article to find out interesting ways of creating interesting and catchy GIFs, either for impressive product marketing or just to make your social media posts leave your community peers in awe!
Looking for the best GIF creator solutions on the web, you can rely on GIPHY, one of the most preferred and convenient databases to create GIFs quickly. This is a smartphone compatible tool and works well with almost any device. Follow the steps given below to make GIFs with this tool:
Step 1:
Download and install the GIPHY app in your device.
Step 2:
Click on ‘Create’ in the app’s welcome screen. This will change (+) icon at the top-right corner to the ‘Camera’ symbol. You can also navigate to the ‘Profile’ at the bottom-right and tap the (+) or ‘Camera’ icon in the app’s account page.
Step 3:
Click on ‘Allow Camera Access’. You will receive two successive prompt messages from the app. Click on ‘Allow’ to grant access permissions to your device media. When you are done, click on ‘I Agree’.
Step 4:
GIFHY uses your device’s front camera for GIF creation. However, if you need to go for a camera switch, click on the ‘Camera’ sign at the bottom-right.
Step 5:
Choose a desired filter and effect for your GIF with a left or right swipe on the live feed toolbar. The app has 11 amazing and realistic effects, including VHS Static, 3D Glasses, etc.
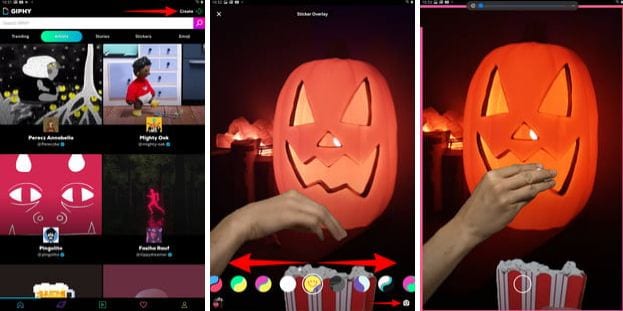
Step 6:
You can take up either of the following:
Press either of the ‘Filter’ or ‘Effect’ buttons to take static shots to create GIF from images, or press and hold the same to create animated GIF. For simply using effects, tap the white button.
In case you choose to create a motion GIF, the app forms a ‘visual timer’ around the editor screen. The motion recording stops once the line is in sync with the screen edges.
Step 7:
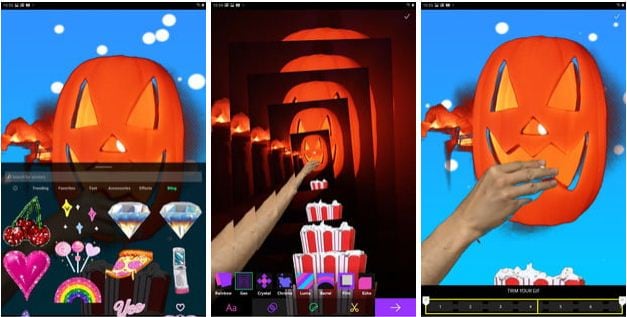
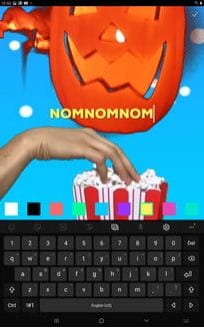
Having captured your perfect shot, you have the liberty to merge it with an image or video. However, do consider the following options to add some more elements to your capture: You can add relatable text in 9 color choices.
● Enhance your graphic presentation with 8 amazing effects like, ‘rainbow overlays’, BW film grains, etc.
● Choose from a never ending list of suitable stickers to add the feel through connect to your GIFs.
● Trim your animated GIFs to the ‘just perfect’ portion by adjusting the editing markers.
Relax; that’s no rocket science. Just tap on the respective buttons and there you go!
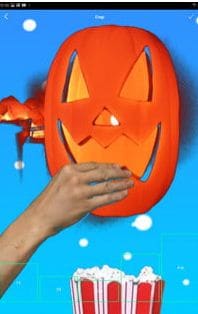
Step 8:
Set your GIF in a desired size frame by choosing the ‘Crop’ tool from the top-right corner of the editing screen. You are given a size flexibility of 1:1, 3:2, 16:9, 4:5 and 9:16.
Step 9:
Once you are satisfied with your creation, tap the ‘Right Arrow’ icon. In the interface that follows, add suitable share tags to the GIF.
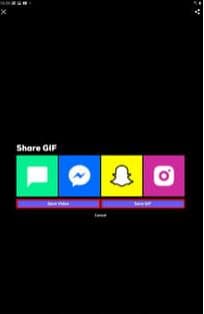
Step 10:
Tap ‘Share GIF’ to post your creation on social media platforms or share it through popular IM apps. To save your initially captured clip, click on ‘Save Video’ or tap ‘Save GIF’ to save your creation in your smartphone’s memory.
Part 1 What Are 10 Best GIF Creator to Find Brilliant Pre-made Gifs?
Having talked about GIF creation on the go, let’s take a dive into the best GIF creator solutions that are a storehouse of exciting pre-made GIFs. When browsing the web for an affordable GIF maker tool, you land across a pool of choices. Read through the further sections of this article to find out what’s best for you.
Described below are 10 best alternatives to get amazing pre-made GIFs:
● Wondershare Filmora Video Editor
This one is a popular, preferred and top rated application where you get to choose from an exciting range of pre-made GIFs under a variety of specific categories. All you need to do is, visit the app’s official site, browse to your favorite GIF category and select a desired GIF. Follow a few app instructions to save your selection and that’s it! Your selected GIF reaches your device memory within seconds.

Wondershare Filmora - Best Video Editor for Mac/Windows
5,481,435 people have downloaded it.
Build unique custom animations without breaking a sweat.
Focus on creating epic stories and leave the details to Filmora’s auto features.
Start a creative adventure with drag & drop effects and endless possibilities.
Filmora simplifies advanced features to save you time and effort.
Filmora cuts out repetition so you can move on to your next creative breakthrough.
Key Features
● This app is available to you absolutely free of cost.
● Has an intelligent and user cohesive interface.
● Loaded with tons of brilliant GIFs to choose from.
● The app supports GIF customization.
● GIFHY
Launched in 2013, this one is probably the best GIF maker and downloader tool available on the web today. It is a free tool, packed with enormous varieties of GIFs to choose from. What’s more interesting about the app is that you are free to play with your editing creativity to enhance your downloaded GIFs in the GIPHY editor.
Key Features
● It comes with an easy to use, convenient interface.
● You can edit downloaded GIFs with hundreds of effects and filters.
● The app provides you a direct sharing platform, allowing you to post GIFs to various social media platforms and also go for sharing via Instant Messaging applications.
● This is a fast processing tool that allows you to escape the notch of annoying and delayed download processes.
● Tenor
You can conveniently regard this one as the closest competitor to the GIPHY GIF creator and downloader tool. Needless to say, both are quite similar to each other in interface and usage respects. However, focusing on search results for a common keyword, you find diverse variations to your obvious surprise.
Key Features
● This is a free to use, interactive interface tool.
● It introduces a GIF Keyboard that allows you to search the most specific and relatable GIFs.
● It ensures a speedy and high quality GIF download.
● You can explore your editing skills to your heart’s content to improvise the downloaded GIFs with this tool.
● This tool gives you the liberty to directly share GIFs across different platforms.
If you like to spend ample time on choosing what’s perfect for you, refer this online tool for your GIF download solutions. It caters to your love of diversity with the most deep rooted and broad GIF range. However, this one comes with a little messy interface, demanding some patience from you to get to the right thing.
Key Features
● This tool provides you with almost all possible choices for a GIF category.
● It is available to you free of cost
● The tool site is loaded with rich and quality GIF content.
● This one is a direct save and export tool for your downloaded GIFs.
● Gfycat
You can prefer this one as a GIF hosting tool. Developed with a view to launch a common medium for GIF and HTML contents, this app ensures in-time and hassle free downloads and delivery. Though lacking a refined search bar, this tool promises you of excellence in content quality.
Key Features
● This comes to you as one of the most reliable GIF hosting tools.
● It is a free and quick content delivery tool.
● You are allowed to select the most suitable one from a variety of playback choices.
● This tool also gives you the flexibility of direct media sharing.
● GIFbin
If you are hung-over decade old nostalgia and the fever doesn’t seem to go away, you can check this site for some really satisfying retro and other similar content. This would definitely make you take a toll back to the times when MSN and Limewire were unparalleled market leaders in content sharing.
Key Features
● GIFbin is a storehouse of the best animated GIFs, that is on a continuous update to facilitate fresh and quality based content, every time you visit the site.
● It has an advanced, API enabled search mechanism.
● It boasts of having the handiest and convenient user interface.
● If you prefer GIFs of the comic genre, this tool is heaven for you.
● Imgflip
This is another GIF download site, commonly preferred for comedy and fun oriented content. Using this site, you can download and create a variety of GIF based memes that have the potential to flood your social media posts with likes and comments. This one is a complete GIF basket, suited to vast content varieties and user preferences. You will find the site’s official watermark on all its contents.
Key Features
● The site stands among the most preferred GIF-meme creation and sharing platforms.
● The tool is packed with loads of quality content under specific categories
● You can improvise the dimensions of your editing skills to modify downloaded GIFs.
● This site has a default media export feature that you can use to share your GIFs on social media.
● Imgur
Launched in 2009, this is among the most visited GIF sites, originally created for sharing meme based contents on social media. Its extensive search filters are dedicated to fetch the exact GIFs and memes you are looking for. If you are tired of browsing sites for particular content requirements, your search spree will definitely end here.
Key Features
● The site is known for its extensive and diversified content quality.
● It is a free, convenient and dependable GIF download tool.
● Imgur is highly preferred for content export across various media platforms.
● It is equipped with an advanced and updated search filter that assures you of getting fresh and top quality GIFs on almost every possible keyword.
● Tumblr
Claiming a launch date of 13 years back, this is quite a good GIF download option. You can find excellent quality GIF content on the site, particularly in the comic genre. Though not as popular as its online counterparts today, the site definitely enjoyed commendable visitor preferences at the time of its launch. You can certainly visit this site for a filling entertainment dose.
Key Features
● Tumblr is a free download site with a user friendly interface.
● The site is loaded with notable content varieties.
● You can go for direct media sharing through this site.
● Its comic GIFs are quite hilarious.
● Know Your Meme
This site uses the Wiki software to stock an inventory of classic GIFs and memes. Using this database for GIF downloads means that you don’t need to compromise on content and image quality. The site contents are periodically updated to ensure that visitors are not exposed to stale and outdated content.
Key Features
● The site offers fresh content having catchy and latest GIFs.
● This is a complete storehouse of GIFs and memes that can definitely keep you rolling.
● The site comes as a free tool and gas a user cohesive interface
● It hast the most efficient search filters that are regularly improvised to ensure quality content delivery.
● Key Takeaways from This Episode →
● GIFs are an effective and captivating means of quality content sharing and message delivery. Take them as a hilarious entertainment source or use them to enhance your marketing policies, GIFs can do it all.
● Influenced by the user credibility of GIFs, there are loads of GIF creator and download tools available online; among which Filmora by Wondershare is the current market leader. You can use this app to explore your GIF editing skills or download and share latest GIFs across media sharing platforms.
Stay tuned to find the most affordable GIF creator solutions.
In this article
01 [Why Gifs Are Essential for Every Marketer?](#Part 1)
02 [How to Make Your Own GIF?](#Part 2)
03 [What Are 10 Best GIF Creator to Find Brilliant Pre-made Gifs?](#Part 3)
Part 1 Why Gifs Are Essential for Every Marketer?
Everyone around you today is accustomed with the fact that GIFs are an interesting and impactful means of content sharing. These 3-5 second snippets are highly preferred and convenient ways to deliver information that is precise, clear and to the point. When it comes to time frames, short and quick GIFs are obvious choices over lengthy videos. Additionally, GIFs are eye-catchy and keep you captivated to see though the entire content within seconds, contradictory to those monotonous and often dull videos that sound more like a long, boring lecture.
These are an effective media tool that is not limited to sharing information that is chiefly entertainment based or fun centered. You can use them to deliver important content that addresses a specific purpose or audience. Owing to this, GIFs have become an essential marketing utility, here’s why:
● Improve Product Branding:
GIFs can serve as impressive branding tools for your products in the market. Markets today are considerably impacted by the ‘What You See is What You Buy’ concept, which puts forward the need to lay added stress on effective branding.
GIFs are ready to sort this out with their exciting range of features. From video editing choices to sound and color customization, GIFs are loaded with everything you need to improvise your product branding. All you have to do is explore your creativity to make the most of the GIF branding choices.
● Explain it Better
On a preference poll, most of us would shift to ‘watch’ over ‘read’ for a comprehensive understanding. An attractive motion visual is an even better treat. GIFs are pivotal in making viewers relate to the concept and message behind your product in a more enhanced manner.
Additionally, these are a continent means to introduce emotional mobility among your target audience with depictive emojis. You can use GIFs to develop effective content approaches to make the audience connect with your product viability, both practically band emotionally.
● Increase Visitor Attraction
Today’s changing times have brought about a rapid outlook towards everything. All of us are bounded by time constraints and when browsing the web, the prime need is to look for quick and accurate solutions to everything concerned.
Short and exact information delivery of GIFs is something that would keep visitors glued to your site because they will be assured of getting exactly what they search for and that too in an interesting and entertaining way.
Part 2 How to Make Your Own GIF?
Now that you are familiar with the creative marketing credibility of GIFs, you might naturally feel motivated towards creating a GIF of your own. In case you are, see through the following section of this article to find out interesting ways of creating interesting and catchy GIFs, either for impressive product marketing or just to make your social media posts leave your community peers in awe!
Looking for the best GIF creator solutions on the web, you can rely on GIPHY, one of the most preferred and convenient databases to create GIFs quickly. This is a smartphone compatible tool and works well with almost any device. Follow the steps given below to make GIFs with this tool:
Step 1:
Download and install the GIPHY app in your device.
Step 2:
Click on ‘Create’ in the app’s welcome screen. This will change (+) icon at the top-right corner to the ‘Camera’ symbol. You can also navigate to the ‘Profile’ at the bottom-right and tap the (+) or ‘Camera’ icon in the app’s account page.
Step 3:
Click on ‘Allow Camera Access’. You will receive two successive prompt messages from the app. Click on ‘Allow’ to grant access permissions to your device media. When you are done, click on ‘I Agree’.
Step 4:
GIFHY uses your device’s front camera for GIF creation. However, if you need to go for a camera switch, click on the ‘Camera’ sign at the bottom-right.
Step 5:
Choose a desired filter and effect for your GIF with a left or right swipe on the live feed toolbar. The app has 11 amazing and realistic effects, including VHS Static, 3D Glasses, etc.
Step 6:
You can take up either of the following:
Press either of the ‘Filter’ or ‘Effect’ buttons to take static shots to create GIF from images, or press and hold the same to create animated GIF. For simply using effects, tap the white button.
In case you choose to create a motion GIF, the app forms a ‘visual timer’ around the editor screen. The motion recording stops once the line is in sync with the screen edges.
Step 7:
Having captured your perfect shot, you have the liberty to merge it with an image or video. However, do consider the following options to add some more elements to your capture: You can add relatable text in 9 color choices.
● Enhance your graphic presentation with 8 amazing effects like, ‘rainbow overlays’, BW film grains, etc.
● Choose from a never ending list of suitable stickers to add the feel through connect to your GIFs.
● Trim your animated GIFs to the ‘just perfect’ portion by adjusting the editing markers.
Relax; that’s no rocket science. Just tap on the respective buttons and there you go!
Step 8:
Set your GIF in a desired size frame by choosing the ‘Crop’ tool from the top-right corner of the editing screen. You are given a size flexibility of 1:1, 3:2, 16:9, 4:5 and 9:16.
Step 9:
Once you are satisfied with your creation, tap the ‘Right Arrow’ icon. In the interface that follows, add suitable share tags to the GIF.
Step 10:
Tap ‘Share GIF’ to post your creation on social media platforms or share it through popular IM apps. To save your initially captured clip, click on ‘Save Video’ or tap ‘Save GIF’ to save your creation in your smartphone’s memory.
Part 1 What Are 10 Best GIF Creator to Find Brilliant Pre-made Gifs?
Having talked about GIF creation on the go, let’s take a dive into the best GIF creator solutions that are a storehouse of exciting pre-made GIFs. When browsing the web for an affordable GIF maker tool, you land across a pool of choices. Read through the further sections of this article to find out what’s best for you.
Described below are 10 best alternatives to get amazing pre-made GIFs:
● Wondershare Filmora Video Editor
This one is a popular, preferred and top rated application where you get to choose from an exciting range of pre-made GIFs under a variety of specific categories. All you need to do is, visit the app’s official site, browse to your favorite GIF category and select a desired GIF. Follow a few app instructions to save your selection and that’s it! Your selected GIF reaches your device memory within seconds.
Wondershare Filmora - Best Video Editor for Mac/Windows
5,481,435 people have downloaded it.
Build unique custom animations without breaking a sweat.
Focus on creating epic stories and leave the details to Filmora’s auto features.
Start a creative adventure with drag & drop effects and endless possibilities.
Filmora simplifies advanced features to save you time and effort.
Filmora cuts out repetition so you can move on to your next creative breakthrough.
Key Features
● This app is available to you absolutely free of cost.
● Has an intelligent and user cohesive interface.
● Loaded with tons of brilliant GIFs to choose from.
● The app supports GIF customization.
● GIFHY
Launched in 2013, this one is probably the best GIF maker and downloader tool available on the web today. It is a free tool, packed with enormous varieties of GIFs to choose from. What’s more interesting about the app is that you are free to play with your editing creativity to enhance your downloaded GIFs in the GIPHY editor.
Key Features
● It comes with an easy to use, convenient interface.
● You can edit downloaded GIFs with hundreds of effects and filters.
● The app provides you a direct sharing platform, allowing you to post GIFs to various social media platforms and also go for sharing via Instant Messaging applications.
● This is a fast processing tool that allows you to escape the notch of annoying and delayed download processes.
● Tenor
You can conveniently regard this one as the closest competitor to the GIPHY GIF creator and downloader tool. Needless to say, both are quite similar to each other in interface and usage respects. However, focusing on search results for a common keyword, you find diverse variations to your obvious surprise.
Key Features
● This is a free to use, interactive interface tool.
● It introduces a GIF Keyboard that allows you to search the most specific and relatable GIFs.
● It ensures a speedy and high quality GIF download.
● You can explore your editing skills to your heart’s content to improvise the downloaded GIFs with this tool.
● This tool gives you the liberty to directly share GIFs across different platforms.
If you like to spend ample time on choosing what’s perfect for you, refer this online tool for your GIF download solutions. It caters to your love of diversity with the most deep rooted and broad GIF range. However, this one comes with a little messy interface, demanding some patience from you to get to the right thing.
Key Features
● This tool provides you with almost all possible choices for a GIF category.
● It is available to you free of cost
● The tool site is loaded with rich and quality GIF content.
● This one is a direct save and export tool for your downloaded GIFs.
● Gfycat
You can prefer this one as a GIF hosting tool. Developed with a view to launch a common medium for GIF and HTML contents, this app ensures in-time and hassle free downloads and delivery. Though lacking a refined search bar, this tool promises you of excellence in content quality.
Key Features
● This comes to you as one of the most reliable GIF hosting tools.
● It is a free and quick content delivery tool.
● You are allowed to select the most suitable one from a variety of playback choices.
● This tool also gives you the flexibility of direct media sharing.
● GIFbin
If you are hung-over decade old nostalgia and the fever doesn’t seem to go away, you can check this site for some really satisfying retro and other similar content. This would definitely make you take a toll back to the times when MSN and Limewire were unparalleled market leaders in content sharing.
Key Features
● GIFbin is a storehouse of the best animated GIFs, that is on a continuous update to facilitate fresh and quality based content, every time you visit the site.
● It has an advanced, API enabled search mechanism.
● It boasts of having the handiest and convenient user interface.
● If you prefer GIFs of the comic genre, this tool is heaven for you.
● Imgflip
This is another GIF download site, commonly preferred for comedy and fun oriented content. Using this site, you can download and create a variety of GIF based memes that have the potential to flood your social media posts with likes and comments. This one is a complete GIF basket, suited to vast content varieties and user preferences. You will find the site’s official watermark on all its contents.
Key Features
● The site stands among the most preferred GIF-meme creation and sharing platforms.
● The tool is packed with loads of quality content under specific categories
● You can improvise the dimensions of your editing skills to modify downloaded GIFs.
● This site has a default media export feature that you can use to share your GIFs on social media.
● Imgur
Launched in 2009, this is among the most visited GIF sites, originally created for sharing meme based contents on social media. Its extensive search filters are dedicated to fetch the exact GIFs and memes you are looking for. If you are tired of browsing sites for particular content requirements, your search spree will definitely end here.
Key Features
● The site is known for its extensive and diversified content quality.
● It is a free, convenient and dependable GIF download tool.
● Imgur is highly preferred for content export across various media platforms.
● It is equipped with an advanced and updated search filter that assures you of getting fresh and top quality GIFs on almost every possible keyword.
● Tumblr
Claiming a launch date of 13 years back, this is quite a good GIF download option. You can find excellent quality GIF content on the site, particularly in the comic genre. Though not as popular as its online counterparts today, the site definitely enjoyed commendable visitor preferences at the time of its launch. You can certainly visit this site for a filling entertainment dose.
Key Features
● Tumblr is a free download site with a user friendly interface.
● The site is loaded with notable content varieties.
● You can go for direct media sharing through this site.
● Its comic GIFs are quite hilarious.
● Know Your Meme
This site uses the Wiki software to stock an inventory of classic GIFs and memes. Using this database for GIF downloads means that you don’t need to compromise on content and image quality. The site contents are periodically updated to ensure that visitors are not exposed to stale and outdated content.
Key Features
● The site offers fresh content having catchy and latest GIFs.
● This is a complete storehouse of GIFs and memes that can definitely keep you rolling.
● The site comes as a free tool and gas a user cohesive interface
● It hast the most efficient search filters that are regularly improvised to ensure quality content delivery.
● Key Takeaways from This Episode →
● GIFs are an effective and captivating means of quality content sharing and message delivery. Take them as a hilarious entertainment source or use them to enhance your marketing policies, GIFs can do it all.
● Influenced by the user credibility of GIFs, there are loads of GIF creator and download tools available online; among which Filmora by Wondershare is the current market leader. You can use this app to explore your GIF editing skills or download and share latest GIFs across media sharing platforms.
Also read:
- Updated In 2024, The Ultimate Guide to GIF for Discord Profile
- New Mastering FFmpeg How to Merge Audio and Video with Ease
- Updated Using Track Matte and Tracking in Adobe After Effects Reviewing All Possibilities
- 2024 Approved Easy Ways to Make Procreate GIFs
- The Necessity of the Creation of Video Content for Social Media Has Urged Many Editing Software to Come Out on the Market. We Have Reviewed some, Free of Them in This Article for You
- New 2024 Approved How to Put Emoji on Mac That Take Less Than 10 Mins
- In 2024, How to Resize FLV Video EfficientlyWindows, Mac, Android, iPhone &
- How to Create Your Own LUTs for Your Video with Filmora
- Do You Have a Sony Camera and Want to Try Different LUTs on Your Digital Content? Youre at the Right Place, as You Can Apply Sony HLG LUTs to Your Media
- How to Make Sony Vegas Freeze Frame for 2024
- New Minecraft Pixel Art A Complete Guide for Die-Hard Fans
- Templates Take Your Music Video From Drab to Fab and Add some Spice to the Catchy Song. Here Are some Templates You Could Use to Make Your Music Video Popular for 2024
- Top 8 Augmented Reality Video Games for 2024
- New 2024 Approved REVIEW Whats Best 10 Software to Make AI Upscaling Video
- Little Tricks to Create Canva Slideshow No One Is Telling You for 2024
- In 2024, The Ultimate Guide to Slideshow Maker with Music
- Despite the Aforementioned Restrictions, Cartoon Video Makers Still Offer a Sea of Possibilities to Their Users, so Lets Dive Into the Magical World of Animated Videos
- 2024 Approved How to Add Motion Blur in After Effects
- In 2024, 10 Best Websites to Discover Free Premiere Pro Video Templates
- Updated 2024 Approved Make A Countdown Video
- New Step by Step Guide of Make Gimp Transparent Background PNG
- In 2024, How Can Filmora Create an Audio Visualizer Project for a Song? All Steps, From Launching the App to Editing the Text, Are Detailed Here
- In 2024, In Todays Article, We Are Going to Show You How Adding a Simple Lower Third to Your Video Can Add a Degree of Professionalism and Polish to Your Videos While Giving It a Higher Perceived Value
- Updated 2024 Approved Motion Blur Photo With GIMP Step-By-Step Guide
- Updated In 2024, Wondershare Filmora Tutorial | Using The AI Auto Reframe Feature
- 2024 Approved | Best WMV to GIF Converters
- Premiere Pro Best Slow Motion Effects To Use for 2024
- 2024 Approved 5 Tips for Faster Editing in Filmora Video Editor
- 2024 Approved If You Are Trying to Create a Countdown Effect, but Youre Not Sure Where to Start, Then This Post Is Going to Show You some Ways to Create a Countdown Animation for Your Videos
- In 2024, Cropping Videos in VLC Step by Step
- 2024 Approved How to Slow-Mo YouTube Videos
- Updated Guide To Selecting and Using the Best Braw Luts
- New 33 Best Video Splitter Recommended
- Updated Guide To Cropping and Combining Content in Wondershare Filmora Latest
- New In 2024, 10 Best Vlogging Cameras for Beginners
- New Complete How-To Tutorials of Kapwing Collage Maker for 2024
- In 2024, Are You Finding It Challenging to Convert GIFs Into JPG or PNG Images? Do Not Worry! The Best Free Online Tool and Software to Change Your GIF Into PNG or JPG Images Are Below
- New Want to Add the Amazing Video Text Effects that You Generally See on Video Streaming Platforms? Use Filmora to Add Popular Video Text Effects Instantly
- Updated What Are the Best Video Background Changers Online?
- Updated Learn How to Create a Kinetic Typography Text Effect in Filmora, One of the Best Video Editors for All Skill Levels. Check Out This Simple Step-by-Step Guide
- Updated In 2024, Guide to Create a Timelapse Video in After Effects
- Updated In 2024, Splitting Audio From Video in Sony Vegas Step by Step
- Updated 2024 Approved AVI Editors for Windows 11/10/8.1/8/7 Easily Edit AVI Files on PC
- Complete Tutorial Sending Photos From Apple iPhone 14 Pro to iPad | Dr.fone
- Top 10 Fingerprint Lock Apps to Lock Your Oppo Reno 11 Pro 5G Phone
- Preparation to Beat Giovani in Pokemon Go For Vivo Y78 5G | Dr.fone
- Unova Stone Pokémon Go Evolution List and How Catch Them For Vivo V30 | Dr.fone
- In 2024, How to Watch Hulu Outside US On Xiaomi Civi 3 | Dr.fone
- Top IMEI Unlokers for Your OnePlus Ace 2 Pro Phone
- In 2024, How to Unlock Verizon iPhone 15
- Updated 7 Best Real Time Video Translation Apps
- How to identify malfunctioning drivers with Windows Device Manager on Windows 10
- How to Fix Life360 Shows Wrong Location On Infinix Zero 5G 2023 Turbo? | Dr.fone
- How to Change Netflix Location to Get More Country Version On Infinix Smart 8 HD | Dr.fone
- 3 Ways to Track Tecno Phantom V Fold without Them Knowing | Dr.fone
- Fixing Persistent Pandora Crashes on Xiaomi Redmi 12 5G | Dr.fone
- How Can You Cast Your Apple iPhone 14 Pro to Windows PC With Ease? | Dr.fone
- In 2024, The Ultimate Guide to Unlocking Apple Watch Or Apple iPhone SE (2020) from iCloud
- In 2024, How to Remove and Reset Face ID on iPhone XS | Dr.fone
- Why Your WhatsApp Location is Not Updating and How to Fix On Oppo A1x 5G | Dr.fone
- Can I use iTools gpx file to catch the rare Pokemon On Xiaomi Redmi Note 12 Pro 5G | Dr.fone
- How To Stream Anything From ZTE Nubia Z60 Ultra to Apple TV | Dr.fone
- In 2024, Apple ID Unlock On iPhone 8 Plus? How to Fix it?
- A Detailed Guide on Faking Your Location in Mozilla Firefox On Motorola Edge 2023 | Dr.fone
- In 2024, How to Transfer Contacts from Oppo A1x 5G To Phone | Dr.fone
- In 2024, How to Share/Fake Location on WhatsApp for Realme C51 | Dr.fone
- In 2024, The 10 Best Tools to Bypass iCloud Activation Lock On Apple iPhone 6s You Should Try Out
- In 2024, How Can We Unlock Our Xiaomi Redmi A2 Phone Screen?
- In 2024, Best Ways to Bypass iCloud Activation Lock from iPhone SE (2022)/iPad/iPod
- The Best Android Unlock Software For Oppo A56s 5G Device Top 5 Picks to Remove Android Locks
- In 2024, Best Nokia FRP Bypass Guide
- Title: How to Create a DIY Green Screen Video Effect for 2024
- Author: Chloe
- Created at : 2024-06-09 16:15:23
- Updated at : 2024-06-10 16:15:23
- Link: https://ai-editing-video.techidaily.com/how-to-create-a-diy-green-screen-video-effect-for-2024/
- License: This work is licensed under CC BY-NC-SA 4.0.
