:max_bytes(150000):strip_icc():format(webp)/GettyImages-1342255561-483b636ee00f40a1b3d91d1969b1aaf6.jpg)
How to Create A Freeze Frame Sequence in Video

How to Create A Freeze Frame Sequence in Video
Are you considering getting your video editing skills to a new high level? Are you worried about spicing your videos with stylish shots and bringing attention to particular aspects of your video?
Freeze frame sequence is one the most stunning effects that can help you greatly. The freeze frame sequence has been used in many classic and present-day movies. And it will never go out of fashion.
Here, we will guide you on creating freeze frame sequences in your videos using Filmora. It is critical here to know what exactly the freeze frame sequence is. So let’s jump right into it!
Part 1. What Is A Freeze Frame?
A freeze frame is a specific single frame of the video clip shown repeatedly in the video. It gives the illusion of a static picture. It is used to draw the viewers’ attention to the minute details of a specific moment, to set up a powerful narrative, or to introduce your main characters.
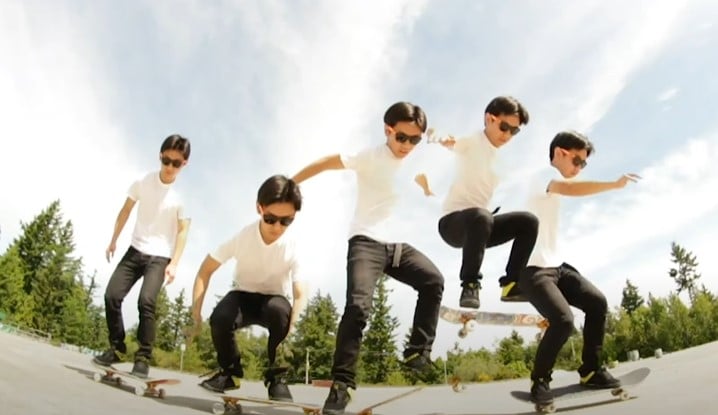
Content creators can also use the freeze-frame effect on fast-moving objects to draw the viewers’ attention. Have a few examples of the most popular freeze frames used in the movies.
Examples of freeze frames in popular movies
Alfred Hitchcock used the first-ever freeze-frame in his film Champagne (1928). There is a long list of many famous tv shows and movies in which the freeze frame effect has been used since then. But to count a few, three examples are given here.
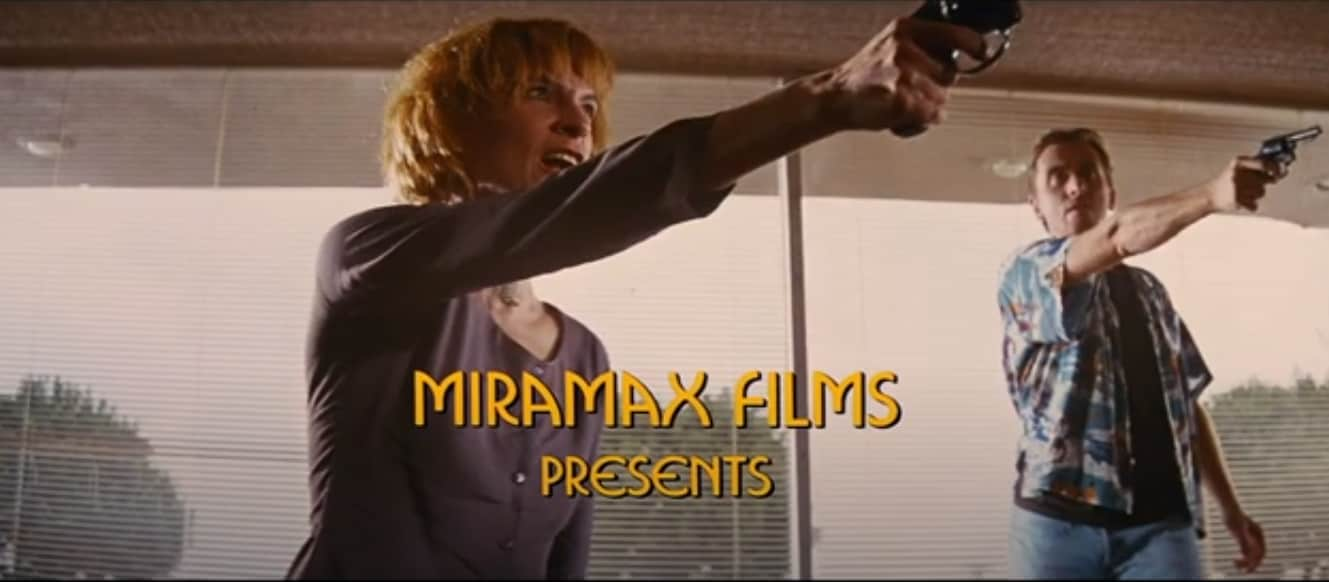
1. Pulp Fiction (1994)
In the beginning scene of Pulp Fiction, where robbery is about to occur, a freeze-frame effect is used to engage the audience. Later in the movie, it was relieved what would happen next. It was a dramatic pause to draw attention. It is a strong example of the freeze-frame effect.
2. The Breakfast Club (1985)
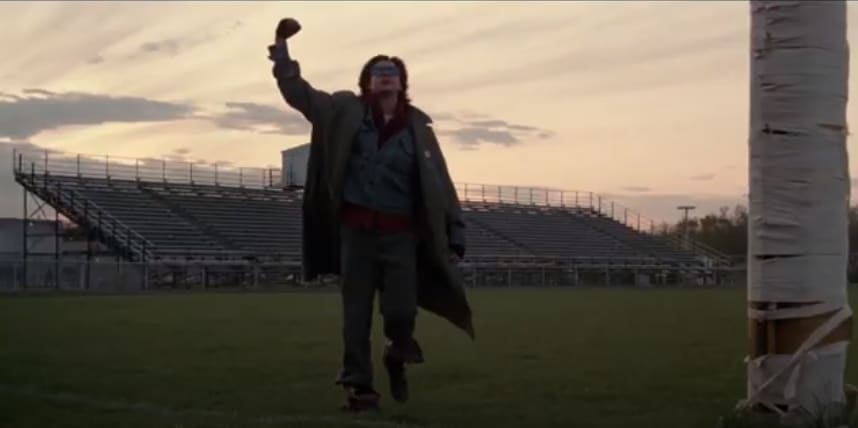
The ending of Breakfast Club is an iconic example of the freeze-frame effect. With a powerful narration, the freeze frame conveys the movie’s central idea to the audience.
3. Suicide Squad (2016)
In the trailer of Suicide Squad, freeze frames were used by the director to introduce the characters. This trailer used stylish animations to give relevant information about the film’s main characters.

Having discussed the famous examples, let’s learn about the power of freeze frames.
The power of freeze frame
The old freeze frames give a retro vibe. However, with the advancement in editing technology, this special effect has proved that there is no end. Furthermore, it has shown that you can do many things with pauses.
Especially when you are a content creator, this effect empowers you by advertising your skills impressively. It also conveys your message convincingly.
Being a content creator, you always want to reach the maximum audience. This special effect will serve this too. It will ultimately get you more viewership, more likes, and more subscriptions. But how to create a freeze frame?
Part 2. How To Create Freeze Frame Sequence? [Step-Wise Guide]
Let’s see how to add a freeze frame sequence in your video step-wise and get started.
Step1 Download Wondershare Filmora
Wondershare Filmora is an all-in-one video editing platform. It is enhanced with multiple practical media resources. You can head to Wondershare Filmora official site to download or upgrade your Filmora.
Free Download For Win 7 or later(64-bit)
Free Download For macOS 10.14 or later
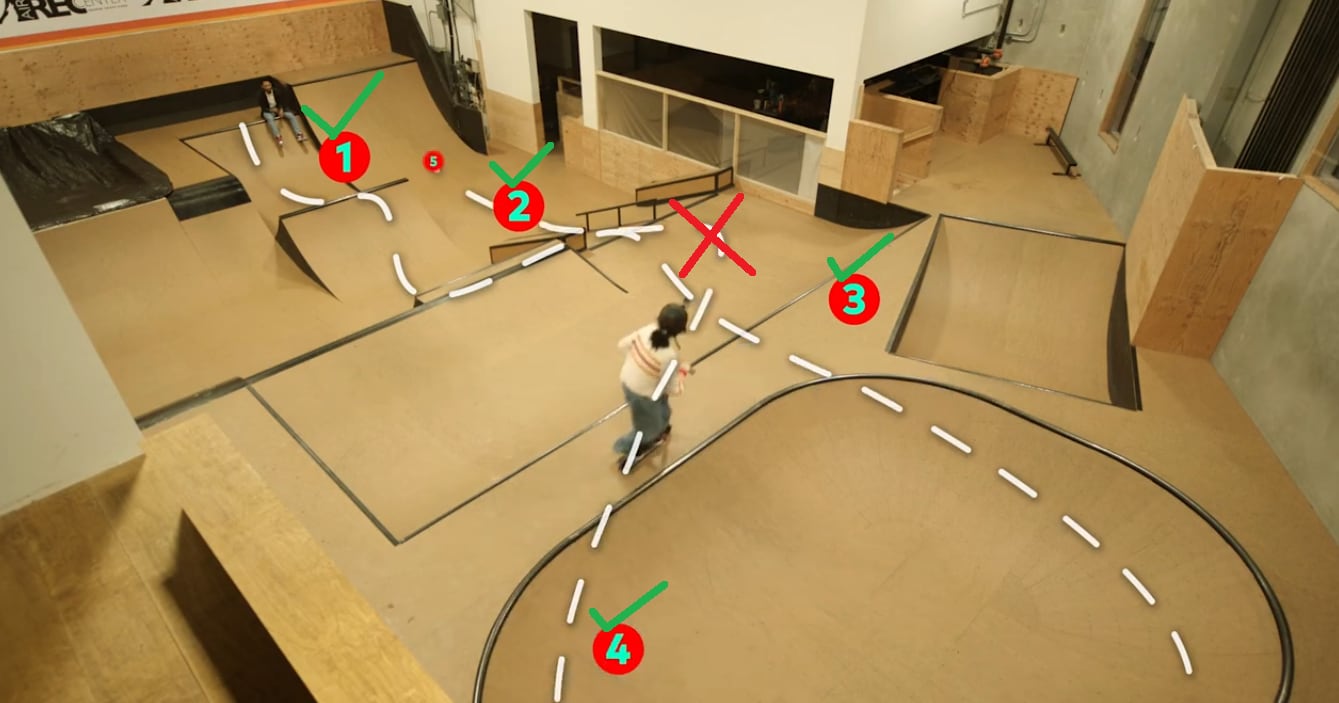
Step2 Import your clips and add them to the timeline
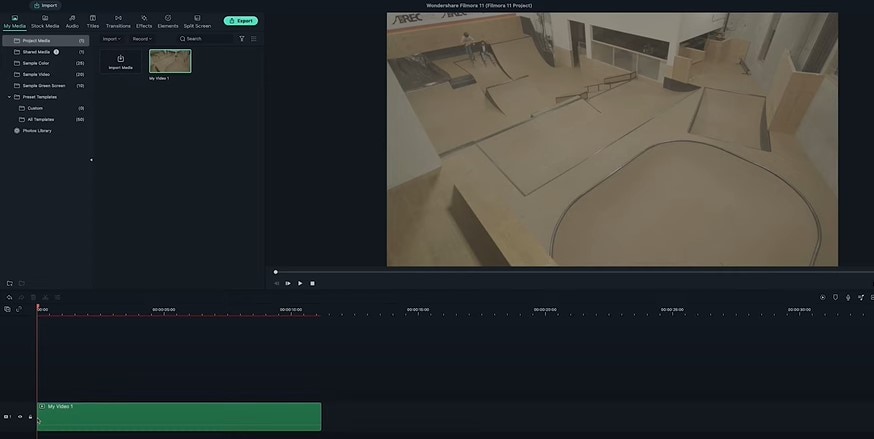
Open Filmora and create a new project. Import your clip into the media library. Add your clips to the first video layer on the timeline.
Step3 Apply color correction to the footage
Before we start our edit, let’s color correct our footage, so the corrected color is already applied when we take the screenshots.
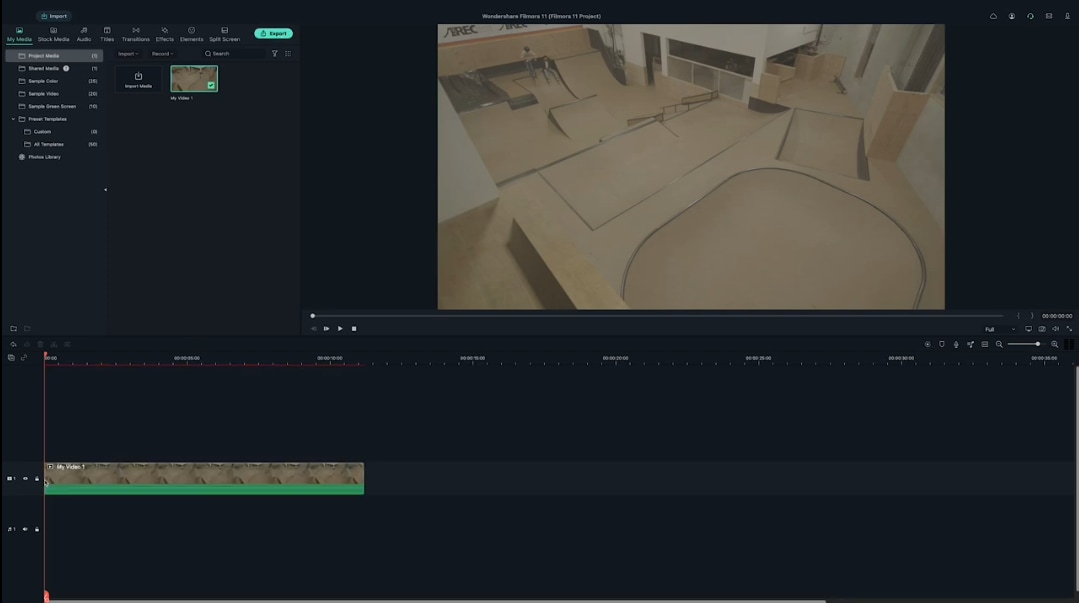
Step4 Find your first action frame
Next, scrub through the clip to find your first action frame. For example, in this video, this is our first action frame.
Step5 Take a screenshot of the action frame
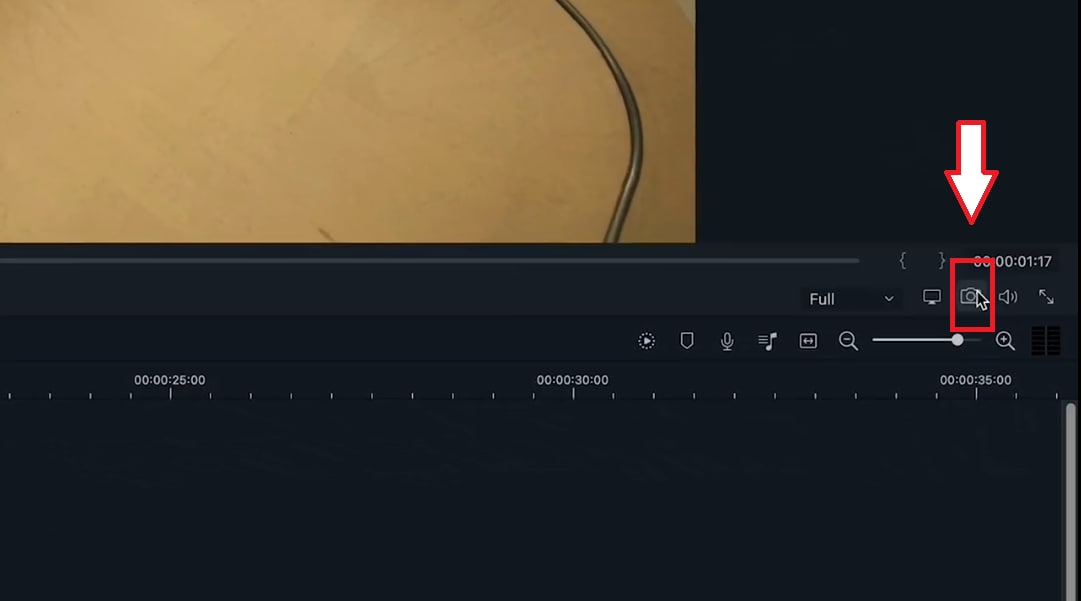
Let’s head to the camera icon under the preview screen and click the icon. It will take a screenshot of the current frame that the playhead is on the timeline.
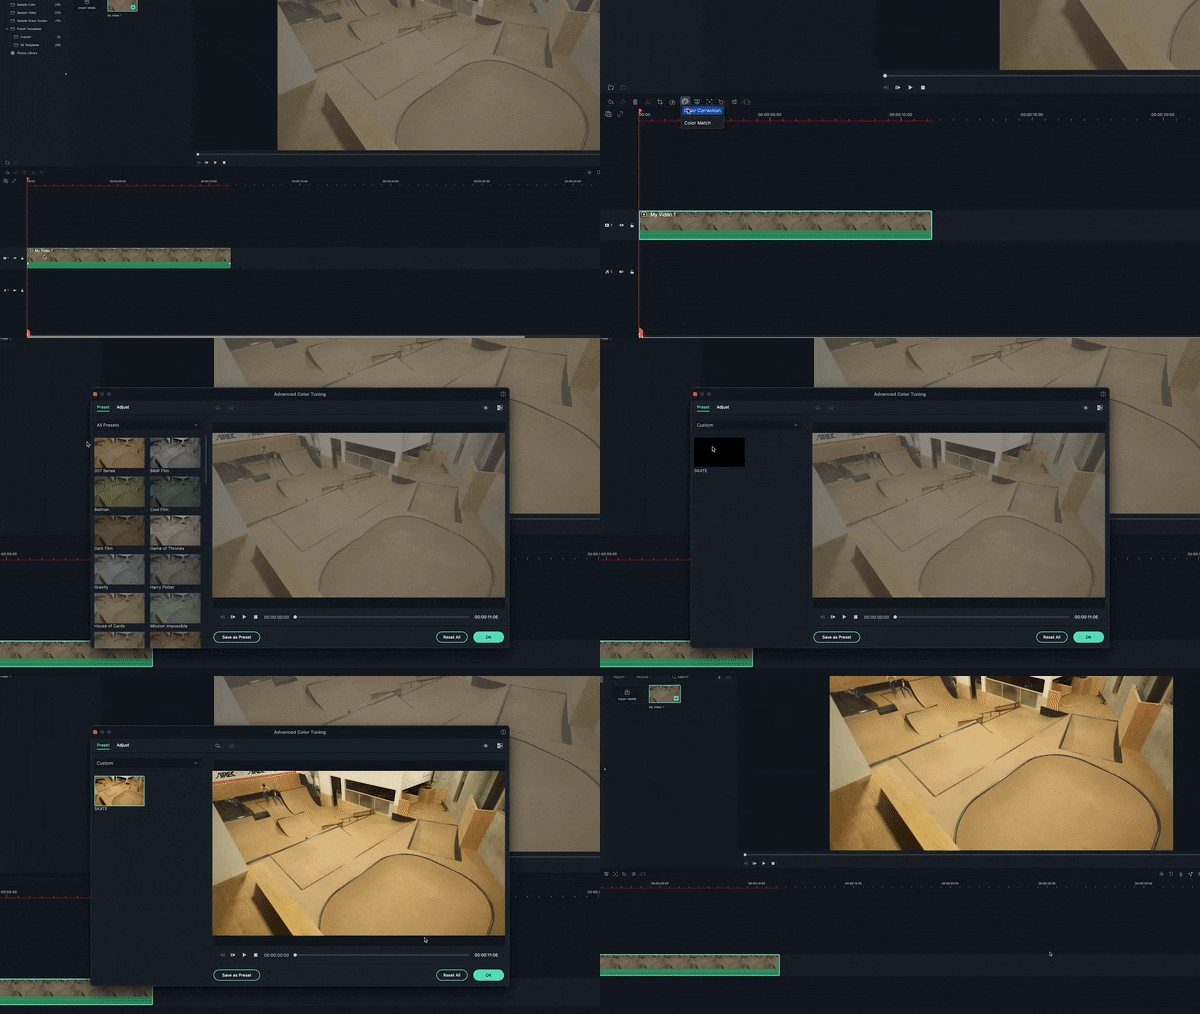
Make sure to keep the playhead the same after you’ve taken the snapshot. You can find your screenshot in the media tab.
Step6 Add the screenshot to timeline
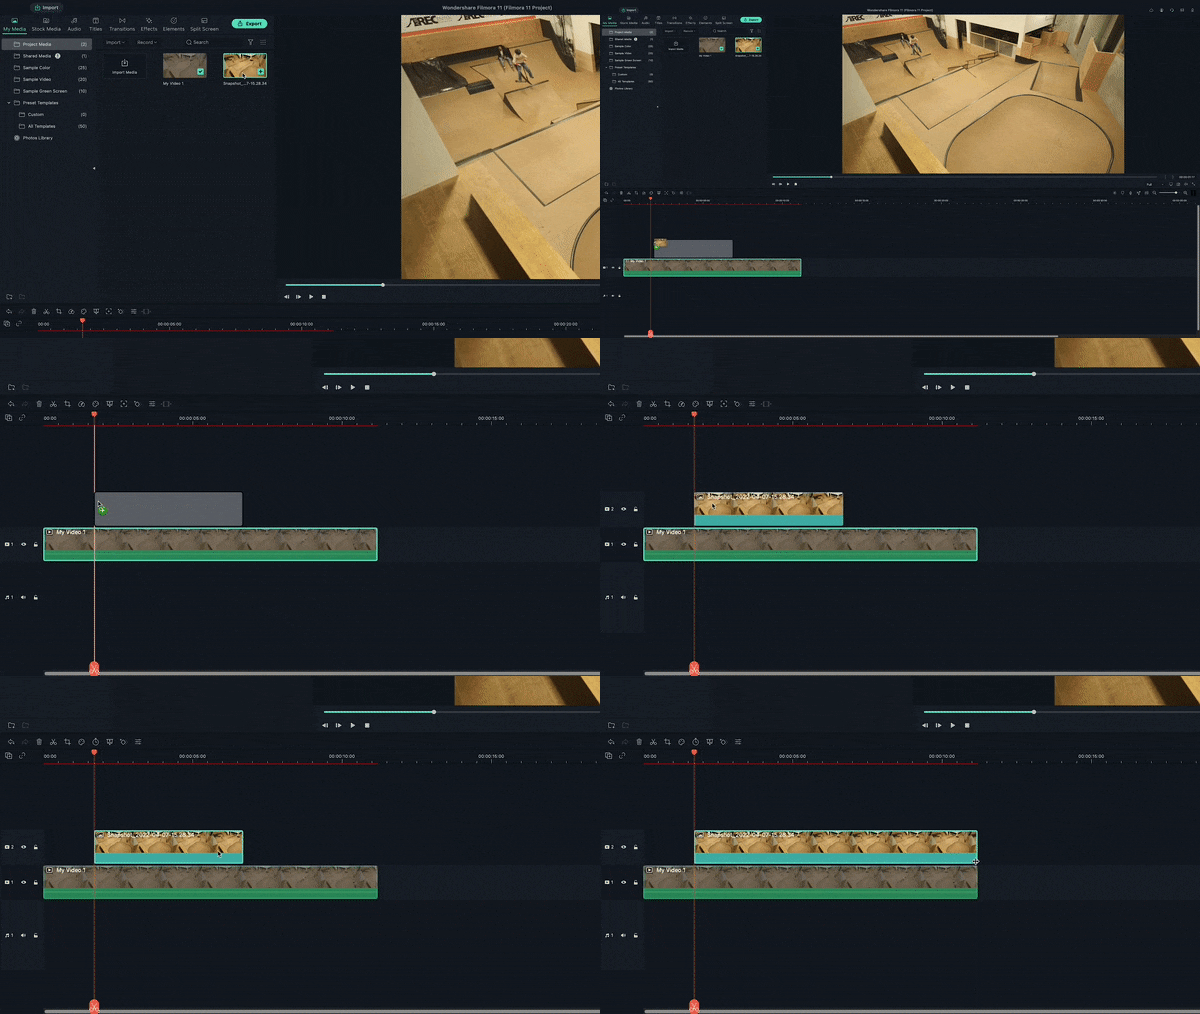
Let’s drag your screenshot onto video layer 2 and align it on the right side of the playhead. Then extend the screenshot so it lasts as long as your central clip.

Step7 Apply masks to the screenshot
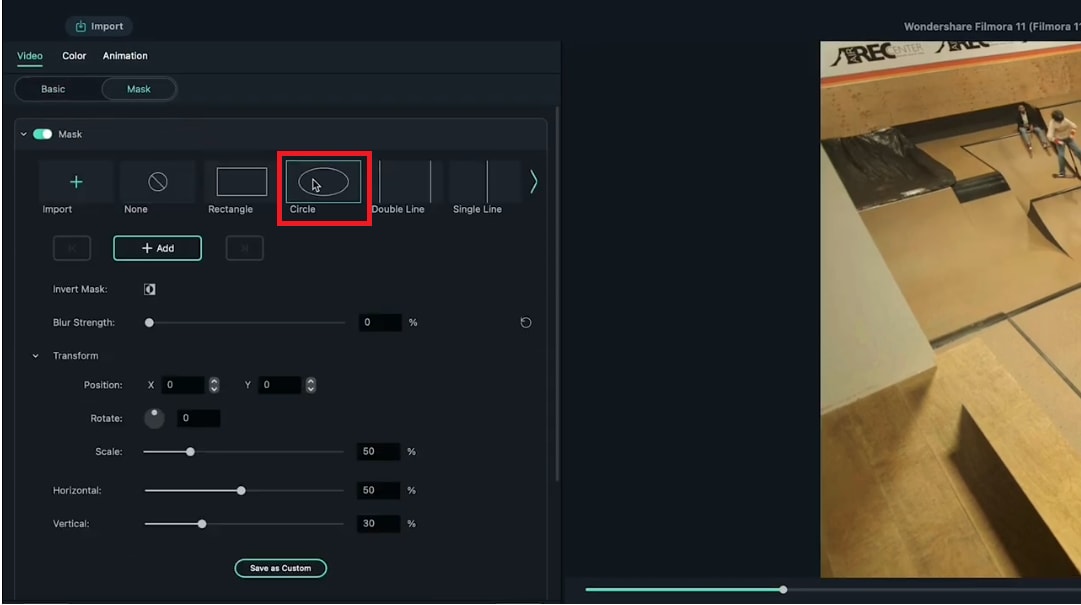
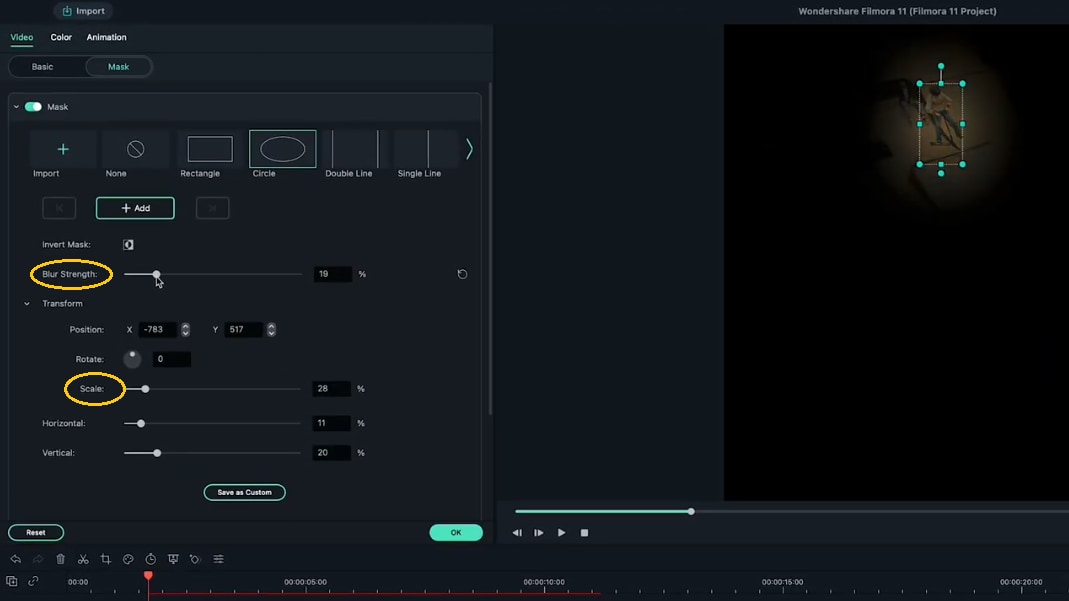
Now, double-click on the screenshot. It will open the “Video” menu, then go into the “Mask” menu. Choose a mask shape and edit it so that it only covers where your subject is in the screenshot. For example, we choose the **”**Circle” mask shape in this video.
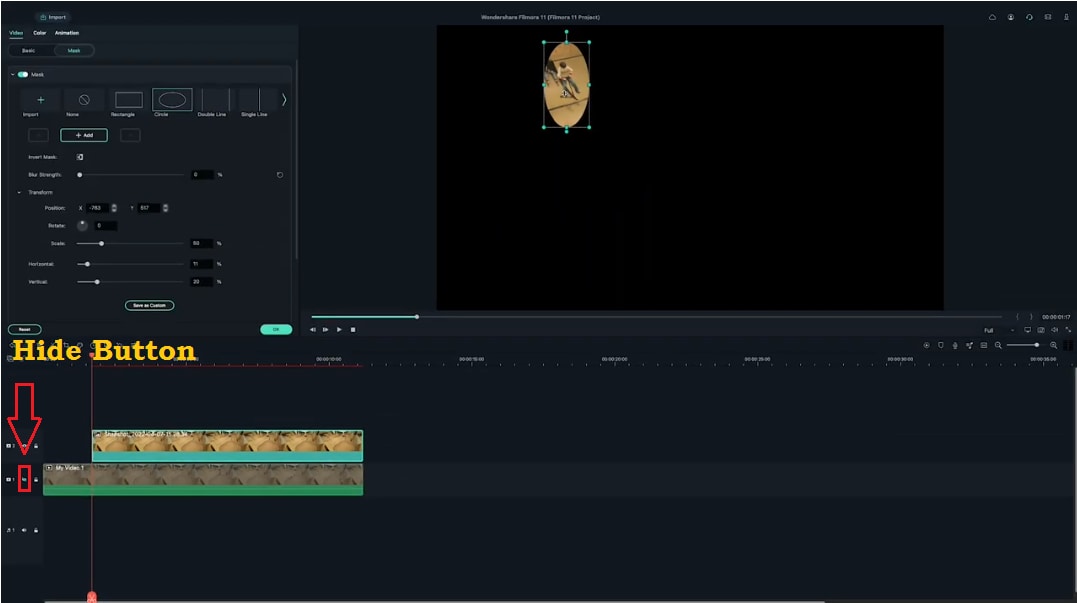
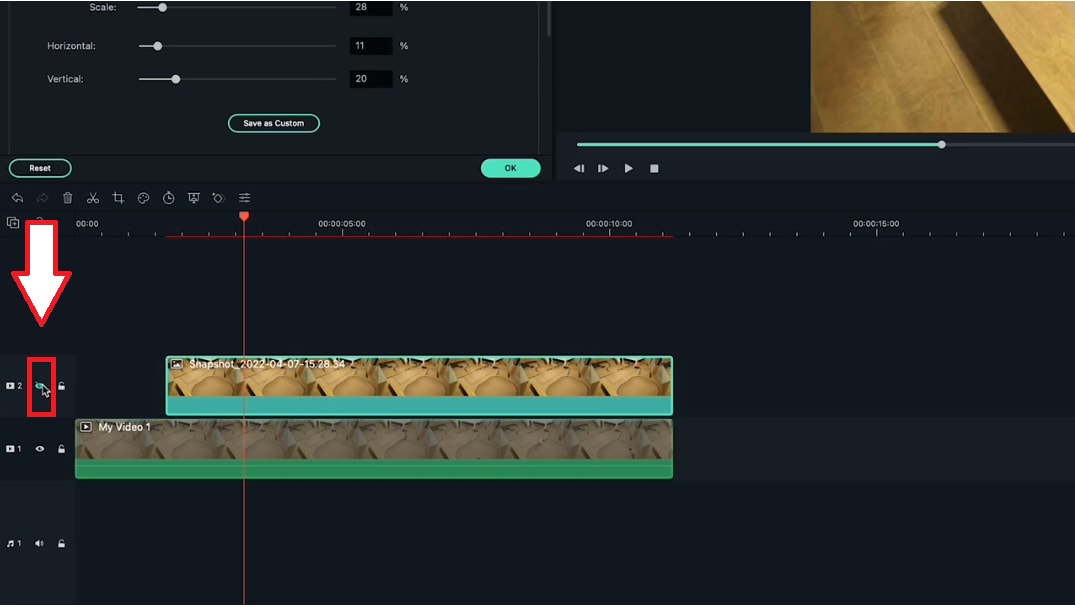
If you need help seeing what you’re masking, hide the main video layer and edit your mask like this.
Move the playhead forward and clean up your “mask.” Next, Increase the blur to soften the edges. But not too much because it may become visible on your subject.
Step8 Hide the first screenshot
Let’s layer a couple more action frames! First, hide the first screenshot so it doesn’t appear in your new screenshot.
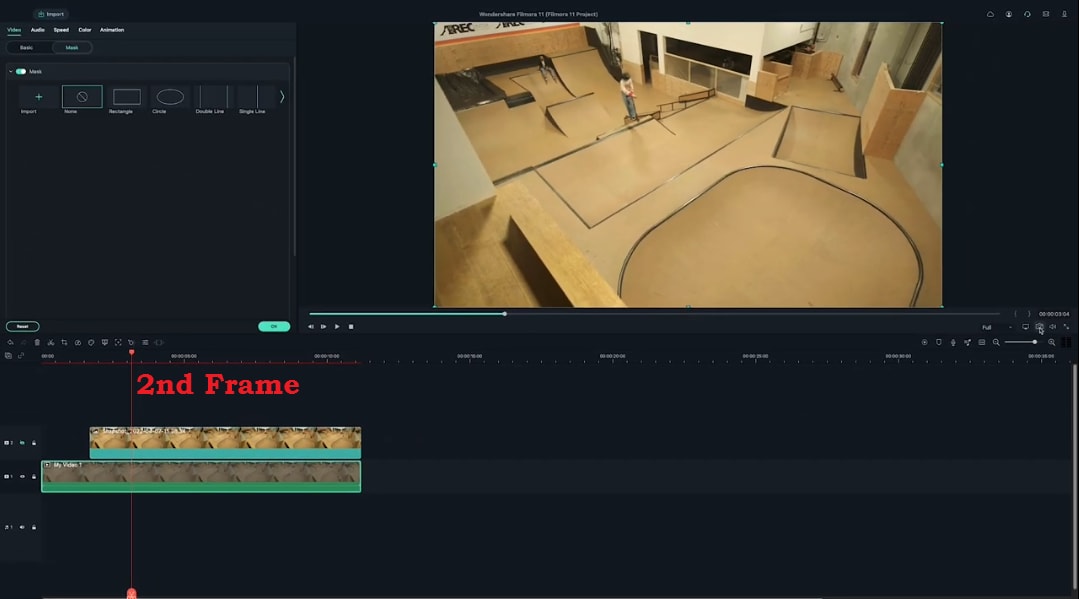
Step9 Select your second action frame
Then, pick a new frame.
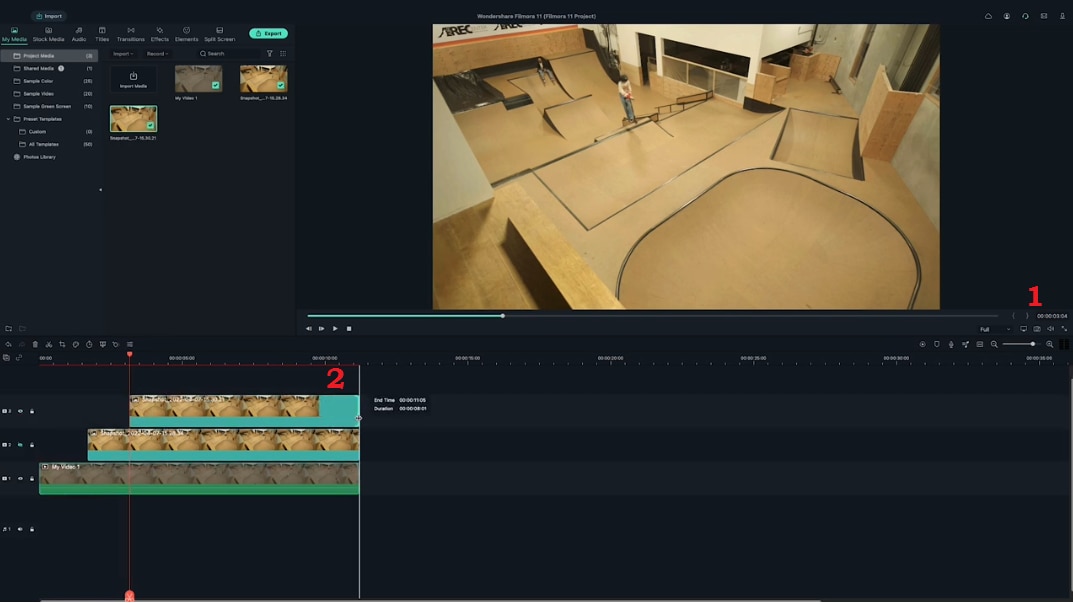
- Click the camera icon.
- Drag the screenshot at the new playhead spot.
- Extend the clip.
- Double-click to mask this frame.
- And play it back to make sure it looks good.
- It would help if you did this a couple more times until you have several frames.
Please have a look at the final product and how it looks!
And that’s how you create a freeze-frame video effect in Filmora.
Part 3. Tips To Use Freeze Frame Sequence
You’ve known how to make the freeze frame sequence. However, don’t miss essential tips to improve your video at the next stage.
Tip 1: Making a steady shot is important
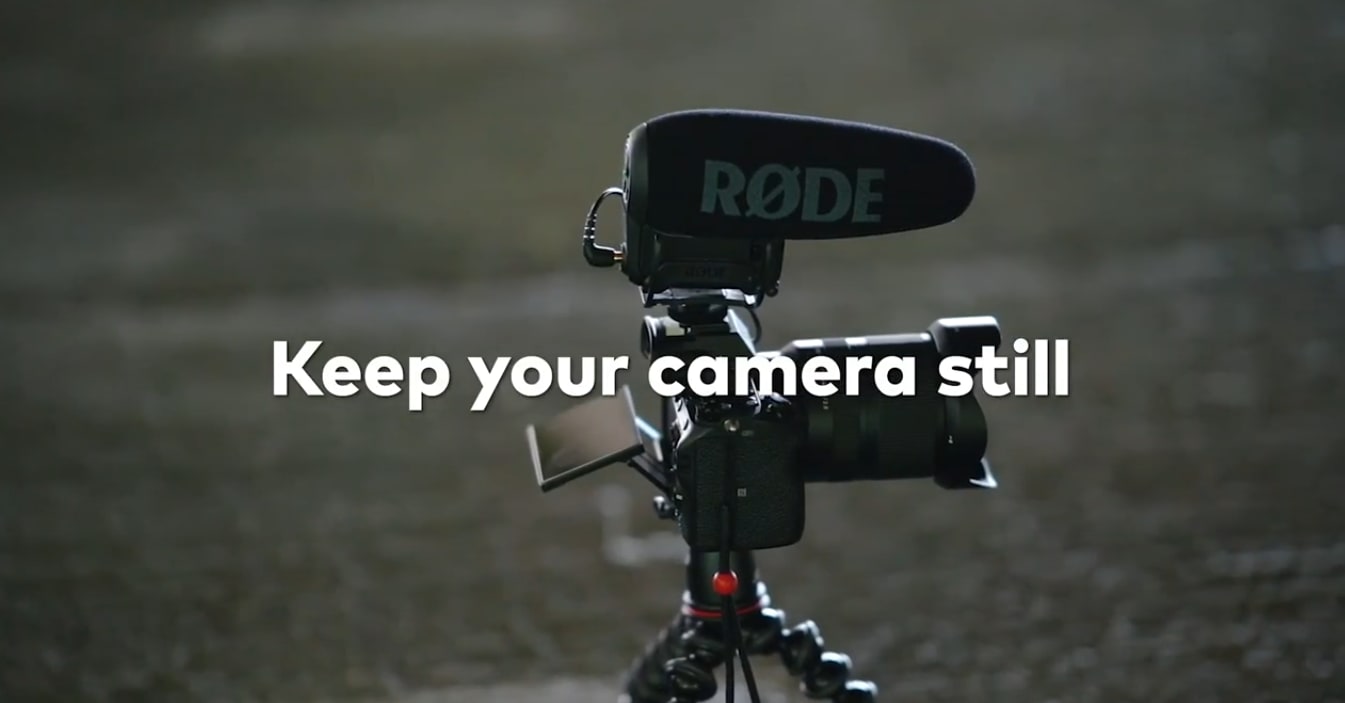
First, ensure a steady shot with no camera shake while filming. You can use a tripod or a stable surface to keep your camera still.
Why is it necessary to make a steady shot?
- It helps you to make smooth, fluid shots.
- It is much more professional.
- It will take your editing skills to a new level.
- It grabs the attention of the viewers.
- It makes your editing easier.
Tip 2: No crossing over
Make sure your subject only crosses the same spot once. Otherwise, you would need help editing the video.

Why is it necessary to avoid crossing the same spot?
- It prevents misalignment of the shots, and your print won’t get damaged, primarily when you use pieces of the same image.
- It helps to create an illusion of holding specific moments.
Final Words
The Freeze Frame Sequence looks professional but much more manageable. The creator’s confidence gets to the next level when they learn how to create it. This step-wise guide using Wondershare Filmora is all for your ease.
Free Download For macOS 10.14 or later
Step2 Import your clips and add them to the timeline
Open Filmora and create a new project. Import your clip into the media library. Add your clips to the first video layer on the timeline.

Step3 Apply color correction to the footage
Before we start our edit, let’s color correct our footage, so the corrected color is already applied when we take the screenshots.

Step4 Find your first action frame
Next, scrub through the clip to find your first action frame. For example, in this video, this is our first action frame.

Step5 Take a screenshot of the action frame
Let’s head to the camera icon under the preview screen and click the icon. It will take a screenshot of the current frame that the playhead is on the timeline.

Make sure to keep the playhead the same after you’ve taken the snapshot. You can find your screenshot in the media tab.
Step6 Add the screenshot to timeline
Let’s drag your screenshot onto video layer 2 and align it on the right side of the playhead. Then extend the screenshot so it lasts as long as your central clip.

Step7 Apply masks to the screenshot
Now, double-click on the screenshot. It will open the “Video” menu, then go into the “Mask” menu. Choose a mask shape and edit it so that it only covers where your subject is in the screenshot. For example, we choose the **”**Circle” mask shape in this video.

If you need help seeing what you’re masking, hide the main video layer and edit your mask like this.

Move the playhead forward and clean up your “mask.” Next, Increase the blur to soften the edges. But not too much because it may become visible on your subject.

Step8 Hide the first screenshot
Let’s layer a couple more action frames! First, hide the first screenshot so it doesn’t appear in your new screenshot.

Step9 Select your second action frame
Then, pick a new frame.

- Click the camera icon.
- Drag the screenshot at the new playhead spot.
- Extend the clip.

- Double-click to mask this frame.
- And play it back to make sure it looks good.
- It would help if you did this a couple more times until you have several frames.
Please have a look at the final product and how it looks!

And that’s how you create a freeze-frame video effect in Filmora.
Part 3. Tips To Use Freeze Frame Sequence
You’ve known how to make the freeze frame sequence. However, don’t miss essential tips to improve your video at the next stage.
Tip 1: Making a steady shot is important
First, ensure a steady shot with no camera shake while filming. You can use a tripod or a stable surface to keep your camera still.

Why is it necessary to make a steady shot?
- It helps you to make smooth, fluid shots.
- It is much more professional.
- It will take your editing skills to a new level.
- It grabs the attention of the viewers.
- It makes your editing easier.
Tip 2: No crossing over
Make sure your subject only crosses the same spot once. Otherwise, you would need help editing the video.

Why is it necessary to avoid crossing the same spot?
- It prevents misalignment of the shots, and your print won’t get damaged, primarily when you use pieces of the same image.
- It helps to create an illusion of holding specific moments.
Final Words
The Freeze Frame Sequence looks professional but much more manageable. The creator’s confidence gets to the next level when they learn how to create it. This step-wise guide using Wondershare Filmora is all for your ease.
Guide To Using Luts Perfectly in Final Cut Pro
Final Cut Pro is a powerful video editing software available for Mac OS. You can create professional-looking videos using this tool. To give your videos a more professional touch, you can use LUTs as well. It is a quick way to color grade and improve the feel of your media content. They are essentially a set of instructions that apply a particular color grading to your video.
Moreover, with so many options available, you can choose from any color grading style you want. From cinematic to retro, LUTs offer you a variety of color adjustment tones and overlays. All you have to do is to choose from free LUTs for Final Cut Pro and download your preferred one.
- Part 2: How to Apply LUTs on Final Cut Pro
- Part 3: Discussing Wondershare Filmora LUTs - The Best Video Editing Platform
Part 1: Discovering The Top Best LUTs for FCPX
You are at the right place if you’re having trouble finding the best LUTs for FCPX. This section will provide you with one of the best LUTs you can choose for your videos.
1.Free Cinematic LUTs Pack for Video Editing
This free LUT pack is a perfect choice to give your videos a cinematic look. It features a soft blue color grading with high contrast that can make your footage look like it was shot on film. This LUT is especially effective for outdoor scenes and action shots. Moreover, its color grading enhances the drama and feel of your video footage.

2.10 Free Vintage Color Presets for Final Cut Pro
10 Free Vintage Color Presets for Final Cut Pro is a great pack if you’re looking for a vintage or retro feel. It has a warm, yellowish color grading that can give your videos a nostalgic look. This pack is ideal for footage shot in the 70s, 80s, or 90s. It highlights the muddiness and brown shades in your video to add a touch of authenticity to it.

3. Perfect Green Video LUT
Perfect Green Video LUT is a pack of 3 cinematic-style LUTs. This pack is ideal for travel or nature videos as it increases the green tone in your videos. It has a lush, green color grading that can make your videos look vibrant and lively. Additionally, this pack is effective for outdoor scenes as it improves your video’s natural colors and makes it look more dynamic.

4. Cyberpunk Color Grades
Cyberpunk Color Grades is a pack of modern cyberpunk-style LUTs. It is a fantastic LUT pack if you’re working on a music video or a creative project. It has a bold, colorful grading with high saturation that can make your video stand out. This LUT pack is perfect for scenes with many neon lights or bright backgrounds. Moreover, it adds an extra pop of color and makes your videos look more energetic.

5. Pro Retouching Essentials Pack by Prince Meyson
Prince Meyson offers this skin tone enhancer LUT pack. It has a neutral, balanced color grading that can make your videos look more polished and professional. This LUT is ideal for interviews, documentaries, or corporate videos. Moreover, this pack is perfect for portraits and close-up shots. It can enhance the natural colors of your footage and make it look more refined.

Part 2: How to Apply LUTs on Final Cut Pro
Now that you’ve discovered there are many Final Cut Pro LUTs free to download. The most important thing is to learn how to use these free LUTs on your video using FCPX. Here are some methods to learn to apply LUTs using Final Cut Pro in simple steps.
Method 1 Using Custom Layer
Step1
Open Final Cut Pro and import your video. Once the video is imported, click on the clip you want to apply the LUT.

Step2
Go to the “Effect Browser” and search for the LUT option from the search menu. After selecting it, you will get a “Custom LUT” layer. Select the custom LUT layer and drag and drop it onto your video clip. Then, click on the video clip and go to the “Inspector” window.

Step3
Select the “Custom LUT” option in the inspector window and choose your desired LUT from the LUT drop-down menu. Final Cut Pro will apply your desired LUT to your video clip.

Method 2 Using Adjustment Layer
Step1
Click the plugin button once you’ve imported your video clip and choose RT Adjustment Layer. Furthermore, if you don’t have this plugin, you can download it for free.

Step2
An icon will appear once you’ve selected RT Adjustment Layer. Drag and drop this icon on top of your video clip.

Step3
Drag and drop the “Custom LUT” layer onto your RT Adjustment Layer from the Effect Browser. Click on the RT Adjustment Layer and choose your desired LUT from the “Inspector” menu.

Method 3 Change Settings To Enable LUTs
Step1
Import your video into Final Cut Pro and click on your video in the library and open the inspector window.

Step2
In the section of the “Inspector” menu, click the drop-down menu and select the “General” option. It will open up new options in the menu where you have to choose the “Camera LUT” option and select your preferred LUT. After selecting your LUT, save your video by choosing the option.

Part 3: Discussing Wondershare Filmora LUTs - The Best Video Editing Platform
If you’re looking for a great video editing tool, Wondershare Filmora might be just what you need. With many features embedded in it, it makes it easy to create professional-looking videos. Moreover, you can apply LUTs to add a cinematic touch to your footage. With over 200+ LUTs available, you can improve the color grading of your videos. Additionally, this tool allows you to adjust its intensity as well.
Furthermore, Wondershare Filmora offers options for color adjustments and enhancements. You can add transitions, templates, effects, and filters to your videos. In addition to this, it offers over 10 billion free media assets that you can use to enhance your videos. With Wondershare Filmora, you can play around with different features and options to make your content look fantastic.

Empower your videos with a new mood using different LUTs. Filmora now offers 100+ top-quality 3D LUTs cover a broad range of scenarios. Transform your videos with Filmora’s powerful 3D LUTs.
Apply LUT on Videos Apply LUT on Videos Learn More

Conclusion
In conclusion, Final Cut Pro is a powerful tool for video editing. This tool allows you to make color corrections and color adjustments to your videos. Furthermore, Final Cut Pro offers the option to use LUTs for color grading. You can find many best LUTs for FCPX available online to use in this tool. However, Wondershare Filmora is another amazing tool that you use to color-grade your videos professionally.
Part 1: Discovering The Top Best LUTs for FCPX
You are at the right place if you’re having trouble finding the best LUTs for FCPX. This section will provide you with one of the best LUTs you can choose for your videos.
1.Free Cinematic LUTs Pack for Video Editing
This free LUT pack is a perfect choice to give your videos a cinematic look. It features a soft blue color grading with high contrast that can make your footage look like it was shot on film. This LUT is especially effective for outdoor scenes and action shots. Moreover, its color grading enhances the drama and feel of your video footage.

2.10 Free Vintage Color Presets for Final Cut Pro
10 Free Vintage Color Presets for Final Cut Pro is a great pack if you’re looking for a vintage or retro feel. It has a warm, yellowish color grading that can give your videos a nostalgic look. This pack is ideal for footage shot in the 70s, 80s, or 90s. It highlights the muddiness and brown shades in your video to add a touch of authenticity to it.

3. Perfect Green Video LUT
Perfect Green Video LUT is a pack of 3 cinematic-style LUTs. This pack is ideal for travel or nature videos as it increases the green tone in your videos. It has a lush, green color grading that can make your videos look vibrant and lively. Additionally, this pack is effective for outdoor scenes as it improves your video’s natural colors and makes it look more dynamic.

4. Cyberpunk Color Grades
Cyberpunk Color Grades is a pack of modern cyberpunk-style LUTs. It is a fantastic LUT pack if you’re working on a music video or a creative project. It has a bold, colorful grading with high saturation that can make your video stand out. This LUT pack is perfect for scenes with many neon lights or bright backgrounds. Moreover, it adds an extra pop of color and makes your videos look more energetic.

5. Pro Retouching Essentials Pack by Prince Meyson
Prince Meyson offers this skin tone enhancer LUT pack. It has a neutral, balanced color grading that can make your videos look more polished and professional. This LUT is ideal for interviews, documentaries, or corporate videos. Moreover, this pack is perfect for portraits and close-up shots. It can enhance the natural colors of your footage and make it look more refined.

Part 2: How to Apply LUTs on Final Cut Pro
Now that you’ve discovered there are many Final Cut Pro LUTs free to download. The most important thing is to learn how to use these free LUTs on your video using FCPX. Here are some methods to learn to apply LUTs using Final Cut Pro in simple steps.
Method 1 Using Custom Layer
Step1
Open Final Cut Pro and import your video. Once the video is imported, click on the clip you want to apply the LUT.

Step2
Go to the “Effect Browser” and search for the LUT option from the search menu. After selecting it, you will get a “Custom LUT” layer. Select the custom LUT layer and drag and drop it onto your video clip. Then, click on the video clip and go to the “Inspector” window.

Step3
Select the “Custom LUT” option in the inspector window and choose your desired LUT from the LUT drop-down menu. Final Cut Pro will apply your desired LUT to your video clip.

Method 2 Using Adjustment Layer
Step1
Click the plugin button once you’ve imported your video clip and choose RT Adjustment Layer. Furthermore, if you don’t have this plugin, you can download it for free.

Step2
An icon will appear once you’ve selected RT Adjustment Layer. Drag and drop this icon on top of your video clip.

Step3
Drag and drop the “Custom LUT” layer onto your RT Adjustment Layer from the Effect Browser. Click on the RT Adjustment Layer and choose your desired LUT from the “Inspector” menu.

Method 3 Change Settings To Enable LUTs
Step1
Import your video into Final Cut Pro and click on your video in the library and open the inspector window.

Step2
In the section of the “Inspector” menu, click the drop-down menu and select the “General” option. It will open up new options in the menu where you have to choose the “Camera LUT” option and select your preferred LUT. After selecting your LUT, save your video by choosing the option.

Part 3: Discussing Wondershare Filmora LUTs - The Best Video Editing Platform
If you’re looking for a great video editing tool, Wondershare Filmora might be just what you need. With many features embedded in it, it makes it easy to create professional-looking videos. Moreover, you can apply LUTs to add a cinematic touch to your footage. With over 200+ LUTs available, you can improve the color grading of your videos. Additionally, this tool allows you to adjust its intensity as well.
Furthermore, Wondershare Filmora offers options for color adjustments and enhancements. You can add transitions, templates, effects, and filters to your videos. In addition to this, it offers over 10 billion free media assets that you can use to enhance your videos. With Wondershare Filmora, you can play around with different features and options to make your content look fantastic.

Empower your videos with a new mood using different LUTs. Filmora now offers 100+ top-quality 3D LUTs cover a broad range of scenarios. Transform your videos with Filmora’s powerful 3D LUTs.
Apply LUT on Videos Apply LUT on Videos Learn More

Conclusion
In conclusion, Final Cut Pro is a powerful tool for video editing. This tool allows you to make color corrections and color adjustments to your videos. Furthermore, Final Cut Pro offers the option to use LUTs for color grading. You can find many best LUTs for FCPX available online to use in this tool. However, Wondershare Filmora is another amazing tool that you use to color-grade your videos professionally.
Why Vimeo Slideshow Maker Become Popular
Why Vimeo Slideshow Maker Become Popular
An easy yet powerful editor
Numerous effects to choose from
Detailed tutorials provided by the official channel
Have you recently heard about Vimeo from any of your friends or colleagues? Or have you come through it and want to know more about it? Then here you can get all information needed about the platform. Vimeo slideshow creator is a wonderful tool launched by a group of filmmakers in 2004.

It has gained a lot of popularity over the past decade and appears as the competitor of largest video sharing giant YouTube. The platform has approximately 80 million users and 1 million subscribers. In some ways, Vimeo is even better than YouTube.
In this article
01 [What Is Vimeo for & Why It Become Popular](#Part 1)
02 [Tips for a Great Slideshow Video](#Part 2)
Part 1: What Is Vimeo for & Why It Become Popular
Vimeo is an online video streaming and editing tool which is designed for video creators and artists. The platform provides various tools to its users including monetization, marketing, collaboration, post-production, management, storage, etc. It provides a great user experience because it is ad-free. The mode of revenue for the owners of Vimeo is a software as a service (SaaS). They provide paid subscription plans for creating and editing videos, broadcasting tools, connecting with clients, etc.
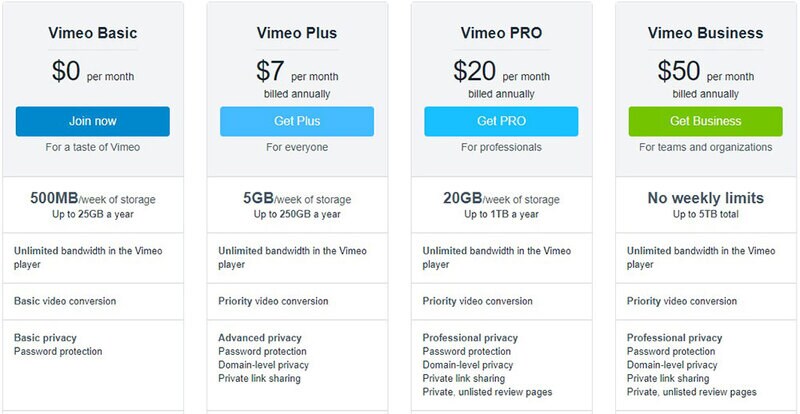
It works in a “freemium” model. That means the users have limited access to the platform if they are using it for free. For example, a basic free membership allows the user to have access to a total of 5GB of storage and can upload 500MB on a weekly basis. As a free or paid member of Vimeo Slideshow maker, you can like, comment on videos, and at the same time save, watch, and upload them. Also, you can create playlists. What features you will be able to access totally depends on your membership level and plan.
Vimeo is becoming popular due to the following reasons:
01Vimeo offers better encoding and video quality
Vimeo is more focused on the quality of the video that gets uploaded on it. Its processing load is lighter and it follows strict guidelines to accept videos. The platform uses better encoding techniques to maximize the quality of the video.
02Vimeo offers greater prestige
Being on Vimeo is a matter of prestige. Vimeo videos are considered more professional as compared to Youtube. There is a limit on what kind of channels one can run on Vimeo.
03Vimeo has a more sophisticated audience
Because of the high quality of videos and its prestigious nature, Vimeo has a more sophisticated fan base. The content offered by the platform is more knowledgeable and determined. The audience here is more sophisticated. Also, the creators are more insightful, mature, and constructive.
04Vimeo offers greater artistic freedom
Vimeo always welcomes the creators with their videos to show their art. It offers artistic freedom to its users. The platform checks the artistic value of the video and talent of the creator and allows them to upload, unlike Youtube.
05Vimeo boasts unique features and customizations
There are certain unique features of YouTube which make it a great platform for its users.
● Plus, Pro, Business, Premium Plans
Vimeo is funded by its community and you have to purchase the plan to use it apart from the free features. Different Vimeo plans are:
Vimeo - $7/month
Pro - $20/month
Business - $50/month
Top-tier Vimeo Premium - $75/month.
● Make money with pay per view
Just like Google’s PPC program, Vimeo also features a pay per program view where viewers need to pay in order to watch certain videos. With this, you can sell your art anywhere in the country or worldwide and make money with it.
● Advanced analytics
The subscribers of Vimeo are offered different levels of analytics. You will get the analytics according to your subscription level. The analytics levels on Vimeo consist of Google Analytics integration, engagement graphs, custom reports, and a traffic dashboard.
● Web player branding
Vimeo allows the users to use their own branding and logo in their videos. It makes all the embedded videos share the same look and ends with an unsightly suggestions page.
● Domain-restricted embeds
Vimeo offers the users a feature of domain-restricted embeds. It means the users can set the domains to embed any particular or a set of videos. This feature lets you hide the video on Vimeo and make it visible on the allowed domain.
● Password protection
It is an extraordinary feature that Vimeo offers. The user can set a password for the particular video to restrict the video’s visibility. Only those people who will have access to the password will be able to watch that particular video.
● Replace video but keep URL
This one is also an amazing and unique feature of Vimeo. With this feature, you can replace any existing video with the new one by keeping the same URL. Also, it will keep the stats, comments, likes, etc as it is.
Part 2 Tips for a Great Slideshow Video
Videos are gaining much popularity these days. It is an easy way to connect with people and show emotions to them. In the same way, slideshow videos also are important in their place. Slides are the collection of traditional photos or negatives which are out of trend now. And slideshow videos are the perfect way to use those slides and relieve those faded memories with loved ones. Creating the slideshow video is also easy and can be done easily with the help of some tools. You don’t need to be professional, but the only need is to follow certain tips carefully. Here, we are sharing the essential tips to prepare a great slideshow video. Also, you will get to know about the best tool for video creation.
● Tell a story
Prepare the slideshow video in the form of storytelling. Whatever is the theme of your slideshow, prepare the script of the video right from the start. Make a meaningful and impressive story. Select and collect the raw materials according to the requirement.
● Keep it cohesive
The cohesion of photos or images is very important in a video slideshow. It is advised not to mix and match still photos and videos in 1 slideshow. Also, choose the photos belonging to the same color family. Mixing different varieties of photos divert the attention of the viewer. Also, one warm photo, then one cool and so on are not the efficient choices for a slideshow. All the images should appear as part of one color family and are similar to one another. Always maintain the quality of photos throughout the slideshow. Gradual jumps between grainy portrait mode photos and some screenshots, meanwhile photos of other modes lead to distracting the viewer and blurring their experience.
● Make it personal
Video slideshows are a powerful tool to show your personality and your personal message. The videos should contain your feelings. So, customize them and make them as personal as you can. Give your uniqueness to your slideshows. For this, you can customize the color palette, text, etc and make them unique and personal. So that the people with whom you share the videos may also feel your touch.
● Keep slideshow videos short
There might be different aims for creating a slideshow video. You might want to share it with loved ones or any of your friends’ circle. Or you might be wanting it to post as an ad on social media platforms such as Instagram, or Facebook. Whatever the purpose of your making the video, keep them concise and short. Short video clips are best for grabbing the attention of the viewers. Everyone does not find it interesting to watch long-form videos. If you are aiming to make a longer-form video slideshow which contains both images and video clips, then keep each photo for 3 to 5 seconds and each video clip a maximum of 20 seconds. It is recommended to maintain the user’s interest throughout.
● Create a storyboard to plan your slideshow video
As we have already discussed in the above point, the video should depict your story. Also, it should be in sync to make it more compelling. Creating a storyboard or outline is the perfect way to predict the right flow as well as choose the right elements for the video.
The storyboard helps to prepare a plan and develop the logical sequence of the photos. Also, if you want to add photos, video clips, texts, etc in a single slideshow, the storyboard can help to outline the sequence. With this, you will be able to create a video that will be logically correct.
● Add text to videos and images to convey your message clearly
Text or captions are very crucial to be added to the slideshow especially if you are preparing them for social media. People these days do watch the videos by keeping the sound off on social media. So, they will not be able to get your message without captions. Keep all your key messages highlighted in the video. The first few seconds of the video play an important role. It is the deciding factor whether the viewer will watch the whole video or will just bounce back. So, give a captivating hook to the slideshow to capture the viewer’s attention and make them hit the unmute button.
Wondershare Filmora Video Editor is an effective tool which can help you to create wonderful video slideshows. It provides all the functionalities which you need to make the slideshow convincing. You can make appealing videos to show your impressions to the viewers. It enables you to create slideshows with photos, videos, and captions. The color correction and gradient option in the Filmora allow you to change the look of the photos or old slides according to your choices. You can edit the slides with this tool, to make them cohesively right and create a slideshow out of them. In short, Filmora is the perfect way to make a slideshow video that can be interesting and engaging for the viewers.
For Win 7 or later (64-bit)
For macOS 10.12 or later
● Ending Thoughts →
● So, here we can conclude that Vimeo slideshow maker is an impressive platform. Despite having a smaller user base, it is gaining much popularity because of its unique features.
● Moreover, you can generate great videos by following the tips we have shared. By uploading those videos on Vimeo, you will be able to gain a decent audience base. If you are aiming to have a genuine and sophisticated fanbase for your videos, then Vimeo would be a great choice.
● Using Filmora will make your process of creating slideshows easy. The variety of features available by the tool will let you create wonderful storytelling out of your old memories.
Have you recently heard about Vimeo from any of your friends or colleagues? Or have you come through it and want to know more about it? Then here you can get all information needed about the platform. Vimeo slideshow creator is a wonderful tool launched by a group of filmmakers in 2004.

It has gained a lot of popularity over the past decade and appears as the competitor of largest video sharing giant YouTube. The platform has approximately 80 million users and 1 million subscribers. In some ways, Vimeo is even better than YouTube.
In this article
01 [What Is Vimeo for & Why It Become Popular](#Part 1)
02 [Tips for a Great Slideshow Video](#Part 2)
Part 1: What Is Vimeo for & Why It Become Popular
Vimeo is an online video streaming and editing tool which is designed for video creators and artists. The platform provides various tools to its users including monetization, marketing, collaboration, post-production, management, storage, etc. It provides a great user experience because it is ad-free. The mode of revenue for the owners of Vimeo is a software as a service (SaaS). They provide paid subscription plans for creating and editing videos, broadcasting tools, connecting with clients, etc.

It works in a “freemium” model. That means the users have limited access to the platform if they are using it for free. For example, a basic free membership allows the user to have access to a total of 5GB of storage and can upload 500MB on a weekly basis. As a free or paid member of Vimeo Slideshow maker, you can like, comment on videos, and at the same time save, watch, and upload them. Also, you can create playlists. What features you will be able to access totally depends on your membership level and plan.
Vimeo is becoming popular due to the following reasons:
01Vimeo offers better encoding and video quality
Vimeo is more focused on the quality of the video that gets uploaded on it. Its processing load is lighter and it follows strict guidelines to accept videos. The platform uses better encoding techniques to maximize the quality of the video.
02Vimeo offers greater prestige
Being on Vimeo is a matter of prestige. Vimeo videos are considered more professional as compared to Youtube. There is a limit on what kind of channels one can run on Vimeo.
03Vimeo has a more sophisticated audience
Because of the high quality of videos and its prestigious nature, Vimeo has a more sophisticated fan base. The content offered by the platform is more knowledgeable and determined. The audience here is more sophisticated. Also, the creators are more insightful, mature, and constructive.
04Vimeo offers greater artistic freedom
Vimeo always welcomes the creators with their videos to show their art. It offers artistic freedom to its users. The platform checks the artistic value of the video and talent of the creator and allows them to upload, unlike Youtube.
05Vimeo boasts unique features and customizations
There are certain unique features of YouTube which make it a great platform for its users.
● Plus, Pro, Business, Premium Plans
Vimeo is funded by its community and you have to purchase the plan to use it apart from the free features. Different Vimeo plans are:
Vimeo - $7/month
Pro - $20/month
Business - $50/month
Top-tier Vimeo Premium - $75/month.
● Make money with pay per view
Just like Google’s PPC program, Vimeo also features a pay per program view where viewers need to pay in order to watch certain videos. With this, you can sell your art anywhere in the country or worldwide and make money with it.
● Advanced analytics
The subscribers of Vimeo are offered different levels of analytics. You will get the analytics according to your subscription level. The analytics levels on Vimeo consist of Google Analytics integration, engagement graphs, custom reports, and a traffic dashboard.
● Web player branding
Vimeo allows the users to use their own branding and logo in their videos. It makes all the embedded videos share the same look and ends with an unsightly suggestions page.
● Domain-restricted embeds
Vimeo offers the users a feature of domain-restricted embeds. It means the users can set the domains to embed any particular or a set of videos. This feature lets you hide the video on Vimeo and make it visible on the allowed domain.
● Password protection
It is an extraordinary feature that Vimeo offers. The user can set a password for the particular video to restrict the video’s visibility. Only those people who will have access to the password will be able to watch that particular video.
● Replace video but keep URL
This one is also an amazing and unique feature of Vimeo. With this feature, you can replace any existing video with the new one by keeping the same URL. Also, it will keep the stats, comments, likes, etc as it is.
Part 2 Tips for a Great Slideshow Video
Videos are gaining much popularity these days. It is an easy way to connect with people and show emotions to them. In the same way, slideshow videos also are important in their place. Slides are the collection of traditional photos or negatives which are out of trend now. And slideshow videos are the perfect way to use those slides and relieve those faded memories with loved ones. Creating the slideshow video is also easy and can be done easily with the help of some tools. You don’t need to be professional, but the only need is to follow certain tips carefully. Here, we are sharing the essential tips to prepare a great slideshow video. Also, you will get to know about the best tool for video creation.
● Tell a story
Prepare the slideshow video in the form of storytelling. Whatever is the theme of your slideshow, prepare the script of the video right from the start. Make a meaningful and impressive story. Select and collect the raw materials according to the requirement.
● Keep it cohesive
The cohesion of photos or images is very important in a video slideshow. It is advised not to mix and match still photos and videos in 1 slideshow. Also, choose the photos belonging to the same color family. Mixing different varieties of photos divert the attention of the viewer. Also, one warm photo, then one cool and so on are not the efficient choices for a slideshow. All the images should appear as part of one color family and are similar to one another. Always maintain the quality of photos throughout the slideshow. Gradual jumps between grainy portrait mode photos and some screenshots, meanwhile photos of other modes lead to distracting the viewer and blurring their experience.
● Make it personal
Video slideshows are a powerful tool to show your personality and your personal message. The videos should contain your feelings. So, customize them and make them as personal as you can. Give your uniqueness to your slideshows. For this, you can customize the color palette, text, etc and make them unique and personal. So that the people with whom you share the videos may also feel your touch.
● Keep slideshow videos short
There might be different aims for creating a slideshow video. You might want to share it with loved ones or any of your friends’ circle. Or you might be wanting it to post as an ad on social media platforms such as Instagram, or Facebook. Whatever the purpose of your making the video, keep them concise and short. Short video clips are best for grabbing the attention of the viewers. Everyone does not find it interesting to watch long-form videos. If you are aiming to make a longer-form video slideshow which contains both images and video clips, then keep each photo for 3 to 5 seconds and each video clip a maximum of 20 seconds. It is recommended to maintain the user’s interest throughout.
● Create a storyboard to plan your slideshow video
As we have already discussed in the above point, the video should depict your story. Also, it should be in sync to make it more compelling. Creating a storyboard or outline is the perfect way to predict the right flow as well as choose the right elements for the video.
The storyboard helps to prepare a plan and develop the logical sequence of the photos. Also, if you want to add photos, video clips, texts, etc in a single slideshow, the storyboard can help to outline the sequence. With this, you will be able to create a video that will be logically correct.
● Add text to videos and images to convey your message clearly
Text or captions are very crucial to be added to the slideshow especially if you are preparing them for social media. People these days do watch the videos by keeping the sound off on social media. So, they will not be able to get your message without captions. Keep all your key messages highlighted in the video. The first few seconds of the video play an important role. It is the deciding factor whether the viewer will watch the whole video or will just bounce back. So, give a captivating hook to the slideshow to capture the viewer’s attention and make them hit the unmute button.
Wondershare Filmora Video Editor is an effective tool which can help you to create wonderful video slideshows. It provides all the functionalities which you need to make the slideshow convincing. You can make appealing videos to show your impressions to the viewers. It enables you to create slideshows with photos, videos, and captions. The color correction and gradient option in the Filmora allow you to change the look of the photos or old slides according to your choices. You can edit the slides with this tool, to make them cohesively right and create a slideshow out of them. In short, Filmora is the perfect way to make a slideshow video that can be interesting and engaging for the viewers.
For Win 7 or later (64-bit)
For macOS 10.12 or later

● Ending Thoughts →
● So, here we can conclude that Vimeo slideshow maker is an impressive platform. Despite having a smaller user base, it is gaining much popularity because of its unique features.
● Moreover, you can generate great videos by following the tips we have shared. By uploading those videos on Vimeo, you will be able to gain a decent audience base. If you are aiming to have a genuine and sophisticated fanbase for your videos, then Vimeo would be a great choice.
● Using Filmora will make your process of creating slideshows easy. The variety of features available by the tool will let you create wonderful storytelling out of your old memories.
Have you recently heard about Vimeo from any of your friends or colleagues? Or have you come through it and want to know more about it? Then here you can get all information needed about the platform. Vimeo slideshow creator is a wonderful tool launched by a group of filmmakers in 2004.

It has gained a lot of popularity over the past decade and appears as the competitor of largest video sharing giant YouTube. The platform has approximately 80 million users and 1 million subscribers. In some ways, Vimeo is even better than YouTube.
In this article
01 [What Is Vimeo for & Why It Become Popular](#Part 1)
02 [Tips for a Great Slideshow Video](#Part 2)
Part 1: What Is Vimeo for & Why It Become Popular
Vimeo is an online video streaming and editing tool which is designed for video creators and artists. The platform provides various tools to its users including monetization, marketing, collaboration, post-production, management, storage, etc. It provides a great user experience because it is ad-free. The mode of revenue for the owners of Vimeo is a software as a service (SaaS). They provide paid subscription plans for creating and editing videos, broadcasting tools, connecting with clients, etc.

It works in a “freemium” model. That means the users have limited access to the platform if they are using it for free. For example, a basic free membership allows the user to have access to a total of 5GB of storage and can upload 500MB on a weekly basis. As a free or paid member of Vimeo Slideshow maker, you can like, comment on videos, and at the same time save, watch, and upload them. Also, you can create playlists. What features you will be able to access totally depends on your membership level and plan.
Vimeo is becoming popular due to the following reasons:
01Vimeo offers better encoding and video quality
Vimeo is more focused on the quality of the video that gets uploaded on it. Its processing load is lighter and it follows strict guidelines to accept videos. The platform uses better encoding techniques to maximize the quality of the video.
02Vimeo offers greater prestige
Being on Vimeo is a matter of prestige. Vimeo videos are considered more professional as compared to Youtube. There is a limit on what kind of channels one can run on Vimeo.
03Vimeo has a more sophisticated audience
Because of the high quality of videos and its prestigious nature, Vimeo has a more sophisticated fan base. The content offered by the platform is more knowledgeable and determined. The audience here is more sophisticated. Also, the creators are more insightful, mature, and constructive.
04Vimeo offers greater artistic freedom
Vimeo always welcomes the creators with their videos to show their art. It offers artistic freedom to its users. The platform checks the artistic value of the video and talent of the creator and allows them to upload, unlike Youtube.
05Vimeo boasts unique features and customizations
There are certain unique features of YouTube which make it a great platform for its users.
● Plus, Pro, Business, Premium Plans
Vimeo is funded by its community and you have to purchase the plan to use it apart from the free features. Different Vimeo plans are:
Vimeo - $7/month
Pro - $20/month
Business - $50/month
Top-tier Vimeo Premium - $75/month.
● Make money with pay per view
Just like Google’s PPC program, Vimeo also features a pay per program view where viewers need to pay in order to watch certain videos. With this, you can sell your art anywhere in the country or worldwide and make money with it.
● Advanced analytics
The subscribers of Vimeo are offered different levels of analytics. You will get the analytics according to your subscription level. The analytics levels on Vimeo consist of Google Analytics integration, engagement graphs, custom reports, and a traffic dashboard.
● Web player branding
Vimeo allows the users to use their own branding and logo in their videos. It makes all the embedded videos share the same look and ends with an unsightly suggestions page.
● Domain-restricted embeds
Vimeo offers the users a feature of domain-restricted embeds. It means the users can set the domains to embed any particular or a set of videos. This feature lets you hide the video on Vimeo and make it visible on the allowed domain.
● Password protection
It is an extraordinary feature that Vimeo offers. The user can set a password for the particular video to restrict the video’s visibility. Only those people who will have access to the password will be able to watch that particular video.
● Replace video but keep URL
This one is also an amazing and unique feature of Vimeo. With this feature, you can replace any existing video with the new one by keeping the same URL. Also, it will keep the stats, comments, likes, etc as it is.
Part 2 Tips for a Great Slideshow Video
Videos are gaining much popularity these days. It is an easy way to connect with people and show emotions to them. In the same way, slideshow videos also are important in their place. Slides are the collection of traditional photos or negatives which are out of trend now. And slideshow videos are the perfect way to use those slides and relieve those faded memories with loved ones. Creating the slideshow video is also easy and can be done easily with the help of some tools. You don’t need to be professional, but the only need is to follow certain tips carefully. Here, we are sharing the essential tips to prepare a great slideshow video. Also, you will get to know about the best tool for video creation.
● Tell a story
Prepare the slideshow video in the form of storytelling. Whatever is the theme of your slideshow, prepare the script of the video right from the start. Make a meaningful and impressive story. Select and collect the raw materials according to the requirement.
● Keep it cohesive
The cohesion of photos or images is very important in a video slideshow. It is advised not to mix and match still photos and videos in 1 slideshow. Also, choose the photos belonging to the same color family. Mixing different varieties of photos divert the attention of the viewer. Also, one warm photo, then one cool and so on are not the efficient choices for a slideshow. All the images should appear as part of one color family and are similar to one another. Always maintain the quality of photos throughout the slideshow. Gradual jumps between grainy portrait mode photos and some screenshots, meanwhile photos of other modes lead to distracting the viewer and blurring their experience.
● Make it personal
Video slideshows are a powerful tool to show your personality and your personal message. The videos should contain your feelings. So, customize them and make them as personal as you can. Give your uniqueness to your slideshows. For this, you can customize the color palette, text, etc and make them unique and personal. So that the people with whom you share the videos may also feel your touch.
● Keep slideshow videos short
There might be different aims for creating a slideshow video. You might want to share it with loved ones or any of your friends’ circle. Or you might be wanting it to post as an ad on social media platforms such as Instagram, or Facebook. Whatever the purpose of your making the video, keep them concise and short. Short video clips are best for grabbing the attention of the viewers. Everyone does not find it interesting to watch long-form videos. If you are aiming to make a longer-form video slideshow which contains both images and video clips, then keep each photo for 3 to 5 seconds and each video clip a maximum of 20 seconds. It is recommended to maintain the user’s interest throughout.
● Create a storyboard to plan your slideshow video
As we have already discussed in the above point, the video should depict your story. Also, it should be in sync to make it more compelling. Creating a storyboard or outline is the perfect way to predict the right flow as well as choose the right elements for the video.
The storyboard helps to prepare a plan and develop the logical sequence of the photos. Also, if you want to add photos, video clips, texts, etc in a single slideshow, the storyboard can help to outline the sequence. With this, you will be able to create a video that will be logically correct.
● Add text to videos and images to convey your message clearly
Text or captions are very crucial to be added to the slideshow especially if you are preparing them for social media. People these days do watch the videos by keeping the sound off on social media. So, they will not be able to get your message without captions. Keep all your key messages highlighted in the video. The first few seconds of the video play an important role. It is the deciding factor whether the viewer will watch the whole video or will just bounce back. So, give a captivating hook to the slideshow to capture the viewer’s attention and make them hit the unmute button.
Wondershare Filmora Video Editor is an effective tool which can help you to create wonderful video slideshows. It provides all the functionalities which you need to make the slideshow convincing. You can make appealing videos to show your impressions to the viewers. It enables you to create slideshows with photos, videos, and captions. The color correction and gradient option in the Filmora allow you to change the look of the photos or old slides according to your choices. You can edit the slides with this tool, to make them cohesively right and create a slideshow out of them. In short, Filmora is the perfect way to make a slideshow video that can be interesting and engaging for the viewers.
For Win 7 or later (64-bit)
For macOS 10.12 or later

● Ending Thoughts →
● So, here we can conclude that Vimeo slideshow maker is an impressive platform. Despite having a smaller user base, it is gaining much popularity because of its unique features.
● Moreover, you can generate great videos by following the tips we have shared. By uploading those videos on Vimeo, you will be able to gain a decent audience base. If you are aiming to have a genuine and sophisticated fanbase for your videos, then Vimeo would be a great choice.
● Using Filmora will make your process of creating slideshows easy. The variety of features available by the tool will let you create wonderful storytelling out of your old memories.
Have you recently heard about Vimeo from any of your friends or colleagues? Or have you come through it and want to know more about it? Then here you can get all information needed about the platform. Vimeo slideshow creator is a wonderful tool launched by a group of filmmakers in 2004.

It has gained a lot of popularity over the past decade and appears as the competitor of largest video sharing giant YouTube. The platform has approximately 80 million users and 1 million subscribers. In some ways, Vimeo is even better than YouTube.
In this article
01 [What Is Vimeo for & Why It Become Popular](#Part 1)
02 [Tips for a Great Slideshow Video](#Part 2)
Part 1: What Is Vimeo for & Why It Become Popular
Vimeo is an online video streaming and editing tool which is designed for video creators and artists. The platform provides various tools to its users including monetization, marketing, collaboration, post-production, management, storage, etc. It provides a great user experience because it is ad-free. The mode of revenue for the owners of Vimeo is a software as a service (SaaS). They provide paid subscription plans for creating and editing videos, broadcasting tools, connecting with clients, etc.

It works in a “freemium” model. That means the users have limited access to the platform if they are using it for free. For example, a basic free membership allows the user to have access to a total of 5GB of storage and can upload 500MB on a weekly basis. As a free or paid member of Vimeo Slideshow maker, you can like, comment on videos, and at the same time save, watch, and upload them. Also, you can create playlists. What features you will be able to access totally depends on your membership level and plan.
Vimeo is becoming popular due to the following reasons:
01Vimeo offers better encoding and video quality
Vimeo is more focused on the quality of the video that gets uploaded on it. Its processing load is lighter and it follows strict guidelines to accept videos. The platform uses better encoding techniques to maximize the quality of the video.
02Vimeo offers greater prestige
Being on Vimeo is a matter of prestige. Vimeo videos are considered more professional as compared to Youtube. There is a limit on what kind of channels one can run on Vimeo.
03Vimeo has a more sophisticated audience
Because of the high quality of videos and its prestigious nature, Vimeo has a more sophisticated fan base. The content offered by the platform is more knowledgeable and determined. The audience here is more sophisticated. Also, the creators are more insightful, mature, and constructive.
04Vimeo offers greater artistic freedom
Vimeo always welcomes the creators with their videos to show their art. It offers artistic freedom to its users. The platform checks the artistic value of the video and talent of the creator and allows them to upload, unlike Youtube.
05Vimeo boasts unique features and customizations
There are certain unique features of YouTube which make it a great platform for its users.
● Plus, Pro, Business, Premium Plans
Vimeo is funded by its community and you have to purchase the plan to use it apart from the free features. Different Vimeo plans are:
Vimeo - $7/month
Pro - $20/month
Business - $50/month
Top-tier Vimeo Premium - $75/month.
● Make money with pay per view
Just like Google’s PPC program, Vimeo also features a pay per program view where viewers need to pay in order to watch certain videos. With this, you can sell your art anywhere in the country or worldwide and make money with it.
● Advanced analytics
The subscribers of Vimeo are offered different levels of analytics. You will get the analytics according to your subscription level. The analytics levels on Vimeo consist of Google Analytics integration, engagement graphs, custom reports, and a traffic dashboard.
● Web player branding
Vimeo allows the users to use their own branding and logo in their videos. It makes all the embedded videos share the same look and ends with an unsightly suggestions page.
● Domain-restricted embeds
Vimeo offers the users a feature of domain-restricted embeds. It means the users can set the domains to embed any particular or a set of videos. This feature lets you hide the video on Vimeo and make it visible on the allowed domain.
● Password protection
It is an extraordinary feature that Vimeo offers. The user can set a password for the particular video to restrict the video’s visibility. Only those people who will have access to the password will be able to watch that particular video.
● Replace video but keep URL
This one is also an amazing and unique feature of Vimeo. With this feature, you can replace any existing video with the new one by keeping the same URL. Also, it will keep the stats, comments, likes, etc as it is.
Part 2 Tips for a Great Slideshow Video
Videos are gaining much popularity these days. It is an easy way to connect with people and show emotions to them. In the same way, slideshow videos also are important in their place. Slides are the collection of traditional photos or negatives which are out of trend now. And slideshow videos are the perfect way to use those slides and relieve those faded memories with loved ones. Creating the slideshow video is also easy and can be done easily with the help of some tools. You don’t need to be professional, but the only need is to follow certain tips carefully. Here, we are sharing the essential tips to prepare a great slideshow video. Also, you will get to know about the best tool for video creation.
● Tell a story
Prepare the slideshow video in the form of storytelling. Whatever is the theme of your slideshow, prepare the script of the video right from the start. Make a meaningful and impressive story. Select and collect the raw materials according to the requirement.
● Keep it cohesive
The cohesion of photos or images is very important in a video slideshow. It is advised not to mix and match still photos and videos in 1 slideshow. Also, choose the photos belonging to the same color family. Mixing different varieties of photos divert the attention of the viewer. Also, one warm photo, then one cool and so on are not the efficient choices for a slideshow. All the images should appear as part of one color family and are similar to one another. Always maintain the quality of photos throughout the slideshow. Gradual jumps between grainy portrait mode photos and some screenshots, meanwhile photos of other modes lead to distracting the viewer and blurring their experience.
● Make it personal
Video slideshows are a powerful tool to show your personality and your personal message. The videos should contain your feelings. So, customize them and make them as personal as you can. Give your uniqueness to your slideshows. For this, you can customize the color palette, text, etc and make them unique and personal. So that the people with whom you share the videos may also feel your touch.
● Keep slideshow videos short
There might be different aims for creating a slideshow video. You might want to share it with loved ones or any of your friends’ circle. Or you might be wanting it to post as an ad on social media platforms such as Instagram, or Facebook. Whatever the purpose of your making the video, keep them concise and short. Short video clips are best for grabbing the attention of the viewers. Everyone does not find it interesting to watch long-form videos. If you are aiming to make a longer-form video slideshow which contains both images and video clips, then keep each photo for 3 to 5 seconds and each video clip a maximum of 20 seconds. It is recommended to maintain the user’s interest throughout.
● Create a storyboard to plan your slideshow video
As we have already discussed in the above point, the video should depict your story. Also, it should be in sync to make it more compelling. Creating a storyboard or outline is the perfect way to predict the right flow as well as choose the right elements for the video.
The storyboard helps to prepare a plan and develop the logical sequence of the photos. Also, if you want to add photos, video clips, texts, etc in a single slideshow, the storyboard can help to outline the sequence. With this, you will be able to create a video that will be logically correct.
● Add text to videos and images to convey your message clearly
Text or captions are very crucial to be added to the slideshow especially if you are preparing them for social media. People these days do watch the videos by keeping the sound off on social media. So, they will not be able to get your message without captions. Keep all your key messages highlighted in the video. The first few seconds of the video play an important role. It is the deciding factor whether the viewer will watch the whole video or will just bounce back. So, give a captivating hook to the slideshow to capture the viewer’s attention and make them hit the unmute button.
Wondershare Filmora Video Editor is an effective tool which can help you to create wonderful video slideshows. It provides all the functionalities which you need to make the slideshow convincing. You can make appealing videos to show your impressions to the viewers. It enables you to create slideshows with photos, videos, and captions. The color correction and gradient option in the Filmora allow you to change the look of the photos or old slides according to your choices. You can edit the slides with this tool, to make them cohesively right and create a slideshow out of them. In short, Filmora is the perfect way to make a slideshow video that can be interesting and engaging for the viewers.
For Win 7 or later (64-bit)
For macOS 10.12 or later

● Ending Thoughts →
● So, here we can conclude that Vimeo slideshow maker is an impressive platform. Despite having a smaller user base, it is gaining much popularity because of its unique features.
● Moreover, you can generate great videos by following the tips we have shared. By uploading those videos on Vimeo, you will be able to gain a decent audience base. If you are aiming to have a genuine and sophisticated fanbase for your videos, then Vimeo would be a great choice.
● Using Filmora will make your process of creating slideshows easy. The variety of features available by the tool will let you create wonderful storytelling out of your old memories.
TOP 10 Types of Video Framing: From Novice to Master
Are you in search of the best practice to frame a video? If yes, then cheer up, as we have got you covered! In this guide, we will share the top 6 types of video framing that even novice and expert users can master.
Framing videos involves focusing on a specific subject and blocking out the irrelevant things in the background. Depending on the results you want, video framing can differ a lot. The information below will help you learn about different frames and how to utilize them effectively.
So, without further ado, let’s get into the deets.
- 01 Establishing Shots
- 02 Single Shot
- 03 Two Shot/Group Shot
- 04 Over-the-shoulder (OTS)
- 05 Insert Shot
- 06 POV Shot (OTS)
Part1 Basic Knowledge About Different Framing
Because framing is related to capturing or focusing an object by the camera lens, it can vary depending on your desired shot. Let’s start with the full-shot first and understand how it works.
01 Full Shot (FS)
Remember the shot of Marvel’s Guardians of the Galaxy, where all the players are focused in one wide frame? This excerpt is a practical example of what a full shot looks like. Full-shot video framing is particularly common in action or thriller movies where the creator wants to generate suspense in the audience.
As the name indicates, a full shot often emphasizes the scenery as your subject fills the frame. Like the background isn’t ignored or blurred out; instead, it isn’t overly stressed as well. In most cases, the camera starts with a wide-angle shot and then eventually ends with focusing on the subject.
A full-camera shot greatly emphasizes the physical presence of the character. It tracks the subject’s movements, gestures, or body language, making it the focal point. As a result, the shot obtained delivers a better understanding of actions and interactions among the character and its surroundings.
02 Medium Shot (MS)
We often see friends in movies, going to a casino, or playing cards at a bar. What do we observe in that shot? Hand movements, facial expressions, body language, and a little context of what is happening in the background. This shot is known as the medium shot and is often called the ¾ shot.
Using the medium shot video framing technique, the camera lens allows the viewers to see the background while still focusing on the main character. It’s like you will know what is happening at the back but still remain close to the character’s emotions and gestures.
A medium shot usually begins by showing the subject from the knees to his face. In other cases, the shot can also start from the character’s waist to the top of their head. Compared to long shots, a medium shot takes you closer to the subject’s emotions.
For example, in The Princess Diary, you can see how medium-shot video framing has been useful in portraying comedic scenes. You can see Mia reaching out for plates and glasses around the tables and her eyes squinting to concentrate on the process. The medium shot captures even the smallest emotions while focusing on the background.
03 Close-Up (CU)
When the subject’s head and face take up most of the frame, framing videos is known as a close-up shot. And a particular example of this shot can be spotted in the airport scene in “Casablanca.” This scene shows how the camera lens takes various shots before ending up on the actor’s face, showcasing a number of emotions and intimacy.
A close-up shot is an eye-level shot, and as a result, it takes the subject to the forefront. As a result, this shot establishes a distinct sense of connection between the audience and the character. Additionally, the environmental distraction is kept minimal throughout this shot. This setup helps maintain the emotional impact that the shot will portray.
Some of the common emotions that would be captured using close-up video framing techniques include:
- Tear-filled gaze
- Furrowed brow
- Subtle smile
Cinematographers often use such shots to intensify climaxes. These shots can be viewed as a window to the characters’ souls, allowing viewers to adapt the emotions on another level.
04 Extreme Close-Up (XCU)
To understand the extreme close-up video framing technique, let us illustrate the movie that remained our favorite action thriller while growing up: Minority Report (2002). In this movie, the shots briefly focus on the character’s eyes before hopping into the future view. This extreme close shot serves as a crucial plot to develop thematic elements in the audience.
So, an extremely close shot focuses on specific details of a character. This can be either the subject’s eyes, ears, or mouth. However, the shot is not often employed casually. Instead, it is used in a stance where it is appropriate and when there is a need to develop heightened emotion among the viewers.
You can see this shot as a magnifying glass that draws attention to even the smallest emotion that would have gone unnoticed otherwise.
Part2 Master framing types
Don’t know how to master framing types? No worries, we have a comprehensive guide on that! First of all, let’s start with the most basic way to frame a video:
01 Establishing Shots
An establishing shot is usually used to develop a context for the next upcoming scene. It is often a movie’s first scene and portrays an extremely wide shot of the context. This frame on the video indicates the location and time of the scene to the audience to engage with them on a deeper level.
One of the least-known things about an establishing shot is that it doesn’t require a narrative to explain what is happening. Instead, it is shot alone, and the context is shot so that the audience gets to know everything as soon as they see the excerpt.
An amazing example of establishing a shot can be seen in Stanely Kubrick’s horror film, The Shining. In the movie’s opening scene, the camera goes through the forest and mountains before getting onto the mountaintop hotel where the action occurs.
02 Single Shot
A single shot frames a video that includes a single subject or character. It occurs when a character is talking or reacting to a scenario. Here, remember that if the lens shifts focus from a subject, it is not a single shot.
In the movie Extraction 2020, you can see a single shot being utilized when the character goes on to rescue his son from the kidnappers. The shot extends a long way, including through a car crash, weapon chasing, and that iconic Hemsworth sliding off a building into a brutal fight. And the incredible part was that all of this was captured in a single shot.
03 Two Shot/Group Shot
As the name indicates, a two-shot or a group shot is used to frame a video that involves more than one character. It could be two people conversing or friends sitting at a cafe gossiping. This shot is particularly helpful in portraying the relationship between the characters in the frame.
A good example of two-shot video framing can be seen in the movie Silverado. During the final shooting scene, you can see two cowboys standing far apart while facing each other. Here, the two-shot technique emphasizes tension before the cowboys draw their guns.
04 Over-the-shoulder (OTS)
OTS, or Over-the-shoulder, is the most used shot in framing videos for making movies. To understand how this shot works, let us take an example of two subjects, one named A and the other named B. Now, A is sitting right in front of subject B. Here; the shot is executed by focusing on subject A from the shoulder of subject B. The basic purpose of the shot is to fill the conversation or the meeting between the subjects.
To understand this situation better, let’s take an example from the movie How to Train Your Dragon. In the scene, Hiccup is seen having a conversation with his father. Here, when Hiccup is talking, the camera is focused on him over his father’s shoulder. And when his father talks, the shot is taken over the shoulder of Hiccup.
05 Insert Shot
Insert short framing technique uses selective focus to draw the audience’s attention to the subject. Whether it be an object or merely a piece of information, insert shot has always been effective in emphasizing details.
For example, in The X-Files, an insert shot is used to provide the audience with a look at the file of Scully. This insert shot reveals the most shocking revelations in the file, including a tissue sample. Additionally, the file insert shot also shows how shady Mulder is.
06 POV Shot
A POV shot is used to frame a video in a way that shows what a character is doing. You can take this as a shot showing the world from the character’s perspective. Our modern-day games, including Call of Duty Black Ops, are a common example of such POV shots.
The movie Friday the 13th is an iconic example of a POV shot frame on video. If you remember, the movie revolved around a killer who wasn’t identified until the end. So, the audience watched the film from the killer’s perspective until he was recognized.
Conclusion
To sum it up, mastering the art of video framing, from full shots to POV shots, is an exciting journey that helps you to weave exciting stories. Understanding these techniques will empower you to craft a compelling narrative to captivate your audience, whether you are a beginner or a professional.
So, begin with framing videos now and let your work speak volumes!
Also read:
- How to Edit FLV Video Files with FLV Editor Windows, Mac,Android, iPhone & Online for 2024
- In 2024, How to Make a Slideshow with Movavi Slideshow Maker
- New 2024 Approved How to Make a Movie with Windows Movie Maker?
- Updated In 2024, How Have Game Recording Software Improved Their Stature in the Market? An Overview
- Updated In 2024, How to Get VHS Filter and Glitch Filter to Your Images or Videos?
- Updated 2024 Approved How to Add a Custom Transition to OBS
- New In 2024, How to Add Subtitles in QuickTime Player?
- 2024 Approved Step by Step to Rotate Video Using KMPlayer
- New Explore the List of the Top Six Online Video Speed Controllers for Chrome, Safari, and Firefox for 2024
- In 2024, Deep Learning of AI Video Recognition - Guide
- In 2024, How to Create Intro with Renderforest
- 2024 Approved How to Use Renderforest Intro Video Maker
- Want to Add the Amazing Video Text Effects that You Generally See on Video Streaming Platforms? Use Filmora to Add Popular Video Text Effects Instantly
- Updated Do You Know How Boring a Video Can Be with Silent Moments? Some Tools with Silent Detection Features Help You Delete Those Moments
- In 2024, Do You Have the Habit to Create Subtitle for Your Video? You Can Always Add Open and Close Subtitles to Your Video to Make It Perfect. Follow This Article to Learn More About It
- New 2024 Approved Quick Answer What Is a GIF File
- Updated In 2024, How to Add Camera Shake to Video in Adobe After Effects
- Updated Creating Flawless Slow-Motion Videos Is Every Content Creators Dream. Learn About DaVinci Resolve Slow-Motion Video Creation, Amongst Other Tools
- Updated Here Are the Steps to Crop a Video in Sony Vegas Pro Step 1 Click on Import and Import the Video to Be Edited. Click on It and Drag-Drop to Timeline
- Updated How To Film a Slow Motion Video
- New 2024 Approved How to Blur a Still or Moving Part of Video
- 2024 Approved Zoom In and Out on Discord (Desktop + App + Browser Solutions)
- How to Make a Video by Mouse with Filmora for 2024
- New In 2024, Top iOS Solutions Finding Premium Slow Motion Apps For Video Creation
- New Create Risograph Effect In Photoshop A Beginners Guide
- New A Detailed Guid to Remove Background From a Video in Premier Pro for 2024
- In 2024, Are You Excited to Learn About a Video Maker with a Song? Do You Want to Create a Video Embedded with Audio Tracks to Entertain the Viewers? Then, This Guide Assists You to Build Interesting Videos Along with Songs Precisely
- 2024 Approved How to Add Text Behind Objects in Video
- In 2024, How to Add Text in Adobe Rush
- Top 10 Sound Extractors to Extract Sound From Video 2023 for 2024
- New Embrace Creativity in Your Media by Replacing Backgrounds. Learn to Replace the Sky in Lightroom Through the Steps and Details Discussed in This Article
- Merging MP4 Videos Made Simple Top 5 Online Tools for 2024
- Updated Create Dynamic Text Animation in Filmora
- Updated 2024 Approved Splitting Video in VSDC Step by Step
- Updated Top List Best VHS Sound Effect That You Can Use in Video Making for 2024
- New How Long Does It Take To Edit A Video
- Final Cut Pro for iPad
- New Do You Know What Is Motion Blur in Fortnite? Read This Article to Find Out How to Apply Motion Blur in Fortnite Efficiently and with Ease
- Updated 5 Tips for Aquasoft Slideshow for 2024
- New In 2024, How to Make GIFs From Videos on Mac
- New Best Slow Motion Camera Apps for Best Content Creation
- 2024 Approved How to Trim Video in Quicktime Player on Mac
- Guide to Create Intro Video with KineMaster
- Updated Keyframes Interval Everything You Need To Know for 2024
- 2024 Approved How to Merge Videos in HandBrake? Expectation Vs. Reality
- In 2024, Here are Some Pro Tips for Pokemon Go PvP Battles On Poco X5 | Dr.fone
- In 2024, How to Detect and Stop mSpy from Spying on Your Motorola Moto G Stylus 5G (2023) | Dr.fone
- Top 10 Telegram Spy Tools On Vivo S17t for Parents | Dr.fone
- Effective Ways To Fix Checkra1n Error 31 On iPhone 14 Plus
- How to identify some outdated your hardware drivers with Windows Device Manager on Windows 11/10/7
- Set Your Preferred Job Location on LinkedIn App of your Nokia C12 Plus | Dr.fone
- In 2024, 9 Mind-Blowing Tricks to Hatch Eggs in Pokemon Go Without Walking On Vivo Y02T | Dr.fone
- Updated In 2024, What Is AI Pixel Art Generator?
- How Many Attempts To Unlock Apple iPhone 15 | Dr.fone
- Can You Unlock Apple iPhone 15 Plus After Forgetting the Passcode? | Dr.fone
- In 2024, How to Cast Vivo Y78 5G to Computer for iPhone and Android? | Dr.fone
- Spotify Keeps Crashing A Complete List of Fixes You Can Use on Sony Xperia 5 V | Dr.fone
- How to Cast Infinix Smart 8 HD Screen to PC Using WiFi | Dr.fone
- Title: How to Create A Freeze Frame Sequence in Video
- Author: Chloe
- Created at : 2024-05-20 03:37:27
- Updated at : 2024-05-21 03:37:27
- Link: https://ai-editing-video.techidaily.com/how-to-create-a-freeze-frame-sequence-in-video/
- License: This work is licensed under CC BY-NC-SA 4.0.


