
:max_bytes(150000):strip_icc():format(webp)/GettyImages-769729481-5bd367dcc9e77c007c015257.jpg)
How to Create a Glitch Text Effect, In 2024
How to Create a Glitch Text Effect?
Have you noticed the glitching effect that appears when you play a video or in games, creating a sporadic shaky effect on video edges? While this usually signifies a systematic software issue in these cases, the effect itself can work to create a dynamic visual style for different objects when done intentionally.
In fact, many video editors today use the glitch effect on elements in their videos, like the introductory title in movies or trailers. It creates a futuristic look to the text, which highly appeals to viewers who engage more in the video itself.
Suppose you are looking to add a similar effect to the title of your video project or other text-based content that you will add to your video, use a good tool for that. Wondershare Filmora , in particular, makes adding this effect very simple. Let’s learn how.
1. Launch the Filmora software
Free Download For Win 7 or later(64-bit)
Free Download For macOS 10.14 or later
The first step in preparing a customized glitch text effect is getting your software ready.
Visit the official website of Wondershare Filmora and tap on the Download button at the top to get the free software. The features necessary to create this effect are available under the free version, so you can avoid the plan upgradation process at this point.
After clicking the free download icon, the software’s installer version will save into your device automatically. Double-click on and agree with the related Terms and Conditions prompt. Then, tap on the Install button, and the software will take a few seconds to complete the installation process fully.

After that, click on the Start Now button to launch the software on your Mac or Windows computer that you are using. Filmora will open on its homepage.
2. Add the default title to timeline
Next, click the Create New Project button on the main page to access the editor section. Then, you have to click on the Titles tab and choose the Default Title option from the menu.
Drag it down from the media library section to the timeline and drop it in the Track 2 row. After that, move the play head with your cursor to the 1-second and the 10th frame on the timeline. Then, hold and move this clip until the end part of the clip is at this mark.

3. Adjust the font of the title
Next, double-click on this clip on the editor timeline to open the text editing window. Here, under the Preset section, change the title font to what to want to first word of your title to be.
Change the font style to a bigger bold option like Impact and increase the font size to 100. Then, scroll a little downward and tap on the Text Spacing option. Increase this value by 5 and press the OK button when you are done.

4. Add and copy all of the word clips
After adjusting the text font, tap on this clip on the timeline and copy it. Then, paste it just after the first clip ends, reducing its duration to around 1 second.
Then, double-click on the copied clip to open the text editing window. Click on the section where you can add the text and change it to the second word of your title. Again, copy this clip and paste it next to it, adjust it to be one second long, double-click on it to adjust the text to read the third word, and so on.

Continue until all of your intro’s words are added in these clip forms.
5. Create and add the snapshots
Following the previous step, click on the My Media section. Then, tap on the first clip in the collection and tap on the Snapshot icon at the end of the editing toolbar right above the timeline. Repeat this step for all the clips you have added until a snapshot of each of the words is stored in the media library.
Next, you have to grab hold of the first snapshot that you click and move it to the Track 1 of the timeline. Use the cursor to hold it and reduce the size of the clip to the same amount as the first clip on Track 1. To be sure, you can place the playhead at this point to see that the ending time for both clips is aligned.

6. Adjust the text effect for the first word
You have to click on the first-word snapshot in Track 1 of the Filmora editing timeline and double-click on it. Next, when the text editing window opens, you must change the Scale section to display the value of 290%. Following that, click on the slider in the Opacity parameter and decrease it to the 7% mark. Then, press the OK button.
On the timeline, right-click on this edited clip and choose the “Copy Effects” option from the drop-down menu.

7. Edit the snapshots for all words
After making changes to the first word, you must take hold of the second word’s snapshot from the media library. Drag and then drop it onto Track 1 of the editing timeline right next to the first clip. Then, hold the edge of this clip and reduce its size to fit the same duration as the second clip adjacent to it on Track 2.
Following that, you must choose this clip on Track 1 and right-click on top of it. Click on the “Paste Effects” option from the next drop-down menu, and the same adjustments will apply to this clip.

Repeat this step with all of the next snapshots of the following words.
8. Add the first effect layer
Next, you have to add stylish effects to your text. For that, you must tap on the Effects tab from the top toolbar of Filmora- a list of many effects collections will appear on the left panel.
Scroll down until you reach the Filmstock option. You must click on it and find the Flicker option from the list. Under this collection, there are many options available. You must choose the Video_seg effect and drag it to the editing timeline above Track 2.

At this point, ensure the effect falls right above the first and second clip parts in the track below. Tap on the edges of this clip to reduce the size of the video effect, taking careful note to keep the clip 8 frames long overall.
Then, copy the cut-down effect from Track 3 and paste it at every intersectional point between the separated word-based clips in Track 2.

9. Zoom in to edit the first effect layer
Following this, you must zoom into the timeline for a better view and editing control for the next part.
Go to the Effects tab at the top and choose the Filters collection next. Under it, choose the Chaos 1 effect option, drag it down to the timeline, and place it above the previous clip on Track 4. Adjust the starting edge of this clip to have the same starting point as the Video_seg effect on Track 3 with an overall 8-frame duration.

10. Edit the Effect
Next, you have to double-click on this clip to open the editing window for this effect. In this section, go to the Frequency parameter and increase the slider to 400. Following that, click on the Position X parameter and move the slider to the 0.20 point. Next, do the same for the Position Y parameter, but to the 0.70 point.
Change the Position Z parameter by typing the value 40 and disable the RGB Separate setting. Then, press the OK button and go to the timeline again.

11. Adjust the Glitch effects
Click on the effect clip on Track 4 and copy it. Please do the same as you did for the effect in Track 3 and paste it at the same locations between the clips in this track.
Afterward, go to the Effects tab again and choose the Filmstock tab. Among the collections here, you have to choose the Glitch option and select Glitch Stripe 1 from the collection. For an easier searching experience, you can directly type the effect in the search bar under the Effects tab.

Then, drag and drop it on Track 5 of the timeline right above the previous effect and reduce its duration to the same level as the first two effects. Copy it and then paste the clip again for each clip-to-clip intersection.
After this part, drag the Glitch Dispersion effect down to the timeline. Place it above the previous effect and adjust the clip’s size to the same length. Again, copy the effect and repeat the steps again. Next, repeat the same whole process with the Negative Flicker effect from the Flicker collection on Track 7.

12. See the preview and save the file
Finally, you are done adding all the effects, and you have to click on the Render Preview icon in the toolbar above the timeline. Then, press the Play button on the Preview window to see the full glitch text effect play out properly.

Conclusion
Now, you are done with creating a visually exciting and dynamic look for your introductory or ending title in the video using the glitch effect. For the best results, you should practice this process sometimes to get used to it and even make certain preferential changes to the font style. Ultimately, with the help of this software, you can expect a high-quality title look and use it for further video editing work.
Free Download For macOS 10.14 or later
The first step in preparing a customized glitch text effect is getting your software ready.
Visit the official website of Wondershare Filmora and tap on the Download button at the top to get the free software. The features necessary to create this effect are available under the free version, so you can avoid the plan upgradation process at this point.
After clicking the free download icon, the software’s installer version will save into your device automatically. Double-click on and agree with the related Terms and Conditions prompt. Then, tap on the Install button, and the software will take a few seconds to complete the installation process fully.
After that, click on the Start Now button to launch the software on your Mac or Windows computer that you are using. Filmora will open on its homepage.
2. Add the default title to timeline
Next, click the Create New Project button on the main page to access the editor section. Then, you have to click on the Titles tab and choose the Default Title option from the menu.
Drag it down from the media library section to the timeline and drop it in the Track 2 row. After that, move the play head with your cursor to the 1-second and the 10th frame on the timeline. Then, hold and move this clip until the end part of the clip is at this mark.
3. Adjust the font of the title
Next, double-click on this clip on the editor timeline to open the text editing window. Here, under the Preset section, change the title font to what to want to first word of your title to be.
Change the font style to a bigger bold option like Impact and increase the font size to 100. Then, scroll a little downward and tap on the Text Spacing option. Increase this value by 5 and press the OK button when you are done.
4. Add and copy all of the word clips
After adjusting the text font, tap on this clip on the timeline and copy it. Then, paste it just after the first clip ends, reducing its duration to around 1 second.
Then, double-click on the copied clip to open the text editing window. Click on the section where you can add the text and change it to the second word of your title. Again, copy this clip and paste it next to it, adjust it to be one second long, double-click on it to adjust the text to read the third word, and so on.
Continue until all of your intro’s words are added in these clip forms.
5. Create and add the snapshots
Following the previous step, click on the My Media section. Then, tap on the first clip in the collection and tap on the Snapshot icon at the end of the editing toolbar right above the timeline. Repeat this step for all the clips you have added until a snapshot of each of the words is stored in the media library.
Next, you have to grab hold of the first snapshot that you click and move it to the Track 1 of the timeline. Use the cursor to hold it and reduce the size of the clip to the same amount as the first clip on Track 1. To be sure, you can place the playhead at this point to see that the ending time for both clips is aligned.
6. Adjust the text effect for the first word
You have to click on the first-word snapshot in Track 1 of the Filmora editing timeline and double-click on it. Next, when the text editing window opens, you must change the Scale section to display the value of 290%. Following that, click on the slider in the Opacity parameter and decrease it to the 7% mark. Then, press the OK button.
On the timeline, right-click on this edited clip and choose the “Copy Effects” option from the drop-down menu.
7. Edit the snapshots for all words
After making changes to the first word, you must take hold of the second word’s snapshot from the media library. Drag and then drop it onto Track 1 of the editing timeline right next to the first clip. Then, hold the edge of this clip and reduce its size to fit the same duration as the second clip adjacent to it on Track 2.
Following that, you must choose this clip on Track 1 and right-click on top of it. Click on the “Paste Effects” option from the next drop-down menu, and the same adjustments will apply to this clip.
Repeat this step with all of the next snapshots of the following words.
8. Add the first effect layer
Next, you have to add stylish effects to your text. For that, you must tap on the Effects tab from the top toolbar of Filmora- a list of many effects collections will appear on the left panel.
Scroll down until you reach the Filmstock option. You must click on it and find the Flicker option from the list. Under this collection, there are many options available. You must choose the Video_seg effect and drag it to the editing timeline above Track 2.
At this point, ensure the effect falls right above the first and second clip parts in the track below. Tap on the edges of this clip to reduce the size of the video effect, taking careful note to keep the clip 8 frames long overall.
Then, copy the cut-down effect from Track 3 and paste it at every intersectional point between the separated word-based clips in Track 2.
9. Zoom in to edit the first effect layer
Following this, you must zoom into the timeline for a better view and editing control for the next part.
Go to the Effects tab at the top and choose the Filters collection next. Under it, choose the Chaos 1 effect option, drag it down to the timeline, and place it above the previous clip on Track 4. Adjust the starting edge of this clip to have the same starting point as the Video_seg effect on Track 3 with an overall 8-frame duration.
10. Edit the Effect
Next, you have to double-click on this clip to open the editing window for this effect. In this section, go to the Frequency parameter and increase the slider to 400. Following that, click on the Position X parameter and move the slider to the 0.20 point. Next, do the same for the Position Y parameter, but to the 0.70 point.
Change the Position Z parameter by typing the value 40 and disable the RGB Separate setting. Then, press the OK button and go to the timeline again.
11. Adjust the Glitch effects
Click on the effect clip on Track 4 and copy it. Please do the same as you did for the effect in Track 3 and paste it at the same locations between the clips in this track.
Afterward, go to the Effects tab again and choose the Filmstock tab. Among the collections here, you have to choose the Glitch option and select Glitch Stripe 1 from the collection. For an easier searching experience, you can directly type the effect in the search bar under the Effects tab.
Then, drag and drop it on Track 5 of the timeline right above the previous effect and reduce its duration to the same level as the first two effects. Copy it and then paste the clip again for each clip-to-clip intersection.
After this part, drag the Glitch Dispersion effect down to the timeline. Place it above the previous effect and adjust the clip’s size to the same length. Again, copy the effect and repeat the steps again. Next, repeat the same whole process with the Negative Flicker effect from the Flicker collection on Track 7.
12. See the preview and save the file
Finally, you are done adding all the effects, and you have to click on the Render Preview icon in the toolbar above the timeline. Then, press the Play button on the Preview window to see the full glitch text effect play out properly.
Conclusion
Now, you are done with creating a visually exciting and dynamic look for your introductory or ending title in the video using the glitch effect. For the best results, you should practice this process sometimes to get used to it and even make certain preferential changes to the font style. Ultimately, with the help of this software, you can expect a high-quality title look and use it for further video editing work.
How to Rotate Videos With Media Player Classic
The Internet and social media have become a staple in our daily lives. Internet users post thousands of videos every day that you can watch online or download and rewatch in your free time. Suppose you encounter a video that is upside down or shot at an angle that makes it difficult for you to enjoy it fully.
It would be nice to find a way to rotate the video to portrait mode so you can watch it without any distractions. Fortunately, this article will discuss using Media Player Classic to rotate any video. We also discuss an excellent alternative to the aforementioned media player.

What Is Media Player Classic?
In a nutshell, Media Player Classic is an open-source media player suitable for 32-bit and 64-bit Microsoft Windows. If you have used the original interface, you might notice that it resembles Windows Media Player 6.4. The only key difference is that the former is more feature-rich and provides more options. In addition, Media Player Classic is very compact and lightweight.

A programmer named “Gabest’’ created and designed this platform as a closed-source application. Things changed, and he later relicensed the media player as free under the terms of the GLP-2.0 license. He released the final version, MPC 6.4.9.0, on 20th March 2006.
Unfortunately, development stalled in 2006, much to the disappointment of many users who had grown to love it. Gabest made a public statement in 2007 saying that Media Player Classic was not dead, just that he couldn’t work on it anymore.
How To Rotate Video in Media Player Classic?
Media Player Classic allows you to rotate your video around three axes, X, Y, and Z. Once you are done, you can fix a video that was initially upside down or in landscape mode for a better viewing experience. Another perk of using Media Player Classic to rotate a video is that you can use shortcuts to make your work easier.
Before we teach you how to rotate video in windows Media Player Classic, there are a few things you should know. Unfortunately, this platform doesn’t allow you to rotate a video in its graphical user interface. You can’t also use it to edit a video. Suppose you want to add text or overwrite the original video clip. Media Player Classic can only allow you to playback a video or rotate it.
Here is a simple guide on how to rotate videos in Media Player Classic.
Step1 Launch Media Player Classic and click on the “View” tab. Select “Options” or click “O” to display the “Options” window.

Step2 Navigate to the left pane to the Player Group and click on “Keys.” If the Player Group is not expanded by the time, you launch the platform, double-click it and wait a few seconds. You can then navigate to the “PnS Rotate” command on the Keys list.

Step3 Go to the “PnS Rotate+” command and double-click the “Key” field. You can then click on any key to rotate your video around the x-axis. Once you are satisfied with the results, click “…” to apply the changes you have made.

Step4 You can now assign shortcuts to “PnS Rotate” commands. For instance, you could assign PnS Rotate Y for rotation along the Y axis and PnS Z for rotation along the Z axis. After each axis has a shortcut, select “Apply” then “OK” to save your changes and close the Options window respectively.

Step5 Select “Output” on the Options window and navigate to the DirectShow Video section to confirm whether the Media Classic Player supports rotation for the rendered video. Ascertain the Rotation feature has a green check mark, which indicates that the platform promotes rotation for the video. If the video has a red X, select “Apply” and click “OK.”

Step6 Use the shortcuts you assigned to the keys in Step 4 to rotate your video as you see fit. Since the rotation occurs gradually, you might need to press the keys numerous times or press and hold to see a visible change.
For instance, you can rotate your video from landscape to portrait by clicking “Alt-Num 1” and “Alt-Num 3,” respectively. To revert your video to its original state, press “Alt-Num 5.”
Need an alternative to Media Player Classic? Try Wondershare Filmora To Rotate a Video
Free Download For Win 7 or later(64-bit)
Free Download For macOS 10.14 or later
You might need a better alternative to Media Classic Player to help rotate your videos. As we mentioned, Media Classic Player doesn’t allow you to change the video. The scope of this platform only extends to playing and rotating videos along three axes. In our opinion, Wondershare Filmora is an excellent alternative.

This feature-rich platform is your one-stop solution for any creator who wants to make a mark with their videos. You can download it free on your desktop, laptop, or smartphone and use it anytime. The cloud storage allows you to snap a photo and upload it for editing at a later time.
In addition, the platform has a co-creation space where you can share your work with other users and compare notes. Here is a list of other nifty features we guarantee you will enjoy.
- Motion tracking
- Auto beat sync
- Split screen
- Title Editing
- Preset templates
- AI Portrait
- Mask and blend
- Text to speech
- Silence detection
- Audio visualizer
How To Rotate a Video 90 Degrees With Wondershare Filmora?
Now that you have seen how different this platform is from Media Classic Player, you might be curious about how effectively it rotates your videos. Perhaps our detailed guide will help you decide whether you want to give Wondershare Filmora a shot.
Stick around to learn how to rotate a video 90 degrees with Wondershare Filmora.
Step1 Import the video you want to rotate to Wondershare Filmora and drag and drop it to the timeline as shown below.

Step2 Click on the monitor icon and select “Change Project Aspect Ratio” in the drop-down menu.

Step3 In the “Project Settings” window, you can change your video’s Aspect Ratio, Resolution, Frame Rate, and Color space.

Step4 Once you are happy with your changes, click “OK” and close the window.

Step5 Double-click the video track and navigate to the Rotate option in the window. Hover your mouse over the dot in the Rotate tab until you get to 90 degrees. You could also adjust the rotation of the video by clicking on the pivot in the media player till the video is at 90 degrees.

Step6 Click “Export” to save a copy of the rotated video to your device.

Which Is Better To Rotate a Video? Media Player Classic or Wondershare Filmora?
Having seen both sides of the coin, you might wonder which option is better to help you rotate a video. In this section of the article, we pit Wondershare Filmora against Media Player Classic to help you determine which option will work best for you.
Take a look at the table below.
| Media Player Classic | Wondershare Filmora | |
|---|---|---|
| Operating System | Microsoft Windows | Windows & Mac |
| Ratings from G2 | N/A | 4.4/5 stars |
| Pricing | Free | Annual Plan – US$49.99/yearCross Platform Plan - US$59.99/YearPerpetual Plan - US$79.99 |
| Features | ● Enhanced video rendering● Removal of tearing● Supports SVCD, VCD, and DVD playback● AVI subtitles● Customizable toolbar | ● AI Portrait● Mask and blend● Text to speech● Silence detection● Audio visualizer● Motion tracking● Auto beat sync● Split screen● Title Editing● Preset templates |
As you have seen, Media player Classic doesn’t have the Rotate feature per se. However, you can assign shortcuts to the keys to rotate a video along three axes as you see fit. You can also use a combination of keys like Alt and Num to change how your video sits so you can enjoy it as you like.
On the other hand, Wondershare Filmora has a more comprehensive Rotate feature that allows you to drag your pointer along a bar till the video sits at the correct number of degrees.
This platform also provides additional features, like allowing you to scale the video to fit the screen and adjusting project settings like the resolution and frame rate. If you don’t want to use the sliding bar, you can use your pointer to manually adjust the rotation by clicking on the pivot with your pointer.
In a nutshell, Windows Media Player is the ideal choice if you want to rotate your video and leave it at that. However, if you are looking for more advanced features, you are better off choosing Wondershare Filmora. The latter option also makes your videos look more polished like they were edited by a professional.
Conclusion
Videos might be trickier to edit than photos, especially when you want to rotate them. Fortunately, developers have been working tirelessly to ensure you have many tools at your disposal to edit your videos from any device at any time.
If you don’t fancy editing videos on your laptop, you could download the software to your smartphone and rotate videos on the move. Technology is truly a blessing that has come to make our work easier. Hopefully, after reading this article, you can effortlessly rotate any video you encounter.
Free Download For macOS 10.14 or later
You might need a better alternative to Media Classic Player to help rotate your videos. As we mentioned, Media Classic Player doesn’t allow you to change the video. The scope of this platform only extends to playing and rotating videos along three axes. In our opinion, Wondershare Filmora is an excellent alternative.
This feature-rich platform is your one-stop solution for any creator who wants to make a mark with their videos. You can download it free on your desktop, laptop, or smartphone and use it anytime. The cloud storage allows you to snap a photo and upload it for editing at a later time.
In addition, the platform has a co-creation space where you can share your work with other users and compare notes. Here is a list of other nifty features we guarantee you will enjoy.
- Motion tracking
- Auto beat sync
- Split screen
- Title Editing
- Preset templates
- AI Portrait
- Mask and blend
- Text to speech
- Silence detection
- Audio visualizer
How To Rotate a Video 90 Degrees With Wondershare Filmora?
Now that you have seen how different this platform is from Media Classic Player, you might be curious about how effectively it rotates your videos. Perhaps our detailed guide will help you decide whether you want to give Wondershare Filmora a shot.
Stick around to learn how to rotate a video 90 degrees with Wondershare Filmora.
Step1 Import the video you want to rotate to Wondershare Filmora and drag and drop it to the timeline as shown below.
Step2 Click on the monitor icon and select “Change Project Aspect Ratio” in the drop-down menu.
Step3 In the “Project Settings” window, you can change your video’s Aspect Ratio, Resolution, Frame Rate, and Color space.
Step4 Once you are happy with your changes, click “OK” and close the window.
Step5 Double-click the video track and navigate to the Rotate option in the window. Hover your mouse over the dot in the Rotate tab until you get to 90 degrees. You could also adjust the rotation of the video by clicking on the pivot in the media player till the video is at 90 degrees.
Step6 Click “Export” to save a copy of the rotated video to your device.
Which Is Better To Rotate a Video? Media Player Classic or Wondershare Filmora?
Having seen both sides of the coin, you might wonder which option is better to help you rotate a video. In this section of the article, we pit Wondershare Filmora against Media Player Classic to help you determine which option will work best for you.
Take a look at the table below.
| Media Player Classic | Wondershare Filmora | |
|---|---|---|
| Operating System | Microsoft Windows | Windows & Mac |
| Ratings from G2 | N/A | 4.4/5 stars |
| Pricing | Free | Annual Plan – US$49.99/yearCross Platform Plan - US$59.99/YearPerpetual Plan - US$79.99 |
| Features | ● Enhanced video rendering● Removal of tearing● Supports SVCD, VCD, and DVD playback● AVI subtitles● Customizable toolbar | ● AI Portrait● Mask and blend● Text to speech● Silence detection● Audio visualizer● Motion tracking● Auto beat sync● Split screen● Title Editing● Preset templates |
As you have seen, Media player Classic doesn’t have the Rotate feature per se. However, you can assign shortcuts to the keys to rotate a video along three axes as you see fit. You can also use a combination of keys like Alt and Num to change how your video sits so you can enjoy it as you like.
On the other hand, Wondershare Filmora has a more comprehensive Rotate feature that allows you to drag your pointer along a bar till the video sits at the correct number of degrees.
This platform also provides additional features, like allowing you to scale the video to fit the screen and adjusting project settings like the resolution and frame rate. If you don’t want to use the sliding bar, you can use your pointer to manually adjust the rotation by clicking on the pivot with your pointer.
In a nutshell, Windows Media Player is the ideal choice if you want to rotate your video and leave it at that. However, if you are looking for more advanced features, you are better off choosing Wondershare Filmora. The latter option also makes your videos look more polished like they were edited by a professional.
Conclusion
Videos might be trickier to edit than photos, especially when you want to rotate them. Fortunately, developers have been working tirelessly to ensure you have many tools at your disposal to edit your videos from any device at any time.
If you don’t fancy editing videos on your laptop, you could download the software to your smartphone and rotate videos on the move. Technology is truly a blessing that has come to make our work easier. Hopefully, after reading this article, you can effortlessly rotate any video you encounter.
Are You Finding It Challenging to Upload and Create a Link for Your Video? Well, This Detailed Upload Video to Link Guide Will Help You with This. Check It Out Now
A well-personalized video is an effective way to get your way around the viewers easily. Besides, you can also easily impress them with your products or services by uniquely pressing them.

Now, imagine if you have an easier way to share your videos with audiences on different platforms! Well, this way you will save a lot of time. For this, you need to upload the video to the link, and then you can share the URL link on various platforms. Keep reading to understand the entire process.
Part 1: Method1: Upload videos to a video hosting platform
The method to upload the video to the link will vary based on the video-sharing platform you are using. Let’s understand this with an example. If you are using YouTube, then you need to follow the below-given steps to upload and generate a link for your video.
- First of all, you need to log into your YouTube channel or account.
- Now, you need to click on the video icon. You can find it on the right-hand side of the screen.
- Then, click on the Upload a Video option.
- Click on the Select Files option and choose the video that you want to upload. You can also drag and drop the video to upload it.
- Once done, click on Publish option to complete the process.
Now, to complete your YouTube video upload share, you need to find the link to your video. For this, you need to click on the pause button and then right-click on the video. Now choose the Copy video URL. Now, you can share that video on other platforms just by pasting the video link.
How To Make Video Private and Public?
- Sign in to your YouTube account.
- Choose the Videos option.
- Now choose the video that you want to update.
- Then you need to click on the down arrow located under Visibility and select Private or Public based on your preference and then click on the Save option.

Different Video Hosting Platforms that You can Use
1. Vimeo
One of the best alternatives to YouTube is Vimeo. This platform allows the user to create, manage and enjoy an easy video upload share process. This platform has more than 250 million active users. It offers different subscription plans, and for unlimited upload limits, webinars, live streaming and more, you can go for its premium package. Some of the impressive features of this platform are:
- Custom CTAs- Calls to Actions
- Support video hosting in 8K quality.
- Easy access to different video editing templates
- CRM- Customer Relationship Management integrations
- Supports content analytics
- video upload share option for social media
2. Streamable

Speaking about Streamable, this is a video editing as well as sharing tool that will allow you to stream videos in 4K quality, and you can even embed the videos. You will have the freedom to upload your videos in different formats and can also resize them in vertical, landscape and square formats. Some unique features of Streamable are:
- Content management tool
- Brand overlay
- Easy-to-customize templates
- Content Library
- Audio capture
- Faster data export and import and more
3. Uscreen
This is an excellent all-in-one platform that helps video creators to sell, manage and market their content while expanding their business. Besides, the platform also helps the users to create mobile and TV apps and offers tools to market the videos. Some features for Uscreen to consider are:
- Different membership options.
- Support offline viewing of content, including videos.
- A professional video player
- You will enjoy full ownership of your audience’s data
- Supports different retention and marketing tools.
- Supports more than 150 hours of video storage and more.
4. Dailymotion

This platform is also called “the home for videos that matter”. Dailymotion is used by many well-known clients such as MLB, CNN and more to host video content. If you are a creator, you can easily upload your videos on this platform for free. Creators can utilize different features available on the platform, such as:
- Easily embeddable and shareable videos
- Easy video sharing using your video link on social media platforms
- You can upload videos of up to 4K quality.
- Password-protected videos
Part 2: Upload your videos to a cloud disk and share to others
As per some studies, more than 85 percent of businesses utilize videos for marketing strategy. Video content is entertaining, easy to understand and can offer better ROI as you can reuse it. However, with the huge volume of these files, it has become more challenging to find a good storage option.

This is where cloud storage comes to play. There are different cloud disk or storage platforms where you can upload video to link and share your videos with others. For example, Google storage or Google Drive. So, let’s know the process of uploading a video to Google Drive.
- First, visit your Google Drive Account and then click on the new option.
- Now, you need to click on File Upload and then select the video that you want to upload.
- You can now see the selected video uploading in the screen’s lower left corner. It will take some time.
- Once done, Google Drive will begin processing the video.
- Once your video is available on Google Drive, you can move it to different folders or change the name.
Now, let’s talk about how to generate a link to your video and share that link with others.
- Open your Google Drive account.
- Choose the video that you want to share and right-click on it.
- Now, you need to click on the Get Link option.
- Then, choose the Anyone with the Link option from the viewer option.
- Now, click on the Copy Link option, and you can now share that link with anyone you want.
There are different reasons that make cloud storage options a perfect choice for video creators or other users. For example:
- You don’t have to worry about data loss.
- Cloud storage is highly scalable.
- There will be no space or storage limit
- The users can enjoy real-time video content updates
- One can access and share videos using any device.
However, some of the cloud storage platforms are not free to use. You will get up to 10GB to 20GB for free. For more storage limits, you will have to buy a subscription plan. For example, if you are using Dropbox, then you will have to pay around USD 20 per month to get up to 3TB of storage.
Besides, there are some content restrictions that you will have to consider. You are not allowed to upload videos that support malicious attacks, hate speech, graphic violence, predatory behavior or videos that promote any dangerous behavior. Besides, the platforms support certain types of video formats, such as OGG, WebM files, WMV, MTS, AVI, and WMV. FLV, 3GPP, MPEG 4, MOV and other file formats.
If you are looking for some free cloud storage platforms, then you can give Google Drive, Dropbox, Box, NeXT cloud, pCloud, Amazon Cloud Drive and OneDrive a try.
Part 3: How to Make Videos That Go Viral?
To make your videos go viral, you will have to make stunning videos by adding some unique special effects. And for this, you can use the Filmora tool. This is a creative video editing tool for a video creator. The platform offers some great features to vloggers, gamers and others. For example, it supports 4K editing, noise removal, advanced text editor, GIF support, video stabilization, equalizer and more. Now, let’s talk about how to use this platform to make or edit a video.
- Open Filmora and choose the desired aspect ratio. Now, click on the New Project option and import the video.
- Then you need to choose the frame rate and resolution for the video.
- Once done, you can go on and transition music between your video clips, or you can use different visual effects.
- Once you are done with editing, you can then explore the videos and then share the videos on different platforms directly from Filmora.
Free Download For Win 7 or later(64-bit)
Free Download For macOS 10.14 or later
FAQs
Why Create a Video Link?
The first reason to consider here is when upload video to link, you can easily share the videos in various formats. Besides, you can share it without worrying about the video size. The video can be shared on multiple platforms and social media channels. It is a faster way to share your video content.
How To Locate the URL of Your Video?
To locate your video URL, you can open the video online. The link that you will see in the browser’s address bar will be the URL of your video. You can then copy the URL and paste it or share it on other platforms. It also applies to YouTube and other video-sharing platforms.
How Do I Get My YouTube Channel’s URL?
You need to sign in to your YouTube Studio. Then from the left Menu, choose Customization and then choose the Basic info. Under the Channel URL option, you can see the URL of your YouTube channel. Now you can copy the Channel URL and share it with others.
Add Green Screen Effects in Final Cut Pro
No matter the type of video you are shooting, the background of the video plays a major play. The background determines how eye-pleasing the frame of the entire video looks. A beautiful background enhances the video content while a distracting background can deteriorate the video outlook. You do not need to be in exotic locations or have eye-catching backgrounds in reality while shooting a video thanks to the use of the green screen effect.
Once you shoot a video with green screen background, you can replace the green screen with anything you want. You will need a video editor to replace the green screen, and Final Cut Pro is the most widely used video editor among Mac Users. We will illustrate how to add green screen in Final Cut Pro and get any background for your recorded video. We will also recommend an alternative watt to add green screen effect to your video.
Part 1. How to add green screen on Final Cut Pro
Final Cut Pro is the most popular professional video editor among Mac users. The learning curve is slightly steep, but once you get used to Final Cut Pro, you can take your recorded video to the next level with profound editing. The most important part of adding green screen effect to a video is shooting the video with a proper green screen in the background. Once you have successfully recorded your video, here are the steps on how to add background to green screen Final Cut Pro.
Step1 Launch Final Cut Pro and go to File> Import> Media. Select the video file with green screen background from your storage to import the file into FCP. Similarly, you should import the video or photo with which you want to replace the green screen.
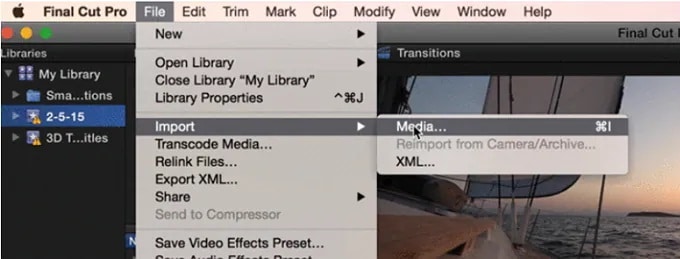
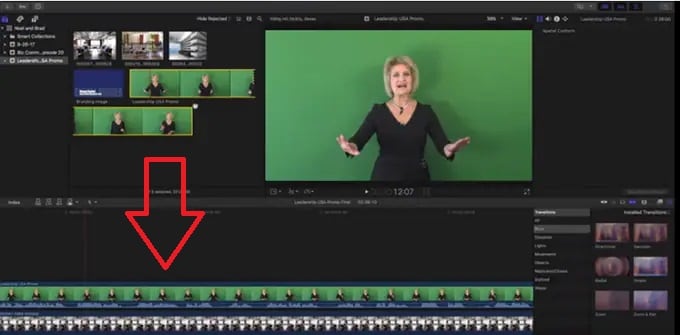
Step2 Drag the video clip with green screen background (called foreground clip) to Timeline and place it to Primary Storyline. Drag the replacement video (called background clip) below the foreground clip in Timeline.
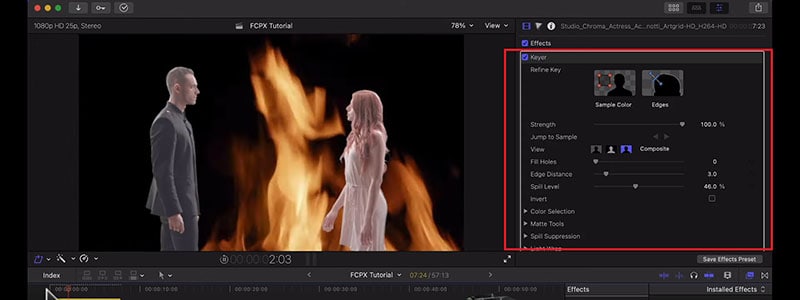
Step3 Select the foreground clip and click on Effects button present at the extreme top-right corner of the Timeline.
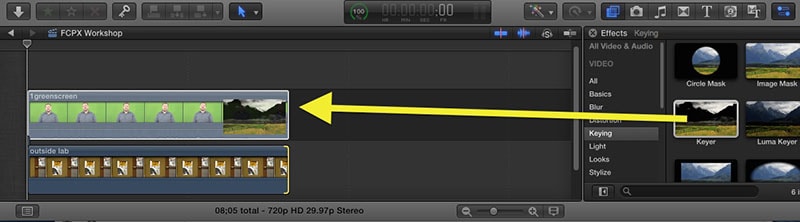
Step4 From the Effects options, select Keyer effect. If you cannot spot it immediately, you can search for it from the search field.
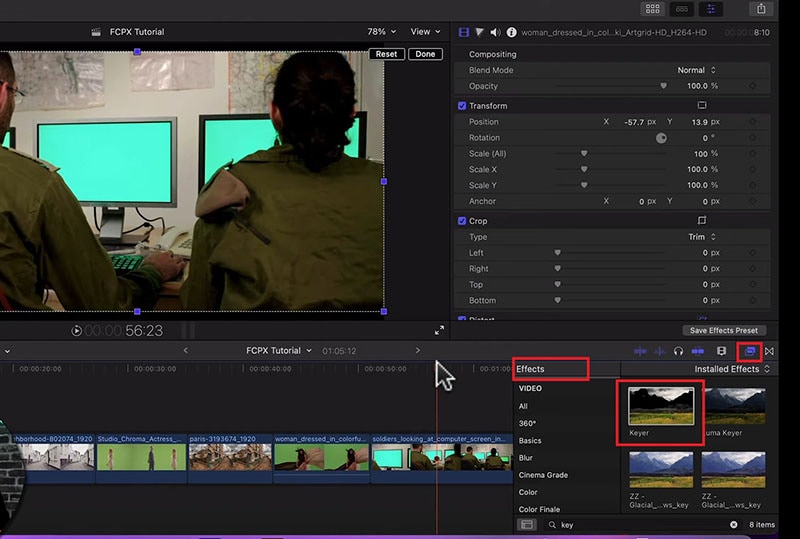
Step5 Drag and drop Keyer effect to the foreground clip. The effect detects the green screen and replaces it with the available background clip.
Step6 You might have to adjust the Keyer effect settings to get the green screen effect perfectly. Go to Inspector Window and click on Sample color and fine-tune the available settings to get it correct.
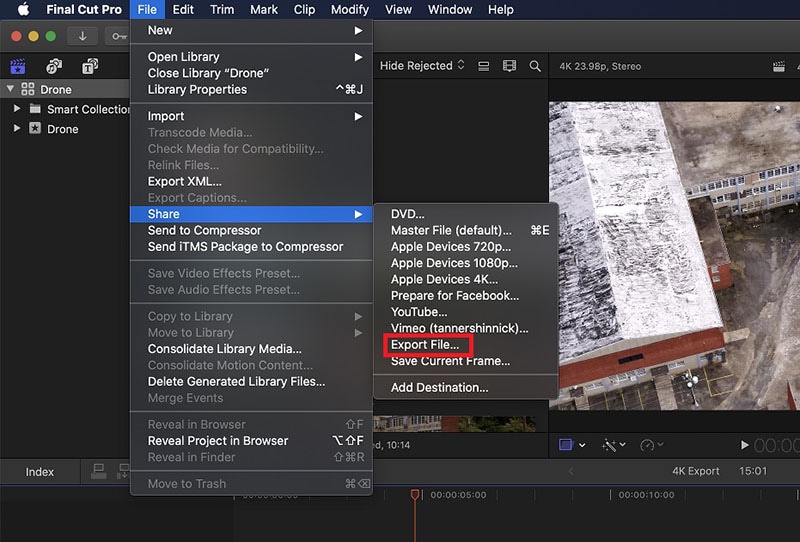
Step7 Once you are satisfied with the effect, go to File> Share> Export File and save the modified video.
Part 2. Alternative Way to Add Green Screen to Videos
Final Cut Pro is a professional but highly expensive video editor. The learning curve is not very suitable for amateur video editors. That is why if you are looking for a better alternative way to add green screen to videos, we recommend Wondershare Filmora . Filmora is a popular video editor that is available for Mac and Windows users. The user interface is extremely intuitive, and adding green screen effect is super easy. Here are the steps on how to add background to green screen effect.
Free Download For Win 7 or later(64-bit)
Free Download For macOS 10.14 or later
Step1 Download and install Filmora on your computer. Launch Filmora and click on New Projects.
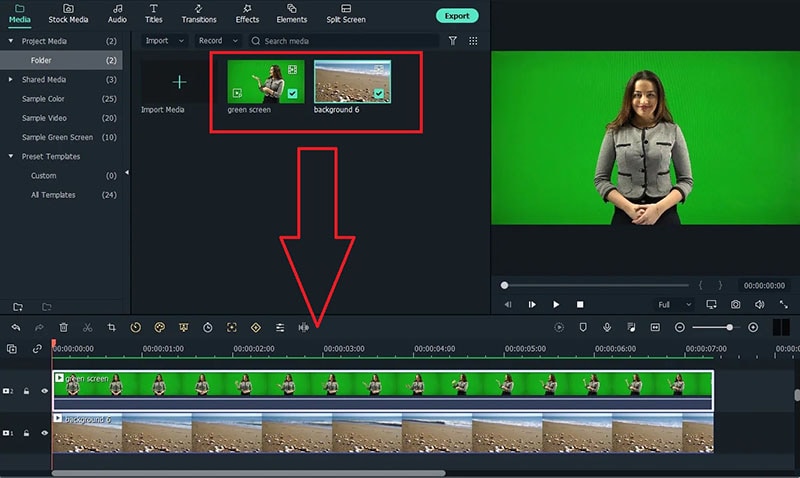
Step2 Under Project Media folder, Drag and drop the video clip with green screen background as well as the photo or video with which you want to replace the green screen.
Step3 Drag and drop the video clips on the Timeline. The video with green screen should be at the top while the replacement video or photo should be below it.
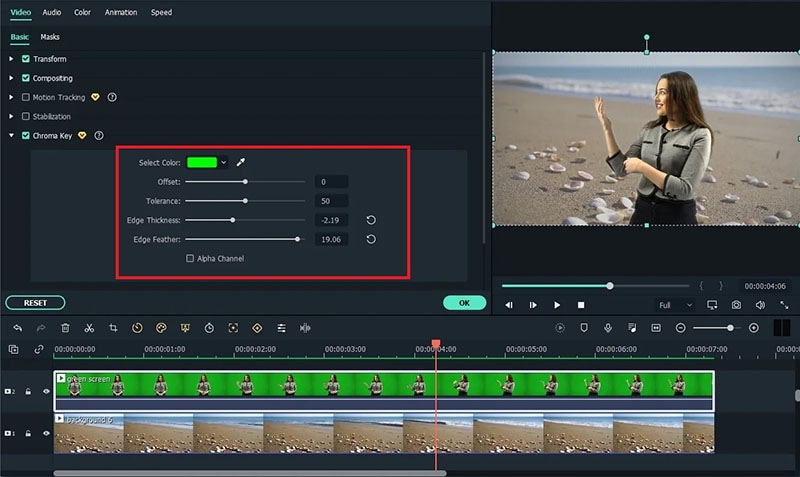
Step4 Double-click on the green screen video clip on Timeline. Go to Video>Basic and turn on Chroma key option.
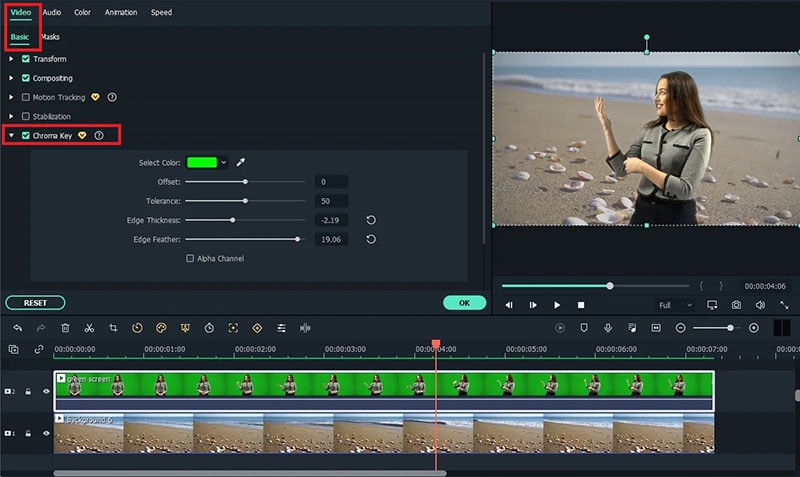
Step5 Adjust the different parameters such as offset to get the effect perfect and click on Ok button.
Step6 Play the video and if you are satisfied with the result, click on Export button to save the modified video file.
Part 3. Green Screen Video Tips to Use
We have already stated that replacing green screen in your video with an eye-catching background is the easiest part. On the contrary, shooting the green screen video is the most important part. If you shoot the video perfectly, replacing the background accurately in the video editor becomes super easy. Here are some important tips to use while shooting green screen video.
Distance – There should be enough distance between the subject and the green screen background so that the subject does not cast a shadow on the green screen. This distance is also important to place lights in between so that the green screen is perfectly lit for a great video shooting session.
Quality – You should opt for a high-quality green screen cloth for the background. This means the green screen should have a solid color instead of light and dark patches here and there. Besides, you should ensure that there are no wrinkles on the green screen.
Otherwise, when you will apply green screen effect through the video editor, the transformation will be uneven. You have to spend a lot of time adjusting the parameters to cover up uneven patches in the background.
Lighting – The way you set up your lights plays a major role in shooting green screen video perfectly. The light falling on the green screen will light up the screen evenly so that there are no light and dark patches. Transforming the green screen in the video editor will become that much easier.
You should focus on soft and even lighting for the entire green screen, and you should check through your camera to ensure the lighting is perfect. Sometimes, you can place lights behind the subject if the subject is staying stationary throughout the video. Otherwise, you can place the light above the subject for even distribution.
Aperture – The settings of your camera are equally important to smoothen out the green screen in the background and focus on the subject sharply. That is where aperture comes into the scene, and you need to use low aperture while shooting green screen videos. Low aperture opens up the camera lens, and the green screen turns softer in the background. The subject stands out while the background turns uniformly green.
Shutter Speed – While shooting a green screen video, you should keep a high shutter speed to prevent motion blur and uneven background. If the subject stays fixed throughout, the shutter speed should be double the frame rate. If the subject is moving throughout, the shutter speed should be around 4 times the frame rate such as 1/100.
ISO – The last thing you want in a green screen video is grainy footage. Your life will turn upside down editing the video and getting the green screen effect perfectly in any video editor. ISO determines the sensitivity and thereby, the grainy effect in your video. When the ISO is too high, the chance of getting grains in the video is high. It is better to use a native ISO for green screen effect, but you need to check with a sample recording and adjust if required.
Conclusion
We have answered how to add background to green screen Final Cut Pro. You can replace any green screen in your video with any video or photo for the background of the video. If you do not have Final Cut Pro or you find the steps slightly complicated, we recommend you to use Wondershare Filmora for instant green screen effect and quick adjustments for the best outcome.
Free Download For macOS 10.14 or later
Step1 Download and install Filmora on your computer. Launch Filmora and click on New Projects.
Step2 Under Project Media folder, Drag and drop the video clip with green screen background as well as the photo or video with which you want to replace the green screen.
Step3 Drag and drop the video clips on the Timeline. The video with green screen should be at the top while the replacement video or photo should be below it.
Step4 Double-click on the green screen video clip on Timeline. Go to Video>Basic and turn on Chroma key option.
Step5 Adjust the different parameters such as offset to get the effect perfect and click on Ok button.
Step6 Play the video and if you are satisfied with the result, click on Export button to save the modified video file.
Part 3. Green Screen Video Tips to Use
We have already stated that replacing green screen in your video with an eye-catching background is the easiest part. On the contrary, shooting the green screen video is the most important part. If you shoot the video perfectly, replacing the background accurately in the video editor becomes super easy. Here are some important tips to use while shooting green screen video.
Distance – There should be enough distance between the subject and the green screen background so that the subject does not cast a shadow on the green screen. This distance is also important to place lights in between so that the green screen is perfectly lit for a great video shooting session.
Quality – You should opt for a high-quality green screen cloth for the background. This means the green screen should have a solid color instead of light and dark patches here and there. Besides, you should ensure that there are no wrinkles on the green screen.
Otherwise, when you will apply green screen effect through the video editor, the transformation will be uneven. You have to spend a lot of time adjusting the parameters to cover up uneven patches in the background.
Lighting – The way you set up your lights plays a major role in shooting green screen video perfectly. The light falling on the green screen will light up the screen evenly so that there are no light and dark patches. Transforming the green screen in the video editor will become that much easier.
You should focus on soft and even lighting for the entire green screen, and you should check through your camera to ensure the lighting is perfect. Sometimes, you can place lights behind the subject if the subject is staying stationary throughout the video. Otherwise, you can place the light above the subject for even distribution.
Aperture – The settings of your camera are equally important to smoothen out the green screen in the background and focus on the subject sharply. That is where aperture comes into the scene, and you need to use low aperture while shooting green screen videos. Low aperture opens up the camera lens, and the green screen turns softer in the background. The subject stands out while the background turns uniformly green.
Shutter Speed – While shooting a green screen video, you should keep a high shutter speed to prevent motion blur and uneven background. If the subject stays fixed throughout, the shutter speed should be double the frame rate. If the subject is moving throughout, the shutter speed should be around 4 times the frame rate such as 1/100.
ISO – The last thing you want in a green screen video is grainy footage. Your life will turn upside down editing the video and getting the green screen effect perfectly in any video editor. ISO determines the sensitivity and thereby, the grainy effect in your video. When the ISO is too high, the chance of getting grains in the video is high. It is better to use a native ISO for green screen effect, but you need to check with a sample recording and adjust if required.
Conclusion
We have answered how to add background to green screen Final Cut Pro. You can replace any green screen in your video with any video or photo for the background of the video. If you do not have Final Cut Pro or you find the steps slightly complicated, we recommend you to use Wondershare Filmora for instant green screen effect and quick adjustments for the best outcome.
Also read:
- Updated 2024 Approved How To Make A Video Longer
- New Convert Your Videos to 60 FPS Using These Excellent Tools for 2024
- Updated 2024 Approved Time Bending Brilliance The Ultimate Slow Motion Video Makers
- New In 2024, Experience Time Differently with The Top Slow-Motion Applications
- Updated In 2024, How to Set Up Twitch Green Screen
- New In 2024, Color Match Game Top Tips for You
- 2024 Approved Do You Know How You Can Trim or Merge Using Wondershare Filmora? Trimming and Merging Using This Tool Is an Easy Task; Learn How
- Updated Detailed Tutorial to Crop a Video Using Openshot, In 2024
- How to Use LUTS to Color Grade on Your iPhone for 2024
- Updated A Guide to Use Distortion Effect in Premeiere Pro for 2024
- New 2024 Approved 7 Ways to Make GIF From Videos on Mac
- Learn How Video Montages Were Used over Film History with Examples and the Types of Videos for Shorter Montages. Plus, Learn About the Best Software for It for 2024
- Updated Want to Add the Amazing Video Text Effects that You Generally See on Video Streaming Platforms? Use Filmora to Add Popular Video Text Effects Instantly
- 2024 Approved In This Article, We Will Discuss What Lens Distortion Is, How It May Be Fixed, and the Factors You Need to Pay Attention to Avoid Lens Distortion when Taking or Recording Videos
- New 2024 Approved Ultimate Guide on How To Plan and Storyboard a Music Video
- 20 Must-Have Graduation Songs for 2024
- In 2024, Do You Want to Create a Zoom Motion Blur Effect Using Photoshop? If You Are Unaware of How to Do This, Read This Article to Learn Simple yet Authentic Instructions
- Updated What Are the Top 15 Slideshow Presentation Examples Your Audience Will
- Start Making Procreate GIFs and Take Your Editing Creativity to the Next Level
- New 2024 Approved Best Video Format Converter for PC and Online
- Updated Adobe After Effects Review
- 2024 Approved Want to Speed up Your Video to Shorten Its Duration and Make It More Entertaining? Here Is How to Speed up Videos in Final Cut Pro. Get a Better Alternative to FCP to Speed up Videos
- New How to Add Filter to Video in Premiere Pro, In 2024
- Attaining Slow Motion Video Trend Finding The Best CapCut Templates
- 2024 Approved Create a Movie with Windows Movie Maker
- In 2024, Create a Transparent Image in Minimal Steps with Right Tools. Try Out Best Transparent Maker and Know How to Use Them. In No Time, the Desired Image Will Be Right There with You
- 2024 Approved Your Recorded Video Footage Has some Visible Grains Making Your Video Noisy and Thus Hampering the Overall Viewing Experience. No Worries, as There AI Video Denoiser and Other Software Available to Correct the Issue
- Step by Step to Cut Videos in Lightworks for 2024
- Updated Splitting Audio From Video in Sony Vegas Step by Step for 2024
- How to Find a High-Quality Video Marketing Agency, In 2024
- A Comprehensive Guide to iPhone 15 Pro Max Blacklist Removal Tips and Tools | Dr.fone
- Apple ID is Greyed Out On Apple iPhone 6 How to Bypass?
- In 2024, How To Unlock Stolen iPhone 12 Pro Max In Different Conditionsin | Dr.fone
- Best Ways to Bypass iCloud Activation Lock from iPhone 13/iPad/iPod
- 4 solution to get rid of pokemon fail to detect location On Vivo Y02T | Dr.fone
- In 2024, How to Fix Pokemon Go Route Not Working On Vivo Y100i Power 5G? | Dr.fone
- In 2024, How To Enable USB Debugging on a Locked Samsung Phone
- Realme 11 Pro+ Bootloop Problem, How to Fix it Without Data Loss | Dr.fone
- Simple ways to get lost files back from Realme
- How to remove Google FRP Lock on OnePlus Nord CE 3 5G
- How to Use Phone Clone to Migrate Your Infinix Hot 30i Data? | Dr.fone
- In 2024, Top 10 Password Cracking Tools For Poco M6 Pro 5G
- Super Easy Ways To Deal with Vivo Y56 5G Unresponsive Screen | Dr.fone
- Fake the Location to Get Around the MLB Blackouts on Vivo V29 | Dr.fone
- In 2024, Top 7 Phone Number Locators To Track Poco X6 Pro Location | Dr.fone
- How to Change Spotify Location After Moving to Another Country On Realme 12+ 5G | Dr.fone
- What to do if iPhone 8 Plus is not listed when I run the software? | Stellar
- How to Stop My Spouse from Spying on My Samsung Galaxy F14 5G | Dr.fone
- How to Change Location On Facebook Dating for your Oppo A2 | Dr.fone
- A Working Guide For Pachirisu Pokemon Go Map On Honor Magic 6 | Dr.fone
- How to Unlock Apple iPhone 15 Pro Max with a Mask On | Dr.fone
- In 2024, How can I get more stardust in pokemon go On Oppo A59 5G? | Dr.fone
- In 2024, 15 Best Strongest Pokémon To Use in Pokémon GO PvP Leagues For Itel P55 | Dr.fone
- List of Pokémon Go Joysticks On Motorola Moto E13 | Dr.fone
- Hacks to do pokemon go trainer battles For Motorola G24 Power | Dr.fone
- How to Update iPhone 14 Plus to the Latest iOS/iPadOS Version? | Dr.fone
- In 2024, 3 Effective Methods to Fake GPS location on Android For your Samsung Galaxy A24 | Dr.fone
- How to Track Xiaomi 13T Pro Location by Number | Dr.fone
- How to find lost iPhone 11 Pro Backup files on Windows PC? | Stellar
- In 2024, How to Fix iPad or Apple iPhone 8 Stuck On Activation Lock?
- Title: How to Create a Glitch Text Effect, In 2024
- Author: Chloe
- Created at : 2024-05-20 03:38:33
- Updated at : 2024-05-21 03:38:33
- Link: https://ai-editing-video.techidaily.com/how-to-create-a-glitch-text-effect-in-2024/
- License: This work is licensed under CC BY-NC-SA 4.0.
