
How to Create a Smooth Cut Transition Effect?

How to Create a Smooth Cut Transition Effect?
Transition effects are necessary for making amazing videos, slideshows, and presentations. These are the dedicated effects appearing when one slide or clip replaces the other. Hence, any video editing software is incomplete without impressive transition effects.
Going by the same, Wondershare Filmora offers different video and audio transitions to help users. Wondershare Filmora users can bring the best transitions at the beginning or end of the video or between two video clips. These can be used while changing the mood of videos, changing the subject, passing the time, showing the change of direction, etc.
The dedicated transitions tab allows Wondershare Filmora users to apply different transitions quickly and easily. Let us go into detail about creating a smooth-cut transition effect in Wondershare Filmora in this step-by-step guide.
Steps to create a smooth cut transition effect in Wondershare Filmora
Wondershare Filmora is a popular video editing tool used by content creators, including social media influencers, marketers, content creators, etc. The following are the quick and detailed steps to create a smooth cut transition effect in Wondershare Filmora:
Free Download For Win 7 or later(64-bit)
Free Download For macOS 10.14 or later
Step1Download and launch Wondershare Filmora
Before even jumping to the smooth-cut transition effect in Wondershare Filmora, the first step is to download and launch it on your system. It is easy to download this software on Windows and Mac devices. The quick steps for downloading and launching Wondershare Filmora are as follows:
- Go to the official website of Wondershare Filmora .
- Go to the Download button located in the top right corner of the official website.
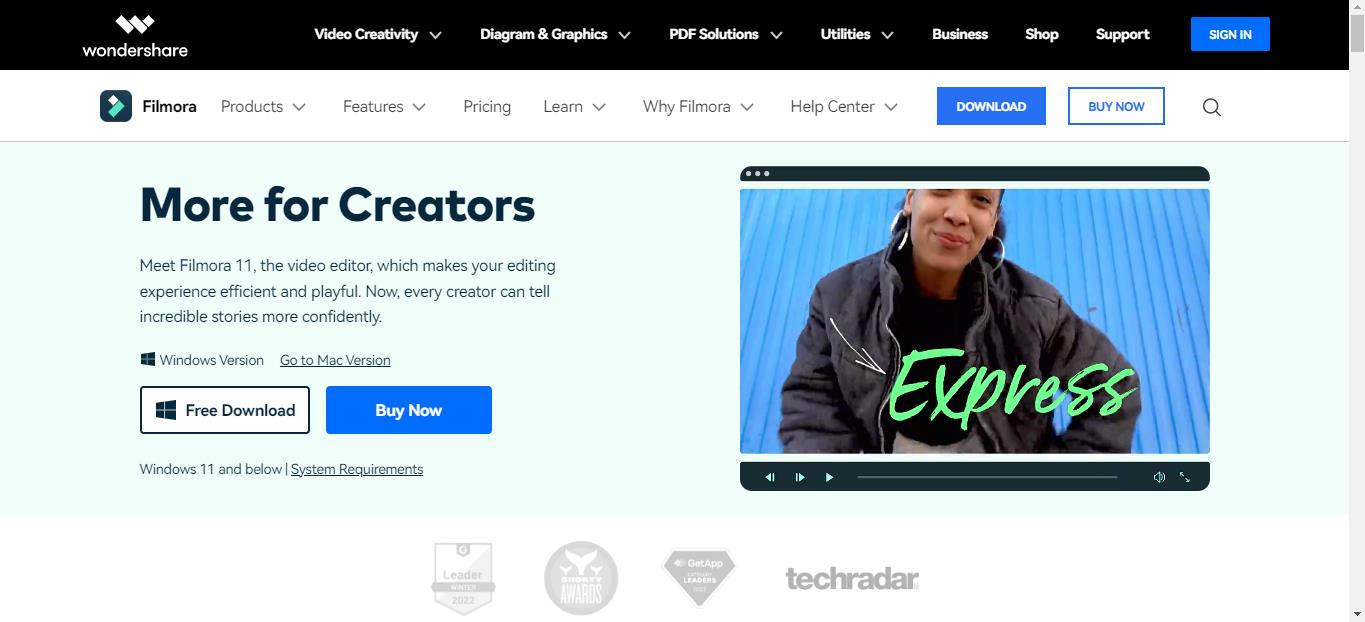
- The Filmora Installer will download quickly for your Windows or Mac system.
- Double-click on the setup and start the installation process. Agree on the terms and conditions menu thus prompted.
- Once Wondershare Filmora is installed, it will start and run automatically on your system.
Step2Import the footage
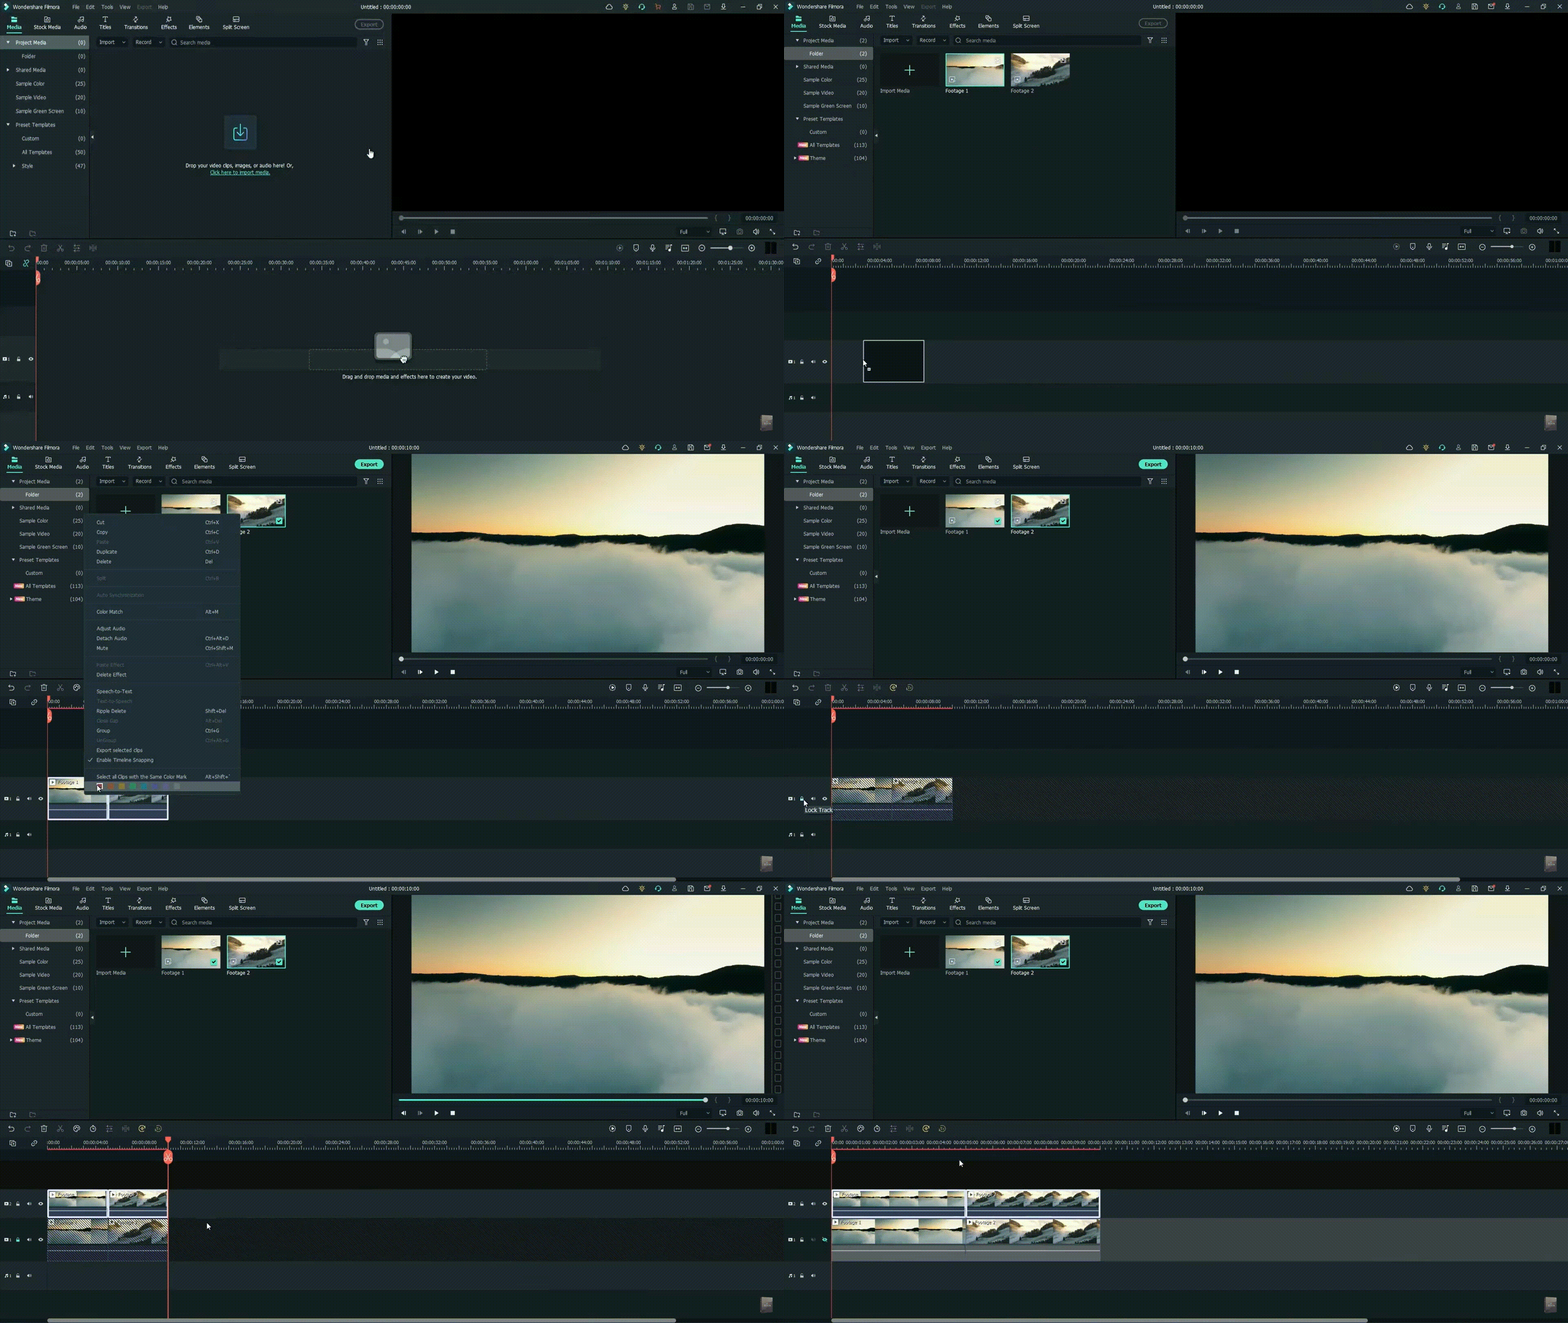
The first step in creating a smooth cut transition effect is to import the footage. All you need to do is use the drag-and-drop functionality of the Wondershare Filmora. You can import 2 footage to the video editor interface with the quick steps mentioned below.
- Start by dragging the two footage to the timeline using the drag and drop functionality.
- Now, select the footage in the video editor.
- The next step is to copy the layer of the footage and lock the current layer.
- Then, paste the current layer over the other layer of the footage.
- Move towards the end of this step by unlocking the layer. Then you need to hide the below layer.
Step3Go to the effects tab and apply preset settings
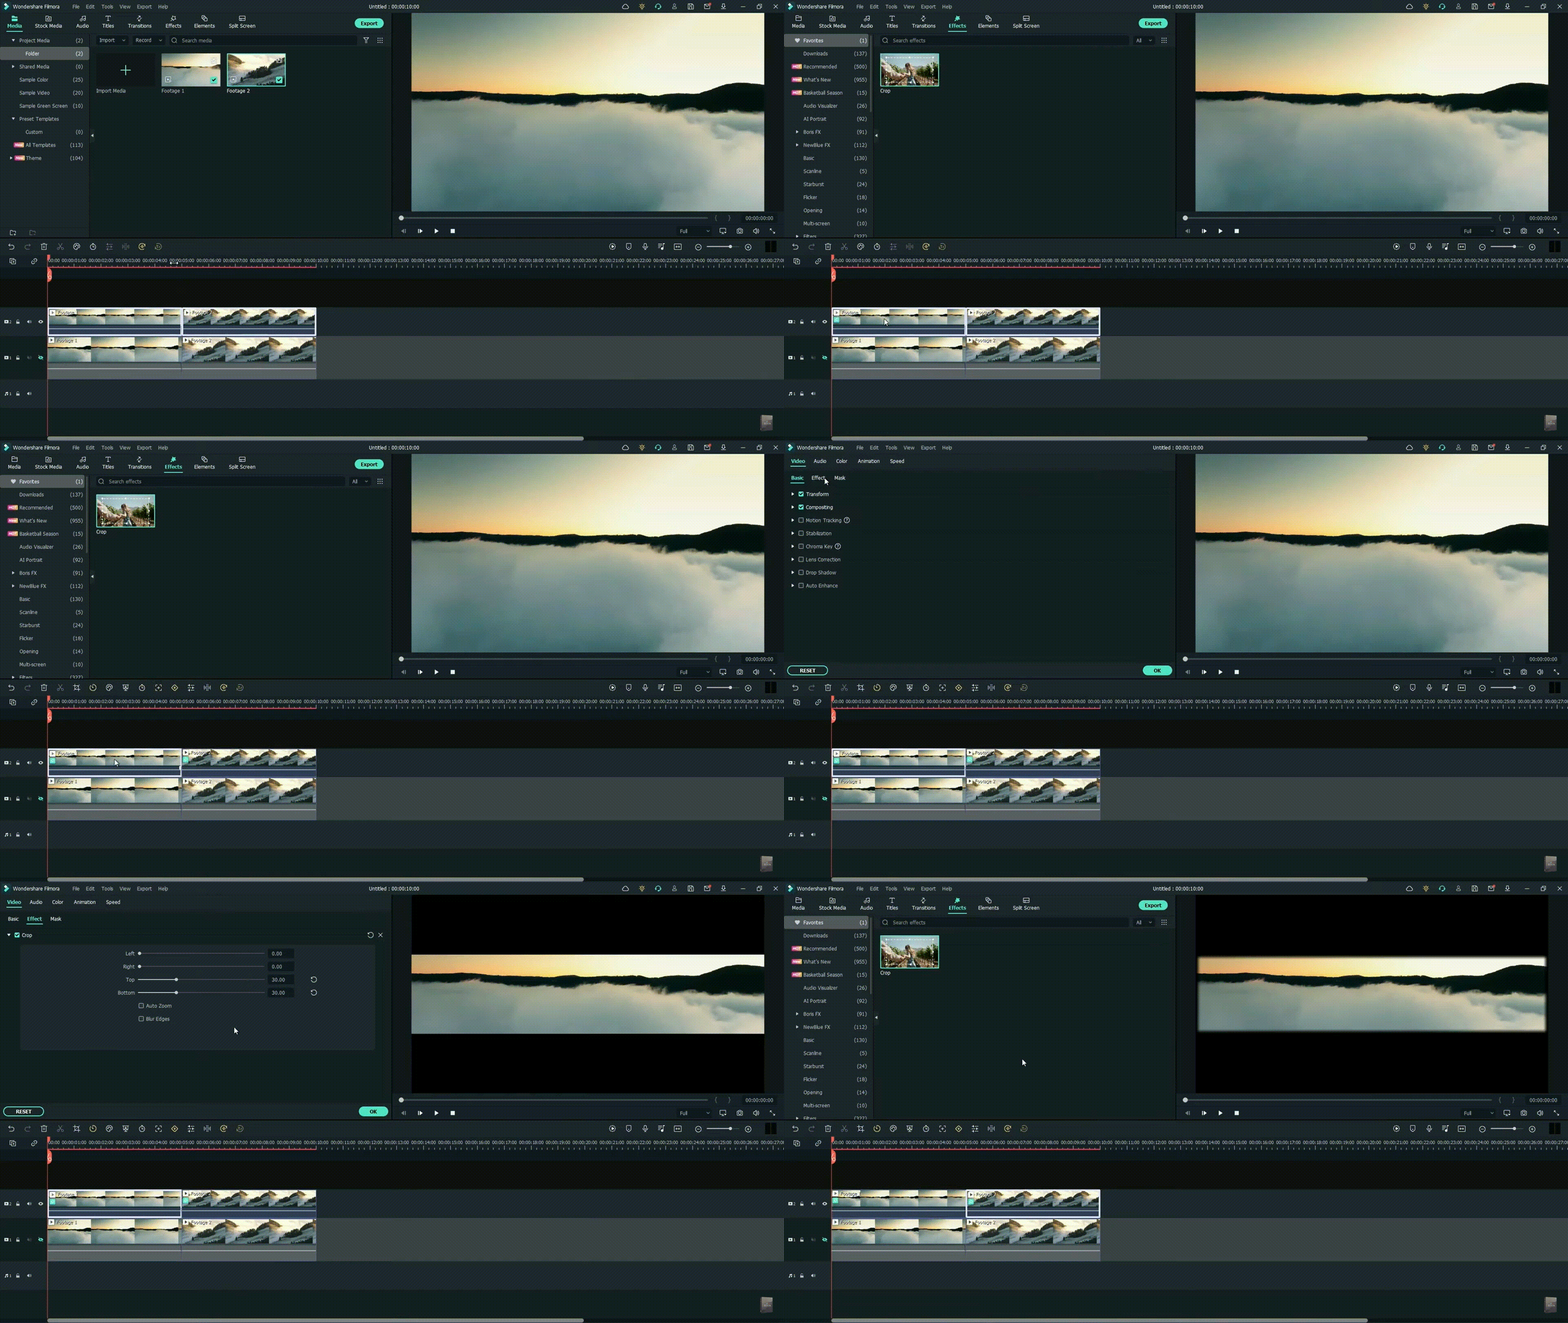
After importing the footage and applying different layers. The next step is to go to the Effects tab in the Wondershare Filmora. Then, the preset settings are applied to the footage. The quick steps for the same are:
- Start by applying the crop presets to the above-layer footage.
- Select the first footage in the video editor.
- Right-click on properties and open the effects menu.
- Search the settings and change the top and bottom settings to 30
- You can select to blur the edges of the footage by ticking on the option.
- Repeat the same steps for the second footage.
Step4Go to the Transitions tab
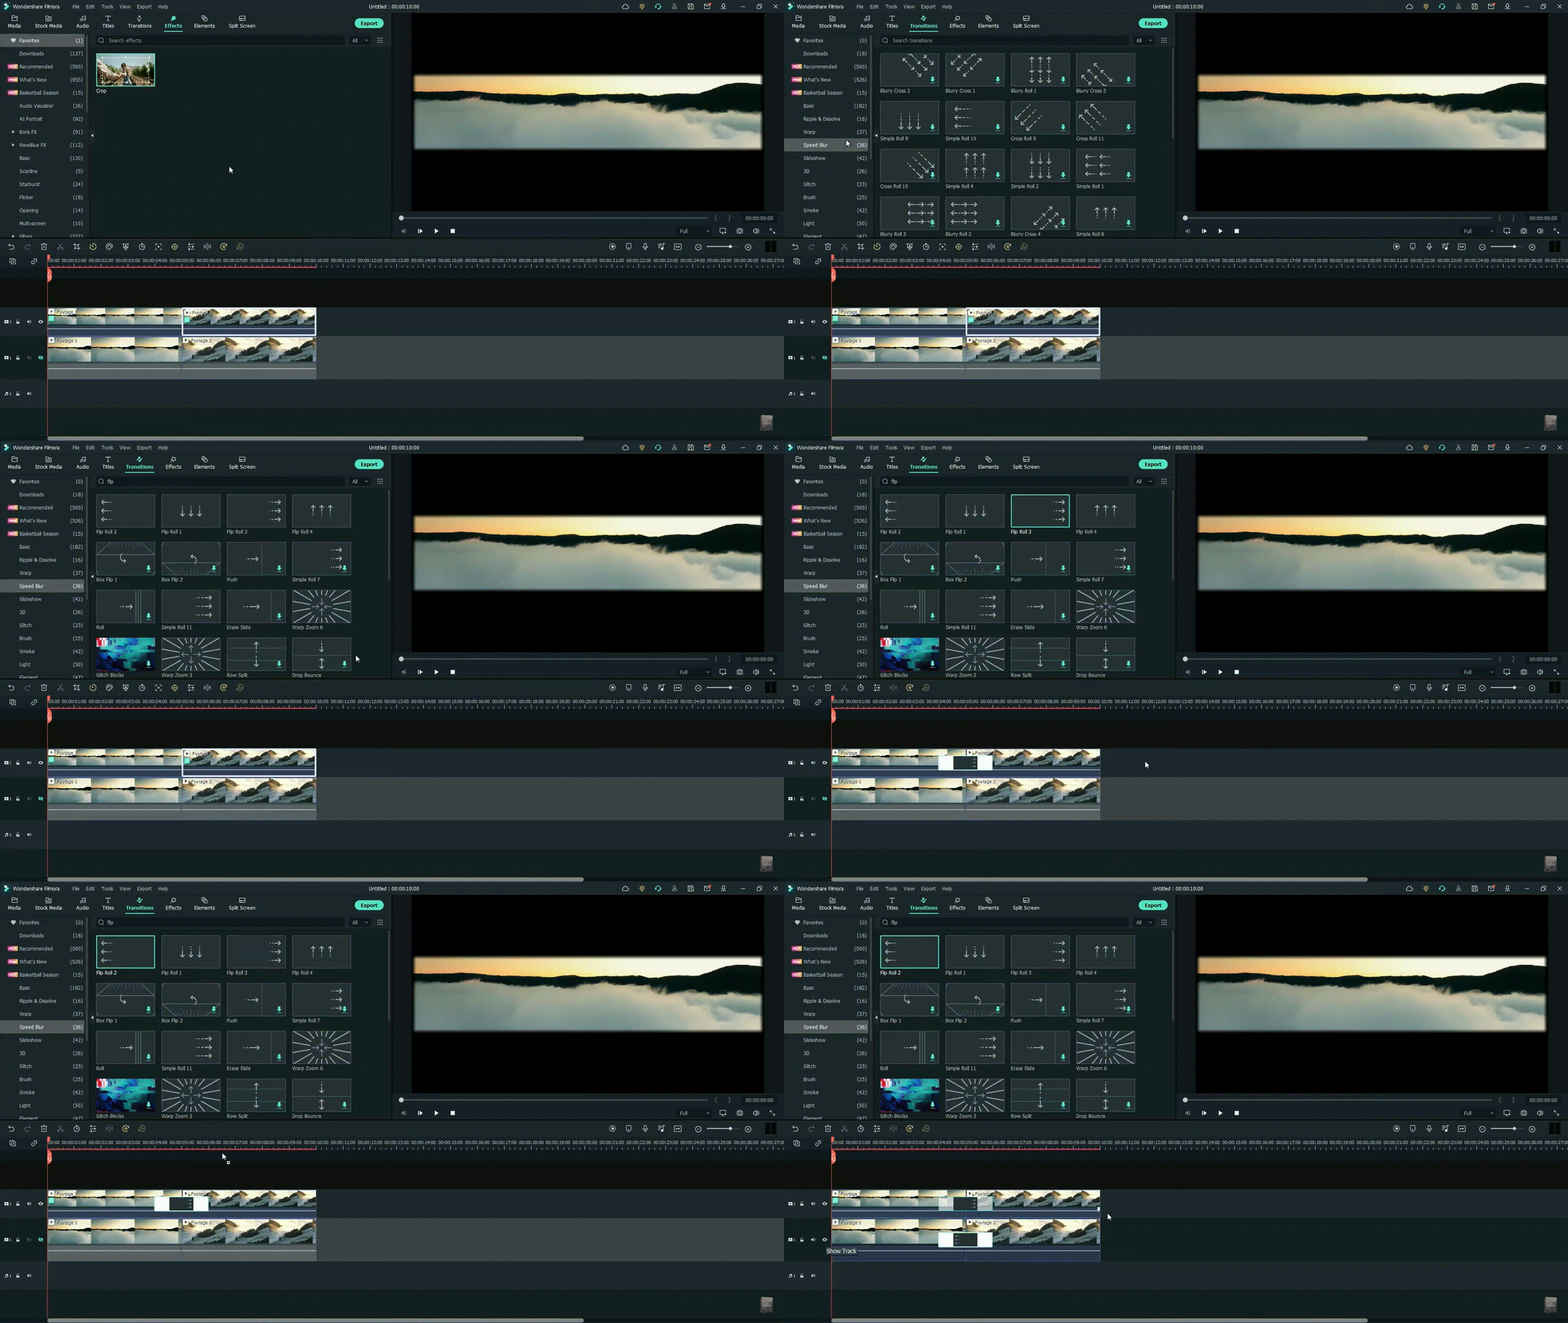
It is time to go to the transitions tab and start putting it in your video clip. The quick steps for the same are:
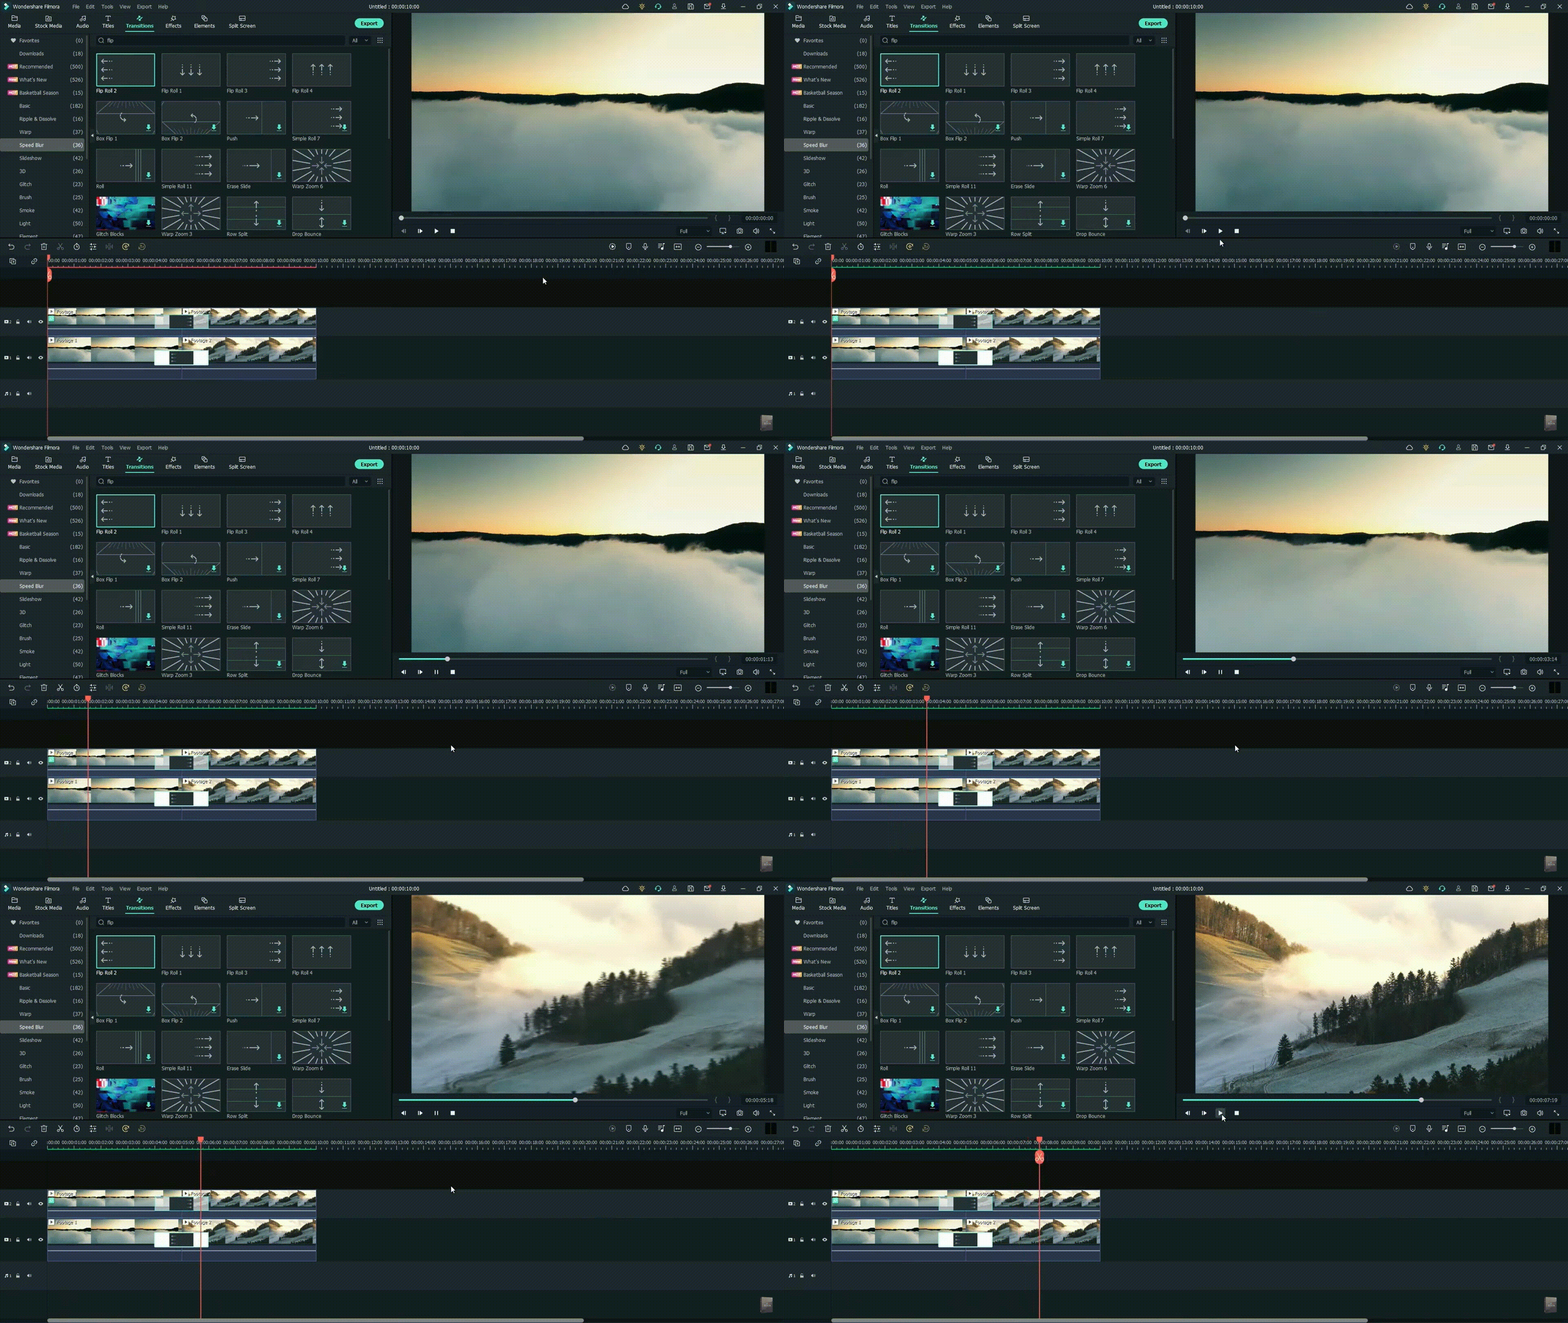
- Select the speed blur category located on the left side of the interface.
- Go to the search box and type “flip.”
- Start placing the transitions on the footage layers.
- Select the first transition, flip all three, and place it on the second layer of the footage.
- Select the second transition, flip all two, and place it on the first layer of the footage.
- Render this video part by unhiding the first layer and moving to the preview step.
Step5Lorem ipsum dolor sit amet eam quas malorum
It is time to preview the created video. The render preview option in the Wondershare Filmora ensures that there is no lag in the preview file on any system. It generates the rendered versions of the files placed on the timeline for a quick preview. In addition to it, it is easy to add a top to bottom transition in the video editing in this step only. The quick steps for the same are:
- Preview the created video file and check if there is a need to change the transition.
- If required to add the top to bottom transition, remove the existing transitions.
- Select the first footage and go to its properties menu.
- Go to the crop settings and reset these settings.
- Change the right and left parameters in the settings to 30.
- Repeat the same steps for the second footage.
- Select the second layer, and apply and flip all four effects.
- Select the first layer, and apply to flip all one effect.
- Render the video footage and go for a quick preview.
Conclusion
Hence, Wondershare Filmora users can quickly create a smooth cut transition effect in their videos. It is easy to download Wondershare Filmora on your Mac or Windows system. All you need to do is import the footage to the interface and go to the effects tab.
The next step is to go to the transitions tab. It is easy to apply these effects to the first and the second layer. It is easy to check the preview of the created video, and if required, users can go for adding top bottom transition here.
Reset the crop settings of the first footage and select the right and left parameters to 30. The same is done to the second footage. After adding the different effects to created video, it is easy to save and preview the final footage. Beginners and professionals can go for these steps to incorporate a smooth-cut transition effect into their next video.
Free Download For macOS 10.14 or later
Step1Download and launch Wondershare Filmora
Before even jumping to the smooth-cut transition effect in Wondershare Filmora, the first step is to download and launch it on your system. It is easy to download this software on Windows and Mac devices. The quick steps for downloading and launching Wondershare Filmora are as follows:
- Go to the official website of Wondershare Filmora .
- Go to the Download button located in the top right corner of the official website.

- The Filmora Installer will download quickly for your Windows or Mac system.
- Double-click on the setup and start the installation process. Agree on the terms and conditions menu thus prompted.
- Once Wondershare Filmora is installed, it will start and run automatically on your system.
Step2Import the footage
The first step in creating a smooth cut transition effect is to import the footage. All you need to do is use the drag-and-drop functionality of the Wondershare Filmora. You can import 2 footage to the video editor interface with the quick steps mentioned below.
- Start by dragging the two footage to the timeline using the drag and drop functionality.
- Now, select the footage in the video editor.
- The next step is to copy the layer of the footage and lock the current layer.
- Then, paste the current layer over the other layer of the footage.
- Move towards the end of this step by unlocking the layer. Then you need to hide the below layer.

Step3Go to the effects tab and apply preset settings
After importing the footage and applying different layers. The next step is to go to the Effects tab in the Wondershare Filmora. Then, the preset settings are applied to the footage. The quick steps for the same are:
- Start by applying the crop presets to the above-layer footage.
- Select the first footage in the video editor.
- Right-click on properties and open the effects menu.
- Search the settings and change the top and bottom settings to 30
- You can select to blur the edges of the footage by ticking on the option.
- Repeat the same steps for the second footage.

Step4Go to the Transitions tab
It is time to go to the transitions tab and start putting it in your video clip. The quick steps for the same are:
- Select the speed blur category located on the left side of the interface.
- Go to the search box and type “flip.”
- Start placing the transitions on the footage layers.
- Select the first transition, flip all three, and place it on the second layer of the footage.
- Select the second transition, flip all two, and place it on the first layer of the footage.
- Render this video part by unhiding the first layer and moving to the preview step.

Step5Lorem ipsum dolor sit amet eam quas malorum
It is time to preview the created video. The render preview option in the Wondershare Filmora ensures that there is no lag in the preview file on any system. It generates the rendered versions of the files placed on the timeline for a quick preview. In addition to it, it is easy to add a top to bottom transition in the video editing in this step only. The quick steps for the same are:
- Preview the created video file and check if there is a need to change the transition.
- If required to add the top to bottom transition, remove the existing transitions.
- Select the first footage and go to its properties menu.
- Go to the crop settings and reset these settings.
- Change the right and left parameters in the settings to 30.
- Repeat the same steps for the second footage.
- Select the second layer, and apply and flip all four effects.
- Select the first layer, and apply to flip all one effect.
- Render the video footage and go for a quick preview.

Conclusion
Hence, Wondershare Filmora users can quickly create a smooth cut transition effect in their videos. It is easy to download Wondershare Filmora on your Mac or Windows system. All you need to do is import the footage to the interface and go to the effects tab.
The next step is to go to the transitions tab. It is easy to apply these effects to the first and the second layer. It is easy to check the preview of the created video, and if required, users can go for adding top bottom transition here.
Reset the crop settings of the first footage and select the right and left parameters to 30. The same is done to the second footage. After adding the different effects to created video, it is easy to save and preview the final footage. Beginners and professionals can go for these steps to incorporate a smooth-cut transition effect into their next video.
This Article Shares Valuable Insight Into the Best Brand Story Videos. Also, It Highlights the Importance of a Video Maker in Your Brand Story Video Ad-Making Process and Why Filmora Should Be Your Go-To Choice
With the advent of streaming content accessible anytime, anywhere, conventional marketing has somewhat lost grip on its performance. Consumers are now savvy as they now take a step further, like using ad blockers or tuning out ads.
However, it doesn’t imply the end of advertising as a brand promotion tool altogether. Individuals still desire best-in-class deals and products and spend their money shopping. All they need is to get informed about the product or service more entertainingly and innovatively.
This is one of the reasons why many established brands are now shifting toward their brand storytelling. And there’s no better and highly effective way to portray your brand story than with video. Simply making a video resembling any conventional TV commercial ad with an irritating ‘Call Today’ voiceover won’t be enough to get results.
Modern-day consumers are much more educated and sophisticated than before. You must learn how many creative and successful brands are infusing their branding and storytelling strategies to engage their customers. If you’re reading this article, you’re aiming to build your own brand storytelling video and are wondering how to make it a successful one.
Take no worries as the further sections will clear all your doubts and give you the perfect answer. So, let’s start.

Source : https://www.pexels.com/photo/business-plan-printed-on-paper-on-a-clipboard-8970679/
- Spotify - All Ears On You
- Airbnb - The Story of a Symbol of Belonging
- Apple - Chase
- Nike - Most Powerful Brand Story Videos
- Bells - Reader
- Dove - You’re More Beautiful Than You Think
- El Gordo - The Spanish Christmas Lottery Ad 2021
Part I. The Most Successful Video Practises of Brand Storytelling
1. Spotify - All Ears On You
Since 2008, Spotify has continued gathering as much information (personal preferences, likes, and dislikes) about their audiences as possible. It has helped them set personalized ad campaigns that will best fit their customers’ interests.
One of their latest, popular campaigns is ‘All Ears On You.’ Take a glimpse of this video to check how the video ad appears. Launched in June, this campaign focuses on celebrating your weird listening habits. It leveraged the users’ in-app experience to let them be proud of their unique choices. This helped Spotify to strengthen its emotional relationship with its listeners.
Learn From Spotify’s Famous Marketing Practices:
- Get the Most Out of Big Data: The customer insights and data helped Spotify make precise, on-point ads. Your firm should also acquire customers’ data and later leverage it to amplify the user experience and make marketing campaigns more relatable.
- Leverage User-Generated Content: Your audience is more interested in what other customers think and say about your business. The most successful video ads don’t involve facts about the company but the customers instead. Make a video using clips where your customers tell a story about themselves and their experience with your brand.
- Utilize The Trending Hashtags & Topics: Social medial trends and news feed is what attracts today’s customers the most. Spotify’s advertisement team always wraps their ad campaigns into a package of top-events-and-stories. Find the most popular and trending hashtags and topics related to your business niche and incorporate them in your brand storytelling video.
Some other marketing practices that teach valuable lessons to businesses for brand video marketing include:
- Leveraging the mentions on social media platforms
- Going for a customer-centric marketing approach with personalized interactions
2. Airbnb - The Story of a Symbol of Belonging
The center of focus of Airbnb’s brand story revolves around the basic ideology of ‘belonging.’ The brand found its mission - to shape the world into a place where individuals can ‘belong anywhere.’
Their official tagline also turned out to be ‘Belong Anywhere,’ which eventually led to the development of their whole brand story and new logo. This symbol was created to make sure it’s instantly recognizable.
Valuable Storytelling Lessons From Airbnb’s Marketing Practices:
- Let Your Customers Be At The Heart Of Your Organization: After interviewing users, Airbnb found out that no one can better inform them about their company than the community of their regular users. The conversations and interviews with such users helped Airbnb to prepare its entire brand story. Thus, you should, too, keep your customers at your core.
- It’s Never Too Late To Discover Your Story: Although launched in 2008, the company Airbnb realized they’d need to discover their business mission to scale and progress. They are an example that it’s never too late for your brand to find the brand story.
- Content Is The King: Airbnb always keeps posting content on its own blog and YouTube channel. Most of their content is based on user experiences and revolves around stories from within the brand’s community. Such high-quality content helped them to engage with the customers more efficiently.
3. Apple - Chase
Chase recently announced via email their latest introduction to the market - Apple Pay. They introduced it in collaboration with Apple as the new mode to pay. Chase leveraged this email communication to inform people about their latest collaboration with Apple.
They also used email to reinforce their commitment to helping people to buy Apple products like the iPhone 14 pro with accessible funds. While ensuring to align with Apple’s marketing strategy for the Apple Pay service announcement (primarily based on social media), Chase put more emphasis on real-time media.
Their marketing practice used direct, real-time media to connect with the on-the-go audience seemingly ready to buy an Apple product with a quick source of funds. Their brand story ad focused more on the ‘on-the-go’ audience who would readily agree to make such a purchase.
4. Nike - Most Powerful Brand Story Videos
If you’ve watched a Nike video ad featuring LeBron James or others, you’ll know how much emphasis on emotions and inspiration. They don’t go for the direct marketing of their brand and products. Instead, they produce video ads with a powerful message drawn from a compelling storyline.
This makes Nike unique from numerous other brands as it has been an expert in brand storytelling for years now. Every piece of video ad from their collection triggers the audience’s feelings and emotions, which can only be met and satisfied by using Nike products.
There’s a lot of power within emotional branding, and Nike has shaped and transformed its whole marketing model into a storytelling form that motivates the audience to take action - ‘Just do it with Nike products. Some of the marketing strategies that have helped them grow over the years include the following:
- They promote the advantages of their product’s features rather than simply highlighting and promoting the features. This is called benefit-based marketing practice.
- They sell brand stories more than their products, which has always been their primary marketing strategy.
- Nike is very strong in the social media game. They leverage user-generated content to create their video ads.
- Collaborating with influencers like LeBron James and Cristiano Ronaldo has always been at the core of their marketing strategy.
5. Bells - Reader
The marketing manager of Bell - Thami Silwana - revealed that the idea behind the ‘Bells-Reader’ campaign is to assist men in acknowledging, comprehending, and speaking about their personal victories.
They realized that sometimes it could be troublesome for men to interact with one another and acknowledge their inside feeling and emotions when one of them have achieved something. Their tagline, ‘Give That Man a Bell, ’ best fits in terms of a man-to-man acknowledging something worth the celebration.
Here is what the video ad director Greg incorporated in the video to make it hit the marketing campaign’s motto:
Sentimentality:
- Greg incorporated an excellent blend of drama, emotion, and sentimentality in this two minutes video ad, which was as good as a two-hour Hollywood movie.
- The video hit the emotions on so many levels that you’ll feel like drinking a glass of whisky at the end of the ad.
- Your brand should also create a brand story video where you help your customers to acknowledge themselves by hitting their emotions at different levels.
- To know how just take a look at the ad yourself: https://www.youtube.com/watch .
6. Dove - You’re More Beautiful Than You Think
The Real Beauty Ad Campaign by Dove focuses on women’s natural charisma and beauty. The ad emphasizes promoting the self-esteem of every woman. In their ‘Dove Real Beauty Sketches’ video ad, you’ll find the events to be chosen, arranged, connected, and assessed as meaningful for a specific set of audience.
Although the video ad’s primary focus is women’s empowerment, it’s still a commercial that promotes Dove products. The ad ends with the phrase ‘you’re more beautiful than you think,’ and a Dove brand logo appears.
Significantly, Dove desires women to know that they are always encouraged, supported, and acknowledged for their real beauty. This storytelling helped Dove boost its product sales without making any direct references.
7. El Gordo - The Spanish Christmas Lottery Ad 2021
Conventionally, you’ll get to know about the arrival of Christmas in Spain when you’ll find the Spanish Christmas Lottery hitting the screens as a commercial. The Christmas Lottery’s 2021 ad version was recorded and created in the picturesque and snowy town of Elizondo.
The ad signifies the spirit of the Christmas festive season and amazingly resonates with the motto of El Gordo - the greatest prize is to share it. They used aesthetics and scenic beauty to allure the viewers and drive them into buying the lottery.
They used the marketing practice of hitting people’s emotions during Christmas when they could truly immerse themselves into enjoying things like winning the lottery.
Part 2. Need Pro-Quality Video Result From Your Video Maker? Try Filmora - The Best in the Market
If you seek pro-quality video results from your video maker for the ‘best-in-class’ brand story videos, use Filmora. It has emerged as the leading video-making tool for global marketers where you can create, edit, and save all sorts of ‘state-of-the-art,’ ‘next-level’ marketing brand videos.
Try Filmora to ensure brand awareness, advertise your business, introduce the audience to your brand and its products, and boost sales. One software, multiple benefits. Here are some features of Filmora that can effectively help you make your brand story videos.
- Numerous Resources: Filmora is an excellent platform to explore your inner creativity as it has thousands of video assets accessible to its users. The widespread availability of unique advanced and basic features will help you create the most appealing brand story video.
- Green Screen: Your brand storytelling videos will become bland if you miss out on adding a unique background. Thanks to the Green Screen feature by Filmora, it takes only a few simple clicks to add such attractive backgrounds to your videos.
- Split Screen: When making your brand story video, it’s more likely that you’ll want to show a comparison of two products side-by-side. In that case, the Split Screen feature from Filmora comes in handy. It lets you incorporate two or more video footage or clips in the video.
- Audio Ducking: Your brand story will involve several key pointers that you’ll want to highlight for the audience. With Filmora’s Audio Ducking feature, you can easily highlight the dialogues and speeches during the video. This will help you to emphasize those video parts so that the audience can hear them with clarity. Of course, the feature fades the background music for those speech and dialogue parts.
- Color Grading: The more appealing the brand story video, the more the viewers. That’s precisely what the color grading feature does for you. It allows you to adjust the tint, 3D Luts, temperature, and lights in all your marketing videos. Introduce mesmerizing cinematographic effects in your videos with Fimora’s ‘state-of-the-art’ color tuning features.
Telling your brand story via videos has just become simpler and faster than ever with Filmora. Try the software for magical results.
Free Download For Win 7 or later(64-bit)
Free Download For macOS 10.14 or later
Conclusion
Telling your brand story is more crucial than ever as it lets you reach new levels of personalization and establish deeper bonds and connections with your clients or customers.
With the ideal brand storytelling strategy and the best video maker tool, you can easily connect with the audience and let them know all about your brand, its products, and its purpose. So, get started today!
Free Download For Win 7 or later(64-bit)
Free Download For macOS 10.14 or later
Part I. The Most Successful Video Practises of Brand Storytelling
1. Spotify - All Ears On You
Since 2008, Spotify has continued gathering as much information (personal preferences, likes, and dislikes) about their audiences as possible. It has helped them set personalized ad campaigns that will best fit their customers’ interests.
One of their latest, popular campaigns is ‘All Ears On You.’ Take a glimpse of this video to check how the video ad appears. Launched in June, this campaign focuses on celebrating your weird listening habits. It leveraged the users’ in-app experience to let them be proud of their unique choices. This helped Spotify to strengthen its emotional relationship with its listeners.
Learn From Spotify’s Famous Marketing Practices:
- Get the Most Out of Big Data: The customer insights and data helped Spotify make precise, on-point ads. Your firm should also acquire customers’ data and later leverage it to amplify the user experience and make marketing campaigns more relatable.
- Leverage User-Generated Content: Your audience is more interested in what other customers think and say about your business. The most successful video ads don’t involve facts about the company but the customers instead. Make a video using clips where your customers tell a story about themselves and their experience with your brand.
- Utilize The Trending Hashtags & Topics: Social medial trends and news feed is what attracts today’s customers the most. Spotify’s advertisement team always wraps their ad campaigns into a package of top-events-and-stories. Find the most popular and trending hashtags and topics related to your business niche and incorporate them in your brand storytelling video.
Some other marketing practices that teach valuable lessons to businesses for brand video marketing include:
- Leveraging the mentions on social media platforms
- Going for a customer-centric marketing approach with personalized interactions
2. Airbnb - The Story of a Symbol of Belonging
The center of focus of Airbnb’s brand story revolves around the basic ideology of ‘belonging.’ The brand found its mission - to shape the world into a place where individuals can ‘belong anywhere.’
Their official tagline also turned out to be ‘Belong Anywhere,’ which eventually led to the development of their whole brand story and new logo. This symbol was created to make sure it’s instantly recognizable.
Valuable Storytelling Lessons From Airbnb’s Marketing Practices:
- Let Your Customers Be At The Heart Of Your Organization: After interviewing users, Airbnb found out that no one can better inform them about their company than the community of their regular users. The conversations and interviews with such users helped Airbnb to prepare its entire brand story. Thus, you should, too, keep your customers at your core.
- It’s Never Too Late To Discover Your Story: Although launched in 2008, the company Airbnb realized they’d need to discover their business mission to scale and progress. They are an example that it’s never too late for your brand to find the brand story.
- Content Is The King: Airbnb always keeps posting content on its own blog and YouTube channel. Most of their content is based on user experiences and revolves around stories from within the brand’s community. Such high-quality content helped them to engage with the customers more efficiently.
3. Apple - Chase
Chase recently announced via email their latest introduction to the market - Apple Pay. They introduced it in collaboration with Apple as the new mode to pay. Chase leveraged this email communication to inform people about their latest collaboration with Apple.
They also used email to reinforce their commitment to helping people to buy Apple products like the iPhone 14 pro with accessible funds. While ensuring to align with Apple’s marketing strategy for the Apple Pay service announcement (primarily based on social media), Chase put more emphasis on real-time media.
Their marketing practice used direct, real-time media to connect with the on-the-go audience seemingly ready to buy an Apple product with a quick source of funds. Their brand story ad focused more on the ‘on-the-go’ audience who would readily agree to make such a purchase.
4. Nike - Most Powerful Brand Story Videos
If you’ve watched a Nike video ad featuring LeBron James or others, you’ll know how much emphasis on emotions and inspiration. They don’t go for the direct marketing of their brand and products. Instead, they produce video ads with a powerful message drawn from a compelling storyline.
This makes Nike unique from numerous other brands as it has been an expert in brand storytelling for years now. Every piece of video ad from their collection triggers the audience’s feelings and emotions, which can only be met and satisfied by using Nike products.
There’s a lot of power within emotional branding, and Nike has shaped and transformed its whole marketing model into a storytelling form that motivates the audience to take action - ‘Just do it with Nike products. Some of the marketing strategies that have helped them grow over the years include the following:
- They promote the advantages of their product’s features rather than simply highlighting and promoting the features. This is called benefit-based marketing practice.
- They sell brand stories more than their products, which has always been their primary marketing strategy.
- Nike is very strong in the social media game. They leverage user-generated content to create their video ads.
- Collaborating with influencers like LeBron James and Cristiano Ronaldo has always been at the core of their marketing strategy.
5. Bells - Reader
The marketing manager of Bell - Thami Silwana - revealed that the idea behind the ‘Bells-Reader’ campaign is to assist men in acknowledging, comprehending, and speaking about their personal victories.
They realized that sometimes it could be troublesome for men to interact with one another and acknowledge their inside feeling and emotions when one of them have achieved something. Their tagline, ‘Give That Man a Bell, ’ best fits in terms of a man-to-man acknowledging something worth the celebration.
Here is what the video ad director Greg incorporated in the video to make it hit the marketing campaign’s motto:
Sentimentality:
- Greg incorporated an excellent blend of drama, emotion, and sentimentality in this two minutes video ad, which was as good as a two-hour Hollywood movie.
- The video hit the emotions on so many levels that you’ll feel like drinking a glass of whisky at the end of the ad.
- Your brand should also create a brand story video where you help your customers to acknowledge themselves by hitting their emotions at different levels.
- To know how just take a look at the ad yourself: https://www.youtube.com/watch .
6. Dove - You’re More Beautiful Than You Think
The Real Beauty Ad Campaign by Dove focuses on women’s natural charisma and beauty. The ad emphasizes promoting the self-esteem of every woman. In their ‘Dove Real Beauty Sketches’ video ad, you’ll find the events to be chosen, arranged, connected, and assessed as meaningful for a specific set of audience.
Although the video ad’s primary focus is women’s empowerment, it’s still a commercial that promotes Dove products. The ad ends with the phrase ‘you’re more beautiful than you think,’ and a Dove brand logo appears.
Significantly, Dove desires women to know that they are always encouraged, supported, and acknowledged for their real beauty. This storytelling helped Dove boost its product sales without making any direct references.
7. El Gordo - The Spanish Christmas Lottery Ad 2021
Conventionally, you’ll get to know about the arrival of Christmas in Spain when you’ll find the Spanish Christmas Lottery hitting the screens as a commercial. The Christmas Lottery’s 2021 ad version was recorded and created in the picturesque and snowy town of Elizondo.
The ad signifies the spirit of the Christmas festive season and amazingly resonates with the motto of El Gordo - the greatest prize is to share it. They used aesthetics and scenic beauty to allure the viewers and drive them into buying the lottery.
They used the marketing practice of hitting people’s emotions during Christmas when they could truly immerse themselves into enjoying things like winning the lottery.
Part 2. Need Pro-Quality Video Result From Your Video Maker? Try Filmora - The Best in the Market
If you seek pro-quality video results from your video maker for the ‘best-in-class’ brand story videos, use Filmora. It has emerged as the leading video-making tool for global marketers where you can create, edit, and save all sorts of ‘state-of-the-art,’ ‘next-level’ marketing brand videos.

Try Filmora to ensure brand awareness, advertise your business, introduce the audience to your brand and its products, and boost sales. One software, multiple benefits. Here are some features of Filmora that can effectively help you make your brand story videos.
- Numerous Resources: Filmora is an excellent platform to explore your inner creativity as it has thousands of video assets accessible to its users. The widespread availability of unique advanced and basic features will help you create the most appealing brand story video.
- Green Screen: Your brand storytelling videos will become bland if you miss out on adding a unique background. Thanks to the Green Screen feature by Filmora, it takes only a few simple clicks to add such attractive backgrounds to your videos.
- Split Screen: When making your brand story video, it’s more likely that you’ll want to show a comparison of two products side-by-side. In that case, the Split Screen feature from Filmora comes in handy. It lets you incorporate two or more video footage or clips in the video.
- Audio Ducking: Your brand story will involve several key pointers that you’ll want to highlight for the audience. With Filmora’s Audio Ducking feature, you can easily highlight the dialogues and speeches during the video. This will help you to emphasize those video parts so that the audience can hear them with clarity. Of course, the feature fades the background music for those speech and dialogue parts.
- Color Grading: The more appealing the brand story video, the more the viewers. That’s precisely what the color grading feature does for you. It allows you to adjust the tint, 3D Luts, temperature, and lights in all your marketing videos. Introduce mesmerizing cinematographic effects in your videos with Fimora’s ‘state-of-the-art’ color tuning features.
Telling your brand story via videos has just become simpler and faster than ever with Filmora. Try the software for magical results.
Free Download For Win 7 or later(64-bit)
Free Download For macOS 10.14 or later
Conclusion
Telling your brand story is more crucial than ever as it lets you reach new levels of personalization and establish deeper bonds and connections with your clients or customers.
With the ideal brand storytelling strategy and the best video maker tool, you can easily connect with the audience and let them know all about your brand, its products, and its purpose. So, get started today!
Free Download For Win 7 or later(64-bit)
Free Download For macOS 10.14 or later
How to Correct Lens Distortion With Filmora
The distortion in your video may irritate you when you’re working on the video’s edit. When you take images or record sound, you frequently end up with distorted results due to lens distortion. In this article, we will discuss what lens distortion is, how it may be fixed, and the factors you need to pay attention to avoid lens distortion when taking or recording videos.
Part 1: Basic introduction to lens distortion
1. What is lens distortion
Distortion means that the straight rectilinear projection is not straight. In the pinhole camera model, lens distortion is measured by how far from the image’s ideal projection is. From a geometric optics point of view, the scene’s straight lines don’t look straight in the image.
When you take a picture, the camera lens can somehow change the shape of the image. It is called camera lens distortion. In simple terms, we can tell you that this is the case because distortion in-camera is when the lens makes curved lines in an image and doesn’t show the straight lines from the scene.
2. What cause it
Lens distortion happens with all lenses. It is because of several things, such as how the lens is curved, how far away the subject is, and the angle at which the photo was taken. Furthermore, it changes the image in many ways, but you can see it most when straight lines at the frame’s edges are no longer parallel.
Most geometric lens distortions happen when the focal distance is short (barrel distortion), long (pincushion distortion), or when a fish-eye lens is used to take a picture from a low angle (keystone distortion).
Part 2: How to correct a distorted lens?
A lot of times, with lower-end wide-angle lenses, especially action cams like GoPro, you get pretty gnarly distortion when you’re filming. As we know, the Earth is round, but it shouldn’t look like this when you take a picture. Indeed, it’s very distorted, it has the horizon line bending all over the place, and basically, all of the lines in the video have some level of curvature.
Hence, follow all the steps below to know how to fix it:
Step1 Import your video to Filmora .

Free Download For Win 7 or later(64-bit)
Free Download For macOS 10.14 or later
Step2 Click on the clip and head over to the lens correction. Choose the “Camera model” based on what you used, but in this tutorial, the video was taken with a GoPro Hero 7. However, you can choose some other camera model options there.

Step3 To adjust the distortion, you can slide the bar to the left or the right. If you slide the bar to the right (maximum level), there will be no adjustment. However, if you slide the bar to the left, you can see it pulling those lines as high up as possible.
You can see a bit of curvature, but it looks much more natural, and all of the lines in the video look so much better.

Step4 Lastly, if you play the video back, you will see the video look much better than before.

Part 3: How to avoid distorted lens while shooting?
1. Avoid very wide-angle lenses
The more distortion there is in a lens, like a 15mm prime, the wider it is. Sometimes you need a very wide-angle lens, and distortion is unavoidable. If you have room to move back, you could try using a lens with a different focal length.
2. Avoid getting too close
Doing so will enhance optical distortion in many lenses and the likelihood of perspective distortion in all lenses.
3. Be mindful of your composition
There are numerous instances where distortion is acceptable or even intended. Others must be carefully examined, such as utilizing a wide-angle lens to photograph a row of people. When you get too close to a group, the distortion makes the people at each end appear considerably wider! Therefore, consider your composition. Stand back and add space around your group; if necessary, you can trim the image afterward.
4. Use a 50mm lens
50mm lenses are often called “all-purpose” lenses. There is a good reason
for this. A 50mm lens is great for portraits, street photography, and many other kinds of photography, including architecture. If your subject is big, you just need space to stand back. You will see that a 50mm lens rarely distorts the image.
Free Download For macOS 10.14 or later
Step2 Click on the clip and head over to the lens correction. Choose the “Camera model” based on what you used, but in this tutorial, the video was taken with a GoPro Hero 7. However, you can choose some other camera model options there.

Step3 To adjust the distortion, you can slide the bar to the left or the right. If you slide the bar to the right (maximum level), there will be no adjustment. However, if you slide the bar to the left, you can see it pulling those lines as high up as possible.
You can see a bit of curvature, but it looks much more natural, and all of the lines in the video look so much better.

Step4 Lastly, if you play the video back, you will see the video look much better than before.

Part 3: How to avoid distorted lens while shooting?
1. Avoid very wide-angle lenses
The more distortion there is in a lens, like a 15mm prime, the wider it is. Sometimes you need a very wide-angle lens, and distortion is unavoidable. If you have room to move back, you could try using a lens with a different focal length.
2. Avoid getting too close
Doing so will enhance optical distortion in many lenses and the likelihood of perspective distortion in all lenses.
3. Be mindful of your composition
There are numerous instances where distortion is acceptable or even intended. Others must be carefully examined, such as utilizing a wide-angle lens to photograph a row of people. When you get too close to a group, the distortion makes the people at each end appear considerably wider! Therefore, consider your composition. Stand back and add space around your group; if necessary, you can trim the image afterward.
4. Use a 50mm lens
50mm lenses are often called “all-purpose” lenses. There is a good reason
for this. A 50mm lens is great for portraits, street photography, and many other kinds of photography, including architecture. If your subject is big, you just need space to stand back. You will see that a 50mm lens rarely distorts the image.
How to Create One Click Video Reverse Effect in Filmora
All great video editors use phenomenal video effects in their videos. One of the most professional effects is the reverse video effect. This unique effect is always challenging for the makers to shoot and portray on the screen flawlessly.
At the same time, it is intriguing and always draws the audience’s attention. In this article, you will learn to shoot and edit the video for reverse effects using Filmora. But first, we will learn what does video reverse effect mean. So let us get into this!
Part 1. What Is Video Reverse Effect?
It is a special video effect in which a motion of things starts in the backward direction. This unique effect is used to intrigue the audience.
For example, if a bullet is fired from a gun. With the reverse effect, you can rewind the footage, and the shot goes back into the gun. So today, you can easily rewind fast action scenes and get a wow reaction from the audience.
Famous Examples of Reverse Effect in Films
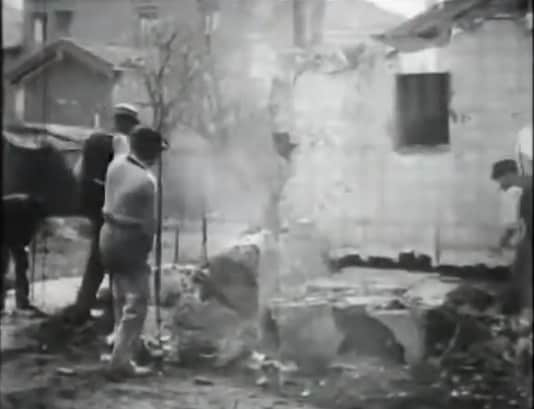
1- Demolition of a Wall (1896)
Filmmakers first used this striking effect in 1896 in a 90 seconds film, “Demolition of a wall.” Louis Lumiere was the one who made that video. Below is shown an image from the film.
2- Tenet (2020)
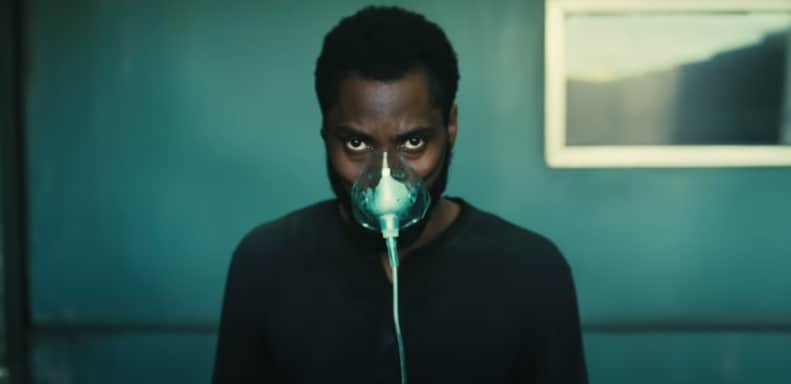
It is a viral film by Christopher Nolan, which was a great success. He explained the concept of reverse entropy, in which you start moving back chronologically in time instead of forward. This concept is all shown through this special video reverse effect. Unfortunately, the audience had difficulty digesting this unique concept, which generated an awful response.
Part 2. How To Shoot Video Reverse Effect?
The reverse effect is unique, so special attention should be paid while filming a video. This section will cover some of the crucial prerequisites to film a video.
Steady Camera
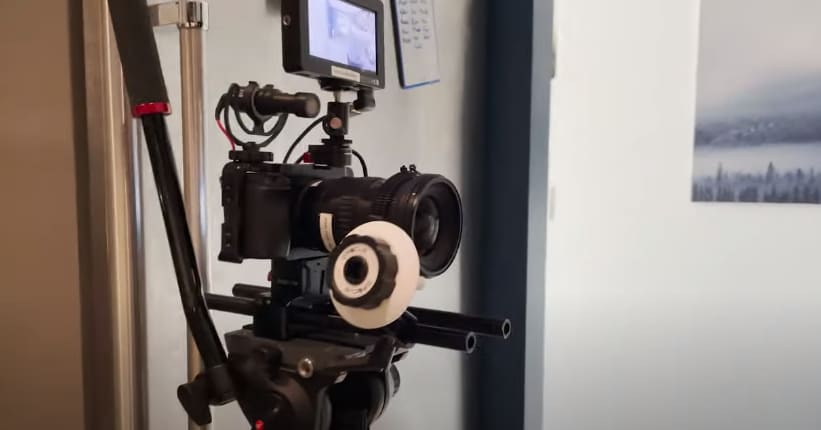
It would be best to have your camera placed on a steady surface or mounted on a tripod stand to lock the focus. We will split the area and perform different tasks to make it look smooth. The audience will not get the idea that you completed the tasks separately. And it helps in the editing process as well.
A Spacious Area
You will need a spacious area in which you will perform different tasks. Make sure your camera stands still while shooting all the frames of video. In an ample space, it becomes easier to do movements freely. It also helps prevent glitches in the final product.
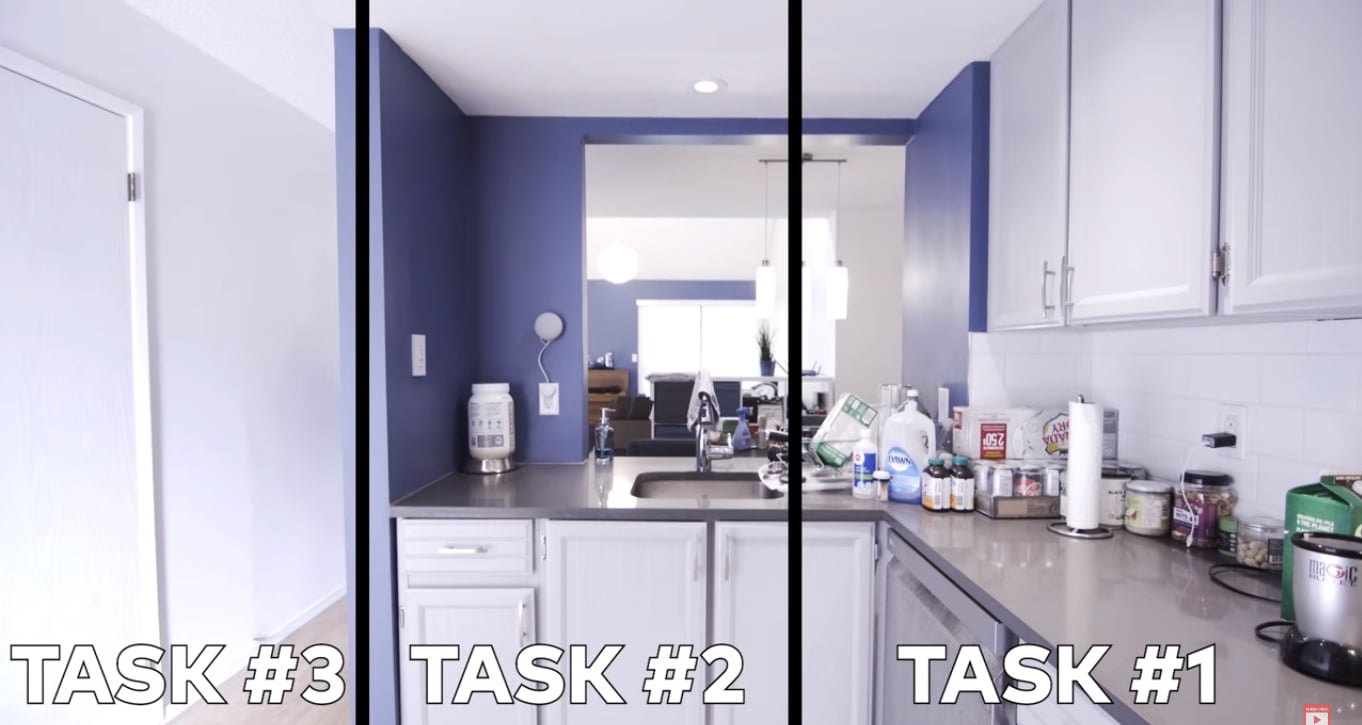
Splitting of Area into Portions
Now you have to split your area into portions. Each task is in its part of the frame, and actions in one frame should not pass over into another. You will do one activity per portion. It makes the editing process a lot easier. Finally, we get all three videos to merge and make it look like a single video.
After covering the prerequisites, we will now learn the editing process of creating a video reverse effect.
Part 3. How To Edit Video Reverse Effect In Filmora? [Stepwise Guide]
Creating video reverse effects is much easier these days. Wondershare Filmora is going to help you a lot. Filmora is an exceptional platform for creating innovative and creative videos. It has advanced editing features, which help make professional videos.
Free Download For Win 7 or later(64-bit)
Free Download For macOS 10.14 or later
Applying video reverse effects to your shots here is a wise guide. Please follow the instructions given below.
Step1 Downloading Filmora and Importing Files
- After recording your shots, you will edit them in Filmora. But first, download Filmora from the website and install it.
- After opening the software, import the recording files by clicking “Import Media.”

Step2 Drag the Shots to the Timeline
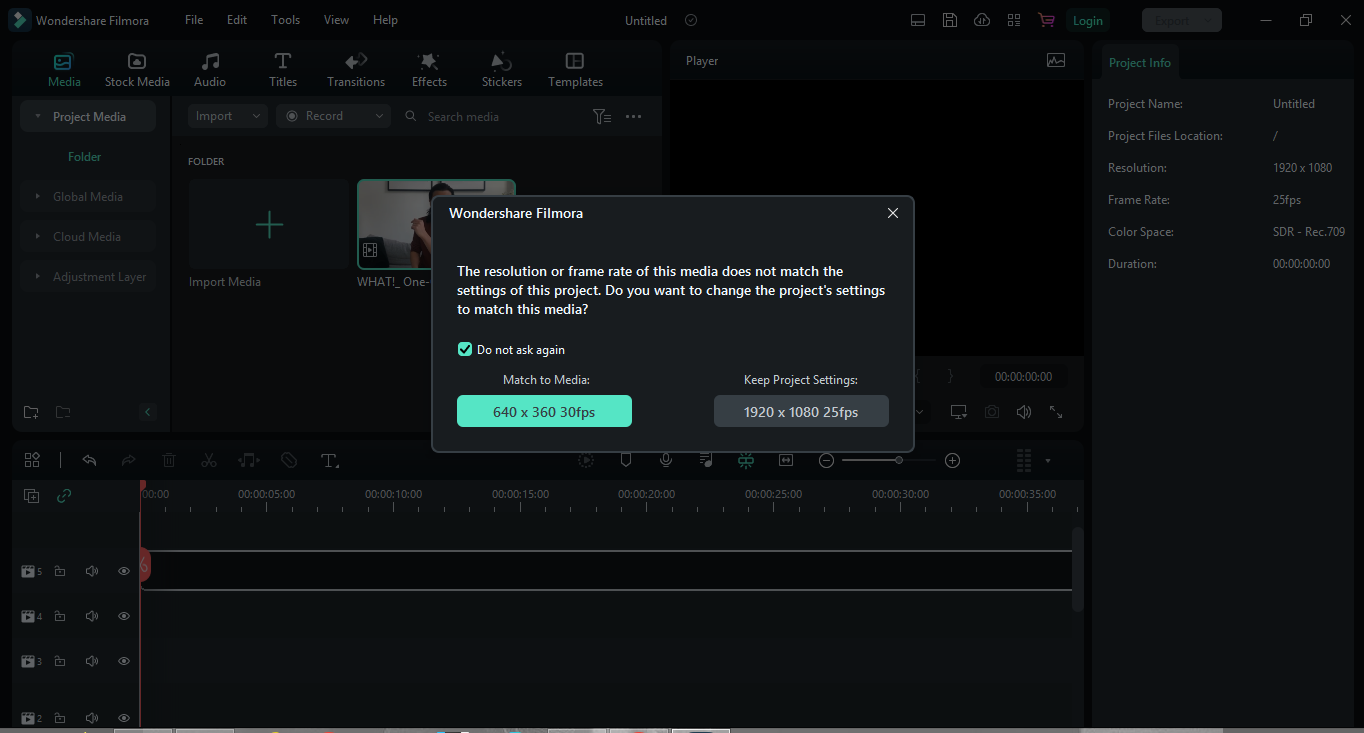
- Drag the shots to the timeline and drop it. If Filmora asks for a matching resolution on the timeline, please click “Match to Media.” It will adjust your media resolution according to the timeline.
- Add videos of each action on the layers above by drag and drop.
Step3 Adding Image Mask to the Clips
- Now you will add an image mask to the clips you shot at the area’s corners.
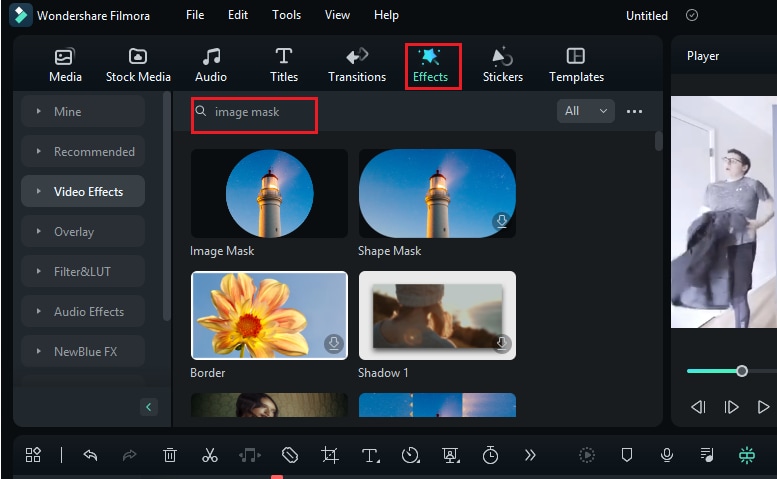
- To simultaneously show each action in the final video, go to “Effects” and click on the search tab.
- Please search “Image Mask.”
- Now drag and drop this effect to the footage shot at corners of the area.
Step4 Adjustment of the Image Mask of each Footage
- Now we will adjust the image mask of each footage so that each will show the task without any glitches.
- For that purpose, double-click on the video. Next, click on “Effects” in the top right corner of the screen. Then select “Image Mask” and make the necessary adjustments so that each mask shows each footage.
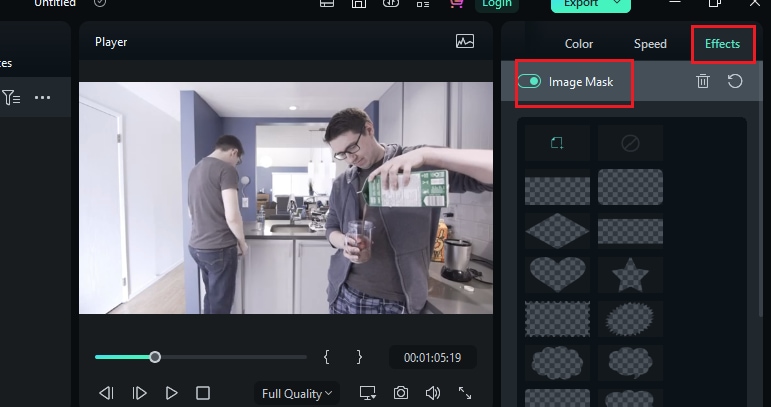
Step5 Trimming the Video Clip
- You can trim the footage to create a smooth movement in each portion. In this way, all the clips gel together in a single frame.

- We have successfully gelled together three video clips in a single frame.
- But all these videos are moving forward. So let us now apply the reverse effect to a video clip.
Step6 Apply Reverse Speed to Video Clip
- Please right-click on the video and select “Show speed control.”
- The Control panel will open in the right corner of the screen.
- Then enable the “Reverse Speed” option. You will apply a reverse effect to that clip.
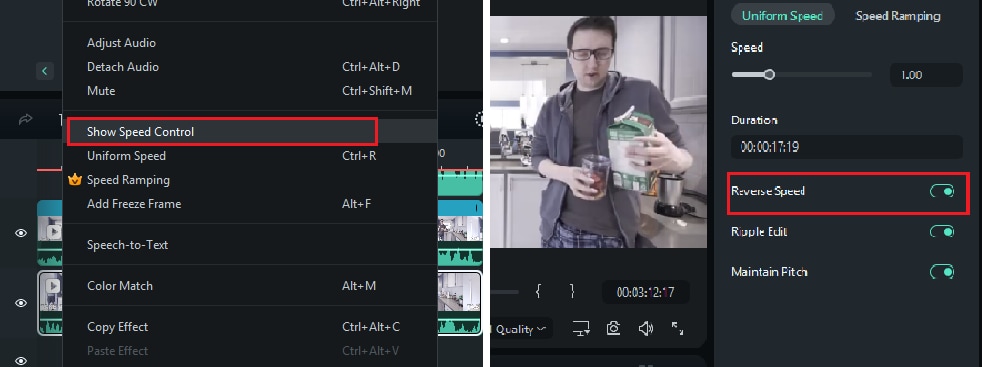
- Your video is ready now, with one clip moving in reverse and two in the forward direction.
- Take a look at the preview of your final product.
- Apply some changes to it if needed.
Step7 Export the Final Project
- Now it’s time to export the project to the device.
- Please select “Export” in the top right corner of the screen. And ship it to the device.
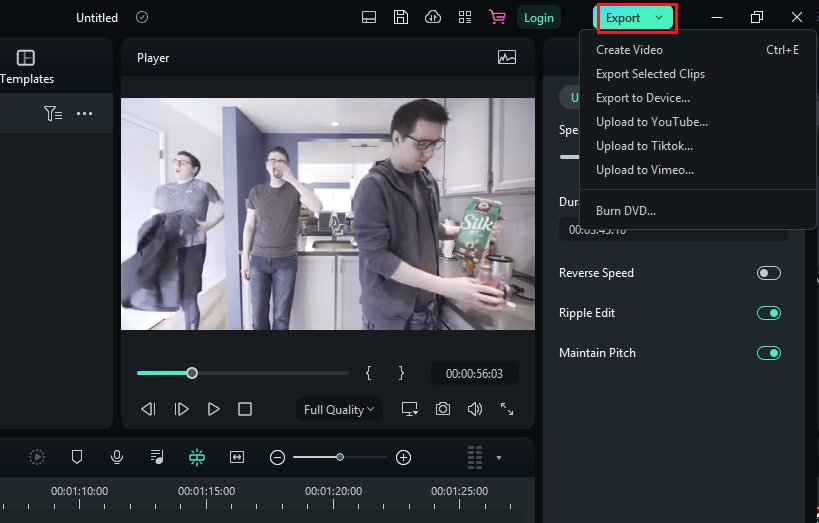
Step8 Final Video
Now have a look at the final project. How smooth and perfect it looks. That’s it!
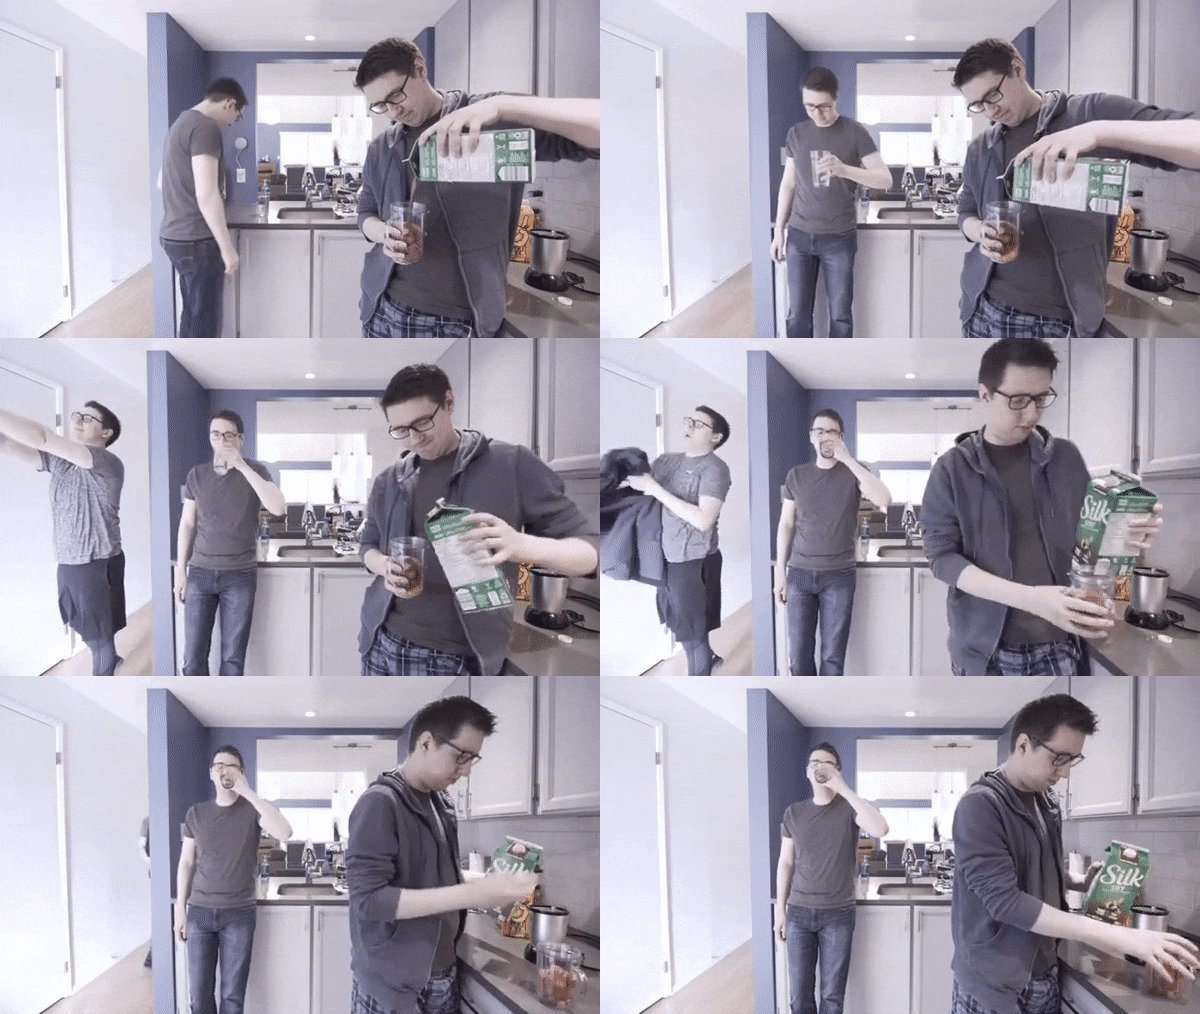
Conclusion
The reverse video effect has a unique characteristic of its own. And it will always work when you use it in your videos. The great success of many popular films is evident by the captivating feature that this effect has got. In this article, we have discussed the prerequisites and steps of creating a reverse video effect.
If this article has helped you, please mention your experience in the comment box. Also, please share this article with your friends and colleagues. Keep creating!
Free Download For macOS 10.14 or later
Applying video reverse effects to your shots here is a wise guide. Please follow the instructions given below.
Step1 Downloading Filmora and Importing Files
- After recording your shots, you will edit them in Filmora. But first, download Filmora from the website and install it.
- After opening the software, import the recording files by clicking “Import Media.”

Step2 Drag the Shots to the Timeline
- Drag the shots to the timeline and drop it. If Filmora asks for a matching resolution on the timeline, please click “Match to Media.” It will adjust your media resolution according to the timeline.

- Add videos of each action on the layers above by drag and drop.
Step3 Adding Image Mask to the Clips
- Now you will add an image mask to the clips you shot at the area’s corners.
- To simultaneously show each action in the final video, go to “Effects” and click on the search tab.
- Please search “Image Mask.”
- Now drag and drop this effect to the footage shot at corners of the area.

Step4 Adjustment of the Image Mask of each Footage
- Now we will adjust the image mask of each footage so that each will show the task without any glitches.
- For that purpose, double-click on the video. Next, click on “Effects” in the top right corner of the screen. Then select “Image Mask” and make the necessary adjustments so that each mask shows each footage.

Step5 Trimming the Video Clip
- You can trim the footage to create a smooth movement in each portion. In this way, all the clips gel together in a single frame.

- We have successfully gelled together three video clips in a single frame.
- But all these videos are moving forward. So let us now apply the reverse effect to a video clip.
Step6 Apply Reverse Speed to Video Clip
- Please right-click on the video and select “Show speed control.”
- The Control panel will open in the right corner of the screen.
- Then enable the “Reverse Speed” option. You will apply a reverse effect to that clip.

- Your video is ready now, with one clip moving in reverse and two in the forward direction.
- Take a look at the preview of your final product.
- Apply some changes to it if needed.
Step7 Export the Final Project
- Now it’s time to export the project to the device.
- Please select “Export” in the top right corner of the screen. And ship it to the device.

Step8 Final Video
Now have a look at the final project. How smooth and perfect it looks. That’s it!

Conclusion
The reverse video effect has a unique characteristic of its own. And it will always work when you use it in your videos. The great success of many popular films is evident by the captivating feature that this effect has got. In this article, we have discussed the prerequisites and steps of creating a reverse video effect.
If this article has helped you, please mention your experience in the comment box. Also, please share this article with your friends and colleagues. Keep creating!
Also read:
- [Updated] 2024 Approved Mastering FaceTime Capturing Conversations Live
- [Updated] CompactScreenGrab Critique Report
- 2024 Approved Optimal GPUs for High Res Media Production
- 3 Ways To Stream And Record At The Same Time
- Benefits of Live Streaming on YouTube for 2024
- Complete Tutorial: How to Restore Erased iMessages on iPads, Including Air and Pro Models
- Do You Want to Create a Zoom Motion Blur Effect Using Photoshop? If You Are Unaware of How to Do This, Read This Article to Learn Simple yet Authentic Instructions
- Effective Solutions for the Most Frequent DVD Player Malfunctions and Errors
- Expert Tips to Repair and Restart a Crashed NVIDIA Control Center
- Foundational Approach to Gradual Volume Adjustment for 2024
- In 2024, 3 Ways To Stream And Record At The Same Time
- In 2024, How To Make Ninja Jump Effect with Filmora
- In 2024, How to Transfer Data from Asus ROG Phone 8 to BlackBerry | Dr.fone
- New 2024 Approved Different Ways to Crop TikTok Video in High-Quality
- The way to recover deleted photos on Tecno Camon 20 Pro 5G without backup.
- Updated In 2024, How to Apply Gaussian Blur Effect to Videos In Premiere Pro?
- Updated In 2024, What You Should Know About Speech-to-Text Technology
- Title: How to Create a Smooth Cut Transition Effect?
- Author: Chloe
- Created at : 2024-09-29 01:50:59
- Updated at : 2024-10-02 22:40:48
- Link: https://ai-editing-video.techidaily.com/how-to-create-a-smooth-cut-transition-effect/
- License: This work is licensed under CC BY-NC-SA 4.0.