:max_bytes(150000):strip_icc():format(webp)/how-to-watch-tiktok-without-the-app-63a4562e4c4b4bd69477425853809a35.jpg)
How to Create a Text Effect Video with Filmora

How to Create a Text Effect Video with Filmora
If your video needs to have texts and titles, instead of static text effects, you should opt for video text effects. Basically, you will be showing eye-catching animated texts instead of unappealing still texts. You can get the attention of the audience towards your texts instantly and get the messages across swiftly. There are literally unlimited types of video editing text effects available but a handful of them are widely used by video creators.
If you want to add those popular text effects to your video, you will need a professional video editor. Wondershare Filmora is the best video editor to add all the popular and amazing video text effects. Filmora is equally popular among professionals and amateurs due to its wide range of text effects and intuitive user interface. We will list down the popular text effects in Filmora and illustrate how to add them to your video using Filmora.
Part 1. Popular text effects in Filmora
There are unlimited text effects available in Filmora but some of them are extremely popular that video creators regularly use in their videos. Here is the list of the popular Filmora video editor text effects that you should be aware of.
1. Text Swipe Effect
Text swipe effects are the most commonly used in today’s videos on social media and video streaming platforms. In this effect, the text slides into the video frame from a particular direction. The entire text can swipe in if it is a one-liner and it can even swipe in word by word or sentence by sentence.
If you want to show short texts and you do not want to experiment with text animations, the text swipe effect is the safest option. For example, if you want to display your social media handles, your location, a coupon code, or a correction phrase that you have uttered wrongly, text swipe effects should be on your video.
2. Type Text Effect
The type text effect in Filmora is referred to as the typewriter text effect in Premiere Pro and After Effects. The effect displays the text as if it is being typed in real-time as it is done in a typewriter. The characters will appear on the screen with a cursor on the screen and therefore, it takes more duration than most other text effects.
The type text effect is particularly useful when you are displaying a large size of text on the screen. It is also widely used when showing a paragraph of text instead of a simple line. This helps in drawing the attention of the audience to the paragraph and retaining the attention for a longer duration of time.
3. WordArt Effect
WordArt is synonymous with MS Word where large words have 3D effects and highlighted background. Apart from 3D effect, text can have a thick stroke or outline as well as a gradient color style when WordArt effect is applied. In Filmora, you will find a plethora of WordArt effects and some are them are modern while others have a retro feel to them.
The WordArt effect is particularly popular while displaying titles and funny texts on the entire screen or covering a large part of the video. These are mostly used in the opening or ending scenes of the video. Besides, some video creators use them while making transitions from one scene to another.
4. Keyframe
If you want to create text animations as per your requirements, you have to use keyframes in any video editor. You can always apply the ready-made video editing text effects but if you want to customize and personalize, you can add keyframes in between two timestamps. Thereafter, you need to change text styles and parameters for each frame so that it looks like an animation.
If you want to add uniqueness to text animations so that you can make the audience wonder and appreciate, keyframes are the way. Adding keyframes in the text layer on Filmora is super easy and you can get effects like texts slowly scaling up, dancing randomly, changing fonts, and much more.
5. Color Text Effect
The color text effect is becoming extremely popular and it is widely used for opening and ending credits. Flashing different colors through your texts and titles against a darker background can act as a feast for the human eyes. There are different types of color text effects available that can make your text stand out.
When you are using color text effect, you need to maintain a large font size for your text so that it is widely visible. Even if your background is not dark, you can use a darker box in the background of the text or a darker frame around the text to amplify the effect.
6. Bounce to Zoom Effect
The bounce to zoom effect is widely used during a transition from one scene to another. It is regarded as a funny text effect where the text can swipe in and bounce and enlarge in size. Alternatively, the characters can bounce individually and zoom in and out with the motion as if they are dancing.
Apart from transitions, you can use the bounce to zoom effect to showcase a few important texts at the bottom of the video so that the viewers notice your text. Generally, the effect lasts for a few seconds before the text disappears. When you are using it for a larger text, you can use it for promotions and advertisements as well.
Part 2. How to Add Text Effects with Filmora
When it comes to adding text effects and animations, there is no better alternative to Filmora . Thanks to its super intuitive user interface, adding and customizing text effects in videos is as simple as text effect video online. Apart from the popular text effects we have discussed, there are so many categories of text effect and animation templates available on Filmora. Here are the steps on how to create text effect video in Filmora.
Free Download For Win 7 or later(64-bit)
Free Download For macOS 10.14 or later
Step1 Download and install Wondershare Filmora as per your operating system. Filmora is available for Windows and Mac users. Launch Filmora and click on New Project on the welcome screen.

Step2 Import your video clips under Project Media folder and drop them onto the timeline. Go to Titles menu option and you will see different categories and templates of text effects and templates from the left panel.

Step3 Search for a popular text effect from the search box. Select a text effect template and drop it on the timeline. Adjust its place on the timeline depending on where you want the text to appear. Double-click on the text layer and edit the text as per your requirements.
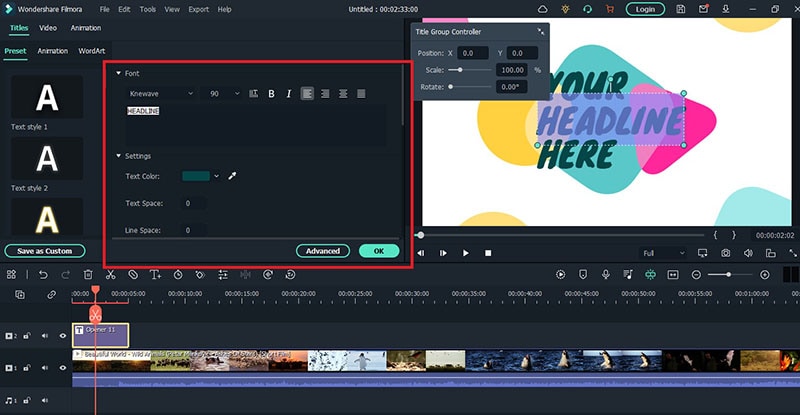
You can edit the style from fonts and settings section. You can also go to Advanced section available for more minute editing and get the desired text effect.
Conclusion
If texts are an essential part of your video, you should apply amazing video editing text effects to the texts and titles present in your video. You can use the common and the popular video text effects as well as use unique text effects to make your video stand out easily. There is no better video editor to add text effects to your video other than Wondershare Filmora for its unlimited text effect and animation templates.
Part 1. Popular text effects in Filmora
There are unlimited text effects available in Filmora but some of them are extremely popular that video creators regularly use in their videos. Here is the list of the popular Filmora video editor text effects that you should be aware of.
1. Text Swipe Effect
Text swipe effects are the most commonly used in today’s videos on social media and video streaming platforms. In this effect, the text slides into the video frame from a particular direction. The entire text can swipe in if it is a one-liner and it can even swipe in word by word or sentence by sentence.
If you want to show short texts and you do not want to experiment with text animations, the text swipe effect is the safest option. For example, if you want to display your social media handles, your location, a coupon code, or a correction phrase that you have uttered wrongly, text swipe effects should be on your video.
2. Type Text Effect
The type text effect in Filmora is referred to as the typewriter text effect in Premiere Pro and After Effects. The effect displays the text as if it is being typed in real-time as it is done in a typewriter. The characters will appear on the screen with a cursor on the screen and therefore, it takes more duration than most other text effects.
The type text effect is particularly useful when you are displaying a large size of text on the screen. It is also widely used when showing a paragraph of text instead of a simple line. This helps in drawing the attention of the audience to the paragraph and retaining the attention for a longer duration of time.
3. WordArt Effect
WordArt is synonymous with MS Word where large words have 3D effects and highlighted background. Apart from 3D effect, text can have a thick stroke or outline as well as a gradient color style when WordArt effect is applied. In Filmora, you will find a plethora of WordArt effects and some are them are modern while others have a retro feel to them.
The WordArt effect is particularly popular while displaying titles and funny texts on the entire screen or covering a large part of the video. These are mostly used in the opening or ending scenes of the video. Besides, some video creators use them while making transitions from one scene to another.
4. Keyframe
If you want to create text animations as per your requirements, you have to use keyframes in any video editor. You can always apply the ready-made video editing text effects but if you want to customize and personalize, you can add keyframes in between two timestamps. Thereafter, you need to change text styles and parameters for each frame so that it looks like an animation.
If you want to add uniqueness to text animations so that you can make the audience wonder and appreciate, keyframes are the way. Adding keyframes in the text layer on Filmora is super easy and you can get effects like texts slowly scaling up, dancing randomly, changing fonts, and much more.
5. Color Text Effect
The color text effect is becoming extremely popular and it is widely used for opening and ending credits. Flashing different colors through your texts and titles against a darker background can act as a feast for the human eyes. There are different types of color text effects available that can make your text stand out.
When you are using color text effect, you need to maintain a large font size for your text so that it is widely visible. Even if your background is not dark, you can use a darker box in the background of the text or a darker frame around the text to amplify the effect.
6. Bounce to Zoom Effect
The bounce to zoom effect is widely used during a transition from one scene to another. It is regarded as a funny text effect where the text can swipe in and bounce and enlarge in size. Alternatively, the characters can bounce individually and zoom in and out with the motion as if they are dancing.
Apart from transitions, you can use the bounce to zoom effect to showcase a few important texts at the bottom of the video so that the viewers notice your text. Generally, the effect lasts for a few seconds before the text disappears. When you are using it for a larger text, you can use it for promotions and advertisements as well.
Part 2. How to Add Text Effects with Filmora
When it comes to adding text effects and animations, there is no better alternative to Filmora . Thanks to its super intuitive user interface, adding and customizing text effects in videos is as simple as text effect video online. Apart from the popular text effects we have discussed, there are so many categories of text effect and animation templates available on Filmora. Here are the steps on how to create text effect video in Filmora.
Free Download For Win 7 or later(64-bit)
Free Download For macOS 10.14 or later
Step1 Download and install Wondershare Filmora as per your operating system. Filmora is available for Windows and Mac users. Launch Filmora and click on New Project on the welcome screen.

Step2 Import your video clips under Project Media folder and drop them onto the timeline. Go to Titles menu option and you will see different categories and templates of text effects and templates from the left panel.

Step3 Search for a popular text effect from the search box. Select a text effect template and drop it on the timeline. Adjust its place on the timeline depending on where you want the text to appear. Double-click on the text layer and edit the text as per your requirements.

You can edit the style from fonts and settings section. You can also go to Advanced section available for more minute editing and get the desired text effect.
Conclusion
If texts are an essential part of your video, you should apply amazing video editing text effects to the texts and titles present in your video. You can use the common and the popular video text effects as well as use unique text effects to make your video stand out easily. There is no better video editor to add text effects to your video other than Wondershare Filmora for its unlimited text effect and animation templates.
Thousands Already Know Ezgif and So Can You
Thousands Already Know Ezgif and So Can You
An easy yet powerful editor
Numerous effects to choose from
Detailed tutorials provided by the official channel
Everything about the know-how of Ezgif creator is here!
In this article
01 [How to Make a GIF on Ezgif](#Part 1)
02 [Video to GIF Made Easy Only With Ezgif](#Part 2)
03 [How to Crop a Video With Ezgif & Filmora](#Part 3)
Part 1 How to Make a GIF on Ezgif
GIFs take you to an exciting journey of expression and impact. With the introduction of GIF keyboards and a variety of creator tools, you are granted the liberty to use pre made GIFs as well as create stirring ones of your own to deliver your messages in unique and impactful ways. When it comes to creating GIFs, the online market is always ready with a heap of creator choices. While each of these tools is distinctive in its own way, some of them are leaders in making the mark among users.
About the Ezgif GIF Maker
Ezgif online GIF maker tool is amongst the most preferred GIF creators in today’s times. This one is a free and super convenient online tool that lets you create and convert animated GIFs in just a few clicks. Compatible with your Windows or MacOS devices, this tool is evidently among the fastest GIF creators of its time.
Apart from creating GIFs, you can also use this tool to cut, crop, trim and resize videos, ass and remove GIF backgrounds and much more. The tool is compatible with almost all common video and image formats; hence you can easily escape the glitch of sticking to a particular format for using this tool.
Here’s how you can use this tool for making next level GIFs:
Step 1: Launch the Tool
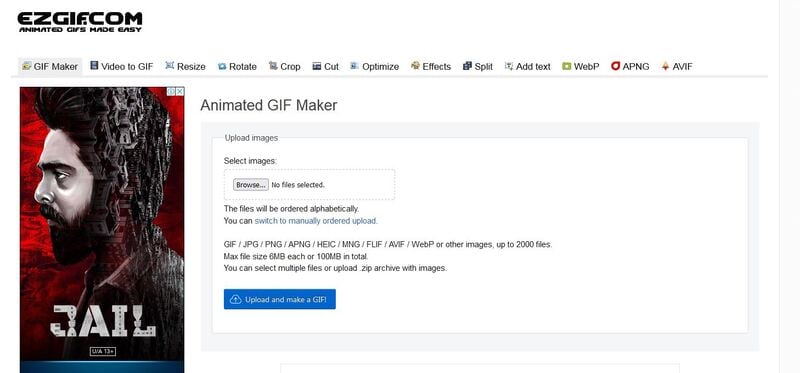
Open the Ezgif maker tool in your favorite browser. In the site’s welcome page, tap on ‘GIF Maker’ from the top toolbar.
Step 2: Upload Your Media
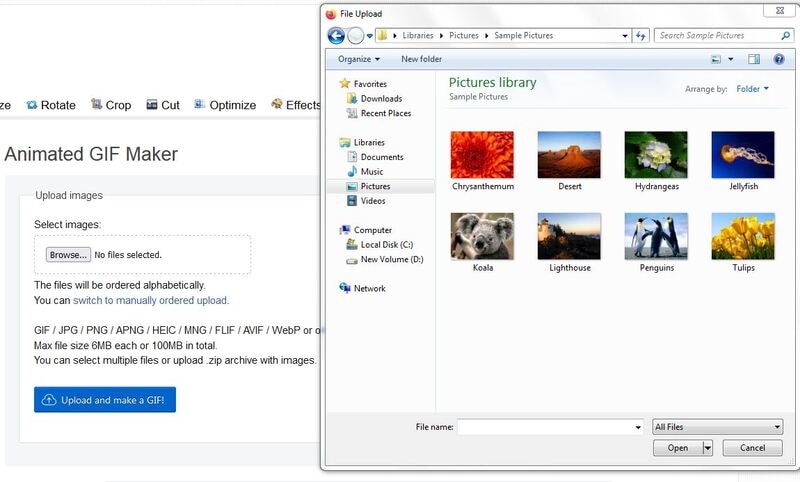
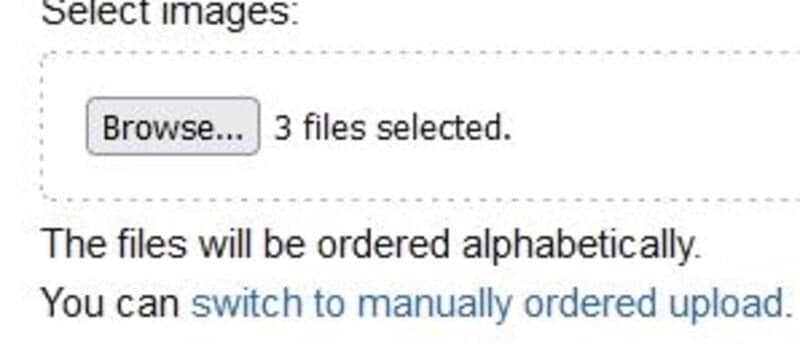
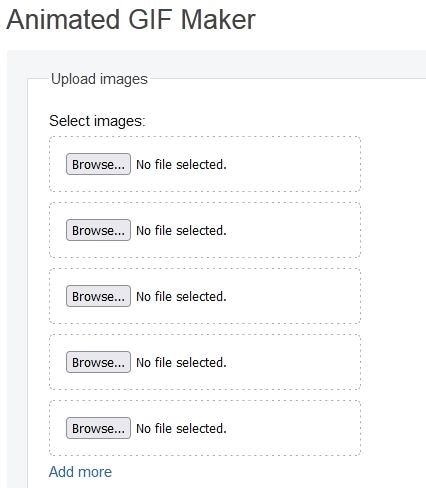
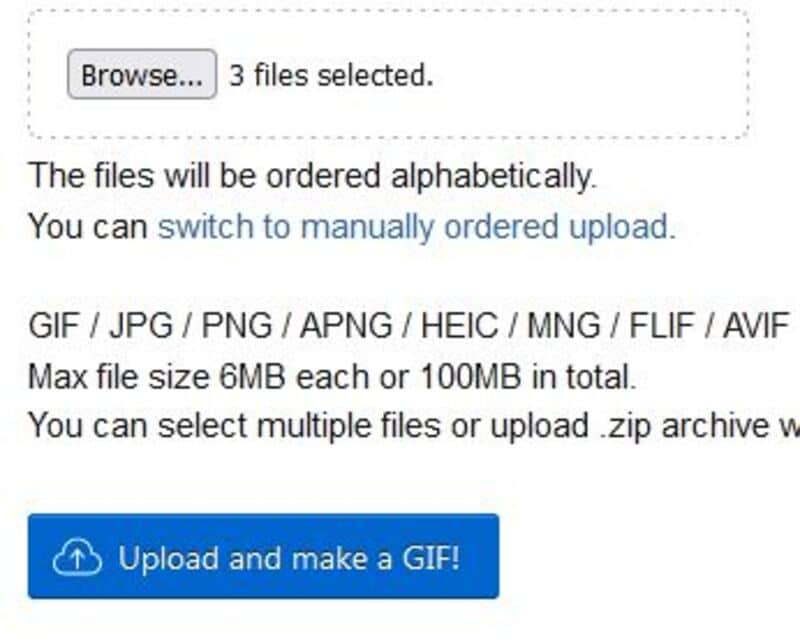
Click on ‘Browse’ to select your desired video or a set of still captures from your device and upload the same to the GIF maker timeline. You can choose from a manually or an alphabetically ordered upload. Ensure that the total file size is restricted within 100 MB.
Step 3: Let’s Create!
Click on ‘Upload and Make a GIF’. You will be shown a preview of your creation. At this point, you can customize the GIF with effects, filters and texts.
Step 4: Visual Adjustments
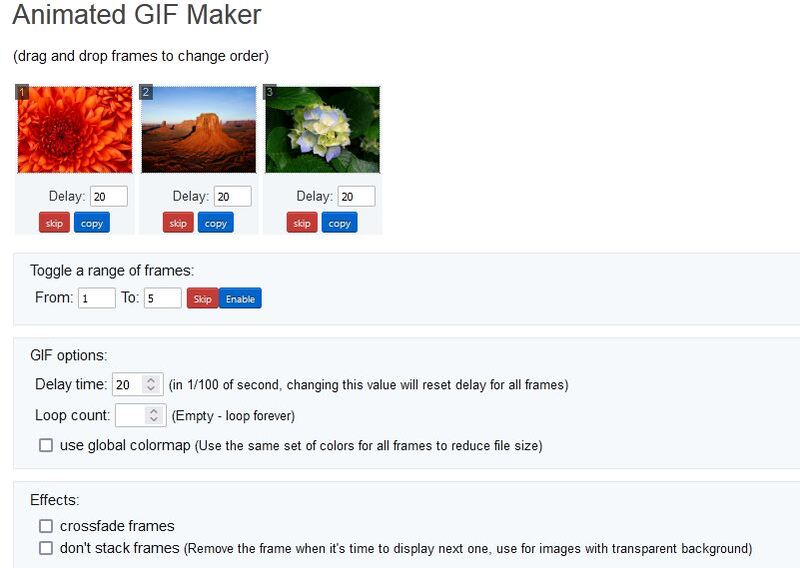
When using still images, consider arranging them in a particular order with the ‘Drag and Drop method’. You can skip this step if you are satisfied with the default arrangement. If you are creating a GIF from a video, pay attention to adjust its play duration.
Step 5: Beautify and Save Your Artwork
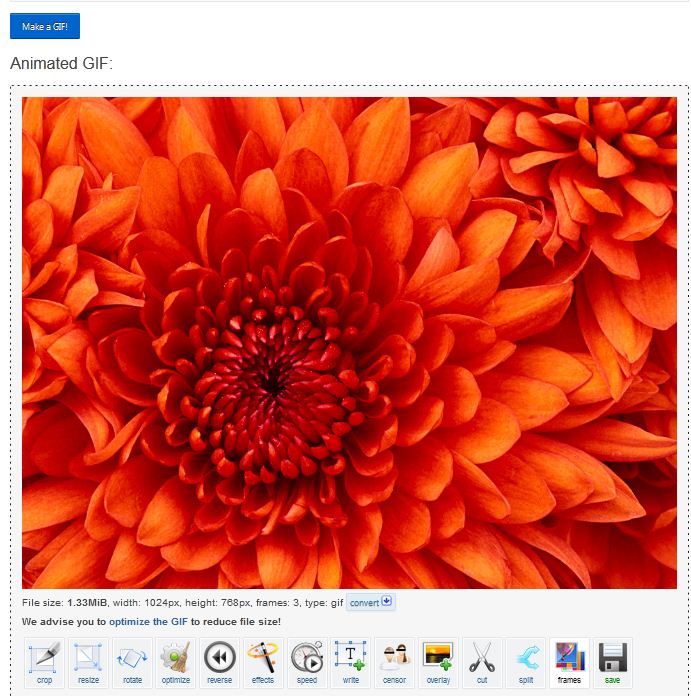
When you are satisfied with your work, tap ‘Make a GIF’. You can see your final creation appear. Click on ‘Save’ to add your artwork to your device memory. You can also customize your creation from the toolbar below the created GIF before saving it.
Part 2 Video to GIF Made Easy Only With Ezgif
As stated earlier, you can create GIFs from images and convert videos to GIFs using the Ezgif converter. What’s interesting is that the conversion process is quite fast and you are allowed to play with your editing skills to your heart’s content while customizing your artwork. Given below is a quick guide to convert videos in any common file format into impressive GIFs:
● Step 1
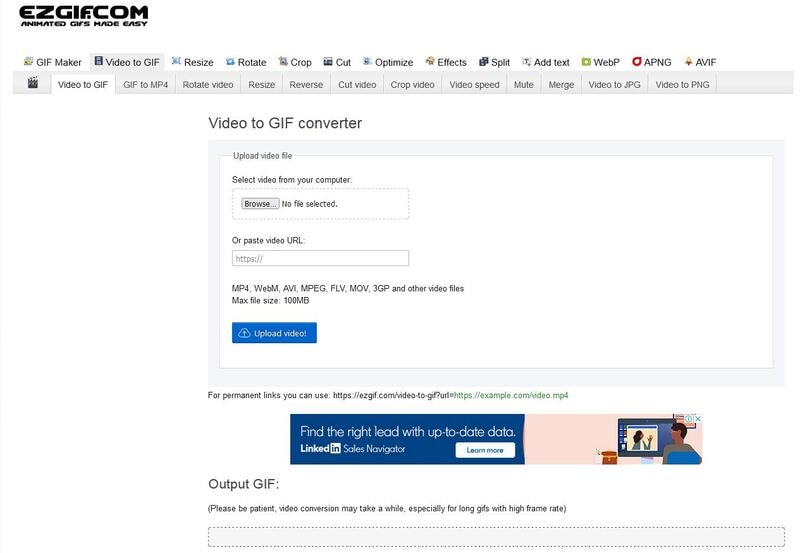
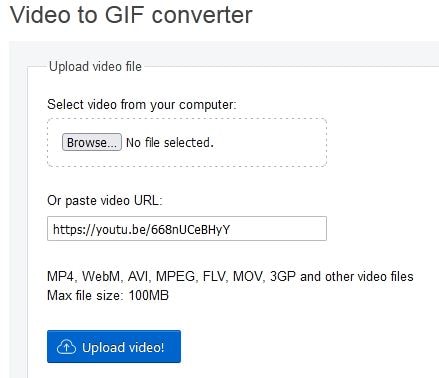
Visit ezgif.com, the official site of the Ezgif creator tool, in any suitable browser of your choice. In the homepage of the tool’s website, navigate to the toolbar at the top and click on ‘Video to GIF’.
Ezgif Video to GIF Converter Link:
● Step 2
In the converter interface, you can either upload a locally saved video from your device by clicking on ‘Browse’ or copy-paste a desired video URL in the address box and tap ‘Upload Video’.
● Step 3
In the tool’s editing interface, set required play duration for your video by setting the start and end points of the clip.
● Step 4
When you are done, click on ‘Convert to GIF’ and wait for the conversion process to finish. You can now see your created GIF in the pop up window that appears next. Click on ‘Save’ option in the toolbar beneath the created GIF to download your creation to your device.
Part 3 How to Crop a Video With Ezgif & Filmora
Ezgif is a multi faceted online tool that allows you to take up a variety of tasks in addition to just creating classy GIFs. Video to GIF conversion is one thing, besides that, you can also crop your videos using this tool. Wondering how to go about the process? Here’s a quick, stepwise tutorial to answer this for you. Follow the steps given below to crop your videos with a blink:
● Step 1: Launch the Ezgif Crop Tool
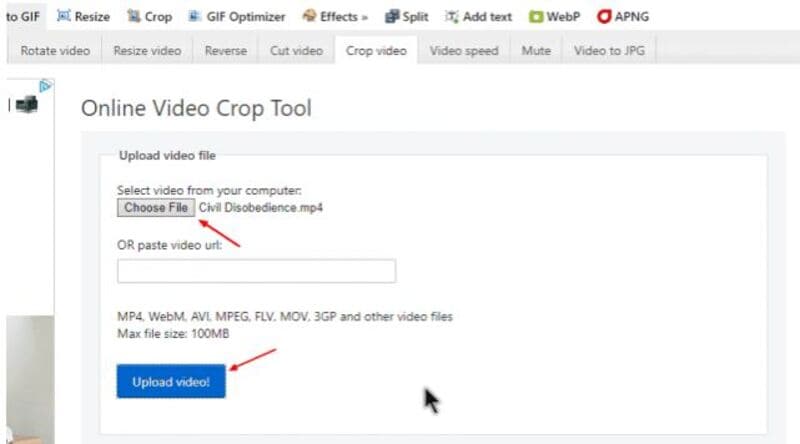
Open the official Ezgif website and navigate to the ‘Crop Video’ tab on the top toolbar in the welcome page. You can alternatively click on the link given below to reach the ‘Crop Video’ interface directly.
● Step 2: Upload Your Video
To upload a locally saved video, click on the ‘Choose File’ button. You will see the file name appear beside it. You can alternatively, copy-paste the URL of a desired video in the address box. Click on ‘Upload Video’ for the file to get uploaded.
● Step 3: Adjust Video Borders
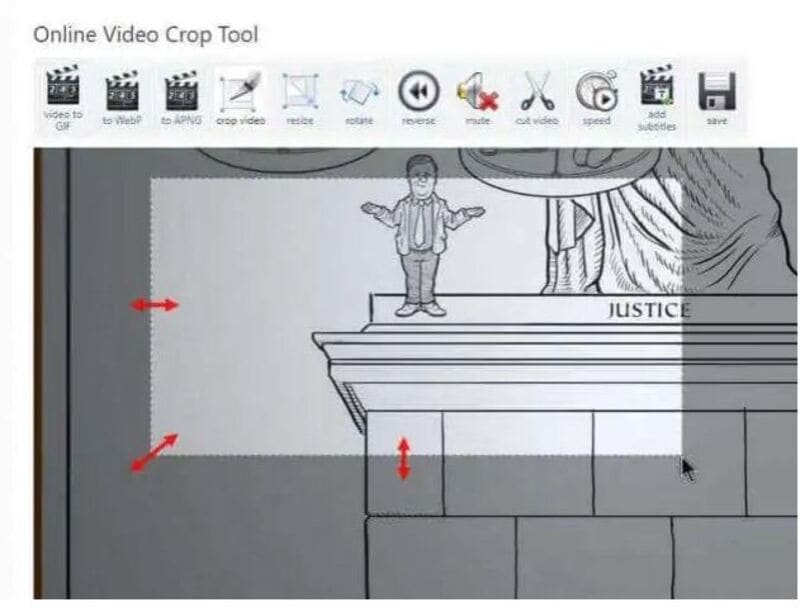
To crop the video to a desired part, you need to set its borders within the required section. To do this, ‘Hold and Drag’ the mouse to highlight a desired section. Now leave the mouse to see the highlighted section within a frame.
● Step 4: Final Touches
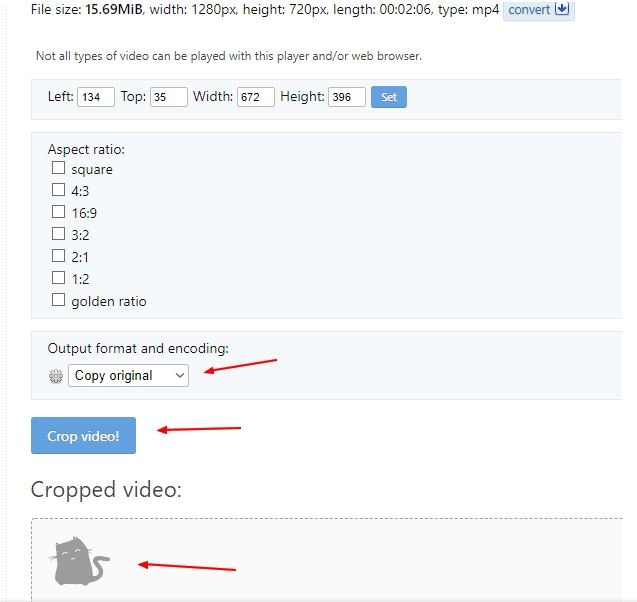
After you have the desired section, scroll down to find some adjustment options. Here, you can resize, set aspect ratio and make frame adjustments to your cropping clip. When selecting the output video format, you can either choose to stick with the original file format or change to mp4.
Tap on ‘Crop Video’ when you are done making the changes. The conversion process may take a few seconds. You can enjoy looking at the swaying kitten in the meantime.
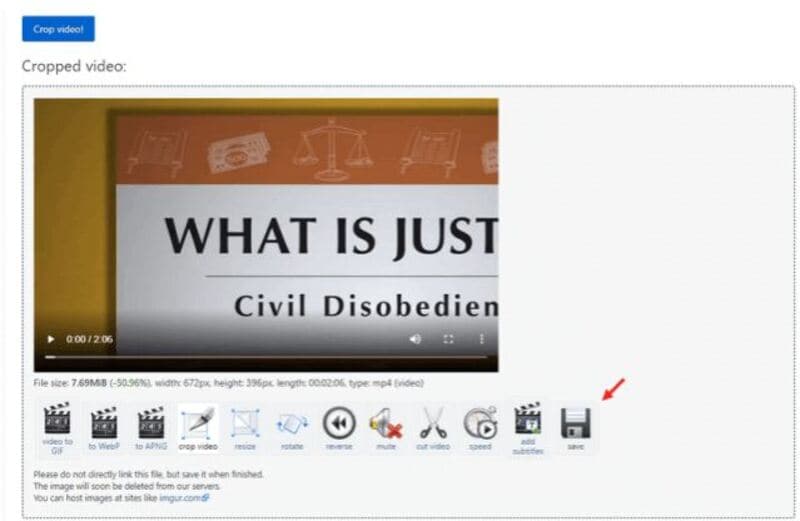
● Step 5: Download and Save
Once the conversion finishes, you will see your cropped video appear on the screen. Click on ‘Save’ from the toolbar below the video to download the sane to your device.
Ezgif is certainly an affordable GIF creator and video cropper tool, no doubt about that, but if you are looking for an alternative, you can consider using the Filmora GIF creator software for cropping a video to your favorite part. This one is a free to use, quick and smart tool with the most convenient user interface.
The huge audio-visual effects library of this software allows you to add sound, music and overlays to your clips and intensify them with text and filters. Here’s a quick tutorial on cropping videos with this software:
● Step 1
Download and install Filmora in your device. When finished, launch the software to reach its editor timeline.
Filmora Crop Video Tool Direct Link:
● Step 2
Within the timeline, select and right click on a desired video. Select ‘Crop and Zoom’ for the drop down menu. You can alternatively click on the ‘Crop’ icon.
● Step 3
In the pop-up window that follows, either choose a preset aspect ratio, or click on ‘Custom’ and navigate the rectangle to select a clip area to crop.

Wondershare Filmora - Best Video Editor for Mac/Windows
5,481,435 people have downloaded it.
Build unique custom animations without breaking a sweat.
Focus on creating epic stories and leave the details to Filmora’s auto features.
Start a creative adventure with drag & drop effects and endless possibilities.
Filmora simplifies advanced features to save you time and effort.
Filmora cuts out repetition so you can move on to your next creative breakthrough.
● Key Takeaways from This Episode →
● Ezgif is one of the most suitable GIF creator and converter tools available online that allows you to explore your skills and create top quality GIFs, convert videos to GIFs and crop video clips, all at one place.
●This one is a quick and hassle free solution to your video and GIF editing concerns. When browsing through its feasible alternatives, you can safely count upon the Filmora video editor and GIF creator software for making and customizing GIFs and video clips.
Everything about the know-how of Ezgif creator is here!
In this article
01 [How to Make a GIF on Ezgif](#Part 1)
02 [Video to GIF Made Easy Only With Ezgif](#Part 2)
03 [How to Crop a Video With Ezgif & Filmora](#Part 3)
Part 1 How to Make a GIF on Ezgif
GIFs take you to an exciting journey of expression and impact. With the introduction of GIF keyboards and a variety of creator tools, you are granted the liberty to use pre made GIFs as well as create stirring ones of your own to deliver your messages in unique and impactful ways. When it comes to creating GIFs, the online market is always ready with a heap of creator choices. While each of these tools is distinctive in its own way, some of them are leaders in making the mark among users.
About the Ezgif GIF Maker
Ezgif online GIF maker tool is amongst the most preferred GIF creators in today’s times. This one is a free and super convenient online tool that lets you create and convert animated GIFs in just a few clicks. Compatible with your Windows or MacOS devices, this tool is evidently among the fastest GIF creators of its time.
Apart from creating GIFs, you can also use this tool to cut, crop, trim and resize videos, ass and remove GIF backgrounds and much more. The tool is compatible with almost all common video and image formats; hence you can easily escape the glitch of sticking to a particular format for using this tool.
Here’s how you can use this tool for making next level GIFs:
Step 1: Launch the Tool
Open the Ezgif maker tool in your favorite browser. In the site’s welcome page, tap on ‘GIF Maker’ from the top toolbar.
Step 2: Upload Your Media
Click on ‘Browse’ to select your desired video or a set of still captures from your device and upload the same to the GIF maker timeline. You can choose from a manually or an alphabetically ordered upload. Ensure that the total file size is restricted within 100 MB.
Step 3: Let’s Create!
Click on ‘Upload and Make a GIF’. You will be shown a preview of your creation. At this point, you can customize the GIF with effects, filters and texts.
Step 4: Visual Adjustments
When using still images, consider arranging them in a particular order with the ‘Drag and Drop method’. You can skip this step if you are satisfied with the default arrangement. If you are creating a GIF from a video, pay attention to adjust its play duration.
Step 5: Beautify and Save Your Artwork
When you are satisfied with your work, tap ‘Make a GIF’. You can see your final creation appear. Click on ‘Save’ to add your artwork to your device memory. You can also customize your creation from the toolbar below the created GIF before saving it.
Part 2 Video to GIF Made Easy Only With Ezgif
As stated earlier, you can create GIFs from images and convert videos to GIFs using the Ezgif converter. What’s interesting is that the conversion process is quite fast and you are allowed to play with your editing skills to your heart’s content while customizing your artwork. Given below is a quick guide to convert videos in any common file format into impressive GIFs:
● Step 1
Visit ezgif.com, the official site of the Ezgif creator tool, in any suitable browser of your choice. In the homepage of the tool’s website, navigate to the toolbar at the top and click on ‘Video to GIF’.
Ezgif Video to GIF Converter Link:
● Step 2
In the converter interface, you can either upload a locally saved video from your device by clicking on ‘Browse’ or copy-paste a desired video URL in the address box and tap ‘Upload Video’.
● Step 3
In the tool’s editing interface, set required play duration for your video by setting the start and end points of the clip.
● Step 4
When you are done, click on ‘Convert to GIF’ and wait for the conversion process to finish. You can now see your created GIF in the pop up window that appears next. Click on ‘Save’ option in the toolbar beneath the created GIF to download your creation to your device.
Part 3 How to Crop a Video With Ezgif & Filmora
Ezgif is a multi faceted online tool that allows you to take up a variety of tasks in addition to just creating classy GIFs. Video to GIF conversion is one thing, besides that, you can also crop your videos using this tool. Wondering how to go about the process? Here’s a quick, stepwise tutorial to answer this for you. Follow the steps given below to crop your videos with a blink:
● Step 1: Launch the Ezgif Crop Tool
Open the official Ezgif website and navigate to the ‘Crop Video’ tab on the top toolbar in the welcome page. You can alternatively click on the link given below to reach the ‘Crop Video’ interface directly.
● Step 2: Upload Your Video
To upload a locally saved video, click on the ‘Choose File’ button. You will see the file name appear beside it. You can alternatively, copy-paste the URL of a desired video in the address box. Click on ‘Upload Video’ for the file to get uploaded.
● Step 3: Adjust Video Borders
To crop the video to a desired part, you need to set its borders within the required section. To do this, ‘Hold and Drag’ the mouse to highlight a desired section. Now leave the mouse to see the highlighted section within a frame.
● Step 4: Final Touches
After you have the desired section, scroll down to find some adjustment options. Here, you can resize, set aspect ratio and make frame adjustments to your cropping clip. When selecting the output video format, you can either choose to stick with the original file format or change to mp4.
Tap on ‘Crop Video’ when you are done making the changes. The conversion process may take a few seconds. You can enjoy looking at the swaying kitten in the meantime.
● Step 5: Download and Save
Once the conversion finishes, you will see your cropped video appear on the screen. Click on ‘Save’ from the toolbar below the video to download the sane to your device.
Ezgif is certainly an affordable GIF creator and video cropper tool, no doubt about that, but if you are looking for an alternative, you can consider using the Filmora GIF creator software for cropping a video to your favorite part. This one is a free to use, quick and smart tool with the most convenient user interface.
The huge audio-visual effects library of this software allows you to add sound, music and overlays to your clips and intensify them with text and filters. Here’s a quick tutorial on cropping videos with this software:
● Step 1
Download and install Filmora in your device. When finished, launch the software to reach its editor timeline.
Filmora Crop Video Tool Direct Link:
● Step 2
Within the timeline, select and right click on a desired video. Select ‘Crop and Zoom’ for the drop down menu. You can alternatively click on the ‘Crop’ icon.
● Step 3
In the pop-up window that follows, either choose a preset aspect ratio, or click on ‘Custom’ and navigate the rectangle to select a clip area to crop.

Wondershare Filmora - Best Video Editor for Mac/Windows
5,481,435 people have downloaded it.
Build unique custom animations without breaking a sweat.
Focus on creating epic stories and leave the details to Filmora’s auto features.
Start a creative adventure with drag & drop effects and endless possibilities.
Filmora simplifies advanced features to save you time and effort.
Filmora cuts out repetition so you can move on to your next creative breakthrough.
● Key Takeaways from This Episode →
● Ezgif is one of the most suitable GIF creator and converter tools available online that allows you to explore your skills and create top quality GIFs, convert videos to GIFs and crop video clips, all at one place.
●This one is a quick and hassle free solution to your video and GIF editing concerns. When browsing through its feasible alternatives, you can safely count upon the Filmora video editor and GIF creator software for making and customizing GIFs and video clips.
Everything about the know-how of Ezgif creator is here!
In this article
01 [How to Make a GIF on Ezgif](#Part 1)
02 [Video to GIF Made Easy Only With Ezgif](#Part 2)
03 [How to Crop a Video With Ezgif & Filmora](#Part 3)
Part 1 How to Make a GIF on Ezgif
GIFs take you to an exciting journey of expression and impact. With the introduction of GIF keyboards and a variety of creator tools, you are granted the liberty to use pre made GIFs as well as create stirring ones of your own to deliver your messages in unique and impactful ways. When it comes to creating GIFs, the online market is always ready with a heap of creator choices. While each of these tools is distinctive in its own way, some of them are leaders in making the mark among users.
About the Ezgif GIF Maker
Ezgif online GIF maker tool is amongst the most preferred GIF creators in today’s times. This one is a free and super convenient online tool that lets you create and convert animated GIFs in just a few clicks. Compatible with your Windows or MacOS devices, this tool is evidently among the fastest GIF creators of its time.
Apart from creating GIFs, you can also use this tool to cut, crop, trim and resize videos, ass and remove GIF backgrounds and much more. The tool is compatible with almost all common video and image formats; hence you can easily escape the glitch of sticking to a particular format for using this tool.
Here’s how you can use this tool for making next level GIFs:
Step 1: Launch the Tool
Open the Ezgif maker tool in your favorite browser. In the site’s welcome page, tap on ‘GIF Maker’ from the top toolbar.
Step 2: Upload Your Media
Click on ‘Browse’ to select your desired video or a set of still captures from your device and upload the same to the GIF maker timeline. You can choose from a manually or an alphabetically ordered upload. Ensure that the total file size is restricted within 100 MB.
Step 3: Let’s Create!
Click on ‘Upload and Make a GIF’. You will be shown a preview of your creation. At this point, you can customize the GIF with effects, filters and texts.
Step 4: Visual Adjustments
When using still images, consider arranging them in a particular order with the ‘Drag and Drop method’. You can skip this step if you are satisfied with the default arrangement. If you are creating a GIF from a video, pay attention to adjust its play duration.
Step 5: Beautify and Save Your Artwork
When you are satisfied with your work, tap ‘Make a GIF’. You can see your final creation appear. Click on ‘Save’ to add your artwork to your device memory. You can also customize your creation from the toolbar below the created GIF before saving it.
Part 2 Video to GIF Made Easy Only With Ezgif
As stated earlier, you can create GIFs from images and convert videos to GIFs using the Ezgif converter. What’s interesting is that the conversion process is quite fast and you are allowed to play with your editing skills to your heart’s content while customizing your artwork. Given below is a quick guide to convert videos in any common file format into impressive GIFs:
● Step 1
Visit ezgif.com, the official site of the Ezgif creator tool, in any suitable browser of your choice. In the homepage of the tool’s website, navigate to the toolbar at the top and click on ‘Video to GIF’.
Ezgif Video to GIF Converter Link:
● Step 2
In the converter interface, you can either upload a locally saved video from your device by clicking on ‘Browse’ or copy-paste a desired video URL in the address box and tap ‘Upload Video’.
● Step 3
In the tool’s editing interface, set required play duration for your video by setting the start and end points of the clip.
● Step 4
When you are done, click on ‘Convert to GIF’ and wait for the conversion process to finish. You can now see your created GIF in the pop up window that appears next. Click on ‘Save’ option in the toolbar beneath the created GIF to download your creation to your device.
Part 3 How to Crop a Video With Ezgif & Filmora
Ezgif is a multi faceted online tool that allows you to take up a variety of tasks in addition to just creating classy GIFs. Video to GIF conversion is one thing, besides that, you can also crop your videos using this tool. Wondering how to go about the process? Here’s a quick, stepwise tutorial to answer this for you. Follow the steps given below to crop your videos with a blink:
● Step 1: Launch the Ezgif Crop Tool
Open the official Ezgif website and navigate to the ‘Crop Video’ tab on the top toolbar in the welcome page. You can alternatively click on the link given below to reach the ‘Crop Video’ interface directly.
● Step 2: Upload Your Video
To upload a locally saved video, click on the ‘Choose File’ button. You will see the file name appear beside it. You can alternatively, copy-paste the URL of a desired video in the address box. Click on ‘Upload Video’ for the file to get uploaded.
● Step 3: Adjust Video Borders
To crop the video to a desired part, you need to set its borders within the required section. To do this, ‘Hold and Drag’ the mouse to highlight a desired section. Now leave the mouse to see the highlighted section within a frame.
● Step 4: Final Touches
After you have the desired section, scroll down to find some adjustment options. Here, you can resize, set aspect ratio and make frame adjustments to your cropping clip. When selecting the output video format, you can either choose to stick with the original file format or change to mp4.
Tap on ‘Crop Video’ when you are done making the changes. The conversion process may take a few seconds. You can enjoy looking at the swaying kitten in the meantime.
● Step 5: Download and Save
Once the conversion finishes, you will see your cropped video appear on the screen. Click on ‘Save’ from the toolbar below the video to download the sane to your device.
Ezgif is certainly an affordable GIF creator and video cropper tool, no doubt about that, but if you are looking for an alternative, you can consider using the Filmora GIF creator software for cropping a video to your favorite part. This one is a free to use, quick and smart tool with the most convenient user interface.
The huge audio-visual effects library of this software allows you to add sound, music and overlays to your clips and intensify them with text and filters. Here’s a quick tutorial on cropping videos with this software:
● Step 1
Download and install Filmora in your device. When finished, launch the software to reach its editor timeline.
Filmora Crop Video Tool Direct Link:
● Step 2
Within the timeline, select and right click on a desired video. Select ‘Crop and Zoom’ for the drop down menu. You can alternatively click on the ‘Crop’ icon.
● Step 3
In the pop-up window that follows, either choose a preset aspect ratio, or click on ‘Custom’ and navigate the rectangle to select a clip area to crop.

Wondershare Filmora - Best Video Editor for Mac/Windows
5,481,435 people have downloaded it.
Build unique custom animations without breaking a sweat.
Focus on creating epic stories and leave the details to Filmora’s auto features.
Start a creative adventure with drag & drop effects and endless possibilities.
Filmora simplifies advanced features to save you time and effort.
Filmora cuts out repetition so you can move on to your next creative breakthrough.
● Key Takeaways from This Episode →
● Ezgif is one of the most suitable GIF creator and converter tools available online that allows you to explore your skills and create top quality GIFs, convert videos to GIFs and crop video clips, all at one place.
●This one is a quick and hassle free solution to your video and GIF editing concerns. When browsing through its feasible alternatives, you can safely count upon the Filmora video editor and GIF creator software for making and customizing GIFs and video clips.
Everything about the know-how of Ezgif creator is here!
In this article
01 [How to Make a GIF on Ezgif](#Part 1)
02 [Video to GIF Made Easy Only With Ezgif](#Part 2)
03 [How to Crop a Video With Ezgif & Filmora](#Part 3)
Part 1 How to Make a GIF on Ezgif
GIFs take you to an exciting journey of expression and impact. With the introduction of GIF keyboards and a variety of creator tools, you are granted the liberty to use pre made GIFs as well as create stirring ones of your own to deliver your messages in unique and impactful ways. When it comes to creating GIFs, the online market is always ready with a heap of creator choices. While each of these tools is distinctive in its own way, some of them are leaders in making the mark among users.
About the Ezgif GIF Maker
Ezgif online GIF maker tool is amongst the most preferred GIF creators in today’s times. This one is a free and super convenient online tool that lets you create and convert animated GIFs in just a few clicks. Compatible with your Windows or MacOS devices, this tool is evidently among the fastest GIF creators of its time.
Apart from creating GIFs, you can also use this tool to cut, crop, trim and resize videos, ass and remove GIF backgrounds and much more. The tool is compatible with almost all common video and image formats; hence you can easily escape the glitch of sticking to a particular format for using this tool.
Here’s how you can use this tool for making next level GIFs:
Step 1: Launch the Tool
Open the Ezgif maker tool in your favorite browser. In the site’s welcome page, tap on ‘GIF Maker’ from the top toolbar.
Step 2: Upload Your Media
Click on ‘Browse’ to select your desired video or a set of still captures from your device and upload the same to the GIF maker timeline. You can choose from a manually or an alphabetically ordered upload. Ensure that the total file size is restricted within 100 MB.
Step 3: Let’s Create!
Click on ‘Upload and Make a GIF’. You will be shown a preview of your creation. At this point, you can customize the GIF with effects, filters and texts.
Step 4: Visual Adjustments
When using still images, consider arranging them in a particular order with the ‘Drag and Drop method’. You can skip this step if you are satisfied with the default arrangement. If you are creating a GIF from a video, pay attention to adjust its play duration.
Step 5: Beautify and Save Your Artwork
When you are satisfied with your work, tap ‘Make a GIF’. You can see your final creation appear. Click on ‘Save’ to add your artwork to your device memory. You can also customize your creation from the toolbar below the created GIF before saving it.
Part 2 Video to GIF Made Easy Only With Ezgif
As stated earlier, you can create GIFs from images and convert videos to GIFs using the Ezgif converter. What’s interesting is that the conversion process is quite fast and you are allowed to play with your editing skills to your heart’s content while customizing your artwork. Given below is a quick guide to convert videos in any common file format into impressive GIFs:
● Step 1
Visit ezgif.com, the official site of the Ezgif creator tool, in any suitable browser of your choice. In the homepage of the tool’s website, navigate to the toolbar at the top and click on ‘Video to GIF’.
Ezgif Video to GIF Converter Link:
● Step 2
In the converter interface, you can either upload a locally saved video from your device by clicking on ‘Browse’ or copy-paste a desired video URL in the address box and tap ‘Upload Video’.
● Step 3
In the tool’s editing interface, set required play duration for your video by setting the start and end points of the clip.
● Step 4
When you are done, click on ‘Convert to GIF’ and wait for the conversion process to finish. You can now see your created GIF in the pop up window that appears next. Click on ‘Save’ option in the toolbar beneath the created GIF to download your creation to your device.
Part 3 How to Crop a Video With Ezgif & Filmora
Ezgif is a multi faceted online tool that allows you to take up a variety of tasks in addition to just creating classy GIFs. Video to GIF conversion is one thing, besides that, you can also crop your videos using this tool. Wondering how to go about the process? Here’s a quick, stepwise tutorial to answer this for you. Follow the steps given below to crop your videos with a blink:
● Step 1: Launch the Ezgif Crop Tool
Open the official Ezgif website and navigate to the ‘Crop Video’ tab on the top toolbar in the welcome page. You can alternatively click on the link given below to reach the ‘Crop Video’ interface directly.
● Step 2: Upload Your Video
To upload a locally saved video, click on the ‘Choose File’ button. You will see the file name appear beside it. You can alternatively, copy-paste the URL of a desired video in the address box. Click on ‘Upload Video’ for the file to get uploaded.
● Step 3: Adjust Video Borders
To crop the video to a desired part, you need to set its borders within the required section. To do this, ‘Hold and Drag’ the mouse to highlight a desired section. Now leave the mouse to see the highlighted section within a frame.
● Step 4: Final Touches
After you have the desired section, scroll down to find some adjustment options. Here, you can resize, set aspect ratio and make frame adjustments to your cropping clip. When selecting the output video format, you can either choose to stick with the original file format or change to mp4.
Tap on ‘Crop Video’ when you are done making the changes. The conversion process may take a few seconds. You can enjoy looking at the swaying kitten in the meantime.
● Step 5: Download and Save
Once the conversion finishes, you will see your cropped video appear on the screen. Click on ‘Save’ from the toolbar below the video to download the sane to your device.
Ezgif is certainly an affordable GIF creator and video cropper tool, no doubt about that, but if you are looking for an alternative, you can consider using the Filmora GIF creator software for cropping a video to your favorite part. This one is a free to use, quick and smart tool with the most convenient user interface.
The huge audio-visual effects library of this software allows you to add sound, music and overlays to your clips and intensify them with text and filters. Here’s a quick tutorial on cropping videos with this software:
● Step 1
Download and install Filmora in your device. When finished, launch the software to reach its editor timeline.
Filmora Crop Video Tool Direct Link:
● Step 2
Within the timeline, select and right click on a desired video. Select ‘Crop and Zoom’ for the drop down menu. You can alternatively click on the ‘Crop’ icon.
● Step 3
In the pop-up window that follows, either choose a preset aspect ratio, or click on ‘Custom’ and navigate the rectangle to select a clip area to crop.

Wondershare Filmora - Best Video Editor for Mac/Windows
5,481,435 people have downloaded it.
Build unique custom animations without breaking a sweat.
Focus on creating epic stories and leave the details to Filmora’s auto features.
Start a creative adventure with drag & drop effects and endless possibilities.
Filmora simplifies advanced features to save you time and effort.
Filmora cuts out repetition so you can move on to your next creative breakthrough.
● Key Takeaways from This Episode →
● Ezgif is one of the most suitable GIF creator and converter tools available online that allows you to explore your skills and create top quality GIFs, convert videos to GIFs and crop video clips, all at one place.
●This one is a quick and hassle free solution to your video and GIF editing concerns. When browsing through its feasible alternatives, you can safely count upon the Filmora video editor and GIF creator software for making and customizing GIFs and video clips.
Tutorial to Add Effects with Movavi Slideshow Maker
Many video editors won’t be late in their artwork. They tend to use different effects to light up their crafts. For them, editing videos with effects applications gives more life to the story. In this composition, you will learn more about Effects, and if you are just about to do your video editing right now, these details are definitely for you.
What are Video Effects?
According to the dictionary, an effect is brought about by a cause or an agency.
In video editing, there are a few video effects you must know to apply them to your video project. Video effects can alter the speed and produce distortions, reflections, aesthetic filters, stylistic color grading, animation transitions, and more. They can also contain 3D features like CGI. When used well, these effects improve the narrative, the atmosphere, and the images’ overall impact.
Let’s dissect a few of the major effects, which will be most helpful to you.
Pans and Tilts
Your first thought upon hearing these two words may be tripod motions. Pans and tilts are a quick way to add additional movement and sensation to your video, making it more dynamic.
Change the Speed/Duration
One feature that virtually every NLE or Non-Linear Editing software gives us is the option to modify the playback speed of your video while reducing or increasing the actual duration and tempo of your segments. Slowing down your footage to match the frame rate at which the video was initially captured is one of the critical explanations for doing this.
To incorporate some frantic or chaotic moments into your production, you can use this to generate slow-motion shots and fast-forward effects. This effect can also quickly pan through footage for humorous effect. Find the “Speed/Duration” option under Effects controls to accomplish this.
Light Leaks and Flares
Nothing gives your video a more ethereal vibe than gentle, warm light emerging from the scene. A direct source visible in the photo may be the source of this light, or it may enter the frame from the edge. You’ve probably seen these flares and leaks countless times in movies, whether they were added in post-production or resulted from the cinematographer’s lens choice. You can select where the light comes from if it doesn’t distract from the task. Remember that these spills and flares must contribute to the narrative while remaining barely perceptible to the viewer.
Retro/VHS Effects
While light leaks and lens flares give your movie or film a timeless feel, nothing gives it a dated or, one would say, “scrappy” vibe. The grunge appearance of the ‘90s is in right now, and one of the most popular effects is the VHS look.
There are several ways to get this effect. Applying a preset, essentially a LUT (look-up table or filter), to your color grade will make the image appear fuzzier, desaturated, and blurrier (using the different alpha and gamma channels). This will cause “chroma errors,” which result from poor recordings and a lack of a flying erase head (a function that enables you to record over previously filmed video; imagine formatting your SD card while the video is still present on the card and you are simply recording over it), giving your images an outline of distorted blues and reds.
Color Grading and Color Correction
Besides actual editing, color grading and correction are arguably the most significant post-production steps. With the help of these tools, you may alter skin tones, highlight, and shadow levels, add vignettes, experiment with contrast, and much more. We’ll briefly go through one aspect of color grading—the ability to adjust particular colors in your image—even though this subject needs its ebook.
Adding Overlays
Although we’ve talked about adding overlays, such as VHS effects or light leaks, you may use many other editing overlays to add particular components to your shot, including weather particles!
Using Titles and Motion Graphics
Motion graphics and clean titles are essential for any video that wishes to appear professional. These could be subtitles, and the animation logo reveals post-credits, lower thirds, or even major titles. There are various free typefaces available that you may use to make your project stand out, regardless of the program you’re working in.
Once you’ve selected the appropriate font, color, and weight, it’s time to move on to motion graphics. These are crucial because they may transform a clear, ageless title or text into a lively, entertaining illustration of the product or concept your movie is attempting to market.
The abundance of tutorials nowadays makes learning the fundamentals of motion graphics a piece of cake. As I previously stated, you can access all the various effects and movements you might need, regardless of the editing program, you use.
These various methods and approaches need the practice to perfect, just like any other component of filmmaking. As you add these video editing effects to your editing toolkit, there will undoubtedly be a lot of trial and error. Still, eventually, they will become second nature to your workflow.
Importance of Applying Effects to your Video
Almost from the first motion film, cinematic storytelling and video effects have gone hand in hand. They can improve a scene, create something that doesn’t exist, hide an error, and do much more. In essence, they assist a filmmaker in telling a tale in the manner they desire.
Applying Effects using Movavi Slideshow Maker
Making picture collages is less appealing than slide show presentations. This method is ideal for presenting a gallery of images or creating a polished photo-video presentation for your brand and goods. You’ll need a creative slideshow program with loads of capabilities to create a polished slideshow that will enhance your production. The Movavi Slideshow Maker now comes into play.
In this composition, I will show you how to apply “Effects” on your video using Movavi Slideshow Maker video editing software. A professional slideshow program called Movavi slideshow creator is made for usage by both professional and amateur picture editors. It is a Mac and Windows PC freemium program with many options to give your slideshow presentation a polished and distinctive appearance.
Features of Movavi Slideshow Maker
- It offers an easy-to-use UI
- Includes a complete toolbox for altering photos
- Advanced features for improving slideshows
- Internal media tools
- Native recording capability
- Features scalable video adjustment.
Take note that this software is not just for editing pictures but also for videos.
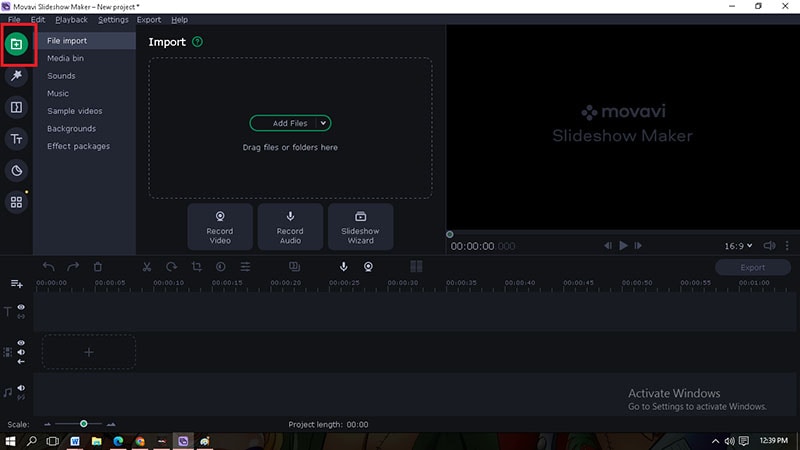
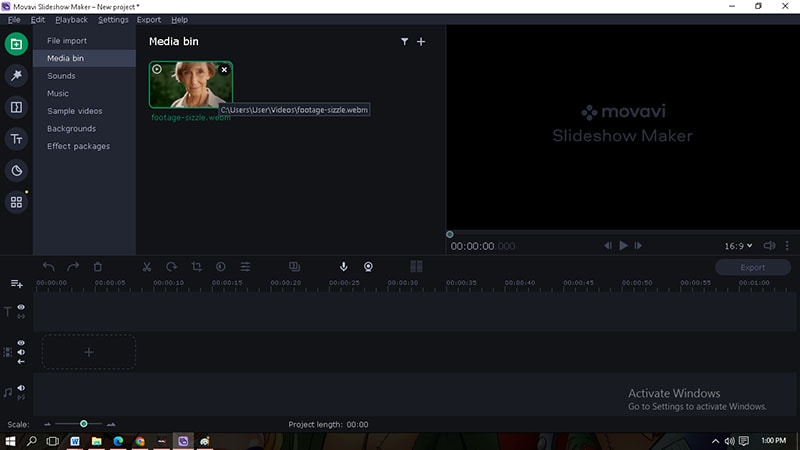
Step1 Click the Import tab.
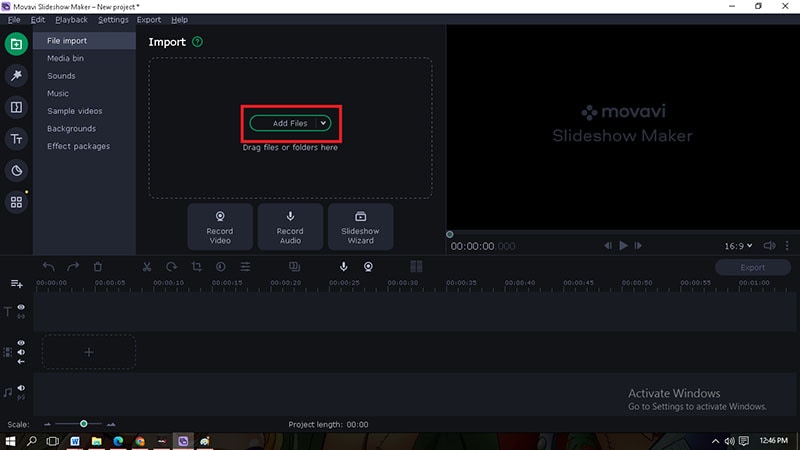
Step2 Click “Add Files” and locate your desired video to edit.
Step3 Drag the imported video that you want to edit onto the video track.
Applying Filter effects
A video filter is software that modifies a multimedia stream somehow. A filter graph is a series of filters that each accept input from an upstream filter, process the information, and then output the edited video to their downstream counterparts.
Step1 Click the Filter tab.
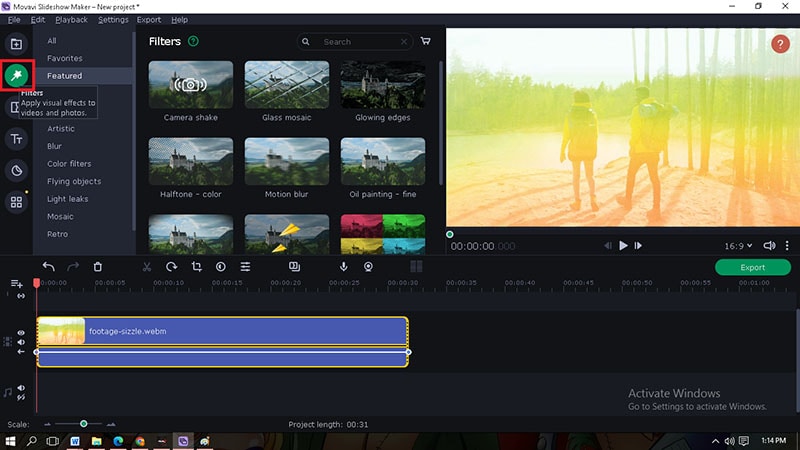
Step2 Choose your desired Filter effects depending on your preferred category.
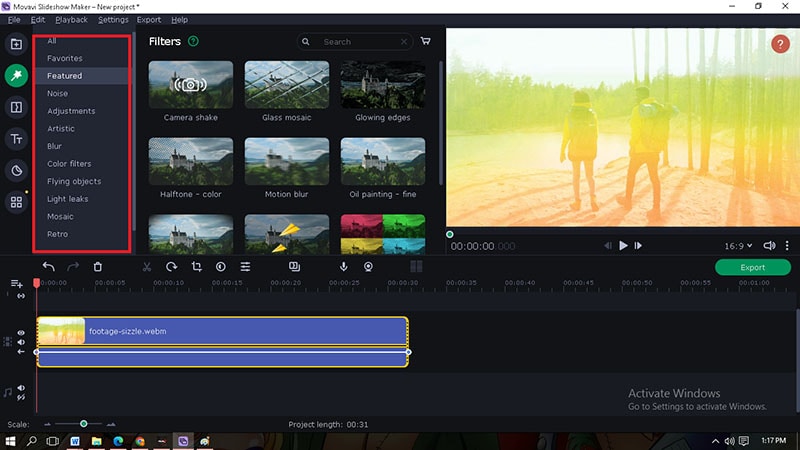
Step3 You can see the preview of a Filter effect by clicking it before applying it to your desired video to be edited.

Step4 If you finally chose a Filter effect, drag it onto the imported video.
Step5 And now you will see the changes. The “star” symbol on the imported video means you have already applied a Filter effect on it.
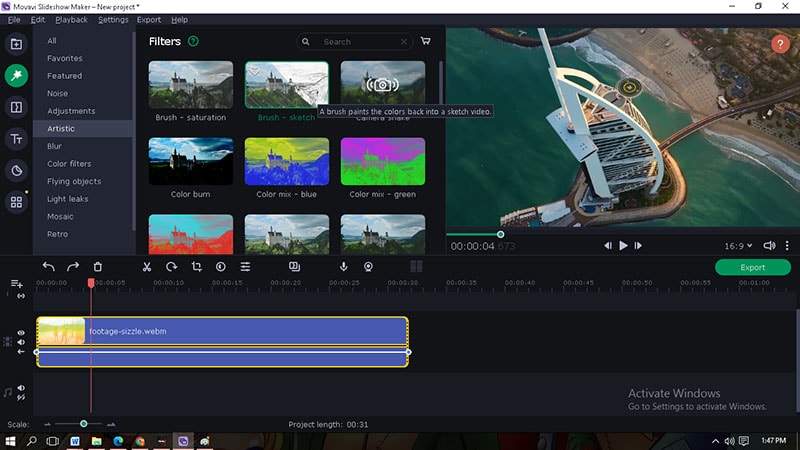
Raw Footage vs With Applied Filter Effect
Raw Footage
Brush – Sketch Filter effect

Adding Transition Effect
Transitions guide your audience.
From the opening to the very end, they structure the movie. There are numerous typical forms, including the wipe, dissolve, split-cut, and many others. Film editors use transitions to transfer a scene from one video clip to another practice. Transitions don’t need to be visible.
Step1 Click the Transition tab.
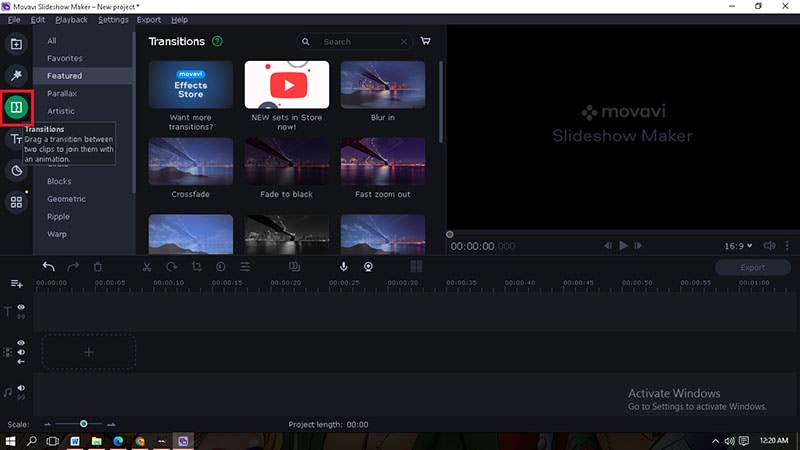
Step2 Choose your desired Transition effect depending on your preferred category.
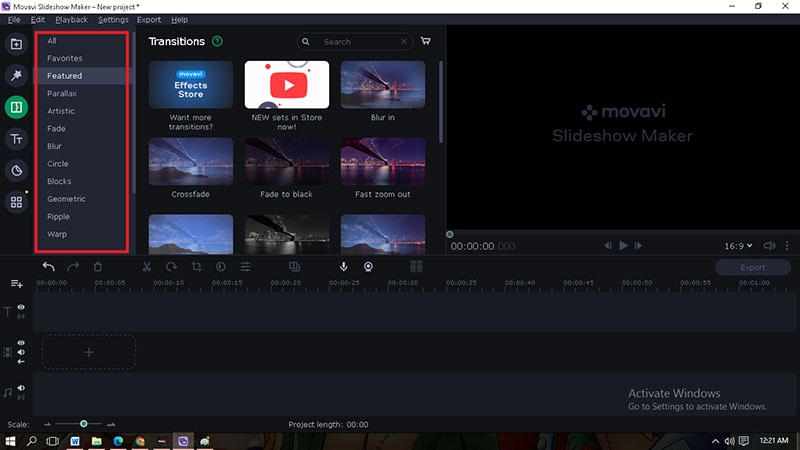
Step3 You can see the preview of a Transition effect by clicking it before applying it to your desired video to be edited.

Step4 If you finally chose a Transition effect, drag it between each imported video.
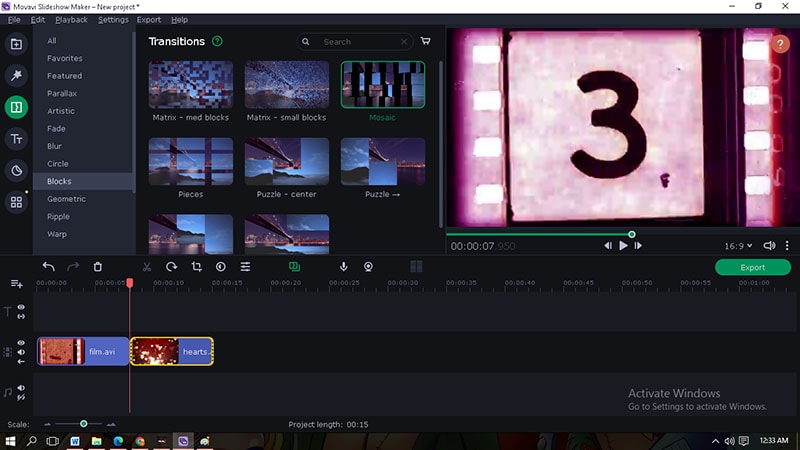
Step5 Now you will see this kind of symbol, which means you have already put a Transition effect between the imported videos.
![]()
Note: Transition effects can also be applied even if you have only one video. You can put transitions effects either at the start of the video, which could make your video introduction more appealing. Also, you can set the Transition effect at the end of the video, which could give you a pleasant closing.
Transition Effect at the start
Transition Effect at the end
Also, you can make your Transition effect longer or shorter simply by clicking this symbol then it will turn yellow. Point your cursor either on the left side of the symbol; the cursor will become a horizontal double-arrow to change the span of your Transition effect on the left video or on the right end side of the symbol to change the span of the Transition effect on the right video.
Applying Titling Motion Effect
Most video editing applications come with built-in titling choices, and many of them vary from basic letters to a collection of motion graphics that have already been pre-programmed. Enter your text into a template to insert them.
The majority of video projects have crucial titles. You can use them to build a mood, label key elements of the film, and convey information.
Step1 Click the Title tab.
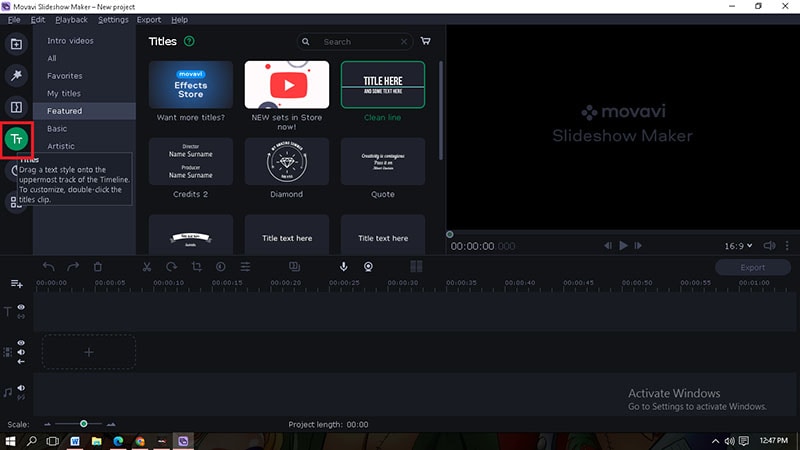
Step2 Choose your desired Titling motion effect depending on your preferred category. You can also see the preview of a title effect by clicking it before applying it to your selected video to be edited.
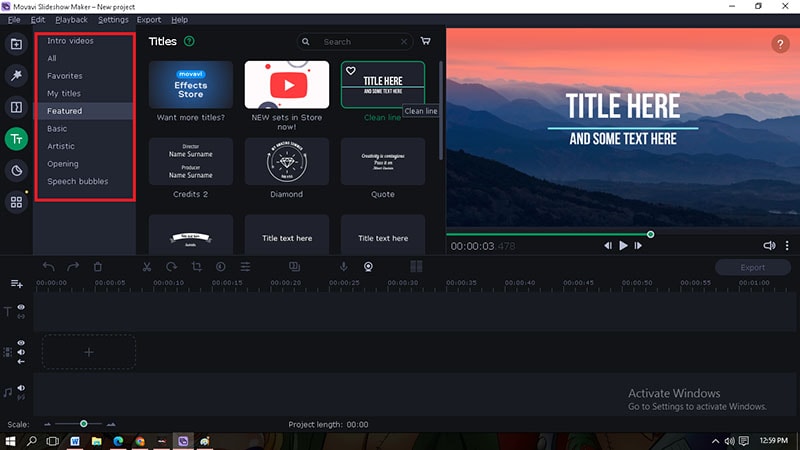
Step3 To apply the Title Motion effect, drag the effect onto the title track, just above the video track.
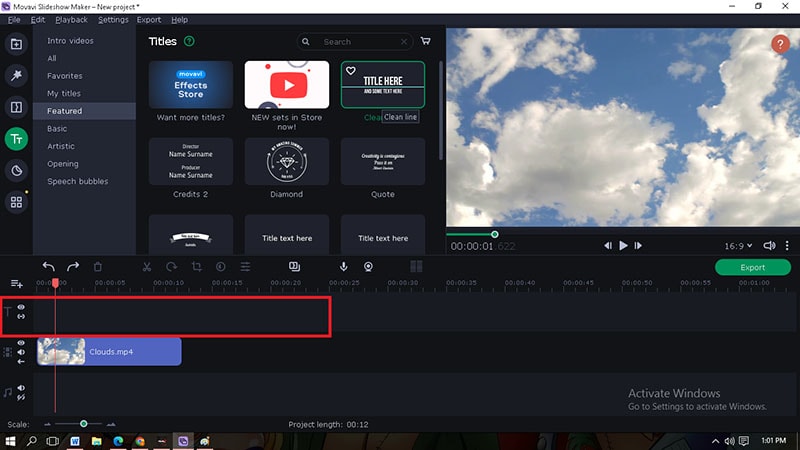
Step4 You can place your Title Motion effect on your desired time where you want it to appear.
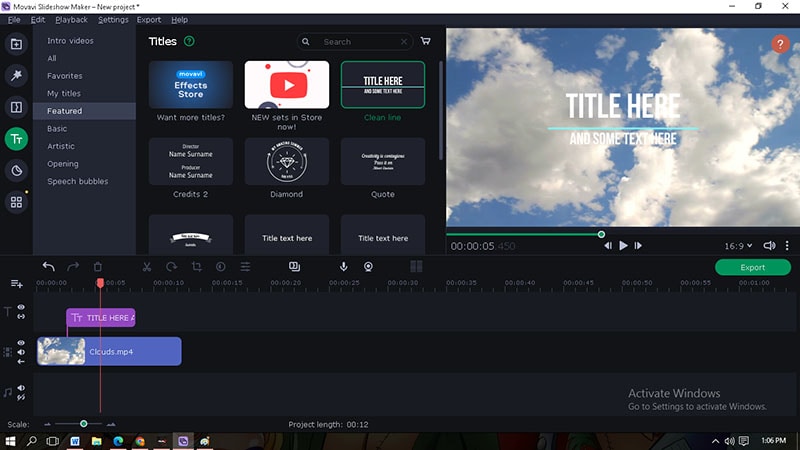
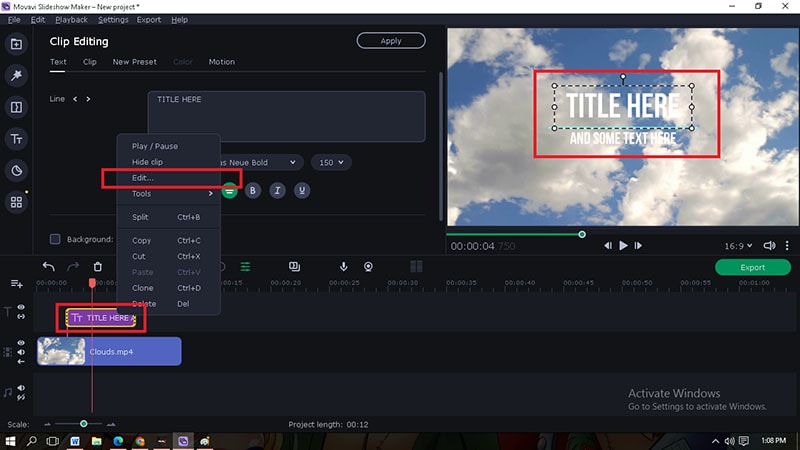
Step5 To edit your Title texts, you can double-click the applied title on the title track or right-click on it and click the “edit” option. You can also edit the text by double-clicking the title portion on the current video editing.
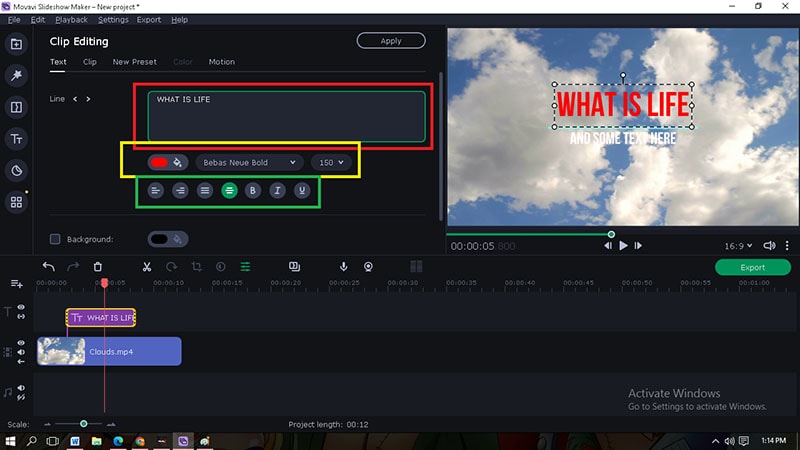
Step6 In this step, you can edit the Title text in the “clip editing” section, as seen in the red color box. You can change the color, text style, and font size on the yellow color box. And in the green color box, you can change the alignment of the text; you can Bold it, Italizing, and make it an Underlined text.
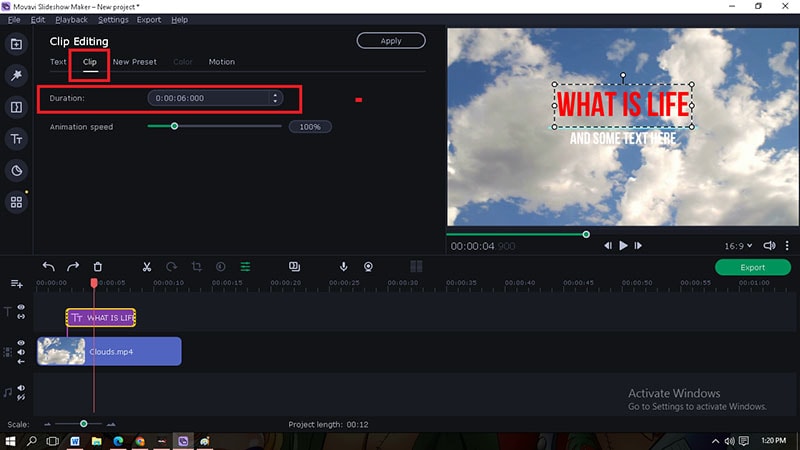
Step7 You can also adjust the time duration of the Titling Motion effect in two ways. First, by clicking the Title effect from the title track and placing your cursor on either side (the cursor will become a double-headed arrow), you have to shorten or lengthen the Title effect. The second step is to click the “Clip” section and adjust the duration.
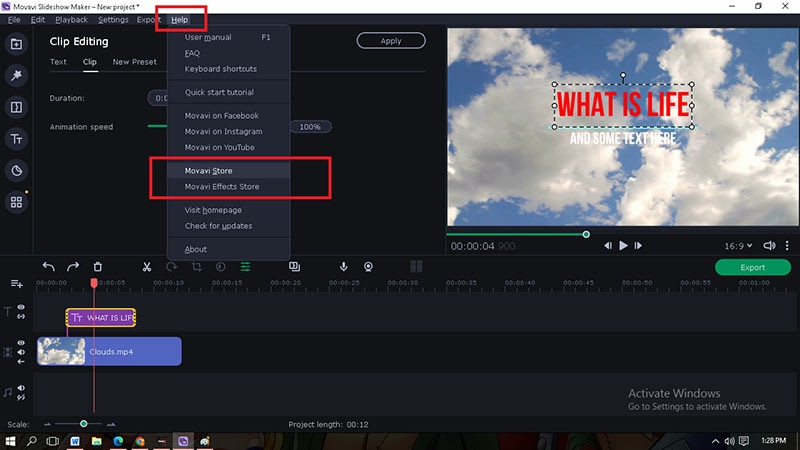
These are some ways to apply effects on Movavi Slideshow Maker video editing software. You can choose your desired effects that can make an excellent contribution to your video project. You can download other effects not included in this software by simply going to their store. Click the Help tab to find “Movavi Store” or “Movavi Effects Store.”
You know many video editing software you can find on the internet, and most of them need your subscription to unlock all their features. But of course, there are also several video editing software that is free to use, which could be very helpful for you, especially when you are just a beginner in this field. Choosing the best video editing software is recommended to develop your skills gradually. You can start with a basic one before working on a professional type of video editing software.
Overall, I hope you learn more about applying effects to video editing. I hope this article helps you decide what video effects you will be using when you start editing videos. Remember that too many effects can ruin your work, so sometimes you need to keep it simple. Just be sure that you will guide the audience very well and lead them to your beautiful story.
Free Download For Win 7 or later(64-bit)
Free Download For macOS 10.14 or later
Transition Effect at the start
Transition Effect at the end
Also, you can make your Transition effect longer or shorter simply by clicking this symbol then it will turn yellow. Point your cursor either on the left side of the symbol; the cursor will become a horizontal double-arrow to change the span of your Transition effect on the left video or on the right end side of the symbol to change the span of the Transition effect on the right video.
Applying Titling Motion Effect
Most video editing applications come with built-in titling choices, and many of them vary from basic letters to a collection of motion graphics that have already been pre-programmed. Enter your text into a template to insert them.
The majority of video projects have crucial titles. You can use them to build a mood, label key elements of the film, and convey information.
Step1 Click the Title tab.

Step2 Choose your desired Titling motion effect depending on your preferred category. You can also see the preview of a title effect by clicking it before applying it to your selected video to be edited.

Step3 To apply the Title Motion effect, drag the effect onto the title track, just above the video track.

Step4 You can place your Title Motion effect on your desired time where you want it to appear.

Step5 To edit your Title texts, you can double-click the applied title on the title track or right-click on it and click the “edit” option. You can also edit the text by double-clicking the title portion on the current video editing.

Step6 In this step, you can edit the Title text in the “clip editing” section, as seen in the red color box. You can change the color, text style, and font size on the yellow color box. And in the green color box, you can change the alignment of the text; you can Bold it, Italizing, and make it an Underlined text.

Step7 You can also adjust the time duration of the Titling Motion effect in two ways. First, by clicking the Title effect from the title track and placing your cursor on either side (the cursor will become a double-headed arrow), you have to shorten or lengthen the Title effect. The second step is to click the “Clip” section and adjust the duration.

These are some ways to apply effects on Movavi Slideshow Maker video editing software. You can choose your desired effects that can make an excellent contribution to your video project. You can download other effects not included in this software by simply going to their store. Click the Help tab to find “Movavi Store” or “Movavi Effects Store.”

You know many video editing software you can find on the internet, and most of them need your subscription to unlock all their features. But of course, there are also several video editing software that is free to use, which could be very helpful for you, especially when you are just a beginner in this field. Choosing the best video editing software is recommended to develop your skills gradually. You can start with a basic one before working on a professional type of video editing software.
Overall, I hope you learn more about applying effects to video editing. I hope this article helps you decide what video effects you will be using when you start editing videos. Remember that too many effects can ruin your work, so sometimes you need to keep it simple. Just be sure that you will guide the audience very well and lead them to your beautiful story.
Free Download For Win 7 or later(64-bit)
Free Download For macOS 10.14 or later
Top Way to Freeze-Frame in Final Cut Pro
Best Way to Freeze Frame in Final Cut Pro
An easy yet powerful editor
Numerous effects to choose from
Detailed tutorials provided by the official channel
The primary purpose of freezing frames is to hold a particular frame in clips in one place, temporarily to stop the action onscreen. You can create the Freeze-Frame clip from any video clip in the browser or the timeline. If a Freeze-Frame clip is created from the browser, it gets affixed to the major storyline at the Playhead location as a connecting clip.
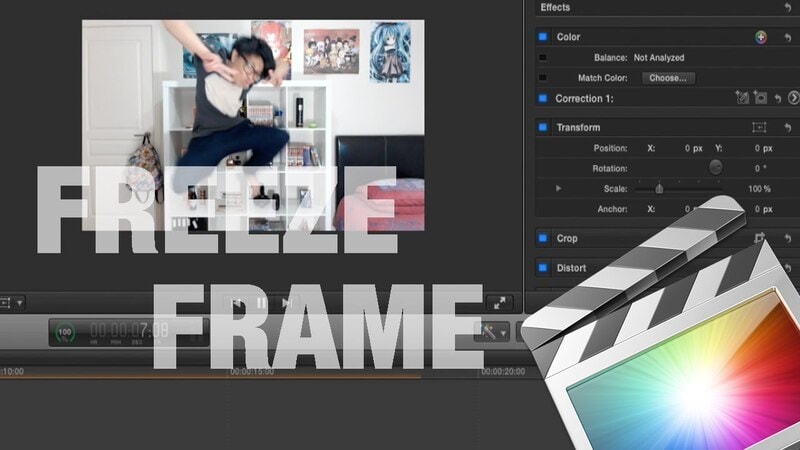
Now, Final Cut Pro is a fantastic video editor available for macOS. It is an entire video editing tool perfect for basic video editing. In addition, it can be valuable to Freeze-Frames in a video. This article will explain why to Freeze-Frame in FCP and its alternatives. We will also introduce how to add a Freeze-Frame Final Cut Pro video editor that can make your videos more appealing.
In this article
01 [Why Do You Need to Freeze-Frame](#Part 1)
02 [How to Freeze-Frames in Final Cut Pro?](#Part 2)
03 [3 Alternative to Freeze-Frames and Why](#Part 3)
Part 1 Why Do You Need to Freeze-Frame
Freeze-Frames is an effective and quick way to begin a drama session when you want to edit a movie. Besides, users of any age, ranging from children to adults, can easily handle it. Participants can use it to create an image using their bodies with no movement, and Freeze-Frames can also be made by individuals, a whole group, or a small group.
Another perfect way to describe a Freeze-Frame is a “still image.” It is a way of pressing the pause button on the remote control and making a statue or taking a photo. The image creation can be quick without discussion, planned, or rehearsed.
Here are some reasons you need a Freeze-Frame app:
● They are beneficial as a quick way of communicating ideas or telling a story.
● In addition, Freeze-Frame can represent objects or people and even abstract concepts like atmosphere or emotions.
● Freeze-Frames can help shyer performers to gain confidence, as there are no lines to learn.
Part 2 How to Freeze-Frames in Final Cut Pro?
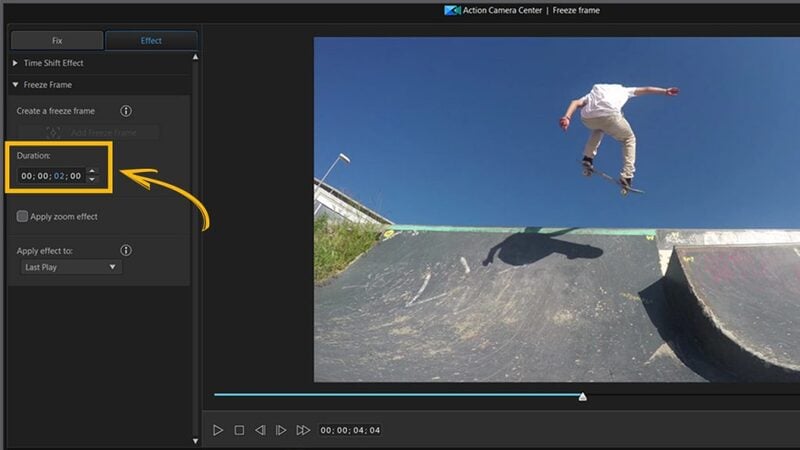
FCPX Freeze-Frame clips can temporarily hold a particular frame in place and stop the action onscreen. The Freeze-Frame, as its phrase, freezes or contains the specific frame you want to feature or focus on in a video.
You have to pick or select the frame you want to freeze and follow the steps in the article to freeze the frame of your choice.
In addition, if you do not want to create a separate freeze-frame clip, make a hold segment to stop the action for part of a clip temporarily. This action offers more precise control, especially when a variable speed effect is created.
You can Freeze-Frame on the fly by navigating to a specific frame in a clip or during playback. Thus, A Freeze-Frame clip will preserve any attributes applied to the source clip, such as settings and effects.
Here is how to Freeze-Frame in Final Cut Pro effectively.
Step 1: In the browser or in the timeline in Final Cut Pro, do any one of the following:
● Begin playback of the clip and pause
● Move the Skimmer or Playhead to the portion you wish to freeze.

Step 2: Choose Edit > Add Freeze-Frame (or press Option-F).
Note: How Freeze-Frame gets added to the project depends on whether it got created from the browser or the timeline:
● If the Freeze-Frame was from a browser clip, a new freeze-frame clip gets attached as a connected clip at the Playhead site in the timeline.
● Alternatively, if the freeze-frame was from the timeline, a new freeze-frame clip gets inserted at the Playhead location or the Skimmer in the timeline.

Part 3 Alternative to Freeze-Frames and Why
There are a lot of alternatives to Freeze-Frame in Final-Cut Pro all over the Internet. However, you must be careful while choosing when you want to add customization to your videos.
Additionally, if you are looking for the best editor to add a Freeze-Frame effect to your video, we recommend trying Filmora. Wondershare Filmora Video Editor for Mac and Windows devices comes with tons of Freeze-Frame impacts that you can use to spice-up your video.
For Win 7 or later (64-bit)
For macOS 10.12 or later
Some of the alternatives to adding a Freeze-Frame on Final Cut Pro include:
01AZ Screen Recorder
This is a free android APK alternative to Freeze-Frames in FCP. It is a great application available for anyone who needs to have the ability to record what is happening on their Android device’s screen. One great benefit of using this application is that your Android device does need to be rooted to experience the best the app has to offer.
A blinking red dot will be noticed in the screen’s right bottom corner when users begin to record with this application. This is an indicator that the recording is in progress. In addition, users can pause the recording as per their requirements by just tapping the screen. If you are not comfortable with the location of the blinking red dot, hold and move it to anywhere on the screen that can better suit your needs. Thus, this is an excellent alternative to Final Cut Pro X Freeze-Frame with the exceptional video quality.
Features
● Simple, clean, and easy to use interface
● The application settings options allow users to adjust things like the video output quality and how the clip recording interacts with the screen while the application is running.
● The four icons located in the middle of the application’s home screen clearly outline their options when the application is first open. The four options include adjusting the application’s settings, accessing previously recorded video files, starting recording, and the option to exit.
Pros:
● It has options to increase video quality.
● No watermark
● No time limits
● No frame loss
Cons:
● No option to live stream.
02AndroVid
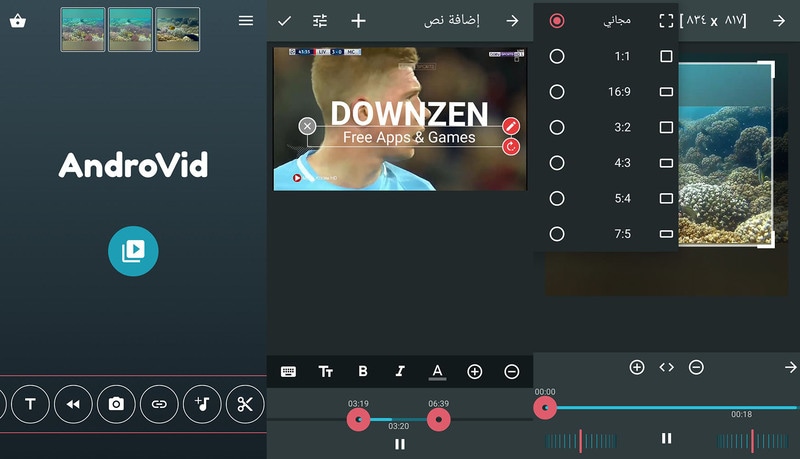
This Android application allows the creation of new videos by cutting and combining two or more video effects on your phone. Additionally, this application is typically different from the others that let you watch videos or share them with other sites. Bits and pieces can be cut from two or more videos and combined to make a new video. In addition, it is fun to use if you want to create a new music video that features the same song but different steps made when various people are being used.
Users can easily cut and paste with simple instructions, and the application also lets you work with any video stored on your phone.
Features
● Add subtitles to the videos that you create
● Create titles in any color or font that is available with the application
● making the videos from the clips a little more personal and customized before sharing.
Pros
● Allows multiple videos editing
● Allows the addition of a subtitle
● Users can reverse video content
Cons
● You cannot save a lot of work automatically
● It takes time to get the video adjusted
03Action Director
This Android editor also serves as an alternative to Final Cut Pro X Freeze-Frame. This video editing tool allows users to create quality compositions in no time at all. Additionally, you can change the image’s color, cut video clips, add a soundtrack, or insert text with this Video Editor using effortless control. With just a few finger taps on the screen, you can customize any video. This excellent video editing tool lets you create and share your videos quickly and easily.
Features
● Record videos with this Android app.
● Edit video and apply effects from its exclusive list.
● Get more than 12 transitions for your videos
● The useful movie editing guide helps you create videos with action effects and edits.
● Share your videos with your friends.
Pros
● It is fast and easy to use
● It is elementary to control
● Has video sharing option to share videos on another website
Cons
● Requires premium version to export video in high quality
● Ending Thoughts →
● About Final Cut Pro X Freeze-Frame and explained to the user how to use Freeze-Frame in FCP.
● Additionally, the article listed and presented three alternatives to Freeze-Frame and
● Recommended Filmora as the best editing software to use Freeze-Frame effects due to its many editing options.
The primary purpose of freezing frames is to hold a particular frame in clips in one place, temporarily to stop the action onscreen. You can create the Freeze-Frame clip from any video clip in the browser or the timeline. If a Freeze-Frame clip is created from the browser, it gets affixed to the major storyline at the Playhead location as a connecting clip.

Now, Final Cut Pro is a fantastic video editor available for macOS. It is an entire video editing tool perfect for basic video editing. In addition, it can be valuable to Freeze-Frames in a video. This article will explain why to Freeze-Frame in FCP and its alternatives. We will also introduce how to add a Freeze-Frame Final Cut Pro video editor that can make your videos more appealing.
In this article
01 [Why Do You Need to Freeze-Frame](#Part 1)
02 [How to Freeze-Frames in Final Cut Pro?](#Part 2)
03 [3 Alternative to Freeze-Frames and Why](#Part 3)
Part 1 Why Do You Need to Freeze-Frame
Freeze-Frames is an effective and quick way to begin a drama session when you want to edit a movie. Besides, users of any age, ranging from children to adults, can easily handle it. Participants can use it to create an image using their bodies with no movement, and Freeze-Frames can also be made by individuals, a whole group, or a small group.
Another perfect way to describe a Freeze-Frame is a “still image.” It is a way of pressing the pause button on the remote control and making a statue or taking a photo. The image creation can be quick without discussion, planned, or rehearsed.
Here are some reasons you need a Freeze-Frame app:
● They are beneficial as a quick way of communicating ideas or telling a story.
● In addition, Freeze-Frame can represent objects or people and even abstract concepts like atmosphere or emotions.
● Freeze-Frames can help shyer performers to gain confidence, as there are no lines to learn.

Part 2 How to Freeze-Frames in Final Cut Pro?
FCPX Freeze-Frame clips can temporarily hold a particular frame in place and stop the action onscreen. The Freeze-Frame, as its phrase, freezes or contains the specific frame you want to feature or focus on in a video.
You have to pick or select the frame you want to freeze and follow the steps in the article to freeze the frame of your choice.
In addition, if you do not want to create a separate freeze-frame clip, make a hold segment to stop the action for part of a clip temporarily. This action offers more precise control, especially when a variable speed effect is created.
You can Freeze-Frame on the fly by navigating to a specific frame in a clip or during playback. Thus, A Freeze-Frame clip will preserve any attributes applied to the source clip, such as settings and effects.
Here is how to Freeze-Frame in Final Cut Pro effectively.
Step 1: In the browser or in the timeline in Final Cut Pro, do any one of the following:
● Begin playback of the clip and pause
● Move the Skimmer or Playhead to the portion you wish to freeze.

Step 2: Choose Edit > Add Freeze-Frame (or press Option-F).
Note: How Freeze-Frame gets added to the project depends on whether it got created from the browser or the timeline:
● If the Freeze-Frame was from a browser clip, a new freeze-frame clip gets attached as a connected clip at the Playhead site in the timeline.
● Alternatively, if the freeze-frame was from the timeline, a new freeze-frame clip gets inserted at the Playhead location or the Skimmer in the timeline.

Part 3 Alternative to Freeze-Frames and Why
There are a lot of alternatives to Freeze-Frame in Final-Cut Pro all over the Internet. However, you must be careful while choosing when you want to add customization to your videos.
Additionally, if you are looking for the best editor to add a Freeze-Frame effect to your video, we recommend trying Filmora. Wondershare Filmora Video Editor for Mac and Windows devices comes with tons of Freeze-Frame impacts that you can use to spice-up your video.
For Win 7 or later (64-bit)
For macOS 10.12 or later
Some of the alternatives to adding a Freeze-Frame on Final Cut Pro include:
01AZ Screen Recorder
This is a free android APK alternative to Freeze-Frames in FCP. It is a great application available for anyone who needs to have the ability to record what is happening on their Android device’s screen. One great benefit of using this application is that your Android device does need to be rooted to experience the best the app has to offer.
A blinking red dot will be noticed in the screen’s right bottom corner when users begin to record with this application. This is an indicator that the recording is in progress. In addition, users can pause the recording as per their requirements by just tapping the screen. If you are not comfortable with the location of the blinking red dot, hold and move it to anywhere on the screen that can better suit your needs. Thus, this is an excellent alternative to Final Cut Pro X Freeze-Frame with the exceptional video quality.
Features
● Simple, clean, and easy to use interface
● The application settings options allow users to adjust things like the video output quality and how the clip recording interacts with the screen while the application is running.
● The four icons located in the middle of the application’s home screen clearly outline their options when the application is first open. The four options include adjusting the application’s settings, accessing previously recorded video files, starting recording, and the option to exit.
Pros:
● It has options to increase video quality.
● No watermark
● No time limits
● No frame loss
Cons:
● No option to live stream.

02AndroVid
This Android application allows the creation of new videos by cutting and combining two or more video effects on your phone. Additionally, this application is typically different from the others that let you watch videos or share them with other sites. Bits and pieces can be cut from two or more videos and combined to make a new video. In addition, it is fun to use if you want to create a new music video that features the same song but different steps made when various people are being used.
Users can easily cut and paste with simple instructions, and the application also lets you work with any video stored on your phone.
Features
● Add subtitles to the videos that you create
● Create titles in any color or font that is available with the application
● making the videos from the clips a little more personal and customized before sharing.
Pros
● Allows multiple videos editing
● Allows the addition of a subtitle
● Users can reverse video content
Cons
● You cannot save a lot of work automatically
● It takes time to get the video adjusted

03Action Director
This Android editor also serves as an alternative to Final Cut Pro X Freeze-Frame. This video editing tool allows users to create quality compositions in no time at all. Additionally, you can change the image’s color, cut video clips, add a soundtrack, or insert text with this Video Editor using effortless control. With just a few finger taps on the screen, you can customize any video. This excellent video editing tool lets you create and share your videos quickly and easily.
Features
● Record videos with this Android app.
● Edit video and apply effects from its exclusive list.
● Get more than 12 transitions for your videos
● The useful movie editing guide helps you create videos with action effects and edits.
● Share your videos with your friends.
Pros
● It is fast and easy to use
● It is elementary to control
● Has video sharing option to share videos on another website
Cons
● Requires premium version to export video in high quality
● Ending Thoughts →
● About Final Cut Pro X Freeze-Frame and explained to the user how to use Freeze-Frame in FCP.
● Additionally, the article listed and presented three alternatives to Freeze-Frame and
● Recommended Filmora as the best editing software to use Freeze-Frame effects due to its many editing options.
The primary purpose of freezing frames is to hold a particular frame in clips in one place, temporarily to stop the action onscreen. You can create the Freeze-Frame clip from any video clip in the browser or the timeline. If a Freeze-Frame clip is created from the browser, it gets affixed to the major storyline at the Playhead location as a connecting clip.

Now, Final Cut Pro is a fantastic video editor available for macOS. It is an entire video editing tool perfect for basic video editing. In addition, it can be valuable to Freeze-Frames in a video. This article will explain why to Freeze-Frame in FCP and its alternatives. We will also introduce how to add a Freeze-Frame Final Cut Pro video editor that can make your videos more appealing.
In this article
01 [Why Do You Need to Freeze-Frame](#Part 1)
02 [How to Freeze-Frames in Final Cut Pro?](#Part 2)
03 [3 Alternative to Freeze-Frames and Why](#Part 3)
Part 1 Why Do You Need to Freeze-Frame
Freeze-Frames is an effective and quick way to begin a drama session when you want to edit a movie. Besides, users of any age, ranging from children to adults, can easily handle it. Participants can use it to create an image using their bodies with no movement, and Freeze-Frames can also be made by individuals, a whole group, or a small group.
Another perfect way to describe a Freeze-Frame is a “still image.” It is a way of pressing the pause button on the remote control and making a statue or taking a photo. The image creation can be quick without discussion, planned, or rehearsed.
Here are some reasons you need a Freeze-Frame app:
● They are beneficial as a quick way of communicating ideas or telling a story.
● In addition, Freeze-Frame can represent objects or people and even abstract concepts like atmosphere or emotions.
● Freeze-Frames can help shyer performers to gain confidence, as there are no lines to learn.

Part 2 How to Freeze-Frames in Final Cut Pro?
FCPX Freeze-Frame clips can temporarily hold a particular frame in place and stop the action onscreen. The Freeze-Frame, as its phrase, freezes or contains the specific frame you want to feature or focus on in a video.
You have to pick or select the frame you want to freeze and follow the steps in the article to freeze the frame of your choice.
In addition, if you do not want to create a separate freeze-frame clip, make a hold segment to stop the action for part of a clip temporarily. This action offers more precise control, especially when a variable speed effect is created.
You can Freeze-Frame on the fly by navigating to a specific frame in a clip or during playback. Thus, A Freeze-Frame clip will preserve any attributes applied to the source clip, such as settings and effects.
Here is how to Freeze-Frame in Final Cut Pro effectively.
Step 1: In the browser or in the timeline in Final Cut Pro, do any one of the following:
● Begin playback of the clip and pause
● Move the Skimmer or Playhead to the portion you wish to freeze.

Step 2: Choose Edit > Add Freeze-Frame (or press Option-F).
Note: How Freeze-Frame gets added to the project depends on whether it got created from the browser or the timeline:
● If the Freeze-Frame was from a browser clip, a new freeze-frame clip gets attached as a connected clip at the Playhead site in the timeline.
● Alternatively, if the freeze-frame was from the timeline, a new freeze-frame clip gets inserted at the Playhead location or the Skimmer in the timeline.

Part 3 Alternative to Freeze-Frames and Why
There are a lot of alternatives to Freeze-Frame in Final-Cut Pro all over the Internet. However, you must be careful while choosing when you want to add customization to your videos.
Additionally, if you are looking for the best editor to add a Freeze-Frame effect to your video, we recommend trying Filmora. Wondershare Filmora Video Editor for Mac and Windows devices comes with tons of Freeze-Frame impacts that you can use to spice-up your video.
For Win 7 or later (64-bit)
For macOS 10.12 or later
Some of the alternatives to adding a Freeze-Frame on Final Cut Pro include:
01AZ Screen Recorder
This is a free android APK alternative to Freeze-Frames in FCP. It is a great application available for anyone who needs to have the ability to record what is happening on their Android device’s screen. One great benefit of using this application is that your Android device does need to be rooted to experience the best the app has to offer.
A blinking red dot will be noticed in the screen’s right bottom corner when users begin to record with this application. This is an indicator that the recording is in progress. In addition, users can pause the recording as per their requirements by just tapping the screen. If you are not comfortable with the location of the blinking red dot, hold and move it to anywhere on the screen that can better suit your needs. Thus, this is an excellent alternative to Final Cut Pro X Freeze-Frame with the exceptional video quality.
Features
● Simple, clean, and easy to use interface
● The application settings options allow users to adjust things like the video output quality and how the clip recording interacts with the screen while the application is running.
● The four icons located in the middle of the application’s home screen clearly outline their options when the application is first open. The four options include adjusting the application’s settings, accessing previously recorded video files, starting recording, and the option to exit.
Pros:
● It has options to increase video quality.
● No watermark
● No time limits
● No frame loss
Cons:
● No option to live stream.

02AndroVid
This Android application allows the creation of new videos by cutting and combining two or more video effects on your phone. Additionally, this application is typically different from the others that let you watch videos or share them with other sites. Bits and pieces can be cut from two or more videos and combined to make a new video. In addition, it is fun to use if you want to create a new music video that features the same song but different steps made when various people are being used.
Users can easily cut and paste with simple instructions, and the application also lets you work with any video stored on your phone.
Features
● Add subtitles to the videos that you create
● Create titles in any color or font that is available with the application
● making the videos from the clips a little more personal and customized before sharing.
Pros
● Allows multiple videos editing
● Allows the addition of a subtitle
● Users can reverse video content
Cons
● You cannot save a lot of work automatically
● It takes time to get the video adjusted

03Action Director
This Android editor also serves as an alternative to Final Cut Pro X Freeze-Frame. This video editing tool allows users to create quality compositions in no time at all. Additionally, you can change the image’s color, cut video clips, add a soundtrack, or insert text with this Video Editor using effortless control. With just a few finger taps on the screen, you can customize any video. This excellent video editing tool lets you create and share your videos quickly and easily.
Features
● Record videos with this Android app.
● Edit video and apply effects from its exclusive list.
● Get more than 12 transitions for your videos
● The useful movie editing guide helps you create videos with action effects and edits.
● Share your videos with your friends.
Pros
● It is fast and easy to use
● It is elementary to control
● Has video sharing option to share videos on another website
Cons
● Requires premium version to export video in high quality
● Ending Thoughts →
● About Final Cut Pro X Freeze-Frame and explained to the user how to use Freeze-Frame in FCP.
● Additionally, the article listed and presented three alternatives to Freeze-Frame and
● Recommended Filmora as the best editing software to use Freeze-Frame effects due to its many editing options.
The primary purpose of freezing frames is to hold a particular frame in clips in one place, temporarily to stop the action onscreen. You can create the Freeze-Frame clip from any video clip in the browser or the timeline. If a Freeze-Frame clip is created from the browser, it gets affixed to the major storyline at the Playhead location as a connecting clip.

Now, Final Cut Pro is a fantastic video editor available for macOS. It is an entire video editing tool perfect for basic video editing. In addition, it can be valuable to Freeze-Frames in a video. This article will explain why to Freeze-Frame in FCP and its alternatives. We will also introduce how to add a Freeze-Frame Final Cut Pro video editor that can make your videos more appealing.
In this article
01 [Why Do You Need to Freeze-Frame](#Part 1)
02 [How to Freeze-Frames in Final Cut Pro?](#Part 2)
03 [3 Alternative to Freeze-Frames and Why](#Part 3)
Part 1 Why Do You Need to Freeze-Frame
Freeze-Frames is an effective and quick way to begin a drama session when you want to edit a movie. Besides, users of any age, ranging from children to adults, can easily handle it. Participants can use it to create an image using their bodies with no movement, and Freeze-Frames can also be made by individuals, a whole group, or a small group.
Another perfect way to describe a Freeze-Frame is a “still image.” It is a way of pressing the pause button on the remote control and making a statue or taking a photo. The image creation can be quick without discussion, planned, or rehearsed.
Here are some reasons you need a Freeze-Frame app:
● They are beneficial as a quick way of communicating ideas or telling a story.
● In addition, Freeze-Frame can represent objects or people and even abstract concepts like atmosphere or emotions.
● Freeze-Frames can help shyer performers to gain confidence, as there are no lines to learn.

Part 2 How to Freeze-Frames in Final Cut Pro?
FCPX Freeze-Frame clips can temporarily hold a particular frame in place and stop the action onscreen. The Freeze-Frame, as its phrase, freezes or contains the specific frame you want to feature or focus on in a video.
You have to pick or select the frame you want to freeze and follow the steps in the article to freeze the frame of your choice.
In addition, if you do not want to create a separate freeze-frame clip, make a hold segment to stop the action for part of a clip temporarily. This action offers more precise control, especially when a variable speed effect is created.
You can Freeze-Frame on the fly by navigating to a specific frame in a clip or during playback. Thus, A Freeze-Frame clip will preserve any attributes applied to the source clip, such as settings and effects.
Here is how to Freeze-Frame in Final Cut Pro effectively.
Step 1: In the browser or in the timeline in Final Cut Pro, do any one of the following:
● Begin playback of the clip and pause
● Move the Skimmer or Playhead to the portion you wish to freeze.

Step 2: Choose Edit > Add Freeze-Frame (or press Option-F).
Note: How Freeze-Frame gets added to the project depends on whether it got created from the browser or the timeline:
● If the Freeze-Frame was from a browser clip, a new freeze-frame clip gets attached as a connected clip at the Playhead site in the timeline.
● Alternatively, if the freeze-frame was from the timeline, a new freeze-frame clip gets inserted at the Playhead location or the Skimmer in the timeline.

Part 3 Alternative to Freeze-Frames and Why
There are a lot of alternatives to Freeze-Frame in Final-Cut Pro all over the Internet. However, you must be careful while choosing when you want to add customization to your videos.
Additionally, if you are looking for the best editor to add a Freeze-Frame effect to your video, we recommend trying Filmora. Wondershare Filmora Video Editor for Mac and Windows devices comes with tons of Freeze-Frame impacts that you can use to spice-up your video.
For Win 7 or later (64-bit)
For macOS 10.12 or later
Some of the alternatives to adding a Freeze-Frame on Final Cut Pro include:
01AZ Screen Recorder
This is a free android APK alternative to Freeze-Frames in FCP. It is a great application available for anyone who needs to have the ability to record what is happening on their Android device’s screen. One great benefit of using this application is that your Android device does need to be rooted to experience the best the app has to offer.
A blinking red dot will be noticed in the screen’s right bottom corner when users begin to record with this application. This is an indicator that the recording is in progress. In addition, users can pause the recording as per their requirements by just tapping the screen. If you are not comfortable with the location of the blinking red dot, hold and move it to anywhere on the screen that can better suit your needs. Thus, this is an excellent alternative to Final Cut Pro X Freeze-Frame with the exceptional video quality.
Features
● Simple, clean, and easy to use interface
● The application settings options allow users to adjust things like the video output quality and how the clip recording interacts with the screen while the application is running.
● The four icons located in the middle of the application’s home screen clearly outline their options when the application is first open. The four options include adjusting the application’s settings, accessing previously recorded video files, starting recording, and the option to exit.
Pros:
● It has options to increase video quality.
● No watermark
● No time limits
● No frame loss
Cons:
● No option to live stream.

02AndroVid
This Android application allows the creation of new videos by cutting and combining two or more video effects on your phone. Additionally, this application is typically different from the others that let you watch videos or share them with other sites. Bits and pieces can be cut from two or more videos and combined to make a new video. In addition, it is fun to use if you want to create a new music video that features the same song but different steps made when various people are being used.
Users can easily cut and paste with simple instructions, and the application also lets you work with any video stored on your phone.
Features
● Add subtitles to the videos that you create
● Create titles in any color or font that is available with the application
● making the videos from the clips a little more personal and customized before sharing.
Pros
● Allows multiple videos editing
● Allows the addition of a subtitle
● Users can reverse video content
Cons
● You cannot save a lot of work automatically
● It takes time to get the video adjusted

03Action Director
This Android editor also serves as an alternative to Final Cut Pro X Freeze-Frame. This video editing tool allows users to create quality compositions in no time at all. Additionally, you can change the image’s color, cut video clips, add a soundtrack, or insert text with this Video Editor using effortless control. With just a few finger taps on the screen, you can customize any video. This excellent video editing tool lets you create and share your videos quickly and easily.
Features
● Record videos with this Android app.
● Edit video and apply effects from its exclusive list.
● Get more than 12 transitions for your videos
● The useful movie editing guide helps you create videos with action effects and edits.
● Share your videos with your friends.
Pros
● It is fast and easy to use
● It is elementary to control
● Has video sharing option to share videos on another website
Cons
● Requires premium version to export video in high quality
● Ending Thoughts →
● About Final Cut Pro X Freeze-Frame and explained to the user how to use Freeze-Frame in FCP.
● Additionally, the article listed and presented three alternatives to Freeze-Frame and
● Recommended Filmora as the best editing software to use Freeze-Frame effects due to its many editing options.
Also read:
- New 3 Ways to Make Time-Lapse Video on MacBook
- 2024 Approved Learn More About the Video Editing Interface of Wondershare Filmora
- New Guide To Using Luts Perfectly in Final Cut Pro for 2024
- How to Make a YouTube Intro by Filmora
- 2024 Approved The Complete Guide to Make a Text Collage
- Updated 2024 Approved Best 22 Video Editing Tips to Know
- Tips That Show Anybody How To Create Youtube Slideshow – Guaranteed for 2024
- New Are You Stuck with How to Use Discord GIF Ideally? Check that Out in This Article, as We Will Guide You on All You Need to Know About GIFs for Discord
- New Top-Search The Best Game Screen Recording Tools for PC
- In 2024, If You Want to Make an Intro Video, Then Adobe After Effects Will Be a Great Choice. This Article Will Show the Steps to Create an Intro Video with After Effects by Your Own
- Use The Best LUTs for Lightroom for 2024
- Updated 2024 Approved How to Correct Lens Distortion in Videos
- Green Screens Are a Fun Way for Creators to Bring Their Personality to Their Stream, Allowing Them to Dynamically Alter Their Stream Background and Make Their Content Appear Even More Engaging and Polished
- In 2024, How to Vlog? A Beginners Guide to Start Vlogging
- New 2024 Approved 4 Ways to Add White Borders on Mobile and Desktop
- Updated In 2024, Top 12 AI Video Generators to Pick
- 4 Simple Methods for Making a High-Quality Recap Video
- Updated 2024 Approved A Complete Guide to Use Distortion Effect in Premiere Pro
- Updated MP3 Cutter Download for Computer and Mobile for 2024
- Updated In 2024, How to Create Video Contents That Convert Sales
- Updated How Can You Deny These Best 10 Free Speech to Text Software for 2024
- Updated 2024 Approved Best 10 Anime Movies for All Time
- Updated Add Green Screen Video on TikTok
- Detailed Tutorial to Rotate Videos in Cyberlink PowerDirector
- New In 2024, Things You Need to Know About Transparent PNG Remove and Convert
- New Easy Way to Apply Green Screen to YouTube Videos
- IMovie Review – Is It The Best Video Editor for Mac Users, In 2024
- 2024 Approved Have You Ever Watched a Movie Where You Felt the Filmmakers Left You Hanging? Yea, Thats What Freeze Frame Does. Here We Will Enlighten You on What It Is, Freeze Frame Examples Where It Has Been Helpful to Drive Our Point Home
- Do You Want to Know About the Best Filmic Pro LUTs for Video Editing? This Article Provides Details on the Best Recommendations for 2024
- In 2024, The Most Efficient Ways to Manage Your Timeline
- In 2024, Recommended Best Applications for Mirroring Your OnePlus Nord N30 5G Screen | Dr.fone
- How to Sign .doc file document with Electronic Digital Signature - (Tutorial)
- Super Easy Ways To Deal with Poco X5 Unresponsive Screen | Dr.fone
- In 2024, Unlock Your Device iCloud DNS Bypass Explained and Tested, Plus Easy Alternatives From Apple iPhone 7 Plus
- Updated In 2024, Must-Read Learn From Deepfake Scandals & Protect Your Stream
- For People Wanting to Mock GPS on Realme GT 3 Devices | Dr.fone
- Thinking About Changing Your Netflix Region Without a VPN On Vivo T2 5G? | Dr.fone
- 8 Best Apps for Screen Mirroring Infinix Smart 8 Pro PC | Dr.fone
- In 2024, Fake the Location to Get Around the MLB Blackouts on Infinix GT 10 Pro | Dr.fone
- Top 10 Nokia C12 Plus Android SIM Unlock APK
- In 2024, Unlocking iPhone 6s Passcode without a Computer
- In 2024, How can I get more stardust in pokemon go On Poco C55? | Dr.fone
- 8 Quick Fixes Unfortunately, Snapchat has Stopped on Oppo Reno 9A | Dr.fone
- How to recover old music from your Infinix
- In 2024, How to Unlock Realme C51 Phone Pattern Lock without Factory Reset
- AddROM Bypass An Android Tool to Unlock FRP Lock Screen For your Vivo Y200e 5G
- Thinking About Changing Your Netflix Region Without a VPN On Samsung Galaxy A05? | Dr.fone
- How To Change Samsung Galaxy A25 5G Lock Screen Clock in Seconds
- Best 3 Honor Magic 5 Lite Emulator for Mac to Run Your Wanted Android Apps | Dr.fone
- 8 Solutions to Solve YouTube App Crashing on Vivo S17 Pro | Dr.fone
- Can Life360 Track Or See Text Messages? What Can You Do with Life360 On Nokia G22? | Dr.fone
- How to Rescue Lost Pictures from Motorola Moto G24?
- Best AI Rap Voice Generators You Should Try for 2024
- In 2024, Here are Some Pro Tips for Pokemon Go PvP Battles On Honor Magic 6 | Dr.fone
- Title: How to Create a Text Effect Video with Filmora
- Author: Chloe
- Created at : 2024-05-20 03:37:21
- Updated at : 2024-05-21 03:37:21
- Link: https://ai-editing-video.techidaily.com/how-to-create-a-text-effect-video-with-filmora/
- License: This work is licensed under CC BY-NC-SA 4.0.

