:max_bytes(150000):strip_icc():format(webp)/is-kindle-unlimited-worth-it-fda01dceb923406a8524c64d2b72693e.jpg)
How to Create and Add an Adjustment Layer in Final Cut Pro

How to Create and Add an Adjustment Layer in Final Cut Pro
Final Cut Pro is an advanced editing software that is available for Mac users exclusively. Using this high-end software, you can create compelling storytelling in your video clips. It offers different features through which you can effortlessly add audio and motion graphics to your videos. You can also add cinematic effects to your videos using Final Cut Pro to modify their focus points.
You can also add adjustment layers in Final Cut Pro to efficiently add the effects in video clips. By reading this article, you will learn how to add an adjustment layer in Final Cut Pro.

Part 1: What is Adjustment Layer in Final Cut Pro?
The adjustment layer in video editing can provide you with great ease as you can apply effects to multiple videos using this particular layer. Using the adjustment layer, you can apply effects and color grading to your video clips that come beneath this layer. So, apart from adding effects and executing color correction to individual clips, you can use an adjustment layer to generate quicker results.
After creating an adjustment layer in any video editor, you can easily cut and extend it like any other clip. You can also remove it anytime from your timeline with a single tap. In Final Cut Pro, you cannot insert adjustment layers in its timeline directly, like in Premiere Pro or After Effects.
To do so, you have to use third-party tools to create adjustment layers from scratch in Final Cut Pro. The process of creating an adjustment layer in Final Cut Pro is a little bit longer compared to other editors. To learn more about the adjustment layer in FCPX, continue reading this article.

Part 2: How to Add an Adjustment Layer in Final Cut Pro?
Are you eager to know how to add adjustment layers in Final Cut Pro? In this section, you can find simple instructions to generate an adjustment layer in Final Cut Pro without hassle.
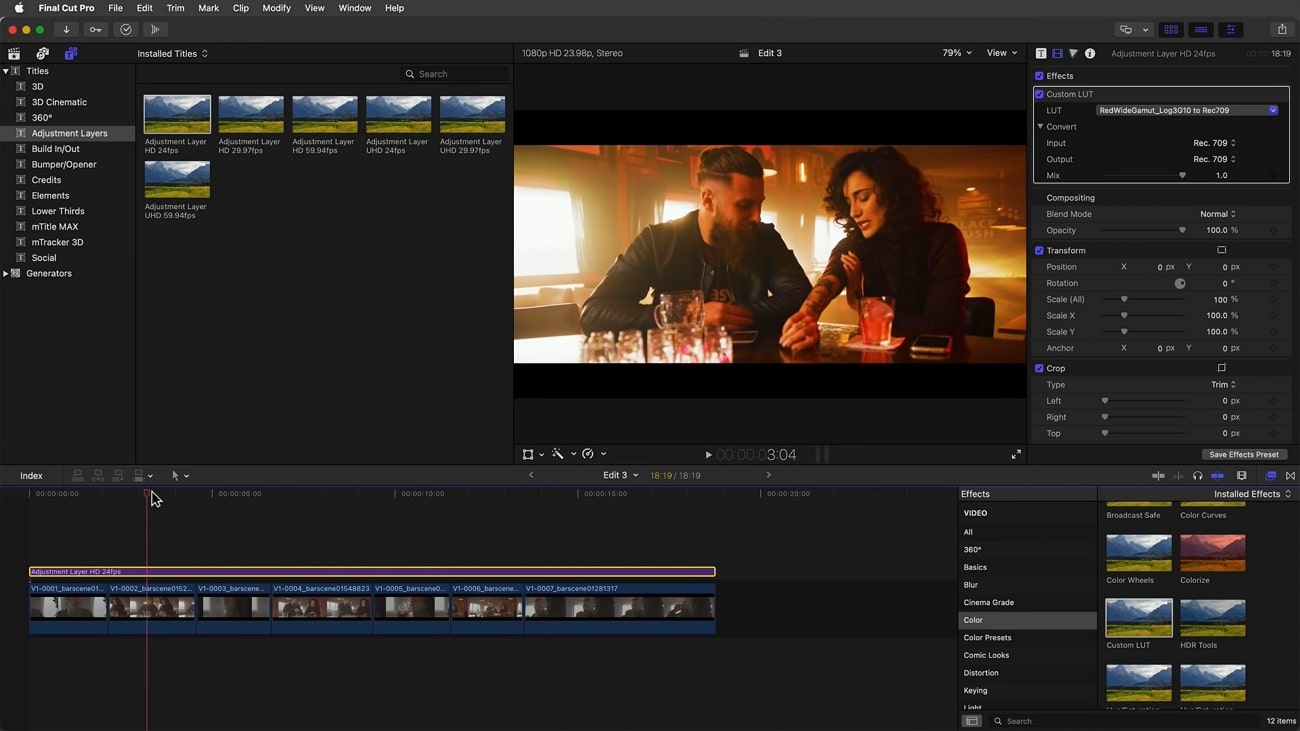
Step1 First, click on this link to download the adjustment layer in your MacBook. Once done, copy your “Adjustment Layer” folder to the “User” folder. Afterward, move it to “Movies” and then “Motion Templates.” Once done, copy it to the “Titles” folder eventually.

Step2 Now open Final Cut Pro and locate the “Adjustment Layer” under the “Titles” section. After locating it, drag and drop it into the timeline. This adjustment layer was created as a title layer in Apple Motion that got published in Final Cut Pro using the built-in publishing tools.

Step3 Once you have created the adjustment layer, you can apply any sort of effects to the video clips. However, you should make sure to place the adjustment layer above in the layers stack.
Bonus Tips – How to Use Adjustment Layers in the Best Alternative to FCPX?
If you want to use an alternative to Final Cut Pro for creating the adjustment layer, you can try Wondershare Filmora 12 . You can edit your videos in an advanced and secure environment using this tool. It supports all multiple platforms, such as Windows, Mac, Android, and iOS. You can do color correction in your videos to manage the saturation, brightness, contrast, exposure, and other factors in Filmora.
Free Download For Win 7 or later(64-bit)
Free Download For macOS 10.14 or later
Moreover, you can also create 3D animated titles in Filmora to give your project a unique look. It also provides a wide range of keyboard shortcut presets through which you can make your editing easier and faster. Apart from editing and modifying your videos, you can also increase their vibrancy by using Filmora effects. You can explore and select a diverse range of visual effects in Filmora to give a new dimension to your video clips.
Key Features of Filmora
- Filmora offers cloud services that allow you to collaborate with your team members effectively. On its workspace cloud platform, you can share and review the edited video clips with your team members in a comfortable environment.
- It offers a pen tool through which you can draw complex mask shapes, such as straight lines or curves around the objects.
- Using the AI Smart Cutout feature, you can use advanced technology to select people or objects in the video effectively.
- Are you annoyed by the background noises in your video clips? You can try the AI Denoise feature of Filmora that can help you to eradicate background noises from the video clips precisely.
How to Add an Adjustment Layer Using Filmora
To create and use the adjustment layer in Wondershare Filmora 12, you can proceed to the following steps:
Step1 Import the Video Clip
Launch Filmora and click on the “New Project” button. Afterward, upload the video file on the project media and then drag and drop it into the timeline.

Step2 Add the Adjustment Layer
Now head to the “Media” section on the left side, where you can find the option of the “Adjustment Layer.” Next, drag and drop the adjustment layer into the timeline. You can double-click on it to change its settings effectively.

Step3 Add Multiple Presets to Adjustment Layer
From the settings, you can change blending mode, rotation, position, and opacity easily. Moreover, you can add different presets to the adjustment layer for more modifications. You can use the color match tool to adjust the colors in your video clip. With this tool, you can also add a border across the video clips using the adjustment layer. Also, you can color code the adjustment layer to create a more attractive look in the video clip.

Conclusion
Adjustment layers can make your editing process easy and fast. If you want to pursue video editing as your profession, you should know how to use the adjustment layer in famous tools like Final Cut Pro. After reading this article, you have learned how to create an adjustment layer in Final Cut Pro without complications.
However, if you want a more compatible and easier-to-use tool to generate adjustment layers, you can try Wondershare Filmora. It’s a powerful video editor that you can use to perform professional editing using adjustment layers.
Free Download For macOS 10.14 or later
Moreover, you can also create 3D animated titles in Filmora to give your project a unique look. It also provides a wide range of keyboard shortcut presets through which you can make your editing easier and faster. Apart from editing and modifying your videos, you can also increase their vibrancy by using Filmora effects. You can explore and select a diverse range of visual effects in Filmora to give a new dimension to your video clips.
Key Features of Filmora
- Filmora offers cloud services that allow you to collaborate with your team members effectively. On its workspace cloud platform, you can share and review the edited video clips with your team members in a comfortable environment.
- It offers a pen tool through which you can draw complex mask shapes, such as straight lines or curves around the objects.
- Using the AI Smart Cutout feature, you can use advanced technology to select people or objects in the video effectively.
- Are you annoyed by the background noises in your video clips? You can try the AI Denoise feature of Filmora that can help you to eradicate background noises from the video clips precisely.
How to Add an Adjustment Layer Using Filmora
To create and use the adjustment layer in Wondershare Filmora 12, you can proceed to the following steps:
Step1 Import the Video Clip
Launch Filmora and click on the “New Project” button. Afterward, upload the video file on the project media and then drag and drop it into the timeline.

Step2 Add the Adjustment Layer
Now head to the “Media” section on the left side, where you can find the option of the “Adjustment Layer.” Next, drag and drop the adjustment layer into the timeline. You can double-click on it to change its settings effectively.

Step3 Add Multiple Presets to Adjustment Layer
From the settings, you can change blending mode, rotation, position, and opacity easily. Moreover, you can add different presets to the adjustment layer for more modifications. You can use the color match tool to adjust the colors in your video clip. With this tool, you can also add a border across the video clips using the adjustment layer. Also, you can color code the adjustment layer to create a more attractive look in the video clip.

Conclusion
Adjustment layers can make your editing process easy and fast. If you want to pursue video editing as your profession, you should know how to use the adjustment layer in famous tools like Final Cut Pro. After reading this article, you have learned how to create an adjustment layer in Final Cut Pro without complications.
However, if you want a more compatible and easier-to-use tool to generate adjustment layers, you can try Wondershare Filmora. It’s a powerful video editor that you can use to perform professional editing using adjustment layers.
Step by Step Guide on Make Gimp Transparent Background PNG
Step by Step Guide on Make Gimp Transparent Background PNG
An easy yet powerful editor
Numerous effects to choose from
Detailed tutorials provided by the official channel
Removing background of images and making them transparent is a really very tough task for the newbies. Sometimes you may need to learn lots of software to get the work done and most of the programs are paid over the internet. There are many reasons why you need to remove the background of images such as you don’t like the background and replace with the new one. Here, in this article we will share the information about the GIMP which is a free and open source programs and can help you to remove background from the images and make the transparent.
In this article
01 [What’s Gimp?](#Part 1)
02 [How to Create a Transparent Background in GIMP](#Part 2)
03 [How to Turn the Complex Image Background Transparent](#Part 3)
04 [How to Turn a One-Color Background Transparent](#Part 4)
Part 1 What’s Gimp?
GIMP is open source software which allows you to do image manipulations. The program is distributed over the internet for free of cost the beginners to learn the photography skills. GIMP software can be used for photo retouching, image authoring and image compositions. GIMP supports all features of photo editing even it can be used for GIMP remove background to transparent. You can also use it as a paint program, online batch processing system, image format converter and as an image renderer.
Part 2 How to Create a Transparent Background in GIMP
With the help of GIMP software you can easily remove background from image and make it transparent. Here, we are going to tell you that how you can remove background with the help of GIMP. Let’s learn it step by step.
Step 1:
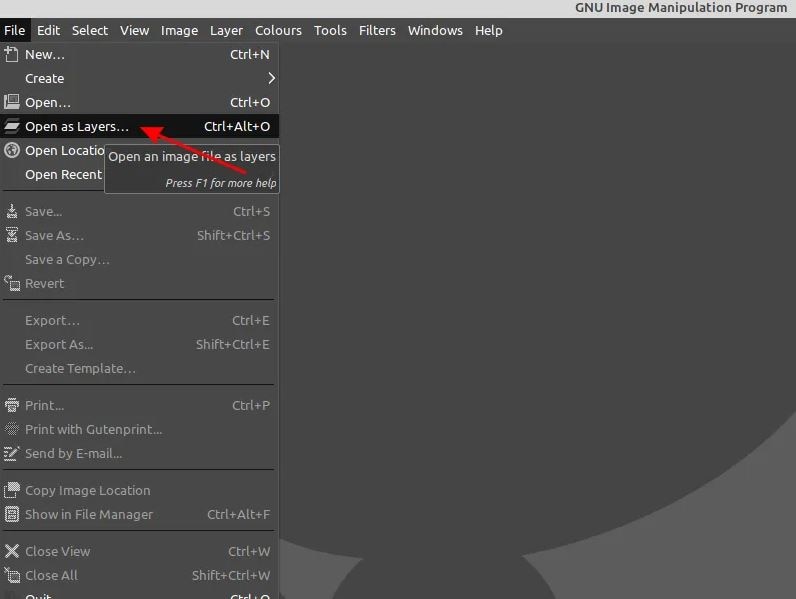
Install and launch GIMP program on your system. Now click the “File > Open” or you can also use “File > Open as Layers” option.
Step 2:
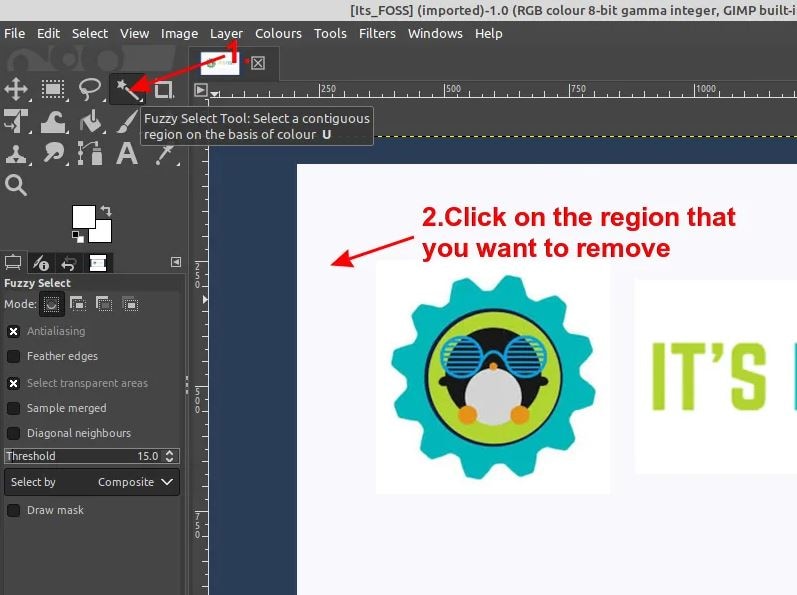
Now, you have to use the Fuzzy tool. The Fuzzy tool is mainly designed to select the current layer area and the image on the basis of color. Using this tool you can easily select the background which you want to remove with just one click.
Step 3:
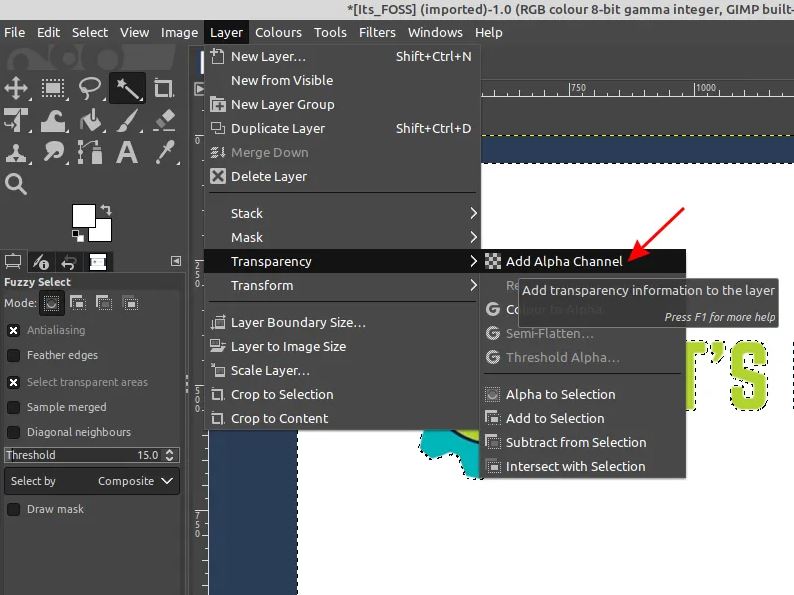
On your image, now you will see a channel dialog when you add a second layer on it. This layer will tell the transparency of the image you have added to remove background. So, click the “Layer > Transparency > Add Alpha Channel option.
Step 4:
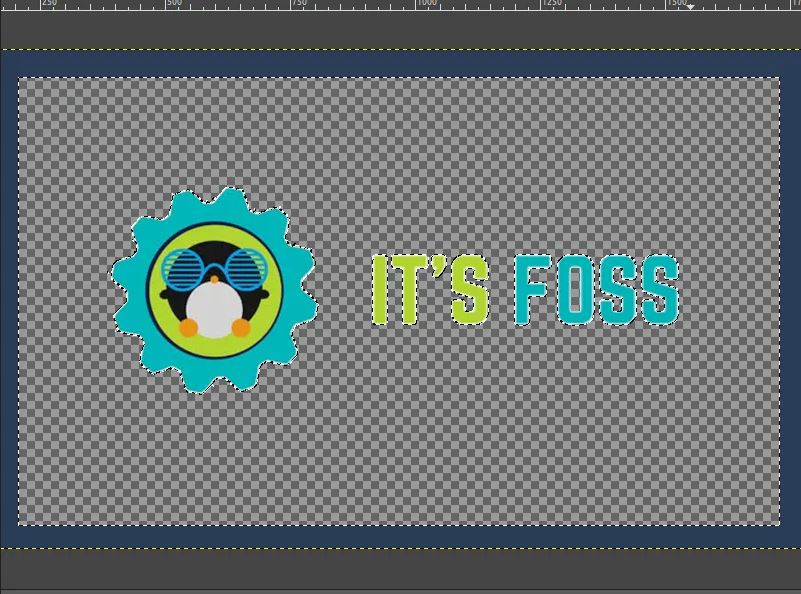
On your keyboard now you need to hit the “Delete” button to remove background. You may need to repeat the steps 2 to 4 if the background is not completely removed else there is no problem. We have removed blue background here for example.
Step 5:
Finally, you can click the “File > Export As” and then select the PNG format and save it on your computer in the PNG format. This is the way about GIMP remove background to transparent.

Part 3 How to Turn the Complex Image Background Transparent
The above part was about removing the simple and easy background from the image. Here we will share about GIMP transparent background PNG when you have the complex background. For, GIMP create transparent background in the complex images you need to add a transparent layer on the image.
Step 1:
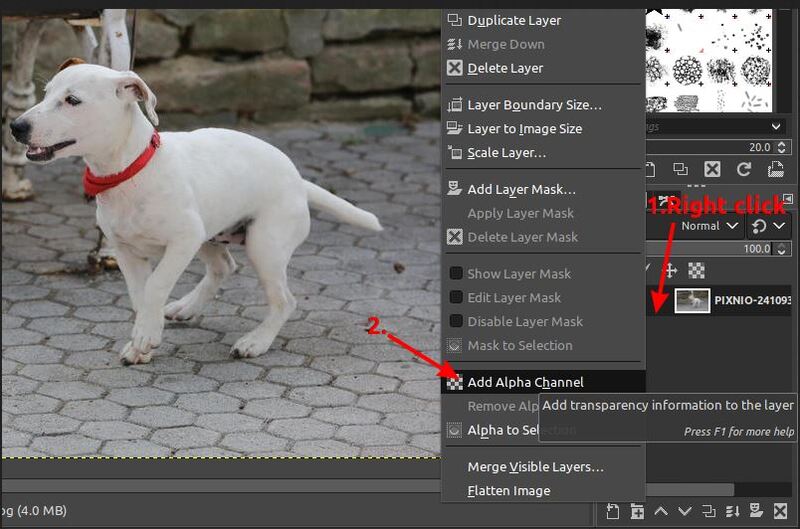
Open the image in GIMP and then right click on the layer of image. Now, click the “Add Alpha Chanel” option.
Step 2:
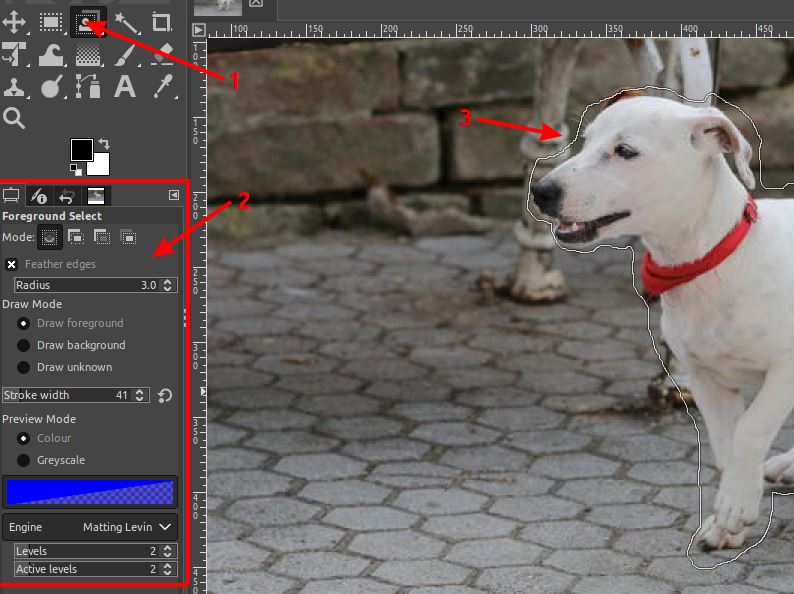
After making a layer for background now you have to select the foreground of the image which you want to keep using the select tool of GIMP. To start, first you need to make sure the in the settings you have selected “Draw foreground option” is selected.
After doing all adjustments of the settings you need to draw outline of the object and finally press the enter button on keyboard.
Step 3:
After doing all the settings you have to adjust the stroke width from settings panel of GIMP. Use your mouse now and start dragging and drawing the image just like you are painting with a brush. Once your drawing is finished and you leave your mouse the image will look like the below screenshot.

Step 4:
You can also fine tune your selection now with the help of draw background option in the GIMP. This will help you to adjust the rough outline you created previously. Once you are happy then simply press the enter button.

Step 5:
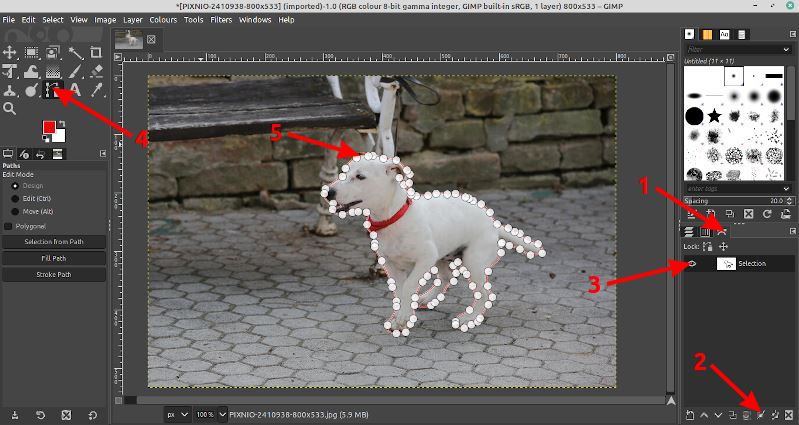
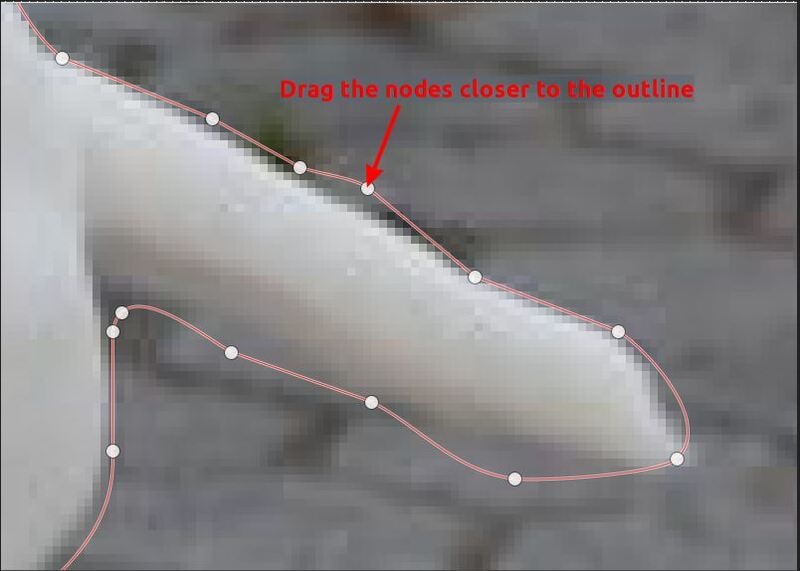
Still, if you want to refine your results more than you can refine your outlines by using the path nodes option. You can view the path nodes by following the below steps.
● Keep your mouse cursor at paths dialog.
● Now, hit selection.
● To view the path you can click the CTRL+Shift+A button.
● Now, select the paths tool.
● Finally click the “Path”.
Step 6:
Now, it’s a time to adjust the outlines according to the output of your foreground image. You can zoom the image and add or adjust the previous nodes. To adjust node you can click the CTRL button on keyboard and drag the node using your mouse. If you need to remove a node then you can use CTRL+Shift button and then click on the node.
Step 7:
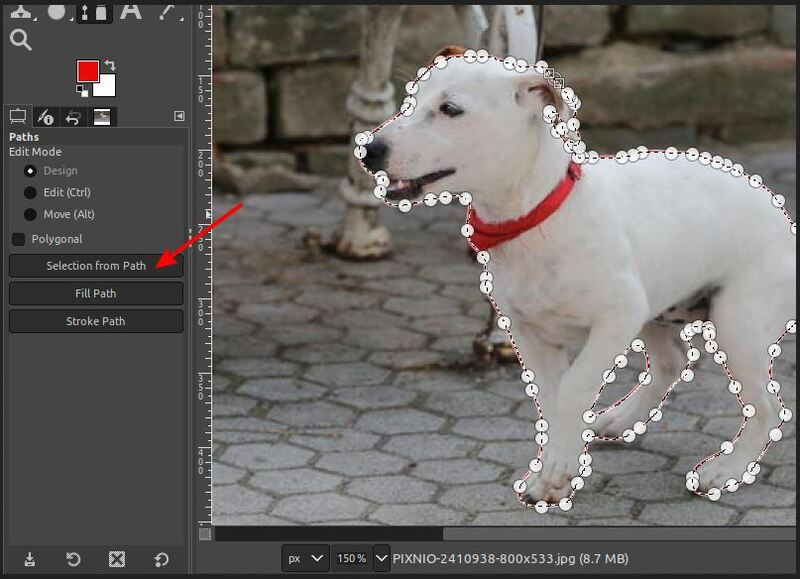
Once the path is refined according to your need hit the “Selection from Path” option at the left side.
Step 8:
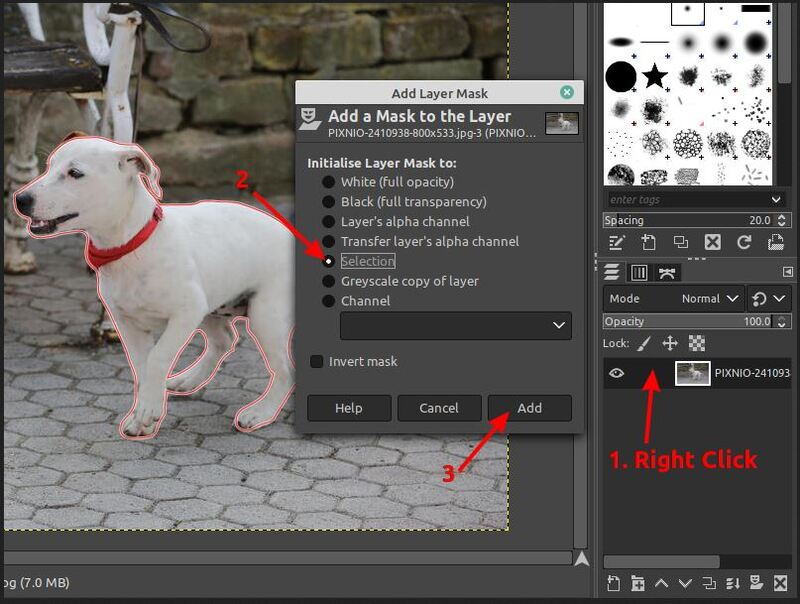
You will have to add the layer mask on the image now to which will reveal the transparency. Right click the Current layer > Add Layer Mask > Selection and finally click “Add” button.
Step 9:
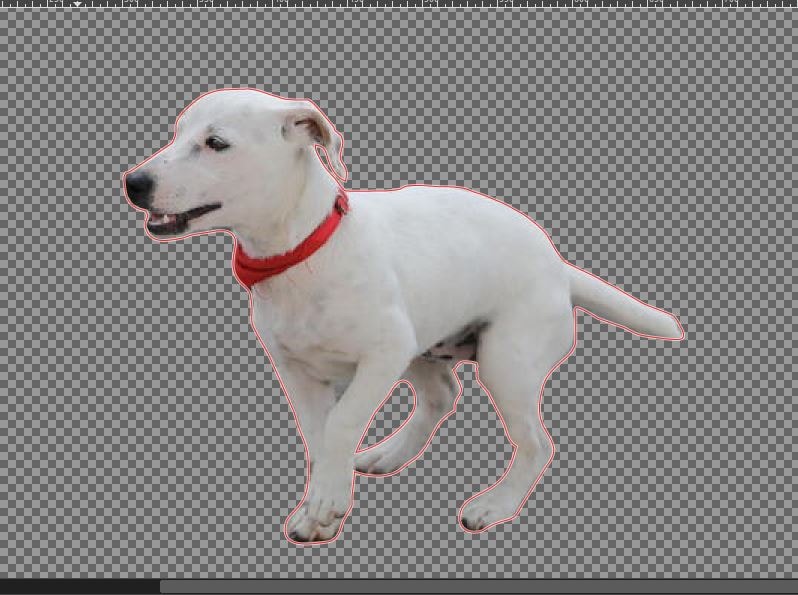
Now, if you have followed all the previous steps perfectly then your background will be removed now and you can also add a new background to the image. This is way about GIMP delete background to transparent for the complex images.
Part 4 How to Turn a One-Color Background Transparent
While using the GIMP you can also run the one color images background in the transparent. This method helps you to make the transparent background in case if you have the single color in the background of your image. In this method you just need to select the background by the color and it will be removed in the seconds. For GIMP create transparent background image in the single color background image you can follow the below steps.
Steps to Follow:
● Open the image using “File > Open” in the GIMP program.
● Once image is opened you have to select the image layer at the right side corner of the screen. Now right click and select the Add Alpha Channel option.
● Now, you have to choose the select by color tool.
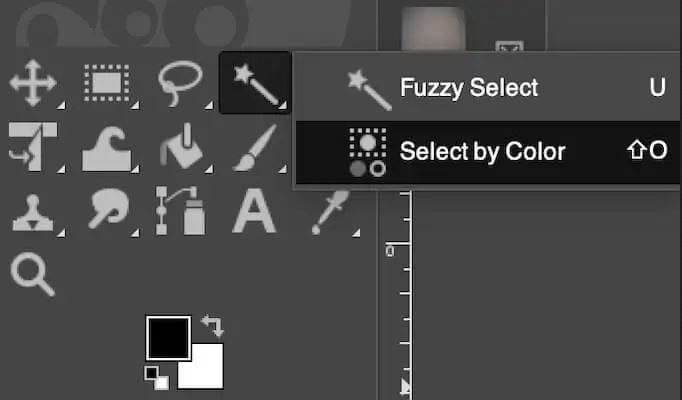
Step 2:
After selecting the color tool you can select the area of the background image which you need to make transparent by clicking on the image. You can also select it manually by clicking and dragging using your mouse pointer. To increase the selection press Shift button on keyboard and then select the different area which you want to select.
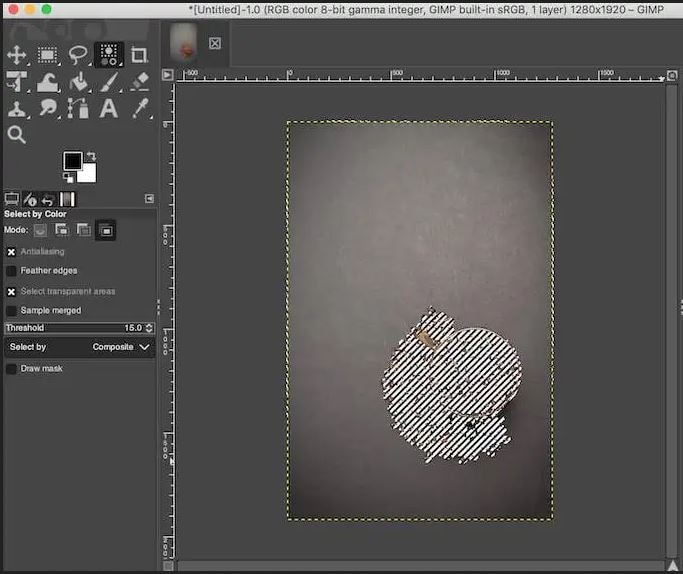
Step 3:
Finally, when you have selected the complete area which you want to make transparent then simply select the delete button. This is the way about GIMP set transparent background for one color background images.
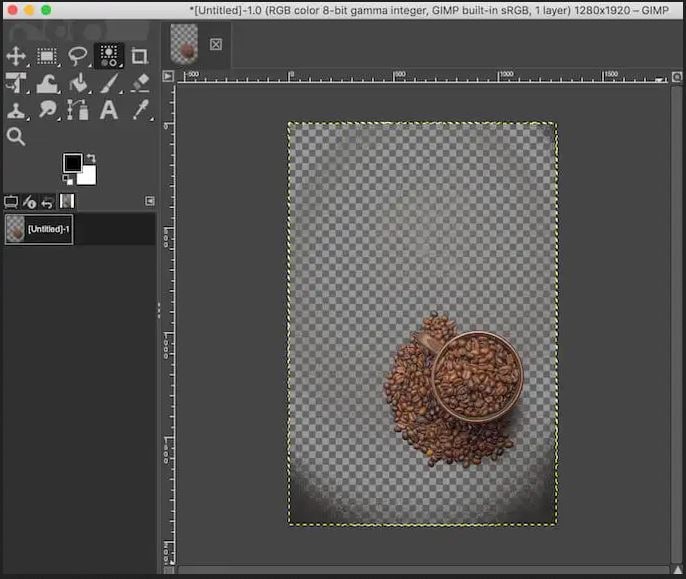
Learn New Ways to Make Transparent Background
GIMP software is a free program for newbie users to expand their skills. With the help of GIMP software you can easily remove background from mostly any kind of images. If you like to go for pro software to make the video from the images you have created then you can try the Wondershare Filmora Video Editor which allows you to make the beautiful videos and edit them quickly.
For Win 7 or later (64-bit)
For macOS 10.12 or later
Wondershare Filmora program is video editor software which also offers you some of the photo editing options as well. It is compatible with the windows as well as the Mac operating system devices. The program comes with a very easy to use interface and allows you to edit the videos and design them from scratch. It comes with the premade templates in it so you can directly use them for your videos to make the process faster. You can do keyframing, speed ramping, splitting screen, motion tracking etc for editing your videos.
Filmora offers you an inbuilt screen recorder which is the best for recording the gaming videos. it also offers you the effects to apply on the videos, color correction, color matching and many more others features which can be used for making the best quality videos.

● Ending Thoughts →
● Well, this is all about making transparent background in the GIMP. GIMP is really a very helpful program that comes with most all features what you need to edit the images and change the background of your images.
● If you need to edit the videos as well or you want to make videos with the images edited using GIMP then you can simply use Wondershare Filmora which the best in the video editing Era.
Removing background of images and making them transparent is a really very tough task for the newbies. Sometimes you may need to learn lots of software to get the work done and most of the programs are paid over the internet. There are many reasons why you need to remove the background of images such as you don’t like the background and replace with the new one. Here, in this article we will share the information about the GIMP which is a free and open source programs and can help you to remove background from the images and make the transparent.
In this article
01 [What’s Gimp?](#Part 1)
02 [How to Create a Transparent Background in GIMP](#Part 2)
03 [How to Turn the Complex Image Background Transparent](#Part 3)
04 [How to Turn a One-Color Background Transparent](#Part 4)
Part 1 What’s Gimp?
GIMP is open source software which allows you to do image manipulations. The program is distributed over the internet for free of cost the beginners to learn the photography skills. GIMP software can be used for photo retouching, image authoring and image compositions. GIMP supports all features of photo editing even it can be used for GIMP remove background to transparent. You can also use it as a paint program, online batch processing system, image format converter and as an image renderer.
Part 2 How to Create a Transparent Background in GIMP
With the help of GIMP software you can easily remove background from image and make it transparent. Here, we are going to tell you that how you can remove background with the help of GIMP. Let’s learn it step by step.
Step 1:
Install and launch GIMP program on your system. Now click the “File > Open” or you can also use “File > Open as Layers” option.

Step 2:
Now, you have to use the Fuzzy tool. The Fuzzy tool is mainly designed to select the current layer area and the image on the basis of color. Using this tool you can easily select the background which you want to remove with just one click.

Step 3:
On your image, now you will see a channel dialog when you add a second layer on it. This layer will tell the transparency of the image you have added to remove background. So, click the “Layer > Transparency > Add Alpha Channel option.

Step 4:
On your keyboard now you need to hit the “Delete” button to remove background. You may need to repeat the steps 2 to 4 if the background is not completely removed else there is no problem. We have removed blue background here for example.

Step 5:
Finally, you can click the “File > Export As” and then select the PNG format and save it on your computer in the PNG format. This is the way about GIMP remove background to transparent.

Part 3 How to Turn the Complex Image Background Transparent
The above part was about removing the simple and easy background from the image. Here we will share about GIMP transparent background PNG when you have the complex background. For, GIMP create transparent background in the complex images you need to add a transparent layer on the image.
Step 1:
Open the image in GIMP and then right click on the layer of image. Now, click the “Add Alpha Chanel” option.

Step 2:
After making a layer for background now you have to select the foreground of the image which you want to keep using the select tool of GIMP. To start, first you need to make sure the in the settings you have selected “Draw foreground option” is selected.
After doing all adjustments of the settings you need to draw outline of the object and finally press the enter button on keyboard.

Step 3:
After doing all the settings you have to adjust the stroke width from settings panel of GIMP. Use your mouse now and start dragging and drawing the image just like you are painting with a brush. Once your drawing is finished and you leave your mouse the image will look like the below screenshot.

Step 4:
You can also fine tune your selection now with the help of draw background option in the GIMP. This will help you to adjust the rough outline you created previously. Once you are happy then simply press the enter button.

Step 5:
Still, if you want to refine your results more than you can refine your outlines by using the path nodes option. You can view the path nodes by following the below steps.
● Keep your mouse cursor at paths dialog.
● Now, hit selection.
● To view the path you can click the CTRL+Shift+A button.
● Now, select the paths tool.
● Finally click the “Path”.

Step 6:
Now, it’s a time to adjust the outlines according to the output of your foreground image. You can zoom the image and add or adjust the previous nodes. To adjust node you can click the CTRL button on keyboard and drag the node using your mouse. If you need to remove a node then you can use CTRL+Shift button and then click on the node.

Step 7:
Once the path is refined according to your need hit the “Selection from Path” option at the left side.

Step 8:
You will have to add the layer mask on the image now to which will reveal the transparency. Right click the Current layer > Add Layer Mask > Selection and finally click “Add” button.

Step 9:
Now, if you have followed all the previous steps perfectly then your background will be removed now and you can also add a new background to the image. This is way about GIMP delete background to transparent for the complex images.

Part 4 How to Turn a One-Color Background Transparent
While using the GIMP you can also run the one color images background in the transparent. This method helps you to make the transparent background in case if you have the single color in the background of your image. In this method you just need to select the background by the color and it will be removed in the seconds. For GIMP create transparent background image in the single color background image you can follow the below steps.
Steps to Follow:
● Open the image using “File > Open” in the GIMP program.
● Once image is opened you have to select the image layer at the right side corner of the screen. Now right click and select the Add Alpha Channel option.
● Now, you have to choose the select by color tool.

Step 2:
After selecting the color tool you can select the area of the background image which you need to make transparent by clicking on the image. You can also select it manually by clicking and dragging using your mouse pointer. To increase the selection press Shift button on keyboard and then select the different area which you want to select.

Step 3:
Finally, when you have selected the complete area which you want to make transparent then simply select the delete button. This is the way about GIMP set transparent background for one color background images.

Learn New Ways to Make Transparent Background
GIMP software is a free program for newbie users to expand their skills. With the help of GIMP software you can easily remove background from mostly any kind of images. If you like to go for pro software to make the video from the images you have created then you can try the Wondershare Filmora Video Editor which allows you to make the beautiful videos and edit them quickly.
For Win 7 or later (64-bit)
For macOS 10.12 or later
Wondershare Filmora program is video editor software which also offers you some of the photo editing options as well. It is compatible with the windows as well as the Mac operating system devices. The program comes with a very easy to use interface and allows you to edit the videos and design them from scratch. It comes with the premade templates in it so you can directly use them for your videos to make the process faster. You can do keyframing, speed ramping, splitting screen, motion tracking etc for editing your videos.
Filmora offers you an inbuilt screen recorder which is the best for recording the gaming videos. it also offers you the effects to apply on the videos, color correction, color matching and many more others features which can be used for making the best quality videos.

● Ending Thoughts →
● Well, this is all about making transparent background in the GIMP. GIMP is really a very helpful program that comes with most all features what you need to edit the images and change the background of your images.
● If you need to edit the videos as well or you want to make videos with the images edited using GIMP then you can simply use Wondershare Filmora which the best in the video editing Era.
Removing background of images and making them transparent is a really very tough task for the newbies. Sometimes you may need to learn lots of software to get the work done and most of the programs are paid over the internet. There are many reasons why you need to remove the background of images such as you don’t like the background and replace with the new one. Here, in this article we will share the information about the GIMP which is a free and open source programs and can help you to remove background from the images and make the transparent.
In this article
01 [What’s Gimp?](#Part 1)
02 [How to Create a Transparent Background in GIMP](#Part 2)
03 [How to Turn the Complex Image Background Transparent](#Part 3)
04 [How to Turn a One-Color Background Transparent](#Part 4)
Part 1 What’s Gimp?
GIMP is open source software which allows you to do image manipulations. The program is distributed over the internet for free of cost the beginners to learn the photography skills. GIMP software can be used for photo retouching, image authoring and image compositions. GIMP supports all features of photo editing even it can be used for GIMP remove background to transparent. You can also use it as a paint program, online batch processing system, image format converter and as an image renderer.
Part 2 How to Create a Transparent Background in GIMP
With the help of GIMP software you can easily remove background from image and make it transparent. Here, we are going to tell you that how you can remove background with the help of GIMP. Let’s learn it step by step.
Step 1:
Install and launch GIMP program on your system. Now click the “File > Open” or you can also use “File > Open as Layers” option.

Step 2:
Now, you have to use the Fuzzy tool. The Fuzzy tool is mainly designed to select the current layer area and the image on the basis of color. Using this tool you can easily select the background which you want to remove with just one click.

Step 3:
On your image, now you will see a channel dialog when you add a second layer on it. This layer will tell the transparency of the image you have added to remove background. So, click the “Layer > Transparency > Add Alpha Channel option.

Step 4:
On your keyboard now you need to hit the “Delete” button to remove background. You may need to repeat the steps 2 to 4 if the background is not completely removed else there is no problem. We have removed blue background here for example.

Step 5:
Finally, you can click the “File > Export As” and then select the PNG format and save it on your computer in the PNG format. This is the way about GIMP remove background to transparent.

Part 3 How to Turn the Complex Image Background Transparent
The above part was about removing the simple and easy background from the image. Here we will share about GIMP transparent background PNG when you have the complex background. For, GIMP create transparent background in the complex images you need to add a transparent layer on the image.
Step 1:
Open the image in GIMP and then right click on the layer of image. Now, click the “Add Alpha Chanel” option.

Step 2:
After making a layer for background now you have to select the foreground of the image which you want to keep using the select tool of GIMP. To start, first you need to make sure the in the settings you have selected “Draw foreground option” is selected.
After doing all adjustments of the settings you need to draw outline of the object and finally press the enter button on keyboard.

Step 3:
After doing all the settings you have to adjust the stroke width from settings panel of GIMP. Use your mouse now and start dragging and drawing the image just like you are painting with a brush. Once your drawing is finished and you leave your mouse the image will look like the below screenshot.

Step 4:
You can also fine tune your selection now with the help of draw background option in the GIMP. This will help you to adjust the rough outline you created previously. Once you are happy then simply press the enter button.

Step 5:
Still, if you want to refine your results more than you can refine your outlines by using the path nodes option. You can view the path nodes by following the below steps.
● Keep your mouse cursor at paths dialog.
● Now, hit selection.
● To view the path you can click the CTRL+Shift+A button.
● Now, select the paths tool.
● Finally click the “Path”.

Step 6:
Now, it’s a time to adjust the outlines according to the output of your foreground image. You can zoom the image and add or adjust the previous nodes. To adjust node you can click the CTRL button on keyboard and drag the node using your mouse. If you need to remove a node then you can use CTRL+Shift button and then click on the node.

Step 7:
Once the path is refined according to your need hit the “Selection from Path” option at the left side.

Step 8:
You will have to add the layer mask on the image now to which will reveal the transparency. Right click the Current layer > Add Layer Mask > Selection and finally click “Add” button.

Step 9:
Now, if you have followed all the previous steps perfectly then your background will be removed now and you can also add a new background to the image. This is way about GIMP delete background to transparent for the complex images.

Part 4 How to Turn a One-Color Background Transparent
While using the GIMP you can also run the one color images background in the transparent. This method helps you to make the transparent background in case if you have the single color in the background of your image. In this method you just need to select the background by the color and it will be removed in the seconds. For GIMP create transparent background image in the single color background image you can follow the below steps.
Steps to Follow:
● Open the image using “File > Open” in the GIMP program.
● Once image is opened you have to select the image layer at the right side corner of the screen. Now right click and select the Add Alpha Channel option.
● Now, you have to choose the select by color tool.

Step 2:
After selecting the color tool you can select the area of the background image which you need to make transparent by clicking on the image. You can also select it manually by clicking and dragging using your mouse pointer. To increase the selection press Shift button on keyboard and then select the different area which you want to select.

Step 3:
Finally, when you have selected the complete area which you want to make transparent then simply select the delete button. This is the way about GIMP set transparent background for one color background images.

Learn New Ways to Make Transparent Background
GIMP software is a free program for newbie users to expand their skills. With the help of GIMP software you can easily remove background from mostly any kind of images. If you like to go for pro software to make the video from the images you have created then you can try the Wondershare Filmora Video Editor which allows you to make the beautiful videos and edit them quickly.
For Win 7 or later (64-bit)
For macOS 10.12 or later
Wondershare Filmora program is video editor software which also offers you some of the photo editing options as well. It is compatible with the windows as well as the Mac operating system devices. The program comes with a very easy to use interface and allows you to edit the videos and design them from scratch. It comes with the premade templates in it so you can directly use them for your videos to make the process faster. You can do keyframing, speed ramping, splitting screen, motion tracking etc for editing your videos.
Filmora offers you an inbuilt screen recorder which is the best for recording the gaming videos. it also offers you the effects to apply on the videos, color correction, color matching and many more others features which can be used for making the best quality videos.

● Ending Thoughts →
● Well, this is all about making transparent background in the GIMP. GIMP is really a very helpful program that comes with most all features what you need to edit the images and change the background of your images.
● If you need to edit the videos as well or you want to make videos with the images edited using GIMP then you can simply use Wondershare Filmora which the best in the video editing Era.
Removing background of images and making them transparent is a really very tough task for the newbies. Sometimes you may need to learn lots of software to get the work done and most of the programs are paid over the internet. There are many reasons why you need to remove the background of images such as you don’t like the background and replace with the new one. Here, in this article we will share the information about the GIMP which is a free and open source programs and can help you to remove background from the images and make the transparent.
In this article
01 [What’s Gimp?](#Part 1)
02 [How to Create a Transparent Background in GIMP](#Part 2)
03 [How to Turn the Complex Image Background Transparent](#Part 3)
04 [How to Turn a One-Color Background Transparent](#Part 4)
Part 1 What’s Gimp?
GIMP is open source software which allows you to do image manipulations. The program is distributed over the internet for free of cost the beginners to learn the photography skills. GIMP software can be used for photo retouching, image authoring and image compositions. GIMP supports all features of photo editing even it can be used for GIMP remove background to transparent. You can also use it as a paint program, online batch processing system, image format converter and as an image renderer.
Part 2 How to Create a Transparent Background in GIMP
With the help of GIMP software you can easily remove background from image and make it transparent. Here, we are going to tell you that how you can remove background with the help of GIMP. Let’s learn it step by step.
Step 1:
Install and launch GIMP program on your system. Now click the “File > Open” or you can also use “File > Open as Layers” option.

Step 2:
Now, you have to use the Fuzzy tool. The Fuzzy tool is mainly designed to select the current layer area and the image on the basis of color. Using this tool you can easily select the background which you want to remove with just one click.

Step 3:
On your image, now you will see a channel dialog when you add a second layer on it. This layer will tell the transparency of the image you have added to remove background. So, click the “Layer > Transparency > Add Alpha Channel option.

Step 4:
On your keyboard now you need to hit the “Delete” button to remove background. You may need to repeat the steps 2 to 4 if the background is not completely removed else there is no problem. We have removed blue background here for example.

Step 5:
Finally, you can click the “File > Export As” and then select the PNG format and save it on your computer in the PNG format. This is the way about GIMP remove background to transparent.

Part 3 How to Turn the Complex Image Background Transparent
The above part was about removing the simple and easy background from the image. Here we will share about GIMP transparent background PNG when you have the complex background. For, GIMP create transparent background in the complex images you need to add a transparent layer on the image.
Step 1:
Open the image in GIMP and then right click on the layer of image. Now, click the “Add Alpha Chanel” option.

Step 2:
After making a layer for background now you have to select the foreground of the image which you want to keep using the select tool of GIMP. To start, first you need to make sure the in the settings you have selected “Draw foreground option” is selected.
After doing all adjustments of the settings you need to draw outline of the object and finally press the enter button on keyboard.

Step 3:
After doing all the settings you have to adjust the stroke width from settings panel of GIMP. Use your mouse now and start dragging and drawing the image just like you are painting with a brush. Once your drawing is finished and you leave your mouse the image will look like the below screenshot.

Step 4:
You can also fine tune your selection now with the help of draw background option in the GIMP. This will help you to adjust the rough outline you created previously. Once you are happy then simply press the enter button.

Step 5:
Still, if you want to refine your results more than you can refine your outlines by using the path nodes option. You can view the path nodes by following the below steps.
● Keep your mouse cursor at paths dialog.
● Now, hit selection.
● To view the path you can click the CTRL+Shift+A button.
● Now, select the paths tool.
● Finally click the “Path”.

Step 6:
Now, it’s a time to adjust the outlines according to the output of your foreground image. You can zoom the image and add or adjust the previous nodes. To adjust node you can click the CTRL button on keyboard and drag the node using your mouse. If you need to remove a node then you can use CTRL+Shift button and then click on the node.

Step 7:
Once the path is refined according to your need hit the “Selection from Path” option at the left side.

Step 8:
You will have to add the layer mask on the image now to which will reveal the transparency. Right click the Current layer > Add Layer Mask > Selection and finally click “Add” button.

Step 9:
Now, if you have followed all the previous steps perfectly then your background will be removed now and you can also add a new background to the image. This is way about GIMP delete background to transparent for the complex images.

Part 4 How to Turn a One-Color Background Transparent
While using the GIMP you can also run the one color images background in the transparent. This method helps you to make the transparent background in case if you have the single color in the background of your image. In this method you just need to select the background by the color and it will be removed in the seconds. For GIMP create transparent background image in the single color background image you can follow the below steps.
Steps to Follow:
● Open the image using “File > Open” in the GIMP program.
● Once image is opened you have to select the image layer at the right side corner of the screen. Now right click and select the Add Alpha Channel option.
● Now, you have to choose the select by color tool.

Step 2:
After selecting the color tool you can select the area of the background image which you need to make transparent by clicking on the image. You can also select it manually by clicking and dragging using your mouse pointer. To increase the selection press Shift button on keyboard and then select the different area which you want to select.

Step 3:
Finally, when you have selected the complete area which you want to make transparent then simply select the delete button. This is the way about GIMP set transparent background for one color background images.

Learn New Ways to Make Transparent Background
GIMP software is a free program for newbie users to expand their skills. With the help of GIMP software you can easily remove background from mostly any kind of images. If you like to go for pro software to make the video from the images you have created then you can try the Wondershare Filmora Video Editor which allows you to make the beautiful videos and edit them quickly.
For Win 7 or later (64-bit)
For macOS 10.12 or later
Wondershare Filmora program is video editor software which also offers you some of the photo editing options as well. It is compatible with the windows as well as the Mac operating system devices. The program comes with a very easy to use interface and allows you to edit the videos and design them from scratch. It comes with the premade templates in it so you can directly use them for your videos to make the process faster. You can do keyframing, speed ramping, splitting screen, motion tracking etc for editing your videos.
Filmora offers you an inbuilt screen recorder which is the best for recording the gaming videos. it also offers you the effects to apply on the videos, color correction, color matching and many more others features which can be used for making the best quality videos.

● Ending Thoughts →
● Well, this is all about making transparent background in the GIMP. GIMP is really a very helpful program that comes with most all features what you need to edit the images and change the background of your images.
● If you need to edit the videos as well or you want to make videos with the images edited using GIMP then you can simply use Wondershare Filmora which the best in the video editing Era.
Top 8 Memoji Makers to Make a Memoji on PC, Android & iPhone
You might have heard of emoji and might be wondering what memoji is! Well, memojis can be described as the next level emojis, wherein the emoji is designed and created from the user’s facial expressions.

The emoji avatars created from your facial expression are more fun to use and can deliver the expression you intended more accurately. Memoji happens to be the next trend after emojis, which is why people widely search for online memoji makers.
Memoji makers help their users to create customized emojis based on their facial expressions. Memojis are more fun to use on online social platforms, and hence we will be talking about the best memoji makers available to us. We will also discuss how to make a memoji easily using these memoji makers and the fun features, these memoji makers offer. Why not add some extra fun while interacting socially, right?
For Win 7 or later (64-bit)
For macOS 10.12 or later
In this article
01 Top 8 Memoji Makers to Make a Memoji
02 How to Use and send Memoji on Your Phone
Part 1: Top 8 Memoji Makers to Make a Memoji
Since using memoji is a way of adding extra fun and making any conversation more interesting, people search for good emoji makers in the online market. If you have a good memoji maker, making a memojis is just a matter of a few clicks on your phone. We have listed 8 of the best memoji makers apt for Android and iOS users below.
Top 8 Memoji Makers
1. Emoji-maker.com (PC/Online)
2. Labeley.com (PC/Online)
3. piZap
4. Avatoon (Android/iPhone)
5. Zmoji.me (Android/iPhone)
6. Bitmoji (Android/iPhone)
7. Mirror Emoji Maker (Android/iPhone)
8. MojiPop (Android/iPhone)
1. Emoji-maker.com (PC/Online)
moji-maker.comis one of the best memoji makers that can take out the boredom of using default emoji icons in your interactions. It will detect your face through the camera and then provide you with many template options matching your face. You can also edit it and customize it further
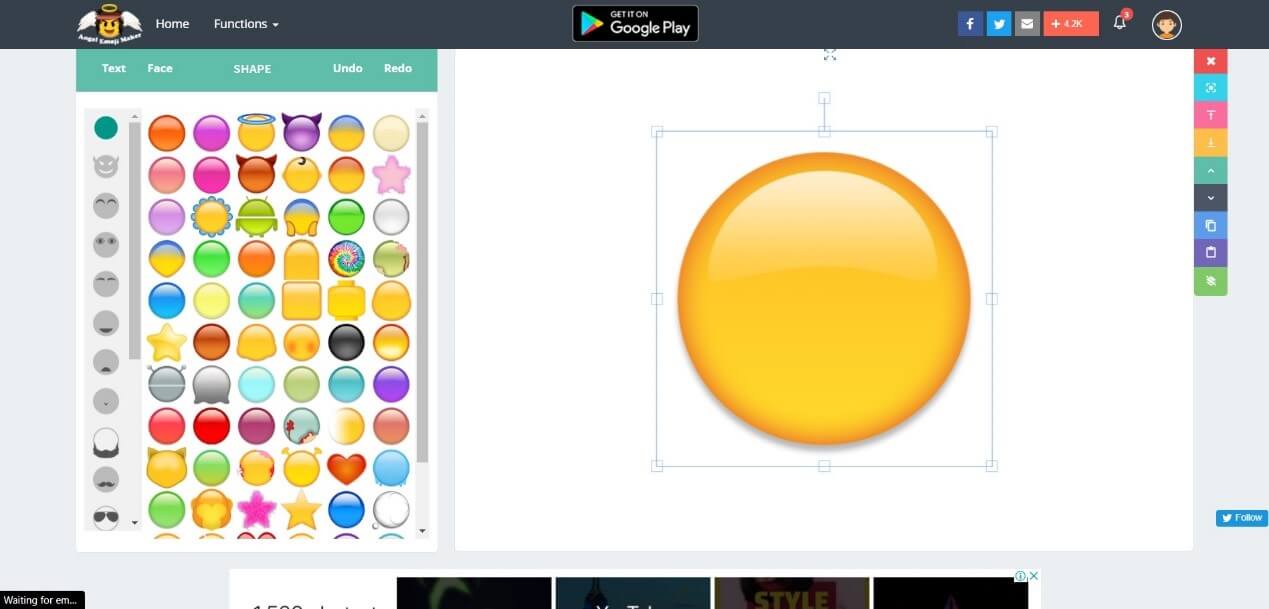
Features:
- Take a picture or choose one from storage.
- A lot of accessories to create the emoji face.
- Save the created emoji and easy sharing on Snapchat, Facebook, Twitter, etc.
2. Labeley.com (PC/Online)
Labeley.com is an online memoji maker that can create memojis very easily. The emojis can be customized according to the picture in your mind, and there is also a print option if you wish to keep physical copies of the memoji you created.

Features:
- A lot of shape options to customize your memoji.
- Options to add text and easy uploading.
- A wide range of accessories and background options to choose from.
- Create an account and options to save your designs.
3. piZap
piZap is an interesting memoji maker in which you can create funny emojis resembling yourself. It allows you to customize all the features of the emoji face to give a similar look to your face and add more fun while you interact with people.
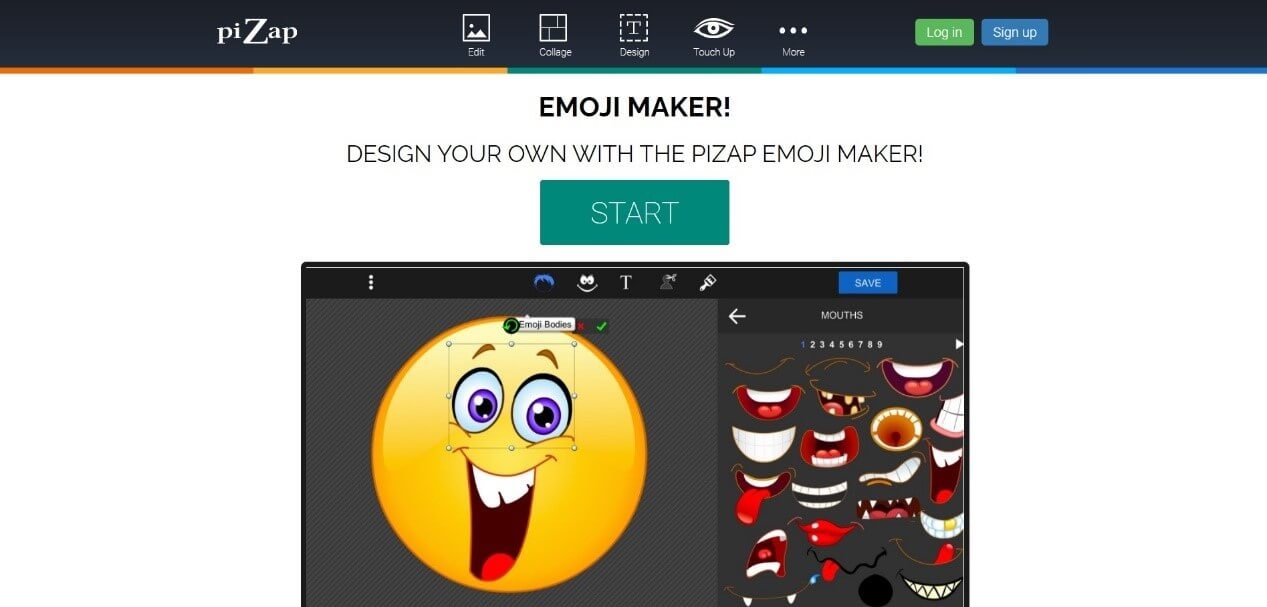
Features:
- A variety of design features to create a memoji.
- free to use after login, and saves the incomplete edits.
- add filters, texts, and masks to the memoji.
- Other editing options like creating collage etc.
4. Avatoon (Android/iPhone)
Avatoon is the best application you can use to spice up your social media interactions a bit. It has powerful editing tools that help you create great personal avatars. These avatars let you stand out among people who still use the default emoji icons and stickers.
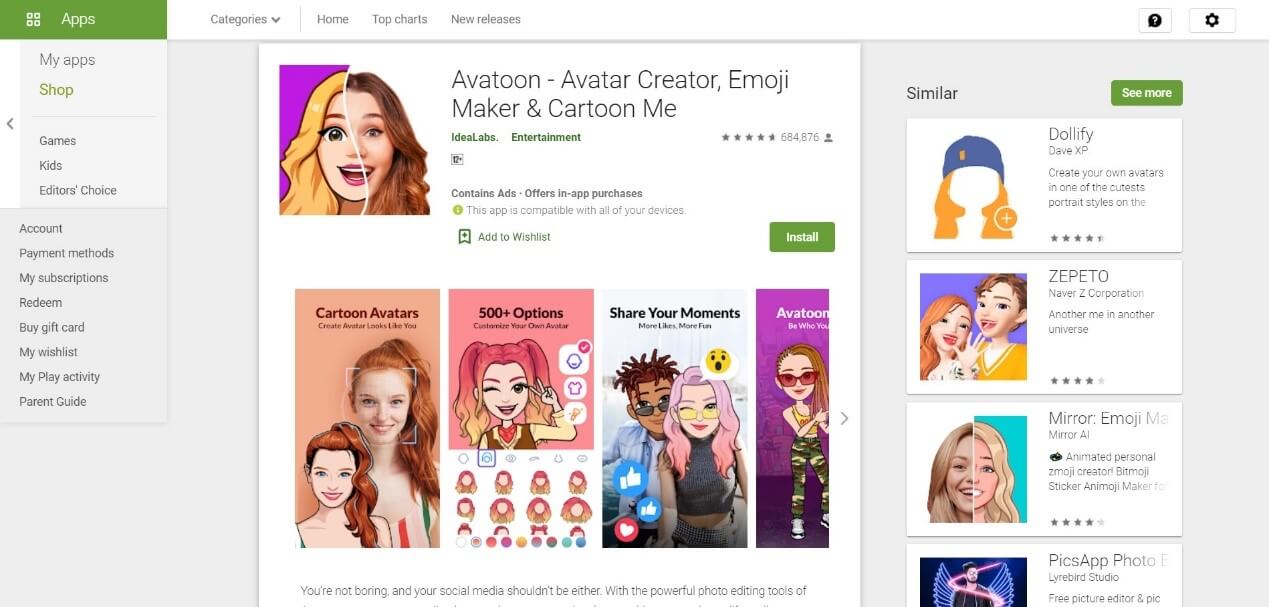
Features:
- Facial recognition feature that helps to grasp your appearance from your photo.
- A photo editor that can help you customize your memojis further.
- An avatar snapshots feature you add expressions and poses to your avatar.
5. Zmoji.me (Android/iPhone)
Zmoji.me helps you to create fun memojis to share on social media. You can create a unique single or group memojis with a few clicks. This online memoji maker also helps you add creative texts to your memojis for more attraction.

Features:
- Manual creation of facial recognition options.
- Numerous outfit and styles options.
- A variety of stickers for every moment you wish to remember.
- Quick sharing in conversations on any social media applications.
6. Bitmoji (Android/iPhone)
Bitmoji is the right application if you wish to more expressive while sending emojis. This online memoji maker helps you create attractive avatars that look like yourself and edit everything from your expressions to your clothes.

Features:
- Create funny and expressive cartoon model avatars.
- A huge library of stickers to choose from.
- Use it on social media platforms like Snapchat, Messenger, etc. easily.
7. Mirror Emoji Maker (Android/iPhone)
Mirror Emoji maker is a free memoji maker that allows you to create memojis and use these memojis on any social media through a personalized emoji keyboard. It is a great application, and its face recognition captures all the details to make the memoji very similar to the user.

Features:
- A decide wheel that helps you choose among the memojis.
- An inbuilt keyboard exclusively for memojis.
- Options to create animated gifs and stickers out of the personalized memojis.
8. MojiPop (Android/iPhone)
MojiPop is an online memoji maker that helps you create wonderful memojis that can add a bit of humor to your interactions. In just 2 clicks, you will be able to access a large number of animated stickers and caricatures of your face, suited for any situation.

Features:
- Easy and fast access to stickers.
- Animated stickers personalized to your looks and appearance.
- Stickers that are updated every day with new ones.
- A favorites options to group your favorite stickers.
Part 2: How to Use and send Memoji on Your Phone
Memoji is the latest trend in online communication across different platforms. It has made chats and social interactions more interesting and funny. With memoji people tend to be more engaging and the memojis help to convey the expressions in a better way.

Let’s see how to make a memoji of your own, using the memoji application:
Step 1: open the Memoji application on your device. Choose a picture or capture one using the camera.
Step 2: Select the template you like and edit it.
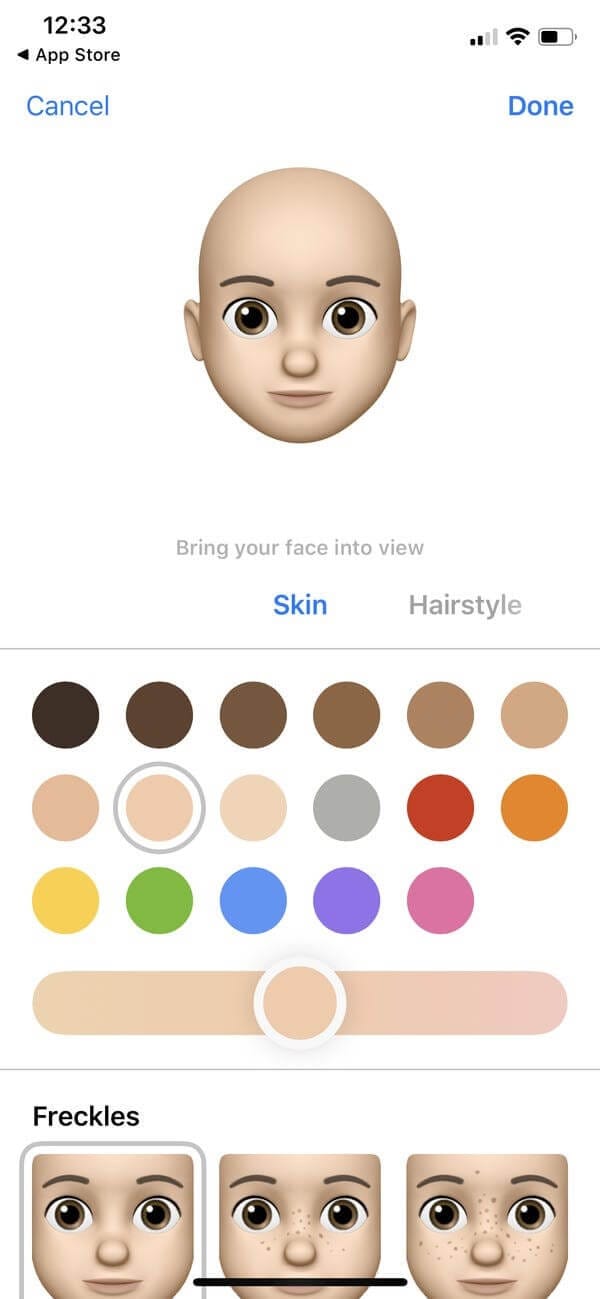
Step 3: Create a face you want with the accessories provided in the app.
Step 4: Save the memoji you created and share it on any social media platform like Snapchat, Facebook, Twitter, etc.
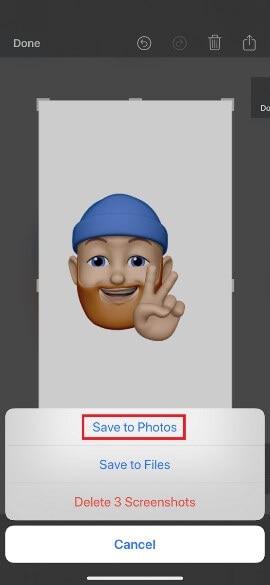
Step 5: Review the memoji you made from the emoji collection. Tap on + to create more memojis.
Bonus tip: Create an Animation Video with Anireel
Anireel is an animated video editing software with rich, fun elements, and scenes to help animated video creators easily create, edit and finish an impressive video. Anireel features a great variety of drag and drop characters, actions, props, text, and audio assets. Users will be able to modify the size and color of the assets. The software also supports imported pictures, videos, and audio assets, covering almost all formats.

Conclusion
In this era, emojis are widely used while interacting on online social media as it conveys our intent perfectly and is fun. Memoji takes this fun to a higher level, which is why people are searching for good online memoji makers.
The use of memojis makes the conversations more interesting and fun and encourages others to get involved in the conversations. Good memoji makers help you customize your emojis however you wish and based on any occasion. We have listed the top memoji makers available on various devices for your convenience. Download any of these apps, create personalized emojis, and have fun on social platforms!
Wondershare Filmora
Get started easily with Filmora’s powerful performance, intuitive interface, and countless effects!
Try It Free Try It Free Try It Free Learn More >

For Win 7 or later (64-bit)
For macOS 10.12 or later
In this article
01 Top 8 Memoji Makers to Make a Memoji
02 How to Use and send Memoji on Your Phone
Part 1: Top 8 Memoji Makers to Make a Memoji
Since using memoji is a way of adding extra fun and making any conversation more interesting, people search for good emoji makers in the online market. If you have a good memoji maker, making a memojis is just a matter of a few clicks on your phone. We have listed 8 of the best memoji makers apt for Android and iOS users below.
Top 8 Memoji Makers
1. Emoji-maker.com (PC/Online)
2. Labeley.com (PC/Online)
3. piZap
4. Avatoon (Android/iPhone)
5. Zmoji.me (Android/iPhone)
6. Bitmoji (Android/iPhone)
7. Mirror Emoji Maker (Android/iPhone)
8. MojiPop (Android/iPhone)
1. Emoji-maker.com (PC/Online)
moji-maker.comis one of the best memoji makers that can take out the boredom of using default emoji icons in your interactions. It will detect your face through the camera and then provide you with many template options matching your face. You can also edit it and customize it further

Features:
- Take a picture or choose one from storage.
- A lot of accessories to create the emoji face.
- Save the created emoji and easy sharing on Snapchat, Facebook, Twitter, etc.
2. Labeley.com (PC/Online)
Labeley.com is an online memoji maker that can create memojis very easily. The emojis can be customized according to the picture in your mind, and there is also a print option if you wish to keep physical copies of the memoji you created.

Features:
- A lot of shape options to customize your memoji.
- Options to add text and easy uploading.
- A wide range of accessories and background options to choose from.
- Create an account and options to save your designs.
3. piZap
piZap is an interesting memoji maker in which you can create funny emojis resembling yourself. It allows you to customize all the features of the emoji face to give a similar look to your face and add more fun while you interact with people.

Features:
- A variety of design features to create a memoji.
- free to use after login, and saves the incomplete edits.
- add filters, texts, and masks to the memoji.
- Other editing options like creating collage etc.
4. Avatoon (Android/iPhone)
Avatoon is the best application you can use to spice up your social media interactions a bit. It has powerful editing tools that help you create great personal avatars. These avatars let you stand out among people who still use the default emoji icons and stickers.

Features:
- Facial recognition feature that helps to grasp your appearance from your photo.
- A photo editor that can help you customize your memojis further.
- An avatar snapshots feature you add expressions and poses to your avatar.
5. Zmoji.me (Android/iPhone)
Zmoji.me helps you to create fun memojis to share on social media. You can create a unique single or group memojis with a few clicks. This online memoji maker also helps you add creative texts to your memojis for more attraction.

Features:
- Manual creation of facial recognition options.
- Numerous outfit and styles options.
- A variety of stickers for every moment you wish to remember.
- Quick sharing in conversations on any social media applications.
6. Bitmoji (Android/iPhone)
Bitmoji is the right application if you wish to more expressive while sending emojis. This online memoji maker helps you create attractive avatars that look like yourself and edit everything from your expressions to your clothes.

Features:
- Create funny and expressive cartoon model avatars.
- A huge library of stickers to choose from.
- Use it on social media platforms like Snapchat, Messenger, etc. easily.
7. Mirror Emoji Maker (Android/iPhone)
Mirror Emoji maker is a free memoji maker that allows you to create memojis and use these memojis on any social media through a personalized emoji keyboard. It is a great application, and its face recognition captures all the details to make the memoji very similar to the user.

Features:
- A decide wheel that helps you choose among the memojis.
- An inbuilt keyboard exclusively for memojis.
- Options to create animated gifs and stickers out of the personalized memojis.
8. MojiPop (Android/iPhone)
MojiPop is an online memoji maker that helps you create wonderful memojis that can add a bit of humor to your interactions. In just 2 clicks, you will be able to access a large number of animated stickers and caricatures of your face, suited for any situation.

Features:
- Easy and fast access to stickers.
- Animated stickers personalized to your looks and appearance.
- Stickers that are updated every day with new ones.
- A favorites options to group your favorite stickers.
Part 2: How to Use and send Memoji on Your Phone
Memoji is the latest trend in online communication across different platforms. It has made chats and social interactions more interesting and funny. With memoji people tend to be more engaging and the memojis help to convey the expressions in a better way.

Let’s see how to make a memoji of your own, using the memoji application:
Step 1: open the Memoji application on your device. Choose a picture or capture one using the camera.
Step 2: Select the template you like and edit it.

Step 3: Create a face you want with the accessories provided in the app.
Step 4: Save the memoji you created and share it on any social media platform like Snapchat, Facebook, Twitter, etc.

Step 5: Review the memoji you made from the emoji collection. Tap on + to create more memojis.
Bonus tip: Create an Animation Video with Anireel
Anireel is an animated video editing software with rich, fun elements, and scenes to help animated video creators easily create, edit and finish an impressive video. Anireel features a great variety of drag and drop characters, actions, props, text, and audio assets. Users will be able to modify the size and color of the assets. The software also supports imported pictures, videos, and audio assets, covering almost all formats.

Conclusion
In this era, emojis are widely used while interacting on online social media as it conveys our intent perfectly and is fun. Memoji takes this fun to a higher level, which is why people are searching for good online memoji makers.
The use of memojis makes the conversations more interesting and fun and encourages others to get involved in the conversations. Good memoji makers help you customize your emojis however you wish and based on any occasion. We have listed the top memoji makers available on various devices for your convenience. Download any of these apps, create personalized emojis, and have fun on social platforms!
Wondershare Filmora
Get started easily with Filmora’s powerful performance, intuitive interface, and countless effects!
Try It Free Try It Free Try It Free Learn More >

For Win 7 or later (64-bit)
For macOS 10.12 or later
In this article
01 Top 8 Memoji Makers to Make a Memoji
02 How to Use and send Memoji on Your Phone
Part 1: Top 8 Memoji Makers to Make a Memoji
Since using memoji is a way of adding extra fun and making any conversation more interesting, people search for good emoji makers in the online market. If you have a good memoji maker, making a memojis is just a matter of a few clicks on your phone. We have listed 8 of the best memoji makers apt for Android and iOS users below.
Top 8 Memoji Makers
1. Emoji-maker.com (PC/Online)
2. Labeley.com (PC/Online)
3. piZap
4. Avatoon (Android/iPhone)
5. Zmoji.me (Android/iPhone)
6. Bitmoji (Android/iPhone)
7. Mirror Emoji Maker (Android/iPhone)
8. MojiPop (Android/iPhone)
1. Emoji-maker.com (PC/Online)
moji-maker.comis one of the best memoji makers that can take out the boredom of using default emoji icons in your interactions. It will detect your face through the camera and then provide you with many template options matching your face. You can also edit it and customize it further

Features:
- Take a picture or choose one from storage.
- A lot of accessories to create the emoji face.
- Save the created emoji and easy sharing on Snapchat, Facebook, Twitter, etc.
2. Labeley.com (PC/Online)
Labeley.com is an online memoji maker that can create memojis very easily. The emojis can be customized according to the picture in your mind, and there is also a print option if you wish to keep physical copies of the memoji you created.

Features:
- A lot of shape options to customize your memoji.
- Options to add text and easy uploading.
- A wide range of accessories and background options to choose from.
- Create an account and options to save your designs.
3. piZap
piZap is an interesting memoji maker in which you can create funny emojis resembling yourself. It allows you to customize all the features of the emoji face to give a similar look to your face and add more fun while you interact with people.

Features:
- A variety of design features to create a memoji.
- free to use after login, and saves the incomplete edits.
- add filters, texts, and masks to the memoji.
- Other editing options like creating collage etc.
4. Avatoon (Android/iPhone)
Avatoon is the best application you can use to spice up your social media interactions a bit. It has powerful editing tools that help you create great personal avatars. These avatars let you stand out among people who still use the default emoji icons and stickers.

Features:
- Facial recognition feature that helps to grasp your appearance from your photo.
- A photo editor that can help you customize your memojis further.
- An avatar snapshots feature you add expressions and poses to your avatar.
5. Zmoji.me (Android/iPhone)
Zmoji.me helps you to create fun memojis to share on social media. You can create a unique single or group memojis with a few clicks. This online memoji maker also helps you add creative texts to your memojis for more attraction.

Features:
- Manual creation of facial recognition options.
- Numerous outfit and styles options.
- A variety of stickers for every moment you wish to remember.
- Quick sharing in conversations on any social media applications.
6. Bitmoji (Android/iPhone)
Bitmoji is the right application if you wish to more expressive while sending emojis. This online memoji maker helps you create attractive avatars that look like yourself and edit everything from your expressions to your clothes.

Features:
- Create funny and expressive cartoon model avatars.
- A huge library of stickers to choose from.
- Use it on social media platforms like Snapchat, Messenger, etc. easily.
7. Mirror Emoji Maker (Android/iPhone)
Mirror Emoji maker is a free memoji maker that allows you to create memojis and use these memojis on any social media through a personalized emoji keyboard. It is a great application, and its face recognition captures all the details to make the memoji very similar to the user.

Features:
- A decide wheel that helps you choose among the memojis.
- An inbuilt keyboard exclusively for memojis.
- Options to create animated gifs and stickers out of the personalized memojis.
8. MojiPop (Android/iPhone)
MojiPop is an online memoji maker that helps you create wonderful memojis that can add a bit of humor to your interactions. In just 2 clicks, you will be able to access a large number of animated stickers and caricatures of your face, suited for any situation.

Features:
- Easy and fast access to stickers.
- Animated stickers personalized to your looks and appearance.
- Stickers that are updated every day with new ones.
- A favorites options to group your favorite stickers.
Part 2: How to Use and send Memoji on Your Phone
Memoji is the latest trend in online communication across different platforms. It has made chats and social interactions more interesting and funny. With memoji people tend to be more engaging and the memojis help to convey the expressions in a better way.

Let’s see how to make a memoji of your own, using the memoji application:
Step 1: open the Memoji application on your device. Choose a picture or capture one using the camera.
Step 2: Select the template you like and edit it.

Step 3: Create a face you want with the accessories provided in the app.
Step 4: Save the memoji you created and share it on any social media platform like Snapchat, Facebook, Twitter, etc.

Step 5: Review the memoji you made from the emoji collection. Tap on + to create more memojis.
Bonus tip: Create an Animation Video with Anireel
Anireel is an animated video editing software with rich, fun elements, and scenes to help animated video creators easily create, edit and finish an impressive video. Anireel features a great variety of drag and drop characters, actions, props, text, and audio assets. Users will be able to modify the size and color of the assets. The software also supports imported pictures, videos, and audio assets, covering almost all formats.

Conclusion
In this era, emojis are widely used while interacting on online social media as it conveys our intent perfectly and is fun. Memoji takes this fun to a higher level, which is why people are searching for good online memoji makers.
The use of memojis makes the conversations more interesting and fun and encourages others to get involved in the conversations. Good memoji makers help you customize your emojis however you wish and based on any occasion. We have listed the top memoji makers available on various devices for your convenience. Download any of these apps, create personalized emojis, and have fun on social platforms!
Wondershare Filmora
Get started easily with Filmora’s powerful performance, intuitive interface, and countless effects!
Try It Free Try It Free Try It Free Learn More >

For Win 7 or later (64-bit)
For macOS 10.12 or later
In this article
01 Top 8 Memoji Makers to Make a Memoji
02 How to Use and send Memoji on Your Phone
Part 1: Top 8 Memoji Makers to Make a Memoji
Since using memoji is a way of adding extra fun and making any conversation more interesting, people search for good emoji makers in the online market. If you have a good memoji maker, making a memojis is just a matter of a few clicks on your phone. We have listed 8 of the best memoji makers apt for Android and iOS users below.
Top 8 Memoji Makers
1. Emoji-maker.com (PC/Online)
2. Labeley.com (PC/Online)
3. piZap
4. Avatoon (Android/iPhone)
5. Zmoji.me (Android/iPhone)
6. Bitmoji (Android/iPhone)
7. Mirror Emoji Maker (Android/iPhone)
8. MojiPop (Android/iPhone)
1. Emoji-maker.com (PC/Online)
moji-maker.comis one of the best memoji makers that can take out the boredom of using default emoji icons in your interactions. It will detect your face through the camera and then provide you with many template options matching your face. You can also edit it and customize it further

Features:
- Take a picture or choose one from storage.
- A lot of accessories to create the emoji face.
- Save the created emoji and easy sharing on Snapchat, Facebook, Twitter, etc.
2. Labeley.com (PC/Online)
Labeley.com is an online memoji maker that can create memojis very easily. The emojis can be customized according to the picture in your mind, and there is also a print option if you wish to keep physical copies of the memoji you created.

Features:
- A lot of shape options to customize your memoji.
- Options to add text and easy uploading.
- A wide range of accessories and background options to choose from.
- Create an account and options to save your designs.
3. piZap
piZap is an interesting memoji maker in which you can create funny emojis resembling yourself. It allows you to customize all the features of the emoji face to give a similar look to your face and add more fun while you interact with people.

Features:
- A variety of design features to create a memoji.
- free to use after login, and saves the incomplete edits.
- add filters, texts, and masks to the memoji.
- Other editing options like creating collage etc.
4. Avatoon (Android/iPhone)
Avatoon is the best application you can use to spice up your social media interactions a bit. It has powerful editing tools that help you create great personal avatars. These avatars let you stand out among people who still use the default emoji icons and stickers.

Features:
- Facial recognition feature that helps to grasp your appearance from your photo.
- A photo editor that can help you customize your memojis further.
- An avatar snapshots feature you add expressions and poses to your avatar.
5. Zmoji.me (Android/iPhone)
Zmoji.me helps you to create fun memojis to share on social media. You can create a unique single or group memojis with a few clicks. This online memoji maker also helps you add creative texts to your memojis for more attraction.

Features:
- Manual creation of facial recognition options.
- Numerous outfit and styles options.
- A variety of stickers for every moment you wish to remember.
- Quick sharing in conversations on any social media applications.
6. Bitmoji (Android/iPhone)
Bitmoji is the right application if you wish to more expressive while sending emojis. This online memoji maker helps you create attractive avatars that look like yourself and edit everything from your expressions to your clothes.

Features:
- Create funny and expressive cartoon model avatars.
- A huge library of stickers to choose from.
- Use it on social media platforms like Snapchat, Messenger, etc. easily.
7. Mirror Emoji Maker (Android/iPhone)
Mirror Emoji maker is a free memoji maker that allows you to create memojis and use these memojis on any social media through a personalized emoji keyboard. It is a great application, and its face recognition captures all the details to make the memoji very similar to the user.

Features:
- A decide wheel that helps you choose among the memojis.
- An inbuilt keyboard exclusively for memojis.
- Options to create animated gifs and stickers out of the personalized memojis.
8. MojiPop (Android/iPhone)
MojiPop is an online memoji maker that helps you create wonderful memojis that can add a bit of humor to your interactions. In just 2 clicks, you will be able to access a large number of animated stickers and caricatures of your face, suited for any situation.

Features:
- Easy and fast access to stickers.
- Animated stickers personalized to your looks and appearance.
- Stickers that are updated every day with new ones.
- A favorites options to group your favorite stickers.
Part 2: How to Use and send Memoji on Your Phone
Memoji is the latest trend in online communication across different platforms. It has made chats and social interactions more interesting and funny. With memoji people tend to be more engaging and the memojis help to convey the expressions in a better way.

Let’s see how to make a memoji of your own, using the memoji application:
Step 1: open the Memoji application on your device. Choose a picture or capture one using the camera.
Step 2: Select the template you like and edit it.

Step 3: Create a face you want with the accessories provided in the app.
Step 4: Save the memoji you created and share it on any social media platform like Snapchat, Facebook, Twitter, etc.

Step 5: Review the memoji you made from the emoji collection. Tap on + to create more memojis.
Bonus tip: Create an Animation Video with Anireel
Anireel is an animated video editing software with rich, fun elements, and scenes to help animated video creators easily create, edit and finish an impressive video. Anireel features a great variety of drag and drop characters, actions, props, text, and audio assets. Users will be able to modify the size and color of the assets. The software also supports imported pictures, videos, and audio assets, covering almost all formats.

Conclusion
In this era, emojis are widely used while interacting on online social media as it conveys our intent perfectly and is fun. Memoji takes this fun to a higher level, which is why people are searching for good online memoji makers.
The use of memojis makes the conversations more interesting and fun and encourages others to get involved in the conversations. Good memoji makers help you customize your emojis however you wish and based on any occasion. We have listed the top memoji makers available on various devices for your convenience. Download any of these apps, create personalized emojis, and have fun on social platforms!
Wondershare Filmora
Get started easily with Filmora’s powerful performance, intuitive interface, and countless effects!
Try It Free Try It Free Try It Free Learn More >

2 Solutions to Crop a Video Using After Effects
Cropping a video is part of the process of video edting. Not all video editing software can be obtained freely. There are some that you need to spend to get the professional output that you aim for. After Effects,a member of the Adobe tools that exist can enhance your videos to another level. This article can help you know how to crop video in After Effects and on the alternative by using Wondershare Filmora. I know that it may seem confusing to compare these two at first. But, I’ll provide an explanation to get the cropped video that you want.
Method 1: Cropping a Video using After Effects
After Effects is a professional motion graphics tool that can create outputs that are beyond the limits of reality. Like the other Adobe tools, this comes with a subscription fee to be able to maximize this product. But, is the price worth the risk? The “ Adobe” brand is known for its quality applications and customer’s satisfaction.
Let’s start with using this tool. The situation is that you want to crop your video using Adobe After Effects but you don’t know how to start. Search for the application on your computer. Launch it, then click the New Project. If you have files from your storage then select the New Composition Footage.

Check if the video is already in the interface. Find the Magnifying tab and zoom out the video into 50%. After that, click the Grid icon and Proportional Grid.

Click the Square icon, it is located beside the Pencil icon at the top section. The shape’s purpose is to crop the video section that you want to remain. If you’re done cutting then you should unclick the Proportional grid, and the video’s magnification should be 100%. Afterwards, you can check the pixel aspect ratio correction in the After Effects. You need to go through the video before saving your project. This is to avoid unnecessary errors that will make the process troublesome.

Already satisfied with the cropped video? Then, select File, Export and finally Add to Render Queue. Check on the Render Settings (located bottom of the interface) to ensure high quality output. Following that, hit the Output To part and decide the destination and folder where you want it to be.

Watch your cropped video and go ahead and repeat this with your other videos. After practicing this process many times, this will come to you as easy. If you get lost while following the instructions go back to this guide until it becomes a part of your memory.
Congratulations on making your first cropped video using After Effects! What was your experience while following through the guide? I hope that the information presented here is easy to understand and implement.
Even though it is not a free application, I hope you have experienced the advantages of using this compared to other tools. Did it come as a surprise for you that you can crop a video not just in Adobe Premiere but also in After Effects as well?
I hope that fear will not hinder you from trying this tool to crop your videos.
Method 2: Cropping a Video using Wondershare Filmora
If you didn’t know there is also an awesome video editing software called Wondershare Filmora Video Editor .
You can try it by searching the internet and downloading it on your computer. If simplicity is your priority then this may suit you perfectly. If you’re still hesitant then read the reviews and watch how others are using it.
There is no need to worry if you have a tight budget as downloading this would be free. You just need to go to the official site. Do not be scared of trying with something unfamiliar. I will guide you with using it and utilizing it to get the result that you dream of.
Wondershare Filmora just like the others that exist are video editors that will turn your raw videos into the vision that you like. Thanks to these applications, the gruesome process of manually cutting it by hand and permanently altering the footage are gone. You can make how many changes that you want without damaging the original video.
For Win 7 or later (64-bit)
For macOS 10.14 or later
Are you done installing the application? If you have any encountered issues with installing it, you can contact customer support.
Not only does it have a straightforward and simple interface but it is also packed with useful tools that can turn your video into another level. But, you should not be overwhelmed by the number of icons and features that exist. Take a deep breath and proceed to opening it in your computer.

Preparation is a must especially if you have multiple videos on your computer. A good tip would be renaming them by the sequence you plan to have. And, you could also place them in folders to avoid repetition and double copies. Once you’re done, you can drag and drop your video or
click the Import.

Go ahead and select the video clip that you want to crop. Then, click the Crop tool and choose if you want the Crop or Pan & Zoom. Yes, you have options on what kind of crop you want it to be.

An alternative way is by right clicking the video clip .Under the Video tab you can select the Crop and Zoom or Crop to Fit then adjust to your preferred ratio.

You can review the cropped video to think through if this is the portion that you want to be included. Unlike other applications, you can go back and adjust it to your liking.
If you’re finally satisfied then you can export it. Choose the output format and you can also rename the file. Clicking the settings button will offer you additional options of your video output.
After all that, you have the cropped video that you can either upload or repurpose in another content. Did you enjoy the process of cropping it in Wondershare Filmora?
Remember, that you have the option to batch crop multiple video clips on this so no need to manually crop and export it. You can see the big picture and monitor if the flow makes sense to you.
Don’t you think that the subscription is worth it? There is a trial that you could check out to test its capabilities and awesomeness.
The Bottom Line
You are once again done with the process of checking out these two applications. After Effects and Wondershare Filmora have a different process when it comes to cropping videos. I hope that you had a clearer understanding on which of these two would suit your video editing needs. The interface also could change your mind depending if you want simplicity or a challenge. Price is also a factor that can affect your willingness to use these applications. But, this guide clearly shows you that it is worth paying for.
What are your thoughts on both of these tools? Did you find this information to be helpful?
Check if the video is already in the interface. Find the Magnifying tab and zoom out the video into 50%. After that, click the Grid icon and Proportional Grid.

Click the Square icon, it is located beside the Pencil icon at the top section. The shape’s purpose is to crop the video section that you want to remain. If you’re done cutting then you should unclick the Proportional grid, and the video’s magnification should be 100%. Afterwards, you can check the pixel aspect ratio correction in the After Effects. You need to go through the video before saving your project. This is to avoid unnecessary errors that will make the process troublesome.

Already satisfied with the cropped video? Then, select File, Export and finally Add to Render Queue. Check on the Render Settings (located bottom of the interface) to ensure high quality output. Following that, hit the Output To part and decide the destination and folder where you want it to be.

Watch your cropped video and go ahead and repeat this with your other videos. After practicing this process many times, this will come to you as easy. If you get lost while following the instructions go back to this guide until it becomes a part of your memory.
Congratulations on making your first cropped video using After Effects! What was your experience while following through the guide? I hope that the information presented here is easy to understand and implement.
Even though it is not a free application, I hope you have experienced the advantages of using this compared to other tools. Did it come as a surprise for you that you can crop a video not just in Adobe Premiere but also in After Effects as well?
I hope that fear will not hinder you from trying this tool to crop your videos.
Method 2: Cropping a Video using Wondershare Filmora
If you didn’t know there is also an awesome video editing software called Wondershare Filmora Video Editor .
You can try it by searching the internet and downloading it on your computer. If simplicity is your priority then this may suit you perfectly. If you’re still hesitant then read the reviews and watch how others are using it.
There is no need to worry if you have a tight budget as downloading this would be free. You just need to go to the official site. Do not be scared of trying with something unfamiliar. I will guide you with using it and utilizing it to get the result that you dream of.
Wondershare Filmora just like the others that exist are video editors that will turn your raw videos into the vision that you like. Thanks to these applications, the gruesome process of manually cutting it by hand and permanently altering the footage are gone. You can make how many changes that you want without damaging the original video.
For Win 7 or later (64-bit)
For macOS 10.14 or later
Are you done installing the application? If you have any encountered issues with installing it, you can contact customer support.
Not only does it have a straightforward and simple interface but it is also packed with useful tools that can turn your video into another level. But, you should not be overwhelmed by the number of icons and features that exist. Take a deep breath and proceed to opening it in your computer.

Preparation is a must especially if you have multiple videos on your computer. A good tip would be renaming them by the sequence you plan to have. And, you could also place them in folders to avoid repetition and double copies. Once you’re done, you can drag and drop your video or
click the Import.

Go ahead and select the video clip that you want to crop. Then, click the Crop tool and choose if you want the Crop or Pan & Zoom. Yes, you have options on what kind of crop you want it to be.

An alternative way is by right clicking the video clip .Under the Video tab you can select the Crop and Zoom or Crop to Fit then adjust to your preferred ratio.

You can review the cropped video to think through if this is the portion that you want to be included. Unlike other applications, you can go back and adjust it to your liking.
If you’re finally satisfied then you can export it. Choose the output format and you can also rename the file. Clicking the settings button will offer you additional options of your video output.
After all that, you have the cropped video that you can either upload or repurpose in another content. Did you enjoy the process of cropping it in Wondershare Filmora?
Remember, that you have the option to batch crop multiple video clips on this so no need to manually crop and export it. You can see the big picture and monitor if the flow makes sense to you.
Don’t you think that the subscription is worth it? There is a trial that you could check out to test its capabilities and awesomeness.
The Bottom Line
You are once again done with the process of checking out these two applications. After Effects and Wondershare Filmora have a different process when it comes to cropping videos. I hope that you had a clearer understanding on which of these two would suit your video editing needs. The interface also could change your mind depending if you want simplicity or a challenge. Price is also a factor that can affect your willingness to use these applications. But, this guide clearly shows you that it is worth paying for.
What are your thoughts on both of these tools? Did you find this information to be helpful?
Check if the video is already in the interface. Find the Magnifying tab and zoom out the video into 50%. After that, click the Grid icon and Proportional Grid.

Click the Square icon, it is located beside the Pencil icon at the top section. The shape’s purpose is to crop the video section that you want to remain. If you’re done cutting then you should unclick the Proportional grid, and the video’s magnification should be 100%. Afterwards, you can check the pixel aspect ratio correction in the After Effects. You need to go through the video before saving your project. This is to avoid unnecessary errors that will make the process troublesome.

Already satisfied with the cropped video? Then, select File, Export and finally Add to Render Queue. Check on the Render Settings (located bottom of the interface) to ensure high quality output. Following that, hit the Output To part and decide the destination and folder where you want it to be.

Watch your cropped video and go ahead and repeat this with your other videos. After practicing this process many times, this will come to you as easy. If you get lost while following the instructions go back to this guide until it becomes a part of your memory.
Congratulations on making your first cropped video using After Effects! What was your experience while following through the guide? I hope that the information presented here is easy to understand and implement.
Even though it is not a free application, I hope you have experienced the advantages of using this compared to other tools. Did it come as a surprise for you that you can crop a video not just in Adobe Premiere but also in After Effects as well?
I hope that fear will not hinder you from trying this tool to crop your videos.
Method 2: Cropping a Video using Wondershare Filmora
If you didn’t know there is also an awesome video editing software called Wondershare Filmora Video Editor .
You can try it by searching the internet and downloading it on your computer. If simplicity is your priority then this may suit you perfectly. If you’re still hesitant then read the reviews and watch how others are using it.
There is no need to worry if you have a tight budget as downloading this would be free. You just need to go to the official site. Do not be scared of trying with something unfamiliar. I will guide you with using it and utilizing it to get the result that you dream of.
Wondershare Filmora just like the others that exist are video editors that will turn your raw videos into the vision that you like. Thanks to these applications, the gruesome process of manually cutting it by hand and permanently altering the footage are gone. You can make how many changes that you want without damaging the original video.
For Win 7 or later (64-bit)
For macOS 10.14 or later
Are you done installing the application? If you have any encountered issues with installing it, you can contact customer support.
Not only does it have a straightforward and simple interface but it is also packed with useful tools that can turn your video into another level. But, you should not be overwhelmed by the number of icons and features that exist. Take a deep breath and proceed to opening it in your computer.

Preparation is a must especially if you have multiple videos on your computer. A good tip would be renaming them by the sequence you plan to have. And, you could also place them in folders to avoid repetition and double copies. Once you’re done, you can drag and drop your video or
click the Import.

Go ahead and select the video clip that you want to crop. Then, click the Crop tool and choose if you want the Crop or Pan & Zoom. Yes, you have options on what kind of crop you want it to be.

An alternative way is by right clicking the video clip .Under the Video tab you can select the Crop and Zoom or Crop to Fit then adjust to your preferred ratio.

You can review the cropped video to think through if this is the portion that you want to be included. Unlike other applications, you can go back and adjust it to your liking.
If you’re finally satisfied then you can export it. Choose the output format and you can also rename the file. Clicking the settings button will offer you additional options of your video output.
After all that, you have the cropped video that you can either upload or repurpose in another content. Did you enjoy the process of cropping it in Wondershare Filmora?
Remember, that you have the option to batch crop multiple video clips on this so no need to manually crop and export it. You can see the big picture and monitor if the flow makes sense to you.
Don’t you think that the subscription is worth it? There is a trial that you could check out to test its capabilities and awesomeness.
The Bottom Line
You are once again done with the process of checking out these two applications. After Effects and Wondershare Filmora have a different process when it comes to cropping videos. I hope that you had a clearer understanding on which of these two would suit your video editing needs. The interface also could change your mind depending if you want simplicity or a challenge. Price is also a factor that can affect your willingness to use these applications. But, this guide clearly shows you that it is worth paying for.
What are your thoughts on both of these tools? Did you find this information to be helpful?
Check if the video is already in the interface. Find the Magnifying tab and zoom out the video into 50%. After that, click the Grid icon and Proportional Grid.

Click the Square icon, it is located beside the Pencil icon at the top section. The shape’s purpose is to crop the video section that you want to remain. If you’re done cutting then you should unclick the Proportional grid, and the video’s magnification should be 100%. Afterwards, you can check the pixel aspect ratio correction in the After Effects. You need to go through the video before saving your project. This is to avoid unnecessary errors that will make the process troublesome.

Already satisfied with the cropped video? Then, select File, Export and finally Add to Render Queue. Check on the Render Settings (located bottom of the interface) to ensure high quality output. Following that, hit the Output To part and decide the destination and folder where you want it to be.

Watch your cropped video and go ahead and repeat this with your other videos. After practicing this process many times, this will come to you as easy. If you get lost while following the instructions go back to this guide until it becomes a part of your memory.
Congratulations on making your first cropped video using After Effects! What was your experience while following through the guide? I hope that the information presented here is easy to understand and implement.
Even though it is not a free application, I hope you have experienced the advantages of using this compared to other tools. Did it come as a surprise for you that you can crop a video not just in Adobe Premiere but also in After Effects as well?
I hope that fear will not hinder you from trying this tool to crop your videos.
Method 2: Cropping a Video using Wondershare Filmora
If you didn’t know there is also an awesome video editing software called Wondershare Filmora Video Editor .
You can try it by searching the internet and downloading it on your computer. If simplicity is your priority then this may suit you perfectly. If you’re still hesitant then read the reviews and watch how others are using it.
There is no need to worry if you have a tight budget as downloading this would be free. You just need to go to the official site. Do not be scared of trying with something unfamiliar. I will guide you with using it and utilizing it to get the result that you dream of.
Wondershare Filmora just like the others that exist are video editors that will turn your raw videos into the vision that you like. Thanks to these applications, the gruesome process of manually cutting it by hand and permanently altering the footage are gone. You can make how many changes that you want without damaging the original video.
For Win 7 or later (64-bit)
For macOS 10.14 or later
Are you done installing the application? If you have any encountered issues with installing it, you can contact customer support.
Not only does it have a straightforward and simple interface but it is also packed with useful tools that can turn your video into another level. But, you should not be overwhelmed by the number of icons and features that exist. Take a deep breath and proceed to opening it in your computer.

Preparation is a must especially if you have multiple videos on your computer. A good tip would be renaming them by the sequence you plan to have. And, you could also place them in folders to avoid repetition and double copies. Once you’re done, you can drag and drop your video or
click the Import.

Go ahead and select the video clip that you want to crop. Then, click the Crop tool and choose if you want the Crop or Pan & Zoom. Yes, you have options on what kind of crop you want it to be.

An alternative way is by right clicking the video clip .Under the Video tab you can select the Crop and Zoom or Crop to Fit then adjust to your preferred ratio.

You can review the cropped video to think through if this is the portion that you want to be included. Unlike other applications, you can go back and adjust it to your liking.
If you’re finally satisfied then you can export it. Choose the output format and you can also rename the file. Clicking the settings button will offer you additional options of your video output.
After all that, you have the cropped video that you can either upload or repurpose in another content. Did you enjoy the process of cropping it in Wondershare Filmora?
Remember, that you have the option to batch crop multiple video clips on this so no need to manually crop and export it. You can see the big picture and monitor if the flow makes sense to you.
Don’t you think that the subscription is worth it? There is a trial that you could check out to test its capabilities and awesomeness.
The Bottom Line
You are once again done with the process of checking out these two applications. After Effects and Wondershare Filmora have a different process when it comes to cropping videos. I hope that you had a clearer understanding on which of these two would suit your video editing needs. The interface also could change your mind depending if you want simplicity or a challenge. Price is also a factor that can affect your willingness to use these applications. But, this guide clearly shows you that it is worth paying for.
What are your thoughts on both of these tools? Did you find this information to be helpful?
Also read:
- Everything You Need to Know About Color Grading in Photography for 2024
- How to Create Sports Intro and YouTube Endscreen?
- Updated 2024 Approved How To Quick Guide for Making Google Slideshows
- How to Make a Bokeh Effect for 2024
- Discover 30+ Amazing Templates for VN Video Editor to Elevate Your Videos. Create Professional-Looking Videos with Ease
- In 2024, What Is Lumetri Color and How Do You Use It in Adobe After Effects? Find Out the Numerous Functions of Lumetri Panel and Ways to Apply Them to Your Video
- Cropping a Video in Final Cut Pro Step by Step
- 2024 Approved Are You Convincingly Fascinated by the Whole Idea of Augmented Reality and Want to Level up Your Marketing Skills with an AR Integration? Rest Assured, Youve Found the Right Place
- How to Speed Up Video with Canva Online Tool?
- 18 Video Editors Weve Tested Heres What We Learned for 2024
- Updated 2024 Approved 5 Excellent Tools To Convert Video to 60 FPS
- New Recording Video in Slow Motion Some Considerable Points for 2024
- New Top Online Video Background Changers Transform Your Videos with Ease
- Updated 2024 Approved The Most Efficient Ways to Manage Your Timeline
- 2024 Approved How To Use Speed Ramping to Create an Intense Action Footage
- 2024 Approved Learn How to Effectively Use Masking in After Effects with This Comprehensive Guide. Includes Step-by-Step Instructions and an Alternative Masking Technique
- New In 2024, Best Ever Ways Make Tiktok Slideshow Solved
- In 2024, How to Use Filmora Slideshow Maker for Making Slideshow? What Is Slideshow Filmora? Know the Steps to Make Filmora Slideshow. What Are Steps to Make Filmora Slideshow Template?
- New In 2024, Easy Ways to Change Aspect Ratio in iMovie?
- Want to Learn How to Make a Fortnite Montage? This Guide Will Give You the Low-Down on Creating Epic Montage Fortnite Videos that You Can Share with Other Players on Social Media Platforms for 2024
- In 2024, A Complete Guideline To Better Use QuickTime Player
- Updated How to Perfectly Use Canva Color Match for 2024
- New How-To Tutorials of Kapwing Collage Maker for 2024
- Updated Do You Want to Stream and Record at the Same Time but Cant Find an Easy Solution? This Guide Will Help You Get This Done Using Three Easy-to-Follow Methods
- New Steps To Fade Audio In Premier Pro
- In 2024, How to Use Motion Tracking in Video Editing
- 8 Solutions to Solve YouTube App Crashing on Infinix Note 30 Pro | Dr.fone
- Spoofing Life360 How to Do it on Oppo F25 Pro 5G? | Dr.fone
- How Honor X50 GT Mirror Screen to PC? | Dr.fone
- In 2024, How to Unlock Apple iPhone 13 Online? Here are 6 Easy Ways
- In 2024, How to Unlock Poco X6 Pro Phone without Any Data Loss
- 2 Ways to Monitor Nubia Z50S Pro Activity | Dr.fone
- Why Does My Realme 10T 5G Keep Turning Off By Itself? 6 Fixes Are Here | Dr.fone
- 4 Ways to Mirror Apple iPhone 14 Plus to Laptop via USB or Wi-Fi | Dr.fone
- How to fix videos not playing with my Edge 40?
- Complete guide for recovering pictures files on Motorola Moto G14.
- Will the iPogo Get You Banned and How to Solve It On Samsung Galaxy S23+ | Dr.fone
- In 2024, How Add Emojis/Stickers to Videos on PC/Mac/Mobile/Online
- Top 11 Free Apps to Check IMEI on Vivo Y55s 5G (2023) Phones
- Title: How to Create and Add an Adjustment Layer in Final Cut Pro
- Author: Chloe
- Created at : 2024-05-20 03:37:22
- Updated at : 2024-05-21 03:37:22
- Link: https://ai-editing-video.techidaily.com/how-to-create-and-add-an-adjustment-layer-in-final-cut-pro/
- License: This work is licensed under CC BY-NC-SA 4.0.


